1
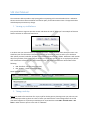
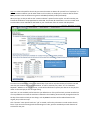
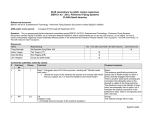
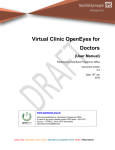
AB 1522 User Guide SubFinderExpress User Instructions Version 1 Santa Ana Unified School District Prepared by Victoria Tait 9/25/2015 SFE User Manual The instructions below provide a step by step guide to requesting sick leave under AB 1522 as a substitute. Please note that the instructions below are based on policy for the 2015-16 Fiscal Year. The approach taken and subsequent processes may change. 1. Viewing my sick balance First you will want to sign into your SFE account and select the role of “employee”. See example of where to find this selection on the home screen here: In order to view your reason balance you will need to select “reason balances” from the top bar menu. You should see your total allocation & remaining balance (as of the time you view) as well as your calculation date. Unless you were hired after 4/1/2015 your calculation date will read 7/1/2015. Otherwise it will read 90 days from your date of hire. Depending on whether or not you are typically a CE or CL employee you will see that classification reflected in your reason balance name. Your reason balance name will be either of the following: 600: Classified – Sub Sick Leave (AB 1522) 601: Teacher – Sub Sic k Leave (AB 1522) See an example below: 2. Taking a sick day Step 1: You need to first cancel out of or reject a job for the day you are planning to use your sick time. You can cancel/reject either by phone or online. If online you would use the “review assignments” tab to find your latest assignment. Via phone you would reject or cancel with the reason 600 – Sub Sick Leave – AB 1522. In either scenario you are in the role of “substitute”. Step 2: In order to be paid for the sick day you must also create an absence for yourself as an “employee”. In order to create an absence you will either need to call in to SFE as an employee or create an absence online. Note: you must create an absence using reason code 600 (classified) or 601 (certificated). When you log in to SFE you will see the “create an absence” option from the top bar. You will note that your location & classification are prepopulated to codes 600. This location & classification is correct. You will need to select either reason code 600 or 601 based on your classification from the reason code drop down: Note that when you select a reason code, you no longer can see the budget code line In order to see only one schedule below, select “no” here Fill in the start and end date as the same calendar day if you wish to only take one day of sick leave. You will note that two schedules are prepopulated below. In order to view only one, select “no” for “Substitute Required?” Whether or not you fill this out, no sub will be called out to replace your absence on this job, but rather on the initial job you are no longer taking. Your hours, or time available, will be based on your default hours. If the job for which you have cancelled out of or rejected does not match the total hours reflected in the schedule, please manually change the hours for the day of the week on which you are taking a sick day. Note: these hours will be audited based on the original job you did not accept. Click “continue”. Here you will see that a “job” is created, confirm this job creation in order to take the sick leave. If you cannot click through with the following error code, you have exceeded your total allotment of sick leave for the year: If you receive the following error code, you are attempting to create an absence for yourself before the current date. You can only create an absence for yourself either on today’s date or a future date. To modify an earlier absence you will need to contact HR: Note: you will be paid based upon your regular hourly rate in our Human Resources system. If you are a long term substitute (CE Only) who has been in a position for more than 9 days, you will be paid for the sick day at the long term rate of pay. For questions regarding how this process works please contact your Human Resources representative.