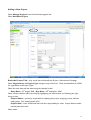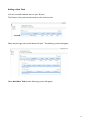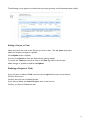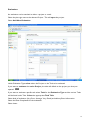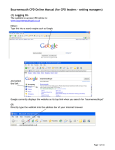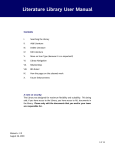
1
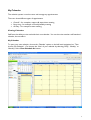
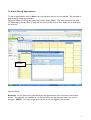
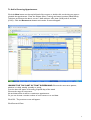
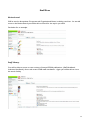
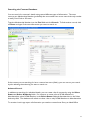
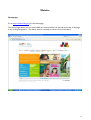
Database System
User Manual
August 2008
To quickly access any of these pages hold your cursor over the topic, hold the Ctrl
button and click your left mouse button.
Accessing the Intranet ..............................................................................................2
Intranet Sign In .........................................................................................................2
Welcome Page .........................................................................................................3
My Calendar .............................................................................................................4
My Calendar .............................................................................................................4
To Add a One-off Appointment: ............................................................................5
To Add a Recurring Appointment: ........................................................................6
To Add an All Day Appointment: ..........................................................................7
To View an Appointment: ......................................................................................8
To Edit an Appointment: ........................................................................................9
To Delete an Appointment: ................................................................................ 10
Delete a Recurring Appointment: ...................................................................... 11
Staff Calendars ...................................................................................................... 12
Resource Calendars ............................................................................................ 13
Projects and Tasks ............................................................................................... 14
Adding a New Project: ......................................................................................... 15
Adding a New Task: ............................................................................................ 16
Editing a Project or Task: .................................................................................... 18
Evaluation: ............................................................................................................ 19
Staff Zone ............................................................................................................... 20
Notice board: ........................................................................................................ 20
Staff Library: ......................................................................................................... 20
Recruitment: ......................................................................................................... 21
Contacts Database ................................................................................................. 22
Accessing the Contacts Database: ..................................................................... 22
Searching the Contacts Database: ..................................................................... 23
Pages Within Contacts Database: ..................................................................... 24
Mailing Lists: ......................................................................................................... 26
Reports: ................................................................................................................. 26
Website ..................................................................................................................... 27
Homepage: ........................................................................................................... 27
Members Zone: ................................................................................................... 28
Accessing the Intranet
Intranet Sign In
Type in the intranet address as http://www.childminding.org/ecms and the Sign In page will appear.
Type in your details as supplied separately and sign in. This will take you to the Welcome Page. See
next page.
2
Welcome Page
Can view your calendar, Notice board, Recruitment section, Projects/Tasks
3
My Calendar
The calendar system is used to store and manage any appointments.
There are three different types of appointment:
•
•
•
One-off – for example a support & supervision meeting
Recurring – for example a monthly/weekly meeting
All Day – for example a team meeting
Viewing Calendars
Staff have the ability to view and edit their own calendar. You can also view another staff member’s
calendar, but not edit it.
My Calendar
To open your own calendar, choose the ‘Calendar’ option on the left hand navigation bar. Then
choose ‘My Calendar’. Can choose the ‘View’ of your calendar by selecting ‘Daily,’ ‘Weekly,’ or
‘Monthly’ at the View Schedule As button.
4
To Add a One-off Appointment:
To add an appointment click on New in the top left hand corner of your calendar. This will open a
page showing a blank appointment.
Enter the Subject (Training) and enter the location (Head Office). Tab down and enter the date,
(4th September), the start time (13:00) and end time (14:00). Any further details can be entered in
the text box.
Reminder
Save and Close
Reminder – If you want to be reminded about the appointment, ensure the box is ticked (see
above). The reminder time defaults to 15 minutes before the appointment starts, but you can
change it. NOTE: You will only get the reminder if you are logged in the Intranet.
5
To Add a Recurring Appointment:
Click the New button on the top left hand of the screen or double click on the day you want to
schedule the appointment. Enter the Subject (More Training) and enter Location (Head Office).
Tab down and ensure the date is correct. Next add your start time (14:00) and an end time
(15:00). Click the Recurrence button and another screen will appear.
IGNORE THE TOP PART OF THAT SCREEN AND Choose the recurrence pattern,
whether it is daily, weekly, monthly or yearly.
You also have the option of choosing a specific day of the week.
Choose the range of recurrence.
No end date means it will be a continuous appointment.
Or you can choose a certain number of occurrences or an end date.
Click OK. The previous screen will appear.
Click Save and Close.
6
To Add an All Day Appointment:
Click ‘New’ on the top left hand of the screen or double click on the day of the appointment.
Enter (Holiday) in the Subject and enter the Location (if relevant). Enter the date
(8th September) and tick the All Day Event box. Any further details can be entered in the text
box.
Save and Close
If the holiday lasts for more than 1 day, enter the start date of the holiday and the end date of the
holiday, tick All Day Event and Save and Close. This does NOT need to be a recurrence.
7
To View an Appointment:
Find the appointment 4th September. Double click on it to see more information. You can only see
more information within your own Calendar.
Save and Close
8
To Edit an Appointment:
Find the appointment 4th September. Double click to open the appointment.
Amend details are required. Change time to Start of 13:30 and End of 14:30.
Save and Close
9
To Delete an Appointment:
Find the appointment 4th September. Double click to open the appointment.
Click on the cross on the toolbar and the appointment will be removed from your calendar.
Save and Close
10
Delete a Recurring Appointment:
Find the appropriate appointment (5th September) and double click on it. You will get a choice to
open the series or a single appointment. Open the appropriate event. As with deleting a one-off
appointment, click on the cross on the top toolbar and the appointment(s) will be removed from
your calendar.
Save and Close
NOTE: POP-UPS When you attempt to open a recurring appointment you may not be able to.
Towards the top of the screen you may get a message saying ‘Pop-ups are Blocked’. Go to
Tools and click on Always ‘Allow Pop-ups’ From This Site’. You should now be able to open
the recurrence.
11
Staff Calendars
You have the ability to view other staff member’s calendars to enable you to see where they are at
a certain point in time.
Click on Staff Calendars on the left hand navigation bar. To look at a specific staff member’s
calendar, go to View Activities For on the top navigation bar and choose the name from the list.
You can then view (not edit) their calendar in the same way as your individual one.
NOTE: You will not be able to double click and view the details of other staff’ appointments.
12
Resource Calendars
In addition to calendars for staff, we are also maintaining calendars for Resources such as Flip
Charts, Data Projector and Head Office meeting rooms. Under calendars on the left of the screen,
click on Other Calendars. Go to View Activities For and select the resource you want to view.
To book one of these resources use the Resource Booking form recently emailed out from Head
Office and also available in the Staff Library. Once completed, return to Lucy Green at Head
Office.
13
Projects and Tasks
The Manage Projects section enables staff to track and manage projects and task lists.
A Project is the overarching thing that needs to be achieved and is made up of individual Tasks
To access, click on Projects on the left hand side of the screen and the click on Manage Projects.
You will see the following screen:
The first screen that appears will only show ‘Active’ projects. Due dates that have passed are
highlighted in RED.
The tick boxes at the top of the field can be used to see inactive projects (will be shown in GREY)
and/or completed projects (will be shown in GREEN).
Ticking both boxes will show all projects.
14
Adding a New Project:
Select Manage Projects from the left hand navigation bar.
Select Add New Project.
Enter the Project Title – Key words that will identify the Project - Recruitment Campaign.
Select Organisation and Project Type using the drop down lists. These should default to SCMA
for organisation and Project Type 1.
Select the start date and due dates using the calendar button
Start Date = 25th August 2008 Due Date = 29th September 2008
Select a Project Admin and Project Staff by highlighting the staff member and selecting the right
facing arrows.
Project Admin – person(s) responsible for updating the project, assigning project staff and
adding tasks. This would include YOU.
Project Staff – other SCMA staff who will have responsibility for tasks. Project Admin should
include themselves here.
Select Insert.
15
Adding a New Task:
You can now add individual tasks to your Project.
The Project is the parent and the tasks are the child records.
Select the plus sign next to the relevant Project. The following screen will appear.
Select Add New Task and the following screen will appear:
16
Give the Task a Title - Order Recruitment Packs
List who the task is assigned to - Zara Tait
Select the start date and due dates using the calendar button
Start Date = 26/08/2008 Due Date = 28/08/2008
Task Status denotes how far along with the task you are. It could be that the task has not started,
or it could be partially complete. This should be updated as you work through the task.
Select appropriate Task Status – 50% Half Way
Additional information can be added in the Description box.
Select Insert.
NOTE: The task details will show on the Welcome Page of whoever has been assigned
that task.
17
The following screen appears to show both the project (parent) and all associated tasks (child).
Editing a Project or Task:
Select the pencil icon next to the Project you wish to edit. This will open the project.
Make the necessary changes or updates.
Click Update when complete.
You can click Cancel to close the task without making changes.
To access the Tasks you must first click on the Plus sign next to the Project.
Make changes or updates as before and Update.
Deleting a Project or Task:
If you just want to delete a Task, you first need to open the Project as listed above.
Click on the bin icon.
Confirm that you wish to delete the task.
If you want to delete the entire Project, click on the bin icon.
Confirm you want to Delete the item.
18
Evaluation:
An evaluation can be attached to either a project or a task.
Select the plus sign next to the relevant Project. This will open the project.
Select Add New Evaluation.
Under Evaluation Type select either the Project or the Task to be evaluated.
If you want to evaluate the entire Project, the title will default to the project you have just
opened.
OR
If you want to evaluate a specific task select Task for the Evaluation Type and the various Tasks
will be listed under Title. Select the appropriate Task Title.
Select level of evaluation (Very Poor, Average, Very Good) and add any Extra Information.
Select the Date Completed for the evaluation.
Select Insert.
19
Staff Zone
Notice board:
Will be used to disseminate Corporate and Organisational News, including new hires. As we add
more to the Notice Board you will be able to search for the topics you need.
See below for an example.
Staff Library:
You will be able to access current versions of internal SCMA publications, (Staff Handbook,
Induction Handbook), forms and recent SCMA staff newsletters. Again you will be able to use a
the search facility.
20
In the future, rather than emailing copies of these documents/forms to everyone, we plan on
emailing links to the documents which will be housed in the Staff Library. That way no one should
have outdated materials on their laptops.
Recruitment:
This section will be used to promote positions vacant within SCMA. Once there is information
available, you will be able to view and search SCMA positions vacant.
21
Contacts Database
Accessing the Contacts Database:
On the left of the screen, click on Contacts Management and then Contacts. You will be taken to
the ‘default’ page for the Contacts Database (see below) which is the Profile page.
22
Searching the Contacts Database:
You can search for someone’s details using several different types of information. The most
common are Membership Number (preferably the new number but we can search the only number
as well), Post Code or Surname.
Type the Membership Number into the Find field and click Search. To find another record, click
on Reset and type in the next information you want to search on.
If the contact you are searching for has a common last name (Smith), you can narrow your search
by also selecting the authority you want to search on.
Advanced Search:
In addition to searching for individual details, you can create a list of contacts by using the Select
Status and Select Authority fields. For instance, to create a list of SCMA Members in
Aberdeenshire, select SCMA Member in the Select Status field and Aberdeenshire in the Select
Authority field. The database will refresh to show a list on only SCMA Members in Aberdeenshire.
To receive a hard copy report of information you need to contact Anne Sherry at Head Office.
23
Pages Within Contacts Database:
The most commonly viewed pages in the database are: Profile, Address and Membership.
The Profile page contains the contact’s name, email address, local authority, job title, contact type
and telephone numbers.
The Address page (see below) will contain the contact’s mailing address. For staff with editing
capabilities, there is a facility whereby the full address can be found by typing in the post code.
24
It is imperative that when providing Head Office with addresses, the post code is included.
The Membership page contains the details of membership status of the contact. If the contact is
not an SCMA member there will be very little detail on this page.
For an SCMA member, the membership type can be Active (membership fees are current), Inactive
(member has contacted us to tell us they are having a break in service) or Cancelled (member
could have actively told us they were cancelling their membership, or they have just let their
membership lapse).
A contact who has purchased an Introductory Information Pack will have a Membership Status of
Inactive and a Membership Type of Potential Member.
The insurance start date and the membership/insurance expiry dates will also be on display.
NOTE: In the interest of maintaining a ‘history’ of our members, SCMA members who do cancel
their memberships will not be deleted from the database. Their Contact Type will change to
Former SCMA Member and we will take steps to prevent them from receiving future mailings.
Non-members (childminders or other kinds of contacts) can be completely deleted from the
database.
25
Mailing Lists:
As the contacts database continues to expand with both member and non-member contacts, it is
envisaged that all mailing lists will be generated from here.
Reports:
Head Office has the ability to create a variety of reports for use by Field Staff. Reports include:
All contacts within a Local Authority area (including cancelled, inactive and non-SCMA
childminders)
All childminders in a Local Authority area
All SCMA members in a Local Authority area
Please contact Anne Sherry at Head Office with your reporting needs.
26
Website
Homepage:
Go to www.childminding.org for the Homepage.
The Home Page allows users to access different sections either via the tabs at the top of the page
or by clicking the pictures. The News Section is actually a sub-set of ‘Find Out More.’
27
Members Zone:
The Members Zone is only available to active SCMA members and staff.
To access the Members Zone you must sign in using your SCMA membership number OR
registered email address, plus a password. At the time a contact is added to the database, a
password is auto-generated.
If either a staff member or SCMA member has difficulty signing in, contact Marketing Services at
Head Office.
28
Once signed in to the Members Zone, there are a variety of Options available.
The Quick shop is available to SCMA members and allows them to renew their
membership/insurance and purchase publications at any time.
To access the Forums you must have registered your email address on the Contacts Database.
SCMA staff can view the forums but cannot contribute in any way.
A variety of booklets and briefing sheets are available to SCMA members to download for free. In
some cases, if the booklet were to be ordered from Head Office. e.g., Safe and Secure, there would
be a £5.00 charge.
PLEASE TELL MEMBERS ABOUT THIS AREA, ESPECIALLY THE FORUMS.
29