1
INSTRUCTION MANUAL
P8315 DUMMY CAMERA WITH BLINKING LED
GEBRAUCHSANWEISUNG
P8315 DUMMY KAMERA MIT BLINKENDER LED
INSTRUCTION MANUAL
P8315 DUMMY CAMERA WITH
BLINKING LED
P3 INTERNATIONAL CORPORATION
LIMITED WARRANTY
P3 INTERNATIONAL CORPORATION ("P3")
-Deterrence against intrudersCongratulations on your purchase of the
Dummy Camera with Blinking LED.
This product was designed to protect
you against burglars and intruders. Due
to the striking similarity to a real camera,
with real lens, integrated video cable,
flashing LED light and the pan-tilt
mechanism, the intruders think that all
events around your home or business
are filmed - like a highly secure bank.
The video cable is fixed at the camera
bottom, so the installation can be carried
our easily. You don’t have to spend a lot
of money for security systems. Protect
your property in a cheap and effective
way with the Dummy Camera. Leave
your home or business with a safe
feeling.
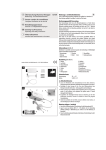
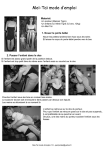
INSTALLATION
After unpacking the camera and the wall
mount, install 2 X AA batteries. Remove
the screw holding the mount to the
camera body. The inner housing will
slide out of the outer housing. Install
batteries according to diagram in battery
holder. Re-assemble unit. Choose a
suitable location for the camera at the
entrance or other sensitive area. The
unit should be shielded from direct
rainfall. Using the mount as a template,
mark and drill two small holes into the
wall. Insert the plastic anchors into the
holes. Using your screwdriver finish the
installation with the two provided
screws.
POSITION
The Dummy Camera with Binking LED
is equipped with a pan-tilt mechanism.
To adjust the slewing range, loosen the
screw holding the pan-tilt arm to the
camera body. Rotate the camera until
the angle is correct. Re-tighten the
screw. To adjust the inclination, firmly
move the body of the camera until the
angle is correct. If the camera is too
loose on the arm, tighten the screw.
MAINTENANCE
Replace batteries as necessary.
warrants to the original retail purchaser only, that its
product is free from defects in material or
workmanship under the condition of normal use and
service for a period of six (6) months from the date of
purchase. In the event that a defect, malfunction or
failure occurs or is discovered during the warranty
period, P3 will repair or replace at its option the
product or component part(s) which shall appear in
the reasonable judgment of P3 to be defective or not
to factory specifications. A product requiring service
is to be returned to P3 along with the sales receipt or
other proof of purchase acceptable to P3 and a
statement describing the defect or malfunction. All
transportation costs shall be borne by the owner and
the risk of loss shall be upon the party initiating the
transportation.
All items repaired or replaced
thereunder shall be subjected to the same limited
warranty for a period of six (6) months from the day
P3 ships the repaired or replaced product. The
warranty does not apply to any product that has been
subject to misuse, tampering, neglect, or accident or
as a result of unauthorized alterations or repairs to the
product. This warranty is void if the serial number (if
any) has been removed, altered, or defaced. This
warranty is in lieu of all warranties expressed or
implied, including the implied warranties of
merchantability and fitness for a particular purpose
which are expressly excluded or disclaimed. P3 shall
not be responsible for consequential, incidental or
other damages, and P3 expressly excludes and
disclaims liability for any damages resulting from the
use, operation, improper application, malfunction or
defeat of any P3 product covered by this limited
warranty. P3's obligation is strictly and exclusively
limited to the replacement or repair of any defective
product or component part(s). Some states do not
allow the exclusion or limitation of incidental or
consequential damages, so the above limitation or
exclusion may not apply to you. P3 does not assume
or authorize anyone to assume for it any other
obligation whatsoever. Some states do not allow
limitation on how long an implied warranty lasts, so
the above limitations may not apply to you. It is the
owner/user's responsibility to comply with local, state,
or federal regulations, if any, that may pertain to P3
products or their use. This warranty gives you
specific legal rights, and you may also have other
rights which vary from state to state.
If you experience difficulty in the operation of your
unit, or if your unit requires repair please contact:
P3 INTERNATIONAL CORPORATION
TECHNICAL SUPPORT
rd
71 West 23 Street
Suite 1201
New York, NY 10010-4102
Tel: 212-741-7289
Fax: 212-741-2288
GEBRAUCHSANWEISUNG
P8315 DUMMY KAMERA MIT
BLINKENDER LED
festgedreht.
Somit ist die Kamera Attrappe inkl.
Halter an der Wand befestigt.
- Abschreckung
Besucher -
AUSRICHTUNG
Die
Kamera-Attrappe
hat
einen
Schwenk-/Neige-Wandhalter.
Um
die
richtige
Position
im
Schwenkbereich einzustellen, wird die
vertikale Kreuzschraube im Gehäuse
soweit gelöst, bis das Gehäuse
schwenkbar ist. Nachdem die richtige
Stellung
fixiert
ist,
wird
die
Kreuzschraube wieder fest angezogen.
Die Neigung wird nach dem Lösen der
horizontalen Kreuzschraube eingestellt
und danach durch das Festdrehen
derselben fixiert.
Nun ist die P3 Kamera-Attrappe richtig
ausgerichtet.
gegen
ungebetene
Herzlichen Glückwunsch zum Kauf Ihrer
Kamera Attrappe mit blinkender LED.
Diese Produkt soll Sie gegen Einbrecher
und ungebetene Besucher schützen.
Durch
die
täuschend
echte
Nachahmung einer blinkenden Kamera
mit Wandhalterung und integriertem
Videokabel
denken
ungebetene
Besucher, daß alle Vorgänge um ihr
Haus gefilmt werden - wie im
Schaltraum
einer
hochgesicherten
Bank. Das Videokabel ist fest am
Kamerafuß betestigt, somit entfäIIt eine
komplizierte Montage.
Sie müssen kein Vermögen für
Sicherheits-Systeme
ausgeben.
Schützen Sie lhr Hab und Gut preiswert
und wirksam mit dieser KameraAttrappe. Verlassen Sie Ihr Haus mit
sicherem Gefühl.
MONTAGE
Nachdem Sie die Kamera Attrappe mit
Wandhalterung aus der Verpackung
entnommen haben, müssen Sie zwei
AA Batterien einlegen. Lockern Sie dazu
die Schraube an der Unterseite des
Gehäuses. Das innere Gehäuse lässt
sich nun ohne Mühe herausschieben.
Legen Sie nun die Batterien mit der
richtigen Polarität ein. Schieben Sie das
Innengehäuse
wieder
ein
und
befestigen Sie die Schraube an der
Unterseite. Nun suchen Sie sich einen
geeigneten PIatz im Eingangsbereich
oder
an
einer
anderen
einbruchgefährdeten
Stelle
Ihres
Hauses für die Montage aus. Die
Kamera Attrappe sollte nach Möglichkeit
an einer trockenen Stelle befestigt
werden. Zwei Löcher für die Aufnahme
der mitgelieferten Dübel müssen
lediglich in die Wand gebohrt werden.
Nachdem sich die Dübel in der Wand
befinden, setzt man den Wandhalter mit
den Schraublöchern darüber, um die
jeweils mitgelieferten Schrauben durch
das Schaubloch des Wandhalters in den
Dübel
zu
stecken.
Mit
einem
Schraubenzieher werden nun die
Schrauben jeweils bis zum Anschlag
Wartung
Wenn die rote LED nicht mehr blinkt,
müssen die Batterien ausgewechselt
werden (einmal jährlich).