1
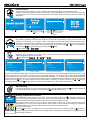
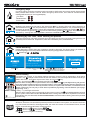
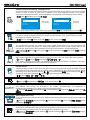
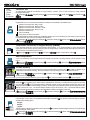
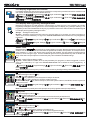
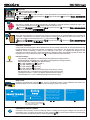
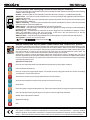
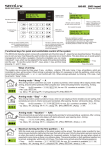
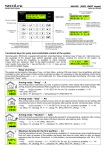
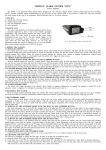
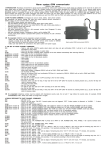
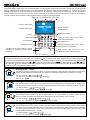
KM24, KM24A keypad
Intruder alarm system
Short user manual
SECOLINK KM24, KM24A are new concept keypads. The large graphic display with help texts on it and a keys with backlight
simplify understanding of alarm system. User has possibility to customize main screen information, to change contrast and
backlight intensity of LCD and illumination of keypad keys. By following blinking keys (prompts) user can easy operate the
system without any commands to remember. Arming, disarming and bypassing of zones are so easy it can be done intuitively.
The main display view and and the main keypad functions are listed on the figure below.
Date field Temperature field Time field
10-26
Partition status field
+25°C
01:44
READY TO ARM
1st Floor
2nd Floor
Garage
System status field
Zones, partitions
Sound settings
System information
Arming
Disarming
Return to upper menu level, alarm/
trouble review and clear
Zone bypass
Navigation keys
Emergency keys
Entering selected menu item, value
entry, selection confirmation
Partition review, also marking of the all
partitions or selecting of other system
elements
Zone review, also marking of the
partitions or other system elements
Ways of arming
The system can be armed by two ways: with special key or by entering PIN code. When arming is activated with the
key, user has a possibility to arm all or selected partitions. For partial arming it's necessary to mark the partitions, which will be
armed (mark the partitions by pressing 1 ... 4 keys or select the partitions using , keys and mark by pressing # or keys
and press the ENT key for decision confirmation). When arming is activated by entering PIN code, all partitions which are
controlled by user will be armed in “Away” mode.
!
GHI
Arming mode “Away”
This arming mode is used when you want to protect a premise, when nobody will be staying inside. After
arming, all zones will be protected. After using the door will be entry delay time for disarming. Arming:
for EU countries – , [Away] ENT , PIN: .
for non EU countries is available , [Away] ENT .
PIN code: PIN: .
Arming mode “Stay”
This arming mode is used to protect a house, when we are staying at home (inside) and are waiting, that
somebody can come in. Interior zones aren’t protected. After opening the door will be entry delay. Arming:
for EU countries –
, [Stay] ENT , PIN: .
for non EU countries is available
, [Stay] ENT .
Arming mode “Vacation”
This arming mode is used when we are leaving the premise for a long period (e.g. vacations). After arming,
all zones will be protected, entry delay is off, alarm will sound upon opening door. Arming :
for EU countries –
, [Vacations] ENT , PIN: .
for non EU countries is available
, [Vacations] ENT .
Arming mode “Night”
This arming mode is used when you want to arm the system with the person staying inside of the premise.
The interior zones are left disarmed, if anyone opens door, won’t be the entry delay and the alarm will sound.
This arming mode is effective, when the door and windows are secured by the opening sensors or there are
installed glass break detectors. Arming:
for EU countries –
, [Night] ENT , PIN: .
for non EU countries is available
, [Night] ENT .
1
KM24, KM24A keypad
Intruder alarm system
Short user manual
Partial arming
This is universal way of arming, which enables to arm selected partition in desired arming mode.
Example: Only the first partition is armed. This kind of arming is available in 2-storied house, when at night
the ground floor isn’t used, all sensors of this partition are armed. When somebody opens doors will be an
entry delay.
10-26
+25°C
01:44
READY TO ARM
1st Floor
2nd Floor
Press
key.
Arming
Away
Sritys
1 1st Floor
2 2 nd Floor
System
wi ll be
armed
Press [ENT] to arm
Press[ ] to select mode
Press [1]..[4] to select part.
Press key to select arming
mode. For partial arming press
... 4 keys.
!
GHI
Using 1 ... 4 keys check all
partitions which have to be armed.
Press ENT key to confirm the
decision.
System will be armed.
!
GHI
1
Arming and disarming of security barrier, “Pre-Alarm” mode
Microwave or infrared rays based security barriers, also outdoor PIR detectors, which are connected to the
system, can be armed by “Pre-Alarm” mode. The system will sound an alarm (without sending alarm
message to Central Monitoring Station), when someone traverses this electrical barrier. The “Pre-Alarm”
mode can be turned on and turned off by marking/unmarking partitions with 1 ... 4 keys or by selecting
partitions with , keys and marking/unmarking with # , keys.
, [Pre-Alarm], 1 ... 4 ENT , PIN:
!
GHI
!
GHI
Bypassing zone
Bypassing a zone allows you to leave a door or window open while still arming the rest of your security
system. Bypass procedure can be made:
B , [Zone bypass], PIN:
, 0 ... 9 or , and # , ENT
BY
!
WXYZ
Zones
1 Door
2 Hallway
3 Kitchen
4 Bedroom
5 Smoke detector
Zones
1 Door
2 Hallway
3 Kitchen
4 Bedroom
5 Smoke detector
Zone isn’t violated
Zone is violated
Zones
1 Door
2 Hallway
3 Kitchen
4 Bedroom
5 Smoke detector
Zone is bypassed temporary
Zones
1 Door
2 Hallway
3 Kitchen
4 Bedroom
5 Smoke detector
Zone is bypassed permanently
There are two different bypass types: temporal or permanent. First is used for one arming and disarming cycle, second – until
the user unbypass the zone. Enter the zone number you would like to bypass. THIS MUST BE A TWO DIGIT NUMBER
(for the first zone – 01, for second – 02 and so on). The zone will be marked by "x". The last number should be pressed and
held for 2 sec to bypass the zone for a long time (permanently). The zone will be marked by capital "X". When all zones are
marked press the ENT key. The same actions can be performed by selecting the zones with the keys
or
and by
marking/unmarking with the # key (short press – temporal zone bypass, long – permanent zone bypass).
Abort arming
For selection aborting, also arm procedure aborting the system SECOLink has the
in process and you want to abort arming, press the CLR key and enter PIN code.
CLR
key. If the exit delay is
Arming system with troubles
10-26
+25°C
01:44
Sys. Trouble
AC Loss
EU standards unexpect using of the system, which has troubles. When key CLR is backlighted with green
color, the arming is impossible in the ways, which were described earlier. It is necessary immediately
eliminate troubles, also inform CMS and company, which had installed the system.
The system detects troubles in own modules, also it detects and other common troubles, like 230V
disappearance in AC line, disconnected phone line because of repair, battery discharge. In exceptional
cases is possible to bypass the troubles for a short time and arm system as usual.
It can be done this way:
Press the CLR key once – message about the trouble will be shown on the display. Press the CLR key again –
the key backlight starts to blink fast. The blinking duration is 30 seconds. During this time is possible to make
usual arming procedure.
2
KM24, KM24A keypad
Intruder alarm system
Short user manual
Emergency keys
In order to call for a help (the premises must be secured by CMS) press at once two specific keys and hold
them pressed down at least 1 second. When emergency alarm occurs, siren starts to sound and alarm
message will be shown on the keypad display.
Fire alarm
–
Medical alarm –
Panic alarm –
A
B
BY
C
!
+
+
+
1
!
4GHI
7
PQRS
.
.
.
Ways of disarming
Disarming can be done by two ways: with special key
or by entering PIN code. When disarming is
activated with the key , user has possibility to disarm all or selected partitions. For partial disarming it's
necessary to unmark the partitions, which will be disarmed (unmark the partitions by pressing 1 ... 4 keys
or select partitions by pressing , keys and unmark/mark by pressing # , or keys). When disarming is
activated by entering PIN code, all partitions, which are controlled by user, will be disarmed.
!
GHI
Disarming by PIN code, when entering the premise
After opening the door, which are protected, the system begins to count the entry delay. During this time it is
necessary to enter PIN code. All partitions, which are controlled by user, will be disarmed.
Partial disarming
Partial disarming is useful when part of partitions should be disarmed. This kind of arming is available in
house with garage. The house partitions are disarmed, the garage partition remains armed.
, [Disarming], 1 ... 4 , ENT , PIN:
!
GHI
10-26
+25°C
01:44
Disarming
Full system
ARMED
1st Floor
2 nd Floor
Garage
Press
key.
Partitions
1 1st Floor
2 2 nd Floor
3 Garage
Disarming
****
Press [ENT] to disarm
Press [1]..[4] to select part.
For partial disarming press
keys.
1
Enter PIN
...
!
4GHI
Using 1 ... 4 keys unmark all
partitions which have to be disarmed.
Press ENT key to confirm the decision.
!
GHI
Enter PIN.
Alarm clearing
10-26
+25°C
Alarm!!!
Door
01:44
If an alarm has occured, on the display appears message “Alarm!!!” with an explanation, what reason
caused it. Key CLR backlight starts to blink red, the siren starts to sound and report about alarm is sending to
CMS or to the user. There are 2 ways to clear alarm and turn off CLR key:
ü1 way – by pressing the CLR key and entering the PIN code: PIN: .
After the alarm clearing action is performed the siren stops sound,the CLR key backlight binking red goes off,
the system status remains the same as was before alarm. If the system has smoke detector and alarm was
caused by smoke, which was raised by domestic reasons, the system will start alarm, nevertheless it was
armed or disarmed. The only way to clear alarm is possible by bypassing of smoke detector (see 2 page,
“Bypassing zone”).
ü2 way – by entering the PIN code.
After the alarm clearing action is performed the siren stops to sound, the CLR key backlight binking red goes
off, the system will be disarmed if it was armed before entering PIN code. When all partitions, which are
controlled by User, are disarmed, it's not recommended to use PIN for alarm clearing, because is possible
casual arming.
Event log review
All events, which are concerned with protected premises and status of the system, are stored in the Event
Log. The events are listed in chronological order, the used can choose to review Alarm Events, Trouble
Events, Control Events or All Events. Event log review:
ENT
, [Event Log] ENT , [Alarm Events] ENT , PIN: ;
ENT
, [Event Log] ENT , [Trouble Events] ENT , PIN: .
Use , keys for navigation on the log.
3
KM24, KM24A keypad
Intruder alarm system
Short user manual
Sensor operation testing, testing zones
It is recommended to do sensor work test at least one time per month. During a test it is necessary to make a
violation of zone, it means to open door or windows, which have magnetic contacts, or to simulate
movement near the motion sensor. Glass break detector can be tested by hard clapping hands. Testing:
ENT
, [Test] ENT , [Burglary zone test] ENT , PIN: .
Zones
1 Door
2 Hallway
3 Kitchen
4 Bedroom
Testing zone
is not violated
Zones
1 Door
2 Hallway
3 Kitchen
4 Bedroom
Zones, which were violated (#), are checking by pressing the
Testing zone
is violated
key, test finishes by pressing
ENT
.
Permission to make changes of the system (service mode entry)
For security reasons Installer will have permission to make changes of the system setting only after
User approves it by entering his PIN .
ENT
, [Service Mode] ENT , [Enter User PIN] PIN: , [Enter service PIN] PIN: .
Activated User PIN code changing
The manufacturer provides the system with 4-digit number default PINs. Each user has default PIN
according his number in the system. For example: the default PIN for the first User will be 0001, for the
second User - 0002 and etc. After installation it is strongly recommended to change default PIN.
ENT
, [Settings] ENT , [Users] ENT , [Change PIN] ENT , [Enter the present PIN] PIN: , [New PIN:] PIN: , [Repeat]
PIN:
, [Changed].
Activated Users’ review
PIN: ?
After system installation is recommended to review, how many Users can control the security system:
ENT
, [Settings] ENT , [Users] ENT , [Edit Users] ENT , PIN: ,
... .
LCD display will show User number (for example U01) and mode: "Enabled" or "Disabled". All Users ,
who have mode “Enabled” can control system or it’s partitions.
Chime mode
“Chime” function is used to inform User with the sound or light signal (LCD display, backlight of keypad
keys) about opening of entry/exit door or violation of other selected zone. From which zone “chime” will be
activated you can set by pressing the keys 0 ... 9 or by selecting with , keys and marking with # key.
The “chime” zone will be marked by . Press the key for “chime” melody changing.
, , [Chime] ENT , 0 ... 9 or
and # , ENT .
WXYZ
WXYZ
Setting Date and time
ENT
, [Settings]
ENT
, [Date and Time]
ENT
,
PIN:
, (enter date and time),
ENT
.
Date Format
YYYY-MM-DD Two different date formats are available in the system: Year-Month-Day (YYYY-MM-DD) or
DD/MM/YYYY Day/Month/Year (DD/MM/YYYY). Date format can be changed via the:
ENT
, [Settings] ENT ,
[Keypad Settings] ENT , [Interface Settings] ENT , [Enter PIN] PIN: , [Date Format] ENT
, ENT .
Show Date and Time
10-26
10-26
01:44
+25°C
01:44
READY TO ARM
1 st Floor
Garage
Swimming pool
If it is not necessary to see Date and Time on keypad LCD screen then the Date and Time can be hidden via
the menu:
ENT
, [Settings] ENT ,
[Keypad Settings] ENT , [Interface Settings] ENT , [Enter PIN] PIN: ,
[Show
Date&Time] ENT
, ENT .
Prompt Change Time
?
4
The keypad is automatically showing prompt to change date and time each time after system power up. If it
is not necessary to see this prompt, then this prompt can be disabled via the menu.
ENT
, [Settings] ENT ,
[Keypad Settings] ENT , [Interface Settings] ENT , [Enter PIN] PIN: ,
[Prompt
Change Time] ENT
, ENT .
KM24, KM24A keypad
Intruder alarm system
Latin
Cyrillic
Greek
Baltic
European
Short user manual
Character Set
An appropriate character set allows to enter partition, module, user or zone names by using national
language characters.
ENT
, [Settings] ENT ,
[Keypad Settings] ENT , [Interface Settings] ENT , [Enter PIN] PIN: , [Character Set] ENT
, ENT .
Show status icons
Keypad has an icon set to represent a different status in each partition. Available icons:
10-26
+25°C 01:44
READY TO ARM
1st Floor
2nd Floor
Garage
– partition is armed in the “Stay” mode;
– partition is armed in the “Night” mode;
– partition is armed in the “Vacation” mode;
– partition is armed in the “Away” mode;
– partition is disarmed”;
– zone is violated;
– “Pre-Alarm” mode is turned On.
Icon based partition status showing is enabled by default. If it is not necessary to see these icons on keypad
LCD screen then the icons can be hidden via the menu:
ENT
, [Settings] ENT ,
[keypad Settings] ENT , [Interface Settings] ENT , [Enter PIN] PIN: ,
[Show
Status Icons] ENT ,
, ENT .
Temperature correction on keypad display (KM24A)
If the keypad shows an incorrect environment temperature, it is recommended to make temperature
correction, which can be done by entering value of temperature, measured with domestic thermometers.
The correction can be made via the menu:
ENT
, [Settings] ENT , [Temperature] ENT , [Correction] ENT , PIN: , (enter temperature value), ENT .
Show temperature
+25°C
10-26
+25°C
01:44
READY TO ARM
1st Floor
2nd Floor
Garage
If it is not necessary to see temperature the keypad LCD screen, the temperature can be hidden via the
menu:
ENT
, [Settings] ENT ,
[Keypad Settings] ENT , [Interface Settings] ENT , [Enter PIN] PIN: ,
[Show
Temperature] ENT ,
, ENT .
Trouble memory
Keypad doesn't show the trouble memory with the slowly blinking Green color CLR key LED by default. If it is
necessary to see trouble memory, then the trouble memory showing can be enabled via the menu:
, [Settings] ENT ,
[Keypad Settings] ENT , [Interface Settings] ENT , [Enter PIN] PIN: ,
[Use
ENT
Trouble memory] ,
, ENT .
In order to clear trouble memory user must press CLR key, review troubles and press CLR key once again.
ENT
Hide troubles
When the CLR key is steady green, the arming is impossible in usual way. In order to arm the system user must
to press twice the CLR key. The keypad starts to hide the trouble, and key LED starts to blink fast. During this
time is possible to make usual arming procedure. How long the keypad will hide the trouble depends on the
setting of this menu: “No” - the trouble will be hidden only for 30 seconds, “Yes” - the trouble will be hidden
until the trouble disappears (example: damaged battery will be replaced by new one).
ENT
, [Settings] ENT ,
[Keypad Settings] ENT , [Interface Settings] ENT , [Enter PIN] PIN: ,
[Hide Troubles] ENT ,
, ENT .
PIN lenth
If PIN length is fixed, then the keypad automatically is pressing
Available fixed PIN lengths:
ENT
key after the last PIN digit is entered.
4 digits;
5 digits;
7 digits;
If PIN length is undefined (variable) user must press ENT key after the last PIN digit is entered. The PIN length
can be changed via the menu:
ENT
, [Settings] ENT ,
[Keypad Settings] ENT , [Inaterface Settings] ENT , [Enter PIN] PIN: ,
[PIN Length] ENT ,
, ENT .
5
KM24, KM24A keypad
Intruder alarm system
Short user manual
LCD display brightness and contrast
10-26
+25°C
01:44
READY TO ARM
1st Floor
2nd Floor
Garage
10-26
+25°C
01:44
READY TO ARM
1 st Floor
2nd Floor
Garage
LCD display brightness and contrast can be modified to correspond to premise illumination conditions and
user needs. These settings can be modified via menu:
ENT
, [Settings] ENT ,
[Keypad Settings] ENT , [Light & Indication] ENT , [Enter PIN] PIN: ,
[LCD brightness], ENT
, ENT .
ENT
ENT
, [Settings] ,
[Keypad Settings] ENT , [Light & Indication] ENT , [Enter PIN] PIN: ,
[Contrast], ENT
, ENT .
LCD display and keypad key backlight modes
Backlight modes allows to install keypad in various place. In place where it is not necessary to hold the
keypad key backlighted, the keypad can be set to backlight the LCD display only (example: hallway). The
keypad keys can be illuminated after the any key is pressed or zone next to PIR is violated. Available keypad
LCD display and keypad key backlight modes:
Always – backlight is always ON;
By zone – backlight will be turned ON, when an entry/exit delay is in progress, an alarm is triggered, a
“chime” zone or zone marked by "+" sign in the "Events from zones" list is violated or the any keypad key
is pressed.
ENT
, [Settings] ENT ,
[Keypad Settings] ENT , [Light & Indication] ENT , [Enter PIN] PIN: , [LCD Backlight]
ENT
ENT
,
, .
ENT
, [Settings] ENT ,
[Keypad Settings] ENT , [Light & Indication] ENT , [Enter PIN] PIN: , [Keypad
backlight] ENT ,
, ENT .
Status LEDs
Backlighted keys , , , B are used to show system status or prompts. Status and prompts can be always
visible or can be visible for a 40 seconds after the predefined condition was present, for example when a
zone marked by "+" sign in the "Events from zones" list was violated. This way allows to install keypad in
bedroom, when during the night time the additional light from the keypad status keys will not disturb the
sleep. If the status and prompts are not necessary they can be disabled. Available settings:
Off;
Always – status LEDs are always visible;
By zone – status LEDs are visible, when an entry/exit delay is in progress, an alarm is triggered, a “chime”
zone or zone marked by "+" sign in the "Events from zones" list is violated or the any keypad key is
pressed.
ENT
, [Settings] ENT ,
[Keypad Settings] ENT , [Light & Indication] ENT , [Enter PIN] PIN: ,
[Status
LEDs] ENT ,
, ENT .
Note: These settings have a priority in relation to the certain key backlight settings described below.
BY
!
key LED
Available backlight modes for key:
Off –
key LED is always Off
Prompt –
key LED blinks, when the system is ready to be armed;
Armed –
key LED is steady On, when the system is armed;
Armed and Prompt – key LED is steady On, when the system is armed, and blinks, when the system is
ready to be armed.
ENT
, [Settings] ENT ,
[Keypad Settings] ENT , [Light & Indication] ENT , [Enter PIN] PIN: ,
[[ ] key
LED] ENT ,
, ENT .
Note: if the system is partially armed the prompt has a priority against status (armed partition).
key LED
Available backlight modes for key:
Off – key LED is allways Off.
Prompt – key LED blinks, when the system is armed and is ready to be disarmed;
ENT
, [Settings] ENT ,
[Keypad Settings] ENT , [Light & Indication] ENT , [Enter PIN] PIN:
LED] ENT ,
, ENT .
B
BY
!
[[ ] key
key LED
Available backlight modes for B key:
Off – B key LED is allways Off.
Not Ready – B key LED blinks, if there are violated zones;
Zone Bypass Status – B key LED is ON, when there are bypassed zones;
ENT
, [Settings] ENT ,
[Keypad Settings] ENT , [Light & Indication] ENT , [Enter PIN]
ENT
ENT
key LED] ,
, .
BY
BY
!
!
BY
!
BY
6
,
!
PIN:
,
[[B]
KM24, KM24A keypad
Intruder alarm system
Short user manual
key LED
Available backlight modes for key:
Off – key LED is always Off ;
Pre-Alarm status – key LED is steady On, when the partition is secured with "Pre-alarm" mode On.
ENT
, [Settings] ENT ,
[Keypad Settings] ENT , [Light & Indication] ENT , [Enter PIN] PIN: ,
[[ ] key LED] ENT ,
, ENT .
Events from zones
This menu is visible when in above mentioned LCD display or keypad interface settings the option "By
zone" has been selected. The key # is used to mark/unmark the zone.
ENT
, [Settings] ENT ,
[Keypad Settings] ENT , [Light & Indication] ENT , [Enter PIN] PIN: ,
#
# , ENT .
[Events from zones [ENT]] ENT ,
Entry/exit sounds
When the entry/exit delay is in progress, the remaining time is shown on keypad displays, the sound signal
is audible. It is possible to turn ON this sound signal on certain keypad and to turn OFF on the other one. In
order to do it mark/unmark the partitions by "+" sign pressing the # key.
ENT
, [Settings] ENT ,
[Keypad Settings] ENT , [Light & Indication] ENT , [Enter PIN] PIN: ,
# , ENT .
[Entry/Exit sounds [ENT]] ENT , #
Interface example
A major benefit of the keypad is that it interface can be very easily customized. An example describes the
keypad interface setup, when the keypad is installed in the bedroom. The bright light source and the
additional sounds, excluding an alarm, are not allowed in this room. The keypad LCD brightness and
contrast levels will be reduced. LCD and keypad key backlight will be automatically turned Off when the
keypad is not in use for last 40 seconds. The key will be used for a status indication.
Interface settings:
LCD backlight – By zone (see "LCD display and keypad key backlight modes");
Keypad backlight – By zone (see "LCD display and keypad key backlight modes");
Status LEDs status – Always (see "Status LEDs");
key LED – Armed (see " key LED");
key LED – Off (see " key LED");
B key LED – Off (see " B key LED");
key LED – Off (see " key LED");
Events from zones – no zones are marked (see "Events from zones");
Entry/Exit sounds – no partitions are marked (see "Entry/exit sounds");
LCD brightness level – 7 (see "LCD display brightness and contrast");
LCD contrast level – 7 (see "LCD display brightness and contrast");
Example
BY
!
BY
!
Help texts
Keypad is equipped with a special ? key. The key LED blinks if there is some additional information. By
pressing this key user can find information how to manage a system or problem.
10-26
+25°C
01:44
READY TO ARM
1st Floor
2nd Floor
Press
key.
Arming
Away
Press [ENT] to arm
Press [ ] to select mode
Press [1]..[4] to select part.
? key will start to blink. It means that
there is a help text is available for
the Away arming mode. Press ?
key to read the help text.
This arming mode is used
when you want to protect
a premise, when nobody
will be staying inside. After
arming, all zones will be
protected. After using the
door will be entry delay
Use
or
for navigation.
time for disarming.
Press [CLR] to exit.
Press
CLR
to exit.
Information about system
Information about system, central monitoring station, installer, power supply voltages can be found in
information menu. In order to enter this menu user must press ? key when keypad is showing main display
view. Choose the corresponding menu, enter it by pressing ENT key.
7
KM24, KM24A keypad
Intruder alarm system
Short user manual
Communication and messaging (GSV2x module must be installed)
Security system
Jeremy Armed 1st
Floor, 2nd Floor,
Garage
Answer
1
More
This menu provides the configuration for the phone numbers that the GSV2x module will use when sending
a SMS or when calling to user.
Number – phone number must be entered in international format. The sign "+" is added automatically;
Smart Phone – this option must be enabled if the user has an Android OS application SECOLINK preinstalled on his phone.
SMS on arming – user will receive the SMS when system was armed. User's name who armed the system
will be mentioned in SMS text.
SMS on disarming – user will receive the SMS when system was disarmed. User's name who disarmed
the system will be mentioned in SMS text.
SMS on alarm – user will receive the SMS when an alarm is triggered;
Call on alarm – user will receive a call when an alarm is triggered. Incoming call must be acknowledged by
pressing 0# or by entering PIN#;
Mandatory call – user will receive a call when an alarm is triggered. The main difference between "Call on
alarm" and "Mandatory call" is that user will receive a call even if the user before him (in the list)
acknowledge the call by pressing 0# or by entering PIN#;
SMS on trouble – user will receive the SMS when a trouble appears on system (example: battery low);
Testing SMS – user will receive the test SMS.
ENT
, [Settings]
ENT
,
[Cell phones (GSM)]
ENT
Remote control with any cell phone. Smart control with “Android OS” phones
The GSV2x is working in the system in the same way as the extra keypad and emulates basic features of the
keypad. In order to control the security system user must call to GSV2x. When a connection is established
via the GSM network, user must enter a valid security system PIN and press #. In order to disarm the system
user must enter 0#, in order to arm the system user must enter 1#. Command 007# is used to start the
microphone. Full list of commands can be found in GSV2x module user manual.
Smart phone owners have big advantage against the classic phone owners, because they can use a
Secolink application and control the system without any commands to remember. Simplified wizard allows
to set-up necessary settings very easily. When this action is done, user will control the system by pressing
corresponding buttons only.
Application commands:
User can arm selected partitions in selected arming mode (Away, Stay, Night, Vacation).
User can disarm all partitions.
User can control pre-programmed outputs. The output can be pre-programmed to turn On/Off the heating
or ventilation or control other devices.
This button is used to receive system status from the security system.
All received messages from the security system are stored in event log.
Clear Alarm.
User can bypass / unbypass selected zones. Temporal and permanent zone bypass modes are available.
User can edit object settings (edit object name, phone numbers, login PIN and other).
WWW link to manufacturer website.
Application settings.
Exit.
System compliance and warranty
The system is made in Lithuania. A warranty term is 24 months. The manufacturer – company "Kodinis
Raktas" declares, that product “SECOLink” complies with essential EU directive and EU standard EN
50131-1. See manufacturer’s web site: www.kodinis.lt, www.secolink.eu for complete text of declaration.
8
© 2011 "Kodinis Raktas"