1
Embedded Support Partner
User Guide
Document Number 007-4065-009
CONTRIBUTORS
Revised by Darrin Goss
Production by Karen Jacobson
Engineering contributions by the System and Site Support Tools Group
COPYRIGHT
© 1999, 2000, 2001, 2002, 2003 Silicon Graphics, Inc. — All Rights Reserved
This document contains proprietary and confidential information of SGI. The
contents of this document may not be disclosed to third parties, copied, or duplicated
in any form, in whole or in part, without the prior written permission of SGI.
LIMITED RIGHTS LEGEND
Use, duplication, or disclosure of the technical data contained in this document by
the Government is subject to restrictions as set forth in subdivision (c) (1) (ii) of the
Rights in Technical Data and Computer Software clause at DFARS 52.227-7013
and/or in similar or successor clauses in the FAR, or in the DOD or NASA FAR
Supplement. Unpublished rights reserved under the Copyright Laws of the United
States. Contractor/manufacturer is SGI, 1500 Crittenden Lane, Mountain View, CA
94043.
TRADEMARKS AND ATTRIBUTIONS
Silicon Graphics, SGI, Challenge, InPerson, IRIX, O2, Octane, Onyx, Onyx2, Origin,
and the SGI logo are registered trademarks, and Altix, CASEVision, Key-O-Matic,
Performance Co-Pilot, and Supportfolio are trademarks of Silicon Graphics, Inc., in
the United States and/or other countries worldwide.
CrayLink is a trademark of Cray, Inc. Linux is a registered trademark of Linus
Torvalds, used with permission by Silicon Graphics, Inc. MIPS is a trademark of
MIPS Technologies, Inc., used under license by Silicon Graphics, Inc. Netscape is a
trademark of Netscape Communications Corporation. UNIX is a registered
trademark and X Window System is a trademark of The Open Group. U.S. Robotics
and Sportster are trademarks of 3Com Corporation. All other trademarks are the
property of their respective owners.
Embedded Support Partner User Guide
Document Number 007-4065-009
Contents
List of Figures
xi
List of Tables xix
What’s New in this Document xxi
1.
Introduction 1
Distribution 3
Base Package 3
Extended Package 4
Named Groups 6
Full and Light Nodes 7
TCP/IP Protocol 9
Group Management Over Hierarchies 9
Simplified Group Management Configuration
Enhanced Configuration for SGM Clients 11
Central Logbook Capability 11
ESP Benefits 12
ESP Architecture 14
Core Software 19
System Support Database (SSDB) 19
ESP and SGM DSOs 19
Monitoring Software 21
Configuration Monitoring 21
Event Monitoring 22
Availability Monitoring 25
Notification Software 26
Console Software 28
Web-based Interface 28
11
iii
Contents
Command Line Interface 29
External Tools 30
Performance Monitoring Tools 30
Diagnostic Tools 31
RAID Monitoring Tools 31
Remote Support Capability 31
Security Features 32
System Performance Impact of ESP 33
2.
3.
iv
Accessing ESP 35
Using the Command Line Interface 35
Using the Web-based Interface 42
Opening a URL in a Web Browser 44
Using the Embedded_Support_Partner Icon (ESP for the IRIX OS Only)
Using the launchESPartner Command (ESP for the IRIX OS Only) 55
Configuring Single System Management 59
Configuring Group Management 60
Administering ESP 63
Setting Up the Customer Profile 64
Using the Web-based Interface 64
Using the Command Line Interface 67
Setting Up the Network Permissions 68
Using the Web-based Interface 68
Using the Command Line Interface 70
Setting Up the User Permissions 71
Viewing the Current Users 71
Using the Web-based Interface 71
Using the Command Line Interface 72
Adding a User 73
Using the Web-based Interface 73
Using the Command Line Interface 76
Updating a Password 77
Using the Web-based Interface 77
49
Contents
Using the Command Line Interface 79
Updating Permissions for a User 80
Using the Web-based Interface 80
Using the Command Line Interface 83
Deleting a User 85
Using the Web-based Interface 85
Using the Command Line Interface 86
Manipulating Database Archives 87
Using the Web-based Interface 87
Using the Command Line Interface 89
4.
Setting Up the ESP Environment 91
Setting Up the System Serial Number (ESP for the Linux OS Only) 92
Setting the System Serial Number (Single System Manager Mode) 93
Setting the System Serial Number (System Group Manager Mode) 95
Setting Up the Global Configuration Parameters 97
Using the Web-based Interface 97
Using the Command Line Interface 102
Setting Up the Paging Parameters (ESP for IRIX OS Only) 105
Setting Up the Modem Parameters (ESP for IRIX OS Only) 107
Using the Web-based Interface 107
Using the Command Line Interface 109
Setting Up the Paging Service Provider Parameters (ESP for IRIX OS Only) 110
Using the Web-based Interface 110
Using the Command Line Interface 112
Setting Up the Paging Parameters (ESP for the IRIX OS Only) 112
Using the Web-based Interface 112
Using the Command Line Interface 113
Setting Up the System Parameters (Single System Manager Mode Only) 114
Setting Up the System/Client Parameters (System Group Manager Mode Only) 116
Adding a New SGM Client 116
Updating the System or a Client 122
Updating the SGM Server 123
Updating an ESP 3.0 SGM Client 125
v
Contents
Updating an ESP 2.0 SGM Client 129
Unsubscribing SGM Clients 131
Setting Up the Authentication Password 133
Adding a Password for a New Server 133
Updating the Password for an Existing Server 134
Using the Command Line Interface to Configure SGM Settings
Importing and Exporting ESP Environments 137
5.
vi
135
Configuring ESP 139
Configuring Events 139
Managing Event Profiles 140
Using the Web-based Interface 140
Using the Command Line Interface 143
Viewing Event Classes and Events 145
Adding Events 146
Using the Web-based Interface 146
Using the Command Line Interface 163
Updating Events 164
Using the Web-based Interface 164
Using the Command Line Interface 171
Updating Multiple Events at the Same Time (Batch Updating)
Using the Web-based Interface 173
Using the Command Line Interface 177
Deleting Events 178
Using the Web-based Interface 178
Using the Command Line Interface 180
Subscribing Events from SGM Clients 182
Using the Web-based Interface 182
Using the Command Line Interface 186
Configuring Actions 187
Viewing the Existing Actions 187
Adding Actions 188
Using the Web-based Interface 188
173
Contents
Using the Command Line Interface 200
Updating Actions 201
Using the Web-based Interface 201
Using the Command Line Interface 205
Disabling and Enabling Actions 206
Using the Web-based Interface 206
Using the Command Line Interface 207
Configuring Performance Monitoring 208
Using the Web-based Interface 208
Using the Command Line Interface 215
Configuring System Monitoring 216
Using the Web-based Interface (Single System Manager Mode) 216
Using the Web-based Interface (System Group Manager Mode) 220
Using the Command Line Interface 222
6.
Viewing Reports 225
About Reports 225
Events Registered Reports 229
Using the Web-based Interface (Single System Manager Mode)
Using the Web-based Interface (System Group Manager Mode)
Using the Command Line Interface 241
Actions Taken Reports 242
Using the Web-based Interface (Single System Manager Mode)
Using the Web-based Interface (System Group Manager Mode)
Using the Command Line Interface 246
Availability Reports 247
Using the Web-based Interface (Single System Manager Mode)
Using the Web-based Interface (System Group Manager Mode)
Using the Command Line Interface 253
Diagnostic Result Reports 254
Using the Web-based Interface (Single System Manager Mode)
Using the Web-based Interface (System Group Manager Mode)
Using the Command Line Interface 258
229
235
242
244
247
250
254
256
vii
Contents
Hardware Reports 259
Hardware Inventory Reports 259
Using the Web-based Interface (Single System Manager Mode)
Using the Web-based Interface (System Group Manager Mode)
Using the Command Line Interface 265
Hardware Changes Reports 266
Using the Web-based Interface (Single System Manager Mode)
Using the Web-based Interface (System Group Manager Mode)
Using the Command Line Interface 270
Software Reports 271
Software Inventory Reports 271
Using the Web-based Interface (Single System Manager Mode)
Using the Web-based Interface (System Group Manager Mode)
Using the Command Line Interface 277
Software Changes Reports 278
Using the Web-based Interface (Single System Manager Mode)
Using the Web-based Interface (System Group Manager Mode)
Using the Command Line Interface 281
System Reports 282
System Inventory Reports 282
Using the Web-based Interface 282
Using the Command Line Interface 285
System Changes Reports 286
Using the Web-based Interface (Single System Manager Mode)
Using the Web-based Interface (System Group Manager Mode)
Using the Command Line Interface 289
Site Reports (System Group Manager Mode Only) 290
Using the Command Line Interface 292
7.
viii
Using the ESP Logbook 293
About the ESP Logbook 293
259
262
266
268
271
275
278
280
286
288
Contents
Viewing Logbook Entries 293
Using the Web-based Interface (Single System Manager Mode) 293
Using the Web-based Interface (System Group Manager Mode) 295
Using the Command Line Interface 297
Adding a Logbook Entry 298
Using the Web-based Interface (Single System Manager Mode) 298
Using the Web-based Interface (System Group Manager Mode) 300
Using the Command Line Interface 303
8.
9.
Sending Notifications 305
About the espnotify Tool 305
Command Line Options for Displaying a Message on the Console
Displaying a Message on an X Window System Display 306
Sending an E-mail Message 308
Invoking espnotify from ESP 309
Example: Creating an Action to Send an E-mail 309
305
Logging Events from Applications and Scripts 313
Event Classification and Sequence Numbers 313
Using the Event Manager API 314
Using the emgrlogger and esplogger Tools 314
Example 1 316
Example 2 316
10.
Default Event Classes and Types 317
ESP for the Linux OS 317
Default Event Classes 317
Default Event Types 318
ESP for the IRIX OS 321
Default Event Classes 321
Default Event Types 323
11.
ESP Error Codes 383
Generic Errors 383
Event Manager Errors 383
SGM Error Codes 384
ESP Execution Errors 385
ix
List of Figures
Figure 1-1
Figure 1-2
Figure 1-3
Figure 1-4
Figure 1-5
Figure 1-6
Figure 1-7
Figure 1-8
Figure 2-1
Figure 2-2
Figure 2-3
Figure 2-4
Figure 2-5
Figure 2-6
Figure 2-7
Figure 2-8
Figure 2-9
Figure 2-10
Figure 2-11
Figure 2-12
Figure 2-13
Figure 2-14
Figure 3-1
Figure 3-2
Figure 3-3
Figure 3-4
Figure 3-5
Figure 3-6
ESP Functional Diagram 2
System Group Management Block Diagram 5
Named Groups 6
Full and Light Nodes 8
Group Management Over Hierarchies 10
ESP Architecture (Using Web Browser) 17
ESP Architecture (Using Command Line Interface) 18
Sending Event Information to SGI 27
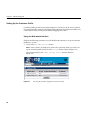
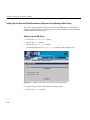
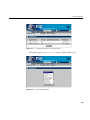
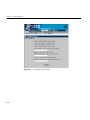
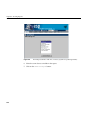
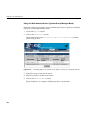
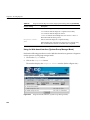
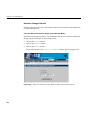
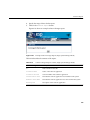
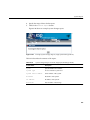
ESP Opening Page 45
Entering a Username and Password 46
ESP Main Page (Single System Manager Mode) 47
ESP Main Page (System Group Manager Mode) 48
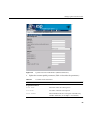
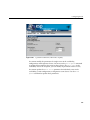
Toolchest Menu 49
Icon Catalog 50
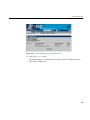
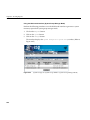
ESP Opening Page 51
Entering a Username and Password 52
ESP Main Page (Single System Manager Mode) 53
ESP Main Page (System Group Manager Mode) 54
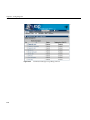
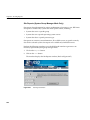
ESP Opening Page 55
Entering a Username and Password 56
ESP Main Page (Single System Manager Mode) 57
ESP Main Page (System Group Manager Mode) 58
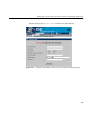
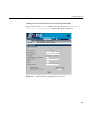
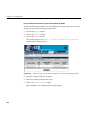
Choosing the System to Update the Customer Profile 64
Update Customer Profile Window (Web-based Interface) 65
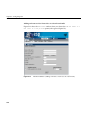
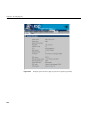
Network Permissions Window (Web-based Interface) 69
Current User List (Web-based Interface) 72
Add User Window (Web-based Interface) 74
Update Password Window (Web-based Interface) 77
xi
List of Figures
Figure 3-7
Figure 3-8
Figure 3-9
Figure 3-10
Figure 3-11
Figure 3-12
Figure 3-13
Figure 4-1
Figure 4-2
Figure 4-3
Figure 4-4
Figure 4-5
Figure 4-6
Figure 4-7
Figure 4-8
Figure 4-9
Figure 4-10
Figure 4-11
Figure 4-12
Figure 4-13
Figure 4-14
Figure 4-15
Figure 4-16
Figure 4-17
Figure 4-18
Figure 4-19
Figure 4-20
Figure 4-21
xii
Update Password for User Window (Web-based Interface) 78
Update User’s Permissions Window (Web-based Interface) 81
Updated Update User Permissions Window (Web-based Interface) 82
Delete User Window (Web-based Interface) 85
Updated Delete User Window (Web-based Interface) 86
Delete Archive Window (Web-based Interface) 88
Delete Archive Verification Screen 89
Linux System SN Button 92
Add Linux System Serial Number Window (Single System Manager
Mode) 93
Add Linux System Serial Number Verification Window (Single System
Manager Mode) 94
Linux System SN Window (SGM Server that has One Client without a
Serial Number Entered) 95
Linux System SN Window (SGM Server that has Multiple Clients
without Serial Numbers Entered) 96
Choosing the System to Update the Global Parameters 98
Global Configuration Window (Web-based Interface) 98
Process for Sending a Page 105
Modem Parameters Window (Web-based Interface) 108
Paging Service Provider Pager (Web-based Interface) 110
Pager Parameters Window (Web-based Interface) 112
Update System Information Window (Single System Manager) 114
Add New Client Window (System Group Manager Mode) 116
Add New Client Window for ESP 3.0 Client (System Group Manager
Mode) 117
Add New Client Window for ESP 2.0 Client (System Group Manager
Mode) 118
Update System/Client Window (System Group Manager Mode) 122
Update System Information Window (SGM Server Selected) 123
Update Client Information Window (ESP 3.0 SGM Client Selected) 125
Update Client Information Window (ESP 2.0 SGM Client Selected) 129
Unsubscribe/Delete Client Window 132
Add Password for a New Server Window 133
List of Figures
Figure 4-22
Figure 5-1
Figure 5-2
Figure 5-3
Figure 5-4
Figure 5-5
Figure 5-6
Figure 5-7
Figure 5-8
Figure 5-9
Figure 5-10
Figure 5-11
Figure 5-12
Figure 5-13
Figure 5-14
Figure 5-15
Figure 5-16
Figure 5-17
Figure 5-18
Figure 5-19
Figure 5-20
Figure 5-21
Figure 5-22
Figure 5-23
Figure 5-24
Update Password for an Existing Server Window 134
Event Profile Window (System Group Manager) 141
Event Profile Window 141
Add Event Window (Single System Manager) 146
Add Event Window (System Group Manager) 147
Add Event Window (Adding Event to Existing Class) 148
Add Event Window with Sample Parameters (Adding Event to Existing
Class) 150
Verification Message for Adding an Event (Adding Event to Existing
Class) 151
Confirmation Message for Adding an Event (Adding Event to Existing
Class) 152
Add Event Window (Adding Event to New Class) 153
Add Event Window with Example Parameters (Adding Event to New
Class) 155
Verification Message for Adding an Event (Adding Event to New
Class) 156
Confirmation Message for Adding an Event (Adding Event to New
Class) 157
Add Event Window (Adding an Event to a New Class in a New
Profile) 158
Add Event Window with Example Parameters (Adding an Event to a
New Class in a New Profile) 160
Verification Message for Adding an Event (Adding an Event to a New
Class in a New Profile) 161
Confirmation Message for Adding an Event (Adding Event to a New
Class in a New Profile) 162
Update Event Window (with SGM Clients) 165
Update Event Window 165
Event List for Updating an Event 166
Update Event Window (with Event to Update) 167
Verification Message for Updating an Event 169
Confirmation Message for Updating an Event 170
Batch Events Update Window (with SGM Clients) 173
Event Batch Update Window 174
xiii
List of Figures
Figure 5-25
Figure 5-26
Figure 5-27
Figure 5-28
Figure 5-29
Figure 5-30
Figure 5-31
Figure 5-32
Figure 5-33
Figure 5-34
Figure 5-35
Figure 5-36
Figure 5-37
Figure 5-38
Figure 5-39
Figure 5-40
Figure 5-41
Figure 5-42
Figure 5-43
Figure 5-44
Figure 5-45
Figure 5-46
Figure 5-47
Figure 5-48
Figure 5-49
Figure 5-50
xiv
Delete User Events Window (with SGM Clients) 178
Delete User Events Window (Web-based Interface) 179
Verification Message for Deleting an Event 179
Confirmation Message for Deleting an Event 180
Batch Event Subscription Window 183
Events by Subscription Class Window 184
Add an Action Window 188
Add an Action Window (Using Notification Action Option) 189
Add an Action Window (Using Notification Action and E-mail
Options) 191
Add an Action Window (Using Notification Action and System Console
Options) 192
Add an Action Window (Using Notification Action and GUI Pop-up
Options) 193
Verification Message for Adding an Action (Using Notification Action
Option) 195
Confirmation Message for Adding an Action (Using Notification Action
Option) 195
Add an Action Window (Using Other Action Option) 196
Example Parameters (Add an Action Window Using Other Action
Option) 198
Verification Message for Adding an Action (Using Other Action
Option) 198
Confirmation Message for Adding an Action (Using Other Action
Option) 199
Update Current Actions Window 201
Update Action Window 202
Verification Message for Updating an Action 203
Confirmation Message for Updating an Action 204
View Current Actions Window 207
Performance Monitoring Window (with SGM Clients) 209
Performance Monitoring Window 210
System Monitoring Window (Single System Manager Mode) 217
System Monitoring Change Verification Screen (Single System Manager
Mode) 218
List of Figures
Figure 5-51
Figure 5-52
Figure 5-53
Figure 5-54
Figure 5-55
Figure 6-1
Figure 6-2
Figure 6-3
Figure 6-4
Figure 6-5
Figure 6-6
Figure 6-7
Figure 6-8
Figure 6-9
Figure 6-10
Figure 6-11
Figure 6-12
Figure 6-13
Figure 6-14
Figure 6-15
Figure 6-16
Figure 6-17
Figure 6-18
Figure 6-19
Updated System Monitoring Window (Single System Manager
Mode) 219
System Monitoring Window (System Group Manager Mode) 220
Update System Monitoring Window (System Group Manager
Mode) 221
System Monitoring Change Verification Screen (System Group Manager
Mode) 221
Updated System Monitoring Window (System Group Manager
Mode) 222
Example Report (Web-based Interface) 226
Example Report (Web-based Interface Printable Format) 227
Example Report (Command Line Interface) 229
Event Reports Window (Single System Manager Mode) 230
Example Events Registered Report (Single System Manager Mode) 231
Events Registered in a Specific Class (Single System Manager
Mode) 233
All Occurrences of a Specific Event (Single System Manager Mode) 234
Event Reports for System Group Window (System Group Manager
Mode) 235
Event Reports Window with List of Classes (System Group Manager
Mode) 236
Example Events Registered Report (System Group Manager Mode) 237
Events Registered in a Specify Class (System Group Manager
Mode) 239
All Occurrences of a Specific Event (System Group Manager Mode) 240
Action Reports Window (Single System Manager Mode) 242
Example Actions Taken Report (Single System Manager Mode) 243
Actions Report for System Group Window (System Group Manager
Mode) 244
Example Actions Taken Report (System Group Manager Mode) 245
Availability Reports Window (Single System Mode) 247
Example Availability Report (Single System Manager Mode) 248
Availability Reports for System Group Window (System Group
Manager Mode) 250
xv
List of Figures
Figure 6-20
Figure 6-21
Figure 6-22
Figure 6-23
Figure 6-24
Figure 6-25
Figure 6-26
Figure 6-27
Figure 6-28
Figure 6-29
Figure 6-30
Figure 6-31
Figure 6-32
Figure 6-33
Figure 6-34
Figure 6-35
Figure 6-36
Figure 6-37
Figure 6-38
Figure 6-39
xvi
Example Availability Report for a Specific Host (System Group
Manager Mode) 251
Diagnostic Results Window (Single System Manager Mode) 254
Example Diagnostic Results Report (Single System Manager
Mode) 255
Diagnostic Results Window (System Group Manager Mode) 256
Example Diagnostic Results Report (System Group Manager
Mode) 257
Hardware Inventory Report Window (Single System Manager
Mode) 260
Example Hardware Inventory Report (Single System Manager
Mode) 261
Hardware Inventory Reports for System Group Window
(System Group Manager Mode) 263
Example Hardware Inventory Report (System Group Manager
Mode) 264
History of Hardware Changes Window (Single System Manager
Mode) 266
Example Hardware Changes Report (Single System Manager
Mode) 267
Hardware Changes Reports for System Group Window
(System Group Manager Mode) 269
Example Hardware Changes Report (Single Group Manager
Mode) 269
Software Inventory Report Window (Single System Manager
Mode) 272
Example Software Inventory Report (Single System Manager
Mode) 273
Software Inventory Reports for System Group Window
(System Group Manager Mode) 275
Example Software Inventory Report (System Group Manager
Mode) 276
History of Software Changes Window (Single System Manager
Mode) 278
Example Software Changes Report (Single System Manager Mode) 279
Software Changes for System Group Window (System Group Manager
Mode) 280
List of Figures
Figure 6-40
Figure 6-41
Figure 6-42
Figure 6-43
Figure 6-44
Figure 6-45
Figure 6-46
Figure 6-47
Figure 6-48
Figure 7-1
Figure 7-2
Figure 7-3
Figure 7-4
Figure 7-5
Figure 7-6
Figure 7-7
Figure 7-8
Figure 7-9
Figure 7-10
Figure 7-11
Figure 7-12
Figure 8-1
Figure 8-2
Figure 8-3
Figure 8-4
Figure 8-5
Figure 8-6
Example Software Changes Report (System Group Manager
Mode) 281
Example System Inventory Report (Single System Manager Mode) 283
Example System Inventory Report (System Group Manager Mode) 284
History of System Changes Window (Single System Manager
Mode) 286
Example System Changes Report (Single System Manager Mode) 287
System Changes for System Group Window (System Group Manager
Mode) 288
Example System Changes Report (System Group Manager Mode) 289
Site Reports Window 290
Site Information Report 292
View Logbook Entries Window (Single System Manager Mode) 294
Specified Logbook Entries (Single System Manager Mode) 294
Logbook Entry Information (Single System Manager Mode) 295
View Logbook Entries Window (System Group Manager Mode) 296
Specified Logbook Entries (System Group Manager Mode) 296
Logbook Entry Information (System Group Manager Mode) 297
Create Log Window (Single System Manager Mode) 298
Logbook Entry Confirmation Window (Single System Manager
Mode) 299
Completed Logbook Entry (Single System Manager Mode) 300
Create Log Window (System Group Manager Mode) 301
Logbook Entry Confirmation Window (System Group Manager
Mode) 302
Completed Logbook Entry (System Group Manager Mode) 303
Displaying a Message in the Console Window 306
Displaying a Message on an X Window System Display 307
Sending an E-mail Message 309
Example Action Parameters for Sending an E-mail Message 310
Example Verification Message for Sending an E-mail Message
Action 311
Example Confirmation Message for Sending an E-mail Message Action
311
xvii
List of Tables
Table 1-1
Table 2-1
Table 3-1
Table 3-2
Table 3-3
Table 4-1
Table 4-2
Table 4-3
Table 4-4
Table 4-5
Table 4-6
Table 4-7
Table 5-1
Table 5-2
Table 5-3
Table 5-4
Table 6-1
Table 6-2
Table 6-3
Table 6-4
Table 6-5
Table 6-6
ESP Benefits 12
ESP Startup Error Messages 42
Customer Profile Parameters 65
Available User Permissions 75
Command Line Interface User Permission Settings 84
Global Configuration Parameters 99
Paging Service Provider Parameters 111
Update System Information Window Parameters (Single System
Manager Mode) 115
Add New Client Window Parameters 119
Update System Information Window Parameters (SGM Server) 124
Update Client Information Window Parameters (ESP 3.0 SGM
Client) 126
Update Client Information Window Parameters (ESP 2.0 SGM
Client) 130
Batch Update Options 175
Notification Action Parameters 194
espnotify Parameters 197
PMIE Rules 211
Report Navigation Controls 227
Events Registered Report Contents (Single System Manager Mode) 232
Events Registered Report Contents (System Group Manager
Mode) 238
Actions Taken Report Contents (Single System Manager Mode) 243
Actions Taken Report Contents (System Group Manager Mode) 245
Single System Availability Report Contents (Single System Manager
Mode) 249
xix
List of Tables
Table 6-7
Table 6-8
Table 6-9
Table 6-10
Table 6-11
Table 6-12
Table 6-13
Table 6-14
Table 6-15
Table 6-16
Table 6-17
Table 6-18
Table 6-19
Table 8-1
xx
Single System Availability Report Contents (System Group Manager
Mode) 252
Diagnostic Results Report Contents (Single System Manager
Mode) 255
Diagnostic Results Report Contents (System Group Manager
Mode) 258
Hardware Inventory Report Contents 262
Hardware Inventory Report Contents (System Group Manager
Mode) 265
Hardware Changes Report Contents (Single System Manager
Mode) 268
Hardware Changes Report Contents (System Group Manager
Mode) 270
Software Inventory Report Contents (Single System Manager
Mode) 274
Software Inventory Report Contents (System Group Manager
Mode) 277
Software Changes Report Contents (Single System Manager Mode) 279
Software Changes Report Contents (System Group Manager
Mode) 281
System Changes Report Contents (Single System Manager Mode) 287
System Changes Report Contents (System Group Manager Mode) 289
Example Action Parameters for Sending an E-mail Notification 310
What’s New in this Document
Revision 009 makes the following changes to this document:
•
It adds information about the version of ESP 3.0 that runs under the IRIX operating
system.
•
It updates the document to include changes from the IRIX 6.5.23 and
SGI ProPack 2.4 releases.
•
It updates the descriptions of the Web-based interface throughout the document.
•
It incorporates miscellaneous technical and editorial changes throughout the
document.
This revision supports the IRIX and Linux operating system versions of ESP 3.0 that are
included in the IRIX 6.5.23 and SGI ProPack 2.4 releases, respectively.
xxi
Chapter 1
1. Introduction
The SGI product line ranges from desktop workstations to supercomputers, which
makes it one of the broadest product lines in the industry. Supporting such a diverse
product line creates many challenges.
Embedded Support Partner (ESP) was created to address some of these challenges by
automatically detecting system conditions that indicate potential future problems and
notifying the appropriate personnel. This enables SGI customers and support personnel
to proactively support systems and resolve issues before they develop into actual
failures.
ESP integrates monitoring, notifying, and reporting operations. It enables users to
monitor one or more systems at a site from a local or remote connection. ESP provides
the following functions:
•
Monitoring system configuration, events, performance, availability, and services
•
Providing proactive notification when specific conditions occur
•
Generating reports about system activity (configuration changes, events,
availability, etc.)
•
Sending event information to SGI for statistical interpretation
•
Providing usability enhancements (common interface, remote support, and system
group management)
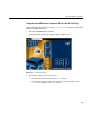
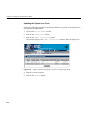
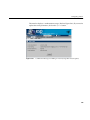
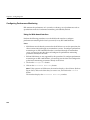
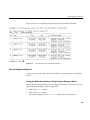
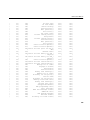
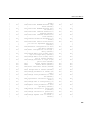
Figure 1-1 provides a functional diagram of ESP.
1
Chapter 1: Introduction
Configuration
Events
Diagnostic
Events
Availability
Events
Performance
Events
RAID
Events
User
Events
Embedded Support Partner
(ESP)
Notifications
Figure 1-1
Event
Information
System
Events
Reports
ESP Functional Diagram
This document describes ESP 3.0, which began shipping in SGI ProPack 2.3 and
IRIX 6.5.23.
2
Distribution
Distribution
The ESP software is distributed in two levels:
•
Base package
•
Extended package
Base Package
The base package includes the single system manager, which has the functionality
necessary to:
•
Configure ESP
•
Monitor a single system for system and performance events, configuration changes,
and availability
•
Notify support personnel when specific events occur
•
Generate basic reports
The features in the base package are included at no extra cost. They are installed by
default, and ESP begins monitoring the system as soon as the system is booted (if ESP is
chkconfig’ed on). You can configure the base package to specify what types of events it
should monitor and whom it should notify when events occur.
Note: ESP can also monitor events from diagnostic tests and perform actions based on
these events. To use these optional features, install the diagnostics from the Internal
Support Tools 2.0 CD or a later release. The Internal Support Tools CDs are available only to
SGI personnel.
3
Chapter 1: Introduction
Extended Package
The extended package includes the System Group Manager (SGM), which adds the
capabilities to monitor multiple systems at a site. The system selected as the group
manager runs the SGM, which manages all systems in the group.
The SGM provides functionality to uniformly manage multiple systems when more than
one system is installed at a site. Specifically, it performs the following functions:
•
System group event tracking
•
System group configuration management
•
System group availability monitoring
•
Notification (based on the events that occur on systems in the group)
•
Enhanced reporting for groups of systems
Any system within a system group can be designated the group manager (it is even
possible to have more than one group manager). A system that is designated as the group
manager monitors all systems in the group, including itself.
The features in the extended package are not enabled unless the customer acquires a
license to use them. (A 90-day free trial license is included; full licenses are included in
some service contracts or may be purchased separately.)
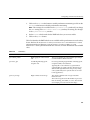
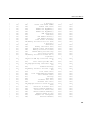
Figure 1-2 provides a block diagram of system group management.
4
Distribution
Single System
Manager
System Group
Manager
Group
Manager
System 1
System 2
Single System
Manager
Single System
Manager
System 3
System 4
Figure 1-2
System Group Management Block Diagram
5
Chapter 1: Introduction
ESP 3.0 adds enhanced group management functionality in the extended package,
including:
•
Support for named groups
•
Communication via TCP/IP protocol
•
Support for full and light nodes
•
Support for group management over hierarchies
•
A simplified group management configuration process
•
Enhanced configuration for SGM clients
•
Central logbook capability
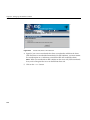
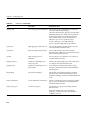
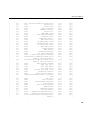
Named Groups
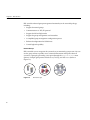
ESP 3.0 enables you to categorize the systems that you monitor by group name. You can
use the group names to quickly access statistical information and reports about all
systems in a group by generating a site report (through the Reports -> Site menu
options). Example group names include Server, Desktop, and Web server. (Refer to
Figure 1-3.)
Server
Figure 1-3
6
Desktop
Named Groups
Web server
Distribution
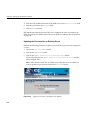
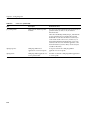
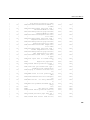
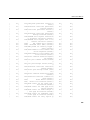
Full and Light Nodes
ESP 3.0 enables SGM clients to be full or light nodes:
•
A full node is a client system that stores ESP data in a database on a local disk and
also sends the data to a group manager system for storage. In this case, ESP
maintains two copies of the data: one copy on the local system and one copy on the
group manager system.
•
A light node is a client system that sends all ESP data to a group manager system for
storage. No ESP data is stored on the client system, which reduces the resources
used on the system. In this case, ESP stores all data on the group manager system.
For light nodes, you can generate reports on the SGM server (by accessing the
ESP 3.0 interface from the Web server or by running the espreport command on
the SGM server).
Running espreport on a light node returns the following message:
****ESPREPORT (EventRprt): This system is a light node. espreport
cannot be run on light node.
Note: You can convert a light node to a full node at any time; however, only data that is
generated after the conversion completes is stored in the local database. (Data generated
before the conversion completes is stored only in the database on the SGM server.)
Figure 1-4 shows an example of a group that contains full and light nodes.
7
Chapter 1: Introduction
Group
manager
ESP
Database
ESP
Database
System 2 (Light node)
System 1 (Full node)
ESP
Database
System 3 (Light node)
Figure 1-4
8
ESP
Database
System 4 (Full node)
Full and Light Nodes
Distribution
TCP/IP Protocol
ESP 3.0 uses TCP/IP protocol to communicate between a group manager system and its
clients. (Previous versions of ESP used RPC protocol over TCP/IP.) Using standard
TCP/IP protocol provides the following benefits:
•
TCP/IP protocol is easier to configure.
•
TCP/IP protocol uses fewer resources.
•
TCP/IP protocol enables ESP 3.0 to communicate through a firewall.
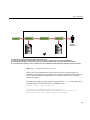
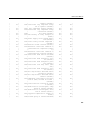
Group Management Over Hierarchies
Under ESP 3.0, an SGM server is required to know the hostname but not the IP address
of a client system. ESP 3.0 allows intermediate system(s) to know this information. This
enables ESP to work through a firewall. (The intermediate systems must have
eventmond and ESP running. The intermediate systems run an SGM dynamic shared
object [DSO] that routes events from host to host. The intermediate systems do not
require an SGM license unless they are configured as SGM servers.)
For example, system A is an SGM server and system D is a client, but system A does not
know the IP address of system D. However, system B knows the IP addresses of systems
A and C, and system C knows the IP addresses of systems B and D. ESP 3.0 allows you
to add system D as a client to system A by specifying the connection path as follows:
B>C
This means that events will be forwarded from system D to system A, following the
connection path through system C and system B. (Refer to Figure 1-5.)
In this example, an SGM DSO that is running on the client system (system D) forwards
the event through the eventmond daemons on the intermediate systems (system C and
system B) to the SGM server system (system A).
Note: The SGM DSO feature does not require a license; however, you need a license on
the SGM system to create SGM clients.
9
Chapter 1: Introduction
System A
(SGM server)
System C
System B
Fir
ew
all
d
ste
Tru
System D
(SGM client)
Figure 1-5
10
Group Management Over Hierarchies
ed
ust
tr
Un
Distribution
Simplified Group Management Configuration
Under ESP 3.0, you do not need to configure group management on both the server and
client sides like you did in earlier versions of ESP. You only need to configure group
management from the SGM server side.
Note: No authentication is performed when you use this method to add clients to a
server. For increased security, you can add a password that the server and client must
exchange before they transfer data. To do this, you must configure the authentication
password on the client and then on the server.
Enhanced Configuration for SGM Clients
ESP 3.0 enables you to configure all configuration parameters (including performance
monitoring and system monitoring parameters) for remote systems from the SGM server.
This enables you to set parameters for multiple systems from one location.
Note: You cannot configure performance monitoring and system monitoring parameters
for clients that are connected to a group manager through intermediate systems. The
group manager must have a direct connection to the clients to configure these
parameters. This restriction is caused by limitations of PMIE.
Central Logbook Capability
ESP 3.0 includes a feature that enables you to create logbook entries for SGM clients on
the SGM server. (The logbook entries are stored on the SGM server.) This feature enables
you to store all logbook data on a common system, which makes it easier to access
information about multiple systems. You can specify which system each logbook entry is
for.
11
Chapter 1: Introduction
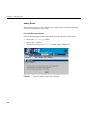
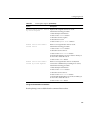
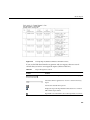
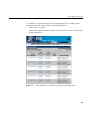
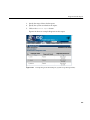
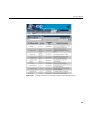
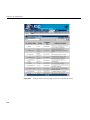
ESP Benefits
Table 1-1 lists the benefits that ESP provides for service personnel and customers.
Table 1-1
12
ESP Benefits
Component
Feature
Benefit to Service Provider Benefit to Customer
Base Package
(Single System
Manager)
Single Web-based
interface
Increases usability of
support tools on a single
system
Broad and useful
support functionality
Provides an integrated set Provides consistent and
wide coverage on
of tools that work in a
single framework while systems
increasing support
coverage
Centralized event
processing (single
system)
Enables you to collect and Provides the entire set
of circumstances in one
display all information
from one central location place
Provides fast and
effective service
Centralized automated Provides visibility to
problems as they occur
response and
notification (single
system)
Enables proactive
support
Provides a quick insight
to problems
Remote support
Provides an effective
means of delivering
service (which greatly
increases system
availability with
accurate problem
diagnosis)
Provides a virtual seat
into the site remotely
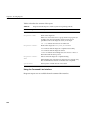
ESP Benefits
Table 1-1
Component
ESP Benefits (continued)
Feature
Extended Package Centralized event
(System Group
processing (group
Manager)
management)
Centralized support
administration (group
management)
Benefit to Service Provider Benefit to Customer
Enables you to collect and Provides the entire set
of circumstances in one
display all information
from one central location place
(which helps to
determine causes of
problems on systems
within the site)
Provides a single location Eases administration
and service tracking
from which all support
activities can be
performed for a group of
systems
Centralized automated Provides visibility to
problems as they occur
response and
notification (group
management)
Provides proactive
support
Provides a quick insight
to problems
Centralized site
reporting
Provides accurate system Enables extensive
and site data online
tracking of availability
and system
performance
Centralized
troubleshooting
Provides the ability to
resolve problems from a
central location
Provides an efficient
mechanism to fix
problems on-site
13
Chapter 1: Introduction
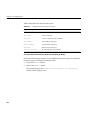
Table 1-1
ESP Benefits (continued)
Component
Feature
Benefit to Service Provider Benefit to Customer
Performance
Monitoring Tools
Proactive, automated
performance analysis
Assists in diagnosis of
system-level
performance issues
Identifies performance
hotspots and areas
where system resource
usage could be
optimized for improved
performance
Extensible rule
Provides an easy method
evaluation mechanism to add site- or
system-specific rules to
the default set
Enables use of
additional software
products to extend the
range of monitored
subsystems (for
example, Cisco routers
and Web servers)
Local or remote service Automates detection of
failed services for
failure detection and
proactive support
quality-of-service
monitoring
Increases service
availability and quality
by automating service
probing and checking
ESP Architecture
ESP is a modular system that uses a producer/client architecture and receives events
from the Event Manager. Each module works independently on a specific function, and
no functional overlap exists between the various modules. Some modules run as
daemons, some run as dynamic shared objects (DSOs) that can load into the Event
Manager, and some run as stand-alone applications that are driven by events.
Note: For more information about the Event Manager and the client/producer
architecture, refer to the Event Manager User Guide, publication number 007-4661-00x.
The daemon components of ESP are:
•
Core software
–
•
Monitoring software
–
14
System Support Database (SSDB): espdbd
Event monitor subsystem: eventmond
ESP Architecture
The DSO components of ESP are:
•
•
Core software:
–
ESP DSO
–
SGM DSO
Monitoring software:
–
availmon DSO
–
syslog DSO
–
Performance monitoring DSO
The stand-alone components of ESP are:
•
•
•
•
Monitoring software
–
Availability monitor: availmon
–
Configuration monitor: configmon
Notification software
–
espnotify
–
espcall
Console software
–
Configurable Web server: esphttpd
–
Web-based interface
–
Report generator core
–
Report generator plugins
Command line interface
–
Configuration tool: espconfig
–
Report tool: espreport
If you install the performance metrics inference engine application, pmie, which is
included in the Performance Co-Pilot Execution Only Environment (pcp_eoe
subsystem), ESP can receive notification of resource oversubscription, bandwidth
saturation, and other adverse performance conditions.
15
Chapter 1: Introduction
If you install the Internal Support Tools 2.0 CD or a later release, ESP can receive data from
the diagnostic tools included on the CD.)
Note: The Internal Support Tools CDs are available only to SGI support personnel (for
example, System Support Engineers).
Figure 1-6 shows the ESP architecture when a Web-based interface is used. Figure 1-7
shows the ESP architecture when a command line interface is used. Descriptions of the
components follow the figures.
16
ESP Architecture
Producers
Scripts
logger
pmie
RAID monitoring tools
Diagnostics
esplogger
emgrlogger
User Apps
SNMP
User Apps
syslogd
Kernel
messages
configmon
availmon
Event Manager API
availmon DSO
syslog DSO
Event Manager
(eventmond)
Event Manager
API
Consumers
SSDB
ESP DSO
Remote Event
Manager
SGM DSO
Utilities
espconfig
espnotify
espcall
ESP UI
User
Figure 1-6
ESP Architecture (Using Web Browser)
17
Chapter 1: Introduction
Producers
Scripts
logger
pmie
RAID monitoring tools
Diagnostics
esplogger
emgrlogger
User Apps
SNMP
User Apps
syslogd
Kernel
messages
configmon
availmon
Event Manager API
availmon DSO
syslog DSO
Event Manager
(eventmond)
Event Manager
API
Consumers
SSDB
ESP DSO
SGM DSO
Utilities
espconfig esplognote espreport
espnotify espcall
User
Figure 1-7
18
ESP Architecture (Using Command Line Interface)
Remote Event
Manager
ESP Architecture
Core Software
The core software includes the functionality that is necessary to process events, to
determine the action to perform, and to store data about the system that ESP is
monitoring.
The core software includes the following components:
•
System Support Database (SSDB)
•
ESP and SGM dynamic shared objects (DSOs)
System Support Database (SSDB)
The SSDB is the central repository for all system support data. It contains the following
data types:
•
System configuration data
•
System event data
•
System actions for system events
•
System availability data
•
Diagnostic test data
•
Task configuration data
The SSDB includes a server that runs as a daemon, espdbd, which starts at boot time.
Note: ESP includes a utility (esparchive) that you can use to archive the current SSDB
data, which reduces the amount of disk space that is used.
ESP and SGM DSOs
There are two main consumer DSOs that ESP 3.0 uses to subscribe, unsubscribe, and
process events:
•
The ESP DSO
•
The System Group Manager (SGM) DSO
19
Chapter 1: Introduction
ESP DSO
The ESP DSO is the main ESP processing module. It is the consumer for all ESP events.
It receives events from the Event Manager, converts them to the ESP-specific format,
saves them in the SSDB, and executes any ESP actions that are assigned to the events. All
processing done is based on configuration information from the ESP database.
The ESP startup script starts this DSO as a task of the Event Manager daemon
(eventmond). The DSO stores event information in the SSDB and uses the espnotify
utility to generate notifications.
SGM DSO
The SGM DSO provides distributed functionality among a group of ESP systems. The
Event Manager loads and executes this DSO when there are SGM-specific events to
handle. There is no need to load and execute this DSO during the startup sequence.
The SGM DSO serves as a router/translator for remote ESP configuration requests. When
an SGM server needs to configure an SGM client, it sends an ESP SGM event via the
Event Manager API. This event has an SGM DSO as a consumer; when an SGM DSO
receives these events, it either performs a routing/forwarding (producer) operation if the
event needs to go to a remote system or executes the specified operation and sends the
result back to the SGM server. SGM DSO functionality requires a license.
20
ESP Architecture
Monitoring Software
A key function of ESP is monitoring the system. The ESP base package includes software
that enables the following types of monitoring on a system:
•
Configuration monitoring
•
Event monitoring
•
Availability monitoring
Monitoring is performed by tools that run as stand-alone programs or as DSOs and send
events to the Event Manager. The Event Manager passes subscribed events to ESP for
processing.
Note: Performance monitoring is available through the pmie application, which is
included in the Performance Co-Pilot Execution Only Environment (pcp_eoe
subsystem). Refer to “Performance Monitoring Tools” on page 30 for more information.
Configuration Monitoring
The base package includes a configuration monitoring application, configmon.
configmon is a standalone application that monitors the system configuration by
performing the following functions when configuration events occur:
•
It determines the current software and hardware configuration of a system,
gathering as much detail as possible (for example, serial numbers, board revision
levels, installed software products, installed patches, installation dates, etc.).
•
It verifies that the configuration data in the SSDB is up-to-date by comparing the
current system configuration data with the configuration data in the SSDB.
•
It updates the SSDB so that it is current (with information about the hardware or
software that has changed).
•
It provides data for various system configuration reports that the system
administrator or field support personnel can use.
The configmon application runs at system start-up to gather updated configuration
information. configmon uses a producer/consumer model. Some functionality is
provided by the producer and some is provided by the consumer (which may or may not
be on the same system as the producer if SGM servers and clients are used). The
configmon binary tool handles both functions.
21
Chapter 1: Introduction
The configmon producer gathers information about the hardware and software
configuration. Then, it checks a file in the /var/esp directory that contains checksums
from the last time that configmon was run. If the current and old checksums are the
same, no action is performed. If the configmon producer detects any differences, then the
data that differs is sent to the configmon consumer via a private configmon event.
The configmon consumer then checks the SSDB and compares the data received from
the producer to the SSDB data. If no differences in the data exist, no action is performed.
If differences do exist, configmon brings the database up-to-date and moves the old
configuration data into the archive tables.
Note: You can use the -u (update) and -f (force) command-line options to force
producer data to go to the consumer.
On non-SGM systems, both the producer and consumer reside on the local system (and
the data passes through the Event Manager).
Event Monitoring
ESP is an event-driven system. Events can come from various sources. Examples of
events are:
•
Configuration events
•
Inferred performance events
•
Availability events
•
System critical events (from the kernel and various device drivers)
•
Diagnostic events
Starting with ESP 3.0, event management moves outside of the ESP framework. A new
standalone version of the Event Manager daemon (named eventmond to maintain
compatibility with previous versions of ESP and other tools) performs all event
management functions.
The Event Manager daemon collects event information from other applications. It runs
independently of all other applications and enables local or remote applications to
receive event data from it on a subscription basis. Any application can subscribe to
receive event information from the Event Manager; event information availability is not
limited to ESP, as it was in earlier releases of ESP and eventmond. ESP 3.0 subscribes to
the Event Manager daemon to receive information about events that occur on a system.
22
ESP Architecture
The new Event Manager daemon provides greater flexibility for applications that submit
events. This flexibility provides enhanced monitoring ability for ESP and any other
applications that subscribe to receive events from the Event Manager.
Applications that submit events can specify the following information:
•
An event class ID number
•
An event type ID number that is unique to each application
•
Internal flags that indicate how to handle the message
•
An event version number that is specific to each application
•
The time that the event occurred
•
The user ID number of the process that generated the event
•
The hostname (including domain name) of the system that generated the event
•
The name of the application that owns the event (for example, Kernel or UNIX)
•
The name of the application that generated the event (for example, SYSLOG)
•
The event data
All events that ESP receives pass to the Event Manager daemon from one of the following
paths:
•
syslog DSO
•
esplogger or emgrlogger
•
logger
•
Event Manager API
23
Chapter 1: Introduction
syslog DSO
The syslog DSO runs as a separate task of the Event Manager daemon and performs
the following functions:
•
It reads all SYSLOG messages from the /tmp/.eventmond.events.sock file.
Note: The ESP installation script creates a configuration entry in the
/etc/syslogd.conf file that causes the syslogd daemon to write all messages to
/tmp/.eventmond.events.sock file.
•
It converts the messages to Event Manager event format.
•
It passes the events to the Event Manager.
The Event Manager sends any subscribed SYSLOG events to the ESP DSO consumer, so
ESP can process the events.
The ESP startup script starts the syslog DSO by loading it as a task of the Event
Manager. The syslog DSO continues to run as long as the Event Manager runs.
esplogger and emgrlogger
The esplogger and emgrlogger applications provide a simple command-line
interface to submit events to the Event Manager. emgrlogger works with the new Event
Manager and replaces esplogger, which previous versions of eventmond and ESP
used. esplogger remains available to provide backward compatibility.
Note: emgrlogger can produce any type of Event Manager event, including
subscription events.
logger
logger provides a shell command interface to the syslog system log routine. It can log
messages specified on the command line, from a specified file, or from the standard
input. Each line in the specified file or standard input is logged separately.
Event Manager API
The Event Manager API provides a mechanism that enables tasks to communicate with
eventmond. The eventmond daemon receives information from external monitoring tasks
through API function calls. Each command that is sent to eventmond returns a status
code that indicates successful completion or the reason that a failure occurred.
24
ESP Architecture
Availability Monitoring
The base package also includes an availability monitoring application, availmon.
availmon monitors system uptime and differentiates between controlled shutdowns,
system panics, power cycles, and power failures. Availability monitoring is useful for
high-availability systems, production systems, or other customer sites where monitoring
availability information is important.
The availmon script runs at system start-up to gather the availability data. Do not
manually run the availmon script. Manually running the script creates inaccurate
availability results.
The availmon DSO monitors system uptime. To do this, it updates the
/var/adm/avail/.save/lasttick file every 5 minutes to indicate that the system is still
running. The /var/adm/avail/.save/lasttick file contains the current uptime (in
seconds since January 1, 1970).
Note: In ESP 3.0, you cannot change the default status interval of last tick (5 minutes) or
the default interval for sending status reports (7 days).
You can use the /usr/sbin/eventmond -T command to verify that the availmon DSO is
running. The output from this command lists the availmon DSO when it is running. SGI
recommends that you do not manually run the availmon DSO.
25
Chapter 1: Introduction
Notification Software
Notification is one of the actions that can be programmed to take place when a particular
system event occurs. The notification software provides several types of notifiers,
including dialog boxes on the local system, e-mail, paging, and diagnostic reports and
other types of reports.
The espnotify tool provides the following notification capabilities for ESP:
•
E-mail notifications
•
GUI-based or console text notifications (with audio if the notification is on the local
host)
•
Program execution for notification
•
Alphanumeric and chatty paging through the Qpage application
ESP 3.0 for the Linux OS does not include paging by default. SGI does not distribute the
QPage application for the Linux OS. Paging capabilities are disabled when ESP 3.0 runs
under the Linux OS. The ESP 3.0 graphical user interface for the Linux OS does not
include the Paging menu.
If you obtain the QPage application for the Linux OS from another source, you should
manually install and configure it and then create an ESP action that calls the QPage
application.
ESP 3.0 for the IRIX OS still includes the QPage application. The ESP 3.0 graphical user
interface for the IRIX OS still includes the Paging menu.
Typically, the ESP DSO invokes the espnotify tool in response to some event. However,
you can run the espnotify tool as a stand-alone application, if necessary.
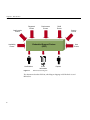
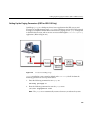
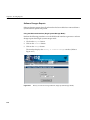
The espcall tool sends event information from a system to the main ESP database at
SGI. Figure 1-8 shows how this information is processed.
26
ESP Architecture
espcall
Mail Parser
Analysis Tool
Call Tool
Support
Personnel
Embedded
Support
Partner
Database
Service Call
Database
1) espcall sends e-mail to SGI with information about the event.
2) A mail parser application running at SGI receives the e-mail and logs the data in the master ESP database.
3) An analysis tool analyzes a set of business rules for the event and determines if a service call should be opened.
4) If a call needs to be opened, the call is created in the service database and the appropriate support personnel are notified.
Figure 1-8
Sending Event Information to SGI
SGI uses the event information to provide faster and more accurate responses to
potential system problems. (Any customer can send event information to SGI; however,
service calls are automatically opened only for customers whose service contracts
include this option.)
The following example message, which was generated by espcall, shows the type of
information that is returned to SGI for an availability event:
Subject: [maui]: System Information
maui.sgi.com 1015961831,1015961831,1015357057,0,7
,NULL,NULL,NULL,NULL,NULL,NULL,0,0,NULL,NULL 03/12/2002 11:37:11
Availability 4000 Status report 2097158 21 B0006011
27
Chapter 1: Introduction
Console Software
The ESP base package includes console software that enables you to interact with it from
a Web browser. The console software uses the Configurable Web Server (esphttpd) to
receive input from the user, send it to the ESP software running on the system, and return
the results to the user. (inetd invokes esphttpd whenever a Web server connection is
needed.)
The console software also includes a report generator core and a set of plugins to create
various types of reports. These reports are based on the data that ESP tasks provide, such
as configmon, availmon, etc.
In the base package, you can access the following types of reports:
•
System, hardware, and software configuration reports (current and historical)
•
System event reports
•
Event action reports
•
Local system metrics (MTBI, availability, etc.)
•
ESP configuration
The extended package enables you to generate enhanced site-level reports and reports
for any system on the site.
Web-based Interface
If you use a graphical Web browser (for example, Netscape Communicator) to access the
Web server, the console software provides a graphical Web-based interface that supports
the following functionality:
28
•
Configuring the behavior of ESP
•
Configuring the Web server
•
Configuring system groups
•
Configuring the behavior of tasks
•
Setting up monitors and associated thresholds
•
Setting up notifiers
•
Generating reports for a single system or group of systems
ESP Architecture
•
Accessing system consoles and system controllers
•
Remotely controlling a system with the IRISconsole multiserver management
system
The ESP GUI uses the espconfig command to interact with the Event Manager
Command Line Interface
If you prefer to use a command line interface, the Command Line Application (CLA)
software enables you to connect to ESP without using a Web server. This enables ESP to
be used at a site where the Web server cannot be used for security reasons. It also enables
ESP to be used over slower remote connections because only text is transferred across the
connection.
The CLA software comprises three components:
•
espconfig
•
esplognote
•
espreport
The espconfig command enables you to configure ESP. espconfig is the main ESP
configuration utility. It maintains all ESP configuration information in the SSDB and ESP
configuration files. It performs ESP-related operations, such as database accesses and
Event Manager interactions (for example, subscribing/unsubscribing certain events and
producing SGM-related events), based on command-line interface requests.
The esplognote command enables you to create logbook entries.
The espreport command enables you to generate and view reports.
Note: You must use the root account or an account with root privileges to execute the
espconfig, esplognote, and espreport commands.
29
Chapter 1: Introduction
External Tools
The following external tools can generate events:
•
Performance monitoring tools
•
Diagnostic tools
•
RAID monitoring tools
These tools are not part of the ESP package and must be loaded separately.
Performance Monitoring Tools
The performance metrics inference engine application, pmie, which is included in the
Performance Co-pilot Execution Only Environment (pcp_eoe subsystem), provides ESP
with performance monitoring events.
pmie is an inference engine for performance metrics: It evaluates a set of performance
rules at specified time intervals. You can use a separate utility to customize and extend
the rules and their attributes.
Refer to the Performance Co-Pilot for IA-64 Linux User’s and Administrator’s Guide,
publication number 007-4580-00x, or the Performance Co-Pilot for IRIX User’s and
Administrator’s Guide, publication number 007-3965-00x, for more information about pmie and
the pcp_eoe subsystem.
ESP 3.0 uses a performance monitoring DSO when you configure performance
monitoring settings via the ESP user interface or the espconfig command (for example,
/usr/sbin/espconfig -on performance or /usr/sbin/espconfig -off
performance).
The performance monitoring DSO enables you to:
•
Enable/disable PMIECONF at the global level (performs chkconfig pmie on or
chkconfig pmie off)
•
Enable/disable specific PMIE rules
You can use the ESP user interface or the espconfig command to configure
performance monitoring.
30
Remote Support Capability
Diagnostic Tools
The support tools included in the Internal Support Tools 2.0 CD and later releases can also
interface with the ESP framework. If you install the Internal Support Tools 2.0 CD or a later
release, ESP collects data from the diagnostic tools that are included on the CD. Refer to
the CD booklet for installation instructions for the support tools.
Note: The Internal Support Tools CDs are available only to SGI support personnel (for
example, System Support Engineers).
RAID Monitoring Tools
Starting with IRIX 6.5.17, ESP receives RAID events from the TP9100 and TP9400 disk
subsystems. The following software enables ESP to receive these events:
•
The tpmwatch application monitors the TP9100 disks and writes RAID events to the
tpmwatch log.
•
The tpssm7monitor (for T9400 releases 3 and 4) and tpssmmonitor (for TP9400
release 5) daemons monitor the TP9400 disks and write RAID events to the Major
Event Log (MEL).
•
A script checks the tpmwatch log and MEL for new events and uses esplogger to
send the events to ESP.
•
The Storage_TP9100.esp and Storage_TP9400.esp ESP event profiles specify the
RAID events that ESP should register.
Refer to the tp9100esptool User Guide, publication number 007-4596-00x, for more
information about how tpmwatch sends events to ESP.
Remote Support Capability
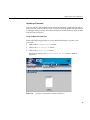
Remote support capability enables you to connect to the console software (with a Web
browser) or directly to ESP (with the command line application) from a remote location.
This capability enables you to control ESP from the remote location and provides SGI
support personnel with a “virtual seat” on the system or systems on which they need to
work.
Remote support capability is built into ESP. The only requirement is a communication
channel (for example, a network connection) to the site.
31
Chapter 1: Introduction
Security Features
ESP implements the following security features to prevent unauthorized access to ESP,
the data that ESP stores, and the system that is running ESP:
32
•
ESP requires a login/password combination to access the Web server.
•
ESP validates user permissions for the accounts that are assigned to execute actions.
•
ESP does not permit actions to run as root.
•
ESP implements ReverseDNS lookup for Web server and SGM connections.
•
ESP uses HMAC-MD5 digital signatures for all data transfers to an SGM server.
•
ESP disables login attempts after four unsuccessful attempts. (Users must wait
several minutes before attempting to log in again.)
•
ESP includes a command-line interface to enable users to use ESP without running
the Web server on their system.
•
ESP restricts database access to local transactions (external systems cannot directly
access the ESP database).
•
ESP limits information returned to SGI with the call-logging feature to
event-specific information. (ESP does not transmit any customer proprietary
information to SGI.)
•
ESP can encrypt the e-mail notifications that it sends.
System Performance Impact of ESP
System Performance Impact of ESP
The eventmond and espdbd daemons that ESP uses are event-driven and consume CPU
resources only when events occur. When ESP receives an event, the daemons use less
than 2 milliseconds of CPU time to process the event and store it in the ESP database.
The eventmond daemon uses approximately 200 KB of memory to run; the espdbd
daemon uses approximately 500 KB of memory to run. Most of this memory is used to
store the system configuration data, so the daemons use more memory on larger systems
than they do on smaller systems.
ESP disk utilization depends on the size of the system; larger systems require more disk
space than smaller systems. (For example, a 64-processor system with 75 to 125 boards
uses less than 30 MB of disk space.) Once a database uses at least 10 MB of disk space,
you can use the esparchive utility to compress the database to 40 to 60 percent of its
original size.
33
Chapter 2
2. Accessing ESP
This chapter describes how to use the command line interface and Web-based interface
to access ESP on your systems. It also describes how to configure single system
management and system group management for your systems.
All ESP components are installed on your system by default when you load an operating
system release or patch that contains ESP. ESP begins monitoring your system when the
system is booted. You can access ESP by using the command line interface or Web-based
interface.
Using the Command Line Interface
The command line interface includes three commands: espconfig, espreport, and
esplognote. The espconfig command configures ESP. The espreport command
generates and displays ESP reports. The esplognote command creates logbook entries.
espconfig has the following command line options:
system# espconfig -help
Information Commands
-------------------espconfig -help [ <prototype> ]
espconfig -spec
espconfig -version
Group Configuration
-------------------------espconfig -add group -name <new group name>
espconfig -delete group -name <group name>
espconfig -list group
espconfig -listmembers group -name <group name>
35
Chapter 2: Accessing ESP
Event Configuration
------------------espconfig -show evtype {-tid <type id> |-td <type desc> }
[-sgmclient <client alias>]
espconfig -list evtype [-cid <class id>|-cd <class desc>]
[-enable|-disable]
[-log|-nolog]
[-sgmclient <client alias>]
espconfig -add evtype -td <type desc>
{-cid <class id>|-cd <class desc>}
[-throttle <value>]
[-enable|-disable]
[-log|-nolog]
[-acfreq <action frequency value>]
[-acid <action id>|-acd <action desc>]
[-pri <priority>] [-fac <facility>]
[-appname <app. name>] [-regexp <reg. expression>]
[-prfid <profile id> |-prfn <profile name>]
[-sgmclient <client alias>|-sysid <client system id
espconfig -update evtype -tid <type id> [-cid <class id>|-cd <class desc>]
[-sgmclient <client alias>|-sysid <client system id
[-td <type desc>]
[-throttle <value>]
[-enable|-disable]
[-log|-nolog]
[-acfreq <action frequency value>]
[-acid <action id> | -acd <action desc>|
-noacid <action id> | -noacd <action desc>]
[-pri <priority>] [-fac <facility>]
[-appname <app. name>] [-regexp <reg. expression>]
[-prfid <profile id> | -prfn <profile name> |
-noprfid <profile id> | -noprfn <profile name>]
espconfig -delete evtype {-tid <type id>|-td <type desc>}
[-sgmclient <client alias>|-sysid <client system id
espconfig -subscribe evtype [-cid <class id>|-cd <class desc>]
[-tid <type id>|-td <type desc>]
[-pri <priority>] [-fac <facility>]
[-appname <application name>]
[-sgmclient <client alias>|-sysid <client system id
espconfig -unsubscribe evtype [-cid <class id>|-cd <class desc>]
[-tid <type id>|-td <type desc>]
[-pri <priority>] [-fac <facility>]
[-appname <application name>]
[-sgmclient <client alias>|-sysid <client system id
36
>]
>]
>]
>]
>]
Using the Command Line Interface
espconfig -add evclass [-cid <class id>] -cd <class desc>
[-sgmclient <client alias>|-sysid <client system id >]
espconfig -update evclass -cid <class id> -cd <class desc>
[-sgmclient <client alias>|-sysid <client system id >]
espconfig -delete evclass {-cid <class id>|-cd <class desc>}
[-sgmclient <client alias>|-sysid <client system id >]
espconfig -list evclass
Event Action Configuration
-------------------------espconfig -show evaction {-acid <action id>|-acd <action desc>}
espconfig -list evaction
espconfig -add evaction -acd <action desc> -act <action string>
[-enable|-disable]
[-user <name>]
[-tout <timeout value>]
espconfig -update evaction {-acd <action desc> | -acid <action id>}
[-act <action string>]
[-enable|-disable]
[-user <name>]
[-tout <timeout value>]
Exporting and Importing Environment
----------------------------------espconfig -add|-load|-merge
eventprofile <profile name>+|allprofiles
[-defaults] [-dontsubscribe]
[-sgmclient <client alias> | -sysid <system Id>]
espconfig -drop|-unload
eventprofile <profile name>+|allprofiles
[-sgmclient <client alias> | -sysid <system Id>]
espconfig -save|-refresh
eventprofile [-defaults] <profile name>+|allprofiles
[-sgmclient <client alias> | -sysid <system Id>]
espconfig -list
eventprofile
[-sgmclient <client alias> | -sysid <system Id>]
espconfig -showevents
eventprofile <profile name>+
[-sgmclient <client alias> | -sysid <system Id>]
espconfig -save
espenv [global][ipaddr][user][site|customer_profile][all] [-to <file
name>]
espconfig -load
espenv [-sysid <client system id >]
[-chk <check definition file name>]
-from <data definition file name>
IP Address Configuration
-----------------------espconfig -enable ipaddr <IP address> ... <IP address>
espconfig -disable ipaddr <IP address> ... <IP address>
37
Chapter 2: Accessing ESP
espconfig -delete
espconfig -list
ipaddr <IP address> ... <IP address>
ipaddr <IP address> ... <IP address> [-enabled|-disabled]
User and User Permission Configuration
-------------------------------------espconfig -add
user -name <user name> [-p <password>]
espconfig -delete user -name <user name> [-p <password>]
espconfig -update user -name <user name> [-p <new password>]
espconfig -list
user [-name <user name>]
espconfig -createadmin
espconfig -add
permdesc -perm <permission name> -desc <permission description>
espconfig -delete permdesc -perm <permission name>
espconfig -list
permdesc [-perm <permission name> .. <permission name>]
espconfig -add
userperm [-name <user name>] -perm <permission name>
espconfig -delete userperm [-name <user name>][-perm <permission name>]
espconfig -list
userperm [-name <user name>][-perm <permission name>]
ESP Archive Management
---------------------espconfig -list
archive
espconfig -drop
archive
[<archive name> .. <archive name>]
<archive name>
ESP Customer Profile Configuration
---------------------------------espconfig -create customer_profile
-fname <first name>
-lname <last name>
-phone <phone number>
-email <email address>
[-street1 <street address (line 1)>]
[-street2 <street address (line 2)>]
[-street3 <street address (line 3)>]
[-city <city name>]
[-state <state or province>]
[-post <postal/zip code>]
-country <country>
[-site_id <site id>]
[-host <host name>|-alias <client alias>|-sysid <system id>]
38
Using the Command Line Interface
espconfig -update customer_profile
[-fname <first name>]
[-lname <last name>]
[-phone <phone number>]
[-email <email address>]
[-street1 <street address (line 1)>]
[-street2 <street address (line 2)>]
[-street3 <street address (line 3)>]
[-city <city name>]
[-state <state or province>]
[-post <postal/zip code>]
[-country <country>]
[-site_id <site id>]
[-host <host name>|-alias <client alias>|-sysid <system id>]
espconfig -show
customer_profile
[-host <host name>|-alias <client alias>|-sysid <system id>]
Global Configuration
-------------------espconfig -enable call_logging [-text|-comp_encoded]
[-sgmclient <client alias> |-sysid <system id>]
espconfig -enable {event_registration
|event_throttling
|event_actions
|shutdown_reason}
[-sgmclient <client alias> |-sysid <system id>]
espconfig -enable mail -from <email address>
[-email1 <email address>]
[-email2 <email address>]
espconfig -disable {call_logging
|event_registration
|event_throttling
|event_actions
|shutdown_reason}
[-sgmclient <client alias> |-sysid <system id>]
espconfig -show {call_logging
|event_registration
|event_throttling
|event_actions
|shutdown_reason}
[-sgmclient <client alias> |-sysid <system id>]
espconfig -show mail
espconfig -flushdb [-sysid <system id>|-host <host name>]
[config|all]
39
Chapter 2: Accessing ESP
espconfig -reconstructdb
Performance and System Monitoring Configuration
-----------------------------------------------espconfig -on performance
-off performance
-list performance [-status|-enable|-disable]
-enable performance -pd {all|<pmie rule description>}
-disable performance -pd {all|<pmie rule description}>
espconfig monitor -list
<service name>
monitor -show
<service name> [-sgmclient <client alias>]
monitor -enable
<service name> [-sgmclient <client alias> ]
monitor -disable <service name> [-sgmclient <client alias> ]
SGM Related Commands
-------------------espconfig -show systems
espconfig -show sgmclients
espconfig -show sgmservers
espconfig -show system
-host <host name>|-sgmclient <client alias>|-sysid <system id>
espconfig -set system -host <host name>|-sysid <system id>
[-alias <new alias>]
[-group <group name> | -gid <group id> ]
espconfig -setnode system -sgmnode|-fullnode
espconfig -check system -sgmlicense|-update
espconfig -add sgmclient -alias <client alias> -host <client hostname>
[-path <client reach path>]
[-group <group descr.>|-gid <group id>]
[-v2|-v3] [-p <password>]
espconfig -subscribe sgmclient
-host <host name>|-alias <client alias>|-sysid <system id>
[-loadprofiles] [-refreshprofiles] [-lightnode|-fullnode] ] [-force]
espconfig -unsubscribe sgmclient
-host <host name>|-alias <client alias>|-sysid <system id>
[-force]
espconfig -update sgmclient
-host <host name>|-alias <client alias>|-sysid <system id>
[-p <password>] [-path <new path>] [-lightnode|-fullnode]
espconfig -delete sgmclient
-host <host name>|-alias <client alias>|-sysid <system id>
espconfig ping
-sgmclient <client alias>|-sysid <system id>|-path <reach path>
[-espver]
espconfig -add sgmserver -host <SGM host name> -p <communication password>
40
Using the Command Line Interface
espconfig -update sgmkey -host <host name> -p <comm. password> [-pid <key ID>]
Refer to Chapter 3, “Administering ESP,” Chapter 4, “Setting Up the ESP Environment,”
and Chapter 5, “Configuring ESP,” for more information about using the espconfig
command.
espreport has the following command line options:
system# espreport -help
Information Commands
-------------------espreport -help [ <prototype> ]
espreport -spec
espreport -version
Report Commands
-------------------espreport availability [-sysid <system id>|-host <host name>]
[-from mm/dd/yyyy] [-to mm/dd/yyyy]
espreport action_taken [-sysid <system id>|-host <host name>]
[-from mm/dd/yyyy] [-to mm/dd/yyyy]
espreport events
[-sysid <system id>|-host <host name>]
[-from mm/dd/yyyy] [-to mm/dd/yyyy]
[-tid <type id> |-td <type desc>]
[-cid <class id> |-cd <class desc>]
espreport hwchanges
[-sysid <system id>|-host <host name>]
[-from mm/dd/yyyy] [-to mm/dd/yyyy]
espreport swchanges
[-sysid <system id>|-host <host name>]
[-from mm/dd/yyyy] [-to mm/dd/yyyy]
espreport logbook
[-sysid <system id>|-host <host name>]
[-from mm/dd/yyyy] [-to mm/dd/yyyy]
espreport summary
[-sysid <system id>|-host <host name>]
[-from mm/dd/yyyy] [-to mm/dd/yyyy]
espreport sysinfo
[-sysid <system id>|-host <host name>]
[all]
Refer to Chapter 6, “Viewing Reports,” for more information about using the espreport
command.
esplognote does not have any command line options:
system# esplognote
Refer to Chapter 7, “Using the ESP Logbook,” for more information about using the
esplognote command.
41
Chapter 2: Accessing ESP
Using the Web-based Interface
The Web-based interface provides a graphical interface that you can use to access ESP.
You can use the following methods to access the Web-based interface:
•
Opening a URL in a Web browser
•
Using the Embedded_Support_Partner icon
•
Entering the launchESPartner command
Note: The Embedded_Support_Partner icon and launchESPartner command are
available only for the IRIX OS.
Table 2-1 lists error messages that might appear when you attempt to start the Web-based
interface. It also lists the cause of each message and the actions you should perform to
correct the problems that caused the error messages.
Table 2-1
ESP Startup Error Messages
Error Message
Cause
There was no response. The
server could be down or is not
responding.
The ESP Web server is not running on the Verify that the system is running. Reboot
system or the system is down.
the system, if necessary.
Verify that the ESP Web server
(esphttpd) is running on the system.
Restart the ESP Web server if it is not
running.
If the esphttpd server is not running,
verify that ESP is chkconfig’ed on.
Forbidden Request
Your system does not have permission to Add your system to the “allow access”
access the ESP Web server.
list or remove it from the “restrict access”
list. (Refer to “Setting Up the Network
Permissions” on page 68.)
The current request was
forbidden. Please check your
permissions.
42
Solution
Using the Web-based Interface
Table 2-1
ESP Startup Error Messages (continued)
Error Message
Cause
Solution
Forbidden Request
Reverse DNS lookup failed because ESP
was not able to verify that your system IP
address and hostname matched.
Reverse DNS lookup fails if an IP address
is “faked” or if the DNS server used by
the ESP Web server is not working
correctly.
If the DNS server on the system is not
working correctly, perform the following
actions to disable reverse DNS lookup:
The current request was
forbidden. Please check your
permissions.
Unable to verify that the host
name matches the address.
1. Add the following line to the Web
server configuration file
(/etc/esphttpd.conf):
ReverseDNSLookup : off
This may be a transient problem
or a botched name server setup.
2. Enter the following command to kill
the current Web server process:
killall esphttpd
3. Restart the esphttpd process.
Warning: Disabling the reverse DNS
lookup feature increases the possibility
of security problems.
Authorization failed. Retry?
The username and password that you
entered are not valid.
Forbidden Request
Wait for two minutes and log in with a
You did not enter a valid
valid username/password combination.
username/password combination
within four attempts.
When this happens, the ESP Web server
prevents login attempts for two minutes.
The current request was
forbidden. Please check your
permissions.
Enter a valid username and password.
If you forget your username and
password, enter espconfig -update
user -name <username>. ESP will
prompt you for a new password.
Connection was rejected since
number of authorization
attempts was reached.
Please try to connect later.
43
Chapter 2: Accessing ESP
Opening a URL in a Web Browser
You can access the Web-based interface via one of the following URLs:
•
http://localhost:5554
•
http://<systemname>:5554
Tips: If the system that you want to use is a server without graphics capability, you can:
•
Log into the server system from another networked system that has graphics
capability. Then, set the DISPLAY variable on the server to a display on the remote
system and start a Web browser application on the server. Open the
http://localhost:5554 URL in the Web browser window that is displayed on the
remote system.
•
Open the http://<server_system_name>:5554 URL from a Web browser application
running on a remote system that has graphics capability. (If you use this option, you
must use the espconfig -enable <ipaddr> command to enable network access for
the remote system before you open the URL.)
Perform the following procedure to access ESP by opening a URL in a Web browser:
1. If this is the first time that you are using ESP on the system, do the following:
•
Log into the system as root and enter espconfig -createadmin to create the
default user account (administrator).
•
Enter espconfig -enable ipaddr 127.0.0.0 and espconfig -enable
ipaddr 127.0.0.1 to enable access to ESP from the local system.
2. Open the appropriate URL (http://locahost:5554 or http://<systemname>:5554)
in a Web browser.
The Web browser displays the ESP opening page. (Refer to Figure 2-1.)
44
Using the Web-based Interface
Figure 2-1
ESP Opening Page
45
Chapter 2: Accessing ESP
3. Specify the system that you want to access:
•
To connect to the local system, click on the login button.
•
To connect to a remote system, enter the system name or IP address in the
hostname box, and click on the login button.6
4. Enter a username and password. (Refer to Figure 2-2.)
The default username is administrator; the default password is partner.
Figure 2-2
46
Entering a Username and Password
Using the Web-based Interface
The ESP main page appears. (Figure 2-3 shows the main page in single system
manager mode. Figure 2-4 shows the main page in system group manager mode.)
The main page shows the current system and ESP configuration information and
provides buttons that link to the main ESP functions.
Figure 2-3
ESP Main Page (Single System Manager Mode)
47
Chapter 2: Accessing ESP
Figure 2-4
48
ESP Main Page (System Group Manager Mode)
Using the Web-based Interface
Using the Embedded_Support_Partner Icon (ESP for the IRIX OS
Only)
Perform the following procedure to use the Embedded_Support_Partner icon to start the
ESP Web-based graphical interface:
1.
Choose Find -> Support Tools in the Toolchest menu. (Refer to Figure 2-5.)
Figure 2-5
Toolchest Menu
49
Chapter 2: Accessing ESP
The Icon Catalog application opens to the SupportTools category. (Refer to
Figure 2-6.)
Figure 2-6
Icon Catalog
2. Double-click on the Embedded_Support_Partner icon.
Netscape displays the ESP opening page. (Refer to Figure 2-7.)
50
Using the Web-based Interface
Figure 2-7
ESP Opening Page
3. Specify the system that you want to access:
•
To connect to the local system, click on the login button.
•
To connect to a remote system, enter the system name or IP address in the
hostname box, and click on the login button.
51
Chapter 2: Accessing ESP
4. Enter a username and password. (Refer to Figure 2-2.)
The default username is administrator; the default password is partner.
Note: Before you use ESP the first time, enter espconfig -createadmin to create
the default user account (administrator).
Figure 2-8
52
Entering a Username and Password
Using the Web-based Interface
The ESP main page appears. (Figure 2-3 shows the main page in single system
manager mode. Figure 2-4 shows the main page in system group manager mode.)
The main page shows the current system and ESP configuration information and
provides buttons that link to the main ESP functions.
Figure 2-9
ESP Main Page (Single System Manager Mode)
53
Chapter 2: Accessing ESP
Figure 2-10
54
ESP Main Page (System Group Manager Mode)
Using the Web-based Interface
Using the launchESPartner Command (ESP for the IRIX OS Only)
Perform the following procedure to use the launchESPartner command to start the ESP
Web-based graphical interface:
1.
Enter the launchESPartner command.
Netscape displays the ESP opening page. (Refer to Figure 2-11.)
Figure 2-11
ESP Opening Page
2. Specify the system that you want to access:
•
To connect to the local host, click on the login button.
•
To connect to a remote system, enter the system name or IP address in the
hostname box, and click on the login button.
55
Chapter 2: Accessing ESP
3. Enter a username and password.
The default username is administrator; the default password is partner.
Note: Before you use ESP the first time, enter espconfig -createadmin to create
the default user account (administrator).
Figure 2-12
56
Entering a Username and Password
Using the Web-based Interface
The ESP main page appears. (Figure 2-13 shows the main page in single system
manager mode. Figure 2-14 shows the main page in system group manager mode.)
The main page shows the current system and ESP configuration information and
provides buttons that link to the main ESP functions.
Figure 2-13
ESP Main Page (Single System Manager Mode)
57
Chapter 2: Accessing ESP
Figure 2-14
58
ESP Main Page (System Group Manager Mode)
Configuring Single System Management
Configuring Single System Management
Perform the following procedure the first time that you use single system manager mode
to configure it:
1.
Log into the system as root and enter espconfig -createadmin to create the
default user account (administrator).
2. Enter espconfig -enable ipaddr 127.0.0.0 and espconfig -enable ipaddr
127.0.0.1 to enable access to the ESP from the local system.
3. Open one of the following URLs in a Web browser:
•
http://localhost:5554
•
http://<systemname>:5554
(Refer to “Using the Web-based Interface” on page 42.)
4. Change the default password to prevent unauthorized access to your system. (Refer
to “Updating a Password” on page 77.)
•
The default user name is administrator.
•
The default password is partner.
5. Set up any user accounts and permissions that you want on your system. (Refer to
“Setting Up the User Permissions” on page 71.)
6. Set up the access lists to allow systems to connect to the Configurable Web Server
that ESP uses. By default, the Configurable Web Server is configured to refuse
connections from all other IP addresses. (Refer to “Setting Up the Network
Permissions” on page 68.)
7. If the system is running the Linux OS and ESP does not detect the system serial
number, enter the system serial number. (Refer to “Setting Up the System Serial
Number (ESP for the Linux OS Only)” on page 92.)
8. Enter the customer profile information. (Refer to “Setting Up the Customer Profile”
on page 64.)
9. Set up the global configuration parameters. (Refer to “Setting Up the Global
Configuration Parameters” on page 97.)
10. Modify and/or add actions. (Refer to “Configuring Actions” on page 187.)
11. Modify and/or add events. (Refer to “Configuring Events” on page 139.)
59
Chapter 2: Accessing ESP
Configuring Group Management
All ESP components necessary for group management are installed on your system by
default; however, you need a nodelocked license to enable the system group
management (SGM) functionality. You must configure a system to use system group
manager (SGM) mode to use the group management functions in ESP.
If you want one system to register events from other systems in a group and perform
actions for those events, you must subscribe to those events on the remote systems. When
the ESP software on a remote system registers subscribed events, it logs them in its
database (if it is a full node; light nodes do not maintain a database), performs any actions
assigned to the events, and then forwards the events to the ESP software on the group
manager system. Then, the ESP software on the group manager system registers the
events, logs the events in its database, and performs any actions assigned to the events.
This process creates a central repository of data on the group manager system, which
enables you to access information about all of the systems in the group from a single
interface.
Be aware of the following requirements as you configure group management:
60
•
Although you can subscribe to any events that are recognized on group member
systems, the systems forward only the events that have event registration enabled.
(Globally disabling event registration on a group member system disables event
forwarding for all events on that system. Disabling an individual event registration
on a group member prevents the group member system from forwarding that event
to the group manager system.)
•
Event forwarding is an internal ESP action, so you must enable ESP actions on
group member systems to forward events to the group manager system.
•
On a group manager system, ESP stores event settings on a per-host basis. There are
separate sets of events for each member of the group. Disabling global or individual
event registration on the group manager does not propagate to the group members
systems: if a group member attempts to deliver an event that is disabled on the
group manager, the event is delivered to the group manager and then the event is
discarded. If you no longer need an event from a member system, you should
unsubscribe the event rather than disable it on the group manager system. This
reduces the overhead caused by unnecessary event delivery.
Configuring Group Management
Perform the following procedure to configure group management:
1.
Select the group of systems that you want to monitor. (These systems are called the
“group members” or “SGM clients.”)
Each system in a group can be monitored by more then one group manager. Each
group manager has an independent set of events that it monitors.
An ESP 3.0 SGM server can have ESP 3.0 and/or ESP 2.0 clients. ESP 3.0 clients can
run the IRIX or Linux OS. ESP 2.0 clients can run the IRIX OS.
2. Select the system that you want to be the group manager. (This system is called the
“group manager” or “SGM server.”)
The group manager system can also be a group member for another group manager.
In that case, the other group manager treats the system as a single system.
3. Configure the group manager system in SGM mode. (Refer to “Setting Up the
System Parameters (Single System Manager Mode Only)” on page 114.)
4. Configure ESP on each client system. You can configure each client as a single
system manager or a system group manager and as a full node or a light node.
5. Add the SGM clients on the SGM server. (Refer to “Adding a New SGM Client” on
page 116.)
Note: For greater security, configure an authentication password on the SGM server
and clients. You must configure the password on an SGM client first (refer to
“Adding a Password for a New Server” on page 133) and then on the SGM server
(refer to“Adding a New SGM Client” on page 116 and “Updating the System or a
Client” on page 122).
6. Subscribe to the events that you want to receive from the SGM Clients. (Refer to
“Subscribing Events from SGM Clients” on page 182.)
61
Chapter 3
3. Administering ESP
This chapter describes how to administer ESP on your system. ESP administration
includes the following components:
•
Customer profile
•
Network permissions
•
User permissions
•
Database archives
You must set up the administration components when you first configure ESP on a
system. After that, modify specific parameters as needed (for example, add or delete
users).
63
Chapter 3: Administering ESP
Setting Up the Customer Profile
Customer profiles provide contact information for a system/site. If the service contract
for your site includes automatic call logging, ESP sends the name, telephone number, and
e-mail address of the contact person to the call logging tool at SGI.
Using the Web-based Interface
Perform the following procedure to use the Web-based interface to set up the customer
profile for a system:
1.
Click on the ESP Administration button.
Note: If the system is an SGM server, choose the system for which you want to set
up the customer profile and click on the Continue button. (Refer to Figure 3-1.)
The interface displays the Create Customer Profile window. (Refer to
Figure 3-2.)
Figure 3-1
64
Choosing the System to Update the Customer Profile
Setting Up the Customer Profile
Figure 3-2
Update Customer Profile Window (Web-based Interface)
2. Update the customer profile parameters. (Table 3-1 describes the parameters.)
Table 3-1
Customer Profile Parameters
Parameter
Description
Required Parametersa
First Name
First name of the site contact person
Last Name
Last name of the site contact person
Phone Number
Phone number of the site contact person (include only
numbers and dashes; for example: 1-715-123-4567)
65
Chapter 3: Administering ESP
Table 3-1
Customer Profile Parameters (continued)
Parameter
Description
E-mail Address
E-mail address of the site contact person (ESP sends a
copy of any automated e-mail messages to this address)
Country
Country where the site is located
Optional Parametersb
Site ID
Identification number for the site
Street Address 1
Street Address 2
Street Address 3
Street address for the site
City
City where the site is located
State
State where the site is located
Postal Code (Zip Code)
Postal code or zip code of the site location
a. Information in the required fields is necessary to enable automatic call logging. If this information is not provided, automatic call logging is disabled.
b. Although these fields are optional, it is recommended that you provide this information
3. Click on the Add button.
66
Setting Up the Customer Profile
Using the Command Line Interface
You can use the espconfig command to view, set up, or modify the customer profile
from the command line interface:
•
Use the following command syntax to view the current customer profile:
/usr/sbin/espconfig -show customer_profile
[-host <host name>|-alias <client alias>|-sysid <systemid>]
•
Use the following command syntax to set up the initial customer profile:
/usr/sbin/espconfig -create customer_profile
[-fname
<first name>]
[-lname
<last name>]
[-phone
<phone>]
[-email
<email>]
[-street1 <street address line1>]
[-street2 <street address line2>]
[-street3 <street address line3>]
[-city
<city>]
[-state
<state/province>]
[-post
<postal code>]
[-country <country>]
[-site_id <site id>]
[-host <host name>|-alias <client alias>|-sysid <systemid>]
•
Use the following command syntax to update an existing customer profile:
/usr/sbin/espconfig -update customer_profile
[-fname
<first name>]
[-lname
<last name>]
[-phone
<phone>]
[-email
<email>]
[-street1 <street address line1>]
[-street2 <street address line2>]
[-street3 <street address line3>]
[-city
<city>]
[-state
<state/province>]
[-post
<postal code>]
[-country <country>]
[-site_id <site id>]
[-host <host name>|-alias <client alias>|-sysid <systemid>]
67
Chapter 3: Administering ESP
Setting Up the Network Permissions
Network permissions enable you to specify which systems can access the Web server that
ESP uses. These permissions provide a layer of security to prevent unauthorized systems
from accessing ESP data from your systems.
If you want to restrict access to ESP, you must set up a “restrict access” list and an “allow
access” list. (If you do not set up a “restrict access” list, all IP addresses can connect to
ESP regardless of the “allow access” list settings because the default configuration allows
connections from all IP addresses if no “restrict access” list exists.)
The most secure configuration is to set the “restrict access” list to all hosts (*.*.*.*) and set
the “allow access” list to the hosts that you want to have access to ESP. (For example, set
the “allow access” list to 197.*.*.* and the “restrict access” list to *.*.*.* if you want
only the systems that have IP addresses that begin with 197 to have access to ESP.)
Caution: All changes that you make to the “restrict access” and “allow access” lists
immediately take effect. Ensure that you do not set up access lists that prevent your
administration system from connecting to ESP.
By default, the “restrict access” list is set to *.*.*.* to restrict all hosts. You must enable
access by the local host (127.0.0.0 and 127.0.0.1) before you can access the ESP Web server.
To do this, enter the espconfig -enable ipaddr 127.0.0.0 and espconfig -enable
ipaddr 127.0.0.1 commands before you attempt to access ESP on a system for the first
time.
Using the Web-based Interface
Perform the following procedure to use the Web-based interface to set up network
permissions:
1.
Click on the ESP Administration button.
2. Click on the Network Permissions button.
The interface displays the Network Permissions window. (Refer to Figure 3-3.)
68
Setting Up the Network Permissions
Figure 3-3
Network Permissions Window (Web-based Interface)
3. To modify the Allow Access list:
•
To add an address, enter the IP address or IP address mask (using * as a wild
card for one or more values in the address) in the box, and click on the Add
button.
•
To delete an address, click on the address in the Allow Access list, and click on
the Delete button.
4. To modify the Restrict Access list:
•
To add an address, enter the IP address or IP address mask (using * as a wild
card for one or more values in the address) in the box, and click on the Add
button.
•
To delete an address, click on the address in the Restrict Access list, and click
on the Delete button.
69
Chapter 3: Administering ESP
Using the Command Line Interface
You can use the espconfig command to set up the network permissions from the
command line interface:
Tip: Use an asterisk as a wild card character in any of the IP addresses that you enter for
the <ip address> parameter (for example, 123.23.2.*, 123.255.*.*, and *.*.*.*).
•
Use the following command syntax to enable IP addresses to access the ESP Web
server:
/usr/sbin/espconfig -enable ipaddr <ip address> ... <ip address>
You must specify at least one IP address. If you specify an IP address that is already
enabled, it remains enabled. If you specify an IP address that is disabled, ESP moves
it from the “restrict access” list to the “allow access” list to enable it for Web server
access. If you specify a new IP address, ESP adds it to the “allow access” list to
enable it for access to the Web server.
•
Use the following command syntax to restrict IP addresses from accessing the ESP
Web server:
/usr/sbin/espconfig -disable ipaddr <ip address> ...<ip address>
You must specify at least one IP address. If you specify an IP address that is
disabled, it remains disabled. If you specify an address that was enabled for Web
server access, ESP moves it from the “allow access” list to the “restrict access” list to
prevent it from accessing the Web server. If you specify a new IP address, ESP adds
it to the “restrict access” list to prevent it from accessing the Web server.
•
Use the following command syntax to delete IP addresses from the access lists on
the system:
/usr/sbin/espconfig -delete ipaddr <ip address> ...<ip address>
You must specify at least one IP address.
•
Use the following command syntax to list the IP addresses that are contained in the
access lists on the system and the current state of the IP addresses:
/usr/sbin/espconfig -list ipaddr <ip address>...<ip address>
[-enabled | -disabled]
If you do not specify an IP address, this command lists all IP addresses in the access
lists on the system. If you specify the -enabled option, this command lists only the
IP addresses that are in the “allow access” list. If you specify the -disabled option,
this command lists only the IP addresses that are included in the “restrict access”
list.
70
Setting Up the User Permissions
Setting Up the User Permissions
User permissions provide an additional security layer by enabling you to create
individual user accounts within ESP. Each user account can have access to different areas
of ESP (for example, one account could have access only to availability reports and a
second account could have access to all reports).
ESP contains one user account by default (login: administrator; password: partner).
The administrator account has full access to all ESP features.
Note: This is no direct correlation between ESP user accounts and “normal” user
accounts on a system.
Viewing the Current Users
You can view a list of all ESP user accounts that are currently available.
Using the Web-based Interface
1.
Click on the ESP Administration button.
2. Click on the User Permissions button.
The interface shows the list of current users. (Refer to Figure 3-4.)
71
Chapter 3: Administering ESP
Figure 3-4
Current User List (Web-based Interface)
Using the Command Line Interface
Use the following syntax of the espconfig command to view a list of current users:
/usr/sbin/espconfig -list user [-name <username>]
If you include the -name option, this command displays information about a specific
user. If you do not include the -name option, this command lists all users.
72
Setting Up the User Permissions
Adding a User
Any user with the “ESP Administration and Set Environment” permission can add new
users and configure access permissions for them.
Using the Web-based Interface
Perform the following procedure to use the Web-based interface to add a user:
1.
Click on the ESP Administration button.
2. Click on the User Permissions button.
3. Click on the Add User button.
The interface displays the Add User window. (Refer to Figure 3-5.)
73
Chapter 3: Administering ESP
Figure 3-5
Add User Window (Web-based Interface)
4. Enter the login name for the user in the User Name field.
User names have the following restrictions:
74
•
User names are case sensitive; for example, User is different than USer.
•
User names cannot be more than 126 characters.
•
User names cannot include the following characters: ? & * “ < > %
Setting Up the User Permissions
5. Enter the password for the user in the Password field.
Passwords have the following restrictions:
•
Passwords are case sensitive; for example, Password is different than PAssword.
•
Passwords cannot be more than 126 characters.
•
Passwords cannot include the following characters: ? & * “ < > % <SPACE>
<Tab>
6. Re-enter the password for the user in the Verify Password field. (You must enter
the password twice to ensure that it is entered correctly.)
7. Set the permissions for the user. (Table 3-2 describes the permissions.)
Table 3-2
Available User Permissions
Permission
Description
ESP Administration and
Set Environment
Enables the user to perform all activities in the ESP
Administration and Set Environment sections of the
interface (set up customer profile, network permissions, user
permissions, global configuration, paging parameters, archive
settings, and SGM settings)
Configuration
Enables the user to perform all activities in the
Configuration section of the interface (configure events,
actions, performance monitoring, and system monitoring)
Events, Actions,
Diagnostics and Site
Reports
Enables the user to view all event reports, action reports,
diagnostic reports, and site reports
Availability Reports
Enables the user to view availability reports
HW and SW Reports
Enables the user to view hardware inventory reports, software
inventory reports, and system reports
View Logs
Enables the user to view logbook entries
Create Log
Enables the user to create logbook entries
8. Click on the Add User button.
75
Chapter 3: Administering ESP
Using the Command Line Interface
Use the following syntax of the espconfig command to add a new user:
/usr/sbin/espconfig -add user -name <username> [-p <password>]
User names have the following restrictions:
•
User names are case sensitive; for example, User is different than USer.
•
User names cannot be more than 126 characters.
•
User names cannot include the following characters: ? & * “ < > %
Passwords have the following restrictions:
76
•
Passwords are case sensitive; for example, Password is different than PAssword.
•
Passwords cannot be more than 126 characters.
•
Passwords cannot include the following characters: ? & * “ < > % <SPACE> <Tab>
Setting Up the User Permissions
Updating a Password
Any user with the “ESP Administration and Set Environment” permission can update
user passwords. (You must know a user’s current password to update their password. If
a user forgets their password, delete their current user account and create a new account
with the same user name.)
Using the Web-based Interface
Perform the following procedure to use the Web-based interface to update a user
password:
1.
Click on the ESP Administration button.
2. Click on the User Permissions button.
3. Click on the Update Password button.
The interface displays the Update Password for User window. (Refer to
Figure 3-6.)
Figure 3-6
Update Password Window (Web-based Interface)
77
Chapter 3: Administering ESP
4. Select the user whose password you want to update.
5. Click on the Update Password button.
The interface displays the Add User window. (Refer to Figure 3-5.)
Figure 3-7
Update Password for User Window (Web-based Interface)
6. Enter the old password for the selected user in the Old Password field.
7. Enter the new password in the New Password field.
Passwords have the following restrictions:
78
•
Passwords are case sensitive; for example, Password is different than PAssword.
•
Passwords cannot be more than 126 characters.
•
Passwords cannot include the following characters: ? & * “ < > % <SPACE>
<Tab>
Setting Up the User Permissions
8. Re-enter the new password in the Verify Password field. (You must enter the
password twice to ensure that it is entered correctly.)
9. Click on the Commit button.
Note: If you change the password for the account you are currently using, the interface
displays an Authorization Failed message and prompts you for the new password.
Using the Command Line Interface
Use the following syntax of the espconfig command to update a password:
/usr/sbin/espconfig -update user -name <username> [-p <new_password>]
Passwords have the following restrictions:
•
Passwords are case sensitive; for example, Password is different than PAssword.
•
Passwords cannot be more than 126 characters.
•
Passwords cannot include the following characters: ? & * “ < > % <SPACE> <Tab>
79
Chapter 3: Administering ESP
Updating Permissions for a User
Any user with “ESP Administration and Set Environment” permission can update
permissions for other users. (Updating permissions enables you to add or remove
specific permissions for a user.)
Note: If a user attempts to access a feature for which he/she does not have permission,
the interface displays an Authorization Failed message and ESP does not perform the
requested operation.
Caution: Do not change the permissions for the administrator account. The
administrator account is the main ESP account and should always have full permissions.
Using the Web-based Interface
Perform the following procedure to use the Web-based interface to update permissions
for a user:
1.
Click on the ESP Administration button.
2. Click on the User Permissions button.
3. Click on the Update Permissions button.
The interface displays the Update User’s Permissions window. (Refer to
Figure 3-8.)
80
Setting Up the User Permissions
Figure 3-8
Update User’s Permissions Window (Web-based Interface)
4. Select the user whose permissions you want to update.
5. Click on the Update Permissions button.
The interface updates the Update User’s Permissions window. (Refer to
Figure 3-9.)
81
Chapter 3: Administering ESP
Figure 3-9
Updated Update User Permissions Window (Web-based Interface)
6. Select the permissions that you want the user to have. (Refer again to Table 3-2 on
page 75 for descriptions of the permissions.)
Note: Restricting the “ESP Administration and Set Environment” permission for the
current user causes the interface to display an Authorization Failed message
because the account no longer has access to the Update Permissions command.
7. Click on the Commit button.
82
Setting Up the User Permissions
Using the Command Line Interface
You can use the espconfig command to list the available permissions on a system and
to list, add, or delete user permissions:
•
Use the following command syntax to create the default user account and
password:
/usr/sbin/espconfig -createadmin
•
Use the following command syntax to list the permissions that are available on a
system:
/usr/sbin/espconfig -list permdesc [-perm <permission
name>..<permission name>]
If you do not specify a specific permission name, this command displays all
permissions that are available on the system.
•
Use the following command syntax to add a new type of permission to a system:
/usr/sbin/espconfig -add permdesc -perm <permission name> -desc
<permission description>
•
Use the following command syntax to delete a specific type of permission from a
system:
/usr/sbin/espconfig -delete permdesc -perm <permission name>
•
Use the following command syntax to list permissions for a user:
/usr/sbin/espconfig -list userperm [-name <user name>] [-perm
<permission name>]
If you do not specify a user name, this command lists all users. If you do not specify
a permission name, this command lists all permissions. If you do not specify a user
name or permission name, this command lists all permissions for all users.
•
Use the following command syntax to add new permissions for a user:
/usr/sbin/espconfig -add userperm [-name <user name>] -perm
<permission name>
Table 3-3 lists the settings for the <permission name> parameter.
83
Chapter 3: Administering ESP
Table 3-3
Command Line Interface User Permission Settings
Permission
Setting
ESP administration and set
environment
ESPpermission:set_environment
Configuration
ESPpermission:configuration
Event registered, actions taken,
diagnostic results, and site reports
ESPpermission:events_actions_diag_reports
Availability reports
ESPpermission:availability_reports
Hardware and software configuration ESPpermission:hw_sw_reports
reports
View logs
ESPpermission:logbook_view
Create log
ESPpermission:logbook
If you do not specify a user name, this command adds the permission to all users.
•
Use the following command syntax to delete permissions from a user:
/usr/sbin/espconfig -delete userperm [-name <user name>] [-perm
<permission name>]
If you do not specify a user name, this command deletes the specified permission
from all users. If you do not specify a permission name, this command deletes all
permissions from the specified user. If you do not specify a permission name or user
name, this command deletes all permissions from all users.
84
Setting Up the User Permissions
Deleting a User
Any user with the “ESP Administration and Set Environment” permission can delete
other ESP users. To ensure that security is not compromised, always delete users that no
longer need access to ESP on a specific system.
Caution: Do not delete the administrator user account. All systems should have the
administrator account.
Using the Web-based Interface
Perform the following procedure to use the Web-based interface to delete a user:
1.
Click on the ESP Administration button.
2. Click on the User Permissions button.
3. Click on the Delete User button.
The interface displays the Delete User window. (Refer to Figure 3-10.)
Figure 3-10
Delete User Window (Web-based Interface)
85
Chapter 3: Administering ESP
4. Select one or more user accounts to delete.
5. Click on the Delete User button.
The interface updates the Delete User window. (Refer to Figure 3-11.)
Figure 3-11
Updated Delete User Window (Web-based Interface)
6. Click on the Commit button.
Using the Command Line Interface
Use the following syntax of the espconfig command to delete a user:
espconfig -delete user -name <user name> [-p <user password>]
If you do not provide the password for the user account that you want to delete, this
command prompts you for the password (but does not display the password on the
screen).
86
Manipulating Database Archives
Manipulating Database Archives
ESP logs data in a database on the system as it registers events and performs actions. You
can archive the current database to reduce the amount of disk space used on the system.
Use the esparchive command at a UNIX prompt to archive the current database that
ESP is using on a system. The esparchive command shuts down ESP momentarily,
compresses the current database to save space, opens a new database to receive data
from ESP, and restarts ESP. (You must use the root account to execute the esparchive
command; this command archives the current database only if it is 10 MB or larger.)
You can use the Web-based interface and command line interface to delete database
archives that you no longer need.
Warning: When you delete a database archive, the information in the database
archive is permanently lost. You will not be able to view any system information that
was stored in the database archive.
Using the Web-based Interface
Perform the following procedure to use the Web-based interface to delete a database
archive:
1.
Click on the ESP Administration button.
2. Click on the Archive button.
The interface displays the Delete Archive window. (Refer to Figure 3-12.)
87
Chapter 3: Administering ESP
Figure 3-12
Delete Archive Window (Web-based Interface)
3. Click on the check box next to the name of the database archive that you want to
delete.
4. Click on the Delete Archive button.
The interface displays a verification screen. (Refer to Figure 3-13.)
88
Manipulating Database Archives
Figure 3-13
Delete Archive Verification Screen
5. Click on the Commit button.
Using the Command Line Interface
You can use the espconfig command to view information about the available database
archives and to delete a specific database archive:
•
Use the following command syntax to view the available database archives:
/usr/sbin/espconfig -list archive [<archive name> ... <archive
name>]
This command displays the name and date information for archives. If you specify
one or more archive names, this command lists information about those archives. If
you do not specify an archive name, this command displays information about all of
the archives on the system.
•
Use the following command syntax to delete a database archive:
/usr/sbin/espconfig -drop archive <archive name>
89
Chapter 3: Administering ESP
The espconfig command also enables you to initialize the ESP database on your system.
Warning: Initializing the ESP database on a system deletes all data for that system.
If the system is a group manager, initializing the ESP database also deletes
information about events on other systems in the group.
•
Use the following command syntax to initialize the ESP database on your system to
return it to the initial state:
/usr/sbin/espconfig -reconstructdb
•
Use the following command syntax to “clean” the ESP database tables on your
system:
/usr/sbin/espconfig -flushdb [-sysid <system id>|-host <hostname>]
[config | all]
Use the -sysid option to select a system by system ID. Use the -host option to
select a system by hostname. If you do not specify the -sysid or -host option, this
command “cleans” the database tables on the local system.
If you do not specify the config or all option, this command “cleans” the ESP data
tables on the selected system. If you specify the config option, this command
“cleans” only the configuration tables for the local system. If you specify the all
option, this command “cleans” the configuration tables and the ESP data tables on
the selected system.
90
Chapter 4
4. Setting Up the ESP Environment
This chapter describes how to set up the ESP environment on your system. The ESP
environment includes the following components:
•
System serial number (Linux OS only)
•
Global configuration
•
Paging parameters
•
System/client parameters
•
System Group Manager (SGM) password parameters
Note: The paging parameters are not included in the ESP 3.0 Web-based interface for the
Linux OS. ESP 3.0 for the Linux OS does not include paging by default because SGI does
not distribute the QPage application for the Linux OS. Paging capabilities are disabled
when ESP 3.0 runs under the Linux OS. The ESP 3.0 graphical user interface for the Linux
OS does not include the Paging menu. If you obtain the QPage application for the Linux
OS from another source, you should manually install and configure it and then create an
ESP action that calls the QPage application.
You must set up the environmental components when you first configure ESP on a
system. After that, modify specific parameters only when the corresponding
environmental component changes.
91
Chapter 4: Setting Up the ESP Environment
Setting Up the System Serial Number (ESP for the Linux OS Only)
The Linux System SN button (refer to Figure 4-1) is available only on systems that run
the Linux OS. This button enables you to enter the serial number of a system that is
running the Linux OS. (This button can appear if you are running ESP from
SGI ProPack 2.3 or later; however, this button should not normally appear for ESP from
SGI ProPack 2.4 and later, which can automatically detect the system serial number.)
Figure 4-1
Linux System SN Button
The Linux System SN button appears under two conditions:
•
A local system is running the Linux OS, and ESP cannot detect the system serial
number.
•
An SGM server has a subscribed client that is running the Linux OS and the system
serial number was not detected or entered on the client before you subscribed the
client to the SGM server.
Note: You cannot set the Registration with SGI global configuration parameter to
Enabled until you set the system serial number.
On a local system, the Linux System SN button disappears after you enter the system
serial number. On an SGM system, the Linux System SN button disappears after you
enter the system serial number for each client system that does not have a system serial
number set.
92
Setting Up the System Serial Number (ESP for the Linux OS Only)
Setting the System Serial Number (Single System Manager Mode)
Perform the following procedure to set the system serial number in single system
manager mode:
1.
Click on the Set Environment button.
2. Click on the Linux System SN button.
The interface displays the Add Linux System Serial Number window. (Refer to
Figure 4-2.)
Figure 4-2
Add Linux System Serial Number Window (Single System Manager Mode)
3. Enter the system serial number in the System serial number field.
Tip: To determine the system serial number, enter the
cat /proc/sgi_sn/system_serial_number command.
4. Click on the Continue button.
The interface displays a verification window. (Refer to Figure 4-3.)
93
Chapter 4: Setting Up the ESP Environment
Figure 4-3
Add Linux System Serial Number Verification Window (Single System Manager
Mode)
Tip: Verify that you correctly entered the serial number before you click on the
Commit button. You cannot change the serial number once it has been submitted.
5. Click on the Commit button.
94
Setting Up the System Serial Number (ESP for the Linux OS Only)
Setting the System Serial Number (System Group Manager Mode)
Perform the following procedure to set the system serial number in system group
manager mode:
1.
Click on the Set Environment button.
2. Click on the Linux System SN button.
The interface displays the Add Linux System Serial Number window.
One SGM Client without a Serial Number Set
If there is only one SGM client without a serial number, enter the system serial number
in the System serial number field, and click on the Continue button. (Refer to
Figure 4-4.) Then, log into ESP on the SGM client, and set the serial number on that
system. You must set the serial number on the SGM server and the SGM client.
Tip: Verify that you correctly entered the serial number before you click on the Commit
button. You cannot change the serial number once it has been submitted.
Figure 4-4
Linux System SN Window (SGM Server that has One Client without a Serial
Number Entered)
95
Chapter 4: Setting Up the ESP Environment
Multiple Clients without a Serial Number Set
If there is more than one SGM client without a serial number, choose the correct system
from the pulldown menu, enter the system serial number in the System serial number
field, and click on the Continue button. (Refer to Figure 4-5.) Then, log into ESP on the
SGM client, and set the serial number on that system. You must set the serial number on
the SGM server and the SGM client.
Tip: Verify that you correctly entered the serial number before you click on the Commit
button. You cannot change the serial number once it has been submitted.
Figure 4-5
96
Linux System SN Window (SGM Server that has Multiple Clients without Serial
Numbers Entered)
Setting Up the Global Configuration Parameters
Setting Up the Global Configuration Parameters
The global configuration parameters define global ESP behaviors and are divided into
the following categories:
•
Global event handling parameters, which determine if ESP should register events,
throttle events, and perform any actions
•
Global availability parameter, which determines if a reason must be supplied when
the system is shutdown
•
Global registration parameters, which determine if event information is returned to
SGI, the format of the message that contains the event information, and any
additional recipients of the message
Using the Web-based Interface
Perform the following procedure to use the Web-based interface to set up the global
configuration parameters:
1.
Click on the Set Environment button.
2. Click on the Global Config button.
Note: If the system is an SGM server, choose the system for which you want to
update the global configuration parameters, and click on the Continue button.
(Refer to Figure 4-6.)
The interface displays the Global Configuration window. (Refer to Figure 4-7.)
97
Chapter 4: Setting Up the ESP Environment
98
Figure 4-6
Choosing the System to Update the Global Parameters
Figure 4-7
Global Configuration Window (Web-based Interface)
Setting Up the Global Configuration Parameters
3. Set the parameters. (Table 4-1 describes the global configuration parameters.)
Table 4-1
Global Configuration Parameters
Parameter
Description
Register events
Specifies whether or not ESP should register events in the
ESP database
Set this parameter to Enabled if you want to register event
information in the ESP database on your system
Set this parameter to Disabled if you do not want to
register event information in the ESP database on your
system (if you set this parameter to Disabled, it overrides
the individual event settings)
Recommendation: Always set this parameter to Enabled
to capture all event information in the ESP database on
your system
Throttle events
Specifies whether or not ESP should throttle events
Set this parameter to Enabled to require that a specific
number of events must occur before the event is registered
in the ESP database on your system
Set this parameter to Disabled to register every event in
the ESP database
Recommendation: Set this parameter to Enabled and
configure the individual throttle values for each event
Enable actions
Specifies whether or not ESP should perform actions
Set this parameter to Enabled to specify that ESP should
perform any assigned actions in response to all events that
occur
Set this parameter to Disabled to specify that ESP should
not perform actions for any events (if you set this
parameter to Disabled, it overrides any action settings for
individual events)
Recommendation: Set this parameter to Enabled and
assign the desired actions for each event
99
Chapter 4: Setting Up the ESP Environment
Table 4-1
Global Configuration Parameters (continued)
Parameter
Description
Shutdown reason
Specifies whether or not users will be prompted to enter a
reason when they shut down the system
Set this parameter to Enabled to prompt users for a reason
whenever they shut down the system
Set this parameter to Disabled to allow users to shut
down the system without providing a reason
Recommendation: Always set this parameter to Enabled
to ensure that ESP generates accurate availability metrics
Registration with SGI
Specifies whether or not ESP should send data (system
hardware and software information, event information,
crash analysis reports, and system availability reports) to
SGI at [email protected] (under specific service contracts, SGI
uses this data to open trouble tickets and respond to
problems on your system before the problems affect system
availability)
Set this parameter to Enabled to have ESP send e-mail
messages to SGI
Set this parameter to Disabled to prevent ESP from
sending e-mail messages to SGI
Recommendation: Always set this parameter to Enabled
so SGI can provide proactive support for your system
(providing this information helps the call center provide
quick and accurate responses to problems on your system)
E-mail formata
Specifies the format for e-mail that ESP sends. ESP can send
e-mail in plain text format or compressed and encrypted
(uuencoded) format.
If e-mail is sent in compressed and encrypted format,
recipients should use the amreceiver program to decode
the e-mail; refer to the amreceiver man page for more
information.
Recommendation: Set this parameter to Compressed &
Encrypted.
100
Setting Up the Global Configuration Parameters
Table 4-1
Global Configuration Parameters (continued)
Parameter
Description
Send e-mail asa
Specifies the name that appears in the "From" portion of the
e-mail header. This option affects e-mail messages sent by
espnotify, availmon, and espcall (when registration
with SGI is enabled).
E-mail (text format)a
E-mail (specified format)a
Specify e-mail addresses that should receive e-mail from
ESP. ESP sends these addresses the same messages that it
sends to [email protected]. If the Registration with SGI
parameter is disabled, ESP sends e-mail to these addresses
only; it does not send e-mail to [email protected].
The E-mail (text format) parameter specifies e-mail
addresses that should receive the e-mail in plain text
format.
The E-mail (specified format) parameter specifies
e-mail addresses that should receive e-mail in the format
specified by the E-mail format parameter.
Each field can hold up to 255 characters; you should
separate multiple e-mail addresses with spaces or commas.
Recommendation: Enter e-mail addresses of local
personnel that are interested in this information (for
example, system administrators)
a. Any changes that you make to these parameters from an SGM server affect all SGM clients that are currently
subscribed to that server.
4. Click on the Update button. The interface displays a confirmation window.
5. Click on the Commit button.
101
Chapter 4: Setting Up the ESP Environment
Using the Command Line Interface
You can use the espconfig command to update the global configuration parameters:
•
Use the following command syntax to view the current setting of the event
registration parameter:
/usr/sbin/espconfig -show event_registration
[-sgmclient <client alias>|-sysid <system id>]
•
Use the following command syntax to enable event registration by ESP:
/usr/sbin/espconfig -enable event_registration
[-sgmclient <client alias>|-sysid <system id>]
•
Use the following command syntax to disable event registration by ESP:
/usr/sbin/espconfig -disable event_registration
[-sgmclient <client alias>|-sysid <system id>]
•
Use the following command syntax to view the current setting of the event
throttling parameter:
/usr/sbin/espconfig -show event_throttling
[-sgmclient <client alias>|-sysid <system id>]
•
Use the following command syntax to enable event throttling:
/usr/sbin/espconfig -enable event_throttling
[-sgmclient <client alias>|-sysid <system id>]
•
Use the following command syntax to disable event throttling:
/usr/sbin/espconfig -disable event_throttling
[-sgmclient <client alias>|-sysid <system id>]
•
Use the following command syntax to view the current setting of the actions
parameter:
/usr/sbin/espconfig -show event_actions
[-sgmclient <client alias>|-sysid <system id>]
•
Use the following command syntax to enable actions:
/usr/sbin/espconfig -enable event_actions
[-sgmclient <client alias>|-sysid <system id>]
•
Use the following command syntax to disable actions:
/usr/sbin/espconfig -disable event_actions
[-sgmclient <client alias>|-sysid <system id>]
102
Setting Up the Global Configuration Parameters
•
Use the following command syntax to view the current setting of the shutdown
description parameter:
/usr/sbin/espconfig -show shutdown_reason
[-sgmclient <client alias>|-sysid <system id>]
•
Use the following command syntax to prompt users for a description when they
shut down the system:
/usr/sbin/espconfig -enable shutdown_reason
[-sgmclient <client alias>|-sysid <system id>]
•
Use the following command syntax to allow users to shut down the system without
providing a reason:
/usr/sbin/espconfig -disable shutdown_reason
[-sgmclient <client alias>|-sysid <system id>]
•
Use the following command syntax to view the current setting of the call logging
parameter:
/usr/sbin/espconfig -show call_logging
[-sgmclient <client alias>|-sysid <system id>]
•
Use the following command syntax to enable call logging (which sends event
information to SGI to provide proactive support):
/usr/sbin/espconfig -enable call_logging [-text|-comp_encoded]
[-sgmclient <client alias>|-sysid <system id>]
Note: You must set up a customer profile for call logging to work.
The -text option specifies that ESP should send the e-mail message in plain text
format; the -comp_encoded option specifies that ESP should send the message in
uuencoded format. The e-mail address lists can contain up to 255 characters of
comma separated e-mail addresses.
•
Use the following command syntax to disable call logging:
/usr/sbin/espconfig -disable call_logging
[-sgmclient <client alias>|-sysid <system id>]
•
Use the following command syntax to view the current setting of the e-mail
parameter:
/usr/sbin/espconfig -show mail
103
Chapter 4: Setting Up the ESP Environment
•
Use the following command syntax to enable ESP to send e-mail messages and
specify the e-mail account that sends the messages:
/usr/sbin/espconfig -enable mail -from <email address>
[-email1 <email address>]
[-email2 <email address>]
•
Use the following command syntax to disable ESP from sending e-mail messages:
/usr/sbin/espconfig -disable mail
104
Setting Up the Paging Parameters (ESP for IRIX OS Only)
Setting Up the Paging Parameters (ESP for IRIX OS Only)
QuickPage (QPage) is a third-party client/server application that ESP uses to send
messages to an alphanumeric pager. QPage uses a modem to send an IXO/TAP-protocol
message to a telephone number that is connected to a paging service. QPage is integrated
in the ESP software suite, and its services are accessed through the /usr/bin/espnotify
application. (Refer to Figure 4-8.)
Figure 4-8
Process for Sending a Page
QPage is installed on your system by default and is chkconfig’ed off. Perform the
following procedure to set it up and enable it:
1.
Enter the following command to turn QPage on:
chkconfig quickpage on
2. Enter the following command to start the QPage server:
/etc/init.d/qpageserver start
Note: The QPage server automatically restarts whenever you reboot the system.
105
Chapter 4: Setting Up the ESP Environment
3. Set up the following paging parameters:
•
Modem parameters that specify the modem that QPage should use to connect to
the paging service provider.
•
Paging service provider parameters that provide information about the paging
service provider and how to contact it.
•
Pager parameters that provide information about the pager to use.
The following sections describe how to set up these parameters.
Note: The paging parameters are not included in the ESP 3.0 Web-based interface for the
Linux OS. ESP 3.0 for the Linux OS does not include paging by default because SGI does
not distribute the QPage application for the Linux OS. Paging capabilities are disabled
when ESP 3.0 runs under the Linux OS. The ESP 3.0 graphical user interface for the Linux
OS does not include the Paging menu. If you obtain the QPage application for the Linux
OS from another source, you should manually install and configure it and then create an
ESP action that calls the QPage application.
106
Setting Up the Paging Parameters (ESP for IRIX OS Only)
Setting Up the Modem Parameters (ESP for IRIX OS Only)
A modem must be connected to the system that is running ESP so that the software can
send pages when events occur. You must specify the device to which the modem is
connected and specify the modem initialization command. (ESP has been tested with the
U. S. Robotics Sportster fax modem with X2.)
Using the Web-based Interface
Perform the following procedure to use the Web-based interface to set up the modem
parameters:
1.
Click on the Set Environment button.
2. Click on the Paging button.
By default, the interface displays the Paging -> Modem Setup window. (Refer to
Figure 4-9.)
107
Chapter 4: Setting Up the ESP Environment
Figure 4-9
Modem Parameters Window (Web-based Interface)
3. Enter a modem name in the Modem Name field (do not include blank spaces).
4. Enter the device name to which the modem is connected in the Modem Device field.
(Example: /dev/ttyd)
5. Enter the modem initialization command in the Modem Initialization Command
field. (Example: ATZ)
108
Setting Up the Paging Parameters (ESP for IRIX OS Only)
Be aware of the following information when you configure the initialization
command:
•
The initialization command is specific to the modem that you are using. Refer to
your modem user manual for specific details about the initialization command.
•
The initialization command can vary, based on requirements from your paging
service provider. For example, many paging services require you to turn off
error correction on your modem. (This can be done on the U. S. Robotics
Sportster fax modem with X2 with the &A0&K0&M0 initialization command.)
Contact your paging service provider to determine any special requirements.
6. Click on the Add button.
The interface displays a confirmation window.
7. Click on the Commit button
Once you have a modem configured, you have the following options to modify the
modem parameters when you click on the Modem Setup button:
•
To add a new modem, click on the Add button.
•
To update a modem, click on the check box next to the modem and then click on the
Update button.
•
To delete a modem, click on the check box next to the modem and then click on the
Delete button. (Deleting a modem deletes all paging service providers and pagers
that are assigned to it.)
Using the Command Line Interface
No command line interface commands are available to set up the modem parameters. To
modify the modem parameters, you must manually edit the /etc/qpage.cf file and use
the /etc/init.d/qpageserver script to start QPage.
109
Chapter 4: Setting Up the ESP Environment
Setting Up the Paging Service Provider Parameters (ESP for IRIX OS
Only)
You need to provide ESP with information about the paging service that you use so it can
properly contact your pager.
Using the Web-based Interface
1.
Click on the Set Environment button.
2. Click on the Paging button.
3. Click on the Service Provider button.
The interface displays the Service Provider Setup window. (Refer to
Figure 4-10.)
Figure 4-10
110
Paging Service Provider Pager (Web-based Interface)
Setting Up the Paging Parameters (ESP for IRIX OS Only)
4. Update the parameters. (Table 4-2 describes the parameters.)
Table 4-2
Paging Service Provider Parameters
Parameter
Description
Service Provider Name
Specifies the name of the paging service
The interface displays this name on other pages to identify the
paging service (Do not include blank spaces)
Modem Name
Specifies the modem to use
Select the modem from the menu
If the modem that you want to use is not in the menu, click on the
Modem Setup button to add it
Maximum Retry (must be
at least 6)
Specifies the number of times that ESP should attempt to contact
this paging service
Maximum Message Length
(consult your service
provider)
Specifies the maximum number of characters that this service
will accept
Phone number (no
spaces)
Specifies the phone number that ESP should dial to contact the
paging service (Enter only numbers in this field; for example
17151234567)
Contact your paging service provider for this information
5. Click on the Add button.
The interface displays a confirmation window.
6. Click on the Commit button
Once you have a paging service provider configured, you have the following options to
modify the parameters when you click on the Service Provider button:
•
To add a new paging service provider, click on the Add button.
•
To update the paging service provider parameters, click on the check box next to the
service provider name and then click on the Update button.
•
To delete the paging service provider, click on the check box next to the service
provider name and then click on the Delete button. (Deleting a paging service
provider deletes all pagers assigned to it.)
111
Chapter 4: Setting Up the ESP Environment
Using the Command Line Interface
No command line interface commands are available to set up the paging service provider
parameters. To modify the paging service provider parameters, you must manually edit
the /etc/qpage.cf file and use the /etc/init.d/qpageserver script to start QPage.
Setting Up the Paging Parameters (ESP for the IRIX OS Only)
You also need to provide information about the pager that you want to use so ESP can
properly contact it.
Using the Web-based Interface
1.
Click on the Set Environment button.
2. Click on the Paging button.
3. Click on the Paging button.
The interface displays the Pager Setup window. (Refer to Figure 4-11.)
Figure 4-11
112
Pager Parameters Window (Web-based Interface)
Setting Up the Paging Parameters (ESP for IRIX OS Only)
4. Enter a unique name for the pager in the Pager Name field. (Do not include blank
spaces.) ESP uses this name on other interface pages to identify the pager.
5. Enter the pager identification number in the Pager ID field.
Your paging service provider assigns a unique pager identification number to each
individual pager. This number could differ from the telephone number that you dial
to access the pager. Contact your paging service provider to determine the pager
identification number of your pager.
6. Choose the paging service provider that you want to use from the list of available
paging service providers. (If you do not see the provider that you want to use, click
on the Service Provider button to add it.)
7. Click on the Add button.
The interface displays a confirmation window.
8. Click on the Commit button
Once you have a pager configured, you have the following options to modify the
parameters when you click on the Service Provider button:
•
To add a new pager, click on the Add button.
•
To update the pager parameters, click on the check box next to the pager name and
then click on the Update button.
•
To delete the pager, click on the check box next to the pager name and then click on
the Delete button.
Using the Command Line Interface
No command line interface commands are available to set up the pager parameters. To
modify the pager parameters, you must manually edit the /etc/qpage.cf file and use
the /etc/init.d/qpageserver script to start QPage.
113
Chapter 4: Setting Up the ESP Environment
Setting Up the System Parameters (Single System Manager Mode Only)
The system parameters enable you to set up an alias name, select the system mode (full
or SGM), and add the system to a group.
Perform the following procedure to update the system parameters in single system
manager mode:
1.
Click on the Set Environment button.
2. Click on the System button.
The interface displays the Update System Information window. (Refer to
Figure 4-12.)
Figure 4-12
Update System Information Window (Single System Manager)
3. Set the parameters. (Table 4-3 describes the parameters that are available.)
4. Click the Update button.
114
Setting Up the System Parameters (Single System Manager Mode Only)
Table 4-3
Update System Information Window Parameters (Single System Manager Mode)
Parameter
Description
Alias
Specifies an alias that ESP uses to identify the SGM server.
This parameter is optional. If you do not set this parameter, ESP uses the
hostname of the client (without the domain name).
This parameter can contain any non-blank-space character, except for
single or double quotes.
System mode
Specifies how the system is configured.
There are two choices: SGM and Full node (default)
The SGM option configures the system to be a system group manager
system.
The Full node option configures the system as a single system manager.
The system does not have any clients.
System group
Specifies the group to which the system belongs. You can use groups to
quickly access information about all systems in a group by generating a site
report. Example group names include Server, Desktop, Web Server, and File
Server.
To create a new group, enter the name in the System group field. Once
you create one or more group names, ESP displays a menu of the existing
groups; to select an existing group, choose it from the menu.
Note: When you enter group names, the entry in the field takes precedence
over the selection in the menu. The proper way to create a new group is to
set the menu to New Group and enter the group name in the System
Group field.
The following three rules apply for creating group names:
1) The case of characters does not matter. (ESP puts systems hat you enter
in the groups named “Web server” and “Web Server” in the same group.)
2) Spacing between characters does matter. (ESP puts systems that you
enter in the groups named “Web server” and “Web server” in different
groups.)
3) Single and double quotes are not allowed.
This parameter is optional.
115
Chapter 4: Setting Up the ESP Environment
Setting Up the System/Client Parameters (System Group Manager Mode Only)
The system/client parameters enable you to add a new SGM client to an SGM server,
update system parameters for an SGM server or one of its SGM clients, and unsubscribe
an SGM client from an SGM server.
Adding a New SGM Client
1.
Click on the Set Environment button.
2. Click on the System button.
3. Click on the Add New Client button.
The interface displays the Add New Client window. (Refer to Figure 4-13.)
Figure 4-13
Add New Client Window (System Group Manager Mode)
4. Select the type of client to add (ESP 3.0 or ESP 2.0 client).
5. Click on the Continue button.
116
Setting Up the System/Client Parameters (System Group Manager Mode Only)
Figure 4-14 shows the Add New Client window for an ESP 3.0 client.
Figure 4-14
Add New Client Window for ESP 3.0 Client (System Group Manager Mode)
117
Chapter 4: Setting Up the ESP Environment
Figure 4-15 shows the Add New Client window for an ESP 2.0 client.
Figure 4-15
Add New Client Window for ESP 2.0 Client (System Group Manager Mode)
6. Set the parameters for the client. (Table 4-4 describes the parameters that are
available.)
7. Click on the Add Client button.
8. Click on the Continue button.
For ESP 3.0 clients, ESP immediately subscribes the system without waiting for
additional verification. If ESP cannot establish a connection between systems, ESP
displays a message that indicates this. For ESP 2.0 clients, you must also configure
SGM clients from the client side.
118
Setting Up the System/Client Parameters (System Group Manager Mode Only)
Table 4-4
Add New Client Window Parameters
Parameter
Description
Client
hostname
Specifies the fully qualified hostname of a client system.
Client alias
Specifies an alias that ESP uses to identify the client.
This parameter is optional. If you do not set this parameter, ESP uses the
hostname of the client (without the domain name).
This parameter can contain any non-blank-space character, except for single
or double quotes.
Client nodea
Specifies how the client is configured.
There are two choices: Full and Light (default).
A full node is an SGM client that sends data to an SGM server and also keeps
a copy of all data in its own database. Full nodes require more local disk space
than light nodes.
A light node is an SGM client that sends data to an SGM server but does not
keep any data in its own database.
You can convert a light node to a full node at any time; however, only data that
is generated after the conversion completes is stored in the local database.
(Data generated before the conversion completes is stored only in the
database on the SGM server.)
Automatic
Specifies whether or not ESP should automatically subscribe events with the
events
Event Manager. If you set this parameter to Yes, you do not need to manually
subscriptiona subscribe the event (with the Subscription button).
119
Chapter 4: Setting Up the ESP Environment
Table 4-4
Add New Client Window Parameters (continued)
Parameter
Description
Connection
patha
Specifies the connection path between the SGM server and this client.
This parameter applies only to ESP 3.0 clients. ESP 2.0 clients ignore this
parameter.
ESP 3.0 does not require an SGM to know the hostname and IP address
information for its clients. ESP 3.0 allows an intermediate system to know this
information about the SGM and client systems. This enables ESP to work
through a firewall.
For example, system A is an SGM server and system D is a client, but system
A does not know the hostname or IP address of system D. However, system B
knows about systems A and C, and system C knows about systems B and D.
ESP 3.0 allows you to add system D as a client to system A by specifying the
connection path as follows:
B>C
This means that events are forwarded from system D to system A, following
the connection path through system C and system B.
If only one system is intermediate, enter a fully qualified hostname of that
system. If a direct connection can be established between SGM server and
client systems, leave this field blank.
Note: A connection path must be specified in the direction from the SGM
server towards a client. The SGM server and client hostnames should be
omitted. All systems name must be fully qualified hostnames.
120
Setting Up the System/Client Parameters (System Group Manager Mode Only)
Table 4-4
Add New Client Window Parameters (continued)
Parameter
Description
System group
Specifies the group to which the client belongs. You can use groups to quickly
access information about all systems in a group by generating a site report.
Example group names include Server, Desktop, Web Server, and File Server.
To create a new group, enter the name in the System group field. Once you
create one or more group names, ESP displays a menu of the existing groups;
to select an existing group, choose it from the menu.
Note: When you enter group names, the entry in the field takes precedence
over the selection in the menu. The proper way to create a new group is to set
the menu to New Group and enter the group name in the System Group
field.
The following three rules apply for creating group names:
1) The case of characters does not matter. (ESP puts systems hat you enter in
the groups named “Web server” and “Web Server” in the same group.)
2) Spacing between characters does matter. (ESP puts systems that you enter
in the groups named “Web server” and “Web server” in different groups.)
3) Single and double quotes are not allowed.
This parameter is optional.
Password
Specifies a password that the server and client must exchange before
transmitting data (to provide stronger security via authentication)
This parameter is optional for ESP 3.0 clients. This parameter is required for
ESP 2.0 clients. If you require a password, you must configure it on the client
side first.
a. This parameter appears only for ESP 3.0 clients.
121
Chapter 4: Setting Up the ESP Environment
Updating the System or a Client
Perform the following procedure to update the SGM server (system) or an SGM client in
system group manager mode:
1.
Click on the Set Environment button.
2. Click on the System/Client button.
3. Click on the Update System/Client button.
The interface displays the Update System/Client window. (Refer to Figure 4-16.)
Figure 4-16
Update System/Client Window (System Group Manager Mode)
4. Select the system to update.
5. Click on the Continue button.
122
Setting Up the System/Client Parameters (System Group Manager Mode Only)
Updating the SGM Server
If you select the local system (the SGM server), ESP displays the Update System
Information window. (Refer to Figure 4-17.)
Figure 4-17
1.
Update System Information Window (SGM Server Selected)
Set the parameters. (Table 4-5 describes the parameters that are available.)
2. Click the Update button.
123
Chapter 4: Setting Up the ESP Environment
Table 4-5
Update System Information Window Parameters (SGM Server)
Parameter
Description
Alias
Specifies an alias that ESP uses to identify the SGM server.
This parameter is optional. If you do not set this parameter, ESP uses the
hostname of the client (without the domain name).
This parameter can contain any non-blank-space character, except for
single or double quotes.
System mode
Specifies how the system is configured.
There are two choices: SGM (default) and Full node
The SGM option configures the system to be a system group manager
system.
The Full node option configures the system as a single system manager.
The system does not have any clients.
System group
Specifies the group to which the system belongs. You can use groups to
quickly access information about all systems in a group by generating a site
report. Example group names include Server, Desktop, Web Server, and File
Server.
To create a new group, enter the name in the System group field. Once
you create one or more group names, ESP displays a menu of the existing
groups; to select an existing group, choose it from the menu.
Note: When you enter group names, the entry in the field takes precedence
over the selection in the menu. The proper way to create a new group is to
set the menu to New Group and enter the group name in the System
Group field.
The following three rules apply for creating group names:
1) The case of characters does not matter. (ESP puts systems hat you enter
in the groups named “Web server” and “Web Server” in the same group.)
2) Spacing between characters does matter. (ESP puts systems that you
enter in the groups named “Web server” and “Web server” in different
groups.)
3) Single and double quotes are not allowed.
This parameter is optional.
124
Setting Up the System/Client Parameters (System Group Manager Mode Only)
Updating an ESP 3.0 SGM Client
If you select an ESP 3.0 SGM client, ESP displays the Update Client Information
window shown in Figure 4-18.
Figure 4-18
1.
Update Client Information Window (ESP 3.0 SGM Client Selected)
Set the parameters. (Table 4-6 describes the parameters that are available.)
2. Click the Update button.
125
Chapter 4: Setting Up the ESP Environment
Table 4-6
Update Client Information Window Parameters (ESP 3.0 SGM Client)
Parameter
Description
Client alias
Specifies an alias that ESP uses to identify the client.
This parameter is optional. If you do not set this parameter, ESP uses the
hostname of the client (without the domain name).
This parameter can contain any non-blank-space character, except for
single or double quotes.
Client node
Specifies how the client is configured:
Full and Light
A full node is an SGM client that sends data to an SGM server and also
keeps a copy of all data in its own database. Full nodes require more local
disk space than light nodes.
A light node is an SGM client that sends data to an SGM server but does
not keep any data in its own database.
You can convert a light node to a full node at any time; however, only data
that is generated after the conversion completes is stored in the local
database. (Data generated before the conversion completes is stored only
in the database on the SGM server.)
This parameter applies only to ESP 3.0 clients.
126
Setting Up the System/Client Parameters (System Group Manager Mode Only)
Table 4-6
Update Client Information Window Parameters (ESP 3.0 SGM Client) (continued)
Parameter
Description
Connection path
Specifies the connection path between the SGM server and this client.
This parameter applies only to ESP 3.0 clients. ESP 2.0 clients ignore this
parameter.
ESP 3.0 does not require an SGM to know the hostname and IP address
information for its clients. ESP 3.0 allows an intermediate system to know
this information about the SGM and client systems. This enables ESP to
work through a firewall.
For example, system A is an SGM server and system D is a client, but
system A does not know the hostname or IP address of system D.
However, system B knows about systems A and C, and system C knows
about systems B and D. ESP 3.0 allows you to add system D as a client to
system A by specifying the connection path as follows:
B>C
This means that events are forwarded from system D to system A,
following the connection path through system C and system B.
If only one system is intermediate, enter a fully qualified hostname of that
system. If a direct connection can be established between SGM server and
client systems, leave this field blank.
Note: A connection path must be specified in the direction from the SGM
server towards a client. The SGM server and client hostnames should be
omitted. All systems name must be fully qualified hostnames.
127
Chapter 4: Setting Up the ESP Environment
Table 4-6
Update Client Information Window Parameters (ESP 3.0 SGM Client) (continued)
Parameter
Description
System group
Specifies the group to which the client belongs. You can use groups to
quickly access information about all systems in a group by generating a
site report. Example group names include Server, Desktop, Web Server,
and File Server.
To create a new group, enter the name in the System group field. Once
you create one or more group names, ESP displays a menu of the existing
groups; to select an existing group, choose it from the menu.
Note: When you enter group names, the entry in the field takes
precedence over the selection in the menu. The proper way to create a new
group is to set the menu to New Group and enter the group name in the
System Group field.
The following three rules apply for creating group names:
1) The case of characters does not matter. (ESP puts systems hat you enter
in the groups named “Web server” and “Web Server” in the same group.)
2) Spacing between characters does matter. (ESP puts systems that you
enter in the groups named “Web server” and “Web server” in different
groups.)
3) Single and double quotes are not allowed.
This parameter is optional.
Password
Specifies a password that the server and client must exchange before
transmitting data (to provide stronger security via authentication)
This parameter is optional. If you require a password, you must configure
it on the client side first. Use the Leave it as is option to retain an
existing password. Use the Add option to add a new password.
128
Setting Up the System/Client Parameters (System Group Manager Mode Only)
Updating an ESP 2.0 SGM Client
If you select an ESP 2.0 SGM client, ESP displays the Update Client Information
window shown in Figure 4-19.
Figure 4-19
1.
Update Client Information Window (ESP 2.0 SGM Client Selected)
Set the parameters. (Table 4-7 describes the parameters that are available.)
2. Click the Update button.
129
Chapter 4: Setting Up the ESP Environment
Table 4-7
Update Client Information Window Parameters (ESP 2.0 SGM Client)
Parameter
Description
Client alias
Specifies an alias that ESP uses to identify the client.
This parameter is optional. If you do not set this parameter, ESP uses the
hostname of the client (without the domain name).
This parameter can contain any non-blank-space character, except for
single or double quotes.
System group
Specifies the group to which the client belongs. You can use groups to
quickly access information about all systems in a group by generating a
site report. Example group names include Server, Desktop, Web Server,
and File Server.
To create a new group, enter the name in the System group field. Once
you create one or more group names, ESP displays a menu of the existing
groups; to select an existing group, choose it from the menu.
Note: When you enter group names, the entry in the field takes
precedence over the selection in the menu. The proper way to create a new
group is to set the menu to New Group and enter the group name in the
System Group field.
The following three rules apply for creating group names:
1) The case of characters does not matter. (ESP puts systems hat you enter
in the groups named “Web server” and “Web Server” in the same group.)
2) Spacing between characters does matter. (ESP puts systems that you
enter in the groups named “Web server” and “Web server” in different
groups.)
3) Single and double quotes are not allowed.
This parameter is optional.
Password
Specifies a password that the server and client must exchange before
transmitting data (to provide stronger security via authentication)
This parameter is required. You must configure the password on the client
side first. Use the Leave it as is option to retain an existing password.
Use the Add option to add a new password.
130
Setting Up the System/Client Parameters (System Group Manager Mode Only)
Unsubscribing SGM Clients
If a system is subscribed, you can either unsubscribe a client or unsubscribe and delete it:
•
When you unsubscribe a client, the client no longer sends events to the SGM server,
and changes occur on the client system. If a client system is a light node and
subscribed to only one SGM server, the client system resets to a full node once the
unsubscription process completes. If a client system is a full node or is subscribed to
two or more SGM servers, the mode for that node remains the same. All
information about an unsubscribed client for the period of time that the system was
subscribed to the SGM server remains available on the SGM system.
•
When unsubscribe a delete a system, the same actions occur, and all information for
the system (including reports) is removed from the SGM server.
Tip: If an ESP SGM license expires and you do not plan to renew it, enter the espconfig
-unsubscribe sgmclient command to unsubscribe the clients.
Perform the following procedure to unsubscribe a system:
1.
Click on the Set Environment button.
2. Click on the System/Client button.
3. Click on the Unsubscribe/Delete Client button.
The interface displays the Unsubscribe/Delete Client window. (Refer to
Figure 4-20.)
Note: If more than one client is subscribed to the SGM server, the interface displays
a list of clients. Select the client that you want to unsubscribe and click on the
Continue button.
131
Chapter 4: Setting Up the ESP Environment
Figure 4-20
Unsubscribe/Delete Client Window
4. Specify if you want to unsubscribe the client or unsubscribe and delete the client.
(ESP 2.0 clients are unsubscribed immediately. For ESP 3.0 clients, you must commit
the unsubscription on a verification screen before ESP will unsubscribe them.)
Note: When you unsubscribe an ESP 2.0 client on the server side, SGI recommends
that you also unregister the server on the ESP 2.0 client side.
5. Click on the Commit button.
132
Setting Up the Authentication Password
Setting Up the Authentication Password
You can use authentication between the SGM server and clients to provide stronger
security. Authentication requires the SGM server to exchange and authenticate a
password before any data transactions can occur. You must configure the password on
the client side and then on the server side.
Adding a Password for a New Server
Perform the following procedure to set up a password on the client side in single system
manager mode:
1.
Click on the Set Environment button.
2. Click on the SGM Server button.
3. Click on the Add Password for a New Server button.
The interface displays the Add Password for a New Server window. (Refer to
Figure 4-21.)
Figure 4-21
Add Password for a New Server Window
133
Chapter 4: Setting Up the ESP Environment
4. Enter the fully qualified hostname of the SGM server in the Server hostname field.
5. Enter the password in the Password field.
6. Click on the Add button.
ESP immediately adds the password. Be sure to configure the same password on the
SGM server when you add the client to the server. (Refer to “Adding a New SGM Client”
on page 116.)
Updating the Password for an Existing Server
Perform the following procedure to update a password that you previously assigned to
a server:
1.
Click on the Set Environment button.
2. Click on the SGM Server button.
3. Click on the Update Password for an Existing Server button.
The interface displays the Update Password for an Existing Server window.
(Refer to Figure 4-22.)
Note: If the client has more than one SGM server, select the server for which you
want to update the password, and click on the Continue button.
Figure 4-22
134
Update Password for an Existing Server Window
Using the Command Line Interface to Configure SGM Settings
4. Enter the new password in the Password field.
Tip: To remove a password, leave the Password field empty.
5. Click on the Update button.
Using the Command Line Interface to Configure SGM Settings
You can use the espconfig command to register an SGM server.
•
Use the following command syntax to register a server:
/usr/sbin/espconfig -add sgmserver -host <SGM host name>
The command prompts you for a communication password.
You can use the espconfig command to configure SGM clients.
•
Use the following command syntax to register a client:
/usr/sbin/espconfig -add sgmclient <client alias> <client hostname>
<server alias>
The command prompts you for a communication password.
•
Use the following command syntax to add a client:
/usr/sbin/espconfig -add sgmclient -alias <client alias>
-host <client hostname>
[-path <client reach path>]
[-group <group descr.>|-gid <group id>]
[-v2|-v3] [-p <password>]
•
Use the following command syntax to subscribe a client:
/usr/sbin/espconfig -subscribe sgmclient
-host <host name>|-alias <client alias>|-sysid <system id>
[-loadprofiles] [-refreshprofiles] [-lightnode|-fullnode]
[-force]
•
Use the following command syntax to unsubscribe a client:
/usr/sbin/espconfig -unsubscribe sgmclient
-host <host name>|-alias <client alias>|-sysid <system id>
[-force]
135
Chapter 4: Setting Up the ESP Environment
•
Use the following command syntax to update a client:
/usr/sbin/espconfig -update sgmclient
-host <host name>|-alias <client alias>|-sysid <system id>
[-p <password>] [-path <new path>] [-lightnode|-fullnode]
•
Use the following command syntax to delete a client:
/usr/sbin/espconfig -delete sgmclient
-host <host name>|-alias <client alias>|-sysid <system id>
•
Use the following command syntax to ping a client:
/usr/sbin/espconfig ping
-sgmclient <client alias>|-sysid <system id>|-path <reach path>
[-espver]
You can use the espconfig to check and configure general SGM settings.
•
Use the following command syntax to show the systems that an SGM knows:
/usr/sbin/espconfig -show systems
•
Use the following command syntax to show an SGM’s clients:
/usr/sbin/espconfig -show sgmclients
•
Use the following command syntax to show the SGM servers configured for a
system:
/usr/sbin/espconfig -show sgmservers
•
Use the following command syntax to show information about a system:
/usr/sbin/espconfig -show system
-host <host name>|-sgmclient <client alias>|-sysid <system id>
•
Use the following command syntax to set group management parameters for a
system:
/usr/sbin/espconfig -set system -host <host name>|-sysid <system id>
[-alias <new alias>]
[-group <group name> | -gid <group id> ]
•
Use the following command syntax to configure a system (node) in SGM or full
mode:
/usr/sbin/espconfig -setnode system -sgmnode|-fullnode
•
Use the following command syntax to get information about the SGM license or
update it:
/usr/sbin/espconfig -check system -sgmlicense|-update
136
Importing and Exporting ESP Environments
•
Use the following command syntax to update the SGM license key:
/usr/sbin/espconfig -update sgmkey -host <host name> -p <comm.
password> [-pid <key ID>]
You can use the espconfig command to create and manage named groups.
•
Use the following command syntax to create a new group name:
espconfig -add group -name <new group name>
•
Use the following command syntax to delete a group name:
espconfig -delete group -name <group name>
•
Use the following command syntax to list the groups that are available:
espconfig -list group
•
Use the following command syntax to list the members of a group:
espconfig -listmembers group -name <group name>
Importing and Exporting ESP Environments
You can use the espconfig command to import and export ESP environments between
systems. The espconfig command transfers the following environmental information:
global configuration parameters, user configuration parameters, and IP address “allow
access” and “restrict access” lists. All changes are effective immediately.
•
Use the following command syntax to save an ESP environment:
/usr/sbin/espconfig -save espenv [global] [ipaddr] [user]
[site|customer_profile] [all] [-to <filename> ]
•
Use the following command syntax to load an ESP environment:
/usr/sbin/espconfig -load espenv [-sysid <client system id>]
[-chk <check definition filename>]
-from <data definition filename>
137
Chapter 5
5. Configuring ESP
This chapter describes how to configure the following components of ESP:
•
Events
•
Actions
•
Performance monitoring
•
System monitoring
Configuring Events
Events are conditions that ESP monitors. ESP includes many default events, and you can
add custom events. Example events include panics, high processor utilizations, and
nonmaskable interrupts (NMI).
Events are organized into event classes, which enables you to quickly view and update
similar events. Example event classes include availability, system configuration, and
performance.
Note: Chapter 10, “Default Event Classes and Types,” contains lists of all event classes
and event types that ESP includes by default.
To manage events on your system, use ESP to perform the following activities:
•
Manage event profiles
•
View existing event classes and events
•
Add events
•
Update existing events
•
Update multiple events at the same time (batch update)
139
Chapter 5: Configuring ESP
•
Delete events
•
Subscribe to events on other system (system group management mode only)
Managing Event Profiles
Event profiles provide an easy way to control which events are being monitored on your
system. You can use event profiles to quickly load events that pertain to your system
configuration and unload events that do not.
Event profiles are located in the /var/esp/init/eventprofiles directory. If you
manually edit an event profile, you must save it with a .esp extension in this directory.
Note: In the following subsections, the term “ESP event list” refers to the events that are
currently loaded in ESP on your system.
Using the Web-based Interface
Perform the following procedure to use the Web-based interface to use event profiles:
1.
Click on the Configuration button.
2. Click on the Events button.
3. Click on the Load Profile button.
Note: If the system is an SGM server, the interface displays a list of clients. (Refer to
Figure 5-1.) Click on the client that you want to use, and click on the Continue
button.)
The interface displays the Event Profile window. (Refer to Figure 5-2.)
140
Configuring Events
Figure 5-1
Event Profile Window (System Group Manager)
Figure 5-2
Event Profile Window
141
Chapter 5: Configuring ESP
4. Use this window as follows:
•
To list the events that are contained in a profile, click on the profile in the
Current Event Profile list, and then click on the List Events button.
•
To remove a set of events from the current ESP event list, click on the profile in
the Current Event Profile list, and then click on the Remove button.
•
To save the current ESP event list in an event profile, click on a profile name,
and then click on the Save button.
•
To refresh the list of profiles (from the SGM client), click on the Refresh All
Profiles button.
•
To add a set of events from an event profile file to the ESP event list, click on the
profile in the Available Event Profiles list, and then click on the Add button.
Note: If the selected system is an SGM client, you should click on one of the
radio buttons before you click on the Add button. Click on the radio button next
to Subscribe to subscribe the events in the profile to the SGM server when ESP
loads the event profile, or click on the radio button next to Do Not Subscribe to
load the event profile without subscribing the events to the SGM server.
•
142
To reload the system defaults, click on the Reload System Defaults button.
Configuring Events
Using the Command Line Interface
You can use the espconfig command to manage event profiles:
•
Use the following command syntax to list the event profiles that are available on a
system and determine which profiles are currently loaded:
/usr/sbin/espconfig -list eventprofile [eventprofile name]
[-sgmclient <client alias> | -sysid <system Id>]
If you indicate a specific event profile, ESP lists only information about that event
profile.
•
Use the following command syntax to clear the current event list and assigned
actions and to install the event profile that is stored in a file:
/usr/sbin/espconfig -load eventprofile
<profile name>+|allprofiles [-defaults] [-dontsubscribe]
[-sgmclient <client alias> | -sysid <system Id>]
•
Use the following command syntax to compare a file of event profile data with the
events that are currently installed in ESP and to insert any events in the file that are
not already installed:
/usr/sbin/espconfig -add eventprofile
<profile name>+|allprofiles [-defaults] [-dontsubscribe]
[-sgmclient <client alias> | -sysid <system Id>]
•
Use the following command to compare the events that are currently loaded in ESP
with an event profile data file and update the events in ESP that are different in the
event profile data file:
/usr/sbin/espconfig -merge eventprofile
<profile name>+|allprofiles [-defaults] [-dontsubscribe]
[-sgmclient <client alias> | -sysid <system Id>]
Note: If the event is not already in the ESP event list, the event is added to the list
with the parameters defined for the event.
•
Use the following command syntax to remove all events that are in the specified
event profile data file from the ESP event list:
/usr/sbin/espconfig -drop eventprofile
<eventprofile name>+|allprofiles
[-sgmclient <client alias> | -sysid <system Id>]
Note: If the event being dropped is part of another event profile, the event is not
dropped.
143
Chapter 5: Configuring ESP
•
Use the following command syntax to unload an event profile:
/usr/sbin/espconfig -unload eventprofile
<eventprofile name>+|allprofiles
[-sgmclient <client alias> | -sysid <system Id>]
•
Use the following command syntax to save the current ESP event list and assigned
actions in an event profile data file:
/usr/sbin/espconfig -save eventprofile <profile name>+|allprofiles
[-defaults]
•
Use the following command syntax to refresh the ESP event list and assigned
actions from an event profile data file:
/usr/sbin/espconfig -refresh eventprofile <profile
name>+|allprofiles
[-defaults]
•
Use the following command syntax to show event information from an event
profile:
/usr/sbin/espconfig -refresh eventprofile <profile name>+
[-sgmclient <client alias> | -sysid <system Id>]
144
Configuring Events
Viewing Event Classes and Events
You can use the espconfig command to view all events and event classes that are
available on your system.
•
Use the following command syntax to list the event classes that are loaded on your
system.
/usr/sbin/espconfig -list evclass
The output lists the event class ID and event class description. (Refer to Chapter 10,
“Default Event Classes and Types,” for a list of the default event classes.)
•
Use the following command syntax to view the event types that are loaded on your
system:
/usr/sbin/espconfig -list evtype [-cid <class id> | -cd <class
description>] [-enable | -disable] [-log | -nolog] [-sgmclient
<alias>]
Use the -cid option to show events with a specific class ID value. Use the -cd
option to show events with a specific description. If you do not use the -cid or -cd
option, this command lists all event types. (Refer to Chapter 10, “Default Event
Classes and Types,” for a list of default events.)
•
The following command syntax shows all information about an event:
/usr/sbin/espconfig -show evtype {-tid <type id> | -td <type
description>} [-sgmclient <alias>]
Use the -tid option to show events with a specific type. Use the -td option to show
events with a specific description. If the type description is not unique, the
command displays all matching event types.
The following example shows output from this command:
karma# espconfig -show evtype
begin : eventType
class
type
classDescription
typeDescription
throttleValue
actionFrequency
eventEnabled
end
: eventType
-tid 4194470
:
:
:
:
:
:
:
7001
4194470 #(0x4000a6)
"Irix"
"unix / * CONFIG-ISSUE*"
1
0
YES
145
Chapter 5: Configuring ESP
Adding Events
You can add your own events to ESP on your system to have it monitor and register
events that are specific to your system.
Using the Web-based Interface
Perform the following procedure to use the Web-based interface to add an event:
1.
Click on the Configuration button.
2. Click on the Add button.
The interface displays the Add Event window. (Refer to Figure 5-3.)
Figure 5-3
146
Add Event Window (Single System Manager)
Configuring Events
If the system is an SGM server, the interface displays a list of clients. (Refer to
Figure 5-4.) Click on the client that you want to use, and click on the Continue
button.)
Figure 5-4
Add Event Window (System Group Manager)
You should be aware of the following restrictions when you add events from an
SGM server:
•
When you select an SGM server from the System Name list, ESP adds events
only to the SGM server. It does not add events to any of the SGM clients for that
server. You must select an SGM client to add events to it.
•
You cannot use this window to add events to ESP 2.0 clients. To add events to an
ESP 2.0 client from an SGM server, click on Configuration -> Events ->
Subscription.
147
Chapter 5: Configuring ESP
Adding an Event to an Existing Event Class in an Existing Profile
Figure 5-5 shows the Add Event window when you choose the Add new event to an
existing customer class in an existing profile option. Use this option to add
an event to an event class that you already created. (You can only add events to the event
classes that you create; you cannot add events to the default event classes.)
Figure 5-5
148
Add Event Window (Adding Event to Existing Class)
Configuring Events
Perform the following procedure to use this window to add an event to an existing event
class:
1.
Choose the event profile.
2. Choose the event class.
3. Enter a description of the event in the Event Description field. ESP displays this
description on other pages of the interface to identify the event.
Note: The description cannot include the following characters: ‘ <
4. Specify a status for the event:
•
Click on Enabled to add the event to the database and to start monitoring it.
•
Click on Disabled to add the event to the database but not monitor it.
5. Specify the number of times that the event must occur before ESP registers it (and
performs any assigned actions) in the Occurrences prior to registration field.
6. Set the following optional parameters to provide more information about the event:
•
Application name
•
Priority value
•
Facility value
•
Regular expression to match
7. Assign an action to the event. (If Event status is set to Enabled, ESP performs this
action when the event is registered.)
8. Specify the number of seconds that ESP should pause between multiple executions
of an action in the Action frequency time field. (A value of 0 disables the option.)
For example, if you set this parameter to 5 seconds and ESP registers an event every
second, ESP executes the assigned action(s) every 5 seconds.
Figure 5-6 shows the Add Event window with example parameters.
149
Chapter 5: Configuring ESP
Figure 5-6
Add Event Window with Sample Parameters (Adding Event to Existing Class)
9. Click on the Add button.
The interface displays a verification message. (Refer to Figure 5-7.)
150
Configuring Events
Figure 5-7
Verification Message for Adding an Event (Adding Event to Existing Class)
10. Click on the Commit button.
The interface displays information about the event that was added. (Refer to
Figure 5-8.) If you need to update the event, click on the Update button.
Be sure to note the sequence number assigned to the event (located in the event
description next to the event name). You need this number to register the event in
ESP from an external application. (Refer to Chapter 9, “Logging Events from
Applications and Scripts.”)
151
Chapter 5: Configuring ESP
Figure 5-8
152
Confirmation Message for Adding an Event (Adding Event to Existing Class)
Configuring Events
Adding an Event to a New Event Class in an Existing Event Profile
Figure 5-9 shows the Add Event window when you choose the Add new event to a
new class in an existing profile option (refer again to Figure 5-3).
Figure 5-9
Add Event Window (Adding Event to New Class)
153
Chapter 5: Configuring ESP
Perform the following procedure to use this window to add an event to a new event class:
1.
Choose the event profile.
2. Enter the name of the new event class in the New custom class field.
3. Enter a description of the event in the Event description field. ESP displays this
description on other pages of the interface to identify the event.
Note: The description cannot include the following characters: ‘ <
4. Specify a status for the event:
•
Click on Enabled to add the event to the database and to start monitoring it.
•
Click on Disabled to add the event to the database but not monitor it.
5. Specify the number of times that the event must occur before ESP registers it (and
performs any assigned actions) in the Occurrences prior to registration field.
6. Set the following optional parameters to provide more information about the event:
•
Application name
•
Priority value
•
Facility value
•
Regular expression to match
7. Assign an action to the event. (If Event status is set to Enabled, ESP performs this
action when the event is registered.)
8. Specify the number of seconds that ESP should pause between multiple executions
of an action in the Action frequency time field. (A value of 0 disables the option.)
For example, if you set this parameter to 5 seconds and ESP registers an event every
second, ESP executes the assigned action(s) every 5 seconds.
Figure 5-10 shows the Add Event window with example parameters.
154
Configuring Events
Figure 5-10
Add Event Window with Example Parameters (Adding Event to New Class)
9. Click on the Add button.
The interface displays a verification message. (Refer to Figure 5-11.)
155
Chapter 5: Configuring ESP
Figure 5-11
Verification Message for Adding an Event (Adding Event to New Class)
10. Click on the Commit button.
The interface displays information about the event that was added. (Refer to
Figure 5-12.) If you need to update the event, click on the Update button.
Be sure to note the sequence number assigned to the event (located in the event
description next to the event name). You need this number to register the event in
ESP from an external application. (Refer to Chapter 9, “Logging Events from
Applications and Scripts.”)
156
Configuring Events
Figure 5-12
Confirmation Message for Adding an Event (Adding Event to New Class)
157
Chapter 5: Configuring ESP
Adding an Event to a New Event Class in a New Event Profile
Figure 5-13 shows the Add Event window when you choose the Add new event to a
new class in a new profile option (refer again to Figure 5-3).
Figure 5-13
158
Add Event Window (Adding an Event to a New Class in a New Profile)
Configuring Events
Perform the following procedure to use this window to add an event to a new event class:
1.
Enter the name of the new event profile in the New profile name field.
2. Enter the name of the new event class in the New custom class field.
3. Enter a description of the event in the Event description field. ESP displays this
description on other pages of the interface to identify the event.
Note: The description cannot include the following characters: ‘ <
4. Specify a status for the event:
•
Click on Enabled to add the event to the database and to start monitoring it.
•
Click on Disabled to add the event to the database but not monitor it.
5. Specify the number of times that the event must occur before ESP registers it (and
performs any assigned actions) in the Occurrences prior to registration field.
6. Set the following optional parameters to provide more information about the event:
•
Application name
•
Priority value
•
Facility value
•
Regular expression to match
7. Assign an action to the event. (If Event status is set to Enabled, ESP performs this
action when the event is registered.)
8. Specify the number of seconds that ESP should pause between multiple executions
of an action in the Action frequency time field. (A value of 0 disables the option.)
For example, if you set this parameter to 5 seconds and ESP registers an event every
second, ESP executes the assigned action(s) every 5 seconds.
Figure 5-14 shows the Add Event window with example parameters.
159
Chapter 5: Configuring ESP
Figure 5-14
Add Event Window with Example Parameters (Adding an Event to a New Class
in a New Profile)
9. Click on the Add button.
The interface displays a verification message. (Refer to Figure 5-15.)
160
Configuring Events
Figure 5-15
Verification Message for Adding an Event (Adding an Event to a New Class in a
New Profile)
10. Click on the Commit button.
The interface displays information about the event that was added. (Refer to
Figure 5-16.) If you need to update the event, click on the Update button.
Be sure to note the sequence number assigned to the event (located in the event
description next to the event name). You need this number to register the event in
ESP from an external application. (Refer to Chapter 9, “Logging Events from
Applications and Scripts.”)
161
Chapter 5: Configuring ESP
Figure 5-16
162
Confirmation Message for Adding an Event (Adding Event to a New Class in a
New Profile)
Configuring Events
Using the Command Line Interface
Use the following espconfig command syntax to add an event:
/usr/sbin/espconfig -add evtype
-td <type description>
{-cid <class id> | -cd <class description>}
[-throttle <throttle value>]
[-enable | -disable]
[-log | -nolog]
[-acfreq <action frequency value>]
[-acid <action id> | -acd <action description>]
[-pri <priority>] [-fac <facility>]
[-appname <app name>] [-regexp <reg expression>]
[-prfid <profile id> | -prfn <profile name>]
[-sgmclient <client alias> | -sysid <client system id>]
Use the -td option to specify the type description (a string enclosed in quotes that
describes the event). Use the -cid option to specify an existing event class ID, or use the
-cd option to provide an existing or new class description (a string enclosed in quotes
that describes the class). If the class does not exist, ESP creates a new class.
Use the -throttle option to specify the throttling value, which is the number of times
the event must occur before ESP registers it. If you do not specify this option, the default
value of 1 is used.
Use the -enable or -disable option to specify whether the event is enabled or disabled.
You can specify only one of these options at a time. If you do not specify this option, the
event is disabled by default.
Use the -log or -nolog option to specify if ESP should log the event.
Use the -acid option to assign an action to the event by specifying an existing action ID,
or use the -acd option to assign an action to an event by specifying an action description
(a string enclosed in quotes that describes the action). If you do not specify an action, no
action is assigned to the event by default.
Use the -pri, -fac, -appname, and -regexp options to provide more information about
the event (priority, facility, application name, and regular expression).
Use the -prfid or -prfn option to add the event to an event profile.
Use the -sgmclient or -sysid to add the event to an SGM client.
163
Chapter 5: Configuring ESP
Use the following syntax to update add an event class:
/usr/sbin/espconfig -add evclass -cid <class id> -cd <class
description> [-sgmclient <client alias> | -sysid <client system id>]
Use the -cid option to specify the event class by class ID. Use the -cd option to specify
a new class description (a string enclosed in quotes).
Use the -sgmclient or -sysid option to select the SGM client on which you want to
update the event information.
Updating Events
You can also update the parameters for existing events.
Using the Web-based Interface
Perform the following procedure to use the Web-based interface to update an event:
1.
Click on the Configuration button.
2. Click on the Events button.
3. Click on the Update button.
Note: If you are using ESP on a system group manager, the interface displays the
Update Event window with a list of SGM clients. (Refer to Figure 5-17.) Select the
system on which you want to update the event, and click on the Continue button.
164
Configuring Events
Figure 5-17
Update Event Window (with SGM Clients)
The interface displays the Update Event window. (Refer to Figure 5-18.)
Figure 5-18
Update Event Window
165
Chapter 5: Configuring ESP
4. Click on the event class that contains the event that you want to update.
5. Click on the Generate Report button.
The interface displays a list of all events in the event class that you selected. (Refer
to Figure 5-19.)
Figure 5-19
Event List for Updating an Event
6. Click on the description of the event that you want to update.
The interface displays the Update Event window with the information for the
event that you selected. (Refer to Figure 5-20.)
166
Configuring Events
Figure 5-20
Update Event Window (with Event to Update)
You cannot modify the parameters for single events in the availability,
configuration, and diagnostics classes. You must use the Batch Update command
to update these parameters for events in those classes. (The Live event in the
availability class is the exception; you can modify all parameters for this event.)
You cannot update the Event Status parameter for individual events in the
availability, system configuration, or diagnostics event classes. Use the Batch
Update command to update these parameters.
167
Chapter 5: Configuring ESP
7. Update the Event Status parameter:
•
Click on Enabled to add the event to the ESP event list on your system and start
monitoring it.
•
Click on Disabled to add the event to the ESP event list on your system but not
monitor it.
8. Update the Registration with SGI parameter:
•
Click on Enabled to specify that ESP should return information about the event
to SGI when the event occurs.
•
Click on Disabled to specify that ESP should not return information about the
event to SGI when the event occurs.
The Registration with SGI parameter provides individual control over specific
events that ESP returns to SGI. To use this parameter, you must also enable the
global Registration with SGI parameter.
When the Registration with SGI global configuration parameter is enabled in
the Global Configuration window (refer to Figure 4-7 on page 98), the
Registration with SGI parameter for each event takes precedence for the
individual events. When the Registration with SGI global configuration
parameter is disabled, the Registration with SGI parameter for individual
events does not affect ESP operation.
The Registration with SGI parameter is not available for custom events. ESP
never returns information about custom events to SGI.
9. Update the Occurrences prior to registration parameter.
10. Select the actions to assign to the event.
11. Update the Action frequency time parameter for each action.
12. Click on the Update button.
The interface displays a verification message that shows the changes that you
selected. (Refer to Figure 5-21.)
168
Configuring Events
Figure 5-21
Verification Message for Updating an Event
13. Click on the Commit button.
The interface displays a confirmation message that shows the updated event in
bold. (Refer to Figure 5-22.)
169
Chapter 5: Configuring ESP
Figure 5-22
170
Confirmation Message for Updating an Event
Configuring Events
Using the Command Line Interface
You can use the espconfig command to update event information:
•
Use the following command syntax to update an event:
/usr/sbin/espconfig -update evtype -tid <type id>
[-cid <class id> | -cd <class description>]
[-sgmclient <client alias> | -sysid <client system id>]
[-td <type description>]
[-throttle <throttle value>]
[-enable | -disable]
[-log | -nolog]
[-acfreq <action frequency value>]
[-acid <action id> | -acd <action description> |
-noacid <action id> | -noacd <action description>]
[-acid <action id> | -acd <action description>]
[-pri <priority>] [-fac <facility>]
[-appname <app name>] [-regexp <reg expression>]
[-prfid <profile id> | -prfn <profile name> |
-noprfid <profile id> | -noprfn <profile name>]
Use the -cid option to specify an existing event class ID, or use the -cd option to
provide a class description (a string enclosed in quotes that describes the class).
Use the -sgmclient or -sysid option to select the SGM client on which you want
to update the event information.
Use the -tid option to specify the event to update. (You must provide a unique
event type ID.)
Use the -td option to update the event description. (You can only update custom
event descriptions. You must provide a string enclosed in quotes.)
Use the -throttle option to update the throttling value, which specifies the
number of times that the event must occur before ESP registers it.
Use the -enable option to enable registration of the event, or use the -disable
option to disable registration of the event.
Use the -log or -nolog option to specify if ESP should log the event.
Use the -acid and -acd options to assign actions to the event. (This command can
add only one action at a time; if you want to assign more than one action to an
event, you must enter the command multiple times.) Specify an action ID with the
-acid option. Specify a string enclosed in quotes with the -acd option.
171
Chapter 5: Configuring ESP
Use the -noacid and -noacd options to remove an action that is already assigned to
the event. Specify an action ID with the -noacid option. Specify a string enclosed in
quotes with the -noacd option.
Use the -pri, -fac, -appname, and -regexp options to provide more information
about the event (priority, facility, application name, and regular expression).
Use the -prfid or -prfn option to add the event to an event profile.
Use the -noprfid or -noprfn to remove the event from an event profile.
•
Use the following syntax to update a custom class description:
/usr/sbin/espconfig -update evclass -cid <class id> -cd <class
description> [-sgmclient <client alias> | -sysid <client system id>]
Use the -cid option to select the event class by class ID. Use the -cd option to
specify a new class description (a string enclosed in quotes).
Use the -sgmclient or -sysid option to select the SGM client on which you want
to update the event information.
172
Configuring Events
Updating Multiple Events at the Same Time (Batch Updating)
You can update multiple events at the same time by using the “batch update” feature.
The “batch update” feature enables you to select more than one event at a time and apply
parameter changes to all of the selected events.
Using the Web-based Interface
Perform the following procedure to use the Web-based interface to update multiple
events at the same time:
1.
Click on the Configuration button.
2. Click on the Events button.
3. Click on the Batch Update button.
4. If you are using ESP on a system group manager, the interface displays the Update
Event window with a list of SGM clients. (Refer to Figure 5-23.) Select the system on
which you want to update events, and click on the Continue button.
Figure 5-23
Batch Events Update Window (with SGM Clients)
The interface displays the Event Batch Update window. (Refer to Figure 5-24.)
173
Chapter 5: Configuring ESP
Figure 5-24
174
Event Batch Update Window
Configuring Events
5. Click on the radio button next to the batch operation you want to perform.
(Table 5-1 describes the batch operations and the procedure to use each operation.)
Table 5-1
Batch Update Options
Option
Description
Update events parameters.
Search by class
Updates the event parameters for an entire class of
events
Perform the following procedure:
1. Click on the Continue button
2. Choose the class of events that you want to update
3. Click on the Update button
4. Update the Event Status and Registration
with SGI values
5. Click on the Update button
6. Click on the Commit button
Update action frequency.
Search by action
Updates the action frequency for multiple events
Perform the following procedure:
1. Click on the Continue button
2. Click on the action that you want to update
3. Click on the Continue button
4. Uncheck the checkmark for any event classes that you
do not want to update, or click on a class description to
update actions assigned to individual events in the class
5. Update the Action Frequency values
6. Click on the Update button
Update action frequency.
Search by class
Updates the action frequency for multiple events
Perform the following procedure:
1. Click on the Continue button
2. Choose the class of events that you want to update
3. Click on the Continue button
4. Update the Action Frequency values
5. Click on the Update button
175
Chapter 5: Configuring ESP
Table 5-1
Batch Update Options (continued)
Option
Description
Assign action(s) to events.
Search events by class
Assigns an action to an entire class of events
Perform the following procedure:
1. Click on the Continue button
2. Choose one or more classes of events
3. Choose one or more actions
4. Click on the Assign Action button
5. If you selected only one event class, select the check
box for any events for which you do not want to assign
the action
6. Click on the Commit button
Assign action(s) to events.
Search by event keyword
Assigns an action to events that match a specific
keyword
Perform the following procedure:
1. Enter the keyword in the box
2. Click on the Continue button
3. Select the events to which you want to assign the
action
4. Click on the Assign Action button
5. Select one or more actions
6. Click on the Assign Action button
7. Deselect the check box for any events for which you
do not want to assign the action
8. Click on the Commit button
Replace events action. Search
events by action
Replaces the assigned action for an event
Perform the following procedure:
1. Click on the Continue button
2. Select the actions to replace
3. Select the new action
4. Click on the Replace Action button
5. Deselect the check box for any events for which you
do not want to replace the action
6. Click on the Commit button
176
Configuring Events
Table 5-1
Batch Update Options (continued)
Option
Description
Replace events action. Search
by action keyword
Replaces the assigned action for an event
Perform the following procedure:
1. Enter the keyword in the box
2. Click on the Continue button
3. Select the actions to replace
4. Select the new action
5. Click on the Replace Action button
Remove action from events.
Search action
Removes an assigned action from an event
Perform the following procedure:
1. Click on the Continue button
2. Select the action to remove
3. Click on the Remove Action button
4. Deselect the check box for any events for which you
do not want to delete the action
5. Click on the Commit button.
Remove action from events.
Search by action keyword
Removes an assigned action from an event (finds
event-action combination by searching for an action)
Perform the following procedure:
1. Enter the keyword in the box
2. Click on the Continue button
3. Select the action to remove
4. Click on the Remove Action button
5. Deselect the check mark for any events for which you
do not want to delete the action
6. Click on the Commit button
Using the Command Line Interface
Batch updating is not available from the command line interface.
177
Chapter 5: Configuring ESP
Deleting Events
You can delete custom events that you added to ESP on your system.
Warning: Deleting an event removes all records that are associated with the event
from the database. After you delete an event, you will not be able to retrieve
information about any occurrences of the event on your system.
Using the Web-based Interface
Perform the following procedure to use the Web-based interface to delete an event:
1.
Click on the Configuration button.
2. Click on the Events button.
3. Click on the Delete button.
Note: If the system is an SGM server, the interface displays a list of clients. (Refer to
Figure 5-25.) Click on the client that you want to use, and click on the Continue
button.)
The interface displays the Delete User Events window. (Refer to Figure 5-26.)
Figure 5-25
178
Delete User Events Window (with SGM Clients)
Configuring Events
Figure 5-26
Delete User Events Window (Web-based Interface)
4. Click on the description of the event that you want to delete, or click the name of
event class to delete an entire class of events.
The interface displays a verification message. (Refer to Figure 5-27.)
Figure 5-27
Verification Message for Deleting an Event
5. Click on the Commit button.
The interface displays a confirmation message. (Refer to Figure 5-28.)
179
Chapter 5: Configuring ESP
Figure 5-28
Confirmation Message for Deleting an Event
Using the Command Line Interface
You can use the espconfig command to delete events and event classes:
•
Use the following command syntax to delete an existing custom event:
/usr/sbin/espconfig -delete evtype {-tid <type id> | -td <type
description>} [-sgmclient <client alias> | -sysid <client system
id>]
Use the -tid option to specify an event ID, or use the -td option to specify an event
description (a string enclosed in quotes).
Use the -sgmclient or -sysid option to specify an SGM client.
Note: If the event description is not unique, the command displays a table of
matching events and event IDs. When this occurs, use an event ID from the table
with the -td option to delete an event.
If the event to delete is the last event in a custom class, this command also deletes
the event class.
180
Configuring Events
•
Use the following command syntax to delete an entire custom event class:
/usr/sbin/espconfig -delete evclass {-cid <class id>|-cd <class
description>} [-sgmclient <client alias> | -sysid <client system
id>]
Use the -cid option to specify an event class ID, or use the -cd option to specify an
event class description (a string enclosed in quotes).
Use the -sgmclient or -sysid option to select the SGM client on which you want
to update the event information.
•
Use the following command syntax to delete all event-related data structures (types,
classes, actions, and so on) in the system support database:
/usr/bin/espconfig -delete events [-sysid <system id> | -host <host
name>]
Use the -sysid option to select a system by system ID. Use the -host option to
select a system by hostname. If you do not specify the -sysid or -host option, this
command deletes data from the database tables on the local system.
181
Chapter 5: Configuring ESP
Subscribing Events from SGM Clients
You can select which events to subscribe from the SGM clients.
Tip: ESP 3.0 includes an automatic subscription option. If you enable the Automatic
events subscription option when you add a client, ESP automatically subscribes
events from the client. Then, you do not need to manually subscribe events via the
Subscription button
Using the Web-based Interface
Perform the following procedure to use the Web-based interface to subscribe to events:
1.
Click on the Configuration button.
2. Click on the Events button.
3. Click on the Subscription button.
Note: If the system is an SGM server, the interface displays a list of clients. (Refer to
Figure 5-29.) Click on the client that you want to use, and click on the Continue
button.
The interface displays the Events Subscription by Class window. (Refer to
Figure 5-30.)
182
Configuring Events
Figure 5-29
Batch Event Subscription Window
183
Chapter 5: Configuring ESP
Figure 5-30
184
Events by Subscription Class Window
Configuring Events
This window displays all event classes available on the selected client.
•
Set the check mark to select an entire class for subscription or unsubscription.
•
Click on a class description to access the individual events in a class. The interface
displays the current status of all events in the class.
•
Click on the Subscribe button to subscribe all events in a class. (ESP subscribes all
events in the class that have event registration enabled on the SGM client.)
•
Click on the Unsubscribe button to unsubscribe all events in a class. (ESP
unsubscribes all events in the class.)
•
If no event classes are listed for an ESP 2.0 client, click on the Refresh button. ESP
retrieves the event list from the ESP 2.0 client, stores the list on the SGM server, and
displays the list of available event classes. You can use the Refresh button to verify
subscribed events.
Note: The Refresh button does not appear for ESP 3.0 clients. Use the Refresh All
Profiles button in the Event Profiles window (accessible via Configuration ->
Events -> Load) to refresh event information from an ESP 3.0 client.
185
Chapter 5: Configuring ESP
Using the Command Line Interface
You can use the espconfig command to subscribe and unsubscribe events:
•
Use the following command syntax to subscribe events:
/usr/sbin/espconfig -subscribe evtype
[-cid <class id>|-cd <class desc>]
[-tid <type id>|-td <type desc>]
[-pri <priority>] [-fac <facility>]
[-appname <application name>]
[-sgmclient <client alias>|-sysid <client system id >]
•
Use the following command syntax to unsubscribe events:
/usr/sbin/espconfig -unsubscribe evtype
[-cid <class id>|-cd <class desc>]
[-tid <type id>|-td <type desc>]
[-pri <priority>] [-fac <facility>]
[-appname <application name>]
[-sgmclient <client alias>|-sysid <client system id >]
186
Configuring Actions
Configuring Actions
Actions are commands that ESP performs in response to events if you set up
event/action assignments. An event/action assignment specifies the action that ESP
should perform for a specific event when it registers a specific number of events.
Example actions include sending an e-mail message and sending a page.
Use ESP to perform the following activities to manage actions on your system:
•
View existing actions
•
Add actions
•
Update existing actions
•
Disable actions
Viewing the Existing Actions
You can use the espconfig command to view the existing actions.
•
Use the following command syntax to list event actions. It lists the action IDs and
action descriptions from the event action fields.
/usr/sbin/espconfig -list evaction
•
Use the following command syntax to view all parameters for an action:
/usr/sbin/espconfig -show evaction {-acid <action id> | -acd <action
description>}
This command shows the fields in the following format:
begin : eventAction
actionId
throttle
action
retryCount
timeout
user
actionDescription
disabled
end
: eventAction
:
:
:
:
:
:
:
:
4
1
"/usr/bin/espnotify -A \"%D\""
0
10
"root"
"Notify sysadmin on console"
"NO"
Use the -acid option to specify an action ID, or use the -acd option to specify an
action description (a string enclosed in quotes).
187
Chapter 5: Configuring ESP
Adding Actions
You can customize ESP by adding new actions.
Using the Web-based Interface
Perform the following procedure to use the Web-based interface to add actions:
1.
Click on the Configuration button.
2. Click on the Actions button.
The interface displays the Add an Action window. (Refer to Figure 5-31.)
Figure 5-31
Add an Action Window
3. Specify how you want to create the action string:
•
To have ESP build a notification action string from menu options that you select,
click on the radio button next to Notification action. (Use this option if you
do not know the appropriate syntax of the espnotify command for the
notification that you want to create.)
•
To manually enter the action string, click on the radio button next to Other
action. (Use this option if you know the syntax of the espnotify command for
the notification that you want to create or if you want to create an action that is
not a notification.)
4. Click on the Continue button.
188
Configuring Actions
The interface updates the Add An Action window. The following subsections
describe how to use this window.
Using the Notification Action Option
Figure 5-32 shows the Add an Action window when you choose the Notification
Action option.
Figure 5-32
Add an Action Window (Using Notification Action Option)
189
Chapter 5: Configuring ESP
Perform the following procedure to use this window to create an action:
1.
Enter a description for the action. ESP displays this description on other pages of
the interface.
2. Select the type of notification that you want to create (e-mail notification, system
console notification, or GUI pop-up notification).
3. Select the priority of the notification.
4. Enter the user account that will execute the command. (The default is the nobody
account.)
5. Enter the amount of time that ESP should wait for the action to execute (timeout
value). If the action does complete within this period of time, ESP kills the action.
6. Click on the Continue button.
190
•
If you selected e-mail notification, ESP displays the window shown in
Figure 5-33.
•
If you selected notify on console, ESP displays the window shown in
Figure 5-34.
•
If you selected GUI pop-up notification, ESP displays the window shown in
Figure 5-35.
Configuring Actions
Figure 5-33
Add an Action Window (Using Notification Action and E-mail Options)
191
Chapter 5: Configuring ESP
Figure 5-34
192
Add an Action Window (Using Notification Action and System Console Options)
Configuring Actions
Figure 5-35
Add an Action Window (Using Notification Action and GUI Pop-up Options)
7. Set the parameters for the action.
Table 5-2 describes the parameters that are available for each type of notification.
193
Chapter 5: Configuring ESP
Table 5-2
Notification Action Parameters
Notification Type
Parameter
Description
E-mail notification
E-mail address(es)
Specifies the e-mail address(es) that receive an e-mail notification
Tip: Separate multiple e-mail addresses with a space, a comma,
or a semicolon.
Subject
Specifies the subject of the e-mail notification
Tip: The message cannot include quotation marks (single or
double).
Notification message
Specifies a message to add to the end of the notification
Tip: The message cannot include quotation marks (single or
double).
Console Notification
Notification format
Specifies event information to include in the notification
Notification message
Specifies a message to add to the end of the notification
Tip: The message cannot include quotation marks (single or
double).
GUI pop-up notification
Notification format
Specifies event information to include in the notification
Display setting
Specifies the X Window System display to use
Notification message
Specifies a message to add to the end of the notification
Tip: The message cannot include quotation marks (single or
double).
Notification format
Specifies event information to include in the notification
8. Click on the Continue button.
The interface displays a verification message. (Refer to Figure 5-36.)
194
Configuring Actions
Figure 5-36
Verification Message for Adding an Action (Using Notification Action Option)
9. Click on the Commit button.
The interface displays a confirmation message. (Refer to Figure 5-37.) If you need to
update the action parameters, click on the Update button.
Figure 5-37
Confirmation Message for Adding an Action (Using Notification Action Option)
195
Chapter 5: Configuring ESP
Using the Other Action Option
Figure 5-38 shows the Add An Action window when you choose the Other Action
option.
Figure 5-38
Add an Action Window (Using Other Action Option)
Perform the following procedure to use this window to create an action:
1.
Enter a description for the action. ESP displays this description on other pages of
the interface.
2. Enter a command to execute as a action. (For example, you could use the espnotify
command to send an e-mail. Refer to Chapter 8, “Sending Notifications,” for more
information about using the espnotify command to send notifications.)
Note: If you want to create a standard notification, it is easiest to use the
Notification Action option in the Add An Action window. (Refer to Figure 5-31.)
196
Configuring Actions
Tip: When you use the espnotify command, you can include several variables in
the <message> parameter. (Table 5-3 describes the variables.)
Table 5-3
espnotify Parameters
Variable
Description
%C
Event class
%T
Event type
%D
Event data
%H
Host where the event originated
%S
Time when the event occurred (in seconds since 00:00:00 UTC on January 1,
1970)
%F
Host that forwarded the event
%I
System ID
%t
Current time string
%s
Current time (in seconds since 00:00:00 UTC on January 1, 1970)
%m
Current minute of the hour
%M
Current month of the year
%h
Current hour of the day
%y
Current year
%d
Current day of the month
3. Enter the user account that will execute the command. (The default is the nobody
account.)
4. Enter the amount of time that ESP should wait for the action to execute (timeout
value). If the action does complete within this period of time, ESP kills the action.
Figure 5-39 shows the Add an Action window with example parameters.
197
Chapter 5: Configuring ESP
Figure 5-39
Example Parameters (Add an Action Window Using Other Action Option)
5. Click on the Add button.
The interface displays a verification page. (Refer to Figure 5-40.)
Figure 5-40
Verification Message for Adding an Action (Using Other Action Option)
6. Click on the Commit button.
198
Configuring Actions
The interface displays a confirmation message. (Refer to Figure 5-41.) If you need to
update the action parameters, click on the Update button.
Figure 5-41
Confirmation Message for Adding an Action (Using Other Action Option)
199
Chapter 5: Configuring ESP
Using the Command Line Interface
Use the following espconfig command syntax to add an action:
/usr/sbin/espconfig -add evaction -acd <action description>
-act <action string>
[-user <name>]
[-retry <count>]
[-tout <timeout value>]
[-throttle <throttle value>]
[-enable | -disable]
Use the -acd option to specify a description of the action (a string enclosed in quotes).
Use the -act option to specify the command (a string enclosed in quotes) that the action
performs.
Use the -user option to specify the UNIX user that executes the action. If you do not
specify a user, ESP uses the default user nobody.
Use the -retry option to specify the number of times that ESP should perform the action
before stopping. If you do not specify a value, ESP uses the default value 0.
Use the -tout option to specify the amount of time (in seconds) that ESP should wait for
the action to execute. If the action does not complete before the timeout period expires,
ESP kills the action command. If you do not specify a value, ESP uses the default value 0.
Use the -throttle option to specify the throttling value for the action, which specifies
the number of times an event must occur before ESP performs the action. If you do not
specify a value, ESP uses the default value 1.
Use the -enable option to enable the action, or use the -disable option to disable the
action.
200
Configuring Actions
Updating Actions
You can update actions to customize them for your site.
Using the Web-based Interface
Perform the following procedure to use the Web-based interface to update an action:
1.
Click on the Configuration button.
2. Click on the Actions button.
3. Click on the Update button.
The interface displays the Update Current Actions window. (Refer to
Figure 5-42.)
Figure 5-42
Update Current Actions Window
201
Chapter 5: Configuring ESP
Tip: The Save Action Profile button in the Update Current Actions window
saves all current actions in an action profile
(/var/esp/init/eventprofiles/Actions.esp). You can copy this file to another
system and load the profile (using the same method as loading event profiles) to
have the same actions on that system. ESP does not automatically save actions in an
action profile. You must click on the Save Action Profile button to save the
current actions in an action profile.
4. Click on the description of the action that you want to update.
The interface displays the Update Action window. (Refer to Figure 5-43.)
Figure 5-43
202
Update Action Window
Configuring Actions
5. Update the parameters.
6. Click on the Update button.
The interface displays a verification window. (Refer to Figure 5-44.)
Figure 5-44
Verification Message for Updating an Action
7. Click on the Commit button.
The interface displays a confirmation message. (Refer to Figure 5-45.) If you need to
update the parameters again, click on the description of the action.
203
Chapter 5: Configuring ESP
Figure 5-45
204
Confirmation Message for Updating an Action
Configuring Actions
Using the Command Line Interface
Use the following espconfig command syntax to update an action:
/usr/sbin/espconfig -update evaction
{-acid <action id> [-acd <new action description>] |
-acd <action description>}
[-act <action string>]
[-user <name>]
[-retry <count>]
[-tout <timeout value>]
[-throttle <throttle value>]
[-enable | -disable]
Use the -acid option to select an action by action ID. If you use the -acd option with the
-acid option, this command updates the action description.
Use the -acd option to select an action by description (a string enclosed in quotes).
Note: If you do not specify any of the following options, ESP does not update the related
action parameters.
Use the -act option to update the command (a string enclosed in quotes) that the action
performs.
Use the -user option to update the UNIX user that executes the action.
Use the -retry option to update the number of times that ESP should perform the action
before stopping.
Use the -tout option to update the amount of time (in seconds) that ESP should wait for
the action to execute. If the action does not complete execution before the timeout period
expires, ESP kills the action command.
Use the -throttle option to update the throttling value for the action, which specifies
the number of times an event must occur before ESP performs the action.
Use the -enable option to enable the action, or use the -disable option to disable the
action.
205
Chapter 5: Configuring ESP
Disabling and Enabling Actions
You can disable actions that you no longer need to use. When you disable an action, ESP
does not execute it when the events to which it is assigned are registered. Disabling an
action allows you to prevent a specific action from occurring without modifying the
individual event-action assignments. (You can also re-enable any actions that you
disable.)
Note: ESP does not allow you to delete actions because deleting an action removes the
historical data for the action from the ESP database.
Using the Web-based Interface
Perform the following procedure to use the Web-based interface to disable an action:
1.
Click on the Configuration button.
2. Click on the Actions button.
3. Click on the Enable/Disable button.
The interface displays the View Current Actions window. (Refer to Figure 5-46.)
206
Configuring Actions
Figure 5-46
View Current Actions Window
4. Deselect the Enabled check mark.
5. Click on the Commit button.
Tip: To re-enable the action, perform the same procedure with the following difference:
Set the Enabled check mark.
Using the Command Line Interface
Actions cannot be disabled from the command line interface.
207
Chapter 5: Configuring ESP
Configuring Performance Monitoring
ESP monitors the performance of a system by evaluating a set of performance rules at
specified time intervals. Performance monitoring is disabled by default.
Using the Web-based Interface
Perform the following procedure to use the Web-based interface to configure
performance monitoring for the local system and/or any ESP 3.0 SGM clients.
Notes:
•
SGM clients must be directly connected to the SGM server to use this procedure; the
clients cannot connect through any intermediate systems. To configure performance
monitoring on an ESP 3.0 SGM client that is connected through an intermediate
server, you must log into the client and configure the performance monitoring
parameters directly on the client.
•
ESP 2.0 SGM clients are not supported by this procedure. To configure performance
monitoring on an ESP 2.0 SGM client, you must log into the client and configure the
performance monitoring parameters directly on the client.
1.
Click on the Configuration button.
2. Click on the Performance Monitoring button.
Note: If the system is an SGM server, the interface displays a list of clients. (Refer to
Figure 5-47.) Click on the client that you want to use, and click on the Continue
button.
The interface displays the Performance Monitoring window.
208
Configuring Performance Monitoring
Figure 5-47
Performance Monitoring Window (with SGM Clients)
209
Chapter 5: Configuring ESP
Figure 5-48
210
Performance Monitoring Window
Configuring Performance Monitoring
3. Click on the Enabled radio button to enable performance monitoring or click on the
Disabled radio button to disable performance monitoring.
Note: This setting is also available in the System Monitoring window. If you change
the PMIE setting in the Performance Monitoring window, the setting also changes
in the System Monitoring window.
4. Set the Enabled check marks for the PMIE rules that you want to enable.
5. Click on the Update button.
Table 5-4 describes the PMIE rules that are available and the performance issues that they
detect. Refer to the Performance Co-Pilot for IA-64 Linux User’s and Administrator’s Guide,
publication number 007-4580-00x, or the Performance Co-Pilot for IRIX User’s and
Administrator’s Guide, publication number 007-3965-00x, for more information about PMIE
rules.
Table 5-4
PMIE Rules
Rule
Description
Performance Issue
cpu.context_switch
High aggregate context switch
rate
The average number of context switches per CPU per
second exceeded a threshold value.
cpu.excess_fpe
Possible high floating-point
exception rate
Processes generating large numbers of floating-point
exceptions (FPEs) were detected.
Typically, this occurs when heavy system time is
coupled with low system call rates. (Exceptions are
delivered through the kernel to the process, taking
some system time, but no system calls are serviced
for the application.)
cpu.load_average
High 1-minute load average
The current 1-minute load average exceeded a
threshold value.
The load average measures the number of processes
that are running, executable, or soon to be executed
(for example, processes in short term sleep).
211
Chapter 5: Configuring ESP
Table 5-4
PMIE Rules (continued)
Rule
Description
Performance Issue
cpu.low_util
Low average processor utilization The average processor utilization across all CPUs
was below a threshold percentage.
This rule is effectively the opposite of cpu.util and is
disabled by default; it is useful only in specialized
environments where, for example, processing is
batch-oriented and low processor utilization is
indicative of poor use of system resources.
In such a situation, you should enable the
cpu.low_util rule and disable the cpu.util rule.
cpu.syscall
High aggregate system call rate
The average number of system calls per CPU per
second exceeded a threshold value.
cpu.system
Busy executing in system mode
The average utilization per CPU exceeded a
threshold value, and the ratio of system time to busy
time exceeded a threshold value.
cpu.util
High average processor
utilization
The average processor utilization across all CPUs
exceeded a threshold value.
espping.response
System Group Manager slow
service response
The amount of time required for a monitored service
to complete exceeded a threshold value.
espping.status
System Group Manager service
probe failure
A service that was being monitored by a group
manager system failed or did not respond within a
timeout period.
filesys.filling
File system is filling up
The amount of data in the filesystem exceeded a
threshold value, and the remaining space in the
filesystem is filling at a rate that exceeded a threshold
value.
memory.exhausted
Severe demand for real memory
The rate at which the system is swapping modified
pages out of main memory to the swap partitions
exceeded a threshold value.
memory.swap_low
Low free swap space
The amount of swap space remaining reached a
threshold value.
Reduce the number and size of the running
programs, or add more swap(1) space before it
completely runs out.
212
Configuring Performance Monitoring
Table 5-4
PMIE Rules (continued)
Rule
Description
Performance Issue
per_cpu.many_util
High number of saturated
processors
The processor utilization for a minimum number of
CPUs exceeded a threshold value.
This rule applies only to multiprocessor systems that
have more than min_cpu_count processors. For
single-processor systems, refer to the cpu.util rule.
For multiprocessor systems with less than
min_cpu_count processors, refer to the
per_cpu.some_util rule.
per_cpu.some_util
High per CPU processor
utilization
The processor utilization for at least one CPU
exceeded a threshold value.
This rule applies only to multiprocessor systems
with less than max_cpu_count processors. For
single-processor systems, refer to the cpu.util rule.
For multiprocessor systems with more than
max_cpu_count processors, refer to the
cpu.many_util rule.
per_cpu.syscall
High per CPU system call rate
The number of system calls per second for at least
one CPU exceeded a threshold value.
This rule applies only to multiprocessor systems. For
single-processor systems, refer to the cpu.syscall
rule.
per_cpu.system
Some CPU busy executing in
system mode
At least one CPU was busy, and the ratio of system
time to busy time exceeded a threshold value.
This rule applies only to multiprocessor systems. For
single-processor systems refer to the cpu.system
rule.
per_netif.collisions
High collision rate in packet sends The number of packets that are being sent across an
interface and causing collisions exceeded a threshold
value.
Ethernet interfaces expect a certain number of packet
collisions, but a high ratio of collisions to packet
sends indicates a saturated network.
per_netif.errors
High network interface error rate
For at least one network interface, the error rate
exceeded a threshold value.
213
Chapter 5: Configuring ESP
Table 5-4
PMIE Rules (continued)
Rule
Description
Performance Issue
per_netif.packets
High network interface packet
transfers
For at least one network interface, the average rate of
packet transfers (in and/or out) exceeded a
threshold value.
This rule is disabled by default; the per_netif.util rule
is more useful because it considers the reported
bandwidth of each network interface. However, in
some situations this value is zero; in that case, an
absolute threshold-based rule like this one is more
useful (for this reason it should be applied to some
network interfaces, but not others; use the interfaces
variable to filter this).
shping.response
Shell-ping PMDA slow
application or service response
A response came from a shell-ping PMDA
application or service probe
shping.status
Shell-ping PMDA application or
service probe failure
A failure occurred in a shell-ping PMDA application
or service probe
214
Configuring Performance Monitoring
Using the Command Line Interface
You can use the espconfig command to configure performance monitoring.
•
Use the following command syntax to enable performance monitoring:
/usr/sbin/espconfig -on performance
•
Use the following command syntax to disable performance monitoring:
/usr/sbin/espconfig -off performance
•
Use the following command syntax to list the current performance monitoring
settings and PMIE rule settings:
/usr/sbin/espconfig -list performance [-status|-enable|-disable]
Use the -status option to list the current status (on or off) of performance
monitoring on a system.
Use the -enable option to list all PMIE that are currently enabled.
Use the -disable option to list all PMIE that are currently disabled.
•
Use the following command syntax to enable PMIE rules:
/usr/sbin/espconfig -enable performance -pd {all|<pmie rule
description>}
Use the all option to enable all PMIE rules.
Use the <pmie rule description> parameter to enable specific PMIE rules.
•
Use the following command syntax to disable PMIE rules:
/usr/sbin/espconfig -disable performance -pd {all|<pmie rule
description}>
Use the all option to disable all PMIE rules.
Use the <pmie rule description> parameter to disable specific PMIE rules.
215
Chapter 5: Configuring ESP
Configuring System Monitoring
You can configure ESP to monitor ICMP, DNS, X Window System server, RPCBIND,
SMTP, NNTP, and PMCD services on the local system or on other systems in a group.
ESP uses Performance Co-Pilot software tools to monitor the services and to register any
events in the Embedded Support Partner database. (The events belong to the
Performance class; possible events include System Group Manager service probe
failure and System Group Manager slow service response.)
System monitoring is disabled by default.
Using the Web-based Interface (Single System Manager Mode)
Perform the following procedure to use the Web-based interface to configure system
monitoring in single system manager mode:
1.
Click on the Configuration button.
2. Click on the System Monitoring button.
The interface displays the System Monitoring window. (Refer to Figure 5-49.)
216
Configuring System Monitoring
Figure 5-49
System Monitoring Window (Single System Manager Mode)
3. Click on the Enabled radio button to enable performance monitoring or click on the
Disabled radio button to disable performance monitoring.
Note: This setting is also available in the Performance Monitoring window. If you
change the PMIE setting in the System Monitoring window, the setting also changes
in the Performance Monitoring window.
4. Click on the Enabled checkbox for each service that you want to monitor.
5. Click on the Update button.
The interface displays a verification screen. (Refer to Figure 5-50.)
217
Chapter 5: Configuring ESP
Figure 5-50
System Monitoring Change Verification Screen (Single System Manager Mode)
6. Click on the Commit button.
218
Configuring System Monitoring
Figure 5-51
Updated System Monitoring Window (Single System Manager Mode)
219
Chapter 5: Configuring ESP
Using the Web-based Interface (System Group Manager Mode)
Perform the following procedure to use the Web-based interface to configure system
monitoring in system group manager mode:
1.
Click on the Configuration button.
2. Click on the System Monitoring button.
The interface displays the System Monitoring window. (Refer to Figure 5-52.)
Figure 5-52
System Monitoring Window (System Group Manager Mode)
Note: To change the performance monitoring status, click on the Enabled radio
button to enable performance monitoring or click on the Disabled radio button to
disable performance monitoring, and click on the Commit button. (To perform system
monitoring, performance monitoring must be enabled.)
3. Click on the name of the service that you want to monitor.
The interface displays the Update System Monitoring window. (Refer to
Figure 5-53.)
220
Configuring System Monitoring
Figure 5-53
Update System Monitoring Window (System Group Manager Mode)
4. Click on the systems(s) that you want to monitor.
5. Click on the Update button.
The interface displays a verification screen. (Refer to Figure 5-54.)
Figure 5-54
System Monitoring Change Verification Screen (System Group Manager Mode)
221
Chapter 5: Configuring ESP
6. Click on the Commit button.
The interface displays an updated System Monitoring window. (Refer to
Figure 5-55.)
Figure 5-55
Updated System Monitoring Window (System Group Manager Mode)
Using the Command Line Interface
You can use the espconfig command to configure system monitoring.
•
Use the following command syntax to list descriptions of services that are available
for monitoring:
/usr/sbin/espconfig monitor -list [<service list>]
Use the <service list> parameter to specify which services to show. If you do not
use the <service list> parameter, this command lists all services that are
available on the system.
222
Configuring System Monitoring
•
Use the following the command syntax to show the hosts that are being monitored
for selected services:
/usr/sbin/espconfig monitor -show [<service list>] [-sgmclient <host
list>]
Use the <service list> parameter to specify which services to show. If you do not
use the <service list> parameter, this command lists all services that are
available on the system.
Use the -sgmclient option to display services on one or more SGM clients. Use the
<host list> parameter to specify the SGM clients to view.
•
Use the following command syntax to enable monitoring of specific services:
/usr/sbin/espconfig monitor -enable [<service list>] [-sgmclient
[all|<host list>]]
Use the <service list> parameter to specify which services to show. If you do not
use the <service list> parameter, this command lists all services that are
available on the system.
Use the -sgmclient option to display services on one or more SGM clients. Use the
all parameter to list services on all SGM clients. Use the <host list> parameter to
list services on specific SGM clients.
•
Use the following command syntax to disable monitoring of specific services:
/usr/sbin/espconfig monitor -disable [<service list>] [-sgmclient
[all|<host list>]]
Use the <service list> parameter to specify which services to stop monitoring. If
you do not use the <service list> parameter, this command disables all services
that are currently monitored on the system.
Use the -sgmclient option to display services on one or more SGM clients. Use the
all parameter to list services on all SGM clients. Use the <host list> parameter to
list services on specific SGM clients.
223
Chapter 6
6. Viewing Reports
This chapter describes how to generate and view the following reports:
•
Events registered reports
•
Actions taken reports
•
Availability reports
•
Diagnostic reports
•
Hardware reports
•
Software reports
•
System reports
•
Site reports
About Reports
ESP generates reports based on parameters that you specify through the Web-based
interface or command line interface.
In single system manager mode, ESP generates reports from the data that is stored in the
ESP database on the local system. In system group manager mode, ESP generates reports
from the information that is stored in the ESP database on the group manager system.
Figure 6-1 shows an example report generated by the Web-based interface. Figure 6-2
shows an example report generated by the Web-based interface in printable format.
225
Chapter 6: Viewing Reports
Figure 6-1
226
Example Report (Web-based Interface)
About Reports
Figure 6-2
Example Report (Web-based Interface Printable Format)
If you use the Web-based interface to generate and view reports, there are several
controls that you can use to navigate the reports. (Refer to Table 6-1.)
Table 6-1
Control
Report Navigation Controls
Function
Select the number of report entries (records) to show on a page
Select the software application to view in a software inventory
report
Activate the selected menu options.
Display the report in the printable format that shows an ASCII
table with all report entries
Expand all rows in the table to show subcomponents of each row
227
Chapter 6: Viewing Reports
Table 6-1
Control
Report Navigation Controls (continued)
Function
Contract all rows in the table to show only the top-level
components
Contract the current row
Expand the current row to show all subcomponents of the
component shown in the row
Go to the last page of report
Go to the next page of the report
Go to the previous page of the report
Go to the first page of the report
Sort by this column ascending.
Sort by this column descending.
228
Events Registered Reports
Figure 6-3 shows an example report generated by the command line interface.
Figure 6-3
Example Report (Command Line Interface)
Events Registered Reports
Event registered reports show all events that ESP has registered within a specific time
period.
Using the Web-based Interface (Single System Manager Mode)
Perform the following procedure to use the Web-based interface to generate an events
registered report in single system manager mode:
1.
Click on the Reports button.
2. Click on the Events button.
The interface displays the Event Reports window. (Refer to Figure 6-4.)
229
Chapter 6: Viewing Reports
Figure 6-4
Event Reports Window (Single System Manager Mode)
3. Specify the range of dates for the report.
4. Select the event classes that the report should include.
5. Click on the Generate Report button.
230
Events Registered Reports
Figure 6-5 shows an example event report.
Figure 6-5
Example Events Registered Report (Single System Manager Mode)
231
Chapter 6: Viewing Reports
Table 6-2 describes the information that the report contains.
Table 6-2
Events Registered Report Contents (Single System Manager Mode)
Column Heading
Description
No.
Index number within the table
Classa
The class that contains the event
Tip: Click on an event class to view a report of all occurrences
of events in that class.
Event Description
Brief description of the event
Tip: Click on an event description to view a report of all
occurrences of that event.
First Occurrence
Date and time at which the event was first registered
Tip: Click on the occurrence date to view the logbook entry for
that date.
Last Occurrence
Date and time at which the event was last registered
Tip: Click on the occurrence date to view the logbook entry for
that date.
Event Count
Number of times that the event occurred
Syslog message
Message from SYSLOG that generated the event
a. This column appears only if a report shows events from more than one class.
232
Events Registered Reports
To “drill down” a report that contains events from multiple classes to find specific
information about an event, perform the following procedure:
1.
Click on the Class name.
The interface displays information about events from the class that were registered.
(Refer to Figure 6-6.)
Figure 6-6
Events Registered in a Specific Class (Single System Manager Mode)
233
Chapter 6: Viewing Reports
2. Click on the Event Description for the event.
The interface displays all occurrences of the event. (Refer to Figure 6-7.)
Figure 6-7
234
All Occurrences of a Specific Event (Single System Manager Mode)
Events Registered Reports
Using the Web-based Interface (System Group Manager Mode)
Perform the following procedure to use the Web-based interface to generate an events
registered report in system group manager mode:
1.
Click on the Reports button.
2. Click on the Events button.
The interface displays the Event Reports For System Group window. (Refer to
Figure 6-8.)
Figure 6-8
Event Reports for System Group Window (System Group Manager Mode)
3. Specify the range of dates for the report.
4. Select the systems to include in the report.
5. Click on the Continue button.
The interface displays the list of classes. (Refer to Figure 6-9.)
235
Chapter 6: Viewing Reports
Figure 6-9
Event Reports Window with List of Classes (System Group Manager Mode)
6. Select the event classes to include in the report.
7. Click on the Generate Report button.
236
Events Registered Reports
Figure 6-10 shows an example events registered report.
Figure 6-10
Example Events Registered Report (System Group Manager Mode)
237
Chapter 6: Viewing Reports
Table 6-3 describes the information that the report contains.
Table 6-3
Events Registered Report Contents (System Group Manager Mode)
Column Heading
Description
No.
Index number within the table
Classa
The class that contains the event
Tip: Click on an event class to view a report of all occurrences
of events in that class.
Event Description
Brief description of the event
Tip: Click on an event description to view a report of all
occurrences of that event.
First Occurrence
Date and time at which the event was first registered
Tip: Click on the occurrence date to view the logbook entry for
that date.
Last Occurrence
Date and time at which the event was last registered
Tip: Click on the occurrence date to view the logbook entry for
that date.
Event Count
Number of times that the event occurred
System Nameb
Client system on which the event occurred
a. This column appears only when reports contain more than one event class.
b. This column appears only on SGM systems when reports contain more than one system.
238
Events Registered Reports
To “drill down” a report to find specific information about an event, perform the
following procedure:
1.
Click on the Class name.
The interface displays information about events from the class that were registered.
(Refer to Figure 6-11.)
Figure 6-11
Events Registered in a Specify Class (System Group Manager Mode)
239
Chapter 6: Viewing Reports
2. Click on the Event Description for the event.
The interface displays all occurrences of the event. (Refer to Figure 6-12.)
Figure 6-12
240
All Occurrences of a Specific Event (System Group Manager Mode)
Events Registered Reports
Using the Command Line Interface
Use the following syntax of the espreport command to view an events registered report:
/usr/sbin/espreport events
[-sysid <system id>| -host <hostname>]
[-from mm/dd/yyyy] [-to mm/dd/yyyy]
[-tid <type id> | -td <type desc>]
[-cid <class id> | -cd <class desc>]
On group manager systems, use the -sysid or -host options to select a specific system
to include in the report. If you do not specify a system, the report contains events from
the local host.
Note: Enter /usr/sbin/esreport sysinfo all to determine the <system id> value.
Use the -from and -to options to select the range of dates for the report. If you do not
specify a range of dates, the report, the report contains all events that have been
registered.
Use the -tid and -td options to select a specific event type. If you do not specify an event
type, the report includes all events.
241
Chapter 6: Viewing Reports
Actions Taken Reports
Actions taken reports show all actions that ESP performed within a specific time period.
Using the Web-based Interface (Single System Manager Mode)
Perform the following procedure to use the Web-based interface to generate an actions
taken report in single system manager mode.
1.
Click on the Reports button.
2. Click on the Actions button.
The interface displays the Action Reports window. (Refer to Figure 6-13.)
Figure 6-13
Action Reports Window (Single System Manager Mode)
3. Specify the range of dates for the report.
4. Click on the Generate Report button.
Figure 6-14 shows an example actions taken report.
242
Actions Taken Reports
Figure 6-14
Example Actions Taken Report (Single System Manager Mode)
Table 6-4 describes the information that the report contains.
Table 6-4
Actions Taken Report Contents (Single System Manager Mode)
Column
Description
No.
Index number in the table
Class
Class of the event to which the action is assigned
Event Description
Description of the event to which the action is assigned
Time
Time and date at that the action was taken
Action Taken
Description of the command that the action performed
Tip: Click on an action to view the parameter settings for the
action.
243
Chapter 6: Viewing Reports
Using the Web-based Interface (System Group Manager Mode)
Perform the following procedure to use the Web-based interface to generate an actions
taken report in system group manager mode.
1.
Click on the Reports button.
2. Click on the Actions button.
The interface displays the Actions Report For System Group window. (Refer to
Figure 6-15.)
Figure 6-15
Actions Report for System Group Window (System Group Manager Mode)
3. Specify the range of dates for the report.
4. Select the systems to include in the report.
5. Click on the Generate Report button.
244
Actions Taken Reports
Figure 6-16 shows an example actions taken report.
Figure 6-16
Example Actions Taken Report (System Group Manager Mode)
Table 6-5 describes the information that the report contains.
Table 6-5
Actions Taken Report Contents (System Group Manager Mode)
Column
Description
No.
Index number in the table
Classa
Class of the event to which the action is assigned
Event Description
Description of the event to which the action is assigned
Time
Time and date at that the action was taken
Action Taken
Description of the command that the action performed
Tip: Click on an action to view the parameter settings for the action.
System Nameb
Client system on which the event occurred
a. This column appears only when reports contain more than one event class.
b. This column appears only on SGM systems when reports contain more than one system.
245
Chapter 6: Viewing Reports
Using the Command Line Interface
Use the following syntax of the espreport command to view an actions taken report:
/usr/sbin/espreport action_taken
[-sysid <system id> | -host <hostname>]
[-from mm/dd/yyyy] [-to mm/dd/yyyy]
Use the -sysid or -host options to select a specific system to include in the report. If you
do not specify a system, the report contains actions from the local host.
Note: Enter /usr/sbin/esreport sysinfo all to determine the <system id> value.
Use the -from and -to options to select the range of dates for the report. If you do not
specify a range of dates, the report displays all actions that have been taken.
246
Availability Reports
Availability Reports
Availability reports provide statistics about system availability from a specified time
period.
Using the Web-based Interface (Single System Manager Mode)
Perform the following procedure to use the Web-based interface to generate availability
reports in single system manager mode:
1.
Click on the Reports button.
2. Click on the Availability button.
The interface displays the Availability Reports window. (Refer to Figure 6-17.)
Figure 6-17
Availability Reports Window (Single System Mode)
3. Specify the range of dates for the report.
4. Click on the Generate Report button.
Figure 6-18 shows an example availability report.
247
Chapter 6: Viewing Reports
Figure 6-18
248
Example Availability Report (Single System Manager Mode)
Availability Reports
Table 6-6 describes the contents of the report.
Table 6-6
Single System Availability Report Contents (Single System Manager Mode)
Row
Description
Unscheduled
Information about any unscheduled downtime events: count,
downtime due to the event (in minutes), mean time between
interrupts (in minutes), and availability percentage
Scheduled
Information about scheduled downtime events: count,
downtime caused by the service action (in minutes), mean
time between interrupts (in minutes), and availability
percentage
Tip: Click on the link to view a report of all scheduled
availability events that ESP registered during the time period.
Scheduled and
Unscheduled
Information about the total downtime for scheduled and
unscheduled downtime: count, downtime (in minutes) caused
by the action, mean time between interrupts (in minutes), and
availability percentage
Tip: Click on the link to view a report of all scheduled and
unscheduled availability events that ESP registered during the
time period.
Average uptime
Average uptime between availability events
Least uptime
Shortest uptime between availability events
Most uptime
Longest uptime between availability events
Average downtime
Average downtime
Least downtime
Shortest downtime
Most downtime
Longest downtime
Logging started at
Date and time that ESP began monitoring availability events
Last boot at
Date and time of last system boot
System has been up for
Length of time that system has been powered up since last
system boot
All registered
availability events
Link to a table of all availability events that ESP registered
during the specified time period
249
Chapter 6: Viewing Reports
Using the Web-based Interface (System Group Manager Mode)
Perform the following procedure to use the Web-based interface to generate availability
reports in system group manager mode:
1.
Click on the Reports button.
2. Click on the Availability button.
The interface displays the Availability Reports For System Group window.
(Refer to Figure 6-19.)
Figure 6-19
Availability Reports for System Group Window (System Group Manager Mode)
3. Specify the range of dates for the report.
4. Select the systems to include in the report.
5. Click on the Generate Report button.
Figure 6-20 shows an example availability report for a specific host.
250
Availability Reports
Figure 6-20
Example Availability Report for a Specific Host (System Group Manager Mode)
251
Chapter 6: Viewing Reports
Table 6-7 describes the contents of the report.
Table 6-7
Single System Availability Report Contents (System Group Manager Mode)
Row
Description
Unscheduled
Information about any unscheduled downtime events: count,
downtime due to the event (in minutes), mean time between
interrupts (in minutes), and availability percentage
Scheduled
Information about scheduled downtime events: count,
downtime caused by the service action (in minutes), mean
time between interrupts (in minutes), and availability
percentage
Tip: Click on the link to view a report of all scheduled
availability events that ESP registered during the time period.
Scheduled and
Unscheduled
Information about the total downtime for scheduled and
unscheduled downtime: count, downtime (in minutes) caused
by the action, mean time between interrupts (in minutes), and
availability percentage
Tip: Click on the link to view a report of all scheduled and
unscheduled availability events that ESP registered during the
time period.
252
Average uptime
Average uptime between availability events
Least uptime
Shortest uptime between availability events
Most uptime
Longest uptime between availability events
Average downtime
Average downtime
Least downtime
Shortest downtime
Most downtime
Longest downtime
Logging started at
Date and time that ESP began monitoring availability events
Last boot at
Date and time of last system boot
System has been up for
Length of time that system has been powered up since last
system boot
All registered
availability events
Link to a table of all availability events that ESP registered
during the specified time period
Availability Reports
Using the Command Line Interface
Use the following syntax of the espreport command to view an availability report:
/usr/sbin/espreport availability
[-sysid <system id>|-host <hostname>]
[-from mm/dd/yyyy] [-to mm/dd/yyyy]
Use the -sysid or -host options to select a specific system to include in the report. If you
do not specify a system, the report contains availability information from the local host.
Use the -from and -to options to select the range of dates for the report. If you do not
specify a range of dates, the report contains all information up to the current date.
253
Chapter 6: Viewing Reports
Diagnostic Result Reports
If you use the diagnostics that are included in the Internal Support Tools 2.0 or later
releases, ESP generates diagnostic results reports.
Using the Web-based Interface (Single System Manager Mode)
Perform the following procedure to use the Web-based interface to generate a diagnostic
results report in single system manager mode:
1.
Click on the Reports button.
2. Click on the Diagnostics button.
The interface displays the Diagnostic Results window. (Refer to Figure 6-21.)
Figure 6-21
254
Diagnostic Results Window (Single System Manager Mode)
Diagnostic Result Reports
3. Specify the range of dates for the report.
4. If you are using system group manager mode, select the systems to include in the
report.
5. Click on the Generate Report button.
Figure 6-22 shows an example diagnostic results report.
Figure 6-22
Example Diagnostic Results Report (Single System Manager Mode)
Table 6-8 describes the contents of the report.
Table 6-8
Diagnostic Results Report Contents (Single System Manager Mode)
Column Heading
Description
No.
Index number within the table
Diagnostic Name
Name of the diagnostic
When one or more tests run as a group under one program (for
example, SVP), the total number of tests run is shown in
parentheses next to the diagnostic name; for example:
SVP (86) indicates that 86 tests ran under SVP
255
Chapter 6: Viewing Reports
Table 6-8
Diagnostic Results Report Contents (Single System Manager Mode) (continued)
Column Heading
Description
Diagnostic Result
Result of the diagnostic: PASS, FAIL, or COMPLETE
PASS indicates that the diagnostic completed successfully
FAIL indicates that the diagnostic failed
COMPLETE indicates that multiple tests ran and one or more of
them failed and the others passed
Diagnostic Result
Time
Time at which the diagnostic completed testing
When multiple tests run under one diagnostic (for example, SVP),
this column indicates the time at which all tests completed
Using the Web-based Interface (System Group Manager Mode)
Perform the following procedure to use the Web-based interface to generate a diagnostic
results report in system group manager mode:
1.
Click on the Reports button.
2. Click on the Diagnostics button.
The interface displays the Diagnostic Results window. (Refer to Figure 6-23.)
Figure 6-23
256
Diagnostic Results Window (System Group Manager Mode)
Diagnostic Result Reports
3. Specify the range of dates for the report.
4. Specify the systems to include in the report.
5. Click on the Generate Report button.
Figure 6-24 shows an example diagnostic results report.
Figure 6-24
Example Diagnostic Results Report (System Group Manager Mode)
257
Chapter 6: Viewing Reports
Table 6-9 describes the contents of the report.
Table 6-9
Diagnostic Results Report Contents (System Group Manager Mode)
Column Heading
Description
No.
Index number within the table
Diagnostic Name
Name of the diagnostic
When one or more tests run as a group under one program (for
example, SVP), the total number of tests run is shown in
parentheses next to the diagnostic name; for example:
SVP (86) indicates that 86 tests ran under SVP
Diagnostic Result
Result of the diagnostic: PASS, FAIL, or COMPLETE
PASS indicates that the diagnostic completed successfully
FAIL indicates that the diagnostic failed
COMPLETE indicates that multiple tests ran and one or more of
them failed and the others passed
Diagnostic Result
Time
Time at which the diagnostic completed testing
System Name
Client system on which the action was taken
When multiple tests run under one diagnostic (for example, SVP),
this column indicates the time at which all tests completed
Using the Command Line Interface
Diagnostic reports are not available from the command line interface.
258
Hardware Reports
Hardware Reports
There are two types of hardware reports:
•
Hardware inventory reports
•
Hardware changes reports
Hardware Inventory Reports
Hardware inventory reports show all hardware installed in a system at a specific date
and time.
Using the Web-based Interface (Single System Manager Mode)
Perform the following procedure to use the Web-based interface to generate a hardware
inventory report in single system manager mode:
1.
Click on the Reports button.
2. Click on the Hardware button.
The interface displays the Hardware Inventory Report window. (Refer to
Figure 6-25.)
259
Chapter 6: Viewing Reports
Figure 6-25
Hardware Inventory Report Window (Single System Manager Mode)
3. Specify the date and time of the hardware inventory that you want to view.
4. Click on the Generate Report button.
Figure 6-26 shows an example hardware inventory report.
260
Hardware Reports
Figure 6-26
Example Hardware Inventory Report (Single System Manager Mode)
261
Chapter 6: Viewing Reports
Table 6-10 describes the contents of the report.
Table 6-10
Hardware Inventory Report Contents
Column Heading
Description
No.
Index number within the table
Part Name
Name of the part
Location
Location where the part is installed
Part Number
Part number for the part
Serial Number
Serial number of the part
Revision
Revision level of the part
Installation Date
Date that the part was installed
Using the Web-based Interface (System Group Manager Mode)
Perform the following procedure to use the Web-based interface to generate a hardware
inventory report in system group manager mode:
1.
Click on the Reports button.
2. Click on the Hardware button.
The interface displays the Hardware Inventory Reports for System Group
window. (Refer to Figure 6-27.)
262
Hardware Reports
Figure 6-27
Hardware Inventory Reports for System Group Window
(System Group Manager Mode)
3. Specify the date and time of the hardware inventory that you want to view.
4. Specify the system for the hardware inventory that you want to view.
5. Click on the Generate Report button.
Figure 6-28 shows an example hardware inventory report.
263
Chapter 6: Viewing Reports
Figure 6-28
264
Example Hardware Inventory Report (System Group Manager Mode)
Hardware Reports
Table 6-11 describes the contents of the report.
Table 6-11
Hardware Inventory Report Contents (System Group Manager Mode)
Column Heading
Description
No.
Index number within the table
Part Name
Name of the part
Location
Location where the part is installed
Part Number
Part number for the part
Serial Number
Serial number of the part
Revision
Revision level of the part
Installation Date
Date that the part was installed
Using the Command Line Interface
Use the following command to view a hardware inventory report:
configmon -h
265
Chapter 6: Viewing Reports
Hardware Changes Reports
Hardware changes reports show all hardware that has been installed or deinstalled with
a specified time period.
Using the Web-based Interface (Single System Manager Mode)
Perform the following procedure to use the Web-based interface to generate a hardware
changes report from single system manager mode:
1.
Click on the Reports button.
2. Click on the Hardware button.
3. Click on the Changes button.
The interface displays the History of Hardware window. (Refer to Figure 6-29.)
Figure 6-29
266
History of Hardware Changes Window (Single System Manager Mode)
Hardware Reports
4. Specify the range of dates for the report.
5. Click on the Generate Report button.
Figure 6-30 shows an example hardware changes report.
Figure 6-30
Example Hardware Changes Report (Single System Manager Mode)
267
Chapter 6: Viewing Reports
Table 6-12 describes the contents of the report.
Table 6-12
Hardware Changes Report Contents (Single System Manager Mode)
Column Heading
Description
No.
Index number in the table
Part Name
Name of the part
Location
Location of the part
Serial Number
Serial number of the part
Part Number
Part number of the part
Revision
Revision level of the part
Install Date/Time
Date and time that the part was installed in the location
Removal Date/Time
Date and time that the part was removed from the location
Using the Web-based Interface (System Group Manager Mode)
Perform the following procedure to use the Web-based interface to generate a hardware
changes report from system group manager mode:
1.
Click on the Reports button.
2. Click on the Hardware button.
3. Click on the Changes button.
The interface displays the Hardware Changes Report For System window. (Refer
to Figure 6-31.)
268
Hardware Reports
Figure 6-31
Hardware Changes Reports for System Group Window
(System Group Manager Mode)
4. Specify the range of dates for the report.
5. Click on the Generate Report button.
Figure 6-32 shows an example hardware changes report.
Figure 6-32
Example Hardware Changes Report (Single Group Manager Mode)
269
Chapter 6: Viewing Reports
Table 6-13 describes the contents of the report.
Table 6-13
Hardware Changes Report Contents (System Group Manager Mode)
Column Heading
Description
No.
Index number in the table
Part Name
Name of the part
Location
Location of the part
Serial Number
Serial number of the part
Part Number
Part number of the part
Revision
Revision level of the part
System Name
System on which the part is located
Install Date/Time
Date and time that the part was installed in the location
Remove Date/Time
Date and time the part was removed from the location
Using the Command Line Interface
Use the following syntax of the espreport command to view a hardware changes report:
/usr/sbin/espreport hwchanges
[-sysid <system id> | -host <host name>]
[-from <mm/dd/yyyy>] [-to <mm/dd/yyyy>]
Use the -from and -to options to specify a range of dates. If you do not use these options,
the report includes all available data.
270
Software Reports
Software Reports
There are two types of software reports:
•
System inventory reports
•
System changes reports
Software Inventory Reports
Software inventory reports show all software installed on a system at a specific date and
time.
Using the Web-based Interface (Single System Manager Mode)
Perform the following procedure to use the Web-based interface to generate a software
inventory report from single system manager mode:
1.
Click on the Reports button.
2. Click on the Software button.
3. Click on the Inventory button.
The interface displays the Software Inventory Report window. (Refer to
Figure 6-33.)
271
Chapter 6: Viewing Reports
Figure 6-33
Software Inventory Report Window (Single System Manager Mode)
4. Specify the date and time of the software inventory that you want to view.
5. Click on the Generate Report button.
Figure 6-34 shows an example software inventory report.
272
Software Reports
Figure 6-34
Example Software Inventory Report (Single System Manager Mode)
273
Chapter 6: Viewing Reports
Table 6-14 describes the contents of the report.
Table 6-14
Software Inventory Report Contents (Single System Manager Mode)
Column Heading
Description
No.
Index number within the table
Software Name
Name of the software application
Version
Version number of the software application
Installation Date
Date on which the software application was installed
Software Description Brief description of the software
274
Software Reports
Using the Web-based Interface (System Group Manager Mode)
Perform the following procedure to use the Web-based interface to generate a software
inventory report from system group manager mode:
1.
Click on the Reports button.
2. Click on the Software button.
3. Click on the Inventory button.
The interface displays the Software Inventory Reports for System Group
window. (Refer to Figure 6-35.)
Figure 6-35
Software Inventory Reports for System Group Window
(System Group Manager Mode)
4. Specify the date and time of the software inventory that you want to view.
5. Click on the Generate Report button.
Figure 6-36 shows an example software inventory report.
275
Chapter 6: Viewing Reports
Figure 6-36
276
Example Software Inventory Report (System Group Manager Mode)
Software Reports
Table 6-15 describes the contents of the report.
Table 6-15
Software Inventory Report Contents (System Group Manager Mode)
Column Heading
Description
No.
Index number within the table
Software Name
Name of the software application
Version
Version number of the software application
Installation Date
Date on which the software application was installed
Software Description Brief description of the software
Using the Command Line Interface
Use the following command to view a software inventory report:
configmon -s
277
Chapter 6: Viewing Reports
Software Changes Reports
Software changes reports show all software that has been added to or removed from a
system within a specific time period.
Using the Web-based Interface (Single System Manager Mode)
Perform the following procedure to use the Web-based interface to generate a software
changes report from single system manager mode:
1.
Click on the Reports button.
2. Click on the Software button.
3. Click on the Changes button.
The interface displays the History of Software Changes window. (Refer to
Figure 6-37.)
Figure 6-37
278
History of Software Changes Window (Single System Manager Mode)
Software Reports
4. Specify the range of dates for the report.
5. Click on the Generate Report button.
Figure 6-38 shows an example software changes report.
Figure 6-38
Example Software Changes Report (Single System Manager Mode)
Table 6-16 describes the contents of the report.
Table 6-16
Software Changes Report Contents (Single System Manager Mode)
Column Heading
Description
No.
Index number in the table
Software Name
Name of the software application
Software Version
Version number of the software application
Installation Date
Date that the software application was installed on the system
Removal Date/Time
Date that the software application was removed from the system
Description
Description of the software application
279
Chapter 6: Viewing Reports
Using the Web-based Interface (System Group Manager Mode)
Perform the following procedure to use the Web-based interface to generate a software
changes report from system group manager mode:
1.
Click on the Reports button.
2. Click on the Software button.
3. Click on the Changes button.
The interface displays the History of Software Changes For System Group
window. (Refer to Figure 6-39.)
Figure 6-39
Software Changes for System Group Window (System Group Manager Mode)
4. Specify the range of dates for the report.
5. Select the system to include in the report.
6. Click on the Generate Report button.
Figure 6-40 shows an example software changes report.
280
Software Reports
Figure 6-40
Example Software Changes Report (System Group Manager Mode)
Table 6-17 describes the contents of the report.
Table 6-17
Software Changes Report Contents (System Group Manager Mode)
Column Heading
Description
No.
Index number in the table
Software Name
Name of the software application
Software Version
Version number of the software application
Installation Date
Date that the software application was installed on the system
Removal Date/Time
Date that the software application was removed from the system
Description
Description of the software application
Using the Command Line Interface
Use the following syntax of the espreport command to view a software changes report:
/usr/sbin/espreport swchanges
[-sysid <system id> | -host <host name>]
[-from <mm/dd/yyyy>] [-to <mm/dd/yyyy>]
Use the -from and -to options to specify a range of dates. If you do not use these options,
the report includes all available data.
281
Chapter 6: Viewing Reports
System Reports
There are two types of system reports:
•
System inventory reports
•
System changes reports
System Inventory Reports
System inventory reports show the current system and ESP information.
Using the Web-based Interface
Perform the following procedure to use the Web-based interface to generate a system
inventory report:
1.
Click on the Reports button.
2. Click on the System button.
3. Click on the Inventory button.
The interface displays the System window. (Figure 6-41 shows an example system
inventory report in single system manager mode. Figure 6-42 shows an example
system inventory report in system group manager mode.)
282
System Reports
Figure 6-41
Example System Inventory Report (Single System Manager Mode)
283
Chapter 6: Viewing Reports
Figure 6-42
284
Example System Inventory Report (System Group Manager Mode)
System Reports
Using the Command Line Interface
Use the following syntax of the espreport command to generate a system information
report:
/usr/sbin/espreport sysinfo
[-sysid <system id> | -host <host name>]
[all]
If you specify the all option, the command displays the system name, serial number,
type, IP address, and system ID. If you do not specify the all option, this command
displays only the system serial number.
Use the following syntax of the espreport command to view a summary report that
includes system information, events, hardware and software changes, logbook
information, availability overview, and local system disk usage:
/usr/sbin/espreport summary
[-sysid <system id> | -host <host name>]
[-from <mm/dd/yyyy>] [-to <mm/dd/yyyy>]
Use the -from and -to options to specify a range of dates. If you do not use these options,
the report includes all available data.
285
Chapter 6: Viewing Reports
System Changes Reports
System change reports show any system changes (system name, IP address, etc.) that
occur within a specific time period.
Using the Web-based Interface (Single System Manager Mode)
Perform the following procedure to use the Web-based interface to generate a system
inventory report from single system manager mode:
1.
Click on the Reports button.
2. Click on the System button.
3. Click on the Changes button.
The interface displays the History of System Changes window. (Refer to
Figure 6-43.)
Figure 6-43
286
History of System Changes Window (Single System Manager Mode)
System Reports
4. Specify the range of dates for the report.
5. Click on the Generate Report button.
Figure 6-44 shows an example system changes report.
Figure 6-44
Example System Changes Report (Single System Manager Mode)
Table 6-18 describes the contents of the report.
Table 6-18
System Changes Report Contents (Single System Manager Mode)
Column Name
Description
SysId
System identification number
System type
Processor that the system uses
System serial number
Serial number of the system
Hostname
Hostname of the system
IP address
IP address of the system
Date/Time
Date and time of the change
287
Chapter 6: Viewing Reports
Using the Web-based Interface (System Group Manager Mode)
Perform the following procedure to use the Web-based interface to generate a system
inventory report from system group manager mode:
1.
Click on the Reports button.
2. Click on the System button.
3. Click on the Changes button.
The interface displays the System Changes For System Group window. (Refer to
Figure 6-45.)
Figure 6-45
288
System Changes for System Group Window (System Group Manager Mode)
System Reports
4. Specify the range of dates for the report.
5. Specify the systems to include in the report.
6. Click on the Generate Report button.
Figure 6-46 shows an example system changes report.
Figure 6-46
Example System Changes Report (System Group Manager Mode)
Table 6-19 describes the contents of the report.
Table 6-19
System Changes Report Contents (System Group Manager Mode)
Column Name
Description
SysId
System identification number
System type
Processor that the system uses
System serial number
Serial number of the system
Hostname
Hostname of the system
IP address
IP address of the system
Date/Time
Date and time of the change
Using the Command Line Interface
System change reports are not available from the command line interface.
289
Chapter 6: Viewing Reports
Site Reports (System Group Manager Mode Only)
Site reports show information for various combinations of systems at a site. ESP limits
site reports to include only systems that meet specific criteria, including:
•
Systems that are in a specific group
•
Systems that run a specific operating system version
•
Systems that have a specific processor type
Site reports can contain system information, all available events, or specific events by
class for the selected systems. Site reports are available only from SGM servers.
Perform the following procedure to use the Web-based interface to generate a site
inventory report from system group manager mode:
1.
Click on the Reports button.
2. Click on the Site button.
The interface displays the Site Reports window. (Refer to Figure 6-47.)
Figure 6-47
290
Site Reports Window
System Reports
3. Select the items to include in the report:
•
Choose the groups that you want to include in the report. The pulldown menu
includes the names of all groups that are available. When you choose a group
name from the menu, the report contains only the systems in the group that you
select. Choose All groups to include all systems in the report.
•
Choose the operating system that you want to include in the report. The
pulldown menu includes the name of all operating systems that ESP detected
on the systems. When you choose an operating system from the menu, the
report contains only systems that are running that operating system.
•
Choose a processor type. The pulldown menu includes all processor types that
ESP detected in the systems. When you choose a processor type from the menu,
the report contains only systems that contain that type of processor.
•
Choose the type of site report to generate. The following options are available:
The System information option generates a site information report, which
includes the following information: system name, IP type (if applicable),
processor type, OS version, the group that includes the system, the system
activation date (the date when system was added to the group for the first
time), and system deactivation date (the date when system was unsubscribed).
The All events option generates a report of all available events.
The Events by class generates a report of events from specific classes.
4. Click on the Generate Report button.
The interface displays the report. (Figure 6-48 shows an example of a site information
report.)
291
Chapter 6: Viewing Reports
Figure 6-48
Site Information Report
Using the Command Line Interface
Site reports are not available from the command line interface.
292
Chapter 7
7. Using the ESP Logbook
This chapter describes the ESP logbook, how to view it, and how to add entries to it.
About the ESP Logbook
Use the ESP logbook to record changes that you make to a system: Create a logbook entry
each time that you perform a service-related activity on a system. Then, if necessary, any
ESP user with the “view logbook” permission can view the entries to review the activities
at a later time.
Viewing Logbook Entries
You can view any logbook entries to review previous system activities.
Using the Web-based Interface (Single System Manager Mode)
Perform the following procedure to use the Web-based interface to view logbook entries
in single system manager mode:
1.
Click on the Logbook button.
2. Click on the View Log button.
The interface displays the View Logbook Entries window. (Refer to Figure 7-1.)
293
Chapter 7: Using the ESP Logbook
Figure 7-1
View Logbook Entries Window (Single System Manager Mode)
3. Specify the range of dates to view.
4. Click on the View Log Entries button.
The interface displays the specified logbook entries. (Refer to Figure 7-2.)
Figure 7-2
294
Specified Logbook Entries (Single System Manager Mode)
Viewing Logbook Entries
5. Perform one the following actions to view a log entry:
•
Set the check mark next to entry number, and click on the Generate Report
button.
•
Click on the subject link for the entry.
The interface displays the logbook entry information. (Refer to Figure 7-3.)
Figure 7-3
Logbook Entry Information (Single System Manager Mode)
Using the Web-based Interface (System Group Manager Mode)
Perform the following procedure to use the Web-based interface to view logbook entries
in system group manager mode:
1.
Click on the Logbook button.
2. Click on the View Log button.
The interface displays the View Logbook Entries window. (Refer to Figure 7-4.)
295
Chapter 7: Using the ESP Logbook
Figure 7-4
View Logbook Entries Window (System Group Manager Mode)
3. Specify the range of dates to view.
4. Select the systems to view.
5. Click on the View Log Entries button.
The interface displays the specified logbook entries. (Refer to Figure 7-5.)
Figure 7-5
296
Specified Logbook Entries (System Group Manager Mode)
Viewing Logbook Entries
6. Perform one the following actions to view a log entry:
•
Set the check mark next to entry number, and click on the Generate Report
button.
•
Click on the subject link for the entry.
The interface displays the logbook entry information. (Refer to Figure 7-6.)
Figure 7-6
Logbook Entry Information (System Group Manager Mode)
Using the Command Line Interface
Use the following syntax of the espreport command to view logbook entries:
/usr/sbin/espreport logbook
[-sysid <system id>|-host <host name>]
[-from mm/dd/yyyy] [-to mm/dd/yyyy]
Use the -sysid and -host options to select a system. Use the -from and -to options to
specify a range of dates. If you do not use these options, the report includes all available
data.
297
Chapter 7: Using the ESP Logbook
Adding a Logbook Entry
You should add logbook entries any time that you modify a system.
Using the Web-based Interface (Single System Manager Mode)
Perform the following procedure to use the Web-based interface to add a logbook entry
in single system manager mode:
1.
Click on the Logbook button.
2. Click on the Add Log button.
The interface displays the Create Log window. (Refer to Figure 7-7.)
Figure 7-7
Create Log Window (Single System Manager Mode)
Note: ESP automatically sets the User field to the user account that you are using.
298
Adding a Logbook Entry
3. Enter a subject for the entry. (This required field can hold up to 128 characters.)
4. Enter a log entry. (This required field can hold up to 4 Kbytes of data.)
5. Click on the Submit Log button.
The interface displays the information that you entered. (Refer to Figure 7-8.)
Figure 7-8
Logbook Entry Confirmation Window (Single System Manager Mode)
6. Click on the Commit button to create the entry.
The interface displays the information that was added to the logbook. (Refer to
Figure 7-9.)
299
Chapter 7: Using the ESP Logbook
Figure 7-9
Completed Logbook Entry (Single System Manager Mode)
Using the Web-based Interface (System Group Manager Mode)
Perform the following procedure to use the Web-based interface to add a logbook entry
in system group manager mode:
1.
Click on the Logbook button.
2. Click on the Add Log button.
The interface displays the Create Log window. (Refer to Figure 7-10.)
300
Adding a Logbook Entry
Figure 7-10
Create Log Window (System Group Manager Mode)
Note: ESP automatically sets the User field to the user account that you are using.
3. Select the system that the log entry is for.
4. Enter a subject for the entry. (This required field can hold up to 128 characters.)
5. Enter a log entry. (This required field can hold up to 4 Kbytes of data.)
6. Click on the Submit Log button.
The interface displays the information that you entered. (Refer to Figure 7-11.)
301
Chapter 7: Using the ESP Logbook
Figure 7-11
Logbook Entry Confirmation Window (System Group Manager Mode)
7. Click on the Commit button to create the entry.
Note: All log entries are stored on the SGM server.
The interface displays the information that was added to the logbook. (Refer to
Figure 7-12.)
302
Adding a Logbook Entry
Figure 7-12
Completed Logbook Entry (System Group Manager Mode)
Using the Command Line Interface
Use the /usr/sbin/esplognote command to add a logbook entry. This command
prompts you for the information that is required in a logbook entry.
303
Chapter 8
8. Sending Notifications
About the espnotify Tool
The ESP software suite includes the espnotify tool, which you can use to perform the
following types of notification:
•
Display a message on the system console
•
Display a message on a local or remote X Window System display
•
Send an e-mail message
Note: This chapter describes how to use the espnotify command to create notifications.
ESP can also automatically generate the espnotify command line from options that you
select from the graphical user interface (when you use the Notification Action option
in the Add Action window). The information in this chapter simply provides examples
of how you can create command lines as actions. If you need to create standard
notification actions, it is easiest to use the automated method.
Command Line Options for Displaying a Message on the Console
Use the following format of the espnotify command to display a message on the system
console:
/usr/bin/espnotify -A <message> [-n <number>]
This format of the espnotify command has the following command line options:
-A
Specifies that the message should be displayed in the console window
<message>
Specifies the message that the window should display
Enclose <message> in single quotes (‘ ‘) if the message contains more
than one word.
305
Chapter 8: Sending Notifications
-n <number>
Specifies an optional priority message, which is determined by the value
that you specify for <number>
The <number> parameter can be a value from 1 to 7. espnotify attaches
a label to the message based on the value of <number>: 1 or 2 (Critical
System Error), 3 (System Error), 4 (System Warning), or 5 to 7
(System Information)
For example, the following command displays the message This is the message to
display. on the console (refer to Figure 8-1):
/usr/bin/espnotify -A ‘This is the message to display.’
Figure 8-1
Displaying a Message in the Console Window
Displaying a Message on an X Window System Display
Use the following format of the espnotify command to display a message on a local or
remote X Window System display:
/usr/bin/espnotify -c <message> [-a] [-D <display>] [-g <geometry>]
[-i <icon>] -n <number>] [-t <title>]
This format of the espnotify command has the following command line options:
-c <message> Specifies the message that the window should display
Enclose <message> in double quotes (“ “) if the message contains more
than one word.
-a
Specifies that an audio file should be played
The /usr/bin/ssplay application plays the audio file. Audio
notification cannot be performed without graphical notification. Audio
notification can be performed only on the local host.
306
About the espnotify Tool
-D <display> Specifies the display to use. (If you do not specify a display, the window
is displayed on the host specified by the $DISPLAY environment
variable.)
-g <geometry> Specifies an optional X Window System geometry string for the window
(in the standard WIDTHxHEIGHTxXOFFxYOFF format)
For example, -g 120x80x50x100 specifies a window that is 120 pixels
wide by 80 pixels high and is located 50 pixels from the left edge of the
screen and 100 pixels from the top edge of the screen. (Refer to the x(1)
man page for more information.)
-i <icon>
Specifies an optional image to display as an icon for the window
-n <number>
Specifies an optional priority message, which is determined by the value
that you specify for <number>
The <number> parameter can be a value from 1 to 7. espnotify attaches
a label to the message based on the value of <number>: 1 or 2 (Critical
System Error), 3 (System Error), 4 (System Warning), or 5 to 7
(System Information)
-t <title>
Specifies an optional title of the window.
Enclose <title> in double quotes (“ “) if the title contains more than one
word.
For example, the following command displays a window on the local host (refer to
Figure 8-2):
/usr/bin/espnotify -c "This is the message to display." -D localhost:0
-t "This is the title."
Figure 8-2
Displaying a Message on an X Window System Display
307
Chapter 8: Sending Notifications
Sending an E-mail Message
Use the following format of the espnotify command to send an e-mail message:
/usr/bin/espnotify -E <address> { -f <filename> | -m <message> }
[-n <number>] [-o <options>] [-s <subject>]
This format of the espnotify command has the following command line options:
-E <address> Specifies the e-mail addresses that should receive the message
Enclose <address> in single quotes (‘ ‘) if the list contains more than one
address.
-f <filename> Specifies a text file to use as content for the message
You cannot use the -f and -m options at the same time.
-m <message> Specifies text to use as content for the message
Enclose <message> in single quotes (‘ ‘) if the message contains more
than one word.
You cannot use the -f and -m options at the same time.
-n <number>
Specifies an optional priority message, which is determined by the value
that you specify for <number>
The <number> parameter can be a value from 1 to 7. espnotify attaches
a label to the message based on the value of <number>: 1 or 2 (Critical
System Error), 3 (System Error), 4 (System Warning), or 5 to 7
(System Information)
-o <options> Specifies processing options for the message
Two options are available: -o COMP (compress and uuencode the
message) and -o ENCO (uuencode the message). These options are valid
only if you also use the -f option.
-s <subject> Specifies the subject of the message
The format of the default subject is [HOSTNAME]: <text>, where
HOSTNAME is replaced with the name of the host and <text> is replaced
with a priority message (for example, Critical System Error).
If you use the -n and -s options, the -s option overrides the -n option.
308
Invoking espnotify from ESP
For example, the following command sends a message to [email protected] (refer to
Figure 8-3):
/usr/bin/espnotify -E [email protected] -m ’This is the text of the message.’
-n 1
Figure 8-3
Sending an E-mail Message
Invoking espnotify from ESP
Because espnotify is a command line utility, you can configure it as an ESP action. To
do this, create a new action or update an existing action with a command string that uses
the /usr/bin/espnotify command. This section shows an example of how to create
ESP actions that use espnotify.
Note: ESP automatically generates the proper espnotify command line when you
choose the Notification option in the Add Action window.
Example: Creating an Action to Send an E-mail
The first example shows how to set up an ESP action to send notification by E-mail.
1.
Click on the Configuration button.
2. Click on the Actions button.
3. Click on the Add button.
4. Click on the radio button next to Other action.
5. Click on the Continue button.
309
Chapter 8: Sending Notifications
6. Update the parameters. (Table 8-1 lists the parameters for this example.)
Table 8-1
Example Action Parameters for Sending an E-mail Notification
Field
Setting
Action description
Send notification via e-mail to
[email protected]
Action string
/usr/bin/espnotify -E [email protected] -m
%D -s ‘An event was just registered.’
Execute action as
nobody
Action timeout
600
Figure 8-4 shows an interface page with the proper settings for this example.
Figure 8-4
Example Action Parameters for Sending an E-mail Message
7. Click on the Add button. (Figure 8-5 shows the verification message for this
example.)
310
Invoking espnotify from ESP
Figure 8-5
Example Verification Message for Sending an E-mail Message Action
8. Click on the Commit button. (Figure 8-6 shows the confirmation message for this
example.)
Figure 8-6
Example Confirmation Message for Sending an E-mail Message Action
311
Chapter 9
9. Logging Events from Applications and Scripts
The ESP framework provides two ways for you to send events from your local
applications and scripts to ESP:
•
By using the Event Manager Application Programming Interface (API)
•
By using the emgrlogger and esplogger tools
Note: You can also use the openlog, syslog, and closelog SYSLOG functions to send
event information through SYSLOG. Refer to the syslog(3c) man page for more
information.
Event Classification and Sequence Numbers
The ESP framework uses a standardized event classification scheme for the events that it
registers. This classification scheme was implemented to:
•
Provide a meaningful representation of the events that have occurred so that users
can easily interpret them
•
Provide an easy way to locate the source of an error by providing a general category
and more specific information
In this scheme, events are categorized by class and type. An event class describes a
general area that ESP monitors (for example, SCSI). An event type provides greater detail
about individual events (for example, a SCSI controller initialization failure).
ESP automatically generates event class and type numbers when you create custom
events and classes. You can use these numbers with your local applications and scripts
to send event information to the ESP framework through the Event Manager API and
esplogger and emgrlogger tools.
The ESP framework also uses unique sequence numbers for system messages. These
sequence numbers provide a mechanism that enables ESP to isolate problems at the
source code level.
313
Chapter 9: Logging Events from Applications and Scripts
Using the Event Manager API
The Event Manager API contains a set of functions that you can call from your local C or
C++ programs to send event information to the Event Manager daemon (eventmond).
The Event Manager forwards events to ESP on a subscription basis.
Refer to the Event Manager User Guide, publication number 007-4661-00x, for more
information about the Event Manager API functions and how to use them.
Using the emgrlogger and esplogger Tools
The esplogger and emgrlogger tools provide a simple command-line interface to
submit events to the Event Manager. emgrlogger works with the new Event Manager
and replaces esplogger, which was used with previous versions of eventmond and
ESP. esplogger remains available to provide backward compatibility. emgrlogger
can produce any type of Event Manager event, including subscription events.
Use the emgrlogger and esplogger tools to pass event information from your local
scripts to the event monitoring component of ESP (eventmond). You can run esplogger
from a UNIX prompt or from a UNIX shell script. emgrlogger and esplogger use the
following command syntax:
emgrlogger:
emgrlogger -h
emgrlogger [-S | -U | -Q | -UQ | -RS]
[-c <class>] [-t <type>] [-a <appname>] [-s <source host>]
[-o <origin>] [-p <priority>] [-f <facility>]
[-P <path to remote host>] [ -is [<tag>]=[<value>]
|
-if [<tag>]=<file path> |
-id [<tag>]=<hex data>
]*
Note: Options related to creating subscription events are not typically used and are not
described in this document.
where:
314
•
The -S option makes a subscription request.
•
The -U option makes an unsubscription request.
Using the emgrlogger and esplogger Tools
•
The -Q option makes a subscription query.
•
The -UQ option makes an unsubscription by query result request.
•
The -RS option makes a remote subscription request.
•
The -c option specifies the event class.
•
The -t option specifies the event type.
•
The -a option specifies the name of the application.
•
The -s option specifies the source (hostname) of the event.
•
The -o option specifies the origin of the event.
•
The -p option specifies the priority value of the event.
•
The -f option specifies the facility value of the event.
•
The -P option specifies the delivery path for a remote subscription event.
•
The -is option specifies string data.
•
The -if option specifies file data.
•
The -id option specifies digital (binary) data in hexadecimal format.
esplogger:
esplogger -s <sequence_number> {-f <filename> | -m "<message>"}
[-p <priority>] [-t <time>]
esplogger -h
esplogger -V
where:
•
The -s <sequence_number> option specifies the sequence number (in decimal or
hexadecimal). You must use this option with the -t option and the -f or -m options.
•
The -f <filename> option specifies the file that contains data to log in the ESP
framework. You must include the -s option with this option. You cannot use this
option with the -m option.
•
The -m <message > option specifies a message to log in the ESP framework. You
must include the -s option with this option. You cannot use this option with the -f
option.
315
Chapter 9: Logging Events from Applications and Scripts
•
The -p <priority> option specifies the priority (for example, local0.notice). Refer
to the syslog(3C) man page for descriptions of the priority values. If you do not
specify a priority value, esplogger sets the priority to local0.info. You must use this
option with the -s option and the -f or -m option.
•
The -t <time> option specifies the time that the event occurred. You must specify
the time in seconds since 00:00:00 UTC on January 1, 1970 (in decimal notation). If
you do not specify the time, esplogger defaults the time to the time that it received
the event. You must use this option with the -s option and the -f or -m option.
•
The -h option prints the usage information.
•
The -V option prints the esplogger version number.
Note: You can also use logger to send event information through SYSLOG. Refer to the
logger(1) man page for more information.
Example 1
emgrlogger -t 200356 -if FILE=availmon.dat
esplogger -s 200356 -f availmon.dat
This example sets the sequence number to 200356, the priority to local0.info (1030), and
the time to the time that esplogger received the event. Then, it passes this information
and the data in the availmon.dat file to eventmond.
Example 2
emgrlogger -t 0x00200000 -p syslog -f warning -is MSG="Start SVP"
emgrlogger -s 0x00200000 -p syslog.warning -m "Start SVP"
This example sets the sequence number to 0x00200000, the priority to syslog.warning
(324), and the time to the time that emgrlogger or esplogger received the event. Then,
it passes this information and the message to eventmond.
316
Chapter 10
10. Default Event Classes and Types
This chapter lists the default event classes and events that ESP includes.
ESP for the Linux OS
Default Event Classes
The following output from the espconfig command shows the default event classes that
ESP includes on a system running the Linux OS:
linux# espconfig -list evclass
ClassId Class description
------- -----------------4000 "Availability"
4001 "Performance"
4002 "System Configuration"
4005 "Diagnostic"
7100 "Kernel Messages"
7110 "User Messages"
7130 "Daemon Messages"
317
Chapter 10: Default Event Classes and Types
Default Event Types
The following output from the espconfig command shows the default event types that
ESP includes on a system running the Linux OS:
linux# espconfig -list evtype
Event types for 8006913E029:
+----------+-----------+-------------------------------+---------+-------------+
| Class Id | Type Id |
Type Description
| Enabled | Log Enabled |
+----------+-----------+-------------------------------+---------+-------------+
|
4002|
2097408|
Configmon init|
Yes|
Yes|
|
4002|
2097409|
Sysinfo changed|
Yes|
Yes|
|
4002|
2097410|
Hardware installed|
Yes|
Yes|
|
4002|
2097411|
Harwdare de-installed|
Yes|
Yes|
|
4002|
2097412|
Software installed|
Yes|
Yes|
|
4002|
2097413|
Software de-installed|
Yes|
Yes|
|
4002|
2097414|
System change|
Yes|
Yes|
|
4002|
2097415|
Configuration error|
Yes|
Yes|
|
4002|
2097416|
ESP registered with SGI|
Yes|
Yes|
|
4002|
2097417|
ESP deregistered with SGI|
Yes|
Yes|
|
4002|
2097418|
ESP package updated|
Yes|
No|
|
4002|
2097419|
ESP package uninstalled|
Yes|
No|
|
4002|
2097420| ESP system information change|
Yes|
No|
|
4002|
2097421|
ESP profile(s) update|
Yes|
No|
|
4002|
340|Customer information is updated|
Yes|
No|
|
4000|
2097152|
Live event|
No|
No|
|
4000|
2097153|
System ID change|
Yes|
Yes|
|
4000|
2097154|
Power cycle|
Yes|
Yes|
|
4000|
2097155|
System reset|
Yes|
Yes|
|
4000|
2097156|
NMI|
Yes|
Yes|
|
4000|
2097157|
Panic (S/W)|
Yes|
Yes|
|
4000|
2097158|
Status report|
Yes|
Yes|
|
4000|
2097159|
Software error|
Yes|
Yes|
|
4000|
2097160|
Hardware error|
Yes|
Yes|
|
4000|
2097161|
No error|
Yes|
Yes|
|
4000|
2097162|
Registration|
Yes|
Yes|
|
4000|
2097163|
Deregistration|
Yes|
Yes|
|
4000|
2097164|
Power failure|
Yes|
Yes|
|
4000|
2097165|
System off|
Yes|
Yes|
|
4000|
2097166|
Interrupt|
Yes|
Yes|
|
4000|
2097167|
Panic (H/W)|
Yes|
Yes|
|
4000|
2097168|
Panic|
Yes|
Yes|
|
4000|
2097169| Controlled shutdown (unknown)|
Yes|
Yes|
|
4000|
2097170| Controlled shutdown (timeout)|
Yes|
Yes|
|
4000|
2097171|Controlled shutdown(1) (unknown|
Yes|
Yes|
318
ESP for the Linux OS
|
|
|
|
|
|
|
|
|
|
|
|
|
|
|
|
|
|
|
|
|
|
|
|
|
|
|
|
|
|
|
|
|
|
|
|
|
|
|
|
|
|
|
|
|
|
4000|
4000|
4000|
4000|
4000|
4000|
4000|
4000|
4000|
4000|
4000|
4000|
4000|
4000|
4000|
4000|
7100|
7100|
7100|
7100|
7100|
7100|
7100|
7100|
7110|
7110|
7110|
7110|
7110|
7110|
7110|
7110|
7130|
7130|
7130|
7130|
7130|
7130|
7130|
7130|
4005|
4005|
4005|
4005|
|
)|
2097182|
Controlled shutdown (1)|
2097183|
Controlled shutdown (2)|
2097184|
Controlled shutdown (3)|
2097185|
Controlled shutdown (4)|
2097186|
Controlled shutdown (5)|
2097187|
Controlled shutdown (6)|
2097190| Singleuser shutdown (unknown)|
2097191|Singleuser shutdown(1)(unknown)|
2097192|
Singleuser shutdown (1)|
2097193|
Singleuser shutdown (2)|
2097194|
Singleuser shutdown (3)|
2097195|
Singleuser shutdown (4)|
2097196|
Singleuser shutdown (5)|
2097197|
Singleuser shutdown (6)|
3761| Subscribe availability events|
3762|Unsubscribe availability events|
7000100|
Kernel Emergency|
7000101|
Kernel Alert|
7000102|
Kernel Critical|
7000103|
Kernel Error|
7000104|
Kernel Warning|
7000105|
Kernel Notice|
7000106|
Kernel Info|
7000107|
Kernel Debug|
7000110|
User Emergency|
7000111|
User Alert|
7000112|
User Critical|
7000113|
User Error|
7000114|
User Warning|
7000115|
User Notice|
7000116|
User Info|
7000117|
User Debug|
7000130|
Daemon Emergency|
7000131|
Daemon Alert|
7000132|
Daemon Critical|
7000133|
Daemon Error|
7000134|
Daemon Warning|
7000135|
Daemon Notice|
7000136|
Daemon Info|
7000137|
Daemon Debug|
2098176|
Diagnostic start|
2098177|
Diagnostic interrupted|
2098178|
Diagnostic end|
2098179|
Stress start|
|
Yes|
Yes|
Yes|
Yes|
Yes|
Yes|
Yes|
Yes|
Yes|
Yes|
Yes|
Yes|
Yes|
Yes|
Yes|
Yes|
Yes|
Yes|
Yes|
Yes|
Yes|
No|
No|
No|
Yes|
Yes|
Yes|
Yes|
No|
No|
No|
No|
Yes|
Yes|
Yes|
Yes|
No|
No|
No|
No|
Yes|
Yes|
Yes|
Yes|
|
Yes|
Yes|
Yes|
Yes|
Yes|
Yes|
Yes|
Yes|
Yes|
Yes|
Yes|
Yes|
Yes|
Yes|
Yes|
Yes|
No|
No|
No|
No|
No|
No|
No|
No|
No|
No|
No|
No|
No|
No|
No|
No|
No|
No|
No|
No|
No|
No|
No|
No|
Yes|
Yes|
Yes|
Yes|
319
Chapter 10: Default Event Classes and Types
|
4005|
2098180|
Stress end|
Yes|
Yes|
|
4005|
2098181|
SVP start|
Yes|
Yes|
|
4005|
2098182|
SVP end|
Yes|
Yes|
|
4005|
2098183|
SVP interrupted|
Yes|
Yes|
|
4005|
2098184|
Stress interrupted|
Yes|
Yes|
|
4001|
2097244|High aggregate context switch r|
Yes|
Yes|
|
|
|
ate|
|
|
|
4001|
2097217|Possible high floating point ex|
Yes|
Yes|
|
|
|
ception rate|
|
|
|
4001|
2097218|
High 1-minute load average|
Yes|
Yes|
|
4001|
2097246|Low average processor utilizati|
Yes|
Yes|
|
|
|
on|
|
|
|
4001|
2097219|High aggregate system call rate|
Yes|
Yes|
|
4001|
2097220| Busy executing in system mode|
Yes|
Yes|
|
4001|
2097221|High average processor utilizat|
Yes|
Yes|
|
|
|
ion|
|
|
|
4001|
2097249|System Group Manager slow servi|
Yes|
Yes|
|
|
|
ce response|
|
|
|
4001|
2097248|System Group Manager service pr|
Yes|
Yes|
|
|
|
obe failure|
|
|
|
4001|
2097226|
File system is filling up|
Yes|
Yes|
|
4001|
2097227| Severe demand for real memory|
Yes|
Yes|
|
4001|
2097228|
Low free swap space|
Yes|
Yes|
|
4001|
2097247|High number of saturated proces|
Yes|
Yes|
|
|
|
sors|
|
|
|
4001|
2097241|High per CPU processor utilizat|
Yes|
Yes|
|
|
|
ion|
|
|
|
4001|
2097239| High per CPU system call rate|
Yes|
Yes|
|
4001|
2097240|Some CPU busy executing in syst|
Yes|
Yes|
|
|
|
em mode|
|
|
|
4001|
2097230|High collision rate in packet s|
Yes|
Yes|
|
|
|
ends|
|
|
|
4001|
2097231|High network interface error ra|
Yes|
Yes|
|
|
|
te|
|
|
|
4001|
2097232|High network interface packet t|
Yes|
Yes|
|
|
|
ransfers|
|
|
|+----------+-----------+-------------------------------+---------+-------------+
320
ESP for the IRIX OS
ESP for the IRIX OS
Default Event Classes
The following output from the espconfig command shows the default event classes that
ESP includes on a system running the IRIX OS:
irix# espconfig -list evclass
ClassId Class description
------- -----------------1 "SCSI"
2 "I/O"
3 "Peripheral"
4 "Power Supply"
5 "Memory Parity"
6 "Memory ECC"
7 "System Error"
8 "System Board"
9 "NMI"
10 "File System"
11 "OS AS"
12 "OS VM"
13 "OS PROC"
14 "OS PDA"
15 "OS NUMA"
16 "OS SYSCALL"
17 "OS Memory"
18 "Kernel Module"
19 "Kernel XLV"
20 "Kernel Clock"
21 "Kernel Vnode"
22 "Kernel Fork"
23 "Kernel KMEM"
24 "Kernel File System"
25 "Kernel Heap"
26 "Kernel Stream"
27 "Net Kernel IFSWITCH"
28 "Net Kernel PS"
29 "Net Kernel Routing"
30 "Net Kernel Internal"
31 "Network Driver FDDI"
32 "Network Driver Fast Enet"
33 "Network Driver GIO Enet"
321
Chapter 10: Default Event Classes and Types
34
35
36
37
38
39
40
41
42
43
44
45
46
47
48
49
50
51
52
53
54
55
56
57
58
59
60
61
62
63
64
65
67
69
70
71
72
73
74
75
78
80
81
82
83
322
"Network Driver VME Fast Enet"
"Network Driver VME FXP Enet"
"Network Driver VME GFE Enet"
"Network Driver GIO FDDI"
"Network Driver VME FDDI"
"Network Driver IP22/6/8 Token"
"Network Driver PCI Fast Enet"
"Network Driver Everest Enet"
"Network Driver MACE Fast Enet"
"Network Kernel IFNET"
"Network Kernel MBUF"
"Network Kernel INPCB"
"Network Kernel BSD Init"
"Kernel"
"User"
"Saudit"
"Kona Command"
"Kona Timeout"
"Kona Resource"
"Kona Validity"
"GFX Command"
"GFX Validity"
"Venice Timeout"
"Venice Resource"
"Venice Validity"
"MGRAS Resource"
"MGRAS Command"
"MGRAS Timeout"
"MGRAS Validity"
"Newport Timeout"
"Newport Command"
"Newport Validity"
"System Controller"
"Net Driver ATM OC3 Everest"
"Net Kernel ATM SVC"
"Net Driver ATM PCI Speedracer"
"Net Kernel ATM TCPIP"
"Net Kernel ATM ARP"
"Net Driver ATM Lego"
"RAS"
"Kernel XTCI"
"Storage TP9100"
"Storage TP9400"
"CXFS"
"XFS"
ESP for the IRIX OS
84
85
4000
4002
4003
4004
4005
7001
"XVM"
"snmp"
"Availability"
"System Configuration"
"ESP Internal Events"
"ESP Event Manager"
"Diagnostic"
"Irix"
Default Event Types
The following output from the espconfig command shows the default event types that
ESP includes on a system running the IRIX OS:
irix# espconfig -list evtype
Event types for 351797:
+----------+-----------+-------------------------------+---------+-------------+
| Class Id | Type Id |
Type Description
| Enabled | Log Enabled |
+----------+-----------+-------------------------------+---------+-------------+
|
4000|
2097152|
Live event|
No|
No|
|
4000|
2097153|
System ID change|
Yes|
Yes|
|
4000|
2097154|
Power cycle|
Yes|
Yes|
|
4000|
2097155|
System reset|
Yes|
Yes|
|
4000|
2097156|
NMI|
Yes|
Yes|
|
4000|
2097157|
Panic (S/W)|
Yes|
Yes|
|
4000|
2097158|
Status report|
Yes|
Yes|
|
4000|
2097159|
Software error|
Yes|
Yes|
|
4000|
2097160|
Hardware error|
Yes|
Yes|
|
4000|
2097161|
No error|
Yes|
Yes|
|
4000|
2097162|
Registration|
Yes|
Yes|
|
4000|
2097163|
Deregistration|
Yes|
Yes|
|
4000|
2097164|
Power failure|
Yes|
Yes|
|
4000|
2097165|
System off|
Yes|
Yes|
|
4000|
2097166|
Interrupt|
Yes|
Yes|
|
4000|
2097167|
Panic (H/W)|
Yes|
Yes|
|
4000|
2097168|
Panic|
Yes|
Yes|
|
4000|
2097169| Controlled shutdown (unknown)|
Yes|
Yes|
|
4000|
2097170| Controlled shutdown (timeout)|
Yes|
Yes|
|
4000|
2097171|Controlled shutdown(1) (unknown|
Yes|
Yes|
|
|
|
)|
|
|
|
4000|
2097182|
Controlled shutdown (1)|
Yes|
Yes|
|
4000|
2097183|
Controlled shutdown (2)|
Yes|
Yes|
|
4000|
2097184|
Controlled shutdown (3)|
Yes|
Yes|
|
4000|
2097185|
Controlled shutdown (4)|
Yes|
Yes|
323
Chapter 10: Default Event Classes and Types
|
|
|
|
|
|
|
|
|
|
|
|
|
|
|
|
|
|
|
|
|
|
|
|
|
|
|
|
|
|
|
|
|
|
|
|
|
|
|
|
|
|
|
|
|
324
4000|
4000|
4000|
4000|
4000|
4000|
4000|
4000|
4000|
4000|
4000|
4000|
4003|
4003|
4003|
4003|
4003|
|
4003|
4003|
4003|
4003|
4003|
4003|
|
4003|
4003|
4003|
|
4003|
4003|
|
4003|
4003|
4003|
4003|
4003|
|
4003|
4003|
|
4003|
|
4003|
4003|
2097186|
Controlled shutdown (5)|
2097187|
Controlled shutdown (6)|
2097190| Singleuser shutdown (unknown)|
2097191|Singleuser shutdown(1)(unknown)|
2097192|
Singleuser shutdown (1)|
2097193|
Singleuser shutdown (2)|
2097194|
Singleuser shutdown (3)|
2097195|
Singleuser shutdown (4)|
2097196|
Singleuser shutdown (5)|
2097197|
Singleuser shutdown (6)|
3761| Subscribe availability events|
3762|Unsubscribe availability events|
2097424|
EventMon Started|
2097425|
EventMon Stopped|
2097426|
Eventmon invalid CPU command|
2097427|
Eventmon invalid FPE command|
2097428|Eventmon mutex initialization f|
|
ailure|
2097429|
Eventmon thread init error|
2097430|
Eventmon no input buffers|
2097431|
Eventmon can't find string|
2097432|
Eventmon too many strings|
2097433| Eventmon database table empty|
2097434|Eventmon condition variable fai|
|
lure|
2097435|
Eventmon fatal API error|
2097436|
Eventmon Non fatal API Error|
2097437|Eventmon cannot open amticker t|
|
imestamp file|
2097438| Eventmon database init failure|
2097439|Eventmon database library load |
|
failure|
2097440|
esphttpd started|
2097441|
esphttpd stopped|
2097442|
esphttpd invalid CPU command|
2097443|
esphttpd invalid FPE|
2097444|esphttpd mutex initialization f|
|
ailure|
2097445|
esphttpd thread error|
2097446|esphttpd condition variable fai|
|
lure|
2097447|esphttpd thread allocation erro|
|
r|
2097448|
esphttpd socket bind error|
2097449|
esphttpd socket listen error|
Yes|
Yes|
Yes|
Yes|
Yes|
Yes|
Yes|
Yes|
Yes|
Yes|
Yes|
Yes|
No|
No|
No|
No|
No|
|
No|
No|
No|
No|
No|
No|
|
No|
No|
No|
|
No|
No|
|
No|
No|
No|
No|
No|
|
No|
No|
|
No|
|
No|
No|
Yes|
Yes|
Yes|
Yes|
Yes|
Yes|
Yes|
Yes|
Yes|
Yes|
No|
No|
No|
No|
No|
No|
No|
|
No|
No|
No|
No|
No|
No|
|
No|
No|
No|
|
No|
No|
|
No|
No|
No|
No|
No|
|
No|
No|
|
No|
|
No|
No|
ESP for the IRIX OS
|
|
|
|
|
|
|
|
|
|
|
|
|
|
|
|
|
|
|
|
|
|
|
|
|
|
|
|
|
|
|
|
|
|
|
|
|
|
|
|
|
|
|
|
|
4003|
4003|
4003|
4003|
4003|
4003|
4003|
4003|
4003|
4003|
|
4003|
|
4003|
|
4003|
4003|
4003|
4003|
4003|
4003|
4003|
4003|
4003|
4004|
4004|
1|
1|
1|
1|
1|
|
1|
|
1|
|
2|
3|
1|
|
1|
1|
1|
2|
2|
2097450|
esphttpd missing library|
2097451|
esphttpd resource path error|
2097452|esphttpd resource path error(1)|
2097453|esphttpd resource path error(2)|
2097454|
esphttpd invalid port number|
2097455|
esphttpd database init error|
2097456|
esphttpd IP load error|
2097457|
esphttpd username error|
2097458|
esphttpd password error|
2097459|esphttpd database connection fa|
|
iled|
2097460|Eventmon cannot write amticker |
|
timestamp file|
2097461|Eventmon cannot find amdiag fil|
|
e|
2097462|
NodeChange for SgmClient|
2097463|
ESP started|
2097464|
ESP stopped|
2097465|
ESP set SGM node|
2097466|
ESP unset SGM node|
2097467|
ESP SGM client added|
2097468|
ESP SGM client subscribed|
2097469|
ESP SGM client unsubscribed|
2097470|
ESP SGM client deleted|
2097920|
Configuration Event|
2097921|
Error Event|
1|
SCSI ctrl init failed|
2|
SCSI command timed out|
3|
SCSI hard error|
4|
SCSI bus reset|
5|SCSI ctrl h/w (sram parity erro|
|
r)|
6|SCSI ctrl h/w (sram parity erro|
|
r bank0)|
7|SCSI ctrl h/w (sram parity erro|
|
r bank1)(1)|
8|
XIO bus error|
9|
Keyboard error|
10|SCSI ctrl h/w (sram parity erro|
|
r bank1)(2)|
11|
SCSI bus error|
12|
SCSI debug|
13|
SCSI target or bus error|
14|
PCI bridge error|
15|
GIO bridge error|
No|
No|
No|
No|
No|
No|
No|
No|
No|
No|
|
No|
|
No|
|
Yes|
No|
No|
No|
No|
No|
No|
No|
No|
Yes|
Yes|
Yes|
Yes|
Yes|
Yes|
Yes|
|
Yes|
|
Yes|
|
Yes|
Yes|
Yes|
|
Yes|
Yes|
Yes|
Yes|
Yes|
No|
No|
No|
No|
No|
No|
No|
No|
No|
No|
|
No|
|
No|
|
No|
No|
No|
No|
No|
No|
No|
No|
No|
No|
No|
Yes|
Yes|
Yes|
Yes|
Yes|
|
Yes|
|
Yes|
|
Yes|
Yes|
Yes|
|
Yes|
Yes|
Yes|
Yes|
Yes|
325
Chapter 10: Default Event Classes and Types
|
|
|
|
|
|
|
|
|
|
|
|
|
|
|
|
|
|
|
|
|
|
|
|
|
|
|
|
|
|
|
|
|
|
|
|
|
|
|
|
|
|
|
|
|
326
4|
5|
5|
5|
5|
5|
5|
7|
7|
7|
7|
8|
8|
8|
8|
8|
8|
|
4|
5|
5|
8|
8|
8|
8|
8|
6|
7|
7|
7|
7|
7|
|
5|
9|
5|
8|
8|
8|
8|
8|
6|
6|
6|
6|
16|
Power fail detected(1)|
17|
Parity error in SIMM(1)|
18|
Parity error in SIMM(2)|
19| Panic parity error in SIMM(1)|
20| Fatal parity error in SIMM(1)|
21| Panic parity error in SIMM(2)|
22|
Parity error in SIMM(3)|
23|
Bus error(1)|
24|
Bus error(2)|
25|
Memory copy error(src)|
26|
Memory copy error(dest)|
27|
TOD battery(1)|
28|
TOD battery(2)|
29|
TOD battery(3)|
30|
TOD battery(4)|
31|
TOD battery(5)|
32|TOD battery(load nvram info err|
|
or)|
33|
Power fail detected(2)|
34|
Fatal memory parity error(2)|
35|
Parity error in SIMM|
36|
TOD battery(6)|
37|
TOD battery(7)|
38|
TOD battery(8)|
39|
TOD battery(9)|
40|
TOD battery(10)|
41|
Fatal memory ECC error|
42|
Bus error (TCC)|
43|
Bus error (5)|
44|
Bus error (6)|
45|
Bus error (internal)|
46|Bus error (exception on IDLE st|
|
ack)|
47|
Parity error in SIMM(4)|
48|
NMI(1)|
49|
Parity error in SIMM(5)|
50|
TOD battery(11)|
51|
TOD battery(12)|
52|
TOD battery(13)|
53|
TOD battery(14)|
54|
TOD battery(15)|
55|
Memory ECC (soft) error|
56|
Memory ECC (hard) error|
57|
Parity error in DIMM(phy-1)|
58|
Parity error in DIMM(phy-2)|
Yes|
Yes|
Yes|
Yes|
Yes|
Yes|
Yes|
Yes|
Yes|
Yes|
Yes|
Yes|
Yes|
Yes|
Yes|
Yes|
Yes|
|
Yes|
Yes|
Yes|
Yes|
Yes|
Yes|
Yes|
Yes|
Yes|
Yes|
Yes|
Yes|
Yes|
Yes|
|
Yes|
Yes|
Yes|
Yes|
Yes|
Yes|
Yes|
Yes|
Yes|
Yes|
Yes|
Yes|
Yes|
Yes|
Yes|
Yes|
Yes|
Yes|
Yes|
Yes|
Yes|
Yes|
Yes|
Yes|
Yes|
Yes|
Yes|
Yes|
Yes|
|
Yes|
Yes|
Yes|
Yes|
Yes|
Yes|
Yes|
Yes|
Yes|
Yes|
Yes|
Yes|
Yes|
Yes|
|
Yes|
Yes|
Yes|
Yes|
Yes|
Yes|
Yes|
Yes|
Yes|
Yes|
Yes|
Yes|
ESP for the IRIX OS
|
|
|
|
|
|
|
|
|
|
|
|
|
|
|
|
|
|
|
|
|
|
|
|
|
|
|
|
|
|
|
|
|
|
|
|
|
|
|
|
|
|
|
|
|
6|
6|
9|
9|
8|
8|
8|
8|
8|
7|
7|
7|
7|
7|
7|
7|
7|
10|
10|
|
10|
10|
10|
10|
10|
10|
10|
10|
|
10|
11|
12|
12|
12|
12|
12|
13|
14|
14|
14|
14|
14|
14|
15|
15|
59|
Parity error in DIMM(Bus-1)|
60|
Parity error in DIMM(Bus-2)|
61|
NMI(2)|
62|
NMI(3)|
63|
TOD battery(16)|
64|
TOD battery(17)|
65|
TOD battery(18)|
66|
TOD battery(19)|
67|
TOD battery(20)|
68|
Bus error(7)|
69|
Cache error(1)|
70|
Cache error(2)|
71|
Cache error(3)|
72|
Cache error(4)|
73|
Cache error(5)|
74|
Bus error(8)|
75|
Bus error(9)|
76|
efs root mount failed|
77|Not enough filesystem quota str|
|
uctures|
78|
Bad magic number|
79|
Unexpect user/project ID|
80|
Disk block timer zero|
81|
inode zero|
82|
Re-init disk quota structure|
83|
fs too large for kernel type|
85| vnode not char/block device(1)|
86|Bad vnode found by console driv|
|
er|
87| vnode not char/block device(2)|
88|
Unexpected PMAP type|
89|
Memory page not freed|
90|
Memory page not found|
91|
Page cache error|
92|
Swap cache error|
93|
Privilege memory pool error|
94|
Watch point stepover|
95|
Driver locking error(1)|
96|
Driver locking error(2)|
97|
Unknown driver routine|
98|
Cross processor interrupt(1)|
99|
Cross processor interrupt(2)|
100|
R10K spec dma error|
101|
Process fork error|
102|
NUMA service error(1)|
Yes|
Yes|
Yes|
Yes|
Yes|
Yes|
Yes|
Yes|
Yes|
Yes|
Yes|
Yes|
Yes|
Yes|
Yes|
Yes|
Yes|
Yes|
Yes|
|
Yes|
Yes|
Yes|
Yes|
Yes|
Yes|
Yes|
Yes|
|
Yes|
Yes|
Yes|
Yes|
Yes|
Yes|
Yes|
Yes|
Yes|
Yes|
Yes|
Yes|
Yes|
Yes|
Yes|
Yes|
Yes|
Yes|
Yes|
Yes|
Yes|
Yes|
Yes|
Yes|
Yes|
Yes|
Yes|
Yes|
Yes|
Yes|
Yes|
Yes|
Yes|
Yes|
Yes|
|
Yes|
Yes|
Yes|
Yes|
Yes|
Yes|
Yes|
Yes|
|
Yes|
Yes|
Yes|
Yes|
Yes|
Yes|
Yes|
Yes|
Yes|
Yes|
Yes|
Yes|
Yes|
Yes|
Yes|
Yes|
327
Chapter 10: Default Event Classes and Types
|
|
|
|
|
|
|
|
|
|
|
|
|
|
|
|
|
|
|
|
|
|
|
|
|
|
|
|
|
|
|
|
|
|
|
|
|
|
|
|
|
|
|
|
|
328
15|
15|
15|
15|
16|
16|
17|
17|
17|
17|
17|
17|
17|
17|
17|
17|
17|
17|
17|
17|
17|
|
17|
|
17|
17|
17|
17|
17|
17|
17|
17|
|
17|
10|
18|
19|
19|
19|
20|
21|
|
21|
21|
22|
103|
MLD set topology error|
104|
NUMA MLD error(1)|
105|
NUMA MLD error(2)|
106|
NUMA service error(2)|
107|
Invalid vfault|
108|
Lpages conversion error|
84|
Invalid node number|
109|
Freeing unaligned memory|
110|
Invalid virtual page|
111|
Cannot swap in K2SEG(1)|
112|
Cannot swap in K2SEG(2)|
113|
Cannot swap in K2SEG(3)|
114| Insufficient memory on node(1)|
115| Insufficient memory on node(2)|
116| Insufficient memory on node(3)|
117|
R10K cannot allocate page(1)|
118|
R10K cannot allocate page(2)|
119|
R10K cannot allocate page(3)|
120|
Poison page panic|
121|
Page allocation failed|
122|Dequeue from free page list err|
|
or(1)|
123|Dequeue from free page list err|
|
or(2)|
124| Invalid page freeing error(1)|
125| Invalid page freeing error(2)|
126| Invalid page freeing error(3)|
127|
VCE page allocation failed|
128|
Page already free|
129| Duplicate virtual page number|
130|
Invalid cache operation|
131|Memory allocation error for MFH|
|
I|
132|
Logical swap fail|
133|
Bad permissions|
134|
Mload missing kernname|
135|
XLV no failover(1)|
136|
XLV unable to open|
137|
XLV no failover(2)|
138|
Table Overflow|
139|Vnode pass through not init'd(1|
|
)|
140|
Vnode on free list(1)|
141|
Negative vnode count(1)|
142|
Fork failed|
Yes|
Yes|
Yes|
Yes|
Yes|
Yes|
Yes|
Yes|
Yes|
Yes|
Yes|
Yes|
Yes|
Yes|
Yes|
Yes|
Yes|
Yes|
Yes|
Yes|
Yes|
|
Yes|
|
Yes|
Yes|
Yes|
Yes|
Yes|
Yes|
Yes|
Yes|
|
Yes|
Yes|
Yes|
Yes|
Yes|
Yes|
Yes|
Yes|
|
Yes|
Yes|
Yes|
Yes|
Yes|
Yes|
Yes|
Yes|
Yes|
Yes|
Yes|
Yes|
Yes|
Yes|
Yes|
Yes|
Yes|
Yes|
Yes|
Yes|
Yes|
Yes|
Yes|
Yes|
|
Yes|
|
Yes|
Yes|
Yes|
Yes|
Yes|
Yes|
Yes|
Yes|
|
Yes|
Yes|
Yes|
Yes|
Yes|
Yes|
Yes|
Yes|
|
Yes|
Yes|
Yes|
ESP for the IRIX OS
|
|
|
|
|
|
|
|
|
|
|
|
|
|
|
|
|
|
|
|
|
|
|
|
|
|
|
|
|
|
|
|
|
|
|
|
|
|
|
|
|
|
|
|
|
23|
23|
24|
25|
25|
25|
25|
25|
25|
25|
25|
25|
25|
26|
26|
26|
|
26|
26|
|
26|
|
26|
26|
26|
26|
27|
28|
28|
29|
30|
30|
30|
30|
30|
29|
31|
31|
31|
31|
31|
31|
31|
31|
31|
143|
No heap zone|
144|
No zone index|
145|
Buffer overlap|
146|
Invalid Size(1)|
147|
Null pointer(1)|
148|
Null size(1)|
149|
Use count wrong|
150|
Pointer already free(1)|
151|
Bad pointer|
152|
Pointer already free(2)|
153|
Invalid Size(2)|
154|
Null pointer(2)|
155|
Null size(2)|
156|
Cannot allocate qband(1)|
157|
Cannot allocate qband(2)|
158|Cannot allocate space for mux_n|
|
ode|
159|
Unknown event|
160|Cannot allocate memory for mux_|
|
edge(1)|
161|Cannot allocate memory for mux_|
|
edge(2)|
162|
Cannot allocate qband(3)|
163|Cannot allocate stream event(1)|
164|Cannot allocate stream event(2)|
165|
Message out of order|
166|
hwgraph no vertex|
167|
Bad service|
168|
Invalid service|
169|
Memory leak warning(1)|
170|
Address out of range|
171|
No memory for net proc(1)|
172|
CPU not used|
173|
No memory for net proc(2)|
174|
Kmemory allocation error|
175|
Memory leak warning(2)|
176|
Receive port error|
178|
Unsupported address|
179|
MAC programming error|
180|
Stray interrupt|
181|
FDDI bad interrupt status|
182|
CAMEL NP error|
183|
Bad hwgraph vhandle|
184|
Bad unit number|
185|
No memory for frame filter|
Yes|
Yes|
Yes|
Yes|
Yes|
Yes|
Yes|
Yes|
Yes|
Yes|
Yes|
Yes|
Yes|
Yes|
Yes|
Yes|
|
Yes|
Yes|
|
Yes|
|
Yes|
Yes|
Yes|
Yes|
Yes|
Yes|
Yes|
Yes|
Yes|
Yes|
Yes|
Yes|
Yes|
Yes|
Yes|
Yes|
Yes|
Yes|
Yes|
Yes|
Yes|
Yes|
Yes|
Yes|
Yes|
Yes|
Yes|
Yes|
Yes|
Yes|
Yes|
Yes|
Yes|
Yes|
Yes|
Yes|
Yes|
Yes|
Yes|
|
Yes|
Yes|
|
Yes|
|
Yes|
Yes|
Yes|
Yes|
Yes|
Yes|
Yes|
Yes|
Yes|
Yes|
Yes|
Yes|
Yes|
Yes|
Yes|
Yes|
Yes|
Yes|
Yes|
Yes|
Yes|
Yes|
Yes|
329
Chapter 10: Default Event Classes and Types
|
|
|
|
|
|
|
|
|
|
|
|
|
|
|
|
|
|
|
|
|
|
|
|
|
|
|
|
|
|
|
|
|
|
|
|
|
|
|
|
|
|
|
|
|
330
31|
31|
31|
31|
31|
31|
31|
31|
32|
32|
32|
32|
32|
32|
32|
32|
32|
32|
32|
32|
32|
32|
32|
32|
32|
33|
34|
34|
34|
34|
34|
34|
34|
34|
34|
34|
34|
35|
35|
36|
36|
36|
34|
36|
37|
186|
NOMEM too many devices|
187|
hwgraph dev addr error|
188|
No memory(1)|
189|
No memory(2)|
190|
Memory alignment error|
191|
No memory(3)|
192|
ISR installation error|
193|
Hwgraph no device vhandle|
194| Interrupt adapter check status|
195|
Statistics overflow|
196|
Need more rxds|
197|
No board found|
198|
10MB physical memory only|
199|
No enet carrier(1)|
200|
Full duplex unsupported|
201|
Auto negation failed|
202|
No enet carrier(2)|
203|
Netlink restored|
204|
Remote fault|
205|
Jabber detected|
206|
hwgraph no vertex|
207|
Kmemory allocation error|
208|
Memory fail to st big endian|
209|
Interrupt setup failed|
210|
hwgraph no vertex info|
211|
No enet carrier|
212|
Assertion routine|
213|
No DMA space|
214|
No VME space|
215|
DMA error|
216|
About to die(1)|
217|
Board not detected|
218|
About to die(2)|
219|
Remote fault|
220|
Jabber detected|
221|
Link OK(1)|
222|
Link down|
223|
Memory base addr missing(1)|
224|
Memory base addr missing(2)|
225|
Remote fault|
226|
Jabber detected|
227|
Link down|
228|
Link OK(2)|
229|
Channel overrun|
230|Memory allocation fail for fram|
Yes|
Yes|
Yes|
Yes|
Yes|
Yes|
Yes|
Yes|
Yes|
Yes|
Yes|
Yes|
Yes|
Yes|
Yes|
Yes|
Yes|
Yes|
Yes|
Yes|
Yes|
Yes|
Yes|
Yes|
Yes|
Yes|
Yes|
Yes|
Yes|
Yes|
Yes|
Yes|
Yes|
Yes|
Yes|
Yes|
Yes|
Yes|
Yes|
Yes|
Yes|
Yes|
Yes|
Yes|
Yes|
Yes|
Yes|
Yes|
Yes|
Yes|
Yes|
Yes|
Yes|
Yes|
Yes|
Yes|
Yes|
Yes|
Yes|
Yes|
Yes|
Yes|
Yes|
Yes|
Yes|
Yes|
Yes|
Yes|
Yes|
Yes|
Yes|
Yes|
Yes|
Yes|
Yes|
Yes|
Yes|
Yes|
Yes|
Yes|
Yes|
Yes|
Yes|
Yes|
Yes|
Yes|
Yes|
Yes|
Yes|
Yes|
ESP for the IRIX OS
|
|
|
|
|
|
|
|
|
|
|
|
|
|
|
|
|
|
|
|
|
|
|
|
|
|
|
|
|
|
|
|
|
|
|
|
|
|
|
|
|
|
|
|
|
|
38|
38|
38|
38|
38|
38|
38|
38|
38|
38|
38|
|
39|
39|
40|
40|
40|
40|
40|
|
40|
|
40|
40|
|
40|
40|
|
40|
40|
40|
40|
40|
40|
40|
40|
|
41|
41|
41|
41|
41|
41|
41|
|
e filter(1)|
231|
Cannot lock mutex IFNET|
232|
Unknow line state|
233|
Membuf has MT_FREE(1)|
234|
Membuf has MT_FREE(2)|
235|
Membuf has MT_FREE(3)|
236|
DMA corruption|
237|
Bad blen|
238|
Bad membuf chain(1)|
239|
Bad membuf chain(2)|
240|
ifnet driver re-ntered|
241|Memory allocation fail for fram|
|
e filter(2)|
242|
Assertion|
243|
Memory allocation fail|
244|
Hwgraph cannot add vertex|
245|
Memory allocation failure|
246|
Shared memory null PIO map|
247|
ioctl reset failure|
248|Memory allocation failure PGS f|
|
or geninfo|
249|PCI IO DMA map allocation faile|
|
d|
250|
ioctl cannot get MAC addr|
251|hwgraph missing controller vert|
|
ex|
252|
Firmware missing|
253|Memory failed to allocate >2 RR|
|
BS|
254|
ioctl event error|
255|
ioctl unimplemented command|
256|
ioctl unknown event|
257|
Link up|
258|
Link down|
259|
Firmware init fail|
260|
Firmware init error|
261|Hwgraph could not create net ve|
|
rtex|
262|
Board not in master slot|
263|
Kernel rebuild needed(1)|
264|
Board not in master IO4|
265|
Kernel rebuild needed(2)|
266|
Adapter number in use|
267|
Adapter not configured|
268|
Bad enet address|
|
Yes|
Yes|
Yes|
Yes|
Yes|
Yes|
Yes|
Yes|
Yes|
Yes|
Yes|
|
Yes|
Yes|
Yes|
Yes|
Yes|
Yes|
Yes|
|
Yes|
|
Yes|
Yes|
|
Yes|
Yes|
|
Yes|
Yes|
Yes|
Yes|
Yes|
Yes|
Yes|
Yes|
|
Yes|
Yes|
Yes|
Yes|
Yes|
Yes|
Yes|
|
Yes|
Yes|
Yes|
Yes|
Yes|
Yes|
Yes|
Yes|
Yes|
Yes|
Yes|
|
Yes|
Yes|
Yes|
Yes|
Yes|
Yes|
Yes|
|
Yes|
|
Yes|
Yes|
|
Yes|
Yes|
|
Yes|
Yes|
Yes|
Yes|
Yes|
Yes|
Yes|
Yes|
|
Yes|
Yes|
Yes|
Yes|
Yes|
Yes|
Yes|
331
Chapter 10: Default Event Classes and Types
|
|
|
|
|
|
|
|
|
|
|
|
|
|
|
|
|
|
|
|
|
|
|
|
|
|
|
|
|
|
|
|
|
|
|
|
|
|
|
|
|
|
|
|
|
332
42|
42|
42|
42|
42|
42|
42|
42|
43|
|
44|
|
45|
46|
47|
47|
47|
47|
47|
47|
47|
47|
47|
47|
47|
47|
47|
18|
18|
18|
18|
|
18|
|
18|
18|
18|
18|
18|
18|
18|
18|
18|
18|
18|
269|
Cannot set interrupt vector|
270|
Invalid enet address(2)|
271|
Probe failed to find device|
272|
RX error, FIFO overflow|
273|
TX link failed|
274|
TX memory error|
275|
Jabber detected|
276|
Remote fault|
277|Memory allocation failure for m|
|
ulticast|
278|Memory request with incorrect s|
|
ize|
279|
Socket unlocked|
280|
Socket zone init failed|
281|
Exception count on exit|
282|
Swap block error|
283|
Tile cache dirty|
284|
Low on kernel memory|
285|
No thread|
286|
MFREE map overflow|
287|
Bad free size for bitmap(1)|
288|
Bad free size for bitmap(2)|
289|
Bitmap overflow|
290|
No free slot for rmap log|
291|
Bad device|
292|
No interactive reboot|
293|
No standalone exec|
294|
mload no ksyms|
295|
mload bootp kernal|
296|
mload registration fail|
297|mload dynamic load module faile|
|
d|
298|mload dynamic attach module fai|
|
led|
299|
mload no symbol table|
300|
Object file not ELF format|
301|
mload object unreadable|
302|
mload driver init failed|
303|
mload stropen failed|
304|
mload strload failed|
305|
mload strload not ELF format|
306|
mload strload unreadable|
307|
mload strload init failed|
308|
mload unload failed|
309|
mload strstub no queue(1)|
Yes|
Yes|
Yes|
Yes|
Yes|
Yes|
Yes|
Yes|
Yes|
|
Yes|
|
Yes|
Yes|
Yes|
Yes|
Yes|
Yes|
Yes|
Yes|
Yes|
Yes|
Yes|
Yes|
Yes|
Yes|
Yes|
Yes|
Yes|
Yes|
Yes|
|
Yes|
|
Yes|
Yes|
Yes|
Yes|
Yes|
Yes|
Yes|
Yes|
Yes|
Yes|
Yes|
Yes|
Yes|
Yes|
Yes|
Yes|
Yes|
Yes|
Yes|
Yes|
|
Yes|
|
Yes|
Yes|
Yes|
Yes|
Yes|
Yes|
Yes|
Yes|
Yes|
Yes|
Yes|
Yes|
Yes|
Yes|
Yes|
Yes|
Yes|
Yes|
Yes|
|
Yes|
|
Yes|
Yes|
Yes|
Yes|
Yes|
Yes|
Yes|
Yes|
Yes|
Yes|
Yes|
ESP for the IRIX OS
|
|
|
|
|
|
|
|
|
|
|
|
|
|
|
|
|
|
|
|
|
|
|
|
|
|
|
|
|
|
|
|
|
|
|
|
|
|
|
|
|
|
|
|
|
18|
18|
18|
18|
18|
47|
47|
47|
47|
47|
47|
47|
47|
47|
|
47|
|
47|
|
47|
|
47|
|
47|
|
48|
48|
48|
48|
48|
|
48|
|
48|
48|
47|
|
47|
|
48|
47|
47|
48|
48|
49|
310| mload strstub no symbol table|
311|
mload strstub not ELF format|
312|
mload strstub unreadable|
313|
mload strstub init failed|
314|
mload strstub no queue(2)|
315|
Probe DMA failed|
316|
SCHED hits bad color|
317|
Callouts allocation failed|
318|
vnode set EATTR failed|
319|
kmem zone too small|
320|
Select device no setting|
321|
PD flush error nfs3|
322|
chunkcommit bad vop|
423|Frame scheduler [slave FRS not |
|
found]|
424|Frame scheduler [invalid state |
|
during interrupt]|
425|Frame scheduler [illegal dispat|
|
ch state]|
426|Frame scheduler [invalid dispat|
|
ch state]|
427|Frame scheduler [invalid new at|
|
tr]|
1752|R4K badaddr for K2 impacting pe|
|
rformance|
1753|
Process killed [errno]|
1754|Process killed [limit exceeded]|
1755|
Process killed [lock stack]|
1756|
Process killed [grow stack]|
1757|Process trapped [but signal hel|
|
d or ignored]|
1758|R4K badaddr for K0 impacting pe|
|
rformance|
1759|
Tlbmiss(1) [invalid badaddr]|
3010|Process core dump - Trap on CPU|
1760|R4K badaddr for K2 wired impact|
|
ing performance|
1761|R4K badaddr for K2 impacting ke|
|
rn performance|
1762|
Tlbmiss(2) [invalid badaddr]|
1763| Tlbmis(User) [invalid badaddr]|
1764|
Too many BADVA|
1765|
Process referenced bad addr|
1766|
Unknown branch instruction|
1770|Sat_pn_start with existing sat_|
Yes|
Yes|
Yes|
Yes|
Yes|
Yes|
Yes|
Yes|
Yes|
Yes|
Yes|
Yes|
Yes|
Yes|
|
Yes|
|
Yes|
|
Yes|
|
Yes|
|
Yes|
|
Yes|
Yes|
Yes|
Yes|
Yes|
|
Yes|
|
Yes|
Yes|
Yes|
|
Yes|
|
Yes|
Yes|
Yes|
Yes|
Yes|
Yes|
Yes|
Yes|
Yes|
Yes|
Yes|
Yes|
Yes|
Yes|
Yes|
Yes|
Yes|
Yes|
Yes|
Yes|
|
Yes|
|
Yes|
|
Yes|
|
Yes|
|
Yes|
|
Yes|
No|
Yes|
Yes|
No|
|
Yes|
|
Yes|
No|
Yes|
|
Yes|
|
Yes|
Yes|
Yes|
Yes|
Yes|
Yes|
333
Chapter 10: Default Event Classes and Types
|
|
|
|
|
|
|
|
|
|
|
|
|
|
|
|
|
|
|
|
|
|
|
|
|
|
|
|
|
|
|
|
|
|
|
|
|
|
|
|
|
|
|
|
|
334
|
49|
|
47|
|
47|
47|
47|
47|
47|
|
47|
|
47|
|
47|
47|
|
47|
47|
47|
47|
47|
47|
47|
47|
47|
47|
47|
|
47|
|
47|
47|
47|
47|
|
48|
|
50|
50|
51|
51|
51|
51|
|
pn|
1771|Sat_pn_start without existing s|
|
at_pn|
1772|Allocated more memory than clea|
|
red|
1773|
Root device not available|
1774|
Bad prom swap|
1775|
Could not allocate nbufs|
1776|
Reconfigure nbufs and reboot|
1777|Frame scheduler [inavlid recove|
|
ry mode]|
1778|Frame scheduler [invalid intr s|
|
ource fire]|
1779|Frame scheduler [invalid intr s|
|
ource reset]|
1780| Frame scheduler [invalid attr]|
1788|Could not allocate job for proc|
|
0|
1789|
Biophysio Failed userdma|
1790| Invalid information label add|
1791|
Invalid label add|
1792|
Preemption with no valid rsa|
1793|
Runable == 2 no rsa(1)|
1794|
Runable == 2 no rsa(2)|
1795|
Illegal request to yield|
1796|
Rbid set for nid but no rsa|
1797|
Dyield nid bad rsa|
1798|
Illegal dyield call|
1799|Table inconsistent with relocat|
|
ion entries(1)|
1800|Table inconsistent with relocat|
|
ion entries(2)|
1801|
Symbol not found|
1802|
Paging daemon not running|
1803|
Swap allocation overflow|
1804|Memory deadlock with no one to |
|
kill|
1805|Process killed due to insuffici|
|
ent memory|
2100|
ARM interrupt error|
2101|
GE interrupt error|
2102|
FIFO timeout|
2103|
Swapbuffer timeout(1)|
2104|
Retrace event timeout|
2105|
Swapbuffer timeout(2)|
|
Yes|
|
Yes|
|
Yes|
Yes|
Yes|
Yes|
Yes|
|
Yes|
|
Yes|
|
Yes|
Yes|
|
Yes|
Yes|
Yes|
Yes|
Yes|
Yes|
Yes|
Yes|
Yes|
Yes|
Yes|
|
Yes|
|
Yes|
Yes|
Yes|
Yes|
|
Yes|
|
Yes|
Yes|
Yes|
Yes|
Yes|
Yes|
|
Yes|
|
Yes|
|
Yes|
Yes|
Yes|
Yes|
Yes|
|
Yes|
|
Yes|
|
Yes|
Yes|
|
Yes|
Yes|
Yes|
Yes|
Yes|
Yes|
Yes|
Yes|
Yes|
Yes|
Yes|
|
Yes|
|
Yes|
Yes|
Yes|
Yes|
|
Yes|
|
Yes|
Yes|
Yes|
Yes|
Yes|
Yes|
ESP for the IRIX OS
|
|
|
|
|
|
|
|
|
|
|
|
|
|
|
|
|
|
|
|
|
|
|
|
|
|
|
|
|
|
|
|
|
|
|
|
|
|
|
|
|
|
|
|
|
52|
50|
50|
51|
51|
50|
50|
50|
50|
51|
52|
53|
53|
53|
52|
51|
51|
51|
52|
51|
54|
|
54|
|
54|
55|
55|
55|
55|
56|
56|
57|
|
58|
57|
59|
56|
56|
56|
56|
56|
57|
57|
57|
|
2106| Illegal hardware configuration|
2107|
XG error(1)|
2108|
XG error(2)|
2109|
Memory timeout|
2110|
Textport timeout|
2111|
XG error(3)|
2112|
TBUS/ARM error|
2113|
Unrecognized command|
2114|
Graphics error|
2115|
Checkpipe timeout|
2116|
DMA overflow(1)|
2117|
XG RAM parity error|
2118|
XG RAM invalid error|
2119|
XG bus parity error|
2120|
DMA overflow(2)|
2121|
Mopup timeout|
2122|
DMA timeout|
2123|
Selectfeed timeout|
2124|
I/O space exhausted|
2125|
Context deactivation timeout|
2126|Process attempting IrisGL and O|
|
penGL at the same time(1)|
2127|Process attempting IrisGL and O|
|
penGL at the same time(2)|
2128|
Unrecognized command|
2129|
Lost clip id(1)|
2130|
Lost clip id(2)|
2131|
Lost clip id(3)|
2132|
Process not bound to rn|
2692|
Swapbuffer timeout|
2693|
Retrace event timeout|
2694|Board manager failed to flush F|
|
IFO|
2695|
FCG error|
2696|
FIFO overflow|
2697|
Unrecognized interrupt|
2698|
FIFO timeout|
2699|
Deactivation timeout|
2700|
DMA timeout|
2701|
Pickfeed timeout|
2702|
Vcstage timeout|
2703|
Hardware incompatibility(1)|
2704|
Hardware incompatibility(2)|
2705|Illegal hardware configuration(|
|
RM4)(1)|
Yes|
Yes|
Yes|
Yes|
Yes|
Yes|
Yes|
Yes|
Yes|
Yes|
Yes|
Yes|
Yes|
Yes|
Yes|
Yes|
Yes|
Yes|
Yes|
Yes|
Yes|
|
Yes|
|
Yes|
Yes|
Yes|
Yes|
Yes|
Yes|
Yes|
Yes|
|
Yes|
Yes|
Yes|
Yes|
Yes|
Yes|
Yes|
Yes|
Yes|
Yes|
Yes|
|
Yes|
Yes|
Yes|
Yes|
Yes|
Yes|
Yes|
Yes|
Yes|
Yes|
Yes|
Yes|
Yes|
Yes|
Yes|
Yes|
Yes|
Yes|
Yes|
Yes|
Yes|
|
Yes|
|
Yes|
Yes|
Yes|
Yes|
Yes|
Yes|
Yes|
Yes|
|
Yes|
Yes|
Yes|
Yes|
Yes|
Yes|
Yes|
Yes|
Yes|
Yes|
Yes|
|
335
Chapter 10: Default Event Classes and Types
|
|
|
|
|
|
|
|
|
|
|
|
|
|
|
|
|
|
|
|
|
|
|
|
|
|
|
|
|
|
|
|
|
|
|
|
|
|
|
|
|
|
|
|
|
336
57|
|
57|
|
57|
|
57|
|
57|
|
58|
58|
59|
60|
60|
61|
60|
60|
61|
61|
61|
61|
60|
60|
59|
60|
62|
60|
59|
59|
61|
60|
60|
62|
60|
59|
59|
59|
59|
59|
60|
61|
62|
60|
61|
2706|Illegal hardware configuration(|
|
RM4)(2)|
2707|Illegal hardware configuration(|
|
illegal VTX config)|
2708|Illegal hardware configuration(|
|
invalid VME adapter)|
2709|Illegal hardware configuration(|
|
no map VME adapter)|
2710|Illegal hardware configuration(|
|
check DVI cable connection)|
2711|
Write to DG2 EEPROM failed|
2712|
DG EEPROM contents invalid|
2713|
Resource exhausted|
2714|
Context switch error(1)|
2715|
Context switch error(2)|
2716|
Context switch timeout|
2717|
Unrecognized command|
2718|
Graphics error|
2719|
Idle wait timeout|
2720|
FIFO timeout|
2721|
Texture I/O DMA timeout(1)|
2722|
Texture I/O DMA timeout(2)|
2723|
Texture DMA error(1)|
2724|
HQ4 context switch error|
2725|
HQ4 FIFO overflow|
2726|
HQ4 ucode error|
2727|
HQ4 DMA address range error|
2728|
HQ4 FIFO privilege violation|
2729|
HQ4 stack overflow|
2730|
HQ3 FIFO overflow|
2731|
HQ3 FIFO timeout|
2732|
FIFO error|
2733|
HQ3 ucode error|
2734|
HQ3 DMA address range error|
2735|
HQ3 FIFO privilege violation|
2736|
HQ3 stack overflow|
2737|
Bad TRAM configuration(1)|
2738|
Bad TRAM configuration(2)|
2739|
Bad SRAM(1)|
2740|
Bad SRAM(2)|
2741|
Texture DMA error(2)|
2742|
Video texture DMA timeout|
2743|
DMA boundary exceeded|
2744|
DMA locking enabled|
2745|
Swapbuffer timeout|
Yes|
|
Yes|
|
Yes|
|
Yes|
|
Yes|
|
Yes|
Yes|
Yes|
Yes|
Yes|
Yes|
Yes|
Yes|
Yes|
Yes|
Yes|
Yes|
Yes|
Yes|
Yes|
Yes|
Yes|
Yes|
Yes|
Yes|
Yes|
Yes|
Yes|
Yes|
Yes|
Yes|
Yes|
Yes|
Yes|
Yes|
Yes|
Yes|
Yes|
Yes|
Yes|
Yes|
|
Yes|
|
Yes|
|
Yes|
|
Yes|
|
Yes|
Yes|
Yes|
Yes|
Yes|
Yes|
Yes|
Yes|
Yes|
Yes|
Yes|
Yes|
Yes|
Yes|
Yes|
Yes|
Yes|
Yes|
Yes|
Yes|
Yes|
Yes|
Yes|
Yes|
Yes|
Yes|
Yes|
Yes|
Yes|
Yes|
Yes|
Yes|
Yes|
Yes|
Yes|
ESP for the IRIX OS
|
|
|
|
|
|
|
|
|
|
|
|
|
|
|
|
|
|
|
|
|
|
|
|
|
|
|
|
|
|
|
|
|
|
|
|
|
|
|
|
|
|
|
|
|
63|
63|
64|
|
64|
|
63|
65|
78|
|
78|
75|
|
75|
|
75|
|
75|
75|
|
75|
|
75|
75|
|
75|
|
75|
|
75|
|
75|
|
75|
|
75|
|
75|
|
75|
75|
75|
75|
75|
75|
2746|
Pixel DMA timeout(1)|
2747|
Pixel DMA timeout(2)|
2748|Unrecognized flat panel display|
|
(1)|
2749|Unrecognized flat panel display|
|
(2)|
2750|
FIFO timeout|
2751|
DMA error|
3011|No room left in the Xthread Tab|
|
le|
3012| Conflict in the Xthread Table|
2900|Number of consecutive exception|
|
s exceeded limit|
2901|Exception while saving hardware|
|
state|
2902|Exception during show hardware |
|
state|
2903| Exception during FRU analysis|
2904|Invalid uncached attribute phy |
|
address|
2905|Data bus error on unknown addre|
|
ss, retrying|
2906|
Unsupported cache algorithm|
2907|Process killed, access to page |
|
with error|
2908|User/Kernel Data/Instr Bus erro|
|
r|
2909|Access to non-existent memory a|
|
ddress|
2910|No write privileges to memory a|
|
ddress|
2911|No read privileges to memory ad|
|
dress|
2912|Write error exception on migrat|
|
ing page|
2913|Unrecoverable VM migration erro|
|
r|
2914|Page with memory/directory erro|
|
r could not be discarded (1)|
2915|
Write error on poisoned page|
2916| No spool info on HSPEC buserr|
2917| Lost Spool info on HPEC buserr|
2918|
error on HSPEC access(0)|
2919|
error on HSPEC access(1)|
2920| No spool info on MSPEC buserr|
Yes|
Yes|
Yes|
|
Yes|
|
Yes|
Yes|
Yes|
|
Yes|
Yes|
|
Yes|
|
Yes|
|
Yes|
Yes|
|
Yes|
|
Yes|
Yes|
|
Yes|
|
Yes|
|
Yes|
|
Yes|
|
Yes|
|
Yes|
|
Yes|
|
Yes|
Yes|
Yes|
Yes|
Yes|
Yes|
Yes|
Yes|
Yes|
|
Yes|
|
Yes|
Yes|
Yes|
|
Yes|
Yes|
|
Yes|
|
Yes|
|
Yes|
Yes|
|
Yes|
|
Yes|
Yes|
|
Yes|
|
Yes|
|
Yes|
|
Yes|
|
Yes|
|
Yes|
|
Yes|
|
Yes|
Yes|
Yes|
Yes|
Yes|
Yes|
337
Chapter 10: Default Event Classes and Types
|
|
|
|
|
|
|
|
|
|
|
|
|
|
|
|
|
|
|
|
|
|
|
|
|
|
|
|
|
|
|
|
|
|
|
|
|
|
|
|
|
|
|
|
|
338
75|
75|
75|
75|
75|
75|
|
|
75|
|
75|
|
75|
|
75|
|
75|
|
75|
|
75|
|
75|
|
75|
|
75|
|
75|
|
75|
|
75|
|
75|
|
75|
|
75|
|
75|
|
75|
|
75|
2921|Lost spool info on MSPEC buserr|
2922|
error on MSPEC access(0)|
2923|
error on MSPEC access(1)|
2924|
UCE interrupt on PIO access|
2925|
Lost spool info on IO buserr|
2926|Uncorrectable error on uncached|
| memory access, physical addres|
|
s|
2927|uncached remote partition acces|
|
s error|
2928|Page with memory/directory erro|
|
r could not be discarded (2)|
2929|uncached partition page access |
|
error|
2930|No spool info on uncached buser|
|
r at paddr|
2931|Lost spool info on uncached bus|
|
err|
2932|Uncached read access timed out,|
|
physical address|
2933|uncached remote partition timeo|
|
ut error|
2934|uncached partition page timeout|
|
error|
2935|Uncached remote partition acces|
|
s error, physical address|
2936|Uncached memory access error, c|
|
ause unknown|
2976|Uncached Read Access Error to n|
|
ode|
2977|Uncached remote partition Read |
|
Access Error to node|
2978|Uncached partition page Read Ac|
|
cess Error to node|
2979|Uncached read Directory Error t|
|
o node|
2980|Uncached remote partition read |
|
Directory Error to node|
2981|Uncached partition page read Di|
|
rectory Error to node|
2982|Uncached read Poison Access Vio|
|
lation to node|
2983|Uncached remote partition read |
|Poison Access Violation to node|
2984|Uncached partition page read Po|
Yes|
Yes|
Yes|
Yes|
Yes|
Yes|
|
|
Yes|
|
Yes|
|
Yes|
|
Yes|
|
Yes|
|
Yes|
|
Yes|
|
Yes|
|
Yes|
|
Yes|
|
Yes|
|
Yes|
|
Yes|
|
Yes|
|
Yes|
|
Yes|
|
Yes|
|
Yes|
|
Yes|
Yes|
No|
No|
Yes|
Yes|
Yes|
|
|
Yes|
|
Yes|
|
Yes|
|
Yes|
|
Yes|
|
Yes|
|
Yes|
|
Yes|
|
Yes|
|
Yes|
|
Yes|
|
Yes|
|
Yes|
|
Yes|
|
Yes|
|
Yes|
|
Yes|
|
Yes|
|
Yes|
ESP for the IRIX OS
|
|
|
|
|
|
|
|
|
|
|
|
|
|
|
|
|
|
|
|
|
|
|
|
|
|
|
|
|
|
|
|
|
|
|
|
|
|
|
|
|
|
|
|
|
|
75|
|
75|
|
75|
|
75|
|
75|
|
75|
|
75|
|
75|
|
75|
|
75|
|
75|
|
75|
75|
|
75|
|
75|
|
75|
|
75|
|
75|
|
75|
|
75|
75|
75|
|
75|
|
75|
| ison Access Violation to node|
2985|Uncached read Excessive NACKs t|
|
o node|
2986|Uncached remote partition read |
|
Excessive NACKs to node|
2987|Uncached partition page read Ex|
|
cessive NACKs to node|
2988|Uncached read Response Data Err|
|
or to node|
2989|Uncached remote partition read |
|
Response Data Error to node|
2990|Uncached partition page read Re|
|
sponse Data Error to node|
2991|Uncached read Packet Length Err|
|
or to node|
2992|Uncached remote partition read |
|
Packet Length Error to node|
2993|Uncached partition page read Pa|
|
cket Length Error to node|
2937|Uncached access error, bad erro|
|
r type|
2938|Lost spool info on cached buser|
|
r|
2939|
Region not populated|
2940|Cached remote partition access |
|
error|
2941|Could not get instruction type.|
|
assuming store instruction|
2942|Trying to recover from ibus err|
|
or|
2943|NACK error on local partition a|
|
ddr|
2944|Unrecoverable bus error excepti|
|
on|
2945|Mem info Hi / Lo entry addresse|
|
s|
2946|Mem info premium/standard dir e|
|
ntry|
2947|
elo|
2948|
dir entry IO owned|
2949|Cached remote partition time ou|
|
t error|
2950|Cached partition page time out |
|
error|
2951|Cached read access. Time out er|
|
Yes|
|
Yes|
|
Yes|
|
Yes|
|
Yes|
|
Yes|
|
Yes|
|
Yes|
|
Yes|
|
Yes|
|
Yes|
|
Yes|
Yes|
|
Yes|
|
Yes|
|
Yes|
|
Yes|
|
Yes|
|
Yes|
|
Yes|
Yes|
Yes|
|
Yes|
|
Yes|
|
Yes|
|
Yes|
|
Yes|
|
Yes|
|
Yes|
|
Yes|
|
Yes|
|
Yes|
|
Yes|
|
Yes|
|
Yes|
|
Yes|
Yes|
|
Yes|
|
Yes|
|
Yes|
|
Yes|
|
Yes|
|
Yes|
|
Yes|
Yes|
Yes|
|
Yes|
|
Yes|
339
Chapter 10: Default Event Classes and Types
|
|
|
|
|
|
|
|
|
|
|
|
|
|
|
|
|
|
|
|
|
|
|
|
|
|
|
|
|
|
|
|
|
|
|
|
|
|
|
|
|
|
|
|
|
340
|
75|
|
75|
|
75|
|
75|
|
75|
|
75|
|
75|
75|
|
75|
75|
75|
75|
75|
|
75|
|
75|
|
75|
|
75|
75|
75|
75|
75|
|
75|
75|
75|
75|
75|
|
75|
|
75|
|
75|
|
ror|
2952|Cached read access. Directory e|
|
rror|
2953|Cached remote partition directo|
|
ry error|
2954|Page with memory/directory erro|
|
r could not be discarded (3)|
2955|Cached partition page directory|
|
error|
2956|Cached read access. Bad error t|
|
ype|
2957|Partition error handler not reg|
|
istered|
2958|T5 writeback surprise. WAR done|
2959|T5 writeback surprise. War fail|
|
ed|
2960|
Cache Error(0)|
2961|
Cache Error(1)|
2962|
Cache Error(2)|
2963|
Cache Error(3)|
2964|Interface Error. Suspect MEMORY|
|
BANK|
2965|Recovered from memory error by |
|
discarding the page|
2966|Unrecoverable Interface error. |
|
Suspect memory address|
2967|CPU isolated after recovered ca|
|
che error|
2968|
CPU isolation failed|
2969|
CPU Error|
2970|
CPU paddr|
2971|
CPU Tag State|
2972|CPU Cache Error recoverd by inv|
|
alidating line|
2973|
Cache Error on CPU|
2974|
Recovered by killing process|
2975|
Cache Error recovery failed|
359|
secondary Cache SBE|
396|Cached remote partition Poison |
|
Access Violation|
397|Cached partition page Poison Ac|
|
cess Violation|
398|Cached read Poison Access Viola|
|
tion|
399|Cached remote partition Excessi|
|
Yes|
|
Yes|
|
Yes|
|
Yes|
|
Yes|
|
Yes|
|
Yes|
Yes|
|
Yes|
Yes|
Yes|
Yes|
Yes|
|
Yes|
|
Yes|
|
Yes|
|
Yes|
Yes|
Yes|
Yes|
Yes|
|
Yes|
Yes|
Yes|
Yes|
Yes|
|
Yes|
|
Yes|
|
Yes|
|
Yes|
|
Yes|
|
Yes|
|
Yes|
|
Yes|
|
Yes|
|
Yes|
Yes|
|
Yes|
Yes|
Yes|
Yes|
Yes|
|
Yes|
|
Yes|
|
Yes|
|
Yes|
Yes|
Yes|
Yes|
Yes|
|
Yes|
Yes|
Yes|
Yes|
Yes|
|
Yes|
|
Yes|
|
Yes|
ESP for the IRIX OS
|
|
|
|
|
|
|
|
|
|
|
|
|
|
|
|
|
|
|
|
|
|
|
|
|
|
|
|
|
|
|
|
|
|
|
|
|
|
|
|
|
|
|
|
|
|
75|
|
75|
75|
|
75|
|
75|
75|
|
75|
|
75|
67|
67|
67|
67|
67|
67|
67|
67|
67|
67|
67|
67|
67|
67|
67|
67|
67|
67|
67|
67|
|
67|
67|
67|
67|
67|
|
67|
|
67|
67|
|
ve NACKs|
400|Cached partition page Excessive|
|
NACKs|
401|
Cached read Excessive NACKs|
402|Cached remote partition Respons|
|
e Data Erro|
403|Cached partition page Response |
|
Data Error|
404|Cached read Response Data Error|
405|Cached remote partition Packet |
|
Length Error|
406|Cached partition page Packet Le|
|
ngth Error|
407|Cached read Packet Length Error|
338|
Environment redundancy lost|
177| Environmental redundancy lost|
323| Auto power down in 30 seconds|
324| Auto power down in 25 seconds|
325| Auto power down in 20 seconds|
326| Auto power down in 15 seconds|
327| Auto power down in 10 seconds|
328|
Auto power down in 5 seconds|
329|
Fan 1 warning limit reached|
330|
Fan 2 warning limit reached|
331|
Fan 3 warning limit reached|
332|
Fan 1 fault limit reached|
333|
Fan 2 fault limit reached|
334|
Fan 3 fault limit reached|
335|
Fan 1 RPM stabilized|
336|
Fan 2 RPM stabilized|
337|
Fan 3 RPM stabilized|
343| Power high fault limit reached|
344| Power low fault limit reached|
345|Power high warning limit reache|
|
d|
346|Power low warning limit reached|
347|
Fan fault limit reached|
348|
Fan warning limit reached|
349|Temperature fault limit reached|
350|Temperature critical limit reac|
|
hed|
351|Temperature advisory limit reac|
|
hed|
352|
Power level stabilized|
353|
Fan speed stabilized|
|
Yes|
|
Yes|
Yes|
|
Yes|
|
Yes|
Yes|
|
Yes|
|
Yes|
Yes|
Yes|
Yes|
Yes|
Yes|
Yes|
Yes|
Yes|
Yes|
Yes|
Yes|
Yes|
Yes|
Yes|
Yes|
Yes|
Yes|
Yes|
Yes|
Yes|
|
Yes|
Yes|
Yes|
Yes|
Yes|
|
Yes|
|
Yes|
Yes|
|
Yes|
|
Yes|
Yes|
|
Yes|
|
Yes|
Yes|
|
Yes|
|
Yes|
Yes|
Yes|
Yes|
Yes|
Yes|
Yes|
Yes|
Yes|
Yes|
Yes|
Yes|
Yes|
Yes|
Yes|
Yes|
Yes|
Yes|
Yes|
Yes|
Yes|
|
Yes|
Yes|
Yes|
Yes|
Yes|
|
Yes|
|
Yes|
Yes|
341
Chapter 10: Default Event Classes and Types
|
|
|
|
|
|
|
|
|
|
|
|
|
|
|
|
|
|
|
|
|
|
|
|
|
|
|
|
|
|
|
|
|
|
|
|
|
|
|
|
|
|
|
|
|
342
67|
67|
67|
67|
|
67|
|
67|
67|
67|
67|
|
67|
|
67|
|
67|
|
67|
|
67|
|
67|
|
67|
|
67|
|
67|
|
67|
|
67|
|
67|
|
67|
|
67|
67|
67|
67|
67|
67|
69|
354|
Temperature stabilized|
355|
Auto power down interrupted|
356|
Auto power down completed|
357|Environment monitor test - faul|
|
t condition - this is a test|
358|Environment monitor test - warn|
| ing condition - this is a test|
418|
VRM not present|
419|
VRM not okay|
420|
48V power failure|
421|System controller watchpoint co|
|
ndition #1|
422|System controller watchpoint co|
|
ndition #2|
428|Power Bay DPS 1 AC fail, lost r|
|
edundancy|
429|Power Bay DPS 2 AC fail, lost r|
|
edundancy|
430|Power Bay DPS 3 AC fail, lost r|
|
edundancy|
431|Power Bay DPS 4 AC fail, lost r|
|
edundancy|
432|Power Bay DPS 5 AC fail, lost r|
|
edundancy|
433|Power Bay DPS 6 AC fail, lost r|
|
edundancy|
434|Power Bay DPS 1 fail, lost redu|
|
ndancy|
435|Power Bay DPS 2 fail, lost redu|
|
ndancy|
436|Power Bay DPS 3 fail, lost redu|
|
ndancy|
437|Power Bay DPS 4 fail, lost redu|
|
ndancy|
438|Power Bay DPS 5 fail, lost redu|
|
ndancy|
439|Power Bay DPS 6 fail, lost redu|
|
ndancy|
440|Power Bay DPS 1 predictive fail|
441|Power Bay DPS 2 predictive fail|
442|Power Bay DPS 3 predictive fail|
443|Power Bay DPS 4 predictive fail|
444|Power Bay DPS 5 predictive fail|
445|Power Bay DPS 6 predictive fail|
2836|
Cannot bring up board|
Yes|
Yes|
Yes|
Yes|
|
Yes|
|
Yes|
Yes|
Yes|
Yes|
|
Yes|
|
Yes|
|
Yes|
|
Yes|
|
Yes|
|
Yes|
|
Yes|
|
Yes|
|
Yes|
|
Yes|
|
Yes|
|
Yes|
|
Yes|
|
Yes|
Yes|
Yes|
Yes|
Yes|
Yes|
Yes|
Yes|
Yes|
Yes|
Yes|
|
Yes|
|
Yes|
Yes|
Yes|
Yes|
|
Yes|
|
Yes|
|
Yes|
|
Yes|
|
Yes|
|
Yes|
|
Yes|
|
Yes|
|
Yes|
|
Yes|
|
Yes|
|
Yes|
|
Yes|
|
Yes|
Yes|
Yes|
Yes|
Yes|
Yes|
Yes|
ESP for the IRIX OS
|
|
|
|
|
|
|
|
|
|
|
|
|
|
|
|
|
|
|
|
|
|
|
|
|
|
|
|
|
|
|
|
|
|
|
|
|
|
|
|
|
|
|
|
|
69|
69|
69|
69|
69|
69|
69|
69|
69|
69|
69|
69|
69|
69|
69|
69|
69|
69|
69|
69|
69|
69|
70|
|
71|
71|
71|
71|
72|
72|
72|
|
72|
|
72|
72|
|
73|
73|
74|
74|
74|
74|
74|
74|
2837|
Timeout reached - wait HCA|
2838| Memory cannot post small buffs|
2839|Memory cannot post medium buffs|
2840| Memory cannot post large buffs|
2841| ATM init had duplicate unit ID|
2842|
Cannot kmem_zalloc|
2843|
Cannot kvpalloc HCA area|
2844|
Cannot kvpalloc CMDQ|
2845|
Cannot kvpalloc B2H|
2846|
Cannot allocate stats area|
2847|
dang_intr_conn() failed|
2848|H/W graph no vertex for io4vhdl|
2849| H/W graph cannot create vertex|
2850|
Unknown input buffer|
2851|
Cannot clear int bit|
2852|
Board seen stray interrupt|
2853|
xcmd ne b2h cqcmd|
2854|
Max b2h cqcmd|
2855|
Cannot destroy fwd vcte (1)|
2856|
Cannot destroy rvc vcte|
2857|
xcmd xmit result warning|
2858|
Cannot destroy fwd vcte (2)|
2859|s2d register response failed fo|
|
r IP|
2860|
Memory TXMT overflow (1)|
2861|Memory TXMT overflow on TSR (1)|
2862|
Memory TXMT overflow (2)|
2863|Memory TXMT overflow on TSR (2)|
2864|
kmem zalloc error|
2865|
ARP request but not server|
2866|AAOP ARP request error - ARP ta|
|
ble full|
2867|ARP reply error - ARP table ful|
|
l|
2868|
ARP reply but not server|
2869|AAOP ARP reply error - ARP tabl|
|
e full|
2870|
Cannot find IFATM info|
2871|
kmem zalloc error|
2872|
Booting bit not cleared|
2873|
LINC LCSR boot error|
2874|
scmd init no response|
2875|
scmd init failed self test|
2876|
scmd init failed|
2877|
H/W graph cannot get vertex|
Yes|
Yes|
Yes|
Yes|
Yes|
Yes|
Yes|
Yes|
Yes|
Yes|
Yes|
Yes|
Yes|
Yes|
Yes|
Yes|
Yes|
Yes|
Yes|
Yes|
Yes|
Yes|
Yes|
|
Yes|
Yes|
Yes|
Yes|
Yes|
Yes|
Yes|
|
Yes|
|
Yes|
Yes|
|
Yes|
Yes|
Yes|
Yes|
Yes|
Yes|
Yes|
Yes|
Yes|
Yes|
Yes|
Yes|
Yes|
Yes|
Yes|
Yes|
Yes|
Yes|
Yes|
Yes|
Yes|
Yes|
Yes|
Yes|
Yes|
Yes|
Yes|
Yes|
Yes|
Yes|
Yes|
|
Yes|
Yes|
Yes|
Yes|
Yes|
Yes|
Yes|
|
Yes|
|
Yes|
Yes|
|
Yes|
Yes|
Yes|
Yes|
Yes|
Yes|
Yes|
Yes|
343
Chapter 10: Default Event Classes and Types
|
|
|
|
|
|
|
|
|
|
|
|
|
|
|
|
|
|
|
|
|
|
|
|
|
|
|
|
|
|
|
|
|
|
|
|
|
|
|
|
|
|
|
|
|
344
74|
74|
|
74|
|
74|
|
74|
|
74|
|
74|
74|
74|
74|
74|
74|
74|
74|
|
74|
|
74|
|
74|
74|
82|
|
82|
|
82|
|
82|
82|
82|
82|
82|
|
82|
82|
82|
|
82|
|
82|
2878|
H/W graph cannot create vhdl|
2879|H/W graph cannot add to xtalk v|
|
ertex|
2880|H/W graph cannot create device |
|
vertex|
2881|H/W graph cannot add device ver|
|
tex|
2882|H/W graph cannot get device ver|
|
tex|
2883|H/W graph cannot create device |
|
vertex for port|
2884|
scmd timed out|
2885| Cannot destroy zombie fwd vcte|
2886|
Unknown b2h type|
2887|
Cannot destroy fwd vcte|
2888|
Cannot destroy rvs vcte (1)|
2889|
Cannot destroy rvs vcte (2)|
2890|
No unit number|
2891|H/W graph ioctl cannot create v|
|
hdl (1)|
2892|H/W graph ioctl cannot create v|
|
hdl (2)|
2893|Ecname error mode at PCI addres|
|
s|
2894|
Debug quadoc3 flash req cmd|
2895|Could not locate DMA descriptor|
3729|CMS:Cannot allocate nCr_handle |
|
current_cells|
3728|Membership lost - withdrawing f|
|
rom cluster|
3727|cms_comb_dynamic_init cannot al|
|
loc memory|
3714|
mtcp_hb_watchdog expired|
3713| Cannot create multicast socket|
3712|
invalid config cmd|
3711|
unexpected param type|
3710|mesg_xpmb_count: Bad paramater |
|
type|
3709|
unknown header type|
3708|
unregistered subsystem|
3707|thread callback still in progre|
|
ss|
3706|unregistered translation subsys|
|
tem|
3705|
unknown subsystem|
Yes|
Yes|
|
Yes|
|
Yes|
|
Yes|
|
Yes|
|
Yes|
Yes|
Yes|
Yes|
Yes|
Yes|
Yes|
Yes|
|
Yes|
|
Yes|
|
Yes|
Yes|
Yes|
|
Yes|
|
Yes|
|
Yes|
Yes|
Yes|
Yes|
Yes|
|
Yes|
Yes|
Yes|
|
Yes|
|
Yes|
Yes|
Yes|
|
Yes|
|
Yes|
|
Yes|
|
Yes|
|
Yes|
Yes|
Yes|
Yes|
Yes|
Yes|
Yes|
Yes|
|
Yes|
|
Yes|
|
Yes|
Yes|
Yes|
|
Yes|
|
Yes|
|
Yes|
Yes|
Yes|
Yes|
Yes|
|
Yes|
Yes|
Yes|
|
Yes|
|
Yes|
ESP for the IRIX OS
|
|
|
|
|
|
|
|
|
|
|
|
|
|
|
|
|
|
|
|
|
|
|
|
|
|
|
|
|
|
|
|
|
|
|
|
|
|
|
|
|
|
|
|
|
82|
82|
|
4002|
4002|
4002|
4002|
4002|
4002|
4002|
4002|
4002|
4002|
4002|
4002|
4002|
4002|
4002|
4005|
4005|
4005|
4005|
4005|
4005|
4005|
4005|
4005|
85|
80|
|
|
80|
|
|
80|
|
|
80|
|
80|
|
80|
|
80|
|
3704|illegal mesging during recovery|
3703|CMS:Cannot allocate nCr_handle |
|
cells|
2097408|
Configmon init|
2097409|
Sysinfo changed|
2097410|
Hardware installed|
2097411|
Harwdare de-installed|
2097412|
Software installed|
2097413|
Software de-installed|
2097414|
System change|
2097415|
Configuration error|
2097416|
ESP registered with SGI|
2097417|
ESP deregistered with SGI|
2097418|
ESP package updated|
2097419|
ESP package uninstalled|
2097420| ESP system information change|
2097421|
ESP profile(s) update|
340|Customer information is updated|
2098176|
Diagnostic start|
2098177|
Diagnostic interrupted|
2098178|
Diagnostic end|
2098179|
Stress start|
2098180|
Stress end|
2098181|
SVP start|
2098182|
SVP end|
2098183|
SVP interrupted|
2098184|
Stress interrupted|
3764|
snmp trap events|
3143|Internal controller has encount|
|ered Strong-ARM processor speci|
|
fic error. (928)|
3142|Internal controller has encount|
|ered i960 processor specific er|
|
ror. (912)|
3141|Internal controller has encount|
|ered a firmware breakpoint. (89|
|
7)|
3140|Internal controller is in the h|
|
ung state. (896)|
3139|A debug dump exists on this sys|
|
tem. (807)|
3138|A Debug Dump exists on this sys|
|
tem. (806)|
3137|Configuration on disk import fa|
|
iled. (805)|
Yes|
Yes|
|
Yes|
Yes|
Yes|
Yes|
Yes|
Yes|
Yes|
Yes|
Yes|
Yes|
Yes|
Yes|
Yes|
Yes|
Yes|
Yes|
Yes|
Yes|
Yes|
Yes|
Yes|
Yes|
Yes|
Yes|
Yes|
Yes|
|
|
Yes|
|
|
Yes|
|
|
Yes|
|
Yes|
|
Yes|
|
Yes|
|
Yes|
Yes|
|
Yes|
Yes|
Yes|
Yes|
Yes|
Yes|
Yes|
Yes|
Yes|
Yes|
No|
No|
No|
No|
No|
Yes|
Yes|
Yes|
Yes|
Yes|
Yes|
Yes|
Yes|
Yes|
Yes|
Yes|
|
|
Yes|
|
|
Yes|
|
|
Yes|
|
Yes|
|
Yes|
|
Yes|
|
345
Chapter 10: Default Event Classes and Types
|
|
|
|
|
|
|
|
|
|
|
|
|
|
|
|
|
|
|
|
|
|
|
|
|
|
|
|
|
|
|
|
|
|
|
|
|
|
|
|
|
|
|
|
|
346
80|
|
80|
80|
80|
80|
80|
80|
|
80|
|
80|
80|
|
80|
|
80|
|
80|
|
80|
80|
80|
|
80|
80|
80|
80|
80|
|
80|
|
|
80|
|
|
80|
80|
80|
|
|
80|
80|
|
80|
3136|Configuration on disk access er|
|
ror. (803)|
3135|
Configuration invalid. (802)|
3134|
Request Sense (702)|
3133|
Back end fibre dead. (644)|
3132| Back end SCSI bus dead. (642)|
3131|
Channel failed. (640)|
3130|Automatic reboot count has chan|
|
ged. (518)|
3129|Lost connection to server, or s|
|
erver is down. (517)|
3128|
Size table full. (513)|
3127|Mirror Race on critical drive. |
|
(428)|
3126|Mirror Race recovery failed. (4|
|
27)|
3125|Controller is using default non|
| -unique world-wide name. (426)|
3124|Controller boot ROM image needs|
|
to be reloaded. (425)|
3123|
Killed partner. (423)|
3122|
BBU out of service. (418)|
3121|Hard ECC error corrected. (415|
|
)|
3120|Soft ECC error corrected. (414)|
3119| BBU battery not present. (410)|
3118|
WARM BOOT failed. (406)|
3117|
BBU removed. (405)|
3116|Controller firmware mismatch. (|
|
404)|
3115|Controller's partner is gone, c|
|ontroller is in failover mode n|
|
ow. (399)|
3114|Controller is gone. System is d|
|isconnecting from this controll|
|
er. (395)|
3113|
BBU Power OK. (394)|
3112|
BBU Power Low. (393)|
3111|Controller is gone. System is d|
|isconnecting from this controll|
|
er. (391)|
3110|
Controller is found. (390)|
3109|Controller has been reset. (389|
|
)|
3108|Controller is dead. System is d|
Yes|
|
Yes|
Yes|
Yes|
Yes|
Yes|
Yes|
|
Yes|
|
Yes|
Yes|
|
Yes|
|
Yes|
|
Yes|
|
Yes|
Yes|
Yes|
|
Yes|
Yes|
Yes|
Yes|
Yes|
|
Yes|
|
|
Yes|
|
|
Yes|
Yes|
Yes|
|
|
Yes|
Yes|
|
Yes|
Yes|
|
Yes|
Yes|
Yes|
Yes|
Yes|
Yes|
|
Yes|
|
Yes|
Yes|
|
Yes|
|
Yes|
|
Yes|
|
Yes|
Yes|
Yes|
|
Yes|
Yes|
Yes|
Yes|
Yes|
|
Yes|
|
|
Yes|
|
|
Yes|
Yes|
Yes|
|
|
Yes|
Yes|
|
Yes|
ESP for the IRIX OS
|
|
|
|
|
|
|
|
|
|
|
|
|
|
|
|
|
|
|
|
|
|
|
|
|
|
|
|
|
|
|
|
|
|
|
|
|
|
|
|
|
|
|
|
|
|
|
80|
|
|
|
80|
80|
|
|
|
80|
|
80|
|
80|
|
80|
|
80|
|
80|
|
80|
|
80|
|
80|
|
80|
80|
80|
80|
|
80|
|
80|
|
80|
|
80|
|
80|
|
80|
|isconnecting from this controll|
|
er. (388)|
3107|Internal log structures getting|
| full; PLEASE SHUTDOWN AND RESE|
|T THE SYSTEM IN THE NEAR FUTURE|
|
. (386)|
3106|
Write back error. (385)|
3105|Access to fan status informatio|
|n has been lost. Switch card o|
|r connectivity has been removed|
|
. (337)|
3104|Access to power supply status i|
|nformation has been lost. (336)|
3103|Access to temperature sensor ha|
|
s been lost. (335)|
3102|Enclosure Soft Addressing Detec|
|
ted. (333)|
3101|Enclosure access is offline. (3|
|
32)|
3100|Enclosure access critical. (330|
|
)|
3099|Temperature sensor is not prese|
|
nt. (329)|
3098|Temperature is above working li|
|
mit.
(327)|
3097|Temperature is over safe limit.|
|
Failure imminent. (326)|
3096|Power supply is not present. (3|
|
25)|
3095|
Power supply failure. (323)|
3094|
Fan is not present.
(322)|
3093|
Fan failure. (320)|
3092|Uninterruptible power supply fa|
|
iled. (310)|
3091|Uninterruptible power supply ba|
|
ttery low. (309)|
3090|Uninterruptible power supply AC|
|
failed. (308)|
3089|Uninterruptible power supply di|
|
sabled. (307)|
3088|Storage Works enclosure reporte|
|
d failure state. (304)|
3087|Storage cabinet temperature sen|
|
sor is not present. (292)|
3086|
Over temperature. (291)|
|
|
Yes|
|
|
|
Yes|
Yes|
|
|
|
Yes|
|
Yes|
|
Yes|
|
Yes|
|
Yes|
|
Yes|
|
Yes|
|
Yes|
|
Yes|
|
Yes|
Yes|
Yes|
Yes|
|
Yes|
|
Yes|
|
Yes|
|
Yes|
|
Yes|
|
Yes|
|
|
Yes|
|
|
|
Yes|
Yes|
|
|
|
Yes|
|
Yes|
|
Yes|
|
Yes|
|
Yes|
|
Yes|
|
Yes|
|
Yes|
|
Yes|
|
Yes|
Yes|
Yes|
Yes|
|
Yes|
|
Yes|
|
Yes|
|
Yes|
|
Yes|
|
Yes|
347
Chapter 10: Default Event Classes and Types
|
|
|
|
|
|
|
|
|
|
|
|
|
|
|
|
|
|
|
|
|
|
|
|
|
|
|
|
|
|
|
|
|
|
|
|
|
|
|
|
|
|
|
|
|
348
80|
|
80|
|
|
80|
|
80|
80|
80|
|
80|
80|
80|
|
80|
|
80|
|
80|
|
80|
|
80|
|
|
80|
|
|
|
80|
|
|
80|
|
80|
|
80|
80|
|
80|
|
80|
|
80|
3085|Temperature is above 50 degrees|
|
Celsius. (289)|
3084|Over temperature. Temperature i|
|s above 70 degrees Celsius. (28|
|
8)|
3083|Storage cabinet power supply is|
|
not present. (275)|
3082|
Power supply failure. (274)|
3081|
Power supply failure. (272)|
3080|Storage cabinet fan is not pres|
|
ent. (259)|
3079|
Fan failure. (258)|
3078|
Fan failure. (256)|
3077|Logical drive background initia|
|
lization completed. (181)|
3076|Logical drive background initia|
|
lization failed. (180)|
3075|Logical drive background initia|
|
lization stopped. (177)|
3074|Logical drive background initia|
|
lization started. (176)|
3073|A standby rebuild has started o|
|
n logical drive. (162)|
3072|Temporary-Offline RAID0+1/RAID1|
|/RAID0/JBOD array is available |
|
to the user again. (161)|
3071|Temporary-Offline RAID5/RAID3 a|
|rray is available to the user a|
|gain with the possibility of da|
|
ta in the array. (160)|
3070|Data for Disk Block has been lo|
|st due to Logical Drive problem|
|
. (159)|
3069|System drive LUN mapping has be|
|
en written to config. (157)|
3068|Bad data blocks found. Possible|
|
data loss. (156)|
3067|
Bad Blocks found. (153)|
3066|Expand Capacity stopped with er|
|
ror. (152)|
3065|Logical drive initialization fa|
|
iled. (147)|
3064|Rebuild stopped because logical|
|
drive failed. (143)|
3063|Rebuild stopped with error. New|
Yes|
|
Yes|
|
|
Yes|
|
Yes|
Yes|
Yes|
|
Yes|
Yes|
Yes|
|
Yes|
|
Yes|
|
Yes|
|
Yes|
|
Yes|
|
|
Yes|
|
|
|
Yes|
|
|
Yes|
|
Yes|
|
Yes|
Yes|
|
Yes|
|
Yes|
|
Yes|
Yes|
|
Yes|
|
|
Yes|
|
Yes|
Yes|
Yes|
|
Yes|
Yes|
Yes|
|
Yes|
|
Yes|
|
Yes|
|
Yes|
|
Yes|
|
|
Yes|
|
|
|
Yes|
|
|
Yes|
|
Yes|
|
Yes|
Yes|
|
Yes|
|
Yes|
|
Yes|
ESP for the IRIX OS
|
|
|
|
|
|
|
|
|
|
|
|
|
|
|
|
|
|
|
|
|
|
|
|
|
|
|
|
|
|
|
|
|
|
|
|
|
|
|
|
|
|
|
|
|
|
80|
|
80|
|
80|
|
80|
|
80|
|
80|
|
80|
|
80|
|
80|
|
80|
|
|
80|
|
80|
|
80|
|
|
80|
|
|
80|
|
|
80|
|
80|
|
|
80|
|
|
80|
|
|
device failed. (142)|
3062|Rebuild stopped with error. (14|
|
1)|
3061|An automatic rebuild has starte|
|
d on logical drive. (137)|
3060|Logical drive is critical. (135|
|
)|
3059|Logical drive has been made off|
|
line. (134)|
3058|Consistency check failed due to|
| physical device failure. (133)|
3057|Consistency check on logical dr|
|
ive failed. (132)|
3056|Consistency check on logical dr|
|
ive error. (131)|
3055|Device loop ID conflict (soft a|
|
ddressing) detected. (96)|
3054|A standby rebuild was started. |
|
(61)|
3053|Temporary-Dead physical drive i|
|s automatically made online. (6|
|
0)|
3052|Physical drive missing on start|
|
up. (57)|
3051|Physical device failed to start|
|
. (54)|
3050|A hard disk failed because writ|
|e operation of 'Bad Data Table'|
|
failed. (49)|
3049|A hard disk failed because writ|
|e operation of the 'Configurati|
|
on On Disk' failed. (48)|
3048|A hard disk failed because devi|
|ce was not found on start up. (|
|
47)|
3047|A hard disk failed because devi|
|
ce is not ready. (46)|
3046|A hard disk failed because devi|
|ce returned an unknown status. |
|
(45)|
3045|A hard disk failed because of a|
| sequence error in the SCSI bus|
|
phase handling. (44)|
3044|A hard disk failed because acce|
|ss to the device met with a sel|
|
Yes|
|
Yes|
|
Yes|
|
Yes|
|
Yes|
|
Yes|
|
Yes|
|
Yes|
|
Yes|
|
Yes|
|
|
Yes|
|
Yes|
|
Yes|
|
|
Yes|
|
|
Yes|
|
|
Yes|
|
Yes|
|
|
Yes|
|
|
Yes|
|
|
Yes|
|
Yes|
|
Yes|
|
Yes|
|
Yes|
|
Yes|
|
Yes|
|
Yes|
|
Yes|
|
Yes|
|
|
Yes|
|
Yes|
|
Yes|
|
|
Yes|
|
|
Yes|
|
|
Yes|
|
Yes|
|
|
Yes|
|
|
Yes|
|
349
Chapter 10: Default Event Classes and Types
|
|
|
|
|
|
|
|
|
|
|
|
|
|
|
|
|
|
|
|
|
|
|
|
|
|
|
|
|
|
|
|
|
|
|
|
|
|
|
|
|
|
|
|
|
350
|
80|
|
80|
|
|
80|
|
80|
|
|
80|
|
80|
|
|
80|
|
80|
|
|
80|
|
80|
|
80|
80|
|
80|
80|
80|
80|
80|
|
80|
|
80|
|
80|
80|
80|
|
80|
|
80|
|
ection time out. (43)|
3043|A hard disk set to failed state|
|
by host. (42)|
3042|A hard disk failed because of b|
|usy status or parity error. (41|
|
)|
3041|A hard disk failed because of t|
|
he system reset. (40)|
3040|A hard disk failed because comm|
|and to the device timed out. (3|
|
9)|
3039|A hard disk failed because of b|
|
ad tag from the device. (38)|
3038|A hard disk failed because of g|
|ross error on SCSI processor. (|
|
37)|
3037|A hard disk failed because devi|
|
ce is missing. (36)|
3036|A hard disk failed because doub|
|le check condition occurred. (3|
|
5)|
3035|A hard disk failed because SCSI|
|
bus reset failed. (34)|
3034|A hard disk failed because writ|
|
e recovery failed. (33)|
3033|
Initialization failed. (31)|
3032|Request Sense Data available. (|
|
28)|
3031|
SCSI device reset. (25)|
3030|
Misc error found. (24)|
3029|
Soft error found. (23)|
3028|
Parity error found. (22)|
3027|SCSI command retried on hard di|
|
sk. (21)|
3026|SCSI command abort on hard disk|
|
. (20)|
3025|SCSI command timeout on hard de|
|
vice. (19)|
3024|
A hard disk has failed. (12)|
3016|
Hard disk error found. (3)|
3023|Rebuild stopped because logical|
|
drive failed. (11)|
3022|Rebuild stopped with error. New|
|
device failed. (10)|
3021|Rebuild stopped with error. (9)|
|
Yes|
|
Yes|
|
|
Yes|
|
Yes|
|
|
Yes|
|
Yes|
|
|
Yes|
|
Yes|
|
|
Yes|
|
Yes|
|
Yes|
Yes|
|
Yes|
Yes|
Yes|
Yes|
Yes|
|
Yes|
|
Yes|
|
Yes|
Yes|
Yes|
|
Yes|
|
Yes|
|
Yes|
|
Yes|
|
|
Yes|
|
Yes|
|
|
Yes|
|
Yes|
|
|
Yes|
|
Yes|
|
|
Yes|
|
Yes|
|
Yes|
Yes|
|
Yes|
Yes|
Yes|
Yes|
Yes|
|
Yes|
|
Yes|
|
Yes|
Yes|
Yes|
|
Yes|
|
Yes|
ESP for the IRIX OS
|
|
|
|
|
|
|
|
|
|
|
|
|
|
|
|
|
|
|
|
|
|
|
|
|
|
|
|
|
|
|
|
|
|
|
|
|
|
|
|
|
|
|
|
|
80|
80|
80|
|
80|
|
80|
|
80|
80|
|
80|
80|
80|
80|
80|
80|
80|
80|
80|
80|
80|
|
80|
80|
80|
80|
80|
|
80|
80|
|
80|
|
80|
|
80|
|
80|
|
80|
|
80|
80|
|
3020|
Rebuild is cancelled. (8)|
3019|
Rebuild is over. (7)|
3018|An automatic rebuild has starte|
|
d. (5)|
3017|Hard disk PFA condition found, |
|
this disk may fail soon. (4)|
3230|Configuration on disk converted|
|
. (804)|
3229|
Configuration cleared. (801)|
3228|New configuration received. (80|
|
0)|
3227|
Set real time clock. (703)|
3226| Event log entries lost. (701)|
3225|
Event log empty. (700)|
3224|
Back end fibre alive. (645)|
3223| Back end SCSI bus alive. (643)|
3222|
Channel online. (641)|
3221|
Server alive. (516)|
3220|
User logged out. (515)|
3219|
User logged in. (514)|
3218|
System started. (512)|
3217|Dual controllers entered nexus.|
|
(424)|
3216|Dual controllers enabled. (422)|
3215|
Inserted partner.
(421)|
3214|
Relinquished partner. (420)|
3213|Updated partner's status. (419)|
3212|Controller's Partner Has Been R|
|
emoved. (417)|
3211| BBU recondition needed. (416)|
3210|Controller device start complet|
|
e. (413)|
3209|Controller entered normal cache|
|
mode. (412)|
3208|Controller entered Conservative|
|
Cache Mode. (411)|
3207|BBU calibration cycle is cancel|
|
ed. (409)|
3206|BBU calibration cycle finished.|
|
(408)|
3205|BBU calibration cycle started. |
|
(407)|
3204|
Installation aborted. (403)|
3203|BBU reconditioning is canceled.|
|
(402)|
Yes|
Yes|
Yes|
|
Yes|
|
No|
|
No|
No|
|
No|
No|
No|
No|
No|
No|
No|
No|
No|
No|
No|
|
No|
No|
No|
No|
No|
|
No|
No|
|
No|
|
No|
|
No|
|
No|
|
No|
|
No|
No|
|
Yes|
Yes|
Yes|
|
Yes|
|
No|
|
No|
No|
|
No|
No|
No|
No|
No|
No|
No|
No|
No|
No|
No|
|
No|
No|
No|
No|
No|
|
No|
No|
|
No|
|
No|
|
No|
|
No|
|
No|
|
No|
No|
|
351
Chapter 10: Default Event Classes and Types
|
|
|
|
|
|
|
|
|
|
|
|
|
|
|
|
|
|
|
|
|
|
|
|
|
|
|
|
|
|
|
|
|
|
|
|
|
|
|
|
|
|
|
|
|
352
80|
|
80|
|
80|
|
|
80|
80|
80|
80|
|
80|
80|
|
80|
|
80|
|
80|
80|
|
80|
|
80|
|
80|
|
80|
|
80|
80|
|
80|
|
80|
|
|
80|
|
80|
|
80|
|
80|
3202|BBU reconditioning is finished.|
|
(401)|
3201|BBU reconditioning is started. |
|
(400)|
3200|Controller is gone. System is d|
|isconnecting from this controll|
|
er. (398)|
3199|
Controller is online. (397)|
3198|
Controller powered on (396)|
3197|
BBU Present. (392)|
3196|Array management server softwar|
| e started successfully. (384)|
3195|Enclosure services ready. (334)|
3194|Enclosure access has been resto|
|
red. (331)|
3193|Normal temperature has been res|
|
tored. (328)|
3192|Power supply has been restored.|
|
(324)|
3191|
Fan has been restored. (321)|
3190|Uninterruptible power supply no|
|
rmal. (311)|
3189|Storage Works enclosure reporte|
|
d normal state. (306)|
3188|Storage Works enclosure reporte|
|
d critical state. (305)|
3187|Normal temperature has been res|
|
tored. (290)|
3186|Power supply has been restored.|
|
(273)|
3185|
Fan has been restored. (257)|
3184|Logical drive background initia|
|
lization restarted. (179)|
3183|Logical drive background initia|
|
lization paused. (178)|
3182|Attempt to read data from block|
| that is marked in Bad Data Tab|
|
le. (158)|
3181|System drive type changed. (155|
|
)|
3180|System drive size changed. (154|
|
)|
3179|Expand Capacity completed.
(|
|
151)|
3178| Expand Capacity started. (150)|
No|
|
No|
|
No|
|
|
No|
No|
No|
No|
|
No|
No|
|
No|
|
No|
|
No|
No|
|
No|
|
No|
|
No|
|
No|
|
No|
No|
|
No|
|
No|
|
|
No|
|
No|
|
No|
|
No|
No|
|
No|
|
No|
|
|
No|
No|
No|
No|
|
No|
No|
|
No|
|
No|
|
No|
No|
|
No|
|
No|
|
No|
|
No|
|
No|
No|
|
No|
|
No|
|
|
No|
|
No|
|
No|
|
No|
ESP for the IRIX OS
|
|
|
|
|
|
|
|
|
|
|
|
|
|
|
|
|
|
|
|
|
|
|
|
|
|
|
|
|
|
|
|
|
|
|
|
|
|
|
|
|
|
|
|
|
80|
|
80|
|
80|
|
80|
|
80|
|
80|
|
80|
|
80|
|
80|
|
80|
|
80|
|
80|
|
80|
|
|
80|
|
80|
|
|
80|
|
80|
|
80|
|
80|
|
80|
|
80|
80|
80|
3177|A logical drive has been delete|
|
d. (149)|
3176|A logical drive has been found.|
|
(148)|
3175|Logical drive initialization ca|
|
ncelled. (146)|
3174|Logical drive initialization do|
|
ne. (145)|
3173|Logical drive initialization st|
|
arted. (144)|
3172|Rebuild on logical drive is can|
|
celled. (140)|
3171|Rebuild on logical drive is ove|
|
r. (139)|
3170|A manual rebuild has started on|
|
logical drive. (138)|
3169|Logical drive has been placed o|
|
nline. (136)|
3168|Consistency check is cancelled.|
|
(130)|
3167|Consistency check is finished. |
|
(129)|
3166|Consistency check is started. (|
|
128)|
3165|Physical drive is switching fro|
|m a channel to the other channe|
|
l. (59)|
3164|Rebuild startup failed due to l|
|
ower disk capacity. (58)|
3163|Physical device negotiated diff|
|erent bus width than config. (5|
|
6)|
3162|Physical device negotiated diff|
| erent offset than config. (55)|
3161|Physical device ID did not matc|
|
h. (53)|
3160|Physical device status changed |
|
to rebuild. (52)|
3159|Physical device status changed |
|
to Hot Spare. (51)|
3158|Physical device status changed |
|
to offline. (50)|
3157| Initialization canceled. (32)|
3156| Initialization completed. (30)|
3155|
Initialization started. (29)|
No|
|
No|
|
No|
|
No|
|
No|
|
No|
|
No|
|
No|
|
No|
|
No|
|
No|
|
No|
|
No|
|
|
No|
|
No|
|
|
No|
|
No|
|
No|
|
No|
|
No|
|
No|
No|
No|
No|
|
No|
|
No|
|
No|
|
No|
|
No|
|
No|
|
No|
|
No|
|
No|
|
No|
|
No|
|
No|
|
|
No|
|
No|
|
|
No|
|
No|
|
No|
|
No|
|
No|
|
No|
No|
No|
353
Chapter 10: Default Event Classes and Types
|
|
|
|
|
|
|
|
|
|
|
|
|
|
|
|
|
|
|
|
|
|
|
|
|
|
|
|
|
|
|
|
|
|
|
|
|
|
|
|
|
|
|
|
|
354
80|
80|
80|
|
80|
80|
80|
|
80|
|
80|
|
80|
80|
|
80|
|
80|
80|
|
80|
|
80|
|
80|
80|
|
80|
80|
|
|
80|
|
80|
|
80|
|
80|
|
80|
|
80|
|
80|
|
3154|
Warm spare found. (27)|
3153|
Active spare found. (26)|
3152|Expand Capacity stopped with er|
|
ror. (18)|
3151|Expand Capacity Completed. (17)|
3150| Expand Capacity started. (16)|
3149|A previously configured disk is|
|
now available. (15)|
3148|A hard disk has been removed. (|
|
14)|
3147|A new hard disk has been found.|
|
(13)|
3146|
A rebuild has started. (6)|
3145|A hard disk added as hot spare.|
|
(2)|
3144|A hard disk has been placed onl|
|
ine. (1)|
3730|
Unknown Event|
3760|Valid SANMap was not found in t|
|he configuration on disk. (809)|
3759|Valid configuration on disk not|
|
found. (808)|
3758|Battery test failed, battery ba|
|
d. (522)|
3757| Battery test cancelled. (521)|
3756|Battery test has completed. (52|
|
0)|
3755|Battery test has started. (519)|
3754|A replacement controller attemp|
|ted to stop the surviving contr|
|
oller. (441)|
3753|Error in mirror race table. (44|
|
0)|
3752|Dual-active negotiation failed |
|
cache memory size. (439)|
3751|Dual-active negotiation failed |
|
memory size. (438)|
3750|Dual-active negotiation failed |
|
host ports. (437)|
3749|Dual-active negotiation failed |
|
disk channels. (436)|
3748|Dual-active negotiation failed |
|
board types. (435)|
3747|Dual-active negotiation failed |
|
IDs. (434)|
No|
No|
No|
|
No|
No|
No|
|
No|
|
No|
|
No|
No|
|
No|
|
Yes|
No|
|
No|
|
Yes|
|
No|
No|
|
No|
Yes|
|
|
Yes|
|
Yes|
|
Yes|
|
Yes|
|
Yes|
|
Yes|
|
Yes|
|
No|
No|
No|
|
No|
No|
No|
|
No|
|
No|
|
No|
No|
|
No|
|
Yes|
No|
|
No|
|
Yes|
|
No|
No|
|
No|
Yes|
|
|
Yes|
|
Yes|
|
Yes|
|
Yes|
|
Yes|
|
Yes|
|
Yes|
|
ESP for the IRIX OS
|
|
|
|
|
|
|
|
|
|
|
|
|
|
|
|
|
|
|
|
|
|
|
|
|
|
|
|
|
|
|
|
|
|
|
|
|
|
|
|
|
|
|
|
|
80|
|
80|
|
80|
|
|
80|
|
80|
|
80|
|
|
80|
|
80|
|
|
80|
|
80|
|
|
80|
|
80|
|
|
80|
|
|
|
|
80|
|
80|
|
81|
|
81|
|
81|
|
81|
3746|Dual-active negotiation failed |
|
jumpers. (433)|
3745|Dual-active automatic flash of |
| replacement controller. (432)|
3744|Controller improperly shutdown.|
| Data might have been lost. (43|
|
1)|
3743|Controller disconnected from cl|
|
uster. (430)|
3742|Controller connected to cluster|
|
. (429)|
3741|Low battery charge level. Logic|
|al drive may have lost data. (1|
|
82)|
3740|Online controller firmware upgr|
|
ade has failed. (75)|
3739|Online controller firmware upgr|
|ade has completed successfully.|
|
(74)|
3738|Online controller firmware upgr|
|
ade has started. (73)|
3737|Controller parameters checksum |
|verification failed; restored d|
|
efault. (72)|
3736|Mirror race recovery failed for|
|
logical drive. (71)|
3735|Physical disk port has failed o|
|r cannot operate at the configu|
|
red channel speed. (70)|
3734|Physical disk has acquired an i|
|nappropriate loop ID. Enclosure|
| disk-slot operations are disab|
|led while this condition persis|
|
ts.|
3733|Physical disk found on only one|
|
disk channel. (67)|
3732|Hot spare replaced with a small|
|
er capacity drive. (62)|
3339|Failed to communicate storage a|
|rray's world-wide name (0x6505)|
3338|Remote storage array's world-wi|
|
de name changed (0x6504)|
3337|Communication to remote volume |
|
- down (0x6503)|
3336|Data on mirrored pair unsynchro|
Yes|
|
No|
|
Yes|
|
|
No|
|
No|
|
Yes|
|
|
Yes|
|
No|
|
|
No|
|
Yes|
|
|
Yes|
|
Yes|
|
|
Yes|
|
|
|
|
Yes|
|
No|
|
Yes|
|
Yes|
|
Yes|
|
Yes|
Yes|
|
No|
|
Yes|
|
|
No|
|
No|
|
Yes|
|
|
Yes|
|
No|
|
|
No|
|
Yes|
|
|
Yes|
|
Yes|
|
|
Yes|
|
|
|
|
Yes|
|
No|
|
Yes|
|
Yes|
|
Yes|
|
Yes|
355
Chapter 10: Default Event Classes and Types
|
|
|
|
|
|
|
|
|
|
|
|
|
|
|
|
|
|
|
|
|
|
|
|
|
|
|
|
|
|
|
|
|
|
|
|
|
|
|
|
|
|
|
|
|
356
|
81|
|
81|
|
81|
81|
|
81|
|
|
81|
|
81|
|
|
81|
|
|
81|
|
|
81|
|
81|
|
|
81|
|
81|
|
|
|
81|
|
|
81|
|
|
81|
|
81|
|
81|
|
|
nized (0x6402)|
3335|Dual secondary volume conflict |
|
(0x6401)|
3334|Dual primary volume conflict (0|
|
x6400)|
3333|Snapshot volume failed (0x6202)|
3332|Snapshot repository volume capa|
|
city - full (0x6201)|
3331|Snapshot repository volume capa|
|city - threshold exceeded (0x62|
|
00)|
3330|Internal configuration database|
|
full (0x6101)|
3329|Diagnostics rejected - configur|
|ation error on this controller'|
|
s alternate (0x5617)|
3328|Diagnostics rejected - configur|
|ation error on controller (0x56|
|
16)|
3327|This controller's alternate fai|
|led diagnostics write test (0x5|
|
610)|
3326|Diagnostics write test failed o|
|
n controller (0x560F)|
3325|This controller's alternate fai|
|led diagnostics read test (0x56|
|
0E)|
3324|Diagnostics read test failed on|
|
controller (0x560D)|
3323|Diagnostics rejected - CtlrDiag|
| task on controller's alternate|
| cannot obtain Mode Select lock|
|
(0x560C)|
3322|Diagnostics rejected - CtlrDiag|
| task cannot obtain Mode Select|
|
lock (0x560B)|
3321|This controller's alternate fai|
|led - timeout waiting for resul|
|
ts (0x5602)|
3320|Feature Enable Identifier chang|
|
ed (0x5404)|
3319|Premium feature exceeds limit (|
|
0x5403)|
3318|Premium feature out of complian|
|
ce (0x5402)|
|
Yes|
|
Yes|
|
Yes|
Yes|
|
Yes|
|
|
Yes|
|
Yes|
|
|
Yes|
|
|
Yes|
|
|
Yes|
|
Yes|
|
|
Yes|
|
Yes|
|
|
|
Yes|
|
|
Yes|
|
|
Yes|
|
Yes|
|
Yes|
|
|
Yes|
|
Yes|
|
Yes|
Yes|
|
Yes|
|
|
Yes|
|
Yes|
|
|
Yes|
|
|
Yes|
|
|
Yes|
|
Yes|
|
|
Yes|
|
Yes|
|
|
|
Yes|
|
|
Yes|
|
|
Yes|
|
Yes|
|
Yes|
|
ESP for the IRIX OS
|
|
|
|
|
|
|
|
|
|
|
|
|
|
|
|
|
|
|
|
|
|
|
|
|
|
|
|
|
|
|
|
|
|
|
|
|
|
|
|
|
|
|
|
|
81|
|
81|
81|
|
81|
|
81|
|
|
81|
|
81|
|
81|
|
81|
|
81|
|
81|
|
81|
|
81|
|
81|
|
81|
81|
|
81|
81|
81|
|
81|
|
81|
|
81|
|
81|
|
81|
|
3317|Error writing configuration (0x|
|
5212)|
3316|
Fail drive (0x5006)|
3315|Place controller offline (0x500|
|
5)|
3255|Cache between controllers not s|
|
ynchronized (0x210B)|
3254|Controller cache not enabled - |
|cache sizes do not match (0x210|
|
9)|
3253|Data/parity mismatch detected o|
|
n volume (0x2034)|
3252|Parity reconstructed on volume |
|
(0x2033)|
3251|Read drive error during interru|
|
pted write (0x202E)|
3250|Virtual disk failed during inte|
|
rrupted write (0x2021)|
3249|Piece failed during interrupted|
|
write (0x2020)|
3248|Uncompleted writes detected in |
|NVSRAM at start-of-day (0x2015)|
3247|Unwritten data/parity recovered|
|
from cache (0x2013)|
3246|Unrecovered deferred error on v|
|
olume (0x200B)|
3245|Data/parity mismatch on volume |
|
(0x200A)|
3244|
Piece failed (0x2006)|
3243|Virtual disk failed - interrupt|
|
ed write (0x2005)|
3242|
ESM miswire (0x1510)|
3241|
Channel miswire (0x150F)|
3240|Controller loop-back diagnostic|
|
s failed (0x150E)|
3239|Unresponsive drive (bad AL_PA e|
|
rror) (0x150A)|
3238|Fibre channel link errors-thres|
|
hold exceeded (0x1207)|
3237|Incorrect mode parameters set o|
|
n drive (0x1015)|
3236|Impending drive failure (PFA) d|
|
etected (0x1010)|
3235|Drive returned CHECK CONDITION |
|
(0x100A)|
Yes|
|
Yes|
Yes|
|
Yes|
|
Yes|
|
|
Yes|
|
Yes|
|
Yes|
|
Yes|
|
Yes|
|
Yes|
|
Yes|
|
Yes|
|
Yes|
|
Yes|
Yes|
|
Yes|
Yes|
Yes|
|
Yes|
|
Yes|
|
Yes|
|
Yes|
|
Yes|
|
Yes|
|
Yes|
Yes|
|
Yes|
|
Yes|
|
|
Yes|
|
Yes|
|
Yes|
|
Yes|
|
Yes|
|
Yes|
|
Yes|
|
Yes|
|
Yes|
|
Yes|
Yes|
|
Yes|
Yes|
Yes|
|
Yes|
|
Yes|
|
Yes|
|
Yes|
|
Yes|
|
357
Chapter 10: Default Event Classes and Types
|
|
|
|
|
|
|
|
|
|
|
|
|
|
|
|
|
|
|
|
|
|
|
|
|
|
|
|
|
|
|
|
|
|
|
|
|
|
|
|
|
|
|
|
|
358
81|
|
81|
|
81|
|
81|
81|
|
81|
|
81|
|
81|
81|
|
81|
|
81|
|
81|
81|
81|
|
81|
|
81|
|
81|
|
81|
|
81|
81|
|
81|
|
81|
|
81|
|
81|
|
81|
|
3234|Drive write failure - retries e|
|
xhausted (0x1006)|
3233|Drive read failure - retries ex|
|
hausted (0x1005)|
3232|Drive error tally exceeded thre|
|
shold (0x1003)|
3231|
Channel failed (0x1001)|
3256|Controller cache battery failed|
|
(0x210C)|
3314|Sys wipe request received by al|
|
ternate controller (0x4002)|
3313|Sys wipe request sent to contro|
|
ller (0x4000)|
3312|
VKI panic (0x3201)|
3311|Environmental card firmware dow|
|
nload failed (0x301D)|
3310|Drive firmware download failed |
|
(0x301A)|
3309|Volume ownership changed due to|
|
failover (0x3019)|
3308|
Drive by-passed (0x2823)|
3307| ESM firmware mismatch (0x281E)|
3306|Temperature sensor removed (0x2|
|
81D)|
3305|Maximum temperature exceeded (0|
|
x281C)|
3304|Nominal temperature exceeded (0|
|
x281B)|
3303|Tray ID mismatch - duplicate ID|
| s in same drive tray (0x2818)|
3302|Tray ID conflict - duplicate ID|
| s across drive trays (0x2816)|
3301|
GBIC failed (0x2815)|
3300|Mini-hub canister failed (0x281|
|
3)|
3299|ESM - loss of communication (0x|
|
280F)|
3298|Standby power source not fully |
|
charged (0x280E)|
3297|Drive tray component failed (0x|
|
280D)|
3296|Controller tray component faile|
|
d (0x280B)|
3295|Controller tray component missi|
|
ng (0x280A)|
Yes|
|
Yes|
|
Yes|
|
Yes|
Yes|
|
Yes|
|
Yes|
|
Yes|
Yes|
|
Yes|
|
Yes|
|
Yes|
Yes|
Yes|
|
Yes|
|
Yes|
|
Yes|
|
Yes|
|
Yes|
Yes|
|
Yes|
|
Yes|
|
Yes|
|
Yes|
|
Yes|
|
Yes|
|
Yes|
|
Yes|
|
Yes|
Yes|
|
Yes|
|
Yes|
|
Yes|
Yes|
|
Yes|
|
Yes|
|
Yes|
Yes|
Yes|
|
Yes|
|
Yes|
|
Yes|
|
Yes|
|
Yes|
Yes|
|
Yes|
|
Yes|
|
Yes|
|
Yes|
|
Yes|
|
ESP for the IRIX OS
|
|
|
|
|
|
|
|
|
|
|
|
|
|
|
|
|
|
|
|
|
|
|
|
|
|
|
|
|
|
|
|
|
|
|
|
|
|
|
|
|
|
|
|
|
81|
81|
81|
|
81|
|
81|
|
|
81|
|
81|
|
81|
|
81|
|
81|
|
81|
|
81|
|
|
81|
|
81|
|
81|
|
81|
81|
|
81|
|
81|
|
81|
|
81|
|
81|
|
81|
|
3294|
Tray ID not unique (0x2808)|
3293|
ESM Failed (0x2807)|
3292|UPS battery-two minutes to fail|
|
ure (0x2803)|
3291|Storage Array running on UPS ba|
|
ttery (0x2801)|
3290|Recoverable error in processor |
|memory detected/corrected (0x27|
|
03)|
3289|Controller unexpected RPA inter|
|
rupt detected (0x2702)|
3288|PCI controller parity error (0x|
|
2701)|
3287|Controller RPA memory parity er|
|
ror detected (0x2700)|
3286|Persistent controller memory pa|
|
rity error (0x2604)|
3285|Automatic controller firmware s|
| ynchronization failed (0x2602)|
3284|Controller inserted or removed |
|
(0x2500)|
3283|Volume definition incompatible |
|with ALT mode-ALT disabled (0x2|
|
255)|
3282|Redundancy (parity) and data mi|
|
smatch was detected (0x2254)|
3281|Drive marked offline during int|
|
errupted write (0x2252)|
3280|Drive failed - reconstruction f|
|
ailure (0x2251)|
3279|
Volume failure (0x2250)|
3278|Drive failed-initialization/rec|
|
onstruction failure (0x224E)|
3277|Drive failed-no response at sta|
|
rt of day (0x224D)|
3276|Drive failed-initialization fai|
|
lure (0x224B)|
3275|Drive has wrong block size (0x2|
|
24A)|
3274|Drive capacity less than minimu|
|
m (0x2249)|
3273|Drive failed - write failure (0|
|
x2248)|
3272|Data lost on volume during unre|
|covered interrupted write (0x22|
Yes|
Yes|
Yes|
|
Yes|
|
Yes|
|
|
Yes|
|
Yes|
|
Yes|
|
Yes|
|
Yes|
|
Yes|
|
Yes|
|
|
Yes|
|
Yes|
|
Yes|
|
Yes|
Yes|
|
Yes|
|
Yes|
|
Yes|
|
Yes|
|
Yes|
|
Yes|
|
Yes|
Yes|
Yes|
|
Yes|
|
Yes|
|
|
Yes|
|
Yes|
|
Yes|
|
Yes|
|
Yes|
|
Yes|
|
Yes|
|
|
Yes|
|
Yes|
|
Yes|
|
Yes|
Yes|
|
Yes|
|
Yes|
|
Yes|
|
Yes|
|
Yes|
|
Yes|
|
359
Chapter 10: Default Event Classes and Types
|
|
|
|
|
|
|
|
|
|
|
|
|
|
|
|
|
|
|
|
|
|
|
|
|
|
|
|
|
|
|
|
|
|
|
|
|
|
|
|
|
|
|
|
|
360
|
81|
|
81|
81|
81|
|
81|
81|
|
81|
|
81|
81|
|
81|
81|
81|
|
81|
|
81|
|
81|
|
|
81|
|
81|
81|
81|
|
81|
|
81|
|
81|
|
81|
|
81|
|
81|
|
|
|
47)|
3271|Partially reconstructed drive m|
|
arked optimal (0x223F)|
3270|
Drive reinserted (0x223C)|
3269| Drive manually failed (0x222D)|
3268|Drive failed by controller (0x2|
|
229)|
3267|
Drive spun down (0x2226)|
3266|Duplicate data structure exists|
|
for two devices (0x2223)|
3265|Piece failed during uncompleted|
|
write processing (0x2218)|
3264|
Piece failed (0x2217)|
3263|Piece taken out of service (0x2|
|
216)|
3262|
Drive marked failed (0x2215)|
3261|
Parity repaired (0x2212)|
3260|Memory parity ECC error (0x2118|
|
)|
3259|Controller cache memory initial|
|
ization failed (0x2110)|
3258|Controller cache memory parity |
|
error detected (0x210F)|
3257|Controller cache memory recover|
|y failed after power cycle or r|
|
eset (0x210E)|
3674|Communication to remote volume |
|
- up (0x6502)|
3673| Remote volume deleted (0x6501)|
3672| Remote volume created (0x6500)|
3671|Mirrored pair changed to optima|
|
l (0x6404)|
3670|Mirror repository volume delete|
|
d (0x6301)|
3669|Mirror repository volume create|
|
d (0x6300)|
3668|Diagnostics rejected - download|
|
is in progress (0x561F)|
3667|Running diagnostics on this con|
|
troller (0x561E)|
3666|Diagnostics initiated from this|
|
controller (0x561D)|
3665|Diagnostics rejected - both con|
|trollers must be in active mode|
|
(0x561C)|
|
Yes|
|
Yes|
Yes|
Yes|
|
Yes|
Yes|
|
Yes|
|
Yes|
Yes|
|
Yes|
Yes|
Yes|
|
Yes|
|
Yes|
|
Yes|
|
|
No|
|
No|
No|
No|
|
No|
|
No|
|
No|
|
No|
|
No|
|
No|
|
|
|
Yes|
|
Yes|
Yes|
Yes|
|
Yes|
Yes|
|
Yes|
|
Yes|
Yes|
|
Yes|
Yes|
Yes|
|
Yes|
|
Yes|
|
Yes|
|
|
No|
|
No|
No|
No|
|
No|
|
No|
|
No|
|
No|
|
No|
|
No|
|
|
ESP for the IRIX OS
|
|
|
|
|
|
|
|
|
|
|
|
|
|
|
|
|
|
|
|
|
|
|
|
|
|
|
|
|
|
|
|
|
|
|
|
|
|
|
|
|
|
|
|
|
81|
|
|
|
81|
|
|
81|
|
|
81|
|
81|
81|
|
81|
|
|
81|
|
|
|
81|
|
|
81|
|
|
81|
|
81|
|
81|
|
81|
|
|
81|
|
|
81|
|
|
81|
|
3664|Diagnostics rejected - data tra|
|nsfer on this controller's alte|
|rnate is not disabled (quiesced|
|
) (0x561B)|
3663|Diagnostics rejected - data tra|
|nsfer on controller is not disa|
|
bled (quiesced) (0x561A)|
3662|Diagnostics rejected - no cache|
| memory on this controller's al|
|
ternate (0x5619)|
3661|Diagnostics rejected - no cache|
| memory on controller (0x5618)|
3660|
Not Used (0x5615)|
3659|A host-side port (link) has bee|
|
n detected as down (0x5614)|
3658|Diagnostics loopback test ident|
|ified bad destination channel(s|
|
) (0x5613)|
3657|This controller's alternate pas|
|sed diagnostics, but loopback t|
|est identified an error on loop|
|
(s) (0x5612)|
3656|Controller passed diagnostics, |
|but loopback test identified an|
|
error on loop(s) (0x5611)|
3655|Diagnostics rejected - access v|
|olume (UTM)is not enabled (0x56|
|
0A)|
3654|Diagnostics unable to select a |
|
drive for I/O (0x5609)|
3653|Diagnostics rejected - test ID |
|
is incorrect (0x5608)|
3652|Diagnostics returned unknown Re|
|
turnCode (0x5607)|
3651|Diagnostics rejected - ctlrDiag|
| task unable to queue DIAG_INIT|
|
_MSG message (0x5606)|
3650|Diagnostics rejected - error oc|
|curred when sending the Icon me|
|
ssage (0x5605)|
3649|Diagnostics rejected - this con|
|troller's alternate is absent o|
|
r failed (0x5604)|
3648|Diagnostics rejected - already |
|
in progress (0x5603)|
No|
|
|
|
No|
|
|
No|
|
|
No|
|
No|
No|
|
No|
|
|
No|
|
|
|
No|
|
|
No|
|
|
No|
|
No|
|
No|
|
No|
|
|
No|
|
|
No|
|
|
No|
|
No|
|
|
|
No|
|
|
No|
|
|
No|
|
No|
No|
|
No|
|
|
No|
|
|
|
No|
|
|
No|
|
|
No|
|
No|
|
No|
|
No|
|
|
No|
|
|
No|
|
|
No|
|
361
Chapter 10: Default Event Classes and Types
|
|
|
|
|
|
|
|
|
|
|
|
|
|
|
|
|
|
|
|
|
|
|
|
|
|
|
|
|
|
|
|
|
|
|
|
|
|
|
|
|
|
|
|
|
362
81|
|
81|
|
81|
|
81|
|
81|
|
81|
|
81|
|
81|
|
81|
|
81|
|
81|
81|
81|
81|
81|
81|
81|
81|
81|
81|
81|
81|
81|
|
81|
|
81|
|
81|
|
81|
|
81|
|
81|
3647|This controller's alternate pas|
|
sed diagnostics. (0x5601)|
3646|Controller passed diagnostics (|
|
0x5600)|
3645|Premium feature disabled (0x540|
|
1)|
3644|Premium feature enabled (0x5400|
|
)|
3643|Change volume-to-LUN mapping (0|
|
x5211)|
3642|Delete volume-to-LUN mapping (0|
|
x5210)|
3641|Create volume-to-LUN mapping (0|
|
x520F)|
3640|Move Storage Array port (0x520E|
|
)|
3639|Delete Storage Array port group|
|
(0x520D)|
3638|Create Storage Array port group|
|
(0x520C)|
3637|
Set host port type (0x520B)|
3636|
Move host port (0x520A)|
3635|
Rename host port (0x5209)|
3634|
Delete host port (0x5208)|
3633|
Create host port (0x5207)|
3632|
Move host (0x5206)|
3631|
Rename host (0x5205)|
3630|
Delete host (0x5204)|
3629|
Create host (0x5203)|
3628|
Rename host group (0x5202)|
3627|
Delete host group (0x5201)|
3626|
Create host group (0x5200)|
3625|Create mirror relationship (0x5|
|
033)|
3624|Change synchronization priority|
|
(0x5032)|
3623|Deactivate remote mirroring (0x|
|
5031)|
3622|Activate remote mirroring (0x50|
|
30)|
3621|Increase volume capacity (0x502|
|
B)|
3620|Assign volume ownership (0x502A|
|
)|
3619|Reset controller battery age (0|
No|
|
No|
|
No|
|
No|
|
No|
|
No|
|
No|
|
No|
|
No|
|
No|
|
No|
No|
No|
No|
No|
No|
No|
No|
No|
No|
No|
No|
No|
|
No|
|
No|
|
No|
|
No|
|
No|
|
No|
No|
|
No|
|
No|
|
No|
|
No|
|
No|
|
No|
|
No|
|
No|
|
No|
|
No|
No|
No|
No|
No|
No|
No|
No|
No|
No|
No|
No|
No|
|
No|
|
No|
|
No|
|
No|
|
No|
|
No|
ESP for the IRIX OS
|
|
|
|
|
|
|
|
|
|
|
|
|
|
|
|
|
|
|
|
|
|
|
|
|
|
|
|
|
|
|
|
|
|
|
|
|
|
|
|
|
|
|
|
|
|
81|
|
81|
|
81|
|
81|
|
81|
|
81|
|
|
81|
|
81|
|
81|
|
81|
|
81|
|
81|
81|
81|
|
81|
81|
|
81|
|
81|
|
81|
|
81|
|
81|
|
81|
|
81|
|
|
x5029)|
3618|Controller NVSRAM download comp|
|
leted (0x5028)|
3617|Controller NVSRAM download fail|
|
ed (0x5027)|
3616|Controller firmware download co|
|
mpleted (0x5026)|
3615|Controller firmware download fa|
|
iled (0x5025)|
3614|Internal download checkpoint (0|
|
x5024)|
3613|Controller return status/functi|
|on call for requested operation|
|
(0x5023)|
3612|Automatic configuration on Stor|
|
age Array (0x5022)|
3611|Reset configuration of Storage |
|
Array (0x5021)|
3610|Change media scan (scrub) setti|
| ngs of Storage Array (0x5020)|
3609|Change media scan (scrub) setti|
|
ngs of volume (0x501F)|
3608|Change positions of trays in ph|
|
ysical view (0x501E)|
3607|
Revive volume (0x501D)|
3606|
Revive drive (0x501C)|
3605|Place controller online (0x501B|
|
)|
3604| Change name of volume (0x501A)|
3603|Change parameters of volume (0x|
|
5019)|
3602|Change cache parameters of volu|
|
me (0x5018)|
3601|Synchronize controller clock (0|
|
x5017)|
3600|Change name of Storage Array (0|
|
x5016)|
3599|Update cache parameters of Stor|
|
age Array (0x5015)|
3598|Change controller to active mod|
|
e (0x5014)|
3597|Change controller to passive mo|
|
de (0x5013)|
3596|Change segment size of volume (|
|
0x5012)|
|
No|
|
No|
|
No|
|
No|
|
No|
|
No|
|
|
No|
|
No|
|
No|
|
No|
|
No|
|
No|
No|
No|
|
No|
No|
|
No|
|
No|
|
No|
|
No|
|
No|
|
No|
|
No|
|
|
No|
|
No|
|
No|
|
No|
|
No|
|
No|
|
|
No|
|
No|
|
No|
|
No|
|
No|
|
No|
No|
No|
|
No|
No|
|
No|
|
No|
|
No|
|
No|
|
No|
|
No|
|
No|
|
363
Chapter 10: Default Event Classes and Types
|
|
|
|
|
|
|
|
|
|
|
|
|
|
|
|
|
|
|
|
|
|
|
|
|
|
|
|
|
|
|
|
|
|
|
|
|
|
|
|
|
|
|
|
|
364
81|
|
81|
|
81|
|
81|
|
81|
|
81|
|
81|
|
81|
|
81|
|
81|
81|
|
81|
81|
|
81|
81|
81|
|
81|
81|
|
81|
|
81|
|
81|
|
81|
|
81|
|
81|
|
81|
|
3595|Change RAID level of volume gro|
|
up (0x5011)|
3594|Add free capacity to volume gro|
|
up (0x5010)|
3593|Start volume group defragment (|
|
0x500F)|
3592|Reconstruct drive/volume (0x500|
|
E)|
3591|Place volume group online (0x50|
|
0D)|
3590|Place volume group offline (0x5|
|
00C)|
3589|Controller NVSRAM download star|
|
ted (0x500B)|
3588|Download drive firmware issued |
|
(0x500A)|
3587|Controller firmware download st|
|
arted (0x5009)|
3586|
Initialize drive (0x5008)|
3585|Initialize volume group or volu|
|
me (0x5007)|
3584|
Delete volume (0x5004)|
3583|De-assign hot spare drive (0x50|
|
03)|
3582|
Create volume (0x5002)|
3581|Assign hot spare drive (0x5001)|
3580|Assign volume group ownership (|
|
0x5000)|
3579|
Controller reset (0x4010)|
3578|Controller reset by its alterna|
|
te (0x400F)|
3577|Automatic volume transfer start|
|
ed (0x400E)|
3576|Controller placed online (0x400|
|
D)|
3575|Controller placed offline (0x40|
|
0C)|
3574|All channel reset detected (0x4|
|
00B)|
3573|Alternate controller quiescence|
|
released (0x400A)|
3572|Controller quiescence released |
|
(0x4009)|
3571|Controller quiescence halted (0|
|
x4008)|
No|
|
No|
|
No|
|
No|
|
No|
|
No|
|
No|
|
No|
|
No|
|
No|
No|
|
No|
No|
|
No|
No|
No|
|
No|
No|
|
No|
|
No|
|
No|
|
No|
|
No|
|
No|
|
No|
|
No|
|
No|
|
No|
|
No|
|
No|
|
No|
|
No|
|
No|
|
No|
|
No|
No|
|
No|
No|
|
No|
No|
No|
|
No|
No|
|
No|
|
No|
|
No|
|
No|
|
No|
|
No|
|
No|
|
ESP for the IRIX OS
|
|
|
|
|
|
|
|
|
|
|
|
|
|
|
|
|
|
|
|
|
|
|
|
|
|
|
|
|
|
|
|
|
|
|
|
|
|
|
|
|
|
|
|
|
81|
|
81|
|
81|
|
81|
|
81|
|
81|
|
81|
81|
81|
|
81|
|
81|
|
81|
|
81|
|
81|
|
81|
|
81|
|
81|
|
81|
|
81|
81|
81|
|
81|
|
81|
|
81|
|
81|
3570|Subsystem quiescence started (0|
|
x4007)|
3569|Alternate controller quiescence|
|
started (0x4006)|
3568|Controller quiescence started (|
|
0x4005)|
3567|Alternate controller quiescence|
|
message received (0x4004)|
3566|NVSRAM clear request received b|
|y alternate controller (0x4003)|
3565|NVSRAM clear request sent to al|
|
ternate controller (0x4001)|
3564|
VKI commom error (0x3200)|
3563| Deferred error (EEL) (0x3102)|
3562|AEN posted for recently logged |
|
event (0x3101)|
3561|Environmental card firmware dow|
|
nload completed (0x301E)|
3560|Environmental card firmware dow|
|
nload started (0x301C)|
3559|Drive firmware download complet|
|
ed (0x301B)|
3558|Set pass command issued (0x3018|
|
)|
3557|Set pass-through issued (0x3017|
|
)|
3556|Alternate controller transition|
|
issued (0x3016)|
3555|Drive pass-through issued (0x30|
|
15)|
3554|Drive firmware download started|
|
(0x3014)|
3553|Download controller firmware is|
|
sued (0x3013)|
3552|
Write Buffer (0x3012)|
3551| Defect list received (0x3011)|
3550|Mode select for hot spare page |
|
3A received (0x3010)|
3549|Mode select for time page 2F re|
|
ceived (0x300F)|
3548|Mode select for vendor-unique c|
| ache page 2E received (0x300E)|
3547|Mode select for redundant contr|
|oller page 2C received (0x300D)|
3546|Mode select for array logical p|
No|
|
No|
|
No|
|
No|
|
No|
|
No|
|
No|
No|
No|
|
No|
|
No|
|
No|
|
No|
|
No|
|
No|
|
No|
|
No|
|
No|
|
No|
No|
No|
|
No|
|
No|
|
No|
|
No|
No|
|
No|
|
No|
|
No|
|
No|
|
No|
|
No|
No|
No|
|
No|
|
No|
|
No|
|
No|
|
No|
|
No|
|
No|
|
No|
|
No|
|
No|
No|
No|
|
No|
|
No|
|
No|
|
No|
365
Chapter 10: Default Event Classes and Types
|
|
|
|
|
|
|
|
|
|
|
|
|
|
|
|
|
|
|
|
|
|
|
|
|
|
|
|
|
|
|
|
|
|
|
|
|
|
|
|
|
|
|
|
|
366
|
81|
|
81|
|
81|
|
81|
|
81|
|
81|
|
81|
|
81|
81|
81|
|
81|
81|
81|
|
81|
|
81|
|
|
|
81|
|
81|
|
81|
|
81|
|
81|
|
81|
|
81|
81|
|
81|
|
age 2B received (0x300C)|
3545|Mode select for array physical |
|
page 2A received (0x300B)|
3544|Mode select for control mode pa|
|
ge A received (0x300A)|
3543|Mode for caching page 8 receive|
|
d (0x3009)|
3542|Mode select for page 2 received|
|
(0x3008)|
3541|Mode select for page 1 received|
|
(0x3007)|
3540|Safe pass-through issued (0x300|
|
6)|
3539|Synchronize controller cache is|
|
sued (0x3005)|
3538|
Release issued (0x3004)|
3537|
Reserve issued (0x3003)|
3536|Reassign blocks issued from hos|
|
t (0x3002)|
3535|
Quiescence issued (0x3001)|
3534|
Format unit issued (0x3000)|
3533|Drive by-passed condition resol|
|
ved (0x2824)|
3532|Incompatible mini-hub canister |
|
(0x2821)|
3531|Two controllers present but NVS|
|RAM (offset 0x35, bit 6) set fo|
|r NOT reporting a missing secon|
|
d controller (0x2820)|
3530|ESM Environmental card firmware|
|
mismatch resolved (0x281F)|
3529|Temperature changed to optimal |
|
(0x281A)|
3528|Tray ID mismatch resolved (0x28|
|
19)|
3527|Tray ID conflict resolved (0x28|
|
17)|
3526|GBIC changed to optimal (0x2814|
|
)|
3525|Mini-hub canister changed to op|
|
timal (0x2812)|
3524|
Not Used (0x2811)|
3523|ESM - communication restored (0|
|
x2810)|
3522|Drive tray component changed to|
|
No|
|
No|
|
No|
|
No|
|
No|
|
No|
|
No|
|
No|
No|
No|
|
No|
No|
No|
|
No|
|
No|
|
|
|
No|
|
No|
|
No|
|
No|
|
No|
|
No|
|
No|
No|
|
No|
|
No|
|
No|
|
No|
|
No|
|
No|
|
No|
|
No|
|
No|
No|
No|
|
No|
No|
No|
|
No|
|
No|
|
|
|
No|
|
No|
|
No|
|
No|
|
No|
|
No|
|
No|
No|
|
No|
ESP for the IRIX OS
|
|
|
|
|
|
|
|
|
|
|
|
|
|
|
|
|
|
|
|
|
|
|
|
|
|
|
|
|
|
|
|
|
|
|
|
|
|
|
|
|
|
|
|
|
|
81|
|
81|
81|
|
81|
81|
|
81|
|
81|
|
81|
81|
|
|
81|
|
81|
|
81|
|
81|
|
81|
|
81|
|
81|
|
81|
|
81|
|
|
81|
|
81|
|
81|
|
81|
|
81|
|
optimal (0x280C)|
3521|Controller tray component chang|
|
ed to optimal (0x2809)|
3520| Tray component change (0x2806)|
3519|Controller tray component chang|
|
e detected (0x2805)|
3518|
Not Used (0x2804)|
3517|UPS battery is fully charged (0|
|
x2802)|
3516|Power supply state change detec|
|
ted (0x2800)|
3515|Start-of-day routine completed |
|
(0x2605)|
3514|Default volume created (0x2603)|
3513|Automatic controller firmware s|
|ynchronization completed (0x260|
|
1)|
3512|Automatic controller firmware s|
|ynchronization started (0x2600)|
3511|Controller mode switch occurred|
|
(0x2505)|
3510|Controller mode changed to acti|
|
ve (0x2504)|
3509|Controller mode changed to pass|
|
ive (0x2503)|
3508|Controller icon chip error (0x2|
|
502)|
3507|Controller mode changed to acti|
|
ve (0x2501)|
3506|Hot swap monitor detected drive|
|
insertion (0x2401)|
3505|Hot swap monitor detected drive|
|
removal (0x2400)|
3504|Immediate availability initiali|
|zation (IAF) started on volume |
|
(0x225A)|
3503|Initialization started on volum|
|
e (0x2259)|
3502|Modification (reconfigure) comp|
|
leted on volume (0x2258)|
3501|Modification (reconfigure) star|
|
ted on volume (0x2257)|
3500|Copyback completed on volume (0|
|
x2256)|
3499|Volume group or volume modified|
|
No|
|
No|
No|
|
No|
No|
|
No|
|
No|
|
No|
No|
|
|
No|
|
No|
|
No|
|
No|
|
No|
|
No|
|
No|
|
No|
|
No|
|
|
No|
|
No|
|
No|
|
No|
|
No|
|
No|
|
No|
No|
|
No|
No|
|
No|
|
No|
|
No|
No|
|
|
No|
|
No|
|
No|
|
No|
|
No|
|
No|
|
No|
|
No|
|
No|
|
|
No|
|
No|
|
No|
|
No|
|
No|
367
Chapter 10: Default Event Classes and Types
|
|
|
|
|
|
|
|
|
|
|
|
|
|
|
|
|
|
|
|
|
|
|
|
|
|
|
|
|
|
|
|
|
|
|
|
|
|
|
|
|
|
|
|
|
368
|
81|
|
81|
|
81|
|
81|
|
81|
|
81|
|
81|
|
81|
|
81|
|
81|
81|
|
81|
|
81|
81|
|
81|
|
81|
|
81|
|
81|
|
81|
|
81|
|
81|
|
81|
81|
|
81|
| (created or deleted) (0x2253)|
3498|Hot spare capacity not sufficie|
|
nt for all drives (0x224F)|
3497|Wrong drive removed/replaced (0|
|
x224C)|
3496|Media scan (scrub) resumed (0x2|
|
246)|
3495|Media scan (scrub) stopped (0x2|
|
245)|
3494|Unknown drive marked unassigned|
|
(0x2244)|
3493|Unassigned drive with no DACSTO|
|
RE removed (0x2243)|
3492|Unassigned drive with no DACSTO|
|
RE deleted (0x2242)|
3491|Unassigned drive with no DACSTO|
|
RE failed (0x2241)|
3490|DACSTORE created for unassigned|
|
or hot spare drive (0x2240)|
3489| Drive marked optimal (0x223E)|
3488|Unassigned drive replaced (0x22|
|
3D)|
3487|Failed/Replaced drive marked re|
|
placed (0x223B)|
3486| Drive marked deleted (0x223A)|
3485|Hot spare drive assigned intern|
|
ally (0x2239)|
3484|Drive added in previously unuse|
|
d slot (0x2238)|
3483|Replaced drive completed recons|
|
truction (0x2237)|
3482|Hot spare drive copy completed |
|
(0x2236)|
3481|Optimal/Replaced drive marked r|
|
emoved (0x2235)|
3480|Reconstructing drive marked rem|
|
oved (0x2234)|
3479|Unassigned drive marked removed|
|
(0x2233)|
3478|Removed drive marked removed (0|
|
x2232)|
3477| Drive marked removed (0x2231)|
3476|Drive failed by device manager |
|
(0x2230)|
3475| Drive marked replaced (0x222F)|
|
No|
|
No|
|
No|
|
No|
|
No|
|
No|
|
No|
|
No|
|
No|
|
No|
No|
|
No|
|
No|
No|
|
No|
|
No|
|
No|
|
No|
|
No|
|
No|
|
No|
|
No|
No|
|
No|
|
No|
|
No|
|
No|
|
No|
|
No|
|
No|
|
No|
|
No|
|
No|
|
No|
No|
|
No|
|
No|
No|
|
No|
|
No|
|
No|
|
No|
|
No|
|
No|
|
No|
|
No|
No|
|
No|
ESP for the IRIX OS
|
|
|
|
|
|
|
|
|
|
|
|
|
|
|
|
|
|
|
|
|
|
|
|
|
|
|
|
|
|
|
|
|
|
|
|
|
|
|
|
|
|
|
|
|
81|
81|
|
81|
|
81|
|
81|
81|
81|
|
81|
81|
|
81|
|
81|
|
81|
|
|
81|
|
81|
|
81|
|
81|
|
81|
81|
|
81|
|
81|
|
81|
81|
81|
|
81|
|
81|
|
81|
3474|
Mark drive removed (0x222E)|
3473|Drive marked unassigned (0x222C|
|
)|
3472|Drive replaced when Storage Arr|
|
ay was turned off (0x222B)|
3471|Hot spare drive assigned (0x222|
|
A)|
3470|
Drive deleted (0x2228)|
3469| Drive marked optimal (0x2227)|
3468|Reconstruction restarted (0x222|
|
5)|
3467|Reconstruction started (0x2224)|
3466|Logical unit number for volume |
|
reassigned (0x2222)|
3465|Hot spare drive removed from ho|
|
t spare list (0x2221)|
3464|Hot spare drive added to hot sp|
|
are list (0x2220)|
3463|Initialization (immediate avail|
|ability) started or restarted (|
|
0x221F)|
3462|Volume group or volume initiali|
|
zed (0x221E)|
3461|Volume group placed online (0x2|
|
21D)|
3460|Volume group placed offline (0x|
|
221C)|
3459|Piece placed in service (0x221B|
|
)|
3458|
Piece replaced (0x221A)|
3457|Piece removed from volume (0x22|
|
19)|
3456|One or more Sundry regions crea|
|
ted (0x2214)|
3455|Volume initialized with zeros (|
|
0x2213)|
3454|
Restore completed (0x2211)|
3453|
Restore started (0x2210)|
3452|Media scan (scrub) completed (0|
|
x220F)|
3451|Media scan (scrub) started (0x2|
|
20E)|
3450|Media scan (scrub) enabled (0x2|
|
20D)|
3449|Device failed during interrupte|
No|
No|
|
No|
|
No|
|
No|
No|
No|
|
No|
No|
|
No|
|
No|
|
No|
|
|
No|
|
No|
|
No|
|
No|
|
No|
No|
|
No|
|
No|
|
No|
No|
No|
|
No|
|
No|
|
No|
No|
No|
|
No|
|
No|
|
No|
No|
No|
|
No|
No|
|
No|
|
No|
|
No|
|
|
No|
|
No|
|
No|
|
No|
|
No|
No|
|
No|
|
No|
|
No|
No|
No|
|
No|
|
No|
|
No|
369
Chapter 10: Default Event Classes and Types
|
|
|
|
|
|
|
|
|
|
|
|
|
|
|
|
|
|
|
|
|
|
|
|
|
|
|
|
|
|
|
|
|
|
|
|
|
|
|
|
|
|
|
|
|
370
|
81|
81|
81|
|
81|
|
81|
81|
|
81|
|
81|
81|
|
81|
81|
81|
|
81|
|
|
81|
|
81|
|
81|
|
81|
|
81|
|
81|
|
81|
|
81|
|
81|
|
|
81|
|
81|
|
|
d write processing (0x220C)|
3448|
Copyback restarted (0x220B)|
3447|
Copyback started (0x220A)|
3446|Modification (reconfigure) comp|
|
leted (0x2209)|
3445|Modification (reconfigure) star|
|
ted (0x2208)|
3444| Device copy complete (0x2207)|
3443|Reconstruction completed (0x220|
|
6)|
3442|Source drive failed during copy|
|
operation (0x2205)|
3441|
I/O is resumed (0x2204)|
3440|Volume group or volume deleted |
|
(0x2203)|
3439|
Volume added (0x2202)|
3438| Volume marked optimal (0x2201)|
3437|Cache corrected by using altern|
|ate controller's cache (0x211A)|
3436|Recoverable error in data buffe|
|r memory detected/corrected (0x|
|
2119)|
3435|Controller cache manager error |
|
cleared (0x2117)|
3434|Alternate controller cache batt|
|
ery failed (0x2116)|
3433|Alternate controller cache batt|
|ery nearing expiration (0x2115)|
3432|Alternate controller cache batt|
| ery is fully charged (0x2114)|
3675|Controller cache battery nearin|
|
g expiration (0x2113)|
3431|Controller cache battery is ful|
|
ly charged (0x2112)|
3430|Controller cache task failed (0|
|
x2111)|
3429|Controller deferred error (0x21|
|
0D)|
3428|Controller cache not enabled or|
| was internally disabled (0x210|
|
A)|
3427|Controller cache manager experi|
|
encing errors (0x2108)|
3426|Clear requested on controller c|
|ache manager's DACSTORE (0x2107|
|
No|
No|
No|
|
No|
|
No|
No|
|
No|
|
No|
No|
|
No|
No|
No|
|
No|
|
|
No|
|
No|
|
No|
|
No|
|
Yes|
|
No|
|
No|
|
No|
|
No|
|
|
No|
|
No|
|
|
No|
No|
No|
|
No|
|
No|
No|
|
No|
|
No|
No|
|
No|
No|
No|
|
No|
|
|
No|
|
No|
|
No|
|
No|
|
Yes|
|
No|
|
No|
|
No|
|
No|
|
|
No|
|
No|
|
ESP for the IRIX OS
|
|
|
|
|
|
|
|
|
|
|
|
|
|
|
|
|
|
|
|
|
|
|
|
|
|
|
|
|
|
|
|
|
|
|
|
|
|
|
|
|
|
|
|
|
|
81|
|
|
81|
|
81|
|
81|
|
81|
|
81|
|
81|
|
81|
|
81|
|
81|
|
81|
|
81|
|
81|
|
81|
|
81|
|
81|
|
81|
81|
|
81|
81|
|
81|
|
81|
|
81|
|
)|
3425|Update requested on controller |
|cache manager's DACSTORE (0x210|
|
6)|
3424|Controller cache reconfigure ev|
|
ent (0x2105)|
3423|Controller cache synchronizatio|
|
n/purge event (0x2104)|
3422|UPS battery is fully charged (0|
|
x2103)|
3421|Cache mirroring on controllers |
|
not synchronized (0x2102)|
3420|Alternate controller checked in|
|
late (0x2101)|
3419|Initialization resumed on volum|
|
e (0x2032)|
3418|Initialization started on volum|
|
e (0x2031)|
3417|Initialization completed on vol|
|
ume (0x2030)|
3416|Automatic volume transfer compl|
|
eted (0x202F)|
3415|Redundancy check resumed (0x202|
|
D)|
3414|Redundancy check completed (0x2|
|
02C)|
3413|Redundancy check started (0x202|
|
B)|
3412|Modification (reconfigure) resu|
|
med (0x202A)|
3411|Modification (reconfigure) comp|
|
leted (0x2029)|
3410|Modification (reconfigure) star|
|
ted (0x2028)|
3409|Reconstruction resumed (0x2027)|
3408|Reconstruction completed (0x202|
|
6)|
3407|Reconstruction started (0x2025)|
3406|Media scan (scrub) resumed (0x2|
|
024)|
3405|Media scan (scrub) completed (0|
|
x2023)|
3404|Media scan (scrub) started (0x2|
|
022)|
3403| VDD repair completed (0x201F)|
|
No|
|
|
No|
|
No|
|
No|
|
No|
|
No|
|
No|
|
No|
|
No|
|
No|
|
No|
|
No|
|
No|
|
No|
|
No|
|
No|
|
No|
No|
|
No|
No|
|
No|
|
No|
|
No|
|
No|
|
|
No|
|
No|
|
No|
|
No|
|
No|
|
No|
|
No|
|
No|
|
No|
|
No|
|
No|
|
No|
|
No|
|
No|
|
No|
|
No|
No|
|
No|
No|
|
No|
|
No|
|
No|
371
Chapter 10: Default Event Classes and Types
|
|
|
|
|
|
|
|
|
|
|
|
|
|
|
|
|
|
|
|
|
|
|
|
|
|
|
|
|
|
|
|
|
|
|
|
|
|
|
|
|
|
|
|
|
372
81|
81|
81|
81|
81|
81|
81|
|
81|
|
81|
|
81|
81|
81|
81|
|
81|
|
81|
|
81|
81|
|
81|
81|
|
81|
81|
|
81|
|
81|
81|
81|
|
81|
|
81|
81|
|
|
81|
|
81|
3402|
VDD repair started (0x201E)|
3401| VDD recover completed (0x201D)|
3400|
VDD recover started (0x201C)|
3399| VDD restore completed (0x201B)|
3398|
VDD restore started (0x201A)|
3397|
Performance monitor (0x2019)|
3396|I/O suspended due to no pre-all|
|
ocated resources (0x2018)|
3395|Interrupted writes detected fro|
|
m checkpoint logs (0x2017)|
3394|Interrupted writes processed (0|
|
x2016)|
3393|
VDD logged an error (0x2014)|
3392| Cache flush completed (0x2012)|
3391|
Cache flush started (0x2011)|
3390|Cache synchronization completed|
|
(0x2010)|
3389|Cache synchronization started (|
|
0x200F)|
3388|Virtual disk driver reconfigure|
|
d (0x200E)|
3387| I/O aborted on volume (0x200D)|
3386|Recovered error on volume (0x20|
|
0C)|
3385| RAID 0 write failures (0x2009)|
3384|Failed volume started reconstru|
|
ction (0x2008)|
3383|
Fail piece delayed (0x2007)|
3382|Interrupted write completed (0x|
|
2004)|
3381|Interrupted write started (0x20|
|
03)|
3380|
Repair completed (0x2002)|
3379|
Repair started (0x2001)|
3378|Environmental card miswire reso|
|
lved (0x1512)|
3377|Channel miswire resolved (0x151|
|
1)|
3376|Channel reset occurred (0x150D)|
3375|Unresponsive environmental card|
| (ESM) (bad AL_PA error) (0x150|
|
C)|
3374|Unresponsive alternate controll|
| er (bad AL_PA error) (0x150B)|
3373|Loop port bypass (LPB) issued t|
No|
No|
No|
No|
No|
No|
No|
|
No|
|
No|
|
No|
No|
No|
No|
|
No|
|
No|
|
No|
No|
|
No|
No|
|
No|
No|
|
No|
|
No|
No|
No|
|
No|
|
No|
No|
|
|
No|
|
No|
No|
No|
No|
No|
No|
No|
No|
|
No|
|
No|
|
No|
No|
No|
No|
|
No|
|
No|
|
No|
No|
|
No|
No|
|
No|
No|
|
No|
|
No|
No|
No|
|
No|
|
No|
No|
|
|
No|
|
No|
ESP for the IRIX OS
|
|
|
|
|
|
|
|
|
|
|
|
|
|
|
|
|
|
|
|
|
|
|
|
|
|
|
|
|
|
|
|
|
|
|
|
|
|
|
|
|
|
|
|
|
|
|
81|
|
81|
|
81|
|
|
81|
|
81|
|
81|
|
|
81|
|
81|
|
81|
|
81|
|
81|
|
|
81|
|
|
81|
|
81|
|
81|
|
81|
81|
|
81|
|
81|
|
81|
|
|o environmental card(ESM) (0x15|
|
09)|
3372|Loop port bypass (LPB) issued t|
|o alternate controller (0x1508)|
3371|Loop port bypass (LPB) issued t|
|
o drive (0x1507)|
3370|Loop port enable (LPE) issued t|
|o environmental card (ESM) (0x1|
|
506)|
3369|Loop port enable (LPE) issued t|
|o alternate controller (0x1505)|
3368|Loop port enable (LPE) issued t|
|
o drive (0x1504)|
3367|Selective LIP reset issued to e|
|nvironmental card (ESM) (0x1503|
|
)|
3366|Selective LIP reset issued to a|
|
lternate controller (0x1502)|
3365|Selective LIP reset issued to d|
|
rive (0x1501)|
3364|Channel initialization error (0|
|
x1500)|
3363|Fibre channel link errors conti|
|
nue (0x1206)|
3362|Fibre channel-driver detected e|
|rror during initialization (0x1|
|
205)|
3361|Fibre channel-driver detected e|
|rror after initialization (0x12|
|
04)|
3360|Fibre channel-TPRLO reset recei|
|
ved (0x1203)|
3359|Fibre channel-TGT reset receive|
|
d (0x1202)|
3358|Fibre channel-LIP reset receive|
|
d (0x1201)|
3357|
Unknown interrupt (0x1104)|
3356|Host bus reset received (0x1103|
|
)|
3355|Host bus reset asserted (0x1102|
|
)|
3354|SRC driver detected exception o|
|
n SCSI chip (0x1101)|
3353|Destination driver successfully|
| issued reassign blocks command|
|
|
No|
|
No|
|
No|
|
|
No|
|
No|
|
No|
|
|
No|
|
No|
|
No|
|
No|
|
No|
|
|
No|
|
|
No|
|
No|
|
No|
|
No|
No|
|
No|
|
No|
|
No|
|
|
|
No|
|
No|
|
No|
|
|
No|
|
No|
|
No|
|
|
No|
|
No|
|
No|
|
No|
|
No|
|
|
No|
|
|
No|
|
No|
|
No|
|
No|
No|
|
No|
|
No|
|
No|
|
373
Chapter 10: Default Event Classes and Types
|
|
|
|
|
|
|
|
|
|
|
|
|
|
|
|
|
|
|
|
|
|
|
|
|
|
|
|
|
|
|
|
|
|
|
|
|
|
|
|
|
|
|
|
|
374
|
81|
|
81|
|
81|
81|
|
81|
|
81|
|
81|
|
81|
|
81|
|
81|
81|
|
81|
81|
83|
83|
83|
|
83|
83|
83|
|
83|
|
83|
83|
83|
83|
83|
83|
84|
84|
84|
84|
84|
|
|
(0x1014)|
3352|Destination driver level 0 diag|
|
nostic failed (0x1013)|
3351|Destination driver error (0x101|
|
2)|
3350|
Chip error (0x1011)|
3349|Bus parity error on controller |
|
(0x100F)|
3348|Unexpected interrupt on control|
|
ler (0x100E)|
3347|Timeout on drive side of contro|
|
ller (0x100D)|
3346|Hardware error on drive side of|
|
controller (0x100C)|
3345|Start-of-day error in destinati|
|
on driver (0x100B)|
3344|Controller memory parity error |
|
(0x1009)|
3343| Unsupported SCSI chip (0x1008)|
3342|Controller out of memory (0x100|
|
7)|
3341|
Error on drive open (0x1004)|
3340|
Channel revived (0x1002)|
3726| Fatal error on root filesystem|
3725|
xfs_buf_item_log_check bip|
3724|attempting to delete a log item|
|
not in the AIL|
3723|
I/O Error Detected.|
3722|
Log I/O Error Detected.|
3721|Corruption of in-memory data de|
|
tected.|
3720|reservation ran out. Need to up|
|
reservation|
3719|
bad inode,forkoff|
3718| detected corrupt incore inode|
3717|
Bad directory inode|
3716|
Bad regular inode|
3715|
Bad inode magic number|
3677|
XFS specific messages|
3687|
unhandled vetype|
3686|
unhandled attrtype|
3685|
old version disk label|
3684|
remote i/o not supported|
3683|io request cannot be routed rem|
|
otely|
|
No|
|
No|
|
No|
No|
|
No|
|
No|
|
No|
|
No|
|
No|
|
No|
No|
|
No|
No|
Yes|
Yes|
Yes|
|
Yes|
Yes|
Yes|
|
Yes|
|
Yes|
Yes|
Yes|
Yes|
Yes|
Yes|
Yes|
Yes|
Yes|
Yes|
Yes|
|
|
No|
|
No|
|
No|
No|
|
No|
|
No|
|
No|
|
No|
|
No|
|
No|
No|
|
No|
No|
Yes|
Yes|
Yes|
|
Yes|
Yes|
Yes|
|
Yes|
|
Yes|
Yes|
Yes|
Yes|
Yes|
Yes|
Yes|
Yes|
Yes|
Yes|
Yes|
|
ESP for the IRIX OS
|
|
|
|
|
|
|
|
|
|
|
|
|
|
|
|
|
|
|
|
|
|
|
|
|
|
|
|
|
|
|
|
|
|
|
|
|
|
|
|
|
|
|
|
|
84|
84|
84|
84|
84|
7001|
7001|
7001|
7001|
7001|
|
7001|
|
7001|
|
7001|
|
7001|
|
7001|
|
7001|
|
7001|
|
7001|
|
7001|
7001|
|
7001|
|
7001|
|
7001|
|
7001|
|
7001|
7001|
|
7001|
7001|
|
7001|
3682|
Freeing more than allocated|
3681|
Allocated less than freed|
3680|
client commit failure|
3679|
XVM hostnames dont match|
3678|
XVM specific messages|
4194471|
unix / *(TOOK-ACTION*|
4194470|
unix / *(CONFIG-ISSUE*|
4194469|
unix / *(SYS-DEGRADED*|
4194468|
unix / *(MAINT-NEEDED*|
4194467|midisynth / *initial preset loa|
|
d error*|
4194466|midisynth / *resource temporari|
|
ly unavailable*|
4194465|midisynth / *unable to set up I|
|
PC pipe*|
4194464|midisynth / *unable to create i|
|
nternal MIDI device*|
4194463|midisynth / *unable to set outp|
|
ut port rate or clock type*|
4194462|midisynth / *unable to open aud|
|
io out port*|
4194461|midisynth / *audio interface se|
|
t failed*|
4194460|unix / Cannot lock process in m|
|
emory *|
4194459|unix / No memory to register pr|
|
otocol *|
4194458|
unix / No space for client *|
4194457|unix / Cannot initialize * clie|
|
nt * list semaphore: *|
4194456|unix / Could not start * thread|
|
*|
4194455|unix / Could not create * semap|
|
hore for io q|
4194454|unix / Out of memory allocating|
|
common client info|
4194453|unix / Client * could not setup|
|
new client|
4194452| unix / Client * Access denied|
4194451|unix / xfs_iflush: detected cor|
|
rupt incore inode *|
4194450|unix / xfs_iflush: *ad *inode *|
4194449|unix / Please umount the filesy|
| stem, and rectify the problem*|
4194448|unix / *I/O error in filesystem|
Yes|
Yes|
Yes|
Yes|
Yes|
Yes|
Yes|
Yes|
Yes|
Yes|
|
Yes|
|
Yes|
|
Yes|
|
Yes|
|
Yes|
|
Yes|
|
Yes|
|
Yes|
|
Yes|
Yes|
|
Yes|
|
Yes|
|
Yes|
|
Yes|
|
Yes|
Yes|
|
Yes|
Yes|
|
Yes|
Yes|
Yes|
Yes|
Yes|
Yes|
No|
No|
No|
No|
No|
|
No|
|
No|
|
No|
|
No|
|
No|
|
No|
|
No|
|
No|
|
No|
No|
|
No|
|
No|
|
No|
|
No|
|
No|
No|
|
No|
No|
|
No|
375
Chapter 10: Default Event Classes and Types
|
|
|
|
|
|
|
|
|
|
|
|
|
|
|
|
|
|
|
|
|
|
|
|
|
|
|
|
|
|
|
|
|
|
|
|
|
|
|
|
|
|
|
|
|
376
|
7001|
|
7001|
|
|
|
7001|
|
|
7001|
|
7001|
|
|
7001|
|
7001|
|
7001|
|
7001|
|
7001|
|
7001|
|
7001|
|
|
7001|
|
7001|
|
7001|
|
7001|
|
7001|
7001|
7001|
7001|
|
|
7001|
|
* meta-data dev * block *|
4194447|unix / *I/O Error Detected. Shu|
|
tting down filesystem:*|
4194446|unix / *Superblock write error |
|detected while unmounting files|
|ystem * Filesystem may not be m|
|
arked shared readonly|
4194445|unix / *Corruption of in-memory|
| data detected. Shutting down |
|
filesystem*|
4194444|unix / *filesystem is corrupt, |
|
unmount and run xfs_repair|
4194443|unix / *corrupt *inode*in files|
|ystem*Unmount and run xfs_repai|
|
r.|
4194442|unix / * mtr*: unable to alloca|
|
te buff memory: *|
4194441|unix / * mtr*: kmem_zalloc fali|
|
ed*|
4194440|unix / * mtr*: could not alloca|
|
te pio map.|
4194439|unix / * mtr*: bad EDT ctlr ent|
|
ry.|
4194438|unix / * mtr*: SIOCSIFADDR(AF_R|
|
AW) failed|
4194437|unix / * mtr*: possible lockup:|
|
*|
4194436|unix / * mtr*: failed to alloca|
|te memory for TX & RX: kvpalloc|
|
*|
4194435|unix / * mtr*: SIOC_TR_RESTART |
|
failed:*|
4194434|unix / * mtr*: SIFINT_ADAPTER_C|
|
HECK*|
4194433|unix / * mtr*: no memory or io |
|
base register!|
4194432|unix / * mtr*: SIOC*MULTI: srb_|
|
used:*|
4194431|
unix / * mtr*: mtr_watchdog*|
4194430|
unix / * mtr*: mtr_output*|
4194429| unix / * mtr*: POLLING_SIFINT:|
4194428|unix / Filesystem on device may|
| be corrupted: unmount and fsck|
|
it.|
4194427|unix / * Directory [0-9]* is co|
|
Yes|
|
Yes|
|
|
|
Yes|
|
|
Yes|
|
Yes|
|
|
Yes|
|
Yes|
|
Yes|
|
Yes|
|
Yes|
|
Yes|
|
Yes|
|
|
Yes|
|
Yes|
|
Yes|
|
Yes|
|
Yes|
Yes|
Yes|
Yes|
|
|
Yes|
|
No|
|
No|
|
|
|
No|
|
|
No|
|
No|
|
|
No|
|
No|
|
No|
|
No|
|
No|
|
No|
|
No|
|
|
No|
|
No|
|
No|
|
No|
|
No|
No|
No|
No|
|
|
No|
ESP for the IRIX OS
|
|
|
|
|
|
|
|
|
|
|
|
|
|
|
|
|
|
|
|
|
|
|
|
|
|
|
|
|
|
|
|
|
|
|
|
|
|
|
|
|
|
|
|
|
|
7001|
|
7001|
|
7001|
|
7001|
7001|
7001|
|
7001|
|
7001|
|
7001|
|
|
7001|
|
|
7001|
|
|
|
7001|
|
7001|
|
7001|
7001|
|
7001|
|
7001|
|
7001|
|
7001|
|
7001|
7001|
7001|
|
7001|
|
rrupted *|
4194426|unix / NFS server: increase svc|
|
_maxdupreqs from [0-9]*|
4194425|unix / wid [0-9]* already swapp|
|
ing buffers|
4194424|unix / crimeError: resetting gr|
|
aphics from *|
4194423| unix / crime: unknown ioctl *|
4194422|
imdmonitor / i18n*|
4194421|unix / Wacom failed init * No t|
|
ablet*|
4194420|unix / * ECC Error in * side of|
|
.IMM Slot [0-9]**|
4194418|unix / Nonrecoverable memory pa|
|
rity error detected *|
4194416|unix / ALERT: arp: host with MA|
|C address * is still using my I|
|
P address *|
4194415|unix / ALERT: arp: host with MA|
|C address * is using my IP addr|
|
ess *|
4194414|unix / NOTICE: SCSI tape #0,3 I|
|ncompatible media in drive, may|
| be blank tape or wrong tape ty|
|
pe|
4194413|unix / ALERT: SCSI tape #* Exce|
|
ssive write errors|
4194412|unix / NOTICE: SCSI tape #* Inc|
|
ompatible media when reading|
4194411|
unix / dks*: [Alert] *|
4194410|mediad / couldn't find DSO for |
|
device at SCSI ctlr *|
4194409|mediad / can't open CD-ROM * I/|
|
O error|
4194408|mediad / can't read sector [0-9|
|
]* of device *|
4194407|mediad / * sector size of [0-9]|
|
* too large for HFS|
4194406|mediad / The file system on dev|
|
ice: * cannot be mounted|
4194405|fam / imon event queue overflow|
4194404|
fam / can't open /dev/imon|
4194403|unix / XFS read error in file s|
|
ystem meta-data block [0-9]*|
4194402|unix / XFS write error in file |
|
Yes|
|
Yes|
|
Yes|
|
Yes|
Yes|
Yes|
|
Yes|
|
Yes|
|
Yes|
|
|
Yes|
|
|
Yes|
|
|
|
Yes|
|
Yes|
|
Yes|
Yes|
|
Yes|
|
Yes|
|
Yes|
|
Yes|
|
Yes|
Yes|
Yes|
|
Yes|
|
No|
|
No|
|
No|
|
No|
No|
No|
|
No|
|
No|
|
No|
|
|
No|
|
|
No|
|
|
|
No|
|
No|
|
No|
No|
|
No|
|
No|
|
No|
|
No|
|
No|
No|
No|
|
No|
377
Chapter 10: Default Event Classes and Types
|
|
|
|
|
|
|
|
|
|
|
|
|
|
|
|
|
|
|
|
|
|
|
|
|
|
|
|
|
|
|
|
|
|
|
|
|
|
|
|
|
|
|
|
|
378
|
7001|
|
7001|
|
7001|
|
7001|
|
|
7001|
|
|
7001|
|
|
7001|
|
|
7001|
|
7001|
|
7001|
|
|
7001|
|
|
7001|
|
7001|
|
7001|
|
7001|
|
|
|
7001|
|
|
|
7001|
|
| system meta-data block [0-9]*|
4194401|unix / * Process * ran out of d|
|
isk space|
4194400|unix / Process * ran out of con|
|
tiguous space|
4194399|unix / Ancestor inode [0-9]* is|
|
not a directory|
4194397|unix / Process * pid [0-9]* kil|
|led: not enough memory to grow |
|
stack|
4194396|unix / Process * pid [0-9]* kil|
|led: not enough memory to lock |
|
stack|
4194395|unix / Process * pid [0-9]* kil|
|led: process or stack limit exc|
|
eeded|
4194394|unix / ALERT: Process * generat|
|ed trap, but has signal [0-9]* |
|
held or ignored|
4194393|unix / Process * pid [0-9]* kil|
| led due to no more swap space|
4194392|unix / Process * pid [0-9]* kil|
|
led due to bad page read|
4194391|unix / Swap * failed on logical|
| swap [0-9]* blkno 0x* for proc|
|
ess *|
4194390|unix / Process * pid [0-9]* kil|
|led due to insufficient memory/|
|
swap.|
4194389|unix / Memory Deadlock with no |
|
one to kill!|
4194388|unix / Swap allocation overflow|
|
?|
4194387|unix / Paging Daemon (vhand) no|
|
t running. NFS server down?|
4194386|unix / Read error in swap (ksta|
|ck ext) for pid [0-9]* - proces|
|s cannot be run again unless th|
|
is is corrected|
4194385|unix / Read error in swap for p|
|id [0-9]* - process cannot be r|
|un again unless this is correct|
|
ed|
4194384|unix / * - out of logical swap |
|
space during *|
|
Yes|
|
Yes|
|
Yes|
|
Yes|
|
|
Yes|
|
|
Yes|
|
|
Yes|
|
|
Yes|
|
Yes|
|
Yes|
|
|
Yes|
|
|
Yes|
|
Yes|
|
Yes|
|
Yes|
|
|
|
Yes|
|
|
|
Yes|
|
|
No|
|
No|
|
No|
|
No|
|
|
No|
|
|
No|
|
|
No|
|
|
No|
|
No|
|
No|
|
|
No|
|
|
No|
|
No|
|
No|
|
No|
|
|
|
No|
|
|
|
No|
|
ESP for the IRIX OS
|
|
|
|
|
|
|
|
|
|
|
|
|
|
|
|
|
|
|
|
|
|
|
|
|
|
|
|
|
|
|
|
|
|
|
|
|
|
|
|
|
|
|
|
|
7001|
|
7001|
|
|
7001|
|
7001|
|
7001|
|
7001|
|
|
7001|
|
7001|
|
7001|
|
|
7001|
|
|
7001|
|
7001|
|
7001|
|
7001|
|
7001|
|
7001|
|
7001|
|
7001|
|
7001|
|
7001|
|
7001|
4194383|unix / Failed to add swap file |
|
* error [0-9]*|
4194382|unix / Swap out failed on logic|
|al swap [0-9]* blkno * for proc|
|
ess [ vhand ]|
4194381|unix / vhand runing low on swap|
| handle lists, only [0-9]* left|
4194380|unix / rtodc: preposterous time|
|
in tod chip:*|
4194379|unix / IO4 NVRAM/time-of-day ch|
|ip reports invalid RAM or time*|
4194378|unix / Environment segment inva|
|lid! Unable to program FLASH RA|
|
M|
4194377|unix / Environment segment inva|
| lid! Unable to zero FLASH RAM|
4194375|unix / Process [0-9]* * sent SI|
|
GBUS due to Bus Error|
4194374|unix / Process [0-9]* * sent SI|
|GBUS due to Memory Error in SIM|
|
M *|
4194373|unix / * SCSI Bus=[0-9]* ID=[0-|
|9]* LUN=[0-9]*: SCSI cmd=0x[0-9|
| ]* timeout after [0-9]* sec *|
4194372|unix / Integral SCSI bus * rese|
|
t|
4194368|unix / * BIST Fails - slot [0-9|
|
]*, Code *|
4194367|unix / * BIST Timed Out (3 seco|
|
nds) - slot [0-9]*|
4194366|unix / SCSI tape * Uncorrectabl|
|
e media error|
4194365|unix / SCSI tape * Hardware err|
|
or, Non-recoverable|
4194363|unix / SCSI tape * Unrecoverabl|
|
e media error|
4194361|unix / SCSI tape * requires cle|
|
aning|
4194360|unix / plp: free context out of|
|
order|
4194359|unix / plp: memory error occure|
|
d during a DMA transation.|
4194358|unix / plp: context IRQ out of |
|
order|
4194357|unix / plp: init failed, out of|
Yes|
|
Yes|
|
|
Yes|
|
Yes|
|
Yes|
|
Yes|
|
|
Yes|
|
Yes|
|
Yes|
|
|
Yes|
|
|
Yes|
|
Yes|
|
Yes|
|
Yes|
|
Yes|
|
Yes|
|
Yes|
|
Yes|
|
Yes|
|
Yes|
|
Yes|
No|
|
No|
|
|
No|
|
No|
|
No|
|
No|
|
|
No|
|
No|
|
No|
|
|
No|
|
|
No|
|
No|
|
No|
|
No|
|
No|
|
No|
|
No|
|
No|
|
No|
|
No|
|
No|
379
Chapter 10: Default Event Classes and Types
|
|
|
|
|
|
|
|
|
|
|
|
|
|
|
|
|
|
|
|
|
|
|
|
|
|
|
|
|
|
|
|
|
|
|
|
|
|
|
|
|
|
|
|
|
380
|
7001|
|
7001|
|
7001|
|
7001|
|
|
7001|
|
|
7001|
|
7001|
|
7001|
|
|
7001|
|
|
7001|
|
7001|
|
7001|
|
7001|
|
7001|
|
|
7001|
|
7001|
|
7001|
|
7001|
|
7001|
|
7001|
|
memory for ecplp driver.|
4194356|unix / attempt to disconnect no|
|
n-existant IOC3 at *|
4194355|unix / out of IOC3 config struc|
|
ts|
4194353|unix / ALERT: SCSI controller [|
|
0-9]* detected pci error *.|
4194352|unix / ALERT: SCSI controller [|
|0-9]* detected bus reset by ext|
|
ernal device.|
4194350|unix / ALERT: SCSI controller [|
|0-9]* detected unexpected bus f|
|
ree.|
4194349|unix / ALERT: SCSI controller [|
|
0-9]* detected parity error.|
4194348|unix / ALERT: SCSI controller [|
| 0-9]* detected internal error.|
4194347|unix / SCSI disconnection must |
|be enabled in order for tag-que|
| ueing to work ([0-9]*,[0-9]*).|
4194346|unix / SCSI command * for ([0-9|
|]*,[0-9]*) rejected because its|
| too large, increase maxdmasz.|
4194345|unix / SCSI bus reset on contro|
|
ller [0-9]*.|
4194344|unix / SCSI CDROM at ([0-9]*,[0|
|
-9]*) failed.|
4194343|unix / SCSI hard error on ([0-9|
|
]*,[0-9]*).|
4194342|unix / unix: SCSI overflow or u|
|
nderflow on *|
4194341|unix / SCSI command on ([0-9]*,|
|[0-9]*) timed out after [0-9]* |
|
secs.|
4194340|unix / SCSI controller [0-9]* i|
|
nitialization failed.|
4194339|unix / XFS: xlog_recover_do_ino|
|
de_trans: bread error *|
4194338|unix / XFS: xlog_recover_do_buf|
|
fer_trans: bread error *|
4194337|unix / xfs_log_recover: unknown|
|
buffer type *|
4194336|unix / XFS: error writing log b|
|
lock *|
4194335|unix / XFS: error reading log b|
|
Yes|
|
Yes|
|
Yes|
|
Yes|
|
|
Yes|
|
|
Yes|
|
Yes|
|
Yes|
|
|
Yes|
|
|
Yes|
|
Yes|
|
Yes|
|
Yes|
|
Yes|
|
|
Yes|
|
Yes|
|
Yes|
|
Yes|
|
Yes|
|
Yes|
|
No|
|
No|
|
No|
|
No|
|
|
No|
|
|
No|
|
No|
|
No|
|
|
No|
|
|
No|
|
No|
|
No|
|
No|
|
No|
|
|
No|
|
No|
|
No|
|
No|
|
No|
|
No|
ESP for the IRIX OS
|
|
|
lock *|
|
|
|
7001|
4194334|unix / reclaim_locks: invalid N|
Yes|
No|
|
|
|
LM version: [0-9]*|
|
|
|
7001|
4194333|unix / Incore quota table overf|
Yes|
No|
|
|
|low. lboot(1M) with larger valu|
|
|
|
|
|
e for NDQUOT|
|
|
|
7001|
4194332| unix / inode 0: illegal mode 0|
Yes|
No|
|
7001|
4194331|unix / ec[0-9]*: TX memory read|
Yes|
No|
|
|
|
error|
|
|
|
7001|
4194330|unix / ec[0-9]*: RX error, data|
Yes|
No|
|
|
|
FIFO overflow|
|
|
|
7001|
4194329|unix / ec[0-9]*: phy device not|
Yes|
No|
|
|
|
found, probe failed|
|
|
|
7001|
4194328|unix / ec[0-9]*: could not set |
Yes|
No|
|
|
|
interrupt vector|
|
|
|
7001|
4194327|unix / ef[0-9]*: link fail - ch|
Yes|
No|
|
|
|
eck ethernet cable|
|
|
|
7001|
4194326|unix / ec[0-9]*: can't allocate|
Yes|
No|
|
|
| space for transmit descriptors|
|
|
|
7001|
4194325|unix / ec[0-9]*: can't allocate|
Yes|
No|
|
|
| space for receive descriptors|
|
|
|
7001|
4194324|unix / ec[0-9]*: auto-negotiati|
Yes|
No|
|
|
|
on fail!|
|
|
|
7001|
4194323|unix / ec[0-9]*: auto-negotiati|
Yes|
No|
|
|
|
on timeout!|
|
|
|
7001|
4194322|unix / ec[0-9]*: only 10Mbit on|
Yes|
No|
|
|
|
-chip PHY was found!|
|
|
|
7001|
4194321|unix / ec[0-9]*: late collision|
Yes|
No|
|
7001|
4194320|
unix / *no carrier: *|
Yes|
No|
|
7001|
4194315|
rexd / Out of ptys: *|
Yes|
No|
|
7001|
4194314|satd / all output paths full --|
Yes|
No|
|
|
| system shutdown in 10 seconds!|
|
|
|
7001|
4194313|satd / Satd recovery failure! |
Yes|
No|
|
|
|System will probably hang soon.|
|
|
|
7001|
4194310|mount_hfs / HFS filesystem writ|
Yes|
No|
|
|
|
e error, block [0-9]*: *|
|
|
|
7001|
4194309|mount_hfs / HFS filesystem read|
Yes|
No|
|
|
|
error, block [0-9]*: *|
|
|
|
7001|
4194308|mount_hfs / file system corrupt|
Yes|
No|
|
|
|
ed *|
|
|
|
7001|
4194307|inetd / * server failing (loopi|
Yes|
No|
|
|
|
ng), service terminated|
|
|
|
7001|
4194306|
vacation / can't exec *|
Yes|
No|
|
7001|
4194304| vacation / no such user uid *|
Yes|
No|
+----------+-----------+-------------------------------+---------+-------------+
381
Chapter 11
11. ESP Error Codes
This chapter lists the error codes that the Web-based interface displays. When an error
occurs, the interface displays more information about what you should do to recover
from the error.
Generic Errors
Code
Description
-1
Generic error
Event Manager Errors
Code
Description
1
Forwarding path is missing
2
Consumer is missing
3
Invalid consumer definition
4
Invalid event
5
Invalid format
6
Invalid DSO
7
Invalid function name
8
Wrong value
9
System error
10
Network error
11
Memory allocation failure
12
Duplicate subscription
383
Chapter 11: ESP Error Codes
Code
Description
13
No such subscription
14
Address resolution error
15
Event translation error
16
Operation timeout
17
No such file
18
No administrative permissions
Code
Description
100
System error
101
Lower layer error
102
Event allocation error
103
Timeout
104
Delivery error
105
Invalid format
106
Invalid parameter value
107
Invalid response ID
108
No response ID
109
No subscription status
110
Database error
111
File access error
112
File save error
113
No system information
114
No site information
115
Tool table information missing
116
No profile information
SGM Error Codes
384
ESP Execution Errors
Code
Description
117
hinv table information missing
118
No SGM information
119
Invalid system role
120
No peer information
121
System is unreachable
122
Already subscribed
123
New role is incompatible
124
No such SGM
125
No license
126
Invalid Destination
127
SGM no response
128
Authorization failure
ESP Execution Errors
Code
Description
200
Memory allocation error
201
Processing error
202
Event profile read error
203
Event profile entry error
204
Unknown section
205
Incomplete definition
206
Invalid event type definition
207
Invalid event action definition
208
Duplicate system
209
Invalid system ID
210
Duplicate event attribute
385
Chapter 11: ESP Error Codes
386
Code
Description
211
Missing system serial number
212
Registration event (Availability class) is disabled (not used)
213
Missing Configuration profile
214
Group operation error
215
Duplicate call log setting
216
Incorrect argument
217
Invalid user
218
Duplicate system group name
219
Missing customer information profile
220
Missing or expired SGM license
221
This operation is not allowed for ESP 2.0 client
222
ESP 2.0 client error
223
System time (ctime) on a client and SGM server is not synchronized
224
System must be unsubscribed before deletion