1
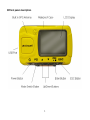
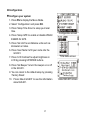
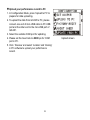
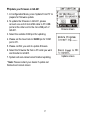
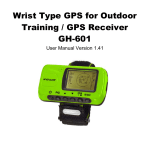
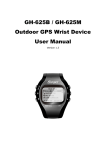
Wrist Type GPS for Outdoor Training / GPS Receiver GH-601 _______________________________________ User Manual Version 1.1 Table of Content Introduction …………………………………………………………………………. 2 Features ...…………………………………………………………………………… 2 Application Software ………………………………………………………........... 2 Accessories …..…..….……………………………………………………………... 2 Front panel description …………………………………….…………………….. 3 Charging the GH-601 ……...……………………………….……………………… 4 Starting up your GH-601 ………………………………………………………….. 5 GH-601 main functions ……………………………………………………………. 9 Sport Record. ………………………………………………………………………. 10 Navigation …………………………………………………………………………… 11 GPS Mouse ………………………………………………………………………….. 14 Configuration ……………………………………………………………………….. 15 1 ◆Introduction Globalsat GH-601 provides a fully-sealed, waterproof, large LCD wrist-watch device, as well as a GPS navigation function that locates and tracks points from start to stop. It is adopted for people who exercise for broad kinds of outdoor sports, such as Jogging, Running, Biking, Snow Skiing, etc. It also can be used as GPS receiver by USB interface. Features 1. Built-in SiRF Star III high performance GPS chipset. Excellent sensitivity for position fixing even with a weak signal status. 2. Built-in rechargeable high capacity lithium-ion battery. 3. Large LCD for easy reading. 4. WAAS/ ENGOS support. 5. Waterproof, rigid design to avoid careless damage. 6. Records all history of self-training by defined day. 7. GH-600 series can be used as a GPS receiver with an easy setup. 8. The firmware of the GH-601 can be upgraded through PC. 9. Navigation: Tracking your route as crumb method; marking and saving your tracking points by a special algorithm; finding specified locations. Application Software 1. Supporting operating system such as Windows 98 /2000 /XP. 2. Smart training database management designed for easy of use. 3. Easy to use perform firmware upgrades. Accessories 1. 2. 3. 4. User’s manual USB cable (For charging and data download) PC software CD AC/DC 5V charger (Optional) 2 Front panel description 3 Charging the GH-601 The GH-601 operates on a built-in Li-ion battery. You must charge the internal battery when the battery runs out. 1. To charge the battery, please connect one end of mini-USB cable to PC USB port and the other end to the mini-USB port of GH-601. 2. Connect one end of mini-USB cable to AC adaptor and the other end to the mini-USB port of GH-601. 4 3. When the GH-601 is fully charged, the battery icon scale will be filled. GH-601 can operate up to 16 hours on one battery charge. 4. GH-601 icons Battery: The battery icon indicates how much battery power is left. A full battery icon indicates a fully-charged battery. Timer icon: When speedometer feature of GH-601 is being used, the timer icon displays just below battery icon. Satellite Dish icon: When the GH-601 has acquired enough signal strength from satellites to position your GPS location, this icon appears steady (not blinking) just below the timer icon. Starting up your GH-601 After the GH-601 is completely charged, it is ready for use. 1. Press and hold the POWER button until the welcome screen is displayed. 2. Allow the GH-601 time to track satellites the first time you use it. Leave the GH-601 outside and face a clear view of the sky and it will be easy to acquire satellite signals within 5 seconds. Note. Should the GH-601 become hung up or frozen, please press and hold the POWER button for 14 seconds to shutdown, and again to restart. 5 Welcome screen z Changing the Mode 1. Press the PG button to cycle through the various modes of the GH-601. The three default modes: Speedometer, Menu and Location modes can be cycled through by pressing PG button. If the Map mode is enabled, then this mode will also be cycled through. Speedometer mode Menu mode 6 Location mode Map mode (If enabled) 2. Speedometer Mode: The Speedometer mode allows you to start or stop the timer, reset the timer and split a lap. It also provides access to two screens: The Timer screen displays “TIME OF DAY”, “SPEED” and “ELEVATION” of you workout. The countdown screen displays the time you spent of workout and average speed and distance of you workout. 3. Menu Mode: The Menu Mode provides access to features and settings. 4. Location Mode: The Location Mode provides your current location for your reference. 5. Map Mode: The Map Mode, when enabled through the Navigation menu, displays where you are going and where you have been on a graphic map. z Setting the Time Zone When the GH-601 is ready for use; you may need to check the Time Zone selection. To change the time zone follow steps below: 1. Press PG button to display the Menu mode. 2. The current date and time are displayed on the button of the screen. When the GH-601 established a GPS fix, the GMT is selected as the default Time Zone. 3. To change the Time Zone, use UP/DOWN buttons to select ‘select time zone’ and press OK. 7 4. Use UP/DOWN buttons to select time offset from GMT as +12,+11…-11,-12 and press OK. z Using the GH-601 Buttons POWER MODE UP DOWN OK START/ STOP EXIT /RESET 1. The POWER button: Press and hold continuously 4 seconds to turn the unit on or off. When the unit is on, press and release to turn the backlight on or off. Press and hold continuously 14 seconds to reset if unit is hung up or frozen. 2. The PG button: Press to switch between the Speedometer and Menu Modes. Press to exit the current page or screen. 3. The ESC/LOOP button: Press to split a lap when timer is running. When it is in menu mode, press and release to return to the previous page. 4. The OK button: Under the Speedometer Mode or Map Mode (if enabled), press to start or stop the timer. Press to confirm data entry or feature selection in Menu Mode. 5. The UP/DOWN buttons: Press to cycle through the different screens of the Speedometer Mode. Press to adjust the LCD contrast. Press to Zoom in and Zoom out in the Map Mode (if enabled). Press to select the feature in Menu Mode. 8 GH-601 Main functions 1. Sport Record Run file info Delete All 2. Navigation Add/Remove Map Mode GPS on/off Save location Search location Return to Orig (return to original location) GPS info 3. GPS Mouse Turn on/off GPS ms 4. Configuratio Setup time zone(time zone ,such as +12、+11…-11、-12 ) Setup GPS Set units User name LCD Contrast Set beeper Upload to PC Factory Reset About GH-601 Update from PC 9 Sport Record z Review your performance record 1. Press PG to display the Menu Mode. 2. Select ‘Sport Record’ and press OK. 3. Select ‘Run File Info’ to review the history record. 4. Select ‘Delete All’ to erase the all history files. Record screen 5. When in Run File Info screen, select ‘View Run Map’ to review the data information in Map mode or ‘Delete’ to remove this file. z To save your training data 1. In the Speedometer Mode, press ESC to stop the count time. 2. Press ESC and saving window appears. 3. Select ‘Yes’ to save your performance data. File info screen Saving window screen Performance record 10 Navigation z Show your location and record the route where you run 1. Press PG to display the Menu Mode. 2. Select ‘Navigation’ and press OK. 3. Press ‘Add Map Mode’ to track and record your route. Or press ‘Remove Map Mode’ to disable the map function. 4. Press ‘GPS On’ to enable GPS function (Default setting is enabled) or press ‘GPS Off’ for more power saving to increase battery life, 5. Press ‘Search Location’ to locate the position you wish to find. 6. Press ‘Return To Orig’ to go back to the starting point. 7. If the image of a person in Map Mode is outlined, the GPS is not fixed. If the image of person is solid, the GPS is fixed. 8. In Map Mode, you can press ‘UP/DOWN’ to zoom in or zoom out. The scale is on the left bottom corner of the screen. 11 GPS is not to be fixed GPS is fixed z Save Location 1. In Navigation Mode, press ‘Save Location’ to save the position where you want. 2. Then the review location appears. (Flagged with symbol, name, and location) 3. Press ENTER and scroll through the available location symbols using DOWN and UP buttons. Then press ENTER to decide what you want. 4. Press DOWN button to highlight the location name. 5. Scroll through the letter holders using DOWN or UP buttons and press ENTER button to decide what you want. 6. Select ‘ ‘ to finish the symbol modification. 7.To decide the Longitude and Latitude and Elevation, use same procedure as location symbol selection. 8.Press DOWN or UP to highlight the ‘CONFIRM’ field and press OK, the location data will be stored automatically in the memory. 12 Save Location screen z Search Location 1. In Navigation mode, press ‘Search Location’ to search the position where you want. 2. Press ‘List All’ to list the location marks and use UP/ Location mark screen DOWN buttons to select the location mark. Or press ‘Delete all’ to erase the all location marks. 3. Press UP/ DOWN buttons to select the waypoints where GOTO location screen you want. 4. Select ‘GOTO’ to review locations in Map mode. Or select ‘Delete’ to delete the waypoint. 5. You can see clearly the destination from the start point. Search Location in Map z STOP GOTO 1. In Navigation mode, the Stop GOTO will appear if the Search Location is enabled. 2. Press ‘Stop GOTO’ to stop the Search Location function in map mode. 13 z GPS info 1. In Navigation mode, press ‘GPS info’ to see the GPS performance in your GH-601. GPS info screen GPS Mouse z To use your GH-601 as a GPS Receiver 1. Press PG to display the Menu Mode. 2. Select ‘GPS Mouse’ and press OK. 3. Select ‘Turn on GPS MS’ and press OK. 4. Please install the GH-601 USB driver on your PC. 5. Please connect one end of mini-USB cable to PC USB port and the other end to the mini-USB port of GH-601. 6. Please set the baud rate to 4800 bps for COM port in PC. 7. Now you can use navigation software to navigate. 14 GPS Mouse screen Configuration z Configure your system 1. Press PG to display the Menu Mode. 2. Select ‘Configuration’ and press OK. 3. Press ‘Setup Time Zone’ to setup your local time. 4. Press ‘Setup GPS’ to enable or disable WAAS/ EGBOS for GPS. Configuration screen 5. Press ‘Set Unit’ to set distance units such as kilometers or miles. 6. Press ‘User Name’ to fill your name into the GH-601. 7. Press ‘LCD Contrast’ to adjust brightness in LCD by pressing UP/DOWN buttons. Time zone screen 8. Press ‘Set Beeper’ to turn the beeper on or off in the GH-601. 9. You can return to the default setup by pressing ‘Factory Reset’. 10. Press ‘About GH-601’ to see the information about GH-601. 15 About GH-601 screen z Upload your performance record to PC 1. In Configuration Mode, press ‘Upload to PC’ to prepare for data uploading. 2. To upload the data from GH-601to PC, please connect one end of mini-USB cable to PC USB port and the other end to the mini-USB port of GH-601. 3. Select the suitable COM port for updating. 4. Please set the baud rate to 4800 bps for COM port in PC. 5. Click ‘ Receive’ and select ‘location’ and ‘training’ in PC software to upload your performance record. 16 Upload screen z Update your firmware in GH-601 1. In Configuration Mode, press ‘Update From PC’ to prepare for firmware update. 2. To update the firmware in GH-601, please connect one end of mini-USB cable to PC USB port and the other end to the mini-USB port of GH-601. Ensure screen 3. Select the suitable COM port for updating. 4. Please set the baud rate to 38400 bps for COM port in PC. 5. Please confirm you wish to update firmware. 6. Select the firmware file from a PC what you want and transfer to GH-601. 7. System will auto-reboot when finished updating. * Note: Please contact your dealer if update not finished and cannot reboot. 17 Update screen