1
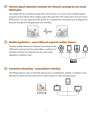
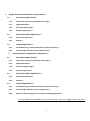
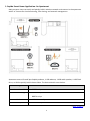
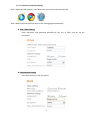
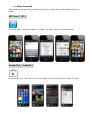
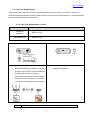
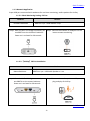
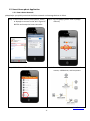
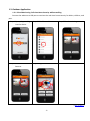
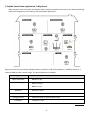
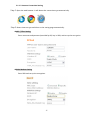
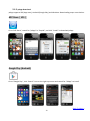
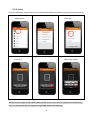
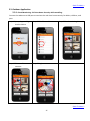
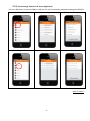
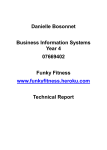
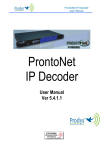
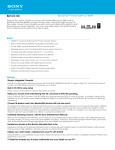
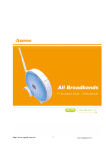
1 2 1. Sapido Smart Home Application- An Apartment4 1.1. Smart Home pdnet Setup5 1.1.1. Smart home controller installation and settings5 1.1.1. pdapp Download8 1.1.2. Wi-Fi AP Bridge Setting9 1.1.3. Network Application10 1.2. Smart Home pdnet Application11 1.2.1. Smart Home Network11 1.2.2. AirPlay12 1.3. Outdoor Application13 1.3.1. Cloud Monitoring- Full time Home Security while travelling. 13 1.3.2. Cloud Storage- Remote File Access Application14 2. 2.1. Sapido Smart Home Application- A Big House15 Smart Home pdnet Setup16 2.1.1. Smart home controller installation and settings16 2.1.2. pdapp Download19 2.1.3. Wi-Fi AP Bridge Setting20 2.1.4. Network Application21 2.2. Smart Home pdnet Application23 2.2.1. Smart Home Network23 2.2.2. AirPlay25 2.3. Outdoor Application26 2.3.1. Cloud Monitoring- Full time Home Security while travelling. 26 2.3.2. Cloud Storage- Remote File Access Application27 2.3.3. Wake-on-LAN Technology for remote files accessing Application28 This User Manual (Ver. 2013/04) is for Firmware Version: Ver1.0.x / pdapp Version: Ver:1.0.x 3 1. Sapido Smart Home Application- An Apartment Main purpose: Users can easily and quickly build a wireless network environment in the apartment with 2 to 3 rooms for cloud monitoring, files sharing, and network management. Apartment users will need 3pcs Sapido products, 1 USB webcam, 1 USB audio speaker, 1 USB Flash Drive, or HDD to quickly build a home Pdnet. The device details are as below: Type Devices Home Controller BR270n x 1pc Wi-Fi AP bridge BRE71n x 1pc BR071n x 1pc Webcam Audio Speaker USB Webcam x 2pcs USB Audio Speaker x 1 set - Back To Menu – 4 1.1. Smart Home pdnet Setup 1.1.1. Smart home controller installation and settings Location Living Room Smart Home Controller Devices BR270n x 1pc + USB Webcam x 1pc + USB Flash Drive or HDD x 1pc 1.1.1.1. Installation Step 1. Install 3pcs 7dBi high gain antennas on BR270n. Step 2. Connect modem to BR270n’s WAN port via an Ethernet cable. Step 3. Connect the USB Flash Drive or External HDD to USB port for network storage. Step 4. Connect a webcam to USB port for remote monitoring. Step 5. Power on and wait for 30 seconds. Step 6. Use wireless devices (smartphone, tablet, or laptop) to connect to the Wi-Fi signal of BR270n and setup the home controller. - Back To Menu 5 1.1.1.2. Internet Connection Setting Step 1.Open the web browser. It will detect the connection type automatically. Step 2.Detect Internet type and direct to the setting page automatically. xDSL / Fiber Setting Enter username and password provided by ISP, key in SSID, and set up the encryption. Cable Modem Setting Enter SSID and set up the encryption. 6 Static IP Setting Enter IP address, Subnet Mask, Gateway, and DNS. (Please check with your ISP or Network Administrator for more details) Step 3.Click ”Apply”. DO NOT disconnect or power off the router while countdowning. Step 4.When “WAN Successfully Connected” appears, download and install pdapp to complete the settings. - Back To Menu - 7 1.1.1. pdapp Download pdapp supports iOS (App store), Android (Google Play), and Windows. Downloading steps are as below: APP Store(iOS) Go to “APP Store”, search for “pdapp” or “Sapido”, and click “Install” to download pdapp. Google Play(Android) Go to “Google Play”, click “Search” icon on the right top corner and search for “Pdapp” to install. 8 - Back To Menu – 1.1.2. Wi-Fi AP Bridge Setting Switch to W (Wi-Fi AP) mode, and press the WPS button for instant Wi-Fi connection, which can extend the wireless network to poor signal corners and share with multiple devices. It can also build an internal wireless network environment. 1.1.2.1. Wi-Fi AP Bridge Setting- CD-free Location Devices Children’s Bedroom BRE71n x 1pc Master Bedroom BR071n x 1pc Step 1. Switch to W (Wi-FI AP) mode on BRE71n. Step 2. Power on and wait for 30 seconds. Step 3. Press “WPS” button on the main router Step 4. Use the same steps to set up Wi-Fi AP bridge on the BR071n. BR270n till WPS LED indicator is flashing, and then press “WPS” button on BRE71n till WPS LED indicator is flashing. When both LED indicators have stopped flashing, the Wi-Fi bridge is successfully connected and automatically encrypted. Remark: Wi-Fi AP bridge router must be Sapido router equipped with WPS button. 9 - Back To Menu 1.1.3. Network Application Super USB port connected with webcams for real time monitoring; audio speakers for AirPlay. 1.1.3.1. Cloud Monitoring Setting- CD-free Location Children’s Bedroom Devices BRE71n x 1pc + USB webcam x 1pc Step 1. After the Wi-Fi AP bridge connected, put Step 2. Connect the webcam to USB port for the one BRE71n at the children’s bedroom. instant remote monitoring. Power on it and wait for 30 seconds. 1.1.3.2. 【AirPlay】CD-free Installation Location Master Bedroom Devices BR071n x 1pc + USB Audio Speaker x 1 set Step 1. After the Wi-Fi AP bridge connected, put one BR071n at the master bedroom. Power on it and wait for 30 seconds. Step 2. Connect the audio speaker to USB port, plug and play for AirPlay. - Back To Menu 10 1.2. Smart Home pdnet Application 1.2.1. Smart Home Network pdapp helps you quickly overview the Pdnet network and manage devices in Pdnet. Step 1. Use wireless devices (smartphone, tablet, or laptop) to connect to the Wi-Fi signal of BR270n and setup the home controller. Step 2. Log into pdapp (please refer to pdapp manual). Step 3. Click “Network” in Pdapp menu. Step 4. Overview the entire network status of routers, USB devices, and computers. - Back To Menu 11 1.2.2. AirPlay CD-free installation; Plug and Play; connecting the audio speaker to USB port to play the music wirelessly. Step 1. Click “Download” in Pdapp menu. Step 2. Download music file Step 3. Preview the downloaded music file. Step 4. Play the downloaded Step 5. Airplay Function. Click Step 6. Choose the audio music file the AirPlay icon. speaker device and AirPlay AirPlay function supports iOS system (iPhone/iPad), which can be used on LAN (Local Area Network) only. The AirPlay icon will not appear through WAN (Wide Area Network). - Back To Menu 12 1.3. Outdoor Application 1.3.1. Cloud Monitoring- Full time Home Security while travelling. Connect the webcam to USB port to monitor the real-time home security for elders, children, and pets. Step 1. Open pdapp and log into the device. Step 2. Click “Camera”. Step 4. Click one of the Cameras Step 5. Single camera screen Step 3. Cloud monitoring screen. 書房的攝 影機 - Back To Menu 13 1.3.2. Cloud Storage- Remote File Access Application Connect USB drive or external HDD to USB port for the file uploading and downloading from BR270n. Step 1. Click ”Download” Step 2. Downloading Step 3. Download completed Step 4. Click “Upload” Step 5. Uploading Step 6. Upload completed ※For more details about Pdapp, please refer to the Pdapp Manual at Sapido official website. - Back To Menu 14 2. Sapido Smart Home Application- A Big House Main Purpose: Users can easily and quickly build a wireless network environment for cloud monitoring, network management, files sharing, and multimedia application. Big house user can use multiple Sapido products, webcams, USB audio speakers, 1 USB flash drive, or 1 external HDD to build a home Pdnet. The device details are as below: Type Home Controller Wi-Fi AP Bridge Devices GR297n x 1pc BRE71n x 4pcs BR071n x 1pc Webcam Webcam x 5pcs Audio Speaker Audio speaker x 1 set Storage device USB Flash drive or external HDD x 1pc Computer Computer x 1pc - Back To Menu - 15 2.1. Smart Home pdnet Setup 2.1.1. Smart home controller installation and settings Location Devices Study room Smart Home Controller GR297n x 1pc + Webcam x 1pc + USB Flash Drive or external HDD x 1pc Study room Computer x 1pc 2.1.1.1. Installation Step 1. Install 3pcs 7dBi high gain antennas on GR297n. Step 2. Connect modem to GR297n’s WAN port via an Ethernet cable. Step 3. Connect the USB Flash Drive or Step 4. Power on the router and wait for 30 seconds. External HDD to USB port for network storage; connect a webcam for remote monitoring. Step 5. Connect a computer to GR297n’s LAN port via an Ethernet cable. Through Wake-on-LAN (WoL) technology, smartphone users can wake the computer remotely for files accessing and multimedia files sharing with others at the same time. Please set up the GR297n using computer. - Back To Menu 16 2.1.1.2. Internet Connection Setting Step 1. Open the web browser. It will detect the connection type automatically. Step 2. Detect Internet type and direct to the setting page automatically. xDSL / Fiber Setting Enter username and password provided by ISP, key in SSID, and set up the encryption. Cable Modem Setting Enter SSID and set up the encryption. 17 Static IP Setting Enter IP address, subnet mask, gateway, and DNS. (Please check with your ISP or Network Administrator for more details). Step 3. Click “Apply”. DO NOT disconnect or power off the router while countdowning. Step 4. When “WAN Successfully Connected” appears, download and install pdapp to complete the settings. - Back To Menu - 18 2.1.2. pdapp Download pdapp supports iOS (App store), Android (Google Play) and Windows. Downloading steps are as below: APP Store(iOS) Go to “APP Store”, search for “pdapp” or “Sapido”, and click “Install” to download pdapp. Google Play (Android) Go to “Google Play”, click “Search” icon on the right top corner and search for “Pdapp” to install. - Back To Menu 19 2.1.3. Wi-Fi AP Bridge Setting Switch to W (Wi-Fi AP) mode, and press the WPS button for instant Wi-Fi connection, which can extend the wireless network to poor signal corners and share with multiple devices. It can also build an internal wireless network environment. 2.1.3.1. Wi-Fi AP Bridge Setting- CD-free Location Devices Gate BRE71n x 1pc Master Bedroom BRE71n x 1 pc Children’s Bedroom BRE71n x 1 pc Guest Room BRE71n x 1 pc Study Room BR071n x 1 pc Step 1. Switch to “W” mode (Wi-Fi AP) on one BRE71n. Step 2. Power on the router and wait for 30 seconds. Step 3. Press “WPS” button on the main router Step 4. Use the same steps to set up Wi-Fi AP bridge on the 2nd BRE71n. GR297n till WPS LED indicator is flashing, and then press “WPS” button on BRE71n Step 5. Use the same steps to set up Wi-Fi AP till WPS LED indicator is flashing. When bridge on the 3rd BRE71n. both LED indicators have stopped flashing, Step 6. Use the same steps to set up Wi-Fi AP the Wi-Fi bridge is successfully connected bridge on the last BRE71n. and automatically encrypted. Step 7. Use the same steps to set up another Wi-Fi AP bridge on BR071n. Remark: Wi-Fi AP bridge router must be Sapido router equipped with WPS button. - Back To Menu 20 2.1.4. Network Application Super USB port connected with webcams for real time monitoring and audio speakers for AirPlay. 2.1.4.1. Cloud Monitoring- CD-free Location Devices Gate BRE71n x 1pc + USB webcam x 1pc Master Bedroom BRE71n x 1pc + USB webcam x 1pc Children’s bedroom BRE71n x 1pc + USB webcam x 1pc Guest room BRE71n x 1pc + USB webcam x 1pc Step 1. After the Wi-Fi AP Bridge connected, put one BRE71n at the gate. Power on it and wait for 30 seconds. Step 2. Connect the webcam on the USB port, plug and play for instant remote monitoring. Step 3. After the Wi-Fi AP Bridge connected, put the 2nd BRE71n in the master bedroom and connect the webcam on the USB port. Power on and wait for 30 seconds. Step 4. After the Wi-Fi AP Bridge connected, put the 3rd BRE71n in the children’s bedroom and connect the webcam on the USB port. Power on and wait for 30 seconds. Step 5. After the Wi-Fi AP Bridge connected, put the last BRE71n in the guest room and connect the webcam on the USB port. Power on and wait for 30 seconds. - Back To Menu - 21 2.1.4.2. Airplay- CD-free Installation. Location Study Room Devices BR071n x 1pc + USB Audio Speaker x 1 set Step 1. After the Wi-Fi AP bridge connected, put one BR071n in the study room. Power on it and wait for 30 seconds. Step 2. Connect the audio speaker on the USB port, plug and play for AirPlay. - Back To Menu - 22 2.2. Smart Home pdnet Application 2.2.1. Smart Home Network Users can build up a private Pdnet platform to enjoy multimedia files sharing, monitoring, and network management through a cross-system (iOS, Android, and Windows) pdapp. Users can also enjoy the cloud service from Three-screen Networked Platform (handheld devices, computers, and televisions) anytime and everywhere. Pdapp helps you quickly overview the Pdnet network and manage devices in Pdnet. Step 1. Use wireless devices (smartphone, tablet, or laptop) to connect to the Wi-Fi signal of GR297n and setup the home controller. Step 2. Log into Pdapp (please refer to pdapp manual). 23 Step 3. Click “Network” in Pdapp menu. Step 4. Overview the entire network status of routers, USB devices, and computers. - Back To Menu - 24 2.2.2. AirPlay CD-free Installation; Plug and Play; Connect the audio speaker to USB port to play the music wirelessly. Step 1. Click “Download” in Pdapp menu. Step 4. Play the downloaded music file. Step 2. Download the music file. Step 3. Preview the downloaded music file. Step 5. Click the AirPlay icon. Step 6. Choose the audio speaker device and AirPlay AirPlay function supports iOS system (iPhone/iPad), which can be used on LAN (Local Area Network) only. The AirPlay icon will not appear through WAN (Wide Area Network). 25 - Back To Menu - 2.3. Outdoor Application 2.3.1. Cloud Monitoring- Full time Home Security while travelling. Connect the webcam to USB port to monitor the real-time home security for elders, children, and pets. Step 1. Open pdapp and log into the device Step 2. Click “Camera”. Step 4. Click one of the cameras. Step 5. Single camera screen Step 3. Cloud monitoring Screen. - Back To Menu 26 2.3.2. Cloud Storage- Remote File Access Application Connect USB drives or external HDDs to USB port for the file uploading and downloading from GR297n. Step 1. Click ”Download” Step 2. Downloading Step 3. Download Completed 客廳的攝 影機 Step 4. Click “Upload” Step 5. Uploading Step 6. Upload Completed - Back To Menu - 27 2.3.3. Wake-on-LAN Technology for remote files accessing Application Through Wake-on-LAN (WoL) technology, smartphone users can wake the computer remotely for files accessing and multimedia files sharing with others at the same time. Step 1. Click “Download” Step 4. Waking up Step 2. Choose the computer to download Step 5. Computer is successfully Step 3. Click “Wake-on” Step 6. Downloading awaken For more details about pdapp, please refer to the Manual on Sapido Official Website. - Back To Menu - 28