1
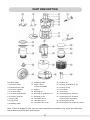
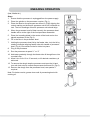
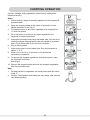
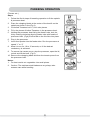
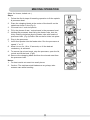
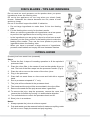
User's MANUAL
Dear Customer,
Congratulations! Thank you for buying this KORYO appliance. Your new
Food Processor has been designed for your convenience. We are sure you
will get many years of trouble free service from this appliance.
Before commissioning this device please read this user manual carefully.
Please retain this user manual, warranty certificate, sales receipt and if
possible carton with the inner packaging.
2
CONTENTS
Important Safeguards. . ................................................... 4
Part Description............................................................. 5
Processing Table.. .......................................................... 6
Kneading Operation....................................................... 7
Chopping Operation....................................................... 8
Pureeing Operation....................................................... 9
Mincing Operation........................................................ 10
Disc Blades - Tips & Warnings...................................... 11
Citrus Juicer................................................................ 11
Centrifugal Juicer. . ....................................................... 12
Grinding . . ..................................................................... 13
Liquidizing................................................................... 13
Chutney Grinder.. ......................................................... 14
Trouble Shooting. . ........................................................ 15
E-Waste Disposal . . ....................................................... 15
Warranty...................................................................... 16
3
IMPORTANT SAFEGUARDS
When using electrical appliance, basic precautions should always be followed, including
the following:
1. Read all the instructions.
2. Check that the voltage on the rating plate of the unit corresponds with your house electricity
supply, which must be 230V AC (Alternating Current)
3. Caution: The processing metal blades, disc attachments grinder and blender / blades
are very sharp. Take care while handling them, especially when removing them from
the processor bowl and cleaning.
4. To protect against risk of electrical shock never immerse the processor body in water or any
other liquid.
5. Never allow a child to use this unit. Close supervision is necessary when this appliance is
used near children.
6. Unplug from the mains when not in use, before putting on or taking off blades or attachments,
and before cleaning.
7. Always fit the safety cover before using the food processor.
8. Avoid touching moving parts. Keep hands, hair, clothing. as well as spatulas and other
utensils away from processor during operation, to prevent personal injury and / or damage
to the food processor.
9. Do not operate any appliance with a damaged power cord or plug, or after an appliance has
malfunctioned, or has been dropped or damaged in any way. Contact KORYO Authorized
Service Centre for advice on examination, repair or electrical / mechanical adjustment.
10. The use of attachments or blades or any other part not sold along with this product may
cause fire, electric shock or damage the product.
11. Do not use outdoors.
12. Do not let the power cord overhang the edge of the table or worktop, or touch hot surfaces.
13. All blades and attachments should be removed before cleaning.
14. Do not place the appliance on or near a hot gas or electric hob, or a heated oven.
15. Do not over fill the processor, grinder or liquidizer. This could cause damage to the motor.
16. When using the processor, grinder or liquidizer, ensure the lid is in place before switching
on and do not remove the lid until the blade has stopped rotating.
17. Always remove the processor blade before emptying the processor bowl of its contents.
18. If the power cord or the appliance is damage, do not try to repair it by yourself and contact
KORYO authorized service centre for advice or service or repair.
19. Never feed the food by hand. Always use the food pusher. Never put your fingers into the
feeder tube.
20. This food processor in intended for household use only.
21. Specifications are subject to change without notice.
4
PART DESCRIPTION
Part Description
10. Chopping blade
21. Chutney jar
1. Processor body
22. Chutney jar gasket for lid
2. Speed selector knob
13. Finger chips /
French fries blade
3. Processor spindle
14. Spatula
24. Citrus filter
4. Processor bowl
15. Grinding jar
25. Citrus cone
5. Processor bowl handle
16. Grinding jar gasket for lid
26. Centrifugal juice extractor
6. Processor bowl lid
17. Grinding jar lid
7. Feeder tube
18. Liquidizer jar lid
27.Centrifugal juice extractor
mesh & cutter assembly
8. Food pusher
19. Liquidizer jar lid
28.Centrifugal juicer lid
9. Kneading blade
20. Liquidizer jar lid cap
29.Centrifugal juice extractor pusher
23. Chutney jar lid
Note: Parts illustrated in this use and care manual are indicative only, parts provided with
the product may differ with illustrations.
5
PROCESSING TABLE
Description of
Blade
Use
Quantity
Speed
Slicing Blade
Slicing of onions, cucumber, radish,
carrots, potatoes etc. For salads
and cooking
Bowl
Capacity
“1” or “2” or “3”
Bowl
Capacity
“1” or “2” or “3”
Grating &
shredding blade
Shreds carrots for halwa, potatoes
for cheevda. Cucumber for raita,
radish and cabbage for parathas
and kofta. Grates cheese for pizza,
coconut for vegetables & sweets.
Finger Chips Blade
Slices potatoes for finger chip fry;
Cabbage cutting for vegetables
Bowl
Capacity
“1” or “2” or “3”
500gms
“1” or “2”
Chopping Blade
Chops onions, leafy vegetables,
minces meat for kheema crumbs,
bread for coating purees tomotoes,
for gravies in dishes mashes boiled
potatoes for tikkis, cuttlets etc.
Pakoras etc crushes ice, fruits and
prepares milk shakes
500gms
“1” or “2”
Kneading blade
Keading atta, maida etc for rotis,
paraths or puris removal of shell
of green peas as well as roasted
peanuts.
Description of
attachment
Use
Speed
Citrus juicer
Extracts juice from citrus fruits like
sweet lime (Mousambi)
Bowl
capacity
“1”
Centrifugal juicer
Extracts juice from non-citrus fruits
like apples, pineapples etc. and
vegetables like carrots
700-750ml
“1”
Liquidizer
Performs blending and liquidizing
operations like lassi, milk shakes,
purees, butter milk & cocktails
1.5 litre
“1” or “2” or “3”
Grinds idli and dosa batter, cocount
chutney ground nut, red chilli sugar
and dry coconut. Purees tomatoes
for gravies in dishes
2/3 of jar
capacity
“1” or “2” or “3”
Grinder
100gms
“1” or “2” or “3”
Chutney Grinder
This jar can be used to grind small
quantities of spices like jeera,
dhania, pepper, garam masala
green chilli and cocount etc. and
make green chuktneys.
6
KNEADING OPERATION
(Atta, Madia etc.)
Steps
1. Ensure that the processor is unplugged form the power supply.
2. Place the spindle on the processor coupler. (Fig.1)
3. Place the Bowl on the processor as shown in (Fig2) aligning the
unlock marking on the bowl & processor unit & turn clockwise to
lock. The lock markings of bowl & processor unit should align.
4. When the processor bowl is fitted correctly, the processor bowl
handle will be to the right of the food processor assemble.
5. Place the kneading blade in the center of the bowl and on the
spindle as shown in the (Fig.3)
6. Fill in the flour in the processor bowl.
Fig.1
Fig.2
Fig.3
7. Holding the processor bowl lid by the feeder tube, lock the lid by
rotating clockwise aligning feeder tube with handle of processor
bowl. (Fig.4). Ensure tab on the lid clicks into place.
8. Plug in the processor
Fig.4
9. Run the processor at speed “1” or “2”
10. Add water gradually through the feeder tube till dough forms into
rounded lump.
11. Allow it to run for 10 to 15 seconds, or till desired consistency is
achieved.
12. To remove the dough stop the processor and open the lid and
turn anti-clock wise to unlock the processor bowl and lift. (Fig.5)
13. Remove the dough from the processor bowl; use spatula if
required.
Note: For better results, grease inner wall of processing bowl with
cooking oil.
7
Fig.5
CHOPPING OPERATION
(Onions, cabbage, leafy vegetables, meat mincing, mash potato
tomato puree etc.)
Steps
1. Follow the first 4 steps of kneading operation to fit the spindle &
processor bowl.
2. Place the chopping blade at the center of the bowl & on the
spindle as shown in the (Fig.3)
3. Cut peeled onions (or any other vegetable to be chopped) into
1½ inch size pieces.
Fig.1
Fig.2
4. Fill in the pieces of onions (or any other vegetable to toe
chopped) in the processor bowl.
5. Holding the processor bowl lid by the feeder tube, lock the lid by
rotating clockwise aligning feeder tube with handle of processor
bowl. (Fig.4) Ensure tab on the lid clicks into place.
Fig.3
6. Plug in the processor
7. Insert food pusher into the feeder tube. Run the processor at
speed “1” or “2”
Fig.4
8. Allow it to run for 10 to 15 seconds, or till the desired
consistency is achieved.
9. To remove the chopped vegetables, stop the processor, open
the lid unlock and lift the
bowl (Fig.5)
10. Remove the chopping blade and then the chopped vegetables
from the processor bowl.
Note:
1. For best results cut vegetables into small pieces and use incher
mode “P”
2. Caution: The stainless steel blades are very sharp, take extreme
care While handling.
8
Fig.5
PUREEING OPERATION
(Tomato etc.)
Steps
1. Follow the first 4 steps of kneading operation to fit the spindle
& processor bowl.
Fig.1
2. Place the chopping blade at the center of the bowl & on the
spindle as shown in the (Fig.3)
3. Cut boiled Tomatoes into 1½ inch size pieces.
4. Fill in the pieces of boiled Tomatoes in the processor bowl.
Fig.2
5. Holding the processor bowl lid by the feeder tube, lock the
lid by rotating clockwise aligning feeder tube with handle of
processor bowl. (Fig4) Ensure tab on the lid clicks into place.
Fig.3
6. Plug in the processor.
7. Insert food pusher into the feeder tube. Run the processor at
speed “1” or “2”
8. Allow it to run for 10 to 15 seconds, or till the desired
consistency is achieved.
9. To remove the tomato puree, stop the processor, open the lid,
unlock and lift the bowl. (Fig.5)
Fig.4
10. Remove the chopping blade and then the tomato puree from
the processor bowl.
Notes:
1. For best results cut vegetables into small pieces.
2. Caution: The stainless steel blades are very sharp, take
extreme care while handling.
9
Fig.5
MINCING OPERATION
(Meat for kheme, kabab etc.)
Steps
1. Follow the first 4 steps of kneading operation to fit the spindle
& processor bowl.
Fig.1
2. Place the chopping blade at the center of the bowl & on the
spindle as shown in the (Fig.3)
3. Cut meat into 1 inch size pieces.
4. Fill in the pieces of raw / cooked meat in the processor bowl.
Fig.2
5. Holding the processor bowl lid by the feeder tube, lock the
lid by rotating clockwise aligning feeder tube with handle of
processor bowl. (Fig.4) Ensure tab on the lid clicks into place.
Fig.3
6. Plug in the processor,
7. Insert food pusher into the feeder tube. Run the processor at
speed “1” or “2”.
8. Allow it to run for 10 to 15 seconds, or till the desired
consistency is achieved.
9. To remove the minced meat, stop the processor, open the lid,
unlock and lift the bowl. (Fig5)
Fig.4
10. Remove the chopping blade and then the minced meet from
the processor bowl.
Notes:
1. For best results cut meat into small pieces.
2. Caution: The stainless steel blades are very sharp, take
extreme care while handling.
10
Fig.5
DISCS BLADES - TIPS AND WARNINGS
Do not exert too much pressure on the pusher when you press
ingredients down the feeding tube.
Do not let the appliance run too long when you shred (hard)
cheese. Otherwise the cheese becomes too hot, starts to melt
and turns lumpy.
Do not fill the bowl beyond the MAX-3 indication.
1. Pre-cut large ingredients to make them fit into the feeding
tube
2. Fill the feeding tube evenly for the best results.
- When you shred or granulate soft ingredients use a low speed
to prevent the ingredients from turning into a puree.
- In the ingredients you are going to shred or slice have a small
diameter, put the outer pusher in the feeding tube to make the
feeding tube smaller. Then use the inner pusher to push the
ingredients down the feeding tube.
- When you have to process a large amount of ingredients,
process small bathes and empty the bowl between batches.
CITRUS JUICER
(Extract juice from sweet lime (mosambi)
Steps
1. Follow the first 4 steps of kneading operation to fit the spindle &
processor bowl.
Fig.1
2. Place the citrus filter in the center of bowl on the spindle & turn to
lock. The lock of the filter snaps into the processor handle. (Fig.3)
3. Place the citrus cone on the center of the citrus juicer.
4. Plug in the processor.
Fig.2
5. Place half cut sweet limes on citrus cone and hold with a cupped
hand.
6. Run to processor at speed of ”1” only.
7. The juice will be collected in the processor bowl.
Fig.3
8. The seeds and the pulp will be accumulated in the citrus filter.
9. Remove the seed and the pulp as and when it gets filled.
10.To remove the juice, stop the processor, remove the cone, then
remove the citrus filter by turning it in anticlockwise direction.
11. Turn anticlockwise to unlock the processor bowl and lift.
12. Store juice in a container.
Notes:
1. Always operate the juicer at minimum speed.
2. Pulp and seeds must be removed before it starts over spilling under
the citrus cone. Empty the seeds and pulp regularly.
11
Fig.4
CENTRIFUGAL JUICER
(Extract juice from apples, pineapples and carrots)
Steps
1. Follow the first 4 steps of kneading operation to fit the spindle &
processor bowl.
2. Lock extractor mesh into the juicer extractor by turning mesh in
anticlockwise direction. Then place the same in the center of the
bowl and on the spindle and press firmly (Fig.3)
3. By holding the feeder tube of the juicer lid, lock the lid by rotating
clockwise aligning feeder tube with the handle of the processor.
4. Plug in the processor.
Fig.1
Fig.2
5. Run the processor at the maximum speed “1”
6. Feed cut pieces of the apple or any other non-citrus fruit through
the feeder tube.
7. Use the food pusher to push and press the fruit pieces.
Fig.3
8. The juice will be collected in the processor bowl.
9. The pulp will be accumulate in the juice extractor mesh & cutter
assembly
10. If the juice extractor mesh & cutter assembly gets clogged during
operation, turn the processor OFF and remove the pulp from it.
11. To remove the juice, stop the processor, remove the juicer lid and
juice extractor mesh & cutter assembly.
Fig.4
12. Turn anticlockwise to unlock the processor bowl and lift.
13. Store juice in a container.
Notes:
Fig.5
1. Always operate the juicer at speed “1”
2. Pulp must be removed before it starts over spilling. Empty the
pulp regularly.
3. When ever the juicing operation is stopped, ensure to empty the
pulp before restarting.
4. To clean juice extractor mesh & cutter assembly, turn the juicer
mesh in clockwise direction & lift.
12
Fig.6
GRINDING
(Idli batter (soaked rice and black gram) spices, pulses, ground nut,
red chili, sugar, green coconut chutney, tomato puree, gravy etc.)
Steps
1. Ensure that the processor is unplugged from the power supply.
2. Place the grinder jar into its location on the processor body; turn
clockwise until the grinder clicks in place. (Fig.1)
Fig.1
3. Put the ingredients to be ground in the jar. (Fig.2)
4. Place the lid on the jar. (Fig.3)
Fig.2
5. Plug in the processor
6. Run the processor starting with the speed “1” to “3” gradually till
the desired consistency is achieved.
7. Stop the processor
8. Remove the ingredients from the jar, use spatula if required.
Fig.3
Notes:
1. Caution: The stainless steel blades are very sharp, take extreme
care while handling
LIQUIDIZING
(Manga / Strawberry (fruits) milk shakes, lassi, butter milk, cocktails,
cold coffee etc.)
Steps
1. Ensure that the processor is unplugged from the power supply.
Fig.1
2. Place the liquidizing jar into its location on the processor body;
turn clockwise until the grinder clicks in place. (Fig.1)
3. Place the ingredients to the liquidized in the jar.
4. Place the lid on the jar along with lid cap. (Fig.2) & (Fig.3)
Fig.2
5. Plug in the processor.
6. Run the processor starting with incher “P” then speed “1” to “2”
gradually till the desired consistency is achieved.
7. Stop the processor.
Fig.3
8. Remove the ingredients from the jar.
Notes:
1. Caution: The stainless steel blades are very sharp, take extreme
care while handling.
13
CHUTNEY GRINDER
(Small quantities of spices, groundnut red chill, sugar, green coconut chutney, tomato puree,
gravy etc.)
Steps
1. Ensure that the processor is unplugged from the power supply.
2. Place the chutney grinder jar into its location on the processor body; turn clockwise until the
grinder clicks in place.
3. Place the ingredients to be grind in the jar.
4. Place the lid on the jar.
5. Plug in the processor.
6. Run the processor starting with speed “1” to “3” gradually till the desired consistency is
achieved.
7. Stop the processor.
8. Remove the ingredients from the jar, use spatula if required.
Notes:
1. Caution: The stainless steel blades are very sharp, take extreme care while handling.
Thermal over load protector (TOP):
•
The TOP is provided in the food processor to protect the motor from burning.
•
When TOP functions, switch off the food processor & unplug from power supply. Reduct the
quantity of ingredient being ground or add some water.
•
After doing the above, wait for few minute in order to cool the motor & TOP to reset.
•
Plug in the appliance & attach the required accessories & attachment & switch ON.
14
TROUBLE SHOOTING
Problem
Cause
Corrective action
No power supply
Ensure power supply is on.
Switch off the supply.
(Ref. to TOP function)
The processor does
not start.
The performance is
not satisfactory
Processor generates
abnormal noise
Tripped due to over load
Wait for a while & restart the
processor.
If it still does not operate, contact
the nearest Koryo Authorised
Service center.
Processor bowl lid cover /
juice extractor lid cover /
citrus filter not fitted property
in its place.
Fit the processor bowl lid cover /
juice extractor lid cover / citrus filter
not fitted properly in its place.
Overloading
Fill the processor bowl or jars with
the quantities as suggested in
processing table.
Size of ingredients to be
processed is not proper
Cut/break the ingredients to be grind
into appropriate size.
Wrong jar / blade used.
Ensure that the jar / blade used is as
specified in the processing table.
Safety notice
• The adult should supervise the children to ensure that the children can’t play with the
appliance.
• This appliance is not intended for use by persons (including children) with reduced physical,
sensory or mental capabilities, or lack or experience and knowledge, unless they have been
given supervision or instruction concerning use of the appliance by a person responsible for
their safety.
E-WASTE DISPOSAL
This symbol on the product or on the container indicates that this product cannot be
treated as general waste. The user is responsible for disposing this kind of waste
by throwing them away at a “recycling point” specifically for electrical and electronic
waste. Selective collection and electrical equipment recycling contribute to preserve
natural resources and warrant waste recycling to protect environment and health.
In order to receive further information about electrical and electronic waste collecting and
recycling, contact your Local Municipal, the service of household waste or the establishment
where the product was acquired.
15
WARRANTY
This product comes with a warranty of 12 months from the date of purchase as specified on the warranty card. This is against
all defective material or workmanship. In the event of a defect, Future Retail Limited or Koryo Authorized Service Centre
undertakes to repair the set, free of charge, during the warranty period.
In the event of a defect developing in the product, contact KORYO Customer Care or KORYO Authorized Service Centre and
provide information about the defect, the model number and serial number of the product.
THIS WARRANTY IS VOID IF
1. The completely filled warranty card is not presented to the authorised personnel at the time of servicing of the product.
2. The product is not operated according to the instructions given in the user manual.
3. Defects are caused by improper or reckless use.
4. Modifications or alterations have been made to the product or if the product has been tampered with,in any manner
whatsoever.
5. Repairs to the product are carried out by anyone other than an authorised company representative.
6. For defects other than faulty parts or workmanship such as damage due to lightning, abnormal voltage, spillages, dust,
accidental damage, etc.
7. The serial number is deleted or altered.
8. Used for any non–domestic purpose.
OTHER TERMS AND CONDITIONS
1. Repairs or replacement will be carried out either by a Future Retail Limited authorised customer care centre or by a
representative.
2. All expenses incurred in collecting the unit(s) or part(s) thereof from the Customer Service Centre, as well as any other
expenses and incidentals will be borne by the customer.
3. Whilst the company will make every effort to carry out repairs at the earliest, it is made expressly clear that the company
is under no obligation to do so in a specified period of time.
4. The company or its authorised customer centre reserves the right to retain any part(s) or component(s) replaced at its
discretion, in the event of a defect being noticed in the equipment during the warranty
WARRANTY CARD
THIS CARD IS VALID ONLY IF IT IS FILLED IN COMPLETELY,
SIGNED AND STAMPED BY THE DEALER ON DATE OF PURCHASE
MODEL NO
: CUSTOMER NAME
:
SERIAL NO
:
ADDRESS:
PHONE NO
: RESIDENCE
INVOICE/CASH BILL NO
:
DATE OF PURCHASE
:
CUSTOMER SIGNATURE
:
:
OFFICE
:
DEALER’S STAMP
* For service request kindly contact Customer Care Centre at : 1800-425-7722, 080-26577722
* Please mail in queries to [email protected]
16
Also Available
Convection MW Ovens
Slow Juicer
Split Air Conditioner
Grill MW Ovens
Juicer Mixer Grinder
Window Air Conditioner
Oven Toaster Grill
Mixer Grinder
Storage Water Heater
Pop Up Toasters
Juice Extractor
Instant Water Heater
Sandwich Maker
Food Steamer
Immersion Heater
Induction Cooker
Chopper
Room Heaters
Electric Cooker
Steam Iron
Vacuum Cleaner
Electric Kettle
Dry Iron
Washing Machine
Coffee/Tea Makers
Ceiling Fans
Emergency Light
Hand Blender
Hair Dryer
Stabilizer
Imported by:
Future Retail Limited
Tower C, 9th Floor, 247 Park, L.B.S. Marg, Vikhroli (West),
Mumbai - 400 083, Maharashtra, India.