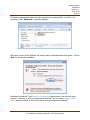
1
USER MANUAL Gauge Controller & Dashboard Software Suite including: Dashboard Professional© v 2.0.0.6 and later (Windows) Dashboard Lite© v2.0.00 and later (Windows) Dashboard App© v1.5 and later (Android) July 17, 2015 Revision 1.2 © 2015 All Rights Reserved REAL TIME MEASUREMENTS INC. 505 – 36th Avenue SE Calgary Alberta Canada T2G 1W5 www.rty.ca [email protected] +1 403 720 3444 Table of Contents 1 Dashboard Suite Overview ........................................................................................... 1 2 G-Con Gauge Controller ............................................................................................... 3 2.1 3 2.1.1 Connect Gauge using the PC ........................................................................... 5 2.1.2 Connecting using Bluetooth© and Android Smartphone ...................................... 6 2.2 Check Log Status .................................................................................................. 8 2.3 Start Job .............................................................................................................. 8 2.4 End Job................................................................................................................ 8 2.5 LED Meanings....................................................................................................... 9 2.6 Firmware Updates ................................................................................................. 9 Using Dashboard Professional© ....................................................................................10 3.1 Overview.............................................................................................................10 3.2 Installation ..........................................................................................................11 3.3 Automatic Dashboard Professional© Updates ..........................................................16 3.4 Main Menu ..........................................................................................................17 3.5 Gauge (panel) .....................................................................................................17 3.5.1 Status Functions............................................................................................18 3.5.2 Configuration Functions .................................................................................20 3.6 Local Data (panel) ...............................................................................................26 3.6.1 Database Manager ........................................................................................26 3.6.2 Settings ........................................................................................................32 3.7 4 Connecting the Gauge ........................................................................................... 5 Reports (panel)....................................................................................................33 3.7.1 Reporting Database .......................................................................................33 3.7.2 Creating Reports ...........................................................................................35 Using Dashboard Lite© ................................................................................................47 4.1 Overview.............................................................................................................47 4.2 Installation (Program Start-up) .............................................................................48 4.2.1 BT_CON Installation ......................................................................................48 4.2.2 KC3 Installation .............................................................................................48 4.3 Automatic Software Updates .................................................................................48 4.4 Main Menu ..........................................................................................................49 4.5 4.5.1 Status Functions............................................................................................49 4.5.2 Configuration Functions .................................................................................51 4.6 5 Local Data ...........................................................................................................57 4.6.1 File Manager .................................................................................................58 4.6.2 Settings ........................................................................................................59 Using Dashboard App© ...............................................................................................60 5.1 Overview.............................................................................................................60 5.2 Installation ..........................................................................................................60 5.3 Automatic Software Updates .................................................................................61 5.4 Starting Dashboard App©.....................................................................................61 5.5 Main Menu ..........................................................................................................63 5.6 Gauge .................................................................................................................63 5.6.1 Status ..........................................................................................................64 5.6.2 Configuration ................................................................................................66 5.6.3 Retrieving Data .............................................................................................70 5.6.4 Saving Data ..................................................................................................70 5.6.5 Deleting Data ................................................................................................70 5.6.6 Plotting Data .................................................................................................70 5.6.7 Exporting Data ..............................................................................................71 5.7 6 Gauge Panel ........................................................................................................49 Local Data ...........................................................................................................72 5.7.1 File Manager .................................................................................................72 5.7.2 Settings ........................................................................................................73 FAQ...........................................................................................................................74 Software Manual Dashboard Revision 1.2 2015 09 09 Page 1 1 Dashboard Suite Overview Real Time Measurement Inc.’s (“RTM”) Dashboard suite of software is comprised of three different software applications called: Dashboard Professional© Dashboard Lite© Dashboard App© All three applications were developed in-house by RTM for use with RTM’s family of KC electronic memory pressure recorders (“gauges”), which includes the model ranges: KC3© KC375© KC3Q© KC3-SPM© All Dashboard applications share a similar “look” and functionality in terms of how they interface with the KC gauges. However, each application is used in a different way, and offers a different range of features to suit different circumstances: Dashboard Professional© The full package. Offers all the features.. Includes basic Dashboard Lite© Field Operators Friend. Same gauge interface functionality Dashboard App© Unbeatable Convenience. Runs on your Android gauge interface functions plus a wide range of advanced data editing, database management and survey reporting features. as Professional, however Lite resides in the KC memory, requires no installation on a PC and offers the basic functions required by the field operator. smartphone. Convenient Bluetooth© wireless communication. Offers similar feature package as Dashboard Lite©. © 2015 Real Time Measurements Inc., All Rights Reserved Software Manual Dashboard Revision 1.2 2015 09 09 Page 2 The following table illustrates the primary features of each RTM Dashboard application: Dashboard Professional© Dashboard Lite© Dashboard App© MS Windows 7, or newer Upload from www.rty.ca MS Windows 7, or newer Upload from KC gauge Android Communication with Gauge USB USB Gauge Status Battery Capacity Indicator Memory Capacity Indicator Gauge Programming Data Retrieval BASIC Plotting Functions Smart Drop Job Dataset Exporting Data Editing Database Management ADVANCED Plotting Functions Survey Reporting Gradient Reporting Operating System Requirements Software Source © 2015 Real Time Measurements Inc., All Rights Reserved Install from “Play Store” Bluetooth Wireless Software Manual Dashboard Revision 1.2 2015 09 09 Page 3 2 G-Con Gauge Controller The communication interface between an RTM KC gauge and a PC computer or Android smartphone is provided by the G-Con (Gauge Controller). G-Con was designed, and is exclusively manufactured by RTM. G-Con contains a microprocessor powered by a rechargeable battery. A single button is used for all functions. An LED emits different colours to indicate GCon status. G-Con communicates with a PC using a USB connection. The USB also charges the G-Con battery. Alternatively the G-Con can communicate with an Android smart phone using Bluetooth© wireless communication. LED Indicator USB Mini Connector Gauge Connector Socket Button On/off Start/stop Flat Spot Microprocessor Rechargeable Battery © 2015 Real Time Measurements Inc., All Rights Reserved Software Manual Dashboard Revision 1.2 2015 09 09 Page 4 In order for any Dashboard software to communicate with a KC gauge, G-Con needs to be attached to the top of the KC gauge. G-Con is designed to fit both 1.25” diameter and 0.75” diameter gauges. The two flat sides of the G-Con are differing distances from the connector. Each flat side corresponds to a specific gauge diameter such that gauges of both diameters can lay flat on a flat surface at the same level as the G-Con. This ensures a good electrical connection between the G-Con and the gauge. 1-1/4” Gauge Orientation 3/4” Gauge Orientation It is important to connect the gauge to the G-Con without twisting. To insert the gauge into the G-Con: Align the flat part on the gauge to the flat part inside the G-Con connector socket (as highlighted below) and push together firmly. After the gauge is connected to the G-Con, and the G-Con is connected through the USB to a PC, the Autoplay screen will open. © 2015 Real Time Measurements Inc., All Rights Reserved Software Manual Dashboard Revision 1.2 2015 09 09 Page 5 2.1 Connecting the Gauge 2.1.1 Connect Gauge using the PC When using a PC to run Dashboard Professional© or Dashboard Lite© a USB cable connects the G-Con to the PC. If the G-Con is connected to the USB on a PC, but NOT connected to a gauge, the PC Autoplay window will appear as follows: On this window: Select “Open folder to view files” The first time this is run on a PC; right click on the icon and select “Run as Administrator”; Double-click “BT_CON.exe” to run the BT_Con program; The G-Con name, status and rechargeable battery capacity will be displayed; If battery level is too low, keep the G-Con connected to the USB until the battery is recharged; “Refresh” updates the battery level. © 2015 Real Time Measurements Inc., All Rights Reserved Software Manual Dashboard Revision 1.2 2015 09 09 Page 6 2.1.2 Connecting using Bluetooth© and Android Smartphone Dashboard App©, can be used on any Android device. The G-Con requires no physical connection to the Android device. Dashboard App©, will communicate with the G-Con and gauge using Bluetooth© wireless communication. Press button on G-Con to turn it on. Run Dashboard App©, and select the appropriate G-Con device as shown below: The first time an individual G-Con is run on an Android device, it will have to be paired with the device. On the Android device, go to Settings, Bluetooth© and select the applicable G-Con from Available devices © 2015 Real Time Measurements Inc., All Rights Reserved Software Manual Dashboard Revision 1.2 2015 09 09 Page 7 If no gauge is connected to the G-Con and Dashboard App© is opened, the user selects “Cancel and go to Controller Page”. The G-Con name, status and battery level are displayed by Dashboard App©, as follows: If a KC gauge is connected to the G-Con and Dashboard App© is open and the G-Con is paired with the Android device, the following will be displayed: © 2015 Real Time Measurements Inc., All Rights Reserved Software Manual Dashboard Revision 1.2 2015 09 09 Page 8 2.2 Check Log Status Regardless of whichever Dashboard software is being used, when the gauge is connected, the most recent pressure, temperature and real time clock from the connected KC gauge are displayed under “Last Sample Taken”. When Refresh is activated, the most recent last pressure, temperature and time readings made by the KC gauge will instantly replace the previous numbers. 2.3 Start Job Start Job is used to program the connected KC gauge with the configuration settings as displayed under Configuration, and instruct the KC gauge to open a new Job file and start logging data as soon as the KC gauge is disconnected from the USB port. Start Job is only available when the connected KC gauge is in standby mode (not logging). When a KC gauge is in logging (recording) mode, no changes can be made to the KC gauge configuration. The gauge can be put in logging mode by selecting Start Job, or pressing and holding the button on the G-Con for 3 seconds once it has been disconnected from the PC. 2.4 End Job If a KC gauge is connected to the PC, and the gauge is in logging mode when it was connected to the USB, left clicking End Job switches the KC gauge from logging to stand-by mode, and terminates the active Job file. Once a Job file is terminated, no more data can ever be written to that file. Once the Job has been ended, and the KC gauge is in stand-by mode, if required, new configuration settings can be sent to the gauge using Program or Start Job as described in Section 3.5.2. The gauge can be taken out of logging mode by selecting End Job, or pressing and holding the button on the G-Con for 3 seconds when it is disconnected from the PC. © 2015 Real Time Measurements Inc., All Rights Reserved Software Manual Dashboard Revision 1.2 2015 09 09 Page 9 2.5 LED Meanings The legend below describes the meaning of each LED colour. 2.6 Firmware Updates Firmware is automatically updated when the G-Con is connected to a PC with internet connection and Dashboard Professional© running. © 2015 Real Time Measurements Inc., All Rights Reserved Software Manual Dashboard Revision 1.2 2015 09 09 Page 10 3 Using Dashboard Professional© 3.1 Overview Dashboard Professional© is distributed by Real Time Measurements Inc. (“RTM”) under an open license concept. Dashboard Professional© is designed to run on a PC running Microsoft Windows 7 or a newer version. Dashboard Professional© is a full featured companion software for the KC range of electronic memory pressure recorders. The KC range includes KC3, KC375, KC3Q and KC3-SPM models. Dashboard Professional© operates in an identical manner with each KC model. Using Dashboard Professional© as the primary gauge configuration and data retrieval software package is the optimum solution to ensuring the embedded software on a KC gauge is kept up to date. Dashboard Professional© will also keep the Dashboard Lite© embedded software on the KC gauges up to date. Communication between the PC with the KC is provided by way of a G-Con and a cable. In order for Dashboard Professional© on the PC to communicate with a KC gauge, the G-Con is attached to the top of the KC gauge. Then a standard USB cable is used to connect the G-Con to the computer USB port. © 2015 Real Time Measurements Inc., All Rights Reserved Software Manual Dashboard Revision 1.2 2015 09 09 Page 11 3.2 Installation Installation of Dashboard Professional© on a PC is initiated by using any web browser to go to www.rty.ca Next left click on the “Software” tab. Next left click on the “Download Software” link. Please note: RTM recommends new users take a few moments to review the various instructional videos and FAQ’s presented on the website or at the end of this manual. After the “Download Software” link is activated and the software is downloaded to the PC, some internet browsers will display the warning “Dashboard Pro_Setup.zip is not a commonly downloaded software, and could be dangerous”. Similar to the warning message presented below: As long as the user got Dashboard Professional© from www.rty.ca, the software is safe and the warning message can be ignored/bypassed. To proceed and install Dashboard Professional©, choose to keep the file by right clicking on the little arrow to the right of the warning message, and then select “Keep”. Details of warning messages may differ from one internet browser to the next. Using the MS Windows file browser, navigate to the downloads folder, right click the link to DashboardPro_Setupv....zip file and select “Extract All”. © 2015 Real Time Measurements Inc., All Rights Reserved Software Manual Dashboard Revision 1.2 2015 09 09 Page 12 In the resulting dialogue box, check the “Show files after...” check box. Then left click “Extract”. Although not necessary, or required, the browse button can now be used to select a different destination for the extracted files. © 2015 Real Time Measurements Inc., All Rights Reserved Software Manual Dashboard Revision 1.2 2015 09 09 Page 13 MS Windows automatically opens the folder containing the extracted files. Left click on the application called “Setup.exe” to initiate installation. With some versions of MS Windows, the security warning illustrated below may appear. Choose “Run” to continue the installation. Dashboard Professional© uses Adobe Acrobat Reader to display some of the plot and report previews. Therefore, in order for Dashboard Professional© to run properly, Adobe Acrobat Reader must be installed on the PC that will be running Dashboard Professional©. © 2015 Real Time Measurements Inc., All Rights Reserved Software Manual Dashboard Revision 1.2 2015 09 09 Page 14 If Adobe Acrobat Reader is not installed, or if the version is not new enough to support Dashboard Professional© the Dashboard Professional© installer will automatically take care of getting Adobe Acrobat Reader installed. If the following dialog pops-up, the user should select “Accept”: Next left click “Update” on the installer dialogue. Adobe Acrobat Reader will install and Dashboard Professional© installation will continue. © 2015 Real Time Measurements Inc., All Rights Reserved Software Manual Dashboard Revision 1.2 2015 09 09 Page 15 Left click “Next” when the Dashboard Professional© setup wizard appears. The next dialogue is about where Dashboard Professional© will be installed. RTM recommends users allow the installer to use the pre-programmed default location. This is useful in the event technical support is required. However, on occasion, a PC might be used by more than person, and each person might have a specific user account. If this is the case; the user needs to be sure to choose the button next to “Everyone”, then left click “Next” to continue installation. Follow the remaining prompts presented by installation wizard to complete the installation. © 2015 Real Time Measurements Inc., All Rights Reserved Software Manual Dashboard Revision 1.2 2015 09 09 Page 16 3.3 Automatic Dashboard Professional© Updates Dashboard Professional© will automatically update when the PC on which it is installed is connected to the internet. Each time Dashboard Professional© is opened, the software checks for available updates and automatically, and if required, the updates are installed. During this process, updates for KC gauge firmware and Dashboard Lite© are also downloaded. Whenever a KC gauge is connected to the PC with Dashboard Professional© running, Dashboard Professional© reads the KC gauge’s memory and checks to see if the embedded firmware or software needs to be updated. *********************************************************** IMPORTANT NOTE : Updating the firmware and/or Dashboard Lite© on a KC gauge results in all Jobs on the connected KC gauge to be erased from the connected KC gauge. The user must choose “no” to any updates if there are any Job files on the KC gauge which have not yet been retrieved from the connected KC gauge. *********************************************************** When Dashboard Professional© is connected to a KC gauge, Dashboard Professional© will automatically interrogate the connected KC gauge to determine if the embedded KC gauge firmware or on-board Dashboard Lite© software is out of date. If attention is required, a dialogue will appear asking the user for permission to proceed with any updates (take notice of the red text above). If the user initially selected “no” when asked to proceed with the software updates, and then took steps to ensure all the Jobs recorded by the connected KC gauge is extracted from the KC gauge, and all the Jobs are safely on the PC, to restart the updating procedure, unplug the USB connector, and plug it back in. This will reset the upgrading process. When the dialogue appears asking if the user wants to proceed, “yes” is selected and the connected KC gauge firmware and/or Dashboard Lite© updates will be installed. © 2015 Real Time Measurements Inc., All Rights Reserved Software Manual Dashboard Revision 1.2 2015 09 09 Page 17 3.4 Main Menu Dashboard Professional© is composed of three Main Panels called “Gauge”, “Local Data” and “Reports”. Links to the three Main Panels are displayed in the black column on the left side under the heading “Main Menu” The required panel is selected by placing the pointer over the desired panel, and left clicking on the selection. 3.5 Gauge (panel) When Dashboard Professional© first starts up, the default panel that’s displayed is Gauge. Gauge is where all the Dashboard Professional© functions are to support communications with the attached KC gauge, including gauge status checking, data extraction and gauge configuration (a.k.a. “programming”) functions. If a KC gauge is connected to the PC through the USB port, in the top black bar, to the right of the Dashboard logo, the gauge serial number and the revision number of the firmware revision installed on the connected KC gauge is displayed. In the example above, the KC gauge serial number is VR3 and the onboard firmware revision is 1.0.17. If a G-Con is connected to the USB port on the PC, but no KC gauge is attached to the G-Con, at the top the message TST on BT_CON v1.1 will be displayed. If no gauge is connected, the message No Gauge Connected will be displayed. © 2015 Real Time Measurements Inc., All Rights Reserved Software Manual Dashboard Revision 1.2 2015 09 09 Page 18 3.5.1 Status Functions On the left side of the Gauge panel are various options that provide the user with the ability to instantly get a full description of the status of all the gauge functions. 3.5.1.1 Refresh With Dashboard Professional© running on the PC, the moment a KC gauge is connected the USB, the most recent pressure, temperature, operational, and diagnostic data recorded in the memory of the KC gauge is displayed under the Status heading. Left clicking on the Refresh button initiates a subsequent reading of the KC gauge, and updates the displayed information. Refresh is disabled if the connected KC gauge is in logging mode. 3.5.1.2 Send Report Send Report sends the KC gauge configuration, hardware diagnostics and calibration data of the KC gauge connected to the USB to RTM’s gauge history management database. This function enables RTM engineers to better monitor the performance of KC gauges. The PC connected to the KC gauge needs to be connected to the internet for Send Report to work. 3.5.1.3 Diagnostic Diagnostic initiates a live diagnostic inspection of the electronics of the connected KC gauge, reads its calibration data, and other important gauge configuration parameters. The results are almost instantly displayed for the user in a pop-up window. 3.5.1.4 Last Sample Data The most recent pressure, temperature and real time clock from the connected KC gauge are displayed under “Last Sample Taken”. When Refresh is activated, the most recent last pressure, temperature and time readings made by the KC gauge will instantly replace the previous numbers. RTD Temp. is an optional extra that’s disabled for KC3, KC375 and KCQ gauge models. This optional external RTD probe is available, however it is an optional extra offered by RTM. © 2015 Real Time Measurements Inc., All Rights Reserved Software Manual Dashboard Revision 1.2 2015 09 09 Page 19 3.5.1.5 Battery Level 3.5.1.6 Memory Level Remaining battery capacity onboard the connected KC gauge is displayed graphically, as a % of full and in terms of the number of days the battery will be able to supply the KC gauge with power. The days calculation is based on the sample rate configuration displayed under Configuration on the right side of the panel. Memory used onboard the connected KC gauge is displayed graphically, as a % of full and in terms of days to memory filled. The days remaining capacity is based on the sample rate configuration displayed under Configuration on the right side of the panel. 3.5.1.7 Data in Gauge Each time the gauge starts logging, a file is created, and Dashboard automatically assigns the file a unique name. When a gauge is connected to the PC, Dashboard reads the gauge’s memory and displays the names of the files in the gauge’s memory in a box below the memory level indicator. The files are sorted chronologically with the oldest file at the top of the list, and the newest file at the bottom of the list. These files can be uploaded to the PC, or deleted by right clicking over the file name and selecting the desired action. © 2015 Real Time Measurements Inc., All Rights Reserved Software Manual Dashboard Revision 1.2 2015 09 09 Page 20 3.5.2 Configuration Functions 3.5.2.1 Print Left click Print to create a printable page displaying the status and configuration settings on the KC gauge attached to the PC. The information will be presented in print form just as it appears on Dashboard Professional©. Hardware diagnostic information is also displayed to the left of the status information. Print is only available when Configuration settings in the memory of the connected KC gauge match the corresponding Configuration values displayed by Dashboard Professional©. In the event of a mismatch, Print is replaced with Program (below). The user can view the configuration of the connected KC gauge by left clicking Refresh, as discussed in the previous subsection. 3.5.2.2 Program Program will appear, instead of Print (above) when the programmed configuration settings in the memory of a connected KC gauge and the corresponding Configuration values displayed by Dashboard Professional© are not the same. Left clicking Program loads the sample rate and trigger arming instructions as displayed in Configuration into the memory of the connected KC gauge. *********************************************************** Left clicking “Program” does not cause the gauge to begin logging. *********************************************************** As soon as Program is finished programming the configuration settings into the connected KC gauge’s memory, the pop-up illustrated below will appear. This pop-up serves two important purposes; i) “Gauge Programmed” confirms the configuration settings were successfully written to the memory in the connected KC gauge, and ii) By selecting “Yes” the user has instructed the connected KC gauge to open a new Job file, begin logging (recording) data as soon as the KC gauge is disconnected from the © 2015 Real Time Measurements Inc., All Rights Reserved Software Manual Dashboard Revision 1.2 2015 09 09 Page 21 USB. Selecting “No” means the KC gauge will remain in stand-by mode until, at some time in the future, the KC gauge is told to begin logging. 3.5.2.3 Start Job Start Job is used to program the connected KC gauge with the configuration settings as displayed under Configuration, and instruct the KC gauge to open a new Job file and start logging data as soon as the KC gauge is disconnected from the USB port. Start Job is only available when the connected KC gauge is in standby mode (not logging). When a KC gauge is in logging (recording) mode, no changes can be made to the KC gauge configuration. 3.5.2.4 End Job If a KC gauge is connected to the PC, and the gauge is in logging mode when it was connected to the USB, left clicking End Job switches the KC gauge from logging to stand-by mode, and terminates the active Job file. Once a Job file is terminated, no more data can ever be written to that file. Once the Job has been ended, and the KC gauge is in stand-by mode, if required, new configuration settings can be sent to the gauge using Program or Start Job as described above. 3.5.2.5 Fixed rate (sec) If the connected KC gauge is to be configured such that it will record at a single rate from start to finish for the next job, then the fixed rate option is selected by left clicking the “Fixed Rate” toggle button, as illustrated above. Left click in the text field to the right of the toggle button and enter the desired time between each sample (also called “sample rate” or “sample interval”). Rate values must be whole numbers, ranging from one second per sample to 65,535 seconds per sample. Once the KC gauge enters logging (recording) mode, and a new Job file is opened, the KC gauge will wait for an even time boundary, and then begin sampling. For example: A KC gauge is configured with a rate of one sample every five seconds (or, “programmed for five seconds”). When the KC gauge is told to start logging, the KC gauge looks at its real time clock, and waits until an even multiple of five seconds occurs, such as 0 seconds, 5 seconds or 10 seconds past the minute. When the even 5 second time is reached, the KC gauge records the first sample, and then continues logging in even five second multiples. © 2015 Real Time Measurements Inc., All Rights Reserved Software Manual Dashboard Revision 1.2 2015 09 09 Page 22 3.5.2.6 Variable Rate If the gauge is to be configured such that it will record at different rates for specified time intervals in one job, then the variable rate option is selected by left clicking the “Variable rate” toggle button. Variable rate configurations are created using the variable rate table. The table offers up to 10 rows, with each row describing a rate and duration. A new blank row is automatically created each time a rate and duration is entered in a row. Blank rows are ignored when the configuration is written to the gauge. Each row contains a sample rate and a corresponding duration for which the gauge will sample at the specified rate. Valid rate and duration values are whole numbers, ranging from one to 65,535. Left click on a cell in the Rate(s) column and enter the required sample rate, in seconds. Then left click in the corresponding box in the Duration (Hrs) column and enter a duration value, in hours. Previously entered rates or durations are edited by left clicking on the particular cell and entering a new value. Rows are removed or inserted right clicking on the selected row and choosing the appropriate function from the resulting context menu. When logging mode is initiated, each row of the variable rate configuration table will be executed by the KC gauge in the order displayed on the Dashboard, starting at the top of the table and working down. Upon completion of all the variable rates, the gauge will continue logging at the fixed rate shown in the fixed rate text box, until logging is stopped. Once the KC gauge enters logging (recording) mode, and a new Job file is opened, the KC gauge will wait for an even time boundary, and then begin sampling. For example: A KC gauge is configured with a rate of one sample every five seconds (or, “programmed for five seconds”). When the KC gauge is told to start logging, the KC gauge looks at its real time clock, and waits until an even multiple of five seconds occurs, such as 0 seconds, 5 seconds or 10 seconds past the minute. When the even 5 second time is reached, the KC gauge records the first sample, and then continues logging in even five second multiples. 3.5.2.7 Pressure Trigger The pressure trigger offers RTM KC gauge users the ability to instruct the gauge to go into logging mode when the gauge is exposed to a pressure that is higher than the set pressure trigger value. When a gauge is programmed, but in stand-by mode, every 10 minutes, the gauge wakes-up and takes a pressure reading. If the gauge finds the pressure is higher than the trigger threshold, two times in a row, the gauge automatically switches into logging mode, and records data in accordance with the sample rate configuration. Pressure trigger values range from the minimum setting of 30 psi to the maximum rated pressure of the gauge. When the gauge © 2015 Real Time Measurements Inc., All Rights Reserved Software Manual Dashboard Revision 1.2 2015 09 09 Page 23 starts logging, the first measurement will be taken at the next even 10 minute interval. For example: If a gauge starts logging due to pressure trigger activation at 12:07:35 the first reading will be recorded at 12:10:00. Given that gauges are typically run in pairs, this feature was implemented to help synchronise recording and start times for gauge pairs. 3.5.2.8 Date Trigger Date Trigger offers KC gauge users the ability to instruct the KC gauge to start a new Job file and begin logging data when a user specified time is reached. Date Trigger works much like an alarm clock. The default state for Date Trigger is “disabled”. As illustrated on the left, to enable Date Trigger, scroll the pointer over the tan text box. When the small arrow appears, right click to bring up the context menu and select: Year, Month, Day, Hour or Minute, type in the required values and left click “OK”. Date Trigger values can be set to any moment in the future starting at the next one minute boundary. The value becomes part of the KC gauge’s configuration. It is important to note the KC gauge can only begin logging once it has been detached from the USB. This means that if a KC gauge remains connected to the USB until sometime after the date trigger time has come and gone, the KC gauge will start logging as soon as it is disconnected from the USB. © 2015 Real Time Measurements Inc., All Rights Reserved Software Manual Dashboard Revision 1.2 2015 09 09 Page 24 3.5.2.9 Display Units 3.5.2.10 Smart Drop The Pressure and Temperature engineering units used by the KC gauge when it is logging are defined in Configuration. To change the Pressure or Temperature units, as illustrated on the left, scroll the pointer over the tan text box. When the small arrow appears, right click to bring up the context menu. Select the required unit. Pressure values can be expressed in absolute (A) or gauge (G) values. In the bottom right corner of the Gauge panel, Smart Drop allows the user to drag and drop certain file types into Dashboard Professional©. Once the files are in Smart Drop, Dashboard Professional© will automatically process the file in accordance with the file type, as follows: .KC3 file - Any job file produced by a KC3 gauge will have the extension .KC3. If a .KC3 file is dragged and dropped into Drop Box, Dashboard Professional© will automatically add the .KC3 to the Dashboard Professional© database. The .KC3 file is then indexed and displayed in Dashboard Professional©’s Local Data Manager (ref 2.6.1). Once a job file is in the Dashboard Professional© database, the data in the file can be processed using Dashboard Professional©’s various data processing features. .HP-DATA file: This is the type of file which was produced by an RTM KC2 series gauge. Dashboard will handle these files in much the same way it handles KC3 files. Some of the information available in the series three (KC3) file types was not recorded in the KC2 files. © 2015 Real Time Measurements Inc., All Rights Reserved Software Manual Dashboard Revision 1.2 2015 09 09 Page 25 .HEX file: The embedded (a.k.a. “firmware”) in RTM’s KC series of gauges, and in the USB Communications Modules can be manually updated by dropping the most recent .HEX file into Smart Drop. While the recommended method for updating device firmware is to allow Dashboard Professional© to acquire updates automatically using the internet, and install necessary updates automatically, the Smart Drop option provides users with a way to manually give to give Dashboard Professional© the updates by dragging and dropping the updates into Drop Box. .DAT file: Occasionally – upon special request - a KC gauge might be manufactured to record something other than pressure or temperature. .DAT files containing the coefficient sets are dropped into Smart Drop. Once in Smart Drop, Dashboard Professional© will automatically make correct use of the .DAT files. .EXE file: All RTM KC3 gauges retain the application Dashboard Lite© in memory. Like any software, Dashboard Lite© requires updating from time to time. RTM recommends the user allows Dashboard Professional© to update itself and update Dashboard Lite© on the connected KC gauge automatically. However, if an internet connection is not available, or when some other unusual circumstance prevents an internet connection, if the updates are sent by email or some other means, the updates can be dropped into Smart Drop. Once in Smart Drop, the new versions will be automatically installed by Dashboard Professional©. © 2015 Real Time Measurements Inc., All Rights Reserved Software Manual Dashboard Revision 1.2 2015 09 09 Page 26 3.6 Local Data (panel) Local Data is where users go to work with Jobs that are in Dashboard Professional© To get to the Local Data Panel the user left clicks on the words “Local Data” on the left side of the Dashboard Professional© main panel. The Local data panel is split into a right and left side. On the left is the “Database Manager”, and on the right is “Settings”. 3.6.1 Database Manager On the left side of the Local Data Panel is “Database Manager”. This is the main working area where the user can apply a variety of functions to a set of data, or “Job”. Database Manager is configured such that more than one new processed file (or “dataset”) can be created using a single original Job file from a KC gauge. Each new Job is saved using a new file name which will be automatically named by Dashboard Professional© or a new name can be named by the user. The first step in using Database Manager is to select the data set the user wants to work with. The dataset is selected by scrolling through the list of dataset names in the menu called “Job(s) in database:” as illustrated on the left. © 2015 Real Time Measurements Inc., All Rights Reserved Software Manual Dashboard Revision 1.2 2015 09 09 Page 27 Once the required Job is found in the menu, the user left clicks on the little + sign in the box to an expanded list of information about the Job. The expanded Job information gives the user further assurance the right Job has been found, as illustrated on the left. Some basic configuration information for the KC gauge that was used to record the job can be viewed by left clicking the + in the little square to the left of “Configuration”. Once the right Job dataset has been positively identified, there is a wide range of operations the user can apply to the Job dataset. 3.6.1.1 Edit Data Edit activates the text table below the “Jobs in database” such that the text information, including File Name, Well Name, and so forth, can be edited. 3.6.1.2 Save Data Save: Clicking Save will save the test data to the computer. Upon completion of any edit work, whether any edits were made or not, the Save button must be clicked to resave the Job dataset and allow work to continue. © 2015 Real Time Measurements Inc., All Rights Reserved Software Manual Dashboard Revision 1.2 2015 09 09 Page 28 3.6.1.3 Delete Data Delete: Deletes the selected Job dataset from the database on the PC. Cancel: Cancels the edit operation and any changes made since the Edit began. 3.6.1.4 Plot Data Plot: Left clicking this button pops-up a new window. The new window contains an automatically scaled plot with pressure and temperature data on the Y axis, and time on the x axis. Below the plot is a table continuing text values of the time/pressure/temperature data. The data is displayed in the units that were chosen in Settings on the right side of Local Data. © 2015 Real Time Measurements Inc., All Rights Reserved Software Manual Dashboard Revision 1.2 2015 09 09 Page 29 At the top of the plot window, Dashboard Professional© offers seven additional Job dataset editing functions, which are explained below. Also, given the plot window is a separate pop-up, it can be maximized, minimized, have its size changed and closed in the normal MS Windows way using the buttons in the top right corner. 3.6.1.5 Export Data Left clicking on Export Data brings up a Windows Explorer style menu. In the usual Windows way, the user gives the exported file a name and chooses the folder the file is to be saved in. When the user left clicks on Save, the Job dataset will be saved in accordance with the Settings described on the right side of Local Data. 3.6.1.6 Publish Data Publish offers a quickie shortcut to producing a .pdf formatted Linear/Overlay Pressure Survey Report. The user would use Publish feature if the goal is to create a simple printable report as quickly as possible. The pressure temperature plot in the report will be identical to the plot that appears in the corresponding pop-up window. Features such as pressure and temperature units, well name and the like, will be in accordance with the data in the Database Manager and Setting as presented in Local Data. 3.6.1.7 Add Data Add Data can be used to overlay another set of data to the displayed plot. This is generally a visual way to verify that when two gauges are run together, the data they record basically draws two parallel lines. To add the second set of data; click on Add Data, Select the second job (data set), and select Plot. © 2015 Real Time Measurements Inc., All Rights Reserved Software Manual Dashboard Revision 1.2 2015 09 09 Page 30 3.6.1.8 Time Fix Time Fix allows the user to adjust times of the test so that the data from more than one gauge are aligned in the time domain. In order to use time fix; Click on “Time Fix” Either change the gauge start time OR Select a point to adjust To apply a linear time shift to all data points, click on “Shift To” To stretch or shrink a dataset, click on “Stretch To” Once the time is corrected, be sure to “Save” the new dataset. 3.6.1.9 Crop Data Crop allows the user to cut out segments of unwanted data. In order to crop data: Plot the Job (dataset) Zoom in on the part of the data to be kept Click on “Crop” Close plot 3.6.1.10 Add Depth Add depth allows the user to enter gradient stops to calculate fluid level(s). Enter measured depths. If well is deviated: From deviation survey, enter closest depth above run depth and enter in MD Top Enter relevant TVD for that measured depth From deviation survey, enter closest depth below run depth and enter measured depth. Enter relevant TVD for the measured depth Click “Calculate” Continue until all depths are entered © 2015 Real Time Measurements Inc., All Rights Reserved Software Manual Dashboard Revision 1.2 2015 09 09 Page 31 3.6.1.11 Difference Plot Create a Difference Plot to check that gauge data matches between two or more gauges Click on tab for overlay plot Click on Diff. Plot Publish o o o Click o o o Unselect Title Page Unselect Data Click Create PDF o Save pdf of Overlay plot This will create a pdf of difference plot of whole test 3.6.1.12 Import Data Import allows the user to read data from an external source into Dashboard Professional©. Imported data does not have to have been produced by an RTM KC brand gauge. To Import Data; Either i) Drag a KC file into Smart Drop on Gauge panel, or ii) On Local Data Panel; Click on “Import” and select the relevant KC3 folder and files, or iii) Click on relevant column separation radial button. Identify type of data in each column. Select appropriate engineering units for each column. Enter gauge serial number and start time. Save © 2015 Real Time Measurements Inc., All Rights Reserved Software Manual Dashboard Revision 1.2 2015 09 09 Page 32 3.6.2 Settings The settings part of the Local Data Panel is where the user sets several important parameters that are in turn used to format the Job that is being worked on. As illustrated to the left, date and time formats, engineering units and text column assignments are defined using the Settings table. The user also has the opportunity to define whether the job file will use commas, spaces or tabs to indicate the separation between columns. The final choice the user makes is whether or not the text that describes parameters such as the Well Name, UWI and the like, is included in the Job file. © 2015 Real Time Measurements Inc., All Rights Reserved Software Manual Dashboard Revision 1.2 2015 09 09 Page 33 3.7 Reports (panel) Reports is where the users go to use Jobs in the Dashboard Professional© database to make comprehensive survey reports. There are a range of report types available, including gradient, flow and build-up and various combinations thereof. To get to Reports the user left clicks on the words “Reports” on the left side of the Dashboard Professional© main panel. Reports is comprised of three areas called Reporting Database in the upper left, Service Company Information in the upper right, and on the bottom part of Reports is a section with five tabs. This is where Well Information, Test Information, Perforation(s) Gauge Information and Comments are entered by the user. This information is required to make a complete survey report. 3.7.1 Reporting Database Every report in the Reporting Database has a unique user defined “Report Name”. The user will decide if i) work will be continued on an already existing report, or ii) work will begin on a brand new report, or iii) an existing report will be used as a template to create a new report. i) To continue work on an already existing report, the report needs to be identified by the user. This is done by moving the pointer on to the pale blue square to the left of the required report in the “Reports in Database” menu. The user then right clicks on the little black right pointing arrow on the left side of the pale blue box to activate working on the Report. All the information attached to this report is now displayed in the various parts of Reports. If the user wants to change any part of © 2015 Real Time Measurements Inc., All Rights Reserved Software Manual Dashboard Revision 1.2 2015 09 09 Page 34 the report, left click on “Edit”. Now any part of the report can be changed, including the Job dataset that is used in the report. ii) If the user wants to start a new report; Start by left clicking the “New” button. A new set of five buttons replaces the original set of four buttons, and the “Reports in database:” menu turns into an empty box called “Job(s) in Report:”. Click on “Add Data” and then select the first test required (usually the bottom gauge). Once the job is selected, Click “Add”. Service Company and survey information will need to be edited or entered, as required. © 2015 Real Time Measurements Inc., All Rights Reserved Software Manual Dashboard Revision 1.2 2015 09 09 Page 35 3.7.2 Creating Reports 3.7.2.1 Import Data Import allows the user to read data from an external source into Dashboard Professional©. Imported data does not have to have been produced by an RTM KC brand gauge. To Import Data; Either i) Drag a KC file into Smart Drop on Gauge panel, or ii) On Local Data Pane; Click on “Import” and select the relevant KC folder and files, or iii) Import a. b. c. d. e. f. ASCII files; Import relevant ASCII file; Click on relevant column separation radial button; Identify type of data in each column; Select appropriate engineering units for each columns; Enter gauge serial number and start time; Save 3.7.2.2 Verify data Plot relevant gauges; o Plot bottom gauge; o Click on Add Data; Select top gauge; Plot; Check to see if data from either gauge needs to be cropped or needs a time fix; Make note of time for shut in Plot relevant gauge; Zoom in on part of test you want to keep; Click on Crop; Close plot; If necessary to crop second gauge from test select other gauge; Plot; Repeat Crop process; New datasets have been created 3.7.2.3 Crop data © 2015 Real Time Measurements Inc., All Rights Reserved Software Manual Dashboard Revision 1.2 2015 09 09 Page 36 3.7.2.4 Align Gauges Zoom in on obvious event to check if Time Fix is necessary; o If Yes; Click on Time Fix; o Either change gauge start time; OR Select point to adjust; Click on Shift To or Stretch To; Save If No; Click on Cancel; Close plot 3.7.2.5 Prepare Report Information Click on Reports; Click New; o Click Add Data; Select bottom gauge (Gauge 1); Click Add; o Click Add Data; Select top gauge (Gauge 2); Click Add 3.7.2.6 Service Company o Edit Service Company information; Name; Address; Phone number; Link to logo if available © 2015 Real Time Measurements Inc., All Rights Reserved Software Manual Dashboard Revision 1.2 2015 09 09 Page 37 3.7.2.7 Well Information Edit Well Information (any information available); o Company name; o Company address; o Well name; o UWI; o Field; o Formation; o License #; o KB elevation; o CF elevation; o GL elevation; o Status; o Well Type; o Flow path; o Drilling leg; o Packer; o Inner tubing; o Inner casing; o Outer casing © 2015 Real Time Measurements Inc., All Rights Reserved Software Manual Dashboard Revision 1.2 2015 09 09 Page 38 3.7.2.8 Test information Click on Test Information tab; o Edit Test Information (any information available); Test type; Test purpose; H2S; Tubing in well; Tubing depth; Select unit; Gas rate prior to test; Oil rate prior to test; Water rate prior to test; Initial tubing pressure; Select unit; Initial casing pressure; Select unit; Final tubing pressure; Select unit; Final casing pressure; Select unit; Surface temperature; Select unit © 2015 Real Time Measurements Inc., All Rights Reserved Software Manual Dashboard Revision 1.2 2015 09 09 Page 39 3.7.2.9 Perforation(s) Click on Perforation(s) tab; o Click Add; Enter Top Value – measured depth; From deviation survey, enter closest depth above perf top and enter in MD Top; Enter relevant TVD for that measured depth; From deviation survey, enter closest depth below perf top and enter in MD Top; Enter relevant TVD for that measured depth; Click Calculate; Enter Bottom Value – measured depth; From deviation survey, enter closest depth above perf bottom and enter in MD Top; Enter relevant TVD for that measured depth; From deviation survey, enter closest depth below perf bottom and enter in MD Bottom; Enter relevant TVD for that measured depth; Click Calculate; Click Save; Enter formation name; Click OK © 2015 Real Time Measurements Inc., All Rights Reserved Software Manual Dashboard Revision 1.2 2015 09 09 Page 40 3.7.2.10 Gauge Information Click on Gauge(s) Information tab; Defaults to Gauge 1 (typically bottom gauge); o Gauge serial number; o Gauge position; o Gauge type; RTM – Piezo resistive; Gauge manufacturer; o Maximum recorder range; o Resolution % of full scale; Already entered for RTM gauges; o Accuracy % of full scale; Already entered for RTM gauges; o Calibration date; o Gauge run depth; Click on Gauge 2 (typically top gauge); o Gauge serial number; o Gauge position; o Gauge type; RTM – Piezo resistive; Gauge manufacturer; o Maximum recorder range; o Resolution % of full scale; Already entered for RTM gauges; o Accuracy % of full scale; Already entered for RTM gauges; o Calibration date; o Gauge run depth 3.7.2.11 Comments Add Comments if necessary; o After gradient calculations have been made, come back and enter comment here prior to publishing; i.e. Fluid level at approximately 1900 metres OR No apparent fluid level 3.7.2.12 Save report Save report name so it can be identified; o Click OK © 2015 Real Time Measurements Inc., All Rights Reserved Software Manual Dashboard Revision 1.2 2015 09 09 Page 41 3.7.2.13 Edit Events Click on Reports; Select saved report; Click plot; Zoom if required; Click on Add Event; Zoom in on plot and select point for event; Add one event – i.e. On Bottom; Click on Events; o Edit; o Edit relevant information; i.e. Run Depth; Enter measured depth; o From deviation survey, enter closest depth above run depth and enter in MD Top; Enter relevant TVD for that measured depth; o From deviation survey, enter closest depth below run depth and enter in MD Bottom; Enter relevant TVD for that measured depth; Click Calculate; o Add check marks to any boxes with information you want shown on annotation; o Click Save; o Repeat for subsequent events; Don’t enter depths unless required for gradient calculations; If event is a gradient stop, select box for Gradient Stop; o If desired, just add annotation boxes to all desired events, then click on Events to edit information; Functions Events in report: Displays a list of all the events in the report. On Bottom?: Allows user to select if the event is an on bottom event. The date for this event is used later in the final report. Off Bottom?: Allows user to select if the event is an off bottom event. Also select Gradient Stop if applicable. The date for this event is used later in the final report. Gradient Stop?: Allows user to select if the event is gradient. This also tells the software to use this event in the gradient plot. Well Shut-In?: Allows user to select if the event is an on bottom event. The date for this event is used later in the final report. Check boxes other than the ones above: Allows user to select which data they would like to add to the annotation on the plot for individual events. © 2015 Real Time Measurements Inc., All Rights Reserved Software Manual Dashboard Revision 1.2 2015 09 09 Page 42 Calculate: Calculates the TVD value based on the MD and values in the TVD Calculator. Calculate Rate: Calculates the Build-Up Rate based on the hours entered in Enter Hours. Close Event window once complete; Click on point on plot, then click on Add Event to add subsequent events; o Any gradient stops that have been added in the event table will have to be manually moved on the plot in order for the pressures and temperatures to be saved; o Program cannot calculate gradient if pressures and temperatures are not stored; Enter all points on plot; o Scroll on table to find correct point; Move points on plot as required; Click on Events and edit each point as required; Click Save after each point 3.7.2.14 Gradient Calculations Click on Grad. Plot; o Move lines as required for best fit; Click on Publish; o Change name for Title Page to Gradient Data; o Save pdf of gradient data; Edit Comments; o After gradient calculations have been made, go back to Reports page; Click on Edit; Enter comment here prior to publishing; o i.e. Fluid level at approximately 1900 metres OR No apparent fluid level 3.7.2.14.1 Create Gradient Overlay Plot Click on tab for Linear/Overlay Plot; o Zoom in on plot data required for gradient; Zoom again if necessary; o Click Publish; o o o Unselect Title Page; Unselect Data; Click Create PDF; o Save pdf of Gradient plot; This will create a pdf of Gradient overlay plot only © 2015 Real Time Measurements Inc., All Rights Reserved Software Manual Dashboard Revision 1.2 2015 09 09 Page 43 3.7.2.15 Create Plot Title Page Click on tab for Linear/Overlay Plot; o Turn off unwanted annotations; o Click Publish; o o o o Change name for Title Page to Plots; Unselect Data; Unselect Plot; Click Create PDF; o Save pdf of Plots title page; This will create a pdf of Plots title page only 3.7.2.16 Create Overlay plot Click on tab for Linear/Overlay Plot; o Click Publish; o o o Unselect Title Page; Unselect Data; Click Create PDF; o Save pdf of Overlay plot; This will create a pdf of overlay plot of whole test 3.7.2.17 Create Difference Plot Click on tab for overlay plot; o Click on Diff. Plot; o Click Publish; o o o Unselect Title Page; Unselect Data; Click Create PDF; o Save pdf of Overlay plot; This will create a pdf of difference plot of whole test © 2015 Real Time Measurements Inc., All Rights Reserved Software Manual Dashboard Revision 1.2 2015 09 09 Page 44 3.7.2.18 Create Flow and Build-up Sub reports 3.7.2.18.1 Create Flow Sub report Click on tab for Difference Plot; o Zoom in on plot data required for flow; Reference noted shut in time and use this as the last pint of the plot; Zoom again if necessary; o Click Publish; o o o Change name for Title Page to Flow Data; Unselect plot; Click Create PDF; o Save pdf of Flow data; This will create a pdf of Flow title page and table showing both gauges and difference column 3.7.2.18.2 Create Flow Overlay Plot Click on tab for Linear/Overlay Plot; o Zoom in on plot data required for flow; Reference noted shut in time and use this as the last point of the plot; Zoom again if necessary; o Click Publish; o o o Unselect Title Page; Unselect Data; Click Create PDF; o Save pdf of Flow plot; This will create a pdf of Flow overlay plot only © 2015 Real Time Measurements Inc., All Rights Reserved Software Manual Dashboard Revision 1.2 2015 09 09 Page 45 3.7.2.18.3 Create Build-up Sub report Click on tab for Difference Plot; o Zoom in on plot data required for build-up; Reference noted shut in time and use this as the first point of the plot; Zoom again if necessary; o Click Publish; o o o Change name for Title Page to Build-up Data; Unselect plot; Click Create PDF; o Save pdf of build-up data; This will create a pdf of Build-up title page and table showing both gauges and difference column 3.7.2.18.4 Create Build-up Overlay Plot Click on tab for Linear/Overlay Plot; o Zoom in on plot data required for build-up; Reference noted shut in time and use this as the first point of the plot; Zoom again if necessary; o Click Publish; o o o Unselect Title Page; Unselect Data; Click Create PDF; o Save pdf of build-up plot; This will create a pdf of build-up overlay plot only © 2015 Real Time Measurements Inc., All Rights Reserved Software Manual Dashboard Revision 1.2 2015 09 09 Page 46 3.7.2.19 Final Report Close plot; Click on Final Report; o First three pages will display; Click on Add PDF; Add pdf files of events in order; Flow data; Build-up data; Gradient data; Plots title page; Overlay plot; Difference plot; Flow plot; Build-up plot; Gradient plot; Move pages as required; o Click on desired page; Click on Move Up or o o Move Down until in desired order; Save Final Report in preferred folder; This does not save the final report in Dashboard Professional© © 2015 Real Time Measurements Inc., All Rights Reserved Software Manual Dashboard Revision 1.2 2015 09 09 Page 47 4 Using Dashboard Lite© 4.1 Overview Dashboard Lite© is distributed by Real Time Measurements Inc. (“RTM”) under an open license concept. Dashboard Lite© runs on a PC and requires Microsoft Windows 7 or a newer version in order to run properly. The Dashboard Lite© software package is resident in the memory of every KC gauge. There is no need for special installation, drivers, or any other cumbersome installation procedure. Indeed, strictly speaking, although it runs on a PC, Dashboard Lite© is never actually “installed” on a PC. Dashboard Lite© is a very unique and convenient way to work with the KC range of gauges. Dashboard Lite© offers the basic KC gauge status checking, configuration (programming), data retrieval, plotting and exporting functions. Dashboard Lite© operates in an identical manner with each KC model. Communication between the PC with the KC is provided by way of a G-Con and a cable. The GCon was designed by, and is exclusively manufactured by, RTM. In order for Dashboard Professional© on the PC to communicate with a KC gauge, the G-Con is attached to the top of the KC gauge. Then the cable is attached to the G-Con at one end, and to the USB port on the computer at the other end. © 2015 Real Time Measurements Inc., All Rights Reserved Software Manual Dashboard Revision 1.2 2015 09 09 Page 48 4.2 Installation (Program Start-up) 4.2.1 BT_CON Installation When using BT-CON.exe and KC3.exe for the first time, an error could be displayed. Right click on the icon, and select “Run as Administrator”. When the Bluetooth Connector (G-Con) is connected, and no gauge is connected, the Autoplay screen will open. Select “Open folder to view files”; Double click on BT_CON.exe to open the program; Serial number and status of the G-Con will be displayed 4.2.2 KC3 Installation When the KC3 gauge is connected to the BT_CON with a gauge also connected, the Autoplay screen will open. Select “Open folder to view files”; Double click on KC3.exe to open the program; Serial number and status of the gauge will be displayed 4.3 Automatic Software Updates Dashboard Lite© will NOT automatically update when connected to a computer that is connected to the internet. This update must be initiated by Dashboard Professional©. Dashboard Professional© will automatically update when the PC on which it is installed is connected to the internet. Each time Dashboard Professional© is opened, the software checks for available updates and automatically, and if required, the updates are installed. During this process, updates for KC gauge firmware and Dashboard Lite© are also downloaded. Whenever a KC gauge is connected to the PC with Dashboard Professional© running, Dashboard Professional© reads the KC gauge’s memory and checks to see if the embedded firmware or software needs to be updated. *********************************************************** IMPORTANT NOTE: Updating the firmware and/or Dashboard Lite© on a KC gauge results in all Jobs on the connected KC gauge to be erased from the connected KC gauge. The user must choose “no” to any updates if there are any Job files on the KC gauge which have not yet been retrieved from the connected KC gauge. *********************************************************** © 2015 Real Time Measurements Inc., All Rights Reserved Software Manual Dashboard Revision 1.2 2015 09 09 Page 49 4.4 Main Menu Dashboard Lite© is composed of two Main Panels called “Gauge” and “Local Data”. Links to the two Main Panels are displayed in the black column on the left side under the heading “Main Menu”. The required panel is selected by placing the pointer over the desired panel, and left clicking on the selection. 4.5 Gauge Panel Gauge is where all the Dashboard Lite© functions are to support communications with the attached KC gauge, including gauge status checking, data extraction and gauge configuration (a.k.a. “programming”) functions. If a KC gauge is connected to the PC through the USB port, in the top black bar, to the right of the Dashboard logo, the gauge serial number and the revision number of the firmware revision installed on the connected KC gauge is displayed. In the example above, the KC gauge serial number is V4L and the onboard firmware revision is 2.0.00. 4.5.1 Status Functions On the left side of the Gauge panel are various options that provide the user with the ability to instantly get a full description of the status of all the gauge functions. 4.5.1.1 Refresh When Dashboard Lite© opens with a KC gauge connected through the USB, the most recent pressure, temperature, operational, and diagnostic data recorded in the memory of the KC gauge is displayed under the Status heading. Left clicking on the Refresh button initiates a subsequent reading of the KC gauge, and updates the displayed information. Refresh is disabled if the connected KC gauge is in logging mode. © 2015 Real Time Measurements Inc., All Rights Reserved Software Manual Dashboard Revision 1.2 2015 09 09 Page 50 4.5.1.2 Send Report Send Report sends the KC gauge configuration, hardware diagnostics and calibration data of the KC gauge connected to the USB to RTM’s gauge history management database. This function enables RTM engineers to better monitor the performance of KC gauges. In the event a gauge is damaged during an operation, this information can help RTM Support rescue any data the memory may retain. The PC connected to the KC gauge needs to be connected to the internet for Send Report to work. 4.5.1.3 Diagnostics Diagnostics initiates a live diagnostic inspection of the electronics of the connected KC gauge, reads its calibration data, and other important gauge configuration parameters. The results are almost instantly displayed for the user in a pop-up window. 4.5.1.4 Battery Level 4.5.1.5 Memory Level Memory used onboard the connected KC gauge is displayed graphically, as a % of full and in terms of days to memory filled. The days remaining capacity is based on the sample rate configuration displayed under Configuration on the right side of the panel. Memory used onboard the connected KC gauge is displayed graphically, as a % of full and in terms of days to memory filled. The days remaining capacity is based on the sample rate configuration displayed under Configuration on the right side of the panel. 4.5.1.6 Data in Gauge Each time the gauge starts logging, a file is created, and Dashboard automatically assigns the file a unique name. When a gauge is connected to the PC, Dashboard reads the gauges memory and displays the names of the files in the gauges memory in a box below the memory level indicator. The files are sorted chronologically with the oldest file at the top of the list, and the newest file at the bottom of the list. These files can be uploaded to the PC, or deleted by right clicking over the file name and selecting the desired action. © 2015 Real Time Measurements Inc., All Rights Reserved Software Manual Dashboard Revision 1.2 2015 09 09 Page 51 4.5.2 Configuration Functions 4.5.2.1 Print Left click Print to create a printable page displaying the status and configuration settings on the KC gauge attached to the PC. The information will be presented in print form just as it appears on Dashboard Lite©. Hardware diagnostic information is also displayed to the left of the status information. Print is only available when Configuration settings in the memory of the connected KC gauge match the corresponding Configuration values displayed by Dashboard Professional©. In the event of a mismatch, Print is replaced with Program (below). The user can view the configuration of the connected KC gauge by left clicking Refresh, as discussed in the previous subsection. 4.5.2.2 Program Program will appear, instead of Print (above) when the programmed configuration settings in the memory of a connected KC gauge and the corresponding Configuration values displayed by Dashboard Lite© are not the same. Left clicking Program loads the sample rate and trigger arming instructions as displayed in Configuration into the memory of the connected KC gauge. ************************************************************ Left clicking “Program” does not cause the gauge to begin logging. ************************************************************ As soon as Program is finished programming the configuration settings into the connected KC gauge’s memory, the pop-up illustrated below will appear. This pop-up serves two important purposes: i) “Gauge Programmed” confirms the configuration settings were successfully written to the memory in the connected KC gauge, and ii) By selecting “Yes” the user has instructed the connected KC gauge to open a new Job file, begin logging (recording) data as soon as the KC gauge is disconnected from the USB. Selecting “No” means the KC gauge will remain in stand-by mode until, at some time in the future, the KC gauge is told to begin logging. © 2015 Real Time Measurements Inc., All Rights Reserved Software Manual Dashboard Revision 1.2 2015 09 09 Page 52 4.5.2.3 Start Job Start Job is used to program the connected KC gauge with the configuration settings as displayed under Configuration, and instruct the KC gauge to open a new Job file and start logging data as soon as the KC gauge is disconnected from the USB port. Start Job is only available when the connected KC gauge is in standby mode (not logging). When a KC gauge is in logging (recording) mode, no changes can be made to the KC gauge configuration. 4.5.2.4 End Job If a KC gauge is connected to the PC, and the gauge is in logging mode when it was connected to the USB, left clicking End Job switches the KC gauge from logging to stand-by mode, and terminates the active Job file. Once a Job file is terminated, no more data can ever be written to that file. Once the Job has been ended, and the KC gauge is in stand-by mode, if required, new configuration settings can be sent to the gauge using Program or Start Job as described above. 4.5.2.5 Fixed rate (sec) If the connected KC gauge is to be configured such that it will record at a single rate from start to finish for the next job, then the fixed rate option is selected by left clicking the “Fixed Rate” toggle button, as illustrated above. Left click in the text field to the right of the toggle button and enter the desired time between each sample (also called “sample rate” or “sample interval”). Rate values must be whole numbers, ranging from one second per sample to 65,535 seconds per sample. Once the KC gauge enters logging (recording) mode, and a new Job file is opened, the KC gauge will wait for an even time boundary, and then begin sampling. For example: A KC gauge is configured with a rate of one sample every five seconds (or, “programmed for five seconds”). When the KC gauge is told to start logging, the KC gauge looks at its real time clock, and waits until an even multiple of five seconds occurs, such as 0 seconds, 5 seconds or 10 seconds past the minute. When the even 5 second time is reached, the KC gauge records the first sample, and then continues logging in even five second multiples. © 2015 Real Time Measurements Inc., All Rights Reserved Software Manual Dashboard Revision 1.2 2015 09 09 Page 53 4.5.2.6 Variable Rate If the gauge is to be configured such that it will record at different rates for specified time intervals in one job, then the variable rate option is selected by left clicking the “Variable rate” toggle button. Variable rate configurations are created using the variable rate table. The table offers up to 10 rows, with each row describing a rate and duration. A new blank row is automatically created each time a rate and duration is entered in a row. Blank rows are ignored when the configuration is written to the gauge. Each row contains a sample rate and a corresponding duration for which the gauge will sample at the specified rate. Valid rate and duration values are whole numbers, ranging from one to 65,535. Left click on a cell in the Rate(s) column and enter the required sample rate, in seconds. Then left click in the corresponding box in the Duration (Hrs) column and enter a duration value, in hours. Previously entered rates or durations are edited by left clicking on the particular cell and entering a new value. Rows are removed or inserted right clicking on the selected row and choosing the appropriate function from the resulting context menu. When logging mode is initiated, each row of the variable rate configuration table will be executed by the KC gauge in the order displayed on the Dashboard, starting at the top of the table and working down. Upon completion of all the variable rates, the gauge will continue logging at the fixed rate shown in the fixed rate text box, until logging is stopped. Once the KC gauge enters logging (recording) mode, and a new Job file is opened, the KC gauge will wait for an even time boundary, and then begin sampling. For example: A KC gauge is configured with a rate of one sample every five seconds (or, “programmed for five seconds”). When the KC gauge is told to start logging, the KC gauge looks at its real time clock, and waits until an even multiple of five seconds occurs, such as 0 seconds, 5 seconds or 10 seconds past the minute. When the even 5 second time is reached, the KC gauge records the first sample, and then continues logging in even five second multiples until the duration for that line has been reached. It will then start recording at the next sample rate. © 2015 Real Time Measurements Inc., All Rights Reserved Software Manual Dashboard Revision 1.2 2015 09 09 Page 54 4.5.2.7 Pressure Trigger The pressure trigger offers RTM KC gauge users the ability to instruct the gauge to go into logging mode when the gauge is exposed to a pressure that his higher than the set pressure trigger value. When a gauge is programmed, but in stand-by mode, every 10 minutes, the gauge wakes-up and takes a pressure reading. If the gauge finds the pressure is higher than the trigger threshold, two times in a row, the gauge automatically switches into logging mode, and records data in accordance with the sample rate configuration. Pressure trigger values range from the minimum setting of 30 psi to the maximum rated pressure of the gauge. When the gauge starts logging, the first measurement will be taken at the next even 10 minute interval. For example: If a gauge starts logging due to pressure trigger activation (i.e. the pressure is higher than the trigger threshold, two times in a row )at 12:07:35 the first reading will be recorded at 12:10:00. Given that gauges are typically run in pairs, this feature was implemented to help synchronise recording and start times for gauge pairs. 4.5.2.8 Date Trigger Date Trigger offers KC gauge users the ability to instruct the KC gauge to start a new Job file and begin logging data when a user specified time is reached. Date Trigger works much like an alarm clock. The default state for Date Trigger is “disabled”. As illustrated on the left, to enable Date Trigger, scroll the pointer over the tan text box. When the small arrow appears, right click to bring up the context menu and select: Year, Month, Day, Hour or Minute, type in the required values and left click “OK”. Date Trigger values can be set to any moment in the future starting at the next one minute boundary. The value becomes part of the KC gauge’s configuration. It is important to note the KC gauge can only begin logging once it has been detached from the USB. This means that if a KC gauge remains connected to the USB until sometime after the date trigger time has come and gone, the KC gauge will start logging as soon as it is disconnected from the USB. © 2015 Real Time Measurements Inc., All Rights Reserved Software Manual Dashboard Revision 1.2 2015 09 09 Page 55 4.5.2.9 Display Units 4.5.2.10 Smart Drop The Pressure and Temperature engineering units used by the KC gauge when it is logging are defined in Configuration. To change the Pressure or Temperature units, as illustrated on the left, scroll the pointer over the tan text box. When the small arrow appears, right click to bring up the context menu. Select the required unit. Pressure values can be expressed in absolute (A) or gauge (G) values. In the bottom right corner of the Gauge panel, Smart Drop allows the user to drag and drop certain file types into Dashboard Lite©. Once the files are in Smart Drop, Dashboard Lite© will automatically process the file in accordance with the file type, as follows: .KC3 file - Any job file produced by a KC3 gauge will have the extension .KC3. If a .KC3 file is dragged and dropped into Drop Box, Dashboard Professional© will automatically add the .KC3 to the Dashboard Professional© database. The .KC3 file is then indexed and displayed in Dashboard Professional©’s Local Data Manager (ref 2.6.1). Once a job file is in the Dashboard Professional© database, the data in the file can be processed using Dashboard Professional©’s various data processing features. .HEX file: The embedded (a.k.a. “firmware”) in RTM’s KC series of gauges, and in the USB Communications Modules can be manually updated by dropping the most recent .HEX file into Smart Drop. While the recommended method for updating device firmware is to allow Dashboard Professional© to acquire updates automatically using the internet, and install necessary updates automatically, the Smart Drop option provides users with a way to manually give Dashboard Professional© the updates by dragging and dropping the updates into Smart Drop. © 2015 Real Time Measurements Inc., All Rights Reserved Software Manual Dashboard Revision 1.2 2015 09 09 Page 56 .DAT file: Occasionally – upon special request - a KC gauge might be manufactured to record something other than pressure or temperature. .DAT files containing the coefficient sets are dropped into Smart Drop. Once in Smart Drop, Dashboard Professional© will automatically make correct use of the .DAT files. © 2015 Real Time Measurements Inc., All Rights Reserved Software Manual Dashboard Revision 1.2 2015 09 09 Page 57 4.6 Local Data © 2015 Real Time Measurements Inc., All Rights Reserved Software Manual Dashboard Revision 1.2 2015 09 09 Page 58 4.6.1 File Manager 4.6.1.1 Editing Data Edit: Allows the user to change any part of the report information, including the Job dataset that is used in the report or exported file. 4.6.1.2 Deleting Data Delete: Deletes the selected Job dataset from the gauge. 4.6.1.3 Plotting Data Plot: Clicking this button pops-up a new window. The new window contains an automatically scaled plot with pressure and temperature data on the Y axis, and time on the x axis. Below the plot is a row containing text values of the time/pressure/temperature data for the sample that is selected on the plot. © 2015 Real Time Measurements Inc., All Rights Reserved Software Manual Dashboard Revision 1.2 2015 09 09 Page 59 4.6.2 Settings The settings part of the Local Data Panel is where the user sets several important parameters that are in turn used to format the Job that is being worked on. As illustrated to the left, date and time formats, engineering units and text column assignments are defined using the Settings table. The user also has the opportunity to define whether the job file will use commas, spaces or tabs to indicate the separation between columns. The final choice the user makes is whether or not the text that describes parameters such as the Well Name, UWI and the like, is included in the Job file. © 2015 Real Time Measurements Inc., All Rights Reserved Software Manual Dashboard Revision 1.2 2015 09 09 Page 60 5 Using Dashboard App© 5.1 Overview Dashboard App© is distributed by Real Time Measurements Inc. (“RTM”) under an open license concept. Dashboard App© is designed to be used on a hand held device that runs on the ANDROID operating system. Dashboard App© is a very convenient way to work with the KC range of gauges. Dashboard App© offers the basic KC gauge status checking, configuration (programming), data retrieval, plotting and exporting functions. Dashboard App© operates in an identical manner with each KC model. Communication between the ANDROID device and the KC gauge is provided by way of a G-Con and a wireless Bluetooth© communication system. The required G-Con was designed by, and is exclusively manufactured by RTM. In order for Dashboard App© on the ANDROID device to communicate with a KC gauge, the G-Con is attached to the top of the KC gauge. Then the wireless Bluetooth communication link is established by Dashboard App©. 5.2 Installation To install Dashboard App© on an ANDROID hand held device: Open “Apps” Open the “Play Store” – Select the “Apps” button Choose the magnifying glass in the top right Type in “dashboard app real time measurements”, and enter Scroll down the list to the Dashboard App© Install Dashboard App. © 2015 Real Time Measurements Inc., All Rights Reserved Software Manual Dashboard Revision 1.2 2015 09 09 Page 61 5.3 Automatic Software Updates Dashboard App© updates transparently whenever an update is available and the Android device is continued to the internet. 5.4 Starting Dashboard App© On the screen image where the Apps are displayed, tap the Dashboard App© icon. On Android device select appropriate G-Con, as shown below © 2015 Real Time Measurements Inc., All Rights Reserved Software Manual Dashboard Revision 1.2 2015 09 09 Page 62 The first time a specific G-Con is run on a specific Android device, the G-Con and Android device need to pair with each other. To pair, on the Android device, go to “Settings, Bluetooth©”. Select applicable G-Con from Available devices Select “Connect”. If no gauge connected to the G-Con, the following is displayed: Controller Name and status of the G-Con will be displayed, as well as battery level. The G-Con contains a rechargeable battery. If the displayed battery level is low, use a cable to connect G-Con to a USB port on a computer. The USB 5 volt supply will charge the battery. If gauge connected to the G-Con, the following screen is displayed: Basic gauge information, remaining battery power capacity and Jobs (or “datasets”) in the gauges memory is displayed. © 2015 Real Time Measurements Inc., All Rights Reserved Software Manual Dashboard Revision 1.2 2015 09 09 Page 63 5.5 Main Menu Dashboard App© is composed of two Main Panels called “Gauge” and “Local Data”. If the “Gauge” and “Local Data” bars are not displayed; Tap on “Main Menu” to display them. 5.6 Gauge At top of “Gauge” are two sub-panel options: Status Configuration © 2015 Real Time Measurements Inc., All Rights Reserved Software Manual Dashboard Revision 1.2 2015 09 09 Page 64 5.6.1 Status 5.6.1.1 Refresh When Dashboard App© opens with a KC gauge connected to the G-Con, the most recent pressure, temperature, operational, and diagnostic data recorded in the memory of the KC gauge is displayed under the Status heading. Left clicking on the Refresh button initiates a subsequent reading of the KC gauge, and updates the displayed information. Refresh is disabled if the connected KC gauge is in logging mode. 5.6.1.2 Send Report Sends the KC gauge configuration, hardware diagnostics and calibration data of the KC gauge connected to the USB to RTM’s gauge history management database. This function enables RTM engineers to better monitor the performance of KC gauges. In the event a gauge is damaged during an operation, this information can help RTM Support rescue any data the memory may retain. The PC connected to the KC gauge needs to be connected to the internet for Send Report to work. 5.6.1.3 Diagnostics Initiates a live diagnostic inspection of the electronics of the connected KC gauge, reads its calibration data, and other important gauge configuration parameters. The results are almost instantly displayed for the user in a pop-up window. © 2015 Real Time Measurements Inc., All Rights Reserved Software Manual Dashboard Revision 1.2 2015 09 09 Page 65 5.6.1.4 Last Sample Data The most recent pressure, temperature and real time clock from the connected KC gauge are displayed. When Refresh is activated, the most recent last pressure, temperature and time readings made by the KC gauge will instantly replace the previous numbers. RTD Temp. is an extra that’s disabled for KC3, KC375 and KCQ gauge models. This optional external RTD probe is available, however it is an optional extra offered by RTM. 5.6.1.5 Battery Level 5.6.1.6 Memory Level Remaining battery capacity onboard the connected KC gauge is displayed graphically, as a % of full and in terms of the number of days the battery will be able to supply the KC gauge with power. The days calculation is based on the sample rate configuration displayed under Configuration on the right side of the panel. Memory used onboard the connected KC gauge is displayed graphically, as a % of full and in terms of days to memory filled. The days remaining capacity is based on the sample rate configuration displayed under Configuration on the right side of the panel. © 2015 Real Time Measurements Inc., All Rights Reserved Software Manual Dashboard Revision 1.2 2015 09 09 Page 66 5.6.1.7 Jobs in Gauge Each time the gauge starts logging, a file is created, and Dashboard automatically assigns the file a unique name. When a gauge is connected to the Android device, Dashboard reads the gauge’s memory and displays the names of the files in the gauge’s memory in a box below the memory level indicator. The files are sorted chronologically with the oldest file at the top of the list, and the newest file at the bottom of the list. These files can be uploaded to the hand-held device, or deleted by tapping on the file name and selecting the desired action. 5.6.2 Configuration Configuration displays the recording instruction settings that are in the gauges memory. © 2015 Real Time Measurements Inc., All Rights Reserved Software Manual Dashboard Revision 1.2 2015 09 09 Page 67 5.6.2.1 Program If the configuration settings in the memory of the gauge are not the same as the corresponding configuration values displayed by Dashboard App©, the illustrated “Program” button will be displayed. Otherwise, this button is inactive. Clicking “Program” writes the sample rate and trigger arming instructions as displayed in Configuration into the memory of the gauge. *********************************************************** Clicking “Program” does not cause the gauge to begin logging. *********************************************************** When Program completes writing the configuration to the gauge’s memory, a pop-up will appear to confirm the gauge is re-programmed. “Gauge Programmed” confirms the configuration settings were successfully written to the memory in the connected KC gauge. 5.6.2.2 Start Job Start Job is used to program the connected KC gauge with the configuration settings as displayed under Configuration, and instruct the KC gauge to open a new Job file and start logging data as soon as the KC gauge is disconnected from the USB port. Start Job is only available when the connected KC gauge is in standby mode (not logging). When a KC gauge is in logging (recording) mode, no changes can be made to the KC gauge configuration. If the gauge is still connected to the G-Con, the gauge will start logging after 2 minutes. The G-Con will beep and the light will change from purple to blue whenever a sample is taken, then will switch to green when not sampling. The G-Con will turn itself off after 1 minute, but the gauge will remain in logging mode. If the G-Con is disconnected, it will start logging right away. 5.6.2.3 End Job If a KC gauge is in logging mode when it was connected to the USB, clicking End Job switches the KC gauge from logging to stand-by mode, and terminates the active Job file. Once a Job file is terminated, no more data can ever be written to that file. Once the Job has been ended, and the KC gauge is in stand-by mode, if required, new configuration settings can be sent to the gauge using Program or Start Job as described above. © 2015 Real Time Measurements Inc., All Rights Reserved Software Manual Dashboard Revision 1.2 2015 09 09 Page 68 5.6.2.4 Fixed rate (sec) If the connected KC gauge is to be configured such that it will record at a single rate from start to finish for the next job, then the fixed rate option is selected by clicking the “Fixed Rate” toggle button, as illustrated above. Click in the text field to the right of the toggle button and enter the desired time between each sample (also called “sample rate” or “sample interval”). Rate values must be whole numbers, ranging from one second per sample to 65,535 seconds per sample. Once the KC gauge enters logging (recording) mode, and a new Job file is opened, the KC gauge will wait for an even time boundary, and then begin sampling. For example: A KC gauge is configured with a rate of one sample every five seconds (or, “programmed for five seconds”). When the KC gauge is told to start logging, the KC gauge looks at its real time clock, and waits until an even multiple of five seconds occurs, such as 0 seconds, 5 seconds or 10 seconds past the minute. When the even 5 second time is reached, the KC gauge records the first sample, and then continues logging in even five second multiples. 5.6.2.5 Variable Rate If the gauge is to be configured such that it will record at different rates for specified time intervals in one job, then the variable rate option is selected by left clicking the “Variable rate” toggle button. Variable rate configurations are created using the variable rate table. The table offers up to 10 rows, with each row describing a rate and duration. A new blank row is automatically created each time a rate and duration is entered in a row. Blank rows are ignored when the configuration is written to the gauge. Each row contains a sample rate and a corresponding duration for which the gauge will sample at the specified rate. Valid rate and duration values are whole numbers, ranging from one to 65,535. Click on a cell in the Rate(s) column and enter the required sample rate, in seconds. Then click in the corresponding box in the Duration (Hrs) column and enter a duration value, in hours. Previously entered rates or durations are edited by clicking on the particular cell and entering a new value. Rows are removed or inserted clicking on the selected row and choosing the appropriate function from the resulting context menu. When logging mode is initiated, each row of the variable rate configuration table will be executed by the KC gauge in the order displayed on the Dashboard, starting at the top of the table and working down. Upon completion of all the variable rates, the gauge will continue logging at the fixed rate shown in the fixed rate text box, until logging is stopped. © 2015 Real Time Measurements Inc., All Rights Reserved Software Manual Dashboard Revision 1.2 2015 09 09 Page 69 Once the KC gauge enters logging (recording) mode, and a new Job file is opened, the KC gauge will wait for an even time boundary, and then begin sampling. For example: A KC gauge is configured with a rate of one sample every five seconds (or, “programmed for five seconds”). When the KC gauge is told to start logging, the KC gauge looks at its real time clock, and waits until an even multiple of five seconds occurs, such as 0 seconds, 5 seconds or 10 seconds past the minute. When the even 5 second time is reached, the KC gauge records the first sample, and then continues logging in even five second multiples. 5.6.2.6 Pressure Trigger The pressure trigger offers RTM KC gauge users the ability to instruct the gauge to go into logging mode when the gauge is exposed to a pressure that is higher than the set pressure trigger value. When a gauge is programmed, but in stand-by mode, every 10 minutes, the gauge wakes-up and takes a pressure reading. If the gauge finds the pressure is higher than the trigger threshold, two times in a row, the gauge automatically switches into logging mode, and records data in accordance with the sample rate configuration. Pressure trigger values range from the minimum setting of 30 psi to the maximum rated pressure of the gauge. When the gauge starts logging, the first measurement will be taken at the next even 10 minute interval. For example: If a gauge starts logging due to pressure trigger activation at 12:07:35 the first reading will be recorded at 12:10:00. Given that gauges are typically run in pairs, this feature was implemented to helps synchronised recording and start times for gauge pairs. 5.6.2.7 Date Trigger Date Trigger offers KC gauge users the ability to instruct the KC gauge to start a new Job file and begin logging data when a user specified time is reached. Date Trigger works much like an alarm clock. The default state for Date Trigger is “disabled”. As illustrated on the left, to enable Date Trigger, scroll the pointer over the tan text box. When the small arrow appears, right click to bring up the context menu and select: Year, Month, Day, Hour or Minute, type in the required values and click “OK”. Date Trigger values can be set to any moment in the future starting at the next one minute boundary. The value becomes part of the KC gauge’s configuration. It is important to note the KC gauge can only begin logging once it has been detached from the USB. This means that if a KC gauge remains connected to the USB until sometime after the date trigger time has come and gone, the KC gauge will start logging as soon as it is disconnected from the USB. © 2015 Real Time Measurements Inc., All Rights Reserved Software Manual Dashboard Revision 1.2 2015 09 09 Page 70 5.6.3 Retrieving Data When the KC gauge is connected through the G-Con, the Jobs in Tool will be displayed under Status. Select the most current job to be downloaded. Enter relevant test information if desired. 5.6.4 Saving Data Save: Clicking Save will save the test data to the computer. Upon completion of any edit work, whether any edits were made or not, the Save button must be tapped to resave the Job dataset and allow work to continue. Cancel: Cancels the edit operation and any changes made since the Edit began. 5.6.5 Deleting Data Delete: Deletes the selected Job dataset from the database on the PC. 5.6.6 Plotting Data Plot: Tapping this button pops-up a new window. The new window contains an automatically scaled plot with pressure and temperature data on the Y axis, and time on the x axis. Below the plot is a row containing text values of the time/pressure/temperature data for the sample that is selected on the plot. © 2015 Real Time Measurements Inc., All Rights Reserved Software Manual Dashboard Revision 1.2 2015 09 09 Page 71 5.6.7 Exporting Data Tapping on Export Data (under the Settings tab) brings up a dialog that allows the file to be shared using such applications as e-mail, Google Drive, Text (SMS), or third party sharing apps such as FaceBook or Drop Box. When the user taps on Save, the Job dataset will be saved in accordance with the Settings tab of Local Data. © 2015 Real Time Measurements Inc., All Rights Reserved Software Manual Dashboard Revision 1.2 2015 09 09 Page 72 5.7 Local Data The Local Data panel offers two options that provide the user with the ability to manage data stored by Dashboard App© the Android device. 5.7.1 File Manager 5.7.1.1 Editing Data Edit: Allows the user to change any part of the report information, including the Job dataset that is used in the report or exported file. 5.7.1.2 Deleting Data Delete: Deletes the selected Job dataset from the gauge. 5.7.1.3 Plotting Data Plot: Tapping this button pops-up a new window. The new window contains an automatically scaled plot with pressure and temperature data on the Y axis, and time on the x axis. Below the plot is a row containing text values of the time/pressure/temperature data for the sample that is selected on the plot. © 2015 Real Time Measurements Inc., All Rights Reserved Software Manual Dashboard Revision 1.2 2015 09 09 Page 73 5.7.1.4 Send Report Send Report sends the KC gauge configuration, hardware diagnostics and calibration data of the KC gauge connected to the G-Con to RTM’s gauge history management database. This function enables RTM engineers to better monitor the performance of KC gauges. In the event a gauge is damaged during an operation, this information can help RTM Support rescue any data the memory may retain. The device connected to the KC gauge needs to be connected to the internet for Send Report to work. 5.7.2 Settings The settings part of the Local Data Panel is where the user chooses parameters used to format the Job being worked on. Parameters include Date and time formats, engineering units. Other parameters are associated with exported data files. Such parameters include data column assignments, column separation type, and which information such as the Well Name, UWI and the like, will be included in any exported files. © 2015 Real Time Measurements Inc., All Rights Reserved Software Manual Dashboard Revision 1.2 2015 09 09 Page 74 6 FAQ 1. How do I communicate with a KC downhole pressure gauge? a. Plug a G-Con on to the top threaded end of the KC gauge. DO NOT TWIST the gauge onto the G-Con. Press the button on the G-Con to turn on the G-Con. A green light on the G-Con indicates the G-Con is turned on. b. Using a standard USB cable, connect the G-Con to the USB port on any PC. A blue light on the G-Con indicates the KC gauge is communicating with the PC. c. On the PC: Open “Windows Explorer”. Place the pointer over the KC3 icon under “Computer”, where you would normally see a flash-drive. Left click on the KC3 icon. Once the KC3 window pops-up, double left-click on “KC3.EXE”. © d. The software program called “Dashboard Lite ” should now be displayed. © Dashboard Lite is the primary way to communicate with a KC gauge. © Dashboard Lite allows the user to interrogate the gauge status, program the gauge recording mode, initiate recording, extract recorded data, and several other basic gauge data functions. 2. How do I get a KC downhole pressure gauge to start logging (recording data)? There are four different ways to get a KC gauge to start recording data (logging): a. USING A PC: With reference to (1) above, connect the KC gauge to a PC. © Establish communication with the KC gauge using Dashboard Lite , or © Dashboard Professional . Ensure the Sample Rate (top right) matches the required rate. Click on the green arrow-head button <link to screen shot> near the © © bottom right of Dashboard Lite or Dashboard Professional . The message “Logging will commence upon USB detach” pops-up. Press “OK”, and the KC gauge will start logging (recording data) when the USB is disconnected. b. USING G-CON (without a PC): Plug a G-Con on to the top threaded end of the KC gauge. DO NOT twist the gauge onto the G-Con. Press the button on the GCon to turn it on. A green light on the G-Con indicates the G-Con is turned on. Press the button on the G-Con, hold it there to the count of three, and release the switch. The KC gauge will begin logging (recording data). © © c. PRESSURE TRIGGER: In Dashboard Lite or Dashboard Professional , the KC gauge can be programmed to start logging (recording data) when a certain pressure value is exceeded. Ref: FAQ – “How does the pressure trigger work? © 2015 Real Time Measurements Inc., All Rights Reserved Software Manual Dashboard Revision 1.2 2015 09 09 Page 75 © © d. TIME TRIGGER: In Dashboard Lite or Dashboard Professional , the KC gauge can be programmed to start logging (recording data) when a certain time is reached. Ref: FAQ – “How does the pressure trigger work? 3. How do I create a new job file? A new “Job File” is created automatically by the KC gauge each time the KC gauge starts logging (recording data). 4. How do I start logging (recording data) if I don’t have a PC? There are three ways to get the KC gauge to start logging, without using a PC. a. Use the G-Con ref: FAQ 2.a b. Set the pressure trigger ref: FAQ 2.c c. Set the time trigger ref: FAQ 2.d 5. How do I stop logging if I do not have a PC Attach the G-Con to the top of the KC gauge. Press down on the trigger button. The blue LED light should begin to flash on and off, then after a few seconds, the blue LED will stop flashing and stay on continuously. Once the blue LED is on continuously, release the trigger button. The LED will turn green to indicate the KC gauge has stopped logging (no longer recording data) and the job file has been ended, which means no more samples will be added to that file. 6. How do I know if the gauge is logging (recording data)? Disconnect the G-Con from your computer, connect it to the gauge, and press the trigger. Release it when you hear a beep. The LED on the G-Con will light up Green if the gauge is in standby mode (not logging) or Blue if the gauge is logging. For the next three minutes, the gauge will signal each time it takes a sample by blinking the LED and beeping. After three minutes, the gauge will continue logging, but to save power, the blue LED will fade to green. 7. How do I start logging if I don’t have a G-Con or a PC? There are two ways to get the KC gauge to start logging, without using a G-Con or PC. a. Set the pressure trigger ref: FAQ 2.c b. Set the time trigger ref: FAQ 2.d © 2015 Real Time Measurements Inc., All Rights Reserved Software Manual Dashboard Revision 1.2 2015 09 09 Page 76 8. How do I get the data off the KC gauge? The recommended method is to connect the gauge to a PC with Dashboard Professional© installed and running. To install Dashboard Professional©, go to www.rty.ca/software and click the download link. Once you have it running and your gauge is connected, double click your desired file from the “Job(s) on Gauge” list box located at the bottom left. Note: Each of the PC download methods will require you to connect the gauge to your machine via the G-Con and cable. Upon making this connection, the windows “Autoplay” dialogue will appear. If you are using Dashboard Professional, you can ignore the Autoplay dialogue. Otherwise, click on “Open folder to view files” and you will be presented with the contents of the gauge memory. Some PC users will have disabled Autoplay feature on their machine. If this is the case for you, click on the Start button (Windows icon) at the bottom left of your screen, then click “Computer” from the resulting Start Menu and you will be presented with the contents of the gauge memory. In the event Dashboard Professional is unavailable, KC series gauges come with a factory installed version of the gauge software called Dashboard Lite. To run this software, follow the directions in the note above, then double click the file called “KC3.exe”. This action will not install software on your machine; it is running from the gauge memory. Just as in Dashboard Professional, select your desired Job file from the “Select job” list box at the bottom left and double click to download. Some IT policies strongly discourage the installation or even operation of third party software by field personnel without some measure of screening. Should this be the case, again, follow the direction in the note above to explore the gauge memory. Any file with an eight digit frame and the extension “XXXXXXXX.KC3” is a job file. You can use the windows file explorer to sort them by date to find the most recently created file or simply highlight them all and drag them to any desired location on your machine. Caution! All standard file handling operations are allowed by this method. This means files can be deleted from the gauge memory just as with any other removable storage device. While the KC3 will disallow the deletion of any operational files: BOOT.HEX, CONFIG.DAT, HW_DIAG.TXT, KC3.EXE, deletion of job files, those with the file extension “.KC3” are allowed to be deleted in order to facilitate normal gauge function. Ensure you have downloaded all valuable data prior to deleting any file. 9. Where is my data stored after I download it? If you downloaded the data using Dashboard Lite©, which is the built-in software tool, your data will be stored in a directory called “C:\KC3 Data”. The file name consists of the three character serial number of the gauge, followed by a five character unique ID number, followed by a “.KC3″ file extension. © 2015 Real Time Measurements Inc., All Rights Reserved Software Manual Dashboard Revision 1.2 2015 09 09 Page 77 If you downloaded the data using Dashboard Professional©, the data is stored in a database file and can only be accessed using Dashboard Professional©. The tabbed panel on the left hand side of the software has a tab labeled “Manage Data”. Click on that tab label and you will see a list of all data downloaded from gauges using Dashboard Professional© or imported from other data storage devices such as flash drives, smart phones, or from the ”C:\KC3 Data” where data is stored if Dashboard Lite© was used to download it from the gauge. 10. Where is my exported ASCII file stored? If you exported the data using Dashboard Lite©, which is the built-in software tool, your ASCII file will be stored in a directory called “C:\KC3 Data”. If you didn’t enter your own file name during the export process, the default file name will be the same as that of the original .KC3 file from which it was created and will consist of the three character serial number of the gauge, followed by a five character unique ID number, followed by a “.TXT” or .CSV file extension. If you exported the data using Dashboard Professional©, you will be prompted to select a location during the process. In the event you have forgotten where that location is, you can either repeat part of the export process, canceling after the file selection menu pops up showing you the folder location to which the previous file was sent, or you can repeat the export process entirely and simply chose a new location. © 2015 Real Time Measurements Inc., All Rights Reserved Software Manual Dashboard Revision 1.2 2015 09 09 Page 78 11. What does the file name mean? Because the KC series gauges are designed to be recognized as flash drives by most USB host devices, such as laptop computers, the information stored in the gauge memory must be organized the way those USB host devices expect to see it. This enables operators to explore the memory of the gauge using only the operating system on their laptop, in the event corporate IT policies or lack of internet connection prevents the use of Dashboard Lite or the installation Dashboard Professional respectively. In order to prevent previously downloaded data from being inadvertently overwritten, the file names of new data sets must be unique. The KC gauge automatically creates a unique eight digit series of characters each time a new file is created. The first three characters in the series are the same as the gauge serial number. This is done so operators can quickly identify which files came from which gauge. The next five characters are a unique sequence which starts at 00000 when the gauge is first tested in the factory and increments automatically every time a new job file is created. In order to reduce the likelihood of a repeated value, the KC gauge employs a base 36 numbering system as opposed to the base 10, or decimal system most of us use in our day to day lives. A five character sequence in a base 10 system, which uses the numerical characters {0,1,2,3,4,5,6,7, 8, and 9}, will allow only 100,000 unique combinations before rolling back to 00000 and potentially creating a duplicate file. A five character sequence in base 36 system, which uses the numerical characters {0,1,2,3,4,5,6,7, 8, and 9} and the alphabetical characters {A, B, C …Z}, will allow over 60,000,000 unique combinations, dramatically reducing the already unlikely probability of a repeated file name. Operators are of course free to rename the files, once downloaded, using their operating system’s file browser or the data management utilities in the Dashboard software. At which time, they are capable of deciding whether or not to overwrite any existing files bearing their chosen file name. 12. How does the pressure trigger work? The KC series gauges have an ever active pressure trigger with a factory default setting, (recommended value) 30 psi (~200 kPa) but operators can set it to any value between the default value and the calibrated maximum pressure rating of the gauge. The sample rate and pressure trigger values are set / confirmed by the operator using the Dashboard software and then uploaded to the gauge by clicking the “Program gauge” button, located near the bottom of the Gauge Program panel on the right hand side of both Dashboard Lite and Dashboard Professional©. Hover the pointer over the buttons to see their names displayed. The program gauge button will put the gauge in standby; no samples are recorded while the gauge is in this mode. © 2015 Real Time Measurements Inc., All Rights Reserved Software Manual Dashboard Revision 1.2 2015 09 09 Page 79 When the gauge is in standby mode (not logging), it will wake up every 10 minutes to perform a pressure trigger test. The trigger is activated when a pressure value higher than the trigger value has been observed in two consecutive pressure trigger tests. This means the trigger event will occur no more than 20 minutes after the gauge is first exposed to pressure higher than the trigger value. When the trigger has been activated, the gauge will start logging to a new job file according to the existing sample configuration. 13. Why can I only save the output files as .csv? Comma separated has been selected in Settings. Change to space or tab to save the file as .txt. 14. How is the real time clock set on the gauge? Whenever the gauge is configured (programmed), the clock is set on the gauge to the same time as the computer it is connected to, or if connecting through Bluetooth©, to the time on the G-Con. 15. Why do I get an error when I am trying to run BT_Con for the first time? Windows is trying to stop the software from writing to the PC. Right click on the icon and select “Run as Administrator”. This will create the folder to hold the KC data, and you won’t have problems with this again. © 2015 Real Time Measurements Inc., All Rights Reserved