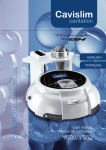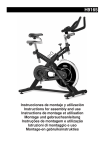
1
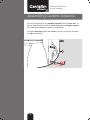
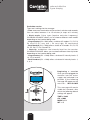
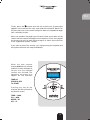
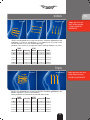
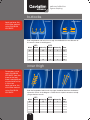
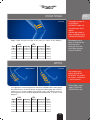
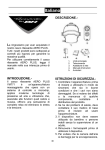
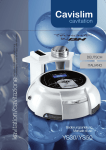
ENGLISH
cavitation /cavitation
FRENCH
safe and effective
figure shaping
modelage
sûr et efficace
de la silhouette
User
manual
Manuel de
l’utilisateur
YS70
safe and effective
figure shaping
contents
chapter 1
• contents of the box
• assembling CAVISLIM ADVANCE
chapter 2
• basic characteristics of CAVISLIM ADVANCE
• operating instructions
chapter 3
• application modes
chapter 4
• correct, safe use of CAVISLIM ADVANCE
chapter 5
• frequently asked questions about CAVISLIM
ADVANCE
chapter 6
• important safety instructions
• warranty
• certificates
• technical specifications
• parts list
4
chapter 1
contents of the box
Inside this box you will find everything you need to enjoy CAVISLIM
ADVANCE from now onward. Carefully check that the pack contains
all of the elements on the following list .
Hand unit M80
Hand unit M38
Hand unit
support
Main unit
DVD
Operating
pedal
User
manual
Cavitation
gel
Allen
key
4 screws
Mains cable
Anti-cellulite
serum
Toning
serum
5
EN
safe and effective
figure shaping
assembling Cavislim Advance
First we are going to fit the handset support onto the main unit. To
do this, place the main unit on a table and position the handset support
by inserting the screws as shown in the diagram.
Using the Allen key tighten the screws securely so that the two parts
fit together perfectly.
6
chapter 2
basic characteristics
of Cavislim Advance
CAVISLIM ADVANCE is a hi-tech device that allows us to selectively and
efficiently remove the build-up of fat (cellulite, orange skin syndrome)
from our body. The technology used is that of ultrasound emission which
produces the physical phenomenon known as cavitation, causing the
removal of fat cells.
This technology with proven results is widely used in beauty salons all
over the world in order to fight cellulite painlessly and non-invasively.
Characteristics for model CAVISLIM ADVANCE Ref. YS70
The YS70 model includes 2 handsets for performing 2 different types of
treatment.
The larger M80 handset is for general, all-over body treatment. It has
4 pulsed mode programs and 1 continuous mode program, with 5 different
intensity levels.
Time: Programmable from 1 to 15 minutes.
Intensity: 5 intensity levels (5-10-15-20-25)
Mode: 4 programmable pulsed work modes (P1-P2-P3-P4)
1 continuous work mode (P5)
The smaller M38 handset is specially designed to treat the more
troublesome areas of fat, because the treatment area is smaller the
power is more concentrated and its effect is greater. It has 10 pulsed
mode programs and 4 different intensity levels. There is also an option
to light an LED ring for greater control over the area being treated.
Time: Programmable from 1 to 15 minutes.
Intensity: 4 intensity levels (1-2-3-4)
Mode: 10 programmable pulsed work modes (P1-P2-P3-P4-P5-P6-P7P8-P9-P10)
With this unit you only have to worry about programming in three simple
functions: intensity, time and work mode.
The intensity function controls how deep the sound waves penetrate
your skin. The greater the intensity, the deeper the waves reach.
The time function allows you to choose how long you wish to work with
CAVISLIM ADVANCE. For reasons of safety the time function allows you
to choose up to 15 minutes which corresponds to the maximum
recommended time for working a specific area. However, you can reduce
this maximum time by 1 minute intervals. Once the selected time has
elapsed CAVISLIM ADVANCE will alert you with a beep and a message
on the display showing the text "Time out".
CAVISLIM ADVANCE also lets you choose the work mode, helping you
select the time interval during which the waves reach your skin.
7
EN
safe and effective
figure shaping
Cavislim Advance
operating instructions
Precautions: Consult your doctor before beginning to use this
appliance. This warning is especially important for people with
health problems. Use by those under 18 years of age is not
recommended. Keep this appliance out of children’s reach.
Starting
• Connect the handsets to the main unit. To do this, take the plug for
the M38 handset and insert into the socket on the left side of the main
unit as shown in Fig. 2.1
• Next, take the plug for the M80 handset and insert into the socket
on the right side of the main unit as shown in Fig.2.2
• Now take the jack for the operating pedal and insert into the socket
on the left side of the main unit as shown in Fig. 2.3
Check that all the connections are made correctly before connecting
it to the mains supply.
• Finally, plug one end of the mains cable into the socket on the
machine and the other end into the electric wall socket (220V) Fig. 2.4
Switch the On/Off switch to position (I) to start the machine.
fig. 2.1
fig. 2.3
8
fig. 2.2
fig. 2.4
EN
Monitor elements
The CAVISLIM ADVANCE monitor consists of a display screen, an LED
and five buttons or keys.
• The display provides information about the cavitation session.
• The ON LED (green) tells you that the device is operating.
• The keys have the following functions:
-
and
change the work MODE
+ and - adjust TIME and INTENSITY
pause and
start session
TIme = 10:00
CH. = M80
MODE = P1
INT. = 5
9
safe and effective
figure shaping
Cavitation session
There are 3 settings for the massage:
• Time: measures the duration of the session in minutes and seconds.
You can select between 1 to 15 minutes (in steps of 1 minute).
• Work mode: Pulse type (impulse emission frequency).
CAVISLIM ADVANCE allows you to choose different work modes
depending on the handset being used:
- Large handset (CH = M80) offers a choice of 5 modes: P1, P2, P3,
P4 and P5 (P1 very low – P4 very high, P5 continuous)
- Small handset (CH. = M38) offers a choice of 10 modes: P1, P2, P3,
P4, P5, P6, P7, P8, P9 and P10.
• Intensity: establishes the intensity level for the session.
CAVISLIM ADVANCE allows you to choose different intensity levels
depending on the handset being used:
- Large handset (CH. = M80) offers a choice of 5 intensity levels: 5,
10, 15, 20 and 25.
- Small handset (CH. = M38) offers a choice of 4 intensity levels: 1,
2, 3, 4.
BIENVENIDO
Beginning a session
Once you have plugged the
machine into the mains
supply and switched it to
position (I) the following
message will appear on the
monitor: WELCOME
This message will remain
visible for 3 seconds, after
which the following default
settings will appear:
TIME = 10:00
CH. = M80
MODE = P1
INT. = 5
10
EN
From here you can modify
the time, handset and work
mode settings to establish
the type of session you want:
Select the parameter to be
modified with the small arrow
located initially next to the
TIME concept which
you can move it with
and
keys
TIme = 10:00
CH. = M80
MODE = P1
INT. = 5
+
-
Changing session duration
Once the TIME concept is
selected, you can modify the
session duration with
the
and
keys.
+
-
The displayed default value
is 10 minutes but this can be
changed in steps of 1 minute
between the values 1:00 and
15:00.
Modify the time parameter
at any moment during the
session.
Selection of handset.
Once the CH concept is
selected, the handset to be
used can be changed in the
+
-
sessio n with the
and
keys.
If you choose the M38
handset you can select if you
want to switch on the red
lights on its head or not, by
pointing with the small arrow
concept P. With the
and
keys, you can choose if
the lights should be switch
on, by letter Y, or if it should
be permanently off, by letter
N.
-
+
TIme = 10:00
CH. = M38
MODE = P1
INT. = 1 P. = Y
TIme = 10:00
CH. = M38
MODE = P1
INT. = 1 P. = Y
11
safe and effective
figure shaping
TIme = 10:00
CH. = M80
MODE = P1
INT. = 5
Changing work mode
Once the MODE concept is
selected, you can modify the
work mode with the
and
keys.
+
-
The default value shown is
P1 (very low pulse frequency)
but this can be modified by
selecting from the values P1,
P2, P3, P4 and P5 (with
handset M80) and P1, P2,
P3, P4, P5, P6, P7, P8, P9
and P10 (with handset M38).
TIme = 10:00
CH. = M80
MODE = P1
INT. = 5
Changing massage intensity
Once the INT. concept is
selected, you can modify the
massage intensity with the
and keys.
-
+
The default intensity level is 5
but this can be changed by
selecting from levels 5, 10, 15,
20 and 25 (with handset M80)
and levels 1, 20, 3 and 4 (with
handset M38).
12
EN
Finally, press the
button and with the machine on (a green light
appears in the centre of the unit), take hold of the handset, place it on
the part where you want to work and press down on the pedal to begin
your cavitation session.
When you tread on the pedal you will see the time count down on the
screen and the handset will begin to emit impulses. Place the handset
on the area you wish to work and massage it as shown on the DVD on
in the “Application modes” section.
If you want to pause the session, just stop pressing on the pedal and
the impulse emission will stop immediately.
When the time counter
reaches 0.00 the unit will stop
and emit a series of beeps to
tell you that the selected
session has finished. The
following message may
appear on the monitor:
TIEMPO AGOTADO
PULSE una TECLA
PARA comenzar
TIME UP
PRESS A KEY
TO START
Pressing any key on the
machine will take you back to
the default screen.
TIME = 10:00
CH. = M80
MODE = P1
INT. = 5
13
safe and effective
figure shaping
chapter 3
application modes
Always apply an abundant amount of gel to the area that you wish to work
and begin to treat it by sliding the handset slowly and without pressing, as
shown in the diagrams.
If you need to purchase gel or any of our preparation creams you can find
them in the shop where you purchased CAVISLIM ADVANCE or at our website:
www.tecnovita.eu
In each of the following sections you will find a table with application protocols.
Before beginning to use the appliance, you must determine the level of fat in
each area to be treated.
A Large accumulation of high density fat
B Large accumulation of medium density fat
C Medium accumulation of medium density fat
D Small accumulation of fat
E orange peel syndrome
F Maintenance session
central abdomen
Remember, never
apply CAVISLIM
ADVANCE to the
navel, breasts, the
thorax area or the
genitals.
Apply an abundant amount of gel on your abdomen and begin to massage
the area by sliding the handset slowly and without pressing, as shown in the
diagrams.
espiral
longitudinal
20cm.
circular
20cm.
20cm.
20cm.
20cm.
20cm.
For best results we recommend applying CAVISLIM ADVANCE by combining
different massage techniques (spiral, crossways, circular) in different sessions.
We recommend lying down for a more comfortable CAVISLIM ADVANCE
application.
M80
Nivel
A
B
C
D
E
F
14
M38
Mode Intensity
3
3
3
2
2
2
15
15
10
10
10
10
Mode Intensity
9
9
8
8
7
6
3
3
2
1
1
1
Time
10’
10’
7’
7’
7’
7’
sides
circular
crossways
lengthways
EN
Apply gel over the
area to be worked
using CAVISLIM
ADVANCE
Circular and longitudinal massage movements should be applied from top
to bottom as shown in the diagrams. It is important to massage in the
correct direction, as this will improve drainage.
Combine the various massage techniques during different sessions.
Nivel
A
B
C
D
E
F
M80
M38
Mode Intensity
Mode Intensity Time
4
3
2
1
1
1
20
15
10
5
5
5
7
7
6
4
4
4
3
3
2
1
1
1
10’
10’
7’
7’
5’
5’
hips
circular
longitudinal
Circular and longitudinal massage movements should be applied from the
bottom upward as shown in the diagrams.
During treatment, concentrate on the area with the most fat.
M80
Nivel
A
B
C
D
E
F
M38
Mode Intensity
3
2
2
1
1
1
15
15
10
5
5
5
Mode Intensity Time
9
8
8
6
4
4
3
3
2
2
1
1
7’
7’
7’
5’
5’
5’
15
Apply gel over the area
to be worked using
CAVISLIM ADVANCE.
safe and effective
figure shaping
buttocks
circular
Apply gel over the
area to be worked
using CAVISLIM
ADVANCE.
longitudinal
Both longitudinal and circular massage should be done in the direction of
the arrows shown in the diagrams.
M80
Nivel
A
B
C
D
E
F
M38
Mode Intensity
5
5
4
3
2
2
25
20
20
15
15
15
Mode Intensity Time
9
8
7
6
6
5
4
3
3
2
2
2
10’
7’
7’
7’
10’
10’
inner thigh
Remember, never
apply CAVISLIM
ADVANCE from the
knee to the foot,
there is no significant
accumulation of fat
in this area.
Apply gel over the
area to be worked
using CAVISLIM
ADVANCE.
circular
longitudinal
Both the longitudinal and circular massage should be done from the bottom
upward as shown in the diagrams. Follow these simple instructions to help
you get the best results.
Nivel
A
B
C
D
E
F
16
M80
M38
Mode Intensity
Mode Intensity Time
3
3
2
2
2
2
15
15
10
10
10
5
8
8
6
6
4
3
2
2
2
2
2
1
10’
10’
7’
7’
7’
7’
inner knee
circular
Apply a light circular massage to this area, as shown in the diagram.
M80
Nivel
A
B
C
D
E
F
M38
Mode Intensity
3
3
2
2
1
1
5
5
5
5
5
5
Mode Intensity Time
7
7
6
4
1
1
2
2
1
1
1
1
10’
10’
7’
7’
7’
7’
EN
Recuerde no aplicar
el CAVISLIM
ADVANCE sobre las
articulaciones de la
rodilla.
Aplique gel sobre la
zona a trabajar con el
CAVISLIM ADVANCE.
Remember not to
apply CAVISILIM on
the knee joints.
Apply gel over the
area to be worked
using CAVISLIM
arms
longitudinal
circular
Recuerde nunca
aplicar CAVISLIM
ADVANCE en la zona
de manos , antebrazo
y articulaciones
Put a generous amount of gel on the area to be worked and this will improve
the effectiveness of the treatment and prevent damaging the machine.
Perform the massage, sliding the handset slowly and without pressing.
Massaging this area should be applied toward the body, as shown in the
diagram.
Nivel
A
B
C
D
E
F
M80
M38
Mode Intensity
Mode Intensity Time
2
2
1
1
1
1
5
5
5
5
5
5
6
4
2
2
1
1
1
1
1
1
1
1
7’
5’
5’
3’
3’
5’
17
Remember, never
apply CAVISLIM
ADVANCE on the
safe and effective
figure shaping
chapter 4
correct, safe use of
Cavislim Advance
For correct and safe use of CAVISLIM ADVANCE, you should keep the
following application times in mind:
• Per work area: 15 minutes maximum.
By "work area" we mean each one of the body parts where CAVISLIM
ADVANCE can be applied. The various work areas are: arms, abdomen,
waist, hips, inner thighs and inner knees.
E.g.: In a single session you can apply CAVISLIM ADVANCE for 15
minutes on your sides and 15 minutes on your arms. But, for example,
you must NEVER perform a 30 minute application session just on your
sides in the same day.
• By session we mean using CAVISLIM ADVANCE on two different
work areas (15 minutes per area) in the same day.
• Between sessions: 72 hours minimum.
By “between sessions” we mean the rest time between each session.
E.g.: In one week the session schedule (maximum) would be: Monday,
Thursday and Sunday.
• Every 20 sessions:
You should rest for 3 weeks. After this period you may decide to repeat
the first treatment or start the maintenance program.
• Maintenance sessions:
This depends on the individual, but one session per month should suffice.
VERY IMPORTANT
• Never exceed the application times (15 minutes per area,
30 minutes total in one day). Your body does not know
"where" you are eliminating the fat from, so a session must
never include 15 minutes on your sides, 15 minutes on your
legs, 15 minutes on your arms, etc. REMEMBER: the maximum
time during one day, adding all the parts of the body being
treated, must be no more than 30 minutes.
• And, above all, respect the rest period of 72 hours
between sessions. This is the time that your body needs to
eliminate all the fat dissolved during the session through the
lymphatic system.
18
chapter 5
EN
frequently asked questions
What is cavitation?
Cavitation is a non-invasive (surgery free) body shaping technique that
reduces volume by eliminating cellulite and localised fat deposits in
the abdomen, hips, flanks, arms, inner thighs and knees.
What are the advantages over other methods?
The main advantage is that we can choose the specific areas of the
body that we want to work. It could be said that it is a technology
which allows us to concentrate on cellulite selectively.
Is cavitation painful?
Use of CAVISLIM ADVANCE should never cause pain.
Is it normal to hear a slight buzzing in your ears while using
CAVISLIM ADVANCE?
Yes, some users may detect a slight buzzing sound during its application.
Can it be used on all parts of the body?
It cannot be applied to all parts of the body. Under no circumstances
can it be applied to: the head or face, neck, breasts, the thorax, navel,
forearm, joints, genitals, back, ankles or lymph glands.
Does CAVISLIM ADVANCE reduce weight and volume?
CAVISLIM ADVANCE eliminates clusters of fat, which have weight;
consequently your body loses volume.
Is CAVISLIM ADVANCE effective on orange peel syndrome?
Yes, CAVISLIM ADVANCE is effective on orange peel syndrome because
it destroys adipose cells that cause fat storage.
Can CAVISLIM ADVANCE be used to remove wrinkles?
No, CAVISLIM ADVANCE has not been designed to remove wrinkles.
Can CAVISLIM ADVANCE be used on the face?
CAVISLIM ADVANCE must NEVER be used on the face, eyes or neck.
After how many sessions will I begin to see results?
You should notice results after the first five sessions, however results
may vary depending on the subject.
How long should I wait between sessions?
It is advisable to wait 72 hours between sessions.
Does cellulite reappear after using CAVISLIM ADVANCE?
Although CAVISLIM ADVANCE ensures effective and long-lasting
results, we cannot guarantee against cellulite reappearing. To prevent
the appearance of new cellulite we recommend a balanced diet, regular
19
safe and effective
figure shaping
Are there any side effects?
If you are healthy, CAVISLIM ADVANCE has no reported side effects;
nevertheless in some people it may produce a reddening of the skin that
can last for about 2 hours.
Is it necessary to combine CAVISLIM ADVANCE with a special diet?
No, it is not necessary to follow any special diet, but a balanced diet and
proper hydration is highly advisable.
How much water should I drink?
It is essential to begin hydrating yourself two hours before applying
CAVISLIM ADVANCE. It is also advisable to drink more water after finishing
a session. The recommended quantity is at least 2 litres during these
periods, as it helps to eliminate toxins.
Is it necessary to combine CAVISLIM ADVANCE with a sports activity?
No, this is not strictly necessary, but at least 30 minutes of physical
activity will enhance the results as it helps to drain fluids.
Which sports activities can supplement CAVISLIM ADVANCE?
The vibration platform is the ideal complement due to its toning and
draining qualities. But if you do not have access to a platform, then
walking, exercise bike, swimming or any other aerobic exercise for at
least 30 minutes is very helpful.
How can I enhance the effects of CAVISLIM ADVANCE?
By combining a balanced diet with regular physical exercise and drinking
plenty of water. Added to which, drainage massage can also be very
useful.
What are the anti-cellulite and toning gels for? When do I use them?
1. Anti-cellulite gel: Contains active ingredients that help eliminate cellulite.
2. Toning gel: Contains active ingredients that make the treated area
firmer.
The application sequence is as follows: during the first few days of
treatment use the anti-cellulite gel and once you begin to notice results,
use the toning gel This is applied before the Cavitation gel, as with any
other serum. The area should be massaged until it is well absorbed and
then apply plenty of cavitation gel to start the session
Can I use CAVISLIM ADVANCE without applying gel?
NEVER, this is because the gel acts as a conductor for the ultrasonic
sound waves with your body. If you do not use gel then the CAVISLIM
ADVANCE application loses its effectiveness and the machine can be
severely damaged.
Can I use any type of gel?
We recommend using only TECNOVITA by BH gel, as the use of any
other type may damage the machine.
20
EN
When is it inadvisable to use CAVISLIM ADVANCE?
• If you are pregnant or think you • Metal implants or prostheses.
might be.
• Physical malformations.
• If you are breast-feeding.
• Epilepsy.
• Undergoing fertility treatments. • Long-term treatment with
• If you have any kind of heart
medications: anti-inflammatories,
disease.
anticoagulants, antibiotics or
antihistamines.
• If you suffer from skin problems.
• Depression.
• Osteoporosis.
• Psychiatric or psychological
• Fibromyalgia.
treatment.
• Malignant tumours.
• Liver problems (fatty liver)
• Hypertension.
• Irritable bowel syndrome.
• High cholesterol levels.
• Diabetes
• Kidney problems
• Physical shortcomings
Can I use CAVISLIM ADVANCE if I am pregnant?
You must never use CAVISLIM ADVANCE if you are pregnant or think
you might be.
Can CAVISLIM ADVANCE be used during lactation?
Do not use it during lactation.
Can CAVISLIM ADVANCE be used on the breasts?
NEVER apply it to the breasts.
Can I use CAVISLIM ADVANCE during menstruation?
Use on the abdominal area is not advisable during menstruation as it
may cause increased bleeding. However, it can be applied in other
areas.
Can I use CAVISLIM ADVANCE if I have an IUD?
Yes.
Can CAVISLIM ADVANCE affect my cholesterol levels?
Use of CAVISLIM ADVANCE may increase your cholesterol levels.
Can CAVISLIM ADVANCE be used with skin conditions?
It should not be used if you have any skin condition. Consult you doctor.
Can I use CAVISLIM ADVANCE if I have ear implants?
Do not use it if you have implants fitted.
Can I use CAVISLIM ADVANCE when I am bathing or showering?
Under no circumstances should the handset or the machine come into
contact with water due to the risk of electrocution.
How do I clean CAVISLIM ADVANCE and the handset?
Never immerse CAVISLIM ADVANCE or the handset in water. Use a
cloth slightly dampened with water.
21
safe and effective
figure shaping
chapter 6
important
safety advice
This product is supplied with a mains cable that has an earth wire and a
plug with an earth pin.
In the event that the appliance malfunctions then the earth connection will
redirect the electrical current away from the machine and reduce the risk
of an electrical shock.
WARNING!: If the equipment is not earthed correctly then there is a
risk of electrical shock.
Do not modify the plug supplied with the equipment, if it does not fit the
wall socket then get an electrician to install an electrical socket that does.
This product should be used on a 220-240 volt circuit and has an earthed
plug similar to that shown in Fig. 6.1
Follow these recommendations:
1. Never use accessories that are not recommended by the manufacturer.
2. Do not use the machine if the mains cable becomes damaged or worn.
3. Keep the mains cable away from hot surfaces.
4. Do not use the machine outdoors.
5. To unplug the machine, first put the switch to the «0» position and then
unplug it from the wall socket.
PROTECTION
This model is equipped with an electronic circuit breaker to protect both
the electronic and electrical circuits.
This safety device (fuse) will be automatically triggered if the unit is subjected
to abnormal force or heat.
Should this occur:
1. Unplug the cable from the mains supply.
2. Set switch (L), located on the casing, to the «0» (OFF) position. Fig. 6.2
3. Change the fuse (C) (1 Amp).
4. Plug the unit into a wall socket equipped with an EARTH terminal. Set
switch (L) to position [1]. Fig. 6.2
earthed socket
L
plug with earth
connection
fig. 6.1
22
C
fig. 6.2
warranty
EN
We suggest that you read through this document carefully in order to fully
understand the cover that the manufacturer offers as well as your responsibilities
as owner.
GUARANTEES
GENERAL INFORMATION
EXERCYCLE, S.L. would like to thank you for purchasing this product and the
trust you have placed in us. Our products have been subjected to rigorous
quality checks. Nevertheless, should you experience any problem with this
appliance during the guarantee period then please read through these warranty
conditions and then get in touch with your local authorised dealer.
This guarantee certificate has been drafted in accordance with that stated in
Directive 1999/44/EC of the European Parliament and of the Council 25th
May, 1999, regarding on certain aspects of the sale of consumer goods and
associated guarantees, incorporated into Spanish Law by virtue of Law 23/2003,
10th July; Guarantees on the sale of consumer goods.
To this effect, EXERCYCLE, S.L. VAT nº'bc B-01029032, with business address
c/ Zurrupitieta 22, Vitoria, Spain, guarantees this product under the following
terms and conditions:
1. GUARANTEE PERIOD
The product covered by this guarantee certificate is protected for a period of
TWO (2) YEARS as from the date of receiving the product, which will be taken
as the date that appears on the sales receipt for the product or on the
corresponding delivery docket should this be later. It is essential that this be
presented in the event of possible repairs. The policy regarding the warranty
period may vary between different countries. The stated warranty period is
only applicable to Europe.
2. RIGHTS UNDER THE GUARANTEE
- Repair or replacement of the product which, in such instance, will be carried
out within a reasonable period and without significant inconvenience to the
consumer, taking into account of the nature of the goods and the purpose for
which the consumer required them.
- Those cases in which the repair or replacement represents a disproportionate
cost for the seller in comparison with other forms of remedy will be exempt
assuming these do not prejudice the consumer.
- Repairs will be free for the consumer with regard to labour, materials and
carriage.
- In the event that the machine is repaired or replaced with a new one, the
guarantee period will be suspended temporarily until the new appliance has
been delivered and will carry at least six months of guarantee, however under
no circumstances will a new 2 year period be initiated.
- The buyer may, as is apparent, require (i) a reduction in price or proceed to
a (ii) recession of the contract when the repair or replacement is not carried
out within a reasonable time or with significant inconvenience to the buyer.
23
safe and effective
figure shaping
The reduction in price (i) will be proportional to the difference between the
value that the goods would have had if they had been delivered in accordance
with the contract and the actual value that the goods were worth at the time
of the said delivery. Recession of the contract (ii) will not proceed when the
non-conformity is of minor importance.
3. THE GUARANTEE DOES NOT COVER
- Defects attributable to use other than that established in the User Manual.
Professional use or commercial leasing or hiring of the product.
Poor installation, poor assembly or breakage of components due
to improper installation, (the User Manual gives detailed instructions on how
to install and use the machine).
Improper use of the product (use without applying gel, exceeding
operating times, exposure to high moisture levels, etc.) or problems arising
from poor maintenance (accumulation of dirt on any part of the product or
its accessories, etc.) (check the User Manual for detailed instructions on how
to install and use the product).
Repairs carried out by persons not authorised by EXERCYCLE,
S.L. or appliances that have been opened or tampered with by persons not
authorised by the manufacturer.
Deviations from the standard product, such as light vibration,
noise or breakage of components that do not affect the performance of the
machine and which cannot be attributed to manufacturing faults.
Scratches, scrapes, abrasions, knocks, falls, etc. caused by
carelessness.
Defects on the appliance caused by damage during transit.
4. CLAIMING AGAINST THE GUARANTEE
Claims made for nonconformities will be limited to three years as
from the date that the goods were delivered.
The consumer must report the existence of the defect within a
period of 2 months as from the date that the defect was discovered.
This guarantee does not affect the consumer’s statutory rights
under any applicable law, unless it is incompatible with the application of
other actions derived from compensation sought for hidden faults in the
contract of sale.
With regard to queries that may arise from the interpretation or
application of this guarantee, these will be governed by the corresponding
national law.
Any discrepancy arising from the interpretation, validity or application of this
contract will be subject to the courts and tribunals of Vitoria, Spain.
certificates
By virtue of this document, Exercycle S.L. declares that this product
meets the essential requirements and other relevant provisions of
Directives 2004/108/EC and 2006/95/EC
24
parts list
1 Operating
pedal
EN
2 Handset
17 Handset
M80
M38
3 Handset
G01 Main unit
support
16 Mains
cable
To order replacement parts, please indicate:
The machine model / Corresponding part Nº/ Quantity
Nº
1
2
3
Technical
16
17
G01
Código
YS50001
YS50002
YS70003
specifications
YS50016
Example:
YS70017
YS50001
YS70G01
technical specifications
Net weight: 7 kg
Dimensions: 34 cm L x 38 cm W x 13 cm H
Ultrasound: 40 kHz
Output power: 25 Watts maximum (depending on program)
Power supply: Voltage: 220 V AC / 50 Hz frequency
25
1