1
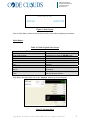
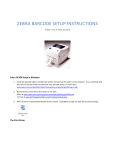
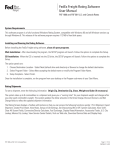
Mobile Application
Website Development
Graphics Design
E-Commerce
CRELoaded Point of Sales Module With Inventory Management
Table of Contents
Introduction.................................................................................................................................... 1
How to Access POS ...................................................................................................................... 1
Sales ............................................................................................................................................... 1
Quick Sales ................................................................................................................................ 2
Customer Sales ......................................................................................................................... 3
Search a Customer ................................................................................................................. 3
View all Existing Customers.................................................................................................... 4
Add a New Customer.............................................................................................................. 4
New Order Page ..................................................................................................................... 5
Services .......................................................................................................................................... 5
Create a New Order ................................................................................................................... 5
Service Order for Existing Customers .................................................................................... 5
Service Order for New Customers.......................................................................................... 6
Inventory......................................................................................................................................... 7
Create Purchase Order ............................................................................................................. 7
Add Items to Inventory.................................................................................................................. 8
Introduction: Point of Sales (POS) module is a plug-in created for the CRE Loaded 6 x applications. It helps
to create, maintain & update Product sale data, Customer information, Order information, Service
information and Inventory details. It has three main features.
The features are:1. Sales.
2. Service.
3. Inventory.
This document is a User Guide describing all the possible functions of these three features.
How to Access POS:After Logging In as the administrator of CRE Loaded software, a “Menu Bar”
appears on the left hand side of the home page.
Click on the POS option to view the features. By default the “sales” page
appears along with the links of “Service” & “Inventory”.
Sales:This feature of the plug in allows you to create sales order for existing and
first time customer, search an existing customer, adds a new customer &
also to print invoice of a sale made. All these function are described in this
section of the document. After clicking on “Sales” these two options
appears:-
Copyright 2010-2011 www.codeclouds.com all rights reserved
1
Mobile Application
Website Development
Graphics Design
E-Commerce
Figure 1: Sales Screen
Click on Quick Sale to create an order and to print the invoice without registering the customer.
Quick Sales:-
Table 1: Fields of Quick Sales Screen
Fields
Enter Product Model
SKU
Description
Qnty
Tax
Price
Dsc %
Total
Description
Enter the model number of the product
purchased, then press the ENTER button.
Shows the product model number.
Shows the description of the product.
Shows the number of products purchased.
Enter the amount of tax to calculate the total
payment.
Shows the price of the product.
Enter the amount of discount on the price of
the product.
Shows the total amount to be paid including tax
and excluding the discount.
After filling in the above fields click on the “Payment” button to go to the next page.
Figure 2: Payment Page
Copyright 2010-2011 www.codeclouds.com all rights reserved
2
Mobile Application
Website Development
Graphics Design
E-Commerce
Select the method of payment in the Payment Type drop down box. The options are Cash, Debit,
Check, Visa and MasterCard.
Click on the “Close” button to close the window.
Click on the “Invoice” button to print the invoice.
Customer Sales:This function allows you to search existing customers, add new customers and to generate new
orders.
Table 2 : Fields of Customer Sales
Fields
Enter Customer First Name
Enter Customer Last Name
Enter Customer Telephone
Select Customer
Description
Enter the first name to search customer
Enter the last name to search customer
Enter customer phone number to search
customer
Click to view the complete list of existing
customers.
Figure 3: Select Customer Fields
Search a Customer:To search an existing customer enter the name and click on “Select Customer”. The list of
customers with the name appears with corresponding phone numbers. Click on “Select” option to
view the details of a particular customer. Complete customer details will appear. Click on
“Confirm” button to confirm the customer data.
Copyright 2010-2011 www.codeclouds.com all rights reserved
3
Mobile Application
Website Development
Graphics Design
E-Commerce
Figure 4: Search Result
View all Existing Customers:To view the complete list of existing customers click on “Select Customer” keeping the above
three fields blank. See Figure 3. The list of all existing customers appears. Click on “Select”
option to view details of a particular customer. Then, Click on the “Confirm” button to confirm the
customer data.
Add a New Customer:To add new customers click on “Add New Customer”. A form will appear where customer data is
to be filled.
Copyright 2010-2011 www.codeclouds.com all rights reserved
4
Mobile Application
Website Development
Graphics Design
E-Commerce
Figure 5: Form for Customer Data
After completing the form click on “Add” button.
Note: - In the form the fields marked in * sign are mandatory to fill.
The confirmation page appears. Click on “Confirm” button to confirm the customer.
New Order Page:A new order page will appear. Fill in the address details of the customer. To place the order the
fields are same as
Table 1.
Note: - If the shipping address and billing address are different uncheck the check box.
Services: This function of the POS module allows you to create new service orders, update existing service
orders & to print invoice of service orders.
Create a New Order:POS allows you to create a new service order for both existing customers & new customers.
Service Order for Existing Customers:-
Figure 6: Services Home Page
To create a service order for an existing customer enter the first name of the customer, last name
of the customer or the telephone number of the customer and click on “Select Customer”. See.
Copyright 2010-2011 www.codeclouds.com all rights reserved
5
Mobile Application
Website Development
Graphics Design
E-Commerce
To view the complete list of existing customers click on “Select Customer” keeping the above
three fields blank.
Click on “Select” to view the details of the customer. Along with details of the customer the page
also shows the previous service orders of the customers at the bottom. Click on “Select” to
update the existing service orders. OR, click on “New Service Order” to create a service order.
The page containing the address details of the customer appears. Make the necessary changes if
any and click on “Update” to change the address details. Then enter the service details of the
customer. To check the details of the fields & buttons of the screen see Table 3.
Figure 7: Enter Service Details
The additional field present in this screen is “Add to billing/ Cancel”. Click on cancel to cancel
the order description. Click on “Add to billing” to check the total cost charged for the service. After
clicking the “Service Price List” appears (see
Table 4).
Then click on “Payment” to view the payment details. Click on “Invoice” to print the invoice of the
service order (See Figure 2).To add an item from the inventory click on “Add Item from
Inventory”.
Service Order for New Customers:To create an order for new customers click on “Add New Customer” and follow the steps to fill in
the form of customer details. Then click on “Add”. Then click on “Select Customer (for new
Order) / Find Order Details”, the main screen of the service page appears. Enter the first name
or the last name of the customer to find the customer and click on “New Service Order”.
NOTE: - Only two fields in this form are mandatory.
To update an existing service order enter the service order number in the “Enter Service Order”
field and click on “Select Service Order”. The screen will show the address details of the
customer. Then the option of updating the service order is shown. The fields are:-
Table 3: Fields of Entering Service Details
Fields
Description
Serial #
Description
Enter the description of the problem.
Enter the serial number of the product.
Copyright 2010-2011 www.codeclouds.com all rights reserved
6
Mobile Application
Website Development
Graphics Design
E-Commerce
Submit
Save & Print
Close
Click to save the service details.
Click to print the service order.
Click to close the window.
Then the details of the existing service order is shown:-
Table 4: Fields of Service Price List
Fields
Description
Delete
Click to delete a service.
Shows the description of the current service.
Description
Serial #
Price
Tax
Enter the serial number of the product.
Shows the cost of the service.
Shows the Tax added for the service.
Dsc %
Total
Add items from inventory
Payment
Shows the discount provided on the total cost.
Shows the total cost of the service.
Click to close add products from the inventory.
Click to process the payment.
The payment page shows the total amount of payment to be done. Click on “Invoice” button to
print the invoice. Click on “Close” to exit from the window.
Inventory:This feature allows you to create & to keep a track record of the purchase orders. It also has the
facility to add new items in the existing purchase orders.
The two functionalities of Inventory are:1. Create Purchase order.
2. Add Items to Inventory.
Create Purchase Order:“Create Purchase Order” allows creating, saving & printing a new purchase order. It generates
an order number for future reference. In the Inventory page click on
“Create Purchase Order”, the following page appears.
Figure 8: Create Purchase Order
Table 5: Fields and Buttons of Purchase Order
Copyright 2010-2011 www.codeclouds.com all rights reserved
7
Mobile Application
Website Development
Graphics Design
E-Commerce
Fields
Description
Enter the model number of the product. Then
click on “Add Product”.
Shows the name of the product.
Shows the model number of the product.
Shows the number of products available.
Enter the number of products to be ordered.
Click the button to print the purchase order.
Enter an existing purchase order number and
click “Search” to view the order details.
Shows the new order number generated.
Enter Product Model
Name
SKU
Current Qnty
Order Qnty
Print
Order Search
Your Order No
Add Items to Inventory:This function allows to check the status of the order and to print the barcode stickers of the
product. Multiple stickers can be printed at once.
Figure 9: Add Inventory Page
Table 6: Fields of Add Inventory
Fields
Order No.
Name
SKU
Current Qnty
Supplied Qnty
Bar Code Sticker
Print All Barcode
Your Order No.
Description
Enter the order number and then click on
Search button to view the details of the order.
Shows the name of the product.
Shows the model number of the product.
Shows the current quantity.
Shows the number of products supplied.
Shows the bar code sticker and the model
number of the product.
Click to print the barcode sticker. It is directly
proportional to” Supplied Qnty”.
Shows the current order number.
Copyright 2010-2011 www.codeclouds.com all rights reserved
8
Mobile Application
Website Development
Graphics Design
E-Commerce
Table of Figures:-
Figure 1: Menu Bar.......................................................................................................................................Error! Bookmark not defined.
Figure 2: Sales Screen.................................................................................................................................................................................2
Figure 3: Payment Page..............................................................................................................................................................................2
Figure 4: Select Customer Fields...............................................................................................................................................................3
Figure 5: Search Result ..............................................................................................................................................................................4
Figure 6: Form for Customer Data ...........................................................................................................................................................5
Figure 7: Services Home Page ...................................................................................................................................................................5
Figure 8: Enter Service Details..................................................................................................................................................................6
Figure 9: Create Purchase Order..............................................................................................................................................................7
Figure 10: Add Inventory Page .................................................................................................................................................................8
List of Tables:Table 1: Fields of Quick Sales Screen .......................................................................................................................................................2
Table 2 : Fields of Customer Sales ............................................................................................................................................................3
Table 3: Fields of Entering Service Details ..............................................................................................................................................6
Table 4: Fields of Service Price List..........................................................................................................................................................7
Table 5: Fields and Buttons of Purchase Order ......................................................................................................................................7
Table 6: Fields of Add Inventory...............................................................................................................................................................8
INDEX:Model · 8
A
P
Add to billing · 7
adds · 2
administrator · 1
Barcode · 9
Payment · 2
plug in · 2
POS · 1
Print · 9
process · 8
proportional · 9
Purchase · 8
C
Q
B
Cancel · 7
Click · 6
Customer Sales · 3
Qnty · 2, 9
Quick Sale · 2
R
F
reference · 8
form · 7
future · 8
S
Inventory · 1
invoice · 2
Invoice · 3, 7, 8
Sales · 1
screen · 6
Search · 1, 4, 9
Service · 1
sticker · 9
M
U
mandatory · 7
Menu Bar · 1
Update · 6
I
Copyright 2010-2011 www.codeclouds.com all rights reserved
9