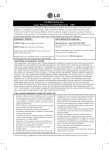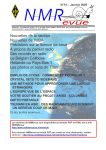
1
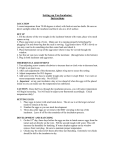
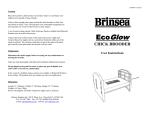
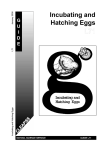
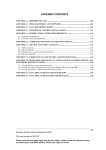
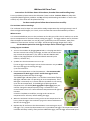
Whirlow Hall Farm Trust Instructions for Chicktec Smart 20 Incubator, Brooder Plate and Candling Lamp For any problems please contact the Education Team on 0114 2360096. Chloe can help with equipment/duckling/chick problems and Joy will help with bookings and admin. If we are not around, any of the team will be pleased to help. For best results please follow these instructions carefully. The incubator and surroundings The incubator must be kept in a room with a steady temperature day and night. Keep it out of direct sunlight and draughts, on a level, secure surface that cannot be knocked by children. When to start It is recommended that you turn the incubator on the day you collect it as it needs to run at the correct temperature for 24 hours before putting the eggs in. The eggs need to rest for 24 hours after transport so store them in a cool dry place, preferably near the incubator, away from radiators or heat sources and not in a fridge. Avoid storing the eggs longer than 5 days. The incubation period for duck eggs is 28 days and for chicken eggs is 21 days. Setting up your Incubator 1. Turn on the incubator by plugging BOTH leads in. The plug attached to the base controls the turning of the eggs, and the one attached to the top controls the temperature. (Tip: Place a ‘DO NOT SWITCH OFF’ label on the plugs/sockets to avoid accidental removal by the children, cleaners etc.) 2. a) Make sure the thermometer sits in its clip. b) Use an egg to test the height so that the thermometer sits just above the top of the egg (not touching the egg). c) Put the lid back on. 3. Check the temperature on the thermometer – the recommended temperature for duck eggs is 37.5°c and for hen eggs is 39.2°c measured just above the top of the eggs. The GREEN light indicates power is on and the intermittent flashing RED light indicates that it is operating at its set temperature. If the RED light is constantly on, it means that the incubator is still coming up to the set temperature. If the RED light is flashing and the temperature is not 37.5°c (duck eggs)/39.2°c (hen eggs) then you need to change the temperature by using a screwdriver in the central white screw. Turn Left to decrease temperature and right to increase. Leave the incubator to stabilise, running at the correct set temperature for 24 hours, before adding the eggs. 4. When the incubator has been running at the correct temperature for 24 hours, place the eggs in the incubator lying on the wire mesh between the bars of the egg grid. 5. Replace the lid and ensure the thermometer is not resting on any of the eggs. If it is, move the thermometer so it is just above the eggs. The temperature of the incubator will drop initially, after you have added the eggs, until the eggs are warmed up to incubation temperature. Do not adjust the thermostat during this period; it should come back to its stable temperature without adjustment. Check the eggs are moving by putting a cross on them and observe over a few hours. The egg grid is connected to a motor which ensures they turn. During incubation – candle the eggs (optional) To gauge the extent of embryo development and air space during incubation, you can candle eggs on the eighth day with the candling lamp supplied. A healthy fertile egg will show a small, dark embryo, possibly with radiating veins in a ‘spider pattern’ (depending on how translucent the eggshell is). An infertile egg will glow a clear red and can be discarded. See the diagrams at the end of these instructions. Any eggs which show a blood ring should also be discarded, to avoid infection developing, as they are early ‘dead-in-shell’. Candling can be repeated on the 14th day to demonstrate the growth in embryonic development. When candling eggs, remove them from the incubator for a maximum of only a few minutes and try to avoid the egg being ‘shaken’ too much. The few minutes of cooling during candling is not detrimental – a duck will spend up to half an hour a day ‘off the nest’ every morning to feed and relieve herself – but don’t overdo it! On the 25th day (duck eggs) /18th day (hen eggs) Three days before hatching it is time to stop the eggs from turning. You need to disconnect the egg grid from the motor and remove it so the eggs are laid directly on the mesh of the incubator. Humidity When a third of the ducklings/chicks have chipped their shells, you need to add water to the base of the incubator. Pour water through the mesh, but not directly onto the eggs, to fill the base 2–3cm. You will need to check the water levels throughout the hatching period to ensure the level is maintained. Always replace lid. Hatching time! Please try to refrain from helping the ducklings/chicks out of their eggs. It can take them a while as they easily get tired and need to rest. If they are too weak to hatch themselves then this could mean they are too weak to survive. Don't panic when you see your ducklings/chicks wobbling and stumbling about in the incubator. They are very awkward on their legs for quite a while. Leave them once they have hatched to become dry, fluffy and steady on their feet – this could take up to 24 hours. It can take between 12–48 hours for all the eggs to hatch. The brooder plate needs setting up and turning on an hour before moving the ducklings/chicks from the incubator so it is warm when you put them under it. To put the yellow legs on the brooder plate, you need to have the black rubber end at the bottom and the rounded end at the top. Underneath the plate, in the four corners are movable brackets marked with ‘PUSH’. Push on the yellow bracket and move the head of the yellow leg from underneath the heating plate through the hole. Then release the bracket when the preferred height is reached. The brooder plate should stand at a height so that the ducklings/chicks just touch it when they sit underneath it. This will need to be adjusted as they get bigger. You need to set up a box (about knee high) with the clean wood shavings provided (Newspaper should not be used as it provides a smooth, slippery surface and ducklings/chicks are more likely to develop splayed legs). Place the brooder plate at one end and the feeder and drinker at the other end. Try to keep the water and food away from the brooder plate. When transferring the ducklings/chicks from the incubator into the box, place them under the brooder plate, dipping their beaks in the drinker first. Encourage them to take chick crumbs by dropping a few in front of them. This stimulates the pecking instinct. Eggs that have not hatched in this time should be discarded (wrap them up and discard in normal household waste). Ducklings/chicks will need to be cared for at the weekend – they cannot be left in school from Friday until Monday without any monitoring. Views of eggs using the candling lamp Plug the candling lamp in and place the egg on top of the light, you may need to do this in a dark room to see the outline of what is inside the egg. Possible outcomes: 1. 2. 3. 4. 5. 6. 7. Clear when candled at 8 days – INFERTILE Red blood vessels at 8 days – FERTILE Red or black staining at 8 days – EARLY DEATH Embryo with red ring at 8 days – EARLY DEATH Dark outline ill-defined at 10–16 days – LATE DEATH LIVE EMBRYO with bill in air sack – due to hatch in 24–48 hours Normal development of the air pocket (1, 10 & 20 days) Bring ducklings back to the farm Bring all equipment back together with ducklings on the date on your booking form. Checklist for returning equipment (any unreturned items will be invoiced for): 1 Incubator 2 leads (one attached to base, one attached to the lid 1 egg grid 1 drinker 1 feeder 1 brooder plate, with 4 yellow legs 1 candling lamp Chloe Rainbow Education Department, Whirlow Hall Farm Trust, Whirlow Lane, Whirlow, Sheffield, S11 9QF T: (0114) 236 0096 E: [email protected]