1
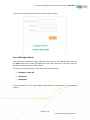
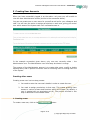
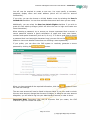
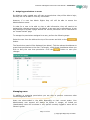
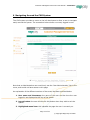
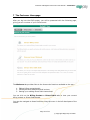
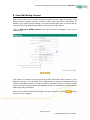
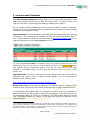
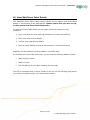
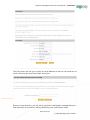
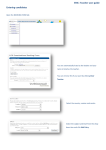
Customer Management Services User Manual – Customers Customer Management Services (CMS) Customer User Manual Version 1.2 – April 2009 Page 1 of 23 © Copyright Sage Pay Ltd 2009 Customer Management Services User Manual – Customers Table of Contents 1 AN INTRODUCTION TO CMS ..................................................................... 3 2 GETTING STARTED WITH CMS .................................................................. 4 ONLINE HELP ................................................................................................ 4 ACCESSING CMS ........................................................................................... 4 THE ADMINISTRATOR ACCOUNT: LOGIN FOR THE FIRST TIME .......................................... 4 3 LOGGING INTO THE CMS SYSTEM............................................................. 5 YOUR CMS LOGIN DETAILS ................................................................................ 6 4 RETRIEVING YOUR LOGIN DETAILS ......................................................... 7 LOGGING INTO CMS........................................................................................ 8 5 CREATING USER ACCOUNTS ..................................................................... 9 1. Creating a user.................................................................................... 9 2. Assigning permissions to a user ...........................................................11 MANAGING USERS..........................................................................................11 PERFORMING FUNCTIONS AGAINST A USER ..............................................................12 6 NAVIGATING AROUND THE CMS SYSTEM................................................ 14 7 THE CUSTOMER HOMEPAGE .................................................................... 16 8 VIEW/EDIT BILLING CONTACT............................................................... 18 9 VIEW ACCOUNT STATEMENT .................................................................. 19 10 VIEW/EDIT DIRECT DEBIT DETAILS..................................................... 21 Page 2 of 23 © Copyright Sage Pay Ltd 2009 Customer Management Services User Manual – Customers 1 An Introduction to CMS This user manual gives a full user guide to the Sage Pay Customer Management Services (CMS) system. The Sage Pay CMS system has been designed to make the administration of your Sage Pay account as fast and easy as possible. The Sage Pay CMS system enables you to perform the following functions: Change your billing details Set up or modify your Direct Debit details View your current invoice In the near future, the CMS system will be extended to allow you to: Manage your existing vendor accounts more effectively Apply for new accounts Change currencies and card types Switch fraud prevention options on or off Manage your contact details If you have any questions about this guide, please email [email protected]. If you have any comments or suggestions, please email [email protected]. Page 3 of 23 © Copyright Sage Pay Ltd 2009 Customer Management Services User Manual – Customers 2 Getting Started with CMS Online Help CMS has a very useful help system. If you need help whilst on any of the CMS screens, click on the button at the bottom of the page. Accessing CMS To access CMS type the following URL into your browser window: https://customerservices.sagepay.com The Administrator account: Login for the first time Sage Pay will send you your CMS login details in the confirmation email that is sent to you on submission of your application form. The first time you login to CMS, you will need to use the Administrator login details sent to you. The Administrator account allows you to create and administer other user accounts. You will not be able to perform any other functions when you are logged in as an administrator. Note: You must create your own User account before you will be able to access the full CMS system. Your Administrator account details always remain the same and you should ensure that you keep this information in a safe place. If you are unsure of your login details, you can access these easily via the CMS system. This is explained in the next section. Page 4 of 23 © Copyright Sage Pay Ltd 2009 Customer Management Services User Manual – Customers 3 Logging into the CMS System To log into the CMS system, click the Customer Login button on the CMS homepage. Page 5 of 23 © Copyright Sage Pay Ltd 2009 Customer Management Services User Manual – Customers You will then be presented with the Customer Login screen: Your CMS login details You have been assigned a single Administrator account. The Administrator account will only allow you to create and administer other user accounts, from which you will be able to access the entire CMS system. To login as the Administrator, enter the following information: Customer Login ID Username Password If you are unsure of your login details, please follow the instructions in the following section. Page 6 of 23 © Copyright Sage Pay Ltd 2009 Customer Management Services User Manual – Customers 4 Retrieving your Login Details If you are unsure of your login details, you can access them easily in four simple steps: link on the Login page. You will then Click on the see the following: button (if you have Enter your Vendor Name and click the more than one Vendor Name, you may specify any one you wish). An email will be sent to the primary contact of the vendor account you specified. The email contains a link to a Password Retrieval page allowing you to securely retrieve your password details. Click on the link within the email sent to you. This will bring up the Password Retrieval page (see below): Enter your name and the merchant number in the fields provided. Ensure you enter the correct merchant number that has been assigned to your company by your acquiring bank. If you do not know the merchant Page 7 of 23 © Copyright Sage Pay Ltd 2009 Customer Management Services User Manual – Customers number, please refer to the Merchant Agreement document provided by your acquirer. If you have more than one merchant number, you may enter any one of these. Click the button. If the merchant number you have entered is valid, you will be granted access to a page displaying the login details for your Administrator account. If you incorrectly enter your merchant number, you will need to contact Sage Pay directly at [email protected] to unlock this page. Note: Ensure you store your login details in a safe place as you will only be able to access the Password Retrieval page once. Your access will be logged and subsequent attempts will fail. In order to access the page again, you will need to contact Sage Pay directly at [email protected]. Once you have obtained your login details, you are then free to log into the CMS system. The following section explains how to do this. Logging into CMS Now that you have your login details, you are ready to login to CMS. Enter the following information into the Login screen: CMS Customer Login ID – Enter your unique CMS Customer Login ID Username – Enter your username. Password – Enter your password. If you have forgotten your password, please enter your Customer Login ID and link. You will be sent an email Username and click on the containing your password. Important Note: Remember the Administrator account only allows you to create and administer other user accounts. You will not be able to perform any other functions when you are logged in as an administrator. You must create your own user account in order to access the full CMS system. If you become locked out of the Administrator user account, you will need to email [email protected] to request that your account be unlocked. Page 8 of 23 © Copyright Sage Pay Ltd 2009 Customer Management Services User Manual – Customers 5 Creating User Accounts When you have successfully logged in as the admin- only user you will be able to view the User Administration screen (similar to the screenshot below). You can now create one or more users for yourself as well as for your colleagues and staff. You will have the option to assign permissions to each user, giving you control over which areas of the system each user is allowed access to. In the example screenshot given above, only one user currently exists – the Administrator user. The Administrator user will always be shown in orange. The purpose of the Administrator account is to create other users, modify or delete existing users, and to perform functions such as unlocking users or locking them out of the system. Creating other users Creating a new user is a two step process: 1. You need to enter the new user’s details in order to create the user. 2. You need to assign permissions to that user. This means granting them access to various screens and functions within the system (by default, a user is created with no permissions at all). The process involved in this step is described in more detail below. 1. Creating a user button. To create a new user, click on the Page 9 of 23 © Copyright Sage Pay Ltd 2009 Customer Management Services User Manual – Customers You will now be required to create a new user. You must specify a username, password, display name and email address (which will be used for account notifications). If you wish, you can also choose to initially disable a user by selecting the User is Locked Out checkbox. You can then activate the account later when you are ready. Additionally, you can select the User has Admin Rights checkbox if you wish to grant this user admin privileges (which will allow the user to login and create new users themselves). When selecting a password, try to ensure you choose a password that is secure: a secure password contains a good combination of upper and lower case letters, numbers and special characters (such as %, & or $). It is also a good idea to choose a password that is at least eight characters long (you can click on the button to view more detailed instructions on choosing a secure password). If you prefer, you can allow the CMS system to randomly generate a secure password by clicking the button. When you have entered all the required information, click the the new user settings. button to save The new user account will now be listed in the user table. If you ever need to unlock this new user account, change User Account Privileges, or delete a new user account altogether, you will need to log into your Administrator account in order to do so. Important Note: Remember that with all accounts that you create, the CMS Customer Login will remain the same. Page 10 of 23 © Copyright Sage Pay Ltd 2009 Customer Management Services User Manual – Customers 2. Assigning permissions to a user By default a newly created user will have no permissions: they will be able to login, but they will not be able to view any information. However, if a user has Admin Rights they will still be able to access the Administration screen. In order for a user to be able to view or edit information, they will need to be assigned the relevant permissions. By default, a new user has no permissions. A user who attempts to access a page without the correct permission will be redirected to an “Access Denied” page. To manage the permissions assigned to a user, perform the following steps: Select the user from the table at the top of the screen and click on the button. The Permissions panel will be displayed (see below). Tick the relevant checkboxes to grant those permissions to the user. Conversely, untick those checkboxes where you wish to deny the user that permission. Click the changes. button to save your Managing users In addition to assigning permissions you are able to perform numerous other functions against a user. Users are colour-coded in the table depending on their current status. Your Administrator user account will always be shown in orange; all locked out (deactivated) users will be shown in red; and all currently logged-in users will be shown in green. Page 11 of 23 © Copyright Sage Pay Ltd 2009 Customer Management Services User Manual – Customers In the above screenshot, the Administrator account (with the username ‘starlight’) is highlighted in gray. The username ‘tom’ represents a user that is currently logged in, highlighted in green. The username ‘catherine’ represents a user that is not logged in, highlighted in white. To either modify or perform an action against a user, simply click the row in the table. The user you are currently modifying will be highlighted in dark grey: In the example above, we can see that the username ‘tom’ (who is currently logged in) is selected. Additionally, John Smith is coloured red because he is locked out (i.e. user ‘john’ will not be able to login; his account is currently inactive). Important Note: A user is automatically locked out of the system if they incorrectly enter their password three times in a row. They will not be able to log back into the system unless you unlock them. Performing functions against a user You can perform a number of functions against a user: Click the button to amend the user’s Display Name or password, or to grant/revoke admin rights to the user. Click If a user is locked out, click the to permanently remove the user from the system. button to reactivate the user. Similarly, if the user is currently active, the button will be displayed, allowing you to deactivate the account. This function can be used if you do not wish to grant a user access to your CMS account. Additionally, if the selected user is currently logged in elsewhere, you can to forcefully log the user out of the system (this will take click immediate effect). Page 12 of 23 © Copyright Sage Pay Ltd 2009 Customer Management Services User Manual – Customers As explained above, you can click the button to grant/revoke permissions against a user at any time (allowing the user view or edit access to different parts of the system). Page 13 of 23 © Copyright Sage Pay Ltd 2009 Customer Management Services User Manual – Customers 6 Navigating Around the CMS System The CMS system provides a menu on the left-hand pane to allow a user to navigate easily around the system. The screenshot below shows a currently logged-in user. Note that an Administrative user would only see the ‘User Administration’ link in the menu, and would not have access to this page. An explanation of the different sections of the screen has been provided below: 1. User name and timestamp: the name of the user and the time the user logged in are displayed at the top of the screen. 2. Logout button: the user should click this button when they wish to exit the system. 3. Highlighted menu item: this indicates the page the user is currently on. Page 14 of 23 © Copyright Sage Pay Ltd 2009 Customer Management Services User Manual – Customers 4. Link to the Technical Support website (http://www.sagepay.com/support): this links to a comprehensive resource that includes extensive technical advice, fraud advice and merchant advice, covering everything from how to integrate your payment solution with Sage Pay to how to apply for a merchant account. 5. Page-sensitive help: this gives the user further information on the different functions available on their current screen and how to use them. 6. Site Footer: this links to the CMS terms of use, security policy and privacy policy. It also allows users to send feedback on both the CMS site and their experience with Sage Pay in general. 7. Link to User Admin section: if the user has administrative privileges (as in the example screenshot) a link to the User Administration page will also appear in the menu. Page 15 of 23 © Copyright Sage Pay Ltd 2009 Customer Management Services User Manual – Customers 7 The Customer Homepage After you log into the CMS system, you will be presented with the following page, giving you an overview of your CMS account: The Welcome tab provides links to the three main functions available to the user: 1. Editing billing contact details 2. Viewing account statements and invoices 3. Setting up or editing Direct Debit instructions. You can click on the Billing Contact or Direct Debit tabs to view your current billing contact or Direct Debit details. You can also navigate to these functions using the menu in the left-hand pane of the screen. Page 16 of 23 © Copyright Sage Pay Ltd 2009 Customer Management Services User Manual – Customers Users who do not have privileges to view or edit the billing contact, account statement or Direct Debit details will be presented with an Access Denied message (see assigning permissions to a user above). In such instances, the user should contact their account administrator, not Sage Pay, who will be able to grant them the appropriate privileges. If you require help at any point or if you need an explanation whilst in any parts of link. the system, you can view page-specific help by clicking on the The following section provides a detailed breakdown of these three functions. Page 17 of 23 © Copyright Sage Pay Ltd 2009 Customer Management Services User Manual – Customers 8 View/Edit Billing Contact This section allows you to modify the billing contact on your Sage Pay account. The billing contact receives monthly invoices, credit notes and billing information. If details of your billing contact change, you should modify them here to ensure that all invoices and billing related information is relayed to the right person. Click on Edit your billing contact from the Customer homepage to get to the screen below: This screen will contain the current billing contact information that is listed on your Sage Pay account. You can make minor adjustments or choose to change the billing contact information entirely. You can also choose whether or not your billing contact receives service announcements and updates as well as newsletters and information about Sage Pay promotions. Once the new billing contact information has been entered, click the to commit your changes. button Page 18 of 23 © Copyright Sage Pay Ltd 2009 Customer Management Services User Manual – Customers 9 View Account Statement The View Account Statement section allows you to view credits and debits made against your Sage Pay account on or after the 1st April 2007. This allows you to view your account history and all payments taken by Sage Pay at a glance. On the example Account Statement below we have provided a number of examples, including the account opening balance, standard monthly charge and other charges based on a ‘per transaction’ basis. Important Note: The Receipts and Credit Notes tabs are features that are currently not available. The Invoices tab is available, but only for invoices dated after April 1st 2007. Please contact the Sage Pay Accounts team at [email protected] for any enquiries relating to invoices dated before April 2007. To view invoices dated after 31st October 2009, you need to select the row in the button table where the item you wish to view is listed, and click on the that appears (see the screenshot below). This lets you view the item you have selected in a printable format. You also have the option to save the invoice in PDF format 1 too. Important Note: In order to view and print any account items you will first need to download and install a copy of Adobe Acrobat Reader. You can download the software at the following link: http://www.adobe.com/products/acrobat/readstep2.html Please also note that invoices are displayed in a separate pop-up window, so you therefore must ensure that your browser allows pop-ups in order to view an invoice. In the example given above there is a transaction shown in red. This represents a payment that has not been made to Sage Pay as expected. In this example there is an outstanding balance of £23.50 on the account. The CMS system allows you to pay your outstanding balance by clicking on the table row (see the screenshot on the following page): 1 PDF stands for Portable Document Format. It's a distribution format developed by Adobe Corporation to allow electronic information to be transferred between various types of computers. The software which allows this transfer is called Acrobat. In order to view and print any invoice items you will first need to download and install a copy of Adobe Acrobat Reader. Page 19 of 23 © Copyright Sage Pay Ltd 2009 Customer Management Services User Manual – Customers You will be given the option to pay the invoice if you wish. Click on to pay the outstanding amount using your debit or credit card (see below): If you select to pay the invoice, you will first be given the opportunity to review the details and ensure you are paying the correct amount for our services. If you are . You will happy with this summary, you will need to click then be presented with the Sage Pay payment page, where you will be required to enter your card details (you will also be given the option of confirming or cancelling the payment before authorisation takes place). For further information, click on the detailed instructions. link on the payment page for more Page 20 of 23 © Copyright Sage Pay Ltd 2009 Customer Management Services User Manual – Customers 10 View/Edit Direct Debit Details The View/Edit Direct Debit Details section allows you to submit new Direct Debit details or edit existing Direct Debit details. Please ensure that you have an upto-date and current Direct Debit Instruction. To enter new Direct Debit details you will need to follow a simple four-step procedure: 1. Tick to say that you have read and accepted our terms and conditions 2. Enter your bank account details 3. Confirm your bank account details 4. Enter an email address so that we can send you a confirmation email. Sage Pay will take payment by direct debit on a monthly basis. To complete the Direct Debit instruction, you will need the following details to hand: Bank account number Bank sort code The full address of your bank including the post code You will be presented with a screen similar to the one on the following page where you will be prompted to enter your bank account details: Page 21 of 23 © Copyright Sage Pay Ltd 2009 Customer Management Services User Manual – Customers When you have entered your bank account details you will need to click the button to proceed to the confirmation screen (see the next page). Please ensure that the details entered are accurate. button at this point you are confirming the details you have By clicking the entered. Sage Pay will now use these details to take monthly payments by direct debit. Page 22 of 23 © Copyright Sage Pay Ltd 2009 Customer Management Services User Manual – Customers The final screen will ask you to enter an email address so that we can send you an email confirming the new Direct Debit Instruction. Once you have done this, you will see an on-screen confirmation message that your new instruction is now active, shortly followed by your confirmation email. Page 23 of 23 © Copyright Sage Pay Ltd 2009