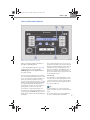
1
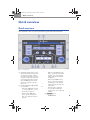
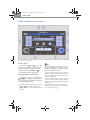
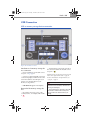
s3vc.2.book Page i Thursday, October 8, 2009 10:02 AM Volkswagen Sound System s3vc.2.book Page ii Thursday, October 8, 2009 10:02 AM About this booklet This booklet contains important information, tips, suggestions and warnings on using your vehicle. The other booklets in the Owner's Literature contain more information that you should be aware of for your own safety and for the safety of your passengers. b ® Make sure that you always keep the complete Owner's Literature in the vehicle. This is especially important when you lend or sell the vehicle. ⇒ Cross-reference to a “WARNING” within or outside of a section. This manual describes the vehicle equipment at the time of publication. The contents of this booklet correspond to the equipment options on your vehicle. Illustrations may vary from your vehicle. For this reason you should regard illustrations as a general guide. At the beginning of this booklet, you will find a table of contents showing all the items described in this manual in the order they appear. An alphabetical index is at the end of the booklet. Directions and positions (for example right, left, front, rear) are always relative to the direction of travel of the vehicle unless stated otherwise. Some sections of this booklet do not apply to all vehicles. If this is the case, a text at the beginning of the section indicates which vehicles it applies to, for example “Applies to USA Models only”. The section is continued on the next page. Indicates the end of a section. Registered trademarks are marked ™ or ®. However, the absence of this symbol does not constitute a waiver of the rights concerning any term. ⇒ Cross-reference to a “Note” within or outside of a section. WARNING Texts with this symbol contain important information on safety and how to reduce the risk of personal injury or death. Note Texts with this symbol draw your attention to potential sources of damage to your vehicle. For the sake of environment Texts with this symbol contain information about the environment and how you can help protect it. Tips Texts with this symbol contain special tips and other information about getting the most out of your vehicle and its features. s3vc.2.book Page iii Thursday, October 8, 2009 10:02 AM Afterword Volkswagen works continuously to develop and improve its products. We must therefore reserve the right to change any part of the vehicle, its equipment or technical specifications at any time. No legal commitment can therefore be derived from the information, illustrations or descriptions in this manual. The texts, illustrations and standards in this manual are based on the information available at the time of publication. No part of this manual may be reprinted, reproduced or translated without the written permission of Volkswagen AG. All rights under the copyright laws are expressly reserved by Volkswagen AG. Subject to alteration and amendment. Printed in Mexico © Volkswagen AG For the sake of environment This paper was bleached without the use of chlorine. s3vc.2.book Page iv Thursday, October 8, 2009 10:02 AM Volkswagen | Sound System Print status: 10.2009 Art.-Nr.: 291.556.BLT.21 | englisch Nordamerika 10.2009 s3vc.2.book Page 1 Thursday, October 8, 2009 10:02 AM Table of contents 1 Table of contents Quick overview ..................... 2 Quick overview . . . . . . . . . . . . . . . . . . . . . . . . . Important Information . . . . . . . . . . . . . . . . . . . 2 4 Radio / CD .......................... 5 Radio . . . . . . . . . . . . . . . . . . . . . . . . . . . . . . . . . . . CD . . . . . . . . . . . . . . . . . . . . . . . . . . . . . . . . . . . . . . 5 10 mp3/wma . . . . . . . . . . . . . . . . . . . . . . . . . . . . . . . USB Connection . . . . . . . . . . . . . . . . . . . . . . . . . Auxiliary audio jack (AUX) . . . . . . . . . . . . . . . Bluetooth® . . . . . . . . . . . . . . . . . . . . . . . . . . . . . . Anti-Theft Coding . . . . . . . . . . . . . . . . . . . . . . . . Warranty . . . . . . . . . . . . . . . . . . . . . . . . . . . . . . . . 13 19 22 23 30 31 Alphabetical index 32 ................. s3vc.2.book Page 2 Thursday, October 8, 2009 10:02 AM 2 Quick overview Quick overview Quick overview This overview is to assist you in familiarizing yourself with the controls Fig. 1 1 Sound System − Balance Control BAL: Press the 2 three times and turn button A 1 to set the desired the knob A balance between the right and left speakers. 1 On/Off switch and volume control. A The mode that was in use before the unit was last turned off – radio or CD – will automatically come back on when you turn on the unit. If the unit is silent when turned on and the word SAFE appears in the display, then you must re-enter the safety code . . . . . . . . . . . . . . . . . . . . . 2 Sound Setting Buttons and radio A set up (SET UP . . . . . . . . . . . . . . . . . . − Bass Control BASS: Press button 2 once and turn knob A 1 to adA just the bass as desired. − Treble Control TREB: Press 2 twice and turn the button A 1 to adjust the treble as knob A desired. 5 6, 6 − Fader Control FADE: Press the 2 four times and turn button A 1 to set the desired the knob A balance between the front and rear speakers 2 until an − Press the button A acoustic signal sounds indicating access to the set up mode (SET UP) 3 SCAN/TUNE button A − SCAN function s3vc.2.book Page 3 Thursday, October 8, 2009 10:02 AM − Radio Mode: Briefly press this button to listen to each of the stations for a few seconds. . . . . . . . . 7 − CD, mp3/wma, USB Mode: Briefly press this button to listen to each of the tracks in a given folder for a few seconds. . . . . . . . . . . . . . . . . . 12, 15 − TUNE function − Radio Mode: Turn the knob to manually tune to the next numerically higher or lower frequency. . . . . . . . . . . . . . . . . . . . . − CD Mode: Turn the knob to “skip” through the tracks. Turn clockwise to skip forward or counterclockwise to skip backward.. . . . . . . . . . . . . . . . . . . . − Mp3/wma, USB Mode: Turn the knob to “skip” through the tracks within all folders. Turn clockwise to skip forward or counterclockwise to skip backward when reproducing mp3/wma files in a CD or external USB audio source. . . . . . . . . . . . . . . . . . . . . . . . 4 Band and sound source setting butA tons MODE . . . . . . . . . . . . . . . . . . . . . − Press this button to select the desired sound source: FM1, FM2, AM1, AM2, CD, USB or AUX.. 5 Automatic Search Buttons (SEEK) A << and >> . − Radio Mode: Press buttons >> or << to search for a higher or lower frequency. . . . . . . . . . . . . . . 7 12 15 8 8 − CD Mode: Press >> to “scroll” upward through the tracks or press and hold the button to fast forward. . . . . . . . . . . . . . . . . . . . . . 12 − CD Mode: Press << to “scroll” forward through the tracks or press and hold the button to fast review. . . . . . . . . . . . . . . . . . . . . . . . 12 − Mp3/wma, USB modes: Press the >> to “scroll” forward through the tracks in a same folder when reproducing mp3/wma files on a CD or in an external USB audio source or press and hold to fast forward. . . . . . . . . . . . . . . . . . . . . . 15 Quick overview 3 − Mp3/wma, USB modes: Press the << to “scroll” backward through the tracks in a same folder when reproducing mp3/wma files on a CD or in an external USB audio source or press and hold to fast review. . . . . . . . . . . . . . . . . . . . . . . 6 Station pre-set and additional funcA tion buttons: − Radio Mode: Press these buttons to pre-set one radio station on each one of the four bands AM1, AM2, FM1 and FM2. . . . . . . . . . . . 15 9 − INF Function: Press this button INF so available information on the title and artist appear on the display when reproducing mp3/wma files on a CD or on an external USB audio source. . . . . 15 − RPT Function: Press this button RPT to repeat a track continuously when reproducing mp3/wma files on a CD or on an external USB audio source. Press the button again to cancel the function. . . . . . . . . . . . . . . . . . . . . 12 − RDM Function: Press this button RDM to randomly play all the tracks on a CD when reproducing mp3/wma files on a CD or on an external USB audio source. Press the button again to cancel the function.. . . . . . . . . . . . . . . . . . . . . 12 − F- and F+ Funtions: Press these buttons F- and F+ to select folders or lists when reproducing mp3/wma files on a CD or on an external USB audio source. . . . . 14 − Pause Function: Press this button II to briefly stop a track when reproducing MP3/wma files on a CD or on an external USB audio source. Press the button again to restart the track in the same place . ............................ 7 Eject button . . . . . . . . . . . . . . . . . . A − Press this button to eject the CD. 8 Display A − Radio Mode. . . . . . . . . . . . . . . . . . 12 11 9 − CD Mode. . . . . . . . . . . . . . . . . . . . . 13 − Mp3/wma Mode. . . . . . . . . . . . . . 16 s3vc.2.book Page 4 Thursday, October 8, 2009 10:02 AM 4 9 A 10 A 11 A 12 A Quick overview CD Slot. . . . . . . . . . . . . . . . . . . . . . . . . Auxiliary audio plug-in (AUX). . . . USB Connection. . . . . . . . . . . . . . . . Bluetooth . . . . . . . . . . . . . . . . . . . . . . − Pairing 11 22 19 23 Driver distraction causes accidents, collisions and serious personal injury! • Never allow yourself to be distracted by setting, adjusting or using the Sound System. − Connect • Use the Sound System only if the road, traffic and weather conditions allow and you are sure you will not be distracted from your driving. − Answer incoming call − Transfer ongoing call − Redial • − Voice recognition call 13 Bluetooth . . . . . . . . . . . . . . . . . . . . . . A WARNING 23 − Cancel call Always set the volume levels so you can clearly hear horns, sirens and other warning sounds outside the vehicle. − Disconnect Important Information Operating the Sound System while driving Driving on today’s roads requires the driver’s full attention. The wide range of sophisticated equipment and details of modern car radios offer not only a vast source of entertainment, but also important information regarding traffic updates, road conditions, weather reports etc. But remember, you should only operate the radio system with its numerous features when the traffic situation really allows ⇒ in “Quick overview” on page 2. which require the battery to be disconnected) it will be necessary to recode the radio. If the radio is installed in another vehicle, the electronic lock must be disengaged manually. If, after switching on the radio the word “SAFE” appears in the display the correct code must be re-entered for the radio to operate - ⇒ page 31. Tips • For example, changing CDs or reading song titles on a CD case or in the radio display when driving is often the cause of auto accidents. Please note that items marked with an asterisk (*) may be standard on certain models, optional on others or not available on your model. Always check with your authorized Volkswagen dealer to see if the feature or item applies to your model. It is also strongly recommended you set the volume of your radio system so you can hear signals from other drivers at any time. The radio code number and the radio serial number can be found on the “Radio Card” at the beginning of the Owner’s Literature. Radio coding Every time you remove the unit from the vehicle (for example: when the car is taken in for repairs • • It is very important that you keep this “Radio Card” in a safe place – never keep it in the vehicle. Only in this way will the antitheft protection be effective s3vc.2.book Page 5 Thursday, October 8, 2009 10:02 AM Radio / CD 5 Radio / CD Radio ON/OFF Buttons Fig. 2 Controls for the radio mode 1 to turn the unit Press the knob ⇒ fig. 2 A on/off. Whatever was playing when the unit was last turned off will automatically come back on when the unit is turned on again. Every time you turn off the system, the following adjustments will be stored and reproduced when switched on again: • • • Radio: the frequency (radio station setting) CD player: selected CD track External audio source: selected track The unit turns off automatically when you remove the key from the ignition. The radio can be switched on even if the key is 1 . After one hour not in the ignition by pressing A the unit will turn off automatically. This process can be repeated as often as desired. WARNING Driver distraction causes accidents, collisions and serious personal injury! • Never allow yourself to be distracted by setting, adjusting or using the Sound System. • Use the Sound System only if the road, traffic and weather conditions allow and you are sure you will not be distracted from your driving s3vc.2.book Page 6 Thursday, October 8, 2009 10:02 AM 6 Radio / CD WARNING (continued) Tips • Always set the volume levels so you can clearly hear horns, sirens and other warning sounds outside the vehicle. If after switching it on, the radio does not play and the word “SAFE” appears on the screen, it means the unit is electronically locked see ⇒ page 31. Volume Control Volume Control 1 to ad– Turn the knob ⇒ page 5, fig. 2 A just the volume. Sound Adjustment The quality of sound can be adjusted while listening to the radio, a CD or an external sound source. On concluding this process the adjusted setting will be stored. Bass Control 2 – Press the button ⇒ page 5, fig. 2 A once, the word “BASS” will appear in the display window. 2 to adjust the bass. – Turn the knob A The volume of the bass tones can be adjusted from the central position (BASS 0) to lower tones (BASS +1...+6) or lower (BASS -1...-6). Treble Control 2 twice. “TREB” will – Press the button A appear in the display window. 2 to adjust the interme– Turn the knob A diate tones. The volume of the trebles can be adjusted from the central position (TREB 0) to higher tones (TREB +1...+6) or lower tones (TREB -1...-6). Adjustment of balance 2 three times. “BAL” – Press the button A will appear in the display screen. 2 to adjust the desired – Turn the knob A volume level between the left and right speaker. The apparent source of sound can be adjusted from the central position (BAL CENTER) to the left (BAL LEFT 1...6) or to the right (BAL RIGHT 1...6). Fader adjustment 2 four times. “FADE” – Press the button A will appear in the display. 2 to adjust the desired – Turn the knob A volume level between the front and rear speakers. The apparent source of sound can be adjusted from the central position (FAD CENTER) to the front (FAD FRONT 1...6) or to the rear (FAD REAR 1...6). Set Up Mode 2 for more than – Press and hold button A two seconds in order to access the SET UP mode. Set up Once within the SET UP mode the following adjustments can de made s3vc.2.book Page 7 Thursday, October 8, 2009 10:02 AM Radio / CD Volume when turning on the unit 7 2 for more than two seconds. SET ON VOL will Press the button ⇒ page 5, fig. 2A 1 to adjust the set on volume appear in the display screen. Turn the knob A Volume during Press the button A 2 for more than two seconds once the SET ON VOL appears in a phone call the display window, briefly press once more. BT VOL will appear in the display 1 to adjust the radio volume when a Bluetooth call is window. Turn the knob A being made ⇒ page 23. Availability of “Bluetooth audio” 2 for two more seconds once SET ON VOL appears in the disPress the button A play, briefly press two consecutive times. BT AUDIO ON/OFF will appear in the 1 to enable or disable the availability of the display window. Turn the knob A “Bluetooth audio”” function ⇒ page 29. SCAN/TUNE Button Use the quency SCAN/TUNE SCAN/TUNE knob to manually tune to the numerically higher or lower fre- Automatic Tuning (SCAN) Automatic Tuning (SCAN) – Press the SCAN button ⇒ page 5, fig. 2 3 briefly to scan upwards to the next A higher frequency. Scanning stops at the next station with a signal. After about 10 seconds, the radio will scan to the next station. SCAN will appear in the display window after you press this button. If you press the button for the 10 second “hold” period, the radio will “latch” onto the station currently being received. Manual radio station search ( (TUNE) 3 clockwise to tune up– Turn the knob A wards. – Turn the knob counterclockwise to tune downwards. Manual radio station search (TUNE) The settings will change in small increments (FM 200 KHz, AM 10 KHz). Tips The automatic tuning function will stop after scanning over the total number of stations with signals. s3vc.2.book Page 8 Thursday, October 8, 2009 10:02 AM 8 Radio / CD Band Setting and Audio Source MODE Fig. 3 Controls for the radio mode 4 to sePress the MODE button ⇒ fig. 3 A lect the desired sound source: FM1, FM2, AM1, AM2, CD or AUX. If any of the sound sources, such as CD or USB are not available, they will not appear in the display window when the MODE button is pushed. Station Search Buttons (SEEK) << Tips The unit has two FM pre-selection groups (FM= Frequency modulated) and two AM pre-selection groups (AM = Amplitude modulated. and >> 5 search Use buttons << and >> ⇒ fig. 3 A for the next higher or lower radio frequency. – Once a station has been found, briefly pressing << or >> will cause the search operation to be repeated. Automatic search Controlled Search – Press >> to automatically search for the next higher frequency (radio station). – Press and hold << or >> to tune to a desired frequency (radio station). – Press << to automatically search for the next lower frequency (radio station). s3vc.2.book Page 9 Thursday, October 8, 2009 10:02 AM Radio / CD 9 – Simply release << or >> just before you reach the desired frequency. The search function will then stop at the next station that offers sufficiently strong reception. Station Preset Buttons You can preset one radio station on each of the six buttons in each of the four bands AM1, AM2, FM1 and FM2 To program AM1 / AM2 and FM1 /FM2: – Select the band/group of pre-selections of your preference ⇒ page 8. – Tune to the desired radio station ⇒ page 7 or ⇒ page 8. – Press and hold the button ⇒ page 8, 6 on which you want to save the stafig. 3 A tion until you hear an audible signal and the program is muted; this means the station is now preset on this button. The number of the preset station will appear in the display screen. – To listen to the station you have just stored, briefly press the button. Tips When selecting a radio station to listen to, briefly press the button, but avoid holding it down! This way you will avoid inadvertently setting a new frequency (radio station) on this button. What you will see in the display screen when you are listening to the radio You will be able to see the following information in the display screen when you are listening to 8 . the radio ⇒ page 8, fig. 3 A Bands Display: FM. . . FM1. . . Station programming buttons Display: 1 . . . 6 Frequencies Display: FM 103.1 MHz Automatic tuning Display: SCAN s3vc.2.book Page 10 Thursday, October 8, 2009 10:02 AM 10 Radio / CD CD Taking care of your audio CD's To assure the highest quality sound reproduction, make sure your CD's are clean and free of scratches or any other type of damage. Cleaning your CD's For routine cleaning, wipe the playing surface with a clean soft lint-free cloth from the center of the disc to the outer edge. If the surface is heavily soiled, dampen a soft clean cloth in a mild neutral commercial detergent solution before cleaning the disk. Note • Never use benzene, paint thinner or record cleaner as these fluids may severely damage the CD surface. • When inserting a CD into the slot, make sure the printed side is facing up. Then, gently insert the CD into the slot until it is pulled in automat- ically by the player. Never force the CD into the CD slot! • If you are going to make your own CD's do not stick an adhesive label on the CD itself. The heat generated by the CD player can loosen the adhesive label which could then come off and jam up the unit. This could cause the need for costly repairs. Instead, use a marker to label your CD's. • Always store CD's in their cases when you are not listening to them. • Keep the CD away from heat sources and out of direct sunlight. • Avoid getting fingerprints on the CD. Tips Always hold the CD either by the center or by the outer edge with the printed side facing up. s3vc.2.book Page 11 Thursday, October 8, 2009 10:02 AM Radio / CD 11 Eject Button and CD Slot Insert the CD with the printed side up. Fig. 4 Controls for the CD mode Ejecting a CD – Briefly press the the CD. 7 to eject ⇒ fig. 4 A CD Slot 9 with With the unit on insert a CD into the slot A the printed side up. On inserting a CD, CD LOAD and then CD READING will appear on the dis- play window. Once the CD is inserted, DISC will appear in the display window. If the CD is not removed from the slot after 9 it will automatically re-insert after pressing A approximately 10 seconds. Tips If the selected mode is any other sound source, 4 to select the press the button ⇒ page 11, fig. 4 A CD mode. s3vc.2.book Page 12 Thursday, October 8, 2009 10:02 AM 12 Radio / CD Track Selection Automatic Track Selection – Briefly press the SCAN/TUNE button 3 to start automatic ⇒ page 11, fig. 4 A scanning to the next track. After 10 seconds, scanning will resume and go to the next track. SCAN will blink in the display screen. – To stop scanning, press the SCAN/TUNE briefly during the 10 second “hold” time. Fast Forward/Fast Review within the same track – Press and hold either one of the buttons 5 in order to fast forward ⇒ page 11, fig. 4 A ( >> ) or fast review ( << ) through the tracks. The elapsed time will appear in the display. – Release the button to stop the operation. 3 knob clockwise – Turn the SCAN/TUNE A or counterclockwise to select the tracks upward or downward. Selecting the Track • •The currently selected track appears in the display: TRACK 01 . . . TRACK 02 . . . TRACK 03 etc. • •Briefly pressing the << button or turning the SCAN/TUNE knob counterclockwise while a track is playing will cause the unit to “jump” back to the beginning of the track and resume playing from there. Tips • The automatic track selection function (SCAN) will stop after scanning through all of the tracks on the CD. • If the random reproduction function has been selected (RDM) and any of the buttons 5 or the knobA 3 is turned the ⇒ page 11, fig. 4 A track scan will also be random. 5 – Press the >> or << ⇒ page 11, fig. 4 A to select the tracks upward or downward. Additional functions The functions described below also apply to the CD player or an external USB sound source with mp3/wma files RPT Function (repetition) 6 RPT to con– Press the ⇒ page 11, fig. 4 A tinually replay a single track. RPT will appear in the display. – Press the button again to cancel the function or select another track. RDM Function (random mode) 6 RDM to play all the tracks – Press the A on the CD in a random manner. RDM will appear in the display. – Press the button again to cancel the function. Pause Function (II) 6 II to momentarily pause – Press the A the track which is playing. PAUSE will appear in the display. – Press the button again to continue playing. Tips In addition to the functions described above, there are others which are applicable when re- s3vc.2.book Page 13 Thursday, October 8, 2009 10:02 AM Radio / CD 13 producing a CD or an external USB sound source with mp3/wma files ⇒ page 14. What you will see on the display when you are listening to a CD You can see the following information on the 8 when listening to a display ⇒ page 11, fig. 4 A CD. Selected compact disk track Display: TRACK 01 . . . TRACK 02 Automatic tuning Display: SCAN Random mode Display: RND Repetition mode Display: RPT Pause mode Display: PAUSE When inserting a CD Display: CD LOAD, CD READING The radio unit cannot read the CD Display: ERROR mp3/wma mp3/wma player operation The CD player is also compatible with CD-R and CD.RW which contain data in mp3 or wma format. However their reflectivity range must be at least 60%. WARNING Try not to become distracted from your driving at any moment. Different types of information (for example: name of the song, and the artist) can appear on the display during the reproduction of compact disks with mp3/wma files. Remember that it is only possible to read this information while the vehicle is stopped or when traffic conditions allow it ⇒ . If a CD that contains audio (mp3 or wma) and data is inserted in the player, the unit will only reproduce the audio files. Only use conventional 12cm (4.72”)CDs. Shape CDs or 8cm (3.15 in.) CDs are not compatible. • Tips • Either WMA or MP3 will appear on the display, depending on the type of file being played. The unit only reads files that do not require licenses. s3vc.2.book Page 14 Thursday, October 8, 2009 10:02 AM 14 Radio / CD Folder and Play List search buttons Fig. 5 Folder search buttons Folder search 6 to – Press buttons F- and F+ ⇒ fig. 5 A select the desired folder or play list in alphabetical order. Press F+ to scroll upwards for folders and play lists or F- to scroll down for folders or play lists. Display the name of the folder – Briefly press either one of the buttons F- and F+ A 6 to display the first eight letters of the name of the folder to which the file being played belongs. The search of folders and play lists by means of the F- and F+ buttons will be take place according to the access order of the files in the CD ⇒ page 18. Tips The name and number of the folder or the play list selected will appear in the display screen: P001 Name... P002 Name... for play lists and F001 Name... F002 Name... for folders. • If there are files (tracks) in the root directory “ROOT” will appear on the display screen for a few seconds before the name of the file (track) appears on the display. • Once the radio unit has “read” the information in the folder, the name of the file (track) will appear on the display and will be displayed for a few moments. • Each time the unit selects a new track, the available information is shown on the display screen while it is playing. s3vc.2.book Page 15 Thursday, October 8, 2009 10:02 AM Radio / CD Information Button 15 INF 8 – Press the INF ⇒ page 14, fig. 5 A button once. TITL will appear on the display, and the name of the track will be shown. Once the name of the track has been fully displayed, the file information will re-appear on the display screen. – Press the INF twice: ART will appear on the display screen and the artist’s name will appear. Once the name of the artist has been fully displayed, available information on the artist will re-appear on the display. Random Play Button Random Track Playing for all files 8 – Press the RDM ⇒ page 14, fig. 5 A button. RND will appear on the display. Press the RDM button once again to cancel the random playing function. Tips If you have chosen the random playing function (RDM) and you press any one of the buttons 5 or if you turn knob A 3 , the ⇒ page 14, fig. 5 A track search will also be done in a random manner. Random Track Playing for a Single Folder. 8 for more than – Press the RDM button A three seconds. RND will blink on the display screen. Press the RDM button again to cancel the random playing function. Track Selection Automatic Track Selection Track selection in all folders – Briefly press the SCAN ⇒ page 14, fig. 5 3 button to start automatic scanning to A the next tracks within a single folder or play list. After 10 seconds, scanning will resume and go to the next track. SCAN and the available information on the file will appear on the display screen. 3 knob to the left – Turn the SCAN/TUNE A or right to select tracks upward or downward in all folders. Available information on the files will be shown on the display. – To stop scanning, press the SCAN button during the ten second “hold” time. Selecting a track within a single folder 5 – Press the >> or << ⇒ page 14, fig. 5 A to select tracks from within a single folder. Press >> to scroll up or << to scroll down. The available information on the file will appear in the display screen. Track selection • The name and number of files (tracks) currently selected will appear on the display: T001 NOMBRE . . . T002 NAME . . . T003 NAME etc. • If you briefly press the << button or turn the knob to the left while a track is playing, the unit “jumps” to the beginning of the track and resumes playing from that point. SCAN/TUNE • If you press the << button twice while the first track in a folder is playing, the unit will “jump” to the last file in the same folder. s3vc.2.book Page 16 Thursday, October 8, 2009 10:02 AM 16 Radio / CD • If you briefly press the >> button while the last track in a folder is playing, the unit will “jump” to the first file in the same folder. • When the last file in the folder has been reached and the SCAN/TUNE knob is turned to the right the unit will “jump” to the first file in the same folder. • When the first file in the folder has been reached and the SCAN/TUNE knob is turned to the left, the unit will “jump” to the last file in the following folder. • When the SCAN/TUNE knob is turned, or either of the << or >> buttons are pressed, the available file information will be scrolled. Once the scroll action has been completed, the first eight characters of the file will remain in the display and after a few seconds the scrolling will start again. Information displayed Information on the file The file information which is available will be scrolled or will appear in the display. The type of information displayed depends on the following: • If the mp3/wma file has an ID3 label with information on it, the radio unit will display the name of the track and the name of the artist in the display. If this information is not available on the mp3/wma file “-- - - -” will appear when the INF button is pressed ⇒ page 14, fig. 5 A 6 . • Folder and the file names can be displayed like titles. Capital letters, numbers and underscored items “___” are scrolled. • A maximum of 32 characters can be displayed. • Folders and file names using other characters to name folders or files will not be appropriately displayed. What you see in the display while listening to an mp3/wma CD You can see the following information in the display when listening to an mp3/wma CD 10 . ⇒ page 14, fig. 5 A Selected play list Display: P001 NAME. . . P002 NAME. . . Selected Folder Display: F001 NAME . . . F002 NAME. . . Selected CD track and available information Display: T001 NAME . . . T002 NAME . . . Type of file playing Display: WMA o MP3 Automatic tuning Display: SCAN Random mode Display: RND Repetition mode Display: RPT Pause mode: Display: PAUSE When inserting a CD Display: CD LOAD, CD READING The radio unit cannot read the CD Display: ERROR s3vc.2.book Page 17 Thursday, October 8, 2009 10:02 AM Radio / CD 17 About mp3 / wma Except for personal enjoyment, duplicating data or distributing, transferring or copying it, whether for free or for a fee, without permission of the copyright holder is strictly forbidden by the Copyright Act and by international treaty. • When creating a CD be sure to choose the Mode 1 CD or Mode 2/XA. • The audio quality depends on the “sampling rate” used to create the MP3 file. • What are MP3 and wma? Be sure to finalize the session when creating a disk. MP3 (MPEG audio layer 3) is a compression standard prescribed by the ISO and MEG. When naming your MP3 files, use short file names. The length of the display is limited. MP3 files contain compressed audio data. MP3 encoding is capable of compressing the audio data at extremely high ratios, shrinking music files by as much as one-tenth their original size. The MP3 format achieves such high compression ratios by eliminating sounds that are either inaudible to the human ear or masked by other sounds. How to create MP3/ WMA files The software used to create MP3 files is widely sold from various sources. For details on creating MP3 files, refer to the owner’s manual for that software. The MP3 files that can be played by this device have the file extension “mp3” or “cad”. Files with no extension can not be played back. Corresponding File Systems This unit supports disks formatted with ISO9660. Disks in Joliet format which adjust to ISO9660 can also be reproduced. However, it is possible that names of folders / files etc. not be adequately visualized. Please take the following points into account: • • We recommend you use one-word names to name your files, (for example: Folder_A) and avoid repeating the same names on the CD. • Don’t use more than 50 folders when creating a disk, otherwise finding the files you want to play will be difficult. • Don’t use more than eight levels of subfolders when you create the CD. • The number of tracks that can be played goes from 1 to 999. • Using the “drag and drop” option available on WINDOWS-XP to move files to the compilation window, does not allow for mode adjustment nor for the ID3 tag version which is compatible with this radio unit. Disks recorded this way can sometimes not be played in this unit. ID3 Tag This radio unit does not accept ID3Tags v1. If the file contains information on the IS3 tag, the name of the track and the name of the artist will appear on the display independently of the name of the file. If the file contains both ID3 vl and ID3 v2 tags, only the information on the ID3 v1 file will appear on the display. s3vc.2.book Page 18 Thursday, October 8, 2009 10:02 AM 18 Radio / CD Order of tracks typical CD containing files, play lists, folders and sub-folders. The unit will access the folders according to the hierarchical structure of the CD they are on. • Playing will start with the first file under the 1 and A 2 .) The root direcroot directory (see A tory will appear in the display as folder 1 (F1). • The unit will then access the folders remaining in the root directory (see F2 and F3) in alphabetical order and will play the files located 3 ,A 4 and A 5 . within them (see A • The unit will then access the suborders within the main folders in the root directory (see F4, F5 and F6 within F2) and will play the files lo6 and A 7 . cated inside them (see A • If there happen to be folders without files inside (see F4 within F2). The unit will ignore this folder and will “jump” to the following folder at the same CD structure level which contains files (in example F5). • The unit will then access the following suborder level (see F7 within F5) and will play the 8 ). files located within (see A • Fig. 6 Traditional structure of CD files The unit plays files inside a CD in a particular order. The illustration ⇒ fig. 6 is an example of a The unit will then access the next existing suborder files (see F8 within F7) and will play the 9 ). files which are within (see A Tips The unit can access up to 8 levels of suborders. s3vc.2.book Page 19 Thursday, October 8, 2009 10:02 AM Radio / CD 19 USB Connection USB or memory storage device connection Fig. 7 USB and AUX connections Introduction of a memory storage device connection – Insert a USB device in the USB connec11 , or tion port ⇒ fig. 7 A – Connect a commercial USB connection cord to the mp3 player and insert the other end of the cable into the USB port if you prefer to use the mp3 player as your memory storage device. – USB LOAD will appear in the display. Removal of the memory storage device – First change the entry source of the sound system to, for example, FM or radio ⇒ . – Afterward remove the memory mode or the extension cable from the USB connection port ⇒ . With the memory storage device inserted, stored music can be played on the radio ⇒ page 21. For more information on mp3/wma files, see ⇒ page 13, ⇒ page 17 WARNING Always concentrate on your driving. Driver distraction causes accidents, collisions and serious personal injury! • Use the USB device only if the road, traffic and weather conditions allow and you are sure you will not be distracted from your driving. s3vc.2.book Page 20 Thursday, October 8, 2009 10:02 AM 20 Radio / CD WARNING (continued) • Always set the volume levels so you can • clearly hear horns, sirens and other warning sounds outside the vehicle. • The USB device or memory mode must never be removed while the vehicle is in movement. WARNING • Never add accessories such as cup or cell phone holders to the airbag surfaces or airbag inflation area ⇒ Booklet “Owner's Manual”, chapter “Safety first”. • Objects on or near the surfaces that harbor the airbags can be projected and cause serious injury in the event the airbags inflate. Note • The allowed temperature range for USB and memory storage devices is limited and frequently is between 0ºC and 40ºC. Therefore the memory storage device must never be left inside the vehicle for long periods of time! • Never plug the mp3 directly into the USB port if you want to use it as a memory storage device because it could damage the port. Connect the player to the port by means of a USB cable. • Never remove the memory storage device if the USB cable is in use as the source, this could permanently damage the memory! • The connection must not be used for any device other than certified USBs or memory storage devices. It is impossible to use hard drives or multi-port USB connectors in the port! • The maximum USB or other memory entry must not exceed 100 mA/5V. • Never introduce metallic objects into the USB connection, as this could cause short-circuits and damage the unit. • Never store important files on the USB device or memory mode. Volkswagen accepts neither responsibility nor obligation for lost data or files. Tips • To select a file from the root directory, use 6 . The radio buttons F+ or F- ⇒ page 19, fig. 7 A plays the first ordered and recognized track (in mp3 or wma format). • If the interface does not detect the memory storage device within 15 seconds, remove the memory mode and re-insert it into the USB connection. • It is only possible to use the mp3 player with a USB cable as a memory mode. The mp3 player must have an available and correctly formatted USB memory function, if not, the mp3 player must be connected to the auxiliary audio entry. • Some mp3 players need to be activated by pressing a button to establish a connection through the USB port. Refer to the Owner’s Manual in what refers to mps players. General Notes • The radio unit can only read certified USB flash drives which use the 1.1,2.0 communication protocol or both 1.1/2.0. The package or wrapping of the USB device must bear the USB logo. • The only music formats which can be played are mp3 (MPEG1 Layer3 from 32 to 329 kbps). • • DRM music formats are not compatible. The radio orders the music folders and files in an ascending manner based on its titles; the first criterion is the number of the music file or folder (numerical order); the second criterion is the name (alphabetical order). • With an external audio device connected, another source on the radio can be selected at any time. The audio device will continue to play until you turn it off. • If you use a 12 volt socket for external audio devices, unshielded devices can cause interference during playback (buzzing, static). If this happens, we recommend you avoid connecting the external audio device to the 12 volt socket. • If you use an external audio device which is very low-volume or which buzzes at a “normal” volume in the vehicle’s sound system, increase the volume of the external audio device. This s3vc.2.book Page 21 Thursday, October 8, 2009 10:02 AM Radio / CD however, will not be possible on all external audio devices. • The number of tracks that can be played is from 1 to 999. 21 • If playback becomes “distorted”, turn down the volume of the external audio device. Playing music files on the radio The radio buttons can be used as control elements. Saving files on a USB flash drive or memory storage device Make sure the USB flash drive or memory storage device is correctly formatted. In order to achieve a tree-type folder configuration of the compatible music files that can be read by the USB flash drive or mp3 player, it will be necessary to build the desired structure on a CPU and once finished, copy the whole tree onto the USB flash drive or memory storage device in one single step. We recommend tracks not be stored directly on USB flash drives or memory storage devices, but rather organized in directories. This way tracks can be saved in a more structured manner (for example all tracks of a certain type of music can be stored together in a folder). Creating sub-folders of a main folder is also an option. For example, you can store all of the albums pertaining to one artist in this manner. Example of the structure of folders: Main folder 1 Sub-folder 1_1 Sub-folder 1_2 Sub-folder 1_3 ... Main folder 2 Main folder 3 Main folder 4 Sub-folder 4_1 Sub-folder 4_2 ... Main folder 5 Main folder 6 Playing music files from the USB flash drive The description for playing music files on ⇒ page 13 also applies to playing files with the USB flash drive. Playing music files from an iPod It is possible to play music files from an iPod using a USB flash drive as long as the files are in mp3 or wma format. Playback, pauses and track search can be done with the radio buttons. The compatible iPod models are: mini, nano, photo, shuffle and video. WARNING Always concentrate on your driving. Driver distraction causes accidents, collisions and serious personal injury! • Use the USB device only if the road, traffic and weather conditions allow and you are sure you will not be distracted from your driving. • Always set the volume levels so you can • clearly hear horns, sirens and other warning sounds outside the vehicle. • The USB device or memory mode must never be removed while the vehicle is in movement. Tips • Skipping through numerous songs can cause a small delay in playback. • Depending on the type of device used, the radio may require a few seconds to recognize the USB flash drive or memory storage device. • The unit can accept up to 8 levels of subfolders. s3vc.2.book Page 22 Thursday, October 8, 2009 10:02 AM 22 Radio / CD What you see on the display while listening to an external USB flash drive audio device with mp3/wma files The following information will appear on the display when listening to an external USB flash 8 . drive audio device ⇒ page 19, fig. 7 A Select folder Display: F001 NAME . . . F002 NAME. . . Track number and available information Display: T001 NAME . . . T002 NAME . . . Random mode Display: RND Repetition mode Display: RPT Pause mode Display: PAUSE Type of file playing On inserting an external USB flash drive audio device Display: WMA or MP3 Display: USB LOAD Automatic tuning The USB flash drive cannot be read Display: SCAN Display: USB ERROR Auxiliary audio jack (AUX) Auxiliary audio jack for external audio devices The auxiliary audio jack allows external audio devices to operate by means of the factory-installed sound system, using a special adapter cable. Adapter cable 1) You will need a special adapter cable to connect an external audio device to the auxiliary audio socket. One end of this adapter cable must be plugged into the safety socket (3.5 mm stereo) and the other end into the external audio device. A suitable cable should be available at electronics specialty stores. Connecting an external audio device • If necessary switch on your external audio device. Disconnecting the external audio device Disconnect an external audio device only when the vehicle is stopped. • • Disconnect the adapter cable from the auxiliary audio socket. An external audio device should only be connected when the vehicle is parked. • Connect the external audio device 10 , to the jack using the adapter ⇒ page 19, fig. 7 A cable 1) . 4 • Press the MODE button ⇒ page 19, fig. 7 A on the radio several times to select the external audio device, AUX PLAY will appear on the radio display. 1) Available at specialized stores Switch your audio system off if necessary. WARNING Always pay attention to your driving. Driver distraction causes accidents, collisions and serious personal injury! • Always set the volume levels so you can clearly hear horns, sirens and other warning sounds outside the vehicle. s3vc.2.book Page 23 Thursday, October 8, 2009 10:02 AM Radio / CD WARNING (continued) WARNING • Never add accessories such as cup or cell phone holders to the airbag surfaces or airbag inflation area ⇒ Booklet “Owner's Manual”, chapter “Safety first”. 23 • Objects on or near the surfaces that harbor the airbags can be projected and cause serious injury in the event the airbags inflate. Tips 1 to control Use the VOL knob ⇒ page 8, fig. 3 A volume and clarity of sound. General Notes • The only music formats which can be played are mp3 (MPEG1 Layer3 from 32 to 320 kbps) AND WMA (from 8 to 192 kbps.) This player cannot play the i-Pod format directly. • If an i-Pod is connected to the external audio jack, the radio unit will only control and play the sound signal generated by the i-Pod.Music playback in i-Pod format will be played by the i-Pod itself. • With the external audio device connected you can select another source on the radio at any moment. The audio device will continue to play until you switch it off. • You cannot control the external audio device through the factory-installed radio. The selec- tion of tracks must be done through the external audio device. • Using a 12-volt socket to power external audio devices without proper shielding can cause interference during playback (buzzing, static). If this happens, we recommend not connecting the external audio device to the 12-volt socket. • If you use an external audio device which is very low-volume or which buzzes at a “normal” volume in the vehicle’s sound system, increase the volume of the external audio device. This however, will not be possible on all external audio devices. • If playback becomes “distorted”, turn down the volume of the external audio device. Bluetooth® General information Bluetooth® is a norm which describes a global standard of wireless communication which makes it possible to transmit voice and data between different equipment by means of a radio frequency link. The type of communication to be established between the radio and a BT device (Bluetooth) depends on the profiles that are supported by both parties. • Basically, the radio allows Bluetooth connections to: Set up Provide cell phones with hands-free functions within the vehicle. • Allow the vehicle’s audio system to play audio generated by a cell phone with BT. The Bluetooth radio connection is free of cost. Bluetooth is a registered brand of Bluetooth SIG, Inc. Using the set up mode, some of the Bluetooth parameters can be modified ⇒ page 6 s3vc.2.book Page 24 Thursday, October 8, 2009 10:02 AM 24 Radio / CD WARNING (continued) WARNING Always concentrate on your driving. Driver distraction causes accidents, collisions and serious personal injury! • Never become distracted while driving because of setting-up, adjusting or using your cell phone. • Use the cell phone only if the road, traffic and weather conditions allow and you are sure you will not be distracted from your driving. • Always set the volume levels so you can clearly hear horns, sirens and other warning sounds outside the vehicle. • In areas where there is deficient or no cell phone coverage, and occasionally in tunnels, carports or underpasses you will be unable to make cell phone calls, not even emergency calls! • Using a cell phone within a vehicle without having a separate external antenna can be hazardous for you health and that of your passengers, because electromagnetic radiation energy emitted by these devices can be above limits established as safe. • Always completely disconnect cell phones when fueling the vehicle. Electromagnetic radiation may cause sparks to light fuel vapors, which may in turn cause fires. WARNING Cardiologists have warned that cell phones can seriously affect the way in which pacemakers work. • Always keep the cell phone antenna at least 20cm (8 inches) from the pacemaker. • Never keep a connected ell phone in a pocket directly above the pacemaker. • If you suspect interference with a pacemaker, immediately switch phone off. WARNING • Never add accessories such as cup or cell phone holders to the airbag surfaces or airbag inflation area ⇒ Booklet “Owner's Manual”, chapter “Safety first”. • Objects on or near the surfaces that harbor the airbags can be projected and cause serious injury in the event the airbags inflate. Tips • Please keep in mind that the quality of a phone call may be affected by high speeds, meteorological factors (rain or wind), road conditions, environmental noise or a deficient network connection. • Always comply with local rules in what refers to cell phone use. • Some countries have restrictions in what refers to Bluetooth devices. You may request information from local authorities. • When you link or connect a cell phone using Bluetooth technology, be sure to follow safety indications included in the instructions for operation. Use only compatible products. Ask your authorized Volkswagen dealer about compatible products. s3vc.2.book Page 25 Thursday, October 8, 2009 10:02 AM Radio / CD 25 Linking a Bluetooth telephone Fig. 8 Controls for Bluetooth connection Before connecting a Bluetooth device to the radio, it must be paired. 12 – Press and hold the button ⇒ fig. 8 A until you hear two acoustic signals. PAIRING appears in the display window for a few seconds. After verifying the Bluetooth connection by inputting the code number, the cell phone and cell phone pre-installation will detect each other. Up to five phones can be paired during the cell phone pre-installation. If an additional phone is paired to the cell phone pre-installation, the phone unused for the longest period of time will be automatically erased. If you do not have a paired phone, the pairing process will begin immediately after the second “beep”. As of this moment the radio will be visible for any telephone with Bluetooth tech14 will nology for about 1 minute. The symbol A blink on the display and the Bluetooth PIN will also appear (Key XXXXX) This PIN will be requested by the telephone in order to allow the pairing and later connection to the radio. About pairing Use the phone to begin the pairing process. Check the phone’s instruction manual. Once the telephone is paired, PAIRED will appear on the 14 will stop blinking in display and the symbol A the display. If the pairing process does not take place within one minute, the process must be started again. The radio is able to pair with five Bluetooth devices, and only one of the paired phones can be connected at a time. Connection priority will be given to the last phone that was paired and connected to the radio unit. Tips • • The radio appears as an audio and Hands Free device with the name “VW RADIO”. s3vc.2.book Page 26 Thursday, October 8, 2009 10:02 AM 26 Radio / CD • It is impossible to pair devices during an established telephone communication. • It is impossible to pair a cell phone while it is playing a BT audio device. Connecting a Bluetooth telephone Once it has been paired, the cell phone can be connected. Refer to the cell phone User’s Manual, as methods vary depending on the brand and model. Automatic connection to the radio Once the cell phone connection is established, 15 appears and rethe symbol ⇒ page 25, fig. 8 A mains inn the display. The cell phones Bluetooth name appears in the display for a few seconds as “BTXXXXXXX”, where “XXXXXXX” is the first eight characters in the telephone name. As long as the connection process is automatic, the display will not show a specific message, and 14 will blink in the the symbol ⇒ page 25, fig. 8 A display screen until the connection is established, from which time it will remain permanently lit. If the paired telephone is using the Bluetooth device search function at the same time, the connection between both devices will be automatic. When a Bluetooth device is connected to the radio for the first time, the radio memorizes the number, so each time it is turned on, or the 12 button is briefly pressed ⇒ page 25, fig. 8 A (manual form), the radio will try to connect with the last five Bluetooth telephones which have been connected to it in the order in which they were connected beginning with the last phone. 14 blinks to indicate that the radio is The symbol A searching for the paired numberscinco On turning on the radio, as long as there is at least one telephone paired and connected, it will begin to search for the Bluetooth devices. Tips • It is important to differentiate between the concepts of pairing and connection, because a Bluetooth device cannot be connected unless it has been previously paired. • • Only one cell phone can be paired at a time. If the radio does not immediately recognize a paired telephone, press the button ⇒ page 25, 12 once. fig. 8 A Cancelling a Bluetooth connection – In order to cancel a Bluetooth telephone connection, press and hold the 13 until you hear button ⇒ page 25, fig. 8 A an acoustic signal. DISCONNECT will appear in the display, and the indicator light 14 will begin to blink in ⇒ page 25, fig. 8 A the display indicating that the radio unit is in search mode for Bluetooth devices to be connected. If you cancel the connection during a call, the call is transferred to the telephone. In the same manner, if the radio frequency signal is not strong enough to allow for an acceptable communication between the radio and the telephone, the link will be disconnected automatically and the display will read: DISCONNECT. Tips It is also possible to cancel a connection from a cell phone. Refer to the cell phone user’s manual as the method varies from phone to phone. s3vc.2.book Page 27 Thursday, October 8, 2009 10:02 AM Radio / CD 27 Accepting and rejecting calls Accepting a call – To accept a call, briefly press the button 12 . The radio will go silent ⇒ page 25, fig. 8 A and the words: ANS CALL and then TALKING will appear in the display. Rejecting a call – Briefly press the button ⇒ page 25, 13 to reject an incoming call during fig. 8 A the “ring” signal. CALL ENDED will appear in the display. Each time there is an incoming call to the connected cell phone with the radio on, an acoustic signal will sound and the display will read CALL FROM. If the connected cell phone has caller ID, the number from which the call is incoming will appear in the radio display. The audio connection will be available through the vehicle’s front speakers and the microphone in the front of the radio. Transferring a call from the radio to the cell phone and vice versa 12 Briefly press the button ⇒ page 25, fig. 8 A during the call, it will then be transferred from the radio to the cell phone and vice versa. CALL TRANS will appear on the display. Tips • It is possible to control volume and audio adjustments with the radio buttons. • In order to end the call, briefly press the 13 . CALL ENDED will apbutton ⇒ page 25, fig. 8 A pear in the display. Making and ending calls Making a call from the cell phone – Dial the desired number on the cell phone. – Once the cell phone “SEND” button is pressed, the radio will go silent and the call will go through. The word CALLING will appear on the display and if the call is answered the display will read TALKING. Making a call from the radio (using the telephone’s voice recognition function)2) – Press the button for approximately 2 12 and release. seconds ⇒ page 25, fig. 8 A The cell phone will begin the calling process by means of voice commandos and the radio display will read VOC DIAL. 2) Depends on the cell phone connected – As of this moment follow the instructions for voice recognition available on the cell phone in order to activate the voice commando to make calls. Making a call from the radio (“REDIAL” ) FUNCTION) – Quickly press the button twice 12 . LAST CALL will appear ⇒ page 25, fig. 8 A on the display and a call will go out to the last number dialed on the cell phone. Ending a call – Briefly press the button ⇒ page 25, 13 during a call. The display will read fig. 8 A CALL ENDED. The call will be ended and the radio will resume playing the previously selected audio. s3vc.2.book Page 28 Thursday, October 8, 2009 10:02 AM 28 Radio / CD Calls from the radio (through the telephone’s voice recognition function) The radio itself cannot guarantee that this function will be available because no universal protocol exists to which all manufacturers of telephones with Bluetooth must adhere. Therefore, before attempting to make a call using voice recognition make sure of the following: • • That the phone has the function. That the phone is correctly adjusted to the commando function. • That the user knows how to use this function on the telephone before attempting to do it with the telephone paired to the radio. Tips • If during the call using voice recognition no name is indicated within the following three seconds, the redial process will begin. • The radio will go back to audio as soon as the cell phone ends the call, either with the corresponding key or when the other party ends the call. Additional functions “Wake-up” function If during the trip in your vehicle you do no wish to use the radio but will take calls, be sure your telephone is connected to the radio ⇒ page 26. You may drive with the radio off, but when an incoming call comes in the radio will automatically go on so you can answer the call, and will go off again once the call ends. Recording the numbers of calls received It is possible to save up to 6 numbers from prior incoming calls, storing them on the six station 6 . programming buttons ⇒ page 19, fig. 7 A When you receive a call the words CALL FROM will appear on the display along with this person’s number. Before answering or during 6 for more than the call press any of the buttons A 2 seconds, the display will then read NUMBER SAVED indicating that the number has been saved in the button. Making a call with recorded numbers Each time you want to make a call with a stored number proceed as follows: • 12 . The disPress the button ⇒ page 25, fig. 8 A play will read CALL TO and the radio will go silent. • Press the memory button on which the number you want to call is stored ⇒ page 28. The stored number will appear in the display so you have the opportunity to read it. • If the number is correct, confirm the call by 12 . pressing the button again ⇒ page 25, fig. 8 A • If the number is not correct select another memory button and proceed as indicated above. s3vc.2.book Page 29 Thursday, October 8, 2009 10:02 AM Radio / CD 29 “Bluetooth® audio” wireless communication interface With the Bluetooth ® Audio wireless communication interface, music stored in a cell phone can be played on the vehicle’s radio In order to use Bluetooth audio, the cell phone must support the Bluetooth “Advanced Audio Distribution Profile” (A2DP). The A2DP is used for wireless transmission of a high quality stereo audio signal. How to begin reproduction with “Bluetooth audio” – To begin using “Bluetooth Audio”, the cell phone must be paired and connected to the radio ⇒ page 25. – Select the cell phone music playback mode (for example play in earpiece or play by means of Bluetooth). Refer to the User’s Manual for this purpose, as methods vary from phone to phone. – Select the VW RADIO equipment. – Begin the playback from the cell phone. Refer to the User’s Manual for this purpose, as methods vary from phone to phone. – You will begin to hear the playback. BT AUDIO ST and the symbol will appear in the display. To end playback with “Bluetooth audio” – End the playback with the music playback mode on your cell phone or turning off the radio. The display will read: MP3 STOP. Operating the system during “Bluetooth audio” playback Use the radio to adjust audio or change to another audio source. 3) Not available for all markets Use the cell phone keys to select fast forward or fast review of a track. Read your cell phone User’s Manual for further instructions. Operating the telephone during “Bluetooth audio” playback All telephone functions are available during “Bluetooth Audio “ playback. The music is silenced during a call. Disconnecting the “Bluetooth audio” function The simultaneous connection of two cell phones, one for making calls (Hands Free) and another one exclusively for audio reproduction by means of the “Bluetooth Audio” function can cause incompatibilities which may damage normal functioning. If you have a cell phone that offers both profiles (Hands Free and A2DP) you must disconnect the “Bluetooth Audio” function in the SET UP mode ⇒ page 6. Linking a compatible audio device with Bluetooth 3) In order to connect a compatible audio device with Bluetooth (for example an MP3 player) to the cell phone pre-installation, proceed as follows: • Disconnect all of the active Bluetooth connections between the cell phone and the cell phone pre-installation. • Connect the audio device compatible with Bluetooth to the cell phone pre-installation. Check operation instructions. Tips • It may take up to 70 sec. for music to begin to be heard through Bluetooth audio. • You can adjust the volume directly on some cell phones. We recommend you set the volume at the highest on the cell phone and use the radio to adjust it if necessary. s3vc.2.book Page 30 Thursday, October 8, 2009 10:02 AM 30 Radio / CD Recommendations for better “Bluetooth Audio” functioning • Before pairing a cell phone with the radio unit, we recommend you turn off the cell phone for approximately 3 seconds before turning it back on. • If you wish to make a call during “Bluetooth Audio” playback, we recommend you stop the playback (from the external audio player) and resume the playback when you have ended the call. • We recommend you frequently check for available cell phone software updates. • After 240 pairing/disconnecting of devices to Bluetooth, some phones may begin to have con- nection problems. Turn the phone off for approx. 3 seconds before turning it back on. • We recommend you erase the historical memory of phones linked through Bluetooth and keep only frequently used numbers. • If you drive two or more vehicles with the radio unit described in this manual, you must identify each one with a different name. • To assure an adequate volume during a call we recommend you control the volume through the SET UP adjustment mode ⇒ page 6, with the BT VOL option. It is also necessary to check the volume set on the cell phone. Anti-Theft Coding Radio coding Every time you remove the unit from the vehicle (for example: when the car is taken in for repairs which require the battery to be disconnected) it will be necessary to manually recode the radio. If the radio is installed in another vehicle, the electronic lock must be disengaged manually. If, after switching on the radio the word “SAFE” appears in the display the correct code must be re-entered for the radio to operate. Tips • The radio code number and the radio serial number can be found on the “Radio Card” at the beginning of the Owner’s Literature. • It is very important that you keep this “Radio Card” in a safe place – never keep it in the vehicle. Only in this way will the antitheft protection be effective s3vc.2.book Page 31 Thursday, October 8, 2009 10:02 AM Radio / CD 31 Cancelling the electronic lock Perform the steps in exactly the following order: – Turn on the radio. First SAFE and then CODE1000 will appear in the display. – Use the radio station preset buttons 1 to 6 to enter the code 4 ⇒ page 14, fig. 5 A number on your Radio Card. Use preset button 1 to enter the first digit of the code number. Use button 2 to enter the second digit etc. The value range for each of the 4 digits is 0 to 9. The digit will increase by 1 each time you tap the preset button. The number returns to 0 after 9. – After you have finished entering the code, press the button >> ⇒ page 14, fig. 5 5 for longer than 2 seconds until you hear A an audible signal. – If you have entered the code number correctly, a radio frequency will appear in the display. Wrong Code Number If you have accidentally entered a wrong code number SAFE will appear in the display. You can repeat the procedure again once. The number of attempts will appear in the display. If you accidentally enter a wrong code a second time SAFE will appear in the display. Initially it will flash, then it will stay on. If the wrong code is entered again, the unit will be disabled for about one hour. Leave the unit ON and the key in the ignition switch for this hour. After the hour has elapsed, the number of attempts will stop being displayed and you can cancel the electronic lock once again Remember the cycle is: • • 2 attempts One hour locked. Tips If you lose your Radio Card, contact your authorized Volkswagen dealer. Warranty Warranty, Replacement, Antenna Care Warranty Antenna Care The same warranty terms and conditions apply to the vehicle sound system as to the vehicle itself. The antenna is designed to achieve optimal performance with the radio and is located in a position where reception is good and susceptibility to interference is low. Replacement After the warranty has expired, a unit that needs to be repaired will be replaced at a reasonable price with a fully reconditioned unit. This unit will be comparable to a new unit and will be covered by a replacement parts warranty. This replacement service will not be available however, if the unit housing is damaged or if unauthorized persons have attempted to make repairs. Vehicles equipped with antennas embedded in the windshield or backlights offer the further advantages of being completely protected from damage and wear. No antenna care is required for vehicles equipped with roof mounted antennas. s3vc.2.book Page 32 Thursday, October 8, 2009 10:02 AM 32 Alphabetical index Alphabetical index A C About mp3 / wma 17 Accepting and rejecting calls 27 Additional functions 12, 28 Making a call with recorded numbers 28 Recording the numbers of calls received 28 Wake-up function 28 Adjustment of balance 6 AM band selection 8 Antenna Care 31 Anti-Theft Coding 30 Audio CD 10 Automatic search 8 Automatic Tuning 7 AUX mode selection 8 Auxiliary audio jack 22 AUX-IN 22 Cancelling the electronic lock 31 CD 10 Care 10 CD Mode Automatic Track Selection 12, 15 CD Slot 11 Display 13 Displays 16 Fast Forward 12 Fast Review 12 Manual Track Selection 12 SCAN 15 Track Selection 12, 15 TUNE 15 CD mode selection 8 Connecting a Bluetooth telephone 26 Controlled Search 8 B Band Setting and Audio Source 8 Bass Control 6 Bluetooth Accepting and rejecting calls 27 Cancelling a Bluetooth connection 26 Connecting a Bluetooth telephone 26 General information 23 Linking a Bluetooth telephone 25 Making and ending calls 27 Transferring a call from the radio to the cell phone and vice versa 27 Bluetooth Audio 29 A2DP 29 Advanced Audio Distribution Profile 29 Bluetooth audio wireless communication interface 29 Bluetooth® 23 Button Eject 11 RDM 15 D Display USB Display 22 Displays 9, 13 E External audio devices 22 F Fader adjustment 6 Fast Forward/Fast Review within the same track 12 FM band selection 8 Folder and Play List search buttons 14 Folder search 14 I Ignition lock 5 Important Information 4 Information Button 15 s3vc.2.book Page 33 Thursday, October 8, 2009 10:02 AM Alphabetical index K Random Play Button 15 Replacement 31 Key 5 L Linking a Bluetooth telephone 25 M Making and ending calls 27 Manual radio station search 7 Manual Track Selection SCAN/TUNE Button 12 Seek button 12 mp3 13 mp3/wma player operation 13 O ON / OFF 5 ON/OFF Buttons 5 Order of tracks CD 18 S SCAN/TUNE Button 7 Search Play List 14 Service 31 Set up 6, 23 Sound Adjustment 6 Station Preset Buttons 9 Station Search Buttons (SEEK) 8 T Taking care of your audio CD's 10 Treble Control 6 U USB mode selection 8 USB or memory storage device connection 19 Q V Quick overview 2 Volume Control 6 R W Radio 5 Radio Card 4 Radio coding 4 Warranty 31 wma 13 33