1
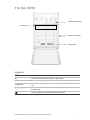
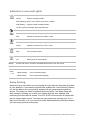
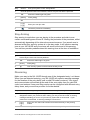
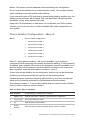
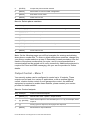
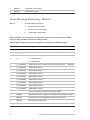
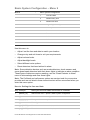
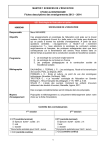
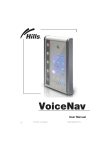
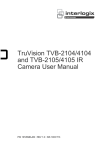
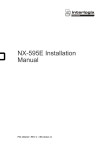
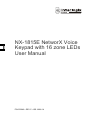
NX-1815E NetworX Voice Keypad with 16 zone LEDs User Manual P/N 230248 • REV C • ISS 18JUL14 Copyright © 2014 UTC Fire & Security Americas Corporation, Inc. All rights reserved. This document may not be copied in whole or in part or otherwise reproduced without prior written consent from UTC Fire & Security Americas Corporation, Inc., except where specifically permitted under US and international copyright law. Trademarks and patents The NX-1815E name and logo are trademarks of UTC Fire & Security Americas Corporation, Inc. Other trade names used in this document may be trademarks or registered trademarks of the manufacturers or vendors of the respective products. Manufacturer Placed on the market by: UTC Fire & Security Americas Corporation, Inc. 3211 Progress Drive, Lincolnton, NC, 28092, USA Authorized EU manufacturing representative: UTC Fire & Security B.V. Kelvinstraat 7, 6003 DH Weert, Netherlands FCC compliance This equipment has been tested and found to comply with the limits for a Class B digital device, pursuant to part 15 of the FCC Rules. These limits are designed to provide reasonable protection against harmful interference when the equipment is operated in a commercial environment. This equipment generates, uses, and can radiate radio frequency energy and, if not installed and used in accordance with the instruction manual, may cause harmful interference to radio communications. You are cautioned that any changes or modifications not expressly approved by the party responsible for compliance could void the user's authority to operate the equipment. NFPA 72 Check local ordinances, this device is not listed by an approved test lab to meet NFPA 72 and therefore may not be sold or installed for use with a fire system in some localities. EU compliance EU directives UTC Fire & Security hereby declares that this device is in compliance with the applicable requirements and provisions of one or more of the Directives 1999/5/EC, 2014/30/EU and 2014/35/EU. For more information see: www.utcfireandsecurity.com or www.interlogix.com 2002/96/EC (WEEE directive): Products marked with this symbol cannot be disposed of as unsorted municipal waste in the European Union. For proper recycling, return this product to your local supplier upon the purchase of equivalent new equipment, or dispose of it at designated collection points. For more information see: www.recyclethis.info. 2006/66/EC (battery directive): This product contains a battery that cannot be disposed of as unsorted municipal waste in the European Union. See the product documentation for specific battery information. The battery is marked with this symbol, which may include lettering to indicate cadmium (Cd), lead (Pb), or mercury (Hg). For proper recycling, return the battery to your supplier or to a designated collection point. For more information see: www.recyclethis.info. Contact information Customer support www.utcfireandsecurity.com or www.interlogix.com www.interlogix.com/customer-support or www.utcfssecurityproducts.eu Content Important information 4 Limitation of liability 4 Advisory messages 4 Warranty 4 Introduction 5 Glossary of terms 6 The NX-1815E 7 Legend 7 Indicators, Icons and Lights 8 Away Arming 8 Stay Arming 9 Disarming 9 Emergency Activation Keys 10 Understanding the Main Menu 11 Controlling Zone Bypasses – Menu 1 11 Control The Zone Chime – Menu 2 12 System Event History – Menu 3 12 System Test – Menu 4 13 User Configuration – Menu 5 16 Phone Number Configuration – Menu 6 18 Output Control – Menu 7 19 Voice Message Recording – Menu 8 20 Basic System Configuration – Menu 9 21 Word Library 25 NX-1815E NetworX Voice Keypad with 16 zone LEDs User Manual 3 Important information Limitation of liability To the maximum extent permitted by applicable law, in no event will UTCFS be liable for any lost profits or business opportunities, loss of use, business interruption, loss of data, or any other indirect, special, incidental, or consequential damages under any theory of liability, whether based in contract, tort, negligence, product liability, or otherwise. Because some jurisdictions do not allow the exclusion or limitation of liability for consequential or incidental damages the preceding limitation may not apply to you. In any event the total liability of UTCFS shall not exceed the purchase price of the product. The foregoing limitation will apply to the maximum extent permitted by applicable law, regardless of whether UTCFS has been advised of the possibility of such damages and regardless of whether any remedy fails of its essential purpose. Installation in accordance with this manual, applicable codes, and the instructions of the authority having jurisdiction is mandatory. While every precaution has been taken during the preparation of this manual to ensure the accuracy of its contents, UTCFS assumes no responsibility for errors or omissions. Advisory messages Advisory messages alert you to conditions or practices that can cause unwanted results. The advisory messages used in this document are shown and described below. WARNING: Warning messages advise you of hazards that could result in injury or loss of life. They tell you which actions to take or to avoid in order to prevent the injury or loss of life. Caution: Caution messages advise you of possible equipment damage. They tell you which actions to take or to avoid in order to prevent the damage. Note: Note messages advise you of the possible loss of time or effort. They describe how to avoid the loss. Notes are also used to point out important information that you should read. Warranty UTC Fire & Security Americas Corporation, Inc. guarantees this product against defective parts and workmanship for twenty-four (24) months from the date of purchase. If any defect appears during the warranty period contact your service provider. UTC Fire & Security Americas Corporation, Inc. assumes no liability for consequential or indirect damage, and accepts no responsibility for repairing 4 NX-1815E NetworX Voice Keypad with 16 zone LEDs User Manual damage to the product caused by misuse, careless handling, or where repairs have been made by others. No other guarantee, written or verbal, is authorized by UTC Fire & Security Americas Corporation, Inc. Introduction Your NX-1815E is an intuitive interface for users of your security system. It delivers one of the most user friendly experiences for controlling a security system available today. Its voice prompts enable even the newest users to immediately utilize the full power of your security system. We trust that you will enjoy your NX-1815E, and we would like to thank you for choosing a NetworX Security System. All users of your security system should read and follow the instructions and precautions in this manual before operating your security system. Failure to do so could result in the security system not working as intended. This manual should be kept in an accessible location for the life of the security system. If you do not understand any part of this manual, you should ask your service provider for further clarification. Read the entire manual and if possible, practice on the NX-1815E whilst your security provider is on site. Keep in mind, the level of security you will obtain with this system relates specifically with two major factors: • The quantity, quality, and placement of security devices attached to this security system. • The knowledge you have of the security system and how that knowledge is utilized in a weekly test of the complete system. This product is to be installed by qualified SERVICE PERSONNEL only The equipment should only be operated with an approved power adapter with insulated live pins. Caution: Risk of explosion if battery is replaced by an incorrect type. Dispose of batteries according to the instructions. Contact your service provider for replacement batteries. NX-1815E NetworX Voice Keypad with 16 zone LEDs User Manual 5 Glossary of terms Authority Level The level of access assigned to a users pin code. Arm To turn your security system On. Partition A group of zones within the security system configured with individual control. Users of the security system are assigned partitions that they are allowed to control. Away Mode To turn your security system on when you are leaving the premises. Central Station Location where alarm signals are sent during an alarm report. Chime Mode An operational mode that will emit a beep at the keypad when specific zones are activated. Chime Group All the zones that will activate chime, when in chime mode. Communicator The device that communicates alarm signals generated from your security system to your central station. Duress Code A predetermined user pin code that will arm / disarm the security system whilst sending a special code to the central station indicating the user is entering / leaving the premises under duress. Only applicable on monitored systems. Disarm To turn your security system Off. Exit delay The time allowed to exit the premises after the security system is armed. Entry delay The time allowed to disarm your security system after the first detection device has been activated. Forced Arming An option that allows certain zones not to be secure when arming. A security system that is ready to be “force armed” will flash the corresponding partition light green. Generally assigned to detection devices that cover the NX-181xx (e.g., motion sensors, front door reed switches), allowing the user to arm the security system without the need to wait for those zones to be secure. Master Code A four (4) or six (6) digit pin code that is used by a user to arm or disarm the security system. Its main feature is the ability to create, alter and delete user pin codes. Can also be used as a function code for all features. NOTE: Your security system may have either four (4) digit pin codes or six (6) digit pin codes, but not a mixture of both. Monitored A security system that is configured to send all alarm signals to a central station. Outputs Where external devices are configured. These devices can be controlled from your security system. Perimeter The outer edge of the protected partition, i.e., doors and windows Quick Arm An option that allows you to turn on (ARM) the security system by touching the [AWAY]. Self Monitored A security system that is programmed to send alarm signals to a private phone number. Not all features are available with a self-monitored system. Stay Mode To turn your security system on when you are staying in the premises, this will automatically bypass pre programmed zones and arm others. Mainly utilized for arming just the perimeter of the premises. Service Provider The installation / maintenance company servicing your security system. User Code A four (4) or six (6) digit pin code that is used by a user to arm or disarm the security system. Also can be used as a function code for certain features. Note: A system may have either four (4) digit pin codes or six (6) digit pin codes, but not a mixture of both. Zone Location on your security system where a detection device is connected. 6 NX-1815E NetworX Voice Keypad with 16 zone LEDs User Manual The NX-1815E Partition/Zone lights Control keys Numeric touchpad Microphone Legend Vital visual information for you to review [2] Press the corresponding number on the keypad [AWAY] Press the corresponding key on the keypad [?]-[ENTER] Press the corresponding number on the keypad followed by the Enter key [?]-[?]-[?]-[?]-[ENTER] Press the corresponding number sequence on the keypad followed by the Enter key Exit the premises, or walk-test the motion sensors NX-1815E NetworX Voice Keypad with 16 zone LEDs User Manual 7 Indicators, Icons and Lights Green System is ready. Yellow System message present. Red (Flashing) One or more zones are in alarm condition. Red (Steady) System trouble message present. To hear system messages, press the status key. Green Partition is disarmed. Off Partition is not ready to arm, check zones. Red Partition is armed in the “AWAY” mode. Green Partition is disarmed, and is ready to stay arm. Off Partition is not ready to stay arm, check zones Yellow Partition is armed in the “STAY” mode. Green OK Red Fire condition present On Mains power is connected Off Mains power is disconnected MENU Access main menu, and when prompted allows users to exit sub menus. ENTER Enters selected option, use when prompted Partition LEDs 1 - 16 Off Zone is OK Yellow flashing Zone is activated (open) Yellow steady Zone is bypassed (isolated) Away Arming Away arming is used when you are leaving and you want the premises protected in your absence. If your service provider has enabled the “forced arming” feature, you will be able to arm your security system with pre-programmed zones not secure. This feature is ideal for systems that have entry / exit doors fitted with door contacts, allowing you to arm your system with the door opened, and protecting the door after its closed. Your NX-1815E will announce all zones that are not secure when armed. You may arm your system by entering your 4 or 6 digit user PIN code, or if your service provider has enabled the quick arm feature, you can simply press the Away key. 8 NX-1815E NetworX Voice Keypad with 16 zone LEDs User Manual Step How to: 1. Close all protected doors and windows, ensure everyone has left the premises. 2. Arm your system in the “Away Mode” Ensure the status light is lit green. [AWAY] Press [Away]. OR [?]-[?][?]-[?] 3. Enter your user pin code. Vacate the premises immediately. Stay Arming Stay arming is used when you are staying in the premises and wish to arm certain zones and bypass others IE: Arming the perimeter of the premises, whilst automatically bypassing all the internal movement sensors. If an armed zone is alarmed whilst your security system is in the stay mode, it will initiate a warning tone at your NX-1815E and your sirens will sound at the end of this warning. Your service provider predetermines this warning time at the time of installation. Step How to: Arm your system in the “Stay Mode” 1. Close all protected doors and windows. If motion sensors are included in your “Stay mode” have everyone move out of those partitions. Ensure the status light is lit green. 2. [STAY] Press [Stay]. 3. Your security system is now armed in the stay mode. Disarming Make your way to the NX-1815E through one of the designated entry / exit doors. When you are detected entering, your NX-1815E will repeat a warning message for the duration of the entry delay until a valid PIN code is entered. Your sirens and communicator will activate at the end of the entry delay time if a valid PIN code is not entered. Away and Stay modes can be configured with different entry delay times, ask your service provider for further details. Step How to: Disarm your system from either the “Away” or “Stay” Modes 1. Enter the premises through your designated entry door/s. If your security system has been designed to detect your presence when making your way to the NX-1815E, a warning message reminding you to turn off your security system will be announced. If your presence is not detected, no warning message is announced. 2. [?]-[?][?]-[?] Enter your user PIN code to disarm from either the away or stay arming modes. Your system is now disarmed from either the Away or Stay modes. NX-1815E NetworX Voice Keypad with 16 zone LEDs User Manual 9 Emergency Activation Keys Three (3) emergency functions are available via your NX-1815E to provide personal support in areas of: Fire, Medical and Police (duress) alarm. To activate these functions press and hold the required keys for two seconds. You should only press these keys in an emergency situation that requires a response by a central station. Check with your service provider to find out if your security system has these function keys enabled and clarify what responses, if any, will be provided upon activation. Activating your personal emergency functions Fire [1]-[3] Press and hold for 2 seconds. Medical [4]-[6] Press and hold for 2 seconds. Panic [7]-[9] Press and hold for 2 seconds. 10 NX-1815E NetworX Voice Keypad with 16 zone LEDs User Manual Understanding the Main Menu Pressing the [MENU] key access the NX-1815E’s main menu, here you will find the 10 main features used for customisation and setup of your security system. From the moment you press the menu key, the NX-1815E’s personal voice guide (PVG) will guide you through your chosen selection. [Menu] [1] Zone bypass [2] Zone chime [3] Event history [4] System test [5] User configuration [6] Phone number configuration [7] Output control [8] Voice message recording [9] Basic system configuration [0] Advanced system configuration Controlling Zone Bypasses – Menu 1 The zone bypass menu is used to bypass (isolate) selected zones in your security system. A bypassed zone is not capable of activating an alarm, as it is temporarily disabled from your system. This option is commonly used to bypass zones that require service, or zones that you wish to temporarily add to your “stay mode”. Whilst still offering security on the remaining zones, bypassing zones lowers your level of security and caution should be exercised. All bypassed zones are reset and cleared from memory when your security system is next armed / disarmed. Your security system must be disarmed (turned off) before being able to bypass zones. After bypassing your selected zones, your security system must be armed (turned on in either the away or stay mode to secure the remaining zones. Note: Press status to check bypassed zones, or simply arm your security system and all bypassed zones will be announced automatically. How to: Bypass a single zone Step Example: How to bypass zone 5 1. [MENU] - [1] Selects main menu - Option 1, To control zone bypass. 2. [5] - [ENTER] Selects zone 5. 3. [0] Toggles zone 5 from un-bypassed to bypassed state (or if already bypassed, from bypassed to un-bypassed.) 4. [MENU] Exits back to main menu. 5. [MENU] Press menu to exit. NX-1815E NetworX Voice Keypad with 16 zone LEDs User Manual 11 Control The Zone Chime – Menu 2 You can setup your NX-1815E so that it will “beep” when selected zones are tripped or activated, this is called chime. Chime mode does not trigger any alarms, and it is only used as a low level alert such as a customer entry door. You can add and delete zones from the “chime group” offering a very flexible chime mode feature. The zones you have selected to be in the “chime group” are stored in memory and are not cleared when the security system is armed and disarmed. How to: Control chime mode Step Example: Turning On / Off Chime Mode 1. [MENU] - [2] Selects main menu - Option 2, Chime Mode. 2. [0] Toggles chime mode On / Off. 3. [MENU] Exits back to main menu. 4. [MENU] Press menu to exit. How to: Add a zone to the chime group Step Example: Adding zone 4 chime group 1. [MENU] - [2] Selects main menu - Option 2, Chime Mode. 2. [4] - [ENTER] Selects zone 4. 3. [0] Set / Unset chime to this zone and adds it to the chime group. 4. [MENU] Exits back to main menu. 5. [MENU] Press menu to exit. System Event History – Menu 3 Menu 3 - System Event History 1 Last alarm memory 2 Event history The Event History menu is used to listen to the last 185 events that occurred in your security system. These events are held within your security systems memory, and include events such as, arming, disarming, system faults and alarmed zones. All events are time date stamped so ensure your clock is set correctly in menu 9. Alarm memory is a quick recall of the last zone(s) that caused your security system to go into alarm condition. 12 NX-1815E NetworX Voice Keypad with 16 zone LEDs User Manual How to: View alarm memory Step Example: To review the zone / zones that caused the last alarm condition 1. [MENU] - [3] Selects main menu - Option 3, Event History. 2. [?]-[?]-[?]-[?] Enter your Master pin code. 3. [1] To reviews last alarm memory. 4. [MENU] Moves back to alarm memory / event history selection (step 3). 5. [MENU] Exits back to main menu. 6. [MENU] Press menu to exit. How to: Review event history Step Example: To review events held within your security system (up to 185 events are stored) 1. [MENU] - [3] Selects main menu - Option 3, Event History. 2. [?]-[?]-[?]-[?] Enter your Master pin code. 3. [2] To reviews last alarm memory. 4. [MENU] Moves back to alarm memory / event history selection (step 3). 5. [MENU] Exits back to main menu. 6. [MENU] Press menu to exit. System Test – Menu 4 Menu 4 - System Test 1 Siren Test 2 Communicator Test 3 Battery Test 4 Zone Walk Test 0 System Version number Your security system is made up of different components, brought together to produce a very powerful, yet easy to use security system. These components are your sirens, communicator, back up battery and detection devices. All these different components require regular testing and maintenance in order for them to remain in peak operational performance. These components can be tested from this menu, and should be scheduled for a weekly test. Failure to conduct regular testing can result in system failure when most required. The four available system tests are: NX-1815E NetworX Voice Keypad with 16 zone LEDs User Manual 13 Siren Test The Sirens are used as audible deterrents in the event of your security system activating. As this test sounds all the audible devices connected to your security system, it is advisable to notify neighbours and other persons within the premises prior to activating this test. Communicator Test The Communicator is located within your security system. The communicator, (if enabled), is the device that communicates with a central station who analyse all the incoming alarm signals and engage the appropriate responses / services dependant on the type of alarm signals received. Alternatively the communicator can be enabled to call an alternate phone number, like a mobile phone, this is sometimes called self-monitoring or domestic dialling. When testing your communicator, no sirens will sound and a test message will be sent to the central station for confirmation of the test. If self monitored, the person answering the number programmed in your security system will hear a siren sound when they answer the phone. Contact the central station and any person whose phone numbers are programmed in the system prior to activating this the communicator test. The communicator test is only available if your security system has been setup to dial a central station, or enabled for domestic dialling. Battery Test The backup battery is housed within your security systems main control box and provides power when mains power has been interrupted. Prolonged operation using only the backup battery will result in total system failure so the condition of the battery is critical to sustain the power required for the longest period of time. It is recommended to change your battery at periodical intervals, please refer to your service provider for further information. This feature is used to test the condition of your back up battery. Zone Walk Test Zone Walk test is used to test the connectivity between your alarm devices IE: motion sensors, door contacts etc, and your security system. When in walk test mode your NX-181xx will emit the chime “beep” each time a zone is activated, and chirp the outside siren. Partition Lights will also blink red after a detection device in that partition has been activated. You must exit Walk Test mode when you are satisfied all the zones function correctly. Your communicator will not function during this test. System Version number This menu is a service tool for your system provider. Step How to: Perform a siren test 1. [MENU] - [4] Selects main menu - Option 4, System Test. 2. [?]-[?]-[?]-[?] Enter your Master pin code. 3. [1] Selects the siren testing. External and internal sirens will sound. 14 NX-1815E NetworX Voice Keypad with 16 zone LEDs User Manual 4. [AWAY] To stop sirens (within 30 seconds). 5. [MENU] Moves back to system test menu (step 3). 6. [MENU] Exits back to main menu. 7. [MENU] Press menu to exit. Step How to: Perform a communicator test 1. [MENU] - [4] Selects main menu - Option 4, System Test. 2. [?]-[?]-[?]-[?] Enter your Master pin code. 3. [2] Selects communicator test. 4. [MENU] Moves back to system test menu (step 3). 5. [MENU] Exits back to main menu. 6. [MENU] Press menu to exit. Step How to: Perform a battery test 1. [MENU] - [4] Selects main menu - Option 4, System Test. 2. [?]-[?]-[?]-[?] Enter your Master pin code. 3. [3] Selects battery test. 4. [MENU] Moves back to system test menu (step 3). 5. [MENU] Exits back to main menu. 6. [MENU] Press menu to exit. Step How to: Perform a zone walk test 1. [MENU] - [4] Selects main menu - Option 4, System Test. 2. [?]-[?]-[?]-[?] Enter your Master pin code. 3. [4] Selects zone walk test. Activate all detection devices, by walking within the field of view of motion sensors and opening and closing all protected windows and doors. 4. 5. [STATUS] Press status to review tested zones. 6. [MENU] Moves back to system test menu (step 3). 7. [MENU] Exits back to main menu. 8. [MENU] Press menu to exit NX-1815E NetworX Voice Keypad with 16 zone LEDs User Manual 15 User Configuration – Menu 5 Menu 5 - User Configuration 1 User PIN 2 User Partition 3 User Authority The user configuration menu is where user authority levels, PIN codes and partitions are assigned to users of your security system. User PIN – This is the code used to arm and disarm partitions within your security system. They are generally four digits in length, but can be configured by your service provider to be six digits in length if this level of security is required. User Partition - Assigning different partitions to users s which sections (partitions) of the security system a user may access to. User Authority - Authorization levels determine the options available to user, user authorization is where you would alter and increase a users authority to become a Master Code. Users with Master PINs can create, delete and modify other user codes with equal or less authority than themselves. How to: Configure (set up) a new pin code for a specific user Step Example: Configure pin code 2580 for user 4. 1. [MENU] - [5] Selects main menu - Option 5, User configuration. 2. [?]-[?]-[?]-[?] Enter your Master pin code. 3. [1] Selects to configure user pin. 4. [4] – [ENTER] Selects user 4. 5. [2]-[5]-[8]-[0] [ENTER] Sets user 4 pin code as 2580. 6. [MENU] Moves back to user configuration (step 3). 7. [MENU] Exits back to main menu. 8. [MENU] Press menu to exit. How to: Delete a pin code from a specific user Step Example: Delete the pin code that is configured for user 4. 1. [MENU] - [5] Selects main menu - Option 5, User configuration. 2. [?]-[?]-[?]-[?] Enter your Master pin code. 3. [1] Selects to configure user pin. 4. [4] – [ENTER] Selects user 4. 5. [0] - [ENTER] To disable user. 16 NX-1815E NetworX Voice Keypad with 16 zone LEDs User Manual 6. [MENU] Moves back to user configuration (step 3). 7. [MENU] Exits back to main menu. 8. [MENU] Press menu to exit. How to: Configure (set up) partition control for a specific user Step Example: Configure control of partition 2 for user 4. 1. [MENU] - [5] Selects main menu - Option 5, User configuration. 2. [?]-[?]-[?]-[?] Enter your Master pin code. 3. [2] Selects to configure user partition. 4. [4] - [ENTER] Selects user 4. 5. [2] Selects partition 2. Note: Pressing enter will announce the partitions available for this user, and the zone lights will indicate selected partitions. 6. [MENU] Moves back to user configuration (step 3). 7. [MENU] Exits back to main menu. 8. [MENU] Press menu to exit. How to: Configure Authority levels for a specific user Step Example: Change user 6 to a master code. 1. [MENU] - [5] Selects main menu - Option 5, User configuration. 2. [?]-[?]-[?]-[?] Enter your Master pin code. 3. [3] Selects to configure user authority. 4. [6] - [ENTER] Selects user 6. 5. [4] Selects option 4, master code authority (see Table 1 below.) Note: Zone lights will indicate selected authority options. 6. [MENU] Moves back to user configuration (step 3.) 7. [MENU] Exits back to main menu. 8. [MENU] Press menu to exit. Table 1: User Authority Options 1 Reserved 5 Arm / disarm code 2 Arm Only 6 Allowed to bypass zones 3 Arm only after close window 7 User code will send open, close reports. 4 Master code authority 8 Must be off. NX-1815E NetworX Voice Keypad with 16 zone LEDs User Manual 17 Notes: The system must be disarmed before accessing user configuration. Do not remove all partitions from a users partition control. Use extreme caution when modifying a user with master code authority. If you attempt to enter a PIN code that is already being used by another user, the following announcement will be heard “PIN code has failed” followed by three fast beeps, simply select another PIN code. Keep user PIN information in a safe place, do not disclose your PIN to others. Contact your service provider to confirm available PIN codes and partitions on your system. Phone Number Configuration – Menu 6 Menu 6 - Phone number configuration 1 Alarm phone number 1 2 Alarm phone number 2 3 Alarm phone number 3 7 Divert phone number 1 8 Divert phone number 2 9 Divert phone number 3 Menu 6 − Alarm phone numbers − will only be available if your system is configured for self monitoring (also known as domestic dialling). If self-monitoring is enabled, and a suitable connection to the telephone network is available, your security system has the ability to call three different numbers in the event of an alarm condition, these are alarm phone numbers 1,2 and 3. A siren tone will be heard by the receiving party, and the call can be terminated (ended) by pressing and holding the star key on the receiving phone. Caution should be used when selecting self-monitoring, as it does not offer the same level of protection provided by a professional monitoring station. Divert phone numbers 1, 2 and 3 will be called when an intercom call is initiated from an outdoor intercom entrance station. How to: Enter phone numbers Step Example: Programming in alarm phone number 1. 1. [MENU] - [6] Selects main menu - Option 6, Phone Number Configuration 2. [?]-[?]-[?]-[?] Enter your Master pin code. 3. [1] Selects alarm phone number 1. 4. Phone Number Enter the phone number that alarm phone number 1 will dial. 18 NX-1815E NetworX Voice Keypad with 16 zone LEDs User Manual 5. [ENTER] Accepts the phone number entered. 6. [MENU] Moves back to Phone number configuration. 7. [MENU] Exits back to main menu. 8. [MENU] Press menu to exit How to: Delete phone numbers Step Example: Delete alarm phone number 1. 1. [MENU] - [6] Selects main menu - Option 6, Phone Number Configuration. 2. [?]-[?]-[?]-[?] Enter your Master pin code. 3. [1] Selects alarm phone number 1. 4. [0] Disables alarm phone number 1. 5. [ENTER] Accepts deletion. 6. [MENU] Moves back to Phone Number Configuration. 7. [MENU] Exits back to main menu. 8. [MENU] Press menu to exit. Note: On the following pages you will find examples for entering and deleting alarm phone number one. To enter or delete other phone numbers, change only your phone number selection at step 3. Remember to seek permission from the owners of the phone numbers that you enter, and it is recommended that a communication test be carried out to verify connectivity. Additional equipment is required for Divert and SMS messaging, ask your service provider for further details. Output Control – Menu 7 Your security system can be configured to control up to 16 outputs. These outputs can be used for a variety of applications, such as external lighting control, electric shutter control or even garage door control. As additional equipment is required to enable these features, please contact your service provider for further details. How to: Control outputs Step Example: Control connected outputs 1. [MENU] - [7] Selects main menu - Option 7, Output Control. 2. [5] - [ENTER] Select which output is to be controlled (from 1 to 16), for example, select output 5. 3. [?] Press [1] to turn output on, touch [2] to turn output off. 4. [MENU] Moves back to output selection. NX-1815E NetworX Voice Keypad with 16 zone LEDs User Manual 19 5. [MENU] Exits back to main menu. 6. [MENU] Press menu to exit. Voice Message Recording – Menu 8 Menu 8 - Voice message recording 4 Zone name configuration 5 Partition name configuration 6 Output name configuration Menu 8 allows you to build your own custom names for zones, partitions and outputs using words from the word library table. Up to eight words may be strung together to build a more detailed name. Step Example: Configure a zone name, partition name or output name 1. [MENU] - [8] Selects main menu - Option 8, Voice message recording 2. [?]-[?]-[?]-[?] Enter your master PIN code 4 = Zone name 3. [?] 5 = Partition name 6 = Output name 4. [?] - [ENTER] Select which Zone, Partition or Output number is to be 5. [?] - [ENTER] Select library word 1 [?] - [ENTER] Select library word 2 [?] - [ENTER] Select library word 3 [?] - [ENTER] Select library word 4 [?] - [ENTER] Select library word 5 [?] - [ENTER] Select library word 6 [?] - [ENTER] Select library word 7 [?] - [ENTER] Select library word 8 configured Note: Press away to reset names back to default 6. [MENU] Moves back to Zone, Partition and Output number selection (step 4). 7. [MENU] Moves back to voice message recording menu (step 3) 8. [MENU] Moves back to main menu 9. [MENU] Exits main menu 20 NX-1815E NetworX Voice Keypad with 16 zone LEDs User Manual Basic System Configuration – Menu 9 Menu 9 - Basic system configuration 1 Time and date 2 Partition entry time 3 Partition exit time 4 Keypad light intensity 5 Voice options 6 Reserved 7 Reset detector in alarm 8 Call back 9 Call answer 0 Volume level Use this menu to • Adjust / set the time and date to match your location • Change entry and exit times to suit your requirements • Adjust volume levels • Adjust backlight levels • Select different voice options • Reset detectors that have latched in alarm Note: Some detection devices such as smoke detectors, shock sensors and some glass break detectors latch their alarm lights to indicate an alarm condition. These types of detectors require resetting, use the “Reset Detector in Alarm” menu to acknowledge and clear these lights. Note: The Call back and call answer options are service tools for your service provider and are not listed in these instructions but will be announced when you enter this menu option. How to: Setting the time and date Step Example: Setting the time as 9.30AM, and the date as 19.6.2009 1. [MENU] - [9] Selects main menu - Option 9, Basic system configuration. 2. [1] Selects time and date configuration. 3. [?]-[?]-[?]-[?] Enter your Master user pin code. 4. [1] To configure the time. 5. [9] - [ENTER] Enter the current hours value, i.e., 9 o’clock. 6. [30]-[ENTER] Enter the current minutes value, i.e., 30 minutes. NX-1815E NetworX Voice Keypad with 16 zone LEDs User Manual 21 7. [1] Selects AM time. 8. [2] To configure the date. 9. [19]-[ENTER] Enter the current day, i.e., 19th. 10. [6] - [ENTER] Enter the current month, i.e., June (sixth month.) 11. [2009] [ENTER] Enter the current year, must be 4 digits, i.e., year 2009. 12. [MENU] Moves back to basic system configuration menu selection (step 2). 13. [MENU] Exits back to main menu. 14. [MENU] Press menu to exit How to: Adjust partition entry or exit times Step Example: Adjust entry or exit times 1. [MENU] - [9] Selects main menu - Option 9, Basic system configuration. 2. [?] 3. [?]-[?]-[?]-[?] Enter your Master user pin code. 4. [1] 5. [?] [ENTER] Enter the new entry / exit time in seconds (1 – 255 seconds). 6. [MENU] Moves back to step 4, partition selection. 7. [MENU] Moves back to basic system configuration menu selection (step 2). 8. [MENU] Exits back to main menu. 9. [MENU] Press menu to exit. [2] Selects partition entry time, [3] Selects partition exit time. Select the partition number you wish to adjust. How to: Adjust keypad LED intensity Step Example: Set keypad led intensity 1. [MENU] - [9] Selects main menu - Option 9, Basic system configuration. 2. [4] 3. [?]-[?]-[?]-[?] Enter your Master user pin code. Selects keypad LED intensity. 4. [?] 1 = Display run mode led intensity 2 = Display idle mode led intensity 3 = Backlight run mode led intensity 4 = Backlight idle mode led intensity 5 = Logo On / Off 5. [?] Select LED intensity from 1-8. 6. [MENU] Moves back to step 4, Run mode / Idle mode selection. 7. [MENU] Moves back to basic system configuration menu selection (step 2). 8. [MENU] Exits back to main menu. 9. [MENU] Press menu to exit. 22 NX-1815E NetworX Voice Keypad with 16 zone LEDs User Manual Display run mode - Controls the light intensity of the away, stay, status, fire, power icons and all zones numbers during the run mode. Display idle mode - Controls the light intensity of the away, stay, status, fire, power icons and all zones numbers during the idle mode. Backlight run mode - Controls the light intensity of the lights located behind the rubber keys during run mode. Display idle mode - Controls the light intensity of the lights located behind the rubber keys during idle mode. Logo – Switches On / Off the logo located at the top of the keypad Note: The keypad lights will switch from run mode to idle mode 60 seconds after the last key press. Pressing any key will “wake” the keypad from idle mode and switch it to run mode. How to: Activate / Deactivate different voice options Step Example: How to activate or deactivate individual voice options 1. [MENU] - [9] Selects main menu - Option 9, Basic system configuration. 2. [5] Selects voice options. 3. [?]-[?]-[?]-[?] Enter your Master user pin code. 4. [?] Select required feature to activate / deactivate. Refer to Table 2 below. 5. [MENU] Moves back to basic system configuration menu selection (step 2). 6. [MENU] Exits back to main menu. 7. [MENU] Press menu to exit. Full Menu Annunciation: Turning this feature On, gives full descriptions to all the options within the main menu. Turning this feature Off shortens the descriptions to all options within the main menu. This is a feature for experienced users. Time Annunciation: Turning this feature On, will make your NX-181xx annunciate the time and date during exit and entry delays. Turning this feature Off, disables this feature. Partition Status Annunciation: Turning this feature On, will make your NX181xx annunciate the partition condition when arming and disarming your system. Turning this feature Off, disables this feature. Table 2: Voice Options 1 Full menu annunciation 3 Partition status annunciation 2 Time annunciation 4 Reserved NX-1815E NetworX Voice Keypad with 16 zone LEDs User Manual 23 How to: Reset latching detectors that are in alarm Step Example: Reset smoke detectors, shock sensors and latching glass break detectors 1. [MENU] - [9] Selects main menu - Option 9, Basic system configuration. 2. [7] Selects to reset detector in alarm, and resets sensor. 3. [MENU] Moves back to basic system configuration menu selection (step 2). 4. [MENU] Exits back to main menu. 5. [MENU] Press menu to exit. How to: Adjust the volume level Step Example: Adjust the volume level 1. [MENU] - [9] Selects main menu - Option 9, Basic system configuration 2. [0] Selects volume level. 3. [?]-[?]-[?]-[?] Enter your master PIN code. 4. [?] Select required volume level from 1 ~ 8. 5. [MENU] Moves back to basic system configuration menu (step 2). 6. [MENU] Exits back to main menu. 7. [MENU] Press menu to exit. 24 NX-1815E NetworX Voice Keypad with 16 zone LEDs User Manual Word Library 1 2 3 4 5 6 7 8 9 10 11 12 13 14 15 16 17 18 19 20 21 22 23 24 25 26 27 28 29 30 31 32 33 34 35 36 37 38 One Two Three Four Five Six Seven Eight Nine Ten Eleven Twelve Thirteen Fourteen Fifteen Sixteen Seventeen Eighteen Nineteen Twenty Thirty Forty Fifty Sixty Seventy Eighty Ninety Hundred Thousand Air conditioner Area Attic Automatic Auxiliary Back Basement Bathroom Bedroom 39 40 41 42 43 44 45 46 47 48 49 50 51 52 53 54 55 56 57 58 59 60 61 62 63 64 65 66 67 68 69 70 71 72 73 74 75 76 Boat Cabinet Car park Ceiling Cellar Child’s Alert Closet Computer Cool Curtain Data Den Detector Dining Door Downstairs Driveway Duress East emergency Exterior Family Fan Fence Fire Forced, arm Foyer Freezer Front Games Garage Gas Gate Glass Glass break Ground Guest 77 78 79 80 81 82 83 84 85 86 87 88 89 90 91 92 93 94 95 96 97 98 99 100 101 102 103 104 105 106 107 108 109 110 111 112 113 114 NX-1815E NetworX Voice Keypad with 16 zone LEDs User Manual Gun Hall Hallway Heat Heating Hold-up Home Home theatre Infrared Inside Instant Interior Key switch Keychain Kitchen Large Laundry Lift Light Living location Master Medicine Meeting Motion Night North Nursery Office Output Outside Panic Pantry Partial Perimeter Pool Rear Reception 115 116 117 118 119 120 121 122 123 124 125 126 127 128 129 130 131 132 133 134 135 136 137 138 139 140 141 142 143 144 145 146 147 148 149 150 151 152 153 Remote Roof Room Rumpus Safe Security Sensor Shed Shock Shop Side Skylight Sliding Small Smoke South Stairs Storage Study Temperature tennis Toilet Training TV Upstairs User Utility Volt Veranda Wall Warehouse Water West Window Windows Wireless Yard Zone Gym 25 24 Hour Zone Programmed Phone Number 3.……………………………………………………………. Stay Zone Programmed Phone Number 2………………………………………………..……………. Entry - Exit Programmed Phone Number 1.………………………………………………..…………… Zone List 1. 2. 3. 4. 5. 6. 7. 8. 9. 10. 11. 12. 13. 14. 15. 16. 17. 18. 19. 20. 21. 22. 23. 24. Service provider……………………………………………………Phone…………………………………………….. Monitoring station………………………………………….……...Phone…………………………………………….. System type.……………………….…………………………….....Date of installation…………………………….... 26 NX-1815E NetworX Voice Keypad with 16 zone LEDs User Manual