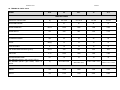
1
02/2014
Mod: DSG-14B
Production code: ES14-(GAZ)
E100301X rev5
21/02/14
TUMBLE DRYERS
INSTALLATION,
USE AND MAINTENANCE
INSTRUCTION
E100301X rev5
21/02/14
INDEX
1. INTRODUCTION ............................................................................................................................................3
2. SAFETY RULES .............................................................................................................................................3
3. MANUFACTURER LIABILITY ........................................................................................................................4
4. UNPACKING ..................................................................................................................................................5
5. MACHINE IDENTIFICATION .........................................................................................................................5
6. INSTALLATION AND POSITIONING .............................................................................................................5
7. INSTALLATION: GAS HEATED MACHINES SPECIFICATIONS .................................................................6
8. NOISE LEVEL ................................................................................................................................................6
9. ELECTRIC CONNECTION.............................................................................................................................7
10. GAS CONNECTION .....................................................................................................................................7
11. GAS CONNECTION: TIGHTNESS TEST ....................................................................................................8
12. GAS CONNECTION: THERMAL POWER ...................................................................................................8
13. GAS CONNECTION: GAS INLET PRESSURE CONTROL ........................................................................8
14. GAS CONNECTION: FINAL TEST ..............................................................................................................9
15. HUMID AIR AND BURN GAS EXAUST .......................................................................................................9
16. STEAM CONNECTION ................................................................................................................................9
17. COMPRESSED AIR CONNECTION ..........................................................................................................10
18. MACHINE DESCRIPTION .........................................................................................................................10
19. PREPARE THE LINEN...............................................................................................................................10
20. START A PROGRAM .................................................................................................................................11
21. PROGRAM DELAYED START .................................................................................................................12
22. PROGRAM PAUSE ....................................................................................................................................13
23. PROGRAM STOP ......................................................................................................................................13
24. PROGRAM STEPS ....................................................................................................................................13
25. END OF A WORKING DAY........................................................................................................................14
26. PARAMETERS MODIFICATIONS DURING THE CYCLE ........................................................................14
27. MANUAL CONFIGURATION .....................................................................................................................14
28. SAVED PROGRAMS .................................................................................................................................15
29. COIN OP DRYER: HOW IT WORKS ........................................................................................................16
30. HOW TO ACCESS THE PROGRAM AREA ..............................................................................................17
31. PROGRAMS ...............................................................................................................................................18
32. LANGUAGE SELECTION ..........................................................................................................................19
33. DATE/TIME MODIFICATION .....................................................................................................................19
34. ENERGY CONSUMPTION ........................................................................................................................19
35. NO WRINKLE .............................................................................................................................................19
36. INITIAL COOLING ......................................................................................................................................20
37. PAYMENT SYSTEM ..................................................................................................................................20
38. ADVERT .....................................................................................................................................................20
39. COIN BOX MENU ......................................................................................................................................20
40. EMERGENCY STOP BUTTON ..................................................................................................................21
41. BLACK OUT ...............................................................................................................................................21
42. WHAT MUST BE DONE IN CASE OF GAS SMELL .................................................................................21
43. DISPLAYED WARNING .............................................................................................................................21
44. DRYER MAINTENANCE ............................................................................................................................23
45. DRYING PROBLEMS.................................................................................................................................24
46. DUAL TIMER DRYER: USE .......................................................................................................................25
47. TILTING DRYER: USE ...............................................................................................................................25
48. SAFETY DEVICE CONTROL.....................................................................................................................26
49. SCRAPPING ..............................................................................................................................................26
50. WARRANTY CONDITION ..........................................................................................................................27
51. TECHNICAL DATA 10-34 ..........................................................................................................................28
52. TEHCNICAL DATA 55-75 .........................................................................................................................33
53. GAS PRESSURE .......................................................................................................................................38
E081101X rev5
21/02/14
1. INTRODUCTION
This manual refers to industrial tumble dryers
installation, use and maintenance.
It is written in compliance with the European
Community rules in force. The information here
written are addressed to the installer and the user,
who must be sure to fully understand them before
to use the machine.
This manual must always be available for
consultancy. In case it should be lost or damaged,
ask for a new copy to the manufacturer.
The producer is not responsible for any
consequence coming from a wrong dryer use
because of a not complete or missing reading of
this manual.
The manufacturer reserves itself the right to
modify the specifications written in this manual or
the characteristics of each machine. Some picture
of this manual may differ from reality because of
some detail. Diagram and technical data may be
changed without any previous notice.
Manual and its attachments are parts of the
machine themselves, so they must be kept
together with the machine and follow the machine
when it is sold to another user.
Attachments and exploded view with spare parts
list can be retrieved in the technical area of the
producer website.
Dryer serial number must be available when
entering in the web site.
Instruction must be read with high attention before
to make the machine work. Instruction must be
available to all the people working with the dryer.
Here described tumble dryers must be used to
professionally drying clothes and linen: any other
use is forbidden, if not before authorized by the
manufacturer.
Before to take out the linen from the dryer, be
sure that the drum is stopped. Never pull your
hands inside the drum, if it is still rotating.
Do not dry in the machine any other different
object; do not dry linen, which entered in contact
with dangerous stuff like explosives, detonating
explosives or inflammables. Linen entered in
contact with this substances, need to be rinsed or
aired before to be dried.
Do not dry linen which has been soaked in
substances dangerous for the operator health, like
poison or cancerogenic stuff.
To avoid risks of fire or explosion, do not
approach to the machine with combustible or
inflammable substances.
The use of this machine is forbidden to people
under 16 years of age.
Children must not play with this equipment.
ATTENTION!
Manufacturer is not responsible for any possible
wrong information here written, when this errors
are due to a printing or translation error.
The manufacturer reserves himself the right to
modify the product, when necessary or useful,
without changing the main characteristics. Without
any previous authorisation of the manufacturer, to
copy completely or partially the text and the
pictures of this manual is forbidden.
Packing materials must be kept out of the reach of
children.
Detergents must be kept out of the reach of
children.
Children and pets must be kept away from the
equipment door when it is open.
External supplementary connection to the
machine release the manufacturer from any
responsibility if they are not properly done.
2. SAFETY RULES
ATTENTION!
Chocking, injuries and
permanent invalidity risks!
WARNINGS
Working with opened sides is forbidden!
Not respecting the following instruction, may
cause damages to people, things and animals.
Installation and maintenance of the here
described machines must be trained by
authorised personnel, which knows the product
and respecting the European Rules in matter of
industrial machines installation.
Reparation made in a not correct way may
seriously compromise the user safety.
In order to avoid burnings or accident it is
forbidden to remove, even temporarily, the
protection panels and the safety systems!
3
E100301X rev5
21/02/14
4
It is forbid
dden to introduce ba
ars, sticks or
metallic ob
bjects insid
de the drum
m. In case of
emergency
y, please follow
f
alwa
ays the he
ere
described p
procedures
c
alwa
ays
Each time the dryer is starter, check
device corre
ect working!
the safety d
upply.
su
Power and co
ontrolled ci rcuits can be
b modified
d
nly by manufacturerr personne
el, on the
e
on
co
ontrary the warranty
w
co
ondition exp
pires.
On
O the electrric board, thhe here bellow warning
g
la
abel was stuck. If this laabel should be
b damaged
d
orr unstuck, it needs to be replaced by
y an identicall
on
ne.
s
devi ce
To know tthe machine and its safety
working is compulsory
y!
BUR
RNS DANGE
ERS
s, because of its naturre, presents
s a
The dryers
burns dang
ger.
Burns may
y be caused by:
- The con
ntact with the
t
linen taken out fro
om
the drye
er;
- The con
ntact with th
he door inside, followin
ng
its open
ning;
- The co
ontact with the heating batteri es
during tthe maintenance;
- The con
ntact with th
he fluxing steam parts.
ollowing lab el,
On the machines are fixed the fo
d be damag
ged, the us
ser
if one of tthem should
must replace it with a new identic
cal one.
S
Stuck near dried
d
linen exit.
e
panels can reach high
h temperatu
ure
External p
during the machine wo
orking.
ed
Dryer must always be used by traine
o
operattor
personnel and with at least one other
m!
in the room
AREFULLY THE
T
INSTRU
UCTION FOR
R
READ CA
OPERATIING IN CASE
E OF BLACK
K OUT, AND
D
INFORM
M ALL THE USER ABOUT THEM.
OP
PERATOR P
PSYCHO-PH
HYSICAL
CONDIT
TIONS
User must be in perfect pssycho-physic
cal condition;;
w
cyclee, the user must always
during the working
assume
a
a verrtical posturee in front of th
he machine.
Sudden or not
n
controlleed movement must be
e
voided becau
use of the rissks of dange
erous knockss
av
ag
gainst the dryer
d
chassiss, i.e.: durin
ng the dryerr
un
nloading.
Th
he other peo
ople in the laaundry room do not have
e
to
o distract the
e operator, who is worrking on the
e
drryer.
While
W
working
g, the operaator do not have to be
e
diistracted by
y TV, radiio or any source off
diistraction.
LIG
GHTING
n the room where
w
the m
machine is in
nstalled, the
e
In
lig
ghting must be at least oof 300-500 lux
l intensity;;
un
npleasant fla
ashing must bbe avoided.
ATT
TENTION!
Th
hese instructions do not cover all po
ossible risks..
User must alw
ways pay higgh attention and respectt
arefully the ru
ules.
ca
3.. MANUFACTURER LIA
ABILITY
Th
he instructio
ons written in this man
nual are nott
re
eplacing, but completing the duties deriving
d
from
m
th
he safety and
d accident pre
revention law
ws.
With
W reference to what iss written in this
t
manual,,
th
he manufactu
ure is not ressponsible when:
-
OCUTION DANGER
D
ELECTRO
Any servic
ce on the electrical
e
parts must by
operated o
only by qua
alified perso
onnel. Befo
ore
to work on
n the machiine, cut off the electric
cal
-
The mac
chine use ddoes not res
spect safetyy
and accid
dent preventiion laws in fo
orce;
The machine was not ccorrectly installed;
aintenance iss
Periodical and/or progrrammed ma
missing;
struction wass not respected;
Manual ins
E100301X rev5
-
21/02/14
Defects occurred in the power supply;
Not authorized modification made on the
machine;
The machine is used by not authorized
personnel.
4. UNPACKING
The machine must be controlled at the delivery
moment, any external or inside damage dues to
the transport, must be reported immediately to the
forwarder.
ATTENTION!
Moving the machine, remember that the dryer
centre of gravity is located in the last third of the
machine height.
Machine must be completely unpacked next to the
installation place. Straps must be cut and the
covering packing material must be taken off.
Packing materials must be wasted following the
rules in subject of environment protection.
Using a key, take away the nuts on the machine
base which are fixing the dryer to the pallet
(frontal and back).
ATTENTION!
Check the machine net and gross weight on the
technical data sheet sent with the machine: it
must comply with the available lifting means.
ATTENTION!
Pallet cannot be used as normal dryer support!
The machine must always be installed without the
pallet and positioned as described in the relative
paragraph.
If the serial number sticker is tampered, missing,
removed or damaged in a way that does not allow
a correct machine identification, the dryer
installation and service can be difficult and the
warranty automatically expires.
6. INSTALLATION AND POSITIONING
Installation must be trained by qualified personnel.
Machine must be positioned on a plane surface
horizontally and in a stable way using the
adjustable feet at the dryer base. Feet can be
adjusted from outside, screwing and unscrewing
them until the dryer is correctly positioned.
In models where it is provided, the feet can be
adjusted from inside using a 5mm hexagonal key
after the filter door and the back panel have been
opened
ATTENTION!
The machine can be moved only when it is fixed
on its pallet: the machine handling must be done
only by trained and competent personnel.
5. MACHINE IDENTIFICATION
The dryer is identified by the sticker reporting the
machine serial number, model, power and
technical characteristics.
Be sure that the electrical, hydraulic, steam, gas,
compressed air connections are complying with
the sticker data.
Spare parts and / or services require the correct
model identification.
Always check if the floor can bear the machine
weight written in the technical data sheet The
machine load can be considered totally static. To
calculate the dryer static load, the weight of the
E100301X rev5
wet linen to be loaded must be added to the dryer
net weight.
Be sure the floor is clean and high temperature
resistant.
For a correct machine use, working and service,
leave at least 500 mm free surface around the
dryer.
The room temperature must be between +5°C
and +40°C.
Protection class is IPX4.
The room where the machine is installed, must
have enough air change. Please note: the
machine takes air from the room where it is
installed and blow off the humid air coming from
the drying cycle to the outside.
The dryer must not be installed behind a door
which can be closed with a key, a sliding door or a
door with hinges mounted on the side opposite to
the tumble dryer.
21/02/14
possible only when air inlet and ventilation are
open.
The room is correctly aired, even when the gas
exhaust is mechanically operated, if the nominal
thermal pollution of this gas equipment do not
cause depression in the room. In this way a
regular gas combustion and the complete exhaust
of the burn gas are guaranteed.
To dimension the air grating, please refer to the
data written on the machine technical sheet and to
the rules in force. In this way a regular gas
combustion and the complete gas exhaust are
guaranteed.
Air inlet dimensions must comply with the
technical sheet requirements and with the subject
rules in force.
In case the dryer supplied with liquid gas is
installed in a basement, forced ventilation system
must be provided.
Do not install or use a machine if it is damaged.
Do not install a machine in a position where the
door cannot be completely open (a suitable kit can
be provide to change the door hinge from left to
right and vice versa.
ATTENTION!
Clean air must be assured to the machine; air
combined with chlorine, fluorine or other
solvent vapours must be avoided.
Do not use or stock near the machine
benzene, petroleum or other inflammable
stuffs. On the contrary fire or explosion may
be caused.
Keep near the machine a foam extinguisher
which is periodically controlled in compliance
with the rules in force.
7. INSTALLATION: GAS HEATED MACHINES
SPECIFICATIONS
Each gas heated machine must be considered,
independently from the capacity, a gas
equipment.
During the installation, the following rules must be
respected:
- territorially building and fire-prevention rules;
- accident prevention rules;
- CENELEC rules (electric system);
- Rules about the combustible gas use
- Rules about gas system supplied by public
net or GPL gas
- Rules coming from the gas company
- Rules coming from the electricity company
- Other possible local rules.
Air inlet and ventilation openings can be closed
only if the opening condition is controlled and only
if the flame of the gas heated equipment is
ATTENTION!
Never installed a gas heated machine in the
same room where machine using solvents are
installed (example: dry cleaning machine) .
This combination could produce dangerous
substances for the operator and it can cause
steel corrosion.
If a gas heated machine and a machine using
solvents are installed in two separate room, be
sure that there is no possibility of air
exchange between the two rooms.
ATTENTION!
In case of machine equipped with a tilting
system, the machine must be fixed to the floor
using some screw anchor.
Machine
must
be
installed
perfectly
horizontally on a floor without elastic reaction.
ATTENTION!
In case of titling machines, there are external
parts which moves during the linen loading
and unloading steps.
For machine dimensions and machine needed
space during the movement, please refer to
the technical data sheet.
8. NOISE LEVEL
The air noise produced by the machine is
producing an A continuous and weighted acoustic
pressure lower than 70 dB.
In case that more machine should be mounted in
line, the sums of the acoustic pressure are:
2 machines: air noise < 73dB
E100301X rev5
21/02/14
3 machines: air noise < 75dB
4 machines: air noise < 76dB
5 machines: air noise < 77dB
9. ELECTRIC CONNECTION
Electric connection must be carried out by
qualified technicians and must comply with local
and national rules in force. Check if the supply
data corresponds to the data written on the
machine plate.
To connect the machine use a H05 VV – F cable
or superior, it must be correctly dimensioned
following the data label.
Install before the machine a omnipolar
disconnecting device (i.e.: a circuit breaker) which
need to have a contact opening that allows the
complete disconnection in case one of the
conditions of the over tension III category is
verified. This device must comply with the subject
regulation in force.
Check the main switch, it must be in position “0”.
Open the electric supply door. Open the electric
supply door.
Pass the electric supply cable through the cable
holder supplied with the machine. The cable must
be correctly dimensioned (check the following
table).
Electric supply cable connection must be done on a
series of marked terminal.
Following the kind of heating, which is indicated
on the serial number plate, connect the cable to
the terminals, as indicated:
rotated in the direction indicated by the arrow
marked on the motor cover.
Check that the phases are connected in the
correct sequence.
The machine must be connected to an efficient
ground system: the supplier is not responsible in
case this connection is not operated in
compliance with the subject rules in force.
Before to do any maintenance cut the electricity
supply to the machine: for maintenance refer to
the machine electric diagram, which is inside the
machine; anyway, it can be retrieved in any
moment in the manufacturer web site.
The minimum section for the electric cable are
indicated in the attached technical data sheet and
2
are expressed in mm .
ATTENTION!
The technical data minimum sections can change
according to the connection length. In case the
cable is longer than 5 meters, the cable diameter
must be proportionally increased.
ATTENTION!
The machine connection must always be made
respecting the data written in the serial number
plate (power, supply tension, frequency).
For voltage different from the one provided, ask
for more information to the manufacturer.
ATTENTION!
For machine equipped with drum or fan speed
control, it means for machine equipped with
inverter, a protection by RCD kind B device must
be provided (sensible to the current medium
value).
: ground, colour: yellow/green
L1, L2, L3: phase, colour: brown
N: neutral, colour: blue
In case of installation or replacement of the
supplying cable, the ground cable must be at least
5cm longer than the other cables.
The electric diagram is contained in an envelope,
near the electric board.
ATTENTION!
Check the fan rotation direction: it must rotate in
the direction which allows the exhaust air
discharge; it means that the fan motor must
ATTENTION!
In case the machine is equipped with a supply
cable, and the cable is damaged, it must be
replaced by the manufacturer or by the authorized
technical service;, anyway only qualified
personnel can service the machine, in order to
prevent any risk.
10. GAS CONNECTION
If the machine is gas heated, the necessary
connection with distribution system must be
made: check the machine serial number plate
data, especially supply gas pressure.
E100301X rev5
ATTENTION!
The gas maximum pressure admitted is
50mbar. To supply the gas with an higher
pressure, even for short time, may damage the
valve.
The gas distribution system must be realised in
compliance with the rules in force and it must
respect the sections and the pressure suitable for
the installed equipment. .
Look to the following picture: before the machine
must be installed a rapid gas interceptor cock (1);
the gas cock must be near the dryer and in an
easy reachable position. The cock must comply
with the rules in force and must be an approved
model.
A low point pressure switch must be provided (2).
The connection to the gas system must be made
using a no-vibration joint (3); if flexible tubes are
used, these must be in stainless steel DIN 3384 or
DIN 3383.
The gas system must be realised in compliance
with the rules in force. The dryer gas connection
has a dimension, which is written in the technical
data sheet; this dimension do no must be
reduced.
The next picture shows how the machine should
be connected in case of gas cylinder with high
pressure: in this case a two steps reduction
system is necessary; it must be realised in
compliance with the rules in force.
A first 1.5mbar governor must be connected after
the high pressure gas cylinder (1), after that a
safety valve with the appropriate dimension must
21/02/14
be installed (2).
The high pressure tube (3) is interrupted by an
interceptor cock (4) and then it follows protected
(5) below the compartments division area border.
Before to enter in the room where the machine is
installed, a second interceptor valve must be
provided and then a filter (6) and a second
governor (7) which brings the pressure to the
correct working value.
11. GAS CONNECTION: TIGHTNESS TEST
All the joints between system and dryer must be
tightness tested .
To make this test, it is suggested to use a leak
finder spray; otherwise the joints can be covered
with a foamy substances, which must not be
corrosive. In both cases, bubbles must not be
created.
ATTENTION!
It is forbidden to use free flame for the
tightness test!
12. GAS CONNECTION: THERMAL POWER
Each dryer tested in the factory is prepared for the
kind of gas which is written in the sticker near the
serial number plate.
If the machine is predisposed for a gas which
does not correspond to the kind available in the
installation place, then it is compulsory to make
the dryer adaptation. In this case, the authorised
after sales centre must be informed.
The dryer working with the expected thermal
power depend on the inlet pressure and the gas
calorific power, but also depend on the nozzle, the
gas pressure arriving to the nozzle and from a
correct supply of primary air.
The pressure of the gas arriving to the machine
must be included in the limits written on the gas
type tables. It the pressure is not included in the
limits written in this manual, the dryer cannot be
started.
If the verified gas pressure is different from the
tables values, please contact the gas company or
the company which realised the gas system.
The GAS Lower Calorific Power, which must be
asked to the gas company, must correspond to
the one indicated in the technical data table.
13.
GAS
CONNECTION:
GAS
INLET
PRESSURE CONTROL
The inlet gas pressure must be controlled using a
digital or liquid measure tool. (precision: at list 0.1
mbar).
Close the interceptor device.
Open the sealing screw of the gas valve
pressure tube connection indicated with
“Pin”.
Connect the manometer.
Open the interceptor device.
E100301X rev5
-
Start the dryer following the user instruction
Check the inlet pressure, with the burner
working.
Switch off the dryer.
Close the interceptor device.
Take off the monometer.
Close the screw of the gas valve pressure
tube and control the tightness.
Open the interceptor device and control test
the tightness.
The dryer must not working if the gas pressure is out of
the limit shown in the reference table.
14. GAS CONNECTION: FINAL TEST
Once the connection works are taken over, the
equipment and the installation must be controlled.
It is necessary to control:
- that the connection are made respecting the
instructions written in this manual;
- that the safety rules and the laws about this
subject are respected;
- that gas connection are tightness tested.
Switch on the machine following the user manual
instructions controlling the burner lighting on and
the flame aspect.
Do a gas test with the volumetric method. Using
the gas contactor, control how much gas was
used in a fixed time unit: this value must be
compared with the values in the tables.
15. HUMID AIR AND BURN GAS EXAUST
The humid air and burn gas exhaust system must
be realized following the rules in force.
To avoid lack of humid air and noise, the exhaust
System elements are identified as below::
1) On - off valve;
2) Filter;
3) pressure reducing valve (if necessary)
21/02/14
joints to the outside must be made tight with high
temperature resistant material (filler, putty,
silicone preparation.
Gas heated tumble dryer are B22 equipment, it
means they are gas equipment which depend on
a aired room without any wind protection device
with blower behind the burning room.
Dryer burned gas must be brought outside
through a chimney.
Burn gas and humid air pipe must be the shortest
possible one and it must be rising to the exhaust
chimney.
In the lowest point a condenser drain must be
provided, this drain derivation must observe the
local rules in subject of water drain connection.
The dryer is equipped with a suction fan which
produces its typical noise while working.
To reduce the noise level, a muffler can be
installed on the drain (it can be found in
specialised shop).
16. STEAM CONNECTION
Only for steam heated tumble dryers, a
connection to the steam system must be provided.
This connection must be performed by qualified
personnel in compliance with the national and
local rules in force.
Steam must satisfy the minimum requirement
which are written in the technical data sheet; all
system parts must be certified.
The steam system must be realised following the
below diagram:
4) Safety valve
IN) Machine steam exchanger inlet
E100301X rev5
ATTENTION!
In order to be efficient, the safety valve must
be of a adequate size to provide to the
maximum steam system rate.
5) Vacuum breaker valves
6) Filter
7) Inverted bucket steam trap
8) Flow indicator
OUT) Machine steam heater outlet
ATTENTION!
Drying productivity depend on the steam
heater efficiency.
Dryer can work with the steam pressure range
referred in the technical data sheet, anyway
lower is the pressure, more poor are the
machine performance. In order to avoid too
much longer drying time, the pressure should
be at least 5bar.
17. COMPRESSED AIR CONNECTION
Connection to a compressed air system is
necessary for some dryer models: check the
equipment data sheet.
System must be performed by qualified personnel
in compliance with national and local rules in
force.
Connection between system and dryer must be
tight tested; it is suggested to use a leak finder
spray. In case of air leaks, stop them.
18. MACHINE DESCRIPTION
The dryer is characterized from some elements
which must be known before to use the machine.
21/02/14
The point nr 2 identifies the control board area,
which can be electronic (microprocessor) or
electro-mechanic (double timer).
The point nr 3 identifies the door of the dryer.
The point nr 4 identifies the filter door. It must be
open each time the filter needs to be cleaned. The
access to the filter must be allowed only to
specialized an competent personnel.
The point nr 5 identifies the electric connection
box and a part of the electric system.
The point nr 6 identifies the humid air exhaust
(always) and the burn gas exhaust (in case of gas
heated machines).
ATTENTION!
Air intakes on the machine back must be
always free. The air passage must not be
limited in any way.
19. PREPARE THE LINEN
Dryer must be loaded on the base of the data
written on the serial number plate: the dryer must
not be loaded with a weight above the nominal
load written on the serial number plate.
Before to decide the most adequate program,
divided the linen into groups, which should be
homogeneous for kind of fabrics or fibres, in order
to reach a uniform drying inside the drum.
Only spin linen must be loaded into the dryer.
Always be sure that batcher or other object are
not among the linen.
Be sure that, during the washing, softener (or
similar products) were used in compliance with
the linen manufacturer instructions.
Before to dry the linen, be sure that the garments
instructions allow the tumbling. The linen must be
wet washed.
Below some international symbol explication:
Normal temperature drying
Low temperature drying
Do not tumble.
ATTENTION!
The point nr 1 identifies to the heater door. In
case of service, the door can be opened using the
plastic key supplied with the machine, inside the
documents envelope.
Only competent and specialized personnel is
allowed to access to the electric board.
Do not use the machine if chemical products
were used to wash.
Do not use the machine in case of self-igniting
fabrics.
Linen to be dried must not have been in
contact with dangerous substances such as
E100301X rev5
21/02/14
4
explosives, detonating
g or flammables.
of linen so
oiled with cocking o
oil,
In case o
acetone, alcohol, petrol,
p
Kero
osene, sta
ain
s
removers, turpentine, wax and substances
to
ax, it must be washed in hot watter
remove wa
with an e
enough qu
uantity of detergent to
completely
y remove the
ese substan
nces.
This linen m
must be well rinsed and
d aired befo
ore
to be dried.
such as foa
am (latex fo
oam), show
wer
Subjects s
caps, wate
erproof texttiles, items with at lea
ast
one side o
of rubber, garments
g
orr pillows wiith
latex foam
m parts, and
d each fabrric containin
ng
rubber partts, must nott be dried.
h was not wa
ashed beforre.
Do not dry linen which
at softener and similarr products a
are
Be sure tha
used in com
mpliance wiith their insttructions.
OPEN
DOOR O
While
W
the do
oor is open, the above massage iss
diisplayed by turns with thee date and th
he time.
008:55
Sa
aturday 09 N
November 13
3
he dryer is
s ready to be loaded. Before to
o
Th
in
ntroduce the wet linen innside the dru
um, be sure
e
th
hat the drum is completelyy empty.
Th
he machine must be loadd with the most
m
possible
e
ho
omogeneous
s linen; loadding weight must
m
not be
e
ab
bove the on
ne indicatedd in the tec
chnical data
a
sh
heet and in th
he serial num
mber plate.
Once
O
the drye
er is loaded, cclose the door.
yer
Check the padded garrments: do not the dry
ged padded garments.
with damag
pers; button
ns the down
n jackets, ti es
Closes zipp
ribbons and laces. Em
mpties the po
ockets.
uch as buc
ckles, hook
ks,
Metallic ellements su
closures, must be wrapped
w
in
n a cloth to
e dryer dru
um from scratches an
nd
protect the
shocks, w hich could also dama
age the line
en
itself.
AM
20. START A PROGRA
Switch on tthe main switch to supply electricity to
the machine
e.
In case of ssteam heated machines open the ga
ate
valve to le
et the stea
am enter. To
T limit watter
hammering, open the gate valve
e slowly: fro
om
pen position in one minutte time.
closed to op
In case of gas heated
d machine open the g
gas
interceptor vvalve.
at the emerg
gency stop button (on tthe
Be sure tha
model equip
pped with th
his option) is
s in the corre
ect
position, tha
at it has not been activated during la
ast
working cyccle or during the transporrt.
Before to start the macchine, safety
y devices ne ed
always to be tested (see the correspondi ng
paragraph)..
ase
When the machine is starter, sofftware relea
ersion are dissplayed.
date and ve
verss. 2.19
27//10/13
After that th
he display shows:
ATT
TENTION!
d
be su
ure that piec
ces of linen
n
Closing the door,
o not stay closed
c
betw
ween the do
oor and the
e
do
drryer front pa
anel.
When
W
the doo
or is compleetely closed,, the displayy
sh
hows:
SELECT
S
AP
PROGRAM
o select a prrogram, scrolll down the programs
p
listt
To
us
sing the follo
owing keys:
-
to scroll
s
ahead: ► or ▲
to scroll
s
back: ◄ or ▼
When
W
a program is visuaalised, its na
ame and itss
po
osition in the
e list are dispplayed (the name
n
can be
e
modified:
m
see the relative pparagraph). Example:
70°C
50’
RAM 03
PROGRA
he characterristic of the program can
n be verified
d
Th
be
efore to sta
art the cyclle; in effectt, after few
w
E100301X rev5
21/02/14
seconds the display will show the drying
parameters.
Program parameters visualisation may be
anticipated or deleted using the ENTER ◄┘ Key.
Here below the parameters description:
In the above picture the red box marks the drum
rotation speed (only in case of machine equipped
with the DSC option).
The parameters shown above on the left are the
drying cycle temperature and length. In our
example the cycle will reach a maximum
temperature of 70°C and will be 50 minutes long.
The ending part of a drying program is a not
heated cycle (called cooling) which is necessary
to assure the integrity of the garments. The box
on the above pictures marks cooling temperature
and the cooling cycle time. The machine will
complete the cycle as soon as one of this two
parameters is reached. In the above example the
cooling cycle will be ended within 5 minutes or the
temperature is lower than 30°C.
In the above picture the drying heating power is
marked (only in case of machine equipped with
the power control option). The dry heating power
are three:
-
level 1: minimum power
level 2: medium power
level 3: maximum power
the level must be selected according to the kind of
fabric to be dryed. Higher is the selected level,
quicker will be the temperature increasing inside
the drum.
In the above picture the red box marks the fan
rotation speed (only in case of machine equipped
with the FSC option). Suction speed levels are
four:
level 1: very low speed
level 2: low speed
level 3: medium speed
level 4: high speed
The selected level correspond to the air passage
speed inside the drum: higher is the selected
level, quicker is the air passage inside the drum.
When the wished program is displayed, press the
START/PAUSE key to start it.
ATTENTION!
For a correct ironing cycle, the selected program
should assure a 10 – 20 % of linen residual
humidity at the end of the cycle.
ATTENTION!
In case of damages or working anomalies,
shut off the dryer and call the authorized
service centre.
ATTENTION!
At the end of the program the line must never
be left inside the stopped machine: you may
run into a phenomenon of auto combustion!
21. PROGRAM DELAYED START
To select the program follow the instructions given
in the previous paragraph, but instead to press
E100301X rev5
21/02/14
4
START/PAU
USE, press the
t key MEN
NU:
ATT
TENTION!
When
W
the do
oor is open during a dryer pause,,
pllease note that the lin
nen tempera
ature could
d
be
e very high!
The displayy shows:
START
TING TIME
14:20
ag
gain and the key START/
T/PAUSE is pressed.
p
The
e
prrogram will start from tthe point where
w
it wass
in
nterrupted.
→
14:20
0
n the left is th
he current on
ne, on the rig
ght
The time on
the starting time is flashing.
ayed at maximum for 24
The start ccan be dela
hours.
w
starti ng
Use the keyys ▼ and ▲ to fix the wished
time and pre
ess ENTER ◄┘ or STAR
RT.
The displayy shows:
PROG
GRAM 2
3. PROGRAM STOP
23
Th
he program can be defi nitely interru
upted at anyy
moment,
m
just pressing
p
the STOP key:
ATT
TENTION!
A tumble dry
yer should never stop
pped before
e
th
he drying program end
d, unless alll the items
s
arre extracted
d and hang o
out to cool them
t
down.
04::14:47
Below the name of th
he program a countdow
wn
nd seconds a
are
shows how many hourss, minutes an
missing to the automaticc start.
down can be
b stopped at any tim
me
The countd
pressing the
e key STOP or MENU.
Once the ccountdown iss ended the
e cycle will be
automatically started.
d
the co
ount down, tthe
If the door is opened during
use (see th
he appropria
ate
machine sttays in pau
paragraph)..
RAM PAUSE
E
22. PROGR
While the program is ru
unning, it can
n be tempora
ary
or definitelyy interrupted.
Pressing th
he key STAR
RT/PAUSE the
t
program is
temporary in
nterrupted.
The displayy shows:
P03
PR
RESS START
T
n, the display
y shows:
If the dryer door is open
P03
D
DOOR
OPEN
N
d
is clos ed
The pause is stopped when the door
ATT
TENTION!
e the hot lin
nen inside the
t
stopped
d
Do not leave
machine:
m
you
u could run into a phen
nomenon off
au
uto combus
stion.
4. PROGRAM STEPS
24
Th
he drying prrogram is coomposed by
y two steps::
he
eating and end cooling.
Each one of these two steps
s has two
o
haracteristic value: tempeerature and time.
t
ch
During the heating step hee machine is
s drying for a
ertain time att the fixed te mperature.
ce
During the co
ooling time, the machin
ne cools the
e
nen for the fix
xed time or uup to arrived to the fixed
d
lin
te
emperature: the
t step will ffinished whe
en one of the
e
tw
wo parameters is reachedd.
While
W
the pro
ogram is ruunning, it is possible to
o
ch
heck all the fixed
f
parameeters.
During the heating step, thhe set point temperature
e
hlighted (in oour example
e: 70°C): the
e
is always high
eal drum tem
mperature iss flashing be
elow on the
e
re
rig
ght (in our ex
xample: 27°C
C).
On
O the right it is indicateed the time remaining
r
to
o
th
he end of the
e heating sttep (in our example:
e
49’’
an
nd 59”).
E100301X rev5
21/02/14
4
The end pa
art of the prog
gram is a no
ot heated cyccle
(cooling ste
ep) to be sure
s
that the
e linen is n
not
damaged.
e the set point temperatu
ure
During the ccooling cycle
is always displayed (in the below example: 30°°C)
al drum temp
perature flash
h on the abo
ove
and the rea
line (in the b
below examp
ple: 76°C)
On the rig
ght of the cooling tem
mperature, tthe
remaining time is displayed
d
(in the belo
ow
example: 4’ and 59”).
ut at the end
d of the cyccle and switc
ched off: the
e
pu
drrum must be emptied andd cleaned.
Close all the energy suppplies to the dryer using
g
he appropria
ate line sw
witches: elec
ctricity, gas,,
th
stteam and com
mpressed ai r.
Th
he dryer doo
or must be lefft open.
6. PARAME
ETERS MOD
DIFICATION
NS DURING
G
26
TH
HE CYCLE
While
W
the prog
gram is runnning, the parameters can
n
be
e modified: th
his changes are not save
ed.
To
o modify a program
p
whilee it is runnin
ng, press the
e
ke
ey MENU or the key ENT
TER ◄┘.
Th
he display sh
hows:
ed by a 10 se
econds buzz .
The cycle end is signale
The displayy shows:
P
P02
CYCL
LE END
of the progra
am just ende
ed is displayyed
The name o
(in the exam
mple: the pro
ogram nr 2). The messa ge
stay displayyed until the
e STOP key is pressed or
until the doo
or is opened.
In case the STOP key is not pressed or the do
oor
n is on (lookk to
is not open,, if the no wrrinkle function
the relative paragraph), the drum will
w start to tu
urn
wing the set value.
v
again follow
No wrinkle step can be
e interrupted
d pressing tthe
or opening the
t door. Anyway this sttep
STOP key o
will stop at the program
mmed time or at the end of
mmed length..
the program
NO WRINKLE
W
09:30
20:00
kle step startt is
The waiting time before the no wrink
he no wrinkle
e step length
h is
displayed on the left. Th
on the right, this value will become
e a
displayed o
countdown as soon as the
t step will start.
s
previous dryiing step can
n be added to
NOTE: A p
the progra
am, if an INITIAL COOLING is
programmed.
ng the key ► it is possiblle to activate
ea
NOTE: usin
rapid advan
nce and stop
p the heating
g step passi ng
directly to th
he cooling step.
s
This fun
nction must be
enabled by IMESA Afterr Sales Service.
F A WORKIN
NG DAY
25. END OF
At the end of the working day, the dryer must be
he temperatture set poinnt is highlig
ghted with a
Th
with
w background.
Each time tha
at a parameeter is highlig
ghted in thiss
way,
w
its value can be increeased or dec
creased with
h
th
he key ▲ and
d ▼.
All the displayed parameeter can be modified: to
o
move
m
from on
n parameter to another one use the
e
ke
eys ◄ and ►.
►
Once
O
all the necessary
n
chhanges are made
m
wait forr
a while: after few secondss the visualis
sation of the
e
arameters will come backk to the usua
al way.
pa
User can mak
ke as many cchanges as he wants, att
ny time and in
i any cycle step.
an
ATT
TENTION!
dification muust be opera
ated only byy
Program mod
ained person
nnel.
tra
7. MANUAL CONFIGUR
RATION
27
Cycle can be run also in a manual configuration::
when
w
the line
en was loadeed, set the main drying
g
pa
arameters..
To
o use this co
onfiguration, press once the
t key ▲ orr
► while the display iss showing “SELECT
“
A
PROGRAM”.
he display sh
hows:
Th
UAL
MANU
START.
Press the key ENTER or S
he display sh
hows:
Th
E100301X rev5
21/02/14
4
MANUAL
30 min
▲
▼
ng time can be
Using the kkeys ▲ and ▼, the dryin
increased o
or decreased up to the wished value.
Once the w
wished time iss visualised, press STAR
RT
or ENTER.
The displayy shows:
MANUAL
40°C
ATT
TENTION!
he used te
emperature must comp
ply with the
e
Th
te
emperature
on
the
garmentss
indicated
manufacturer
m
instructions label.
▲
▼
ng temperatu
ure
Using the kkeys ▲ and ▼, the dryin
can be incrreased or de
ecreased up to the wish ed
value.
wished tempe
erature is vis
sualised, pre
ess
Once the w
ENTER and
d then start or
o directly ST
TART.
The manual cycle start.
ue stay in memory
m
as de
efault value ffor
The set valu
the next use
e of a manua
al cycle.
As explaine
ed for the prrograms valu
ue, also in th
his
case param
meters can be change
ed during tthe
drying cycle
e (see the pre
evious parag
graph).
MS
28. SAVED PROGRAM
The machine is delivvered with 30 configurred
age a table is
s resuming tthe
programs. In the next pa
am paramete
er.
each progra
Program ca
an be freely modified as explain in tthe
relevant parragraph.
eversing dru
um
In case of dryers equipped with re
default reverrsing times are:
option, the d
-
n case of machine
m
eqquipped with
h the otherr
In
op
ptions, the de
efault param
meters are the
e same in alll
th
he programs:
ating power: level 3
- hea
- Dru
um Speed: 400 rpm
- Fan
n Speed: speeed 2
right: 40 seconds
e: 5 secondss
pause
left: 4
40 seconds
ATT
TENTION!
s on the linen mean
ns that the
e
Yellow stains
etergent was
s not well rrinsed or the linen wass
de
drried to a temperature hhigher than the allowed
d
on
ne!
ATT
TENTION!
Wrinkles
W
on the
t
dried lineen can be caused
c
by a
to
oo much longer waiting time after the
t
program
m
en
nd. If this event
e
occurss often, the
e no wrinkle
e
cy
ycle should be
b activated.
ATT
TENTION!
o the fabricss
Sensible difference in thee thickness of
may be caus
sed by seam
ms) may caus
se a uneven
n
(m
drrying.
ATT
TENTION!
Av
void to dry garments with plastic buttons orr
fa
abrics with sy
ynthetics seaams. High te
emperaturess
may
m cause the
e plastic mellts and consequently the
e
drrum could be
e soiled.
nd pause tim
mes can be modified (s ee
Rotation an
the relevantt paragraph).
DRYING
G
PROG.
01
02
03
04
05
06
07
08
TYPE
T
RESIDUA
AL HUMIDITY
Y
RESIDUA
AL HUMIDITY
Y
RESIDUA
AL HUMIDITY
Y
RESIDUA
AL HUMIDITY
Y
TIME
T
T
TIME
T
TIME
T
TIME
°°C
9
90
8
80
7
75
6
60
5
50
4
40
9
90
8
80
Min.
DRY
IRON DRY
DRY
DRY
50
50
40
40
G
COOLING
°C
40
40
40
40
40
40
40
40
Min.
3
3
3
3
3
3
3
3
E100301X rev5
21/02/14
4
DRYING
G
PROG.
09
10
11
12
13
14
15
16
17
18
19
20
21
22
23
24
25
26
27
28
29
30
TYPE
T
T
TIME
T
TIME
T
TIME
T
TIME
T
TIME
T
TIME
T
TIME
T
TIME
T
TIME
T
TIME
T
TIME
T
TIME
T
TIME
T
TIME
T
TIME
T
TIME
T
TIME
T
TIME
T
TIME
T
TIME
T
TIME
T
TIME
HIGH
MEDIUM
LOW
TIME
T
T
TIME
T
TIME
°°C
Min.
7
70
40
6
60
40
5
50
40
4
40
40
9
90
30
8
80
30
7
70
30
6
60
30
5
50
30
4
40
30
9
90
20
8
80
20
7
70
20
6
60
20
5
50
20
4
40
20
9
90
15
8
80
15
7
70
15
6
60
15
5
50
15
4
40
15
Co
oin Op dryerrs
9
90
50
8
80
50
7
70
50
OP DRYER: HOW IT WO
ORKS
29. COIN O
In case the dryer is prepared to
o work with a
al cash, coin
n box, prepa
aid
payment syystem (centra
keys, etc.), the keypad
d is modified
d to allow tthe
hoose among three pro
ograms: LOW
W,
user to ch
HIGH.
MEDIUM, H
COOLING
G
°C
40
40
40
40
40
40
40
40
40
40
40
40
40
40
40
40
40
40
40
40
40
40
Min.
3
3
3
3
3
3
3
3
3
3
3
3
3
3
3
3
3
3
3
3
3
3
40
40
40
3
3
3
According to the system configuration, when the
e
co
oins are inse
erted, the dissplay shows the residuall
am
mount to com
mplete the cyycle purchase.
When
W
the pric
ce is entirely paid, the dis
splay shows:
TEMP
LOW T
PRESS S
START
If one of the keys LO
OW, MEDIUM
M or HIGH is
e cost of the program is displayed.
d
pressed, the
For examplle, when the
e user press the key LO
OW
the display shows:
When
W
the STA
ART is presssed, the cycle
e is started.
During the drrying cycle, a sliding line riminds to
o
he chosen program
p
andd to the mis
ssing drying
g
th
tim
me in minute
es and seconnds.
DRYING LO
OW TEMP
LOW
W TEMP
INSE
ERT 2€
at the minimum price for a cycle is 2€
€.
It means tha
15:45
E100301X rev5
21/02/14
4
During the cycle, the drying pro
ogram can be
changed jusst pressing the new pro
ogram key: tthe
selection w
will be autom
matically up
pdated witho
out
any machine stop.
A
ATTENTION!
!
In case the selected prrogram should be chang ed
e new progra
am
while the cyycle is running, and the
values are
e different, the credit time will be
proportionally modify.
e field “ADVE
ERT” was co
onfigured (s ee
In case the
the relevantt paragraph)), the advertising messa ge
is displayed
d by turns with
w
the sele
ected progra
am
name:
TODAY SPE
ECIAL OFFE
ER …
ened, or the key PAUSE or
Should the door be ope
STOP be pressed, while the cycle is running, tthe
d be in stand--by.
dryer would
The credit ttime count down continu
ues also duri ng
this pause.
A
ATTENTION!
!
e is longer th
han 5 minute
es, the creditt is
If the pause
automatically lost.
ATTENTION!
A
ooling step, tthe
If the door is opened during the co
ed and broug
ght to the end
d.
cycle is defiinitely stoppe
The credit iss not lost, be
ecause the payment
p
nee
eds
only to buy drying time and
a not cooliing time.
e is running, the selectted
While the ccooling time
program cannot be chan
nged.
before the drrying cycle end, the displlay
5 minutes b
shows the message “INTRODUC
CE COINS IF
T TO BUY MORE
M
DRYIN
NG TIME”. Th
his
YOU WANT
sentence iss followed by
b the minim
mum price a nd
the corresp
ponding min
nimum time that can be
brought.
INTRO
ODUCE COIN
NS IF YOU WANT
W
…
4:45
O ACCESS THE PROGR
RAM AREA
30. HOW TO
Default para
ameter value
e can be mo
odified enteri ng
in the user m
menu.
While the machine is stopped, press
p
the kkey
MENU:
Th
he following message is displayed:
PASSW
WORD
______
f
codee pressing 6 time the
e
Digit the 6 figures
TART/PAUS
SE key. The display show
ws a star forr
ST
ea
ach digit.
Once
O
the se
equence is completed, the displayy
sh
hows:
PR
ROGRAMS
▲▼
▼
nt it is possibble to start to program.
Frrom this poin
Using the ke
eys ▲ and ▼ scroll up/down
u
the
e
prrogramming areas:
-
PROGR
RAMS
LANGU
UAGE
DATE/T
TIME
ENERG
GY CONSUM
MES
he
e following paragraphs are explain
ning how to
o
manage
m
these
e areas.
To
o exit from on menu, justt press STOP
P or MENU.
If the machiine is equiipped with a paymentt
ystem, the access
a
to thee program area
a
can be
e
sy
made
m
keeping
g pressing thhe STOP ke
ey within 30
0
se
econds from the machinee switch on (power on).
Program men
nu allows to make all the necessaryy
peration. The below tabble match the standard
d
op
ve
ersion keys with
w the coin op version keys:
k
Standa
ard
configura
ation
Coin
n Op
configu
uration
STAR
RT
STOP
P
LEFT: ◄
RIGHT: ►
DOWN: ▼
UP: ▲
ENTER: ◄┘
MENU
U
STA
ART
STO
OP
not ava
ailable
not ava
ailable
LO
OW
HIG
GH
MED
DIUM
not ava
ailable
E100301X rev5
21/02/14
31. PROGRAMS
To enter in the program area, please follow the
instruction given in the previous paragraph.
When the display shows “PROGRAMS ▲▼”,
press ENTER ◄┘.
N. STEP
(only programs “TIME”)
A number of heating steps (or cooling steps) can
be set:
- 1 ÷ 10
Scroll down the programs with the key ▲ and ▼
until it is displayed the name of the program that
you want to modify.
When the wished program is displayed (in our
example the number 3), press ENTER ◄┘. In this
way it is possible to enter in the program n. 3
parameters modification. The parameters list can
be scrolled up and down using the keys ▲ and ▼.
STEP 1
(only programs “TIME”)
For each step composing the cycle, it is possible
to decide the drying temperature and the step
length:
- TIME: 1’ ÷ 120’
- TEMPERATURE: 0°C ÷ 90°C
From this point use the keys as explained below:
-
The keys ”▲▼”, to scroll the available
parameters.
The key “ENTER ◄┘” to enter in a
program and modify it.
The keys ”▲▼” to modify the value while
it is flashing.
The key “ENTER ◄┘” to confirm the
displayed value.
The key “◄ ►” to change the cursor
position to write the PROGRAM NAME.
Here below the program which can be modified
and their possible values.
PROGRAM NAME
Program description displayed during the program
selection and execution. It can be maximum 16
character long.
PROGRAM TYPE
This parameter is used to make the program
works in an automatic way (deciding the residual
humidity at the end of the cycle) or in a traditional
way (deciding the cycle length). The two
parameters are:
- HUMIDITY
- TIME
RESIDUAL HUMIDITY AT THE CICLE END
(only programs “WITH RESIDUAL HUMIDITY”)
Select the value of the residual humidity at the
end of the cycle, once this value is reached the
cycle is ended:
- IRON DRY
- DRY
- EXTRA DRY
WDT T SET
(only programs “WITH RESIDUAL HUMIDITY”)
In this area can be fixed the safety time for the
program stop and the set point temperature for
the automatic cycle.
- DRYING TIME OUT: 1’ ÷ 120’
- TEMPERATURE: 0°C ÷ 90°C
STEP 2 … 10
For each step composing the cycle, it is possible
to decide the drying temperature and the step
length:
- TIME: 1’ ÷ 120’
- TEMPERATURE: 0°C ÷ 90°C
COOLING TIME
It corresponds to the length of the cooling cycle at
the end of the drying cycle. This time is
automatically reduced if the set point cooling
temperature is reached before the end of the
cycle:
- 0’ ÷ 30’
COOLING TEMPERATURE SET POINT
It is the cooling temperature which determine the
end of the drying program. If the cooling time
elapse before the temperature is reached, the
program end however.
- 0°C ÷ 90°C
REVERSING DRUM
(with machine with reversing options)
In case the machine is equipped with a reversing
option, this function can be excluded from the
program.
If the parameter “WITHOUT” is selected, the drum
turn always in the same direction (right).
- WITH
- WITHOUT
DRUM RIGHT ROTATION TIME
(machines and programs WITH REVERSING
DRUM)
It is the drum clockwise turning time:
0” ÷ 5’
DRUM STOP TIME
(machines and programs WITH REVERSING
DRUM)
It is the drum rotation pause:
1” ÷ 5’
DRUM LEFT ROTATION TIME
(machines and programs WITH REVERSING
DRUM)
It is the drum counterclockwise turning time:
E100301X rev5
21/02/14
4
0” ÷ 5’
DRUM
M SPEED
(dryers equipped with DSC
D
option)
It is the drum
m speed in round
r
per min
nute:
20rpm ÷ 80rpm
FAN SPEED
(dryers equipped with FSC option)
mid air suctio
on fan speed level
It is the hum
1÷4
P
POWER LEV
VEL CONTR
ROL
(dryers equipped with a power level control)
o reduce the heating pow
wer
This parameter allow to
of the electrric heater:
MIN 1
MED 2
MAX 3
TARTING CO
OOLING LEN
NGTH
ST
(dryer where this functio
on is activate
ed)
he initial coolling cycle be
efore the dryi ng
Length of th
cycle.
0’ ÷ 30’
UAGE SELEC
CTION
32. LANGU
To enter in
n the progra
am area an
nd change tthe
language, follow the instructions given in tthe
aragraph.
pertinent pa
When the display showss:
LINGUA
O
ITALIANO
▲▼
ER ◄┘.
Press ENTE
The language (ITALIAN
N, in our example) starts to
he languages
s list using tthe
flash. Scroll down/up th
d ▲. When
n the wished
d language is
key ▼ and
displayed press ENTER
R to confirm.
nu using the keys STOP or MENU.
Exit the men
TIME MODIF
FICATION
33. DATE/T
To enter in the program
m area and ch
hange the da
ate
me, follow the
e instruction
ns given in tthe
and the tim
pertinent pa
aragraph.
When the display showss:
DATE/TIM
ME
2010/01/2
22
MON 15:2
22
▲▼
ER ◄┘.
Press ENTE
The year (in
n our examplle 2010) starrts to flash.
Using the kkeys ▼ and ▲ it is poss
sible to mod
dify
the value off each data.
Using the kkeys ◄ and ► it is poss
sible to mod
dify
th
he value of ea
ach data.
When
W
all data/time param
meters are fixed, presss
ENTER to con
nfirm.
xit the menu using the keeys STOP orr MENU.
Ex
4. ENERGY CONSUMPT
TION
34
To
o enter in the prog ram area, follow the
e
in
nstructions given in the peertinent para
agraph.
Please note, the data ggiven in this area are
e
orrect only if the insttaller correc
ctly set the
e
co
machines
m
at th
he test momeent.
When
W
the disp
play shows:
CONSUMES ▲▼
ENERGY C
R ◄┘ to diisplay the dryer
d
energyy
Press ENTER
onsumption. The display shows:
co
ENERGY C
CONSUM.
TOTAL ENE
ERGY
110 kWh
▲▼
he display shows
s
how much energ
gy has been
n
Th
us
sed starting from
f
the insttallation day.
Press ▼. The display show
ws:
ENERGY C
CONSUM.
PARTIAL EN
ENERGY
55 kWh
▲▼
he display shows
s
how much energ
gy has been
n
Th
us
sed starting from
f
the lastt hour counte
er reset.
Press ▼. The display show
ws:
ENERGY C
CONSUM.
COUNTER RESET ▲▼
▼
R ◄┘ to reseet the counte
er. A flashing
g
Press ENTER
NO” is displa
ayed: press ▼ or ▲ to change it in
n
“N
“Y
YES”. Press ENTER ◄┘ to reset.
Ex
xit from program area uusing the ke
ey STOP orr
MENU.
M
5. NO WRINKLE
35
To
o enter in the program
m area to activate orr
de
eactivate th
he no-wrinklle function, follow the
e
in
nstructions given in the peertinent para
agraph.
When
W
the disp
play shows:
E100301X rev5
21/02/14
4
NO WRIN
NKLE ▲▼
ER ◄┘ to enter
e
in the NO WRINKL
LE
Press ENTE
menu.
odified are tthe
The parameters which can be mo
following:
WRINKLE: po
ossible value
e are:
NO W
art
o YES: no-wrinkle
n
cycle
c
will sta
after the
e cooling end
d, if the doorr is
not op
pen and re
especting tthe
parame
eters fixed be
elow.
art
o NO: no--wrinkle cycle will not sta
after the
e cooling en
nd, even if tthe
door is not
n open.
END CYCLE PAUSE: it is th
he waiting tim
me
after the end of the cooling before the no
wrinkkle cycle start; it is expressed in
secon
nds.
FORW
WARD: it iss the right ro
otation time in
secon
nds. Value valid
v
only for the no wrinkkle
cycle
e.
SE: how long the drum stopped. Tim
me
PAUS
expre
essed in secconds. Value
e valid only ffor
the no wrinkle cyccle.
K: it is the le
eft rotation tim
me in second
ds.
BACK
Value
e valid only fo
or the no wrinkle cycle.
MAX TIME CY
YCLE: no wrinkle
w
leng
ght
d
stop
ps.
beforre the dryer definitely
L COOLING
36. INITIAL
To enter in the prog
gram area to
t activate or
al cooling, follow tthe
deactivate the initia
aragraph.
instructions given in the pertinent pa
When the display showss:
INTIAL C
COOLING
▲▼
ER ◄┘ to go
o into the pa
arameter me nu
Press ENTE
and ▼ or ▲ to select YE
ES or NO.
Press ENTE
ER ◄┘ to co
onfirm the selected option
n.
If it is seleccted YES, th
hen an initia
al cooling tim
me
can be sett in each program: it is
s a beginni ng
cycle, which
h start togetther with the program sta
art
before the n
normal heatin
ng cycle.
ENT SYSTEM
M
37. PAYME
If the macchine is eq
quipped with a payme
ent
system, the
ere are some
e special pa
arameter whiich
are not avaiilable in the standard
s
verrsion.
These para
ameters are the
t ones into
o the ADVER
RT
menu or in
nto the COIN BOX me
enu, plus tw
wo
additional p
parameters which
w
can be only read:
AL CREDIT: total amoun
nt of the cred
dit,
TOTA
startin
i
date.
ng from the installation
DAILY CREDIT: tootal amount of credit off
the day (starting fro m 00:00).
8. ADVERT
38
Th
he “ADVERT
T” menu is aavailable onlly in case off
Coin – Op Dry
yers.
o enter in the prog ram area, follow the
e
To
in
nstructions given in the peertinent para
agraph.
When
W
the disp
play shows:
ADVERT
▲▼
y MEDIUM too display the
e advertising
g
Press the key
ext, which will run on thee display while the dryerr
te
is working.
he display shows a curssor to indicate where it iss
Th
po
ossible to write:
ADVERT
▒
etely empty,,
If the line with the cursoor is comple
here will be no messagges appearin
ng while the
e
th
drryer is runnin
ng.
To
o compile th
he message,, use the ke
eys following
g
th
he here below
w explain loggic:
START pressed forr less then 1 second: the
e
cursor moves
m
througgh the text.
START pressed foor 2 second
ds: add one
e
figure at
a the left of thhe selected position.
START pressed foor 5 seconds
s: erase the
e
selected
d letter.
HIGH, LOW to moove among the
t
possible
e
or the selecteed figure.
value fo
Th
he available characters aare 29.
9. COIN BOX
X MENU
39
Th
he “COIN BO
OX MENU’” iis present on
nly in case off
Coin Op dryerrs.
o enter in the prog ram area, follow the
e
To
in
nstructions given in the peertinent para
agraph.
When
W
the disp
play shows:
COIN
N OP MENU
Press MEDIUM to set the coin box.
s possible to
o
Using the LOW and HIGH
H keys, it is
croll the men
nu parameterr.
sc
When
W
the wis
shed parameeter is displlayed, presss
MEDIUM
M
to confirm
c
and, while it is flashing,
f
use
e
th
he LOW and HIGH keys tto modify its value.
Once
O
the wished value iss displayed, press again
n
MEDIUM
M
to confirm.
c
Herre below the
e parameterr
E100301X rev5
list of this m
menu:
COIN
N: it identifiess the curren
ncy that will be
displa
ayed.
TOKE
EN 1: it iden
ntifies the vallue (express ed
in cu
urrency) of each
e
impulse
e given to tthe
electrronic board input (terminal identified by
TOKE
EN 1).
TOKE
EN 2: it iden
ntifies the vallue (express ed
in cu
urrency) of each
e
impulse
e given to tthe
electrronic board input (terminal identified by
TOKE
EN 2).
DECIIMALS: num
mber of decimals show
wn
when
n the price is displayed:
o XX: no decimal
o decimal
o XX,X: one
o XX,XX: two decimals
AUTO
OMATIC STA
ART:
o If “YES”: when the payement h
has
been completed, the cyccle
atically start.
automa
o If “NO””: when the
e payment is
completted, the cyc
cle start onlyy if
START
T is pressed.
o go back to
o the previo
ous
To exit the menu or to
e.
program levvel, just presss STOP one or more time
GENCY STOP BUTTON
40. EMERG
In case a qu
uick machine
e stop is nee
eded, press tthe
emergency stop button (if present).
emergency stop
s
button is pressed, tthe
When the e
drum stops and the drye
er is turned off.
o
et again tthe
When the emergencyy ends, se
emergency stop button, turning it in the directi on
written on itt.
K OUT
41. BLACK
In case of b
black out, one
e or more clo
othes may sttay
in the drum and they could risk to ca
atch fire.
e, open the door,
d
unload the dryer a nd
In this case
leave it opened.
electricity will be restore
ed, the displlay
When the e
will show:
21/02/14
4
windo
ows;
close immediatelyy the valve ore the gass
v
before the machine
e;
gate valve
- do no
ot light on the room illumination,,
match
hes or lighterr;
- do not smoke;
Call the installler to check tthe gas leak.
-
3. DISPLAYE
ED WARNIN
NG
43
Th
he microproc
cessor reporrts both in ca
ase of a no-co
orrect dryer working annd in case of a simple
e
hiighlight of a status.
s
Here below a completee list of th
he possible
e
diisplayed alarrms.
In
n case one of the folloowing alarms
s should be
e
diisplayed, ple
ease contact
ct an authorized service
e
ce
entre to solve
e the possiblle problem.
Each one of
o the folloowing alarm
ms is also
o
coustically signalled by a buzzer.
ac
In
n case of a dual timer dryyer, there is no
n possibilityy
off warning: in case the m
machine shou
uld stop, askk
diirectly to the authorized sservice centrre.
NO FL
LAME
In
n case of a gas
g heated ddryer, the following alarm
m
co
ould be displayed:
NO FLA
LAME
PRESS E
ENTER
When
W
this ala
arm is displayyed, the dryer continuess
to
o work, but th
he heating syystem is stop
pped waiting
g
fo
or a reset. To start againn the heating, press the
e
ke
ey ENTER ◄┘.
◄
Control if the gas
g tap is oppen. In case the alarm iss
hown often, ask
a for a cheeck to the service centre.
sh
ATT
TENTION!
n case of co
oin op dryer,, the above message iss
In
re
eplaced by: “NO FLAME PRESS STA
ART”
OVERHE
EATING
In
n case the te
emperature iinside the drum is 30°C
C
hiigher than the set poiint temperatture, at the
e
diisplay is flash
hing:
pted program
m number is displayed (tthe
The interrup
number 1, in our exam
mple), press
sing Start it is
possible to start it again.
machine agaiin and close
e the door: tthe
Load the m
cycle will be started fro
om the pointt where it w
was
interrupted.
D
IN CASE OF GA
AS
42. WHAT MUST BE DONE
SMELL
mell
In case the room where the dryer is installed sm
of gas:
p immediatelly the progra
am;
- stop
- ope
en immedia
ately all th
he door a nd
OVERHE
EATING
n case the
e heating is stopped
d until the
e
In
te
emperature is
s not going bbelow the saffety value.
ATT
TENTION!
n this case th
he suction coontinues to work
w
to cooll
In
E100301X rev5
21/02/14
4
the linen.
In case thiss alarm is repeating very
y often, ask ffor
a check to a
an authorized
d service cen
ntre.
DRUM
M MOTOR TH
HERMAL ALA
ARM
MAINTENA
ANCE NEEDE
ED
In case the
e temperature inside the drum is 30 °C
higher than the set poin
nt temperatu
ure, the displlay
shows the ffollowing flasshing alarm:
urn off the dryer and ask for the
e authorised
d
Tu
se
ervice centre
e interventionn.
MAINTENANCE NEEDE
ED
Pressing on
ne key, the machine
m
startt again witho
out
any other siignal. Anywa
ay it is necessary to call tthe
authorised service centre
c
for the ordina
ary
maintenancce.
DOOR OPEN
If the door is opened during the dry
ying cycle, tthe
machine sto
ops. The disp
play shows:
P
P01
PEN
DOOR OP
ne is in pausse: close the door and sta
art
The machin
again the cyycle pressing
g START.
FILTER DOOR
D
OPEN
N
If the filter door is op
pen, the dry
yer stops. T
The
display show
ws:
FILTER DOOR
D
OPEN
N
The machin
ne is in pausse: close the filter door a nd
start again tthe cycle pre
essing STAR
RT.
FAN THERMAL
T
If the fan m
motor overhea
ats, the drye
er stop and tthe
display show
ws:
FAN THER
RMAL ALARM
M
he dryer and ask for the
t
authoris ed
Turn off th
service centtre interventiion.
DRUM MOT
TOR THERMAL
If the drum motor overh
heats, the drryer stops a nd
the display shows:
E100301X rev5
21/02/14
4
TEM
MPERATURE
E PROBE FA
AILURE
If the tempe
erature prob
be is damage
ed, the displlay
shows:
TEM
MPERATURE
E PROBE FA
AILURE
Th
his alarm ap
ppears also iif the coin blocked while
e
a cycle is running, i.e. whhen extra tim
me is bought..
n this case
e the progrram is going on and
d
In
co
ompleted, ev
ven if the alarrm stays disp
played.
If the coin bo
ox should suuddenly make free, the
e
b automaticaally reset.
allarm would be
CE
4. DRYER MAINTENANC
M
44
he dryer and ask for the
t
authoris ed
Turn off th
service centtre interventiion.
PRESSOR TR
RANSDUCE
ER CLOSED
AIR DEP
If the air depressor tra
ansducer is damaged, tthe
ws:
display show
AIR DEPRESSO
OR TRANSD
DUCER
CLO
OSED
Ask for the authorised service
s
centre
e intervention
n.
AIR EX
XHAUST
If there is a problem with
w the humid air exhau
ust,
the display shows:
ATTENTION
N!
There is
s a risk of in
njuring yourrself or
da
amaging thee equipmentt.
Each ordinarry and extrraordinary maintenance
m
e
ntervention must be operated by
b
qualified
d
in
pe
ersonnel.
All the dryer supply connnection mus
st be cut offf
be
efore any maintenancee interventiion on the
e
machine.
m
Do not use wa
ater or stem tto clean the parts.
n the following paragraaphs are ex
xplained the
e
In
ne
ecessary
ordinary
and
extraordinary
e
y
maintenance
m
and
a how theyy need to be
e scheduled.
Av
void the flufff backlog aroound the dry
yer (this note
e
in
n not necess
sary in casee of dryer with
w
externall
ex
xhaust).
Fo
or the daily cleaning, a wet and sofft cloth mustt
be
e used. Do not use abraasive produc
cts, abrasive
e
sp
ponge, solvents or metalllic objects.
AIR EXHA
AUST ALARM
M
ACH CYCLE
E
EA
Att the end off each dryinng cycle, cle
ean the filterr
fro
om the fluff.
n.
s
centre
e intervention
Ask for the authorised service
F
FILTER CLE
EANING CHE
ECK
If the filter iss dirty, the diisplay shows
s:
C
CHECK FILT
TER CLEANIING
f
door a nd
Turn off the machine, open the filter
clean the filtter.
COIN BLOCKED
B
If the mach
hine is config
gured to wo
ork with a co
oin
box, the dissplay shows:
COIN BLOCKED
B
hat the coin is blocked inside the co
oin
It means th
box for more than 5 secconds.
d ask for the authoris ed
Check the credit and
service centtre interventiion.
o clean the
e filter, openn the door or pull the
e
To
drrawer (for so
ome modelss), in order to
t access to
o
th
he filter room.
In
n case of model with filterr door, the filter must nott
be
e removed.
Fo
or model witth filter draw
wer, empty the filter bag
g
pa
aying attentio
on to not dam
mage the nett.
In
n both cases, the fluff muust be remov
ved from the
e
filter using th
he hands, ddo not use
e sharpened
d
E100301X rev5
21/02/14
object
ATTENTION!
Never use the dryer without the fluff filter. If the
filter is damaged, replace it immediately.
EACH WEEK
Check the drum cleaning condition: there must no
be deposit on the drum. Be sure that there are not
stains due to melted nylon seams, button and
other.
ATTENTION!
To clean the drum, do not use a high pressure or
a water continuously cleaner.
The drum must be cleaned with a dried and soft
cloth.
EACH THREE MONTHS
Check the fan and the suction cleanness. Check
the drum and the ventilator motor cooling fans
cleanness.
EACH YEAR
An authorized service centre must be contacted
to:
- clean the burner or the heating element from
fluff and other
- clean the dryer inside
- control the pneumatic tightness
- control the gas tightness
WHEN NECESSARY
In case the temperature inside the burner reaches
too much higher values, a safety thermostatic
paste stops the heating system: the drum
continues to rotate, but the heating system stay
deactivated.
The thermostatic paste need to be manually
rearmed, in this case it is necessary to turn off the
dryer, cut all the energy supply, open the above
frontal door and press the brown coloured push
button near the thermostatic paste.
If the problem should repeat, switch off the dryer
and call the authorised service centre.
ATTENTION!
In case of tilting dryers, before to start any
maintenance service, control that the air
system is completely discharged and no
pneumatic movement can be activated, even
when if there is no electricity supply.
In case of maintenance with mechanism,
which are not in the rest position, be sure to
mechanically and safely block the pneumatic
mechanism.
45. DRYING PROBLEMS
In case of not satisfying drying results, please
check the following table to find a solution to the
most usual problems.
PROBLEM
SOLUTION
The linen presents
yellow stains.
Check if the linen is
correctly rinsed and all
the soap is washed
away.
The PH value must be
included between 5
and 6.
The linen is yellowed.
Check that the drying
temperature is
complying with the data
on the label.
E100301X rev5
PROBLEM
21/02/14
SOLUTION
Check the selected
temperature, it could be
too much low.
At the end of the cycle
linen is still wet.
Check the air suction
system, it could be
blocked and its
efficiency limited.
Check the exhaust
system: it could be to
much strong avoiding
the air to pass through
the linen.
At the end of the cycle
linen is hardened
Check the cycle
temperature, especially
in case of linen fabrics.
If temperature is too
much high, the fabrics
is going to harden.
At the end of the cycle
linen is felted
Check clothes label
and their conformity
with the dryer use,
especially in case of
wool or mixed wool
fabrics. In this case
avoid a complete
drying.
The drum is scratched.
Some clothes are
damaged, torn
Metallic objects like
buckle, hooks,
fastenings must be
covered with a cloth
before to dry, so the
drum is protected by
scratches or collisions,
which could also
damage the linen.
46. DUAL TIMER DRYER: USE
Until now it was treated only the case of a
microprocessor controlled dryer.
It is also available a simplified dryer model, which
is controlled by electromechanical commands.
For this dryer the control is the following:
Marks 1 and 2 indicate the heating and the
cooling timers.
Marks nr 3 indicates the thermostat and the
marks nr 4 the START button.
In this picture is not preset the RESET button,
which equips only gas heated dryers.
Load the machine and close the door; all the
instructions given in the previous paragraphs must
be respected.
Fix the heating and cooling times using the two
timers; fix the drying temperature using the
thermostat.
Press the START button.
The START button lights on and the cycle starts
and runs until its end.
In case the drum door or the filter door are
opened, the cycle stops: to start it again press
START.
If the START button does not light on, and the
cycle does not start, when the button is pressed
ask for the intervention of an authorised service
centre.
Only in case of gas heated dryers: if the burner
does not start, the red RESET button lights on to
signal the flame control block.
In this case the machine continues to work, but
the heating is deactivated. To unlock the flame
control, press the RESET button until it lights off.
In case the RESET button light on often, ask for a
dryer check to an authorized service centre.
47. TILTING DRYER: USE
In case the dryer is equipped with a tilting system,
to the previous paragraphs indication, the
following remarks need to be added to control the
right and left drum rotation.
In this case the controls can be given using a
remote keyboard.
ATTENTION!
When the machine is in the tilting step, or the
pneumatic door is opening, the user must not
stay close to the machine and control the
dryer using the remote keyboard.
E100301X rev5
21/02/14
Close the door pressing at the same time the
activation key (C) and the “CLOSE DOOR” key.
Switch off the keyboard using the key (D).
48. SAFETY DEVICE CONTROL
After the machine is turned on, before to start the
drying cycle, it is necessary to control the safety
device correct working.
The user should always stick to the following
procedure:
Before to start the tilting, always wait for the end
of the running cycle.
To activated or deactivate the keyboard use the
key – switch (D).
When the keyboard is on, the microprocessor is
off.
If the keyboard is on, the green light is also on (A).
LOADING (for machine equipped with two way
tilting)
Switch on the keyboard using the key. To open
the door press at the same time the activation key
(below at left) and the “DOOR OPEN” key.
When the door opening is complete, make the
dryer bend to the back pressing at the same time
the activation key (C) and the “LOAD UP” key.
When the loading is completed, bring the dryer in
the original position pressing at the same time the
activation key (C) and the “LOAD DOWN” key.
Close the door pressing at the same time the
activation key (C) and the “CLOSE DOOR” key.
Switch off the keyboard using the key (D).
UNLOADING
Switch on the keyboard using the key (D).
To open the door press at the same time the
activation key (C) and the “DOOR OPEN” key.
When the door opening is complete, make the
dryer bend forward pressing at the same time the
activation key (C) and the “UNLOAD DOWN” key.
When the machine is in the unloading position,
the linen exit can be helped by the slow alternate
rotation of the drum (right and left); to make the
drum rotate, press at the same time the activation
key (C) and the “UNLOAD ROTATION” key
(RIGHT and/or LEFT).
When the unloading operation is ended, bring the
dryer to the orginal position pressing at the same
time the activation key (below – left) and the
“UNLOAD UP” key.
ACTION SEQUENCE
REACTION
Start a drying cycle and
open the door…
… the dryer should
stop and stay in pause.
Start a drying cycle and
open the filter door…
… the dryer should
stop and stay in pause.
Press (if present) the
emergency stop button
…
… the drum should
stops and the dryer
should turn off.
As soon as the dryer is
electrically supplied …
… the machine must
be in stand-by waiting
for a command (drum
stopped, fan and
heating deactivated)
ATTENTION!
Safety device must always be tested when the
machine is switch on and before to start the
working shift.
49. SCRAPPING
When the machine life cycle arrives to the end,
please proceed with the machine scrapping
following the country rules, keeping separate the
metallic,
the
plastic,
the
glass,
the
electric/electronic parts.
The above symbol on the appliance or on the
package means that at the end of its life cycle this
product must be collected separately from other
waste material.
For this appliance waste separation, follow the
rules in force in the Country where the machine is
installed.
A correct waste separation avoid dangerous
impact on the environment and make easier the
material recycling.
Unlawful disposal may caused application of
E100301X rev5
21/02/14
administrative sanction, following the rules in force
in the country where the dryer is installed.
ATTENTION!
In case the machine should not be more used
before the dryer disposal, make the door lock
out of service, to avoid that somebody close
himself inside risking his life.
Electric supply cable must be disconnected
and disposed.
50. WARRANTY CONDITION
For the warranty condition,
manufacturer price list.
check
the
ATTENTION!
To benefit of the manufacturer warranty condition,
the manual instructions must be carefully
followed. In particolar:
-
Work always respecting the dryer use limits;
Maintenance must be always correctly
operated;
The dryer must be used only by well trained
personnel;
Use only original spare parts.
E100301X rev5
21/02/14
51. TECHNICAL DATA 10-34
MODEL
U.M.
10
14
18
23
34
MAIN FEATURES
CAPACIY 1/20 and 1/25
kg
10 / 7,4
14 / 10
18 / 13,5
23 / 17,4
34 / 25,6
-
OPTIONAL
OPTIONAL
OPTIONAL
SI / YES
SI / YES
Ø mm
756
756
756
977
977
mm
420
585
767
590
870
Ø mm
560
560
560
560
560
rpm
38
38
38
38
38
dB(A)
61
61
61
61
61
%
15
15
15
15
15
Ø mm
150
150
150
200
200
m3/h
1200
1200
1200
1680
1680
BACKPRESSURE
mt
10
10
10
10
10
NET WEIGHT (electric / gas / steam)
kg
203 / 201 / 207
217 / 215 / 221
233 / 230 / 234
286 / 287 / 290
323 / 321 / 323
REVRSING
DIAMETRO CESTO
DRUM DEPTH
LOADING DIAMETER
STANDARD SPEED
NOISE
LOSS AT SHELL
AIR/BURN GAS EXHAUST (pos.6)
AIR FLOW
STANDARD PACKAGE
WIDTH
mm
840
840
840
1060
1060
DEPTH
mm
740
890
1070
950
1220
E100301X rev5
21/02/14
MODEL
U.M.
10
14
18
23
34
HEIGHT
mm
1882
1882
1882
1974
1974
VOLUME
m3
1,17
1,4
1,7
1,98
2,55
GROSS WEIGHT (electric / gas / steam)
kg
210 / 208 / 214
225 / 223 / 229
245 / 242 / 246
298 / 300 / 303
341 / 339 / 341
HEATING
ELECTRIC HEATING
STEAM (pos. 2=IN; pos. 3=OUT)
STEAM CONSUMPTION*
GAS (pos. 4)
GAS CONSUMPTION*
kW
18
18
24
24
36
Ø IN
1”
1”
1”
1”
1”
Ø OUT
1”
1”
1”
1”
1”
bar
1÷15
1÷15
1÷15
1÷15
1÷15
kg
26 (5bar)
36 (5bar)
46 (5bar)
49 (5bar)
73 (5bar)
kW
29,4
29,4
29,4
37,8
50.4
Ø IN
¾”
¾”
¾”
¾”
¾”
m3 (G20)
0,7
1
1,2
1,6
2,3
kg (GPL / GLP)
0,5
0,7
0,8
1,1
1,6
ELECTRIC ABSORPTION (pos. 5)
ELECTRIC HEATING
3ph380V-480V (+N) / 3ph220V-240V / 1ph230V
50/60Hz
CABLE SECTION
kW
18,7
18,7
24,7
25,1
37,1
A
27 / 48 / 82
27 / 48 / 82
35 / 62 / 106
37 / 64 / 110
54 / 94 / 162
mm2
10 / 10 / 25
10 / 10 / 25
10 / 16 / 25
10 / 16 / 25
16 / 35 / 25
E100301X rev5
21/02/14
MODEL
U.M.
10
14
18
23
34
CONSUME*
kWh
6,7
9,3
11,9
15,4
22,6
STEAM / GAS HEATING
kW
0,7
0,7
0,7
1,1
1,1
A
1,5 / 3 / 4
1,5 / 3 / 4
1,5 / 3 / 4
2,1 / 4 / 6,3
2,1 / 4 / 6,3
CABLE SECTION
mm2
2,5 / 2,5 / 2,5
2,5 / 2,5 / 2,5
2,5 / 2,5 / 2,5
2,5 / 2,5 / 2,5
2,5 / 2,5 / 2,5
CONSUME*
kWh
0,2
0,2
0,2
0,4
0,5
3ph380V-480V (+N) / 3ph220V-240V / 1ph230V
50/60Hz
NOTE: Technical data refers to reversing drum equipped machines.
NOTE: Machine is mounted on 4 adjustable feet (pos. 7) with tread M10.
*Standard cycle: load at the nominal capacity using wet cotton (180gr/m2) with a 50% residual humidity for a 0% residual humidity output. 3’ cooling.
E100301X rev5
21/02/14
DRYERS 10 - 34
E081101X rev5
21/02/14
[mm]
10
14
18
23
34
A
971
971
971
1061
1061
B
691
691
691
781
781
C
791
791
791
1022
1022
D
1610
1610
1610
1691
1691
E
1760
1760
1760
1932
1932
F
707
874
1051
918
1188
G
15÷20
15÷20
15÷20
15÷20
15÷20
H
1508
1508
1508
1496
1496
I
1302
1302
1302
1496
1496
J
622
622
622
921
921
K
576
576
576
685
685
L
563
563
563
921
921
M
208
208
208
327
327
N
157
157
157
193
193
P
422
422
422
422
422
Q
1576
1576
1576
1691
1691
R
1666
1666
1666
1776
1776
S
714
714
714
945
945
T
487
654
831
671
952
V
560
560
560
560
560
Wmin
10
10
10
10
10
Xmin
500
500
500
500
500
DRYERS 10 - 34
32
E100301X rev5
21/02/14
52. TEHCNICAL DATA 55-75
MODEL
U.M.
55
55 T
75
75 T
MAIN FEATURES
CAPACITY 1/20 and 1/25
kg
55 / 43,5
55 / 43,5
75 / 60
75 / 60
-
SI
SI
SI
SI
Ø mm
1202
1202
1202
1202
mm
960
960
1310
1310
Ø mm
890
890
890
890
rpm
25
25
25
25
dB(A)
74
74
74
74
%
15
15
15
15
Ø mm
300
300
300
300
m3/h
1980
1980
1980
1980
MAX BACKPRESSURE
mt
10
10
10
10
NET WEIGHT (electric / gas / steam) STD or
NET WEIGHT (electric / gas / steam) 1 WAY / 2
WAYS
kg
813 / 829 / 822
821 / 837 / 830
828 / 844 / 837
1135 / 1156 / 1147
1143 / 1164 / 1155
1150 / 1171 / 1162
REVERSING DRUM
DRUM DIAMETER
DRUM DEPTH
LOADING DIAMETER
STANDARD SPEED
NOISE
LOSS AT SHELL
AIR / BURN GAS EXHAUST (pos.6)
AIR FLOW
STANDARD PACKAGE
WIDTH
mm
1540
1540
1540
1540
DEPTH
mm
1700
1700
2050
2050
E100301X rev5
21/02/14
MODEL
U.M.
55
55 T
75
75 T
HEIGHT WITH PALLET
mm
2422
2422
2422
2422
HEIGHT WITHOUT PALLET (FOR CONTAINER)
mm
2272
2272
2272
2272
VOLUME WITH PALLET / WITHOUT PALLET
m3
6,3 / 5,9
6,3 / 5,9
7,6 / 7,1
7,6 / 7,1
GROSS WEIGHT (electric / gas / steam) STD or
GROSS WEIGHT (electric / gas / steam) 1 WAY /
2 WAYS
kg
882 / 898 / 891
889 / 905 / 898
897 / 913 / 906
1199 / 1220/ 1211
1206 / 1227 / 1218
1214 / 1235 / 1226
HEATING
ELECTRIC HEATING
STANDARD STEAM (pos. 2=IN; pos. 3=OUT)
kW
58,5
58,5
97,5
97,5
Ø IN
1 ¼”
1 ¼”
1 ½”
1 ½”
Ø OUT
1”
1”
1 ¼”
1 ¼”
bar
15
15
15
15
kg
71
71
97
97
kW
95
95
115
115
Ø IN
1 ¼”
1 ¼”
1 ¼”
1 ¼”
m3 (G20)
3,8
3,8
5,2
5,2
kg (GPL / GLP)
2,6
2,6
3,5
3,5
TILTING STEAM (pos. 2T=IN; pos. 3T=OUT)
STEAM CONSUME (10bar)*
STANDARD GAS (pos. 4)
TILTING GAS (pos. 4T)
GAS CONSUME*
ELECTRIC ABSORPTION (pos. 1)
ELECTRIC HEATING
3ph380V-480V (+N) / 3ph220V-240V / 1ph230V
50/60Hz
kW
60,7
60,7
100,5
100,5
A
88 / 152 / -
88 / 152 / -
148 / 256 / -
148 / 256 / -
E100301X rev5
21/02/14
MODEL
U.M.
55
55 T
75
75 T
CABLE SECTION
mm2
16 / 35/ -
16 / 35 / -
35 / 50 / -
35 / 50 / -
CONSUME*
kWh
35,8
35,8
48,8
48,8
STEAM AND GAS HEATING
kW
2,2
2,2
3
3
3ph380V-480V (+N) / 3ph220V-240V / 1ph230V
50/60Hz
CABLE SECTION
A
2,8 / 4,8 / 8,4
2,8 / 4,8 / 8,4
4/7/-
4/7/-
mm2
2,5 / 2,5 / 2,5
2,5 / 2,5 / 2,5
2,5 / 2,5 / 2,5
2,5 / 2,5 / 2,5
CONSUME*
kWh
0,7
0,7
1
1
COMPRESSED AIR
COMPRESSED AIR IN (pos. 5) std configuration
steam heating
COMPRESSED AIR IN (pos. 5T) tilting
configuration
COMPRESSED AIR CONSUME (electric / gas
machine)
COMPRESSED
AIR
CONSUME
(steam
machine)
Ø mm
6
-
6
-
Ø mm
-
12
-
12
l/h
-
100
-
100
l/h
5
105
5
105
NOTE: in case of tilting configuartion, data refers to a 2 way tilting machine (laod and unload with tilting)
*Standard cycle: load at the nominal capacity using wet cotton (180gr/m2) with a 50% residual humidity for a 0% residual humidity output. 3’ cooling.
E100301X rev5
21/02/14
DRYERS 55 - 75
E081101X rev5
21/02/14
[mm]
55
55 T
75
75 T
Amin
500
500
500
500
B
1063
1063
1063
1063
C
858
858
858
858
D
1520
1520
1870
1870
E
40
40
40
40
F
1330
1330
1340
1340
G
10
10
10
10
H
1360
1360
1360
1360
I
2260
2260
2260
2260
J
1850
1850
1850
1850
K
1295
1295
1295
1295
L
807
807
807
807
M
500
500
500
500
N
-
2516
-
2516
O
-
11°
-
8°
P
-
296
-
229
Q
1700
1700
1930
1930
R
-
247
-
292
S
220
-
220
-
T
913
-
913
-
U
514
-
514
-
V
395
-
395
-
W
570
-
570
-
X
359
359
359
359
Y
-
270
-
270
Z
-
207
-
207
A1
-
331
-
331
B1
330
330
330
330
C1
330
330
330
330
D1
2032
-
2032
-
E1
2095
-
2095
-
F1
2139
-
2139
-
G1
Ø 13
Ø 13
Ø 13
Ø 13
DRYERS 55 - 75
37
E081101X rev5
21/02/14
10
14
18
23
34
55
75
53. GAS PRESSURE
Only in case of gas heated dryers, please check
the nominal pressure data and the nozzle
dimension in the next tables.
I, UK, IE, ES
Type B22, II2H3+ CE 0085-AT0341
Max pressure in the flue: 150Pa
2
2
2
3
4
4
4
1,85
1,85
1,85
1,75
1,75
2,35
2,75
F
Type B22, IIE+3+ CE 0085-AT0341
Max pressure in the flue: 150Pa
3
NATURAL GAS 2H (G20); PCI=34,02MJ/Nm
Pn=20.
000Pa
Pmax=2500Pa; Pmin=1700Pa
nozzles
Ø nozzles
Dryer
[nr]
[mm]
10
2
2,90
14
2
2,90
18
2
2,90
23
3
2,70
34
4
2,70
55
4
4,05
75
4
5,00
NATURAL GAS 2E+ (G20); PCI=34,02MJ/Nm3
Pn=2000Pa
Pmax=2500Pa; Pmin=1700Pa
nozzles
Ø nozzles
Dryer
[nr]
[mm]
10
2
2,90
14
2
2,90
18
2
2,90
23
3
2,70
34
4
2,70
55
4
4,05
75
4
5,00
LIQUID GAS 3+ (G30); PCI=45,65MJ/kg
Pn=2800-3000/3700Pa
Pmax=3500/4500Pa; Pmin=2000/2500Pa
nozzles
Ø nozzles
Dryer
[nr]
[mm]
10
2
1,85
14
2
1,85
18
2
1,85
23
3
1,75
34
4
1,75
55
4
2,35
75
4
2,75
LIQUID GAS 3+ (G30); PCI=45,65MJ/kg
Pn=2800-3000/3700Pa
Pmax=3500/4500Pa; Pmin=2000/2500Pa
nozzles
Ø nozzles
Dryer
[nr]
[mm]
10
2
1,85
14
2
1,85
18
2
1,85
23
3
1,75
34
4
1,75
55
4
2,35
75
4
2,75
AT, CH
Type B22, II2H3+ CE 0085-AT0341
Max pressure in the flue: 150Pa
DE
Type B22, II2ELL3B/P CE 0085-AT0341
Max pressure in the flue: 150Pa
3
NATURAL GAS 2H (G20); PCI=34,02MJ/Nm
Pn=2000Pa
Pmax=2500Pa; Pmin=1700Pa
nozzles
Ø nozzles
Dryer
[nr]
[mm]
10
2
2,90
14
2
2,90
18
2
2,90
23
3
2,70
34
4
2,70
55
4
4,05
75
4
5,00
NATURAL GAS 2ELL (G20); PCI=34,02MJ/Nm3
Pn=2000Pa
Pmax=2500Pa; Pmin=1700Pa
nozzles
Ø nozzles
Dryer
[nr]
[mm]
10
2
2,90
14
2
2,90
18
2
2,90
23
3
2,70
34
4
2,70
55
4
4,05
75
4
5,00
LIQUID GAS 3B/P (G30); PCI=45,65MJ/kg
Pn=2800-3000/3700Pa
Pmax=3500/4500Pa; Pmin=2000/2500Pa
nozzles
Ø nozzles
Dryer
[nr]
[mm]
38
E100301X rev5
NATURAL GAS 2ELL (G25); PCI=29,30MJ/Nm3
Pn=1800Pa
Pmax=2500Pa; Pmin=2000Pa
nozzles
Ø nozzles
Dryer
[nr]
[mm]
10
2
3,20
14
2
3,20
18
2
3,20
23
3
3,00
34
4
3,00
55
4
4,50
75
4
5,50
LIQUID GAS 3B/P (G30); PCI=45,65MJ/kg
Pn=2800-3000/3700Pa
Pmax=3500/4500Pa; Pmin=2000/2500Pa
nozzles
Ø nozzles
Dryer
[nr]
[mm]
10
2
1,65
14
2
1,65
18
2
1,65
23
3
1,50
34
4
1,50
55
4
2,35
75
4
2,75
21/02/14