1
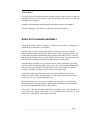
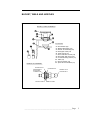
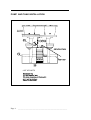
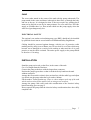
User Manual for the
Root Washer
type RWC
RWC-UM-2
DELTA-T DEVICES
Installation Guide
Root Washer
Version 2
Editor: N Webb
Document code:
RWC-UM-01-3
Date: Feb1995, last revised Aug 2001
Delta-T Devices Ltd
128 Low Road, Burwell
Cambridge, CB5OEJ, England
Telephone: UK
International + 44
Fax:
UK
International + 44
01638 742922
1638 742922
01638 743155
1638 743155
© Delta-T Devices Ltd., 1995
All Rights Reserved.
Reproduction, adaptation, or translation without prior written
permission is prohibited, except as allowed under copyright
laws.
Delta-T is a UK registered trademark of Delta-T Devices Ltd.
Table of Contents
INTRODUCTION
1
BASIC ROOT WASHER
1
OPTIONAL TANK
1
OPTIONAL PUMP
1
WARNINGS
2
BASIC ROOT WASHER ASSEMBLY
3
HOSES AND CONNECTIONS
4
BUCKET, TABLE AND NOZZLES
5
PUMP AND TANK INSTALLATION
6
PUMP
ELECTRICAL SAFETY
7
7
INSTALLATION
7
HOW TO USE THE ROOT WASHER
8
HOW IT WORKS
8
STEP BY STEP
8
SPECIFICATIONS, PARTS AND ACCESSORIES
10
Basic Root Washer System : type RWB
List of Parts :
10
10
Root Washer System with Water Tank and Electric Pump : type RWC
10
Optional Extras and Accessories
11
Water Tank : type RWT
11
Pump : type RWP
11
Spares Kit for Pump : type SKP
11
Spares and Consumables for Basic Root Washer : type SKR
11
SERVICING, WARRANTY AND REPAIRS
12
Replacement parts.
12
Servicing the Pump
12
WARRANTY
13
SERVICE
13
INTRODUCTION
Root washing is an essential but time consuming and labour intensive precursor
to the measurement and analysis of root structure. Anything that can help
automate this task is highly desirable. The Delta-T Root Washer has evolved
from a design used by CSIRO Cunningham Laboratory in Brisbane, Australia.
This was modified by Kirchhof & Pendar (authors of the Delta-T SCAN image
analysis software) who produced designs for a do-it-yourself kit published in the
Delta-T SCAN User Manual. The Kirchhof/Pendar design has been further
improved by Delta-T, and is more rugged and easier to use and service.
BASIC ROOT WASHER
The Root Washer Basic, type RWB comes complete with four buckets with a
central overflow downpipe and two nozzle jets. These are mounted on a
corrosion resistant table with four filters mounted in funnels underneath. Water is
fed to the buckets via a series of hoses and connectors from a mains water supply.
The basic root washer has a four-tap connector which enable the user to turn off
and adjust the water to each bucket when required.
For optimum performance a pressure of 50 to 70 psi and a flow rate of 10 gallons
per minute is required. The UK mains water pressure is about 40 psi, just a bit
less than ideal, but still useable.
OPTIONAL TANK
This is a shallow, cylindrical, open topped, UV-protected, polypropylene tank.
The Basic Root Washer stands in it.
The tank catches the dirty water, which can either be recycled using the pump, or
drained away via an overflow pipe.
The tank is fitted with two outlets, one with a tap to allow for controlled drainage,
and the other for filling or as an overflow.
OPTIONAL PUMP
This is useful where a mains water or sufficient pressure is not available.
The pump, type RWP can be used in conjunction with the root washer tank, type
RWT to recirculate the washing water.
The pump is fitted with a bypass hose and tap for adjusting the flow rate inside
the buckets.
____________________________________________Page
1
WARNINGS
PERSONNEL PROTECTIVE EQUIPMENT
Non-slip footwear and waterproof clothing are recommended, particularly in
colder climates. Protective eyewear is not normally required, but there is some
water spray from the buckets when the root washer is first connected to the water
supply.
WET FLOORS
Provide non-slip flooring. Root washing inevitably results in water spills.
Carefully site the water hoses to prevent personnel tripping over them.
SUITABLE DRAINAGE
Drainage of some sort will be required for the root washer. In warm climates it
may make sense to site the root washer outside so that waste water can be used
for irrigation. In colder climates this may be impractical, in which case it is
doubly important to ensure that drainage is adequate.
When assessing the suitability of drainage arrangements indoors consider the
following:
Is a sump or settling tank required for removing the soil washings,
or can the drainage system tolerate the soil burden without
clogging? (The optional water tank type RWT may be sufficient)
Can soil washings be removed from the sump or tank safely
without he threat of mechanical damage to any local electrical
cabling?
Does the siting of the root washing equipment guarantee that the
delicate computer and scanning electronics are adequately
protected from condensation and high humidity? Refer to the
Hewlett Packard Installation Guide for the exact environmental
specifications for temperature and humidity. If in doubt, site the
scanner and computer in a separate air conditioned room.
Is the drainage adequate to prevent damage to the building structure?
Page 2
_____________________________________________
UNPACKING
Carefully remove all packing material and keep it safe so that it can be re-used to
transport the system in the future. Using the packing list(s), make sure that the
consignment is complete.
Identify each component using the parts lists and drawings in this manual.
Check for damage. If you notice any damage notify your supplier.
BASIC ROOT WASHER ASSEMBLY
Using the drawings shown on pages 4 complete the assembly by plugging the
yellow & grey connectors to each other.
Lay the table on its face and partially push one leg into its aperture. Push the
funnel mounting frame into the hole up the inside of the leg, partially insert a leg
in the opposite aperture whilst fitting the mounting frame into its hole. Continue
this procedure with the other two legs, making sure the frame is supported by the
four legs before pushing them fully into their apertures in the table.
Turn the whole assembly over, if you have a root washer catch tank, type RWT,
stand the whole assembly roughly in the centre. One of the legs has an adjustable
foot, use this to get the table level and stable. Put the four orange root funnels
complete with their 550 micron filters into the mounting frame.
Fit the table funnels into their holes in the table top and then stand the four
buckets over these holes. Arrange the hoses to the best positions that will easy
access to the 4-way controller and spray gun.
Inside each bucket are two nozzle assemblies, the jets of these may have been
moved in transit or during assembly, adjust them so that they point horizontally
in a clockwise direction and secure with a spanner.
Select one of the four threaded connectors provided, to suit your tap fitting. If
your local water supply connection is not compatible you will have to seek
advice from a plumber or water engineer for help.
____________________________________________Page
3
HOSES AND CONNECTIONS
HOSE AND CONNECTORS
List of parts
1. Tap connnectors : 22mm , 3/4", 1/2", 5/8" (x1)
2. Push-fit hose connectors (x8)
3. 20M of 12.5mm dia hose (x1)
4. 1" BSP tap connector (x1)
5. 3M of 12.5mm dia hose (x1)
6. Spray gun and rose (x1)
Page 4
7. 4-way tap connector (x1)
8. 0.5M of 12.5mm dia hose (x4)
9. Simple Y piece connector (x4)
10. Hose clip 15 - 18mm (x12)
11. Hose clip 17 - 20mm (x8)
12. Bucket assembly (x4)
_____________________________________________
BUCKET, TABLE AND NOZZLES
BUCKET, TABLE & NOZZLES
List of Parts
12. Root Bucket (x4)
13. Washer Downpipe (x4)
14. Nozzle Jet Assembly (x8)
15. Downpipe Collar (x4)
16. Table Funnel (x1)
17. Root Collection Funnel (x4)
18. Root Filter 550 micron (x4)
19. Funnel Mounting Frame (x1)
20. Table (x1)
21. Root Container (x4)
22. Spare & Consumables (x1)
NOZZLE JET ASSEMBLY
BUCKET WALL
NOZZLE BODY
WITH HOSE
CONNECTION
OUTER O RING
FLANGED NUT
NOZZLE JET &
LOCKING NUT
INNER O RING
____________________________________________Page
5
PUMP AND TANK INSTALLATION
TO ROOT
WASHER
LIST OF PARTS
Page 6
_____________________________________________
PUMP
The root washer stands in the centre of the tank with the pump underneath. The
pump stands in the water and draws it through its base filter, up through the body
and out at the top. It is designed so that is does not require any priming but it
must not be allowed to run dry for many minutes. For users who have 220/240v
supply at 50/60Hz there is a float switch which cuts the pump supply when the
water level gets dangerously low.
ELECTRICAL SAFETY
The optional root washer recirculation pump, type RWP, should only be installed
by qualified electricians in accord with local Health and Safety Regulations.
Cabling should be protected against damage, with the use of protective cable
trunking and by siting it out of harms way. Do not let it lie on a floor which may
become wet or damaged as a result of root washing or other activities. It is good
practice to run the cable overhead. The mains power supply to the pump should
be fused to a 13A rating.
INSTALLATION
Stand the pump on its end, on the floor, in the centre of the tank.
Cut a 2 m length from the 20m hose.
Connect the pump to the hose with the largest hose connector.
Position the pump bypass hose so that it can drain freely bank into the tank
without restriction.
Arrange the float switch so that it does not interfere with the table legs and adjust
it so that it cuts the pump when the level reaches 100mm.
Fill the tank to 75mm from the top. (There is a hose adapter at the top of the tank
which can be used to fill the tank as well as acting as an overflow).
Arrange the pump cable safely and with consideration to the electrical safety
hazard warnings given on page 2.
Do not operate the pump until the electrical safety considerations have been fully
complied with.
____________________________________________Page
7
HOW TO USE THE ROOT WASHER
HOW IT WORKS
The Delta-T Root Washer comprises 4 buckets modified with a central overflow
downpipe. Water from two jets at the base of each bucket swirls around and up,
teasing roots and soil apart. The lighter roots float up with the water flow, into
the central overflow pipe, and are then caught in a 550 micron mesh filter in a
funnel under the table.
The soluble fraction of the soil is washed through the filter. Gentle agitation by
the operator helps free up the soil. The remainder of the roots, stones and debris
remain in the bucket. Finally the water supply is turned off and the bucket
emptied through the filter, to catch remaining roots. The debris in the bucket then
dumped out and the cycle restarted.
The root washer has a four-tap controller, this allows the operator to adjust and
switch off the water supply to individual buckets where required.
Kirchhof & Pendar, with a similar design, found they could wash about 10
samples an hour, but this depends on soil type and sample volume.
STEP BY STEP
1. Weigh. Before washing roots you may wish to measure the mass and volume
of the whole soil sample and of each subsample.
2. Pre-soak. Some soils are strongly held together by electric charges. These
bonds can be by soaking the soil overnight in a bucket of water to which you
have added an ordinary domestic water softening agent.
3. Turn on the water slowly. Once connected to the mains water supply (or
optional pump) the water can be turned on. This is best done slowly to allow
for the removal of air in the pipework and minimal amounts of water spray.
Check all connections for leakage at this point and tighten where necessary.
Once the level of water has reached the nozzles in the buckets then the supply
can be turned fully open and root washing can commence.
4. Adjust the flow rate: For optimum performance the root washer requires a
water pressure of 50 to 70 psi and a flow rate of 10 gallons per minute. The
UK mains water pressure is about 40 psi, just a bit less than ideal but still
useable. If you are using the pump use the bypass tap to control the flow rate.
The water should swirl around the buckets creating a vortex which overflows
into the central tunnel.
5. Place a soil sample in a bucket.
6. Wait for the water pressure to break up the soil. The resulting vortex will lift
the lighter roots over the lip, down the central tunnel, and onto the mesh in the
funnel.
7. Assist the more reluctant lumps to disperse by breaking them up with your
hands.
8. Continue washing until the water is clear and all roots are clear of soil.
9. Switch off the water to the bucket using the three-way hose switch provided.
Page 8 _____________________________________________
10.Pour the remaining water and roots into the funnel, leaving any remaining
stones and sediment in the bucket.
11.Empty the stones and sediment out of the bucket. Do not pour this debris into
the funnel or the recirculation tank.
12.Remove the roots from the filter and store them safely in one of the containers
provided.
____________________________________________Page
9
SPECIFICATIONS, PARTS AND ACCESSORIES
Basic Root Washer System : type RWB
Includes 4 buckets each with 2 water jets, table, funnels with filters, pistol-type
spray gun, water hoses and connectors, isolation valves, 30m of ½ inch (12.5
mm) input hose, plastic containers for holding washed samples, and a
consumables kit.
Note 1: Requires a pressurised water supply - approximately 10 gal/min at about
50-70 psi (or approx. 38 litre/min at about 3.5 to 5 x10⁵ kgs/metre). In Great
Britain mains water pressure is about 40 psi, so for optimum performance the
recirculating pump accessory is recommended.
Note 2: Water runs out over the ground, so only suitable for outside operation.
For inside use the water tank and recirculating pump are recommended.
List of Parts :
Root washer table in UV resistant resin plastic x1
Table funnels x4 (in the table top)
Root collection funnels x4 (under the table)
550 micron filter for root collection funnels x4
Stainless steel frame for mounting root collection funnels x1
Root washer buckets x4, each includes a downpipe, collar & 2 water jets
Simple Y-piece connectors x4,
Four-way tap connectors x1
Push-fit hose connectors x8
Hose clips (15-18mm) x12
Hose clips (17-21mm) x8
Hose pipe, diameter 1/2 inch (12.5mm), 20 m, 3.0m, 0.5 m (x4)
Set of tap connectors to fit the following male threaded pipe sizes:
1/2 inch, 5/8 inch, 3/4 inch (British Standard Pipe thread specification)
and M22 (22mm) metric pipe thread specification x1
Pistol Spray gun and fine rose x1
Root Containers with screw top x4
Root Washer System with Water Tank and Electric Pump : type
RWC
This has the advantage that you can rely on the pump for ensuring adequate water
pressure. It allows you also to recirculate, and so conserve water. Please specify
Page 10
_____________________________________________
the mains and frequency. Further details about the pump and tank are given
overleaf.
Optional Extras and Accessories
Water Tank : type RWT
This is a shallow, cylindrical, open topped, UV-protected, polypropylene tank,
diameter 4 ft (1.22 m), height 14 inches (35 mm). The Basic Root Washer stands
in it from which it catches the dirty water, which can either be recycled using the
pump, or drained away via an overflow pipe with tap and 5 m of ½ inch hose
(included). Two ¾ inch threaded drainage outlets are provided, the lower one
with an internal tap, the upper one with a spigot.
Pump : type RWP
This is a submersible pump which sits in the water on the base of the tank . It has
a 1.5 HP electric motor, and a float switch* to ensure that it does not run dry.
Also includes a bypass tap to allow for adjustment of flow and 10m electric
cable. Weight : 65lb (30Kg) Specify voltage and frequency.
* Float Switch only available for 220/240v at 50/60Hz only
Spares Kit for Pump : type SKP
Includes gaskets, seals, bearings etc., suitable for two years normal operation.
Spares and Consumables for Basic Root Washer : type SKR
10 m of ½ inch (12.5mm) diameter water hose (x1)
Root collection funnel (x1)
Root filter (550 micron) (x2)
Nozzle assembly (complete) (x2)
Nozzle assembly "O" rings (x16)
Hose end connector (x2)
Simple Y-piece connector (x2)
Plastic hose clips (15-18mm) (x12)
Plastic Hose clips (17-21mm) (x8)
Screw-top Root containers (x4)
____________________________________________Page 11
SERVICING, WARRANTY AND REPAIRS
Replacement parts.
Refer to the parts lists on each of the three detailed diagrams in order to identify
the names of parts when ordering replacements.
The Delta-T Root Washer design is based largely on readily available building
and garden furniture and equipment, following the Kirchhof/Pendar design fairly
closely. You might find it quicker and cheaper to source replacement parts
locally.
Servicing the Pump
The only component requiring regular servicing is the optional water pump,
which has been chosen because it is designed to work or long periods of time in
dirty water. Delta-T offer an optional spares kit, type SKP, which includes those
parts which may need replacing after many hours of service.
More detailed servicing information is included in the separate leaflet supplied by
the pump manufacturer.
Page 12
_____________________________________________
WARRANTY
Instruments manufactured by Delta-T are guaranteed for one year against defects
in manufacture or materials used. The guarantee does not cover damage through
misuse or inexpert servicing, or other circumstances beyond our control.
For Great Britain this means that no charges are made for labour, materials of
return carriage for guarantee repairs. For other countries, the guarantee covers
free exchange of faulty parts during the guarantee period.
Alternatively, if the equipment is returned to us for guarantee repair, we make no
charge for labour or materials but we do charge for carriage and U.K. customs
clearance.
We strongly prefer to have such repairs discussed with us first, and if we agree
that the equipment does need to be returned, we may at our discretion waive
these charges.
SERVICE
We recognise that some users of our instruments may not have easy access to
technically specialised backup.
Spare parts can be supplied from our works. These can normally be despatched
within one working day of receiving an order.
Spare parts and accessories for the pump may take longer.
Should it prove necessary, instruments may be returned to our works for
servicing. We normally expect to complete repairs of our own instruments within
2 days of receiving the equipment. Other manufacturers' products supplied by us
and returned for servicing will take longer. They will have to be returned to the
original manufacturer for servicing, and may be subject to additional delays.
Users in countries which have a Delta-T Representative should contact them first.
____________________________________________Page 13