1
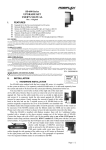
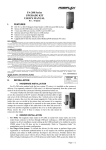
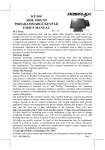
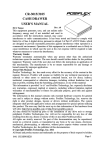
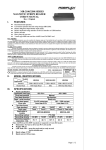
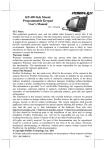
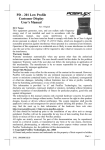
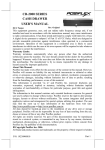
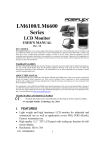
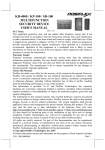
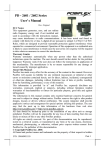
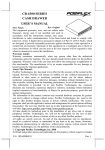
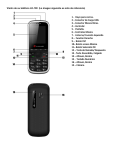
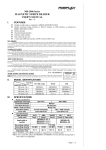
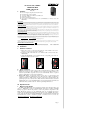
SD-460/466(Z/W) SERIES UPGRADE KIT USER’S MANUAL Rev.: A0 I. Features ISO 7811 Magnetic Stripe Reader with USB interface Dual directional operation for MSR 3 tracks type MSR reads AAMVA and CA DMV card Textured front surface Built-in Optical Finger Print Sensor Side-mounted on KS-62/68/69/72/75/77 series (SD-460Z/466Z) or KS-66/73 series (SD460W/466W) FCC NOTICE This equipment generates, uses, and can radiate radio frequency energy and, if not installed and used in accordance with the instructions manual, may cause interference to radio communications. It has been tested and found to comply with limits for a Class A digital device pursuant to subpart J of Part 15 of FCC Rules, which are designed to provide reasonable protection against interference when operated in a commercial environment. Operation of this equipment in a residential area is likely to cause interference in which case the user at his own expense will be required to take whatever measures to correct the interference. WARRANTY LIMITS Warranty will terminate automatically when the equipment is opened by any person other than the authorized technicians. The user should consult his/her dealer for the problem happened. Warranty voids if the user does not follow the instructions in application of this merchandise. The manufacturer is by no means responsible for any damage or hazard caused by improper application. The hardware utility program, including instructions for its use, is provided “AS IS” without warranty of any kind. Posiflex Technology, Inc. further disclaims all implied warranties including without limitation any implied warranties of merchantability or of fitness for a particular purpose. the entire risk arising out of the use or performance of the software and documentation remains with you. ABOUT THIS MANUAL This manual is written in an attempt with full strength to assist the user to utilize the upgrade kit SD-460/466(Z/W) for the Posiflex fan free touch terminals KS series. This series of products incorporate 2 delicately designed POS peripherals each can be used as an excellent tool to accommodate the required security specially involved in POS business, kiosk and hospitality operation. This manual covers the conceptual and operational aspects of these units. For technical aspects involving opening of the unit or option implementation, it is only available to the authorized distributors. The manufacturer of the SD-460/466(Z/W) series heartily apologizes to the user for reserving the right to change or to modify this manual without notice due to the rapid and constant progress and improvement on science and technology. The user may always obtain the most up to date information through any of our web sites: http://www.posiflex.com or http://www.posiflex.com.tw. Copyright Posiflex Technology Inc. 2013 All rights are strictly reserved. No part of this documentation may be reproduced, stored in a retrieval system, or transmitted in any form or by any means, electronic, mechanical, photocopying, or otherwise, without the prior written consent of Posiflex Technology, Inc. the publisher of this documentation TRADE MARKS AND SERVICE MARKS POSIFLEX is a registered trademark of Posiflex Technology, Inc. an ISO-9001 and ISO-14001 certified manufacturer. Other brand and product names are trademarks and registered trademarks and service marks of their respective owners. P/N: 19800902020 II. Installation 1. Hardware Installation 1. Release the 2 screws on the back of the right side of the terminal to remove the protective cover. Store the protective for future use. 2. Connect the cable found under the cover with the white connector inside SD460/466(Z/W). 3. Attach SD-460/466(Z/W) to the terminal with the corresponding screw holes in alignment, and then secure the 2 screws. 1 2. 2 3 Driver Installation 1. MSR: The magnetic stripe reader connects to the host through USB port working as a USB KB and also requires no driver installation except setting up the USB keyboard to be enabled in system CMOS setup if the OS does not do it automatically. Refer to “Operation Guide” for manipulation over the reader configuration. 2. Finger Print Sensor: To include the drivers for this sensor to perform finger print registration or verification (authentication) in an AP requires the software programmer to purchase and utilize its SDK (software developer’s kit). However, Posiflex delivers this optical finger print sensor with its drivers. Please find in the mini CD delivered with SD460/466(Z/W) series except SD-460/466(Z/W) model or Product Information CD delivered with Posiflex POS system the folder for “Posiflex Optical Finger Print Sensor”. III. Operation Guide 1. Magnetic Stripe Reader The MSR in SD-460/466(Z/W) series reads an ISO magnetic stripe card without driver. Yet, there is a “MSR.EXE” program for SD-460/466(Z/W) model and a “Posiflex USB MSR Manager” program for other model provided to control some parameter configuration for this MSR. Through this program, you can enable/disable track, set up Alt+Num approach for ASCII codes, and enable/disable Leading/Stop code. Please look for “USBMSR” and “SetUp” folders in the mini CD delivered with SD-460/466(Z/W) or Product Information CD delivered with Posiflex POS system to install the program or download it from our web site: http://www.posiflex.com or http://www.posiflex.com.tw. Page 1 2. Finger Print Sensor a. Cautions 1. Never pour the glass cleaner directly on the sensor window 2. Never use alcohol-based cleaners 3. Never submerge the sensor in liquid 4. Never rub the window with an abrasive material, including paper 5. Do not poke the window coating with your fingernail or any hard item, such as a pen. b. Principle The finger print sensor software never stores fingerprint images. The finger print sensor software creates a fingerprint template, which is a highly compressed and digitally encoded mathematical representation of fingerprint features. This template is created when a user registers a finger and is stored in an encrypted file. When the user later touches the fingerprint reader to authenticate, a new template is created and compared to the “registered” template. If there is a match, the authentication is successful. c. Finger Print Recognition In order for the sensor to acquire a good image of your finger, you must place the pad of your finger but not the tip in the center of the sensor window, and apply gentle, even pressure. Do not “roll” your finger as usually practiced in the traditional ink and paper fingerprint taking technique. Pressing too hard will distort your fingerprint. Pressing too lightly will not expose a large enough area of your finger. Also, make sure to hold your finger on the sensor until you see the sensor light blink; this may take longer for dry fingers. Then, lift your finger. Although you may use any finger with the sensor, your index finger of either hand works best. If the sensor is capturing your finger image as indicated by the sensor blink and you have tried all the above suggestions, you may need to reregister your finger. d. Sensor Activation The LED behaviors are described in the following table. LED Color Description Blue Finger print sensor on standby Red Reading successfully Failure to connect to a self-powered USB port will cause non-operation of the sensor. If you activate your terminal’s power-saving functionality but your third party application does not support this, then your fingerprint sensor will enter “sleep mode” even though your workstation does not. If this occurs, you will need to reboot the system. Please check with your application developer for compatibility. e. Cleaning the Sensor Depending on the amount of use, the sensor window may need to be cleaned periodically. To clean it, apply the sticky side of a piece of adhesive cellophane tape on the window and peel it away as in the drawing at right. Under heavy usage, the window coating on some sensors may turn cloudy from the salt in perspiration. In this case, gently wipe the window with a cloth (not paper) dampened with a mild ammonia-based glass cleaner. IV. SPECIFICATIONS 1. Reader Specifications Applicable card type ISO 7811 Card feed method Manual Card feed direction Bi-direction Read / write function Read only Card feed speed 5 to 55 inches/sec. Error rate < 0.5% * Reader specs option must be specified upon ordering. 2. JIS X 6302 Manual Bi-direction Read only 100 to 1200mm /sec. < 0.1% Card Data Specifications Data standard IATA ABA THRIFT JISII Track used Track 1 Track 2 Track 3 Rear section Recording method F2F (FM) F2F (FM) F2F (FM) F2F (FM) Recording density 210 BPI 75 BPI 210 BPI 210 BPI Recording capacity 79 / 7 40 / 5 107 / 5 72 / 7 * Card data specs is decided by reading head type, and must be specified upon ordering. 3. Other Specifications Standards AAMVA, CA DMV Interface USB Rated Voltage 5V DC Rated Current 300 mA (Max) Reading Head Single ISO head or Dual ISO Head or JISII head* * Reading head type must be specified upon ordering. 警告使用者 T31454 這是甲類的資訊產品,在居住的環 境中使用時,可能會造成射頻干 擾,在這種情況下,使用者會被要 求採取某些適當的對策。 Page 2