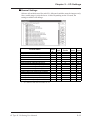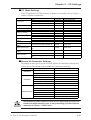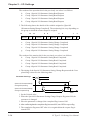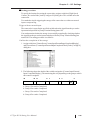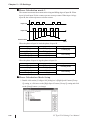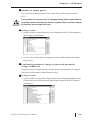
1
LT Type H I/O Setting
User Manual
Digital Electronics Corporation
PREFACE
Thank you for purchasing Pro-face's LT Type H Series unit, hereafter referred to
as the "LT" or the "LT unit". This unit, which utilizes Pro-face's newest PC architecture, is equipped with a wide range of standard-equipment interfaces and is
designed for use in a wide variety of industrial applications.
Prior to using the LT unit, be sure to read this manual thoroughly to familiarize
yourself with the unit's operation procedures and functions.
< Note >
1. It is forbidden to copy the contents of this manual in whole, or in part,
without the permission of the Digital Electronics Corporation.
2. The information in this manual is subject to change without notice.
3. This manual was written with care; however, if you should find any errors or
omissions, please contact Pro-face and inform them of your findings.
4. Please be aware that Digital Electronics Corporation shall not be held liable
by the user for any damages, losses, or third party claims arising from the
uses of this product.
Product names used in this manual are the trademarks of their respective manufacturers.
© Copyright 2002 Digital Electronics Corporation. All rights reserved.
LT Type H I/O Setting User Manual
1
Preface
DOCUMENTATION CONVENTIONS
This manual uses the following symbols and terminology.
Safety Symbols and Terms
This manual uses the following symbols and terms to identify important information related to the correct and safe operation of this product.
Symbol
Description
Indicates a potentially hazardous situation that could result in serious injury or
death.
Indicates a potentially hazardous situation that could result in minor injury or
equipment damage.
Indicates a potentially damaging action or dangerous situation that could result in
abnormal equipment operation or data loss.
Indicates instructions or procedures that must be performed to ensure correct
product use.
Indicates instructions or procedures that must not be performed.
General Information Symbols and Terms
This manual uses the following symbols and terms for general information.
Symbol
Description
Provides hints on correct product use, or supplementary information.
Indicates an item's related information (manual name, chapter,
section, sub-section).
Refers to keys on the computer keyboard.
Esc Ctrl
Keyboard Compatibility List
Device
Indicates peripheral devices such as temperature controllers,
inverters, etc. connected via serial I/O It does not include devices
connected via the Flex Network or DIO.
LT
Generic name for the "LT Series" Graphic Logic Controller made by
Digital Electronics Corporation.
LT Editor
Indicates Digital Electronics Corporation's LT integrated
development software "LT Editor" Version 2.0 (this product).
2
LT Type H I/O Setting User Manual
Preface
TABLE OF CONTENTS
PREFACE .................................................................................................................. 1
DOCUMENTATION CONVENTIONS ................................................................ 2
TABLE OF CONTENTS ......................................................................................... 3
CHAPTER 1 OVERVIEW
1.1
System Configuration .................................................................................. 1-1
1.2
I/O Types ...................................................................................................... 1-2
CHAPTER 2 I/O SETTINGS
2.1
Interface Specifications............................................................................... 2-1
2.2
I/O Settings ................................................................................................... 2-5
2.2.1 Overview ............................................................................................ 2-5
2.2.2 I/O Allocation (General) ................................................................... 2-6
2.2.3 DIN ................................................................................................... 2-22
2.2.4
DOUT .............................................................................................. 2-24
2.2.5 High-Speed Counter (General Use) ............................................... 2-25
2.2.6 High-Speed Counter (Single-Phase Setting) ................................. 2-27
2.2.7
High-Speed Counter (two-phase)................................................... 2-50
2.2.8 PWM Output ................................................................................... 2-55
2.2.9 Normal Pulse Output ....................................................................... 2-63
2.2.10 Acceleration/Deceleration Speed Pulse Output ............................ 2-71
2.2.11 Analog Input .................................................................................... 2-86
2.2.12 Analog Output ................................................................................. 2-89
2.2.13 Thermocouple Input ........................................................................ 2-91
2.2.14 Pt100 Input ....................................................................................... 2-96
CHAPTER 3 ERROR MESSAGES
LT Type H I/O Setting User Manual
3
Memo
4
LT Type H I/O Setting User Manual
1. System Configuration
Chapter
1 Overview
1.1
System Configuration
This section shows the standard peripheral devices and I/O interfaces that can be
connected to the LT unit.
System Design
LT Unit (Type H)
Tool Connector
Data Transfer
Cable
(GPW-CB02)
Bar Code
Reader
(limited to
tested types)
Alarm Output
Buzzer, Safety Interlock
DIO I/F
Switches, Lamps, Sensors, etc.
PC
Serial Connection
Printer
(Commercial Type)
High Speed Counter
Pulse Output
PWM Output
Analog I/F
Analog Input
Analog Output
Temperature
Input I/F
*1
Thermocouple Input
Pt100 Input
*1
*1
*1 The I/O specifications will vary depending on the model of LT Type H unit used.
LT Type H I/O Setting User Manual
1–1
1.2
I/O Types
Maximum number of I/O Points
Depending on the type of I/O used, the number of points available will vary.
I/O Type
Standard Input
Standard Ouput(200mA)
Standard Output(500mA)
DIO
*1
PWM Output
*1
Pulse Output
*1 *2
High-Speed Counter
Analog Input
Analog Output
Thermocouple Input
Pt100 Input
Special I/O
Analog I/O
Temperature Input
Type H-AD
16
8
8
4
4
4
2
1
-
Type H-ADP
16
8
8
4
4
4
2
2
2
Type H-ADT
16
8
8
4
4
4
2
2
3
-
DIO and Special I/O Allocation
Regardless of the I/O type, DIO terminal settings can be performed using the
[Group Terminal Settings].The characteristics of each I/O type is as follows:
DIO
Standard I/O
Input
Output
Standard Input
Standard Output
Special I/O
Single-phase counter
Input
Output
Counter Input
Synch. Output
Preload Input
Prestrobe Input
Counter Input 1A
2-phase counter
Synch. Output
Counter Input 1B
Counter Input 1Z (Marker Input)
PWM
PWM Output
Pulse
Pulse Output
*1 Since the I/O terminals for the Standard Input, Standard Output, PWM Output, Pulse
Output and High-Speed Counter I/O are common, it will not be possible to simultaneously use the maximum number of each of these units.
*2 When using 2-phase Counters, the maximum number of counters that can be used is
one 2-phase Counter and two Single-phase Counters.
1–2
LT Type H I/O Setting User Manual
DIO Terminal Settings
As shown in the drawing below, this unit’s terminals X8 to X15 are reserved just
for Input, and terminals Y4 to Y15 are reseved just for Ouput. Terminals from X0
to X7 and from Y0 to Y3 are designed as [Group Terminal Settings]. These
[Group Terminal Settings] can be assigned for DIO and Special I/O.
For details,
2.2.2 I/O Allocation (General)
Setting Normal I/O,
High-Speed Counter, PWM Output and Pulse Output
X15 X14 X13 X12 X11 X10
Y15 Y14 Y13 Y12 Y11 Y10
X9
Y9
X8
Y8
X7
Y7
X6
Y6
X5
Y5
X4
Y4
X3
Y3
X2
Y2
X1
Y1
X0
Y0
As shown below, each group consists of 2 input terminals and 1 output terminal,
which is set as a unit. The following figures show the arrangement of each group.
Group 4
Group 3
Group 2
Group 1
X7
X5
X3
X1
X6
Y3
LT Type H I/O Setting User Manual
X4
Y2
X2
Y1
X0
Y0
1–3
Memo
1–4
LT Type H I/O Setting User Manual
Chapter
2 I/O Settings
This chapter presents an overview and description of the functions of the driver
software for the LT Type H. It also describes how to use LT Editor software to set
these functions.
2.1
Interface Specifications
I/O Board Overview
As shown in the block diagram below, in response to control instructions from the
LT, a variety of I/O control is performed. All instructions and I/O board data is
received via I/F RAM.
LT
Controller
LT Type H I/O Setting User Manual
I/O Driver
I/O Board
I/F RAM
Firmware
2–1
Chapter 2 – I/O Settings
I/O Board Processing Flow
A
2ms interrupt
Timer Interrupt Permit
Read Analog Data Value
(channel by channel) (*1)
Normal operation
Calculate Analog Data Value
(channel by channel) (*1)
Pt100 or Thermocouple AD read
and calculate
I/O Refresh
(DIO, Analog I/O)
Accel/Decel Speed Pulse Table
Creation Request Monitor
Request?
No
Yes
Accel/Decel Speed Pulse Table
Creation
Pt100 Calculation (*1) or
Thermocouple Calculation
Processing (*1)
Special I/O Update
(counter current value, pulse
amount current value)
Check all control flags
Request?
Yes
Perform request
Special I/O Parameter
Change Request
Param. Change Request Check
Yes
Request?
No
Board Operation Stop
Special I/O Control Request
No
System ROM Check
Reset interrupt
Average 21 channels
of input and output 1
average value.
Perform request
500µs Interrupt
Standard Input Readout
Jump to Power ON and similar
processing
IFR:I/F RAM
*1 Depending on I/O Board type, this may not be possible to do.
2–2
LT Type H I/O Setting User Manual
Chapter 2 – I/O Settings
I/O Board Processing Flow
I/O Board processing is normally updating I/O data and performing special I/O
control in response to LT unit requests. This processing usually consists of special
I/O interrupt processing, 0.5ms processing, 2ms processing, then normal processing.
For example, if during 2ms processing a special I/O interrupt processing request is
received, the 2ms processing is stopped and the interrupt processing is performed.
Processing
Item
Special I/O Interrupt
Special I/O Processing
0.5ms interval
Input terminal status data storage
Standard I/O update
Analog I/O update
Pt100/Thermocouple input storage
Special I/O control monitor
Special I/O parameter change monitor
2ms interval
Description
(Counter synch. output control)
(Counter preload input processing)
(Counter pre-strobe input processing)
(2-phase counter mark input processing)
(Output pulse amount control)
(Accel/Decel speed pulse table switching)
Special I/O start/stop
Special I/O parameter change
Counter value clear
Special I/O counter input special request monitor
(Synch. output clear)
(Counter value readout)
(Counter value write)
Accel/Decel speed pulse table creation
Pt100/Thermocouple input update
Normal operation
Special I/O update
Current counter value
Pulse output amount current value
System ROM check
When only DIO, Analog I/O, Temperature Input are used
Each type of processing is usually performed simultaneously.
Special I/O Interrupt
0.5ms period
2ms period
Normal scan
Reset Processing
LT Type H I/O Setting User Manual
2–3
Chapter 2 – I/O Settings
Special I/O
If a Special I/O parameter change is performed during normal processing, the 2ms
period’s processing is changed. When the 2ms period is extended, in order to
compress the normal scan time, the normal scan time is also increased.
Special I/O Interrupt
0.5ms period
2ms period
Normal Scan
Reset processing
Due to Special I/O processing, period processing is changed.
Normal scan time is compressed.
When Interrupt Processing Occurs
If a Special I/O interrupt occurs and Special I/O is used, the interrupt processing
can be performed at any arbitrary timing. During special I/O interrupt processing,
in order to compress all other types of processing times, other procesing times are
increased.
Special I/O Interrupt
0.5ms period
2ms period
Normal Scan
Reset processing
For special I/O processing, the 0.5ms and normal scan times are compressed.
2–4
LT Type H I/O Setting User Manual
Chapter 2 – I/O Settings
2.2
I/O Settings
After creating a logic program, you can enable real I/O control by assigning
appropriate variables to actual I/O terminals.
The following sections describe how to assign functions to I/O terminals, including Standard I/O, High-Speed Counter, Pulse Output and PWM Output.
2.2.1
Overview
Allocating Standard I/O, High-Speed Counter, Pulse Output and PWM
Output
Standard I/O, High-Speed Counter, Pulse Output and PWM Output are assigned to
the LT unit’s DIO32-point interface I/O. Standard I/O can be assigned to any input
terminals from X0 to X15 and to any output terminals from Y0 to Y15. The HighSpeed Counter, PWM Output and Pulse Output, however, can only be assigned to
input terminals X0 to X7 and to output terminals Y0 to Y3, as indicated below.
For details,
2.2.2 I/O Allocation (General)
Setting Standard
I/O, High-Speed Counter, PWM Output and Pulse Output
X15 X14 X13 X12 X11 X10 X9
Y15 Y14 Y13 Y12 Y11 Y10 Y9
X8
Y8
X7
Y7
X6
Y6
X5
Y5
X4
Y4
X3
Y3
X2
Y2
X1
Y1
X0
Y0
Depending on the type of LT unit used, the following I/O point amounts may vary.
I/O Type
*1
Standard Input
Standard Output (200mA)
Standard Output (500mA)
*1
PWM Output
*1
Pulse Output
*1*2
High-Speed Counter
DIO
*1
*1
Special I/O
Type H-AD
16
8
8
4
4
4
Type H-ADP
16
8
8
4
4
4
Type H-ADT
16
8
8
4
4
4
Assigning Analog I/O
The Analog I/O is assigned to the Analog Interface I/O terminals. Analog I/O can
be assigned to two terminals - CH1 and CH2.
I/O type
Analog Input
Analog Output
Analog I/O
Type H-AD
2
1
Type H-ADP
2
2
Type H-ADT
2
2
*1 Since the I/O terminals for the Standard Input, Standard Output, PWM Output, Pulse
Output and High-Speed Counter I/O are common, it will not be possible to simultaneously use the maximum number of each of these units.
*2 When using 2-phase Counters, the maximum number of counters that can be used is
one 2-phase Counter and two Single-phase Counters.
LT Type H I/O Setting User Manual
2–5
Chapter 2 – I/O Settings
Assigning Thermocouple Input and Pt100 Input
The Thermocouple Input and Pt100 Input are assigned to the I/O terminals for
"Temperature Input Interface." The Thermocouple Input can be assigned to three
terminals for CH1, CH2 and CH3, and the Pt100 Input can be assigned to two
terminals for CH1 and CH2.
I/O Type
Thermocouple Input
Pt100 Input
2.2.2
Temperature Input
Type H-AD
-
Type H-ADP
2
Type H-ADT
3
-
I/O Allocation (General)
Use the LT Editor [Configure I/O] dialog box to assign I/O terminals for the
DIO32-point Interface, Analog I/O Interface and Temperature I/O Interface.
General Settings
In the [General Item Setup] dialog box, select the LT type and the unit for temperature input, and specify whether a 2-phase counter is to be used.
2.2.5 High- Speed Counter (General Settings)
2–6
LT Type H I/O Setting User Manual
Chapter 2 – I/O Settings
The above dialog box’s [Group*Terminal Settings(*)] and [Terminal Assignment Display] items are explained in the DIO,
High-Speed Counter, PWM Ouptut, Pulse Output Settings.
DIO, High-Speed Counter, PWM Output, Pulse Output Settings
Overview
This sections explains the allocation methods used for the Input terminals X0 to
X7, and Output terminals Y0 to Y3. As shown in the figure below, in the LT
Editor software these terminals are arranged into 4 groups, which are then allocated according to the [Setting Pattern [P]] shown on the following page.
Group 4
Group 3
Group 2
Group 1
X7
X5
X3
X1
X6
Y3
X4
Y2
X2
Y1
X0
Y0
These groups are listed in the [General Item Setup] dialog box.
Input terminals X0 and X1, and Output terminal Y0, are combined in “Group 1”.
Input terminals X2 and X3, and Output terminal Y1, are combined in “Group 2”.
Input terminals X4 and X5, and Output terminal Y2, are combined in “Group 3”.
Input terminals X6 and X7, and Output terminal Y3, are combined in “Group 4”.
LT Type H I/O Setting User Manual
2–7
Chapter 2 – I/O Settings
For example, clicking on the [Group 1] setting will call up the following dialog
box. Selecting [Pattern 5] will designate the I/O settings as: X0: Counter Input,
X1: DIN, and Y0: Synch.Output. (When not using a 2-phase Counter.)
After all groups are allocated, the [Terminal Assignment Display] can be used to
check the terminal allocations. The following screen shows the results of the
following allocations. (When not using the 2-phase Counter)
[Group 1]
used Pattern 5
[Group 2]
used Pattern 2
[Group 3]
used Pattern 4
[Group 4]
used Pattern 3
[Setting Pattern] List (when NOT using the 2-phase Counter)
No.
1
2
3
4
5
6
7
8
9
X(2n-2)
DIN
X(2n-1)
DIN
DIN
Counter I nput
Preload I nput
Pre-strobe I nput
Y(n-1)
DIN
PW M Output
Pulse Output
DIN
S ynch. Output
DOUT
S ynch. Output
DOUT
S ynch. Output
n : group number
2–8
LT Type H I/O Setting User Manual
Chapter 2 – I/O Settings
When using 2-phase Counter - [Gr1 Terminal Setting]
No.
X0
1
2
3
Counter Input 1A
4
5
6
X1
DIN
Preload Input
Pre-strobe Input
Y0
DOUT
Synch. Output
DOUT
Synch. Output
DOUT
Synch. Output
When using 2-phase Counter - [Gr2 Terminal Settings]
No.
X2
1
2
3
Counter Input 1B
4
5
6
X3
Counter Input 1Z
(Marker Input)
DIN
Y1
DOUT
PWM Output
Pulse Output
DOUT
PWM Output
Pulse Output
When using 2-phase Counter - [Gr3 Terminal and Gr4 Terminal
Settings]
These settings are same as when not using the 2-Phase Counter.
LT Type H-AD Setup
1. Open the Project Manager and select the LT unit type - “LT Type H”.
2. Enter the [TypeH Driver [ID:#1] Type[TypeH-AD]] settings in the
[Configure I/O] screen.
• I/O type
• Temperature Input units
• Use/not use 2-phase Counter
• Group Terminal Settings
3. Allocate the Driver’s General Item variable(s).
• I/O Board Version
• AnalogInputDataEnableDisplay
* I/O Type settings will vary depending on the [Group Terminal setting] used. For
details, refer to next page’s [General Item Setup] list.
4. Perform individual I/O mode settings.
Standard Input
• Digital Input Filter Time
Standard Output
• Controller Stop Output Status
Analog Input
• Analog Input Range
• Analog Input Filter Time
Analog Output
• Analog Output Range
• Output Status at Controller Stop
LT Type H I/O Setting User Manual
2–9
Chapter 2 – I/O Settings
* I/O Type settings will vary depending on the [Group Terminal settings] used. For
details, refer to next page’s [General Item Setup] list.
5. Allocate variables for special I/O parameter items.
* I/O Type settings will vary depending on the [Group Terminal settings] used. For
details, refer to next page’s [General Item Setup] list.
6. Allocate variables for terminals.
• DIO terminals (any setting)
• Analog I/O terminals (any setting)
7. Use the Error Check feature to check the data/settings.
General Item Setup
When using the LT Type H unit, be sure to enter these settings first.
Setting Item
2–10
Description
Type (I/O type)
Select the I/O type.
Temperature Input Unit
Select the units used for temperature input data display.
Use 2-Phase Counter
Selects the 2-phase Counter feature.
Group Terminal Settings
Designates the DIO terminal settings.
LT Type H I/O Setting User Manual
Chapter 2 – I/O Settings
General Settings
Allocate all variables used for each I/O. Allocated variables must be integers only.
Also, usable range is only the lower 16 bits. Depending on the I/O used, the
settings available will change.
Terminal Name
I/O Board Version
Analog Input Data Enable Display
Temperature Input Data Enable Display
Special I/O Control
Special I/O Status
Special I/O Output Status Display
Special I/O Parameter Setting Change Request
Special I/O Parameter Setting Change Completed
Special I/O Parameter Setting Alarm DisplayA
Special I/O Parameter Setting Alarm DisplayB
Accel/Decel Speed Pulse Table Creation Request
Accel/Decel Speed Pulse Table Creation Completed
Counter Input Operation Control Request
Counter Input Operation Control Response
Counter Input External Input Completed Display
Counter Input External Input Completed Check
Normal
Temp
Input
High Speed
Counter
PWM
Output
Pulse
Output
O
O
O
O
O
O
O
O
O
O
O
O
O
O
O
O
O
O
O
O
O
O
O
O
O
O
O
O
* “O” indicates that this item must be set.
LT Type H I/O Setting User Manual
2–11
Chapter 2 – I/O Settings
General Setting Items Terminal Format
When using bit-related ON-OFF control and references, instead of word access, be sure to bit instructions (OUT, NO,
etc.). When using word format commands (MOV, EQ, etc.) be
sure to use masking or other methods to prevent other features from being effected.
I/O Board Version
15
0
The firmware version is displayed using one word.
Ex. Version 01.05 => “0x0105”
Analog Input Data Enable Display
15
0
b a
a: Analog Input (CH1) data
0: Data disable (now sampling)/1: Data enable
b: Analog Input (CH2) data
0: Data disable (now sampling)/1: Data enable
* Initial value = 0
Temperature Input Data Enable Display
15
9
8
2
Not used (normally "0") e d Not used (normally "0") c
1
0
b a
a: Thermocouple Input(CH1) data 0: Data disable (now sampling)/1: Data enable
b: Thermocouple Input(CH2) data 0: Data disable (now sampling)/1: Data enable
c: Thermocouple Input (CH3) data 0: Data disable (now sampling)/1: Data enable
d: Pt100 Input (CH1) data
0: Data disable (now sampling)/1: Data enable
e: Pt100 Input (CH2) data
0: Data disable (now sampling)/1: Data enable
* Initial value = 0
2–12
LT Type H I/O Setting User Manual
Chapter 2 – I/O Settings
Special I/O Control
15
12 11
d
8 7
0
4 3
c
b
a
Special I/O Control is set using 4 bits of data, which designates the Group used.
a: Group 1 Special I/O Control c: Group 3 Special I/O Control
b: Group 2 Special I/O Control d: Group 4 Special I/O Control
PWM Output
b(n+3)
b(n+2)
b(n+1)
0
0
0
b(n+0)
PWM Output Control 0: Stop/1: Start
Pulse Output
b(n+3)
b(n+2)
0
0
b(n+1)
b(n+0)
Pulse Output Control 0: Stop/1: Start
Accel/Decel Speed Pulse setting 0: Disable/1: Enable
High-Speed Counter (including 2-phase Counter)
b(n+3)
b(n+2)
0
0
b(n+1)
b(n+0)
High- Speed Counter Control 0: Stop/1: Start
Synch. Ouput setting 0: Disable/1: Enable
The “n” character shown in the bit number, depending on the group number, will
become 0, 4, 8, 12.
Special I/O Status
15
12 11
d
8 7
0
4 3
c
b
a
Special I/O Status is set using 4 bits of data, which designates the Group used.
a: Group 1 Special I/O Status
c: Group 3 Special I/O Status
b: Group 2 Special I/O Status
d: Group 4 Special I/O Status
PWM Output
b(n+3)
b(n+2)
b(n+1)
0
0
0
b(n+0)
Pulse Output
b(n+3)
PWM Output Status 0: Stop/1: Start
b(n+2)
b(n+1)
b(n+0)
0
Pulse Output Status 0: Stop/1: Start
Accel/Decel Speed Pulse setting 0: Disable/1:
Enable
Accel/Decel Speed Pulse Amount Output Completed
0:not completed/ 1:Completed
LT Type H I/O Setting User Manual
2–13
Chapter 2 – I/O Settings
High-Speed Counter (including 2-phase Counter)
b(n+3)
b(n+2)
0
0
b(n+1)
b(n+0)
High-Speed Counter Status 0: Stopped/1: Started
Synch. Ouput Setting Status 0: Disable/1: Enable
The “n” character shown in the bit number, depending on the group number, will
become 0, 4, 8, 12.
Special I/O Output Status Display
15
12 11
d
8 7
0
4 3
c
b
a
Special I/O Ouput Status Display is set using 4 bits of data, which designates the
Group used.
a: Group 1 Special I/O Ouput Status c: Group 3 Special I/O Ouput Status
b: Group 2 Special I/O Ouput Status d: Group 4 Special I/O Ouput Status
b(n+3)
b(n+2)
b(n+1)
0
0
0
b(n+0)
Special I/O Output Status 0: Stop/1: Start
The “n” character shown in the bit number, depending on the group number, will
become 0, 4, 8, 12.
Special I/O Parameter Setting Change Request
15
12 11
d
8 7
c
0
4 3
b
a
Special I/O Parameter Setting Change Request is set using 4 bits of data, which
designates the Group used.
a: Group 1 Special I/O Parameter Setting Change Request
b: Group 2 Special I/O Parameter Setting Change Request
c: Group 3 Special I/O Parameter Setting Change Request
d: Group 4 Special I/O Parameter Setting Change Request
b(n+3)
b(n+2)
0
0
b(n+1)
b(n+0)
Special I/O Parameter Setting Change Request
0: No request/1: Request
Special I/O Parameter Setting Read Request
0: No request/1: Request
2–14
LT Type H I/O Setting User Manual
Chapter 2 – I/O Settings
* Be sure to perform all parameter changes prior to turning the Special I/O
Parameter Setting Request bit ON.
* It is not possible here to change Accel/Decel Speed Pulse parameters. This
should be performed using the Accel/Decel Speed Pulse table Creation Request
Flag.
* When reading out the Accel/Decel Speed Pulse Parameters, be sure to also turn
the Special I/O Control’s Accel/Decel Speed Pulse Output Control Flag ON at
the same time.
* The “n” character shown in the bit number, depending on the group number,
will become 0, 4, 8, 12.
Special I/O Parameter Setting Change Completed
15
12 11
d
8 7
c
0
4 3
b
a
Special I/O Parameter Setting Change Completion is set using 4 bits of data,
which designates the Group used.
a: Group 1 Special I/O Parameter Setting Change Completed
b: Group 2 Special I/O Parameter Setting Change Completed
c: Group 3 Special I/O Parameter Setting Change Completed
d: Group 4 Special I/O Parameter Setting Change Completed
b(n+3)
b(n+2)
0
0
b(n+1)
b(n+0)
Special I/O Parameter Setting Change Completed
0: No request/1: Request
Special I/O Parameter Setting Read Completed
0: No request/1: Request
* The “n” character shown in the bit number, depending on the group number,
will become 0, 4, 8, 12.
LT Type H I/O Setting User Manual
2–15
Chapter 2 – I/O Settings
Special Parameter Setting Alarm Display A
15
12 11
8 7
f
e
0
4 3
d
c
b
a
a: Group 1 Special PWM Output Parameter Alarm
b: Group 2 Special PWM Output Parameter Alarm
c: Group 3 Special PWM Output Parameter Alarm
d: Group 4 Special PWM Output Parameter Alarm
e: Groups 1 to 4 Pulse Output Frequency Alarm
f: Pulse Output Frequency Total Alarm
PWM Output Parameter Alarm
b(2n-1)
b(2n-2)
PWM Output Frequency Alarm 0: Normal/ 1: Alarm (2.5kHz or higher)
PWM Output ON Duty Alarm 0: Normal/ 1: Alarm (outside range)
* The “n” character shown in the bit number is the Group number.
Pulse Output Frequency Alarm
b11
b10
b9
b8
Group 1 Pulse Output Frequency Value Alarm
0: Normal/ 1: Alarm (>=5kHz)
Group 2 Pulse Output Frequency Value Alarm
0: Normal/ 1: Alarm (>=5kHz)
Group 3 Pulse Output Frequency Value Alarm 0: Normal/ 1: Alarm (>=5kHz)
Group 4 Pulse Output Frequency Value Alarm 0: Normal/ 1: Alarm (>=5kHz)
Pulse Output Frequency Total Alarm
b15
b14
b13
b12
0
0
0
Pulse Output Frequency Total Alarm 0: Normal/ 1: Alarm (5kHz or higher)
* The “n” character shown in the bit number is the Group number.
* If the parameter being changed via the Special I/O Parameter change has an Alarm, the
related bit will turn ON.
2–16
LT Type H I/O Setting User Manual
Chapter 2 – I/O Settings
Special Parameter Setting Alarm Display B
15
12 11
8 7
Not used
0
4 3
c
b
a
a: Groups 1 to 4 Counter Preset Value Alarm
b: Groups 1 to 4 Pulse Initial Ouput Frequency Value Alarm
c: Groups 1 to 4 Accel/Decel Speed Pulse Parameter Warning
Counter Preset Value Alarm
b3
b2
b1
b0
Group 1 Counter Preset Value Alarm
Group 2 Counter Preset Value Alarm
Group 3 Counter Preset Value Alarm
Group 4 Counter Preset Value Alarm 0: Normal/ 1: Alarm (ON and OFF presets are equal )
Pulse Initial Ouput Frequency Value Alarm
b3
b2
b1
b0
Group 1 Pulse Initial Ouput Frequency Value Alarm
Group 2 Pulse Initial Ouput Frequency Value Alarm
Group 3 Pulse Initial Ouput Frequency Value Alarm
Group 4 Pulse Initial Ouput Frequency Value Alarm 0: Normal/ 1: Alarm (Initial output frequency is larger
than normal outtput frequency)
Accel/Decel Speed Pulse Parameter Warning
b3
b2
b1
b0
Group 1 Accel/Decel SpeedPulse Parameter Warning
Group 2 Accel/Decel Speed Pulse Parameter Warning
Group 3 Accel/Decel Speed Pulse Parameter Warning
Group 4 Accel/Decel Speed Pulse Parameter Alarm 0: Normal/ 1: Warning (Output pulse amount
is less than 21/Accel/Decel time increase/Accel/Decel time decrease)
LT Type H I/O Setting User Manual
2–17
Chapter 2 – I/O Settings
Accel/Decel Speed Pulse Table Creation Request
15
Unused
10
8
6
4
d
c
b
a
0
Unused
a: Group 1 Accel/Decel Speed Pulse Table Creation Request 0: No request/ 1:
Request
b: Group 2 Accel/Decel Speed Pulse Table Creation Request 0: No request/ 1:
Request
c: Group 3 Accel/Decel Speed Pulse Table Creation Request 0: No request/ 1:
Request
d: Group 4 Accel/Decel Speed Pulse Table Creation Request 0: No request/ 1:
Request
Accel/Decel Pulse Table Creation Completed
15
87
12 11
Unused
d
c
43
b
a
0
Unused
a: Group 1 Accel/Decel Pulse Table Creation Completed
b: Group 2 Accel/Decel Pulse Table Creation Completed
c: Group 3 Accel/Decel Pulse Table Creation Completed
d: Group 4 Accel/Decel Pulse Table Creation Completed
Accel/Decel Pulse Table Creation Completed
b(2n+3)
b(2n+2)
Accel/Decel Pulse Table Creation Completed 0: Normal/ 1: Being created
Accel/Decel Pulse Table Created/Not Created 0: Not created/ 1: Created (Table can be output)
* The “n” character shown in the bit number is the Group number.
2–18
LT Type H I/O Setting User Manual
Chapter 2 – I/O Settings
Counter Input Operation Control Request
15
12 11
d
8 7
c
4 3
b
0
a
Counter Input Operation Control Request is set using 4 bits of data, which designates the Group used.
a: Group 1 Counter Input Operation Control Request
b: Group 2 Counter Input Operation Control Request
c: Group 3 Counter Input Operation Control Request
d: Group 4 Counter Input Operation Control Request
Counter Input Operation Control Request
b(n+3)
b(n+2)
b(n+1)
b(n+0)
Counter Value Clear Request 0 : No request/ 1: Request (Clears counter value using “0”)
Synch. Output Clear Request
0: No request/ 1: Request (Synch. output turns OFF)
Preload Write Request
0: No request/ 1: Request (Counter value overwrites the Preload value)
Pre-strobe Read Request
0: No request/ 1: Request (Counter value is read to Pre-strobe value variable)
* The “n” character shown in the bit number, depending on the group number, is
0, 4, 8, 12.
Counter Input Operation Control Response
15
12 11
d
8 7
c
0
4 3
b
a
Counter Input Operation Control Response is set using 4 bits of data, which
designates the Group used.
a: Group 1 Counter Input Operation Control Response
b: Group 2 Counter Input Operation Control Response
c: Group 3 Counter Input Operation Control Response
d: Group 4 Counter Input Operation Control Response
LT Type H I/O Setting User Manual
2–19
Chapter 2 – I/O Settings
Counter Input Operation Control Response
b(n+3)
b(n+2)
b(n+1)
b(n+0)
Counter Value Clear Completed
0: Normal 1: Completed (Clears counter value using “0”)
Synch. Output Clear Completed
0: Normal 1: Completed (Synch. output turns OFF)
Preload Write Completed
0: Normal/ 1: Written (Counter value overwrites the Preload value)
Pre-strobe Read Completed
0: Normal/ 1: Read completed (Counter value is read to Pre-strobe value variable)
* The “n” character shown in the bit number, depending on the group number, is
0, 4, 8, 12.
Counter Input External Input Completed Display
Announces that the Counter Special External Input (Preload/ Prestrobe Input/
Marker Input (*1)) has turned ON and that the new counter value Write or Read
out, has been completed.
15
12 11
8 7
4 3
1
0
Not used e Not used d Not used c Not used b a
a: Group 1 Preload/Pre-strobe is completed 0: Normal 1: Completed
b: 2-phase Counter Input’s Marker Input (*1) is completed 0: Normal 1: Completed
c: Group 2 Preload/Pre-strobe is completed 0: Normal 1: Completed
d: Group 3 Preload/Pre-strobe is completed 0: Normal 1: Completed
e: Group 4 Preload/Pre-strobe is completed 0: Normal 1: Completed
Counter Input External Input Completed Check
Used to check the Counter Special External Input (Preload/ Prestrobe Input/
Marker Input (*1) has been completed.
15
12 11
8 7
4 3
1
0
Not used e Not used d Not used c Not used b a
a: Group 1 Preload/Pre-strobe Completion Check 0: Normal 1: Check completed
b: 2-phase Counter Input’s Marker Input (*1) Completion Check 0: Normal 1: Completed
c: Group 2 Preload/Pre-strobe Completion Check 0: Normal 1: Check completed
d: Group 3 Preload/Pre-strobe Completion Check 0: Normal 1: Check completed
e: Group 4 Preload/Pre-strobe Completion Check 0: Normal 1: Check completed
*1 Indicates the use of 2-phase counter input
2–20
LT Type H I/O Setting User Manual
Chapter 2 – I/O Settings
I/O Mode Settings
The LT Type H unit’s I/O has a variety of features. For details, refer to each I/O
feature’s separate explanation.
I tem
S etting Data
Type
Temperature Input Unit
2-phase Counter (Used/Not used)
Default
Type H-AD
Centigrade
Not Used
S etting Range
Type H-AD/ADT/ADP
Farenheit/Centigrade
Used/Not used
Group Terminal Settings
Terminal Setting Pattern
DIO
Patterns 1 to 9
Standard Input Settings
Standard Output Settings
Digital Input Filter Time
Hold output values after Controller stop
Analog Input Range
Analog Input Filter Frequency
Analog Output Range
Hold output values after Controller stop
Thermocouple Input Range
Thermocouple Input Filter Samp.
Pt100 Input Filter Samp.
0
Not held
0 to 10V
0
0 to 10V
Not held
J
0
0
0 to 40 (0.5 to 20ms)
Held/ Not held
0 to 10V/0 to 20mA/4 to 20mA
0 to 64 times
0 to 10V/0 to 20mA
Held/ Not held
J/K
0 to 64 times
0 to 64 times
Hold Counter value after Controller stop
Not held
Held/ Not held
(Single-phase Counter)
Hold Synch. Output values after Controller
Not held
stop
Held/ Not held
High Speed Counter
Settings
2-phase Counter mode
Modes 0 to 4
(2-phase Counter)
Hold Counter value after Controller stop
Not held
Hold Synch. Output values after Controller
Not held
stop
General Items
Analog Input Settings
Analog Output Settings
Thermocouple Input
Settings
Pt100 Input Settings
High-Speed Counter
Settings
Mode 0
Held/ Not held
Held/ Not held
Special I/O Parameter Settings
Depending on the type of special I/O used, Special I/O Parameter Settings may
need to be set. The setting items available for each feature will vary.
Special I/O Types
PWM Output
Pulse Output
Parameters
Output Frequency
OnDuty
10Hz to 2.5kHz
0 to 100%
Output Frequency
10Hz to 5kHz
Output Pulse Count
0 to 65,535
Initial Output Frequency
0, 10 to 5000Hz
Accel/Decel Speed Time
0 to 65,535ms
Pulse Output Count Current Value
Count ContentType Change
High-Speed Counter
Effective Range
0 to 65,535
0 to 3
Preload Value
0 to 65,535
Pre-strobe Value
0 to 65,535
On Preset value
0 to 65,535
Off Preset value
0 to 65,535
Counter Current Value
0 to 65,535
Since updating pulse output’s current value is performed during the I/O
board’s normal processing cycle, a 2ms processing cycle will require a
maximum of “40ms + LT Scan time”.
LT Type H I/O Setting User Manual
2–21
Chapter 2 – I/O Settings
2.2.3
DIN
The I/O board’s microcomputer monitors the Input terminals’ status every 0.5ms,
and the I/O refresh performed every 2ms writes the input status to I/F RAM.
If you choose to use a digital input filter time, the I/O refresh timing is used as a
trigger to write the average of the collected (sampled) input values to I/F RAM.
The number of samples is set using the Sampling Frequency setting. This averaged value is then read out each scan time.
Digital Input Filter Time
This filter is designed to remove/reduce signal noise via software. This filter can
be set in 0.5ms units, starting at 0.5ms and going to 20ms.
When this filter is used, data that is sampled every 0.5ms is stored internally.
Then, the data is read out when the I/O refresh is performed every 2ms, while
referring back to the previously read input terminal status data.
When all the input terminal status is the same, that value is used as the input
terminal value. If the values do not agree within the designated period of time, the
previous value is used. (The digital input filter’s timing setting is used to check if
the amount of sampling data satisfies or does not satisfy the filter’s time setting. If
it does not, the input status becomes OFF.)
Digital Input Filter Time
Input Signal
Digital Input Filter
Time Setting’s
Input Status
• Be sure to consider the output characteristics of your connected
device(s) and also any possible noise when setting up this
feature’s filter time.
• Depending on the Group terminal settings used and if the special
I/O is used, input terminals in the same group cannot be used for
DIN.
2–22
LT Type H I/O Setting User Manual
Chapter 2 – I/O Settings
DIN Setup
1. Double-click on the [Configure I/O] dialog box’s [DIN] setting, or click once on the
[DIN] and click on the [Setup] button. (see image)
Depending on the Group terminal settings used and if the special I/O
is used, input terminals in the same group are not displayed.
2. When the [DIN Setup] dialog box appears, enter the desired DIN filter time in
0.5ms units.
• This filter can be set from 0 to 20ms.
• A setting value of “0” ms means the digital input filter is not
used.
LT Type H I/O Setting User Manual
2–23
Chapter 2 – I/O Settings
2.2.4
DOUT
When using the Type H driver, output data is written to I/F RAM every scan time,
and the I/O board then reads the I/F RAM’s output area every 2ms.The data read
out is reflected to the I/O board’s output terminals.
The normal output terminals Y0 to Y7 provide 200mA output and Y8 to Y15
provide 500mA output. DOUT is also used to designate whether output hold is
used or not used during controller stop periods.
Output Hold At Controller Stop
This feature will hold the current output condition when the logic program stops.
Then, when the logic program restarts, the hold is released and operation starts
again. However, if the variables allocated are non-hold types, these variables are
all turned OFF. Also, when the unit is changed to OFFLINE mode or is reset, or
main power is turned OFF, all held variables are reset to OFF in order to reset all
I/O to its initial state.
• The output hold setting applies to ALL terminals.
• Depending on the Group terminal settings used and if the special
I/O is used, input terminals in the same group cannot be used for
Standard Input.
DOUT Setup
1. Double-click on the [Configure I/O] dialog box’s [DOUT] setting, or, click once on
the [DOUT] setting and then click on the [Setup] button. (see image)
• Depending on the Group terminal settings used and if the special
I/O is used, input terminals in the same group are not displayed.
2. The [DOUT Setup] dialog box appears. Hold is set by clicking on the checkbox
and clicking on [OK].
2–24
LT Type H I/O Setting User Manual
Chapter 2 – I/O Settings
2.2.5
High-Speed Counter (General Use)
The High-Speed Counter can count pulse signals of up to 10 kHz from 0 to 65535
(16 bits). Two types of High-Speed Counters are provided: a Single-phase
Counter that occupies one input terminal; and a 2-phase Counter that occupies
two input terminals. The available functions and the terminal numbers to be
assigned vary depending on the type. For details about single and two-phase
counters,
2.2.6 High-Speed Counter (Single-phase Settings),
2.2.7 High- Speed Counter (2-phase Counter Settings)
Feature Overview
Up/Down Counter
Counter Type Change
Single-phase
Counter
Counter Input
Preload Input (Modify Current Value)
Pre-strobe Input (Save Current Value)
Synch. Output
Mode 0
Phase
2-phase
Counter
Calculation
Mode 1
Mode
Mode 2
Mode 3
Counter Input
Preload Input (Modify Current Value)
Pre-strobe Input (Save Current Value)
Synch. Output
Marker Input (Clear Counter Values)
Terminal Number Allocations
Feature
Single
2-Phase
Phase
Counter Input
O
O
Preload Input
O
O
Pre-strobe Input
O
O
Synch. Output
O
O
Usable Terminal Numbers
Single-phase: X0,X2,X4,X6
2-phase:
Single-phase:
2-phase:
Single-phase:
2-phase:
Single-phase:
2-phase:
X0,X2
X1,X3,X5,X7
X1,X5,X7
X1,X3,X5,X7
X1,X5,X7
Y0,Y1,Y2,Y3
Y0,Y2,Y3
To set the usable terminal numbers, use the [General Item
Setup | Group Terminal Setup] area.
Allocation (General)
LT Type H I/O Setting User Manual
2.2.2 I/O
2–25
Chapter 2 – I/O Settings
Counter Value and Synch. Output at Controller Stop
When the logic program stops, the current value data in all counters is held.
When the logic program is restarted, operation starts from the retained value.
Also, when the LT unit is changed to OFFLINE mode or is reset, or the main
power is turned OFF, all counter values are reset in order to initialize all I/O.
High-Speed Counter Setup
1. Double-click on the [Configure I/O] dialog box’s [High-Speed Counter [Group1]]
setting, or, click once on the [High-Speed Counter [Group1]] setting and then click
on the [Setup] button. (see image)
2. The [High-Speed Counter Setup] dialog box appears. Counter Value and/or
Synch. Output Hold is set by clicking on the checkbox and clicking on [OK].
2–26
LT Type H I/O Setting User Manual
Chapter 2 – I/O Settings
2.2.6
High-Speed Counter (Single-phase Setting)
The Single-phase Counter is a counter that occupies one input terminal to measure
Single-phase Input signals.
Changing Up/Down Counting
During counting, the counting method can be switched between the up counter
and down counter. Also, the counting method can be changed for the particular
group to which the counter is assigned.
When changing the count method, a single pulse may be
skipped.
Summary
The following steps are used to change the up/down counting method.
1. Set the count method and the counting edge with [Counting Method Change].
2. Set the parameters with [Special I/O Parameter Setting Change Request].
3. Check the changes in [Special I/O Parameter Setting Change Completed].
4. Use [Special I/O Control] to start counting.
5. Confirm the operation with [Special I/O Status].
As mentioned earlier, the actions performed by [Special I/O Parameter Setting Change Request] and [Special I/O Parameter Setting
Change Completed] are reflected in all the parameters in a group.
Count Method Setup
1. Allocate variable(s) to the [Configure I/O] dialog box’s [High-Speed Counter]’s
[CounterTypeChange] item. (see image)
LT Type H I/O Setting User Manual
2–27
Chapter 2 – I/O Settings
2. The [CounterTypeChange] detailed settings should be like the drawing below,
i.e. when the “0” bit position’s bit is set to OFF, counting is UP, and when it is
set to ON, counting is DOWN. Also, when the “1” bit position is set to OFF
(0), the count trigger is the rising edge, and ON (1) is the falling edge.
15
Not used
a:Count Type
[0]:Count Up, [1]:Count Down
b:Count Edge
[0]:Rising Edge, [1]:Falling Edge
1
0
b
a
3. Allocate variables to the [General Item]’s [Special I/O Parameter Setting
Change Request] and [Special I/O Parameter Setting Change Completed]
items. (see image)
4. The [Special I/O Parameter Setting Change Request] detailed settings should be
like the drawing below, i.e. showing to which group counters are allocated. The
bits used will change, depending on how this allocation is set.
15
Not used
13
12
h
g
Not used
9
8
f
e
Not used
5
4
d
c
1
0
b
a
Not used
a:
Group 1 Special I/O Parameter Setting Change Request
c:
Group 2 Special I/O Parameter Setting Change Request
e:
Group 3 Special I/O Parameter Setting Change Request
g:
Group 4 Special I/O Parameter Setting Change Request
The readout of the operation bit for the previously set values is as follows.
2–28
b:
Group 1 Special I/O Parameter Setting Read Request
d:
Group 2 Special I/O Parameter Setting Read Request
f:
Group 3 Special I/O Parameter Setting Read Request
h:
Group 4 Special I/O Parameter Setting Read Request
LT Type H I/O Setting User Manual
Chapter 2 – I/O Settings
5. The following shows the details of the variable assigned to [SpecialI/
OParameterSettingChangeCompleted]. The monitoring bits vary depending on
the group to which the counter output is assigned.
a:
Group 1 Special I/O Parameter Setting Change Completed
c:
Group 2 Special I/O Parameter Setting Change Completed
e:
Group 3 Special I/O Parameter Setting Change Completed
g:
Group 4 Special I/O Parameter Setting Change Completed
The readout of the monitor bit for the previously set values is as follows.
b:
Group 1 Special I/O Parameter Setting Read Completed
d:
Group 2 Special I/O Parameter Setting Read Completed
f:
Group 3 Special I/O Parameter Setting Read Completed
h:
Group 4 Special I/O Parameter Setting Read Completed
6. The timing of the Special I/O Parameter Setting Change Request and the Completed flag is shown in the following chart.
Parameter Setting 1)
4)
Special I/O Parameter Setting
Change Request Flag
Special I/O Parameter Setting
Change Completed Flag
2)
3)
5)
Parameter Change
Time
1. Enter all count and count edge settings.
2. When the Special I/O Parameter Setting Change Request flag turns ON, the
parameter is changed.
3. After the parameter is changed, the completed flag is turned ON.
4. After confirming that the completion flag has turned ON, turn OFF the request flag.
5. The completion flag turns OFF after it is recognized that the request flag is
turned OFF.
LT Type H I/O Setting User Manual
2–29
Chapter 2 – I/O Settings
Up/Down Count Control
This feature starts or stops Up/Down counting. As mentioned previously, after parameters are set, [General Item | SpecialI/OControl] is used to start, or stop, the counter.
Setting Procedure
1) Allocate a variable to the [Configure I/O] area’s [General Item | SpecialI/OControl]
selection.
2) As shown below, depending on which group the variable in the [Special I/O
Control] selection is allocated to, the bit used will differ.
15
12 11
Group 4
8
Group 3
7
0
4 3
Group 2
Group 1
Turning the top bit (0 bit) in a group ON will start the feature, and OFF will stop it.
Bit 3
Bit 2
Bit 1
Bit 0
[1]: Operating, [0]:Stopped
Up/Down Count Status
This feature displays the status of the Up/Down counting.
Setting Procedure
1) Allocate a variable to the [Configure I/O] area’s [General Item | SpecialI/OStatus]
selection.
2–30
LT Type H I/O Setting User Manual
Chapter 2 – I/O Settings
2) As shown below, depending on which group the [Special I/O Control] counter’s
variable is allocated to, the bit used for monitoring will differ.
15
12 11
Group 4
8
7
Group 3
0
4 3
Group 2
Group 1
When the top bit (0 bit) in a group is 1, this feature is ON; when it is 0 it is OFF.
Bit 3
Bit 2
Bit 1
Bit 0
[1]: Monitor, [0]:Not Monitor
Clear Current Counter Value
This feature clears the current counter value. It can also check that the value has
been cleared. This feature can be used regardless of whether the counter is operating or stopped.
Setting Procedure
1) Allocate variables to the [Configure I/O] area’s [General Item | CounterInputOperation
ControlRequest] and [CounterInputOperationControlResponse] selections.
2) As shown below, depending on which group the variable in the [General Item |
Counter Input Operation Control Request] selection is allocated to, the bit used
will differ.
15
12 11
Group 4
8
Group 3
7
0
4 3
Group 2
Group 1
Turning the top bit (0 bit) in a group ON will clear the counter value.
Bit 3
Bit 2
Bit 1
Bit 0
[1]: Clearing data, [0]:Not clearing
LT Type H I/O Setting User Manual
2–31
Chapter 2 – I/O Settings
3) As shown below, depending on which group the variable in the [General Item |
Counter Input Operation Control Response] selection is allocated to, the monitoring bit used will differ.
15
12 11
Group 4
8
Group 3
7
0
4 3
Group 2
Group 1
Turning the top bit (0 bit) in a group ON will complete the counter clear.
Bit 3
Bit 2
Bit 1
Bit 0
[1]: counter clear completed,
[0]: counter clear not completed
1. The counter value is cleared when the Clear Perform flag is set to ON.
2. After the counter is cleared, the Clear Completed flag is set to ON.
3. After confirming that the Clear Completed flag is set to ON, the Clear Perform
flag is set to OFF.
4. After confirming that the Clear Perform flag is set to OFF, the Clear Completed
flag is set to OFF.
3)
Clear Perform Flag
1)
Clear Completed Flag
2)
4)
Counter Value Clear
Preload
When using the Preload feature, the counter’s current value can be easily changed
to any desired value. The Preload feature allows you to set a specific value from
where counting begins. Writing of this value can be done via an External Input, or
a Request Flag.
Preload Value
0
Preload Input
Time
Overview
Use the following steps to enter the Preload setting value.
1. Set the Preload value.
2. Use [Special I/O Parameter Setting Change Request] to enter the parameter.
3. Use [Special I/O Parameter Setting Change Completed] to check the parameter.
4. Use External Input, or a Request Flag to change/overwrite the value.
5. If External Input is used to change the value, use [Counter Input External Input
Completed Display] to check the value.
6. If Request Flag is used to change the value, use [Special I/O Status] to check the value.
2–32
LT Type H I/O Setting User Manual
Chapter 2 – I/O Settings
If the [Special I/O Parameter Setting Change Request] and [Special I/O
Parameter Setting Change Completed] features are used, they will be
reflected in all the parameters of the group being changed.
Preload Value Setting Method
To set the Preload value, click on the [Configure I/O] area’s [High-Speed Counter
| PreloadValue] selection.
Setting Procedure
1) Allocate a variable to the [Configure I/O] area’s [High-Speed Counter |
PreloadValue] selection.
2) Save the Preload variable’s value.
3) Allocate variables to the [Special I/O Parameter Setting Change Request] and
[Special I/O Parameter Setting Change Completed] selections.
4. The [Special I/O Parameter Setting Change Request] detailed settings should be
like the drawing below, i.e. showing to which group a counter is allocated. The
bits used will change, depending on how this allocation is set.
15
Not used
13
12
h
g
Not used
9
8
f
e
Not used
5
4
d
c
Not used
a:
Group 1 Special I/O Parameter Setting Change Request
c:
Group 2 Special I/O Parameter Setting Change Request
e:
Group 3 Special I/O Parameter Setting Change Request
g:
Group 4 Special I/O Parameter Setting Change Request
LT Type H I/O Setting User Manual
1
0
b
a
2–33
Chapter 2 – I/O Settings
The readout of the operation bit for the previously set values is as follows.
b:
Group 1 Special I/O Parameter Setting Read Request
d:
Group 2 Special I/O Parameter Setting Read Request
f:
Group 3 Special I/O Parameter Setting Read Request
h:
Group 4 Special I/O Parameter Setting Read Request
5. The following shows the details of the variable assigned to [SpecialI/
OParameterSettingChangeCompleted]. The monitoring bits vary depending on
the group to which the counter output is assigned.
15
Not used
13
12
h
g
Not used
9
8
f
e
Not used
5
4
d
c
1
0
b
a
Not used
a:
Group 1 Special I/O Parameter Setting Change Completed
c:
Group 2 Special I/O Parameter Setting Change Completed
e:
Group 3 Special I/O Parameter Setting Change Completed
g:
Group 4 Special I/O Parameter Setting Change Completed
The readout of the monitor bit for the previously set values is as follows.
b:
Group 1 Special I/O Parameter Setting Read Completed
d:
Group 2 Special I/O Parameter Setting Read Completed
f:
Group 3 Special I/O Parameter Setting Read Completed
h:
Group 4 Special I/O Parameter Setting Read Completed
6. The timing of the Special I/O Parameter Setting Change Request and the Completed flag is shown in the following chart.
Parameter Settings
1)
4)
Special I/O Parameter Setting
Change Request Flag
Special I/O Parameter Setting
Change Completed Flag
2)
3)
5)
Parameter Change
Time
1. Set the Preload value.
2. When the Special I/O Parameter Setting Change Request flag turns ON, the
parameter is changed.
3. After the parameter is changed, the completed flag is turned ON.
4. After confirming that the completion flag has turned ON, turn OFF the request flag.
5. The completion flag turns OFF after it is recognized that the request flag is
turned OFF.
2–34
LT Type H I/O Setting User Manual
Chapter 2 – I/O Settings
Using Remote Input or Request Flag to Enter/Change Values.
You can use either of two triggers to reset the current counter value - Remote
Input or Request Flag.
Remote Input Trigger
When the [Group Terminal Settings] feature is used to turn the designated preload
input terminal’s signal ON, this will write a new preload value. Also, after this
input signal is turned ON, you can then perform a value change completion check.
The procedure for this check is as follows.
Confirming Value Changes
1) Allocate a variable to the [Configure I/O] area’s [General Item | CounterInput
ExternalInputCompletedCheck] and [General Item | CounterInputExternal
InputCompleted Display] selections.
2) As shown below, depending on which group the variable in the [General Item |
Counter Input External Input Completed Display] selection is allocated to, the
monitoring bit used will differ.
15
Not used
12
11
8
7
4
3
0
d
Not used
c
Not used
b
Not used
a
a: Group1 preload completed
b: Group2 preload completed
c: Group3 preload completed
d: Group4 preload completed
LT Type H I/O Setting User Manual
2–35
Chapter 2 – I/O Settings
3) As shown below, depending on which group the variable in the [General Item |
Counter Input External Input Completed Check] selection is allocated to, the counter
bit used will differ.
15
Not used
12
11
8
7
4
3
0
d
Not used
c
Not used
b
Not used
a
a: Group1 preload completion check
b: Group2 preload completion check
c: Group3 preload completion check
d: Group4 preload completion check
4. The timing of the [General Item | Counter Input External Input Completed Display]
and the [General Item | Counter Input External Input Completed Check] is shown in
the following chart.
1)
External Input
Completed
Display Flag
Completed
Check Flag
2)
4)
3)
Time
1) When the External Input turns ON, the preload value is written.
2) After the write, Counter Input External Input Completed Display flag turns ON.
3) After confirming that the Counter Input External Input Completed Display flag has
turned ON, turn the Counter Input External Input Completed Check flag ON.
4) After the Counter Input External Input Completed Check flag ON is recognized,
the CounterInput External Input Completed Display flag is turned OFF.
Request Flag Trigger
1) Allocate a variable to the [Configure I/O] area’s [General Item |
CounterInputOperationControlRequest] and [General Item |
CounterInputOperationControlResponse] selections.
2–36
LT Type H I/O Setting User Manual
Chapter 2 – I/O Settings
2) As shown below, depending on which group the variable in the [General Item |
Counter Input Operation Control Request] selection is allocated to, the bit used
will differ.
15
12 11
8
Group 4
7
Group 3
0
4 3
Group 2
Group 1
Turning the 2nd bit in a group ON will perform the write.
Bit 3
Bit 2
Bit 1
Bit 0
[1]: Writing, [0]:Not writing
3) As shown below, depending on which group the variable in the [General Item |
Counter Input Operation Control Response] selection is allocated to, the bit
used for monitoring will differ.
15
12 11
Group 4
8
Group 3
7
0
4 3
Group 2
Group 1
Writing a “1” to the 2nd bit will signal the write is completed, and a “0” will say that it
is not completed.
Bit 3
Bit 2
Bit 1
Bit 0
[1]: Write completed, [0]:Not completed
3)
Write Execute Flag
1)
Write Completed
Flag
2)
4)
Write Execute
Time
1) Write will be executed when the Counter Input Operation Control Request flag
turns ON.
2) After writing, the Write Completed flag turns ON.
3) After confirming that the Write Completed flag is ON, turn the Write Execute
flag OFF.
4) After Write Execute flag is confirmed as being OFF, Write Completed flag also
turns OFF.
LT Type H I/O Setting User Manual
2–37
Chapter 2 – I/O Settings
Pre-strobe
The Pre-strobe feature is used to record (save) the current count value. Saving of
this value can be done via an External Input, or a Request Flag.
Overview
Use the following steps to enter the Pre-strobe setting value.
1. Designate the value used for saving the Counter value.
2. Save the value via an External Input, or a Request Flag.
3. If External Input is used to write the value, use [CounterInputExternal
InputCompletedDisplay] to check the value.
4. If Request Flag was used to write the value, use [SpecialI/OStatus] to check the
value.
If the [Special I/O Parameter Setting Change Request] and [Special I/O
Parameter Setting Change Completed] features are used, they will be
reflected in all the parameters of the group being changed.
2–38
LT Type H I/O Setting User Manual
Chapter 2 – I/O Settings
Setting procedure
To specify the location for storing the count value, assign a variable to [High-Speed
Counter | Pre-strobeValue] in the [Configure I/O] dialog box. This variable stores the
count value.
Two methods exist for triggering the storage of the count value: use either an external
input or a request flag.
Trigger with an external input:
The count value is stored in the specified variable when the signal from the pre-strobe
input terminal specified in [Group Terminal Setting] turns ON.
You can determine whether the storage is successfully completed by checking whether
the signal from the pre-strobe input terminal specified in [Group Terminal Setting] has
turned ON. The setting procedure is as follows:
Confirm the completion of the storage
1. Assign variables to [General Item | CounterInputExternalInputCompletedDisplay]
and [General Item | CounterInputExternalInputCompletedCheck] in the [ConfigI/O]
dialog box.
2. The following shows the details of the variable assigned to [Counter Input External
Input Completed Display]. The monitoring bits vary depending on the group to which
the counter is assigned.
15
Not used
12 11
d
Not used
8 7
c
Not used
4 3
0
b
a
Not used
a: Group 1 Pre-strobe Completed
b: Group 2 Pre-strobe Completed
c: Group 3 Pre-strobe Completed
d: Group 4 Pre-strobe Completed
LT Type H I/O Setting User Manual
2-39
Chapter 2 – I/O Settings
3. The following shows the details of the variable assigned to [Counter Input External
Input Completed Check]. The operation bits vary depending on the group to which
the counter is assigned.
15
12 11
Not used
d
8
Not used
7
c
Not used
4
3
0
b
Not used
a
a: Group 1 Preload Completion Confirmed
b: Group 2 Preload Completion Confirmed
c: Group 3 Preload Completion Confirmed
d: Group 4 Preload Completion Confirmed
4. The following is the timing chart for [Counter Input External Input Completed Display] and [Counter Input External Input Completed Check].
1)
External input
External counter input
completion display flag
External counter input
completion confirmation flag
2)
4)
3)
Time
1) When the external input is turned ON, the count value is stored in the specified
variable.
2) After the value has been stored, the external counter input completion display flag
turns ON.
3) After confirming that the external counter input completion display flag has turned
ON, turn ON the external counter input completion confirmation flag.
4) The external counter input completion display flag turns OFF after it has been
recognized that the external counter input completion confirmation flag has turned
ON.
2-40
LT Type H I/O Setting User Manual
Chapter 2 – I/O Settings
Trigger via request flag
1. Assign a variable to [General Item | CounterInputOperationControlRequest] in the
[Configure I/O] dialog box.
2. The following shows the details of the variable assigned to [Counter Input Operation
Control Request]. The operation bits vary depending on the group to which the
counter is assigned.
15
12 11
Group 4
8 7
Group 3
4 3
Group 2
0
Group 1
When bit 3 of each group turns ON, the current count value is written.
Bit 3
Bit 2
Bit 1
Bit 0
[1]: Write,
[0]: Do Not Write
3. The following shows the details of the variable assigned to [Counter Input Operation
Control Response]. The monitoring bits vary depending on the group to which the
counter is assigned.
15
12 11
Group 4
8 7
Group 3
4 3
Group 2
0
Group 1
When bit 3 of each group is "1", the count value has been written. When it is "0", the
count value has not been written.
Bit 3
Bit 2
Bit 1
Bit 0
[1]: Written,
[0]: Not Written
LT Type H I/O Setting User Manual
2-41
Chapter 2 – I/O Settings
3)
Write Execute Flag
1)
Write Completed
Flag
2)
Write Execute
4)
Time
1) Write is executed when the Counter Input Operation Control flag is set ON.
2) After write is completed, the Write Completed flag is set ON.
3) After Write Completed Flag ON is confirmed, turn Write Execute flag OFF.
4) After Write Execute Flag OFF is confirmed, Write Completed flag turns OFF.
Synch. output
Synch. output is designed to output (turns) ON (or OFF) when the Counter Input value
exceeds the ON Preset value, or output (turns) OFF (or ON) when the Input value
exceeds the OFF Preset value.
The timing of this output, since it is designed to only output (change status) when the
counter value either exceeds the ON preset or exceeds the OFF preset, will maintain
this condition even if the Counter value is changed via the Preload Input or the Count
Value Clear Input.
Also, during Synch. Output, even if the Special I/O Control Request's Synch. Output
Enable/Disable Flag turns ON (or if the flag's ON conditions are met), Synch. Output
will not turn ON.
Counting up
Counting down
OffPreset
OffPreset
OnPreset
OnPreset
0
0
Synch. output
Synch. output
Time
Time
Summary
The following is a summary of the setting procedure for the Synch. output function.
1. Specify the OnPreset and OffPreset values.
2. Set the parameters with [Special I/O Parameter Setting Change Request].
3. Check that the parameters are changed with [Special I/O Parameter Setting Change
Completed].
4. Start the output with [Special I/O Control].
5. Confirm the result with [Special I/O Status].
The [Special I/O Parameter Setting Change Request] and [Special I/O
Parameter Setting Change Completed] features are reflected in all the
parameters in a single group.
2-42
LT Type H I/O Setting User Manual
Chapter 2 – I/O Settings
Preset Value Setting Procedure
1. Assign variables to [OnPresetValue] and [OffPresetValue] in the [High-Speed
Counter] of the [Configure I/O] dialog box.
2. Store count values in the variables assigned for the OnPreset and OffPreset values.
3. Assign variables to [General Item | Special I/O Parameter Setting Change Request]
and [General Item | Special I/O Parameter Setting Change Completed].
4. The following shows the details of the variable assigned to [Special I/O Parameter
Setting Change Request]. The operation bits vary depending on the group to which
the counter output is assigned.
15
Not used
13
12
h
g
Not used
9
8
f
e
Not used
5
4
d
c
Not used
1
0
b
a
a: Group 1 Special I/O Parameter Setting Change Request
c: Group 2 Special I/O Parameter Setting Change Request
e: Group 3 Special I/O Parameter Setting Change Request
g: Group 4 Special I/O Parameter Setting Change Request
The trigger bits for activating reading of the preset value are as follows:
b: Group 1 Special I/O Parameter Setting Read Request
d: Group 2 Special I/O Parameter Setting Read Request
f: Group 3 Special I/O Parameter Setting Read Request
h: Group 4 Special I/O Parameter Setting Read Request
LT Type H I/O Setting User Manual
2-43
Chapter 2 – I/O Settings
5. The following shows the details of the variable assigned to [Special I/O Parameter
Setting Change Completed]. The monitoring bits vary depending on the group to
which the counter output is assigned.
15
Not used
13
12
h
g
Not used
9
8
f
e
Not used
5
4
d
c
Not used
1
0
b
a
a: Group 1 Special I/O Parameter Setting Change Compeleted
c: Group 2 Special I/O Parameter Setting Change Compeleted
e: Group 3 Special I/O Parameter Setting Change Compeleted
g: Group 4 Special I/O Parameter Setting Change Compeleted
The trigger bits for activating reading of the preset value are as follows:
b: Group 1 Special I/O Parameter Setting Read Compeleted
d: Group 2 Special I/O Parameter Setting Read Compeleted
f: Group 3 Special I/O Parameter Setting Read Compeleted
h: Group 4 Special I/O Parameter Setting Read Compeleted
6. The following is the timing chart for the request and completion flags for changing the
special I/O parameter.
Parameter setting 1)
4)
Special I/O parameter setting
change request flag
2)
Special I/O parameter setting
change completion flag
3)
Parameter is changed.
5)
Time
1) Specify the ON-preset and OFF-preset values.
2) When the special I/O parameter setting change request flag is turned ON, the
parameter is changed.
3) After the parameter has been changed, the completion flag turns ON.
4) After confirming that the completion flag has turned ON, turn OFF the request
flag.
5) The completion flag turns OFF after it is recognized that the request flag is turned
OFF.
2-44
LT Type H I/O Setting User Manual
Chapter 2 – I/O Settings
Preset Value Alarm Status
This is used to display the Synch. Output On or Off Preset Value's alarm status. When
#IOStatus shows error code 842, a High speed Counter Parameter Setting alarm will
appear. (When any of this item's bits turns ON.)
When any of the previously explained Special I/O Parameters are changed,
if the Preset value is set as a disabled value, operation will continue using the current parameter.
Setting Method
1. Allocate a variable to the [Configure I/O]'s [General Item | Special I/O Setting Alarm
DisplayB] selection.
2. The [General Item | Special I/O Setting Alarm Display B] settings are as follows and
the bits monitored will depend on which group the counter is allocated to.
15
Not us ed
a: Group 1 Counter Preset Value alarm
3
2
1
0
d
c
b
a
[1]: On Preset and Off Preset use same value
[0]: Normal
b: Group 2 Counter Preset Value alarm
[1]: On Preset and Off Preset use same value
[0]: Normal
c: Group 3 Counter Preset Value alarm
[1]: On Preset and Off Preset use same value
[0]: Normal
d: Group 4 Counter Preset Value alarm
[1]: On Preset and Off Preset use same value
[0]: Normal
LT Type H I/O Setting User Manual
2-45
Chapter 2 – I/O Settings
Controlling the Synch. output operation
You can enable or disable the Synch. output.
Setting procedure
1. Assign a variable to [General Item | SpecialI/OControl] in the [Configure I/O] dialog
box.
2. The following shows the details of the variable assigned to [Special I/O Control]. The
operation bits vary depending on the group to which the counter is assigned.
15
12 11
Group 4
8 7
Group 3
4 3
Group 2
0
Group 1
The Synch. output starts when the first bit is turned ON, and stops when the first bit
is turned OFF.
Bit 3
Bit 2
Bit 1
Bit 0
[1]: Enable, [0]: Disable
Synch. output status
The status of the Synch. output (enabled or disabled) can be determined.
Setting procedure
1. Assign a variable to [General Item | SpecialI/OStatus] in the [Configure I/O] dialog
box.
2-46
LT Type H I/O Setting User Manual
Chapter 2 – I/O Settings
2. The following shows the details of the variable assigned to [Special I/O Status]. The
monitoring bits vary depending on the group to which the counter output is assigned.
15
12 11
Group 4
8 7
Group 3
4 3
Group 2
0
Group 1
When bit 0 of each group is "1", Synch. output is enabled. When it is "0", Synch.
output is disabled.
Bit 3
Bit 2
Bit 1
Bit 0
[1]: Enabled
[0]: Disabled
Clearing outputs during Synch. output
You can suspend the output while the Synch. output operation is enabled. You can also
determine whether the Synch. output has been successfully cleared.
Setting procedure
1. Assign variables to [General Item | CounterInputOperationControlRequest] and
[General Item | CounterInputOperationControlResponse] in the [Configure I/O]
dialog box.
2. The following shows the details of the variable assigned to [Counter Input Operation
Control Request]. The operation bits vary depending on the group to which the
counter is assigned.
15
12 11
Group 4
8 7
Group 3
4 3
Group 2
0
Group 1
When bit 1 of each group is turned ON, the Synch. output is turned OFF.
Bit 3
Bit 2
Bit 1
Bit 0
[1]: Clear synch. output,
[0] Do not clear synch. output
LT Type H I/O Setting User Manual
2-47
Chapter 2 – I/O Settings
3. The following is the timing chart for the Synch. output operation control and the
Synch. output clear flags.
Synch. output operation
control flag
Synch. output
Synch. output clear flag
Time
4. The following shows the details of the variable assigned to [Counter Input Operation
Control Response]. The monitoring bits vary depending on the group to which the
counter is assigned.
15
12 11
Group 4
8 7
Group 3
4 3
Group 2
0
Group 1
When bit 1 of each group is "1", the Synch. output has been cleared. When it is "0",
the Synch. output has not been cleared.
Bit 3
Bit 2
Bit 1
Bit 0
[1]: Cleared, [0]: Not cleared
2-48
LT Type H I/O Setting User Manual
Chapter 2 – I/O Settings
Synch. output status
You can check the Synch. output status of output terminals Y0 through Y3.
Setting procedure
1. Assign a variable to [General Item | SpecialI/OOutputStatusDisplay ] in the [Configure I/O] dialog box.
2. The following shows the details of the variable assigned to [Special I/O Output
Status Display ]. The monitoring bits vary depending on the group to which the
counter output is assigned.
15
12
Not used
d
8
Not used
a: Group 1 Output Status
b: Group 2 Output Status
c: Group 3 Output Status
d: Group 4 Output Status
LT Type H I/O Setting User Manual
4
c
Not used
b
0
Not used
[1]:
Output being produced
[0]:
No output
[1]:
Output being produced
[0]:
No output
[1]:
Output being produced
[0]:
No output
[1]:
Output being produced
[0]:
No output
a
2-49
Chapter 2 – I/O Settings
2.2.72.7 High-Speed Counter (2-phase)
The 2-phase Counter is a counter that occupies two input terminals (X0 and X2) to
measure 2-phase Input signals. The terminal arrangement to be assigned is slightly
different from that of the Single-phase Counter, since the 2-phase counter occupies
input terminal X0 of group 1 and X2 of group 2. The functions and setting of the
Preload Input, Pre-strobe Input and Synch. Output are the same as those of the
Single-phase Counter.
"2.2.6 High-speed counter (single-phase)"
The 2-phase Counter offers four measurement modes, "Phase Calculation mode 0"
through "Phase Calculation mode 3."
Phase Calculation mode 0
When the phase of input 1A leads the phase of input 1B, the counter operates as an up
counter. When the phase of input 1A lags the phase of input 1B, the counter operates as
a down counter.
Input 1A
Input 1B
Count value
Time
When the phase of input 1A precedes the phase of input 1B
Input 1A
Input 1B
Operation
1 (High)
0 (Low)
Falling edge
Rising edge
Rising edge
Falling edge
1 (High)
0 (Low)
Counting Up
When the phase of input 1A lags the phase of input 1B
2-50
Input 1A
Input 1B
Operation
0 (Low)
1 (High)
Falling edge
Rising edge
Rising edge
Falling edge
0 (Low)
1 (High)
Counting Down
LT Type H I/O Setting User Manual
Chapter 2 – I/O Settings
Phase Calculation mode 1
The counter increments/decrements at the rising edge of input 1A. When input 1B is 0
(Low), the counter operates as an up counter. When input 1B is 1 (High), the counter
operates as a down counter.
Input 1A
Input 1B
Count value
Time
Input 1A
Input 1B
1 (High)
0 (Low)
F alling edge
Rising edge
0 (Low)
1 (High)
F alling edge
Rising edge
Rising edge
F alling edge
1 (High)
0 (Low)
Rising edge
F alling edge
0 (Low)
1 (High)
Ope ra tion
No c ount
Counting Up
No c ount
Counting Down
Phase Calculation mode 2
When input 1B is 0 (Low) at the rising edge of input 1A, the counter operates as an up
counter. When input 1A is 0 (Low) at the rising edge of input 1B, the counter operates
as a down counter.
Input 1A
Input 1B
Count value
Time
Input 1A
Input 1B
1 (High)
0 (Low)
Falling edge
Rising edge
0 (Low)
1 (High)
Falling edge
Rising edge
Rising edge
Falling edge
1 (High)
0 (Low)
Rising edge
Falling edge
0 (Low)
1 (High)
LT Type H I/O Setting User Manual
Operation
No count
Counting Up
Counting Down
No count
2-51
Chapter 2 – I/O Settings
Phase Calculation mode 3
The counter increments/decrements at the rising and falling edges of input 1B. When
input 1A leads input 1B, the counter operates as an up counter. When input 1A lags
input 1B, the counter operates as a down counter.
Input 1A
Input 1B
Count value
Time
When the phase of input 1A leads the phase of input 1B
Input 1A
Input 1B
1 (High)
0 (Low)
Falling edge
Rising edge
Rising edge
Falling edge
1 (High)
0 (Low)
Operation
Counting Up
Not counting
When the phase of input 1A lags the phase of input 1B
Input 1A
Input 1B
0 (Low)
1 (High)
Falling edge
Rising edge
Rising edge
Falling edge
0 (Low)
1 (High)
Operation
Counting Down
Not counting
Phase Calculation Mode Setup
1. Double-click ont the [Configure I/O] dialog box’s [High-Speed Counter [Group
1]] setting, or, click once on the [High-Speed Counter [Group 1]] setting and click
on the [Setup] button. (see image)
2-52
LT Type H I/O Setting User Manual
Chapter 2 – I/O Settings
2. The [High-Speed Counter Setup] dialog box appears. Counter Value and/or Synch
Output Hold is set by selecting the checkbox and clicking [OK].
2.2.5 High-speed counter (Common Settings)
Marker Input
The counter value can be cleared with an external input signal while the 2-phase
Counter is operating. You can also determine whether the counter value has been
successfully cleared.
Terminals assigned for the marker input
The input terminal that can be assigned to the Marker Input (external input signal) is only
terminal X3 of "Counter 1Z" shown below.
Terminal configuration of group 2 when the 2-phase Counter is used
No.
1
2
3
4
5
6
X2
X3
Counter Input 1Z
(Marker Input)
Counter 1B
Standard Input
Y1
Standard Output
PWM Output
Pulse Output
Standard Output
PWM Output
Pulse Output
Confirming marker input
1. Assign variables to [General Item | CounterInputExternalInputCompletedDisplay]
and [General Item | CounterInputExternalInputCompletedCheck ] of the [Configure
I/O] dialog box.
LT Type H I/O Setting User Manual
2-53
Chapter 2 – I/O Settings
2. Bit 1 of the variable assigned to [Counter Input External Input Completed Display]
acts as the input operation completion flag.
15
12 11
Not used
8
7
Not used
4
3
1
Not used
a
Not used
0
a: Completion of Marker Input operation of 2-phase Counter Input
3. Bit 1 of the variable assigned to [Counter Input External Input Completed Check]
acts as the input operation completion confirmation flag.
15
12 11
Not used
8
7
Not used
4
3
1
Not used
a
Not used
0
a: Confirmation of completion of Marker Input operation of 2-phase Counter Input
4. The following is the timing chart of [Counter Input External Input Completed Display]
and [Counter Input External Input Completed Check].
1)
Marker Input
Counter Input External Input
Completed Display Flag
Counter Input External Input
Completed Check Flag
2)
4)
3)
Time
1) When the Marker Input turns ON, the count value is cleared.
2) After the count value has been cleared, the Counter Input External Input Completed Display flag turns ON.
3) After confirming that the Counter Input External Input Completed Display flag has
turned ON, turn ON the Counter Input External Input Completed Check flag.
4) The Counter Input External Input Completed Display flag turns OFF after the
Counter Input External Input Completed Check flag's ON condition is detected.
2-54
LT Type H I/O Setting User Manual
Chapter 2 – I/O Settings
2.2.8
PWM Output
PWM Output is a function that outputs signals at the specified Output Frequency at a
specified On Duty ratio. Up to four output channels can be used for PWM Output and
each channel can be specified individually.
Summary
The following is a summary of the setting procedure for PWM Output.
1. Specify the Output Frequency and On Duty value.
2. Set the parameters with [Special I/O Parameter Setting Change Request].
3. Check the parameters with the [Special I/O Parameter Setting Change Completed]
feature.
4. Start the output with [Special I/O Control].
5. Confirm the output with [Special I/O Status].
The [Special I/O Parameter Setting Change Request] and [Special I/O
Parameter Setting Change Completed] features are reflected in all the
parameters in a single group.
Output Frequency
Specify the output frequency. The available range is from 10Hz to 2.5kHz.
Setting procedure
1. Assign a variable to [OutputFrequency] of [PWM Output] in the [Configure I/O]
dialog box.
2. Store a desired frequency value in the variable assigned for [Output Frequency].
LT Type H I/O Setting User Manual
2-55
Chapter 2 – I/O Settings
OnDuty
OnDuty is the ratio between the ON time and OFF time of a pulse, specified as a
percentage (%).
OnDuty is changed.
Frequency
Output Frequency and
OnDuty are changed.
OnDuty
Output pulse
Time
OnDuty ratio Effective range
The higher the frequency, the less the output waveform resembles the intended form
specified with the OnDuty ratio. Therefore, if the Output Frequency is high, correct the
output waveform by setting the OnDuty value within the effective range.
Calculation of the effective range
Use the following expression to obtain the upper and lower limit values for the effective
range of the OnDuty Value:
Upper limit value: 100 - Hardware delay time (µs) x Frequency
Lower limit value: Hardware delay time (µs) x Frequency
The hardware delay time is the total of the ON -> OFF time (Time required for the
voltage to drop to 2.4 V, or 10% of 24 V) and the OFF -> ON time (time required
for the voltage to increase to 21.6 V, or 90% of 24 V).
Example: When the hardware delay time is 40 µs and the output frequency is 2000Hz:
Upper limit value: 100 - 40 x 10-4 x 2000 = 92 (%)
Lower limit value: 40 x 10-4 x 2000 = 8 (%)
Thus, the effective range of the OnDuty value is 8 to 92%.
2-56
LT Type H I/O Setting User Manual
Chapter 2 – I/O Settings
Setting procedure
1. Assign a variable to [OnDutyValue] in [PWM Output] of the [Configure I/O] dialog
box.
2. Store the OnDuty value in the variable that is assigned to the [On Duty Value].
Confirming the parameter change request and parameter
change completion.
The parameters for the Output Frequency and OnDuty value are changed with [Special
I/O Parameter Setting Change Request].
Setting procedure
1. Assign variables to [General Item | SpecialI/OParameterSettingChangeRequest] and
[General Item | SpecialI/OParameterSettingChangeCompleted] in the [Configure I/
O] dialog box.
LT Type H I/O Setting User Manual
2-57
Chapter 2 – I/O Settings
2. The following shows the details of the variable assigned to [Special I/O Parameter
Setting Change Request]. The operation bits vary depending on the group to which
the PWM Output is assigned.
15
Not used
13
12
h
g
Not used
9
8
f
e
Not used
5
4
d
c
Not used
1
0
b
a
a: Group 1 special I/O parameter setting change request
c: Group 2 special I/O parameter setting change request
e: Group 3 special I/O parameter setting change request
g: Group 4 special I/O parameter setting change request
The trigger bits for activating reading of the preset value are as follows:
b: Group 1 special I/O parameter setting read request
d: Group 2 special I/O parameter setting read request
f: Group 3 special I/O parameter setting read request
h: Group 4 special I/O parameter setting read request
3. The following shows the details of the variable assigned to [Special I/O Parameter
Setting Change Completed]. The monitoring bits vary depending on the group to
which the PWM Output is assigned.
15
Not used
13
12
h
g
Not used
9
8
f
e
Not used
5
4
d
c
Not used
1
0
b
a
a: Group 1 special I/O parameter setting change completion
c: Group 2 special I/O parameter setting change completion
e: Group 3 special I/O parameter setting change completion
g: Group 4 special I/O parameter setting change completion
The trigger bits for activating reading of the preset value are as follows:
b: Group 1 special I/O parameter setting read completion
d: Group 2 special I/O parameter setting read completion
f: Group 3 special I/O parameter setting read completion
h: Group 4 special I/O parameter setting read completion
2-58
LT Type H I/O Setting User Manual
Chapter 2 – I/O Settings
4. The following is the timing chart for the request and completion flags for changing the
special I/O parameter.
Parameter Settings 1)
4)
Special I/O parameter setting
change request flag
Special I/O Parameter Setting
Change Completion flag
2)
3)
5)
Parameter change
Time
1) Set the Output Frequency and the OnDuty values.
2) When the special I/O parameter setting change request flag is turned ON, the
parameter is changed.
3) After the parameter has been changed, the completion flag turns ON.
4) After confirming that the completion flag has turned ON, turn OFF the request
flag.
5) The completion flag turns OFF after it is recognized that the request flag is turned
OFF.
PWM Output alarm status
Displays the Alarm status of the Output Frequency and OnDuty Value of the PWM
Output. When the #IOStatus shows an error code of 842, a PWM Output parameter
setting alarm will appear (one of this feature's bits will turn ON.)
When any of the previously explained Special I/O Parameters are changed,
if the Preset value is set as a disabled value, operation will continue using the current parameter.
Setting procedure
1. Assign a variable to [General Item | SpecialI/OSettingAlarmDisplayA] in the [Configure I/O] dialog box.
LT Type H I/O Setting User Manual
2-59
Chapter 2 – I/O Settings
2. The following shows the details of the variable assigned to [Special I/O Setting Alarm
Display A]. The monitoring bits vary depending on the group to which the PWM
output is assigned.
15
7
Not used
6
h
5
4
3
2
1
0
g
f
e
d
c
b
a: Alarm Output Frequency for Group 1 PWM Output [1]: Exceeds 2.5kHz
[0]: Normal
b: Alarm OnDuty Value for Group 1 PWM Output
[1]: Out of effective ONduty range,
[0]: Normal
c: Alarm Output Frequency for Group 2 PWM Output [1]: Exceeds 2.5kHz
[0]: Normal
d: Alarm OnDuty Value for Group 2 PWM Output
[1]: Out of effective ONduty range
[0]: Normal
e: Alarm Output Frequency for Group 3 PWM Output [1]: Exceeds 2.5kHz
[0]: Normal
f: Alarm OnDuty Value for Group 3 PWM Output
[1]: Out of effective ONduty range
[0]: Normal
g: Alarm Output Frequency for Group 4 PWM Output [1]: Exceeds 2.5kHz,
[0]: Normal
h: Alarm OnDuty Value for Group 4 PWM Output
[1]: Out of effective ONduty range
[0]: Normal
2-60
LT Type H I/O Setting User Manual
Chapter 2 – I/O Settings
PWM Output control
Starts or stops PWM Output.
Setting procedure
1. Assign a variable to [General Item | SpecialI/OControl] in the [Configure I/O] dialog
box.
2. The following shows the details of the variable assigned to [Special I/O Control]. The
operation bits vary depending on the group to which the PWM Output is assigned.
15
12 11
8 7
Group 4
Group 3
4 3
Group 2
0
Group 1
PWM output starts when the first bit (bit 0) is turned ON, and stops when the first
bit is turned OFF.
Bit 3
Bit 2
Bit 1
Bit 0
[1]: Start, [0]: Stop
PWM Output status
The status of PWM Output can be checked.
Setting procedure
1. Assign a variable to [General Item | SpecialI/OStatus] in the [Configure I/O] dialog
box.
LT Type H I/O Setting User Manual
2-61
Chapter 2 – I/O Settings
2. The following shows the details of the variable assigned to [Special I/O Status]. The
monitoring bits vary depending on the group to which the PWM Output is assigned.
15
12 11
Group 4
8 7
Group 3
4 3
0
Group 2
Group 1
When the first bit (bit 0) is "1", the PWM Output is in operation. When it is "0", the
PWM Output is stopped.
Bit 3
Bit 2
Bit 1
Bit 0
[1]: In Operation, [0]: Stopped
PWM Output terminal status
You can determine the status of PWM Output for output terminals Y0 through Y3.
Setting procedure
1. Assign a variable to [General Item | SpecialI/OOutputStatusDisplay] in the [Configure I/O] dialog box.
2. The following shows the details of the variable assigned to [Special I/O Output
Status Display ]. The monitoring bits vary depending on the group to which PWB
Output is assigned.
15
12
Not used
d
8
Not used
a: Group 1 Output Status
b: Group 2 Output Status
c: Group 3 Output Status
d: Group 4 Output Status
2-62
4
c
Not used
b
0
Not used
[1]:
Output being produced
[0]:
No output
[1]:
Output being produced
[0]:
No output
[1]:
Output being produced
[0]:
No output
[1]:
Output being produced
[0]:
No output
a
LT Type H I/O Setting User Manual
Chapter 2 – I/O Settings
2.2.9
Normal Pulse Output
Two types of pulse output are available: Normal Pulse Output, which outputs the
specified number of pulses at the specified frequency; and Acceleration/Deceleration
Speed Pulse Output, which gradually increases frequencies until the specified frequency
is reached.
"2.2.10 Acceleration/Deceleration Speed Pulse Output"
Connecting a CW, CCW stepping motor or servo amp, a positioning control motor can
be operated.
Summary
The following is a summary of the setting procedure for pulse output.
1. Specify the output frequency and the number of output pulses.
2. Request the change of parameters with [Special I/O Parameter Setting Change
Request].
3. Request the check of parameter change with [Special I/O Parameter SettingChange
Completed].
4. Start the output with [Special I/O Control].
5. Check the output with [Special I/O Status].
• The [Special I/O Parameter Setting Change Request] and [Special I/O
Parameter Setting Change Completed] features are reflected in all the
parameters in a single group.
• The pulse output default frequency is 10Hz.
• If pulse output is turned from OFF to ON, then from ON to OFF, a single
output is produced. Even though the output pulse amount’s count is
updated using ON to OFF timing, if pulse output is used for a forced
stop, the forced stop pulse may not be counted, due to the need to
stop the operation immediately.
Output Frequency
Specify the Output Frequency. The available range is between 10Hz and 5kHz. When
several groups are used for pulse output, the total Output Frequency must not exceed
5kHz.
Also, while two types of pulses, normal and Accel/Decel, can be set for a group, the
Output Frequency total check will use whichever value is larger, the Accel/Decel Speed
Pulse Frequency or the Normal Pulse Output's Output Frequency.
"2.2.10 Acceleration/Deceleration Speed Pulse Output"
LT Type H I/O Setting User Manual
2-63
Chapter 2 – I/O Settings
Example of Pulse Output Output Frequency Parameter Changes
Group
1
2
3
4
Initial Setting
Parameter Change
Actual Frequency After
Parameter Change
Frequency (Hz)
500
1000
1500
2000
Frequency (Hz)
2000
NG
1500
NG
1000
OK
500
OK
Frequency (Hz)
500
1000
1000
500
When the above parameter changes are made, the following actions occur.
Initial Settings and then Table Creation
1. When "2000Hz" is set for Group 1, the total output frequency at this time (6500Hz)
exceeds the allowed maximum of 5000Hz, and therefore the unit operates at the
initial setting of 500Hz.
2000 + 1000 (Group 2:Initial) + 1500 (Group 3:Initial) + 2000 (Group 4:Initial) = 6500
2. When "1500Hz" is set for Group 2, the total output frequency at this time (5500Hz)
exceeds the allowed maximum of 5000Hz, and therefore the unit operates at group
2's initial setting of 1000Hz and 1500Hz is not used.s
500 (Group 1:Initial) + 1500 + 1500 (Group 3:Initial) + 2000 (Group 4:Initial) = 5500
3. When "1000Hz" is set for Group 3, the total output frequency at this time (4500Hz)
is within the allowed maximum of 5000Hz, and therefore the unit operates at the new
setting of 1000Hz.
500(Group 1:Initial) + 1000 (Group 2:Initial) + 1000 + 2000 (Group 4:Initial) = 4500
4. When "500Hz" is set for Group 4, the total output frequency at this time (3000Hz) is
within the allowed maximum of 5000Hz, and therefore the unit operates at the new
setting of 500Hz.
500(Group 1:Initial) + 1000 (Group 2:Initial) + 1000(Group 3:Initial) + 500 = 3000
Setting procedure
1. Assign a variable to [OutputFrequency] of [Pulse Output] in the [Configure I/O]
dialog box.
2. Store the value of the output frequency in the variable assigned for [Output Frequency]. Store the value of the number of output pulses in the variable assigned for
[Output Pulse Count].
2-64
LT Type H I/O Setting User Manual
Chapter 2 – I/O Settings
Number of output pulses
You can specify the number of pulses to be output. The available range is from 0 to
65535.
If the number of output pulses is changed during pulse output and the
specified value is less than the number of pulses that have been output
by that time, pulse output will stop.
Setting procedure
1. Assign variables to [OutputFrequency] and [OutputPulseCount] of [Pulse Output] in
the [Configure I/O] dialog box.
2. Store the value for the number of output pulses in the variable assigned for [Output
Pulse Count].
Confirming parameter change request and parameter
change completion
The parameters for the output frequency and the number of output pulses are changed
with [Special I/O Parameter Setting Change Request].
Setting procedure
1. Assign variables to [General Item | SpecialI/OParameterSettingChangeRequest] and
[General Item | SpecialI/OParameterSettingChangeCompleted] in the [Configure I/
O] dialog box.
LT Type H I/O Setting User Manual
2-65
Chapter 2 – I/O Settings
2. The following shows the details of the variable assigned to [Special I/O Parameter
Setting Change Request]. The operation bits vary depending on the group to which
the pulse output is assigned.
15
Not used
13
12
h
g
Not used
9
8
f
e
Not used
5
4
d
c
Not used
1
0
b
a
a: Group 1 Special I/O parameter Setting Request
c: Group 2 Special I/O parameter Setting Request
e: Group 3 Special I/O parameter Setting Request
g: Group 4 Special I/O parameter Setting Request
The trigger bits for activating reading of the preset value are as follows:
b: Group 1 Special Parameter Setting Read Request.
d: Group 2 Special Parameter Setting Read Request.
f: Group 3 Special Parameter Setting Read Request.
h: Group 4 Special Parameter Setting Read Request.
3. The following shows the details of the variable assigned to [Special I/O Parameter
Setting Change Completed]. The monitoring bits vary depending on the group to
which the pulse output is assigned.
15
Not used
13
12
h
g
Not used
9
8
f
e
Not used
5
4
d
c
Not used
1
0
b
a
a: Group 1 Special I/O Parameter Setting Change Completed
c: Group 2 Special I/O Parameter Setting Change Completed
e: Group 3 Special I/O Parameter Setting Change Completed
g: Group 4 Special I/O Parameter Setting Change Completed
The trigger bits for activating reading of the preset value are as follows:
b: Group 1 Special I/O Parameter Setting Read Completed.
d: Group 2 Special I/O Parameter Setting Read Completed.
f: Group 3 Special I/O Parameter Setting Read Completed.
h: Group 4 Special I/O Parameter Setting Read Completed.
2-66
LT Type H I/O Setting User Manual
Chapter 2 – I/O Settings
4. The following is the timing chart for the request and completion flags for changing the
special I/O parameter.
Parameter setting
1)
4)
Special I/O parameter setting
change request flag
2)
Special I/O Parameter Setting
Change Completed flag
3)
Parameter is changed.
5)
Time
1) Set the Output Frequency and the Output Pulse count.
2) When the special I/O parameter setting change request flag is turned ON, the
parameter is changed.
3) After the parameter has been changed, the completion flag turns ON.
4) After confirming that the completion flag has turned ON, turn OFF the request
flag.
5) The completion flag turns OFF after the request flag OFF condition is detected.
Pulse Output Alarm Status
This feature allows you to determine the alarm status of the Output Frequency, as well
as the Total Pulse Output Frequency.
Setting procedure
1. Assign a variable to [General Item | SpecialI/OSettingAlarmDisplayA] in the [Configure I/O] dialog box.
LT Type H I/O Setting User Manual
2-67
Chapter 2 – I/O Settings
2. The following shows the details of the variable assigned to [Special I/O Setting Alarm
Display A]. The monitoring bits vary depending on the group to which the pulse
output is assigned.
15
e
Not used
11
10
9
8
d
c
b
a
a: Group 1 Pulse Output Frequency Alarm
0
[1]: Exceeds 5kHz
[0]: Normal
b: Group 1 Pulse Output Frequency Alarm
[1]: Exceeds 5kHz
[0]: Normal
c: Group 1 Pulse Output Frequency Alarm
[1]: Exceeds 5kHz
[0]: Normal
d: Group 1 Pulse Output Frequency Alarm
[1]: Exceeds 5kHz
[0]: Normal
e: Pulse Output Total Frequency Alarm
[1]: Total frequency exceeds 5kHz
[0]: Normal
Normal pulse output control
Starts or stops pulse output.
Setting procedure
1. Assign a variable to [General Item | SpecialI/OControl] in the [Configure I/O] dialog
box.
2-68
LT Type H I/O Setting User Manual
Chapter 2 – I/O Settings
2. The following shows the details of the integer variable assigned to [Special I/O
Control]. The operation bits vary depending on the group to which the counter is
assigned.
15
12 11
Group 4
8 7
Group 3
4 3
0
Group 2
Group 1
The pulse output starts when the first bit (bit 0) of each group is turned ON, and
stops when the first bit is turned OFF.
Bit 3
Bit 2
Bit 1
Bit 0
[1]: Start, [0]: Stop
Normal pulse output status and completion status
You can check the status of operation and the status of normal pulse output completion.
Setting procedure
1. Assign a variable to [General Item | SpecialI/OStatus] in the [Configure I/O] dialog
box.
2. The following shows the details of the variable assigned to [Special I/O Status]. The
monitoring bits vary depending on the group to which the pulse output is assigned.
15
12 11
Group 4
8 7
Group 3
4 3
Group 2
0
Group 1
When the first bit (bit 0) of each group is "1", output is enabled. When it is "0",
output is disabled.
When bit 2 is "1", the output of the specified number of pulses has been completed.
Bit 3
Bit 2
Bit 1
Bit 0
[1]: In Operation, [0]: Stopped
[1]: Specified number of output pulses completed,
[0]: Not completed
LT Type H I/O Setting User Manual
2-69
Chapter 2 – I/O Settings
Pulse output terminal status check
You can check the status of the pulse output for output terminals Y0 through Y3.
Setting procedure
1. Assign a variable to [General Item | SpecialI/OOutputStatusDisplay] in the [Configure I/O] dialog box.
2. The following shows the details of the variable assigned to [Special I/O Output
Status Display]. The monitoring bits vary depending on the group to which the pulse
output is assigned.
15
12
Not used
d
8
Not used
a: Group 1 Output Status
b: Group 2 Output Status
c: Group 3 Output Status
d: Group 4 Output Status
2-70
4
c
Not used
b
0
Not used
[1]:
Output being produced
[0]:
No output
[1]:
Output being produced
[0]:
No output
[1]:
Output being produced
[0]:
No output
[1]:
Output being produced
[0]:
No output
a
LT Type H I/O Setting User Manual
Chapter 2 – I/O Settings
2.2.10
Acceleration/Deceleration Speed Pulse Output
Two types of pulse outputs are available: normal pulse output, which outputs the specified number of pulses at the specified frequency; and Acceleration/Deceleration pulse
output, which gradually increases frequencies until the specified frequency is reached.
"2.2.9 Normal Pulse Output"
Summary
The following is a summary of the setting procedure for the Acceleration/Deceleration
Speed Pulse Output.
1. Specify the Output Frequency, number of output pulses, Initial Output Frequency
and Acceleration/Deceleration Speed Time.
2. Specify parameters with [Accel/Decel Speed Pulse Table Creation Request].
3. Check parameter changes with [Accel/Decel Speed Pulse Table Creation Completed].
4. Turn ON the Acceleration/Deceleration bit specified for [Special I/O Control].
5. Start the output with [Special I/O Control].
6. Check the status with [Special I/O status].
As shown below, the Accel/Decel Pulse Output is used to produce a smooth output
frequency time line, as the set number of pulses is reached.
The Pulse Output’s Initial Output Frequency begins at (F0 ) and accelerates in ten
discrete steps until it reaches the Standard Output Frequency (F). Then, during the
following deceleration, from the Standard Output Frequency’s pulse level to the desired
reduced pulse level, the same 10 steps are used for pulse output.
Be sure when setting the Standard Output Frequency and the Output Pulse Amount
settings to also enter the Initial Output Frequency (F0 ) and the Accel/Decel Speed Time
(T) settings.
Standard Output
Frequency (F)
T/10
9
8
7
6
5
4
0
Acceleration Time T
LT Type H I/O Setting User Manual
3
4
5
7
(F-F0)/10
1
Initial Output
Frequency
(F0)
2
6
3
2
1
8
9
10
Deceleration Time T
2-71
Chapter 2 – I/O Settings
Output Frequency
Specify the Output Frequency. The available range is between 10Hz and 5kHz.
When several groups are used for Pulse Output, the total output frequency must not
exceed 5kHz.
Also, while two types of pulses, Normal and Accel/Decel Speed, can be set for a
group, the Output Frequency total check will use whichever value is larger, the
standard Accel/Decel Speed Pulse Frequency or the Normal Pulse Output's Output
Frequency.
"2.2.9 Normal Pulse Output"
Example of Pulse Output Output Frequency Parameter Changes
Initial Setting
Creating Table
Group Frequency (Hz)
1
2000
2
500
3
500
4
500
Frequency (Hz)
1500
OK
500
OK
500
OK
2000
OK
Parameter Change
Frequency (Hz)
3000
NG
500
OK
500
OK
500
OK
Actual Frequency
After Parameter
Change
Frequency (Hz)
1500
500
500
500
When the above parameter changes are made, the following actions occur.
Initial Settings and then Table Creation
1. When "1500Hz" is set for Group 1, the total output frequency at this time (3000Hz)
is within the allowed maximum of 5000Hz, and therefore the setting of 1500Hz is
used and a table is created.
1500 + 500 (Group 2:Initial) + 500 (Group 3:Initial) + 500 (Group 4:Initial) = 3000
2. When "500Hz" is set for Group 2, the total output frequency at this time (3000Hz) is
within the allowed maximum of 5000Hz, and therefore the setting of 500Hz is used
and a table is created.
1500 (Group 1:After change) + 500+500 (Group 3:Initial) + 500 (Group 4:Initial) = 3000
3. When "500Hz" is set for Group 3, the total output frequency at this time (3000Hz) is
within the allowed maximum of 5000Hz, and therefore the setting of 500Hz is used
and a table is created.
1500 (Group 1:After change) + 500(Group :After change) + 500 + 500 (Group
4:Initial) = 3000
4. When "500Hz" is set for Group 4, the total output frequency at this time (3000Hz) is
within the allowed maximum of 5000Hz, and therefore the setting of 500Hz is used
and a table is created.
1500 (Group 1:After change) + 500 (Group 2:After change) + 500 (Group 3:After
change) + 500 = 3000
2-72
LT Type H I/O Setting User Manual
Chapter 2 – I/O Settings
Table Creation and then Parameter Change
1. When "3000Hz" is set for Group 1, the total output frequency at this time (6000Hz)
exceeds the allowed maximum of 5000Hz, and therefore the unit operates at the
initial setting of 1500Hz. 3000Hz is not used.
3000 + 500 (Group 2:Table value) + 500 (Group 3:Table value) + 2000 (Group
4:Table value) = 6000
The unit operates at 1500Hz, however when the output frequency total
check includes Group 1, the initial value of 2000Hz is larger than the table
value of 1500Hz and the initial value is used.
2. When "500Hz" is set for Group 2, the total output frequency at this time (3500Hz) is
within the allowed maximum of 5000Hz, and therefore the unit operates at 500Hz.
2000 (Group 1:Initial) + 500 + 500 (Group 3:Table) + 500 (Group 4:Table value) = 3500
3. When "500Hz" is set for Group 3, the total output frequency at this time (3500Hz) is
within the allowed maximum of 5000Hz, and therefore the unit operates at the new
setting of 500Hz.
2000(Group 1:Initial) + 500 (Group 2:Table value) + 500 + 500 (Group 4:Table) = 3500
4. When "500Hz" is set for Group 4, the total output frequency at this time (3500Hz) is
within the allowed maximum of 5000Hz, and therefore the unit operates at the new
setting of 500Hz.
2000(Group 1:Initial) + 500 (Group 2:Table value) + 500(Group 3:Table value) + 500 = 3500
LT Type H I/O Setting User Manual
2-73
Chapter 2 – I/O Settings
• When a Pulse Output Frequency Total Alarm and a Accel/Decel Speed
Pulse Parameter Alarm occur at the same time, due to a change in a
group's Output Frequency, the display of the Pulse Output Frequency
Total Alarm will be given priority over the Accel/Decel Speed Pulse
Parameter Alarm and the Accel/Decel Speed table will not be created.
• When a Pulse Output Frequency Total Alarm and an Initial Frequency
Value Alarm occur at the same time, due to a change in a group's Output Frequency, the display of the Initial Frequency Value Alarm will be
given priority and the Accel/Decel Speed table will not be created.
• When the Accel/Decel Speed Pulse Output starts from the OFF state,
changing back from ON to OFF will cause 1 output. The timing of the
changing from ON to OFF will change the Output Pulse Count, however, when Pulse Output is forced to stop. In order to stop the pulse in
any type of condition, the pulse created at the forced stop may not be
counted.
• When multiple groups turn their Accel/Decel Speed Pulse Table Creation Request ON at the same time, processing is basically performed
in first to last order, it may be performed in 3 -> 4 -> 1 -> 2 order to
create data from a table in a group that has a Request Flag ON.
Initial Output Frequency
Sets the Output Frequency used when Pulse Output starts or stops. Initial Frequency
can be set to 0, or from 10Hz to 5kHz. When the Initial Output Frequency is set to "0",
if the Accel/Decel Speed time is not "0", the Initial Output Frequency is changed to
10Hz.
Acceleration/Deceleration Speed Time
This setting is used when the output pulse is changed from Initial Output Frequency to
Standard Output Frequency. The time used can be from 0ms to 65535ms.
Requesting and confirming the creation of a parameter table
Create a parameter table with [Accel/Decel Speed Pulse Table Creation Request].
Also, you can delete this table by setting the initial frequency and the Accel/Decel Speed
time values to "0". Then, when the Accel/Decel Speed Pulse table is created, this table
is deleted.
2-74
LT Type H I/O Setting User Manual
Chapter 2 – I/O Settings
Setting method
1. Assign variables to [General Item | Accel/DecelSpeedPulseTableCreationRequest]
and [General Item | Accel/DecelSpeedPulseTableCreationCompleted] in the [Configure I/O] dialog box.
2. The following shows the details of the variable assigned to [General Item | Accel/
Decel Speed Pulse Table Creation Request]. The operation bits vary depending on
the group to which the pulse output is assigned.
15
Not used
10
8
6
4
d
c
b
a
0
Not used
a: Request for a table for an Acceleration/Deceleration Pulse for group 1 [1]: Request
b: Request for a table for an Acceleration/Deceleration Pulse for group 2 [1]: Request
c: Request for a table for an Acceleration/Deceleration Pulse for group 3 [1]: Request
d: Request for a table for an Acceleration/Deceleration Pulse for group 4 [1]: Request
LT Type H I/O Setting User Manual
2-75
Chapter 2 – I/O Settings
3. The following shows the details of the variable assigned to [Acceleration/Deceleration
Pulse Table Creation Completed]. The monitoring bits vary depending on the group to
which the Pulse Output is assigned.
15
10
Not us ed
h
g
8
f
e
6
d
c
4
b
a
0
Not us ed
a: Completion of the table for an Acceleration/Deceleration Speed Pulse for group 1
[1]: Table completed
b: Existence of a table for an Acceleration/Deceleration Speed Pulse for group 1
[1]: Table exists and can be output. [0]: No table exists. (Table cannot be output.)
c: Completion of the table for an Acceleration/Deceleration Speed Pulse for group 2
[1]: Table completed
d: Existence of a table for an Acceleration/Deceleration Speed Pulse for group 2
[1]: Table exists and can be output. [0]: No table exists. (Table cannot be output.)
e: Completion of the table for an Acceleration/Deceleration Speed Pulse for group 3
[1]: Table completed
f: Existence of a table for an Acceleration/Deceleration Speed Pulse for group 3
[1]: Table exists and can be output. [0]: No table exists. (Table cannot be output.)
g: Completion of the table for an Acceleration/Deceleration Speed Pulse for group 4
[1]: Table completed
h: Existence of a table for an Acceleration/Deceleration Speed Pulse for group 4
[1]: Table exists and can be output. [0]: No table exists. (Table cannot be output.)
2-76
LT Type H I/O Setting User Manual
Chapter 2 – I/O Settings
4. The following is the timing chart for the flags for the request for and completion of a
table for an Acceleration/Deceleration Speed Pulse.
Parameter settings
1)
4)
Acceleration/Deceleration
Speed Pulse table request
flag
Acceleration/Deceleration
Speed Pulse table completion flag
Acceleration/Deceleration
Speed Pulse table present/not
present
2)
3)
5)
Table is created.
Turned OFF once when the
specified table is created.
Time
1) Set the Output Frequency, Output Pulse, Initial Output Frequency and Accel/
Decel Speed Time values.
2) When the [Accel/Decel Speed Pulse Table Creation Request] flag is turned ON,
a table is created.
3) After the table has been created, the completion flag turns ON.
4) Confirm that the completion flag turns ON and turn the request flag OFF.
5) The completion flag turns OFF after the request flag is recognized as OFF.
Precautions when creating tables
If, during Accel/Decel Speed Pulse Output (i.e. the "Accel/Decel Speed Pulse Output
Request" bit is ON), the drawing below shows how the [Accel/Decel Speed Pulse
Table Creation Request] cannot be received.
Cannot be received
Even when the output status
bit turns OFF, this is disabled
Accel/Decel Speed
Pulse Output
Reques t
Accel/Decel Speed
Pulse Output Status
Accel/Decel Speed
PulseTable
CreationRequest
Accel/Decel Speed
PulseTable Creation
Completed
Accel/Decel Speed
Table Enable/Disable
Unless turned OFF and then ON again,
cannot be detected
LT Type H I/O Setting User Manual
2-77
Chapter 2 – I/O Settings
Controlling Acceleration/Deceleration Speed Pulse Output operation
The Acceleration/Deceleration Speed Pulse Output is started or stopped. Prior to
starting Acceleration/Deceleration Speed Pulse Output, this bit must be enabled (Setting
procedure 2) and then started (Setting procedure 3).
Setting procedure
1. Assign a variable to [General Item | SpecialI/O Control] in the [Configure I/O] dialog
box.
2. The following shows the details of the variable assigned to [Special I/O Control]. The
operation bits vary depending on the group to which the counter output is assigned.
15
12 11
Group 4
8 7
Group 3
4 3
Group 2
0
Group 1
Bit 1 of each group is used for controlling the Acceleration/Deceleration Speed Pulse
Output. To start the Acceleration/Deceleration Speed Pulse Output, first turn ON
this bit.
Bit 3
Bit 2
Bit 1
Bit 0
[1]: Enabled
2-78
LT Type H I/O Setting User Manual
Chapter 2 – I/O Settings
3. The operation bits for starting or stopping the pulse output vary depending on the
group to which the pulse output is assigned.
15
12 11
8 7
Group 4
Group 3
4 3
Group 2
0
Group 1
The Acceleration/Deceleration Speed Pulse Output starts when the first bit (bit 0) is
turned ON, and stops when the first bit is turned OFF.
Bit 3
Bit 2
Bit 1
Bit 0
[1]: Start, [0]: Stop
Pulse Output precautions
During Accel/Decel Speed Pulse Table Creation, pulses cannot be output.
Accel/Decel Speed Pulse
Table Creation Request
Accel/Decel Speed Pulse
Table Creation Completed
Even when the output status bit
turns OFF, this is disabled
Accel/Decel Speed Pulse
Output Request
Accel/Decel Speed
Pulse Output Status
Cannot be
received
Unless turned OFF and then ON
again, cannot be detected
Status of operation and completion of the Acceleration/
Deceleration Speed Pulse Output
You can confirm the operation and completion of the Acceleration/Deceleration Speed
Pulse Output.
Setting procedure
1. Assign a variable to [General Item | SpecialI/OStatus] in the [Configure I/O] dialog box.
LT Type H I/O Setting User Manual
2-79
Chapter 2 – I/O Settings
2. The following shows the details of the variable assigned to [Special I/O Status]. The
monitoring bits vary depending on the group to which the Pulse Output is assigned.
15
12 11
Group 4
8 7
Group 3
4 3
Group 2
0
Group 1
When the first bit (bit 0) of each group is "1", output is enabled. When it is "0",
output is disabled.
When bit 2 is "1", the output of the specified number of pulses has been completed.
Bit 3
Bit 2
Bit 1
Bit 0
[1]: In Operation, [0]: Stopped
[1]: Enabled, [0]:Disabled
[1]: Specified number of output pulses completed,
[0]: Not completed
Acceleration/Deceleration Speed Pulse Output Terminal
Status
You can check the pulse output status of output terminals Y0 through Y3.
Setting procedure
1. Assign a variable to [General Item | SpecialI/OOutputStatusDisplay] in the [Configure I/O] dialog box.
2-80
LT Type H I/O Setting User Manual
Chapter 2 – I/O Settings
2. The following shows the details of the variable assigned to [Special I/O Output
Status Display]. The monitoring bits vary depending on the group to which the pulse
output is assigned.
15
12
Not used
d
a: Group 1 Output Status
8
Not used
c
4
Not used
b
0
Not used
a
[1]: Output being produced
[0]: No output
b: Group 2 Output Status
[1]: Output being produced
[0]: No output
c: Group 3 Output Status
[1]: Output being produced
[0]: No output
d: Group 4 Output Status
[1]: Output being produced
[0]: No output
Acceleration/Deceleration Speed Pulse Output Alarm Status
You can check for Alarm status of the Output Frequency and total Speed Frequency of
the Pulse Output.
Setting procedure
1. Assign variables to [General Item | SpecialI/OSettingAlarmDisplayA] and [General
Item | SpecialI/OSettingAlarmDisplayB] in the [Configure I/O] dialog box.
LT Type H I/O Setting User Manual
2-81
Chapter 2 – I/O Settings
2. The following shows the details of the variables assigned to [Special I/O Setting
Alarm Display A ] and [Special I/O Setting Alarm Display B]. The monitoring bits
vary depending on the group to which the Pulse Output is assigned.
Alarm Display A for Special I/O Setting
15
e
7
Not used
d
c
b
6
5
4
3
2
1
0
a
a: Group 1 Pulse Output Frequency Alarm
[1]: Exceeds 5kHz
[0]: Normal
b: Group 2 Pulse Output Frequency Alarm
[1]: Exceeds 5kHz
[0]: Normal
c: Group 3 Pulse Output Frequency Alarm
[1]: Exceeds 5kHz
[0]: Normal
d: Group 4 Pulse Output Frequency Alarm
[1]: Exceeds 5kHz
[0]: Normal
e: Pulse Output Frequency Total Alarm
[1]: Total frequency exceeds 5kHz
[0]: Normal
Alarm Display B for Special I/O Setting
15
Not us ed
11
10
9
8
7
6
5
4
h
g
f
e
d
c
b
a
0
a: Group 1 pulse initial frequency output value alarm
[1]: Initial output frequency is higher than (steady-state) frequency.
[0]: Normal
b: Group 2 pulse initial frequency output value alarm
[1]: Initial output frequency is higher than (steady-state) frequency.
[0]: Normal
c: Group 3 pulse initial frequency output value alarm
[1]: Initial output frequency is higher than (steady-state) frequency.
[0]: Normal
d: Group 4 pulse initial frequency output value alarm
[1]: Initial output frequency is higher than (steady-state) frequency.
[0]: Normal
2-82
LT Type H I/O Setting User Manual
Chapter 2 – I/O Settings
e: Group 1 Accel/Decel Speed Pulse parameter alarm
[1]: Initial Output Frequency is same as (steady-state) Frequency, Output Pulse
count equals 21, Accel/Decel Speed Time increase/decrease
[0]: Normal
f: Group 2 Accel/Decel Speed Pulse parameter alarm
[1]: Initial Output Frequency is same as (steady-state) Frequency, Output Pulse
count equals 21, Accel/Decel Speed Time increase/decrease
[0]: Normal
g: Group 3 Accel/Decel Speed Pulse parameter alarm
[1]: Initial Output Frequency is same as (steady-state) Frequency, Output Pulse
count equals 21, Accel/Decel Speed Time increase/decrease
[0]: Normal
h: Group 4 Accel/Decel Speed Pulse parameter alarm
[1]: Initial Output Frequency is same as (steady-state) Frequency, Output Pulse
count equals 21, Accel/Decel Speed Time increase/decrease
[0]: Normal
When creating an Accel/Decel Speed Pulse Output table, if the special
I/O setting alarm display B's initial frequency alarm and the same group's
Output Frequency change cause a special I/O setting alarm A's Output
Frequency total alarm, the special I/O setting alarm display A's Output
Frequency total alarm will not be detected.
About the operation of the Accel/Decel Speed Pulse alarm
In the following cases, pulse output is not created. (Accel/Decel Speed Pulse table
enable flag does not turn ON.)
1) When the output terminals are not set for pulse output.
2) When the designated group is already producing output pulses.
3) When the Standard Frequency exceeds 5kHz*1
4) When the Initial or Standard Frequency plus another pulse Output Frequency totally
exceeds 5kHz*2
5) When the Initial Frequency is higher than the Standard Frequency.
In the following cases, Pulse Output does not follow the parameter settings.
1) When the total Output Pulse count is low. (Does not reach 21 - instead of
accellerating to the Standard Frequency, will decelerate. Or, during Accel/Decel
Speed, the Output Pulse count changes in 1 level increments.)
1. The Special I/O setting alarm display area A's Frequency alarm bit turns ON.
2. The Special I/O setting alarm display area A's Frequency total alarm bit turns ON.
LT Type H I/O Setting User Manual
2-83
Chapter 2 – I/O Settings
2) When the Accel/Decel Speed setting time is short. (Accel/Decel Speed levels are performed one at a time, which causes the Accel/Decel Speed Time to vary from set time.)*1
3) When the Accel/Decel Speed setting time is long. (Accel/Decel Speed levels are performed one at a time, which causes the Accel/Decel Speed Time to vary from set time.)*1
Accel/Decel Speed Frequency level diagram
Standard Output
Frequency (F)
T/10
9
8
7
6
5
4
Initial Output
Frequency
(F0)
1
2
3
4
5
6
3
2
1
7
(F-F0)/10
0
Acceleration Time T
8
9
10
Deceleration Time T
When requesting each level's frequency
nth level's frequency = Initial Frequency + (Standard Frequency - Initial Frequency)/10
levels*(n levels - 1 level)
nth level's frequency's decimal point data is discarded.
When requesting each level's pulse amount
nth level's pulse amount = (Accel/Decel Speed Time/10 levels)*(nth level's Frequency/
1000ms)
nth level's pulse amount's decimal point data is discarded.
Since the minimum pulse amount is "1", if the pulse amount is actually "0", it is treated as "1".
The required pulse amount for an Accel/Decel Speed Pulse = (1st level's pulse amount
+ ....+ 10th level pulse amount)*2+1 pulse.
This pulse amount, if it becomes larger than the designated pulse output amount, will
become the Accel/Decel Speed Pulse parameter alarm's Accel/Decel increase.
When requesting each level's Accel/Decel Speed Time
nth level's Accel/Decel Speed Time = nth level's Pulse amount*(1000ms/nth level's
frequency)
nth level's Accel/Decel Speed Time's decimal data is discarded.
Accel/Decel Speed Time required for Accel/Decel = 1st level's Accel/Decel time + ....
+ 10th level's Accel/Decel time.
This Accel/Decel Speed Time, if it becomes larger than the designated Accel/Decel
Speed Time, will become the Accel/Decel Speed Pulse parameter alarm's Accel/Decel
Speed decrease.
1. The Special I/O setting alarm display area B's Accel/Decel Speed Pulse parameter alarm bit turns ON. (however, Accel/Decel Speed Pulse enable flag turns
ON, and Accel/Decel Speed Pulse Output is possible.)
2-84
LT Type H I/O Setting User Manual
Chapter 2 – I/O Settings
Ex. Using the previously explained calculation method, an Accel/Decel Speed table is
created using the parameters given below. The calculated values are used to determine if
a value becomes an alarm value or not.
Output Frequency (Hz)
500
Output Pulse Count (Pulse)
300
Initial Frequency (Hz)
10
Accel/Decel Speed Time (ms)
600
Thus, each level's frequency, pulse amount and Accel/Decel Speed Time will become
as follows:
nLevel
Frequency
Pulse Amount
Accel/Decel Speed Time
1
2
3
4
5
6
7
8
9
10
10
59
108
157
206
255
304
353
402
451
1
3
6
9
12
15
18
21
24
27
100
50
55
57
58
58
59
59
59
59
Output Pulse Total
Calculating the total of each level's Output Pulses, (1 + 3 + 6 + ....+ 27)x2+1 = 273.
Since this is less than the set Output Pulse Count, the [Accel/Decel Speed increase]
alarm is cleared.
Accel/Decel Time Total
Calculating the total of each level's Accel/Decel Speed Time, 100 + 50 + 50 + ....+ 59
= 614. Since this is more than the set Accel/Decel Speed Time, the [Accel/Decel Speed
decrease] alarm is triggered.
LT Type H I/O Setting User Manual
2-85
Chapter 2 – I/O Settings
2.2.11
Analog Input
The controller reads analog signals by monitoring terminals at a rate of 1ch/2ms, converting them into 12-bit digital signals and writing them to I/F RAM. These I/F RAM
values are read by the LT once each scan.
Analog Input Filter
Every 2 ms, this filter averages the current and preceding values to the extent specified
with the [Analog Input] dialog box.
The available setting range is 0 to 64, and when this value is set to "0", data is used exactly as
it is read out. Also, While the read-in analog data is less than the set sampling number, the
analog input data enable display flag is OFF and the analog input value is "0".
Input signal
Time
Averaging
Averaging
Averaging
....
The number specified for the analog input filter is common to all channels.
Setting procedure
1. Double-click [AnalogInput] in the [Configure I/O] dialog box, or select [Analog
Input] and click the [Setup] button.
2-86
LT Type H I/O Setting User Manual
Chapter 2 – I/O Settings
2. The [Analog Input Setting] dialog box appears.
When the Analog Input Filter is set to "0", the filter is disabled.
Analog Input Range and Displayed Value
The Analog Input Values are displayed within the range of 12-bit values as shown below.
Displayed value
4000
2000
0
0
5
10
0
10
20
4
10
20
0
0
V
mA
mA
The following table shows the analog value(s) displayed based on the voltage or current
input setting.
Analog Input Range
Input Value
Displayed Value (Decimal)
0 to 10 (V)
0 to 20 (mA)
4 to 20 (mA)
0 to 10.2375 (V)
0 to 20.475 (mA)
0 to 20.380 (mA)
0 to 4095
0 to 4095
-1000 to 4095
• Depending on the Type H driver used, 4 to 20mA is converted to 0 to 20mA.
The conversion formula is as follows.
(Depending on the Type H driver used)
a-(b-800) x 1.25
• a: Conversion value (the Input Display Value is rounded.)
• b: Value from the I/O board (0 to 20mA).
• When the Input Range is set from 4 to 20mA, the value used for display when
the input is less than 4mA (0 to less than 4) will be displayed a minus value. Use
the cable cut detection feature for this minus display range.
LT Type H I/O Setting User Manual
2-87
Chapter 2 – I/O Settings
Data acquisition status when the Analog Input Filter is
used
You can verify that the amount of Analog Input Data specified is obtained by the Analog
Input Filter.
Setting procedure
1. Assign a variable to [General Item | AnalogInputDataEnableDisplay] in the [Configure I/O] dialog box.
2. The following shows the details of the variable assigned to [Analog Input Data
Enable Display]. The status bits vary depending on the channel.
15
2
Not us ed
a: Analog Input Data (CH1)
1
0
b
a
[0]: Invalid data (obtained during sampling)
[1]: Valid data
b: Analog Input Data (CH2)
[0]: Invalid data (obtained during sampling)
[1]: Valid data
2-88
LT Type H I/O Setting User Manual
Chapter 2 – I/O Settings
2.2.12
Analog Output
Output data is written to I/F RAM from the TypeH driver every LT unit scan time.
Next, every 2ms values are read from I/F RAM by the I/O board and reflected to the
I/O board's analog output terminal. When the logic program is stopped, the output
status of the analog output can be retained.
Output Hold at Controller Stop
When the logic program is stopped, the output status of the Analog Output is retained.
When the logic program is restarted, the operation starts from the retained status.
Going OFFLINE, reseting the LT, or turning its power OFF however, initializes the I/O
terminals. As a result, all the retained output statuses are turned OFF.
Setting procedure
1. Double-click [AnalogOutput] in the [Configure I/O] dialog box, or select
[AnalogOutput] and click the [Setup] button.
2. The [Analog Output Setting] dialog box appears.
The dialog box may differ between Type H-AD and Type H-ADP/Type H-ADT due
to the differing number of channels. See the appropriate screen for the type you are
using.
Type H-AD
LT Type H I/O Setting User Manual
Type H-ADP/Type H-ADT
2-89
Chapter 2 – I/O Settings
3. When the controller stops, the output hold and the analog output range are set.
For information about the Analog Output Range, see the following “Analog Output Range and display” section.
Analog Output Range and Displayed Values
The Analog Output Values are displayed within the range of 12-bit values as shown
below.
Displayed value
4000
2000
0
0
5
10
0
10
20
0
V
mA
The following table shows the analog values displayed with the voltage or current input
setting.
2-90
Analog Input Range
Input Value
Displayed Value
(Decimal)
0 to 10 (V)
0 to 20 (mA)
0 to 10.2375 (V)
0 to 20.475 (mA)
0 to 4095
0 to 4095
LT Type H I/O Setting User Manual
Chapter 2 – I/O Settings
2.2.13
Thermocouple Input
The controller reads analog signals from the thermocouple input by converting them into
temperature data.
The I/O board reads thermocouple input (every 2ms) from each Channel and from the
circuit board's temperature. Temperature data is stored in each channel's internal buffer.
When the AD values (analog temperature data converted to digital) reach 21, those
values are averaged and the single resulting value is written to I/F RAM. This value is
then read out once every LT scan.
To avoid noise-induced fluctuations of thermocouple input signals, the thermocouple
input filter can be used to average input signals.
Internal Buffer
Temperature Data
I/F RAM
1st AD value
2nd AD value
Average
3rd AD value
Thermocouple Input Value
:
21st AD value
Thermocouple Input Filter
Input signal (AD) values are collected every 2ms and stored in each channel's internal
buffer. When the number of AD values collected in these internal channel buffers equals
21, the data is averaged automatically and stored in Internal Buffer 2. Then, according
to the value set in the [Thermocouple Input Settings] dialog box, averaging is performed
a second time when the number of averaged data values in Buffer 2 reaches this setting
value (Example below uses "64"). This second averaged value is then written to I/F
RAM, and is read out once every LT scan.
Internal Buffer 1
Temperature
Data
Internal Buffer 2
1st AD value
Average 1st Averaged AD value
2nd AD value
2nd Averaged AD value
3rd AD value
:
21st AD value
3rd Averaged AD value
I/F RAM
Average
Thermocouple
Input Value
:
64th Averaged AD value
• The thermocouple input filter's frequency and input range settings are
used for all channels.
• Until an averaged AD value is stored, in order for 2ms x [Ch No. (H4:2, H5:3)
+1 (board temperature)] x 21(ms) to elapse, if the filter frequency is increased,
LT unit power ON or Reset, and also if the temperature returns to the normal
specification range from outside of the normal specification range, time will
be required for the new temperature data to be enabled.
Ex. Using a Type H-ADT with a filter frequency setting of 64:
2 x 4 x 21 x 64=10.752(ms) Ave. 10.8sec.
LT Type H I/O Setting User Manual
2-91
Chapter 2 – I/O Settings
Setting procedure
1. Double-click [Thermocouple Input] in the [Configure I/O] dialog box, or select
[Thermocouple Input] and click the [Setup] button.
2. The [Thermocouple Input Setting] dialog box appears. This sets the thermocouple
input range and the thermocouple filter amount (0 to 64). For thermocuple input
range details, see
Thermocouple Input Range.
When the Thermocouple Input Filter is set to "0", the filter is disabled.
Thermocouple Input Range
Select the type of thermocouple to be connected, either type J or type K.
2-92
LT Type H I/O Setting User Manual
Chapter 2 – I/O Settings
Thermocouple Input Value and Displayed Value
Type J
7000
12920
-100
-148.0
-1000
°C (Celsius)
700
1292.0 F (Fahrenheit)
-1480
The following table is a summary of the range above.
Celsius
Fahrenheit
Displayed
Displayed
Input Value C
Input Value F
Value(decimal)
Value(decimal)
Out of specified
temperature range (+)
32767
710.1 or higher
Within specified
temperature range
-1000 to 7000
100.0 to 700.0
Out of specified
temperature range (-)
-32768
-110.1 or lower
32767
1310.1 or higher
-1480 to 12920 -148.0 to 1292.0
-32768
-166.1 or lower
The temperature can be switched between Celsius and Fahrenheit modes in the
[General Item Setup] dialog box
Type K
12000
21920
-100.0
-148.0
1200.0
°C (Celsius)
2192.0
-1000
F (Fahrenheit)
-1480
The following table is a summary of the range above.
Celsius
Fahrenheit
Displayed
Displayed
Input Value F
Input Value C
Value(decimal)
Value(decimal)
Out of specified
temperature range (+)
Within specified
temperature range
Out of specified
temperature range (-)
32767
1210.1 or higher
32767
2210.1 or higher
-1000 to 12000 -100.0 to 1200.0 -1480 to 21920 -148.0 to 2192.0
-32768
-110.1 or lower
-32768
-166.1 or lower
The temperature can be switched between Celsius and Fahrenheit modes in the
[General Item Setup] dialog box.
LT Type H I/O Setting User Manual
2-93
Chapter 2 – I/O Settings
Temperature Input Outside of Specification Range
When the temperature values input exceed the specified range by more than 10°C(+/-),
all sampled data collected up to that point is cleared. Then, when the input temperature
falls back to within the specified range, sampling will restart. At this time, until the
sampling amount reaches the set value, the display will read "32767" or "-32768".
Ex. J type (°C display)
-110°C (-1100)
710°C (7100)
710°C
-100°C
700°C
-110°C
Sampling time
Sampling time
Data valid
flag*1
Data valid
flag*1
Displayed data
32767
0
0
-32768
Displayed data
t
t
1. Temperature input data valid display's data valid flag.
2-94
LT Type H I/O Setting User Manual
Chapter 2 – I/O Settings
Data acquisition status when the Thermocouple Input
Filter is used
You can determine whether the amount of thermocouple input data obtained is as
specified for the Thermocouple Input Filter.
Setting procedure
1. Assign a variable to [General Item | TemperatureInputDataEnableDisplay] in the
[Configure I/O] dialog box.
2. The following shows the details of the variable assigned to [Temperature Input Data
Enable Display]. The status bits vary depending on the channel.
15
2
Not used
a: Thermocouple Input Data (CH1)
Not used
1
c
0
b
a
[0]: Invalid data (obtained during sampling)
[1]: Valid data
b: Thermocouple Input Data (CH2)
[0]: Invalid data (obtained during sampling)
[1]: Valid data
c: Thermocouple Input Data (CH3)
[0]: Invalid data (obtained during sampling)
[1]: Valid data
LT Type H I/O Setting User Manual
2-95
Chapter 2 – I/O Settings
2.2.14
Pt100 Input
The controller reads analog signals from the Pt100 Input by converting them into temperature data.
The I/O board reads Pt100 Input (every 2ms) from each Channel and from the circuit
board's temperature. Temperature data is stored in each channel's internal buffer.
When the AD values (analog temperature data converted to digital) reach 21, those
values are averaged and the single resulting value is written to I/F RAM. This value is
then read out once every LT scan.
The controller reads the analog signals of the Pt100 Input by converting them into
temperature data. To avoid noise-induced fluctuations in Pt100 Input signals, the Pt100
Input Filter can be used to average the input signals.
Inte rna l Buffe r
Temperature Data
I/F RAM
1st AD value
2nd AD value
Average
3rd AD value
Pt100 Input Value
:
21st AD value
Pt100 Input Filter
Every 2 ms, this filter averages the current and preceding values according to the
number specified with the [Pt100 Input Setup] dialog box.
Input signal (AD) values are collected every 2ms and stored in each channel's internal
buffer. When the number of AD values collected in these internal channel buffers equals
21, the data is averaged automatically and stored in Internal Buffer 2. Then, according
to the value set in the [Pt100 Input Setup] dialog box, averaging is performed a second
time when the number of averaged data values in Buffer 2 reaches this setting value
(Example below uses "64"). This second averaged value is then written to I/F RAM,
and is read out once every LT scan.
Internal Buffer 1
Temperature
Data
Internal Buffer 2
1st AD value
Average 1st Averaged AD value
2nd AD value
2nd Averaged AD value
3rd AD value
:
21st AD value
3rd Averaged AD value
I/F RAM
Average
Pt100 Input
Value
:
64th Averaged AD value
2-96
LT Type H I/O Setting User Manual
Chapter 2 – I/O Settings
• The number specified for the Pt100 Input filter and the range specified
for Pt100 Input are common to all channels.
• When the filter frequency becomes large, temperature reading data
(When the power is turned ON or reset, or when the temperature returns to within the specified range from outside the range) may require over 5 seconds to become effective. The time required until an
averaged AD value is stored (2ms x No. of channels x 21ms) is as
follows:
Assuming Pt100 Input filter frequency is set to 64 (with Type H-ADP)
2 x 2 x 21 x 64 = 5,376(ms) [Approx. 5.4 sec.]
Setting procedure
1. Double-click [Pt100 Input] in the [Configure I/O] dialog box, or select [Pt100 Input]
and click the [Setup] button.
2. The [Pt100 Input Setup] dialog box appears. Here, enter the number of Input Filter
Samples (0 to 64) used.
When the Pt100 Input Filter is set to "0", the filter is disabled.
LT Type H I/O Setting User Manual
2-97
Chapter 2 – I/O Settings
Pt100 Input Value and Displayed Value
4000
7520
-50.0
-58.0
°C (Celsius)
400.0
752.0
-500
F (Fahrenheit)
-580
The following table is a summary of the range above.
Celsius
Fahrenheit
Displayed
Displayed
Input Value C
Input Value F
Value(decimal)
Value(decimal)
Out of specified
temperature range (+)
32767
410.1 or higher
32767
770.1 or higher
Within specified
temperature range
-500 to 4000
50.0 to 400.0
-580 to 7520
-58.0 to 752.0
Out of specified
temperature range (-)
-32768
-60.1 or lower
-32768
-76.1 or lower
The temperature can be switched between Celsius and Fahrenheit modes in the
[General Item Setting] dialog box.
Temperature Input outside of Specification Range
When the temperature values input exceed the specified range by more than 10°C(+/-),
all sampled data collected up to that point is cleared. Then, when the input temperature
falls back to within the specified range, sampling will restart. At this time, until the
sampling amount reaches the set value, the display will read "32767" or "-32768".
-60°C(-600)
410°C(4100)
410°C
-50°C
400°C
-60°C
Sampling time
Sampling time
Data valid
flag*1
Data valid
flag*1
Displayed data
32767
0
0
-32768
Displayed data
t
t
1. Temperature input data valid display's data valid flag.
2-98
LT Type H I/O Setting User Manual
Chapter 2 – I/O Settings
Data acquisition status when the Pt100 Input Filter is used
You can determine whether the number of Pt100 Input Data obtained is as specified for
the Pt100 Input Filter.
Setting procedure
1. Assign a variable to [General Item | TemperatureInputDataEnableDisplay] in the
[Configure I/O] dialog box.
2. The following shows the details of the variable assigned to [Temperature Input Data
Enable Display]. The status bits vary depending on the channel.
15
Not used
a: Pt100 Input Data (CH1)
9
8
b
a
0
Not used
[0]: Invalid data (obtained during sampling)
[1]: Valid data
b: Pt100 Input Data (CH2)
[0]: Invalid data (obtained during sampling)
[1]: Valid data
LT Type H I/O Setting User Manual
2-99
Memo
2-100
LT Type H I/O Setting User Manual
Chapter
3 Error Messages
All I/O errors noted here are I/O read or write errors. When an error occurs, that
error's code is written to the controller's #IOStatus [1] variable.
Setting errors are checked when the logic program is downloaded to the LT unit. When
a setting error is detected, the logic program stops. However, Initialization, Runtime or
Internal errors will not cause the logic program to stop. This section explains the meaning of each error and that error's possible solution.
If an I/O error occurs and the controller stops, please create the following logic
program. However, please understand that 1 scan will be required from when the
error is detected to when the logic program stops.
In the following example, #IOFault detects the I/O error, 1 is entered to #Command and the logic program stops.
When an error exists in I/O, #IOFault will turn ON. For error details, check
#IOStatus [1].
LT Type H I/O Setting User Manual
3-1
Chapter 3 – Error Messages
Setting Errors
Error #
Error 500
Error 501
Error 502
Error 503
Error 504
Error 505
Error 506
Error 507
Error 508
Error 801
3-2
Problem
An unsupported driver has been
detected.
An internal-type variable has been
assigned as the variable for an I/O
terminal.
An input-type variable has been
assigned as the variable for an output
terminal.
An output-type variable has been
assigned as the variable for an input
terminal.
A discrete-type variable has been
assigned as the variable for an integer
terminal.
An integer-type variable has been
assigned as the variable for a discrete
terminal.
Variable types not supported by the
driver have been assigned as variables
for the terminals.
No variables have been assigned to the
terminals.
A hardware type not supported by the
driver has been specified.
Some terminal numbers may overlap
due to file corruption.
Countermeasure
Change the variable type to input or
output.
Change the variable type to output.
Change the variable type to input.
Change the variable type to integer.
Change the variable type to discrete.
Change the variable types.
Allocate variables to all terminals.
Change the LT type.
Not supported by the current driver.
LT Type H I/O Setting User Manual
Chapter 3 – Error Messages
Initialization Errors
Error #
Error 821
Problem
T he actual LT type and the LT type
setting differ.
Error 822 I/O Board Initialization Alarm.
Error 823 I/O Board System ROM Alarm.
Error 824 I/O Board System RAM Alarm.
Error 825 I/O Board Microprocessor Alarm.
Error 826 I/O Board Interface RAM Alarm.
Error 827 I/O Board E2PROM Alarm.
Countermeasure
Check that the LT type agrees with the
current unit.
LT may be damaged. Contact your
local LT service center about this error
code.
LT may be damaged. Contact your
local LT service center about this error
code.
LT may be damaged. Contact your
local LT service center about this error
code.
LT may be damaged. Contact your
local LT service center about this error
code.
LT may be damaged. Contact your
local LT service center about this error
code.
LT may be damaged. Contact your
local LT service center about this error
code.
Runtime Errors
Error #
Problem
Countermeasure
Error 841 I/O Board Alarm.
LT may be damaged. Contact your
local LT service center about this error
code.
Error 842 Special I/O Setting Parameter Alarm.
Refer to the Special Parameter Setting
Alarm Display A or B, and re-enter the
current settings.
Internal Errors
Error #
Problem
Errors 850 Driver errors. A major system error has
occurred.
to 853
LT Type H I/O Setting User Manual
Countermeasure
Reset the LT unit. If the error code
persists, the problem may be either a
connected peripheral device or the LT unit
itself. If LT is damaged, contact your local
LT service center about this error code.
3-3
Memo
3-4
LT Type H I/O Setting User Manual