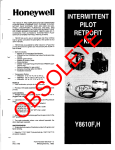
1
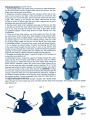
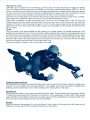
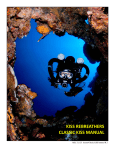
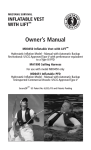
¡- o +r (\t o c o CL E o o o q ñ z v - â (E o I J .cI +r c I J o E o p Ø = /^\- Buoyancy compensator DIAMOND - User manual Definition of terms Buoyancy compensator - a device for adjusting buoyancy, consisting of a wing and a harness (picture 1) Wing a part of the buoyancy compensator consisting of a bladder, inflation mechanism, and safety valve. Harnêss - 2 stainless steel plates, straps and fìttings for attaching the wing and bottles - lntroduction and warninqs . Before using the compensator, read these inslructions thoroughly. usaqe, maintenance, or damage damaqe io the compensator may mav render ren the wananty void, and may also result lncorrect ncorrect usage, in a dangerous situation, injury or death. * Use the compensator only for the purposes for which it is designed. The DIAMOND series compensators are designed for diving with two independent cylinders placed at the sides - side mount system. Make sure you always use a compensator of the appropriate size. A compensator that is too big can cause problems during deflation. Onethat istoo small might not provide sufficient buoyancy. The maximum recommended size of cylinders to be used with ihe wing is written on a label of each wing, and in the compensator description * The buoyancy compensator is not a life preserver. lt does not maintain the diver in a face-up position. lt is not designed to maintain the diver's face above the surface should he become unconscious or immobile. For this reason, it is important to follow the rules of safe diving, and always dive with a companion " Do not inhale from your compensator. The inner bladder can be dirty, or contain contaminated air that could cause serious health problems. * Do not inflate the compensator to its maximum. This will shorten its lifespan. A failure of the safety valve may result in damage to the compensator, and injury to the diver. * Before each dive, it is critical to go through all safety procedures in order to detect possible damage to the compensator A good instructor can acquaint you with these procedures. * Service and repair of the compensator must be provided only by factory trained personnel. Unauthorized service not only voids the warranty, but may also endanger the health and life of the user " lf you do not have sufficient exper¡ence in diving with this type of compensator, go through appropriate training, side mount diver, and then test the compensator in the conholled environment of a swimming pool or shallow water. WARNING: The manufaciurer is not responsible for any damage or injury to a user of the buoyancy compensator that is caused by incorrect usage or inappropriate adjustment that affects its functioning. Fittino the straps A high quality strap threads through two stainless steel plates, which are part of the compensator, in a way that guarantees the correct functioning of the entire system (p¡cture 2) Do not change the way the strap is fed through the plates (picture 3) lf you pull the strap from the plate, carefully remember the way it is threaded through in order not to restrict the functionality of the system. pict. 3 pict.2 Fittino the harness (pictures 4 & 5) 1 . Set the length of the rear center sirap so that the top plate is between the shoulder-blades and the bottom plate bellow the sacrum, the side straps then lead across the buttocks. 2. Adjust the shoulder straps so that the harness will fìt well on the back, noi ioo loose nor too tight. At the same time you should be able to pull your arm out ofthe strap. Check that both straps are the same length. After setting up the straps, the upper plate should be high enough to reach its upper edge with your hand, respectively its top is just below the second thoracic vertebra 3 Set the crotch strap. Pull it between your legs so that you are able to pull left end of the belt strap with buckle through it. Thread the right end of the strap through the buckle and snap it. Belt strap should be tightened slightly, crotch strap should be tight enough, but stay comfortable. 4 Once you fit the main straps, you must adjust the chest D-rings, we recommend at the armpit level. Side welded D-rings should follow the axis of your body or slightly higher. Low D-rings on the side straps are placed approx. 5-10 cm from the welded D-rings, they are used for tacking empty bottles so they do not rise above your body when in horizontal position. D-rings on the crotch strap are placed approx. 5-10 cm bellow the bottom plate. Continue by passing the left side of the waist strap through the belt buckle ¡n such a way that the belt buckle can pass through the crotch strap. Guide the strap through each opening in the buckle, starting with the outside one We recommend securing the strap by passing it again through the first opening. 5. Bungees for holding the valves - adjust the length of the bungees by moving the knots (picture 6). 6. Attaching the w¡ng - thread the upper two straps through the upper plate until the end, the strap ends shall be secured under the rubber bands (picture 7). Attach the wing to the rear center strap using the three Velcro's. Attent¡on, bottom two Velcro's are longer (picture 6) so they can be used also with the weight system )pictures 10 & 111. Set approximate length of bottom bungee and using the Quick Link attach it to the low D-ring on..i.¡iè crotch strap (picture 8). BEWARE, D-rings on the crotch strap must be secured by reversing the strap through the stopper, otherwise they can move spontaneously (picture 9) Length of the bottom bungee should be such that the wing is slightly stretched in its longitudinal axis. Put the corrugated hose under the rubber band on the left shoulder strap (picture 5). 7. Adjust the length of the waist bungee Bungee with double-ender goes through the crotch strap loop and connects with the other end of bungee. The bungee should be slightly tight (picture 5). pict. 6 pict. 7 pict. 8 8. Optional weighting system large (picture 10), weighting system small (picture 11)and trim pockets (picture '12). Thread the reaicenter strap ofthe harness, then through the tunnel in the weighting system and again tháugh the bottom plate. The same procedure applies for the side parts. Trim pockets can be attached anywhere you need them pict picl.12 g. placement of inflator and overpressure valve - there is a couple of possibilities where to place them. Our DIAMOND wings have 3 openings - each of ihem can be used for both - inflator or OPV The 3rd opening is always blinded with a compatible plug (pictures 13, 14 & 15). pict 13 you test your gear in the water. You will be doing 1 0 Do not shoÌ1en the straps after the fìrst fìtting. Wait until additional adjusiments for 3 to 5 dives until the gear is fitted properly on your back - as snug as is comfortable Only then can you shorten them to leave an extra 10 to 15 cm on each side. We recommend finishing off the righi side of thé waist strap in an arc. When shortening straps, do not forget to fìnish them off properly so that thãy do not fray, You can use a cigarette lighter or a candle to do this, but make sure that you do not create a thiCk layer on the end tiÌ¿it would hinder threading the strap through the buckles and stoppers. Bottles - we strongly recommend the use of bottles with neutral buoyancy, such as Luxfer S40, S80 or Faber 7 liters with weight 7.5 kg and Faber 12 liters with weight 12-12'5 kg. It is advantageous to have one valve left-handed and one right-handed. Attach the stáinless steel hose clamp with protection to the bottles and add large bolt-snap with small loop. The loop must be as small as possible. Place the bolt-snap so that after attaching to the welded D-ring the valve rubber knob points down (when you are in horizontal position) and regulator towards your chest Distance between the stainless steel hose clamp with protection and the valve is such that the valve is located just under the armpit. pict '16 pict. 18 Regulators & hoses Left bottle - the 1st stage can be non-slewing, up from it leads LP hose towards the 2nd stage and inflator hose The inflator hose may pass over the shoulder or under arm, recommended length is 45-55 cm. The LP hose runs under the arm around the neck and 2nd stage is equipped with a bungee loop for fastening it around the neck. We recommend us¡ng the omniswivel for attaching the 2nd stage to the hose. The length of LP hose depends on the size of your shoulders, we recommend 75 to 80 cm with using the omniswivel. Down from the 1st stage leads 15 cm HP hose with pressure gauge We recommend a rubber hose, not Miflex Alternatively when necessary, inflator hose for dry suit, we recommend length of 25 cm Right bottle - preferably lst stage with swivel turret. Down from the 1st stage leads 15 cm HP hose with pressure gauge. From the swivel turret goes the LP hose over your chest, around neck, and if not used then hooked on the right D-ring. Hose length is again 75 to 80 cm with using omniswivel. We recommend using Miflex for all LP hoses, they are far more flexible, resistant and comfortable. On the contrary, the HP hose must be from rubber. Diving When you need to add some weights use the pockets of our weight system. By suitable posiiioning of the weights you can adjust your trim Put on the harness. While putting on the harness it is advantageous to have the small bolt-snap on the bungee unhooked from D-ring. Clip the left bottle io the left welded D-ring and place the valve knob in the bungee loop. Place the 2nd stage around your neck, connect the inflatoÍ hose. Then attach the right bottle to the right welded D-ring, valve knob in the bungee loop. The hose with the 2nd stage around the chest and neck and hook it to the right chest D-ring. Whenever possible it is better to clip on the bottles in the water lnsoection before each use use lt is good idea 1o check whether the safety valve and cap nut on the inflator's joint are well tighiened. lf not, tighten well. Check the function of inflating and deflating, and the overpressure valve. Test the sealing of the whole system in the water. We recommend an overall visual inspection before each Maintenance After diving in the ocean, rinse the gear thoroughly with fresh water. The salt crystals might damage the inflator or safety valve, and cause them to become non-functional. lf the compensator is dirty, clean it while paying special attention to the inflation mechanism and safety valve. No other maintenance is necessary After every dive, pour out the water that gets into the wing during deflation. Storage Store the buoyancy compensator in a dry dark place in such a way that the wing cover and hoses are not strained in any way. We recommend laying the wing out on a flat board. lnsoections We recommend doing the inspection described above before every use We highly recommend having a thorough inspection performed once a year by factory trained personnel. Comoensator description Back The material is stainless steel Wing inner bladder: The material is CORDURA 360 with PU coating. lt resists hydrolysis, low temperatures, and hydrocarbons, and has low gas permeability. Wing The material is CORDURA'1000 lnflator mechanism: Simple joint without a deflating valve Corrugated hose with inner lining prevents loosening plates: cover: andstretchingofthehose lnflatormechanismwhichallowsl)regulatedinflationbypressinganlnflatorbutton (placed on the side) with varying force,2) fast deflating by pressing the button at the end of the inflato¡ and 3) inflating of the wing by mouth. Safety Overpressure valve preventing damage or destruction of the wing by over-filling. valve: Certification The Buoyancy Compensator has the Certifìcates ES of revision type no. OOP-253/ES-017312O11 and complies w¡th ÖsN EN 1809. DIAMOND S, DIAMOND M and DIAMoND L are trade marks of models P75-11o1, P75-1102, P75-1103. CE certificates are valid when using the complete system - DIAMOND wing and harness. Set contains - fully assembled harness including all fìttings and knife with sheet - wrng. Additional accessories - special weighting system, trim pockets DIAMOND S .... 2x 7 I bottle DIAMOND M ...2x 11 lbottle 2x12lbottle DIAMOND L. Operating pressure of the inflator is 5-12 bar. Usage temperature range of the compensator Min. water temperature: -1'C Max temperature: 35"C Warranty information The manufacturer provides a warranty on proper functioning of the buoyancy compensator limited in duration to a period ending 2 years from the date of purchase The warranty applies to defects in material and individual parts of the compensator. The warranty does not apply to: - ordinary wear and tear - damages caused by transport - damages caused by using the compensator for purposes other than diving Manufactured bv PLANTEKO, spol s r.o U Mlfna 12 664 51 Kobylnice Czech republic