1
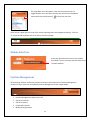
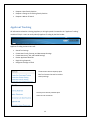
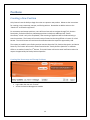
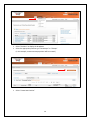
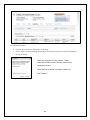
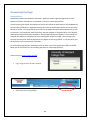
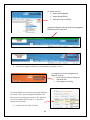
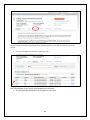
Table of Contents
Introduction .................................................................................................................................................. 3
Access........................................................................................................................................................ 3
User Roles ................................................................................................................................................. 4
eTerp2 Terminology .................................................................................................................................. 6
Login .......................................................................................................................................................... 7
System Overview .......................................................................................................................................... 8
Home Page ................................................................................................................................................ 8
Inbox ......................................................................................................................................................... 8
Watch List ................................................................................................................................................. 9
User Roles ............................................................................................................................................... 10
Module Selection .................................................................................................................................... 11
Position Management ............................................................................................................................. 11
Applicant Tracking................................................................................................................................... 12
Positions ...................................................................................................................................................... 13
Creating a New Position .......................................................................................................................... 13
Creating New Nonexempt and Exempt Positions ............................................................................... 13
Requesting a New Faculty Position ..................................................................................................... 22
Modifying Existing Positions ................................................................................................................... 26
Modify an Existing Nonexempt or Exempt Position ........................................................................... 26
Requesting a Change to an Existing Faculty Position.......................................................................... 32
Searching for Positions............................................................................................................................ 37
Searching for Actions .............................................................................................................................. 40
Postings ....................................................................................................................................................... 45
Creating a New Posting ........................................................................................................................... 46
From an Existing Nonexempt Position ................................................................................................ 46
From an Existing Exempt or Faculty Position ...................................................................................... 54
From the Hourly/GA/Pool ................................................................................................................... 63
Searching for Postings............................................................................................................................. 68
Designating Postings as Filled ................................................................................................................. 72
Approving Actions, Postings, and Hiring Proposals .................................................................................... 75
1
Reviewing Applicants .................................................................................................................................. 79
Exempt and Faculty Searches ................................................................................................................. 79
Search Chairs ....................................................................................................................................... 79
Search Committee Members .............................................................................................................. 94
Hiring Officials ................................................................................................................................... 103
Nonexempt Postings ............................................................................................................................. 112
Hiring Officials ................................................................................................................................... 112
Hiring Proposals .................................................................................................................................... 121
Creating a Hiring Proposal ................................................................................................................ 121
Seating the Position .......................................................................................................................... 127
Additional Information.......................................................................................................................... 129
Reference Information: ..................................................................................................................... 129
2
Introduction
Welcome to the University of Maryland College Park Online Employment and Classification system. This
manual is designed to assist with the understanding and use of the eTerp2 system. Technical support
and training is available through University Human Resources eTerp Customer Service Center. For more
information or assistance, call 301-405-5600 or email: [email protected].
This system is for posting all position types (Nonexempt, Exempt, Faculty, and Hourly/GA/Pooled) as
follows:
•
•
•
•
•
•
Request New Positions
Modify Existing Positions
Request a Waiver of Search
Create Postings
Review Applicant Information
Create Hiring Proposals
Access
Access to the eTerp2 system for Creators, Hiring Officials, Approvers, and Equity Administrators must
first be created and approved on the employees PHR appointment. Access is then implemented by the
eTerp Customer Service Center and available to the employee the following day. Access for Hiring
Officials, Search Chairs/Designees, Search Committee Members, and Guest Users is “individual scope”
and is assigned to a specific posting at the time it is created.
Questions regarding access to eTerp2 should be directed to the eTerp Customer Service Center at 301405-5600 or via email to [email protected].
3
User Roles
Creator
Person who coordinates and begins the hiring and classification actions for
a department/college. This user is responsible for identifying the Hiring
Official in eTerp and moves action forward.
Hiring Official
Person who interviews the finalists and makes the hiring decision. Gives
hiring official charge to search committee. This person is usually the
immediate supervisor of the open position. “Please Note: If the
immediate supervisor is not the hiring official, it is strongly recommended
that the immediate supervisor be included in the hiring official interview
phase and not be a part of the search committee.”
Chair/Dept. Approver
1st Level of Approval - Person who approves hiring and classification
actions for a department. This level would include Directors, Dept. Chairs,
etc.
Dean/VP Approver
2nd Level of Approval - Person who approves hiring and classification
actions for a Division as the Executive Authority (Dean, VP).
Provost/President
Approver
3rd Level of Approval - Person who approves hiring and classification
actions as the Executive Authority (Provost, Pres.).
Equity Administrator
This person is appointed by their Dean or Vice President. They have access
to the system that reflects the following responsibilities.
1. Review the search and selection plan.
2. Charge the search committee at their first meeting.
3. Review finalist list for diversity before it goes to the hiring official.
4. Approve temporary search and selection plans.
5. Monitor the overall search process (both general climate and
specific processes) for equity and diversity at the division level.
Person who reviews hire actions and approves hiring proposals at
the department/college/division level.
University Equity
Administrator
UHR
This unit is a part of the President’s Office and has access to the system
that reflects the following responsibilities.
1. Review the search and selection plan.
2. Assign temporary search ID numbers.
3. Monitor the overall search process (both general climate and specific
processes) for equity and diversity at the University level.
Persons in the central University Human Resources office within
Employment/Classifications.
4
Search Chair/Designee
Person who leads the search committee for a particular hire. This person
will lead the search committee to screen/interview applicants and then
make recommendations for further interviews.
Search Committee
Member
A voting member of the search committee. Responsible for
screening/interviewing applicants.
Major Unit Head
Faculty Position Specialist
This person commits the funds for the open position and approves the
Search and Selection Plan. Provides a final sign-off authorizing the hiring
official to make an offer to the finalist. This is usually a Dean or VP.
This person will receive the requests via eTerp to create new faculty
positions and make changes to existing faculty positions prior to the
Creators or Hiring Officials starting an action.
5
eTerp2 Terminology
eTerp2 – The eTerp system is the official campus system of record for position management and
applicant tracking. It is used to create and route position descriptions, as well as position actions, such
as reclasses, within band adjustments or just job description changes. It is the mechanism for posting all
campus jobs (faculty and staff) and routing hiring proposals.
Position Management Module – The side of the eTerp2 system that houses all positions and position
descriptions. Requests to create new positions or modify existing positions are created from Position
Management. Users will know they are in Position Management if the header appears orange.
Applicant Tracking Module – The side of the eTerp2 system that houses all postings open, closed, and
filled, as well as applicants and hiring proposals. Requests to post positions are created from Applicant
Tracking. Users will know they are in Applicant Tracking if the header appears blue.
Inbox – The Inbox is a notification area where the system will display any items upon, which action is
needed. They will only appear in the user’s inbox, if the items were sent directly to the user.
Watch List – The watch list displays any item that the user has flagged to watch prior to sending
forward.
Take Action on Action – When selected will display a dropdown menu containing all the possible
workflow actions available to users. The workflow actions displayed will depend on the role the user is
logged in under.
Move in Workflow – This is used to change applicant statuses. When selected will display the applicants
statuses available to the user.
Keep Working on Action – Selecting this option will “save” the user’s work.
6
Login
To access eterp2 go to: http://eterp.umd.edu.
To Login enter Directory ID and Password and click Login.
Guest Users should enter the ID and Password provided to them by the Search Chair.
For trouble logging into the system, please contact the eTerp Service Center at x55600 or via email at:
[email protected]
7
System Overview
Home Page
Once logged in users will come to the Home Page. On this page, users will find the Inbox, Watch List,
User Role, and links to training materials.
Inbox
The Inbox gives users an initial view of any Postings, Hiring Proposals, and Actions that require attention.
Once action has been taken on items, they will be removed from the inbox.
8
Click “Inbox” for a more detailed
view of the Inbox.
User Roles are displayed on the left side of
the page and display how many items, if
any need attention.
Toggle between Postings, Hiring Proposals, and Actions to see what items need attention at what User
Role category. If logged in under the correct User Role, items needing attention can be accessed from
the inbox.
Watch List
The Watch List is an easy way to keep track of any Postings, Hiring Proposals, or Actions by flagging
items prior to moving them forward.
9
Click “Watch List” for a more
detailed view of the Watch List.
To remove items from the Watch List:
•
•
Click Actions to display the dropdown box
Select Stop Watching
User Roles
Users can easily see what role they are viewing in the system by looking next to their name.
10
The drop-down menu will appear, if the user has multiple roles. To
toggle between user roles select the new user role from the drop-down
menu and hit the refresh button (
) next to the user roles.
Users will see a green bar at the top of the screen indicating roles have changed successfully. Click the
“X” on the bar OR anywhere else on the bar to close the message.
Module Selection
At the top right side of the screen is the module
drop-down. Hover, the mouse over the down arrow
to switch modules.
Position Management
All Nonexempt, Exempt, and Faculty positions and actions are located in the “Position Management”
module of eTerp2. Users can easily identify Position Management by the orange header.
•
•
•
•
•
Position Management is where users will:
Search for Positions
Search for Actions
Create New Positions
Modify Existing Positions
11
•
•
•
Request a New Faculty Position
Request a Change to an Existing Faculty Position
Request a Waiver of Search
Applicant Tracking
All information related to a Posting, Applicant, or Hiring Proposal is locataed in the “Applicant Tracking”
module of eTerp2. Users can easily identify Applicant Tracking by the blue header.
Applicant Tracking is where users will:
•
•
•
•
•
•
Search for Postings
Create New Faculty, Exempt, and Nonexempt Postings
Create New Hourly, GA, and Pooled Postings
Review Applicant Materials
Begin Hiring Proposals
Designate Postings as Filled
The Shortcuts section displays quick
links for Creators that can be used to
create postings.
The My Links section provides quick
access to user resources.
12
Positions
Creating a New Position
Only Creators have the ability to begin the action to request a new position. Below are the instructions
for creating a new nonexempt, exempt, and faculty position. Remember to add the action to the
“Watch List” to follow the approvals.
For nonexempt and exempt positions, users will have three tabs to navigate through Title, Position
Description, and Action Summary. Nonexempt positions include one additional tab, “Search
Committee,” which is only to be completed, if the screening of applicants will be conducted using a
search committee. The Creator will move the action forward to the Hiring Official or Creator for a 2nd
Review. The initial Creator will receive email notification when the request is approved by UHR.
The request to establish a new faculty position contains three tabs Title, Position Description, and Action
Summary. The Creator will move the action forward to the “Faculty Position Specialist” in Academic
Affairs or to another Creator for 2nd Review. The initial Creator will receive email notification when the
request is approved by the Faculty Position Specialist.
Creating New Nonexempt and Exempt Positions
•
•
Login under the user role “Creator”
Access the Position Management module
13
•
•
Select “Positions” to display the dropdown
Select the appropriate position type “Nonexempt” or “Exempt”
(In this example, a new nonexempt position will be created.)
•
Select “Create New Position”
14
•
Select “New Nonexempt Position” (if the user had chosen Exempt in the beginning, the screen
would display select “New Exempt Position”)
•
•
•
•
Enter the “Functional Title” (if there is no a Function Title, enter the System Title)
Select the Division
Select the Department
Click “Start Action” to begin (“Cancel” to Cancel the action)
Required fields are indicated with an “*”
15
•
•
Select the appropriate Title by highlighting the radio button on the Title page
Click “Next”
Users can narrow the search for titles by:
•
•
•
•
•
Selecting “Filter these results”
In the popup box next to “Search” enter the title being searched
Click “Search”
Highlight the radio button next to the appropriate title
Click “Next”
16
•
•
Fill in all the required fields
Click “Next”
If the user is not attaching any Supplemental Documents, click “Next.” To attach Supplemental
Documents:
•
Next to the document type select “Actions”
17
From the dropdown box, select the appropriate
method to use:
•
•
•
Upload New
Create New
Choose Existing
Only Nonexempt Positions will have the Search Committee Tab available when routing the position
description. To add committee members select “Add Search Committee Entry.”
Enter the following information for each member:
• Name
• UID
• Email
• Race and Gender Information
• Committee Information
18
To add additional committee members select “Add Search Committee Entry.” To remove a committee
member check “Remove Entry” and click “Save.” When finished adding all committee members click
“Next.”
The Summary screen allows users to review all information prior to sending the action forward.
To move the action forward click “Take Action on Action” and select one of the following actions:
• Keep working on this Action – saves the action
• Action Canceled – Cancels the action
• Send to Creator – 2nd review – allows users to send to an additional Creator for review if
necessary
• Send to Hiring Official – sends the action to the Hiring Official
19
•
•
•
•
In the popup box, select the name of the
person to send the action to.
Enter comments for the user selected. These
comments will appear in the systemgenerated email the user receives.
Comments also become part of the historical
record for this action.
Check the box to “Add the action to the watch
list”
Click “Submit” to send the action
Check for the “green” message at the top of the screen to verify the action was successfully
transitioned.
20
Once transitioned, the action will
appear in the user’s watch list, if
the action was flagged when
sending it forward.
The Creator will receive an email
once the position has been
created.
21
Requesting a New Faculty Position
•
•
Select “Positions” to display the dropdown
Select the position type “Faculty”
Select “Create New Position”
Click “New Faculty Position”
22
Fill in the required fields:
•
•
•
•
Functional Title
Division
Department
Click “Start Action”
•
•
Select the appropriate title by highlighting the radio button
Click “Next”
23
•
Complete the required fields and click “Next” (to save the action click “Save”)
From the “Summary” screen, verify all information is correct.
Hover, over the “Take Action on Action” tab to display the dropdown box.
Select the appropriate action:
• Keep working on this Action (saves action)
• Action Cancelled (cancels action)
• Send to Faculty Specialist (sends action to Academic Affairs
to create position)
24
•
Add any comments for the Position Specialist
(becomes part of the historical record)
•
Designate, if adding this action to the “Watch
List”
•
Click “Submit”
When a position is created by the Position Specialist, the Creator will receive an email containing the
position information including the position number.
25
Modifying Existing Positions
Only Creators have the ability to begin the action to modify an existing position. Below are the
instructions for modifying an existing nonexempt, exempt, and faculty position. If reclassifying a
position across position types (i.e., nonexempt to exempt), contact the eTerp Service Center for
instructions. Remember to add the action to the “Watch List” to follow the approvals.
For nonexempt and exempt positions, users will have three tabs to navigate through Title, Position
Description, and Action Summary. Nonexempt positions include one additional tab, “Search
Committee,” which is only to be completed, if the screening of applicants will be conducted using a
search committee. The Creator will move the action forward to the Hiring Official or Creator for a 2nd
Review. The initial Creator will receive email notification when the request is approved by UHR.
The request to modify an existing faculty position contains three tabs Title, Position Description, and
Action Summary. The Creator will move the action forward to the “Faculty Position Specialist” in
Academic Affairs or to another Creator for a 2nd Review. The initial Creator will receive email
notification when the action is approved by the Faculty Position Specialist.
All required fields are indicated with an “*”
Modify an Existing Nonexempt or Exempt Position
•
•
Login under the user role “Creator”
Access the Position Management module
26
•
•
Click “Positions” to display the dropdown box
Select the appropriate position type (In this example, a new exempt position will be created.)
The Exempt positions are displayed at the bottom of the screen. To search for position select “More
Search Options.”
•
Enter the Position Number or Title and click “Search”
27
•
Click the “Title” of the position to be modified
•
From the Summary page select “Modify Exempt Position” (or “Modify Nonexempt Position,” if
applicable)
28
•
Click “Start” to begin the action
• To change the title of the current
position scroll down the page to
search and view all titles.
• If not changing the title, click the
orange “next” button to move to
the next tab.
• If changing title,
highlight the new title by
clicking the radio button
next to the title.
• Click the orange “next”
button to move to the
next tab.
29
•
•
Complete each tab paying close attention to all the required fields
Click “Next” to move to the next tab
To add Supplemental Documents:
• Select the document type being added
• Hover, over the “Actions” button to display the dropdown box
• Select the method being used to upload the document and follow the instructions for attaching
• Select “Next” to move to the next tab
30
•
•
•
From the summary page verify all information is correct
Select “Take Action on Action” to display the dropdown menu
Select the appropriate action
• Select the name of the next user to send
the action to.
• Add comments for the next user if
applicable.
• Check the box to add the action to the
watch list.
• Click “Submit”
When the changes to the position are approved by UHR the Creator will receive an email notification.
31
Requesting a Change to an Existing Faculty Position
•
•
Login under the user role “Creator”
Access the “Position Management” module
•
•
Select “Positions” to display the dropdown
Select “Faculty”
32
Listings of the Faculty positions appear at the bottom of the screen.
To narrow the search, click “More Search Options”
Search by any of the following fields:
• Department
• Status
• Position Number
• When done click “Search”
33
•
Click the “Title” to access the position
•
From the summary page select “Request Change to Existing Faculty Position”
•
Click “Start” to begin the action
34
If not changing the current title, click “Next.”
If changing the titles, scroll to the bottom of the page:
• Highlight the radio button next to the appropriate title
• Click “Next”
35
• Fill in all the required fields
• Click “Next” to advance to the next tab
Note: If moving the position from one department to another, type the new department name in the
box.
•
•
•
From the summary screen select “Take Action on Action” to display the dropdown menu
Select “Send to the Faculty Position Specialist” to move the action forward
Select “Keep Working on this Action” to save information and exit or “Action Canceled” to
cancel the action
When the position has been modified, the Creator will receive an email notification.
36
Searching for Positions
To search for positions or to see a listing of all positions by position type, follow the instructions below.
Access eTerp2 at: www.eterp.umd.edu
•
Login using directory ID and Password
•
•
Verify this is the Position Management side of eTerp2
Verify user role (Search Chair/Designee and Committee Members cannot view the listing of
positions)
37
•
•
Click “Positions” to display the drop down box
Select the Position Type
•
•
Scroll down the page to view all the Positions
Click “Next” or the “Number” to move to the next page
38
•
To narrow the search by Position Number or Department, click “More search options”
•
•
•
Enter Position Number or select Department
Click “Search”
To hide the search fields click “Hide Search Options”
39
Searching for Actions
Users also have the ability to search for any actions that are approved, canceled, or in progress in the
system. Follow the instructions below to search for actions.
Access eTerp2 at: www.eterp.umd.edu
•
Login using directory ID and Password
•
•
Verify this is the Position Management side of eTerp2
Verify user role
40
•
•
Click “Positions” to display the dropdown box
Select the Position Type Actions (e.g. Nonexempt Actions)
Scroll down the page to view the complete listing of all positions
Click “Next” or the “page
number” to view the next
page of actions.
41
To narrow the search by Position Number or Workflow State:
•
Click “More search options”
Narrow the search by selecting or entering:
•
•
Department
Workflow State Position Number
After entering all or any of the above, click “Search.” To hide the search option fields click “Hide Search
Options.”
To select more than one Dept. or Workflow State hold the Shift key and highlight all the fields to be
searched. To remove highlighted fields hold the Ctrl key and click on the highlighted field.
42
To view the details of the action click “Title”
Scroll down the screen to view the position summary
When done return to the listing of actions by using the back button or accessing the “Positions” tab at
the top of the screen.
43
To view the history of the action, click “History.” To exit the screen, use the back button or select
“Positions” from the top of the page.
44
Postings
Postings are created by the Creator for all position types including Hourly/GA/Pooled from the Applicant
Tracking module or by selecting the posting type under the “Shortcuts” box. The Creator will enter all
necessary information and send forward for approval or to the eTerp Service Center for posting. No
changes can be made to the existing position descriptions. The workflow and tabs vary depending upon
the position type with the final step being the eTerp Service Center for posting. Nonexempt and
Exempt Regular or Contingent II postings should only be created after UHR has approved the action
for the position (i.e. create a new position, modify, request target hiring range, etc.).
Nonexempt postings have the following tabs to view/complete:
•
•
•
•
•
Position Information
Posting Details
Search Committee (if applicable)
Supplemental Documents
Summary
Exempt Postings have the following tabs to view/complete:
•
•
•
•
•
•
Position Information
Search and Selection Plan
Search Committee
Applicant Documents
Supplemental Documents
Summary
Faculty postings are also created by the Creator. Any changes to the position should first be routed as
an action to the Faculty Position Specialist. Faculty Postings have the following tabs to view/complete:
•
•
•
•
•
•
Position Information
Search and Selection Plan
Search Committee
Applicant Documents
Supplemental Documents
Summary
Below are the instructions for creating a new nonexempt, exempt, and faculty position.
45
Creating a New Posting
From an Existing Nonexempt Position
•
Login using directory ID and Password
•
•
Verify this is the Applicant Tracking side of eTerp2
Verify logged in as a “Creator”
46
Begin the posting by selecting the position type under “Postings” or from the “Shortcuts” box.
If the posting began by selecting the
position type, under the Positions drop
down box click:
•
47
Create New Posting
Select “Create from Position”
Scroll down the page to view all the Nonexempt positions. Narrow the search by selecting or entering
the Department, Status, or Position Number.
48
To access the position being posted click “Title”
View the position summary by scrolling down the page or begin creating the posting by selecting:
•
Create Posting from this Position
49
Enter the required information and click:
•
Create New Posting
The Position Information tab displays the approved position details. Click “Next” to move to the next
tab.
50
Posting Details is where the posting, closing date, and any special posting or advertising instructions for
UHR is entered.
The Search Committee tab is view only, for Nonexempt positions this was completed in the original
action.
51
To add Supplemental Documents such as Advertising text etc., click the “Actions” tab to display the drop
down box.
Select the method used to upload
the document:
• Upload New
• Create New
• Choose Existing
Follow the instructions on the
screen to attach and confirm the
document(s)
52
The Summary page allows users to view all the tabs from one page. If any required fields are omitted,
they will be indicated on this page. To move the posting forward select:
•
Take Action on Posting
To move the posting forward select:
• Send to eTerp Service Center for Posting
To save the information and move forward later select:
• Keep working on this Posting
•
•
•
Enter any comments for the eTerp Service
Center
Check the box to Add the Posting to the
Watch List
Click “Submit”
The Creator will receive email notification when the
position has posted
53
From an Existing Exempt or Faculty Position
•
•
•
•
Login using directory ID and Password
Verify this is the Applicant Tracking side of
eTerp2
Verify the user role is selected as a
“Creator”
Begin the posting by selecting the position type under “Postings” or from the “Shortcuts” box.
54
If the posting began by selecting the
position type, under the Positions drop
down box click:
•
Create New Posting
Select “Create from Position”
•
Scroll down the page to view all the Exempt positions. Narrow the search by selecting or
entering the Department, Status, or Position Number.
55
•
To access the position being posted click “Title”
View the position summary by scrolling down the page or begin creating the posting by selecting:
•
Create Posting from this Position
56
Fill in all required fields and click:
•
Create New Posting
The Position Information screen displays the position details from the approved action and cannot be
edited.
•
Click “Next” to move to the next tab.
The Search and Selection (S&S) Plan contains posting information including the Open and Closing dates.
The S&S Plan must be routed to the Search Chair prior to posting. After entering all required
information:
•
Click “Next” to move to the next tab.
57
The Search Committee tab must be completed prior to posting. This tab can be completed by the
Creator or the Search Chair. To add the members of the Search Committee and to designate the Search
Chair and Search Designee:
•
Click “Add Search Committee Entry”
•
Fill in the information for each Committee Member as applicable
58
To add a new member click
•
•
Add Search Committee Entry
Click “Next” when all members have been added to move to the next screen
To remove a member check:
•
“Remove Entry” and click “Save”
Faculty postings will have one additional tab “Temp Faculty Appointments,” which should only be
completed if the posting is a position being filled under the temporary search ID number.
The Applicant Documents tab is where it indicates what application materials will be required or
optional when applying. Users can indicate in which order the documents will open when viewing as a
committee member (i.e. Cover Letter, Resume, or List of References, etc.).
59
•
•
•
•
To select the required applicant documents place a check in both the Included Box and the
Required Box next to the name of the document type
Warning: if “required” is checked, but “included” is unchecked the document will not be
included
To select optional documents place a check in only the “Included” box next to the name of
document type
To indicate the order in which to view applicant documents place the number 1, for the first
document to be viewed, 2 for the next, etc.
Click “Save” when done
In this example, the required documents are a Cover Letter, Resume, and a List of References. When
committee members review the application material, they will open in the following order, Cover Letter,
Resume, and List of References. Note, the Curriculum Vitae is not checked as included or required and
will not appear as part of the applicant documents.
60
Online References tab should only be completed, if using this feature.
To add Supplemental Documents such as Advertising text etc., click the “Actions” tab to display the
dropdown box.
61
Select the method being used to
upload the document:
• Upload New
• Create New
• Choose Existing
Follow the instructions on the screen
to attach and confirm the document(s)
The Summary page allows users to view all the tabs from one page. If the user has left any required
fields out, it will be indicated on this page. To move the posting forward select:
Take Action on Posting
To move an Exempt posting forward in the workflow
select:
• Send to Hiring Official
• Send to Creator – 2nd Review
To move a Faculty posting forward in the workflow
select:
• Send to Creator – 2nd Review
• Send to Search Chair/Designee
62
From the Hourly/GA/Pool
•
•
Login using directory ID and Password
•
Verify this is the Applicant Tracking side of
eTerp2
Verify the user role is selected as a “Creator”
•
Begin the posting by selecting the position type under “Postings” or from the “Shortcuts” box.
63
If beginning the posting from the “Postings”
drop down box, click:
•
For Hourly Postings select “Create from Position Type”
Fill in all required information and select:
• Create New Posting
64
Create New Posting
Accepted Application Forms:
For Nonexempt hourly postings use the General Application
For Hourly Faculty and Exempt postings use UMD Profile
For Hourly/GA/Pooled postings, all position types have the same tabs. Complete each tab as
appropriate for the position type being posted. Fill in all required information and click “Next” to move
through each tab.
The tabs should be completed for the following position types:
Posting Details – all position types
Temporary Appointments – Faculty only
Search and Selection Plan – Faculty, Exempt, and GA
Applicant Documents – Faculty, Exempt, and GA
Guest User – All position types, if applicable
Search Committee – All position types
Online References – Faculty, Exempt, and GA
Supplemental Documents – All Position Types
65
After completing the applicable tabs, select:
•
Take Action on Posting
Depending on the position type and the users Divisions Workflow for hourly postings select one of the
following options to move the posting forward:
•
•
•
Send to Creator – 2nd Review
Send to Hiring Official
Send to eTerp Service Center
66
If moving, to the Creator – 2nd Review
• Select the name of the Creator to send the posting to
• Enter any applicable comments
• Check the box to add to watch list
• Click “Submit” to move the posting forward
If sending, to the Hiring Official or the eTerp Service Center:
• Enter any applicable comments
• Check the box to add to watch list
• Click “submit” to move the posting forward
The Creator will receive an email when the position has been posted.
67
Searching for Postings
Postings are displayed by position types in the system. Users have the ability to search for postings at
any stage, i.e. posted, closed, removed from the web, and filled, etc. Below are the instructions to follow
when searching for postings.
Login using Directory ID and Password
Verify the Applicant Tracking module
•
From the Postings dropdown menu select the position type being searched, Nonexempt,
Exempt, Faculty, or Hourly/GA/Pooled positions
68
After selecting the position type, the first page the user lands on will always display the current, posted
positions the user has access to view. User role determines what information users are allowed to view
(i.e., active applicants)
Narrow the search by selecting:
•
•
•
•
The Workflow State
Department
Position Number
Click “Search” when done
69
•
To view the posting click the “Title” of the position being viewed
There are additional “view” options under the Actions drop down menu.
The “Summary” page is the first tab users will see after selecting to view the posting.
70
To access any of the other tabs associated with the posting simply click the name of the tab to be
viewed. The user’s view of the information on each tab will depend upon their user role.
To return to the listing of posted positions:
•
Click the position type (i.e., Exempt) at the top of the posting
To exit the posting screen completely select any of the navigational tabs at the top of the page:
Home | Postings | Hiring Proposals | My Profile | Help
71
Designating Postings as Filled
The last step in the posting process is to designate the posting as filled. This step can only be done by
the Creator. Once the Hiring Official has identified a candidate for hire, their final step will be to send
the posting to the Creator to designate as filled. After the posting is sent, it can be found in the user’s
inbox.
There cannot be any active applicants and the posting must be closed and removed from the web.
Below are the steps to follow to designate a posting as filled.
•
Login using Directory ID and Password
•
•
Verify this is the Applicant Tracking module
Verify the user role is Creator
To change user role:
•
•
•
Click the down arrow to display the drop down box
with all user roles assigned
Select Creator
Click the refresh arrow to change roles
If successful, the user will receive a green notification at the
top of the page
72
•
To access the posting from the inbox click the “Title” of the position
•
Click “Take Action on Posting”
•
Select “Posting Filled (move to Filled)
•
Keep Working on this Posting saves
information
•
Return to Hiring Official – only if,
there is a problem designating the
posting filled
73
•
Place any applicable comments
•
Check box to now remove from watch list
•
Click “Submit”
74
Approving Actions, Postings, and Hiring Proposals
Approvers are notified via email when an action, posting, or hiring proposal in eTerp2 has been sent for
approval. Only the selected “Approver” receives the email notification and the item can be found and
accessed from the approvers Inbox.
Access eTerp2 at: https://eterp.umd.edu
•
Login using Directory ID and Password
Verify “User Role”
To change user role:
•
Click the arrow to display the drop down menu
•
Highlight the User Role
•
Click the “Refresh Arrow”
75
The user will receive a green notification message at the top of the screen indicating the new role.
Items needing attention can be found in the “Inbox.” The inbox displays:
•
•
•
The number of items needing attention
The user role being viewed
The number of items under each module
•
To view the items requiring attention click the appropriate tab
76
•
To access the item click the “Title”
•
Verify from the summary page that all information is correct.
To approve or move the action forward:
Take Action on Action
Select the appropriate action based on user role in
the position type workflow:
Keep working on this Action – saves the action
77
• Select the name of the next user from the
drop down box
• Add comments for the next user, if
applicable
• Add to watch list to follow (optional)
• Click “Submit”
The next user will receive an email notification an item needs their attention.
78
Reviewing Applicants
The review of candidate applications is perhaps the most important function in the search process.
Search and Selection guidelines are available and are designed to ensure that for all position types, each
search conducted encourages a diversity of participants from the beginning of the process—the
development of the search committee if applicable, to the end, the selection of a diverse group of
finalists and employees.
The official Search and Selection Guidelines for all position types at UMD are available on line at:
http://www.provost.umd.edu/diversity/publications/Equity_Charge.pdf
Exempt and Faculty Searches
Searches for regular faculty and exempt positions require the appointment of a Search Committee. Each
Search Committee will have a Search Chair. The Search Chair may designate a Search Chair/Designee to
provide administrative support.
Search Chairs are required to sign off on the Search and Selection Plan and complete the plan if
applicable. The S&S plan should describe the ways in which candidates will be recruited for the position,
as well as special efforts to attract a diverse pool of candidates. It should also define the methods by
which applicants will be evaluated and the procedures for selecting finalists.
Before evaluating applicants, the committee should discuss and come to consensus about the standards
for evaluating the applicants. These standards must be followed consistently for all candidates and
throughout the search process.
It is required that the Search Chair or Search Chair/Designee change the applicant statuses for each
applicant that has applied as the search progresses. As part of an initial review, all resumes/curriculum
vitae (CV) should be reviewed to determine which candidates meet the minimum qualifications for the
position. At the next level, all resumes or CVs should be reviewed in detail against a pre-determined set
of objective criteria related to the position description and job duties.
Once the Search Committee has completed its review of the candidate pool, it will identify a group of
candidates to be interviewed. From the interviews, a list of “finalists” will be identified, which in eTerp
will be sent to Equity for approval. If approved by Equity, these candidates will then be sent in eTerp to
the Hiring Official for further consideration.
79
Search Chairs
Signing off on Search and Selection Plan
Search Chairs are required to sign off on the Search and Selection Plan and complete, if applicable. The
S&S plan should describe the ways in which candidates will be recruited for the position, as well as
special efforts to attract a diverse pool of candidates. It should also define the methods by which
applicants will be evaluated and the procedures for selecting finalists.
Below are the instructions for reviewing the S&S Plan:
Access eTerp2 at: https://eterp.umd.edu
Login using Directory ID and Password
•
Verify user role is Search Chair/Designee
To change role:
• Access the drop down
• Select Search Chair/Designee
• Click the arrow to refresh
A green message is displayed at the top of the
screen informing users of the new role.
Contact the eTerp Service Center at x55600, if unable to access the correct user role
80
•
Verify on the “Applicant Tracking” module (header will appear in blue)
To change from Position Management to
Applicant Tracking:
• Hover over the arrow to display the
drop down box
• Select Applicant Tracking
•
Items needing attention will appear in the “Inbox” under the Postings tab. The listing is
displayed by Job Title, Type of Position, The Current State, and who is the current Owner of the
Posting.
81
•
Click the “Title” to access the posting requiring approval
•
Scroll down the page to view a summary of the position
•
Click “Edit” to access the Search and Selection Plan
82
•
•
Enter required information (if the information is not completed) and click “Next”
Continue until reaching the Summary screen
•
To move the action forward in the workflow click “Take Action on Posting”
If S&S Plan is complete, highlight the appropriate
“Workflow” as determined by position type:
• Exempt: Send to Equity Admin (move to Equity
Admin)
• Faculty: Send to Hiring Official (move to Hiring
Official)
The Return option should only be selected, if there was
a problem with the S&S Plan.
Keep Working on the Posting – Saves the information.
83
•
•
•
•
Select a name if moving to Equity (A Hiring Official will be prepopulated)
Add comments for the next user (these comments will be retained in history as part of the
permanent record)
Check the box to add to Watch List
Click “Submit” to move forward
Reviewing Applicants and Changing Applicant Statuses
As applicants apply to the posting, Search Chair/Designee and Committee Members will have access to
the applicants and their associated documents. The Search Chair/Designee is the only role that has the
ability to change the applicant’s status. It is required that ALL applicants have their statuses changed as
the search progresses. Below are the instructions for reviewing applicants, applicant documents, and
changing statuses.
Access eTerp2: eterp.umd.edu
Login using Directory ID and Password
•
Verify user role is Search Chair/Designee
84
To change role:
• Access the drop down
• Select Search Chair/Designee
• Click the arrow to refresh
A green message will appear at the top of the
screen informing user of the new role.
Contact the eTerp Service Center at x55600, if unable to access the correct user role
•
Verify the “Applicant Tracking” module (header will appear in blue)
To change from Position Management to
Applicant Tracking:
• Hover over the arrow to display the
dropdown box
• Select Applicant Tracking
85
•
•
Click “Postings” to display the dropdown box
Highlight and click the position type being accessed
After selecting the position type, a summary page is displayed with all currently posted positions.
Additionally, the summary page displays useful information such as title, position number, posting
number, posting/closing date, unit, workflow state, and the number of active applicants.
To access postings at a different workflow such as closed and removed from the web select “More
search options.”
86
Highlight the workflow state being searched (i.e., Closed/Removed from Web) and click Search
•
•
To access the posting click the title link
The summary page displays useful information such as title, position number, posting number,
posting/closing date, unit, workflow state, and the number of active applicants.
87
All information related to the posting is now available for the Search Chair/Designee.
•
To access applicants click the “Applicants” tab
This screen displays all the “active” applicants in the pool.
To view applicants individually click the applicant’s Last Name.
88
•
Scroll down the page to view the applicant’s information or click “Preview Application” to view
the information
At the bottom of the screen, users will find multiple ways to view the required applicant documents
such as resume and cover letter
To view documents separately click the link next to the document type
To view all documents in one PDF click “Application and attached documents”
89
To view multiple applicants and documents at one time:
Place a check in the box next to “Last Name”
Hover over the “Actions” tab to display the menu options
Select “Download Applications as PDF”
User has the option of viewing all applicant
materials or limiting on certain documents.
To limit on certain documents:
Select “Only These Document Types”
Select the documents to be viewed
To exit the documents page simply use the back button
90
After reviewing the applicants, their statuses should be changed appropriately. Applicant statuses can
be changed by accessing each applicant separately or by selecting more than one applicant.
•
•
Select the applicant(s) being change
Select “Move in Workflow”
•
•
Click the down arrow to display the applicant statuses
Highlight the appropriate applicant status
•
Click “Save Changes” or Cancel to cancel selected choices
Notice the green message at the top of the screen
91
As the applicant statuses are changed throughout the search, the remaining “Active” applicants will
display on the screen. Accessing the “Inactive” can be done at any time:
•
•
Select “More Search Options”
Highlight “Inactive” and click “Search”
Once all applicants are reviewed, statuses are updated, and finalists have been selected they must be
sent to Equity for review. The only applicants that should be “Active” at this time are the finalists with
the applicant status of “Recommend as Finalist.” To forward the finalist to Equity:
•
•
•
•
Attach the minutes under “Supplemental Documents”
Click the down arrow on “Take Action on Posting”
Select “Send Recommended Finalist to Equity Administrator”
“Keep Working on This Posting” saves work to send at a later time
92
NOTE: For open until filled positions, the action of sending the finalists to Equity will close and remove
the posting from the web. Contact the eTerp Service Center to have it reposted.
To remove a posting from the web prior to sending the finalist to Equity contact the eTerp Service Center.
93
Search Committee Members
As applicants apply to the posting, Committee Members will have access to the applicants and their
associated documents.
Access eTerp2 at: https://eterp.umd
•
Login using Directory ID and Password
•
Verify user role is Search Committee Member
94
To change user role:
access the drop down
select Search Chair/Designee
click the arrow to refresh
A green message appears at the top of the screen informing users of new role
Contact the eTerp Service Center at x55600, if unable to access the correct user role
•
•
Verify on the “Applicant Tracking” module (header will appear in blue)
User must be in Applicant Tracking to access postings
To change from Position Management to
Applicant Tracking:
• Hover over the arrow to display the drop
down box
• Select Applicant Tracking – the page will
update automatically
95
To access the posting a user has been assigned:
Click “Postings” to display the position types
Highlight and click the position type (i.e., Exempt)
This page displays positions that are currently posted and as a Search Committee Member, the user has
access to
To Search for postings that are closed and
removed from the web:
• Select “More search options”
96
•
•
Highlight the “Workflow State” or “Department” or enter a “Position Number”
Click “Search”
To access assigned position:
• Click the title of the position
97
The Summary Page allows committee members to view the position details such as minimum
qualifications, position summary, etc.
To access applicants click “Applicants”
The applicant page displays relevant applicant information such as name, application date, and
workflow state.
98
This screen displays all the “active” applicants in the pool.
• To view applicants individually click the applicant’s Last Name.
To view “Inactive” and “Active” applicants:
• Click “More Search Options”
• Highlight “Inactive”
• Highlight both “Active” and “Inactive” to view all applicants
99
•
To view applicants individually, click the applicant’s Last Name
•
Scroll down the page to view the applicant information or click “Preview Application” to view
the information
100
At the bottom of the screen, users will find multiple ways to view the required applicant documents
such as cover letter and resume.
• To view documents separately under the “Required Documents” click the link next to the
document type
• To view all documents in one PDF click “Application and attached documents”
To view multiple applicants and documents at one time:
• Place a check in the box next to “Last Name”
• Hover over the “Actions” tab to display the menu options
• Select “Download Applications as PDF”
101
Users have the option of viewing all
applicant materials or limiting on certain
documents.
To limit on certain documents:
• Select “Only These Document Types”
• Select the documents to be viewed
• Click “Submit”
A status message will appear
indicating the file is generating.
Once the file is generated, the documents will open as a PDF. To exit the documents page simply use
the back button.
102
Hiring Officials
When the search committee has identified the finalists, the Search Chair will forward the list to Equity
for review. If approved, the Equity Administrator will then forward the finalist to the Hiring Official. It is
at this point that the Hiring Official can begin reviewing the finalists and conduct the interviews. The
Hiring Official is required to change the applicant statuses appropriately as the search progresses until
the final candidate is identified and “Recommended for Hire.” Below are the instructions for reviewing
the finalists and their applicant documents.
To access eTerp2 go to: http://eterp.umd.edu
•
Login using Directory ID and Password
•
Verify user role is Search Chair/Designee
To change role:
• Access the dropdown
• Select Hiring Official
• Click the arrow to refresh
A green message appears at the top of the screeninforming user of new role.
Contact the eTerp Service Center at x55600, if unable to access the correct user role
103
•
Verify on the “Applicant Tracking” module (header will appear in blue)
To change from Position Management to
Applicant Tracking:
• Hover over the arrow to display the
drop down box
• Select Applicant Tracking
•
•
Click “Postings” to display the dropdown box
Highlight and click the position type being accessed
After selecting the position type, a summary page is displayed with all currently posted positions. The
summary page displays useful information such as title, position number, posting number,
posting/closing date, unit, workflow state, and the number of active applicants.
104
•
•
•
To access postings on a different workflow such as closed and removed from the web
select “More search options”
•
Highlight the workflow state being search (i.e., Closed/Removed from Web) and click
Search
To access the posting click the title link
The summary page displays useful information such as title, position number, posting number,
posting/closing date, unit, workflow state, and the number of active applicants
105
All information related to the posting is now available for the Search Chair/Designee.
•
To access the applicants click the “Applicants” tab
This screen displays all the “active” applicants in the pool.
• To view applicants individually click the applicant’s last name
106
•
Scroll down the page to view the applicant information or click “Preview Application” to view
the information
At the bottom of the screen, users will find multiple ways to view the required applicant documents
such as resume and cover letter.
• To view documents separately, click the link document link under
• To view all documents in one PDF, click “Application and attached documents”
107
To view multiple applicants and documents at one time:
• Place a check in the box next to “Last Name”
• Hover over the “Actions” tab to display the menu options
• Select “Download Applications as PDF”
Users have the option of viewing all applicant
materials or limiting on certain documents.
To limit on certain documents:
• Select “Only These Document Types”
• Select the documents being viewed
To exit the documents page simply use the back button
After reviewing finalists, their statuses should be changed appropriately. Applicant statuses can be
changed by accessing each applicant separately or by selecting more than one applicant.
• Select the applicant(s) being change
• Select “Move in Workflow”
108
•
•
•
Click the down arrow to display the applicant statuses
Highlight the appropriate applicant status
For Finalist-Not Selected select a reason
•
Click “Save Changes” or Cancel to cancel the choices
•
Notice the green message at the top of the screen
109
As the finalists statuses are changed throughout the search, the remaining “Active” applicants will
display on the screen. Users can access the “Inactive” at any time:
•
•
Select “More Search Options”
Highlight “Inactive” and click “Search”
The remaining finalist should be the candidate that is recommended for hire. Once the approval is given
to hire the candidate a Hiring Proposal should be created and routed for approval. Both the Creator and
Hiring Official have the ability to create the Hiring Proposal. The final action of the Hiring Official is now
to send the posting to the Creator to designate as filled.
110
To send to the Creator:
•
•
Click the down arrow on “Take Action on Posting”
Select “Send to Creator to Designate Posting as Filled (move to Send to Creator to Designate
Posting as Filled)”
Enter any comments for the Creator. These
comments will be stored in history as part of the
permanent record.
Check the box to add this posting to watch list.
Click “Submit”
111
Nonexempt Postings
Hiring Officials
Nonexempt positions are posted for two weeks. Applicants submit a general application for each
position of interest. Resumes are not accepted in eTerp for nonexempt positions.
Once the posting has closed, the employment analyst will review the applications of the candidates for
the minimum qualifications. Applicants meeting the minimum qualifications will be sent to the Hiring
Official for review. The Hiring Official will review the candidates and select which applicants they wish
to interview. These applicants should have their statuses changed to “Recommend for List of Eligible”
and those not selected should be changed to “Not Recommended (List of Eligible).” Once statuses are
changed, the applicants should be sent to the employment analyst for review. Once reviewed, the
employment analyst will send the approved List of Eligible to the Hiring Official. It is at this point, that
the applicants can be contacted for interviews.
For information regarding the nonexempt search process, contact the Employment Office at x55679.
Below are the instructions for the reviewing applicants for nonexempt positions.
Access eTerp2 at: https://eterp.umd.edu
•
Login using Directory ID and Password
•
Verify user role is Hiring Official
112
To change user role:
•
•
•
access the dropdown
select Hiring Official
click the arrow to refresh
A green message at the top of the screen appears
informing user of new role.
•
•
Contact the eTerp Service Center at x55600, if unable to access the correct user role
Verify on the “Applicant Tracking” module (header will appear in blue)
To change from Position Management to
Applicant Tracking:
• Hover over the arrow to display the
drop down box
• Select Applicant Tracking
The Hiring Official can access the posting and applicants
from their “Inbox” once the eligible candidates have
been sent by the Employment Analyst. The applicants
will not be viewable until this point. To access the
posting from the Inbox:
•
Click the title link under “Job Title”
113
All information related to the posting and the qualified applicants are now available for the Hiring
Official.
•
To access the applicants click the “Applicants” tab
This screen displays all the “active” qualified applicants in the pool.
• To view applicants individually click the applicant’s last name.
114
•
Scroll down the page to view the applicant information or click “Preview Application” to view
the information
•
•
To view the application in another format click “Application”
To exit the application simply use the back button
115
To view multiple applications at one time:
• Place a check in the box next to “Last Name”
• Hover over the “Actions” tab to display the menu options
• Select “Download Applications as PDF”
•
•
•
Select “Application and All Documents
Click “Submit”
To exit the documents page simply use the back button
After reviewing the finalists their statuses, should be changed appropriately. Applicant statuses can be
changed, by accessing each applicant separately or by selecting more than one applicant.
• Select the applicant(s) being changed
• Select “Move in Workflow”
116
•
•
•
•
Click the down arrow to display the applicant statuses
Highlight the appropriate applicant status
For Finalist-Not Selected select a reason
Click “Save Changes”
•
Notice the green transition message at the top of the screen
117
The applicants selected as “Recommended for List of Eligibles” must be sent to the Employment Analyst
for review. Applicants should NOT be contacted for interviews, until the Analyst has reviewed and
approved the selected candidates. To send the selected applicants to Employment:
•
•
Click the down arrow on “Take Action on Posting”
Click “Send Selected Eligibility/Interview List to UHR”
•
•
•
•
Select the Employment Analyst
Add any comments for the Analyst
(comments become part of the historical
record of the posting)
Check to add to Watch List
Click “Submit”
Once the Employment Analyst reviews the selected candidates, they will change the applicant statuses
of those selected to “UHR Approved List of Eligibles.” The approved List of Eligibles will be sent to the
Hiring Official and can be accessed from the Inbox. At this point, the applicants can then be contacted.
Interviewing from the Approved List of Eligibles
Verify user role:
•
•
•
access the dropdown
select Hiring Official
click the arrow to refresh
A green message at the top of the screen appears
informing user of new role.
•
Contact the eTerp Service Center at x55600, if unable to access the correct user role
118
The Hiring Official can access the
posting and applicants from their
“Inbox” once the approved list of
eligibles, has been sent by the
Employment Analyst. To access the
posting from the Inbox:
• Click the title link under “Job Title”
•
To access the applicants click the “Applicants” tab
To view multiple applications at one time:
• Place a check in the box next to “Last Name”
119
•
•
Hover over the “Actions” tab to display the menu options
Select “Download Applications as PDF”
•
•
Select “Application and All Documents”
Click “Submit”
As the applicants are interviewed, their statuses should be changed appropriately until a candidate has
been selected.
The candidate selected for hire should have the status of “Recommended for Hire.” Other candidates
should be set to “Interviewed – Not Advanced Further” or “Interviewed-Finalist-Not Selected.”
120
Hiring Proposals
Once a candidate has been selected and the status changed to Recommend for Hire, a hiring proposal
should be created and routed for approval. Both Creators and Hiring Officials have the ability to begin
the Hiring Proposal. Below are the instructions for creating the Hiring Proposal.
Creating a Hiring Proposal
Access eTerp2 at: https://eterp.umd.edu
•
Login using Directory ID and Password
•
Verify user role is Hiring Official or Creator
121
To change user role:
• Access the drop down
• Select Hiring Official or Creator
• Click the arrow to refresh
A green message at the top of the screen appears
informing user of new role.
•
•
Contact the eTerp Service Center at x55600, if unable to access the correct user role
Verify on the “Applicant Tracking” module (header will appear in blue)
To change from Position Management to
Applicant Tracking:
• Hover over the arrow to display the
dropdown box
• Select Applicant Tracking
122
To access the postings:
•
•
Hover over the “Posting” tab at the top of the page
Highlight and click the position type
The initial postings page will display a listing of all “Posted” positions. To search for postings that are
closed and removed from the web or at another status:
•
Click “More Search Options” to display the additional search categories
The search can be narrowed by limiting on:
•
•
•
Workflow State, Department, or Position Number
Click “Search”
Click “Hide Search Options” to close the additional search categories
123
To access the posting and the applicant:
•
Click the title of the position
•
Click “Applicants” to access the candidate
124
The only applicant(s) on the screen should be those that are at the status of “Recommend for Hire.” To
begin the hiring proposal:
•
Click the “Last Name” of the applicant
•
Click “Start Hiring Proposal”
•
If appointing to the same position number that was posted scroll to the bottom of the page and
click “Select Position”
•
To appoint to a position number other than the one that was posted scroll to find the position
and select by clicking in the radio button, click “Select Position”
125
•
•
•
Fill in all required information such as Proposed Hire Date, and Salary then click Next
Attach any documents relevant to the search under Supplemental Documents (Note: the
applicant documents appear in the hiring proposal at the bottom of the summary screen), click
Next
Continue to the Summary Page and verify information is correct
•
From the Summary Page click the down
arrow on “Take Action on Hiring Proposal”
•
Depending upon the position type (see
workflow) select the next role to send to
•
•
•
•
Select the name of the next user (if applicable)
Enter any comments for the next user (the comments
are stored in history as part of the permanent record)
Click the box to add to watch list
Click Submit
The next user will receive a system-generated email informing
them an item in eTerp2 needs attention
126
Seating the Position
Once the Hiring Proposal is routed and approved, it will be sent to the Creator to Seat the Position. The
Creator will receive a system generated email notification and can access the Hiring Proposal from their
inbox. Below are the instructions for seating the position.
Access eTerp2 at: https://eterp.umd.edu
•
Login using Directory ID and Password
•
Verify user role is Creator
•
Click the “Hiring Proposal” tab on the Inbox to display awaiting items
127
•
Click the “Job Title” to access the Hiring Proposal
To Seat the position:
• Click the down arrow on “Take Action on Hiring Proposal”
To seat the position select:
• Creator Seats Position (move to Hiring
Proposal Approved)
Keep working on this Hiring Proposal saves the
action
Return to Hiring Official, if changes need to be
made
Once the Hiring Proposal(s) have been approved and seated the Creator, should access the posting and
designate the posting as filled. This is the final step of the posting process and can only be completed by
the Creator.
128
Additional Information
Reference Information:
Requesting reference information can be required or optional in the system. The Creator, Hiring Official,
or Search Chair has the option to select how they wish to receive the applicant’s references. There are 3
separate features in the eTerp2 system: List of References, Letters of Reference, and an On Line
Reference Feature. To avoid confusion for applicant’s only one form of obtaining references should be
used.
On Line Reference Feature: This feature allows the Search Chair to send a system generated email to
the providers that were entered by the applicant at the time they applied. This feature can be optional
or required. The reference letters are confidential and applicants do not have access to read them. The
applicant will enter as part of the application package the names and email addresses of their providers.
The Search Chair/Designee has the responsibility of changing the applicant status to “Send On Line
References” in order for the email to be sent to each provider. Prior to sending the Search Chair can
write detailed instructions to the reference providers, as well as a completion message.
List of References: This feature is selected as part of the applicant documents. It can be required or
indicated as an optional document. The applicant will attach a list of their reference providers. The
Search Chair/Designee will contact the providers outside of the eTerp system to obtain reference
information.
Reference Letters: This feature is selected as part of the applicant documents. It can be required or
optional and is attached by the applicant.
Using the Ranking Criteria – coming soon
Sending System Generated Emails – coming soon
129
130