1
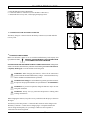
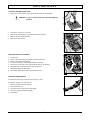
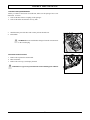
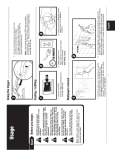
AUTOMATIC SCRUBBER
MODEL 20C
OPERATING & MAINTENANCE
INSTRUCTIONS
INTRODUCTION
READ THIS BOOK
This operator’s book has important information for the use
and safe operation of this machine. Read this book carefully before starting the machine. Keep this book and tell
all operators to read the book. If you do not follow the
instructions, you can cause an injury or damage equipment,
furniture or buildings.
The contents of this manual are based on the latest product
information available at the time of publication. Triple S
reserves the right to make changes or improvements to its
machines without notice.
For additional information refer to the Triple S website
www.triple-s.com or write to:
Triple S
2 Executive Park Drive
Billerica, MA 01862
FOR YOUR CONVENIENCE, RECORD THIS
IMPORTANT INFORMATION:
Carefully inspect all components to ensure that there is no
concealed freight damage. If such damage is discovered,
file a “CONCEALED DAMAGE REPORT” immediately
with the delivering carrier.
MODEL_______________________________
SERIAL NUMBER______________________
PART NUMBER ________________________
DATE PURCHASED ____________________
TABLE OF CONTENTS
IMPORTANT SAFETY INSTRUCTIONS
SYMBOLS USED ON THE MACHINE
MACHINE PREPARATION
○
○
○
○
○
○
○
○
○
○
○
○
○
○
○
○
○
OPERATION
○
○
○
OPERATING
DEVICE TOO FULL
MOVEMENT
○
○
○
○
○
○
○
○
○
○
○
○
○
○
○
○
○
○
○
○
○
○
○
○
○
○
○
○
○
○
○
○
UPON COMPLETION OF THE WORK
DAILY MAINTENANCE
○
○
○
○
○
○
○
CLEANING THE RECOVERY TANK
CLEANING THE VACUUM FILTER
CLEANING THE SQUEEGEE
REPLACING THE SQUEEGEE BLADES
DISASSEMBLY OF THE BRUSH
WEEKLY MAINTENANCE
○
○
○
○
○
○
○
○
○
○
○
○
○
○
○
○
○
○
○
○
○
○
○
○
○
○
○
○
○
○
○
○
○
○
○
○
○
○
○
○
○
○
○
○
○
○
○
○
○
○
○
○
○
○
○
○
○
○
○
○
○
○
○
○
○
○
○
○
○
○
○
○
○
○
○
○
○
○
○
○
○
○
○
○
○
○
○
○
○
○
○
○
○
○
○
○
○
○
○
○
○
○
○
○
○
○
○
○
○
○
○
○
○
○
○
○
○
○
6
○
○
○
○
○
7
○
○
○
○
○
○
○
○
○
○
○
8
9
○
○
○
○
○
○
○
○
○
○
○
○
○
○
○
○
○
○
○
○
○
○
○
○
○
○
○
○
○
○
○
○
○
○
○
○
○
○
○
○
○
○
○
○
○
○
○
○
○
○
○
○
○
○
○
○
○
○
○
○
○
○
○
○
○
○
○
○
○
○
○
○
○
○
○
○
○
○
○
○
○
○
○
○
○
○
○
○
○
○
○
○
○
○
○
○
○
○
○
○
○
○
○
○
○
○
○
○
○
○
○
○
○
○
○
○
○
○
○
○
○
○
○
○
○
○
○
○
○
○
○
○
○
○
○
○
○
○
○
○
○
○
○
○
○
○
○
○
○
○
○
○
○
○
○
○
○
○
○
○
○
○
○
○
○
○
○
○
○
○
○
○
○
○
○
○
11
○
○
○
10
○
○
○
○
○
○
○
○
○
○
○
○
○
○
○
○
○
○
○
○
○
○
○
○
○
○
○
○
○
○
○
○
○
○
○
○
○
○
○
○
○
○
○
○
○
○
○
○
○
○
○
○
○
○
○
○
○
○
○
○
○
○
○
○
○
○
○
○
○
○
○
○
○
○
○
○
○
○
○
○
○
○
○
○
○
○
○
○
○
○
○
○
○
○
○
○
○
○
○
○
○
○
○
○
○
○
5
○
○
○
3
○
○
○
○
○
○
○
○
○
○
○
○
○
○
○
○
○
○
○
○
○
○
○
○
○
○
○
○
○
○
○
○
○
○
○
○
○
○
○
○
○
○
○
○
○
○
○
○
○
○
○
○
○
○
○
○
○
○
○
○
○
○
○
○
○
○
○
○
○
○
○
1. UNPACKING THE MACHINE
2. BATTERY INSTALLATION
3. CONNECTING THE BATTERY CHARGER
4. CHARGING THE BATTERIES
5. CONNECTING THE BATTERY CONNECTOR
6. BATTERY CHARGE LEVEL INDICATOR
7. SQUEEGEE ASSEMBLY
8. ADJUSTING THE SQUEEGEE HEIGHT
9. ADJUSTING THE SQUEEGEE INCLINATION
10. INSTALLING THE SPLASH GUARD
11. BRUSH INSTALLATION
12. RECOVERY TANK
13. SOLUTION WATER
○
○
13
14
15
○
○
12
16
○
CLEANING THE SQUEEGEE HOSE
SOLUTION TANK CLEANING
TROUBLE SHOOTING GUIDE
○
○
○
○
○
○
○
○
○
○
○
○
○
○
○
○
○
○
○
○
○
○
○
○
○
○
○
○
○
○
○
○
○
○
○
○
○
○
○
○
○
○
○
○
○
○
○
○
○
○
○
○
○
○
○
○
○
○
○
○
○
○
○
○
○
○
○
○
○
○
○
17
INSUFFICIENT WATER ONTO THE BRUSH
THE MACHINE DOES NOT CLEAN SATISFACTORILY
THE SQUEEGEE DOES NOT DRY THE FLOOR WELL
EXCESSIVE FOAM PRODUCTION
WARRANTY POLICY
○
○
○
○
○
○
○
○
○
○
○
○
○
○
○
○
2
18
IMPORTANT SAFETY INSTRUCTIONS
READ AND UNDERSTAND ALL INSTRUCTIONS AND WARNINGS BEFORE OPERATING
THIS MACHINE!
WARNING: To reduce the risk of fire, electric shock or injury:
1. You must have training in the operation of the machine before using it. READ THE
INSTRUCTION BOOK. If you do not understand any instruction, ask your supervisor.
2. Make sure all labels, decals, warnings, cautions and instructions are fastened to the machine.
3. Read the labels carefully on the machine. Do not cover them for any reason and replace them
if damaged.
4. Do not operate this machine unless it is completely assembled, inspect the machine carefully
before operation.
5. Pay close attention to other people and especially children while operating this machine.
6. Be a careful driver, do not strike shelving or scaffolding, especially where there is a danger of
falling objects.
7. Machines can cause an explosion when operated near flammable materials and vapors. Do
not use this machine with or near fuels, grain dust, solvents, thinners, or other flammable
materials.
8. In case of fire, use a powder extinguisher. Do not use water.
9. Do not use this machine as a means of transport.
10. Do not use acid solutions that could damage the machine.
11. Adjust your speed to the conditions of the floor.
12. Do not turn the machine on a ramp. Do not stop and leave the machine on a ramp or incline.
13. When the machine is parked, take out the key and set the parking brake.
14. During any maintenance operation disconnect the power supply from the machine.
15. Lead acid batteries generate gases that can cause an explosion. Read the instruction manual
supplied with the battery charger. Keep sparks and flames away from batteries.
NO SMOKING. Charge the batteries only in an area with good ventilation.
16. Do not use a charger if the power cord is damaged.
17. Always wear eye protection and protective clothing when working near batteries. Remove all
jewelry. Do not put tools or other metal across the battery terminals, or the tops of the batteries.
18. Check the level of the electrolyte every time you charge the batteries. If the level is low, add
distilled water only.
19. Maintenance and repairs must be performed by authorized Service Centers only. Make adjustments according to the specifications given in the service manual for this machine.
20. Keep the electrical parts of the machine dry. Do not wash the machine with direct water jets or
high pressure, nor with corrosive material. For storage, keep the machine in a dry building.
21. Water solutions or cleaning materials used with this type of machine can leave wet areas on
the floor surface. These areas can cause a dangerous condition for the operator or other persons. Always put CAUTION signs near the area you are cleaning.
22. Do not reach under shrouds with fingers, hands, or toes when machine is running.
3
SYMBOLS USED ON THE MACHINE
Symbol for the water lever:
Indicates the valve is open.
Symbol indicating the raised or lowered position of the brush base:
Indicates the lever for lifting the brush base.
Symbol for the brush:
Indicates the brush motor switch.
Symbol for the vacuum motor:
Indicates the vacuum motor switch.
Symbol indicating the raised or lowered position of the squeegee:
Indicates the squeegee lever position.
Symbol indicating the charge levels of the batteries:
It is necessary to recharge the batteries when the green light begins to blink
Indicates the drain hose of the recovery tank.
Indication of the maximum recommended temperature for the solution water (50°C or
122°F): It is located near the fill hole of the solution tank.
Symbol for the coupling:
Indicates the anchor points and the load direction.
4
5
MACHINE PREPARATION
1. UNPACKING THE MACHINE
1.
2.
3.
4.
Use a fork truck to move the machine when packaged.
Take off the outer package
The machine is fixed on the pallet with wooden wedges that block the wheels.
Take the wedges off.
5.
Using a ramp, pull the machine down from the pallet, pushing it in reverse
motion. Avoid violent blows to the base.
2. BATTERY INSTALLATION
The two 12 volt batteries fit in the compartment under the recovery tank.
For battery maintenance and charging, follow the instructions
provided by the battery supplier.
Installation Instructions:
1. Lift the recovery tank forward.
2. Detach the squeegee hose (1) from the recovery tank.
3. Take off the vacuum plug (2) by rotating it counterclockwise.
4. Remove the drain hose from its’ hook and take the recovery tank off.
6
2
1
MACHINE PREPARATION
5. Place the batteries in their compartment.
6. Connect the batteries’ connector (2) to the machine’s connector (1).
7. Reassemble the recovery tank, vacuum plug and squeegee hose.
2
1
3. CONNECTING THE BATTERY CHARGER
The battery chargers’ connector fits into the battery connector (2) located under the
recovery tank.
4. CHARGING THE BATTERIES
Make sure the battery charger is for use with the installed battery, both capacity and
type (lead/acid or GEL).
WARNING! NEVER CHARGE A GEL BATTERY WITH
AN INCORRECT BATTERY CHARGER.
NEVER ALLOW THE BATTERIES TO RUN COMPLETELY DOWN, recharge them
within a few minutes after the battery indicator starts blinking. Never leave the batteries
completely discharged, even if the machine is not being used.
WARNING! When charging the batteries, follow all the instructions
provided with this manual and the battery charger. Trained staff must carry
out the installation and maintenance operations.
WARNING! Fire Danger: Lead acid batteries generate gases that can cause
an explosion. Keep sparks and flames away from batteries. NO SMOKING!
WARNING! To prevent an explosion, charge the batteries only in an area
with good ventilation.
WARNING! Always wear eye protection and protective clothing when
working near batteries.
When charging the batteries, keep the recovery tank lifted with the prop as shown in
the figure.
Turn the key to the OFF position. Connect the DC connector on the charger to the
DC battery connector. Connect the AC charger plug to a receptacle that has the
correct voltage and frequency for your charger. Make sure the receptacle is
connected to the electrical ground.
7
2
MACHINE PREPARATION
5. CONNECTING THE BATTERY CONNECTOR
After charging the batteries, reconnect the battery connector (2) to the connector of
the machine (1).
6. BATTERY CHARGE LEVEL INDICATOR
The batteries’ indicator is digital with 4 fixed positions and a blinking one. The
numbers, which appear on the display, show the approximate charge level.
4 = maximum charge, 3 = charge 3/4, 2 = charge 2/4, 1 = charge 1/4,
0 = (blinking) discharged batteries)
NOTE: The brush motor automatically switches off a few seconds after the battery
indicator light begins to blink. By restarting the machine, you will be allowed to turn
on the vacuum motor and finish drying any wet areas.
7. SQUEEGEE ASSEMBLY
The squeegee is assembled as shown in the figure. The squeegee lever should be in
its up position. Insert the holding pin into the squeegee stud bolt to secure the
squeegee in place. Then fit the squeegee hose into its coupling; the hose should be
located to the right of the lifting cable.
8. ADJUSTING THE SQUEEGEE HEIGHT
The height from the floor to the squeegee should be adjusted based on the blade’s wear.
Rotate the wing nuts (1) counter-clockwise to lift the squeegee and clockwise to lower
it.
Note: Adjust the right and left wing nuts the same amount; the squeegee should be
positioned parallel to the floor.
8
1
MACHINE PREPARATION
9. ADJUSTING THE SQUEEGEE INCLINATION
During operation, the rear squeegee blade is most efficient when tilted back about
3/16 inch (5mm) along its whole length. To increase the blade bending in the central
part, tilt the squeegee body backward by turning the adjuster counter-clockwise.
Subsequently, turn the adjuster clockwise to increase the bending at the sides of the
squeegee blade.
5mm
10. INSTALLING THE SPLASH GUARD
The splash guard should be installed as shown in the picture.
11. BRUSH INSTALLATION
1.
Lift the brush base with the foot pedal.
2.
Place the brushes under the base. Line up the lugs with the holes in the brush plate.
Insert the brushes into the plate and turn each brush so the lugs are pushed toward
their retaining springs, until locked in place.
The picture shows the direction of rotation for the right brush. The left brush is
rotated in the opposite direction.
9
MACHINE PREPARATION
3. Invert the positions of the right and left brushes daily. However, if the brushes are
not new and have deformed bristles, it is better to reassemble them in the same position.
Because the different inclination of the bristles may cause an overload to the brush
motor and excessive vibrations.
12. RECOVERY TANK
1
Open the lid and confirm the following connections are secure:
1. The vacuum plug (2) is securely attached, turn clockwise to tighten.
2. The vacuum hose (1) is attached.
3. The plug on the drain hose (on the back of the machine) is inserted.
13. SOLUTION WATER
Fill the solution tank with clean water at a temperature not more than 50°C/122°F. Add
the proper concentration of liquid detergent by following the manufacturer instructions.
Excess foam in the recovery tank can damage the vacuum motor, so use only the minimum amount of detergent necessary. Reassemble the cover.
WARNING!: Always use low foaming detergent. Adding antifoam liquid into
the recovery tank before cleaning will also help prevent foaming. NEVER USE
PURE ACID.
10
2
OPERATION
OPERATING
1.
Connect the machine connector (1) to the battery connector.
1
2.
3.
Press the brush motor switch (2).
Press the vacuum motor switch (3).
3
4.
5.
6.
Adjust the amount of cleaning solution through the lever (4). There should be
enough solution to wet the floor uniformly, but not so much that it gets past the
splash guard. Remember that the correct solution quantity depends on the type of
floor, the dirt and the speed.
Release the pedal and lower the brush base.
Lower the squeegee using lever (5).
7. The brushes start turning by pressing on the lever (6). During the first few yards of
operation, check that the quantity of the cleaning solution is sufficient and that the
squeegee dries the floor surface.
11
2
5
4
6
OPERATION
DEVICE TOO FULL
The machine is equipped with a float that stops the vacuum when the recovery tank is
full. When this occurs, empty the recovery tank by removing the plug on the drain
hose.
WARNING! Use gloves for protection from contact with dangerous
solutions.
MOVEMENT
The movement of this machine is obtained through brush assistance.
There is no separate traction drive motor in this unit.
WARNING! Lift the squeegee when moving backward.
12
UPON COMPLETION OF THE WORK
After finishing your work and before any type of maintenance is done, it is necessary
to do the following:
1.
2.
3.
Close the water valve through lever (1).
Raise the brush base with the pedal.
Lift the squeegee with lever (2). Note: The squeegee blades can be damaged if the
squeegee is not raised during storage or transport.
4.
5.
6.
Switch off the brush switch (3).
Switch off the vacuum motor switch (4).
Transport the machine to the location where the recovery tank should be emptied.
2
1
4
7.
Empty the recovery tank by removing the drain plug from the drain hose.
WARNING! Use gloves for protection from contact with dangerous
solutions.
8.
Take the brush off and clean it with water (for brush disassembly please read the
section “DISASSEMBLY OF THE BRUSH”).
13
3
DAILY MAINTENANCE
CLEANING THE RECOVERY TANK
1.
Empty the recovery tank by removing the drain plug from the drain hose.
WARNING! Use gloves for protection from contact with dangerous
solutions.
2.
3.
4.
5.
Lift the cover of the recovery tank.
Take off the vacuum plug (1) by rotating it counter-clockwise.
Remove the filter and its housing.
Rinse the tank with water.
1
CLEANING THE VACUUM FILTER
1.
2.
3.
4.
5.
6.
7.
8.
Lift the cover.
Take off the vacuum plug by rotating it counter-clockwise.
Remove the filter and its housing.
Use water to clean the walls and the bottom of the filter.
If necessary, loosen the screws which lock the filter to the housing.
Rotate the filter counterclockwise until it is released.
Wash all components thoroughly.
Reassemble repeating the above operations inversely.
CLEANING THE SQUEEGEE
To obtain the best drying results, keep the squeegee clean.
To clean the squeegee it is necessary to:
1. Remove the hose from the squeegee.
2. Loosen the knobs (1).
3. Clean the inside of the squeegee thoroughly.
4. Clean the squeegee blades thoroughly.
5. Reassemble.
1
14
DAILY MAINTENANCE
REPLACING THE SQUEEGEE BLADES
Check the squeegee blades for wear and if necessary, change them.
To replace the squeegee blades:
1. Remove the squeegee hose from its coupling.
2. Take off the pin from the stud bolt.
3. Remove the squeegee from its support.
4. Loosen the wing nuts (1) that lock the rubber blades and take them off.
5. Replace the blades.
6. To reassemble the squeegee, repeat the above operations inversely.
1
DISASSEMBLY OF THE BRUSH
To remove the brushes:
1. Lift the brush base with the pedal.
2. Make sure the brush switch (1) is OFF.
1
3.
Rotate each brush until they come off the brush plate. The figure shows the
rotating direction for releasing the right brush. Rotate in the opposite direction to
release the left brush.
15
WEEKLY MAINTENANCE
CLEANING THE SQUEEGEE HOSE
Weekly or whenever the suction is insufficient, make sure the squeegee hose is not
obstructed. To clean:
1. Take off the hose from its coupling on the squeegee.
2. Take off the other end from the recovery tank.
3.
4.
Wash the inner part of the hose with a water jet from the tank side.
Reassemble.
WARNING! Do not wash the hose that goes from the vacuum motor
to the vacuum plug.
SOLUTION TANK CLEANING
1
1. Remove the cap from the solution tank.
2. Rinse with water.
3. Remove the outer cap (1) and empty the tank.
WARNING! Use gloves for protection from contact with dangerous solutions.
16
TROUBLE SHOOTING GUIDE
INSUFFICIENT WATER ONTO THE BRUSH
1. Make sure the water valve is open (lever 1).
2. Confirm there is water in the solution tank.
1
THE MACHINE DOES NOT CLEAN SATISFACTORILY
Check the condition of the brush and replace it if necessary. The brush should be
replaced when the bristles reach about 5/8 inch (15mm).
THE SQUEEGEE DOES NOT DRY THE FLOOR WELL
1.
2.
3.
4.
5.
6.
7.
Check that the squeegee blades are clean.
Adjust the inclination of the squeegee (see “MACHINE PREPARATION” #9).
Confirm the vacuum hose is correctly fitted in its housing on the recovery tank.
Take off the entire vacuum assembly and clean it.
Replace the blades if worn.
Check that the vacuum motor switch is on.
Check the squeegee height adjustment (see “MACHINE PREPARATION #8).
EXCESSIVE FOAM PRODUCTION
Check that a low foam detergent has been used. If required, add a small quantity of
antifoam liquid into the recovery tank.
Remember that more foam is generated when the floor is not very dirty. Use less
detergent if this is the case.
REFER TO THE PARTS & SERVICE MANUAL FOR ELECTRICAL SCHEMATICS
17
SSS AUTOMATIC SCRUBBER, MODEL 20C
LIMITED WARRANTY
The SSS Automatic Scrubber, Model 20C has been manufactured, tested and inspected in accordance with specific engineering requirements,
and is WARRANTED by the manufacturer to be free from defects in workmanship and materials.
This warranty is, however, subject to the following qualifications, conditions and limitations which are set forth to provide you and all users
of the SSS Automatic Scrubber with information concerning the duration, extent, availability and applicability of this Limited Warranty, the
procedure to be taken to obtain its performance and other information concerning the manufacturer’s warranty policy.
1. TO WHOM EXTENDED AND DURATION OF ITEMS COVERED
This warranty extends to the original consumer purchaser from the date it
was purchased and for the items and periods as follows:
Battery Warranty: Any original Battery which becomes unserviceable
under normal use within a period of ninety (90) days from date of sale to
the original user will be repaired or replaced with one of equal specification,
F.O.B. any authorized Triple S Sales or Service Branch, with no charge to
user, except transportation costs. After the expiration of the above ninety
(90) day period, any battery which fails under normal use will be adjusted
to the original user with a new battery of equal specification on a twelve
(12) month pro rata basis from the date of purchase. Adjustment will be
determined using the then current list price, plus transportation costs. Warranty is rendered null and void if battery is not kept filled to the proper
level with DISTILLED WATER.
Ten (10) years parts, one (1) year labor – Polyethylene components
Five (5) years parts, one (1) year labor– Main Frame
Two (2) years parts, one (1) year labor– Brush Drive Motors
One (1) year parts, one (1) year labor– All other components unless
excluded below.
Travel time for warranty repair is authorized for a period of ninety (90)
days following the date of sale to the end user, with a maximum of
three (3) hours per claim.
2. PARTS NOT COVERED BY WARRANTY
Certain parts of the SSS Automatic Scrubber require replacement in the
ordinary course of use due to normal wear by reason of their characteristics.
This warranty does not cover normal wear items such as carbon motor
brushes, floor brushes, belts, hoses, squeegee blades, etc.
3. EXCEPTIONS AND EXCLUSIONS FROM WARRANTY
Defects, malfunctions, failure or damage of the SSS Automatic Scrubber
caused by improper, unreasonable or negligent use or abuse while in the
possession of the consumer are likewise excluded from this warranty.
If repair is done on your SSS Automatic Scrubber by anyone other than
those below designated as authorized to perform such work without first
having obtained factory instructions, the manufacturer, at its sole option,
may determine that this warranty will not apply and that reimbursement
for such repair will not be made because of the failure to comply with
such factory specified instructions.
8/04
4. PROCEDURE TO BE TAKEN TO OBTAIN PERFORMANCE
OF WARRANTY
To secure repair of the SSS Automatic Scrubber or any warranted parts
under this warranty, the following procedure should be taken: The inoperative SSS Automatic Scrubber or warranted parts, together with satisfactory
evidence of the purchase date, must be delivered with shipping and delivery
charges prepaid to the Dealer from whom purchased.
If you are unable to locate the Dealer, you may write or otherwise communicate with Triple S, 2 Executive Park Drive, Billerica, MA 01862
for instructions before repair service is performed by anyone else. In such
event Triple S will provide either the location of a closely available Triple
S distributor Service Department or other factory instructions.
Upon compliance with the above procedure, all warranted defects will
be repaired, at no additional charge or costs to the consumer, and the
repaired product returned to the consumer, with all shipping and delivery
charges prepaid.
In following the procedures above set forth PLEASE MAKE CERTAIN
to state the Triple S model, type and serial number as shown on the name
plate of the SSS Automatic Scrubber.
REPLACEMENT
In the event of the defect, malfunction or failure of your SSS Automatic
Scrubber or any warranted part to conform with this warranty, the manufacturer may at its sole option and own expense, replace the SSS Automatic
Scrubber or any warranted part with another new identical or reasonably
equivalent model or part in lieu of repairing the defect.
5. NO REFUND OF PURCHASE PRICE
Triple S will not, as a matter of its warranty policy, refund the consumer’s purchase price.
6. WARRANTY REGISTRATION CARD FOR YOUR SSS
AUTOMATIC SCRUBBER AND REQUESTS FOR INFORMATION
Please fill out the warranty registration card accompanying your SSS
Automatic Scrubber, giving complete information as requested on the card,
and return to Triple S.
This warranty is in lieu of all other expressed or implied warranties.
865607