1
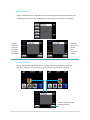
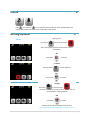
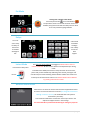
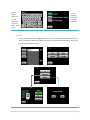
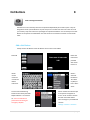
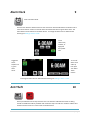
tattletale
User Guide
Consumer unit version 2.48
1|P a g e
Contents
Basic
1 ................................................................................................................................ 4
Base Unit Features .................................................................................................................................................... 4
Initial Setup ............................................................................................................................................................... 4
Arming ....................................................................................................................................................................... 5
Disarming .................................................................................................................................................................. 5
Quiet Button .............................................................................................................................................................. 5
Settings ...................................................................................................................................................................... 5
Settings
2 .................................................................................................................................. 6
Quick Buttons ............................................................................................................................................................ 6
Sensors
3 ......................................................................................................................................... 6
Add a Door/Window Sensor ...................................................................................................................................... 6
Delete a Sensor ......................................................................................................................................................... 8
Edit a Sensor .............................................................................................................................................................. 8
Bypass a Sensor ......................................................................................................................................................... 9
Sensor Indicators ....................................................................................................................................................... 9
Chime
Arming Options
4 .................................................................................................................................... 10
5 ........................................................................................................................... 10
Home ....................................................................................................................................................................... 10
Away ........................................................................................................................................................................ 10
Pet Mode ................................................................................................................................................................. 11
Delays ...................................................................................................................................................................... 11
Instant Mode ........................................................................................................................................................... 11
When an Alarm Occurs ............................................................................................................................................ 11
Users
6 .......................................................................................................................... 12
Add a User ............................................................................................................................................................... 12
Delete a User ........................................................................................................................................................... 13
Edit a User ............................................................................................................................................................... 13
Remote .................................................................................................................................................................... 14
Remote Operation ................................................................................................................................................... 15
Edit PIN #
Hot Buttons
7 ......................................................................................................................................... 15
8 .................................................................................................................................. 16
Add a Hot Button..................................................................................................................................................... 16
Arm a Hot Button .................................................................................................................................................... 17
Delete a Hot Button ................................................................................................................................................ 17
Edit a Hot Button ..................................................................................................................................................... 18
Alarm Clock
9 ................................................................................................................................. 19
Anti Theft
10 ............................................................................................................................ 19
Advanced Features
11 ............................................................................................................. 20
Contacts................................................................................................................................................................... 20
Custom Alerts .......................................................................................................................................................... 21
Test .......................................................................................................................................................................... 21
Screen Saver ............................................................................................................................................................ 21
Timers ...................................................................................................................................................................... 22
Panic Keys ................................................................................................................................................................ 22
2|P a g e
Tamper .................................................................................................................................................................... 23
Review Log .............................................................................................................................................................. 23
More Features
12 ............................................................................................................................. 24
Name System........................................................................................................................................................... 24
Nightlight ................................................................................................................................................................. 24
Brightness ................................................................................................................................................................ 25
Reset to Factory ...................................................................................................................................................... 25
Power Down ............................................................................................................................................................ 25
Glossary 26
3|P a g e
Basic
1
Base Unit Features
Motion Detector
Cellular Radio
Dual Speakers
Strobe Light
SD Card Slot
LCD Touchscreen
A/C Power Port
Rattlesnake Technology
Initial Setup
Plug the supplied power cord into the A/C power port on the back of tattletale base unit. Plug the A/C adapter into
a grounded outlet. Follow the on-screen tutorial to create a PIN number, enter your mobile phone and email
address, and learn in the remote. If text or email notifications are not desired press No when prompted.
Signal Strength: Indicates the strength of the cell signal. Five white bars indicate full strength,
five RED bars indicate no cell service.
Message: Indicates that a message has been sent (white) or received (green), when received
the unit will make a swooshing sound.
Time: This is the time of day at your location. It is set automatically.
Motion Detector: Indicates the built-in motion detector is seeing movement.
Battery Charge: Indicates the level of charge of the alarm system battery. RED icon indicates
that the unit is unplugged from AC power.
4|P a g e
Arming
To arm push Away
icon will turn red
OR
Press Away
on Remote
A 60 second countdown will begin to exit the area
Disarming
When movement is detected by the built-in motion detector
there will be 30 seconds to disarm with PIN
Push Disarm icon
and enter PIN
OR
Press Unlock
on the Remote
Quiet Button
For peace and quiet push the Quiet button (keypad will be silenced and chime will
be taken to half volume).
Settings
Push to access Quick Buttons; you must enter PIN
Hint
Prevents someone from stealing your tattletale
You can have a tattletale and pets
5|P a g e
Settings
2
Quick Buttons
Anti Theft: Push to provide base unit security when the unit
is not armed. When tattletale senses that it is being moved
an audible tone will be produced until movement stops. Anti
theft will activate after exiting Settings.
Sensors
3
Push to manage sensors
Add a Door/Window Sensor
Push Add, you will have two minutes to place the sensor in learn mode. Learn sensor into the
system by pressing the center of the large contact. The unit will chime confirming sensor
enrollment.
6|P a g e
Choose door or window for the sensor
Door Sensor: When Front,
Back, or Garage is selected
user is taken to sensor sound.
When Custom is selected a list
of perimeter and interior
sensor locations will be
presented (see below).
Window Sensor: A list of
interior sensor locations will
be presented. Touch to
highlight choice of location
and push Done.
Touch to
highlight
location.
Use arrows
to scroll.
Push Done.
Sensor Sound: A custom sound can be added to each sensor. If this
sensor is in alarm the selected sound will repeat three times before
system siren begins. This provides audible recognition of which sensor
has been tripped. When highlighted a sample of the sound is emitted.
Siren is the main system siren sound. Push Done.
Sensor List: The added sensor will now appear on the list
7|P a g e
Delete a Sensor
To remove a sensor from the system highlight the sensor name then push delete. Confirm deletion
by pressing yes or no. The sensor will now be removed from the system and sensor list.
Edit a Sensor
To edit the name, action, chime, or sound of a sensor highlight the sensor in the sensor list and
push edit.
Highlight to
select
sensor type
(see
glossary)
Push Done
Delete the
current
name and
rename
sensor.
Push Done
Highlight to select sound. Push Done.
8|P a g e
Bypass a Sensor
Bypass is used when the user would like to have that sensor ignored through one arm/disarm cycle
(example, you would like to have a window sensor open but still arm the system). Push Bypass.
Highlight
the sensor
name you
would like
to bypass.
Push Bypass
Bypassed
lights up on
the left.
Push
Remove to
take off.
Sensor Indicators
The Home Screen will indicate open sensors or sensors with trouble conditions. Pushing the
Sensors or Trouble icons takes the user to a list screen that shows all present conditions.
Sensor bypass here as well
PIN input required
9|P a g e
Chime
4
Push
to turn chime on
the unit will emit chime sound when chime enabled sensors are
tripped. When Quiet is activated Chime will be taken to half volume.
Arming Options
5
Staying Home?
Home
Push Home
system arms instantly
with a hot (instant) perimeter and all interior sensors
are disabled.
OR
Press Home
on remote
To Disarm
Push the Disarm
icon and input PIN.
OR
Press Unlock
Away
on remote
Leaving?
Push Away
icon will turn red
All sensors are hot with at least one door delay to allow for
re-entry without tripping tattletale
OR
Press Away
on remote
A 60 second countdown will begin to exit the area
(To change delay time Go to Settings > Features > Timers)
10 | P a g e
Pet Mode
Leaving Pets or People in the Home?
Push Away and Pet off
to turn Pet Mode on
The perimeter sensors are hot and all interior sensors are
disabled, entry/exit sensors will have delay active to allow
for re-entry without tripping tattletale.
Delays
You must
arm in Away
for delays. A
60 second
countdown
will begin to
exit.
A 30 second
countdown
will begin
once a delay
sensor has
been
tripped
(To change delay times Go to Settings > Features > Timers)
Instant Mode
Press Home or Away twice
Disarm
The base unit motion detector will trigger an instant alarm as soon as
motion is detected. All other sensors behave normally based upon arming
mode.
To enable Instant Mode press Home or Away two times. Press one time,
pause until you hear double chirp indicating unit is armed, press again and
unit will chirp four times indicating Instant Mode is enabled. The motion icon
on the top bar of Home Screen will turn red. Instant Mode must be disabled
by pressing unlock on the remote.
When an Alarm Occurs
When there is an alarm the sensors that have been tripped will be listed
on screen. The siren will sound for 5 minutes (To change siren time Go to
Settings > Features > Timers). The strobe will flash until system is
disarmed for your safety.
Text and Email notifications will have the name of your alarm in the
subject and tripped sensors in the message.
You must subscribe to professional monitoring for emergency response
11 | P a g e
Users
6
Push to manage Users
Add a User
Push Add, you will be guided through entering a PIN, naming, selecting privilege level, and the option
to add a remote. Privilege levels include: Level 1 is disarm only, Level 2 is disarm and has the ability
to bypass sensors, Level 3 has full privilege to the system which includes configuring the system and
operation of Hot Buttons. Add up to 20 Users and remotes to the system. “Master” is the User that
input information in the initial set-up and has complete control over the system. “Master can be
edited (PIN, Remote, and Name) but it can not be deleted or have Privileges restricted.
Push Add to
create a
new User.
4 digit PIN
that is
different
from other
Users
Delete the
current
name and
rename
User. Push
Done
Select level
of access.
Push Done.
If you have
a remote to
add for this
User push
Yes. If not
push No, go
to User List.
Press any
button on
the remote.
The unit will
chime when
enrolled.
12 | P a g e
Select
Police,
Medical, or
No Alert for
the remote
panic
feature.
Push Done.
The new
User will
now appear
on the User
List. Push
Done to
exit.
Delete a User
To remove a User from the system highlight the User name then push delete. Confirm deletion by
pressing yes or no. The User will now be removed from the system. If a remote was assigned to the
User it will be deleted as well.
Edit a User
To edit the User PIN, Remote, Name, or Privileges highlight the User name and push Edit. Privilege
levels include: Level 1 is disarm only, Level 2 is disarm and has the ability to bypass sensors, Level 3
has full privilege to the system which includes configuring the system and operation of Hot Buttons.
To Edit PIN
enter a 4
digit PIN
that is
different
from other
Users
13 | P a g e
To Edit
Name
delete the
current
name and
enter new
name. Push
Done
To edit
Privileges
select level
of access.
Push Done.
Remote
To add, delete, or edit a remote highlight User on the User List and push Edit and then Remote. If a
remote is already enrolled you can edit the panic feature or delete the remote. Add a remote if one
has not been assigned to the User.
14 | P a g e
Remote Operation
tattletale remote can arm the system in Home, Away, and Instant Modes, Disarm, enable a Panic
Alarm, and operate Chime once enrolled.
You must subscribe to professional monitoring for emergency response
Press and hold top two buttons for 3 seconds to enable Panic
Arm Home
Disarm
Arm Away
Chime On/Off
To enable Instant Mode press Home or Away two times. Press one time, pause until you hear double chirp
indicating unit is armed, press again and unit will chirp four times indicating Instant Mode is enabled. The
motion icon on the top bar of Home Screen will turn red as well.
Edit PIN #
7
Push to manage PIN
Push to change the User PIN number used to arm, disarm, or change settings on the unit. The User’s
PIN input to enter Settings will be the only code modified. The Master user or any Level 3 User can
modify all User codes in Settings > Users > Edit > PIN #
15 | P a g e
Hot Buttons
8
Push to manage Hot Buttons
Hot Buttons act as an auxiliary alarm that is operated independently of the main system. They are
designed for assets you would like to stay hot until you turn it off and so that no one else can undo
your security. Only Users with Level 3 privileges can operate Hot Buttons. You can add up to four Hot
Buttons to the system. Each Hot Button can have its own siren and chime sound or it can be made
silent.
Add a Hot Button
Add up to four Hot Buttons. Each Hot Button can have one sensor added.
Push Add
Follow the
instructions
provided
with sensor
to learn in.
Delete
current
name and
rename Hot
Button.
Push Done.
Select a
sound for
Hot Button.
Turn Silent
on (blue) to
have a silent
alarm.
To have Central Monitoring
Station receive alarm push CMS
Dispatch button. It is red when
on. You must subscribe to
professional monitoring for
emergency dispatch.
Phone numbers and emails input
in the system will appear on
screen. Touch to select contacts
that will receive Hot Button
alarm messages. Input additional
contacts
Settings > Features > Contacts
16 | P a g e
Hot Button List: Hot Button
name will now appear on the
list.
Arm a Hot Button
Once a Hot Button has been added the Hot Button icon will appear on the Home screen. Chime will be
enabled push the sound icon to disable.
Push the icon and input PIN to arm. An open lock
icon will appear if the sensor is closed and ready to arm. Push to arm, the lock will turn red. When the
sensor is open the lock will appear yellow
pushing the yellow lock will bring up the open sensor
list. Sensors on Hot Buttons can not be bypassed and must be closed to arm. When armed the “H” in
the Home screen Hot Button icon will turn red. To disarm push Hot Button icon, input PIN, and push
red lock.
Delete a Hot Button
To remove a Hot Button from the system highlight the Hot Button name then push Delete. Confirm
deletion by pressing yes or no. The Hot Button and Hot Button sensor will now be removed from
the system.
17 | P a g e
Edit a Hot Button
To edit the Name, Sound, or Alerts highlight the Hot Button name on the list and push Edit.
Delete
current
name and
rename Hot
Button.
Push Done.
To have Central Monitoring
Station receive alarm push CMS
Dispatch button. It is red when
on. You must subscribe to
professional monitoring for
emergency dispatch.
Select a
sound for
Hot Button.
Turn Silent
on (blue) to
have a silent
alarm.
Phone numbers and emails input
in the system will appear on
screen. Touch to select contacts
that will receive Hot Button
alarm messages. Input additional
contacts
Settings > Features > Contacts
18 | P a g e
Alarm Clock
9
Push to set Alarm Clock
Push the Hour button to advance time in1 hour increments. Push the Min button to advance time in
5 minute increments. Push on to activate alarm clock the button will turn green when active. The
Alarm Clock icon will activate on the Home Screen. To change the Alarm time or deactivate the
feature go to Settings > Alarm > Clock
To set
volume low,
medium, or
high push
the speaker
icon.
To turn off
Alarm at set
wake-up
time push
Turn Off or
10min
Snooze.
Toggle the
Alarm
On/Off. Icon
is green
when
active.
To change the Alarm time or deactivate the feature go to Settings > Alarm > Clock
Anti Theft
10
Push to provide base unit security when the unit is not armed. If tattletale senses that it is being
moved an audible tone will be produced until movement stops. Icon will turn red when enabled. Unit
must be at home screen or in screen saver to activate feature.
19 | P a g e
Advanced Features
11
Push to access Advanced Features
Manage Contacts, Custom Alerts, send a Test message, Screen Saver, Timers, Panic Keys, Tamper,
Review Log, or More Advanced Features. Only Level 3 Users have access to this menu.
Contacts
Add up to 5 email and 5 text Contacts to receive messages from the system. All Contacts entered will
receive Alarm messages. To add text push the +Text button, to add email push the +Email button. To
edit or delete a text or email highlight the contact and push the appropriate function.
20 | P a g e
Custom Alerts
To customize the messages sent for non-alarm events highlight the Alert name from the Alerts List
and push the green Select button. All text and emails that have been input into the system will
appear. Touch the Contacts you would like to receive messages for that Alert. You can select multiple
contacts at one time by touching to highlight. Push Done.
Test
Test will send a test message to any text and email contacts input in the system. Push Test then
confirm sending the message by selecting yes or no.
Screen Saver
When tattletale is inactive for one minute screen saver begins. To set tattletale screen saver push
corresponding icon, it will turn green when selected. Push Back to return to Settings.
Clock: Time of day and date will be displayed. This is the default
Screen Saver.
Picture Screen: Select this option and insert an SD card loaded with
JPEG images into the slot on the side of the unit. The unit will cycle
through images when in screen saver. SD card must remain inserted.
Logo Screen: The tattletale logo will display.
Stealth Mode: Shows a blank screen which gives tattletale the
appearance of being powered down; in reality it is fully functional.
Home Screen: Disables the screen saver and Home Screen remains
21 | P a g e
Timers
Customize Entry and Exit Delays, Alarm siren time, and when to begin Screen Saver. Highlight Timer
to edit and push + to increase time and – to decrease time.
Panic Keys
To activate Home Screen Panic buttons select Medical, Police, or Fire. When selected the button
turns green. Only two Panic buttons can be enabled on the Home Screen at one time. To activate
Panic call push and hold button on Home Screen for 3 seconds. You must subscribe to professional
monitoring for emergency dispatch.
22 | P a g e
Tamper
tattletale’s patented Rattlesnake Tamper will activate an instant alarm if the base unit is tampered
with in any way during entry delay. The Rattlesnake can be set to Low or High depending upon the
amount of sensitivity desired. If the unit is removed from power during entry delay an instant alarm
will occur as well. For mobile applications mount tattletale’s tamper tab to the surface intended for
tattletale placement. Set tattletale on the tamper tab inserting tab into the slot on the bottom of
tattletale toward the face of the unit. Once inserted, the Lift-off tab button will be active select it and
push Done. If the unit is lifted off the tab during entry delay an instant alarm will occur. When this
feature is enabled the unit must have tab inserted to arm.
Review Log
tattletale will store up to the last 500 events in the Log. Any alarm events or programming events will
be on the View Log list. Three events will be shown at a time that include the date and time. Push
Next or Prev to cycle through the list.
23 | P a g e
More Features
12
To access More Features from the Advanced Features menu push More. In More Features you can
Name the System, Reset to Factory, operate the Nightlight, and screen Brightness.
Name System
To name your system delete current name and input new name. This name will appear in text and
email messages received from the system.
Nightlight
tattletale’s strobe light (on the back of the unit) can double as a nightlight as well. The unit must be
plugged into power. The nightlight has four levels of brightness. To cycle through the levels push the
Nightlight button. A portion of the tattletale logo will appear with each push. The complete logo
indicates full brightness.
24 | P a g e
Brightness
To adjust tattletale’s screen brightness push the Brightness button. The level increases with each
press and will step back down once the maximum level has been reached.
Reset to Factory
Please contact tattletale support at 888.tell.on.u (888-835-5668)
Power Down
If the unit will be removed from power and not in use it must be shut down to prevent battery failure
or accidental messages being sent.
Remove
system from
power and
push Turn
Off.
Confirm
shutdown.
To wake up
the unit you
must
connect to
AC power.
25 | P a g e
Glossary
Action:
Used to describe a sensor behavior type (example: interior instant, perimeter delay)
Alarm Clock:
tattletale can also be used as a wake up alarm.
Alarm time:
The length of time tattletale will siren in an alarm event.
Anti-theft:
Provides base unit security when the unit is not armed. When tattletale senses that it is being moved an
audible tone will be produced until movement stops.
Away Mode:
Used to arm system when leaving the home. All sensors are armed and delay times will be active.
Back button:
Used to return to the previous screen.
Brightness:
Used to adjust mount of screen brightness.
Bypass:
Used when the user would like to have that sensor ignored through one arm/disarm cycle.
Chime:
Unit will emit chime sound when chime enabled sensors are tripped.
CMS Dispatch:
Used to indicate Central Monitoring Station. You must subscribe to professional monitoring for
emergency dispatch.
Contacts:
Mobile numbers and addresses that will receive text and email notifications.
Custom Alerts:
Used to set recipients of messages sent for non-alarm events.
Delete:
Removes item from the system.
Disarm:
Disables armed state of system.
26 | P a g e
Done:
Used to exit programming.
Edit:
Used to change an item that has been previously input into the system.
Entry Delay:
Indicates the amount of time user has to disarm system before an alarm occurs.
Exit Delay:
Indicates the amount of time user has to exit the area before alarm is set.
Features:
Used to manage Contacts, Custom Alerts, send a Test message, Screen Saver, Timers, Panic Keys, Tamper,
Review Log, or More Advanced Features.
Full Privileges:
User has access to disarm system, bypass sensors, configure system, and manage Hot Buttons.
Home Mode:
Used to arm system while at home. System arms instantly, all perimeter sensors become instant, and all
interior sensors are disabled.
Hot Button:
An auxiliary alarm that is operated independently of the main system. They are designed for assets you
would like to stay hot until you turn it off and so that no one else can undo your security.
Hot Button Status:
Indicates when Hot Button is ready to arm, open, or armed.
Initial Setup:
Steps user takes when powering up the system for the first time.
Instant Mode:
The base unit motion detector will trigger an instant alarm as soon as motion is detected.
Interior Sensors:
Sensors located inside the home, these sensors will not arm in Home Mode.
Interior Instant:
Interior sensors that do not have a delay time. When tripped an instant alarm will occur.
Interior Delay:
Interior sensors that will go into delay time when tripped.
27 | P a g e
Learn Mode:
System is ready to enroll sensor or remote. User must follow sensor specific instructions to activate.
Log:
Record of the last 500 events in the system.
Lost:
Sensor has been taken out of range and is no longer communicating with the base unit.
Low Battery:
Sensor battery needs replaced.
Name System:
User can set customized name for system.
Nightlight:
Used to operate tattletale’s strobe light as a nightlight.
Open Sensor:
Sensor is tripped and will need to be closed or bypassed to arm system.
Pet Mode:
The perimeter sensors are hot and all interior sensors are disabled with at least one door delay to allow
for re-entry without tripping tattletale.
Perimeter Sensors:
Sensors located on the perimeter of the home, typically doors and windows.
Perimeter Instant:
Perimeter sensors that do not have a delay time, when tripped an instant alarm will occur.
Perimeter Delay:
Perimeter sensors that will go into delay time when tripped.
PIN:
Four digit personal code used for operating system.
Quiet:
Silences keypad volume and reduces chime volume by half.
Rattlesnake:
tattletale’s anti tamper sensor that will trigger an instant alarm when tattletale is disturbed.
Reset to Factory:
Call tattletale technicians if factory reset is required 1.888.TELL.ON.U.
28 | P a g e
Remove Bypass:
Used to take a sensor off of bypass if it is no longer required.
Screen Saver Time:
Amount of time tattletale is idle before screen saver begins.
Sensor Sound:
Sensor will emit selected tone three times before alarm siren in an alarm event.
Settings:
Used to access quick buttons and advanced features.
Tamper tab:
Used for mobile applications as an anti tamper sensor, user must inset tab and select Lift-off Tab in
Advanced Features, Tamper.
Test Message:
Used to send a test message to contacts and/or Central Station.
Timers:
Used to customize delay times, alarm siren time, and screen saver.
Trouble Sensor:
Sensor has a low battery, is lost, or has been tampered with.
Unlock:
Used to disarm the system with the remote.
Users:
Those assigned a PIN and privileges in the system.
29 | P a g e
30 | P a g e