1
D01175120A
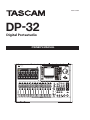
DP-32
Digital Portastudio
OWNER'S MANUAL
IMPORTANT SAFETY PRECAUTIONS
ªª For European Customers
CAUTION: TO REDUCE THE RISK OF ELECTRIC SHOCK,
DO NOT REMOVE COVER (OR BACK). NO USERSERVICEABLE PARTS INSIDE. REFER SERVICING TO
QUALIFIED SERVICE PERSONNEL.
The lightning flash with arrowhead symbol,
within equilateral triangle, is intended to
alert the user to the presence of uninsulated
“dangerous voltage” within the product’s
enclosure that may be of sufficient
magnitude to constitute a risk of electric
shock to persons.
The exclamation point within an equilateral
triangle is intended to alert the user to
the presence of important operating and
maintenance (servicing) instructions in the
literature accompanying the appliance.
WARNING: TO PREVENT FIRE OR SHOCK
HAZARD, DO NOT EXPOSE THIS
APPLIANCE TO RAIN OR MOISTURE.
ªª For U.S.A.
TO THE USER
This equipment has been tested and found to comply
with the limits for a Class B digital device, pursuant to Part
15 of the FCC Rules. These limits are designed to provide
reasonable protection against harmful interference in
a residential installation. This equipment generates,
uses, and can radiate radio frequency energy and, if not
installed and used in accordance with the instruction
manual, may cause harmful interference to radio
communications. However, there is no guarantee that
interference will not occur in a particular installation. If
this equipment does cause harmful interference to radio
or television reception, which can be determined by
turning the equipment off and on, the user is encouraged
to try to correct the interference by one or more of the
following measures.
a) Reorient or relocate the receiving antenna.
b) Increase the separation between the equipment and
receiver.
c) Connect the equipment into an outlet on a circuit
different from that to which the receiver is connected.
d) Consult the dealer or an experienced radio/TV
technician for help.
CAUTION
Changes or modifications to this equipment not expressly
approved by TEAC CORPORATION for compliance could
void the user's authority to operate this equipment.
2 TASCAM DP-32
Disposal of electrical and electronic equipment
(a) All electrical and electronic equipment should be
disposed of separately from the municipal waste
stream via collection facilities designated by the
government or local authorities.
(b)By disposing of electrical and electronic equipment
correctly, you will help save valuable resources and
prevent any potential negative effects on human
health and the environment.
(c) Improper disposal of waste electrical and electronic
equipment can have serious effects on the
environment and human health because of the
presence of hazardous substances in the equipment.
(d)The Waste Electrical and Electronic Equipment (WEEE)
symbol, which shows a wheeled bin that has been
crossed out, indicates that electrical and electronic
equipment must be collected and disposed of
separately from household waste.
(e) Return and collection systems are available to end
users. For more detailed information about the
disposal of old electrical and electronic equipment,
please contact your city office, waste disposal service
or the shop where you purchased the equipment.
For Canada
THIS CLASS A DIGITAL APPARATUS COMPLIES WITH
CANADIAN ICES-003.CET
APPAREIL NUMERIQUE DE LA CLASSE B EST CONFORME
A LA NORME NMB-003 DU CANADA.
This appliance has a serial number located on the
bottom panel. Please record the model number and
serial number and retain them for your records.
Model number ______________________________
Serial number ______________________________
IMPORTANT SAFETY INSTRUCTIONS
1 Read these instructions.
2 Keep these instructions.
3 Heed all warnings.
4 Follow all instructions.
5 Do not use this apparatus near water.
6 Clean only with dry cloth.
7 Do not block any ventilation openings. Install in
accordance with the manufacturer's instructions.
8 Do not install near any heat sources such as radiators,
heat registers, stoves, or other apparatus (including
amplifiers) that produce heat.
9 Do not defeat the safety purpose of the polarized
or grounding-type plug. A polarized plug has two
blades with one wider than the other. A grounding
type plug has two blades and a third grounding
prong. The wide blade or the third prong are
provided for your safety. If the provided plug does
not fit into your outlet, consult an electrician for
replacement of the obsolete outlet.
10 Protect the power cord from being walked on
or pinched par ticularly at plugs, convenience
receptacles, and the point where they exit from the
apparatus.
11 Only use attachments/accessories specified by the
manufacturer.
12 Use only with the cart, stand, tripod, bracket, or
table specified by the manufacturer, or sold with the
apparatus. When a cart is used, use caution when
moving the cart/apparatus combination to avoid
injury from tip-over.
• The apparatus draws nominal non-operating power
from the AC outlet with its POWER or STANDBY/ON
switch not in the ON position.
• The mains plug is used as the disconnect device, the
disconnect device shall remain readily operable.
• Caution should be taken when using earphones or
headphones with the product because excessive sound
pressure (volume) from earphones or headphones can
cause hearing loss.
• If you are experiencing problems with this product,
contact TEAC for a service referral. Do not use the product until it has been repaired.
CAUTION
• Do not expose this apparatus to drips or splashes.
• Do not place any objects filled with liquids, such as
vases, on the apparatus.
• Do not install this apparatus in a confined space such
as a book case or similar unit.
• The apparatus should be located close enough to the
AC outlet so that you can easily grasp the power cord
plug at any time.
• If the product uses batteries (including a battery pack
or ooinstalled batteries), they should not be exposed
to sunshine, fire or excessive heat.
• CAUTION for products that use replaceable lithium
batteries: oothere is danger of explosion if a battery
is replaced with an incorrect type of battery. Replace
only with the same or equivalent type.
WORNING
Products with Class ! construction are equipped
with a power supply cord that has a grounding
plug. The cord of such a product must be plugged
into an AC outlet that has a protective grounding
connection.
13 Unplug this apparatus during lightning storms or
when unused for long periods of time.
14 Refer all servicing to qualified service personnel.
Servicing is required when the apparatus has been
damaged in any way, such as power-supply cord or
plug is damaged, liquid has been spilled or objects
have fallen into the apparatus, the apparatus has
been exposed to rain or moisture, does not operate
normally, or has been dropped.
TASCAM DP-32
3
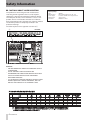
Safety Information
ªª CAUTIONS ABOUT LASER RADIATION
This product has been designed and manufactured
according to FDA regulations “title 21, CFR, chapter 1,
subchapter J, based on the Radiation Control for Health
and Safety Act of 1968,” and is classified as a class 1 laser
product. There is no hazardous invisible laser radiation
during operation because invisible laser radiation emitted
inside of this product is completely confined in the
protective housings.
The label required in this regulation is shown at 1.
1
For USA
Cautions:
• DO NOT REMOVE THE PROTECTIVE HOUSING USING A
SCREWDRIVER.
• USE OF CONTROLS OR ADJUSTMENTS OR
PERFORMANCE OF PROCEDURES OTHER THAN THOSE
SPECIFIED HEREIN MAY RESULT IN HAZARDOUS
RADIATION EXPOSURE.
• IF THIS PRODUCT DEVELOPS TROUBLE, CONTACT YOUR
NEAREST QUALIFIED SERVICE PERSONNEL, AND DO
NOT USE THE PRODUCT IN ITS DAMAGED STATE.
4 TASCAM DP-32
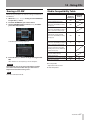
Optical pickup
Type
Manufacturer
Laser output
Wavelength
Standard
:SW651L
: Hitachi Media Electronics Co., Ltd.
: Less than 95mW on the objective lens
: 785 nm (Typ.)
: IEC60825-1: 2007
Table of Contents
1 – Introduction...............................................8
Features................................................................................... 8
Items included with the product................................... 8
Conventions used in this manual................................... 8
Intellectual property rights.............................................. 9
Precautions for placement and use............................... 9
Beware of condensation.................................................... 9
Cleaning the unit................................................................. 9
About SD cards..................................................................... 9
Precautions for use.....................................................10
About CDs (Compact Discs)...........................................10
Precautions for use.....................................................10
About CD-R and CD-RW discs.................................10
2 - Quick Guide............................................... 11
Playback and mixing.........................................................11
Preparation....................................................................11
Listening to the demo song....................................12
Recording and mastering...............................................13
Creating a new song..................................................13
Connecting and setting the input sources........14
Setting the guitar as the recording source for
TRACK 1..........................................................................14
Adjusting and monitoring the input level.........14
Recording a guitar to TRACK 1...............................15
Playing back the recording......................................15
Recording a guitar to TRACK 2...............................15
Recording a vocal to TRACK 3.................................16
Mixing the tracks.........................................................17
Mastering a recording...............................................18
Creating an audio CD with the master file................19
Inserting a CD...............................................................19
Writing to a CD-R/CD-RW.........................................20
Ejecting a CD.................................................................21
Shutting down....................................................................21
3 – Names and Functions of Parts................22
Top panel..............................................................................22
Front panel...........................................................................26
Rear panel.............................................................................27
Home screen........................................................................28
Menu structure...................................................................29
Navigating screens............................................................30
Function button assignments......................30
Navigation examples.................................................30
4 – Preparation...............................................31
Inserting and removing SD cards.................................31
Inserting an SD card...................................................31
Removing the card.....................................................31
About write-protected SD cards............................31
Powering the unit..............................................................31
Starting up & shutting down.........................................32
Starting up the unit....................................................32
Shutting down.............................................................32
Setting the date and time...............................................33
Preparing an SD card for use.........................................33
Recorder modes.................................................................33
Connecting other equipment.......................................34
Front panel....................................................................34
Rear panel......................................................................34
Adjusting the display........................................................34
5 - Song Management...................................35
Editing names.....................................................................35
Loading a song...................................................................35
Creating a new song.........................................................35
Saving a song......................................................................36
Viewing song information..............................................37
Copying songs....................................................................37
Erasing songs.......................................................................37
Protecting songs................................................................38
Deleting unnecessary audio data from a song.......38
Changing a song name....................................................39
6 - Basic Recording........................................40
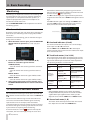
Selecting the input sources............................................40
Assigning inputs.................................................................40
Setting the track type................................................40
Assigning inputs to mono tracks...........................40
Assigning inputs to stereo tracks..........................41
Assigning inputs to a stereo bus...........................41
Checking assignments..............................................41
Canceling assignments.............................................41
Using phantom power.....................................................41
Monitoring...........................................................................42
Monitor selection........................................................42
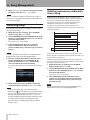
OL indicators and level meters......................................42
Peak hold display........................................................43
Mixer screen settings........................................................43
Using the input equalizer.........................................43
DIGITAL TRIM setting (track only)..........................44
Sending signals to internal/external effects......44
Enabling insert effects...............................................44
Setting the stereo position......................................44
Changing the signal phase......................................45
Checking the fader level...........................................45
Setting levels sent to stereo buses.......................45
Solo.........................................................................................45
TASCAM DP-32
5
Table of Contents
Muting tracks.......................................................................45
Rehearsing a recording....................................................45
Making the first recording..............................................46
Multitrack recording.........................................................46
Arming tracks for recording....................................46
Adjusting track pan and level settings................46
Input selection and assignment............................47
Setting input levels.....................................................47
Recording.......................................................................47
Undoing an operation......................................................47
Undo feature settings................................................47
Undoing the last operation (single undo)..........47
Undoing older operations (multiple undo).......48
Overview of track editing................................................57
Editing points...............................................................57
Basic editing procedures..........................................57
Explanation of items..................................................57
COPY/PASTE.........................................................................58
COPY/INSERT.......................................................................58
MOVE/PASTE........................................................................59
MOVE/INSERT......................................................................59
OPEN (Insert Silence)........................................................59
CUT (Remove Part).............................................................59
SILENCE (Erase Part)..........................................................60
CLONE TRACK (duplicate track).....................................60
CLEAN OUT (delete track)...............................................60
7 - Recorder Functions...................................49
9 - Using Internal Effects...............................61
Punching in and out.........................................................49
Using a footswitch to punch in/out......................49
Setting the footswitch...............................................49
Bouncing tracks..................................................................50
Using the bounce function......................................50
Checking the bounce result....................................50
Direct location function...................................................50
Locating a specified time directly.........................51
Locating a specified bar/beat directly.................51
Location marks....................................................................51
Setting a location mark.............................................51
Skipping to location marks......................................51
Deleting a location mark..........................................51
Returning to zero or the last recording position....52
Fast forwarding and rewinding....................................52
Cueing with the JOG/DATA dial....................................52
Jogging while viewing a waveform......................52
Jogging while listening to audio...........................52
Repeat playback.................................................................53
Setting IN/OUT points...............................................53
Using repeat playback...............................................53
Jumpback playback..........................................................53
Previewing cue points......................................................54
Automatic punching in and out...................................54
Setting punch-in/out points...................................54
Checking punch-in/out points...............................55
Rehearsing with automatic punching.................55
Recording with automatic punching...................55
Checking takes.............................................................55
Virtual tracks........................................................................56
Recording to virtual tracks.......................................56
Assigning virtual tracks.............................................56
Dynamic effects..................................................................61
Inserting a dynamic effect.......................................61
Adjusting dynamic effects.......................................61
Guitar effects.......................................................................62
Inserting a guitar effect............................................62
Adjusting guitar effects............................................62
Loading guitar effect settings................................62
Saving guitar effects in the library........................62
Send effects..........................................................................63
Using send effects.......................................................63
Adjusting send effects...............................................63
Loading send effect settings...................................63
Saving send effects in the library..........................63
8 - Track Editing.............................................57
6 TASCAM DP-32
10 - Mixing Down and Mastering Songs......64
Mixing down tracks...........................................................64
Levels and balance.....................................................64
Fader group...................................................................64
Stereo position (panning)........................................64
Track equalizer.............................................................64
Send effects...................................................................65
Creating a master file........................................................65
Setting the start and end points............................65
Creating a master file.................................................65
Exiting Mixdown mode.............................................66
Checking the master file..................................................66
Ending master file checking....................................66
Using the mastering tools...............................................66
Mastering procedures...............................................67
Using the mastering equalizer...............................67
Using mastering compression................................68
Using normalize...........................................................69
Checking the noise shaper (noise shaped
dithering).......................................................................69
Exiting Mastering mode...........................................69
Table of Contents
11 - Various Other Functions.........................70
Metronome..........................................................................70
MIDI Sync..............................................................................70
MIDI remote control..........................................................71
Tuner function.....................................................................71
PREFERENCE menu settings...........................................72
Setting automatic power saving...........................72
Setting automatic monitoring...............................72
Setting the song name format...............................72
Restoring the initial preference settings...................73
Viewing information.........................................................73
12 - SD Card Management.............................74
Quick formatting an SD card..........................................74
Full formatting an SD card..............................................75
13 - Exchanging Data with a Computer........76
Operating system requirements...................................76
Connecting to a computer.............................................76
Disconnecting..............................................................77
Track import and export..................................................78
Importing tracks..........................................................78
Exporting tracks...........................................................79
Deleting files from the AudioDepot folder...............79
Ratings...................................................................................93
Input/output ratings.........................................................93
Analog audio input/output ratings......................93
Control input/output ratings..................................93
Audio performance...........................................................93
Operating requirements..................................................93
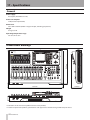
Dimensional drawings.....................................................94
General..................................................................................94
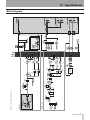
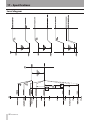
Block diagram......................................................................95
Level diagram......................................................................96
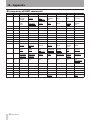
18 – Appendix................................................97
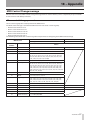
MIDI Control Change message.....................................97
Mixer control change parameters.........................97
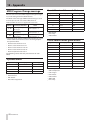
MIDI Program Change message...................................98
Dynamic effects...........................................................98
Preset libraries of the send effects........................98
Preset libraries of the guitar effects......................98
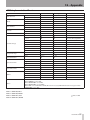
MIDI Implementation Chart....................................99
Bit-map array of MMC commands............................ 100
14 - Using CDs.................................................80
Using the CD drive.............................................................80
Preparations before using CDs with this unit...80
Compatible CD types.................................................80
Loading and ejecting CDs...............................................80
Loading a CD................................................................81
Ejecting a CD.................................................................81
Forcing disc ejection..................................................82
Playing back an audio CD...............................................82
Creating an audio CD.......................................................82
Using Disc At Once.....................................................83
Using Track At Once...................................................84
Using LIVE WRITER......................................................85
Finalizing a CD..............................................................86
Importing songs from audio CDs.................................86
Erasing a CD-RW.................................................................87
Media Compatibility Table..............................................87
15 – Troubleshooting....................................88
16 – Messages................................................89
General messages..............................................................89
CD mode messages...........................................................91
CD-related error messages.............................................92
17 – Specifications.........................................93
TASCAM DP-32
7
1 – Introduction
Thank you very much for purchasing the TASCAM DP-32
Digital Multitrack Recorder.
Before connecting and using the unit, please take time to
read this manual thoroughly to ensure you understand
how to properly set up and connect the unit, as well as
the operation of its many useful and convenient functions.
After you have finished reading this manual, please keep
it in a safe place for future reference.
You can also download the Owner's Manual from the
TASCAM website (http://tascam.com/).
• Audio CDs can be created from mixed-down master
files, and tracks on audio CDs can be played back and
imported
• Song data and WAVE files can be copied and backed up
to a computer connected by USB 2.0
• Punch in/out and other functions can be assigned to
and controlled by a TASCAM RC-3F footswitch (sold
separately)
Features
The DP-32 package contains the following items.
Take care when opening the package not to damage the
items. Keep the package materials for transportation in
the future.
Please contact the store where you purchased this unit
if any of these items are missing or have been damaged
during transportation.
• Main unit......................................................................................... 1
• AC adaptor (TASCAM PS-1225L)............................................. 1
• Power cord for AC adaptor....................................................... 1
• SD memory card (inserted into the unit)............................ 1
• USB cable (80cm)......................................................................... 1
• Warranty card................................................................................ 1
• Owner's Manual (this manual)................................................ 1
This unit uses SD cards for multitrack recording of up to
8 tracks and playback of up to 32 tracks simultaneously.
Multiple tracks can be mixed down to a stereo master file
using the built-in mixer functions.
Master files can be written to CD-Rs and similar media,
as well as transferred to a computer that is connected
by USB. Moreover, since transferring data between the
unit and a computer is possible, you can copy tracks and
master files, and back up song files to a computer.
• 32-track Digital Multitrack Recorder uses SD cards as
recording media and includes a CD drive
• Supports SDHC standard for high-capacity SD cards of
up to 32GB
• Multitrack recorder functions include simultaneous
8-track recording and 32-track playback (44.1/48kHz,
16/24-bit)
• Stereo/mono track type selection function makes
changing track allocation easy
• 20 track faders and 1 master fader for level adjustment
(all 45 mm)
• Each track has independent SELECT and REC buttons
• +48V phantom power supported mic input
• 8 balanced mic/line inputs (XLR/TRS combo jacks)
• INPUT H supports high-impedance guitar input (6.3mm
(1/4") phone jack)
• Large TFT color display with excellent visibility (3.5-inch)
• Independent 3-band equalizers for each input and
playback track
• Mixing down to a dedicated master file possible
• Mastering effects that can be used during mix downs
of master files
• Reverb and various other effects that can be adjusted
independently for each playback track
• Automatic punch in/out
• Track bouncing
• COPY INSERT, COPY PASTE, MOVE INSERT, MOVE PASTE,
OPEN, CUT, SILENCE, CLONE TRACK and CLEAN OUT
track editing functions
• Undo and redo functions, including 10-level history
setting option
• Location to marks
• Tuner and metronome
8 TASCAM DP-32
Items included with the product
CAUTION
Never use any AC adaptor or power cord other than
the supplied TASCAM PS-1225L AC adaptor and AC
adaptor power cord. Moreover, do not use the supplied
AC adaptor and AC adaptor power cord with other
equipment. Doing so could cause malfunction, fire or
electric shock.
Conventions used in this manual
Conventions used in this manual are as follows.
• Names of buttons, controls, etc. of this unit appear like
this: MENU.
• Text displayed on the LCD display appears like this:
MENU.
The
four buttons beneath the LCD display (F1 to F4)
•
are function buttons. The functions displayed at the
bottom of each screen are sometimes shown after the
button names in parentheses.
Example: F1 (TIMELINE) button, F4 (t) button.
• "SD memory card" is abbreviated as "SD card".
• CD-DA format is sometimes called audio CD format.
Moreover, a CD recorded with audio CD format tracks is
sometimes called an audio CD.
• An unused CD-R/CD-RW or a completely erased CD-RW
may be mentioned as a blank CD.
• Text displayed on a computer monitor appears like this: OK.
1 – Introduction
• Additional information is introduced in the following
styles when needed: TIP, NOTE, and CAUTION.
TIP
Useful hints when using the unit.
NOTE
Explanation of actions in special situations, supplementary
explanations, etc.
CAUTION
Instructions that should be followed to avoid injury,
damage to the unit or other equipment, and loss of
data.
Intellectual property rights
• TASCAM is a trademark of TEAC Corporation, registered
in the U.S. and other countries.
• SDHC Logo is a trademark of SD-3C, LLC.
• Microsoft, Windows, Windows XP, Windows Vista,
and Windows 7 are either registered trademarks or
trademarks of Microsoft Corporation in the United
States and/or other countries.
• Apple, Macintosh, iMac, Mac OS and Mac OS X are
trademarks of Apple Inc.
• Pentium and Intel are trademarks of Intel Corporation
in the U.S. and/or other countries.
• Other company names, product names and logos
in this document are the trademarks or registered
trademarks of their respective owners.
Any data, including, but not limited to information,
described herein are intended only as illustrations
of such data and/or information and not as the
specifications for such data and/or information. TEAC
Corporation disclaims any warranty that any use
of such data and/or information shall be free from
infringement of any third party's intellectual property
rights or other proprietary rights, and further, assumes
no liability of whatsoever nature in the event of any
such infringement, or arising from or connected with
or related to the use of such data and/or information.
This product is designed to help you record and
reproduce sound works to which you own the
copyright, or where you have obtained permission
from the copyright holder or the rightful licensor.
Please use the product appropriately.
Under no circumstances will TEAC Corporation be
responsible for the consequences of any illegal
copying performed using the recorder.
Precautions for placement and
use
• The operating temperature should be between 5°C and
35°C (41°F and 95°F).
• Do not install in the following types of places. Doing
so could degrade the sound quality and/or cause
malfunctions.
• Places with significant vibrations or that are
otherwise unstable
• Near windows or other places exposed to direct
sunlight
• Near heaters or other extremely hot places
• Extremely cold places
• Places with bad ventilation or high humidity
• Very dusty locations
• Make sure that the unit is mounted in a level position
for correct operation.
• Do not place any object on the unit for heat dissipation.
• Avoid installing this unit on top of any heat-generating
electrical device such as a power amplifier.
Beware of condensation
If the unit is moved from a cold to a warm place, or used
after a sudden temperature change, there is a danger of
condensation; vapor in the air could condense on the
internal mechanism, making correct operation impossible.
To prevent this, or if this occurs, let the unit sit for one or
two hours at the new room temperature before using.
Cleaning the unit
Use a dry soft cloth to wipe the unit clean. Do not clean
the unit with a chemically treated cloth or substances
such as thinner and alcohol. This could damage the
surface or change the color of the unit.
About SD cards
This unit uses SD cards for recording and playback.
SD and SDHC cards that are at least 512 MB in size can be
used.
A list of SD cards that have been tested with this unit can
be found on the TASCAM website (http://tascam.com/).
Use of cards that have not been verified for use with this
unit could result in the unit not functioning properly.
TASCAM DP-32
9
1 – Introduction
Precautions for use
SD cards are delicate media. In order to avoid damaging a
card or the card slot, please take the following precautions
when handling them.
• Do not leave them in extremely hot or cold places.
• Do not leave them in extremely humid places.
• Do not let them get wet.
• Do not put things on top of them or twist them.
• Do not hit them.
• Do not remove or insert an SD card when the power is
ON.
About CDs (Compact Discs)
In addition to audio CDs, this unit can play CD-R and CDRW discs on which audio CD (CD-DA) format files are
recorded. The unit can also play 8cm CDs.
Precautions for use
• Use only CD, CD-R and CD-RW discs that bear the
following logos.
CD-R
CD-RW
• Always place the compact discs in the trays with their
label facing upward.
• To remove a disc from its case, press down on the
center of the disc holder, then lift the disc out, holding
it carefully by the edges.
• Do not touch the signal side (the unlabeled side).
Fingerprints, oils and other substances can cause errors
during recording.
• To clean the signal side of a disc, wipe gently with a soft
dry cloth from the center towards the outside edge.
Dirt on discs can lower the sound quality, so clean
them and always store them in a clean state.
• Do not use any record spray, anti-static solutions,
benzine, paint thinner or other chemical agents to
clean CDs. This could damage the delicate playing
surface and cause CDs to become unplayable.
• Do not apply labels or other materials to discs. Do
not use discs that have had tape, stickers or other
materials applied to their surface. Do not use discs that
10 TASCAM DP-32
have sticky residue from stickers, etc. Such discs could
become stuck in the unit or cause it to malfunction.
• Never use a commercially available CD stabilizer. Using
stabilizers with this unit will damage the mechanism
and cause it to malfunction.
• Do not use cracked discs.
• Only use circular compact discs. Do not use noncircular promotional, etc. discs.
• Some record companies sell copy-protected discs or
copy-controlled discs that may not play back correctly
in this unit. Since such discs may not conform with the
CD standard, do not use them in this unit.
• If you experience problems with such non-standard
discs, you should contact the producers of the disc.
About CD-R and CD-RW discs
CD-R discs can be recorded only once. Tracks (songs)
recorded in such discs cannot be deleted. However, if the
disc has not been finalized and sufficient space is available
on the disc, additional material can be recorded. After
finishing recording, finalizing a CD-R makes it playable in
most ordinary CD players (some CD players might not be
able to play these discs).
If a CD-RW disc becomes full, you can erase the recorded
data to allow reuse.
However, you cannot designate specific songs for erasure.
Even after being finalized, CD-RW discs can only be played
in players that specifically support their playback.
2 - Quick Guide
Playback and mixing
In this section, we will play back the demo song on the
included SD card.
When this unit is purchased new, an SD card with the
demo song on it is already inserted in the unit, but we
will start by explaining how to insert an SD card using the
procedures below.
CAUTION
Never use any AC adaptor or power cord other than the
supplied TASCAM PS-1225L AC adaptor and its power
cord. Use of a different adaptor or cord could cause
malfunction, fire or electric shock.
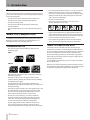
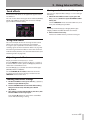
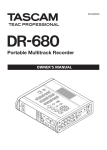
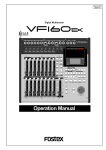
3. Connect headphones to the PHONES jack on the
front panel.
Preparation
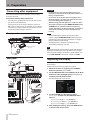
1. Insert the included SD card into the SD card slot
on the rear panel. Be careful not to forcibly insert
the card in the wrong direction. Doing so could
damage the SD card slot or the SD card.
2. Connect the supplied AC adaptor (TASCAM PS1225L) to the DC IN 12V jack on the rear panel.
TASCAM
PS-1225L
Headphones
ヘッドホン
4. Press and hold the STANDBY/ON button for a few
seconds on the rear panel to turn the power ON.
When the unit starts, the Home screen opens on
the display.
AC outlet
DC plug
Start-up screen
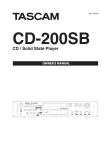
The bottom panel has a hook (cord holder) that can
be used to hold the AC adaptor cord in place. Wrap
the cord around this hook to prevent it from being
disconnected during use.
Home screen
TASCAM DP-32
11
2 - Quick Guide
CAUTION
• Do not remove or insert an SD card when the power
is ON. Always turn the power off (put in standby)
before removing or inserting an SD card.
• When the power is ON, do not disconnect the power
cord or otherwise interrupt the power to the unit.
Doing so will cause all settings made since the last
time you saved to be lost. If the power is interrupted
while an SD card is being accessed, all recorded songs
and data on the card could be damaged beyond
recovery.
• Before turning the power ON, minimize the
headphones volume and the volume on any
monitoring system connected to this unit.
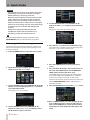
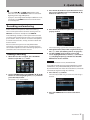
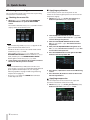
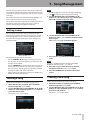
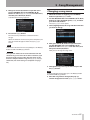
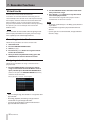
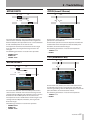
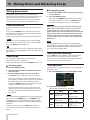
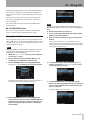
5. Use the JOG/DATA dial or the CURSOR (5/b)
buttons to select LOAD, and then press the F4 (t)
button.
The SONG LOAD pop-up window appears.
TIP
By connecting an amplifier or powered speakers to the
MONITOR OUT jacks, you can monitor using speakers.
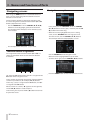
Listening to the demo song
The included SD card in the unit contains a demo song.
We will use this demo song to practice listening to and
mixing a recording.
1. Press the HOME button to open the Home screen.
2. When the recorder is stopped, press the MENU
button to open the MENU screen.
3. Use the JOG/DATA dial or the CURSOR (5/b/g/t)
buttons to select (highlight green) SONG, and then
press the F4 (t) button.
The SONG LIST screen opens.
4. Use the JOG/DATA dial or the CURSOR (5/b)
buttons to select DEMO SONG, and then press the
F4 (t) button to open a menu list.
12 TASCAM DP-32
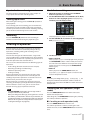
6. Press the F2 (YES) button to load the demo song.
The demo song is loaded and the window closes, but
the SONG LIST screen remains open.
7. Press the HOME button to return to the Home
screen.
8. Press the PLAY (7) button, and raise the levels of
the track and STEREO faders and the MONITOR
LEVEL knob to listen to the demo song.
The STEREO fader adjusts the overall volume of the
mixer output. When the STEREO fader is at 0dB the
overall level is neither increased nor decreased.
Use the track faders to adjust the balance of the tracks.
Use the MONITOR LEVEL knob to adjust the final
monitoring volume.
9. Press the MIXER button to open the Mixer screen.
10.Press a SOURCE buttons to select an input (A-H) or
press a SELECT button to select a track to be set.
Then use the PAN knob to set the stereo position
of that input or track. Repeat for other inputs and
tracks.
2 - Quick Guide
TIP
• Press the STOP (8) and REW (m) buttons at the
same time to use the TO ZERO function to return to the
beginning of the song (ZERO point).
• If you press the wrong button and open a different screen,
you can press the HOME button to return to the Home
screen at any time.
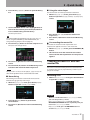
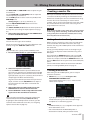
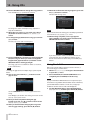
3. Press the F4 (t) button to open the menu list and
then use the JOG/DATA dial or the CURSOR (5/b)
buttons to select CREATE.
Recording and mastering
In this section we will practice multitrack recording.
Here we will explain how to connect electric guitars to
INPUT H and external microphones to INPUT B.
In the following example, we will explain how to record
an electric guitar rhythm part to track 1 and a lead guitar
part to track 2. Then, we will use an external microphone
to record vocals to track 3. Finally, we will mix down the
tracks to stereo.
We will assume that you have already followed the
instructions in the previous section, and that you have
connected headphones or other monitoring equipment,
started the unit and inserted an SD card.
Creating a new song
1. When the recorder is stopped, press the MENU
button to open the MENU screen.
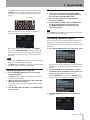
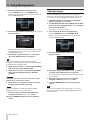
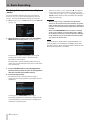
4. Press the F4 (t) button to open the SONG CREATE
pop-up window.
The created song is given the name SONG_0002.
5. Change the name (title) of the song if necessary in
the Name item. (See "Editing names" on page 35.)
6. Use the CURSOR (5/b) buttons to move the
cursor (highlighted blue) to select Bit (bit rate) or
Hz (sampling frequency), and then use the JOG/
DATA dial to set it as desired.
NOTE
2. Use the JOG/DATA dial or the CURSOR (5/b/g/t)
buttons to select (highlight green) SONG, and then
press the F4 (t) button.
The SONG LIST screen opens.
Standard audio CDs are 16-bit, 44.1kHz format.
If you make an audio CD using songs with different setting
combinations, they will automatically be converted to 16bit, 44.1kHz format. The master file itself, however, will not be
converted (the original settings are retained).
7. Press the F2 (YES) button.
The currently loaded song is saved and a new song is
created.
8. Press the HOME button to return to the Home
screen.
TASCAM DP-32
13
2 - Quick Guide
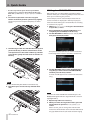
Connecting and setting the input
sources
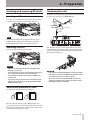
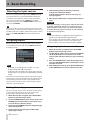
Setting the guitar as the recording
source for TRACK 1
1. Connect an electric guitar to the MIC/LINE INPUTS
H jack on the rear panel.
When you press the ASSIGN button to open the Assign
screen, the default screen setting for the recording source
is A (INPUT A) for TRACK 1, B (INPUT B) for TRACK 2, C
(INPUT C) for TRACK 3, and so on for tracks 4 to 8 (D to H).
(See "Assigning inputs" on page 40.)
Since initially INPUT H is set only as the recording source
for TRACK 8, you must change the TRACK 1 recording
source.
Follow these procedures to change the recording source
of TRACK 1.
1. Press the ASSIGN button to open the Assign screen.
Guitar
2. Set the LINE-GUITAR switch on the rear panel to
GUITAR.
2. Use the CURSOR (5/b/g/t) buttons or press
the SELECT button for TRACK 1 to move the cursor
(frame) on the Assign screen with TRACK 1.
3. Use the JOG/DATA dial or the SOURCE button for
INPUT H to set the recording source of TRACK 1 to
H.
The GUITAR indicator lights.
GUITAR indicator
Now the guitar is the input source for INPUT H.
TIP
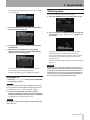
Adjusting and monitoring the input
level
1. Press the HOME button to return to the Home
screen.
When connecting an electric-acoustic guitar with a built-in
preamp or an active-type electric guitar, or when using an
effects pedal, for example, between the guitar and this unit,
set the LINE-GUITAR switch to LINE on the rear panel.
2. Press the REC button for TRACK 1.
The REC button flashes and the unit enters recording
standby.
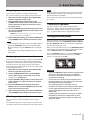
3. Use the TRIM knob for INPUT H to adjust the guitar
input level. Set the TRIM knob so that the OL
indicator for INPUT H does not light even when the
loudest sound to be recorded is input.
14 TASCAM DP-32
2 - Quick Guide
If the OL indicator continues to light even when the
TRIM knob is turned down, the guitar signal itself is
too loud. In this case, lower the output level on the
guitar.
OL indicator
When you play the guitar, level meter 1 (TRACK 1)
shows the input level on the display.
Playing back the recording
1. To return to the beginning of the song (ZERO
point), press and hold the STOP (8) button and
press the REW (m) (TO ZERO) button.
2. Press the PLAY (7) button to play back the
recording on TRACK 1.
3. Use the fader for TRACK 1 and the STEREO fader
to adjust the playback monitoring level. Use
the MONITOR LEVEL knob to adjust the final
monitoring volume.
TIP
Use the PAN knob for TRACK 1 on the Mixer screen to set the
stereo position of the track signal.
Recording a guitar to TRACK 2
When you raise the fader for TRACK 1, the STEREO
fader and the MONITOR LEVEL knob, you will be able
hear the sound of the guitar through the headphones
(or monitoring system), and the L and R level meters
will move.
Next, you can listen to the rhythm guitar on TRACK 1 as
you play the lead guitar part and record it on TRACK 2.
Follow these procedures to change the recording source
of TRACK 2.
1. Press the ASSIGN button to open the Assign screen.
NOTE
• You can use the PAN knob for TRACK 1 on the Mixer screen
to set the stereo position for monitoring.
• If the REC button for TRACK 1 is not lit, you will not be able
to hear the guitar sound that is being input.
Recording a guitar to TRACK 1
1. Press the RECORD (0) button to start recording
and play the guitar.
The REC button for TRACK 1 stops flashing and lights
steadily when recording.
2. After you finish your performance, press the STOP
(8) button to stop recording.
The recorded file is saved in the folder of the currently
loaded song.
3. Press the REC button for TRACK 1 so the REC button
becomes unlit.
We want to record the lead guitar sound from INPUT
H to TRACK 2, but INPUT B is assigned to TRACK 2 by
default.
2. Use the CURSOR (5/b/g/t) buttons or press
the SELECT button for TRACK 2 to move the cursor
(frame) on the Assign screen to TRACK 2.
Use the JOG/DATA dial or press the SOURCE button
for INPUT H to set the TRACK 2 recording source to H.
3. Press the HOME button to return to the Home
screen.
TASCAM DP-32
15
2 - Quick Guide
4. Press the REC button for TRACK 2.
Its REC indicator blinks and the unit enters recording
standby.
When you play the guitar, the input level is shown by
the 2 level meter (TRACK 2).
3. Press the HOME button to return to the Home
screen.
5. Return to the beginning of the song (ZERO point)
and start playback of the recorded rhythm guitar
to practice the lead guitar part along with the
recording.
Raise the fader for TRACK 2 to hear the input guitar
signal along with the TRACK 1 playback signal through
your headphones or monitoring system.
6. As necessary, use the TRACK 1, 2 and STEREO
faders and MONITOR LEVEL knob to adjust the
monitoring level and balance and the PAN knob to
adjust the stereo positions.
7. Return to the beginning of the song, press the
RECORD (0) button to start recording, and play the
lead guitar part.
The RECORD (0) button lights red and the REC
indicator for TRACK 2 stops flashing and stays lit while
recording.
8. After you finish your performance, press the STOP
(8) button to stop recording.
The recorded file is saved in the folder of the currently
loaded song.
9. Press the REC button for TRACK 2 so the REC button
becomes unlit.
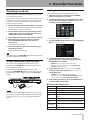
4. Press the REC button for TRACK 3.
The REC indicator blinks and the unit enters recording
standby.
5. Use the TRIM knob for INPUT B to adjust the input
level suitably for the mic. Set the TRIM knob so that
the OL indicator for INPUT B does not light even
when the loudest sound to be recorded is input.
OL indicator
When you input a sound through an external
microphone, the input level is shown by the 3 level
meter.
Recording a vocal to TRACK 3
1. Press the ASSIGN button to open the Assign screen.
When you raise the fader for TRACK 3, the STEREO
fader and the MONITOR LEVEL knob, you can hear
the sound of the mic input through the headphones.
NOTE
2. Use the CURSOR (5/b/g/t) buttons or press
the SELECT button for TRACK 3 to move the cursor
(frame) on the Assign screen to TRACK 3.
Use the JOG/DATA dial or press the SOURCE button
for INPUT B to set the TRACK 3 recording source to B.
16 TASCAM DP-32
If the OL indicator continues to light even when the TRIM
knob is turned down, the mic signal itself is too loud. In this
case, move the mic further away from the sound source or
lower the volume of the sound source.
6. Return to the beginning of the song, start playback
of the recorded rhythm and lead guitar parts, and
practice singing along with the recording.
2 - Quick Guide
You can hear the playback of the recorded guitar
parts on tracks 1 and 2 along with the vocal on your
headphones.
7. As necessary, use the TRACK 1, 2, 3 and STEREO
faders and the MONITOR LEVEL knob to adjust the
monitoring level and balance and the PAN knob to
adjust the stereo positions.
8. Return to the beginning of the song, press the
RECORD (0) button to start recording, and then
sing along with the recording.
The RECORD (0) button lights red, and the REC
indicator for TRACK 3 stops flashing and stays lit while
recording.
9. After you finish your performance, press the STOP
(8) button to stop recording.
The recorded file is saved in the folder of the currently
loaded song.
10.Press the REC button for TRACK 3 so that the REC
button becomes unlit.
Mixing the tracks
Once you have finished your recording, you are ready to
mix down and create a master file.
1. Use the faders for TRACKS 1 to 3 to balance their
levels. Use the STEREO fader to adjust the overall
level.
2. Press the MIXER button to open the Mixer screen.
Press the SELECT buttons for TRACKS 1 to 3 to select
the track to be adjusted and then use the PAN knob to
set its stereo position.
TIP
You can also press and hold the MARK SET button and
press the IN or OUT button to set the IN or OUT point when
playback is stopped.
5. Press the MIXDOWN/MASTERING button.
The recorder switches to Mixdown mode and the
display returns to the Home screen.
NOTE
When in Mixdown mode, Mixdown appears in the upper
left of the Home screen.
6. Press the RECORD (0) button.
Master file recording starts.
Recording stops automatically when the OUT point is
reached.
NOTE
• The IN and OUT points must be at least 4 seconds apart.
If the interval is shorter than 4 seconds, the message I/
O Too Short will appear and the Recorder mode
cannot switch to Mixdown mode.
• During recording, you can use the track faders to adjust
the levels of the tracks and the overall level.
• You can also use the equalizer or reverb effect while
recording a master file. (See "Send effects" on page 65 and
"Track equalizer" on page 64)
• You can mute unwanted tracks so that they are not
recorded to the master file. (See "Muting tracks" on page
45.)
3. Set the IN point.
The interval from the IN point to the OUT point will be
used for the master file.
Play back the song, press and hold the MARK SET
button and press the IN button at the point where you
want to start the master file.
The position where you press the button is set as the
IN point, which is where the mix down will start.
4. Set the OUT point.
Play back the song, press and hold the MARK SET
button and press the OUT button where you want to
end the master file.
The position where you press the button is set as the
OUT point, which is where the mix down will end.
TASCAM DP-32
17
2 - Quick Guide
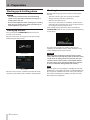
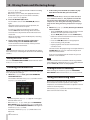
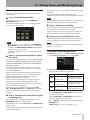
Mastering a recording
ªª Applying equalization
You can adjust the sound or the master file to your liking.
This process is called mastering.
In this example, we will use the equalizer on the
master file to reduce high frequencies and increase low
frequencies slightly.
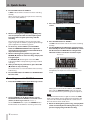
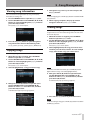
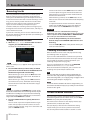
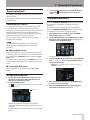
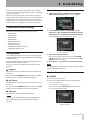
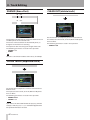
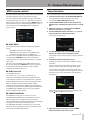
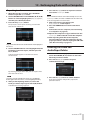
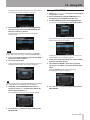
1. When in Mastering mode, press the F1 (EQ)
button to open the EQUALIZER screen.
ªª Checking the master file
1. When in Mixdown mode, press the MIXDOWN/
MASTERING button to open the MASTERING
screen.
The recorder switches to Mastering mode and the
display returns to the Home screen.
NOTE
• When in Mastering mode, Mastering appears on the
upper left corner of the Home screen.
• If a master file does not exist, the recorder mode cannot
switch to Mastering mode.
• If the recorder is in Multi Track mode, press the
MIXDOWN/MASTERING button to switch to Mixdown
mode, and then press the MIXDOWN/MASTERING
button again to switch to Mastering mode.
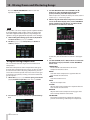
2. In this mode, press the PLAY (7) button to listen to
the master file that you have created.
2. Turn the EQ HIGH GAIN knob left to lower the
HIGH GAIN knob on the screen to "-2dB". This
reduces the high frequencies.
3. Next turn the EQ MID GAIN knob left to lower
the MID GAIN to "-2dB". This reduces the mid
frequencies.
4.Next, turn the EQ LOW GAIN knob right to raise
the LOW GAIN knob on the screen to "+6dB". This
increase the low frequencies.
5. Press the ON/OFF button to the right of the LOW
knobs to turn the equalizer ON.
NOTE
• Confirm that both the EQ and COMP items are set to
OFF. If either is set to ON, the sound heard will be affected
by the equalizer and/or compressor. (See "Using the
mastering equalizer" on page 67 and "Using mastering
compression" on page 68.)
• In Mastering mode, the STEREO fader cannot be
used to adjust the level.
6. Press the F1 (g) button to return to the Mastering
screen.
7. Press the PLAY (7) button to listen to the master
file with equalization.
ªª Applying compression
Use the compressor on the master file to adjust the
dynamics and loudness of the entire song.
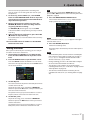
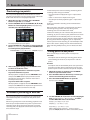
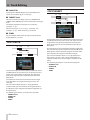
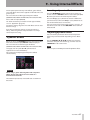
1. When in Mastering mode, press the F2 (COMP)
button to open the COMP MULTI screen.
18 TASCAM DP-32
2 - Quick Guide
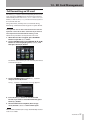
2. Press the F3 (LIBRARY) button to open the library
list.
3. Use the JOG/DATA dial to select (highlight blue) an
item in the list and then press the F4 (t) button to
load a suitable setting from the library.
The library list closes.
TIP
You can also adjust the parameters on the COMP MULTI
screen using the CURSOR keys and JOG/DATA dial. (See
"Using mastering compression" on page 68.)
4. Press the F4 (ON) button to turn the compressor on.
The OFF icon changes to ON.
5. Press the F1 (g) button to return to the Mastering
screen.
6. Press the PLAY (7) button on the Mastering screen
to listen to the master file with compression.
NOTE
If the EQ item is set to ON on the EQUALIZER screen, the
effect of the equalizer on the sound will also be heard.
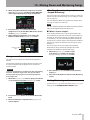
ªª Normalizing
Normalizing maximizes the volume of the master file
without changing the dynamic range.
1. When in Mastering mode, press the F4 (NORM)
button to open the NORMALIZE screen.
ªª Using the noise shaper
Use this function to reduce quantization distortion.
1. When in Mastering mode, press the F3 (NSD)
button to open the NOISE SHAPED DITHERING
screen.
2. Press the F4 (ON/OFF) button to set the noise
shaper to ON.
3. Press the F1 (g) button to return to the Mastering
screen.
ªª Re-recording the master file
Re-record the master file with equalization and
compression applied to create a new master file.
1. When in Mastering mode, press the RECORD (0)
button.
2. This will record over the master file and create a
new master file with equalization and compression
applied.
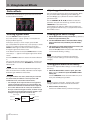
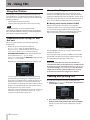
Creating an audio CD with the
master file
You can use a master file that you have created to make
an audio CD that can be played back by an ordinary CD
player, for example.
Inserting a CD
1. When in Multi Track mode, press the CD button
to open the CD menu.
CAUTION
2. Press the F2 (YES) button to perform the
normalization.
3. Press the F1 (g) button to return to the Mastering
screen.
• When in a mode other than Multi Track mode,
you cannot open the CD menu.
In Mixdown or Mastering mode, press the
MIXDOWN/MASTERING button repeatedly until you
return to Multi Track mode.
In Bounce mode, press the BOUNCE button to
switch to Multi Track mode.
TASCAM DP-32
19
2 - Quick Guide
• The disc tray will not open when only the Home
screen or MENU screen is open. Open the disc tray
when the CD menu or CD PLAY/IMPORT screen is
open.
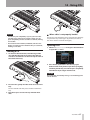
2. Press the F3 (-) button or the disc tray eject
button on the front panel to open the tray slightly.
Pull the tray out until it opens completely as shown
below.
3. Hold the edge of the disc with the label side up and
put it into the tray so that its central hole is on the
round protrusion in the center of the tray, and then
press the disc gently near the center to mount it on
the tray.
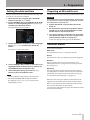
Writing to a CD-R/CD-RW
When writing to a CD-R/CD-RW, the procedure differs
between when you are choosing multiple master files and
when you are choosing only one file.
In this example, we will select multiple master files to
create a CD that can be played in ordinary CD players.
For details about writing to a CD-R/CD-RW, see "Creating
an audio CD" on page 82.
1. When in Multi Track mode, press the CD button
to open the CD menu.
2. Place a blank CD (unused CD-R/CD-RW disc or a
completely erased CD-RW) on the disc tray.
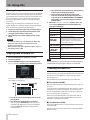
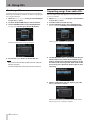
3. Use the JOG/DATA to select MASTER WRITE and
then press the F4 (t) button.
This opens the MASTER WRITE screen and shows a
list of songs that have been recorded as master files.
4. Use the JOG/DATA dial to select (highlight blue) a
song that you want to write to the CD-R/CD-RW,
and then press the F2 (4) button.
A check mark 4 appears in the check box next to the
song.
NOTE
The disc will click into place and be level with the tray.
4. Push the tray to close it. The tray will click when
shut.
NOTE
To remove the check mark 4 from a check box, press the
F2 (4) button again while the song with the 4 is selected
(highlighted blue).
5. Repeat step 4 above as necessary.
6. When you select all songs to be written, press the
F4 (t) button to open the WRITE SONG LIST
screen.
On this screen, you can change the order that the
master files will be written to the CD-R/CD-RW and set
the gaps between them. (For details about changing
20 TASCAM DP-32
2 - Quick Guide
the order and setting the gaps, see "Creating an audio
CD" on page 82).
Shutting down
Turn the unit off when you are done using it.
1. Press the HOME button to open the Home screen.
7. Press the F4 (t) button again and a confirmation
pop-up window will appear.
2. Press and hold the STANDBY/ON button on the rear
panel until DIGITAL PORTASTUDIO appears on
the display.
8. Press the F2 (YES) button to begin writing to the
CD-R/CD-RW.
9. When writing is complete, a message asking
whether you want to write another CD-R/CD-RW
with the same contents appears.
When the unit completes its automatic shutdown
procedure, which includes keeping a record of
various information about operations that have been
performed until now, the power turns off (enters
standby mode).
Always use the procedure above to turn the power off
properly.
CAUTION
If you want to write the same contents to another
CD-R/CD-RW, press the F2 (YES) button.
To finish the procedure, press the F1 (NO) button.
Ejecting a CD
When the power is ON, do not disconnect the power
cord or otherwise interrupt the power to the unit. Doing
so will cause all settings made since the last time you
saved to be lost. If the power is interrupted while an SD
card is being accessed, all recorded songs and data on
the card could be damaged beyond recovery.
1. When in Multi Track mode, press the CD button
to open the CD menu.
CAUTION
The disc tray will not open when only the Home screen
or MENU screen is shown. Open the disc tray when the
CD menu or CD PLAY/IMPORT screen is open.
2. Press the F3 (-) button or the disc tray eject
button on the front panel to open the tray slightly,
and then pull the tray out until it opens completely.
Hold the disc by its edges and lift it out.
CAUTION
Do not lift the disc forcibly. Doing so could damage the
unit or the disc.
TASCAM DP-32
21
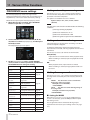
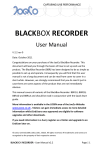
3 – Names and Functions of Parts
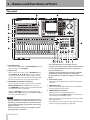
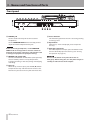
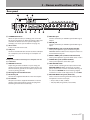
Top panel
1 GUITAR indicator
This indicator lights when the LINE-GUITAR switch on
the rear panel is set to GUITAR.
2 Display area
While viewing the screen, use the JOG/DATA dial or
the CURSOR (5/b/g/t) buttons to, for example,
return to the Home screen, open the MENU screen,
assign input signals to tracks and change parameters
for each input and track. (See page 26 for details.)
3 PHANTOM (+48V) buttons/indicators
Use these buttons to turn phantom power on/off for
MIC/LINE INPUTS A-D and E-H on the rear panel.
The PHANTOM indicators light when phantom power
is turned on for each set of inputs.
When the GUITAR indicator is lit, even if phantom
(+48V) power is ON (indicator lit) for E-H, INPUT H will
not receive phantom power.
CAUTION
• Use the STEREO fader to lower the output volume
of the unit before turning phantom power on or off.
Depending on the microphone, a loud noise could
occur, possibly damaging equipment and harming
people's hearing.
• Do not connect or disconnect a microphone when
phantom power is turned on.
22 TASCAM DP-32
• Turn phantom power on only when using a
condenser microphone that requires phantom power.
• Do not supply phantom power to an unbalanced
dynamic microphone.
• Supplying phantom power to some types of ribbon
microphones could break them. Do not supply
phantom power to a ribbon microphone if you are in
doubt.
4 OL indicators (A-H)
These indicators light when the input source signal is
too loud.
5 TRIM knobs (A-H)
Use these knobs to adjust input levels. (See "Making
the first recording" on page 46.)
6 SOURCE buttons/indicators
When you press one of these buttons, the
corresponding input (INPUT A to H) is selected as the
input source (and its button lights).
Operation of mixer controls and other functions affect
the selected input.
These buttons are also used to assign input sources to
tracks (see "Assigning inputs" on page 40).
3 – Names and Functions of Parts
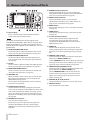
7 MUTE (solo) indicators
These indicators light when a track is muted or soloed.
When the SOLO button is not lit, it indicates the track
is muted. When the SOLO button is lit, it indicates the
track is soloed.
8 REC buttons/indicators
Use these buttons to enable (arm) or disable recording
for each track.
To monitor a track's input sound through headphones
or a monitoring system, press the REC button for the
corresponding track.
When recording is enabled for a track, the REC button
flashes when the recorder is stopped, and lights
during recording. (See "Making the first recording" on
page 46 and "Multitrack recording" on page 46.)
9 SELECT buttons/indicators
When you press one of these buttons, the
corresponding track (1 to 31/32) is selected as the
current channel (its button lights).
The mixer and other functions affect the current
channel.
These buttons are also used for the following
purposes.
• To assign an input source to a track (See "Assigning
inputs" on page 40.)
• To assign effects to an input (See "Inserting a guitar
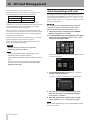
effect" on page 62.)
• To select tracks in a fader group
0 TRACK faders (1–31/32)
Use these faders to adjust the monitoring level of each
track's playback signal or input signal assigned to the
track. (See "Levels and balance" on page 64.)
q Operation buttons
Use these buttons to activate/deactivate functions or
make settings. (See pages 26-27 for details.)
w FADER GROUP button/indicator
Press to set a fader group.
The button lights when in use. (See "Fader group" on
page 64.)
t REW (m) (TO ZERO) button
When stopped or playing back, press and hold this
button to rewind. Rewinding is at a fixed 10x speed.
Press briefly to jump to the previous mark.
Press and hold the STOP (8) button and press to
locate the beginning of the song (00:00:00:00
= ZERO point). (See "Returning to zero or the last
recording position" on page 52.)
y F FWD (,) (TO LAST REC) button
When stopped or playing back, press and hold this
button to fast-forward. Fast-forwarding is at a fixed 10x
speed.
Press briefly to jump to the next mark.
Press and hold the STOP (8) button and press to
locate the last recording position (LAST REC point). (See
"Returning to zero or the last recording position" on
page 52.)
u STOP (8) button
Use this button to stop playback, recording and fastforwarding/rewinding. Press at the same time as you
press the REW (m) (TO ZERO) button or F FWD
(,) (TO LAST REC) button to locate the beginning
of the song (00:00:00:00 = ZERO point) or the last
recording position (LAST REC point). (See "Returning
to zero or the last recording position" on page 52.)
i PLAY (7) button/indicator
Press to start playback.
During recording, press to stop recording and start
playback (punch out).
During playback or recording, the PLAY (7) button
lights.
o RECORD (0) button/indicator
Press to start recording.
This button lights during recording. During playback,
if you press this button when a track REC button is
flashing, recording to that track will begin (punch in).
(See "Automatic punching in and out" on page 54.)
e STEREO SELECT button/indicator
When the Assign screen is open, you can press to
move the cursor from the TRACK display area to the
STEREO BUS display area, and set the input for the
stereo bus. (See "Assigning inputs to a stereo bus" on
page 41.)
r STEREO fader
Use this fader to adjust the stereo signal level output
from the STEREO OUT jacks and PHONES jack. Use
this fader also to adjust the recording level when
bouncing or mixing down tracks.
TASCAM DP-32
23
3 – Names and Functions of Parts
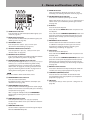
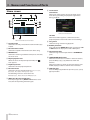
k DYNAMICS button/indicator
Pressing this button opens a screen to adjust the
settings for the effects applied to the inputs (INPUT A
to H). (See "Dynamic effects" on page 61.)
l EFFECT button/indicator
Pressing this button opens a screen to make
adjustments to the effects. (See "Guitar effects" on
page 62 and "Send effects" on page 63.)
; MENU button
Press to open the MENU screen. (See "Menu structure"
on page 29.)
p Color display
This 3.5-inch TFT display with 320x240 resolution
shows various types of information.
NOTE
The display is produced with extremely high-precision
manufacturing technologies. More than 99.99% of the pixels
operate to specification. Less than 0.01% of the pixels may
occasionally misfire or appear as red or black dots. This is not
a malfunction.
a GAIN (HIGH/MID/LOW) knobs
Use these knobs to adjust the equalizer gain of each
band. (See "Using the input equalizer" on page 43.)
s FREQ (HIGH/MID/LOW) knobs
Use these knobs to adjust the center frequency of
each equalizer band. (See "Using the input equalizer"
on page 43.)
d Q knob
Use this knob to adjust the width of the MID equalizer
band. (See "Using the input equalizer" on page 43.)
f EQUALIZER ON/OFF button
Use this button to turn the equalizer on and off. (See
"Using the input equalizer" on page 43.)
g JOG/DATA dial
When the Home screen is open, you can use this dial
for transport jog operations. (See "Cueing with the
JOG/DATA dial" on page 52.)
Use this dial to change parameter values and select
items when using menus.
h ASSIGN button/indicator
Use this button to set the track type for tracks 9/10–
31/32 and set (assign) the input (INPUT A to H) for each
track. When you press this button, the Assign screen
opens. The input signal of the assigned input source
becomes the recording source. (See "Assigning inputs"
on page 40.)
j MIXER button/indicator
Press to open the Mixer screen.
On this screen, you can adjust the settings for the
selected input (INPUT A to H) or track (including
GROUP) that is selected. (See "Bouncing tracks" on
page 50.)
24 TASCAM DP-32
z HOME button
Press to open the Home screen. (See "Home screen"
on page 28.)
x F1 to F4 (function) buttons
The functions of these buttons depend on the
currently open screen. The functions currently
assigned to the F1 to F4 buttons are shown at the
bottom of the screen.
c PAN knob
Use this knob to adjust the stereo position of the
track's playback signal or the input signal assigned to
that track. (See "Stereo position (panning)" on page
64.)
v SEND EFF 1/EFF 2 knobs
Use these knobs to adjust the amount of track signal
output to the EFFECT SENDS jacks.
Use the SEND EFF 1 knob also to adjust the amount of
track signal sent to the internal effects. (See "Sending
signals to internal/external effects" on page 44.)
b SEND MASTER 1/MASTER 2 knobs
Use these knobs to adjust the amount of master track
signal output to the EFFECT SENDS jacks.
Use the SEND MASTER 1 knob also to adjust the
amount of master track signal sent to the internal
effects. (See "Sending signals to internal/external
effects" on page 44.)
n CURSOR (5/b/g/t) buttons
Use these buttons to move the cursor on the screen.
m JOG PLAY button
Press to switch to Search mode.
3 – Names and Functions of Parts
* MARK SET button
During recording or playback, press to set a mark
manually. (See "Setting a location mark" on page 51.)
( AUTO PUNCH button/indicator
Press to turn automatic punching on and off.
When auto punch is on, Auto Punch appears on the
Home screen. (See "Automatic punching in and out"
on page 54.)
) IN button
, SOLO button/indicator
Press to switch to Solo mode (the button lights). (See
"Solo" on page 45.)
. MUTE button/indicator
Press to switch to Mute mode (the button lights). (See
"Muting tracks" on page 45.)
/ TRACK EDIT button
Press to open the TRACK EDIT screen. (See
"Overview of track Editing" on page 57.)
! VIRTUAL TRACK button/indicator
Press to open the VIRTUAL TRACK screen. (See
"Virtual tracks" on page 56.)
@ BOUNCE button/indicator
Press to switch to Bounce recording mode (the button
lights). (See "Bouncing tracks" on page 50.)
# MIXDOWN/MASTERING button/indicator
Press to cycle through the Multi Track, Mixdown
and Mastering modes. Mastering mode is only
available when there is a master track. (See "Mixing
down tracks" on page 64, "Creating a master file" on
page 65, "Checking the master file" on page 66 and
"Using the mastering tools" on page 66.)
NOTE
The current mode is shown on the Home screen.
$ METRONOME button/indicator
Press to set the metronome.
The button flashes in time with the set tempo. (See
"Metronome" on page 70.)
% UNDO/REDO button/indicator
Press to locate the IN point.
Press and hold the MARK SET button and press to set
the IN point.
Press and hold the JUMPBACK (PREVIEW) button and
press this to start pre-roll playback up to the current
position where it stops. (See "Previewing cue points"
on page 54.)
Q REHEARSE button/indicator
Use this button to turn Rehearse mode on and off.
In addition to auto punch in/out, you can also use
the Rehearse mode for ordinary recording. (See
"Rehearsing a recording" on page 45.)
W OUT button
Press to locate the OUT point.
Press and hold the MARK SET button and press to set
the OUT point.
Press and hold the JUMPBACK (PREVIEW) button and
press this to start post-roll playback from the current
position for a set amount of time, then return to the
current position and stop. (See "Previewing cue points"
on page 54.)
E REPEAT button/indicator
Press to this button to turn Repeat Playback mode on
and off. (See "Using repeat playback" on page 53.)
R JUMPBACK (PREVIEW) button
Press to rewind a set number of seconds from the
current position and start playback. (See "Jumpback
playback" on page 53.)
T CD button
Press to open the CD menu. (See "14 – Using CDs" on
page 80.)
Press to undo the immediately previous action (single
undo) or to cancel the last undo (redo). (See "Undoing
an operation" on page 47.)
After a single or multiple undo, the UNDO/REDO
button lights, showing that an operation has been
undone.
^ MONITOR SELECT button
Press to open the MONITOR SELECT pop-up
window on the Home screen. (See "Monitor selection"
on page 42.)
& MONITOR LEVEL knob
Use this knob to adjust the level of the signals output
from the MONITOR OUT jacks.
TASCAM DP-32
25
3 – Names and Functions of Parts
Front panel
Y PHONES jack
Use this standard stereo jack to connect stereo
headphones.
Use the MONITOR LEVEL knob on the top panel to
adjust the volume output from this jack.
CAUTION
Before connecting headphones, use the MONITOR
LEVEL knob on the top panel to set to the volume to
minimum. A loud noise could occur, which might result
in damage to equipment and people's hearing.
U REMOTE jack (2.5mm TRS)
Connect a TASCAM RC-3F footswitch (sold separately)
here to remotely control a variety of operations,
including punching in and out (starting and stopping
recording).
I Disc tray
When the CD menu is open, press the F3 (-) button
to open the disc tray and then load or remove a disc.
Push the tray to close it. The tray will click when shut.
26 TASCAM DP-32
O Access indicator
This indicator lights when the unit is accessing (reading
or writing) a disc.
P Eject button
When the CD menu is displayed, press to open the
disc tray.
A Emergency eject hole
If the disc tray does not open, press the button inside
this hole to forcibly open the disc tray. (See "Forcing
disc ejection" on page 82.)
CAUTION
Do not use this button at any time other than an
emergency. Before doing this, turn the power off (put in
standby) and disconnect the AC adaptor.
3 – Names and Functions of Parts
Rear panel
S STANDBY/ON button
When the power is OFF (in standby), press and hold
this to turn the power on. When the power is ON, press
and hold this button to turn the power off (put in
standby). (See "Start-up & Shutdown" on page 32.)
D SD card slot
Insert an SD card into this slot.
F USB port
Use the included USB cable to connect with a USB port
on a computer. (See "Connecting to a computer" on
page 76.)
CAUTION
L MIDI OUT jack
Use this standard 5-pin DIN MIDI jack for MIDI signal
output.
: MIDI IN jack
Use this standard 5-pin DIN MIDI jack for MIDI signal
input.
Z MONITOR OUT jacks (standard balanced TRS)
These jacks output the signal selected using the
MONITOR SELECT button on the top panel. These are
standard balanced jacks.
X EFFECT SENDS jacks (standard unbalanced TS)
These jacks output the signal for effect sends 1 and 2.
Always connect the unit directly to a computer. Do not
use a USB hub.
C STEREO OUT jacks (unbalanced RCA)
G GROUND connector
V LINE-GUITAR switch
H Kensington lock attachment hole
J DC IN 12V jack
B MIC/LINE INPUTS A-H jacks (balanced)
Depending on other conditions in your setup, you
might hear noise when monitoring. If this occurs, use
this connector to ground the unit. (Please prepare the
necessary wiring yourself.)
Connect the supplied TASCAM PS-1225L AC adaptor.
K Cord holder
Wrap the cord of the supplied TASCAM PS-1225L AC
adaptor around this hook to prevent the plug from
becoming disconnected accidentally.
These jacks output the stereo bus signal.
Set this switch according to the input source of the
MIC/LINE INPUT H. When connecting an electric
guitar, electric bass or similar instrument directly, set
this switch to GUITAR. When connecting a digital
instrument or other audio equipment, set it to LINE.
These are balanced analog XLR/TRS combo jacks for
microphone and line level input.
• XLR (1: GND, 2: HOT, 3: COLD)
• TRS (Tip: HOT, Ring: COLD, Sleeve: GND)
TASCAM DP-32
27
3 – Names and Functions of Parts
Home screen
8 Track section
Level meters
When level meters appear, they show input signal
levels during recording and playback signal levels
during playback.
Home screen with timeline
Timeline
When the timeline appears, it shows the current
playback position and which tracks have recordings.
Home screen with track level meters
1 Counter mode
Shows the currently selected time counter mode: ABS
or BAR.
2 Recorder time counter
Shows the elapsed time from the start of the song.
3 REMAIN time
Shows the remaining recordable time (hours: minutes)
on the SD card.
4 Repeat playback icon
When the unit is in Repeat Playback mode, the
icon appears.
5 Playback position
Shows the current playback position.
6 Recorder mode
Shows the current recorder mode: Multi Track,
Bounce, Mixdown or Mastering.
The following items are also shown here:
Rehearsal, Auto Punch and Search.
7 INPUT A to H overload indicators
If the input signal of any INPUT A to H source is too
loud, the corresponding indicator lights.
28 TASCAM DP-32
9 Song name
Shows the song name during playback.
0 IN/OUT point time
Press and hold the MARK SET button and press the IN
or OUT button to display the set IN or OUT point.
q Stereo level meters
Shows the signal level output from the STEREO OUT
jacks.
w TIMELINE/METER function
When the level meters are shown in the track section,
press the F1 (TIMELINE) button to shown the
timeline.
When the timeline is shown in the track section, press
the F1 (METER) button to shown the level meters.
e SAVE function
Press the F2 (SAVE) button to open the SONG SAVE
pop-up window.
3 – Names and Functions of Parts
Menu structure
Press the CD button to open the CD menu, which contains
the following items.
Press the MENU button to open the MENU screen.
The menu contains the following items.
Menu item
Function
Reference
Menu item
Function
Reference
PLAY/IMPORT
Play back audio CDs and
import songs from them
Pages 82
and 86
MASTER WRITE
Create audio CDs with
master files
Page 82
SONG
Song loading, saving
and creation, and other
song-related operations
Page 35
AUDIO DEPOT
Import and export WAV
files
Page 78
LIVE WRITER
INFORMATION
View information about
songs, files, and the
system
Create audio CDs with
multiple tracks by
Page 85
dividing master files with
marks
Page 72
FINALIZE
Finalize unfinalized
CD-R/CD-RW discs
Page 86
MIDI
Make MIDI settings
Page 70
ERASE
Page 87
TUNER
Tune instruments
Page 71
Erase written CD-RW
discs
USB
Make USB settings
Page 76
FORMAT
Format SD cards
Page 74
Auto Power Save setting
Page 72
Contrast
(LCD adjustment)
Brightness
(LCD adjustment)
Page 34
Backlight
(LCD adjustment)
Foot SW Right
assignment
Foot SW Center
assignment
Page 49
Foot SW Left assignment
PREFERENCE
Undo History
(Switch between Level 1
and Level 10)
Page 47
Jump Back (JUMP time
setting)
Page 53
Auto Monitor setting
Page 72
Preview Time setting
Page 54
Peak Hold setting
Page 43
Song Name Type (switch
between DATE and
WORD)
Page 72
Date/Time (system time
setting)
Page 33
Initialize (restore default
settings)
Page 73
TASCAM DP-32
29
3 – Names and Functions of Parts
Navigating screens
Navigation examples
After using the MENU button or a dedicated button to
open a screen, follow the guidelines below to use the
functions on the screen.
These examples show basic operation procedures, but
the actual assignments of the function buttons (F1 to F4
buttons) depend on the screen.
• Use the JOG/DATA dial or the CURSOR (5/b/g/t)
buttons to select (highlight green) the desired item.
This example shows the MENU screen with the SONG
item selected.
In this menu, use the JOG/DATA dial or the CURSOR
(5/b) buttons to select LOAD, and then press the F4
(t) button to load the song.
• When the cursor (highlighted blue) is on a setting
value, use the JOG/DATA dial to change the value.
To select an item, use the CURSOR (5/b) buttons.
This example shows the PREFERENCE screen.
• This example shows the SONG LIST menu.
Function button assignments
The assignments of the function buttons (F1 to F4) are
shown at the bottom of the screen above the buttons
themselves.
F2
F3
F4
"4" above the F2 button shows that "4" is assigned to the
F2 button when using this screen. In this manual, the function assigned to a function button
is shown in parentheses, for example, "F2 (4) button".
In this way, "INFO" is assigned to the F3 button, and "t"
is assigned to the F4 button.
When an item has a menu, "t" appears on the right side,
and the F4 (t) button is used to open it.
In the menu, you can press the F1 (g) button to return to
the previous screen.
30 TASCAM DP-32
Use the JOG/DATA dial to change the value.
Move the cursor (highlighted blue) up or down.
• To move left or right, use the CURSOR (g/t) buttons.
• Press the HOME button to return to the Home Screen.
4 – Preparation
Inserting and removing SD cards
Powering the unit
As shown in the illustration, connect the included TASCAM
PS-1225L AC adaptor to the DC IN 12V jack.
Inserting an SD card
Insert the SD card into the SD card slot on the rear panel
as shown in the illustration until it clicks into place.
TASCAM
PS-1225L
AC outlet
DC plug
NOTE
An SD card is already in the SD card slot when the unit is
shipped from the factory. If you want to use this card to
record and play tracks, there is no need to reinsert it.
Removing the card
Push the loaded card in gently to eject it.
The bottom panel has a hook (cord holder) that can be
used to hold the AC adaptor cord in place. When using it,
wrap the cord around this hook to prevent it from being
disconnected during use.
CAUTION
• Always turn the power off (put in standby) before
removing an SD card.
• If you remove or insert an SD card when the power is
on, recorded data could be lost permanently.
• SD and SDHC cards that are at least 512 MB in size
can be used.
• A list of SD cards that have been confirmed to work
with this unit can be found on the TASCAM website
(http://tascam.com/).
CAUTION
• Use only the included TASCAM PS-1225L AC adaptor
and power cord. Use of a different AC adaptor could
cause malfunction, fire or electric shock.
• Be sure to use the included TASCAM PS-1225L AC
adaptor to supply power to this unit. Power cannot
be supplied to this unit by USB.
About write-protected SD cards
SD cards have write-protect (lock) switches.
Unprotected
Protected
When the protect switch is in the LOCK position, files
cannot be recorded or edited on the card. Slide the switch
away from the LOCK position if you want to record, erase
or otherwise change files on a card.
TASCAM DP-32
31
4 – Preparation
Starting up & shutting down
CAUTION
• Turn down the volume of any sound monitoring
system connected to the unit before starting up or
shutting down the unit.
• Do not use headphones when starting up or shutting
down the unit. A loud noise could cause damage to
your headphones or your ears.
Starting up the unit
Press and hold the STANDBY/ON button on the rear
panel for a few seconds.
When the unit starts, the startup screen opens briefly
followed by the Home screen.
Shutting down
Make the following preparations before shutting down
the unit.
• Stop the recorder. (The unit cannot be shut down
during recording and other operations.)
• Return to the Home screen.
• If the unit is connected to a computer, disconnect the
USB cable after performing the necessary procedure on
the computer to disconnect the unit.
After making these preparations, press and hold the
STANDBY/ON button on the rear panel until the following
screen opens.
The power turns off (enters standby) after the unit
completes its shutdown process, which includes saving
various information from your session.
Start-up screen
CAUTION
When the power is ON, do not disconnect the power
cord or otherwise interrupt the power to the unit. Doing
so will cause all settings made since the last time you
saved it to be lost. If the power is interrupted while an
SD card is being accessed, all recorded songs and data
on the card could be damaged beyond recovery.
NOTE
Home screen
When the unit starts up, it defaults to multitrack mode,
regardless of the mode used last before shutting down.
32 TASCAM DP-32
When the power is turned off (put in standby), the currently
loaded song is saved. When the power is turned on again, the
last song used is reloaded in the same state it was when the
power was turned off (put in standby). You can even undo
and redo previous operations.
4 – Preparation
Setting the date and time
Preparing an SD card for use
Using its internal clock, this unit remembers the date and
time when a song or file is recorded.
1. When the recorder is stopped, press the MENU
button to open the MENU screen.
2. Use the JOG/DATA dial or the CURSOR (5/b/g/t)
buttons to select (highlight green) PREFERENCE,
and then press the F4 (t) button.
The PREFERENCE screen opens.
In order to use an SD card in this unit, you must format it first.
3. Use the CURSOR (5/b) buttons to select (highlight
blue) Date/Time, and then press the F4 (t)
button.
The DATE/TIME screen opens.
Recorder modes
CAUTION
The included SD card is already formatted, so formatting
it is not necessary. Formatting the supplied SD card will
erase the demo song stored on it.
1. Confirm that the SD card is loaded and turn the
power on.
2. An "Invalid Card" pop-up warning appears when a
new SD card or an SD card formatted for use with
another device is inserted in the unit.
3. You can also reformat a card in this unit at any time.
(See "Quick formatting an SD card" on page 74 and
"Full formatting an SD card" on page 75.)
To close the pop-up message, press the F1 button.
This unit has four modes.
Multi Track
Use to operate the unit as a multitrack recorder.
Bounce
Use to bounce tracks. (See "Bouncing tracks" on page 50.)
4. Use the CURSOR (g/t) buttons to move the cursor
(highlighted blue) to the desire item, and then use
the JOG/DATA dial to change the value.
5. After making the settings, press the F2 (YES)
button to return to the Home screen.
NOTE
• The time indication stops while the time is being set.
• You can automatically add the date to file names
by setting the Song Name Type to DATE in the
PREFERENCE menu.
Mixdown
Use to mix down tracks to create a master file. (See
"Mixing down tracks" on page 64 and "Creating a master
file" on page 65.)
Mastering
Use to play back the master files that you have created
and apply effects and tailor them to suit your preferences
(mastering). (See "Checking the master file" on page 66
and "Using the mastering tools " on page 66.)
When the unit starts up, it defaults to multitrack mode,
regardless of the mode used last before shutting down.
When in any mode other than multitrack mode, many of
the onscreen operations are unavailable.
In this manual, explanations are given for multitrack mode
unless otherwise noted.
TASCAM DP-32
33
4 – Preparation
Connecting other equipment
This section shows examples of how to connect other
devices to this unit.
Precautions before making connections
• Turn off (put in standby) this unit and all devices that
you will connect beforehand.
• Supply power to all the devices from the same line.
When using a power strip, for example, use one with a
cable that has a high electric current capacity in order
to minimize power voltage variations.
Front panel
CAUTION
• Do not connect a dynamic microphone using an
unbalanced connection when phantom power is on.
Doing so could break it.
• Do not connect or disconnect a microphone when
phantom power is on. Doing so could cause a loud
noise and damage the equipment.
• Before turning phantom power on or off, turn down
the output volume using the MONITOR LEVEL knob,
STEREO fader and external monitor monitoring
system. Depending on the microphone, a loud noise
could occur, resulting in harm to equipment and
hearing.
NOTE
• Before producing any sound, minimize the output
volume using the MONITOR LEVEL knob and external
monitoring system. Loud noise could occur, resulting in
harm to equipment and hearing.
• Recorder functions cannot be used when the unit is
connected to a computer via USB.
フットスイッチ
TASCAM RC-3F Footswitch
( 別売 )
TASCAM RC-3F
(Optional)
TIP
When connecting an electric-acoustic guitar with a built-in
preamp or an active-type electric guitar, or when using an
effects pedal, for example, between the guitar and this unit,
set the LINE-GUITAR switch on the rear panel to LINE.
Headphones
ヘッドホン
Rear panel
TASCAM
PS-1225L
Adjusting the display
AC outlet
DC plug
Drum
machine
USB
You can adjust the contrast, brightness and backlight level
of the display.
Follow these procedures to adjust the contrast.
1. When the recorder is stopped, press the MENU
button to open the MENU screen.
2. Use the JOG/DATA dial or the CURSOR (5/b/g/t)
buttons to select (highlight green) PREFERENCE,
and then press the F4 (t) button.
The PREFERENCE screen opens.
Computer
Mini-B USB plug
Connect microphones
to INPUTS A to H
Powered speakers or
amplifier and speakers
Connect electronic keyboards
to INPUTS A to H
External effect
External recorder
34 TASCAM DP-32
Connect a
guitar/bass
to INPUT H
3. Use the CURSOR (5/b) buttons to select
Contrast, and then use the JOG/DATA dial to
adjust it.
Contrast range: 1 – 25 (default: 5)
Brightness range: 1 – 25 (default: 13
Backlight range: 1 – 25 (default: 25)
4. After making the settings, press the HOME button
to return to the Home screen.
5 - Song Management
This unit manages data in units called "songs". Ordinarily,
each project should have its own "song" file. The first step
is to load an existing song that you want to use or create a
new song.
The audio data for the recorded multitrack (TRACKS 1 to
31/32) and the master file are saved in the song.
This chapter covers basic operations, including procedures
for loading songs and creating new songs, as well as
explains various song management functions.
NOTE
• The 0 icon appears next to the currently loaded song.
• A lock icon appears next to any protected song.
3. Use the JOG/DATA dial or the CURSOR (5/b)
buttons to select the desired song, and then press
the F4 (t) button to open the menu.
Editing names
You can edit the name of a song in a pop-up window
when creating (SONG CREATE), saving (SONG SAVE)
and copying (SONG COPY) the song. You can also edit
the name of a song by opening the SONG NAME EDIT
pop-up window.
SONG NAME EDIT screen
Use the following controls to edit names.
• Use the CURSOR (g/t) buttons to move the cursor.
The character at the cursor position (underlined) is the
one that can be edited.
• Use the JOG/DATA dial to change the characters at the
cursor (underline) position. You can input a maximum
of 15 characters, including ordinary symbols, numerals
and English upper and lower case letters.
• After inputting or editing the name, press the F2 (YES)
button to save the edited name.
Loading a song
Follow these procedures to load the song you want.
1. When the recorder is stopped, press the MENU
button to open the MENU screen.
2. Use the JOG/DATA dial or the CURSOR (5/b/g/t)
buttons to select (highlight green) SONG, and then
press the F4 (t) button.
The SONG LIST screen opens.
4. Use the JOG/DATA dial or the CURSOR (5/b)
buttons to select LOAD, and then press the F4 (t)
button again.
The SONG LOAD pop-up window appears.
5. Press the F2 (YES) button to load the selected
song.
NOTE
If you press the F1 (NO) button, the pop-up window
disappears from the SONG LIST screen.
6. Once the song is loaded, the pop-up window
disappears from the SONG LIST screen.
7. Press the HOME button to return to the Home
screen.
Creating a new song
Follow these procedures to create a new song.
1. When the recorder is stopped, press the MENU
button to open the MENU screen.
2. Use the JOG/DATA dial or the CURSOR (5/b/g/t)
buttons to select (highlight green) SONG, and then
press the F4 (t) button.
The SONG LIST screen opens.
TASCAM DP-32
35
5 - Song Management
3. Press the F4 (t) button to open the menu.
Use the JOG/DATA dial or the CURSOR (5/b)
buttons to select CREATE from the menu, and then
press the F4 (t) button.
4. Press the F4 (t) button to open the SONG CREATE
pop-up window.
The created song will automatically be given a name
according to the Song Name Type setting in the
PREFERENCE menu.
5. Change the song name in the Name item if you
want. (See "Editing names" on page 35.)
Saving a song
This unit automatically saves the current song during
shutdown and when loading another song. You can also
save a song at any time using the following procedure.
1. When the recorder is stopped, press the MENU
button to open the MENU screen.
2. Use the JOG/DATA dial or the CURSOR (5/b/g/t)
buttons to select (highlight green) SONG, and then
press the F4 (t) button.
The SONG LIST screen opens.
3. Press the F4 (t) button to open the menu.
Use the JOG/DATA dial or the CURSOR (5/b)
buttons to select SAVE from the menu, and then
press the F4 (t) button.
4. Press the F4 (t) button to open the SONG SAVE
pop-up window.
TIP
You can edit the name of a song later by selecting
NAME EDIT from the SONG screen. You can also edit the
song name when saving the song.
6. Align the cursor with Bit and turn the JOG/DATA
dial to set the bit rate. (Default: 16bit)
7. Align the cursor with Hz and turn the JOG/DATA
dial to set the sampling frequency. (Default:
44.1kHz)
CAUTION
If you plan to create a CD from a master file, use the
default values of 44.1kHz and 16bit.
8. Press the F2 (YES) button to save the currently
loaded song and create a new song.
NOTE
If you press the F1 (NO) button, the pop-up window
disappears from the SONG LIST screen.
9. Once the song is created, the pop-up window
disappears from the SONG LIST screen.
10. Press the HOME button to return to the Home
screen.
36 TASCAM DP-32
5. Change the song name in the SongName item if
you want. (See "Editing names" on page 35.)
To save without changing the name, just press the F2
(YES) button.
6. Once the song is saved, the pop-up window
disappears from the SONG LIST screen.
7. Press the HOME button to return to the Home
screen.
TIP
The SAVE item, which is one of the SONG LIST menu
items, can also be selected using the F2 (SAVE) button on
the Home screen.
5 - Song Management
Viewing song information
You can check the song file format, song name (title),
time/date, and song size.
1. Press the MENU button to open the MENU screen.
2. Use the JOG/DATA dial or the CURSOR (5/b/g/t)
buttons to select (highlight green) SONG, and then
press the F4 (t) button.
The SONG LIST screen opens.
3. Press the F3 (INFO) button to cycle through the
song information shown in the following order:
SIZE, SAMPLE RATE, SAMPLE BIT, and DATE.
Copying songs
You can copy songs.
1. When the recorder is stopped, press the MENU
button to open the MENU screen.
2. Use the JOG/DATA dial or the CURSOR (5/b/g/t)
buttons to select (highlight green) SONG, and then
press the F4 (t) button.
The SONG LIST screen opens.
3. Select (highlight blue) a song you want to copy.
5. Change the song name as you want and press the
F2 (YES) button.
NOTE
To cancel copying, press the F1 (NO) button instead of the F2
(YES) button.
6. When copying completes, the pop-up window
disappears from the SONG LIST screen.
Erasing songs
You can erase a single song or multiple songs at once. You
might want to erase unneeded songs if the SD card starts
to run out of space.
1. When the recorder is stopped, press the MENU
button to open the MENU screen.
2. Use the JOG/DATA dial or the CURSOR (5/b/g/t)
buttons to select (highlight green) SONG, and then
press the F4 (t) button.
The SONG LIST screen opens.
3. Select (highlight blue) the song you want to erase
and then press the F2 (4) button. To erase multiple
songs, check all the songs you want to erase.
NOTE
To remove a check 4 from a box, press the F2 (4) button
again while the song is selected (highlighted blue).
4. Next, press the F4 (t) button to open the menu.
Use the JOG/DATA dial or the CURSOR (5/b)
buttons to select ERASE from the menu, and then
press the F4 (t) button.
A confirmation pop-up message appears.
4. Next, press the F4 (t) button to open the menu.
Use the JOG/DATA dial or the CURSOR (5/b)
buttons to select COPY from the menu, and then
press the F4 (t) button.
A confirmation pop-up message appears.
5. Press the F2 (YES) button to perform the erase.
NOTE
To cancel erasing a song, press the F1 (NO) button instead of
the F2 (YES) button.
TASCAM DP-32
37
5 - Song Management
6.When erasing a song completes, the pop-up window
disappears from the SONG LIST screen.
NOTE
The MUSIC folder must always have at least one song in it.
Therefore, one song will be automatically created when you
insert or format a card.
Protecting songs
If you protect a song, editing, recording and erasing that
song will be prevented.
1. When the recorder is stopped, press the MENU
button to open the MENU screen.
2. Use the JOG/DATA dial or the CURSOR (5/b/g/t)
buttons to select (highlight green) SONG, and then
press the F4 (t) button.
The SONG LIST screen opens.
3. Select (highlight blue) the song you want to
protect and then press the F2 (4) button. To
protect multiple songs, select all songs you want to
protect.
NOTE
To remove a check 4 from a box, press the F2 (4) button
again while the song is selected (highlighted blue).
4. Next, press the F4 (t) button to open the menu.
Use the JOG/DATA dial or the CURSOR (5/b)
buttons to select the PROTECT item from the
menu, and then press the F4 (t) button.
The song protect function is enabled for the selected
song.
5. When protecting a song completes, the pop-up
window disappears from the SONG LIST screen.
NOTE
• In a song list used to copy, erase or perform other
functions, lock icons will appear next to protected songs.
• If you try to perform a prohibited operation (edit, record
or erase) on a protected song, a Song Protected
message will appear and the operation will be prevented.
• To remove protection from a song, follow the same
procedure above, unchecking songs that you want to
unlock in step 3.
38 TASCAM DP-32
Deleting unnecessary audio data
from a song
In addition to audio data for a track, a song may also
contain "unused" audio data. When a track is overwritten
in this unit, the overwritten audio data is not erased,
but remains on the SD card. Audio data that has been
completely overwritten is "unused" audio data.
As shown in the illustration, if old audio data is not
completely overwritten by new audio data, old audio data
cannot be deleted.
New guitar solo overwrites old one
Old guitar solo (deleted)
New guitar solo overwrites old one
Old guitar solo (not deleted)
New guitar solo overwrites old one
Old guitar solo (not deleted)
"Unused" old audio data in any virtual track that has not
been assigned to a physical track can also be deleted. (See
"Virtual tracks" on page 56.)
Follow these procedures to delete "unused" audio data
and create room on the SD card for additional storage (this
operation cannot be undone).
1. When the recorder is stopped, press the MENU
button to open the MENU screen.
2. Use the JOG/DATA dial or the CURSOR (5/b/g/t)
buttons to select (highlight green) SONG, and then
press the F4 (t) button.
The SONG LIST screen opens.
3. Select (highlight blue) the song that contains
unnecessary audio data and then press the F2 (4)
button. To erase multiple songs, select all songs
you want to erase.
NOTE
To remove a check 4 from a box, press the F2 (4) button
again while the song is selected (highlighted blue).
5 - Song Management
4. Next, press the F4 (t) button to open the menu.
Use the JOG/DATA dial or the CURSOR (5/b)
buttons to select DELETE UNUSED from the menu,
and then press the F4 (t) button.
A confirmation message appears.
5. Press the F2 (YES) button.
The unnecessary audio data is deleted from the
song(s).
When the deletion of unnecessary data completes, the
pop-up window disappears from the SONG LIST
screen.
NOTE
To cancel the deletion of unnecessary data, press the F1 (NO)
button instead of the F2 (YES) button.
CAUTION
Changing a song name
1. When the recorder is stopped, press the MENU
button to open the MENU screen.
2. Use the JOG/DATA dial or the CURSOR (5/b/g/t)
buttons to select (highlight green) SONG, and then
press the F4 (t) button.
The SONG LIST screen opens.
3. Select (highlight blue) the song with the name that
you want to change.
4. Next, press the F4 (t) button to open the menu.
Use the JOG/DATA dial or the CURSOR (5/b)
buttons to select NAME EDIT from the menu, and
then press the F4 (t) button.
Now you can change the song name.
This operation deletes all unused audio data from the
selected songs and cannot be undone. Therefore, if you
think you might use this audio data later, back up the
data to a computer before using the DELETE UNUSED
command. (See "Connecting to a computer" on page
76.)
5. Change the song name as you want and press the
F2 (YES) button.
NOTE
To cancel changing a song name, press the F1 (NO) button
instead of the F2 (YES) button.
6. Once the song name is changed, the pop-up
window disappears from the SONG LIST screen.
TASCAM DP-32
39
6 - Basic Recording
Selecting the input sources
This unit is equipped with eight inputs (INPUTS A to H),
and each of them has a standard XLR/TRS combo jack.
In addition to microphones and line level instruments,
you can connect guitars to the INPUT H jack. When
connecting a guitar, set the LINE-GUITAR switch on the
rear panel to GUITAR.
TIP
When connecting an electric-acoustic guitar with a builtin preamp or an active-type electric guitar, or when using
an effects pedal, for example, between the guitar and this
unit, set the LINE-GUITAR switch on the rear panel to
LINE.
Assigning inputs
When using this unit, "assigning inputs" means setting
the recording source for each track to INPUT A to H on
the Assign screen.
Assign screen
NOTE
• By default, the recording sources of tracks 1 to 8 are
assigned to inputs A to H, in that order.
• Assignments are saved when you save a song or turn the
unit off. Likewise, assignments are loaded when you load
a song.
This unit can simultaneously record a maximum of eight
tracks. You can assign one input source to multiple tracks
simultaneously, but you cannot assign multiple input
sources to the same track. You can also assign an input
source to a direct stereo bus.
Setting the track type
You can set tracks 9/10–31/32 to be used as either stereo
or mono tracks. By default, they are all stereo tracks.
Change these settings on the Assign screen.
1. When the recorder is stopped, press the ASSIGN
button to open the Assign screen.
2. Use the STEREO SELECT button of each track or the
CURSOR (5/b/g/t) buttons to move the cursor
to a track that you want to change.
3. Press the F3 [ST/MONO] button to change the type
of the selected track.
4. If you want to change the type of other tracks,
repeat steps 2 and 3.
40 TASCAM DP-32
5. After selecting all the tracks that you want to
change, press the F4 [t] button.
A “Erase selected tracks. Are you sure?” pop-up
message appears.
6. Press the F2 [YES] button to change all the tracks at
once.
CAUTION
When the track type is changed, the audio for that track
is cleared, so the track will have no audio signal. If you
make a mistake, however, you can undo this operation
to restore the track type and audio on it. (See "Undoing
an operation" on page 47.)
NOTE
• When the track type is changed, the input assignment is
cleared, so you should make assignments now.
• If you set track 9/10 as a mono track, it will become track
9, for example. Likewise, if 31/32 is set to mono, it will
become track 31. (The even numbered track is skipped.)
Assigning inputs to mono tracks
1. When the recorder is stopped, press the ASSIGN
button to open the Assign screen.
2. Use the SELECT button of each track or the CURSOR
(5/b/g/t) buttons to move the cursor to the
mono track to which you want to assign a recording
source.
3. Press the SOURCE button of the desired input (A to
H) or turn the JOG/DATA dial to set the input source
of each mono track.
4. After making the settings, press the ASSIGN button
or the HOME button to return to the Home screen.
6 - Basic Recording
Assigning inputs to stereo tracks
Stereo tracks are always recorded simultaneously.
You cannot record to a single track of a stereo track pair.
1. When the recorder is stopped, press the ASSIGN
button to open the Assign screen.
2. Use the SELECT button of each track or the
CURSOR (5/b/g/t) buttons to move the cursor
to the stereo track to which you want to assign a
recording source.
3. Press the SOURCE button of the desired input (A to
H) or turn the JOG/DATA dial to set the input source
of each stereo track.
Options: A/A, A/B, B/B, C/C, C/D, D/D, E/E,
E/F, F/F, G/G, G/H, and H/H
4. After making the settings, press the ASSIGN button
or the HOME button to return to the Home screen.
NOTE
• You can assign a single input source to multiple tracks by
keeping the SOURCE button of the desired input (A to
H) pressed and pressing the SELECT buttons of multiple
tracks.
• However, you cannot assign multiple input sources to the
same track.
Assigning inputs to a stereo bus
To use an external effect device, assign the inputs (A to H)
that are connected to the outputs of the effect (EFFECT
RETURN) to a stereo bus to return the effect signal to that
stereo bus. You can also assign inputs to stereo buses
during mixdown, allowing you to mix up to 8 input signals
with the playback tracks.
1. When the recorder is stopped, press the ASSIGN
button to open the Assign screen.
2. Use the STEREO SELECT button or the CURSOR
(5/b/g/t) buttons to move the cursor to the
STEREO BUS display area.
3. Use the CURSOR (g/t) buttons to move the cursor
to the stereo bus to which you want to assign the
input source.
4. Press the SOURCE button of the desired input
(INPUT A to H) or turn the JOG/DATA dial to set the
input source to the stereo bus.
5. After making the settings, press the ASSIGN button
or the HOME button to return to the Home screen.
Checking assignments
You can check the current assignment on the Assign
screen.
The assigned input source name (A to H) is shown on the
level meter display area of each track on the Home screen.
NOTE When the power is turned off, the current song is saved and
all song-related settings are stored (except when the song
protection function is enabled).
The next time you turn the power on, all stored settings will
be restored.
Canceling assignments
When the Assign screen is open, pressing the F1
(DEFAULT) button restores the default track type and
assignment settings. On this screen, pressing the F2
(ALL CLEAR) button clears all assignment settings.
Using phantom power
When connecting a condenser microphone that requires
phantom power, press the PHANTOM (+48V) for INPUTS
A to D or INPUTS E to H when the recorder is stopped to
turn phantom power on or off.
When you turn phantom power on, the PHANTOM (+48V)
button lights and phantom power is supplied to the XLR
jacks of INPUTS A to D and/or INPUTS E to H.
When the GUITAR indicator is lit, however, INPUT H will
not receive phantom power even if phantom (+48V)
power is on (indicator lit) for E-H.
CAUTION
• Turn the STEREO fader down before turning phantom
power on or off. Depending on the microphone,
a loud noise could occur, resulting in harm to the
equipment and hearing.
• Do not connect or disconnect a microphone when
phantom power is on. This could cause a loud noise
that might damage the equipment.
• Turn phantom power on only when using a
condenser microphone that requires phantom power.
• Do not supply phantom power to an unbalanced
dynamic microphone. Doing so could cause a
malfunction.
• Supplying phantom power to some types of ribbon
microphones could cause a malfunction. Do not
supply phantom power to a ribbon microphone if
you are in doubt.
TASCAM DP-32
41
6 - Basic Recording
Monitoring
Monitoring is an important element in the recording and
mastering process. You can use an external monitoring
system (such as a self-powered monitor speakers, an
amplifier equipped with speakers) or headphones to
monitor the sound of this unit.
Use the MONITOR LEVEL knob to adjust the level of the
monitoring system.
while before automatically disappearing). If the level is
too loud, the sound might be distorted, so lower the level
until the red line
stops appearing.
If an OL indicator lights, the signal from the input source
might be too loud and/or the TRIM knob might be set too
high.
If the OL indicator lights even though the TRIM knob is
set to the LINE position, the input source signal is too
loud, so lower the volume of the input source.
Monitor selection
Besides the stereo bus, this unit allows you to monitor the
bounce bus (see "Bouncing tracks" on page 50) or Effect
Send 1 or 2.
With Effect Send monitoring, you can monitor the signal
being sent to an effect.
1. When the Home screen is open, press the MONITOR
SELECT button to open the MONITOR SELECT
menu.
Overload indicator
ªª Overload indicators (A to H)
The overload indicators for inputs A to H on the display
show input level (A to H) overloads.
Use the TRIM knobs of INPUTS A to H or the output
volume controls of the input sources to reduce their input
levels if overloads occur.
ªª Track level meters (1 to 31/32)
2. Use the JOG/DATA dial or the CURSOR (5/b)
buttons to select the signal to monitor.
STEREO (default)
Select to monitor the stereo signal of the stereo bus.
BOUNCE
Select to monitor the stereo signal of the bounce
bus.
EFFECT SEND 1
Select to monitor the mono signal of Effect Send 1.
EFFECT SEND 2
Select to monitor the mono signal of Effect Send 2.
3. After selecting the signal source to monitor, press
the MONITOR SELECT button to return to the Home
screen.
OL indicators and level meters
You can check the audio signal levels of this unit with the
OL indicators and the onscreen level meters for INPUTS A
to H.
The level meters allow the signal levels to be observed
and can be used to confirm whether signals are being
input into the unit. For example, if the level meters
assigned to inputs A to H on the Home screen are moving,
this means that signals are being input into the unit even
if you cannot hear anything when monitoring.
As shown below, if a red line
appears at the top of a
level meter, the level is too high (it stays on screen for a
42 TASCAM DP-32
These level meters show either the playback signal levels
or the input signal levels of the corresponding tracks. The
signal levels shown by the track level meters depend on
the operating conditions as shown below.
REC button
Transport status
Level meters
Playback
Show playback signal
levels
Playback
(Automatic
monitoring ON)
Show track playback
signal levels
Playback
(Automatic
monitoring OFF)
Show input and
playback signal levels
Flashing
(recording
standby)
Stopped
Show input signal
levels
Lit (recording)
Recording
Show input signal
levels
Unlit
Flashing
(recording
standby)
NOTE
• When playback signal levels are shown, they cannot
be adjusted because they are the levels of the recorded
signals. When input signal levels are shown, you can
adjust the levels with the TRIM knobs of INPUT A to H.
ªª Stereo level meter (L, R)
This meter shows the output level of this unit's stereo
bus. Adjust this level with the STEREO fader.
6 - Basic Recording
Peak hold display
1. Press the MIXER button to open the Mixer screen.
Using the peak hold function , you can set how long peak
levels are shown on the level meters on the Home Screen
and other screens.
1. When the recorder is stopped, press the MENU
button to open the MENU screen.
2. Use the JOG/DATA dial or the CURSOR (5/b/g/
t) buttons to select PREFERENCE, and then press
the F4 (t) button.
2. Press the SOURCE button of an INPUT (A to H) or
the SELECT button of a track to open the Mixer
screen with the corresponding equalizer.
3. Press the EQUALIZER ON/OFF button to the right of
the LOW FREQ knob to turn the equalizer on/off.
The equalizer parameters are as follows.
GAIN
3. Use the CURSOR (5/b) buttons to select the
Peak Hold item, and then use the JOG/DATA dial
to change the setting.
Option
Function
OFF (default)
Peak value is not shown.
1 Sec
Peak value is shown for about one
second.
KEEP
In mastering mode, the peak value is
cleared when you locate a new time.
In all other modes, press the F3 [PEAK
CLEAR] button to clear the peak value.
4. After making the settings, press the HOME button
to return to the Home screen.
TIP
When you are unable to monitor the meters continuously
(when playing, for example), use the KEEP setting to check
the highest level so far.
Mixer screen settings
Press the SOURCE button for an input or press the
SELECT button for a track to adjust its EQ and other
settings.
Using the input equalizer
INPUTS A to H and tracks 1 to 31/32 have independent
3-band EQs (equalizers).
FREQ
HIGH
Setting range: ±12
dB
(Default: 0 dB)
Setting range: 1.7 kHz to
18 kHz
(Default: 10 kHz)
MID
Setting range: ±12
dB
(Default: 0 dB)
Setting range: 32 Hz to
18 kHz
(Default: 1.0 kHz)
LOW
Setting range: ±12
dB
(Default: 0 dB)
Setting range: 32 Hz to
1.6 kHz
(Default: 100 Hz)
Use track SELECT buttons to select desired tracks.
Use INPUT SOURCE buttons to select desired inputs.
Use HIGH, MID and LOW GAIN knobs to adjust the
gain of each band.
Use the HIGH, MID and LOW FREQ knobs to adjust the
center frequency of each band.
Use the MID Q knob to set the resonance (width) of the
MID FREQ band.
Setting range: 0.25 to 16 (Default: 0.5)
NOTE
• The "Q" value is the center frequency of the equalizer
divided by the bandwidth. A high Q value reduces the
range of the cut or boost applied to the frequencies.
Depending on the equalizer setting, the graph at the top
of the screen changes.
• If you press the F1 (EQ FLAT) button, all the settings
shown on the open Mixer screen will be restored to their
default values.
3. After making the settings, press the HOME button
to return to the Home screen.
CAUTION
The effect of the input equalizer will be recorded. If you
plan to make EQ adjustments during mixdown, turn
input equalizers OFF and turn track equalizers ON.
Adjust the equalizer settings on the Mixer screen.
TASCAM DP-32
43
6 - Basic Recording
DIGITAL TRIM setting (track only)
Enabling insert effects
Depending on the playback sound, EQ boosting could
cause distortion (digital clipping). If this happens, use the
DIGITAL TRIM to lower the playback level before the EQ.
1. Use the CURSOR (5/b/g/t) buttons to move the
cursor to the DIGITAL TRIM display area.
This unit has dynamic and guitar effects that can be
used as insert effects. For details about these effects, see
"Dynamic effects" on page 61 and "Guitar effects" on page
62.
1. Use the CURSOR (5/b/g/t) buttons to move the
cursor to the INSERT EFFECT area.
Digital trim
Insert effect
indicator
2. Turn the JOG/DATA dial to set the value.
Setting range: -42dB to +6dB (Default: 0dB)
Sending signals to internal/external
effects
This unit has two external effect sends (EFF 1 and EFF 2)
and a send for the internal effects (INSERT EFFECT).
You can adjust send levels for each track. For details about
the built-in send effects, see "Send effects" on page 63.
Follow these procedures to enable use of these
effects.
1. Use the CURSOR (5/b/g/t) buttons to move the
cursor to the SEND EFF 1/EFF 2 area.
2. Turn the JOG/DATA dial to enable/disable the
insert effect.
Options
OFF: INSERT EFFECT indicator unlit (default)
ON: INSERT EFFECT indicator lit
Setting the stereo position
Use the PAN parameter to set the stereo position.
The full left value is L63, and the full right value is R63.
The center position is shown by C.
Effect sends
PAN
2. Turn the JOG/DATA dial to enable the effect.
Options: OFF (default), PRE, POST
PRE
This sends the track pre-fader signal to the effect
send bus. The effect send signal level is not affected
by the track fader.
POST
This sends the track post-fader signal to the effect
send bus. The effect send signal level is affected by
the track fader.
3. Use the SEND EFF 1/EFF 2 knobs to adjust the
external send levels.
Setting range: 0 to 127 (Default: 0)
4. Use the SEND MASTER 1/MASTER 2 knobs to adjust
the internal send levels.
Setting range: 0 to 127 (Default: 0)
44 TASCAM DP-32
Turn the PAN knob to adjust the stereo position.
Setting range: L63 to C to R63 (Default: C)
6 - Basic Recording
Changing the signal phase
When the phase is inverted due to mic wiring or another
reason, use the PHASE Ø item to correct the phase.
1. Use the CURSOR (5/b/g/t) buttons to move the
cursor to the PHASE Ø area.
Phase
2. Turn the JOG/DATA dial to change the signal phase.
Options:
PHASE Ø unlit (default): Normal phase
PHASE Ø lit: Inverted phase
Checking the fader level
You can check the level of a track with the LEVEL item
of the Mixer screen. You cannot, however, select this item
and adjust the level of a track directly on this display.
NOTE
The fader level indicator shows the actual fader level.
When playing back a track, by default, the positions of the
faders (physical faders) on the top panel and the fader level
indicators match, but a fader group or MIDI command sent
by a remote control to the unit could cause them to differ.
In this case, when you move a physical fader, the fader level
indicator will respond to and match the physical fader value,
and thereafter the physical fader will control the level again.
CAUTION
In such cases, a sudden level change could occur.
Setting levels sent to stereo buses
You can adjust the levels sent to stereo buses
independently for each input (INPUT A to H).
1. Use the CURSOR (5/b/g/t) buttons to move the
cursor to the LEVEL area.
Solo
Press the SOLO button to enable Solo mode. The SOLO
button lights when this mode is active.
In Solo mode, the REC button of each track works as a
SOLO button, so you can monitor the signal of the desired
track.
When Solo mode is active, only tracks that have lit REC
buttons can be heard. All other tracks are muted.
1. When the Home screen is open, press the SOLO
button to enable Solo mode.
In Solo mode, the SOLO button is lit.
2. Press the REC button for the track you want to solo.
(You can solo multiple tracks at the same time.)
When Solo mode is activated, the MUTE indicator of
the track whose REC button was pressed lights.
ªª To cancel soloing
In Solo mode, press the SOLO button or the REC button
of the soloed track.
When Solo mode is deactivated, the MUTE indicators of
soloed tracks turn off.
Muting tracks
1. Press the MUTE button to enter Mute setting mode.
In Mute setting mode, the MUTE button lights.
2. Press the REC button for a track that you want to
turn muting on/off.
When muted, the MUTE indicator of that track lights.
ªª To cancel muting
Press the MUTE button to enter Mute setting mode.
Press the REC button of a muted track to unmute it (and
turn its MUTE/SOLO indicator off ).
NOTE
If you solo a muted track, you can hear its sound, but its
muted status is retained. So, it will be muted again when you
end soloing.
Rehearsing a recording
Fader level indicator
2. Turn the JOG/DATA dial to adjust the level.
Setting range: inf to +6.0dB
This unit has a recording rehearsal function, so you can
rehearse without actually recording.
The rehearsal function is especially useful for auto
punch recording and other recording operations. (See
"Automatic punching in and out" on page 54.)
In a rehearsal mode, monitoring and other recording
operations are the same as during actual recording, but
input signals are not recorded.
To rehearse, press the REHEARSE button so that the
button lights.
TASCAM DP-32
45
6 - Basic Recording
When you record in Rehearsal mode, the RECORD (0)
button flashes instead of becoming lit.
After finishing your rehearsal, press the REHEARSE button
to cancel Rehearsal mode.
Making the first recording
Before beginning the following recording procedures,
connect a recording source (such as a microphone or
guitar) to an input, assign that input as the recording
source for the track, and prepare your monitoring
equipment.
1. Press the REC button of the track that you want to
record on.
The REC button flashes red and the unit enters
recording standby.
A maximum of eight tracks can be recorded
simultaneously. When the REC buttons of eight
tracks are flashing, the other REC buttons become
inoperative.
2. Set the recording level.
Use the TRIM knobs of INPUTS A to H to adjust the
input level.
When doing this, adjust the levels appropriately by
checking the OL indicators above and to the left of the
TRIM knobs.
At the same time, confirm that the sound heard from
the headphones or monitoring system is not distorted,
and that no effects have been applied to the sound
unintentionally.
NOTE
The level meter of tracks that have input sources assigned
to them show input levels after the application of INPUT
equalizer.
OL indicators light if inputs are too loud.
If an OL indicator stays lit even when you lower the TRIM
knob for that input, lower the input source signal level.
3. Press the REHEARSE button to activate Rehearsal
mode.
In Rehearsal mode, Rehearsal appears in the
upper left corner of the Home screen.
4. Press the RECORD (0) button.
Rehearsal starts, the RECORD (0) button flashes, and
the PLAY (7) button lights.
The REC button of tracks set to be recorded keep
flashing because they are not being recorded.
5. After rehearsing your recording, press the STOP (8)
button.
6. Press the REHEARSE button to exit Rehearsal
mode.
Rehearsal disappears from the upper left corner of
the Home screen.
46 TASCAM DP-32
7. Press the RECORD (0) button.
Recording starts, and the RECORD (0) and PLAY (7)
buttons light.
The REC buttons of the tracks being recorded stop
flashing and stay lit.
8. After finishing your recording, press the STOP (8)
button.
9. If you want to check part of a recording, use the
REW (m) (TO ZERO) button, for example, to move
(locate) to it.
TIP
Use the TO LAST REC function to move to the last recording
position and the TO ZERO function to return to the start of
the song (00:00:00). For more information about the
rewind/fast-forward and locate functions, see "Returning to
zero and the last recording position" on page 52.
10.Press the PLAY (7) button to play back the
recorded tracks.
Use the track and STEREO faders to adjust the
playback level.
Use the MONITOR LEVEL knob or the volume control
on your monitoring system to set the final monitoring
volume.
Use the PAN knob on the Mixer screen to set the
stereo position of each track.
NOTE
• For each track, the PAN knob on the Mixer screen and the
track fader control the recorded track's playback output
signal or the monitoring sound of the input signal. They
do not control the signal being recorded to the track.
• If you are not satisfied with the recorded sound, repeat the
procedure above from the beginning.
Multitrack recording
You can record new audio to different tracks while playing
back already recorded tracks.
Arming tracks for recording
• Press the REC buttons of the already recorded tracks to
turn off their REC buttons if they are lit.
• Press the REC buttons of the tracks on which you want
to record to put them into recording standby (the REC
buttons start flashing).
Adjusting track pan and level settings
Use the track faders and PAN knobs on the Mixer screen
of the already recorded tracks to adjust their levels and
stereo positions that will be used when monitoring their
playback signals while making the new recording.
6 - Basic Recording
Input selection and assignment
Undo feature settings
Use the procedures described earlier in this chapter to
assign input sources to the recording tracks.
1. When the recorder is stopped, press the MENU
button to open the MENU screen.
2. Use the JOG/DATA dial or the CURSOR (5/b/g/t)
buttons to select (highlight green) PREFERENCE,
and then press the F4 (t) button.
Setting input levels
After making the settings, press the PLAY (7) button to
start playback.
Just as though you were recording, you can monitor the
sound of the already recorded tracks being played back
and the input sources on the tracks for recording, allowing
you to check the monitoring balance and volume.
Recording
Press the RECORD (0) button to start recording to
another track while monitoring the playback signal.
The PREFERENCE menu screen opens.
3. Use the CURSOR (5/b) buttons to select (highlight
blue) Undo History.
Undoing an operation
This unit allows you to undo an operation or recording
that was not successful or satisfactory. Many ordinary
operations, including editing and recording, can be
canceled (undone).
This unit has two types of undo functions. Single undo
can be performed by a simple button press, while multiple
undo allows you to return to a specific past operation and
undo the operations that occurred after it.
You can use the undo functions for the following types of
operations.
• Track editing (functions described in this chapter)
• Recording (including track bouncing)
• Automatic punching in/out
• Track type setting
All these operations are stored on the SD card as song
information. Even when you turn the unit off (put it in
standby), the previous operations are stored and can be
undone when you turn the unit on again.
When listening to a part that you replaced in your last
recording, for example, you might find that the previous
take was better. In such a case, you can use the undo
function to easily get your previous take back.
NOTE
• The UNDO/REDO button lights when a single undo or
multiple undo has been performed.
• When you change the track type, the assignment is turned
OFF and any recorded track is deleted. If you undo this, the
recorded track will be restored and the track type changed
back, but the assignment setting will not be restored. (See
"Setting the track type" on page 40.)
4. Set the undo level.
LEVEL 1 (Default)
The HISTORY LIST is not displayed when you press
the UNDO/REDO button. In other words, this returns
the unit to the state before the last operation (single
undo). (To cancel an undo, press the UNDO/REDO
button again.)
LEVEL 10
When you press the UNDO/REDO button, the
HISTORY LIST appears and you can return to the
state to 10 operations earlier.
NOTE
Even when you change from LEVEL 10 to LEVEL 1, the
history for a maximum of 10 actions remains stored. The
position of the cursor in the HISTORY LIST shows the current
undo position.
Undoing the last operation (single
undo)
Press the UNDO/REDO button to return to the state
before the last operation.
After doing this, the UNDO/REDO button lights, showing
that redo (see below) is possible.
ªª Canceling an undo operation (redo)
Press the UNDO/REDO button when it is lit.
The undone operation is redone, restoring the state
before the undo, and the UNDO/REDO button becomes
unlit.
TASCAM DP-32
47
6 - Basic Recording
Undoing older operations (multiple
undo)
To use the multiple undo function, first you must set
the Undo History on the PREFERENCE menu to
LEVEL 10. (See "Undo feature settings" on page 47.)
1.Set Undo History in the PREFERENCE menu to
LEVEL 10.
2. When the Home screen is open, press the UNDO/
REDO button to display the HISTORY LIST.
On the HISTORY LIST screen, the 0 icon appears
next to the last event not undone. If the most recent
event in the HISTORY LIST is selected, pressing the
F4 (t) button returns to the state before the multiple
undo was executed.
CAUTION
• When saving a song, a maximum of 10 operation
events can be saved in the history with the song data.
If the number of history events exceeds 10, the oldest
events in it are erased. These erased events cannot be
restored.
• When the UNDO/REDO button is lit after a multiple
undo, if you perform a new operation that is added
to the history, the history of events after the multiple
undo will be erased, and you will not be able to redo
any of these undone events.
NOTE
Since the history is stored with the song information, even
when the power is turned off (put in standby), the previous
operation remains stored, so undo operations will be possible
the next time the power is turned on.
The maximum number of operations in the undo
history is 10. In other words, a maximum of 10
operations can be undone.
This operation is called "multiple undo" because it
allows you to undo multiple events at once and return
to an earlier state.
3. Use the JOG/DATA dial to select (highlight blue)
the event that you want to return to (all operations
after the selected event will be undone).
4. Press the F4 (t) button.
The multiple undo is executed and the song is
restored to the state just after the selected event was
performed.
In this state, the UNDO/REDO button lights.
The record of operations undone by a multiple undo
is not immediately erased. The unit has simply been
returned to a previous state.
48 TASCAM DP-32
7 - Recorder Functions
Punching in and out
Punching in/out is a technique used to replace a part of
an already recorded track.
Start playback and when you reach the part that you want
to replace, switch to record (punch in), then switch back
to playback (or stop) when you finish replacing the part
that you want (punch out).
1. Decide what part of the track you plan to re-record.
Choose a point to begin where the new recording can
sit well with the existing recording.
2. Press the REC buttons of the tracks that you want
to partially re-record to put them into recording
standby (REC buttons start flashing).
3. Start playback before the part you want to replace.
4. When the part you want to replace is reached,
press the RECORD (0) button and start your
performance.
Recording starts (punch in).
5. When you finish the replacement recording, press
the PLAY (7) button.
Playback resumes (punch out).
Setting the footswitch
Set the footswitch on the PREFERENCE screen.
1. When the recorder is stopped, press the MENU
button to open the MENU screen.
2. Use the JOG/DATA dial or the CURSOR (5/b/g/t)
buttons to select (highlight green) PREFERENCE,
and then press the F4 (t) button.
The PREFERENCE screen opens.
3. Use the CURSOR (5/b) buttons to select (highlight
blue) Foot SW Right.
TIP
You can also press the STOP (8) button to punch out at the
end of the replacement recording.
Using a footswitch to punch in/out
You can connect a TASCAM RC-3F footswitch (sold
separately) to the REMOTE jack on the front panel and
use it to punch in and out.
In step 4 above, step on the footswitch instead of
pressing the RECORD (0) button, and in step 5, step on
the footswitch again instead of pressing the PLAY (7)
button.
4. Use the JOG/DATA dial to select the function
that you want to assign to the right pedal of the
TASCAM RC-3F footswitch.
Options: PLAY, REC, STOP, FF, REW,
PUNCH IN/OUT, PLAY/STOP (right pedal
default), CUE LOCATE
5. In the same way, set Foot SW Center for the
function of the center pedal and Foot SW Left
for the left pedal.
Options: PLAY, REC, STOP, FF, REW,
PUNCH IN/OUT (center pedal default), PLAY/
STOP, CUE LOCATE (left pedal default)
6. After making the settings, press the HOME button
to return to the Home screen.
ªª Footswitch function list
TASCAM RC-3F footswitch
(sold separately)
NOTE
Step on the switch (pedal) that you have set to PUNCH IN/
OUT in the footswitch settings. By default, the center pedal
is set to PUNCH IN/OUT. (See "Setting the footswitch"
below.)
Function
PLAY
Description
Same as unit's PLAY (7) button
REC
Same as unit's RECORD (0) button
STOP
Same as unit's STOP (8) button
FF
Same as unit's F FWD (,) (TO LAST REC)
button
REW
Same as unit's REW (m) (TO ZERO) button
PUNCH IN/
OUT
Punches in when pressed during playback,
punches out when pressed during recording.
PLAY/STOP
Starts playback when stopped, stops in other
states.
CUE LOCATE
Locates last point where playback started.
TASCAM DP-32
49
7 - Recorder Functions
Bouncing tracks
Like many multitrack recorders, this unit allows you to
bounce tracks (ping-pong recording). Track bouncing
allows you to combine the signals of multiple tracks and
use them to create new mono or stereo recordings. In this
way, you can virtually record more than 32 tracks. Note,
however, that the original tracks cannot be separated
again, so save them if they are important to you.
In Bounce mode, the recording source track signals pass
through the mixer tracks via the bounce bus, and they are
sent to the bounce tracks.
If you make a mistake, you can use the undo function of
this unit to undo the incorrect operation (see "Undoing an
operation" on page 47).
Using the bounce function
1. When in Multi Track mode and the recorder is
stopped, press the BOUNCE button.
The Recorder switches to Bounce mode.
Use the track faders and the PAN knobs on the Mixer
screen to adjust the signals of tracks to be bounced.
When bouncing in stereo, the lower numbered track
becomes the left channel.
When bouncing in mono, set the PAN knobs on the
Mixer screen of tracks that will be bounced completely
to the left.
To adjust the bounce master level when in Bounce
mode, press the F4 (BOUNCE MASTER) button to
show a fader. Use the JOG/DATA dial to adjust it.
CAUTION
If a bounce source is selected before selecting a
destination, the audio signals of the bounce sources will
not be output from the STEREO OUT or MONITOR OUT
jacks until you select the bounce destination.
4. Locate to the point where you want to start the
bounce and press the RECORD (0) button to start
bouncing.
Press the STOP (8) button at the position where you
want to end the bounce.
Checking the bounce result
NOTE
In Bounce mode, Bounce appears in the upper left of the
Home screen.
2. Press the REC button(s) of the track(s) on which
you want to record the bounce. The REC button for
the bounce target track starts flashing.
When bouncing in stereo, press the REC buttons for
two mono tracks or one stereo track. The button or
buttons start flashing.
When bouncing in mono, press the REC button for
one mono track (1 to 8). The button starts flashing.
You should also set the fader of the bounce target
track to 0 dB.
NOTE
Though the track fader and STEREO fader settings of the
bounce destination affect the monitoring volume, they do
not affect the recording level. If you want the monitoring
level to be the same as the recording level, set the bounce
target track and STEREO faders to 0 dB.
3. Press the SELECT button to specify the bounce
source.
You can select any tracks except the bounce target
tracks and any inputs as bounce sources. To set an
input as a bounce source, assign it to a stereo bus and
press its SOURCE button.
50 TASCAM DP-32
Mute the bounce source tracks and play back the song.
(See "Muting tracks" on page 45.)
If you are not satisfied with the result because you think
the balance between the instruments or the pan settings
are not good, for example, undo the operation. (See
"Undoing an operation" on page 47.)
If you are satisfied with the result, press the BOUNCE
button to return to Multi Track mode.
Once the track bounce completes, you can make new
recordings over (overwrite) the other tracks.
TIP
If it is possible that you might need the original tracks at
some time later, copy or back up song data to a computer
before bouncing tracks. (See "Copying songs" on page 37 and
"Connecting to a computer" on page 76.)
NOTE
To hear the audio recorded to the bounce target track(s), set
the monitor destination to BOUNCE so that you can monitor
the bounce bus signal.
Direct location function
You can specify a time or measure/beat to be located
without using marks. On the Home screen, use the JOG/
DATA dial to specify the location point.
The Home screen counter has two display modes: ABS
(absolute time) and BAR (bar/beat).
The BAR display is based on the metronome setting.
In BAR mode, you can locate a position in beat units.
The current position of the recorder is shown as a time
7 - Recorder Functions
(measure-beat) at the top of the Home screen. The tempo
is also displayed.
The ABS display is based on the absolute time. In ABS
mode, you can locate a position in frame units. The
current position of the recorder is shown as a time (hours:
minutes: seconds: frames) at the top of the Home screen
(30 frames per second).
You can specify a time in this time display area and move
the transport to that point.
Locating a specified time directly
In ABS mode, you can locate a specified time directly
using the following procedure. Direct location this way is
not possible when recording.
1. Press the HOME button to open the Home screen.
2. ABS appears to the left of the counter on the Home
screen.
If ABS does not appear, press the METRONOME
button to open the METRONOME screen.
Use the CURSOR (5/b) buttons to select the
BAR DISP item, and then use the JOG/DATA dial
to set it to OFF. This will cause ABS to appear on the
Home screen.
3. Turn the JOG/DATA dial to change the time (the
speed that the time changes corresponds to the
speed that the dial is turned).
4. After setting the desired time value, press the PLAY
(7) button to start playback from that time.
Locating a specified bar/beat directly
In BAR mode, in the same way that you can locate a
specified time directly in ABS mode, you can locate a
position by specifying a time in bars and beats using
the following procedure. Direct location this way is not
possible when recording.
1. Press the HOME button to open the Home screen.
2. BAR appears to the left of the counter of the Home
screen.
If BAR does not appear, press the METRONOME
button to open the METRONOME screen..
Use the CURSOR (5/b) buttons to select the
BAR DISP item, and then use the JOG/DATA dial
to set it to ON. This will cause BAR to appear on the
Home screen.
3. The value cycles automatically when they reach the
highest or lowest value in a field.
When set to 4/4, if the beat field exceeds 04, for
example, the bar value will increase by one, and the
beat field will return to 01.
In the same way, when you turn the JOG/DATA dial
to lower a value and the beat value passes through
01, the bar value will decrease and the total value will
change in succession. When set to 4/4, for example, if
the value drops below 01 when the cursor is located
under the beat field, the bar value will decrease by
one, and the beat field will return to 04.
4. After setting the desired measure/beat, press the
PLAY (7) button to start playback from that beat.
Location marks
This unit allows you to set up to 99 location marks in each
song. For example, you could mark the intro, vocal entry
points and the starts of verses.
Setting a location mark
When stopped, recording or playing back, press the
MARK SET button at a point where you want a location
mark.
A mark number (MARK xx) appears on the Home screen
(xx is the mark number).
The displayed mark number is the mark at the current
position or the mark that is placed closes before the
current position. A flag icon is also shown above the
timeline.
NOTE
The marks are numbered in the order that you enter them.
They are not numbered according to their positions in the
song. Therefore, MARK 05 could appear before MARK 01
in a song, for example.
Skipping to location marks
Press the F FWD (,) or REW (m) button to skip to
the next or previous mark.
NOTE
Marks are skipped to in time order, not in numerical order.
Deleting a location mark
You can delete marks when the recorder is stopped.
1. Press the F FWD (,) or REW (m) button to move
to the mark that you want to delete.
2. Press the MARK SET button to delete the location
mark.
NOTE
This operation cannot be undone. Make sure you want to
execute it.
TASCAM DP-32
51
7 - Recorder Functions
Returning to zero or the last
recording position
You can easily jump to the beginning of a song
(00:00:00:00 = ZERO point) or to the last recording
position (LAST REC point) by using two buttons at once.
To return to the beginning of a song (00:00:00:00 = ZERO
point), press and hold the STOP (8) button and press the
REW (m) (TO ZERO) button.
To return to the last recording position (LAST REC point),
press and hold the STOP (8) button and press the F FWD
(,) (TO LAST REC) button. This function is useful when
you want to record again after finishing recording.
Fast forwarding and rewinding
During playback or when stopped, press the REW (m)
or F FWD (,) button to rewind or fast-forward while
the button is pressed. The rewind and fast-forward speed
is fixed at 10 times normal speed.
Cueing with the JOG/DATA dial
You can use the JOG/DATA dial to jog to a precise
playback position. There are two ways to cue by jogging:
while viewing a track's waveform and while listening to
the audio of tracks.
Jogging while viewing a waveform
1. Use the transport buttons or other locate functions
to move the playback position near the position
where you want to cue playback.
2. Press the JOG PLAY button to enter jog mode.
If in timeline display mode, press the F1 key to switch
to waveform display.
3. Press the SELECT button for the track that you want
to view.
The waveform of the selected track appears.
If a stereo track is selected, the displayed track (odd
or even) changes each time the SELECT button is
pressed, and you can monitor only the displayed track.
4. Use the CURSOR (g/t) buttons to increase/
decrease the horizontal zoom (time) as necessary.
Press the CURSOR g button to decrease the
horizontal zoom (time), or the CURSOR t button to
increase it.
You can also use the CURSOR (5/b) buttons to
increase/decrease the vertical zoom (audio level).
Press the CURSOR 5 button to increase the vertical
zoom (audio level), or the CURSOR b button to
decrease it.
Increasing the zoom makes it easier to cue precisely.
52 TASCAM DP-32
5. Use the JOG/DATA dial to locate the cue point.
6. After you find the cue point, press the JOG PLAY
button to return to the Home screen.
Jogging while listening to audio
1. Use the transport buttons or other locate functions
to move the playback position near the position
where you want to cue playback.
2. Press the JOG PLAY button to enter jog mode.
If in waveform display mode, press the F1 key to
switch to timeline display.
3. Use the CURSOR (g/t) buttons to increase/
decrease the horizontal zoom (time) as necessary.
Press the CURSOR (g) button to decrease the
horizontal zoom (time), or the CURSOR (t) button to
increase it.
Increasing the zoom makes it easier to cue precisely.
The jogging sound, which is the sound of a short
increment being repeated, can be heard.
4. While listening to the jog sound, use the JOG/DATA
dial to locate the cue point.
5. After you find the cue point, press the JOG PLAY
button to return to the Home screen.
NOTE
The transport buttons can be used even in jog mode.
However, when the timeline is displayed, pressing the PLAY
button switches between normal playback and jog playback,
and pressing the STOP button activates jog playback.
When in jog mode, you can move in 1/10 frame (1/300
seconds) units. You can also set IN and OUT points with 1/10
frame precision.
7 - Recorder Functions
Repeat playback
Use the repeat playback function to play the same part
again and again.
The repeat playback interval is the audio between the IN
and OUT points.
Setting IN/OUT points
In addition to setting the repeat playback interval, the
IN and OUT points are also used to set track editing
intervals and as the punch-in and punch-out points when
automatically punching in and out. Moreover, these
points are used as the start and end points of the mixeddown master file when creating a master file.
You can set these points when the unit is recording,
playing back or stopped.
NOTE
3. To end repeat playback, press the REPEAT button,
so that the
icon disappears from the Home
screen.
Jumpback playback
Press the JUMPBACK (PREVIEW) button during playback
to move back a set number of seconds and restart
playback.
If you want to hear a passage again during playback,
press the JUMPBACK (PREVIEW) button to go back the
set number of seconds and replay that passage.
1. When the recorder is stopped, press the MENU
button to open the MENU screen.
2. Use the JOG/DATA dial or the CURSOR (5/b/g/t)
buttons to select (highlight green) PREFERENCE,
and then press the F4 (t) button.
The IN and OUT points cannot be set or edited in the
following modes: repeat playback, auto punch and
mastering.
ªª Adding IN/OUT points
Regardless of whether the unit is stopped, playing back
or recording, when the recorder is at the desired position,
press and hold the MARK SET button and press the IN or
OUT button.
The position where you pressed the IN/OUT button is set
as the IN/OUT point and the time is shown on the Home
screen.
ªª Locating IN/OUT points
The PREFERENCE screen opens.
3. Use the CURSOR (5/b) buttons to select (highlight
blue) Jump Back, then use the JOG/DATA dial to
set the jumpback time.
Options: 1 Sec to 10 Sec, 20 Sec, 30 Sec
(default: 3 Sec)
When stopped or playing back, press the IN or OUT
button.
Using repeat playback
1. Set the IN point and OUT points as the start and
end points of the repeat playback interval, and
then return to the Home screen.
2. Press the REPEAT button.
The
icon appears on the Home screen, and repeat
playback starts.
4. After making the setting, press the HOME button
to return to the Home screen.
5. Press the JUMPBACK button during playback to
move back by the time set in step 3.
Repeat icon
After starting from the IN point, when playback
reaches the OUT point, it returns to the IN point and
continues.
Playback continues to repeat between the IN and OUT
points.
TASCAM DP-32
53
7 - Recorder Functions
Previewing cue points
You can preview playback to check whether it is cued
correctly. This function can be used to preview audio both
before and after the current playback position.
1. When the recorder is stopped, press the MENU
button to open the MENU screen.
2. Use the JOG/DATA dial or the CURSOR (5/b/g/t)
buttons to select (highlight green) PREFERENCE,
and then press the F4 (t) button.
The PREFERENCE screen opens.
3. Use the CURSOR (5/b) buttons to select (highlight
blue) Preview Time, then use the JOG/DATA dial
to set the preview playback time.
Preview Time: 1 Sec to 10 Sec (default: 4 Sec)
4. After making the setting, press the HOME button
to return to the Home screen.
5. Preview playback before or after the cue point.
To preview after the cue point:
While playback is stopped, hold the PREVIEW button
and press the OUT button to play from the current
point for the preview time, and then return to the
current point and stop.
To preview before the cue point:
While playback is stopped, hold the PREVIEW button
and press the IN button to skip back the preview time
and then play to the current time and stop.
In automatic punch in/out recording, monitoring of the
recording tracks changes as follows.
• Pre-roll period: Track playback signal + input source
signal
• Punch in–out interval: Input source signal
• Post-roll period: Track playback signal + input source
signal
Tracks not armed for recording can be monitored the
entire time.
When using this auto punch in/out function, the above
monitoring changes occur not only during actual
recording, but also in the Rehearsal mode.
In Rehearsal mode, you can simulate auto punch in/out
recording, so you can rehearse your performance and also
check whether the IN and OUT points are set correctly.
You can also use punch in/out in with the repeat function.
By using these functions together, you can repeatedly
rehearse punch in/out recording, or record multiple takes
of the same section, letting the unit work automatically.
After recording multiple takes, you can choose the best
one.
Setting punch-in/out points
There are two ways to set the punch-in/out points.
LAST REC:
This option sets the starting and ending points of the
last recording (or rehearsal) as the punch in and out
points.
IN - OUT:
This option sets the IN and OUT points as the punch-in/
out points. The first of these points will be used as the
punch-in point and the second as the punch-out point.
1. When the recorder is stopped, press the HOME
button to open the Home screen.
2. Press the REC button for the track(s) on which you
want to automatically punch in and out.
3. Press the AUTO PUNCH button to open the
AUTO PUNCH screen.
Automatic punching in and out
You can use the punch in/out function to automatically
record between punch-in and punch-out points set in
advance.
When using auto punch in/out recording, playback starts
from the pre-roll point before the punch-in point where
recording starts. Once the punch-out point is reached,
recording ends, but playback continues for the post-roll
time and then stops.
54 TASCAM DP-32
4. Use the CURSOR (5/b) buttons to select (highlight
blue) MODE, PREROLL or POSTROLL, and then
use the JOG/DATA dial to set the value.
MODE: LAST REC or IN-OUT
PREROLL: 1.0 to 9.9 sec
POSTROLL: 1.0 to 9.9 sec
After setting MODE, PREROLL and POSTROLL,
press the F4 (t) button to return to the Home screen.
7 - Recorder Functions
Auto Punch appears at the top of the screen when
automatic punching is enabled.
You can also press the AUTO PUNCH button again to
return to the Home screen without enabling automatic
punching.
NOTE
You can press the AUTO PUNCH button before putting
any tracks into recording standby. Press the REC button of
any track to put it into recording standby after enabling
automatic punching.
Checking punch-in/out points
When punch-in/out points are set, you can confirm the
setting by pressing the PLAY (7) button.
The playback starts from the pre-roll point and continues
to the post-roll point. When the punch-in point is reached,
on tracks armed for recording, already recorded audio will
be muted and only input signals will be heard. When the
punch-out point is reached, already recorded audio and
input signals will both be heard.
If you want to change the punch-in/out points, locate the
desired points and set them again.
If there are no problems with the punch-in/out points
and pre-roll and post-roll times rehearse recording, as
described below.
Rehearsing with automatic punching
You can rehearse before punch in/out recording. During
rehearsal, monitoring operates the same way as in actual
recording, but no recording occurs.
1. When the AUTO PUNCH button is lit and at least
one of the tracks is in recording standby, press the
REHEARSE button.
The REHEARSE button lights.
2. Press the RECORD (0) button.
Automatic punch in/out rehearsal starts.
• Playback starts from the pre-roll point. You can
monitor both the track playback and input source
signals during the pre-roll.
• When the punch-in point is reached, monitoring
changes to only the input source signal, and the
RECORD (0) button starts flashing (indicating that
this is a rehearsal).
• When the punch-out point is reached, monitoring
of both the track playback and input source signals
resumes, and the RECORD (0) button becomes
unlit.
• Playback stops at the post-roll point.
Before starting a rehearsal, you can press the REPEAT
button to repeat rehearsal of the auto-punch interval
until you press the STOP (8) button. (AUTO PUNCH,
REHEARSE and REPEAT buttons all light in this case.)
Recording with automatic punching
After rehearsing, record with auto punch in/out.
1. If necessary, press the REHEARSE button so that it
becomes unlit.
2. Press the RECORD (0) button.
• Playback starts from the pre-roll point. You can
monitor both the track playback and input source
signals during the pre-roll.
• When the punch-in point is reached, monitoring
changes to only the input source signal, and the
RECORD (0) button starts flashing (indicating that
this is a rehearsal).
• When the punch-out point is reached, monitoring
of both the track playback and input source signals
resumes, and the RECORD (0) button becomes
unlit.
• Playback stops at the post-roll point.
Before starting punch in/out recording, you can press
the REPEAT button so that it lights. Then, you can repeat
automatic punch in/out recording up to 8 times (takes).
This uses the recorder's virtual track feature.
After recording, you can choose your favorite take
from one of the 8 takes recorded on virtual tracks. (See
"Checking takes" below.)
NOTE
You can undo auto punch in/out operations.
Checking takes
After recording one or more takes, follow these
procedures to check them.
After punch in/out recording completes, the VIRTUAL
TRACK screen opens, as shown below.
1. Use the JOG/DATA dial or the CURSOR (5/b)
buttons to select (highlight blue) a take in the list.
2. Press F4 (LOAD) to assign that virtual track to the
physical track.
Playback the take to check it.
Repeat steps 1 and 2 to check other takes.
3. If you are satisfied with the result, press the
VIRTUAL TRACK button to close this screen.
To end Auto Punch mode, press the AUTO PUNCH
button.
If you are not satisfied with the result, press the
RECORD (0) button again and record another take.
TASCAM DP-32
55
7 - Recorder Functions
Virtual tracks
This unit has 8 virtual tracks for each track.
Since there are 8 virtual tracks for each track, you can
record multiple takes of lead vocals and improvised solos,
for example, and then choose the best takes afterwards.
After recording, assign an unused virtual track to the
physical track, and then record another take. By repeating
this process, you can use multiple virtual tracks for
different takes.
NOTE
The virtual tracks are mono tracks. When assigning virtual
tracks to a physical track of a stereo pair, you must assign
them separately to the left and right channels.
Recording to virtual tracks
Follow these procedures to record a virtual track.
1. Select the track.
2. Press the VIRTUAL TRACK button.
3.Select UNUSED.
4. Press the F4 (LOAD) button to assign the virtual
track to be recorded to.
5. Once you have completed the setting, press the
HOME button to return to the Home Screen.
Assigning virtual tracks
Follow these procedures to assign a virtual track to a
physical track.
1. Press the SELECT button of a track you want to
assign a virtual track to when the Home screen is
open, and then press the VIRTUAL TRACK button.
(You can also press the VIRTUAL TRACK button first,
and then select the track.)
The VIRTUAL TRACK screen opens.
NOTE
• When creating a song, Virtual Track #1 is assigned to each
physical track.
• Recording, playback, and editing is only possible on
virtual tracks assigned to physical tracks.
• You can assign an already recorded virtual track to a
physical track and record over it.
56 TASCAM DP-32
2. Use the JOG/DATA dial to select the virtual track
that you want to assign.
3. Press the F4 (LOAD) button to assign the virtual
track to the physical track.
The virtual track assigned to the physical track is
marked with an icon on the screen.
NOTE
• To delete a virtual track, press the F3 (CLEAR) button in
step 3 above.
• A virtual track assigned to a physical track cannot be
deleted.
• If you assign an unused virtual track, the physical track
becomes empty.
8 - Track Editing
In the past, editing recordings made on tape recorders
required advanced techniques, but with this unit editing
is easy and accurate.
Moreover, unlike with a tape recorder when an editing
error could not be undone, this unit uses non-destructive
editing, which means you can edit without altering the
original data so the undo function can be used to correct
an edit easily. (See "Undoing an operation" on page 47.)
Basic editing procedures
1. When the recorder is stopped, press the TRACK
EDIT button to open the TRACK EDIT menu.
Overview of track editing
This unit has the following track editing functions.
• COPY/PASTE
• COPY/INSERT
• MOVE/PASTE
• MOVE/INSERT
• OPEN (insert silence)
• CUT (remove part)
• SILENCE (erase part)
• CLONE TRACK (duplicate track)
• CLEAN OUT (delete track)
Editing points
The IN, OUT and TO points are used as editing points for
the COPY/PASTE, COPY/ INSERT, MOVE/PASTE and MOVE/
INSERT functions.
The IN and OUT points are used as editing points for the
OPEN, CUT, and SILENCE functions.
These are the same IN and OUT points used for repeat
playback.
ªª IN point
The IN point is the start point for the part of the track to
be edited.
Press and hold the MARK SET button and press the IN
button to set the IN point at the current position.
ªª OUT point
The OUT point is the end point for the part of the track to
be edited.
Press and hold the MARK SET button and press the OUT
button to set the OUT point at the current position.
2. Use the JOG/DATA dial or the CURSOR (5/b)
buttons to select (highlight blue) the desired track
editing function, and then press the F4 (t) button.
The corresponding function window opens.
COPY PASTE window
3. Select the setting item value.
If there are multiple setting items, use the CURSOR
(5/b) buttons to select one, and then use the JOG/
DATA dial to set the value.
4. Press the F2 (YES) button to execute the function.
NOTE
Press the F1 (NO) button to close the COPY PASTE window
without executing the function.
Explanation of items
ªª SOURCE
This is the track to be edited.
The choices available depend on the editing function.
• 1 to 12: Single track
• 13/14 to 31/32: Stereo track
You can also use track SELECT buttons to set this.
• ALL: Every track from 1 to 32
ªª TO point
The TO point is the current playback position.
NOTE
If you press the JOG PLAY button to enable jog mode, you
can set IN and OUT points with subframe (1/10 frame)
precision.
COPY PASTE window
TASCAM DP-32
57
8 - Track Editing
ªª IN/OUT/TO
To change the IN/OUT/TO points, exit the TRACK EDIT
screen, and set them again as necessary.
COPY/INSERT
IN
OUT
TO
IN
OUT
TO
ªª TARGET Track
This is the track that is edited. In the case of OPEN, CUT,
SILENCE and CLEAN OUT, the source track itself is the target
track.
The options depend on what you have set for the
SOURCE track.
When the SOURCE track is ALL (all tracks) , the
TARGET track must also be ALL (all tracks).
ªª TIMES
Set the number of times that the copied section will be
pasted between 1 and 99.
COPY/PASTE
IN
OUT
TO
IN
OUT
TO
This function copies the audio data from between the IN
and OUT points on the source track, and pastes it on the
target track starting from the TO point. This operation
does not change the source track between the IN and
OUT points.
This operation overwrites recorded data on the target
track. Therefore, the length of the target track is not
changed.
You can make multiple copies in a single operation.
In other words, you can overwrite the target track from
the TO point with a designated number of repetitions of
the source data.
The following parameters are used in this operation.
• SOURCE Track
• IN/OUT/TO
• TARGET
• TIMES
58 TASCAM DP-32
This function copies the audio data from between the IN
and OUT points on the source track, and inserts it on the
target track starting from the TO point. This operation
does not change the source track between the IN and
OUT points.
This operation inserts recorded data into the target track.
The recorded data on the target track after the TO point is
offset by the amount of time used by the inserted audio
data. Therefore, the target track becomes longer.
You can make multiple copies in a single operation. In
other words, you can insert a designated number of
repetitions of the data into the target track from the TO
point.
The following parameters are used in this operation.
• SOURCE Track
• IN/OUT/TO
• TARGET
• TIMES
8 - Track Editing
MOVE/PASTE
OPEN (Insert Silence)
IN
OUT
TO
IN
OUT
IN
OUT
TO
IN
OUT
The audio data between the IN and OUT points on the
source track is removed and pasted on the target track
from the TO point. This operation leaves a silence between
the IN and OUT points on the source track.
This operation overwrites recorded data on the target
track. Therefore, the length of the target track is not
changed.
The following parameters are used in this operation.
• SOURCE Track
• IN/OUT/TO
• TARGET Track
This function inserts silence between the IN and OUT
points on the selected track.
This function splits the track at the IN point and shifts the
recorded data after the IN point to after the OUT point.
Therefore, the track becomes longer.
The following parameters are used in this operation.
• TARGET Track
• IN/OUT
CUT (Remove Part)
IN
MOVE/INSERT
IN
OUT
TO
IN
OUT
TO
The audio data between the IN and OUT points on the
source track is removed and inserted in the target track
starting from the TO point. This operation leaves a silence
between the IN and OUT points on the source track.
This operation inserts recorded data into the target track
starting from the TO point. Therefore, the target track
becomes longer.
The following parameters are used in this operation.
• SOURCE Track
• IN/OUT/TO
• TARGET Track
OUT
IN
This function cuts (deletes) the audio data between the
IN and OUT points on the selected track, and shifts the
remaining recording after the OUT point forward to the IN
point. Therefore, the track becomes shorter.
The following parameters are used in this operation.
• TARGET Track
• IN/OUT
TASCAM DP-32
59
8 - Track Editing
SILENCE (Erase Part)
IN
OUT
IN
OUT
This function cuts (deletes) the audio data between the IN
and OUT points on the selected track.
This creates silence between the IN and OUT points, as
though there had been no recording.
This operation does not change the length of the track.
The following parameters are used in this operation.
• TARGET Track
• IN/OUT
TIP
You can use this function to delete short noises, for example.
CLONE TRACK (duplicate track)
Use this function to duplicate a mono or stereo track to a
different track.
This copies the entire track, so the IN, OUT and TO points
have no effect.
The following parameters are used in this operation.
• SOURCE Track
• TARGET Track
NOTE
If you choose the same track for both the SOURCE and the
TARGET track, a Same Track notification appears and
the operation will not be executed.
60 TASCAM DP-32
CLEAN OUT (delete track)
Use this function to completely erase the selected track.
This deletes the entire track, so the IN, OUT and TO points
have no effect.
The following parameter is used in this operation.
• TARGET Track
9 - Using Internal Effects
This chapter explains the dynamic effects, guitar effects,
and send effects that can be applied to individual mic and
guitar inputs.
You can select one of four types of dynamic effects
(COMPRESSOR, NOISE SUPPRESSOR, DE-ESSER, EXCITER)
for use with all inputs (A to H).
For details about the parameters of each type of effect,
see "18 - Appendix" (page 97).
The library settings of guitar and send effects can be used
for other songs.
Even when parameter settings are not stored in the
library, effect assignments and parameters are always
stored as part of a song.
Dynamic effects
When you press the DYNAMICS button, the inserted effect
for the last selected input (INPUT A to H) is displayed.
You can select one of the four types of effects
(COMPRESSOR, NOISE SUPPRESSOR, DE-ESSER, EXCITER)
and apply it to all inputs (A to H) (simultaneous
application has some limitations).
You cannot use multiple types of dynamic effects
simultaneously.
Inserting a dynamic effect
Press the DYNAMICS button to open the DYNAMICS
screen. Press the SOURCE button to select the input (A to
H) where you want to insert the dynamic effect.
Press the F3 (SELECT) button to select the effect that
you want to insert. Press the F4 (ON/OFF) button to set
the selected effect to ON and insert it.
You can also align the cursor with INSERT EFFECT on
the Mixer screen and use the JOG/DATA dial to turn the
effect on/off.
Adjusting dynamic effects
You can edit the parameters of the selected dynamic
effect. The parameters differ depending on the effect
type.
Use the CURSOR (5/b/g/t) buttons to select the
parameter that you want to change, and then use the
JOG/DATA dial to set the value.
NOTE
There is no preset or library function for dynamic effects.
CAUTION
When using a guitar effect together with a dynamic
effect, the dynamic effect can be inserted on a
maximum of 2 channels.
The selected input (A to H) and on/off state are shown on
the screen.
TASCAM DP-32
61
9 - Using Internal Effects
Guitar effects
Adjusting guitar effects
This unit has multi-effects for guitar. You can insert and
use these effects on tracks.
You can edit the parameters of the selected guitar effect.
The parameters differ depending on the effect type.
Press the F3 (SELECT) button to select the effect that
you want to edit.
Use the CURSOR (5/b/g/t) buttons to select the
parameter that you want to change, and then use the
JOG/DATA dial to set the value.
Select whether to apply the effect during recording or
during playback with the POSITION parameter on the
Guitar Effect screen.
Inserting a guitar effect
Loading guitar effect settings
Press the EFFECT button to open the
1. On the Guitar Effect screen, press the F2 (LIBRARY)
button to open the library list.
2.Use the JOG/DATA dial to select the effect setting
that you want to load, and then press the F4 (t)
button.
3. The setting is loaded and the library list closes, but
the Guitar Effect screen stays open.
Press the F1 (g) button to return to the Guitar Effect
screen without loading a setting.
GUITAR EFFECT/SEND EFFECT screen (the last
displayed effect appears).
If the SEND EFFECT screen is open, press the F1
(GUITAR) button to open the GUITAR EFFECT screen.
If there is any effect already inserted on a track, the
SELECT button lights and the track number appears in
the upper right corner of the screen.
If no effect has been inserted, the SELECT button is unlit,
and TRACK -- appears in the upper right corner of the
screen.
Press the SELECT button of a track to insert the effect on
it.
You can also align the cursor with INSERT EFFECT on
the Mixer screen and use the JOG/DATA dial to turn the
effect on/off.
NOTE
A guitar effect has a mono input and a mono output, but
when inserted on a stereo track, it can have a stereo output
and some types will have a stereo effect.
CAUTION
Since guitar effects are mono, when they are inserted
on stereo tracks, the effect is sent only to the oddnumbered track. (See the illustration below.)
• For example, when inputs G and H are assigned to
stereo track 9/10 and you insert a guitar effect, the
effected sound will be recorded on track 9 (input G).
• Since some effects work in stereo, we recommend
that you set the track type to stereo, and then assign
the same input to both odd and even numbers. (For
example, assign input H/H to tracks 9/10.)
Mono input
Stereo input
Odd track
Even track
62 TASCAM DP-32
Odd track
EFFECT
Even track
NOTE
Factory preset settings are stored in the PRESET
category, and user settings are stored in the USER
category.
Saving guitar effects in the library
You can save adjusted effect settings as a user setting in
the library.
1. When the Guitar Effect screen is open, press the
F2 (LIBRARY) button to open the PRESET/USER
library list.
Use the JOG/DATA dial to select the USER area, and
then press the F3 (SAVE) button.
NOTE
The library list has a PRESET category and a USER
category. PRESET area data cannot be overwritten.
2. Enter a name, if necessary.
Names in the PRESET library cannot be changed.
9 - Using Internal Effects
Send effects
Saving send effects in the library
The internal send effect can be applied to signals sent to
Send Effect 1.
You can use one of the three types of send effects (REVERB,
DELAY and CHORUS) available. You cannot use multiple
types of effects simultaneously.
You can save adjusted effect settings as a user setting in
the library.
1. When the Send Effect screen is open, press the
F2 (LIBRARY) button to open the PRESET/USER
library list.
Use the JOG/DATA dial to select the USER area, and
then press the F3 (SAVE) button.
NOTE
The library list has a PRESET category and a USER
category. PRESET area data cannot be overwritten.
2. Enter a name if necessary.
Names in the PRESET library cannot be changed.
Using send effects
You can send input channel or track signals to the send
effects. Set channel signal send levels and whether
the signal is pre or post fader on the Mixer screen. (See
"Sending signals to internal/external effects" on page 44.)
The return signal from this effect is sent to the stereo bus.
In Bounce mode, however, it is sent to the bounce bus. (See
"Bouncing tracks" on page 50.)
Adjusting send effects
Adjust parameters on the EFFECT screen.
Press the EFFECT button to open the EFFECT screen. If
the Guitar Effect is shown, press the F1 (SEND) button to
switch to the Send Effect screen.
Press the F3 (SELECT) button to select the effect type
(REVERB, DELAY or CHORUS).
Use the CURSOR (5/b/g/t) buttons to select the
parameter that you want to change, and then use the
JOG/DATA dial to set the value.
Loading send effect settings
1. On the Send Effect screen, press the F2 (LIBRARY)
button to open the library list.
2. Use the JOG/DATA dial to select the effect setting
that you want to load, and then press the F4
(t) button.
3. The setting is loaded and the library list closes, but
the Send Effect screen stays open.
Press the F1 (g) button to return to the Send Effect
screen without loading a setting.
TASCAM DP-32
63
10 - Mixing Down and Mastering Songs
Mixing down tracks
Mixing down tracks is the process of adjusting the
volumes and stereo positions of each recorded track and
combining them into a well-balanced stereo track.
Including recorded tracks (32 maximum) and inputs (8
maximum), you can mix down up to 40 total tracks.
Levels and balance
Use the track faders to balance the relative levels of the
tracks.
Then, use the STEREO fader to adjust the overall level.
Watching the stereo level meters on the display, adjust
the level until it is suitable.
If the level is too loud, the sound will become distorted.
NOTE
The track meters on the display show the recorded signal
levels of the tracks. Therefore, these meters do not change
when the TRACK faders are adjusted.
TIP
You do not need to keep the entire song at the same volume.
For example, you could gradually increase the volume during
a guitar solo.
Fader group
You can group multiple faders to control them
simultaneously with a single fader.
Group and ungroup tracks while the GROUP button is lit.
ªª Grouping tracks
1. Press the GROUP button.
2. Adjust the level and balance between tracks you
want to control.
3. Press the SELECT buttons of tracks to control.
A lit SELECT button indicates a track in the group.
The track fader with the smallest number will be the
master fader, and faders in the group can be controlled
by it. When a fader other than the master fader is
moved, the SELECT button of the master fader blinks
and the movement will have no effect.
This fader group internally retains the relative level
differences from the master fader that it had when it
was set. The relationship between physical faders is
not retained.
NOTE
After tracks have been grouped, they will not be ungrouped
when you press the GROUP button. (The GROUP button
will blink.)In this case, if the group master fader is moved,
the SELECT buttons of tracks in the group will light during
operation.
If another fader is moved, the SELECT button of the
master fader will blink and the movement will have no
effect.
64 TASCAM DP-32
ªª Ungrouping tracks
1. Press all the SELECT buttons of tracks in the group
to turn them off.
2. Press the GROUP button.
If you press the GROUP button before turning off all
the buttons (a button is still lit), the GROUP button
will blink, indicating that tracks are still grouped.
CAUTION
After ungrouping tracks, the positions of the physical
faders and the actual levels (values shown onscreen)
might not match. In such a case, when you move a
physical fader, the actual level will change to match the
physical fader value, and thereafter the physical fader
will controls the level. This might cause a sudden level
change and loud noise, so turn the stereo fader down
beforehand.
NOTE
After grouping tracks, if the group master fader changes
because the lowest numbered track is ungrouped or a lower
numbered track is added to the group, the track levels are
reset to their physical fader values.
Stereo position (panning)
Use the PAN knobs on the Mixer screen of each mono
track to set the stereo position of the track signal.
For stereo tracks, instead of panning, adjust the balance
(BAL) between left and right channels.
Track equalizer
Each track has a 3-band equalizer that can be adjusted on
the Mixer screen.
1. Press the MIXER button to open the Mixer screen.
2. Adjust the track equalizer.
The equalizer parameters are as follows.
GAIN
FREQ
Setting range: 1.7 kHz to
HIGH Setting range: ±12 dB 18 kHz
(Default: 0 dB)
(Default: 10 kHz)
MID
Setting range: ±12 dB
(Default: 0 dB)
Setting range: 32 Hz to
18 kHz
(Default: 1.0 kHz)
LOW
Setting range: ±12 dB
(Default: 0 dB)
Setting range: 32 Hz to
1.6 kHz
(Default: 100 Hz)
Use track SELECT buttons to select desired tracks.
10 - Mixing Down and Mastering Songs
Use HIGH, MID and LOW GAIN knobs to adjust the gain
of each band.
Use the HIGH, MID and LOW FREQ knobs to adjust the
center frequency of each band.
Use the MID Q knob to set the resonance (width) of the
MID FREQ band.
Setting range: 0.25 to 16 (Default: 0.5)
Press the EQUALIZER ON/OFF button to turn the
equalizer on or off.
Use INPUT SOURCE (A–H) buttons to select inputs to set
the equalizer. (See "Using the input equalizer" on page
43.)
3. After making the settings, press the HOME button
to return to the Home screen.
Creating a master file
When you are satisfied with your mix, this unit can create
a stereo master file by recording the mixed down tracks.
Master files created by this unit are saved with their songs.
A master file can be recorded by an external stereo
recorder and can also be converted by the unit into a WAV
file and stored with the same name as the song in the
song's folder on the SD card.
CAUTION
Only one master file ("[song name].wav") can be created
in each song. (When mastering, another file besides the
"[song name].wav" master file is created, but it is only
for use by the unit. Do not erase it.)
Send effects
Setting the start and end points
This unit has three types of send effects.
Adjust the level of the signal sent to the effect from each
track by using their SEND EFF 1/EFF 2 knobs.
Before creating a master file, set the start and end points
to be used for the mixed down master file. The range
between the song's IN and OUT points will be recorded as
the master file.
Usually, you will probably want to set the beginning of
the song as the IN point and the end of the song as the
OUT point.
Press and hold the MARK SET button and press the IN
button where you want to set the IN (start) point of the
master file, and press and hold the MARK SET button and
press the OUT button where you want to set the OUT (end)
point.
For more information about how to correct the IN/OUT
points, see "Setting IN/OUT points" on page 53.
NOTE
Adjust the RETURN LEVEL on the Send Effect screen.
1. Press the EFFECT button to open the Effect screen.
2. Select and adjust the send effect.
Press the EFFECT button to open the Effect screen
where the last operation was performed. Press the F3
(SELECT) button to select one of the three available
types (REVERB, DELAY or CHORUS). You cannot use
multiple types of effects simultaneously.
Align the cursor with the parameter that you want to
adjust, and then use the JOG/DATA dial to adjust it.
The return from the send effect is mixed with the
stereo signal.
3. After making the send effect setting, press the
HOME button to return to the Home screen.
4. Use the SEND EFF 1 knob to adjust the level of the
signal sent to the send effect of each track.
Creating a master file
After setting the IN and OUT points, you are ready to
create the master file.
1. When in Multi Track mode, press the
MIXDOWN/MASTERING button.
The recorder switches to Mixdown mode and the
Home screen reopens.
TIP
When using an external effect, connect the output of the
external effect (EFFECT RETURN) to INPUT A to H. By
assigning the connected input to the stereo bus, you can
return the effect sound to the stereo bus. (See "Assigning
inputs to a stereo bus" on page 41.)
If you play or record, you can hear the signal of the
mixed tracks (the signal to be recorded) through
headphones or a monitoring system.
NOTE
• In Mixdown mode, Mixdown appears on the upper left
corner of the Home screen.
• If the interval between the IN and OUT points is
shorter than 4 seconds, when you start to record,
TASCAM DP-32
65
10 - Mixing Down and Mastering Songs
Trk Too Short appears and the mixdown recording
will not be performed.
• When in Mixdown mode, some playback functions
do not work. If you try to use one of these functions,
In Mixdown Mode appears.
2. Press the RECORD (0) button.
The mixdown starts and the RECORD (0) button
lights.
Regardless of the recorder's current position, the
mixdown starts from the IN point.
If necessary, adjust the track faders or the Mixer
screen's PAN knobs while mixing down the tracks
to stereo. These adjustments will be reflected in the
master file.
When the recorder reaches the OUT point, recording
automatically stops.
3. If you want to redo the creation of the stereo
master track, press the RECORD (0) button.
A new master file will be created, and the previous
master file will be overwritten.
NOTE
After recording the master file, you can play back the master
file to check it. (See "Checking the master file" in the following
section.)
Exiting Mixdown mode
Press the MIXDOWN/MASTERING button twice to return
to Multi Track mode.
Checking the master file
Follow these procedures to listen to a master file after you
have completed recording it.
1. When in Mixdown mode, press the MIXDOWN/
MASTERING button.
The recorder switches to Mastering mode and the
Mastering screen opens.
NOTE
• In Mastering mode, Mastering appears in the upper
left of the Home screen.
• When in Multi Track mode, press the MIXDOWN/
MASTERING button to switch to Mixdown mode, and
then press the MIXDOWN/MASTERING button again to
switch to Mastering mode.
You
cannot switch to Mastering mode if there is no
•
master file.
66 TASCAM DP-32
2. In this state, press the PLAY (7) button to play
back the master file that you have created.
CAUTION
Confirm that both the EQ and COMP items are set to
OFF. If either is set to ON, the playback sound of the
master file will be affected by the equalizer and/or
compressor. (See "Using the mastering equalizer" on
page 67 and "Using mastering compression" on page
68.)
3. When in Mastering mode, the transport buttons
work as follows.
• Press the PLAY (7) button to play back the master
file from the current position until its end.
• Use the REW (m) button and the F FWD (,)
button to rewind and fast-forward in the same way
as in ordinary recorder mode.
• Press the STOP (8) button to stop playback.
• Track recording is not possible.
• Repeat playback and location mark functions
cannot be used.
Since the master file playback signal is output from the
STEREO OUT jack, you can record the output to an
external stereo recorder.
If you are not satisfied with this master file, you can
perform a new mixdown.
NOTE
To listen to a master file recorded in a saved song, load the
song, change the recorder to Mastering mode, and then
press the PLAY (7) button to start playback.
Ending master file checking
After checking the master file, press the MIXDOWN/
MASTERING button to return to Multi Track mode.
Using the mastering tools
This unit has specialized tools for enhancing the sound
of the master file. Use the equalizer, noise shaper,
compressor, and normalize functions to adjust the overall
volume and sound quality.
Switch to Mastering mode and use the mastering
tools to enhance the master file.
10 - Mixing Down and Mastering Songs
Mastering procedures
Follow the steps below to master the file that has been
mixed down.
ªª Step 1 - Enter Mastering mode.
When in Mixdown mode, press the MIXDOWN/
MASTERING button.
The recorder switches to Mastering mode and the
Mastering screen opens.
Recording in Mastering mode overwrites the previous
master file.
At the end of the master file, recording finishes
automatically and the position returns to 00:00:00:00.
NOTE
If you stop the recording in the middle, a new master file will
be created until the time when you stopped the unit.
ªª Step 4 - Check your recording.
Turn the equalizer and compressor off before playing back
the master file to check the mastering results.
Single undo and redo can be used, so you can compare
the sound before and after using the mastering tools.
ªª If you are not satisfied with the result
Undo the operation to return the master file to mixdown
state, and apply the mastering tools again from step 1.
NOTE
• When in Multi Track mode, press the MIXDOWN/
MASTERING button to switch to Mixdown mode, and
then press the MIXDOWN/MASTERING button again to
switch to Mastering mode.
• You cannot switch to Mastering mode if there is no
master file.
ªª Step 2 - Use the mastering tools to adjust
the sound.
You can use the following mastering tools: EQUALIZER (F1
(EQ) button), COMPRESSOR (F2 (COMP) button), NOISE
SHAPED DITHERING (F3 (NSD) button) and NORMALIZE
(F4 (NORM) button).
You can also switch between a multi-band and singleband type compressor on the COMP MULTI screen by
pressing the F2 button.
When using the multi-band compressor, the parameter
display on the COMP MULTI screen is split into LOW
BAND, MID BAND and HIGH BAND areas, allowing
separate adjustments for each band.
Make the necessary settings for each tool. (For further
details, see "Using the mastering equalizer," "Using
mastering compression," "Using normalize," and "Using
noise shaped dithering" below.)
When in Mastering mode, you can use the PLAY
(7), STOP (8), REW (m) and F FWD (,) transport
buttons to monitor the playback signal as you adjust
settings.
ªª Step 3 - Record a new master file using the
mastering tools.
After adjusting the mastering tool settings, press the
RECORD (0) button to start recording.
The recording starts and the PLAY (7) and RECORD (0)
buttons light.
Recording always starts from 00:00:00:00 regardless
of the current position.
NOTE
Multiple undo and redo cannot be used when the recorder is
in Mastering mode.
Using the mastering equalizer
1. When the Mastering screen is open, press the F1
(EQ) button to open the EQUALIZER screen.
2. Adjust mastering equalization on this screen.
The equalizer parameters are as follows.
GAIN
Setting range: ±12
HIGH dB
(Default: 0 dB)
MID
Setting range: ±12
dB
(Default: 0 dB)
Setting range: ±12
LOW dB
(Default: 0 dB)
FREQ
Setting range: 1.7 kHz to
18 kHz (Default: 10 kHz)
Setting range: 32 Hz to 18
kHz (Default: 1.0 kHz)
Setting range: 32 Hz to
1.6 kHz (Default: 100 Hz)
Use the HIGH, MID and LOW GAIN knobs to adjust
the gain of each band.
Use the HIGH, MID and LOW FREQ knobs to adjust
the center frequency of each band.
Use the MID Q knob to set the resonance (width) of the
MID FREQ band.
Setting range: 0.25 to 16 (Default: 0.5)
TASCAM DP-32
67
10 - Mixing Down and Mastering Songs
Press the EQUALIZER ON/OFF button to turn the
equalizer on or off.
3. Use the JOG/DATA dial or the CURSOR (5/b)
buttons to select (highlight blue) the desired
preset, and then press the F4 (t) button.
After the preset is loaded, the library list closes, but the
COMP MULTI screen stays open.
4. When using the multi-band compressor, move the
cursor to the band display area, use the JOG/DATA
dial to switch among the bands, and then set the
parameter for each band as desired.
NOTE
The "Q" value is the center frequency of the equalizer divided
by the bandwidth. A high Q value reduces the range of the
cut or boost applied to the frequencies. Depending on the
equalizer setting, the graph at the top of the screen changes.
3. After making the settings, press the F1 (g) button
to return to the Mastering screen.
4. On the Mastering screen, the EQ is shown as
either ON or OFF.
Multiband compressor
Single band compressor
Using mastering compression
You can choose between single band and multi-band
compressors.
Multi-band compressors allow independent settings for
the low, mid and high frequency ranges, so you can adjust
the overall level balance. By using compression, you can
also reduce unwanted peaks and increase the overall gain
to make the song louder, creating a mastered sound with
greater impact.
1. When the Mastering screen is open, press the F2
(COMP) button to open the COMP MULTI screen.
2. Press the F3 (LIBRARY) button to open the library
list.
68 TASCAM DP-32
At this time, the selected band is shown in the upper
left.
5. Use the CURSOR (5/b/g/t) buttons to select the
parameter to adjust, and then use the JOG/DATA
dial to set it.
THRESHOLD
The threshold value determines when the
compressor becomes active.
RATIO
Sets how much compression is applied after the
level exceeds the threshold.
KNEE
Sets the transition curve.
GAIN
Adjusts the output level.
ATTACK
Adjusts how fast the compressor responds after the
level exceeds the threshold.
RELEASE
Adjusts how fast the compressor disengages after
the level drops below the threshold.
AUTO MAKE
This feature automatically adjusts the volume to
prevent it from being reduced by the compressor.
10 - Mixing Down and Mastering Songs
6. When using the multi-band compressor, move the
cursor to CROSSOVER and then use the JOG/DATA
dial to adjust the frequency range of each band.
Checking the noise shaper (noise
shaped dithering)
You can use the noise shaper when creating an audio CD
from master files of 24-bit songs. (See "Creating an audio
CD" on page 82.)
You can check the effect of using the noise shaper when
creating an audio CD in advance.
NOTE
7. Press the F4 (ON/OFF) button to turn the
compressor on or off. The ON or OFF state is shown
on the Mastering screen.
8. After setting the parameters, press the F1 (g)
button to return to the Mastering screen.
Compressor ON/
OFF
Using normalize
The noise shaper only affects the audio CD created. It has no
effect on the original master files themselves.
ªª What is a noise shaper?
Since standard audio CDs use 16-bit quantization, this
unit automatically converts master files created from 24bit songs to 16-bit when writing a CD. When the bit rate
is converted, a very low level of quantization distortion
usually occurs at points where sound becomes inaudible,
but you can reduce this distortion by turning the noise
shaper on.
The noise shaper in this unit reduces quantization
distortion by using a dithering technique that adds
random noise below the quantization steps.
1. When the Mastering screen is open,
press the F3 (NSD) button to open the
NOISE SHAPED DITHERING screen.
Use the normalize function to automatically adjust the
volume.
This function detects the highest volume level and raises
the overall volume until the highest level reaches the
maximum limit.
CAUTION
If you use equalization or compression after normalizing
the track, distortion might occur. Use the normalize
function after adjusting the sound with equalization
and compression.
1. When the Mastering screen is open, press the F4
(NORM) button to open the NORMALIZE screen.
2. Press the F4 (ON/OFF) button to turn the noise
shaper ON.
3. Press the F1 (g) button to return to the Mastering
screen.
Exiting Mastering mode
To exit Mastering mode and return to Multi Track
mode, press the MIXDOWN/MASTERING button.
2. Press the F2 (YES) button to normalize the master
track.
3. Once normalization completes, the Mastering
screen reopens.
TASCAM DP-32
69
11 - Various Other Functions
Metronome
This unit has a built-in metronome that can be used when
the recorder is running.
You can set it to work during both playback and recording
or only during recording.
1. When the recorder is stopped, press the
METRONOME button to open the METRONOME
screen.
2. Set the following items.
Use the CURSOR (5/b) buttons to select the desired
item, and then use the JOG/DATA dial to set its value.
MODE
You can select from the following modes.
Mode
Description
OFF
Default, metronome off
Active during recording and
REC&PLAY playback
Active only during recording
REC
LEVEL
Set the metronome volume.
The setting range is from 0 to 127. (Default: 60)
TEMPO
Set the speed.
The setting range is from 20 to 250 (BPM). (Default: 120)
SIGNATURE
Set the time signature to 4/4, 3/4, etc.
The setting range is from 1/1 to 12/8.
(Default: 4/4)
BAR DISP
Set the BAR display to ON or OFF. (Default: OFF)
3. After making the settings, press the HOME button
to return to the Home screen.
The metronome works according to the MODE setting
made in step 2 above.
When enabled, the METRONOME button flashes in
time with the metronome tempo.
The metronome signal is not recorded even if set to
work during recording.
70 TASCAM DP-32
NOTE
• When the metronome is working, you can monitor the
sound of the metronome through connected external
speakers. Note, however, in this case that the metronome
sound could also be recorded if you are using a
microphone to record in the same room.
• When the metronome is running, you can adjust the
LEVEL item on the METRONOME screen, but other
items cannot be changed.
• You can use the metronome as a click track to help keep
time when recording rhythm guitar or bass, for example,
as the first tracks of a song.
• If you want to use the metronome alone for practice,
you can either turn each track's fader all the way down
during playback or play a song that does not have any
recordings.
MIDI Sync
This unit support MIDI Time Code (MTC) and MIDI Clock,
so synchronization with other equipment is possible.
The following synchronization types are available.
ªª MTC Master
You can synchronize the MTC generated by this unit with
external equipment (MTC compatible synthesizer, DAW,
etc.).
ªª MIDI Clock Master
You can synchronize external equipment (sequencer,
drum machine, etc.) with MIDI clock based on a specified
tempo.
NOTE
When MIDI clock master is active, in addition to the MIDI
clock, a variety of data, including start, stop, continue and
song position points is transmitted from this unit to another
device. When MTC master is active, full timecode messages
can be transmitted while locating the song position.
The synchronization settings are made under the SYNC
item on the MIDI screen.
ªª FRAME TYPE
The MTC frame type used for transmission/reception is
always 30 (which is common for music and high-definition
video).
ªª GENERATOR
Select the sync signal output from the MIDI OUT jack.
• Select MTC to set this unit to MTC Master.
• Select CLOCK to set this unit to MIDI Clock Master.
• Select OFF when you do not want to output a sync
signal from the unit.
11 - Various Other Functions
MIDI remote control
Tuner function
The mixer, effects and recorder of this unit can be remotely
controlled by other devices using MIDI messages.
For more information about MIDI messages that can be
used to control this unit, see "18 - Appendix" on page 97.
When the transport is stopped, press the MENU button to
open the MENU screen, select (highlight blue) the MIDI
item, and then press the F4 (t) button to open the
MIDI screen.
You can use the built-in chromatic tuner to tune guitars.
1. Connect a guitar or bass to the MIC/LINE INPUT H.
Tuning cannot be performed with instruments
connected to MIC/LINE INPUTS A to G.
2. Set the LINE-GUITAR switch on the rear panel to
GUITAR. (See "Selecting the input sources" on page
40.)
3. When the recorder is stopped, press the MENU
button to open the MENU screen.
4. Use the JOG/DATA dial to select the TUNER menu
item and then press the F4 (t) button.
The TUNER screen opens.
ªª MMC MODE
Set the MIDI Machine Control transmission/reception
mode.
OFF: MMC communication disable.
MASTER: This unit functions as the MMC master.
SLAVE: This unit functions as an MMC slave.
When the unit is the MMC master, the MMC command
is output by the MIDI OUT jack, and it is possible to
remotely control an external MIDI sequencer or another
DP-32 unit.
When the unit is the MMC slave, MMC commands can
be received through the MIDI IN jack, and it is possible
to remotely control this unit from an external MIDI
sequencer or another DP-32 unit.
ªª MMC Device ID
Set the MMC device ID.
Select from 1 to 127, and ALL. (Default: ALL)
Master units send MMC commands with device IDs that
slaves with the same IDs can receive. When ALL is selected,
however, MMC commands are sent and received for all IDs.
MMC is used for remote transport control of MIDI
equipment. On the other hand, MIDI Time Code (MTC) is
used for synchronization with MIDI equipment. Note that
the MMC mode and MMC device ID are not related to
mixer and effect remote control.
ªª REMOTE CONTROL
Use MODE to set this unit as a master or a slave.
Use PROGRAM CHANGE EFF to set whether this unit's
effect changes when a program change message is
received (ON or OFF). In Mastering mode, program change
messages are not received even if this is ON.
Use CONTROL CHANGE to set whether or not received
control change messages control the parameters of this
unit's mixer and effects (ON or OFF).
5. Use the JOG/DATA dial or the CURSOR (5/b)
buttons to set the standard frequency of A4.
The setting range is from 435Hz to 445Hz. (Default:
440Hz)
6. Play the instrument and begin tuning.
The pitch name closest to the string appears above
the meter.
Tune the instrument so that the target pitch name
appears and the center of the tuning meter lights.
A bar appears to the left or right of the center if the
sound is lower or higher than the target pitch. The bar
becomes longer as the sound shifts away from the
target pitch.
When the pitch played matches the note shown, the
center , t and g icons light green.
7. After tuning the instrument, press the HOME
button to return to the Home screen.
TASCAM DP-32
71
11 - Various Other Functions
PREFERENCE menu settings
Use the PREFERENCE menu to change various
settings to optimize the unit for your use conditions and
requirements, as well as to restore the factory settings.
Follow these steps to open the PREFERENCE menu.
1. When the recorder is stopped, press the MENU
button to open the MENU screen.
Setting automatic power saving
Use the Auto Power Save item to set the amount
of time until the unit power turns off after the last user
operation or function completes.
The options and default value are as follows.
Options: OFF, 3 min, 5 min, 10 min, 30 min
(default)
NOTE
The Auto Power Save function is disabled under the following
conditions.
(1) During recording or playback
(2) When the metronome is in use
(3) When the record function is ON
(4) When a signal is output from the STEREO OUT
2. Use the JOG/DATA dial or the CURSOR (5/b/g/
t) buttons to select PREFERENCE, and then press
the F4 (t) button.
The PREFERENCE screen opens.
3. On the PREFERENCE screen, use the CURSOR
(5/b) buttons to select a parameter, and then use
the JOG/DATA dial to change its setting.
Menu item
Function
Reference
Auto Power
Save
Set automatic power
saving
Contrast
Adjust display contrast
Brightness
Adjust display brightness
Backlight
Adjust display backlight
Foot SW
Right
Set right footswitch pedal
assignment
Foot SW
Center
Set center footswitch
pedal assignment
Foot SW
Left
Set left footswitch pedal
assignment
Undo
History
Set length of undo history Page 47
Jump Back
Set jumpback time
Auto
Monitor
Set automatic monitoring Page 72
Preview
Time
Set preview playback
time
Page 54
Peak Hold
Set peak hold time
Page 43
Song Name
Type
Set file name format
Page 72
Date/Time
Set date and time
Page 33
Initialize
Restore default settings
Page 73
72 TASCAM DP-32
Setting automatic monitoring
Input monitoring is possible when recording is enabled
and the transport is stopped.
If automatic monitoring is ON, when playback starts,
input sounds are muted, and only playback sounds can be
monitored.
Use the AUTO MONITOR item to set this function.
OFF (default):
Input sounds are not muted even when playback starts.
When recording is enabled, input and playback sounds
are mixed.
ON:
When playback starts, input sounds are muted.
When recording is enabled, only playback sounds can
be heard.
Page 72
Setting the song name format
Page 34
Page 49
Page 53
Use the Song Name Type item to set the format used
for song names created by this unit to WORD (default) or
DATE.
WORD: The characters set are used for the
beginning of the song name.
Example (set to "TASCAM"):
"TASCAM0001"
DATE: The date is used for the beginning of
the song name.
Example (created on July 10, 2012):
"201207100001"
ªª Setting the WORD
When the Song Name Type on the PREFERENCE
screen is set to WORD, press the F4 [t] button to open
the setting screen.
The length of the word is limited to XX single-byte
alphanumeric characters. (See "Editing names" on page
35.)
11 - Various Other Functions
Restoring the initial preference
settings
You can restore the PREFERENCE screen settings to
their initial values (factory defaults). This operation is
called initialization.
1. When the recorder is stopped, press the MENU
button to open the MENU screen.
2. Use the JOG/DATA dial or the CURSOR (5/b/g/t)
buttons to select (highlight green) PREFERENCE,
and then press the F4 (t) button.
The PREFERENCE screen opens.
3.Use the CURSOR (5/b) buttons to select
Initialize, and then press the F4 (t) button.
4. When the confirmation message appears, press the
F2 (YES) button to confirm.
Viewing information
You can view information about the current song
(currently loaded song), the SD card and the firmware.
1. When the recorder is stopped, press the MENU
button to open the MENU screen.
2. Use the JOG/DATA dial or the CURSOR (5/b/g/t)
buttons to select (highlight green) INFORMATION,
and then press the F4 (t) button.
The INFORMATION screen opens.
The following information is shown on the
INFORMATION screen.
CURRENT SONG
NAME
FORMAT
DATE
SIZE
INFO
TOTAL SONG
TOTAL SIZE
REMAIN SIZE
SYSTEM VERSION
5. Once initialization completes, the messages closes,
but the PREFERENCE screen remains open.
NOTE
If you want to cancel the initialization, press the F1 (NO)
button.
6. After making the settings, press the HOME button
to return to the Home screen.
TASCAM DP-32
73
12 - SD Card Management
The recording files are stored on SD cards.
Depending on the capacity of the SD card, the card is
formatted using the FAT16 or FAT32 file system.
SD card capacity
File system
512 MB to 2 GB
FAT16
Above 2 GB
FAT32
Moreover, this unit is compatible with SD card writeprotection, so you can write-protect your cards to prevent
accidental deletion by formatting them. (See "About
write-protected SD cards" on page 31.)
When an SD card is inserted, the unit mounts the card
and enables it for use. At this time, if the inserted SD card
has not been formatted by this unit, a message appears
prompting you to format it.
If the inserted SD card has no setup file on it, a message
appears prompting you to create a setup file.
When an SD card is ejected, the unit unmounts it and
then a No Card message appears.
Quick formatting an SD card
Use the QUICK FORMAT item to quickly format an SD
card. Using QUICK FORMAT erases all files on the card and
automatically creates new MUSIC, UTILITY and AudioDepot
folders, as well as the dp-24.sys file that is necessary to use
the card with this unit.
CAUTION
This operation erases all data from the SD card and
cannot be undone. Confirm that you will not lose
important data before quick formatting a card.
1. When the recorder is stopped, press the MENU
button to open the MENU screen.
2. Use the JOG/DATA dial or the CURSOR (5/b/g/t)
buttons to select (highlight green) FORMAT, and
then press the F4 (t) button.
CAUTION
• Ejection during recording is not supported.
• Formatting cannot be undone.
NOTE
• The FAT (File Allocation Table) format is a file system
format that can be read by a computer.
• SD and SDHC cards that are at least 512MB in size can be
used.
A list of SD cards that have been confirmed to work
with this unit can be found on the TASCAM website
(http://tascam.com/).
The format screen where you can choose Quick Format
or Full Format opens.
3. Use the JOG/DATA dial to select QUICK FORMAT
and press the F4 (t) button.
A QUICK FORMAT confirmation message appears.
4. Press the F2 (YES) button to execute the quick
format. If you want to cancel the quick format,
press the F1 (NO) button.
5. Once the quick format completes, the message
closes, but the FORMAT screen remains open.
NOTE
When a card is formatted, one song is automatically created
in the MUSIC folder.
74 TASCAM DP-32
12 - SD Card Management
Full formatting an SD card
Use the FULL FORMAT item to completely format an SD
card. Using FULL FORMAT erases all files on the card and
automatically creates new MUSIC, UTILITY and AudioDepot
folders, as well as the dp-24.sys file that is necessary to use
the card with this unit.
Using Full Format, memory errors are checked during
formatting. A full format takes longer than a quick format.
CAUTION
This operation erases all the data from the SD card. This
operation cannot be undone. Confirm that you will not
lose important data before full formatting a card.
Follow these procedures to fully format an SD card.
1. When the recorder is stopped, press the MENU
button to open the MENU screen.
2. Use the JOG/DATA dial or the CURSOR (5/b/g/t)
buttons to select (highlight green) FORMAT, and
then press the F4 (t) button.
The format screen where you can choose Quick Format
or Full Format opens.
3. Use the JOG/DATA dial to select FULL FORMAT
and press the F4 (t) button.
A FULL FORMAT confirmation message appears.
4. Press the F2 (YES) button to execute the full
format. If you want to cancel the full format, press
the F1 (NO) button.
5. Once the full format completes, the message
closes, but the FORMAT screen remains open.
NOTE
When a card is formatted, one song is automatically created
in the MUSIC folder.
TASCAM DP-32
75
13 - Exchanging Data with a Computer
By connecting this unit to a computer using the included
USB cable, you can backup song data from an SD card
in the unit to a computer and restore backed-up song
data from a computer to the card. In addition, you can
export track files and stereo master files from songs to the
computer, as well as import audio files from the computer
to the unit.
Backed-up data can be restored to a different DP-32 unit
than the one that created it. In other words, files can be
freely exchanged between DP-32 units, making it easy to
add additional recordings or mix existing recordings in
different location.
CAUTION
If you want to remove an SD card from this unit and
back up its data on a computer using a card reader,
always turn off the unit's power before removing the
card.
NOTE
In this chapter, "computer" refers to a Windows or Macintosh
personal computer connected to this unit. (See "Operating
system requirements" in the following section.)
The following types of data can be transferred from this
unit to a computer.
ªª Entire songs
You can transfer the data for an entire song from the
unit's MUSIC folder to a computer. This operation is called
"backing up". In addition, data backed up on a computer
can be transferred to the MUSIC folder, and then restored
as a song file. This operation is called "restoring".
ªª WAV format tracks
Export specified track files as WAV files to the AudioDepot
folder of the SD card. In addition, you can import specified
track files by storing WAV files from a computer in the
AudioDepot folder beforehand.
In other words, data transfer between the computer and
track files is carried out through the AudioDepot folder.
Operating system requirements
You can connect this unit to computers with the following
operating systems.
ªª Windows
Windows XP, Windows Vista and Windows 7
ªª Mac OS X
Mac OS X 10.2 or later
When this unit is connected to a computer, the computer
recognizes it as a removable disk. There is no need for a
special driver.
NOTE
Data transfer between this unit and a computer occurs at
USB 2.0 speed (maximum). Data can still be transferred if
the computer connection is USB 1.1, but it will be slower. In
addition, to assure USB 2.0 speed, use a cable that meets USB
2.0 standards.
Connecting to a computer
When connected to a computer via USB, this unit's record,
playback and other recorder functions cannot be used.
To connect with a computer, use a mini-B-type USB 2.0
cable to connect the USB port on the rear panel of the
unit with a USB port on the computer.
It does not matter whether you turn the unit's power ON
before or after the USB connection is made.
When this unit is ON, enable the USB connection with the
USB item of the MENU screen.
The currently loaded song is saved before the USB
connection becomes effective. When connected, the
following screen appears on the display.
ªª Master file
A master file created on this unit can be transferred to
a computer as a stereo WAV file (from the "Song name"
folder inside the MUSIC folder).
Only export of the master file is possible.
After making a USB connection, you must turn the power
on and enable the USB connection in the USB item of the
MENU screen.
This unit appears as an external drive named DP-32 on the
computer's display.
Clicking on the DP-32 drive will display the MUSIC, UTILITY,
and AudioDepot folders.
CAUTION
• Be sure to use the included TASCAM PS-1225L AC
adaptor to supply power to this unit. Power cannot
be supplied to this unit via USB.
76 TASCAM DP-32
13 - Exchanging Data with a Computer
• Do not disconnect the AC adaptor or otherwise cut
the power to the unit during data transfer. Doing so
will cause all the data to be lost beyond recovery.
• Do not change the names of folders inside the DP-32.
NOTE
The UTILITY folder is used, for example, to update the system
software used by the unit. In addition, do not delete or
change the names of individual files in the Song subfolder
inside the MUSIC folder. You can, however, delete an entire
Song folder if you no longer need that song.
Disconnecting
ªª Disconnecting from Macintosh computers
1. Drag the DP-32 icon that represents this unit to the
Trash, or use Command + E to eject the DP-32.
TIP
Depending on the OS version and settings you might also be
able to eject the DP-32 icon by clicking on an eject icon next
to it in a Finder window or by using a control key.
2. After the DP-32 icon disappears from the display,
press the function key to disconnect this unit and
the computer. After that, unplug the USB cable.
The Home screen opens on the display.
Follow these procedures to disconnect the USB
connection correctly.
CAUTION
When transferring data, do not disconnect the unit or
remove the USB cable. Doing so could cause data on the
computer or this unit to be damaged.
NOTE
When disconnecting from a computer, the procedure
on the computer might be called "eject", "unmount'' or
"remove".
ªª Disconnecting from computers running
Windows XP, Windows Vista or Windows 7
Follow these procedures to disconnect from computers
that use Windows XP, Windows Vista or Windows 7
operating systems.
A PC card icon and arrow appear in the taskbar (usually at
the bottom right of the screen).
1. Left click on this icon to open a pop-up bar. Click
on this pop-up bar to disconnect this unit from the
computer.
2. After a message appears on the computer screen
saying that the unit can be disconnected, press the
applicable function key to disconnect it from the
computer. After that, unplug the USB cable.
The Home screen opens on the display.
CAUTION
If a message appears on the computer screen saying
that this unit cannot be disconnected safely, do not
disconnect the USB cable.
Close all the computer programs and windows that are
accessing files on this unit, and then try the operation
again.
TASCAM DP-32
77
13 - Exchanging Data with a Computer
Track import and export
You can import and export individual tracks between a
computer and this unit using the AudioDepot folder.
Files must be WAV files (with the ".WAV" extension) to be
imported/exported as tracks.
You can import both mono and stereo files, and export
mono files.
If you want to import an audio file of a different format
into this unit, you must convert it to a WAV file first.
Importing tracks
1. Connect the unit to a computer. (See "Connecting
to a computer" on page 76.)
2. Use the computer to copy WAV files to the
AudioDepot folder on the SD card in this unit.
NOTE
The files to be copied must have single-byte alphanumeric
character names. If you try to copy a file with double-byte
characters, it cannot be imported because the file name will
not appear on the display in step 6 below,.
3. Disconnect the unit properly from the
computer, and then unplug the USB cable. (See
"Disconnecting" on page 77.)
4. Press the MENU button to open the MENU screen.
5. Use the JOG/DATA dial or the CURSOR (5/b/g/t)
buttons to select (highlight green) AUDIO DEPOT,
and then press the F4 (t) button.
6. Use the JOG/DATA dial or the CURSOR (5/b)
buttons to select the WAV file that you want to
import, and then press the F1 (IMPORT) button.
Empty tracks that can be imported appear.
NOTE
• If you are trying to import a WAV file with attributes that
do not match the current song, an error pop-up message
appears. For example, this occurs if the current song is
44.1 kHz and you try to import a 48 kHz WAV file. If there
is no file that can be imported, FILE NOT FOUND
appears.
• When the file name is short, spaces appear after the file
name, but those spaces are not included in the actual file
name.
7. Use the JOG/DATA dial or the CURSOR (5/b)
buttons to select the track to be imported, and
then press the F4 (t) button.
A confirmation message appears.
NOTE
WAV files that can be imported appear.
If the WAV file to be imported is stereo, you must select a
track pair.
8. Press the F2 (YES) button to start importing the
file.
NOTE
• If there is not enough space or the file format is wrong, an
error message appears.
• The beginning of the file is set at the start of the song
(00:00:00:00). In the same way as with other
recording tracks, you can edit a track with an imported
file. (See "Overview of track Editing" on page 57.)
• To import a stereo WAV file, an empty stereo track is
necessary.
9. Once importing completes, a pop-up window
appears and then the Audio Depot screen
reopens.
10.Press the HOME button to return to the Home
screen.
78 TASCAM DP-32
13 - Exchanging Data with a Computer
Exporting tracks
1. When the recorder is stopped, press the MENU
button to open the MENU screen.
2. Use the JOG/DATA dial or the CURSOR (5/b/g/t)
buttons to select (highlight green) AUDIO DEPOT,
and then press the F4 (t) button.
3. Press the F2 (EXPORT) button.
The EXPORT screen opens showing a list of tracks
that contain audio data.
NOTE
Song tracks that do not have audio data are not displayed in
the file list.
4. Use the JOG/DATA dial to select (highlight blue) the
track that you want to export, and then press the
F2 (4) button.
A check mark 4 appears in the box next to the
selected track.
6. Press the F2 (YES) button to export the selected
track to the AudioDepot folder.
NOTE
When a track file with the same name already exists in the
AudioDepot folder, a number is added to the file name end,
so the existing track is not overwritten.
7. After a pop-up message appears, the
Audio Depot screen reopens.
8. Press the HOME button to return to the Home
screen.
9. Connect the unit to a computer. (See "Connecting
to a computer" on page 76.)
10.Operate the computer to copy track files from the
AudioDepot folder of the SD card to the computer.
11. After exporting track files to the computer,
disconnect the unit from the computer using the
proper procedures, and then unplug the USB cable.
(See "Disconnecting" on page 77.)
Deleting files from the
AudioDepot folder
1. When the file list is displayed, use the JOG/DATA
dial or the CURSOR (5/b) buttons to select the
files that you want to delete.
2. Press the F3 (DELETE) button to open a
confirmation message.
By checking multiple boxes (4), you can export more
than one track at once.
NOTE
To remove a check mark 4 from a box, press the F2 (4)
button again while the track is selected (highlighted blue).
5. After you finish putting checks (4) next to the
tracks you want to export, press the F4 (t) button.
A confirmation message appears.
3. Press the F2 (YES) button to confirm deletion.
If you want to delete multiple files, repeat the
procedure above.
TASCAM DP-32
79
14 - Using CDs
Using the CD drive
This unit has a CD drive that supports writing to CD-R
and CD-RW discs. In addition to playing back audio CDs
(CD-DA discs), the unit's CD drive can also be used for the
following purposes.
• Create audio CDs from master files
• Import tracks from audio CDs into the current song
NOTE
Standard audio CDs are 16-bit, 44.1kHz format.
If you make an audio CD using a master file of a song that
was created with different settings, it will automatically be
converted to 16-bit, 44.1kHz format.
Compatible CD types
This unit is compatible with 12cm and 8cm CD, CD-R,
CD-RW and CD-RW High Speed discs. This unit does not
support CD-RW Ultra Speed or CD-RW Ultra Speed+ discs.
For the functions that can be used with different types of
discs, see the "Media Compatibility Table" on page 87.
ªª Writing to an already written CD-RW
With this unit, you do not need to erase a CD-RW
beforehand. You can use a previously written CD-RW by
erasing it at the beginning of the desired operation.
When creating an audio CD, the following message will
appear if you load an already written CD-RW disc.
Preparations before using CDs with
this unit
When using CDs with this unit, make the following
preparations.
• Before using a CD, change the recorder to
Multi Track mode. In modes other than
Multi Track, you cannot open the CD menu.
In Mixdown or Mastering mode, press the
MIXDOWN/MASTERING button repeatedly until the
unit switches to Multi Track mode.
In Bounce mode, press the BOUNCE button to switch
to Multi Track mode.
Open
the CD menu before inserting or ejecting a CD.
•
In order to prevent the sound of the CD drive being
operated during recording, for example, the power
to the drive is disabled when in modes other than CD
mode. For this reason, it is necessary to put the unit
into CD mode in order to load or eject a CD. Even in CD
mode, a CD cannot be loaded or ejected after being
loaded, unless the CD menu is open.
Since CDs are unmounted when screens other than the
CD menu are open, use the CD menu or CD PLAY/
IMPORT screen to load or eject a CD.
Confirmation message
Press the F2 (Yes) button to erase the data previously
recorded on the disc.
If you do not want to erase the CD-RW disc, press the F1
(NO) button. The disc tray will open slightly. Pull the tray
out and replace the disc with another one.
CAUTION
If you use Track At Once to write a master file to an
unfinalized CD-RW in audio CD format (a CD-RW created
by selecting a single master file on the MASTER WRITE
screen and setting FINALIZE to OFF), the file will be
added without showing the CD-RW erasure warning,
and it will not overwrite existing data on the disc.
Loading and ejecting CDs
Place the disc on the disc tray at the front of the unit.
1. When in Multi Track mode, press the CD button
to open the CD menu.
2. Press the F3 (-) button or the disc tray eject
button on the front panel to open the tray slightly.
Pull the tray out until it opens completely as shown
below.
80 TASCAM DP-32
14 - Using CDs
CAUTION
• Pull the tray out completely. If you try to load a disc
into the tray or remove a disc from it when it is not
open completely, the disc could be scratched, making
it unusable.
• Do not touch the writable (unlabeled) side of a disc.
Doing so could cause it to become dirty or scratched,
making it unusable.
Loading a CD
ªª When a disc is not properly loaded
Pull the tray out completely once, reload the disc properly
and push the tray closed again. (If you force the disc in,
the unit or the disc could be damaged.)
Ejecting a CD
1. When in Multi Track mode, press the CD button
to open the CD menu.
1. As shown in the illustration, hold the edge of the
disc with the label side up and put it into the tray
so that its central hole is on the round protrusion at
the center of the tray.
2. Press the F3 (-) button or the disc tray eject
button on the front panel to open the tray slightly,
and then pull the tray out until it opens completely.
Hold the disc by its edges and lift it out.
CAUTION
Do not lift the disc forcibly. Doing so could damage the
unit or the disc.
2. Press the disc gently near the center to set it on the
tray.
The disc should click into place and be level with the
tray.
3. Push the tray to close it. The tray will click when
shut.
TASCAM DP-32
81
14 - Using CDs
Forcing disc ejection
If the disc does not eject even when you press the F3 (-)
button while the CD menu is open or press the disc tray
eject button on the front panel due to a failure of the CD
drive, for example, you can eject the disc by using the
emergency eject button, which is accessed through a
small hole.
Before using the emergency eject function, turn the
power off (put it in standby), disconnect the AC adaptor
from the unit. Then, follow these procedures.
1. Prepare an extended paper clip or similar object.
2. Insert the paper clip into the hole and press the
emergency eject button a few times.
3. When the disc tray opens slightly, pull it out by
hand.
CAUTION
• Use this function only in an emergency. Normally,
remove the disc by the usual procedure. (See
"Ejecting a CD" above.)
• Never use the emergency ejection button to eject a
disc when power is ON.
Playing back an audio CD
1. Press the CD button to open the CD menu.
2. Load an audio CD.
3. Use the JOG/DATA dial to select (highlight blue)
PLAY/IMPORT and then press the F4 (t) button.
3 This shows the elapsed time from the beginning
of the track currently playing back.
4 These meters show the levels of the audio
recorded on the CD. The playback signal sent
from the CD to the MONITOR OUT and PHONES
jacks of this unit cannot be adjusted with the
STEREO fader.
4. When the CD PLAY/IMPORT screen is open, you
can use the JOG/DATA dial and other buttons to
control the CD player.
Button/dial
Description
JOG/DATA
STOP (8)
Select a track for playback.
PLAY (7)
Press when the CD player is stopped to
play the selected track.
REW (m)
(TO ZERO)
Skip to previous track when near the
beginning of a track. Return to the
beginning of the current track when in
the middle of a track.
F FWD (,)
(TO LAST REC)
STOP (8)
+ REW (m)
(TO ZERO)
F2 (4)
F3 (-)
F4 (t)
Stop the CD player.
Skip to the next track.
Skip to the first track on the CD and
stop.
Select a track to be imported.
Stop playback and open the disc tray.
Import tracks.
NOTE
During playback, selecting a track does not affect playback.
Stop playback and start again to play the selected track.
Creating an audio CD
The CD PLAY/IMPORT screen opens and the CD
drive works as a CD player.
1 This shows the number of the track currently
playing back.
2 This shows the track numbers and times.
You can use the JOG/DATA dial to change the
selected track. When the CD player is stopped,
press the PLAY (7) button to play back the
selected track.
82 TASCAM DP-32
You can create audio CDs that can be played back by
ordinary CD players using this unit by writing song master
files to CD-R and CD-RW discs. (See "Creating a master
file" on page 65.)
Use the following three methods to create audio CDs.
ªª Disc At Once (DAO)
Use Disc At Once to write multiple master files to a disc at
one time.
Since this method automatically finalizes the disc, making
it playable by an ordinary CD player, you will be able to
use the completed disc with other CD players right away.
(See "Finalizing a CD" on page 86.)
However, once DAO completes, you will not be able to
add any more tracks to the CD-R/CD-RW because it will
have been automatically finalized.
ªª Track At Once (TAO)
Use Track At Once to write a single master file at a time to
a CD-R/CD-RW.
Use this when you want to write files to a CD-R/CD-RW at
different times.
14 - Using CDs
With TAO, the CD-R/CD-RW is not automatically finalized.
Note that even though an unfinalized CD-R/CD-RW can
be played in this unit, it cannot be played by ordinary CD
players.
After you have written all the master files to a disc that
you want using TAO, finalize the disc. (See "Finalizing a
CD" on page 86.)
You cannot add more tracks to a CD-R/CD-RW that has
been finalized.
ªª LIVE WRITER function
You can use marks to divide a master file into multiple
parts, and write them as multiple tracks to a disc.
Using Disc At Once
Use Disc At Once when you have selected multiple tracks.
Using DAO, you can set the order of multiple tracks as you
like. Moreover, you can set the length of silent pauses and
add them between songs.
NOTE
When using DAO, you can also make multiple discs with the
same contents. When doing so, use identical discs (same
manufacturer, type and capacity).
1. When in Multi Track mode, press the CD button
to open the CD menu.
2. Place a blank CD (unused CD-R/CD-RW disc or a
completely erased CD-RW) on the disc tray.
3. Use the JOG/DATA dial to select (highlight blue)
MASTER WRITE and then press the F4 (t) button.
This opens the MASTER WRITE screen that shows a
list of songs that have recorded master files.
NOTE
To remove the check mark 4 from a check box, press the
F2 (4) button again while the song is selected (highlighted
blue).
5. Repeat step 4 above as necessary.
6. To use noise shaped dithering, press the F3 (NSD)
button to check (4) the box.
7. After you finish selecting songs, press the F4 (t)
button.
The WRITE SONG LIST screen opens. On this
screen, you can change the order that the master files
will be written to the CD-R/CD-RW and set the length
of the gaps between them.
8. To change the song order, press the F2 (ORDER)
button to open the WRITE SONG ORDER screen
(song order change screen).
9. Use the JOG/DATA dial or the CURSOR (5/b)
buttons to select (highlight blue) the song that you
want to put in different order, and then press the
F2 (MOVE) button.
4 appears before the song name.
4. Use the JOG/DATA dial to select (highlight blue)
songs which you want to write to CD-R/CD-RW, and
press the F2 (4) button to select the desired songs
(selected songs have check marks 4 in the boxes
next to them).
TASCAM DP-32
83
14 - Using CDs
10.Use the JOG/DATA dial to change the song position.
Press the F2 (SELECT) button to confirm.
To change the order of multiple songs, repeat the
steps 9 and 10 above.
11.When the song order is as you want, press the F1
(g) button to return to the WRITE SONG LIST
screen.
12.To change the gap between the songs, press the F3
(GAP) button.
The WRITE SONG GAP screen opens.
13.Use the CURSOR (5/b) buttons to select (highlight
blue) the song for which you want to change the
length of the gap that follows it, and then use the
JOG/DATA dial to set the gap length.
The song gap can be set between 0.0 to 9.9 seconds,
in 0.1-second units.
NOTE
To change the gap between multiple songs, repeat step 13
above.
14.You can also press the F2 (ALL) button to set all
gaps at once.
17.When the confirmation message appears, press the
F2 (YES) button to confirm.
CD-R/CD-RW writing starts.
NOTE
If you want to cancel the writing, press the F1 (NO) button to
return to the WRITE SONG LIST screen.
18.When writing completes, a message appears
asking whether you want to write another CD-R/
CD-RW with the same contents.
If you want to burn another CD-R/CD-RW with the
same contents, press the F2 (YES) button. If you
do not want to burn another disc, press the F1 (NO)
button.
Using Track At Once
When using Track At Once, after one track is written, a
two-second gap is added after it.
1. When in Multi Track mode, press the CD button
to open the CD menu.
2. Place a blank CD (unused CD-R/CD-RW disc or a
completely erased CD-RW) on the disc tray.
NOTE
If you put a CD-R/CD-RW that has been used previously to
write tracks using Track At Once and has not been finalized,
you can add another track to it. In this case, no pop-up
window to confirm erasure of the CD-RW appears.
3. Use the JOG/DATA dial to select (highlight blue)
MASTER WRITE and then press the F4 (t) button.
Use the JOG/DATA dial to set the gap between the
songs.
Press F2 (SET) to confirm the setting and return to the
WRITE SONG GAP screen.
15.Once you have completed setting the gap
lengths, press the F1 (g) button to return to the
WRITE SONG LIST screen.
16.
After you have finished changing the song order
and song gap settings, press the F4 (t) button.
84 TASCAM DP-32
14 - Using CDs
This opens the MASTER WRITE screen that shows a
list of songs that have recorded master files.
Using LIVE WRITER
1. When in Multi Track mode, press the CD button
to open the CD menu.
2. Place a blank CD (unused CD-R/CD-RW disc or a
completely erased CD-RW) on the disc tray.
3. Use the JOG/DATA dial to select (highlight blue)
LIVE WRITER and then press the F4 (t) button.
4. Use the JOG/DATA dial to select (highlight blue)
only one song to write to the CD-R/CD-RW, and
then press the F2 (4) button.
A check mark 4 appears in the box next to the
selected song.
This opens the LIVE WRITER screen where you can
divide master files at mark points.
NOTE
To remove a check mark 4 from a box, press the F2 (4)
button again while the song is selected (highlighted blue).
5. To use noise shaped dithering, press the F3 (NSD)
button to check (4) the box.
6. Press the F4 (t) button.
A pop-up window appears asking whether you want
to finalize the disc when the writing completes.
At this time, if no master file has been created or no
mark has been set, a messages appears.
4. To use noise shaped dithering, press the F3 (NSD)
button to check (4) the box.
5. The column for TRACK 1 shows the song name,
the columns for TRACK 2 and after show the mark
name.
Press the F4 (t) button and the following
confirmation message will appear.
TIP
Finalize the disc if you do not plan to add any more tracks to
the CD-R/CD-RW. (See "Finalizing a CD" on page 86.)
7. To finalize, use the JOG/DATA dial to select ON,
otherwise, select OFF, and then press the F4 (t)
button again (default: OFF).
The confirmation message shown below appears.
6. Press the F2 (YES) button to begin writing to the
CD-R/CD-RW.
8. Press the F2 (YES) button to begin writing to the
CD-R/CD-RW.
TASCAM DP-32
85
14 - Using CDs
Finalizing a CD
Importing songs from audio CDs
If you do not plan to write any more songs to a CD-R/CDRW using Track At Once, finalize it so that it can be played
on a regular CD player.
1. When in Multi Track mode, press the CD button
to open the CD menu.
2. Load the CD-R/CD-RW that you want to finalize.
3. Use the JOG/DATA dial to select (highlight blue)
FINALIZE and then press the F4 (t) button.
You can import tracks (songs) from an audio CD to the
AudioDepot folder.
1. When in Multi Track mode, press the CD button
to open the CD menu.
2. Load the audio CD on the disc tray.
3. Use the JOG/DATA dial to select (highlight blue)
PLAY/IMPORT and then press the F4 (t) button.
A finalize confirmation message appears.
4. Press the F2 (YES) button to finalize the disc.
NOTE
• Note that unfinalized CD-R/CD-RWs cannot be played in
ordinary CD players.
• You cannot add tracks to a disc that has been finalized.
The CD PLAY/IMPORT screen opens.
4. Use the JOG/DATA dial to select the tracks that you
want to import and confirm them with the F2 (4)
button, and then press the F4 (t) button to show a
list of the tracks to be imported. If the tracks in the
list are okay, press the F4 (t) button again to start
importing.
5. When a confirmation message appears, press the
F2 (YES) button to confirm.
After the tracks have been imported from the audio
CD, the CD PLAY/IMPORT reopens.
86 TASCAM DP-32
14 - Using CDs
Erasing a CD-RW
Follow these procedures to erase the songs recorded on a
CD-RW disc.
1. When in Multi Track mode, press the CD button
to open the CD menu.
2. Load the CD-RW that you want to erase.
3. Use the JOG/DATA dial to select ERASE and then
press the F4 (t) button.
Media Compatibility Table
Audio CD
playback
and import
Commercially-available
standard CDDA format CD
OK
Finalized standard CDDA
format CD-R/CD-RW (made by
this player)
OK
Finalized standard CDDA
format CD-R/CD-RW (made by a
device other than this player)
A confirmation message appears.
4. Press the F2 (YES) button to begin erasing the CDRW.
After the disc is erased, the CD menu reopens.
CAUTION
This operation erases the entire CD-RW. Erased data
cannot be restored. Confirm that you will not lose
important data before erasing a disc.
Audio CD
writing
–
Unfinalized standard CDDA
format CD-R/CD-RW (made by
this player)
OK
OK
Unfinalized standard CDDA
format CD-R/CD-RW (made by a
device other than this player)
N
N
Commercially-available CD in
a format other than standard
CDDA (protected CD, DATA CD,
enhanced CD, etc.)
–
Non-standard CDDA format
CD-R/CD-RW (DATA CD,
enhanced CD, etc.)
–
Blank High-Speed CD-R/CD-RW
Ultra-Speed CD-RW
OK
N
N
OK: Compatible
–: Operation not assured
N: Not compatible
NOTE
CD-R discs cannot be erased.
TASCAM DP-32
87
15 – Troubleshooting
When working with this unit, if something is not working as you expect it should or if you experience any other difficulties,
please refer to this troubleshooting section first. It contains the most common troubles, their probable causes and
corrective measures. In addition, see the "Messages" chapter starting on page 89 for the meaning of messages that may
appear on the display. Consult this table if a message appears when an operation cannot be completed by the unit.
The SD card is not recognized.
• Confirm that the SD card is completely inserted.
Why can't I hear any sound when I play back?
• Are the track faders of the tracks set to a proper level?
• Is the STEREO fader set to a proper level?
• Have you connected the PHONES or MONITOR
OUT jacks to your headphones or monitoring system
properly?
Is your monitoring system set up correctly?
• Is the MONITOR LEVEL knob set to a proper level?
(PHONES jack only)
The sound I am trying to record sounds distorted.
• Are the INPUT A to H TRIM knobs on the top of the
unit set too high?
Is the input source too loud?
• Is the monitoring system distorted because the
monitoring level is too high?
Why can't I record?
• You must have at least one track in recording standby
(REC indicator flashing) before you can start recording
by pressing the RECORD (0).
Are
input sources assigned to tracks? (See "Assigning
•
inputs" on page 40.)
Noise occurs if I connect a passive guitar or bass
directly.
• Connecting another device to the unit's STEREO OUT
jacks might reduce the noise.
• This might be caused by interference from another
device. If there is a power amplifier or other device
that uses a large transformer, a fluorescent light or
something similar nearby, you might be able to reduce
the noise by changing the distance and orientation of
this unit in relation to such equipment.
• You might also be able to noise if you use this unit's
GROUND connector to ground the unit.
88 TASCAM DP-32
The disc tray does not open.
• The disc tray will not open unless CD mode is active
(CD screen or its CD menu open). Put the recorder into
Multi Track mode, press the CD button to open
the CD menu, and then press the F3 (-) button or the
disc eject button on the front panel.
An audio CD that I made cannot be played on a CD
player.
• Did you finalize the audio CD?
An audio CD that has not been finalized cannot be
played on an ordinary CD player. Finalize the CD and
try again. (You cannot record on the CD any more after
finalizing it.)
• Are you trying to play a CD-RW disc on a CD player that
does not support CD-RW discs?
Use a compatible CD player or create a new audio CD
using a CD-R disc. (Some CD players cannot play back
CD-R discs either.)
I cannot or fail to create an audio CD.
• Are you using a blank CD (CD-R/CD-RW) that is
supported by this unit?
This unit does not support Ultra-Speed or Ultra-Speed+
CD-RW discs.
• Depending on the manufacturer and type of CD-R/CDRW, writing might fail, writing might succeed but result
in an unreadable disc, or writing might take a long
time. In any of these cases, try using a CD-R/CD-RW
from a different manufacturer or of a different brand.
16 – Messages
General messages
The following list shows messages that could appear during the use of this unit.
These messages alert you to conditions that might arise while you are using the unit. Consult the table below if you see
something you do not understand or if you want to know how to solve a problem.
Message
Description and remedy
Can not Import
This pop-up appears when the sample frequency or bit rate of the selected file in the AUDIO DEPOT
IMPORT menu differs from the current song.
Cannot Clear
Current
The current track cannot be deleted.
A virtual track assigned to a physical track cannot be deleted.
Card Error
The card could not be recognized properly. Replace the card.
Card Full
The card has no remaining capacity. Erase unnecessary files or move them to your computer to make
open space.
Empty Export
Track
You tried to export a track that does not contain any recording data.
This pop-up appears if you try to export a song track that does not contain a recording. (See "Exporting
tracks" on page 79.)
Export a song track that has a recording.
Export File
Too Big
The track to be exported exceeds the available capacity on the SD card.
You have tried to export a track to the AudioDepot folder, but the size is too large for the remaining
space on the SD card.
Delete unnecessary songs or files from the AudioDepot folder to create more space on the SD card, then
try to export the track again.
File Not Found
The file to be imported could not be found.
You tried to import a WAV file from the AudioDepot folder, but there are no WAV files in it. (See
"Importing tracks" on page 78.)
Connect the unit to a computer and transfer files that you want to import from the computer to the
AudioDepot folder of the unit.
Format Error
Format CARD
The formatting of the card is abnormal or corrupted. This message also appears if you used a computer
connected via USB to format the card in FAT format and if an unformatted card is inserted in the unit.
Always use the DP-32 to format cards to be used with it. Replace the card or format it using the FORMAT
menu.
FAT formatting erases all data currently on the card.
I/O Too Short
The interval between IN and OUT points is too short.
You tried to use repeat mode, but the time between the IN and OUT points is too short.
Import Failed
Export Failed
Importing or exporting failed.
Import File
Too Large
The size of file to be imported is too large.
You tried to import a WAV file from the AudioDepot folder that is too large for the remaining space on
the SD card. Free up some space in the AudioDepot folder by deleting unnecessary songs, and try again.
In Bounce Mode
Bounce mode is active.
You tried to perform an action that is not possible while in Bounce mode.
In Master Mode
Mastering mode is active.
You tried to perform an action that is not possible while in Mastering mode.
In Punch Mode
Auto punch mode is active.
You tried to perform an action that is not possible while in auto punch mode.
In Repeat Mode
Repeat playback mode is active.
You tried to perform an action that is not possible while in repeat playback mode.
Invalid Card
The inserted SD card is in a format the cannot be used by this unit.
Insert another SD card after turning off the unit, or format the card using FORMAT on the MENU screen.
Invalid Card
Change Card
Something might be wrong with the card. Replace the card.
Mark Full
It is not possible to add more location marks.
You tried to store more than 99 location marks in a song. (See "Location marks" on page 51.)
Delete some location marks and try again.
Master File
Not Found
A master file could not be found.
This message appears if you try to enter Mastering mode, but you have not made any mixdown
recording yet. First make a mixdown recording.
TASCAM DP-32
89
16 – Messages
Master Track
Too Large
The master file is too large.
You tried to create a master file that is larger than the remaining open space on the SD card.
To make more space, format the SD card (see "Quick formatting an SD card" on page 74 and "Full
formatting an SD card" on page 75), delete unnecessary files or connect the unit to a computer to
transfer (and then delete) files.
MBR Error
Init CARD
The formatting of the card is abnormal or corrupted.
Replace the card or format the card using the FORMAT menu.
Formatting erases all data currently on the card.
No Card
No SD card is in the unit. Load a recordable SD card.
No Armed Track
There is no track in recording standby (armed).
You tried to enter auto punch mode or pressed the RECORD button when no tracks were in recording
standby. (See "Automatic punching in and out" on page 54.)
Put a track into recording standby before pressing RECORD or activating auto punch.
No Undo History
There is no undo history.
There are no actions to be undone. (See "Undoing an operation" on page 47.)
Not Stopped
The recorder transport is not stopped.
When the recorder is not stopped, this message appears if you press a button, such as UNDO/REDO,
that works only when the recorder is stopped.
Now Recording
The unit is recording.
This message appears when you try to operate a menu while the unit is recording.
Some other operations are also not allowed during recording.
OUT point must
be set after
the IN point.
You cannot set the OUT point before the IN point.
Set the OUT point after the IN point.
Protected Card
The inserted SD card is write-protected.
To record or edit, turn off the unit and unlock the write-protection on the SD card.
Recorded Track
Not Found
When trying to use the export function, no recordings were found on the current song's tracks.
No tracks have been recorded in the current song, or virtual tracks with recordings have not been
assigned to physical tracks.
Select a recorded song, assign the track you want to export to a physical track, and then export it. (See
"Virtual tracks" on page 56.)
Revert to
discard changes.
Edits and changes made since the song was loaded will be cleared, and the song will be reset to status it
had when loaded. Proceed only when you are sure you wish to discard all changes.
Same Track
The same track has been specified.
This message appears when using the clone track function if the source track is also set as the
destination track.
Song Protected
The song is protected.
You are trying to change (record, edit, etc.) a protected song. (See "Protecting songs" on page 38.)
Unprotect the song.
All the stereo tracks already have recordings.
Stereo Track Full This message appears if you try to import a stereo file when all the stereo tracks in the song already
have recordings, even if some mono tracks are still open.
Track Full
All the tracks already have recordings.
This message appears if you try to import a file when all tracks in the song already have recordings. (See
"Importing tracks" on page 78.)
Trk Edit Fail
Track editing failed.
Save the song, turn the unit off and on again, and then try the track edit one more time.
Trk Too Short
The track is too short.
You are trying to record in mixdown mode, but the time between the IN and OUT points is too short.
The IN and OUT points must be at least 4 seconds apart. (See "Setting IN/OUT points" on page 53.)
Turn off the
Guitar Effect or
use two or less
Dynamic Effects.
While using a guitar effect, the use of dynamic effects is limited to one or two channels. To use dynamic
effects on three or more channels, turn the guitar effect OFF.
Work Memory Full
The working memory is full.
Even if the SD card has enough remaining space, this error could occur if you perform many editing
operations. You may be able to continue to work after executing the DELETE UNUSED item in the
SONG menu to increase the amount of available working memory. (See "Undoing an operation" on
page 47.)
90 TASCAM DP-32
16 – Messages
Audio Rst Fail
Device Error
File Error
No CD Drive
Not Continued
Remote Cmd
Remote Rx
Sys Rom Err
System Err 50
System Error 1
System Error 2
If any of these errors occur, turn the unit's power off and restart it.
If these error messages continue to appear, please contact a TEAC Service Center.
System Error 3
System Error 4
System Error 5
System Error 6
System Error 7
System Error 8
System Error 9
Writing Failed
CD mode messages
The following pop-up messages appear when the unit is in CD mode (when the CD menu or one of its submenus is open).
Refer to this chart when you want to understand the meaning of these messages and how you should respond to them.
Message
Description and remedy
Blank CD
Insert CD-RW A blank CD has been inserted. Insert a CD-RW that is not blank.
This message appears when the ERASE item of the CD menu is used, but the set disc is blank. There is no
need to erase the inserted CD-RW.
Blank CD
Insert Opened CD
A blank CD has been inserted. Insert an unfinalized CD-R/CD-RW.
This message appears when the FINALIZE item of the CD menu is used, but the set disc is blank.
Insert a CD-R/CD-RW that you want to finalize.
Finalized CD
Insert CD-RW
A finalized CD-RW has been inserted. Insert an unfinalized CD-RW.
This message appears when the ERASE item of the CD menu is used, but the set disc is a finalized CD-R/
CD-RW.
Only CD-RW discs can be erased.
Finalized CD
Insert Opened CD
A finalized CD-R/CD-RW has been inserted. Insert an unfinalized CD-R/CD-RW.
This message appears when the FINALIZE item of the CD menu is used, but the set disc is an already
finalized CD-R/CD-RW.
This CD-R/CD-RW does not need to be finalized.
Import File
Too Big
The size of file to be imported is too large.
When using the CD PLAY/IMPORT item of the CD menu, the size of the file to be imported exceeds the
free space on the SD card.
Create more free space on the SD card by erasing the undo operation history, for example, to open
enough space to import the file.
Invalid CD
Insert Blank CD
An invalid CD-R/CD-RW has been inserted. Insert a blank CD.
You tried to write to a CD-R/CD-RW using the MASTER WRITE or CD BACKUP items in the CD menu, but
inserted a CD-R/CD-RW that is not blank. (When using Track At Once, this message also appears if a
finalized CD-R/CD-RW is set.)
Insert a blank CD.
Not Erasable
Insert CD-RW
A disc other than a CD-RW has been inserted.
This message appears when the ERASE item of the CD menu is used, but the set disc is a CD-R.
Insert a CD-RW that you want to erase.
Invalid CD
Insert Opened CD
An invalid CD-R/CD-RW has been inserted. Insert an unfinalized CD-R/CD-RW.
This message appears when the FINALIZE item of the CD menu is used, but a CD-R/CD-RW that cannot
be finalized has been inserted.
Insert a CD-R/CD-RW that you want to finalize.
TASCAM DP-32
91
16 – Messages
No disc
Insert Blank CD
There is no CD-R/CD-RW inserted. Insert a blank CD.
There is no CD-R/CD-RW loaded in the disc tray, but you tried to write to a CD-R/CD-RW with the
MASTER WRITE item of the CD menu.
Insert a blank CD and close the disc tray.
No disc
Insert Opened CD
There is no CD-R/CD-RW inserted. Insert an unfinalized CD-R/CD-RW.
There is no CD-R/CD-RW in the CD tray, but you tried to use the FINALIZE item of the CD menu.
No Room On CD
You tried to write an amount of data that exceeds the CD-R/CD-RW capacity.
You selected a master file to be written to the CD-R/CD-RW using the MASTER WRITE item of the CD
menu, but the total size of that file exceeds the remaining capacity of the loaded CD-R/CD-RW.
Change or erase the disc or use a smaller master file.
Not Audio CD
Insert Audio CD
You loaded a CD that is not an audio CD. Insert an audio CD.
This message appears when you try to use the CD-DA IMPORT item of the CD menu to import audio if
the loaded CD is not an audio CD.
Not Blank
Insert Blank CD
An unfinalized CD-R/CD-RW has been inserted. Insert a blank CD.
This message appears when you try to create an audio CD with Disc At Once, but an unfinalized CD-R/
CD-RW written with Track At Once has been loaded.
Either insert a blank CD or write with Track At Once.
CD-related error messages
If you experience a problem while reading or writing a CD, you may see one of the following error messages.
When one of the messages is displayed, press the HOME button to exit the CD menu, then check the disc, and retry the
operation.
Message
Description and remedy
CD Read Error An error occurred during the execution of a CD menu FINALIZE, CD-DA IMPORT or ERASE operation.
CD Write Error An error occurred during the execution of a CD menu FINALIZE or ERASE operation.
Erase Error An error occurred during the execution of a CD menu ERASE operation.
Finalize Error
An error occurred during the execution of a CD menu FINALIZE operation.
Import Error An error occurred during the execution of a CD menu CD-DA IMPORT operation.
Media Error
An error occurred during the execution of a CD menu CD PLAYER operation.
Writing Failed
An error in CD-R/CD-RW writing occurred during the execution of a CD menu MASTER WRITE operation.
92 TASCAM DP-32
17 – Specifications
Ratings
Recording media
SD card (512 MB to 2 GB)
SDHC card (4 GB to 32 GB)
File system
SD card (512 MB to 2 GB): FAT16
SDHC card (4 GB to 32 GB): FAT32
Input/output ratings
Analog audio input/output ratings
INPUT A to H jack
• XLR type (Balanced)
Connector: XLR-3-31 (1: GND, 2: HOT, 3: COLD)
Input impedance: 2.4 kΩ
Rated input level: –14 dBu
Maximum input level: +2 dBu
• Standard jack type (Balanced)
Connector: 6.3 mm (1/4") TRS standard jack
Input impedance:
Above 22 kΩ
1 MΩ (INPUT H only, when LINE-GUITAR switch is
set to GUITAR)
Rated input level: +4 dBu
Maximum input level: +20 dBu
STEREO OUT jack
Connector: RCA pin jack
Rated output level: –10 dBV
Maximum output level: +6 dBV
Output impedance: 200 Ω
EFFECT SENDS jack
Connector: 6.3 mm (1/4") TS standard jack
Rated output level: –10 dBV
Maximum output level: +6 dBV
Output impedance: 200 Ω
MONITOR OUT jack
Connector: 6.3 mm (1/4") TRS standard jack
Rated output level: –2 dBu
Maximum output level: +14 dBu
Output impedance: 200 Ω
PHONES jack
Connector: 6.3 mm stereo jack
Maximum output level: 70 mW+70 mW or more
(THD+N 0.1% or less, 32 Ω load)
Control input/output ratings
MIDI input (MIDI IN)
Connector: 5-pin DIN
Format: Standard MIDI format
MIDI output (MIDI OUT)
Connector: 5-pin DIN
Format: Standard MIDI format
USB port
Connector: USB 4-pin mini-B type
Format: Mass Storage Class USB 2.0 HIGH SPEED
REMOTE jack
Connector: 2.5 mm TRS jack
Audio performance
Frequency response
INPUT (MIC/LINE) q STEREO OUT/EFFECT SENDS/
MONITOR OUT: 20 Hz to 20 kHz, +1 dB/–1 dB
Distortion
INPUT (MIC/LINE) q STEREO OUT/EFFECT SENDS/
MONITOR OUT: 0.01% or less
S/N ratio
INPUT (MIC/LINE) q STEREO OUT/EFFECT SENDS/
MONITOR OUT: 90 dB or more
Operating requirements
See the TASCAM website (http://www.tascam.com/) for
updated information about OS compatibility.
Windows
Pentium 300 MHz or faster
128 MB or more memory
USB port (USB 2.0 recommended)
Macintosh
Power PC, iMac, G3, G4 266 MHz or faster
64 MB or more memory
USB port (USB 2.0 recommended)
Recommended USB host controller
Intel chipset
Supported OS
Windows: Windows XP, Windows Vista, Windows 7
Macintosh: Mac OS X 10.2 or later
TASCAM DP-32
93
17 – Specifications
General
Power supply
AC adaptor (TASCAM PS-1225L)
Power consumption
12 W (Phantom power ON)
Dimensions
514 x 104 x 340 mm (Width x Height x Depth, excluding projections)
Weight
6.2 kg/13.67 lb
Operating temperature range
5 to 35ºC/41 to 95ºF
340mm
Dimensional drawings
514mm
* Illustrations in this manual may differ from the actual product.
* In order to improve the product, specifications and appearance could be changed without prior notice.
94 TASCAM DP-32
104mm
17 – Specifications
TRACK 1-32
INPUT A-H
DP-32 Mixer Block Diagram
Block diagram
TASCAM DP-32
95
17 – Specifications
Level diagram
96 TASCAM DP-32
18 – Appendix
MIDI Control Change message
When the DP-32 receives MIDI Control Change messages from an external device (such as a sequencer), they can control
the DP-32 mixer and effect parameters.
Mixer control change parameters
Select a channel group of 8 track/input channels beforehand.
The Bank Select message is used with the MIDI channel 15 to select a channel group.
• Bank 0: track channels 1 to 8
• Bank 1: track channels 9 to 16
• Bank 2: track channels 17 to 24
• Bank 3: track channels 25 to 32
• Bank 4: input channels A to H
The following table shows the variable range of mixer parameter and mapping to the MIDI Control Change.
MIDI Channel
Control Change
Number
1-8
16
Track/Input Channel
Parameter
Stereo Master
Values
7
Internal Level
0 - 127 (0=–∞dB, 105=0dB, 127=+6dB)
10
Pan
1 - 64 - 127=L63 - C (center) - R63
0 - 127 (–∞ - 0dB)
11
DigitalTrim
0 - 48 (–42 - +6dB)
16
Low Freq
0 - 31=
32, 40, 50, 60, 70, 80, 90, 100, 125, 150, 175, 200, 225, 250,
300, 350, 400, 450, 500, 600, 700, 800, 850, 900, 950, 1.0k,
1.1k, 1.2k, 1.3k, 1.4k, 1.5k, 1.6k (Hz)
17
Low Gain
0 - 24=–12 - +12 (dB)
18
Mid Freq
0 - 63=
32, 40, 50, 60, 70, 80, 90, 100, 125, 150, 175, 200, 225, 250,
300, 350, 400, 450, 500, 600, 700, 800, 850, 900, 950, 1.0k,
1.1k, 1.2k, 1.3k, 1.4k, 1.5k, 1.6k, 1.7k, 1.8k, 1.9k, 2.0k, 2.2k,
2.4k, 2.6k, 2.8k, 3.0k, 3.2k, 3.4k, 3.6k, 3.8k, 4.0k, 4.5k, 5.0k,
5.5k, 6.0k, 6.5k, 7.0k, 7.5k, 8.0k, 9.0k, 10k, 11k, 12k, 13k, 14k,
15k, 16k, 17k, 18k (Hz)
19
Mid Gain
0 - 24=–12 - +12 (dB)
20
Mid Q
0 - 6=0.25, 0.5, 1, 2, 4, 8, 16
21
High Freq
32 - 63=
1.7k, 1.8k, 1.9k, 2.0k, 2.2k, 2.4k, 2.6k, 2.8k, 3.0k, 3.2k, 3.4k,
3.6k, 3.8k, 4.0k, 4.5k, 5.0k, 5.5k, 6.0k, 6.5k, 7.0k, 7.5k, 8.0k,
9.0k, 10k, 11k, 12k, 13k, 14k, 15k, 16k, 17k, 18k (Hz)
22
High Gain
0 - 24=–12 - +12 (dB)
23
EFFECT1 Level
0 - 127 (0=–∞dB, 127=0dB)
EFFECT1 Level
24
EFFECT2 Level
0 - 127 (0=–∞dB, 127=0dB)
EFFECT2 Level
80
EQ SW
0, 1=OFF, ON
81
EFFECT1 Position
0, 1, 2=OFF, PRE, POST
82
EFFECT2 Position
0, 1, 2=OFF, PRE, POST
TASCAM DP-32
97
18 – Appendix
MIDI Program Change message
When the DP-32 receives MIDI Program Change messages,
it can call settings from the effect libraries.
The Bank Select message of MIDI Control Change is used
to select presets and users of the effect libraries.
Different MIDI Channels are applied for each item.
MIDI
Channel
Parameter Function
Preset libraries of the send effects
Program Change
Value
1 - 8*
Recalling the dynamic
effect type
Bank 0 (Type): 0 - 3
10
Calling from the send
effect library
Bank 0 (Preset): 0 - 6
Bank 1 (User): 0 - 9
11
Calling from the guitar
effect library
Bank 0 (Preset): 0 - 9
Bank 1 (User): 0 - 9
* The Bank Select message of MIDI Control Change is used
with the MIDI channel 14 to select a channel group for
the dynamic effect.
• Bank 0: track channels 1 to 8
• Bank 1: track channels 9 to 16
• Bank 2: track channels 17 to 24
• Bank 3: track channels 25 to 32
• Bank 4: input channels A to H
The following tables show the preset libraries of each
effect.
•
•
•
•
Display
COMP
CMP
1
NOISE SUPRESSOR
NSP
2
DE-ESSER
DSR
3
EXCITER
EXC
CMP: Compressor
DSR: De-Esser
EXC: Exciter
NSP: Noise Suppressor
98 TASCAM DP-32
0
HALL
REV
1
ROOM
REV
2
LIVE
REV
3
STUDIO
REV
4
PLATE
REV
5
CHORUS
CHO
6
STEREO DLY
DLY
Preset libraries of the guitar effects
Program Change
Effect type
0
Effect type
• REV: Reverb
• DLY: Delay
• CHO: Chorus
Dynamic effects
Program Change
Display
•
•
•
•
•
•
•
Display
Effect type
0
PRESET 01
AMP, CMP, DLY
1
PRESET 02
AMP, CHO
2
PRESET 03
AMP
3
PRESET 04
AMP, CMP, DLY
4
PRESET 05
AMP, FLG
5
PRESET 06
AMP, CMP
6
PRESET 07
AMP, CMP, CHO
7
PRESET 08
AMP, CMP, PHA
8
PRESET 09
AMP
9
PRESET 10
AMP, CMP, WAH
AMP: Amplifier
CMP: Compressor
FLG: Flanger
PHA: Phaser
CHO: Chorus
WAH: Wah
DLY: Delay
18 – Appendix
MIDI Implementation Chart
Function
Basic Channel
Mode
Note Number
Velocity
Transmitted
Default
1 - 16
1 - 16
Changed
×
1 - 16
Default
×
Mode 3
Messages
×
×
Altered
*******
True Voice
0 - 127
0 - 127
*******
0 - 127
Note On
×
×
Note Off
×
×
Pitch Bend
×
0, 32
Control Change
Program Change
Recognized
×
*1
*2
System Real Time
Others
EFF Bank, CH Bank
7, 10, 11
Mix Level, Pan, DigitalTrim
16-22
Mix Eq
23-28
Mix Send
EQ SW, EFF1 Posi, EFF2 Posi
80, 81, 82
6, 38
×
×
96, 97
×
×
98, 99
×
×
×
True #
*******
0 - 127
System Exclusive
System Common
Remarks
*5
Quarter Frame
*3
Song Position
*4
×
Song Select
×
×
Tune
×
×
×
Clock
Commands
*4
×
Local On/Off
×
×
All Notes Off
×
×
Active Sense
×
×
Reset
×
×
When REMOTE is set to MASTER
*2
When REMOTE is set to SAVE
*3
When GENERATOR is set to MTC
*4
When GENERATOR is set to CLOCK
*5
When MMC is set to MASTER or SLAVE, RP version 1.00 (T, R): MIDI full timecode message is T when
GENERATOR is set to MTC.
*1
Notes
Mode 1: OMNI ON, POLY
Mode 2: OMNI ON, MONO
Mode 3: OMNI OFF, POLY
Mode 4: OMNI OFF, MONO
: YES / ×: NO
TASCAM DP-32
99
18 – Appendix
Bit-map array of MMC commands
Byte
Bit7
Bit6 (40H)
Bit5 (20H)
Bit4 (10H)
Bit3 (08H)
Bit2 (04H)
Bit1 (02H)
Bit0 (01H)
c0
–0
(06)
RECORD
STROBE
(05)
REWIND
(04)
FAST
FORWARD
(03)
DEFERRED
PLAY
(02)
PLAY
(01)
STOP
(00)
reserved
c1
–0
(0D)
MMC
RESET
(0C)
COMMAND
ERROR RESET
(0B)
CHASE
(0A)
EJECT
(09)
PAUSE
(08)
RECORD
PAUSE
(07)
RECORD
EXIT
c2
–0
(14)
(13)
(12)
(11)
(10)
(0F)
(0E)
c3
–0
(1B)
(1A)
(19)
(18)
(17)
(16)
(15)
c4
–0
–0
–0
–0
(1F)
(1E)
(1D)
(1C)
c5
–0
(26)
(25)
(24)
(23)
(22)
(21)
(20)
c6
–0
(2D)
(2C)
(2B)
(2A)
(29)
(28)
(27)
c7
–0
(34)
(33)
(32)
(31)
(30)
(2F)
(2E)
c8
–0
(3B)
(3A)
(39)
(38)
(37)
(36)
(35)
c9
–0
–0
–0
–0
(3F)
(3E)
(3D)
(3C)
c10
–0
(46)
SEARCH
(45)
VARIABLE
PLAY
(44)
LOCATE
(43)
UPDATE
(42)
READ
(41)
MASKED
WRITE
(40)
WRITE
c11
–0
(4D)
ADD
(4C)
MOVE
(4B)
MTC
COMMAND
(4A)
GENERATOR
COMMAND
(49)
ASSIGN
SYS, MAS
(48)
STEP
(47)
SHUTTLE
c12
–0
(54)
DEFERRED
VARI, PLAY
(53)
COMMAND
SEGMENT
(52)
GROUP
(51)
EVENT
(50)
PROCEDURE
(4F)
DROP FR
ADJUST
(4E)
SUBTRACT
c13
–0
(5B)
(5A)
(59)
(58)
(57)
(56)
(55)
REC STROBE
VARIABLE
c14
–0
–0
–0
–0
(5F)
(5E)
(5D)
(5C)
c15
–0
(66)
(65)
(64)
(63)
(62)
(61)
(60)
c16
–0
(6D)
(6C)
(6B)
(6A)
(69)
(68)
(67)
c17
–0
(74)
(73)
(72)
(71)
(70)
(6F)
(6E)
c18
–0
(7B)
(7A)
(79)
(78)
(77)
(76)
(75)
c19
–0
–0
–0
–0
(7F)
RESUME
(7E)
(7D)
(7C)
WAIT
100 TASCAM DP-32
Note
TASCAM DP-32
101
Note
102 TASCAM DP-32
Note
TASCAM DP-32
103
DP-32
TEAC CORPORATION
Phone: +81-42-356-9143
1-47 Ochiai, Tama-shi, Tokyo 206-8530, Japan
http://tascam.jp/
TEAC AMERICA, INC.
http://tascam.com/
TEAC CANADA LTD.
http://tascam.com/
Phone: +1-323-726-0303
7733 Telegraph Road, Montebello, California 90640 USA
Phone: +1905-890-8008 Facsimile: +1905-890-9888
5939 Wallace Street, Mississauga, Ontario L4Z 1Z8, Canada
TEAC MEXICO, S.A. de C.V.
http://www.teacmexico.net/
Phone: +52-55-5010-6000
Río Churubusco 364, Colonia Del Carmen, Delegación Coyoacán, CP 04100, México DF, México
TEAC UK LIMITED
http://www.tascam.co.uk
Phone: +44-8451-302511
Suites 19 & 20, Building 6, Croxley Green Business Park, Hatters Lane, Watford, Hertfordshire, WD18 8TE, UK
TEAC EUROPE GmbH
http://www.tascam.de/
Phone: +49-611-71580
Bahnstrasse 12, 65205 Wiesbaden-Erbenheim, Germany
Printed in China