1
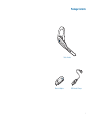
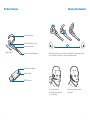
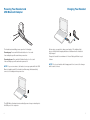
Plantronics® Calisto™ Headset
with Bluetooth® USB Adapter
User Guide
56-A11A-10511
Table of Contents
Package Contents........................................................................... 1
Product Features............................................................................. 2
Wearing Your Headset..................................................................... 3
Powering......................................................................................... 4
Charging......................................................................................... 5
Indicator Lights................................................................................ 6
Pairing............................................................................................. 7
Computer Audio Settings................................................................ 8
Using Your Headset......................................................................... 9
Regulatory Notices........................................................................ 10
iii
Package Contents
Calisto Headset
Bluetooth Adaptor
USB Headset Charger
1
Product Features
Wearing Your Headset
Reversible Earloop
Call Control Button (on/off)
Charge Connection
Volume Adjust
Noise-Canceling Microphone
Your headset can be worn on your left or right ear. To switch from one ear
to the other, flip the ear loop to the side, and twist around.
Pairing/Connect Button
Indicator Light
USB Connector
The ear tip should fit
comfortably in the opening
of your ear canal
2
Point the mouthpiece toward
your mouth
3
Powering Your Headset and
USB Bluetooth Adapter
The headset automatically powers up when it is charging.
Powering up: Press and hold Headset button for 2 seconds.
4 ascending beeps will sound when powered on.
Powering down: Press and hold Headset button for 4 seconds.
4 descending beeps will sound when powered off.
NOTE For your convenience, the headset comes pre-paired with the USB
Bluetooth adapter, and (if the headset is within range) will automatically
connect to the adapter when powered on.
Charging Your Headset
Before using, you must first charge your headset. The indicator light
glows solid red while charging and turns solid blue when the headset is
fully charged.
Charge the headset for a minimum of 2 hours. Battery talk time is up to
8 hours.
NOTE Do not use headset while chargng and do not connect the charger
while headset is in use.
The USB Bluetooth adapter is automatically powered on upon inserting into
the USB port of the computer.
4
5
Headset Indicator Lights and Alerts
USB Bluetooth Adapter Indicator Lights
Headset Indicator Lights
Action
Button Action
Sounds
Indicator Lights
Action
Indicator Lights
Turn
headset on
Press and hold
for 2 seconds
4 ascending
beeps
Flashes blue every
10 seconds
Connected to the headset
Solid blue
Turn
headset off
Press and hold
for 4 seconds
4 descending
beeps
Microphone on
Flashes blue
Turn
microphone
on/off
Press for
1 second
1 high beep
Disconnected from headset
Flashes purple
Pairing mode
Flashes red and blue
Adjust volume
Press up or
down (not
inward)
2 beeps when
max/min volume
reached
Headset Alerts
Alert
Sounds
Indicator Lights
Low battery
3 beeps every
30 seconds
Flashes red 3 times every 3 seconds
Charging
Glows solid red
Fully charged
Glows solid blue while connected
to charger
Pairing Your Headset with the
USB Bluetooth Adapter
NOTE The headset and USB Bluetooth adapter are paired to each other
at the factory. However, if you have purchased a USB Bluetooth adapter
separately, or if you wish to use a replacement headset with your existing
adapter, the units must be paired.
Insert the USB Bluetooth adapter in the USB port of your computer.
2 sec.
1.To put the headset into pairing mode, you must first power the headset
off. You will hear 4 descending beeps when the headset powers off.
2.Once headset is off, remove it from your ear and hold down call control
button for 4 – 6 seconds.
3.Release the button when the indicator lights on the headset begin to flash
red then blue.
6
7
4.To put the USB Bluetooth adapter into pairing mode, Pinch the pairing/
connect button for at least 2 seconds until adapter flashes red and blue
and begin pairing with your Bluetooth headset.
5.When both USB adapter and headset are in pairing mode, and within
30 feet of each other, they should connect.
6.The USB adapter show a solid blue light when connected to the headset.
NOTE Take caution when manually pairing the USB adapter. Do not press
hard. Please “pinch” with both fingers rather than push on the adapter to
avoid damage to the adapter or USB port.
Adjusting Computer Audio Settings
4. If Dragon prompts you to “Choose
your sound system”, select
Plantronics BT Adapter from the
list and then click Next to continue.
1.On your PC, launch the Sound and Audio Devices from the control
panel button and select the Audio tab.
2.Under Sound Playback and Sound Recording default devices, make
sure Plantronics Bluetooth Adapter is selected.
3.Press OK.
Using Your Headset with Dragon
NaturallySpeaking and Dragon Medical
When creating a new user within Dragon using your headset, note the
following:
1. Make sure the headset is fully charged and powered on (pg. 4) and USB
adapter is connected to your computer. You must stay within 33 feet of
your computer to use the headset.
2. Press the headset button for under 1 second to turn microphone on.
When the headset microphone turns on, you will hear 1 beep and the
light on the USB adapter will go from solid blue (standby) to flashing
blue (active).
Note When the headset microphone is on, the battery will drain faster than
when the headset is in standby mode. To preserve battery life/talk time you
should turn off the headset microphone between uses.
3. On the first screen of the New User Wizard, make sure to select
Bluetooth Microphone from the Dictation Source list:
8
5. If Dragon tells you that your “Sound level is too low” while reading the
text in the New User Wizard, the headset microphone may be turned off.
Make sure that it is turned on and try reading the text again.
Note If after following the above steps, you still receive the “Sound level is
too low” message from Dragon, your Windows sound system may not be
setup correctly. Visit http://support.nuance.com
6. When dictating with Dragon using your headset, please note that when
your headset microphone is turned on, you must also turn the microphone
on from inside of Dragon. To turn on the microphone from Dragon, press
the plus key (+) on the numeric keypad or click the microphone button on
the DragonBar.
The microphone is off
The microphone is on
Note Even when the Dragon microphone icon is red and horizontal,
indicating that the microphone is off, your headset microphone may still be
on. When you are done using Dragon, you may want to make sure that your
headset microphone is on standby. USB adapter will be solid blue in standby
mode and flashing blue when headset microphone is on/active. You can also
turn off your headset to conserve battery life.
9
Regulatory Notices
Industry Canada Notice
FCC Requirements Part 15
This Class B digital apparatus complies with Canadian ICES-003.
Cet appareil numérique de la classe B est conforme à la norme NMB-003 du Canada.
This device complies with part 15 of the FCC Rules subpart B. Operation is subject to
the following two conditions:
Headset:
BlueMax (BUA-100):
(1) This device may not cause harmful interference, and
Model:B70 IC: 457A-BUA100
(2) This device must accept any interference received, including interference that may
cause undesired operation.
For IC: 457A-E3XX
FCC ID: AL8BUA-100
Changes or modifications not expressly approved by the party responsible for compliance could void the user’s authority to operate the equipment.
For FCC ID: AL8-E3XX
This equipment has been tested and found to comply with the limits for a Class B digital
device, pursuant to part 15 of the FCC Rules. These limits are designed to provide
reasonable protection against harmful interference in a residential installation. This
equipment generates uses and can radiate radio frequency energy and, if not installed
and used in accordance with the instructions, may cause harmful interference to radio
communications. However, there is no guarantee that interference will not occur in
a particular installation. If this equipment does cause harmful interference to radio or
television reception, which can be determined by turning the equipment off and on, the
user is encouraged to try to correct the interference by one or more of the following
measures:
— Reorient or relocate the receiving antenna.
— Increase the separation between the equipment and receiver.
— Connect the equipment into an outlet on a circuit different from that to which the
receiver is connected.
— Consult the dealer or an experienced radio/TV technician for help.
EXPOSURE TO RF RADIATION
The internal wireless radio operates within the guidelines found in radio frequency safety
standards and recommendations, which reflect the consensus of the scientific community. Independent studies have shown that the internal wireless radio is safe for use by
consumers.
Visit www.plantronics.com for more information.
10
11
© 2008 Plantronics, Inc. All rights reserved. Plantronics, the logo design, Calisto, and
Sound Innovation are trademarks or registered trademarks of Plantronics, Inc. The
Bluetooth® word mark is owned by Bluetooth SIG,Inc., and any use of the mark by
Plantronics, Inc. is under license
56-A11A-10511 (12.08)