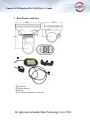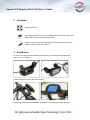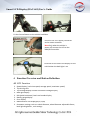
1
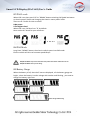
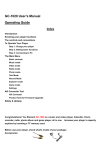
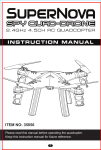
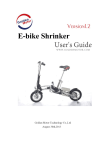
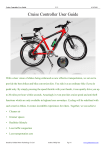
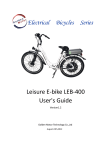
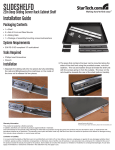
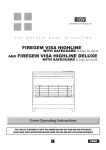
Smart LCD Display (BAC-601) (for MagicPie-4/SmartPie-4) Smart LCD Display (BAC-601)User’s Guide PRECAUTIONS Dear Users: In order to better operate your electric vehicle, please read the user’s guide carefully before using smart LCD display BAC-601. We will lead you how to use smart LCD display BAC-601 in most simple language from device installation to settings of LCD. At the same time we will help you solve the possible problem you will encounter. TABLE OF CONTENTS 1 REAL PICTURE AND SIZE 1 2 ATTENTION 2 3 INSTALLATION 2 4 FUNCTION OVERVIEW AND BUTTON DEFINITION 3 4.1 LCD Function 3 4.2 LCD Display Interface 4 4.3 Control Button Definition 4 5 OPERATION INSTRUCTIONS 4 5.1 On/Off 4 5.2 Interface Display Instructions 5 5.3 PAS Levels 6 5.4 PAS Mode 6 5.5 Battery Gauge 6 5.6 Output Power Display 7 5.7 Back light on 7 5.8 Unit Display 8 5.9 Error Code Display 8 6 SETTING UP INSTRUCTIONS 9 6.1 Preparations before LCD on 9 6.2 General Settings 9 7 SAVE SETTINGS PARAMETERS 10 Smart LCD Display (BAC-601)User’s Guide 1 Real Picture and Size ① ③ ② ④ ①smart LCD ②Control Buttons ③Bracket ④LCD display connector to controller 1 Smart LCD Display (BAC-601)User’s Guide 2 Attention Avoid the bump. Only waterproof film is for LCD and do not tear it, otherwise it will affect the LDC waterproof performance. When LCD does not work ,please go to vehicle repairing shop or dealer shop for help and repair it. 3 Installation Fix the LCD to the vehicle handlebar and adjust it for appropriate perspective. See pictures as follows: Install the bracket to the LCD with screws. Fix the LCD to the vehicle handlebar and adjust it for appropriate perspective. 2 Smart LCD Display (BAC-601)User’s Guide Fix the Control button to the vehicle handlebar. Connect the LCD display connector to the motor controller. Note:Only when the vehicle is power off, connect the LCD to the MP4/SP4 controller. Overview of the smart LCD display on the vehicle.Now the back light is on. 4 Function Overview and Button Definition 4.1 LCD Function Speed display ( real-time speed, average speed, maximum speed ) Trip driving time Trip mileage display and the cumulative mileage display Back light display PAS (pedal assistance) levels and modes display Battery gauge display Error display Measurement unit display(km/h, mph) Parameter settings, such as: wheel diameter, wheel diameter adjustable factor, back light brightness , unit settings. 3 Smart LCD Display (BAC-601)User’s Guide 4.2 LCD Display Interface Current Driving Time Max Speed Backlight Cumulative Mileage Average Speed Real-time Speed Current Mileage Unit Display PAS Mode PAS Levels Battery Gauge Error Code Power in watt 4.3 Control Button Definition ① ② ③ ①Up ②Mode ③Down 5 Operation Instructions 5.1 On/Off On: Turn on the power then the LCD start to work Off: Turn off the power then the LCD stop working. 4 Smart LCD Display (BAC-601)User’s Guide 5.2 Interface Display Instructions Turn on the LCD, the LCD show real time speed by default. Short press "Mode" button the LCD will show: SPEED ( real-time speed km / h); AVG SPEED ( current average speed km/h); SPEED MAX ( current maximum speed km/h); TRIP ( current mileage km); TRIP TIME (current driving time h); ODO ( total cumulative mileage km). Real-Time Speed km/h Current Average Speed km/h Current Max Speed km/h Current Max Speed km/h Current Driving Time Current mileage km Cumulative mileage 5 Smart LCD Display (BAC-601)User’s Guide 5.3 PAS Levels When LCD is on,short press"UP"or "DOWN" button switching PAS (pedal assistance or electric power) levels and changing the electric motor power levels. There are 0- 5 levels for rider to select: 0:No power 5:The highest level When LCD is on ,PAS level is at "0" by default. Here are the 0-5 levels for your reference: ..... 5.4 PAS Mode Long Press "DOWN" button, the electric vehicle enters into PAS mode. Electric vehicle will drive at constant speed 6km/h. 6KM/H PAS Mode only can be used when rider pushes the electric vehicle. Do not use 6KM/H PAS Mode when you are riding . 5.5 Battery Gauge When the battery is full, then the 5 bars are displayed , all the battery gauge are bright ; when the battery is under voltage with one bar and blinking , you need to charge the battery right now. Under voltage and flashing 6 Smart LCD Display (BAC-601)User’s Guide 5.6 Output Power Display LCD will display the output power of electric vehicle, the unit is in "Watt" . 5.7 Back light on Long press “UP+MODE” button, back light on. Then again long press “UP+MODE” button, back light off. Back light On Back light Off 7 Smart LCD Display (BAC-601)User’s Guide 5.8 Unit Display Speed and mileage display under metric and imperial units shown in following pictures. Mileage under metric km Mileage under imperial Mil Speed under metric km/h Speed under imperial Mil 5.9 Error Code Display When the electric vehicle system fails, LCD will automatically display the error code. Error code definitions shown in the following table. Error Code Definitions 0 No Failure 1 Break Lever Failure 2 Throttle Failure 3 Hall Failure or Phase 4 Under Voltage 5 MOSFET Failure 6 Overheating 7 Over current 8 Over voltage 9 Communication Failure 8 Smart LCD Display (BAC-601)User’s Guide Only after the failure has been cleared, LCD can exit the error display screen. The electric vehicle can not continue driving when the failure appear. 6 Setting Up Instructions 6.1 Preparations before LCD on Make sure all the plugs are well connected and turn on the electric vehicle battery power. 6.2 General Settings When LCD is on, long press "UP+DOWN" button and then enter into general settings state. Short press "MODE" button and then shift setting state,SE1,SE2,SE3,SE4. 6.2.1 SE1.Electric Vehicle Wheel Diameter Setting 28in,700c,26in,24in,22in,20in,18in,16in can be optional. Set the wheel diameter through "UP" and "DOWM" button to ensure speed and mileage is correct.By default the LCD display is 20in. 6.2.2 SE2.Wheel Diameter Adjusting Factor Setting Setting the wheel diameter adjusting factor can obtain the accurate speed and mileage value through "UP" and "DOWN" button. The default setting is 1.00 and minimum is 0.7 and maximum is 1.3. (Note:actual wheel diameter = wheel diameter X wheel diameter adjusting factor ) 6.2.3.SE3 .Back light Brightness Settings Back light brightness can be chosen between 1-3. Through "UP" and "DOWN"button , shift brightness: 9 Smart LCD Display (BAC-601)User’s Guide 1:Low 2:Middle 3.High The factory value is 3 by default. 6.2.4.SE4. Unit Setting The LCD has the metric and imperial unit for option. Through"UP" and "DOWN"button,shift units: 0:KM. 1:Mile If you do not carry out any operation during 3 minutes, the LCD will automatically exit setting mode . 7 Save Settings Parameters After finishing the settings, short press "MODE" button and confirm the current settings and then enter into next setting interface. Long press "MODE" will automatically save the parameters and exit. 8 FAQ Q: I can not turn on the LCD, why ? A: Check whether the LCD plug connector is well connected to the controller corresponding key. Q: How to handle when LCD display error code? A: Go to repairing shop for professional help. Golden Motor Technology Co.,Ltd www.goldenmotor.com [email protected] Mobile:86 519 81004118 10