1
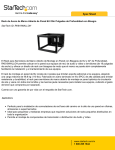
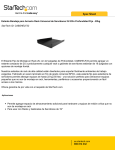
SLIDESHELFD
22in Deep Sliding Server Rack Cabinet Shelf
Installation Guide
Packaging Contents
• 1 x Shelf
• 2 x Set of Front and Rear Mounts
• 2 x Sliding Rails
• 1 x Package of assembly/mounting screws/nuts/washers
System Requirements
• EIA RS-310D compliant 19” rack/cabinet
Tools Required
• Phillips head Screwdriver
• Wrench
Installation
1.Separate the sliding rails into two pieces by fully extending
the rails and lifting/lowering the small lever on the inside of
the inner rail to release the two pieces.
Warranty Information
2.The piece that contains the lever can be mounted along the
sides of the shelf unit using the provided screws, nuts and
washers. The nut and washer should sit inside the shelf unit
with the screws going in from the outside. The lever on the
rail should be towards the rear of the shelf (without handle).
Manual Revision:09/15/2010
For the most up-to-date information, please visit www.startech.com
This product is backed by a lifetime warranty.
In addition, StarTech.com warrants its products against defects in materials
and workmanship for the periods noted, following the initial date of purchase. During this period, the products may be returned for repair, or replacement with
equivalent products at our discretion. The warranty covers parts and labor costs only. StarTech.com does not warrant its products from defects or damages arising
from misuse, abuse, alteration, or normal wear and tear.
Limitation of Liability
In no event shall the liability of StarTech.com Ltd. and StarTech.com USA LLP (or their officers, directors, employees or agents) for any damages (whether direct
or indirect, special, punitive, incidental, consequential, or otherwise), loss of profits, loss of business, or any pecuniary loss, arising out of or related to the use of
the product exceed the actual price paid for the product. Some states do not allow the exclusion or limitation of incidental or consequential damages. If such laws
apply, the limitations or exclusions contained in this statement may not apply to you.
3.Attach the front rack mounting bracket to the sliding rail. The
front bracket is the short bracket. Two screws will fasten the
bracket to the rail. Make sure the screw is inserted from
inside the rails, so the nuts and washers are on the outside.
7.Slide the shelf onto the rails from the front and push the shelf
all the way to the back until it stops.
8.Pull the shelf out and ensure that it stops and locks when fully
extended.
9.If the shelf needs to be removed (i.e. to be flipped over), refer
to Step 1.
4.The rear rack mounting bracket can be fastened to the rails
in the same manner as the front. These should not be fully
tightened however, so they can be adjusted to the exact
length needed to fit the rack/cabinet.
5.Fasten the completed rails into the cabinet/rack using the
appropriate hardware for your cabinet/rack. Make sure to
fully tighten the rear bracket to the rails, if they were left loose
from the previous step.
6.The revolving front handle can be inserted into the opening
on the front of the shelf and fastened from the rear/inside with
two screws.
Specifications
Description
Material
22in Deep Sliding Server Rack Cabinet Shelf
Aluminum
Color
Black
Maximum Weight Capacity
25 kg
Min/Max Mounting Depth
Mounting Height
Dimensions (WxD)
20in / 24in
1U
444.5mm x 559.0mm
Net Weight
5680 g
Certifications
RoHS