1
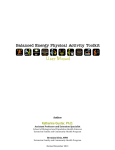
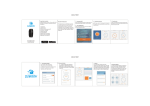
Quick reference for MyPulse bluetooth monitor
The complete manual & video instructions are on this product DVD.
For the latest version please visit www.MyPulseMonitor.com.
Installing the MyPulse Heart Monitoring Software.
NOTE: It may be necessary to temporarily turn off virus protection.
Insert the Heart Monitoring Software DVD into your computer’s DVD-ROM drive. The MyPulse Software Setup
Wizard will launch automatically. If not, click on the window task bar Start/Computer, double-click the DVD ROM
drive icon, and double-click on the Setup.exe icon. Follow the Setup instructions. The default folder where the
software program will be installed is MyPulse.
Installing the MyPulse Hardware on the Person to be Monitored
Wet the left and right electrode areas of the strap under running water and make sure they are
well moistened. Use electrode gel if planning to be sedentary or for sleep monitoring. Adjust
the strap length to fit snugly and comfortably. Secure the strap around your chest, just below or
over the chest muscles for men, and below or over the breasts for women (over the chest muscles
or breasts may give better contact when lying down). Check that the two electrode areas are
firmly against your skin and that the MyPulse logo of the sensor/transmitter is in a central,
upright position. This turns it on.
Charging the MyPulse bluetooth Heart Rate Sensor/Transmitter:
Plug the charger into a usb port and the
sensor/transmitter into the charger. The green
LED indicates the charger is connected to a
power source. The red LED indicates that the
sensor/transmitter is charging. The red light will
turn off when it is fully charged. Expect 90%
charge in 1hour, 100% charge in 3 hours. A
fully charged new battery will last about 26 hours.
Direct mid range computer communications: Wet the chest strap electrodes thoroughly, then placed them firmly
against your skin, adjusting the strap length for comfort. Use electrode gel if planning to be sedentary or for sleep
monitoring. Clip the sensor/transmitter to the chest strap with the MyPulse logo in a central upright position. This
turns it on. The first time you wear the sensor/transmitter, click Windows Control panel/Add a device to add the
sensor/transmitter. The sensor/transmitter pairing code is 1234. View Devices & Printers then Right click the new
HxM heart monitor icon and click properties then services. Note the OUTGOING serial port COM number. You will
need it to customize the MyPulse computer software.
Smart phone indirect global communications: Consult the full user’s manual for instructions on how to use a
smart phone to collect and transmit data and gps coordinates to the computer.
Patent no. 6897773 Copyright© 2005 All rights reserve
1
Launching MyPulse
Click on the windows task bar Start/All Programs/MyPulse/MyPulse. If this is the first launch, the program will start
and take you directly to the Customize Screen.
Utilizing MyPulse
There are three main processes to learn when utilizing the MyPulse Heart Monitoring Software. They are: 1)
Customizing the MyPulse Monitor, 2) Starting the MyPulse Heart Rate Monitor and 3) Reporting.
3 - Customizing MyPulse
Each user must have a unique profile set up before using the MyPulse Monitor. The steps for creating each profile
are as follows. On the Main Menu Screen, click Customize. This will take you to the user-profile customization
screen.
Point at each entry in the customize screen and read the instructions in the upper text box. Complete the customize
screen and click on Save then Ok. MyPulse will return to the main menu. Click on the main menu Start Monitor icon
then Continue.
The first time you attempt to start the MyPulse Heart Monitor after installation, a customer code will appear on the
screen and you will be prompted for an activation code (one time only). The software will not work without it. In
order to obtain the activation code via e-mail, send the customer code to [email protected]. The
activation code will be sent to you by return email.
Consult the full user’s manual for additional detailed instructions.
2