1
This file is provided FREE OF CHARGE from the
electromaniacs.com community
You are free to distribute this file to other persons
who needs it , but without of charge
Also on http://electromaniacs.com you can find
thousands of service manuals , schematics free of
charge
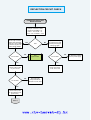
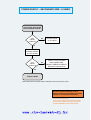
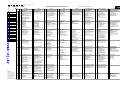
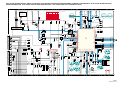
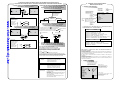
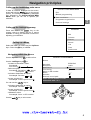
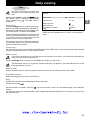
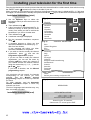
DEFLECTION CIRCUIT CHECK
START TROUBLESHOOTING
TV starts
for a moment
with EHT (at least 1s)
and attempts
3 starts.
Horizontal
deflection
repair routine
ERROR CODE
28 Signal by LED.
Vertical
deflection
repair routine
Short circuit TL71?s
Collector to GROUND.
Check safety
circuit components
TL71,72, etc.
TV now OK ?
Vertical
deflection
repair routine
TV now OK ?
Check for open circuit
horizontal deflection
stage components.
Horizontal
deflection
repair routine
Check BCL components
CL09. DL09, CL08
TL02,TL59
Check DL75
Open circuit DL74
Open circuit TL71
www.rtv-horvat-dj.hr
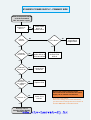
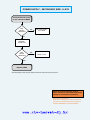
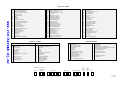
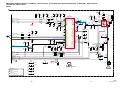
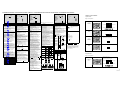
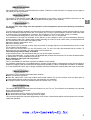
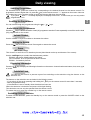
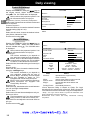
DEFLECTION CIRCUIT CHECK
HORIZONTAL DEFLECTION
REPAIR ROUTINE
Open circuit pin 8 IP95 or
short pin 4 of IP95 to GND
Check the U-TIMER ~ 9v
USYS ~ 70v / 5VUP ~ 5v
+UA ~ 12v / U-VIDEO ~ 100v
Connect pin 8 or remove
short on pin 4 of IP95.
Short circuit TL34 B/E.
Short TL71 Col. to GND.
Check for H_Drive on
RV18, breifly visiable.
TV now OK ?
Yes
No
OK?
IV01
repair routine
Open circuit either pin
10 of the DST or JL60.
Check power supply
voltage as again.
TV now OK ?
No
Yes
Yes
Check TL34 DL21,
CL21 CL24, DST
Check H drive pulse
on pin1 of LL32.
TV now OK ?
No
No
Check H_Drive
components RL35,
RL36,TL31,TL32,TL33
Yes
Check Short TL34 B/E.
Check retrace pulse
on the collector TL34
(probe 100:1)
Go to 1
www.rtv-horvat-dj.hr
No deflection problem!
refer to power supply
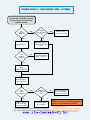
DEFLECTION CIRCUIT CHECK
1
No
OK?
Check for short circuit DST
supply lines 5Vdst, Vsupply,
Vretrace check TL34, LL32
Check Modulator components
Yes
Check DST output voltages
these should be least at 50%
of the nominal value. Check
5VON, VSUPPLY,VRETRACE
OK?
No
Check the following, ZL11/13
ZL14, DL11/13/14, TL14
Yes
Check the Line Flyback
pulse (LFB) during start-up.
Briefly visible?
No
OK?
Check flyback voltage
on pin 8 of the DST.
Check DL09, DL19, DV09
Yes
Vertical
deflection
repair routine
www.rtv-horvat-dj.hr
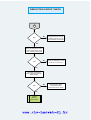
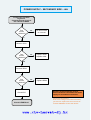
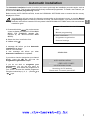
DEFLECTION CIRCUIT CHECK
VERTICAL DEFLECTION STAGE
REPAIR ROUTINE
V supply
and V retrace
was OK or
>50% during
start?
No
Check the following items:RL11/13, ZL11/13, DL11/13.
Yes
Vertival retrace visible on
pin 7 IF01 during
start ?
OK ?
No
Check vertical guard signal
on pin 34 of IV01, pulse
with U>4V during retrace
and <4V during scan visible.
Yes
Check Vetical Deflection IC
pin resistance with TV "OFF"
V supply (pin 3) > 5KOhm
V retrace (pin 6) > 50KOhm
Output A (pin 7) ~ 5,7KOhm
Output B (pin 4) ~ 5,7KOhm
OK ?
Yes
No
OK ?
No
Change IF01
Yes
Check pin 1 and 2 of IF01
vertical amplifier during start-up.
At pin 1 approx. 3V DC and a
visible sawtooth signal,
on pin 2 approx. 3V DC.
IV01
repair routine
No
OK ?
Yes
NO vertical problem !!
www.rtv-horvat-dj.hr
Yes
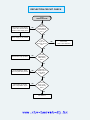
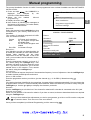
DEFLECTION CIRCUIT CHECK
IV 01
REPAIR ROUTINE
Check RV01, CV03, RC02,
CC03. Also check for short
circuits on IV01 supply pins?
No
Is +8v
present on
pins 23 & 53 of
IV01 at switch
"On" ?
Yes
Yes
Power supply or µP problem
+5V
on pin 55
& 6,8V on pin 19
IV01
No
Check CC01,
CI57 or IV01 defective.
Yes
Bus blocked or µP problem
No
I2C Bus
transmission
visible during
start ?
Yes
IC not initialised or defect.
Check crystals, bus protocol.
No
Sawtooth
signal on pin 4
IV01 during
start ?
Yes
Check safety circuit and
EHT compensation signal
No
Pin 58 <6v
& pin 3 <3V
of IV01 during
start ?
Yes
IV01 defect. ?
www.rtv-horvat-dj.hr
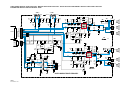
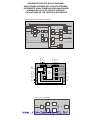
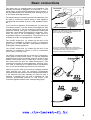
SECONDARY DC-VOLTAGES
All measurements in this chapter must be done WITHOUT the mains supply
connected to the TV.
Test circuit:
The external voltage source is provided by a variable DC-power supply with its output
voltage set to 11V and the current limitation set to 500mA's. The negative terminal of
the DC-power supply must be directly connected to the chassis secondary ground plane.
The positive terminal of the DC-power supply is first connected to an ammeter and then
the anode of an isolation diode. The cathode of the isolation diode is then connected to
the load on the chassis as shown below. Measure the current drawn by each load tested.
DP82
U-VIDEO
DP84
+UA
0,5A
11V
+
DP80
U-SYS
DP93
U-TIMER
CHASSIS ICC17
www.rtv-horvat-dj.hr
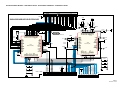
STANDBY POWER SUPPLY - PRIMARY SIDE
Short circuit pins 3 and 4
of LP50 and switch
"ON" the mains supply.
230VAC at
BP01 ?
No
Check mains
plug-in &
mains switch
Yes
CP10=
310VDC
No
FP01 Blown
Yes
No
Check mains
supply filter &
bridge rectifier
Yes
Cathode
DP20=42V
No
Check Standby
rectifier DP16-19
RP20 and DP20
No
Check CP26
and DP22
Replace FP01
& check TP50
& RP15
Yes
Cathode
DP22=5.2V
Yes
Check
IP20 pin 1
for a 62kHz
signal
No
Replace IP20
Yes
General: All measurements must be
taken with the TV connected to the mains
supply via an Isolation Transformer.
CP63=9.7V
No
Yes
Primary side of
Standby Power Supply
should be OK.
Check TP21
& LP20
Important information:
If the over-voltage circuit was activated,
you will have to change the fuse resistor at
location RB/LB06 on the CRT-board.
www.rtv-horvat-dj.hr
DEGAUSSING CIRCUIT
Check degauss circuit.
Switch "ON" the TV.
Voltage
CP13 > 4.5V
No
Check RP10
Yes
Voltage
RP12 > 1.2V
No
Check whether
DP14 is
open circuit
Yes
Voltage
RP12 < 1.8V
No
Check whether
DP14 is
short circuit
Yes
Check
connector BP15
& posistor RP15
Check
TP14 and TP15
www.rtv-horvat-dj.hr
SECONDARY DC-VOLTAGES
All measurements in this chapter must be done WITHOUT the mains supply
connected to the TV.
Test circuit:
The external voltage source is provided by a variable DC-power supply with its output
voltage set to 11V and the current limitation set to 500mA's. The negative terminal of
the DC-power supply must be directly connected to the chassis secondary ground plane.
The positive terminal of the DC-power supply is first connected to an ammeter and then
the anode of an isolation diode. The cathode of the isolation diode is then connected to
the load on the chassis as shown below. Measure the current drawn by each load tested.
DP82
U-VIDEO
DP84
+UA
0,5A
11V
+
DP80
U-SYS
DP93
U-TIMER
CHASSIS ICC17
www.rtv-horvat-dj.hr
STANDBY POWER SUPPLY - SECONDARY SIDE
Short circuit pins 3 & 4 of
LP50, short circuit CP69.
Switch"ON" mains supply
Check
voltage across
RP76 = 3.3V
No
Yes
Check
voltage across
RP76 < 3.3V
No
Check the Keyboard PCB,
DK01, CK02, GE01 (LED)
and GK01 (IR-receiver)
Yes
Check the connection to
the Keyboard and the
voltages on KDB17000
Cathode
IP61 > 5V
No
Yes
No
Check Standby rectifier
DP16-19 and RP20
Yes
Solder a 10K
resistor from CP63
to gate IP61
voltage at
cathode of IP61
goes from > 5V
to < 2.5V
Gate of
IP61 < 2V
Replace IP61
No
Check IP50
and IP61
Yes
Regulation circuit OK.
After finishing this test, please remove the short circuits
from pins 3/4 of LP50 and CP69 also remove the 10k resistor.
General: All measurements must be
taken with the TV connected to the mains
supply via an Isolation Transformer.
Important information:
If the over-voltage circuit was activated,
you have to replace the fuse resistor at
location RB/LB06 on the CRT-board.
www.rtv-horvat-dj.hr
POWER SUPPLY - SECONDARY SIDE : U-VIDEO
Connect the test circuit
to the cathode of DP82.
Test
current
>200mA?s
No
No short circuit
on U-VIDEO
Yes
Remove the cable
inserted at BL02
(to CRT-board)
Test
current
>200mA?s
No
Check on CRT-board the
video amplifier IB01,
DB30/31, DB50/51 & DB70/71.
Reconnect cable in BL02
Yes
Replace DP82
After finishing this test, please replace cable BL02 and remove the test circuit.
General: All measurements must be
taken with the TV connected to the mains
supply via an Isolation Transformer.
Important information:
If the over-voltage circuit was activated,
you have to replace the fuse resistor at
location RB/LB06 on the CRT-board.
www.rtv-horvat-dj.hr
POWER SUPPLY - SECONDARY SIDE : U-SYS
Connect the test circuit
to the cathode of DP80.
Test
current
>500mA?s
No
No short circuit
on U-SYS.
Yes
Remove
JL60/LL60
Test
current
>500mA?s
No
Check TL34
Yes
Replace DP80
After finishing this test, please replace JL60/LL60 and remove the test circuit.
General: All measurements must be
taken with the TV connected to the mains
supply via an Isolation Transformer.
Important information:
If the over-voltage circuit was activated,
you have to replace the fuse resistor at
location RB/LB06 on the CRT-board.
www.rtv-horvat-dj.hr
POWER SUPPLY - SECONDARY SIDE : U-TIMER
Connect pin 4 of IP95 to ground.
Connect the test circuit to the
cathode of DP93.
Test
current
>200mA?s
No
Yes
No
Check +5VUP
and 5V_VCC rails
Yes
Measure +8V rail
(at pin 8 of IP95)
>1.3V
Remove LL31
Test
current
>200mA?s
Voltage
at pin 9 of IP95
= 5.1V
No
Check line driver
circuit, TL32, etc.
Yes
Check
DP93 and IP95
Connect pins 4
and 9 of IP95.
Test
current
>500mA?s
Yes
Check +8V rail
to AP, DP, OS,
SCART and KDB
No
Voltage
at pin 8 of IP95
= 8.1V
No
Check voltage at
pin 4 of IP95 and
DP94 and CP96.
Yes
No short circuit
on U-TIMER
General: All measurements must be
taken with the TV connected to the mains
supply via an Isolation Transformer.
Important information:
If the over-voltage circuit was activated,
After finishing this test, please replace LL31, remove the
link between pins 4 and 9 of IP95 and remove the test circuit. you have to replace the fuse resistor at
www.rtv-horvat-dj.hr
location RB/LB06 on the CRT-board.
POWER SUPPLY - SECONDARY SIDE : +UA
Connect pin 4 of IP95
to ground.
Connect the test circuit to
the cathode of DP84.
Test
current
>200mA?s
No
No short circuit
on +UA rail.
No
Replace Audio
Amplifier IS80.
Yes
Remove JP03
Test
current
>200mA?s
Yes
Remove DP84
Test
current
>200mA?s
Check IP87
Check U-TIMER rail.
No
Replace DP84
General: All measurements must be
taken with the TV connected to the mains
supply via an Isolation Transformer.
Important information:
If the over-voltage circuit was activated,
you have to replace the fuse resistor at
location RB/LB06 on the CRT-board.
www.rtv-horvat-dj.hr
AUDIO SIGNAL MODULE DOLBY PROLOGIC - MODULE AUDIO DOLBY PROLOGIC - DOLBY PROLOGIC VERSTÄRKER - MODULO AUDIO DOLBY PROLOGIC
ESQUEMA DEL MÕDULO AMPLIFICADOR DE AUDIO
BA005
Cinch output
CA001
1N0
RA001
100K0
RA002
100K0
RA003
470R0
CA005
1N0
6
5
Surround
4
CA002
1N0
RA005
100K0
RA004
470R0
CA003
4U7
BS003
Subwoofer
3
2
Right
1
Left
BA005
Cinch output
RA006
100K0
RA007
470R0
CA004
4U7
CA006
1N0
RA008
470R0
CA007
4U7
SUB AMDP
RA016
4K7
CA014
4U7
RA014
4K7
CA008
4U7
Left
CA013
4U7
CA011
1N0
9
RA015
4K7
3
1
11
RA017
1K0
8
RA048
22K0
4
5
CA017
470P0
5
RA070
TA021
BC847B
10K0
4
IA001
TDA7269
DA023
BZX55C3V6
3
2
1
CA054
1MI0
2
10
7
3
CA043
1MI0
RA021
18K0
RA071
10K0
DA070
LL4148
3
2
DA071
LL4148
RA072
10K0
RA073
120K0
RA074
4K7
DA074
LL4148
DA075
LL4148
RA081
5K6
RA031
1K0
RA023
15K0
CA031
1MI0
CA033
100N0
Right
Left
1
1
5
2
Right
2
4
RA045
1K0
BA005
7
8
9
10
BA006
RA056
1K0
RA039
22K0
3
CA056
1N0
CA045
1N0
CA041
100N0
6
BA007
SA001
1
Left
2
RA041
4R7
RA027
100R0
RA150
100K0
Heatsink
CA023
1U0
DA083
LL4148
RA025
18K0
RA029
15K0
1
TA072
BC847B
CA109
470U0
CA105
220U0
RA105
470R0
CA101
1N0
CA103
1U0
CA104
1U0
CA102
1N0
CA106
1N0
RA109
47K0
RA111
47K0
RA107
120K0
RA106
120K0
CA074
100U0
RA077
22K0
TA077
BC847B
RA078
1K2
CA080
100U0
RA113
6K8
IA003
MC33076/P1
CA035
470U0
RA082
6K8
RA036
560R0
RA083
5K6
RA079
10K0
CA090
1N0
CA078
100U0
RA094
4K7
CA092
4U7
Surround
CA096
470P0
CA094
1U0
RA092
4K7
RA096
1K0
1
6
11
CA093
4U7
Center
RA115
10K0
CA115
1N0
CA091
1N0
CA095
1U0
RA093
4K7
RA097
1K0
2
CA049
100N0
RA047
22K0
10
CA058
22N0
CA053
470U0
CA060
22N0
4
7
RA040
22K0
RA119
1K0
1
4 VEE
8 VCC
INOUT
6
IN+
7
+
5
4 VEE
CA112
10U0
RA114
10K0
RA117
33R0
CA119
100U0
3
IA002
TDA7269
CA044
470U0
BA004
4
2
CA114
1N0
CA118
100U0
RA118
1K0
DA024
BZX55C3V6
RA028
100R0
CA032
1MI0
CA034
100N0
5
3
RA116
33R0
RA032
1K0
1
Left
Headphones
RA030
18K0
RA026
10K0
RA024
15K0
Right
CA042
100N0
RA042
4R7
CA024
1U0
TA022
BC847B
AMDP
AM/DP.17000.00
RA022
18K0
AUDIO MODULE DOLBY PROLOGIC
Surround
RA055
1K0
CA061
22N0
RA046
1K0
BA009
1
Center L
2
8 VCC
OUT
11
12
13
14
8
5
CA097
470P0
RA095
4K7
BA005
RA049
4R7
RA037
560R0
9
CA113
10U0
IN- 2
IN+
+
3
CA107
1N0
TA080
BC857B
RA076
22K0
RA112
6K8
First issue 07 / 98
CA050
100N0
6
6
DA073
LL4148
ICC17
1
7
BA002
GND
+ UA
Mute
RA018
1K0
8
RA080
120MI0
ICC17
RA050
4R7
RA038
560R0
CA015
1U0
RA013
4K7
10
BS02
CA018
470P0
CA016
1U0
9
10
Left
Gnd
Right
Subwoofer
Center
Mute L/R
Surround
Mute Surr.
Headph L
Headph R
CA012
1N0
Right
BA001
1
RA035
560R0
CA036
470U0
CA064
22N0
BA008
1
2
Center R
SUB AUDIO SIGNAL MODULE - SUB MODULE AUDIO - AUDIO SIGNAL SUBMODUL - SUB MODULO AUDIO
64
58
33
BS002
1
2
3
4
5
6
7
8
9
10
11
12
13
14
15
16
17
18
19
20
21
22
23
24
25
26
27
28
29
30
31
32
PINS of MSP
55
SC2OUTR
AGND
CS207
100N0
CS206
10U0
DGND
CS209
100N0
1
+8V
CS208
3U3
SC2OUTL
SC1OUTR
CAPLA
SC1OUTL
CAPLM
AGNDC
SC4INL
SC4INR
AGND
SC3INL
SC3INR
SC2INL
SC2INR
SC1INL
SC1INR
VREFTOP
MONOIN
+5VA
ANAIN1+
ANAIN-
ANAIN2+
SUB AUDIO MODULE DOLBY PROLOGIC
XTALIN
XTALOUT
DGND
1
AGND
43
42
41
40
39
38
37
36
35
34
33
32
31
30
29
28
27
CS210
10U0
CS201
220N0
AGND
CS106
AGND
1N0
+5VD
DACMC
IS200
DPL3518(DIE)
26
25
24
23
22
21
20
19
18
17
16
15
14
13
12
11
10
+5VA
AGND
+5VD
RESETQ
I2SDAOU2
I2SDAIN2
DVSS
DVSS
DVSUP
DVSUP
NP
NC
NC
NC
I2SDAIN1
I2SDAOU1
I2SWS
I2SCL
I2CDA
I2CCL
CS211
10U0
AVSUP
NC
NC
NC
TESTEN
XTALIN
XTALOUT
DCTRIN
AUDCLOUT
NP
NP
NP
DCTRIO1
DCTRIO0
ADRSEL
STANDBYQ
NP
61
62
63
64
65
66
67
68
1
2
3
4
5
6
7
8
9
MSP3410D(DIE)
27
26
25
24
23
22
21
20
19
18
17
16
15
14
13
12
11
10
CAPLC1
AHVSUP
AHVSUP
CAPLC2
SC1OUTL
SC1OUTR
VREF1
VREF1
SC2OUTL
SC2OUTR
ASG3
DACC1L
DACC1R
VREF2
VREF2
DACC2L
DACC2R
DACMSURR
IS100
AVSUP
AVSUP
ANAIN1+
ANAINANAIN2+
TESTEN
XTALIN
XTALOUT
DMACSYNC
AUDCLOUT
NP
NP
NP
DCTROUT1
DCTROUT0
ADRSEL
STANDBYQ
NP
CS203
1N0
CS204
10N0
CS205
+5VD
Mute L/R
Surround
Mute Surr.
5
6
7
8
Headph R
Center
10
Subwoofer
4
9
Right
3
2
Left
1
32
31
DACML
30
DACMR
29
DACAL
26
28
DACAR
25
27
RESETQ
24
DACC2L
23
22
21
20
19
18
+5VD
17
16
15
14
13
12
11
9
10
I2CCL
8
ADRSEL
6
7
DCTROUT0
5
I2CDA
BS001
32
100N0
DGND
+5VD
BS003
BA001
AMDP
1
DGND
1
AGND
10
100N0
3
PINS of MSP
2
10N0
CS105
DCTROUT1
1N0
CS104
4
DGND
Headph L
CS103
1
AGND
AHVSS
CAPLM
AHVSUP
AVHSUP
CAPLA
SC1OUTL
SC1OUTR
VREF1
VREF1
SC2OUTL
SC2OUTR
ASG3
TESTNEU
DACMSUB
DACML
DACMR
VREF2
VREF2
44
45
46
47
48
49
50
51
52
53
54
55
56
57
58
59
60
+8V
DACAL
DACAR
RESETQ
I2SDAIN2
DVSS
DVSS
DVSUP
DVSUP
ADRCL
ADRWS
NP
ADRDA
I2SDAIN1
I2SDAOU1
I2SWS
I2SCL
I2CDA
I2CCL
46
47
48
49
50
51
52
53
54
55
56
57
58
59
60
61
62
63
AHVSS
AHVSS
AGNDC
SC3INL
SC3INR
ASG2
SC2INL
SC2INR
ASG1
SC1INL
SC1INR
VREFTOP
VREFTOP
MONOIN
AVSS
AVSS
AVSUP
SUB AMDP 17001 00
64
65
66
67
68
69
70
71
72
1
2
3
4
5
6
7
8
9
+8V
10N0
SUB AMDP
AHVSS
AGNDC
SC4INL
SC4INR
ASG3
SC3INL
SC3INR
ASG1
SC2INL
SC2INR
ASG0
SC1INL
SC1INR
VREFTOP
VREFTOP
MONOIN
AVSS
AVSS
CS101
220N0
DGND
CS202
CS102
10N0
45
44
43
42
41
40
39
38
37
36
35
34
33
32
31
30
29
28
DGND
DACMSUB
AGND
TP1
DGND
TP2
ICC17
First issue 07 / 98
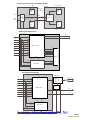
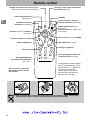
KEY BOARD AND FRONT CONNECTOR BOARD
MODULE PRISE EN FACADE ET INTERCONNEXION DU CLAVIER
TASTATUR UND FRONT ANSCHLUSSPLATTE - PIASTRA CONNESSIONE
PLACA TECLADO Y CONECTORES FRONTALES
SK01
1
3
4
3
2
4
PR-
Vol+
SK02
SK03
BK01
9
1
2
1
2
3
4
3
4
PR+
VolJK01
KEY_IN_1
KEYB_B
6
KEYB_A
1
5
4
RK01
1K0
+5V_STBY
3
1
RE03
2
3
A2
100R0
C
2
1
G
RK02
270R0
CK02
22U0
16V
KEY_IN_2
7
JK02
GND
Vss
OUT
3
2
8
GK01
TFMK1330-D-T
2
SK04
1
DK01
BZX55C5V1
R
IR
+8V
U_STBY
A1
GE01
LU5351-JM
DE01
BZX55C2V7
KDB 17000 00
BJ10
CJ02
1U0
6
VIDEO
5
4
R
CJ04
470P0
RJ04
47K0
CJ03
470P0
RJ03
47K0
3
AUDIO
2
L
1
BJ04
1
CJ01
1U0
L
2
3
RJ20
220R0
1
3
5
4
2
VIDEO
CHROMA.
R
CHROMA
4
BJ11
RJ21
75R0
5
6
VIDEO
CJ20
22P0
RJ05
220R0
BQ12
8
7
2
3
4
5
1
CJ05
NI
RQ05
330R0
RQ06
RQ03
330R0
RQ01
330R0
CQ01
10U0
CQ05
470P0
RJ06
75R0
BQ09
1
2
330R0
3
CQ03
3N3
CQ04
3N3
RQ04
330R0
RQ02
330R0
CQ02
10U0
4
5
FCB 17001 00
CQ06
470P0
L
L
FCB-GND
R
R
FCB.17000.00
www.rtv-horvat-dj.hr
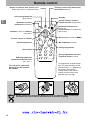
GENERAL INFORMATION - LED BEHAVIOUR
CODES
DEFAUTS
LED FLASHES
Message transmission.
The Error codes are signalled by the TV’s red LED.
Count the number of flashes : error code is two burst sepera
ted by a pause of 0.7sec. and repeated four times..
There is 1.7 sec. between each codes sequence .
14
IC TDA8855H DOES NOT ANSWER
15
AUDIO PROCESSOR NO LONGER RESPONDING.
21
SDA LINE BEING HELD LOW
23
CLOCK JAMMED AT LOW LEVEL, SCL LINE
JAMMED AT LOW LEVEL.
25
SWITCHED 5V NOT AVAILABLE
26
TUBE DOES NOT GET WARM IN TIME
27
THE DETECTION SYSTEM HAS DETECTED PROTECTION ON
MORE THAN THREE OCCASIONS
orange pause
0,7 sec.
1,7 sec.
green
2
4
orange
0,7 sec.
(DOES THIS MEAN THAT A PROBLEM HAS BEEN DETECTED ON THE BREATING LINE?).
1,7 sec.
green pause
250ms
28
SCANNING PROBLEM AFTER 2 S, THE PROGRAM
TRIES TO PERFORM A START.
34
THE NVM CHIP DOES NOT ANSWER
36
WRONG NVRAM ADDRESS PASSED TO THE
BUS-HANDLER
37
UNEXPECTED LEVEL ON NMI (INTERRUPT) LINE
FOUND (POSSIBLE CAUSE : TUBE FLASHOVER)
41
BUS (DATA LINE) NOT RECOVERABLE
250ms
red pause
0,7 sec.
1,7 sec.
off
3
4
red
0,7 sec.
1,7 sec.
off pause
currently all known ICC17 TV sets are fitted with a Bicoloured LED,
the red part is the Standby LED whilst, the green part is directly
connected to the switched +8V supply. Therefore,the colour of the LED
will depend upon the state of this voltage,the chart below gives the
corresponding LED-colours:
switched +8V
on
off
LED-port
off
on
green orange
off
red
LIST OF ABBREVIATIONS - LISTE DES ABREVIATIONS- ABKÜRZUNGEN
LISTA DELLE ABBREVIAZIONI - LISTA DE ABREVIACIONES
+USYS:
System voltage
●
+U_VIDEO:
Video drive voltage for the CRT board
●
+ STDBY_ ON:
Standby data (0V standby , 0.6v switched ON)
●
+5V DST:
5v unregulated voltage from the DST
●
to supply the tuner and audio MSP device
●
+5V ON:
5v regulated voltage from the DST
to supply the tuner and audio MSP device
●
+5V UP :
Microprocessor supply voltage
●
BCL:
Beam current limiting information
●
CVBS:
Composite video / luminance signal
●
CVBS_OUT:
Composite video output
●
CVBS_TXT:
Composite video for teletext extraction
●
DEGAUSS:
Degauss signal
●
EW :
East / West
●
FORMAT / BC:
Full white control DATA depending on
16/9 selected format
●
HDRV:
Horizontal deflection signal
●
HTR1 / HTR2:
Heater voltage from the DST to CRT PCB
●
LFB:
L ine Fast Blanking
●
MUTE :
Mutes audio amplifiers
●
PO:
“Power ON “ IP95 : reset activated and output = 8v
“PO” = 5v when TV is working in normally
●
POWER_FAIL:
Detection of mains supply and deflection stage failures
●
RESET:
Microprocessor reset signal
●
SAFETY:
Safety information from the deflection stage
●
SCL:
Serial Clock
●
SDA :
Serial Data
●
SIF:
Sound IF
●
TRAP_INFO:
31.4Mhz IF trap activation
●
U_ STANDBY:
Standby voltage
●
U_DRIVER:
Horizontal sync signal from TDA8855H
●
U_TIMER:
11v voltage used during “Switch ON “ phase
and “Wake Up“ mode
●
V FLB:
Vertical flyback reference for the microprocessor
●
V GUARD:
Safety data generated by the vertical amplifier
TDA 8351
●
V_RETRACE:
42 / 48volts (depending on tube type) generated by
the DST and used for vertical blanking
●
V_SUPPLY:
www.rtv-horvat-dj.hr
13.5 to 15.5 volts (depending on tube type) generated
by the DST
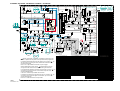
INTEGRATED CIRCUITS AND TRANSISTORS OUTLINE CIRCUITS INTEGRES ET TRANSISTORS
INTEGRIERTE SCHALTUNGEN UND TRANSISTOREN CIRCUITI INTEGRATI TRANSISTOR
CIRCUITOS INTEGRADOS Y TRANSISTORES
1
64
32
41
65
16
40
17
80
MX27C200MC-12
25
1
24
ST92R195
MPS3400C-PP-C6
32
14
33
13
52
1
TDA8351
53
64
TDA8855H
11
9
7
5
8
10
8
1
TDA7269
9
7
5
3
2
6
4
6
4
3
1
E
C
B
BUH516TH16
2
TDA6107Q
TDA 8139
BC 847B
BC 857B
BCR141
BCR191
DTC113ZK
DTC144EK
TN1401
ST24C08-M
TS3702CD
STP6 NA60F1
BT806 -600C
MC7812/CT
E B C
B
C
E
BD241C
BC 337
BC 546B
BC 547B
BF 422
BF423
2SA1020Y
2SC2236Y
www.rtv-horvat-dj.hr
MPS750
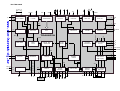
INTEGRATED CIRCUITS BLOCK DIAGRAMS SYNOPTIQUES INTERNES DES CIRCUITS INTEGRES INTEGRIERTE SCHALTUNGEN BLOCKSCHALTBILDER
SCHEMA A BLOCCHI DEI CIRCUITI INTEGRATI VISTA INTERNA DE LOS CIRCUITOS INTEGRADOS
Audio baseband processing of the MSP3410
SC A RT 1
SC A RT 2
SC A RT 3
MONO
SC 1 O U T
D C -FM 1
SC 2 O U T
A
FM
O FF
50u
N
D C -FM 2
N IC A M
LS OUT
E FFE C T S
A
J17
BEEP
SB U S12
J17
HP OUT
A
SB U S34
J17
I2S
I2S O U T
A
QP L
Sound IF
ANA_IN1+
ANA_IN2+
Sound IF
Mono_IN
SC1_IN_L
SC1_IN_R
SC2_IN_L
SC2_IN_R
SC3_IN_L
SC3_IN_R
58
60
DEMODULATOR
13
S1..4
14
I2S_CL
I2S_WS
I2S_DA_OUT
16
SBUS Interface
I2S_DA_IN
S_CL
17
15
S_ID
S_DA_OUT
20
S_DA_IN
QP R
11
12
I2S Interface
FM1
FM2
NICAM1
NICAM2
MSP3410
I2S L/R
LS L
D/A
LS R
D/A
Headphone L
D/A
Headphone R
D/A
29
DACN_L
28
DACN_R
DFP
55
IDENT
52
FM1
26
DACA_L
25
DACA_R
53
49
A/D
Scart_L
50
A/D
Scart_R
37
Scart_L
D/A
Scart_R
D/A
36
34
46
33
47
SCART Switching Facilities
SC1_OUT_L
SC1_OUT_R
SC2_OUT_L
SC2_OUT_R
Detection part of the MSP 3410
Stereo
Detection
Filter
ID EN T
Level
Detect
AM
Demodulation
Stereo
Detection
Register
Bilingual
Detection
Filter
Level
Detect
www.rtv-horvat-dj.hr
IV01 TDA 8855H
TUNER
13
1
6
VIF AMPLIFIER
AGC FOR IF
+ PLL DEMOD
+ TUNER
+8V
SDA
H-DRIVE
17
TOP
18
59
I2C - BUS
28
25
61
23
SYNC SEP.
TRANSCEIVER
53
19
58
VCO
+1st LOOP
57
56
2nd LOOP
+CONTROL
EW - GEOMETRY
HOR. OUT
HOR. OUT
POL
62
EW
3
EHT
63
VERICAL SYNC.
H / V
VERTICAL
AMPLIFIER
DAC's
SEPARATOR
DIVIDER
GEOMETRY
TDA8855H
AFC
MUTE
IDENTIF.
VIDEO IDENT
VIDEO
CHROM TRAP
MUTE
+ BANDPASS
FILTER
TUNING
64
V-DRIVE
CONTR.
CONTROL
WHITE P
15
VIDEO
BRI
AFC
33
CONTINUOUS
RGB CONTROL
CATHODE
BLUE STRETCH
CALIBRATOR
OUTPUT
R
32
G
31
REF
B
34
BEAM CURR.
30
BLACK CURR.
SW
35
R1
SIF
QSS MIXER
CVBS Y/C
LUMA DELAY
BLACK STRETCH
36
G1
AMPLIFIER
AM DEMOD.
SWITCH
PEAKING
RGB MATRIX
37
B1
CORING
RGB-1 INPUT
38
BL1
8
10
27
11
SWITCH
PAL/NTSC
BASE-BAND
RGB-2 INPUT
CD MATRIX
SECAM
DELAY LINE
RGB/YUV
SAT. CONTROL
MATRIX
SKIN TINT
DECODER
16
24
SOUND
TRAP
29
54
26
20
CHR.
60
CVBS
SW
21
CVBS/Y
AGC
SAT
CVBS OUT
22
SW.OUT
AM OUT
SW.OUT
HUE
CVBS OUT
9
CVBS IN
www.rtv-horvat-dj.hr
SIF - IN
2
7
INTERCARR. OUT
IF - IN
14
SCL
53
51
50
55 49
Fsc
41
R2
42
43 44
G2
40 45
B2 BL2
46
47
39
V
U
Y
BLOCK DIAGRAM (AUDIO MODULE DOLBY PROLOGIC)
SCHEMA SYNOPTIQUE (AUDIO MODULE DOLBY PROLOGIC)
BLOCKSCHALTBILD (AUDIO MODULE DOLBY PROLOGIC)
SCHEMA A BLOCCI (AUDIO MODULE DOLBY PROLOGIC)
ESQUEMA DE BLOQUES (AUDIO MODULE DOLBY PROLOGIC)
BLOCKDIAGRAM:
audio module dolby prologic
BA005c
L& R
Subwoofer
Surround
BA002
C u r r ent
L i m i t er
GND
+ Us
BA005d
+ Ua
M ute
3
Right
IA001
11
2
BA005a
Ex t ernal speaker
BA006
Internal speaker
BA005a
Ex t ernal speaker
SA 0 0 1
Left 7
4
BA007
6
Internal speaker
5
BA001
Lef t
M u t e Circuit
+ Us
Right
Subwoofer
Center
3
IA002
11
2
BA008/
BA009
Center
7
4
BA005b
Surround
M ute_L/ R
Surround
M ute_surr
6
Headphones
L& R
5
M u t e Circuit
IA003
BA004
www.rtv-horvat-dj.hr
Headphones
Interface requirement audio part with Dolby Prologic
Left
Right
Center Subwoofer
DP L 3520 A
MSP3410 D
Audio_clock
Headphone
D/A
Channel 1
D/A
Demod.
IF input
I/O
Switching
Part
A/D
AM and
Scart in
I2Sout
I2S1 in
I2S1 in
I2Sout
DSP
(Dolby + effect)
Loudspeaker
D/A
Mute L/ R Mute Surr
Left
Channel 2
D/A
Right
Not Surround
Used
Block diagram Dolby Prologic
Dolby Prologic COB
(IS40)
AV1 out
+5V
AV2 out
IIC Bus
2
RESET MSP
+8V
SIF
MSP 3410 D
AV1 in
Left
2
AV2 in
Right
2
Headphone Left
AV3 in
Headphone Right
2
Mute L/R
AM AF
Mute Surround
BS003
IISBus
Clock
Center
RESETQ
Surround
DPL 3520
IIC Bus
Subwoofer
+5V
Block diagram Virtual Dolby
TDA 7269
Headphones
+5V
2
IIC Bus
2
2
2
2
Loudspeakers
RESET MSP
+8V
SIF
Mute
Circuit
MSP 3410 D
AV1 out
AV1 in
2
2
AV2 in
2
AV2 out
AV3 in
2
2
AM AF
IISBus
RESETQ
IIC Bus
DPL 3518
+5V
Virtual Dolby
COB
+UA
MUTE
www.rtv-horvat-dj.hr
ICC17
First issue 07 / 98
EXTENDED SYMPTOM CODE
(*1)
CONDITION
CODE
IRIS REPAIR CODING SYSTEM
MAIN SYMPTOM CODE
1
NO ACTION
IN A HOT ENVIRONMENT
5
IN A COLD ENVIRONMENT
6
WHEN SWITCHING
7
UNDER VIBRATION
8
IN A DAMP/WET
ENVIRONMENT
9
IN A DRY ENVIRONMENT
A
AFTER BEING DROPPED
B
AFTER LIGHTNING STRIKE
C
ONLY CERTAIN
STATION(S)/SOFTWARE/
MODE
D
ONLY ON CERTAIN
STANDARDS
E
ONLY ON ONE CHANNEL
F
ONLY WITH CERTAIN
INPUT(S)
G
ONLY ON CERTAIN
OUTPUT(S)
H
IN STANDBY/OFF MODE
J
AT EDIT POINT
K
WHEN INTERCONNECTED
L
LIQUID CONTAMINATION
X
NO SYMPTOM OR
PROBLEM FOUND
111
112
113
114
115
116
117
118
119
11A
11B
11X
NO POWER ON AC
NO POWER WHEN USING AC-ADAPTER
NO POWER WHEN USING DRY BATTERIES
NO POWER WHEN USING RECHARGEABLE
BATTERIES
NO POWER FROM SOLAR CELL
NO POWER WHEN USING A CAR BATTERY
SHORT OPERATION TIME/SHORT BATTERY
LIFE
POWER-OFF FUNCTION NOT WORKING
NO SWITCH-ON FROM STANDBY
POWERS UP, BUT NO OPERATION
CYCLIC POWER ON/OFF
OTHER POWER PROBLEM
210 NO RECEPTION
2
COMMUNICATION
4
1
211
212
213
214
215
216
217
218
219
21X
NO AM RECEPTION
NO FM RECEPTION
NO SW RECEPTION
NO VHF RECEPTION
NO UHF RECEPTION
NO BS RECEPTION
NO CS RECEPTION
NO HDTV RECEPTION
NO QPS RECEPTION
OTHER 'NO RECEPTION' PROBLEM
310 NO PICTURE
3
PICTURE
AFTER A WHILE
311
312
313
314
315
316
317
31X
NO PICTURE IN E TO E MODE
NO PICTURE IN PLAYBACK MODE
NO PICTURE IN VIEWFINDER
NO PICTURE, ONLY RASTER
NO RASTER, BLACK PICTURE
ONLY HORIZONTAL LINE
ONLY VERTICAL LINE
OTHER 'NO PICTURE' PROBLEM
410 NO COLOUR
4
COLOUR
3
411
412
413
414
41X
NO COLOUR IN E TO E MODE
NO COLOUR IN PLAYBACK MODE
NO COLOUR IN VIEWFINDER
NO COLOUR IN PART OF PICTURE
OTHER 'NO COLOUR' PROBLEM
510 NO AUDIO
5
AUDIO
INTERMITTENTLY
511
512
513
51X
NO SOUND IN E TO E MODE
NO PLAYBACK OF OUTGOING MESSAGE(S)
NO PLAYBACK OF INCOMING MESSAGE(S)
OTHER 'NO AUDIO' PROBLEM
610 NO MECHANICAL OPERATION
6
MECHANISM
CONSTANTLY
2
www.rtv-horvat-dj.hr
1
GENERAL
110 POWER PROBLEM
611
612
613
614
615
616
617
618
619
61A
61X
NO DISC ROTATION
NO FORWARD OPERATION
NO REVERSE OPERATION
NO FAST FORWARD OR REWIND FUNCTION
NO LOADING
NO UNLOADING OR EJECTING OF TAPE
NO AUTO SHUT-OFF OPERATION
TONEARM DOES NOT MOVE
DISC NOT BEING EJECTED
MAGAZINE DOES NOT EJECT
OTHER 'NO MECHANICAL OPERATION'
PROBLEM
7
(*1)
DATA PROCESSING
710 NO DATA PROCESSING
CAUTION
THE 'X' EXTENDED SYMPTO
AVAILABLE IN THE
CONCERNED SYMPTOM GROUP
8
PRINTING
ONLY BE USED TO INDICATE
DESCRIPTION IS NOT
717
718
71X
NO INITIAL SCREEN
SYSTEM DOES NOT RESET
SYSTEM DOES NOT BOOT UP
NO OPERATION FROM PLUG-IN MODULE
NO KEYBOARD OPERATION
NO OPERATION FROM OTHER
INPUT/OUTPUT
NO DATA STORAGE OPERATION
NO DATA COMMUNICATION
OTHER 'NO DATA PROCESSING' PROBLEM
810 NO PRINTER OPERATION
CODES (*-**X) SHOUL
THAT A SUITABLE SYMPTOM
711
712
713
714
715
716
811
812
813
814
815
81X
NOT PRINTING
NO COMMUNICATION WITH PRINTER
PAPER NOT LOADING
NO PAPER FEED
NO IMAGE FIXATION
OTHER NO PRINTER OPERATION PROBLEM
2
LEVEL
120 CHARGING PROBLEM
121
122
12X
NO BATTERY CHARGING
INCOMPLETE BATTERY CHARGE
OTHER CHARGING PROBLEM
3
QUALITY
130 DISPLAY FUNCTION PROBLEM
131
132
133
134
135
136
137
138
139
13X
FAULTY TIMER/COUNTER DISPLAY
FAULTY LAMP/LED OPERATION
FAULTY LEVEL METER OPERATION
FAULTY ON-SCREEN DISPLAY OPERATION
ELECTRONIC TUNING DISPLAY FAULT
MECHANICAL TUNING DISPLAY FAULT
FAULTY TIME CODE DISPLAY
FAULTY ALARM/ERROR DISPLAY
DISPLAY DIM
OTHER DISPLAY FUNCTION PROBLEM
4
NOISE
140 ABNORMAL NOISE
141
142
143
144
145
146
14X
CRT DISCHARGING NOISE
EHT DISCHARGING NOISE
NOISY CABINET
NOISY TRANSFORMER
NOISY COMPONENT(S)
RATTLE
OTHER ABNORMAL NOISE
SYMPTOM CODE TABLE
5
UNSTABLE
150 REMOTE CONTROL PROBLEM
151
152
153
154
15X
NO REMOTE CONTROL OPERATION
INCORRECT REMOTE CONTROL OPERATION
REMOTE CONTROL PROGRAMMING/
LEARNING MODE PROBLEM
POOR REMOTE CONTROL SENSITIVITY
OTHER REMOTE CONTROL PROBLEM
6
160 PHYSICAL DAMAGE
161
162
163
164
165
166
167
168
169
16A
16B
16C
16X
220 POOR RECEPTION
221
222
223
224
225
226
227
228
229
22X
POOR AM RECEPTION
POOR FM RECEPTION
POOR SW RECEPTION
POOR VHF RECEPTION
POOR UHF RECEPTION
POOR BS RECEPTION
POOR CS RECEPTION
POOR HDTV RECEPTION
POOR QPS RECEPTION
OTHER 'POOR RECEPTION' PROBLEM
230 TRANSMISSION PROBLEM
231
232
233
234
235
23X
NO TRANSMISSION
POOR TRANSMISSION
TRANSMISSION LEVEL TOO HIGH
NO TRANSMISSION BETWEEN BASE UNIT
AND HANDSET
POOR TRANSMISSION BETWEEN BASE UNIT
AND HANDSET
OTHER TRANSMISSION PROBLEM
240 NOISY RECEPTION/
TRANSMISSION
241
242
243
24X
LINE NOISE
OSCILLATION
INTERSTATION INTERFERENCE
OTHER NOISE RECEPTION/TRANSMISSION
PROBLEM
320 PICTURE LEVEL PROBLEM
330 PICTURE QUALITY PROBLEM
340 PICTURE NOISE
321
322
323
324
325
326
327
32X
331
332
333
334
335
336
337
338
339
33A
33X
341
342
343
344
345
346
347
348
34X
PICTURE TOO DARK
PICTURE TOO BRIGHT
CONTRAST TOO LOW
CONTRAST TOO HIGH
SATURATED WHITE OR BLACK LEVEL
SHADING ON PICTURE
ONLY PARTIAL PICTURE
OTHER PICTURE LEVEL PROBLEM
420 COLOUR LEVEL PROBLEM
421
422
42X
WEAK COLOUR
EXCESSIVE COLOUR
OTHER COLOUR LEVEL PROBLEM
520 AUDIO LEVEL PROBLEM
521
522
523
524
525
52X
LOW AUDIO LEVEL
EXCESSIVE AUDIO LEVEL
BALANCE PROBLEM
FADER PROBLEM
AUDIO LEVEL REMAINING
OTHER AUDIO LEVEL PROBLEM
620 IRREGULAR MECHANICAL
OPERATION
621
622
623
624
625
626
627
628
629
62A
62X
IRREGULAR ROTATION
IRREGULAR FORWARD MODE
IRREGULAR REVERSE OPERATION
IRREGULAR FAST FORWARD OR REWIND
FUNCTION
IRREGULAR LOADING
IRREGULAR UNLOADING OR EJECTING OF
TAPE
IRREGULAR AUTO SHUT-OFF OPERATION
IRREGULAR TONEARM MOVEMENT
IRREGULAR EJECTION OF DISC
IRREGULAR DIRECTION CHANGE
OTHER 'IRREGULAR MECHANICAL
OPERATION' PROBLEM
720 FAULTY DATA PROCESSING
OPERATION
721
722
723
724
725
726
727
728
72X
INCORRECT DATA
SYSTEM RESET WHILE BEING USED
SYSTEM LOCKS OUT/CRASHES
FAULTY OPERATION OF PLUG-IN MODULE
FAULTY KEYBOARD OPERATION
FAULTY OPERATION OF OTHER
INPUT/OUTPUT
FAULTY DATA STORAGE OPERATION
FAULTY DATA COMMUNICATION
OTHER 'FAULTY DATA PROCESSING'
PROBLEM
820 ERRONEOUS PRINTER
OPERATION
821
822
823
82X
PRINT IMAGE REVERSED (NEGATIVE/
POSITIVE)
IRREGULAR PAPER FEED
ERRONEOUS PRINT MODE SWITCHING
OTHER PRINTER OPERATION PROBLEM
POOR PICTURE RESOLUTION
POOR FOCUS
RINGING ON PICTURE
EXCESSIVE SMEAR/LAG
POOR LINEARITY OR GEOMETRY
PICTURE SIZE INCORRECT
INCORRECT CENTRING OF PICTURE
PICTURE SLANTED
V-SIZE INCORRECT
H-SIZE INCORRECT
OTHER PICTURE QUALITY PROBLEM
430 POOR COLOUR QUALITY
431
432
433
434
435
436
437
438
43X
SOME OR ALL COLOURS MISSING
POOR WHITE BALANCE
HUE PROBLEM
PURITY ERROR
LANDING ERROR
CONVERGENCE ERROR
REGISTRATION ERROR
PITCH MOIR…
OTHER COLOUR QUALITY PROBLEM
530 AUDIO QUALITY
531
532
533
534
53X
POOR FREQUENCY RESPONSE
DISTORTED AUDIO
NO OR POOR TREBLE
NO OR POOR BASS
OTHER AUDIO QUALITY PROBLEM
630 SPEED PROBLEM
631
632
63X
SPEED TOO FAST
SPEED TOO SLOW
OTHER SPEED PROBLEM
730 DATA DISPLAY PROBLEM
731
732
733
734
735
736
737
73X
251
252
25X
441
442
44X
COLOUR NOISE ON A BLACK & WHITE
PICTURE
COLOUR STREAKING
OTHER COLOUR NOISE PROBLEM
540 NOISY AUDIO
541
542
543
544
545
546
547
548
54X
HUM
HISS
CROSSTALK
STATIC, POP OR CLICK NOISE
BUZZ
SCRATCHING NOISE
IGNITION NOISE
MULTIPATH NOISE
OTHER AUDIO NOISE PROBLEM
640 MECHANICAL NOISE
641
642
643
644
645
646
647
64X
INCORRECT PRINTING POSITION
LOW PRINT CONTRAST
EXCESSIVE PRINT CONTRAST
BLURRED PRINT IMAGE
PRINT IMAGE NOT SHARP
DOTS MISSING-IN PRINT IMAGE
OTHER PRINT QUALITY PROBLEM
260 TUNING PROBLEM
261
262
263
264
26X
PRINTING NOISE LINES
DIRTY PRINTING
OTHER NO I S Y P R I N T I N G PROBLEM
178
17X
FAULTY CLOCK FUNCTION
FAULTY SLEEP FUNCTION
FAULTY TIMER PROGRAMMING
FAULTY TIMER RECORDING
SOFTWARE PROGRAMMING PROBLEM
FAULTY RECORD MUTE OPERATION
FAULTY PROGRAMMED PLAYBACK
OPERATION
FAULTY MEMORY FUNCTION
OTHER GENERAL FUNCTION PROBLEM
270 SPECIAL COMMUNICATION
PROBLEM
271
272
273
274
275
276
277
278
27X
FAULTY DIALLING
FAULTY CHANNEL SELECTION
FAULTY AUTO-ANSWER OPERATION
FAULTY MESSAGE READ-OUT FUNCTION
FAULTY AUTODIAL MEMORY
FAULTY SPEECH PROCESSING
NO RINGING TONE
WEAK RINGING TONE
OTHER SPECIAL COMMUNICATION
PROBLEM
370 SPECIAL PICTURE FUNCTION
PROBLEM
361
362
363
371
372
373
355
356
357
358
450 UNSTABLE COLOUR
451
452
453
454
45X
COLOUR FLASHING
HUE CONSTANTLY CHANGING
FLICKERING COLOUR
COLOUR NOT LOCKED
OTHER UNSTABLE COLOUR PROBLEM
550 UNSTABLE AUDIO
551
552
553
554
555
556
55X
JUMPING OR REPEATING AUDIO
AUDIO PUMPING OR BREATHING
AUDIO DROPOUTS
CYCLIC AUDIO MUTING
WOW AND FLUTTER
HOWLING/ACOUSTIC FEEDBACK
OTHER UNSTABLE AUDIO PROBLEM
364
365
366
36X
NO PICTURE RECORDING
NO ERASURE PROTECTION FOR VIDEO
PREVIOUS VIDEO RECORDING NOT BEING
ERASED
UNWANTED ERASURE OF PICTURE
NO CAMERA RECORDING
ONLY ONE FIELD PER FRAME BEING
RECORDED
OTHER PICTURE RECORDING PROBLEM
460 POOR COLOUR RECORDING
461
46X
NO COLOUR RECORDING
OTHER COLOUR RECORDING PROBLEM
560 POOR AUDIO RECORDING
561
562
563
564
565
56X
AUDIO NOT BEING RECORDED
NO ERASURE PROTECTION FOR AUDIO
PREVIOUS AUDIO RECORDING NOT BEING
ERASED
UNWANTED ERASURE OF AUDIO
MESSAGE NOT BEING RECORDED
OTHER AUDIO RECORDING PROBLEM
660 DAMAGE TO SOFTWARE
650
661
662
663
664
665
666
667
66X
TAPE GETS SCRATCHED
DISC GETS SCRATCHED
TAPE GETS CHEWED/WRINKLED
TAPE JAMMED OR BROKEN
TAPE GETS CURLED
SLACK TAPE
TAPE STICKING
OTHER SOFTWARE DAMAGE PROBLEM
760 DATA READ/WRITE PROBLEM
761
762
763
76X
841
842
84X
171
172
173
174
175
176
177
360 POOR PICTURE RECORDING
SYNC PROBLEM
PICTURE PUMPING
PICTURE JITTER
PICTURE SHAKING (HORIZONTAL OR
VERTICAL)
FLICKERING PICTURE
FLASHING PICTURE
CYCLIC PICTURE MUTING
HEAD IMPACT ERROR CAUSING UNSTABLE
PICTURE
VCR SKEW ERROR
FROZEN PICTURE
JUMPING/REPEATING PICTURE
OTHER 'UNSTABLE PICTURE' PROBLEM
750
840 NOISY PRINTING
MANUAL TUNING PROBLEM
AUTOMATIC TUNING PROBLEM
INCORRECT TUNING
TUNING MEMORY PROBLEM
OTHER TUNING PROBLEM
SPECIAL FUNCTIONS
351
352
353
354
ROTATION NOISE
MOTOR NOISE
WIND NOISE
TAPE SQUEALING
FAN NOISE
DISC SCRAPING
NOISY TAPE LOADING
OTHER MECHANICAL NOISE PROBLEM
740
DAMAGED CABINET
DAMAGED HANDLE
DAMAGED CONTROL KNOB(S)/BUTTON(S)
DAMAGED DOOR/COVER
DAMAGED SEAL
DAMAGED PLUG OR SOCKET
DAMAGED LENS
DAMAGED CARTRIDGE OR STYLUS
DAMAGED ANTENNA
DAMAGED CRT OR VIEWFINDER
MISSING COMPONENT(S) OR ORNAMENTAL
PARTS
PRINTED MARKINGS ERASED/PEELED OFF
OTHER PHYSICAL DAMAGE
7
FORMATTING PROBLEM
DATA ON STORAGE MEDIUM BEING LOST
FRAME MEMORY PROBLEM
OTHER DATA READ/WRITE PROBLEM
850 UNSTABLE PRINTER OPERATION 860 RIBBON/PAPER PROBLEMS
851
852
853
85X
UNSTABLE PAPER LOADING
UNSTABLE MULTI-PAPER LOADING
INCORRECT LINE-UP OF CHARACTERS
OTHER UNSTABLE PRINTER OPERATION
PROBLEM
861
862
863
864
865
86X
RIBBON BROKEN
RIBBON STUCK/STICKING
RIBBON DERAILED
PAPER STUCK/STICKING TO MECHANISM
PAPER JAM
OTHER RIBBON/PAPER PROBLEM
8
OTHER CONDITIONS
170 GENERAL FUNCTION PROBLEM 180 SPECIAL REQUIREMENTS
350 UNSTABLE PICTURE
359
35A
35B
35X
440 NOISY COLOUR
TUNING DRIFT
FADING
OTHER UNSTABLE RECEPTION/
TRANSMISSION PROBLEM
INCORRECT CHARACTER DISPLAY
MISSING DISPLAY CHARACTERS
FAULTY GRAPHIC DISPLAY
FAULTY SWITCHING BETWEEN GRAPHIC/
CHARACTER MODE
FAULTY PROMPT/CURSOR OPERATION
DATA DISPLAY COLOUR INCORRECT
NO PAGING OR SCROLL MODE
OTHER DATA DISPLAY PROBLEM
830 POOR PRINT QUALITY
831
832
833
834
835
836
83X
SNOWY PICTURE
DOT NOISE OR DROPOUT ON PICTURE
NOISE BARS ON PICTURE
BLANKING LINES ON PICTURE
BEATING O PICTURE
GHOSTING ON PICTURE
VCR HEAD SWITCHING NOISE ON PICTURE
OVERMODULATION NOISE
OTHER PICTURE NOISE PROBLEM
250 UNSTABLE RECEPTION/
TRANSMISSION
RECORDING & PHYSICAL
PROBLEMS
374
375
376
377
378
379
37A
37B
37X
EDITING PROBLEM
FAULTY FADING/WIPER OPERATION
FAULTY NEGATIVE/POSITIVE SWITCHING
FUNCTION
FAULTY SUPERIMPOSE/TELOP OPERATION
FAULTY PICTURE IN PICTURE/DIGITAL
PICTURE OPERATION
FAULTY PICTURE TRANSMISSION
FAULTY DIGITAL SHUTTER FUNCTION
FAULTY GENLOCK FUNCTION
FAULTY FLASH/STROBE FUNCTION
FAULTY DIGITAL PICTURE FUNCTION
FAULTY AUTO-EDIT FUNCTION
OTHER SPECIAL PICTURE FUNCTION
PROBLEM
470 SPECIAL COLOUR FUNCTION
PROBLEM
471
472
47X
FAULTY FADE OPERATION
FAULTY ECHO OPERATION
FAULTY MIXING OPERATION
FAULTY REPEAT MODE OPERATION
FAULTY AUDIO PROCESSING
FAULTY SYNC RECORDING OPERATION
FAULTY DBB/DOL OPERATION
FAULTY NOISE REDUCTION OPERATION
OTHER SPECIAL AUDIO FUNCTION
PROBLEM
670 MECHANICAL OPERATION
PROBLEM
671
672
673
674
675
676
677
678
679
67A
67X
FAULTY START/STOP OPERATION
FAULTY PAUSE OPERATION
FAULTY AUTOMATIC PROGRAM SEARCH
FAULTY CUE/REVIEW MODE
FAULTY SLOW MOTION OPERATION
FAULTY HIGH-SPEED SCANNING MODE
FAULTY SPEED COPY FUNCTION
FAULTY REPEAT OPERATION
FAULTY RECORD REVIEW MODE
FAULTY AMS OPERATION
OTHER MECHANICAL OPERATION PROBLEM
770 SPECIAL DATA PROCESSING
771
772
773
77X
870
TEST AND CHECK
GENERAL OVERHAUL
SYSTEM/FREQUENCY CONVERSION
INITIAL SETUP REQUESTED
MODIFICATION/CIRCUIT CHANGE
WRONG SET IN CARTON
OTHER SPECIAL REQUIREMENTS
SYMPTOM NOT AVAILABLE
280 SPECIAL RECEPTION PROBLEM
281
282
283
284
285
286
287
288
28X
FAULTY STEREO RECEPTION
FAULTY MAIN CHANNEL (A) FUNCTION
FAULTY SUB-CHANNEL (B) FUNCTION
FAULTY SSB RECEPTION
FAULTY RDS/VPS OPERATION
FAULTY TELETEXT RECEPTION
FAULTY SATELLITE/RTTY RECEPTION
FAULTY FAX OPERATION
OTHER SPECIAL RECEPTION PROBLEM
380 PICTURE DISPLAY/PICKUP
PROBLEM
381
382
383
384
385
38X
BURN MARK ON DISPLAY/PICKUP
SCRATCH ON DISPLAY/PICKUP
DUST/DIRT ON DISPLAY/PICKUP
PHOSPHOR/PIXEL MISSING ON
DISPLAY/PICKUP
BRIGHT POINT(S) IN PHOSPHOR/PIXEL
OTHER PICTURE DISPLAY/PICKUP
PROBLEM
480
FAULTY AUTOMATIC WHITE BALANCE
FAULTY COLOUR EFFECTS FUNCTION
OTHER SPECIAL COLOUR FUNCTION
PROBLEM
570 POOR SPECIAL AUDIO
FUNCTION
571
572
573
574
575
576
577
578
57X
181
182
183
184
185
186
18X
18Z
580 STEREO/MULTI MODE
OPERATION PROBLEM
581
582
583
584
585
58X
NO STEREO OPERATION
POOR CHANNEL SEPARATION
DIFFERENCE IN PHASE BETWEEN
CHANNELS
PROBLEM WITH SURROUND SOUND MODE
PROBLEM WITH PCM AUDIO MODE
OTHER STEREO/MULTI MODE PROBLEM
680 LENS PROBLEM
681
682
683
684
68X
FOCUS PROBLEM
ZOOM PROBLEM
IRIS PROBLEM
MACRO PROBLEM
OTHER LENS PROBLEM
780
FAULTY SELF-DIAGNOSTIC MODE
FAULTY WORD PROCESSING FUNCTION
FAULTY GRAPHIC EDIT FUNCTION
OTHER 'SPECIAL DATA FUNCTION' PROBLEM
880 FAULTY FONT/CHARACTER
FUNCTIONS
881
882
883
88X
INCORRECT CHARACTERS
INCORRECT CHARACTER SIZE
FONT LOADING PROBLEM
OTHER FAULTY FONT/CHARACTER
FUNCTION PROBLEM
SECTION CODES
ANTENNA SECTION
HDD
HARD DISC DRIVE
RFU
BOOSTER/RF UNIT
APA
AUDIO PROCESSING/ANALOG
HFS
HIGH FREQUENCY SECTION (RF)
RHD
ROTARY HEAD(S)
APD
AUDIO PROCESSING/DIGITAL
HOL
CASSETTE HOLDER
SFT
SOFTWARE (TAPE, DISC, ETC.)
APR
SIGNAL PROCESSING (ANALOG)
IDS
INFORMATION DISPLAY SECTION
SHD
STATIONARY HEAD(S)
ARM
ARM MECHANISM
IFC
IF-CIRCUIT
SLD
SLED MECHANISM
BCH
BATTERY CHARGE
IMG
IMAGE DISPLAY UNIT
SNS
SENSOR UNIT
BZL
BEZEL
INC
INTERNAL CONNECTOR
SPK
SPEAKER
CBT
CABINET
INP
SIGNAL INPUT SECTION
SRS
SUPPLY REEL SECTION
CHA
CHASSIS
KBD
KEYBOARD (SEPARATE)
STA
STATIC BLOCK
CLK
CLOCK/TIMER SECTION
LDG
LOADING MECHANISM
SVO
SERVO SECTION
CPA
COLOUR PROCESSING/ANALOG
LNM
LENS MECHANISM
SYS
SYSTEM CONTROL SECTION
CPD
COLOUR PROCESSING/DIGITAL
MEM
MEMORY CIRCUIT
TDM
TAPE DRIVE MECHANISM
CRT
PICTURE TUBE
MIC
MICROPHONE SECTION
THR
THREADING MECHANISM
CTR
CONTROL PANEL
OUT
SIGNAL OUTPUT SECTION
TIM
TIMER SECTION
DDM
DISC DRIVE MECHANISM
PFM
PAPER FEED MECHANISM
TNR
TENSION REGULATOR
DFL
DEFLECTION CIRCUIT
PIN
PINCH ROLLER/LEVER
TPT
TAPE PATH
DPR
SIGNAL PROCESSING (DIGITAL)
PRG
PROGRAMMING SECTION
TRS
TAKE-UP REEL SECTION
ERA
ERASE CIRCUIT
PRI
PRINT BLOCK
TUN
TUNING SECTION
EXC
EXTERNAL CONNECTOR
PRT
PROTECTION CIRCUIT
TXT
TEXT PROCESSING
FDD
FLOPPY DISC DRIVE
PSU
POWER SUPPLY
VPA
VIDEO PROCESSING/ANALOG
FLX
FLEXIBLE PCB
PUD
PICK-UP DEVICE
VPD
VIDEO PROCESSING/DIGITAL
FMW
FIRMWARE
PWA
POWER AMP SECTION
VWF
VIEWFINDER
FPK
FOCUS PACK
REM
REMOTE CONTROL SECTION
WIR
LEAD WIRE
HCM
HEAD CARRIAGE MECHANISM
RFM
RIBBON FEED MECHANISM
XXX
CABINET/COSMETIC PARTS
DEFECT CODES
MECHANICAL
REPAIR CODES
ELECTRICAL
A
REPLACEMENT
N
MAINTENANCE
B
MECHANICAL ALIGNMENT
O
REFURBISHING
C
ELECTRICAL ALIGNMENT
P
PREVENTIVE PARTS REPLACEMENT
D
E
RESOLDERING
Q
PREVENTIVE ACTION WITHOUT PARTS REPLACEMENT
CLEANING
U
EXPLANATION FOR CUSTOMER
OPEN
F
LUBRICATION
V
ESTIMATION REFUSED
S
LEAKING
REPAIRED ELECTRICAL PARTS
W
ESTIMATION WITH PARTS
SCRATCHED
T
BAD CONTACT, CONNECTION
G
H
REPAIRED MECHANICAL PARTS
X
ESTIMATION WITHOUT PARTS
H
CRACKED, PEELED, CORRODED
U
OPEN PATTERN
I
S/B MODIFICATION
A
WORN OUT
N
EXHAUSTED, LOW EMISSION
B
DIRTY, CLOGGED
O
BURNT, ARCING, MISSING PIXELS
C
MISALIGNED
P
MISALIGNED
D
CUT, BROKEN
Q
SHORT
E
DEFORMED
R
F
SNAPPED
G
I
LOOSE
V
CRACKED PCB
J
SHAKY, UNSTABLE
W
COLD OR NO SOLDERING
K
LEAKING
X
BRIDGED SOLDERING
L
DRY (NO LUBRICANT)
Y
WRONG COMPONENT
M
FOREIGN OBJECT
Z
MISSING COMPONENT
1
SOFTWARE BUG
J
REMOVED COMPONENT (S)
K
ADDED COMPONENTS
Y
RETURN WITHOUT REPAIR
L
FUNCTIONAL CHECK
Z
SET EXCHANGE
M
SPECIFICATION MEASUREMENT
FLAG
SYMPTOM
CODE
PART NO
REF. NO
SECTION/PCB
REPAIR
CODE
FLAG: INDICATES THE ONE MAJOR SYMPTOM/PART COMBINATION BY '1'
DEFECT
CODE
www.rtv-horvat-dj.hr
ANT
QTY
1
.
1 4 1 2
3 6 4 1
1 1 1 1 1 1 1 1 1
3 4 5 6 7 8 9 X X
R 1 2 3 .
1 1 1 . .
Y A 2 2 .
T D M . .
R
C
A
B
1
0
EXAMPLE OF USE :
REV01
S-795-020-10
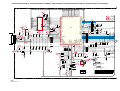
POWER SUPPLY - ALIMENTATION - NETZTEIL - ALIMENTAZIONE - ALIMENTACIÓN
RP20
470R0
19
RP21
RP22 1K0
220R0
DP
1N4001GP
275V~
CP24
4U7
50V
DP21
BZX85C39
43(40)
TP21
BF423
5,4(3,4)
CP22
100N0
5460702500
CP20
220P0
7
1
RP23
100K0
CP23
CP26
100U0
25V
DP22
BZX55C5V6
150P0
DP20
BZX55C51
DP24
LL4148
PGND
PGND
PGND
100K0
VPGND
RP27
100K0
8
RP30 6
470K0 5
IN- IN+
CP03
4N7
RP05
RP31
270K0
RP38
1K0
PGND
T
03
DP
01
DP
RP03
10R0
1N5
02
DP
04
CP10
220U0
400V
GP30M
PGND
CP04
4N7
1
A2
TP15
BTB06-600C
G
TP14
153(160) BC547B
A1
LP82
RP07
5R0
RP14
1K0
RP12
270R0
DP12
RGP10G
RP10
2R2
JL82
3
JL81
4
JL80
7
DP50
RGP02-20
-
-1,1(0,1)
0,2(0)
CP01
100N0
DL81
BZX55C15
FP01
T 2.5 AL
BZX55C27 47U0
1
PL80
47K0
TL82
BC337-40
EFC.17000.00 (TUBE 16/9)
DL82
1N4148
2
CL83
100N0
RP49
470MI0
2W5
AC MAINS
BL81
2
1
EFCcoil
100R0
DP48
RGP10G
CP47
100N0
BP01
Mainsvoltage
(180V-260V)
RL86
270R0
1
RP40
5
CP43
1N0
DP42
LL4148
RL87
270R0
TL83
BC327-40
PGND
BL82
2
1
PGND
HEARTH FIELD
CONNECTION COIL
8(0)
+8V
+200V
LP80
-
DP80
BYW76
2
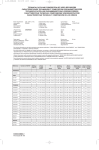
Format
4:3
4:3
4:3
4:3
4:3
4:3
4:3
16:9
16:9
16:9
Usys
126V
132V
132V
126V
126V
126V
126V
138V
138V
138V
Jumper
JL80
JL81
JL81
JL80
JL80
JL80
JL80
JL82
JL82
JL82
RL65
4k7
24k
24k
4k7
4k7
4k7
4k7
47k
47k
47k
+33V
RP80
10K0
RP79
22K0
6,9 (0)
DP46
RGP10G
PGND
CP52
1U0
100V
DP52
LL4148
USYS
CP80
100U0
200V
+12v
DP93
MUR120
LP93
19
U_TIMER
RP91
33K0
-2,2 (0)
CP93
470U0
16V
CP94
330P0
5
RP52
100R0
PGND
DP89
LL4148
9
LP84
RP93
5(0) 10K0
EFC
BP85
TP90
BC847B
+UA
1
2
BL80
CP89
470N0
+UA
(A) -UA
DP84
MUR120
DP54
LL4148
CP84
1MI0
50V
RP54
470R0
18
RP84
1K0
8
IP87
MC7812/CT
33 (0) 1
3
-
0W25
CP54
4U7
RP44
820R0
0W25
CP92
10N0
DP53
1N4148
RP92
1R0
DP94
BZX55C13
PGND
2,7(2,6)
CP56
100N0
3,2(0)
PGND
0,5(0,7)
TP59
BC847B
CP87
10U0
5 (0)
DP83
BAT42
CP96
470U0
16V
12 (0)
CP58
22U0
50V
DP59
BZX55C18
3,2 (0,2)
DP56
LL4148
0,1(0,7) RP09
220R0
PGND
2
PGND
1
RP56
10K0
DP57
LL4148
RP57
10R0
CP57
150P0
RP28
100R0
PGND
CP59
1N5
PGND
DIS
IP95
TDA8139
8
HEAT-GND
7
5
+5V
+5VDST
RP87 +5V
10K0
+5VON
POWER_FAIL
(A,UP)
+5VUP
RP96
1K0
+5V
(UP) RESET-
3
3
RP97
2K74
4,9 (0,2)
6
RESET
2,5 (0)
CP97
10U0
5 (0)
DP85
LL4148
9
-
4
TP86
BC857B
CP86
10N0
0 (0)
5 (0,2)
RP94
1K0
PGND
(2,6)
RP58
1K0
RP83
2K2
TP58
BC847B
DP58
LL4148
RP86
100R0
-
17(0)
RP98
1K0
RP59
1K0
RP39
100R0
0W25
12,2 (0)
DP87
RGP02-20
2
RP85
2K7
0W43
-
TP57
BCR191
+33v
-
PGND
RP55
6K8
DP45
RGP02-20
RP90
10K0
RP89
100R0
CP85
330P0
17
0W25
RP19
1K0
0W25
PGND
TP44
2SA1020-Y
DP44
-1,02
(0,2) BZX55C3V9
DP47
RGP10G
+33V
-
CP42
-
DP43
RGP02-20
PGND
+8V
330P0
RP43
6K8
PGND
!
CP41
10N0
RP53
5K6
PGND
DL83
1N4148
RP42
6K8
6,7(0)
RP46
1K5
RL82
150R0
CL80
7,2
(0)
LP44
3
100R0
1
VI2
-
1
CP49
2N2
1K6V
1
DL80
TL80
BC337-40
297(316)
TP50
ON4977(BU2525AX)
LP01
RP48
-
RL83
1K0
CL82
1MI0
RL85
5K6
RL80
22R0
4
6
TL81
BC327-40
RL81
1K0
CP44
2N2
15VPP T=12µs
RL84
470R0
TP42
BC857B
RP45
10K0
1000VPP T=12µs
3
ICC17
CP81
1N0
VO2
7,2 (0)
0W7
BL80
1 UA
2
TP76
BC847B
2,8 (0)
CP95
1N0
DP41
RGP10G
RP02
1M0
+5VON
RP75
150K0
14
CP13
470U0
16V
RP11
470R0
+5V
TP82
BCR191
5
DP14
BZX55B3V3
150(159)
13
BP85
RP81
1K0
U_VIDEO
CP12
100P0
RP13
15R0
RP72
3K3
Tube
A51EFS83X191
A59EHJ43X15
A66EHJ43X15
A59EGD048X30
A68EGD038X30
A68AGA25X01
A80AEJ15X01
W56EGV023X015
W66EGV023X015
W76EGV023X015
RL65
*
0W25
16
149(160)
RP08
100R0
To DEGAUSSING-COIL
RP77
10K0
RP82
1K2
MUR160
DP82
21
P
CP15
68N0
0(0)
RP74
2K2
PGND
P
2
RP70
4K7
RP63
432K0
0W25
RP64
8K25
CP82
22U0
350V
RP15
9R0
1
DP70
LL4148
TP75
BCR191
12(0)
-
2
BP15
+12V
U_TIMER
CP83
100P0
6
CP11
10N0
400V
STBY_ON
RP73
470K0
TP71
BC847B
12(0)
PP64
1K0
15
+5VUP
0(0)
0,7(0)
LP50
297
+5VUP
RP71
10R0
CP69
220U0
25V
DP72
BZX55C5V1
-UA
--
GP30M
0(0,7) RP68
100R0
CP66
470U0
16V
DP66
LL4148
0(07)
RP69
33K0
TP67
BC847B
TP72
DTC113ZK
TL431ACZ
RP88
0
0W7
RP01
470K0
GNDA
DP
Part of board connected to mains supply.
Partie du châssis reliée au secteur.
Primärseite des Netzteils.
Parte dello châssis collegata alla rete.
Parte del chassis conectar a la red.
CP72
10U0
CP73
10U0
RP62
475R0
RP50
10M0
RP06
470K0
CP38
100N0
DP40
LL4148
IP61
TL431ACZ
4kV
PGND
RP65
10K0
PGND
RP95
100R0
GP30M
CP05
CP50
1N0
RP16
470K0
845.0
v
RP78
470K0
CP61
100P0
2
CP51
150P0
RP18
470K0
PGND
RP41
470R0
V4
RP61
1M0
K
PGND
RP17
470K0
DP67
LL4148
A
E
3
OUT 7 5,7(0)
+
DP60
LL4148
U_STBY
6,8(7,1)
0W25
RP60
2K2
1
C
IP50
TLP621
IP20
2(1,2)
ERZV14D511
5VPP-H
RP35
470K0
6
1,3(3)
V+
DP61
LL4148
CP63
100U0
25V
RP66
1K0 9,3(0)
4
3(1,9)
PGND
5,5
DP63
LL4148
3
5,5(3,4)
IP20
8 V+
TS3702CD
OUT 1
4,1(2,5)
+
RP25
4
3 100K0
PGND
2,7(1,7) 2 INRP26 3 IN+
DP62
LL4148
5
RP24
27K0
U_STBY
RP76
270R0
LP20
4
VO1
16
DP
1N4001GP
GP30M
(PP)17900
MAIN
42 (39,7)
0W25
VI1
PGND
CP16
470N0
PROG
DP
17
DP
Note :
During measurements in the power
supply unit
- Use the primary power unit ground
( PGND ).
Attention :
Mesure dans le bloc alimentation
- Utiliser la masse du bloc alimentation
( PGND ).
Achtung :
Bei Messungen im Primärnetzteil
- Primärnetzteilmasse verwenden
( PGND ).
Attenzione :
misure nell'alimentatore primario
- usare massa alimentazione primario
( PGND ).
Cuidado :
Medida en el bloque de alimentacion
- Utilizar la masa del bloque de
alimentacion ( PGND ).
1N4001GP
18
1N4001GP
CP17
470N0
275V~
GND
DELAY
(5) : standby
RP99
1K21
+8(0)
+8V
CP98
470N0
(UP) PO
Use isolating mains transformer - Utiliser un transformateur isolateur du secteur -Einen Trenntrafo verwenden
Utilizar un transformador aislador de red - Utilizzare un trasformatore per isolarvi dalla rete
ICC17
First issue 07 / 98
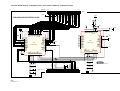
GNDF
EHT
9
CF03
220N0
RL05
*
FOCUS
RL02
*
GNDF
49
CF10
10N0
RF06
*
7,9
+
-
CF08
220N0
(DP17169.00)
LL31
(OS)
RL35
4R7
0W5
DL31
BAV21
TL32
BC337-40
6,3
CL33
100P0
TL31
BC847B
0,4
RL33
2K2
GNDL
GNDL
1
(OS)
RL42
100R0
LL33
TL34
BUH516TH16
RL26
1K0
6
LL32
2
GNDL
0,5
RL25
6K8
0,6
RL40
1K0
RL41
220R0
GNDL
GNDL
GNDL
T = 20ms
LFB
PO
U_VIDEO
(uP,OS)
(P)
(uP)
CL11
100U0
RL12
100K0
GNDF
RL70
5K6
GNDL
CL24
*
DL25
RGP10G
CL51
*
DL51
RGP10M
LL22
*
CL22
*
DL24
RGP10G
TL51
SH2G41
GNDL
GNDL
DP.17169.00
DL22
BYW76
RL51
1K0
RL76
4K7
RL52
18K0
RL71
13K0
DL72
1N4148
RL72
24K0
DL73
LL4148
RL73
12K0
DL74
1N4148
(DP)
MAIN
.17043.00
1100Vpp-H
CL52
22N0
RL55
220K0
CL55
330P0
Indicates critical safety components, and identical components should
be used for replacement. Only then can the operational safety be garanteed.
Le remplacement des éléments de sécurité (repérés avec le symbole
) par
des composants non homologués selon la Norme CEI 65 entraine la nonconformité de l'appareil.
Dans ce cas, la responsabilité du fabricant n'est plus engagée.
Wenn Sicherheitsteile (mit dem Symbol
gekennzeichnet) durch nicht
normgerechte Teile ersetzt werden, erlischt die Haftung des Herstellers.
La sostituzione degli elementi di sicurezza (contrassegnati con il segno
componenti non omologati secondo la norma CEI 65 comporta la non
conformitá dell'apparecchio.
In tal caso é “esclusa la responsabilità” del costruttore.
La subtitución de elementos de seguridad (marcados con el simbolo
componentes no homologados segun la norma CEI 65, provoca la no
conformidad del aparato.
En ese caso, el fabricante cesa de ser responsable.
) con
) por
TV PSD CT 17062 26
16N2F +3.5% -3.5% 1K6V
30N0F +5% -5% 400.0V
560N0F +5% -5% 250.0V
100P0F +10% -10% 50.0V
10N0F +10% 63.0V
D-SLP BAV103 200.0V
D-ZENER BZX55C30 30V 500MI0W
WIREBARE 22
0 OHM +0% 100MI0W
LF 32U0H +4% -4%
TF-DST TDS29 TBD 11
LF 650U0H +5% -5% R 2873 A0 00
LL 26U5H +10%
1R21 OHM +1% 700MI0W
10R0 OHM +1% 100MI0W
6K04 OHM +1% 100MI0W
4K75 OHM +1% 100MI0W
4K75 OHM +1% 100MI0W
4K75 OHM +1% 100MI0W
6K81 OHM +1% 100MI0W
13K0 OHM +5% 100MI0W
150K0 OHM +5% 100MI0W
76K8 OHM +1% 100MI0W
560K0 OHM +5% 100MI0W
RCF 4K7 OHM +5% 250MI0W
RMF 23K7 OHM +1% 250MI0W
0
0,7
+5VON
(OS,A)
(OS) BCL
DL75
1N4148
(P) +8V
(OS)
SAFETY
0,1
GNDT
GNDT
P_SWITCH
RL57
1K0
DP.17169.00
10515550
GNDL
TV ASY A59EGD048X30 19
TV ASY A68EGD038X30 (A) 68 00
Tube 4/3 21" OT
10555770
CL21
CL22
CL24
CL41
DL71
JL60
JL80
LB02
LL05
LL22
LL26
RF05
RF06
RL02
RL03
RL04
RL05
RL06
RL45
RL49
RL65
RV20
15,7 VSUPPLY
TL71
BC847C
TL72
RN1401
TV ASY A51EFS83X191 03
Tube 4/3 33" , MP
10575830
CL21
CL22
CL24
CL41
CL48
DL48
DL71
JL60
JL80
LB02
LL05
LL22
LL26
RF05
RF06
RL02
RL03
RL04
RL05
RL06
RL19
RL45
RL48
RL49
RL65
RV20
GNDL
CL71
1N0
GNDL
RL56
1K0
GNDL
VRETRACE
49
RL77
27K0
RL74
10K0
TL55
BF422
# see in CRT 17xxx xx partlist
* see in CT 17xxx xx partlist
12Vpp-V
GNDF
RL75
680R0
DL77
LL4148
CL72
100U0
TUBE 16/9
GNDL
DL71
*
RL54
10K0
TL52
BF423
TV ASY A80AEJ15X01 (A) 00
First issue 07 / 98
P
GNDF
CL53
100N0
1
1Vpp-V
ICC17
49 VRETRACE
+8V
GNDL
CL42
2U7
TL41
BD241C
+5VDST
RL11
4R7
ZL11
500MI0
RL53
18K0
CL25
1U0
DL21
BY228
RL24
6K8
4
RL44
2R2
TL42
BC546B
+5VON
CL16
470U0
GNDL
BL01
10095060
1,2
(P) +5VUP
DL12
1N4148
1
15Vpp-H
16,1
RL43
68K1
GNDL
DL11
RGP10M DP1769.00
1
RL37
22R0
0W25
0
13Vpp-H
DL42
ZMM5.1
DL19
LL4148
H-YOKE
LL26
*
0
GNDL
EW
GNDL
CL14
470U0
4
3
CL38
220U0
16V
GNDL
GNDL
15,7 VSUPPLY
5
TL14
2SC2236Y
7
CL21
*
6,1
6,3
TL33
MPS750
RL49
*
CL41
*
100P0
12Vpp-V
CL37
10U0
DL33
1N4148
10518110
DL48
*
RL48
*
DL14
RGP15G
LL33
6,5
GNDL
1K0
5,6
RL10
47R0
RL36
2R2
0
1,2Vpp-H
BAV103
CL48
*
6
GNDL
GNDL
5
DL32
1N4148
6,3
RL19
*
330P0
BCL
DL09
BZX55C5V1
DP1769.00
RL15 5,7 RL16
GNDL
GNDF
11,5
RL34
1K8
CL31
22P0
ZL14
500MI0
GNDL
RL39
2K2
RL32
1K0
EHT2
O(B) +V
DL13
RGP30D
RL18
10K0
5
2,3
+
CL36
4N7
GNDL
CL39
1N0
2,3
2
+V
2
RL31
3K3
HDRIVE
+
S+I
+
1
2
CL32
470U0
16V
GNDL
P
ZL13
630MI0
(OS)
CL09
10U0
4U7
CL08
10N0
*
1
6
1
4
7,8
RL07
6K19
CL13
1MI0
TV PSD CT 17035 26
8N3F +3.5% -3.5% 1K6V
33N0F +5% -5% 1K0V
440N0F +5% -5% 250.0V
1N0F +10% -10% 50.0V
D-ZENER BZX55C24 24V 500MI0W
WIREBARE 22
0 OHM +0% 100MI0W
LF 18U0H +7% -7%
TF-DST M30FBC3 10555640 3087 A0
LF 650U0H +5% -5% R 2873 A0 00
LL 85U0H 2519 A0
1R5 OHM +1% 700MI0W
10R0 OHM +1% 100MI0W
6K04 OHM +1% 100MI0W
10K0 OHM +1% 100MI0W
10K0 OHM +1% 100MI0W
10K0 OHM +1% 100MI0W
3K32 OHM +1% 100MI0W
110K0 OHM +5% 100MI0W
60K4 OHM +1% 100MI0W
4K7 OHM +5% 250MI0W
23K7 OHM +1% 250MI0W
5Vpp-H
Tube 4/3 25" SF, 29" SF
10515520
CL21
CL22
CL24
CL41
CL48
DL48
DL71
JL60
JL80
LB02
LL05
LL22
LL26
RF05
RL02
RL03
RL04
RL05
RL06
RL19
RL45
RL48
RL49
RL65
RV20
TV ASY A59EHJ43X15 00
TV ASY A66EHJ43X15 00
Tube 4/3 25", 28" , MP /Vectorgun
EHT2
RL09
6K8
47K0
DEV
CL15
DEV
U_TIMER (P)
GNDF
RL13
470MI0
RL46
12K0
GNDL
P
T -I
P+V
RL45
*
# RB10
LL13
GNDL
U_DRIVER
3
S-I
T +I
9
(OS) EHT
1
1
GNDL
CL12
330P0
11
4
+
+
7,8
GNDL
BB03
GNDL
8
P+V
IF01
TDA8351
O(A) +V
GNDF
2V
3
CURRENT
SOURCE
P+V
7
DF01
BZW04-48
RF08
33R0
50Vpp-V
8
G2
GNDL
V
RF07
220R0
1
BF01B
+
-
2
GNDL
2
1
15,7
10
RF05
*
BF01
BF01A
6
GNDL
3
0,1
CL59
470N0
5Vpp-V
RL47
33K0
GNDF
3
RF04
*
0
CRT
CF04
22N0
RF09
(OS)
DP1769.00
VRETRACE
VGUARD
RL06
*
4
CRT
GNDF
GNDF
5
0
(P) +8V
7
to CRT-Bord
GNDF
TL02
BF422
BL02
6
RL58
RL59
4K7
10K0
0,8 TL59
BC857B
0,3
0,8
RL04
*
10500980
BB02
7
GNDL
LL05 *
(uP) FORMAT/BC
RL03
*
JL60
*
CF01
1N0
(P) U_TIMER
USYS
+V
(OS)
CF02
1N0
2V
0,9Vpp-F
0
RF03
100R0
T = 64µs
T = 20ms
HEAT_2
RF13
39K0
RF02
3K01
RL01
45K3
HEAT_1
VSUPPLY
CF11
1N0
CF12
100P0
RF12
68K0
TF01
BC847B
RF01
100R0
(P)
RF11
3K9
VFLB (uP)
(OS) -V
+5VON
(OS,A)
SCANNING - BALAYAGE - ABLENKUNG - BARRIDO - SCANSIONE
TV PSD CT 17071 26
16N2F +3.5% -3.5% 1K6V
30N0F +5% -5% 400.0V
510N0F +5% -5% 250.0V
100P0F +10% -10% 50.0V
10N0F +10% 63.0V
D-SLP BAV103 200.0V
D-ZENER BZX55C30 30V 500MI0W
WIREBARE 22
0 OHM +0% 100MI0W
LF 32U0H +4% -4%
TF-DST TDS29 TBD 13
LF 650U0H +5% -5%
LL 26U5H +10%
RMF 1R0 OHM +1% 700MI0W
6K8 OHM +5% 100MI0W
4K75 OHM +1% 100MI0W
4K75 OHM +1% 100MI0W
4K75 OHM +1% 100MI0W
4K75 OHM +1% 100MI0W
15K0 OHM +5% 100MI0W
180K0 OHM +5% 100MI0W
100K0 OHM +5% 100MI0W
300K0 OHM +5% 100MI0W
4K7 OHM +5% 250MI0W
33K2 OHM +1% 250MI0W
10518330 TV PSD CT 17061 32
CL21
14N0F +3.5% -3.5% 1K5V
CL22
30N0F +5% -5% 400.0V
CL24
470N0F +5% -5% 250.0V
CL24
440N0F +5% -5% 250.0V
CL41
100P0F +10% -10% 50.0V
CL48
CPM 10N0F +10% 63.0V
DL48
D-SLP BAV103 200.0V
DL71
D-ZENER BZX55C30 30V 500MI0W
JL60
WIREBARE 22
JL81
0 OHM +0% 100MI0W
JP80
0 OHM +0% 100MI0W
LB02
LF 18U0H +7% -7%
LL05
TF-DST M30FBC3 10546610 3087 A0
LL22
LF 650U0H +5% -5% R 2873 A0 00
LL26
LL 26U5H +10%
LL26
LL 30U5H 2519 A0
RF04
1R21 OHM +1% 700MI0W
RF05
1R0 OHM +1% 700MI0W
RF05
1R21 OHM +1% 700MI0W
RF06
12R1 OHM +1% 100MI0W
RL02
10K0 OHM +5% 100MI0W
RL02
6K04 OHM +1% 100MI0W
RL02
499R0 OHM +1% 100MI0W
RL03
10K0 OHM +1% 100MI0W
RL03
11K5 OHM +1% 100MI0W
RL04
10K0 OHM +1% 100MI0W
RL04
20K0 OHM +1% 100MI0W
RL04
11K5 OHM +1% 100MI0W
RL05
10K0 OHM +1% 100MI0W
RL05
20K0 OHM +1% 100MI0W
RL05
11K5 OHM +1% 100MI0W
RL06
4K75 OHM +1% 100MI0W
RL06
11K5 OHM +1% 100MI0W
RL11
4R7 OHM +10% 250MI0W
RL11
4R7 OHM +5% 250MI0W
RL19
22K0 OHM +5% 100MI0W
RL19
33K0 OHM +5% 100MI0W
RL43
68K1 OHM +1% 250MI0W
RL43
68K1 OHM +1% 250MI0W
RL43
68K1 OHM +1% 100MI0W
RL45
180K0 OHM +5% 100MI0W
RL45
270K0 OHM +5% 100MI0W
RL46
12K0 OHM +5% 100MI0W
RL47
33K0 OHM +5% 100MI0W
RL48
76K8 OHM +1% 100MI0W
RL48
60K4 OHM +1% 100MI0W
RL64
8K25 OHM +1% 100MI0W
RCF 24K0 OHM +5% 250MI0W
RL65
RV20
RMF 33K2 OHM +1% 250MI0W
RV20
33K2 OHM +1% 100MI0W
ZL13
PROTEC MOD MP63 630MI0 A 65.0V
TV ASY W56EGV023X015 56 01
TV ASY W66EGV023X015 66 00
TV ASY W76EGV023X015 (A) 00
Tube 16/9 24", 28",32", SF / vectorgun
10515530
CL21
CL22
CL24
CL41
CL48
CL51
DL48
DL71
JL60
JL82
LB02
LL05
LL22
LL26
RF05
RL02
RL03
RL04
RL05
RL06
RL19
RL45
RL48
RL49
RL65
RV20
TV PSD CT 17083 38
15N5F +3.5% -3.5% 1K6V
27N0F +5% -5% 400.0V
440N0F +5% -5% 250.0V
100P0F +10% -10% 50.0V
100N0F +5% 63.0V
290N0F +5% -5% 250.0V
D-SLP BAV103 200.0V
D-ZENER BZX55C24 24V 500MI0W
WIREBARE 22
0 OHM +0% 100MI0W
LF 32U0H +4% -4%
TF-DST TDS29 15314460 10
LF 650U0H +5% -5%
LL 30U5H 2519 A0
1R21 OHM +1% 700MI0W
4K99 OHM +1% 100MI0W
6K49 OHM +1% 100MI0W
6K49 OHM +1% 100MI0W
6K49 OHM +1% 100MI0W
2K37 OHM +1% 100MI0W
13K0 OHM +5% 100MI0W
390K0 OHM +5% 100MI0W
220K0 OHM +5% 100MI0W
180K0 OHM +5% 100MI0W
47K0 OHM +5% 250MI0W
100K0 OHM +1% 250MI0W
ADDR7
ADDR6
ADDR5
ADDR4
ADDR3
ADDR2
ADDR1
ADDR0
DAT0
DAT1
DAT2
DAT7
DAT6
DAT5
78
77
76
75
74
73
72
71
70
69
68
67
66
65
DAT3
ADDR12
79
DAT4
ADDR15
80
CONTROL MICROPROCESSOR - MICROPROCESSEUR DE COMMANDE - MIKROPROZESSOR - MICROPROCESSORE DEI COMANDI - MICROPROCESADOR DE LOS MANDOS
2
5V_VCC
39K0
23
RR04
39K0
24
+5V_STBY
DR20
1N4148
5V_VCC
DR24
LL4148
RR20
10K0
RR22
1K0
CR09
47P0
CR08
47P0
CR07
47P0
CR06
47P0
DR21
LL4148
CR05
47P0
100R0
RR21
22K0
0,3 =TV
0,15 = Stdby
RR40
CR22
10N0
CR24
1N0
25
RR08
39K0
+5V_STBY
TR20
DTC113ZK
CR21
10N0
0,7 = TV
0 = Stdby
5V_VCC
LR10
10U0
RR49
10K0
RR87
2K2
First issue 07 / 98
CR97
22P0
55
CR94
1N0
54
RR94
53
RR93
5K6
52
CR92
22P0
CR11
100N0
CR10
47U0
RR32
3K3
4,8 = TV
0 = Mute
RR30
220R0
(P)
CR93
4N7
GNDA
CR90
220P0
CR91
220N0
GNDA
RR81
10K0
RR80
1K0
48
RR78
1K0
(DP)
VFLB
47
RR76
560R0
(OS)
R_OSD
46
RR74
560R0
(OS)
G_OSD
45
RR72
560R0
(OS)
B_OSD
44
RR70
150R0
(OS)
FB_OSD
43
RR63
1K0
(DP)
BCC
42
RR62
10K0
(OS) TRAP_INFO
41
RR66
100R0
GNDA
49
RR82
6K8
5K6
(A)
(DP)
(DP)
RR64
4K7
RR58
10K0
RR71
1K5
RR73
1K5
RR75
1K5
5V_VCC
RR69
10K0
RR56
10K0
LFB
FORMAT
RR77
1K5
GNDA
(OS) AV3_PORT
RR57
1K0
RR55
100R0
RR68
100R0
RR50
10K0
(OS)
AVS1
RR51
10K0
(OS)
(P)
AVS2
PO
(P)
RESET-
RR53
6K8
VDDA
TR60
BC847B
DR23
1N4148
0
5V_VCC
RR60
33K0
RR52
6K8
GNDA
CR20
100N0
5V_VCC
0,2 = Stdby
(P) STBY_ON
CR23
1N0
0 = Stdby
TR23
BCR141
GNDP
CR30
100N0
MAIN
(RP)
(RP)
.17000.00
.17001.00
CR32
100P0
CR33
100P0
RESET-
GNDA
*
RESET_MSP-
4,8 = TV
0 = Mute
GNDA
GNDA
6K8
RR31
220R0
BR08
TR40
BCR141
5V_VCC
CVBSTXT
RR90
RR10
1K0
IR03
ST24C08M
U_STBY
GNDA
1K0
RR91
+8V
+5VUP
50
10U0
CR41
1N0
MUTE- (A)
POWER_FAIL
4N7
56
LR20
RR33
3K3
(P)
STBY_ON
ICC17
2N2
CR95
+5VUP
(P)
RR86
470R0
CR96
5K6
1
0 = TV
0 = Mute
15K0
RR95
51
5V_VCC
RR44
*
DR22
LL4148
RR96
57
58
Po-Port
RR46
10K0
VDDA
82P0
VDDA
RR03
5
59
(OS)
CR98
VDDA
22
60
E
SCL
6
NC MODE/ WC
7
PRE
VCC
1
8
21
1K5
GNDA
61
3
1K5
RR02
CR99
470N0
5
RR01
SDA
20
VSS
19
Stby-Port
4
Led-Port
100R0
62
40
100R0
RR17
39
RR12
38
18
37
DR05
LL42
100N0
17
36
RR18
4K7
16
35
RR05
10K0
15
34
RR06
10K0
ADDR13
ADDR14
MMU1
MMU2
SDA (OS,A)
RR09
10K0
5V_VCC
DR10
BAT42
#
SCL (OS,A)
+5V_STBY
IR01
33
13
32
12
QR01
4M0
31
11
4M0
ADDR15
ADDR12
ADDR7
ADDR6
ADDR5
ADDR4
ADDR3
ADDR2
ADDR1
ADDR0
DAT0
DAT1
DAT2
DAT7
DAT6
DAT5
1
5V_VCC
CR04
82P0
100R0
1
9
10
+5VUP
(P)
U_STBY 6,8
63
RR45
2
9
(P)
64
DAT4
DAT3
GNDA
CVBS1
CVBS2
TEST0
CVBSO
TXCF
JTRSTO
MCFM
RESET
PXFM
VDDA
WSCF
WSCR
HSYNC
VSYNC
R
G
B
FB
P4.0/PWM0
P4.1/PWM1
P4.2/PWM2
*
3
CR03
NI
CR12
100N0
(OS)
4
DAT7
DAT6
DAT5
DAT4
DAT3
AV_LINK
5
8
14
0 = TV
7,1= Stdby
4,8 = TV
0 = Stdby
TR13
BCR141
+8V
Q3 17
7
30
FCB
IR
+5V_STBY
CR15
KEYB_A
KEYB_B
KEY_IN_1
KEY_IN_2
Q5 19
Q4 18
16 GND
6
ADDR8
Format-detect
6
14 Q1
15 Q2
ADDR9
RR48
7
Q7 21
Q6 20
5
29
8
12 A0
13 Q0
4
1K0
U_STBY
OE 24
A10 23
CE 22
DSN
ADDR11
MMU0
MMU3
ADDR10
DSN
ADDR11
ADDR9
ADDR8
R/WN
GNDM
VDDM
OSCIN
OSCOUT
ADDR13
ADDR14
MMU1
MMU2
MMU4
MMU5
P3.7/CSO/RESETI
P3.6/ASN
P3.5
P3.4/RWN
P5.1/SDI/
SDO/INT1
P5.0/SCK/
INT2
RR43
9
1
RR16
100R0
9 A3
10 A2
11 A1
3
28
BR01
A9 26
A11 25
2
1K0
CR80
1N0
7 A5
8 A4
1
100R0
BK01
RR14
22K0
A13 28
A8 27
MMU0
ADDR10
RR42
GNDP
5 A7
6 A6
MMU2
MMU1
ADDR14
ADDR13
ADDR8
ADDR9
ADDR11
DSN
ADDR10
RR41
6,7 = TV
5,3 = Stdby
6 = TV
7,1= Stdby
A17 30
A14 29
(P)
+8V
P2.0/
INT7
P2.3/INT6/VSO1
P2.4/NMI
P0.2
P0.1
P0.0
P4.7/PWM7/INT3
P4.6/PWM6
P4.5/PWM5
VDD
GND
P2.1/INT5/AIN1
P2.2/INT0/AIN2
P2.5/INT4/AIN3/VSO2
P4.4/PWM4
P4.3/
PWM3
TR15
BC857B
3 A15
4 A12
JR51
0
27
6,8 = TV
U_STBY 7,1= Stdby
RR15
4K7
VCC 32
A18 31
26
MMU0
ADDR15
ADDR12
ADDR7
ADDR6
ADDR5
ADDR4
ADDR3
ADDR2
ADDR1
ADDR0
DAT0
DAT1
DAT2
1 VPP
2 A16
2
CR01
100N0
LR02
IR02
MX27C4000MC-90
RR44
4/3
RR48
16/9
* = value see partlist DP 17... 00
#
RP 17000 00
RP 17001 00
IR01
ST92R195 CUT 2.2 JAL (10592030)
ST92R195 CUT 2.2 JAM (10588150)
2
4
8
GNDV
9
GNDV
RX14
0
10
GNDV
14
15
CX03
13
330P0
11
12
GND1
GNDV
RX57
150R0
CX59
10U0
20
21
RX39
75R0
TX45
2,3 BC547B 8
BJ04
GNDV
RX58
75R0
BX50
1
GNDV
RX47
2K2
RX43
0
GNDV
3
CX47
100N0
GNDV
2
GNDV
BX04
6
FCB
1
1
2
3
IN2b
CTLb
OUTb
OUTa
CTLa
IN2a
GND
10 IN1b
9
8
7
6
5
6
+8V
(P)
CVBSTXT
+8V
AV2_CVBS_OUT
(uP)
(P)
GNDA
LFB
HDRIVE
(DP)
(DP)
EW
(DP)
+8V
-V
(DP)
(P)
+V
(DP)
1U0
52
53
54
55
56
2N7
CC01
CV20
58
59
61
0 7,9
4
3 3,3
GND1
CI63
10U0
RI65
180R0
DET
VP2
CVBS10
DECDIG
3,5 5,5
CV01
4U7
RV03
100R0
RV15
6K8
RI60
1K0
R_SC
FB_OSD
38
0
37
3,8
CV12
22N0
36
3,8
CV11
22N0
35
3,8
CV10
22N0
R_OSD
34
3
RV13
1K0
(DP) VGUARD
33
2,5
RV12
8K2
CV09
1N0
GND1
G_OSD
(DP) BCL
CV08
4U7
GND1
0
RV05
100R0
RV06
100R0
RV07
100R0
LV05
6U8
LV06
6U8
LV07
6U8
0
CV14
1N0
1V
3,5Vpp-H
1V
3,8Vpp-H
BV01
1
1
2
CV05
82P0
CI61
4N7
RV01
1R0
B_OSD
DV09
LL4148
GND1
+8V
1,8V
3,5Vpp-H
22N0
2,5
RI66
160R0
CC11
1N0
CV15
2,3
GND1
GND1
2
2V
4Vpp-H
HOUT
RO
3
-
FBISO
SW02
DECBG
1,2 3,5
LI50
3U3
FI50
5M74
PH2LF
GND2
EWD
BCLIN
CV06
82P0
CV07
82P0
3
GND1
GND1
GND1
GND1
GND1
4
5
6
CRT
6
GND1
CV02
100N0
GND1
4
CV03
100U0
CV04
4U7
GND1
CX19
1N0
GNDAU
0
MAIN
1,5V
3,2Vpp-H
SCL (uP)
SDA (uP)
(A)
SIF
CHROMA_AV2/AV3
AV2/AV3_Y/CVBS
(uP)
AV3_PORT
AV3_R (A)
AV3_L (A)
AV2_CVBS_OUT
AV1_CVBS_OUT
AV1_CVBS_IN
B_SC
G_SC
FB_SC
R_SC
(A)
RI
SDA
3
GNDV
(A)
AV1_OUT_R
AV1_IN_R
(A)
(A)
AVS1 (uP)
AV1_OUT_L
AV1_IN_L
(A)
(A)
AV2_OUT_R
AV2_IN_R
(A)
AV2_OUT_L
(A)
AV2_IN_L
(uP)
SDA
AVS2 (uP)
(uP)
SCL
RX28
220R0
SCL
GND1
GNDV
RX27
220R0
RV31
100R0
CX62
10U0
LX62
2U2
19
GI
CI60
10N0
1
CRROMA
CVBS2_OUT
CVBS2_IN
19
18
IFVO
G_SC
41
39
BI
GND1
RV30
100R0
GND1
CX61
22N0
17
RGBIN
PLLF
7,9
RI59
220R0
CI72
22N0
16
4,9
LUMIN
IFVC02
CI57
2U2
TI60
BC847B
LX59
2U2
AV3
FRONT-CONNECTOR
18
SW01
CI59
1N0
1,8
CHROMA_IN
GNDV
DX62
BAV103
1,8
2,5
RI63
560R0
RI64
56R0
GNDV
2,5
CX60
22N0
CX58
27P0
2,5
DX59
BAV103
GNDV
RX59
100R0
GNDV
GNDV
4,9
2,5
16
17
5
VCC
5
CX18
100N0
GNDV
RX56
75R0
GNDV
RX16
10R0
CX15
10U0
3,4
IFVC01
B_SC
22N0
1,5V
2Vpp-H
(OS)
3,8Vpp-H
1,2V
+8V
.17055.00
* = see CT 17xxx partslist
+5VON
+5VON (DP)
8
8
CX17
100N0
GNDV
RX03
10K0
7
3
15
22N0
CV16
+8V (P)
RX13
2K2
RI61
1K0
IX01
BA7604N
Y/CVBS/AV3
150R0
GNDV
6
RX19
5
RX24
GNDAU
150R0
RX22
4
150R0
3
IN1a
2,3
GNDV
2
4
1
TX15
BC547B
+5VON
RX17
10R0
3
BX02
+8V
RX18
75R0
2
RX09
75R0
1
RX25
CX02
330P0
150R0
RX23
CVBS1_IN
GNDV
150R0
GNDV
21
14
CI56 4,8
10N0
6,8
GNDT
GNDT
20
13
2,8
CV17
3
40
LUMOUT
NC
20
CVBS1_OUT
19
GND1
18
CH08
100U0
RX08
75R0
GNDV
GND1
17
3,8
1 3,8
RI2
QSS0
3
42
TO CRT BOARD
RI51
390R0
GND2
12
GI2
SIFAGC
FB_SC
0
43
GO
3
44
BI2
Bo
0
11
7
-
5
CI55
100N0
0
2,2
IV01
TDA8855H
SIFIN2
BLKIN
TI45
DTC144EK
RH04
15K0
DH04
1N4148
10
46
45
RGBIN2
SIFIN1
GND1
47
BYO
AGCOUT
QC02
3M579545
GND1
32
6
9
3,6
RYO
31
3
0
BYI
30
2
8
RYI
2K7
2U2
0
CC07
18P0
48
DECAGC
RV08
CI54
7
QC01
4M433619
4M433619
49
IREF
CVBSext
GND2
2,5
CC06
18P0
50
VCS
29
6
220N0
5
2U2 4
VRDA
VDRB
39K2 3,9
CI50
GNDV
16
4
RV25
51
REFO
EHTO
AV1_CVBS_IN
15
4
FI30
77M8
-
GNDT
RX07
75R0
(DP) SAFETY
XTAL1
SECPLL
GNDV
14
RC05
100K0
GND1
IFIN2
AMOUT
1
5
100N0 3,9
O1 4
O2 5
GND
3
CV26
GND2
GNDT
7
13
GND2
2,1
28
4
6
GNDV
12
3
I2
GND1
CC05
100N0
3
XTAL2
AM/AF(A)
FI02
31M9
RX06
75R0
11
GND2
3
8
91P0
RX02
10K0
GNDV
10
SDA
SCL
GND
2
DI40
BA782S
CC04
3N3
GND2
27
RI41
2K2
GND2
CC10
CI05
12P0
-
GNDV
8
AV1
CI03
12P0
CI09
15P0
RX05
75R0
7
AV2
1 I1
GNDAU
GNDV
9
CI53
10N0
FI20
K9650M
RI04
82R0
GNDT
2
-
GND2
IFIN1
AV1_CVBS_OUT
3
4,6
GND2
3
7
2
4
2
-
1
2
1
GND2
68p
6
4,6
VP1
1
5
FI10
K6257K
5
RI50
680R0
GND2
23
4
FI01
40M4
1
8
10
RI33
2K2
CI04
6P8
GNDT
BX01
3
CHROMA
RI07
100R0
DI30
BA782S
CC02
100N0
TDA8855H
CHROMA_AV2/AV3
IF
CI10
1N0
GNDT
RI32
2K2
8
9
64
GND2
CI02
6P8
6
GND2
GNDT
SW01
LI10
470N0
+5VUP
RV14
100R0
0,5
2,3 2,3 1,1
6Vpp-H
CC03
100U0
GND2
RI58
220R0
CI58
1N0
RC02
1R0
2,8
62
TI30
DTC144EK
GNDT
GNDT
11
NH01
CTT5010
5
SW02
0
6Vpp-V
RV17
15K0
63
GND2
RV18
100R0
CV21
1U0
CV24
1N0
T = 64µs
T = 20ms
RV10
220R0
3
RV19
4K7
CV22
4N7
RV09
220R0
2,3
57
0 = Secam
5,1 = Pal
TI10
DTC144EK
-
4
GND2
3,7 = Secam
0 = Pal
GNDT
IF
NC
NC
9 10
NC
6
+30V
5
DA
4
CL
2
33,5
+5V
NC
3
AS
1
5
GNDT
RI31
1K5
CVBS/Y
GNDT
GNDT
AGC
DH01
BZX55B33
RI42
1K5
CI45
22N0
22
CH01
100N0
RH05
3K9
21
4 = Secam
0 = Pal
CI43
22N0
RV16
22K0
GND2 GND2
CV23
1N0
GND2
GNDT
RH10
100R0
GNDT
CV27
15P0
CV25
1N0
RI03
4K7
0 = Secam
5 = Pal
TV10
BC847B
8
1,5V
1,5Vpp-V
PH1LF
0
GNDT
CI12
1N0
CH03
470U0
DV19
1N4148
RV20
*
CVBS20
0
0
0
0
0
0
X
GND1
0
0
0
0
0
0
X
CVBSINT
0
0
0
0
0
0
0
26
0
0
0
0
0
1
X
25
0
0
0
0
1
1
X
60
1
0
1
0
0
0
X
AV2/AV3_Y/CVBS
LH10
10U0
0
0
0
0
0
1
X
32.90/32.35
32.40/32.65
32.40/33.05
32.40/33.05
40.40
X
GND1
RH02
100R0
CI47
22N0
38.90
38.90
38.90
38.90
38.90
33.90
X
24
B/G
I
D/K
K’
L
L'
AV
+5VON
RH03
2K7
(DP) EHT
+5VUP
Standard picture carrier sound carrier SWO1 SWO2 MOD L’FA VSW IFS STM
[MHz]
[MHz]
(uP)
Piece de securite
N'utilisez que les pieces d'origine
GND2
Safety Part
When repairing, use original part only
(DP)
TRAP_INFO
+33V
(uP)
Sicherheitsbauteil
Bei Ersatz nur Originalteil verwenden
(P)
SCL
SDA
(uP)
RF/FI/ SCART INTERFACE/VIDEO SIGNAL PROCESSING -HF/FI INTERFACE PERITELEVISION/TRAITEMENT LUMINANCE CHROMINANCE - HF/ZF/ SCART INTERFACE/VIDEO
SIGNALVERARBEITUNG - RF/FI /PRESA PERITEL/ELABORAZIONE VIDEO - RF/FI /EUROCONECTOR / TRATAMENTO VIDEO
ICC17
First issue 07 / 98
CV25
1N0
GND2
+8V
GNDA
CC02
100N0
GND2
GND2
CC04
3N3
GND2
GND1
1U0
RC05
100K0
GND1
(DP) SAFETY
55
2N7
CV20
CC05
100N0
3
56
57
11
GND2
58
64
2,3 2,3 1,1
CC01
0,5
1,5V
1,5Vpp-V
59
0
LI10
470N0
RV14
100R0
6Vpp-H
CC03
100U0
GND2
GNDT
GNDT
+5VUP
IF
NC
NC
9 10
NC
6
+30V
5
DA
4
CL
2
33,5
RC02
1R0
2,8
TI10
DTC144EK
GNDT
5
+5V
NC
3
AS
1
GNDT
0
6Vpp-V
RV17
15K0
60
GNDT
GNDT
AGC
DH01
BZX55B33
RV18
100R0
CV21
1U0
CV24
1N0
61
CH01
100N0
0 = Secam
5 = Pal
CV22
4N7
T = 64µs
52
4 = Secam
0 = Pal
RH05
3K9
GND2
GNDT
RH10
100R0
GNDT
CI43
22N0
RV10
220R0
3
RV19
4K7
GND2 GND2
CV23
1N0
GND2
RI03
4K7
RV09
220R0
2,3
53
GNDT
CI12
1N0
CH03
470U0
RV16
22K0
54
LH10
10U0
62
RH02
100R0
63
RH03
2K7
CV27
15P0
CI47
22N0
T = 20ms
(uP)
TV10
BC847B
8
+5VON
(P)
CVBSTXT
+8V
AV2_CVBS_OUT
DV19
1N4148
RV20
*
(P)
LFB
HDRIVE
(DP)
(DP)
EW
(DP)
+8V
-V
(DP)
(P)
+V
(DP)
(DP) EHT
+5VUP
(uP)
Piece de securite
N'utilisez que les pieces d'origine
(DP)
Safety Part
When repairing, use original part only
TRAP_INFO
+33V
(uP)
Sicherheitsbauteil
Bei Ersatz nur Originalteil verwenden
(P)
SCL
SDA
(uP)
RF/FI/ SCART INTERFACE/VIDEO SIGNAL PROCESSING -HF/FI INTERFACE PERITELEVISION/TRAITEMENT LUMINANCE CHROMINANCE - HF/ZF/ SCART INTERFACE/VIDEO
SIGNALVERARBEITUNG - RF/FI /PRESA PERITEL/ELABORAZIONE VIDEO - RF/FI /EUROCONECTOR/TRATAMENTO VIDEO
15
RX57
150R0
20
21
TX45
2,3 BC547B 8
BJ04
GNDV
RX58
75R0
BX50
1
GNDV
RX47
2K2
RX43
0
GNDV
3
CX47
100N0
GNDV
BX04
6
FCB
GNDV
2
1
1
2
3
RV30
100R0
6
LI50
RI65
180R0
3U3
3 3,3
CC11
1N0
2
CV01
4U7
CV15
22N0
R_SC
FB_OSD
38
0
37
3,8
CV12
22N0
B_OSD
36
3,8
CV11
22N0
G_OSD
35
3,8
CV10
22N0
R_OSD
RV13
1K0
(DP) VGUARD
34
3
33
2,5
DV09
LL4148
RV12
8K2
GO
Bo
BLKIN
3
CV09
1N0
(DP) BCL
CV08
4U7
GND1
0
RV05
100R0
RV06
100R0
RV07
100R0
LV05
6U8
LV06
6U8
LV07
6U8
0
CV14
1N0
1
2
CV05
82P0
CV06
82P0
CV07
82P0
3
GND1
GND1
1V
3,5Vpp-H
3,8Vpp-H
1V
BV01
GND1
CI61
4N7
RV01
1R0
1,8V
3,5Vpp-H
G_SC
41
2,5
RV15
6K8
RI60
1K0
B_SC
22N0
2,3
GND1
RV03
100R0
+8V
22N0
CV16
GND1
3,5 5,5
GND1
CV17
3
32
GND1
3
-
DET
VP2
CVBS10
DECDIG
HOUT
FBISO
SW02
4
RI66
160R0
GND1
2V
4Vpp-H
PH2LF
PH1LF
GND2
7,9
CI63
10U0
GND1
GND1
GND1
1
4
5
CRT
6
6
GND1
CV02
100N0
CV03
100U0
CV04
4U7
GNDV
GND1
4
5
EWD
VRDA
1,2 3,5
31
20
GND1
IN1b
IN2b
CTLb
OUTb
OUTa
CTLa
IN2a
VCC
GND
10
9
8
7
6
5
LX62
2U2
GND1
CX19
1N0
GNDAU
0
SCL (uP)
SDA (uP)
(A)
1,5V
3,2Vpp-H
SIF
CHROMA_AV2/AV3
AV2/AV3_Y/CVBS
(uP)
AV3_PORT
AV3_R (A)
AV3_L (A)
AV2_CVBS_OUT
AV1_CVBS_OUT
AV1_CVBS_IN
B_SC
G_SC
FB_SC
(A)
R_SC
(A)
AV1_OUT_R
(A)
AV1_IN_R
(A)
AVS1 (uP)
AV1_OUT_L
(A)
AV1_IN_L
(A)
AV2_OUT_R
(A)
AV2_OUT_L
AV2_IN_R
(A)
AV2_IN_L
(uP)
AVS2 (uP)
SDA
(uP)
SCL
RX28
220R0
RV31
100R0
CX62
10U0
GNDV
RX27
220R0
RO
CI60
10N0
1
CX61
22N0
RX39
75R0
DECBG
FI50
5M74
CRROMA
CVBS2_OUT
CVBS2_IN
19
BCLIN
GND1
CI72
22N0
LX59
2U2
AV3
FRONT-CONNECTOR
18
SDA
7,9
1,8
CHROMA_IN
GNDV
RI
30
GND1
CX59
10U0
SCL
FB_SC
3
42
39
GI
CI57
2U2
TI60
BC847B
DX62
BAV103
1,8
2,5
RI63
560R0
RI64
56R0
IFVO
0
43
40
BI
GNDV
2,5
CX60
22N0
CX58
27P0
DX59
BAV103
GNDV
RX59
100R0
GNDV
2,5
2,5
16
17
GNDV
4,9
19
44
1,5V
2Vpp-H
OS.17056.00
10515740
20.01.98
* = see CT 17xxx partslist
3,8Vpp-H
1,2V
+8V
+5VON
+5VON (DP)
GNDV
14
CX03
13
330P0
11
12
GNDV
GNDV
RX56
75R0
GNDV
5
CX18
100N0
18
RGBIN
PLLF
46
TO CRT BOARD
9
GNDV
RX14
0
RX16
10R0
CX15
10U0
17
LUMIN
IFVC02
GND1
+8V (P)
8
10
8
CX17
100N0
GNDV
RX03
10K0
7
3
GND1
RX13
2K2
RI61
1K0
IX01
BA7604N
Y/CVBS/AV3
150R0
GNDV
6
RX19
5
RX24
GNDAU
150R0
RX22
4
150R0
3
IN1a
2,3
GNDV
2
4
1
TX15
BC547B
+5VON
RX17
10R0
3
BX02
+8V
RX18
75R0
2
RX09
75R0
1
RX25
CX02
330P0
150R0
RX23
CVBS1_IN
GNDV
150R0
GNDV
21
4,9
CI56 4,8
10N0
6,8
GNDT
20
3,4
16
IFVC01
2K7
CVBS1_OUT
19
15
AV1_CVBS_IN
18
CH08
100U0
RX08
75R0
GNDV
14
2,8
RV08
GNDV
17
1 3,8
CVBSext
8
GND1
45
LUMOUT
NC
29
4
RI2
220N0
RI51
390R0
GND2
13
QSS0
SECPLL
2
5
CI55
100N0
RH04
15K0
DH04
1N4148
12
3,8
GI2
AMOUT
3
SIFAGC
QC02
3M579545
47
BI2
28
7
GNDV
16
4
11
-
6
-
GNDT
RX07
75R0
15
2,2
IV01
TDA8855H
SIFIN2
CC07
18P0
48
RGBIN2
SIFIN1
27
GNDV
14
10
BYO
CC10
GNDT
7
13
3
FI30
77M8
9
2U2 3,6
GND2
2
3
CI54
AGCOUT
AM/AF(A)
5
JI50
0
GNDT
1
6
GNDV
12
O2 5
GND
RYO
CVBS20
RX06
75R0
11
8
4
8
0
BYI
DECAGC
GND1
10
FI02
31M9
0
IREF
CVBSINT
RX02
10K0
GNDV
I2
O1 4
3
91P0
9
SDA
SCL
GND
2
RI41
2K2
GND2
7
RYI
26
CI05
12P0
GNDV
8
6
5
2,5
QC01
4M433619
4M433619
49
REFO
25
CI09
15P0
RX05
75R0
7
2U2 4
CC06
18P0
50
VCS
AV1_CVBS_OUT
GNDV
6
CI03
12P0
CI50
51
EHTO
VP1
1 I1
GNDAU
5
-
GND2
XTAL1
24
RI04
82R0
CI53
10N0
IFIN2
23
GNDT
4
AV1
FI20
K9650M
7
3
4
RV25
100N0 3,9
39K2 3,9
GND2
3
-
2
AV2
2
CV26
3
XTAL2
CHROMA
6
1
GND2 GND2
GND2
5
68p
FI01
40M4
BX01
RI50
680R0
1
2
2,1
3
GNDT
8
4
O2 5
GND
IFIN1
SW01
I2
1
4,6
CVBS/Y
2
GND
4,6
O1 4
22
1 I1
RI33
2K2
CI04
6P8
21
RI07
100R0
CI02
6P8
AV2/AV3_Y/CVBS
IF
FI10
QFWG3970M
-
CHROMA_AV2/AV3
NH01
CTT5010
CI10
1N0
GND1
RI32
2K2
-
VDRB
TDA8855H
ICC17
First issue 07 / 98
AMPLIFIER SCHEMATIC DIAGRAM - SCHEMA DE L’AMPLIFICATEUR - SCHALTBILD AUDIO-SIGNALVERABEITUNG - SCHEMA DELL’ AMPLIFICATORE
ESQUEMA DEL AMPLIFICADOR
(STEREO)
RS63
470R0
CS17
AHVSS
GNDV
CS09
1N0
AV3_L (OS)
CS39
470P0
RS55
6K8
°VIRTUAL LS10
4U7
DOLBY
AHVSS
CS36
470P0
RS12
18R0
CS15
10N0
CS14
220U0
CS18
AHVSS
+8V
AHVSS
3,7
AHVSS
CS46
3U3
AV3_R (OS)
AV2_IN_L
AV2_IN_R
RS53
6K8
(OS)
(OS)
RS54
6K8
CS53
1U0
CS52
RS52
1U0
AHVSS
AHVSS
AHVSS
AHVSS
AHVSS
CS54
820P0
CS55
820P0
CS56
820P0
(OS)
RS51
6K8
CS51
1U0
AV1_IN_R
(OS)
RS50
6K8
CS50
1U0
CS35
CS57
820P0
AHVSS
AHVSS
AHVSS
3,7
3,7
0
3,7
1U0
AHVSS
CS43
10U0
AHVSS
CS42
100N0
AHVSS
RS02
6K8
AHVSS
0,2
TS01
BC847B
4,1
RS04
180R0
LS20
10U0
CS01
22N0
QS40
18M432
RS20
4R7
CS02
47P0
AHVSS
39
40
41
42
43
44
45
46
47
48
49
50
51
52
53
54
55
56
57
58
59
DVSS
61
62
CS23
10N0
CS41
1P0
AHVSS
DVSS
CS40
1P0
-
NC
SC2_OUT_L
NC
VREF1
ASG3
SC1_OUT_R
DACM_L
SC1_OUT_L
DACM_R
CAPL_A
VREF2
AHVSUP
DACA_L
CAPL_M
DACA_R
AHVSS
RESETQ
AGNDC
NC
NC
NC
NC
NC
NC
I2S_DA_IN2
SC3_IN_L
SC3_IN_R
DVSS
DVSUP
ASG2
ADR_CL
SC2_IN_L
ADR_WS
SC2_IN_R
ADR_DA
ASG1
I2S_DA_IN1
SC1_IN_L
I2S_DA_OUT
SC1_IN_R
I2S_WS
VREFTOP
MONO_IN
AVSS
AVSUP
ANA_IN1+
ANA_IN-
31
°
29
NC
STANDBYQ
ADR_SEL
D_CTR_OUT0
TESTEN
D_CTR_OUT1
XTAL_IN
NC
XTAL_OUT
NC
AUD_CL_OUT
CS75
4U7
0
27
26
GNDP
RS79
1K0
CS04
CS76
4U7
1N0
5
CS74
1N0
CS27
1N0
22
21
RS78
4K7
AHVSS
DVSS
19
18
CS78
1U0
RS76
4K7
9
15
RS80
1K0
CS80
470P0
LS40
RS42
15U0
470R0
RS41
47R0
LS41
RS43
15U0
470R0
CS25
470U0
16
15
14
DVSS
DVSS
13
12
CS34
47P0
5
3
CS07
1N0
DVSS
CS93
1N0
6
5
4
LS25
4U7
RS29
220R0
DS90
BZX55C3V6
3
RS99
100R0
2
RS97
1K0
GNDP
1
RS92
10K0
RS96
18K0
CS82
1U0
25,4
TS81
BC847B
4,8
RS90
10K0
RS98
15K0
BS80
BQ09
AHVSS
FCB
4,2
RS93
18K0
DVSS
CS81
100N0
CS85
470U0
CS94
1N0
CS95
1N0
2
AMDP
GNDV
CS59
4N7
AHVSS
GNDP
2
1
1
GNDP
2
1
BS90
BS91
R
MAIN
(AP)
.17000.00
(FM-Stereo)
CS08
1N0
GNDT
CS92
1N0
1
BA002
3
DVSS
AHVSS
CS91
470U0
°1MI0
2
GND-HEATSINK
AHVSS
CS90
470U0
DVSS
RS27
10K0
8
CS88
100N0
RS88
4R7
CS24
1N0
°VIRTUAL
RS91
DOLBY
15K0
BS02
CS06
1N0
AHVSS
3
33
IS80
TDA7269
DVSS
17
+8V
GNDP
GND_HEATSINK
AHVSS
5
RS83
22K0
RS84
22K0
GNDP
RS95
100K0
GNDP
25,4
7
AHVSS
AHVSS
DVSS
47R0
15
15
8 14,7
4 15
2
10
CS26
2N2
DVSS
RS40
14,6
CS87
100N0
6
1
11
23
7
CS79
470P0
CS77
1U0
14,8
DVSS
25
20
RS75
4K7
0
28
24
RS77
4K7
DVSS
30
CS33
11 47P0
I2S_CL
10 4,9
I2C_DA
9 4,9
I2C_CL
ANA_IN2+
NC
CS73
1N0
32
GNDP
CS05
1N0
First issue 07 / 98
38
IS40
MSP3400C-PP-C6
SC2_OUT_R
(uP)
GNDP
ICC17
37
63
CS22
220U0
SDA (uP)
-UA (P)
36
60
AHVSS
AHVSS
+5VON (DP)
RESET_MSPMUTE- (uP)
+UA (P) 33
4,9
1,5
10N0
35
64
RS05
27R0
SCL (uP)
CS32
AHVSS
RS03
47R0
0,9
SIF (OS)
3,7
3,7
3,7
3,7
CS31
1N0
RS01
1K5
AHVSS
6K8
AV1_IN_L
AM/AF (OS)
AHVSS
CS47
100N0
34
GNDP
LS63
2U2
(OS)
3,7
3,7
10U0 6,8
7,8
10U0 6,9
33
RS87
4R7
5
AV1_OUT_L
+8V (P)
CS67
10U0
3,7
3,7
GNDP
RS85
560R0
AHVSS
AHVSS
1
CS66
10U0
RS86
560R0
GNDP
RS62
470R0
AHVSS
CS84
470U0
4
AV1_OUT_R (OS)
LS62
2U2
AV2_OUT_L
AHVSS
1
RS61
470R0
Piece de securite
N'utilisez que les pieces d'origine
3
(OS)
LS61
2U2
CS65
10U0
IS40 = SUB AMVD 19100 00 => VIRTUAL DOLBY
= SUB AMDP 17001 00 => DOLBY PROLOGIC
= MSP 3410D-PP => STEREO / NICAM
= MSP 3400C-PP-C5 => STEREO 2X10W
Safety Part
When repairing, use original part only
2
RS60
470R0
Sicherheitsbauteil
Bei Ersatz nur Originalteil verwenden
CS60
1N0
5
CS64
10U0
AHVSS
CS61
1N0
GNDP
LS60
2U2
AV2_OUT_R (OS)
AHVSS
CS62
1N0
GNDP
AHVSS
CS63
1N0
GNDP
AHVSS
GNDP
AHVSS
AHVSS
AHVSS
DVSS
AHVSS
AHVSS
RS67
100K0
CS13
1N0
AHVSS
AHVSS
RS66
100K0
CS12
1N0
AHVSS
RS65
100K0
CS11
1N0
AHVSS
RS64
100K0
CS10
1N0
AHVSS
L
AMPLIFIER SCHEMATIC DIAGRAM - SCHEMA DE L’AMPLIFICATEUR - SCHALTBILD AUDIO-SIGNALVERABEITUNG - SCHEMA DELL’ AMPLIFICATORE ESQUEMA DEL AMPLIFICADOR
(MONO)
AHVSS
CS63
1N0
CS62
1N0
CS61
1N0
33
34
RS63
470R0
+8V
RS12
18R0
CS14
220U0
10U0
38
CS18
10U0
40
AHVSS
AHVSS
CS46
3U3
CS47
100N0
AHVSS
AHVSS
AV1_IN_L
AV1_IN_R
(OS)
(OS)
RS51
6K8
CS51
1U0
RS50
6K8
CS50
1U0
AHVSS
AHVSS
CS54
820P0
36
39
CS15
10N0
AHVSS
35
37
CS17
LS10
4U7
CS60
1N0
CS66
10U0
CS67
10U0
CS84
470U0
AHVSS
AHVSS
41
42
43
44
45
46
47
CS55
820P0
AHVSS
48
49
50
AHVSS
51
52
53
54
AM/AF (OS)
55
CS35
1U0
AHVSS
CS31
1N0
AHVSS
CS43
10U0
AHVSS
CS42
100N0
SIF (OS)
AHVSS
RS02
6K8
RS04
180R0
LS20
10U0
CS01
22N0
TS01
BC847B
DVSS
61
62
63
64
RS05
27R0
CS22
220U0
CS02
47P0
SDA (uP)
-UA (P)
59
60
QS40
18M432
CS23
10N0
AHVSS
CS41
1P0
AHVSS
DVSS
CS40
1P0
-
SC2_OUT_R
NC
SC2_OUT_L
NC
ASG3
VREF1
SC1_OUT_R
DACM_L
SC1_OUT_L
DACM_R
CAPL_A
VREF2
AHVSUP
DACA_L
CAPL_M
DACA_R
AHVSS
RESETQ
AGNDC
NC
NC
NC
NC
NC
NC
I2S_DA_IN2
SC3_IN_L
DVSS
SC3_IN_R
DVSUP
ASG2
ADR_CL
SC2_IN_L
ADR_WS
SC2_IN_R
ADR_DA
ASG1
I2S_DA_IN1
SC1_IN_L
I2S_DA_OUT
SC1_IN_R
I2S_WS
VREFTOP
I2S_CL
MONO_IN
I2C_DA
AVSS
I2C_CL
NC
AVSUP
ANA_IN1+
ANA_IN-
STANDBYQ
ADR_SEL
ANA_IN2+
D_CTR_OUT0
TESTEN
D_CTR_OUT1
XTAL_IN
NC
NC
XTAL_OUT
NC
AUD_CL_OUT
RS77
4K7
32
31
30
29
AHVSS
28
27
26
CS76
4U7
CS04
DVSS
CS74
1N0
23
CS27
1N0
22
21
18
RS78
4K7
LS40
RS42
15U0
470R0
RS41
47R0
LS41
RS43
15U0
470R0
RS80
1K0
AHVSS
2
10
5
4
IS80
TDA7269
RS84
22K0
3
AHVSS
DVSS
DVSS
13
CS33
47P0
CS34
47P0
CS24
1N0
DVSS
RS88
4R7
CS88
100N0
CS90
470U0
10
9
RS27
10K0
8
7
6
4
RS83
22K0
8
DVSS
14
5
CS87
100N0
6
9
7
CS80
470P0
LS25
4U7
RS29
220R0
DS90
BZX55C3V6
3
RS99
100R0
2
CS92
1N0
RS97
1K0
1
RS92
10K0
RS96
18K0
DVSS
47R0
CS78
1U0
1
CS25
470U0
15
DVSS
RS40
RS79
1K0
CS26
2N2
16
11
RS76
4K7
AHVSS
DVSS
17
12
GNDP
CS77
0
1N0
24
19
RS87
4R7
11
AHVSS
25
20
CS79
470P0
CS73
1N0
GNDP
RS85
560R0
AHVSS
CS82
1U0
RS98
15K0
CS81
100N0
RS93
18K0
(uP)
AHVSS
TS81
BC847B
DVSS
CS85
1MI0
CS94
1N0
GNDP
+5VON (DP)
RESET_MSPMUTE- (uP)
+UA (P)
10N0
AHVSS
RS20
4R7
AHVSS
SCL (uP)
CS32
AHVSS
RS03
47R0
57
58
AHVSS
RS01
1K5
56
AHVSS
IS40
MSP3400C-PP-C6
RS86
560R0
GNDP
AHVSS
GNDP
(OS)
CS13
1N0
RS62
470R0
LS63
2U2
AHVSS
GNDP
CS12
1N0
LS62
2U2
AV1_OUT_R (OS)
AV1_OUT_L
+8V (P)
RS67
100K0
AHVSS
AHVSS
GNDP
RS66
100K0
AHVSS
DVSS
AHVSS
AHVSS
AHVSS
GNDP
CS59
4N7
RS95
100K0
GNDP
GND_HEATSINK
CS05
1N0
AHVSS
GND-HEATSINK
CS06
1N0
AHVSS
Piece de securite
N'utilisez que les pieces d'origine
AHVSS
RS90
10K0
GNDP
2
RS91
15K0
GNDP
MAIN
(AP)
1
BS90
R
.17002.00
DVSS
CS07
1N0
Sicherheitsbauteil
Bei Ersatz nur Originalteil verwenden
Safety Part
When repairing, use original part only
GNDT
+8V
AHVSS
DVSS
CS08
1N0
GNDV
AHVSS
ICC17
29
30
First issue 07 / 98
LOCATION OF CONTROLS - EMPLACEMENT DES REGLAGES SERVICE LAGEPLAN - POSIZIONE REGOLATORI DI SERVIZIO SITUACIÓN DE LOS AJUSTES
LP44
RP76
U
STBY
265V (ASIA)
BR01
264V (EUR)
140
QR01
1
190
4Mhz
1
T 2.5A L
BP01
FP01
PP64
-UA
1
CP92
DP80
CP80
DP72
+UA
DP84
CP82
U-
BL02
1
CP97
FI50
8V
IP95
VIDEO
5,74Mhz
FI30°
DL12
DP85
U
Timer
IX01
77,8Mhz
JF14
FI02
31,9Mhz
+5V
UP
FI01
5V
DST
FI10
USYS
1
1
IV0 3,579545Mhz
QC02 +5V
ON
QC01
40,4Mhz
4,433619Mhz
NH01
LX18
DP82
BV01
BP15
CP84
FI20
RP92
LS25
BF01
IS40
1
LS10
QS40
BX01
BX02
1
IF01
° it is not necessary , to adjust FI30 by after sales
focus
G2/cutoff BX50
Part of board connected to mains supply.
Partie du châssis reliée au secteur.
Primärseite des Netzteils.
Parte dello châssis collegata alla rete.
Parte del chassis conectada a la red.
!
Use isolating mains transformer Utiliser un transformateur isolateur du secteur Trenntrafo verwenden Utilizar un transformador aislador de red Utilizzare un trasformatore per isolarvi dalla rete
www.rtv-horvat-dj.hr
ICC17
First issue 07 / 98
ADJUSTMENTS - REGLAGES - EINSTELLUNGEN - REGOLAZIONI - AJUSTES
U Sys
+
PP 64
+
= 50%
DP 80
V=
CP 80
trap 40,4Mhz
FI 01
Switch set to standard BG
Commuter le TV au standard
BG
trap 31,9Mhz
IF Signal
40,4MHz (BG)
31,9MHz (BG)
IF Alignment
Alignement FI
SCREEN
Usys
126V+/-0,5V
132V+/-0,5V
132V+/-0,5V
126V+/-0,5V
126V+/-0,5V
126V+/-0,5V
126V+/-0,5V
138V+/-0,5V
138V+/-0,5V
138V+/-0,5V
Jumper
JL80
JL81
JL81
JL80
JL80
JL80
JL80
JL82
JL82
JL82
RL65
4k7
24k
24k
4k7
4k7
4k7
4k7
47k
47k
47k
FI10
1
V=
Adjust FI01 for minimum value at 40,4Mhz
RI33
TUNER
1
1nF
G
U G2 / cutoff
Format
4:3
4:3
4:3
4:3
4:3
4:3
4:3
16:9
16:9
16:9
FI20
Adjust FI20 for minimum value at 31,9Mhz
11
50 mV
FI 02
Tube
A51EFS83X191
A59EHJ43X15
A66EHJ43X15
A59EGD048X30
A68EGD038X30
A68AGA25X01
A80AEJ15X01
W56EGV023X015
W66EGV023X015
W76EGV023X015
+
75Ω
+
NH01
= 50%
V=
RI41
DI40
CRT IB01:
pins 9 / 12 / 15
AV (no Signal, black screen)
160V
highest output
0
FOCUS
FOCUS
LL05
Sharp picture
Test pattern
(standard values)
www.rtv-horvat-dj.hr
ICC17
First issue 07 / 98
GB
SERVICE MODE
MODE SERVICE
F
I - ENTER/EXIT SERVICE MODE - ENTREE/SORTIE DU MODE SERVICE
1 ACCESSING THE SERVICE MODE
1 ACCES AU MODE SERVICE
Accès avec le clavier du téléviseur
TV Control Panel Access
• Switch the TV into “Standby” mode by pressing the Standby button on
the RCU.
• Switch “OFF” the mains supply to the TV and wait for the
LED to extinguish.
• Whilst holding depressed the PR - and VOL- (8s),
switch “ON” the mains supply to the TV.
• Once initialised, the Main Service Menu will appear on the screen of
the TV.
Soft-Ver.
Config.
Serial-No.
V1.00-0
A5- - - -N
103465071
• Commuter le téléviseur en position de veille avec la télécommande.
Eteindre le téléviseur par l’interrupteur secteur (attendre l’extinction
complète du voyant).
• Tout en appuyant sur les touches PR - et VOL - , mettre le TV en
service à l'aide de la touche M/A.
• Maintenir enfoncées les touches PR - et VOL -. (8s)
Le menu suivant apparaît.
Soft-Ver.
Config.
Serial-No.
0080
V1.00-0
A5- - - -N
103465071
QUIT
TUBE
SETUP
GEOMETRY
VIDEO
QUIT
TUBE
SETUP
GEOMETRY
VIDEO
IF
IF
0080
Please Note:
Note :
In the service mode :
- The CHILD LOCK function is re-initialised.The LOCK function (PIN
number) is ignored.
- All Wake-up/Sleep timer settings are CLEARED.
- SCART socket pin 8 switching voltages are ignored.
- AV-Link, WSS Detection, EPG and TELETEXT functions are
disabled.
- Automatic standby mode switching functions (no signal conditions)
are disabled.
- Brightness, Colour and Contrast are set to factory defaults.
- Sharpness settings are set to MID position.
- Contrast Expand is set to LOW.
- Automatic INSTALL mode is disabled.
- FORMAT and ZOOM are reset to factory defaults.
En mode service:
- Le verrouillage parental est effacé ( réinitialisé ).
- La fonction de verrouillage ( Pin number ) est ignorée.
- La programmation des heures «reveille/matin» est annulée.
- Possibilité de passer en mode service avec commutation lente active.
- AV- Link , la détection WSS, l’EPG et le Vidéotexte ne sont pas
validés.
- La fonction de stand-by automatique en cas d’absence de signal
d’antenne n’est pas validée.
- Les valeurs de réglages usine sont affectées au contraste, à la
couleur et à la lumière.
- Le contour est appelé à sa valeur moyenne.
- L’expansion contraste est au niveau bas.
- Le mode ambiance «Light sensor» n’est pas valides.
- Zoom et format ignorées.
2 TEMPORARY EXIT FROM SERVICE MODE
2 SORTIE TEMPORAIRE DU MODE SERVICE
- Press the “EXIT” button on the RCU.
- Pressing the “MENU” button on the RCU will activate the customer
menus.
- Utiliser la touche Exit de la télécommande.
- Le menu utilisateur peut être accessible via la touche «Menu».
- The Service Menu can be re-entered by pressing the “BLUE” button on
the RCU.
- Pour entrer à nouveau dans le mode service utliliser la touche bleue.
3 SORTIE DEFINITIVE DU MODE SERVICE
3 EXITING FROM SERVICE MODE
Remote Control
TV Control Panel
- Select the “QUIT” line of the “Main Service
Menu”.
- Press «<», «OK»
or «>» button
ON/OFF key or “Stand-by”
buttons
- RCU “Standby” button
or switch “OFF”
mains supply.
- Press «VOL.+»button
- TV mode.
Values or adjustment not “STORED” before exiting
the service mode will NOT be “SAVED” in the NVM.
télécommande
clavier du téléviseur
- Aller au point «QUIT» dans le menu principal
du mode service.
- Appuyer sur «<»,
«OK» ou «>»
First issue 07 / 98
- Foncion Stand-by ou
«off» par M/A
-Appuyer sur «VOL+»
- Mode TV.
Les valeurs ou réglages non mémorisées avant la
sortie ne seront pas écrites en NVM.
www.rtv-horvat-dj.hr
ICC17
Inter M/A ou Stand-by
II - NAVIGATION INSIDE THE SERVICE MODE - DEPLACEMENT DANS LE MODE SERVICE
FUNCTIONS WALLIN SERVICE MODE - OPZIONI NEL SERVICE MODE - BUSQUEDA EN MODO SERVICIO
1
Soft-Ver.
Config.
Serial-No.
REMOTE CONTROL - TELECOMMANDE - FERNBEDIENUNG
TELECOMANDO - MANDO A DISTANCIA
V1.00-0
A5- - - -N
103465071
V1.00-0
A5- - - -N
103465071
0080
QUIT
TUBE
SETUP
GEOMETRY
VIDEO
➠
DISPLAYING THE VALUE OF THE SETTING - AFFICHAGE DES
VALEURS - ANZEIGE DES EINSTELL WERTS
VISUALIZZAZIONE DEL VALORE DELLA REGOLAZIONE VISUALIZACION DEL VALOR DE AJUSTE
H-Position
➠
QUIT
TUBE
SETUP
GEOMETRY
VIDEO
Soft-Ver.
Config.
Serial-No.
0080
3
Naviagation down
Naviagation up
>
- Select option
- Option anwählen
- Selezionare l’opzione
- Seleccionar opción
VALUE
4
TV CONTROL PANEL - CLAVIER TV - TASTATUR DES
FERNSEHGERÄTS - COMANDI DEL TELEVISORE V1.00-0
A5- - - -N
103465071
Soft-Ver.
Config.
Serial-No.
0080
QUIT
TUBE
SETUP
GEOMETRY
VIDEO
V1.00-0
A5- - - -N
103465071
QUIT
TUBE
SETUP
GEOMETRY
VIDEO
0080
SELECT
Display
➠
- < NVM value
: :Enable function
+
-
- Select option
- Option anwählen
- Selezionare l’opzione
- Seleccionar opción
- “Change“ value
- Wert “änden“
- “Cambiare“ valore
- “Cambiar“ valor
5
Vol.
+
Vol.
-
+
VALUE
VALUE
➠
➠
➠
➠
Store
FULL SCREEN
GEOMETRY
➠
ZOOM0
Return
System Voltage
H-VCO
H-Delay
V-Blanking
V-Amplitude
V-Position
UP
DOWN
-3B
+1B
-23
1E
Copîes RAM values into NVM
Copie la valeur RAM en NVM
Kopieren des Werts von RAM nach NVM
Copiare i valori RAM in NVM
Copiar valores RAM en NVM
H-Blanking
+3B
H-Blanking Symmetry -19
Default
Store
Restore
+0A
1B
CHANGE
UP
Restore
DOWN
CHANGE
➠
Copies all values from NVM into RAM.
Copie toutes les valeurs des données NVM en RAM
Kopiert alle NVM-Datenwerte in den RAM
Copiare tutti i valori da NVM sulla RAM
Copia todos los valores de NVM a RAM
ROM Default ➠All the default values of a page in use are stored in RAM.
L’ensemble des valeurs par défaut d’une page courante
est chargé en RAM.
Sämtliche Standardwerte der aktuellen Seite werden im
RAM geladen
Tutti i valori di default di una pagina in uso vengono
memorizzati sulla RAM
Todos los valores por defecto de la página en curso
están almacenados en RAM.
QUIT
TUBE
SETUP
GEOMETRY
VIDEO
IF
A1Z-DKC
Serial-N0.
AI6------
Character 1 : Factory : «A»= Angers , «C» =Celle, «T» =Tarancon
Character 2 : Year : «G» = 1996, «H»= 1997 etc..
Character 3 : Month, from : «1»=January to «C»=December
Character 4-9 : Serial N0.
STORING VALUES IN MEMORY - MEMORISATION DES
VALEURS - SPEICHERN DER WERTE - MEMORIZZAEZ I
VALORI - VALORES ALMACENADOS EN LA MEMORIA
The box
becomes
During alignment, values are temporarily stored in RAM.
En cours d’alignement les valeurs sont mémorisées temporairement en RAM
Während des Abgleichs werden die Werte vorübergehend im RAM gespeichert
Durante l’allineamento i valori vengono memorizzati provvisoriamente sulla RAM
Durante el ajuste, los valores son almacenados temporalmente en RAM
GEOMETRY
Config.
-
After setting, the values are stored in NVM.
Après réglages les valeurs sont mémorisées en NVM.
Nach dem Einstellen werden die Werte im NVM gespeichert.
Dopo la regolazione i valori vengono memorizzati in NVM.
Después del ajuste, los valores son almacenados en NVM
0080
Character 1 : Tube type : «A»= 4/3 , «W» =16/9
Character 2 : Chassis type : «5» = 50Hz,
Character 3 : Zoom available : «Z»=yes, «-»=not
Character 4 : Ambiant Sensor : «S»= detected, «-»= not
Character 5 : Dolby : «D»=detected, «-»= not
Character 6 : AV Link detected : «K»=IR link detected, «-»= not
Character 7 : Chassis Variant: «N»= Nicam, «S»=Stereo
: Disable function
-
V1.00-0
A5- - - -N
103465071
TV CONFIGURATION - CONFIGURATION DU TV - GERÄTEKONFIGURATION CONFIGURAZIONE DEL TV - CONFIGURACIÕN DEL TV
Naviagation up
-
Soft-Ver.
Config.
Serial-No.
Counter
Compteur
Betriebsstundenzähler
Contador
Contatore
Alignment
Alignement
Abgleich
Regolazione
Alineacion
PR +
PR +
Naviagation down
DOWN
Serial Number
N° de série
Serien-Nr.
Numero seriale
N° Serie
Navigation inside the Service Mode
Navigation dans le Service Mode
Funktionen im Service Mode
Opzioni del Service Mode
Búsqueda en el Modo Servicio
TOGGLE FUNCTIONS - VALIDATION DES FONCTIONS
EIN-UND AUSSCHALT FUNKTIONEN - FUNZIONI DI
COMMUTAZIONE - FUNCION CONMUTACION
IF
IF
UP
To enable a function check (tick)
the box.
Pour valider une fonction cocher
la case correspondante
Zum Implementieren einer Funktion das Kontrollkästchen
aktivieren (ankreuzen)
Per implementare una funzione di verifica, (vistare)
la casella
Para poner en fucionamiento una función verifique (señale)
la casilla
➠
Soft-Ver.
Config.
Serial-No.
<
➠
www.rtv-horvat-dj.hr
2
VALUE
Software Version
Version software
Software Version
Versione software
Versión software
Chassis Configuration codes.
Configuration du récépteur
Gerätekonfiguration
Composizione del ricevitore
Composición del Receptor
<
Set value
: NVM value
+ > NVM value
>
MAIN MENU - MENU PRINCIPAL
0E
Display
➠
- “Change“ value
- Wert “änden“
- “Cambiare“ valore
- “Cambiar“ valor
1
00 to FF
Hexadecimal value
valeur hexadécimale
Einstell wert hexadezimal
Valore esadecimale
Valor héxadecimal
IF
IF
III - LITE-MENU FOR FIELD SERVICE MODE MENUS DU MODE SERVICE
TIME COUNTER - COMPTEUR DE TEMPS - BETRIEBSSTUNDENZÄHLER CONTATORE - CONTADOR
The counter indicates the TV’s number of service hours.It counts from to 0 to 65535 hours.
The display is hexadecimal.
Le compteur de temps indique le nombre d’heures de service du TV. Il compte de 0 à 65535
heures. L’affichage est en hexadécimal.
Der Zähler zeigt an, wieviele Stunden der Fernseher in Betrieb ist. Die Anzeige ist
hexadezimal.
Il contatore indica il numero di ore di servizio del TV. Puo’ contatore da 0 a 65535. La
visualizzazione è esadecimale.
El contador indica el número de horas de servicio de la TV. Cuenta de 0 a 65535 horas. El
visualizador es hexadecimal.
2
SUBMENU - SOUS-MENU
Navigation inside the Service Mode
Navigation dans le Service Mode
Funktionswahl im Service Mode
Opzioni del Service Mode
Busquena en el Modo Servicio
VIDEO
Return
Factory
Norm.
Drive Adjust.
R-Drive
G-Drive
B-Drive
Peak-White
Scale Bright
Scale Colour
Scale Contr.
Default
Store
Restore
PAL
BG
Hexadecimal value
Valeur hexadecimale de reglage
Abgleichwerte hexadezimal
Valore di regolazione esadecimale
Valor del ajuste en hexadecimal
9C
9C
9C
70
5C
CC
Enable a function
Case de validation - Fonction validée si "cochée"
Zum Implementieren einer Funktion
Per inserire la Funzione
Activar una functión
ALIGNMENT PROCEDURE - PROCESSUS DE REGLAGES - ABGLEICH - VISUALIZZAZIONE DEL VALORE DELLA REGOLAZIONE - PROCEDIMIENTO DE ALINEACION
TUBE
Return
Tube type
A66ECY...
Store
Restore
SETUP
GEOMETRY
Return
Clear Progs.
Return
V- Slope
V-Amplitude
V-Position
Blanking On
S - Correction
H-Position
H-Amplitude
EW-Amplitude
EW-Trapezium
Default
Store
Restore
Kbd.
Config.
Default
WSS
Default
Store
www.rtv-horvat-dj.hr
Restore
Return
SETUP
Verlassen des Untermenüs,das Hauptmenü
des service Modes erscheint
Chiude il sottomenu e fa apparire il menu
principale Field Service Mode.
Cierra el submenú. El menú Field Service
Mode aparece.
Press </>: remote control; Vol. +/- : TV keyb.
Tube type
After replacing the NVM, the correct tube type
number must be entered (6 characters).
Once entered, the tubes geometry and video
default vales are immediately activated.
Variable geometry and video parameters
are written to the NVM when the “STORE” line is
selected.
See table below for tube type numbers.
Definit le tube exact après changement de
NVM.
Les nouvelles valeurs de tubes (avec video
et géometrie) sont actives de suite.
Les paramètres de vidéo et de géométrie sont
chargés en NVM lorsque STORE est
sélectionné. Voir liste ci-dessous.
Nach Tausch des NVM den bildröhrentyp
(6 Ziffern) auswählen. Die neuen Geometrie-und
Video-defaultwerte werden sofort aktiv. Variable
Geometrie- und Videowerte werden durch
Speichern mit "STORE" ins NVM geschrieben.
Bildrohrauflistung : siehe unten.
Scegliere il tubo appropriato dopo aver sostituito
la NVM; i 6 caratteri che indicano il nuovo tipo di
tubo, richiamano i valori video e geometria di
default. I parametri per video e geometria
vengono caricati nella NVM
Definir el tubo correcto después de haber
cambiado el NVM.6 caracteres.Los nuevos
valores de tipo de tubo (con la vídeo y la
geometría por defecto) se activan
inmediatamente. Los parámetros variables de
geometría y vídeo se graban en el NVM al
seleccionar la función Store. Vea más abajo
la lista de tubos.
Tube Name
A51EFS83X191
A59EHJ43X15
A66EHJ43X15
A68EGD038X30
A80AEJ13X01
A59EGD048X30
A68AGA25X01
W56EGV023X015
W66EGV023X015
W76EGV023X015
Store (+)
LIST name Description
A51EFS
A59EHJ
A66EHJ
A68EGD
A80AEJ
A59EGD
A68AGA
W56EGV
W66EGV
W76EGV
GEOMETRY
Return
Return
Closes the sub-menu and returns to the “Main
Service Menu”.Press </> on the RCU or
VOL+/VOL- on TV front panel.
Retourne au menu principal.
After setting
54
94
70
78
98
Test Pattern Signal used: 4/3 with geometric circle.
TUBE
4:3; 21” OT; AK-Mask; Coty-M
4:3; 25” MP; AK-Mask; Vector
4:3; 28” MP; AK-Mask; Vector
4:3; 29” SF; Invar; Vector
4:3; 33” MP AK-Mask; Coty-M
4:3; 25” SF; Invar-Mask; Vector
4:3; 29” VHP; AK-Mask; Coty-M
16:9; 24” SF; Invar-Mask; Vector
16:9; 28” SF; Invar-Mask; Vector
16:9; 32” SF; Invar-Mask; Vector
Closes the sub-menu and returns to the “Main
Service Menu”.
Retourne au menu principal.
Verlassen des Untermenüs
Chiude il sottomenu e fa apparire il menu
principale Field Service Mode.
Cierra el submenú. El menú Field Service
Mode aparece.
Press </>: remote control; Vol. +/- : TV keyb.
Clear Prog.
Clears all programmes STORED in memory and
RESETS all PICTURE and SOUND settings to the
factory default values.
The AUTO INSTALL (out of factory) mode can
be initialised by a long press (> 5sec.) of the
selection button.
Efface tous les programmes mémorisés.
valeurs SON et IMAGES: valeurs usines.
Pour sortir des valeurs usine :
Selection : Long press:2,5s
Löscht alle Programme und ersetzt alle Ton-und
Bildeinstellungen durch Fabrikwerte. Nach erneutem
Einschalten erscheint das Installationsmenü.
Anwahl: 2,5s drücken
Clear Prog.
Cancella tutti i programmi in memoria.I Valori
analogici SUONO E IMMAGINE vengono riportati
a livello di default. Per ristabilire le condizioni di
uscita fabbrica, selezionare la funzione e premere
per 2,5sec
Programa de borrado.
Borra todos los programas almacenados en la
memoria.Valores análogos de
SOUND PICTURE: valores de fábrica.Regreso
a la TV para "salir del modo fábrica".Selección:
Presión larga igual a 2,5 s.
active-aktiv
No active-inaktiv
Kbd. Config
Factory adjusted
Reserve au reglage usine
Reserviert für fabrikeinstellungen
Riservato alla regolazione di fabbrica
Kbd. Config
Default
WSS Automatic detection of DOLBY surround
sound and 16/9 Format pictures via
Teletext line number 23 is valid on all
programmes.
Sélection du process WSS valid pour tous
programmes
WSS (nur bei 16:9 oder Dolby)
Auswertung der Zeile 23 zur automatischen
Format umschaltung und Dolby umschaltung
Idendificazione "auto-surround" e "format" tramite
il televideo, decodificando la riga 23. La selezione
di WSS è valida per tutti i programmi.
Detección "auto-surround" y "format" a través
de la línea 23 de Teletext.La selección del
procesamiento WSS es válida para todos los
programas.
detect.enable- aktiv
disable-inaktiv
VIDEO
Return
Factory
Norm.
Drive Adjust.
R-Drive
G-Drive
B-Drive
Peak-White
Scale Bright
Scale Colour
Scale Contr.
Default
Store
Restore
7C
6C
7C
Closes the sub-menu and returns to the
“Main Service Menu”.
Retourne au menu principal.
Verlassen des Untermenüs
Chiude il sottomenu e fa apparire il menu
principale Field Service Mode.
Cierra el submenú. El menú Field Service
Mode aparece.
Press </>: remote control; Vol. +/- : TV keyb.
V-Blanking
Press </> on the RCU or VOL+/VOL- on TV
front panel.
1.Select the standard 4:3 format and zoom
mode 0.
1.Sélectionner le mode zoom standard 4/3
pour tube 4/3
1.Wählen Sie den Standard-Zoom 4:3
bei 4:3 Bildröhren.
1.Selezionare il modo zoom standard 4/3
per tubo 4/3
1.Seleccione el modo de zoom estándar
4/3 para tubo 4/3.
2.Apply a test pattern signal to the
TV with a single horizontal and vertical
line on the screen.
2.appliquer une MIRE de BARRE avec
seulement une ligne blanche horizontale
en milieu de l'ecran
2.Speisen Sie ein Testbild mit nur einem
horizontalen Strich in der Bildmitte ein.
2.Applicare un monoscopio con un'unica linea
bianca orizzontale al centro dello schermo
2.Aplique una plantilla de prueba con sólo
una línea blanca horizontal en el centro
de la pantalla.
3.Select “Blanking On” line of the menu and
ENABLE (tick) the function, the bottom half
of the screen will go black.
3.Positinner dans le mode Service Blanking
On la moitié basse de l' ecran devient noire
3.Schalten Sie den Blanking-Mode ein. Die
untere Hälfte des Bildschirms wird schwarz.
3.Posizionarsi in modo Service Blanking on;
la parte inferiore dello schermo divienta nera
3.Pase al modo Service Blanking On. La
mitad inferior de la pantalla se vuelve negra.
4.Select the “V_Slope” line of the menu and
adjust its value until the centre line of the
pattern is just invisible.
4.Aligner "Vertical - Slope" pour que la ligne
mediane soit a peine non visible
4.Regeln Sie "V-Slope" so ein,
dafl die Mittellinie nahezu verschwindet.
4.Allineare la "Vertical Slope" in modo che
la linea centrale sia appena visibile
4.Alinee "Vertical-Slope" para que la
línea mediana sea casi invisible.
5.Return to the “Blanking On” line of the
menu and DISABLE (un-tick) the function.
5 Revenir à Blanking On et mettre
5.Schalten Sie den Blanking-Mode wieder
ein und
5.Ritornare in modo Blanking on e porre
5.Vuelva a "Blanking on" y poner
6.Switch the test pattern signal to the
crosshatch geometry pattern.
6.Positioner la mire de quadrillage
6.Speisen Sie ein Gittertestbild ein.
6.Posizionare il monoscopio
6.Coloque la plantilla cuadriculada.
7.Perform the geometry adjustments
described below.
7.Effectuer les reglages de geometrie
d'écrits ci- dessous
7.Nehmen Sie die Geometrieeinstellung wie
unten beschrieben vor:
PAL
BG
IF
Return
AGC Take Over
9C
9C
9C
88
GEOMETRY MODE ALIGNMENT
4/3 picture tube
FFI - Bit
70
5C
CC
Default
Store
Restore
Signal : 4/3 test pattern
overscan V=107% , H=107%
1- Adjust Vertical position and Vertical amplitude
2- Adjust Vertical Blanking and linearity
Adjust separate for 4/3 and 16/9 format. See annexed
The signals colour standard is auto detected and displayed opposite the main menu line.
VIDEO
GEOMETRY
9.Adjust position H.
9.Regler la position H
9.Korrigieren Sie Horizontale Lage.
9.Regolare la posizione H
9.Ajuste la posición H
10.Ajuster l'amplitude H
10.Adjust amplitude H.
10.Korrigieren Sie Horizontal-Amplitude
10 Regolare l'ampiezza H
10.Ajuste la amplitud H
11-12.Correction of EW pincushion distortion.
11-12.Correction de coussin EW
11-12.Korrektur der Ost/West Kissenverzerrung.
11-12.Correzione della distorsione a cuscino EW
11-12.Corrección de la distorsión de cojín EW.
13.Correction of corners (Shape).
13.Correction de coins (Shape)
13.Korrektur der Ecken.
13.Correzione degli angoli (Forma)
13.Corrección de esquinas (Shape)
14.Trapeze. / Trapèze
14 Trapez-Verzerrung.
14.Trapezio / Trapecio
"These adjustments are not necessary
for 4:3 tubes in 16:9 mode"
"Pour les tubes 4/3 en mode 16/9,
ces reglages ne sont pas necessaire"
“Diese Einstellungen sind nicht für 4:3
Bildröhren im 16:9 Betrieb erforderlich.“
"Queste regolazioni non sono necessarie
per tubi 4/3 in modo 16/9"
"Estos ajustes no son necesarios
para los tubos 4/3 en modo 16/9"
PAL
Closes the sub-menu and returns to the
“Main Service Menu”.
Press </> on the RCU or VOL+/VOL- on
TV front panel.
Retourne au menu principal.
Verlassen des Untermenüs
Chiude il sottomenu e fa apparire il menu
principale Field Service Mode.
Cierra el submenú. El menú Field Service
Mode aparece.
Press </>: remote control; Vol. +/- : TV keyb.
Factory settings recalled
User settings kept.
+
=nom.
Grey scale test pattern
white =100%
overscan V=120% , H=120%
Fast filter (IF /PLL)
Filtre rapide (FI /PLL)
Schnelles filter (ZF/PLL)
Filtro rapido (IF /PLL)
16 / 9
standard mode
zoom 0
Asie
grey
+
R - Drive
+
Europ
=nom.
Grey scale test pattern
white =100%
G - Drive
B - Drive
After setting
white
+
+
white =100%
Tube Type [init]
Blue cathode
420
(600max)
A80AEJ
240 (340max)
A59EHJ
A59EGD
A66EHJ
380
400
300
(540max)
(470max)
(430max)
W56EGV
W66EGV
W76EGV
520 (610max)
480 (560max)
300 (350max)
A68EGD
350
(410max)
+
Scal.
Brightness
Adjust the vertical height : V =90%
Note :
* adjust separate for PAL/NTSC/SECAM and RGB/AV
getrennte Einstellung für PAL/SEACAM und RGB/AV
* * After PEAK white adjustment control cut off setting.
Repeat the adjustments if necessary.
Nach der Einstellung von "Peak white" die "Cut off"Einstellungen wiederholen.
<16 / 9>
zoom 1
[init]
Tube Type
A51EFS
EW Trapezium
Store (+)
=nom.
Peek white test pattern
CRT
Pin 6,8,11
EW Amplitude
<4/3>
zoom 1
Adjust the vertical height until V = 80%
G-Cut off*
Blue cathode
H-Amplitude
4-Adjust EW Amplitude ,EW Shape and Trapezium
FFi - Bit
+
R-Cut off*
H-Position
S
- Minimum noise- Minimum de bruit
- Minimum Rauschen- Rumore minimo
- Minimo ruido
Normalise User Settings
V-Position
S -Correction
4/3
standard mode
zoom 0
3- Adjust Horizontal position and Horizontal ampltude
AGC
Recalls the factory settings for colour,
brightness, contrast and sharpness and sets
contrast expand to "low".
Peak-White**
V-Amplitude
IF
Return
= 50%
= 100%
16/9 picture tube
Signal : 4/3 test pattern
Grey scale test pattern
white =100%
EW -Shape
overscan V=107%, H =107%
1- Adjust Vertical position and Vertical amplitude
2- Adjust Vertical Blanking and linearity
black
Scal*.
Colour
+
+
=nom.
PAL (then SECAM +RGB)
75% Colour bar test pattern via
RF.
16 / 9
standard mode
zoom 0
3- Adjust Horizontal position and Horizontal ampltude
Blue
Cathode
CRT
4-Adjust EW Amplitude ,EW Shape and Trapezium
=
7.Effettuare le regolazioni di geometria
descritte in precedenza
7.Efectúe los ajustes geométricos
descritos más abajo.
8.Store /Memoriser /Speichern /Memorizzare
/Almacene
Correct
After setting
F-H
incorrect
Store (+)
Scal.
Contrast
factory settings.
ICC17
First issue 07/ 98
SUB AUDIO SIGNAL MODULE - SUB MODULE AUDIO - AUDIO SIGNAL SUBMODUL - SUB MODULO AUDIO
PINS of IC
64
33
SC2OUTR
100N0
10U0
CS207
DGND
CS206
SC2OUTL
SC1OUTR
SC1OUTL
+8V
CAPLA
CAPLM
SC4INL
AGNDC
SC4INR
AGND
SC3INL
SC3INR
SC2INL
SC2INR
SC1INL
SC1INR
VREFTOP
MONOIN
+5VA
ANAIN1+
ANAIN-
SUB AUDIO MODULE VIRTUAL DOLBY
ANAIN2+
XTALIN
DGND
XTALOUT
1
2
3
4
5
6
7
8
9
10
11
12
13
14
15
16
17
18
19
20
21
22
23
24
25
26
27
28
29
30
31
32
BS002
TP2
1
DGND
TP1
1
DGND
43
42
41
40
39
38
37
36
35
34
33
32
31
30
29
28
27
CS102
10N0
AHVSS
AGNDC
SC4INL
SC4INR
ASG3
SC3INL
SC3INR
ASG1
SC2INL
SC2INR
ASG0
SC1INL
SC1INR
VREFTOP
VREFTOP
MONOIN
AVSS
AVSS
45
44
43
42
41
40
39
38
37
36
35
34
33
32
31
30
29
28
DGND
IS100
MSP3410D(DIE)
AVSUP
AVSUP
ANAIN1+
ANAINANAIN2+
TESTEN
XTALIN
XTALOUT
DMACSYNC
AUDCLOUT
NP
NP
NP
DCTROUT1
DCTROUT0
ADRSEL
STANDBYQ
NP
AGND
CS106
1N0
IS200
DPL3518(DIE)
26
25
24
23
22
21
20
19
18
17
16
15
14
13
12
11
10
+5VD
65
66
67
68
69
70
71
72
1
2
3
4
5
6
7
8
9
AGND
AHVSS
CAPLM
AHVSUP
AVHSUP
CAPLA
SC1OUTL
SC1OUTR
VREF1
VREF1
SC2OUTL
SC2OUTR
ASG3
TESTNEU
DACMSUB
DACML
DACMR
VREF2
VREF2
AVSUP
NC
NC
NC
TESTEN
XTALIN
XTALOUT
DCTRIN
AUDCLOUT
NP
NP
NP
DCTRIO1
DCTRIO0
ADRSEL
STANDBYQ
NP
RESETQ
I2SDAOU2
I2SDAIN2
DVSS
DVSS
DVSUP
DVSUP
NP
NC
NC
NC
I2SDAIN1
I2SDAOU1
I2SWS
I2SCL
I2CDA
I2CCL
46
47
48
49
50
51
52
53
54
55
56
57
58
59
60
61
62
63
CAPLC1
AHVSUP
AHVSUP
CAPLC2
SC1OUTL
SC1OUTR
VREF1
VREF1
SC2OUTL
SC2OUTR
ASG3
DACC1L
DACC1R
VREF2
VREF2
DACC2L
DACC2R
61
62
63
64
65
66
67
68
1
2
3
4
5
6
7
8
9
+8V
27
26
25
24
23
22
21
20
19
18
17
16
15
14
13
12
11
10
44
45
46
47
48
49
50
51
52
53
54
55
56
57
58
59
60
DACAL
DACAR
RESETQ
I2SDAIN2
DVSS
DVSS
DVSUP
DVSUP
ADRCL
ADRWS
NP
ADRDA
I2SDAIN1
I2SDAOU1
I2SWS
I2SCL
I2CDA
I2CCL
CS101
220N0
CS202
10N0
AHVSS
AHVSS
AGNDC
SC3INL
SC3INR
ASG2
SC2INL
SC2INR
ASG1
SC1INL
SC1INR
VREFTOP
VREFTOP
MONOIN
AVSS
AVSS
AVSUP
AGND
CS104
DACML
DACMR
DACAL
DACAR
RESETQ
DGND
CS105
DGND
1
100N0
ICC17
First issue 07 / 98
100N0
PINS of IC
10N0
DGND
SUB AMVD 19100 00
10N0
CS205
1
2
3
4
5
6
7
8
9
10
11
12
13
14
15
16
17
18
19
20
21
22
23
24
25
26
27
28
29
30
31
32
1N0
SUB AMVD
1N0
CS204
+5VD
I2CDA
CS103
I2CCL
ADRSEL
CS203
+5VD
BS001
32
+5VD
+5VA
AGND
+5VD
TECHNICAL INFORMATION
Chassis concerned : ICC17 (25"MP & 28"MP)
Symptom/ Problem observed :
Spare Parts List, component part number amendment.
Solution implemented :
To optimize the CRT heater supply voltage for the above mentioned tubes, both LL05(DST) and
LB02 (coil) have been changed.
LL05 : Old Part No. 10546610 ---> New Part No. 10600190
LB02 : Old Part No. 10477930 ---> New Part No. 25349470
Comment :
Both components must be replaced at the same time.
www.rtv-horvat-dj.hr
TECHNICAL INFORMATION
Finished products / Chassis concerned :
All TV sets equiped with ICC17 chassis (CRT Board)
Subject : Protection of transistor TB02 against arcing
Symptom/ Problem observed :
Transistor type number BF422 used in position TB02 found defective.
Cause :
Arcing.
Solution implemented :
- Remove the resistor at location RB13.
- On the copper side of the CRT PCB, add an insulated wire link between pin 1 of inductor LB02 and
pin 4 of the CRT socket (ground).
10533820
CRT 17000
N 00
Q
CB06
P
LB06
BB02
R
1
RB13
RB12
TB02
E
LB02
B
C
BB
05
CB03
1
BB04
E
0
RB03
RB05
RB02
RB04
LB51 LB71 LB31
RB07
RB08
IB01
BB06
1
TB01
C
1
DB04
B
DB71
RB71
DB31
2
RB01
DB70
RB31
DB51 RB51
BB01
1
RB11
BB03
DB30
DB50
LB01
CB01
CB04
IRIS CODE: the code mentioned below must be used to report this failure on the warranty sheet. It will
make your report easier and more reliable
Condition/
Symptom
1
3
1
Part No
Qty
5
Position
R B 1
Section
3
V
P
A
You do not need to write anything in the white boxes.
www.rtv-horvat-dj.hr
Fault
Code
Repair
Code
Y
T
TECHNICAL INFORMATION
Chassis concerned : ICC17
Symptom/ Problem observed :
Moiré patterning visible on some channels.
Cause :
High frequency cross modulation.
Solution implemented
- Remove the jumper link at location JR06.
- Remove the inductor at location LR20.
- Replace LR10 10µH inductor with a jumper link.
J
L
K
M
CP72
RP76
DR10
BR01
CP73
JR01
JR02
DR20
1
JR10
QR01
CR99
RR04
JR03
BR06
CR10
1
BS80
RV31
JX94
1
0
CV08
1
RS88
0
BV01
CS90
BS90
JS15
RV30
RV01
LV07
BS02
1 BS91
DR23
RR58
RR50
RR51
JR07
LR10
RR77
JR13
JR11
JR12
10516550/A
S91
RR57
RR71
RR73
RR75
JV04
JR04
JR05
RR76
RR74
RR72
RR70
RR82
RR78
LR20
JR06
BR07
RR45
www.rtv-horvat-dj.hr
VHF / UHF TUNER CTT5010
( For information only )
CH29
22N
RH11
22K
CH07
1P
TH01
S595TR
DH02
BB535
LH02
RH06
22K
CH05
10P
LH05
LH04
CH09
100P
LH03
LH06
DH06
BB535
CH03
12P
CH14
100P
LH09
CH13
100P
CH12
100P
CH11
9P
LH07
CH08
9P
CH02
4P7
LH08
LH10
3
CH47
1N
RH01
470K
CH85
22n
TH30
S595TR
DH32
BB639C
LH34
RH02
22K
CH31
10N
LH41
9
20
RH70
180R
10
RH71
10K
11
CH79
18P
QH70
4MHz
DH43
BB639C
RH56
330R
CH88
1N
RH53
100R
10N
BII
CH56
15N
CH89
1N
RH55
220R
15 BI
RH52
22K
DH44
BB639C
DH70
BA592
CH82
1N
RH41 RH46
22K 470R
LH39
RH85
6K8
RH50
39K
CH81
1N
RH87
56R
CH83
39p
CH32
1N
RH86
4R7
TH80
MMBR571LT1
RH88
2R2
RH49
4R7
RH39
22K
RH72
33R
16 BIII
Pr.
* CH42
VAL
CH70
33N
LH38
RH33
470K
CH40
22N
CH55
100P
14
CH35
22N
RH42
2R2
LH47
DH45
BA592
RH73 47K
I/O-PORTS
RH43
22K
RH44
22K
Ref.-
CH49
10N
LH36
LH49
RH59
1K2
18
17
Divider
TH40
S595TR
RH51
10K
CH54
100P
CH53
1P5
CH59
RH80
4R7
LH48
19
12
4K7
RH58 13
CH37
1N
RH30
1R
LH81
CH45
220P
RH36
470K
DH41
BB639C
RH31
22K
RH38
22K
LH37
CH93
22P
LH30
LH32
DH33
BB639C
CH44
470P
LH83
Crystal
Oscillator
LH33
CH33
82P
CH39
4N7
RH81
8R2
LH42
CH28
5P6
RH32
22K
RH08
3K9
DH42
BB639C
RH45
22K
CH36
1N
0P75
CH43
Progr.
Divider
DH31
BB639C
CH38
1N
DH34
BB639C
21
DH35
BB639C
CH52
1P5
22
8
RH13
10K
CH51
1P5
23
PHASEDet.&
ChgPmp
LH31
LH35
CH86
CH25
47P
LH12
CH50
1P5
27p
LH43
I2C-Bus
Interface
RH03
3K9
CH34
1N
7
LH82
2R2
RH82
LH40
RH37
27R
Oscillator VHF/HYP
RH92
24 15R
Isolation
Amplifier
CH06
1N
DH07
BB535
CH23
0.75P
5
Mixer
VHF
HYP
CH95
15N
RH04
22K
RH14
47K
RH15
100K
CH24
8P
LH11
CH22
1p
26
25
6
2P
LH84
CH21
1p
27
4
CH87
RH10
22K
CH20
0.75P
28
2
CH48
1N
RH09
47R
RH05
22K
TUA6010X
IH70
1
Oscillator UHF
DH03
BB535
DH05
BB535
Mixer
UHF
CH04
100P
Isolation
Amplifier
LH01
RH12
22K
CH96
4N7
RH35
150K
RH34
150K
RH07
150K
CH90
10N
RH91
4K7
LH22
CH17
82P
*
DH47
5V6
CH72
1nF
CH71
1N
CH92
4N7
CH91
4N7
RH93
10K0
LH20
1
INP
AGC
ICC17
First issue 07 / 98
* DENOTES : NO COMPONENTS IN LAYOUT
2
TU
3
AS
4
CL
RH94
3U9
5
DA
6
UB
7
5V
8
LOCK
BANDSWITCH
BI =03
BII =06
BIII=85
CH78
1N
CH94
1N
CH76
10N
CH75
22P
9
33V
11
IF1
VIDEO AMPLIFIER BOARD - PLATINE AMPLIFICATEURS VIDEO - VIDEOVERSTÄRKERPLATTE - PIASTRA AMPLIFICATORE VIDEO PLATINA AMPLIFICADOR VIDEO
G2 FOCUS
BL02
7
ICC17
1
7
6
5
4
3
2
1
U_VIDEO
NC
GND
GND
HEAT_2
HEAT_1
SK
LB06
68U0
CRT.17000.00
CB06
10U0
TB01
196 BF423 196
CB04
100N0
RB05
560K0
CHASSISGND
0,6
TB02
BF422
BB01
6
ICC17
1
I_CUT
GND
GND
B
R
G
1
CRT
BB02
RB08
47K0
RB02
560K0
195,4
0,1
RB07
560K0
CB03
10U0
DB04
1N4004GP
RB04
1K5
LB01
10U0
CB01
10N0
Ri
-
DB31
BAV21
+
Ra
BV01
Ri
+
Ra
3
Ri
+
Ra
LB71
8 137 10U0
2
RB31
560R0
BB05
GG2
LB51
7 147 10U0
3
BG2
RB51
560R0
8
R
6
G
11
B
3,8Vpp-H
1V
R G1
IB01
TDA6107Q
2
G2
B
3
CB10
NI
* = see CT 170XX partslist
10
CB09
100P0
CRT GND
1V
3,5Vpp-H
1
G
9
CHASSIS GND
1,2V
7
DB50
BAV21
5 6,3
4
3,8Vpp-H
5
RB71
560R0
DB70
BAV21
VIP
REF
LB02
*
RG2
1K5
DB30
BAV21
Rf
2,2
RB01
DB51
BAV21
LB31
Rf
2,5 2
DB71
BAV21
9 136 10U0
1
RB03
0
6
Rf
2,5 1
BB04
VH
196
6
5
4
3
2
1
CRT GND
1
BB03
120Vpp-H
150Vpp-H
150Vpp-H
12
4
BB06
1
CHASSIS GND
M
a
d’
u
t
B
e
d
n
i
i
a
n
l
M
a
n
u
t
i
l
U
l
u
i
s
e
u
i
z
a
n
u
i
t
e
a
l
z
a
a
δ
η
χ
ρ
η
2
1
2
n
o
n
g
s
-
u
z
i
u
γ
l
i
n
o
e
n
Ο
t
e
s
m
e
g
d
i
n
e
r
a
l
ι
ε
ς
σ
ε
ω
ς
D
U
2
1
C
1
M
T
2
1
C
2
5
D
G
2
1
C
2
8
D
G
2
1
C
2
9
D
L
2
1
C
www.rtv-horvat-dj.hr
MAIN BOARD - PLATINE PRINCIPALE - CHASSIS GRUNDPLATTE - PIASTRA PRINCIPALE - PLATINA PRINCIPAL
COMPONENT SIDE - COTE COMPOSANTS - BESTÜCKUNGSSEITE - LATO COMPONENTI - LADO COMPONENTES
CP72
JP02
JP01
CP63
JR01
JR02
JR10
QR01
1
CP51
CR99
RR04
JP03
RP63
C
D
CS90
BS80
JS90
CS88
CS91
CS87
JS92
RS87
JS80
RS79
IS80
RS80
CS75
JS72
LX18
CS78
CS76
JS09
JS71
JS49
RV14
CS84
JC02
RV17
DL75
RV16
1 BS91
RR58
JI10
JI05
RI65
CI63
JC01
FI30
CV26
CV21
1
BX04
CS77
LS20
IS40
CS50
CS35
1
IF01
H
CS65
CS64
E
J
K
CS18
L
B
C
QS40
CS52
BX02
CX15
CS53 CS43
CS46
CS22
CS14
JS79
BX01
RS61 CS17
CS66
LS10
RS12
CH08
BX08
RX23
RS20
JX79
RX17
RS60
JX07
CS51
CV04
CS67
JX21
JX20
JS11
JS12
JS18
JS21
JX24
CX59
DV19
RH04
RV20
JH07
CC03
RC02
DL71
G
DS90
JI04
FI20
JV03
RI50
JV01
JV02
JV05
DL74
CL09
DH01
JH01
LH10
RF05
DL72
JH04
JH03
JX60
RL75
JH08
JH05
CF03
F
CS82
LS25
JX61
JX23
1
CH03
RF08
CF07
CL11
RF04
RF07
NH01
CF04
E
JV90
CC01
CS85
CX62
JS75
JS74
TX15
RL44
CL08
RF09
CF10
IX01
JC81
JX80
BX50
B
RL43
E
JF36
E
BF01
LL05
ZL11
CL48
TL41
ZL13
CL42
JC84
QC01
JF30
JF31
RL07
RL11
DF01
FI10
CL16
CL13
CF08
CL51
DL51
DL24
TL51
1
DL11
JF12
JF11
DL12
JF17
TL14
E
C
CV01
JX85
CS25
JF08
CP87
CP98
B
BR08
JX88
JX22
RV03
QC02
JL74
JX93
JX92
JX91
JX82
JH02
CL24
DL21
DL22
JL92
B
B
LV05
GND-AV2
JX83
FI01
1
RS88
CV08
1
CV03
JF14
RL16
1
DL25
CI57
DL09
JF25
RL52
RL13
C
RV31
CL72
LL13
CL25
JR09
JF07
CL55
B
C
BL01
LL32
LL26
RL26
LL33 JF26
E
C
CL14
RL18
DL13
LL22
TL42
CI50
CL15
DL14
RL24 RL25
1
BS90
JX94
JI02
JI01
DH04
E
JF22
JF23
CI54
FI02
CL12
CL22
A
JF18
JF19
ZL14
V
Z
CP96
RL59
RL10
CL21
9
JI03
1
1
B
8
E
B
C
RL01
E TL52
LL60
JL60
B
7
TL34
DP83
JF21
JF24
JF40
JF41
DP94
CL60
RL53
RL37
IP95
1
DL31
1
CL37
RL60
DL33
BL02
RP79
CL53 TL02 TL55
C
DL32
RL34
C
JR15
JR16
CP97
BV01
LV07
LV06
FI50
BS02
JS15
RV30
1
JL61
RP85
RP80
CL32
TL32
B
E
DP87
DP72
DR23
RV01
JF10
IP87
RL35
1
E
BP85
JF06
JF03
CP81
DP80
RL36
DP84
LL31
CP83
CP93
CP82
C B
CL38
DP93
JP08
CP80
TL33
6
LP93
RL65
5
CP94
10516550/A
JX90
CP85
DP82
JR13
JR11
JR12
RL57
1
LP82
RR77
1
CP84
CR10
BR07
RR57
RR76
RR74
RR72
RR70
C
JR08
JV04
LP50
CP50
E
BP15
JR04
JR05
RR50
RR51
JR07
LR10
CP15
RR71
RR73
RR75
TP14
TP15
RR82
RR78
LR20
RP07
JR06
CP01
BP01 1
RR45
B
CP13
DP14
RP10
RP15
RP02
JR03
BR06
T 2.5A L
LP84
LP80
DR10
BR01
IP61
CP66
PP64
FP01
RP04
LP01
CP02
LP06
RP50
IP50
CP16
DP01
CP17
JP05
DP43
RP05
DP45
DR20
CP73
DP21
DP20
CP69
JP07
DP12
4
M
DP03
RP03
LP09
C
CP09
JP06
L
K
RP76
1
CP07
CP08
RP49
3
DP09
CP04
CP11
RP51
DP50
B
2
DP02
DP04
LP44
DP48
CP03
CP05
RP44
RP46
DP47
CP49
RP39
DP59
CP10
J
H
LP20
DP16
DP17
E
CP44
CP43
CP47
TP50
E
1
DP44
G
RP20
TP21
CP24
DP18
DP19
CP26
CP06
DP22
CP52
CP58
F
CP20
CP22
CP54
TP44
DP41
RP19
CP41
E
RP95
RP65
C
B
DP46
RP52
CP42
D
C
E C B
0
B
RP54
DP53
A
GND-AV2
E
B
C
1
TX45
M
N
P
ICC17
First issue 07 / 98
SOLDER SIDE - CÔTE SOUDURES - LÖTSEITE - LATO SALDATURE - LADO SOLDADURAS
CS07
CS33 CS23
CS34
CS41
CS40
CS54
CS56
CS57
CS36
CS27
JS66
CS04
JS65
DS41
CS55
CS39
JS55
CS63
CS62
CS61
CS60
JS53
CS74
CX60
JS62
IS40
JS01
1
RS55
CS80
RS77
CS26
RS40
RS78
JS57
RS75
RS02
BX04
RS85
RS86
10
1
RS84
RS96
RS83
CX18
RS92
IX01
TS81
CX19
LX62
RS93
1
CX61
CS09
DX59
CX58
CS79
RS41
RS29
RS27
RS05
JV53
LX59
JV54
CV09
1
RV15
RV05
RV06
RV07
RS97
JS54
TS01
JS44
DX62
RS99
CC11
CI61
RS03
CV02
JS61
RS54
CV15
CV16
6
CV10
CS06
JS98
RS43
RS76
RI59
CI56
LS40
RS04
RI66
RI51
CI55
RI41
RX39
RX58
CS32
RS52
RS53
JS52
RX08
JX29
JV52
+5V
ON
RI60
CI51
RV25
8V
1
CS05
CS10
LS60
RX14
RX19
JC52
CV18
CV27
CI45
CV25
CS01 CS02 64
LS41
CV12
CC10
RI31
RI42
TI10
CS08
RS64
CS69
RS65
CS11
JS50
CX17
RX13
RX09
RX18
RX07
JX53
JX54
RX06
RX25
TL71
CL71
CV23
CI58
CV17
1
JI50
RP97
TV10
RV09
RL77
JL72 TL72
CH02
CH20
RI15
RI04
CI16
DI40
RL76
RL47
JX52
JF54
CI09
CC06
CC07
RV19
JI51
RP99
CC05
CV11
TI30
CI12
IP95
1
RC05
CC02
CS24
JS59
CS73
64
TI45
RP84
TP86
RP93
RP87
DL19
BL02
RB10
7
RI58
CS42
DS40
RS42
CC04
DI30
RI03
JF50
RP96
RP94
JF53
CP95
TL33
+5V
UP
CP86
RP86
RL56
RL58
Video
JF49
CL34
JF51
RR86
RI16
RX57
32
CV13
JI53
JI52
CX47
CX03
RX03
CS31
JS56
RI33
RP82
DP85
TL59
RL02
CL59
U
CI15
CI05
Timer
RL55
U-
CL36
CL33
TL52
RL54
TL32
CAD-REF:
10516550.0A
RL03
BL01
RL39
TL02 TL55
DL77
CV24 CV22 CV20
TX45
RX47
CS47
RV18
JI54
RL74
RL45
CI03
RL19
RL31
CL39
CL35
TP82
RL04
HOR
CL31
1
CI04
RL09
RL46
RL32
RL33
3
5V
DST
RI07 CI47
CI02
21
CS16
33
01
4
RP81
JF52
17
RX59
JX51
IV
LL32
TL31
6
DL14
JL71
CI10
RI32
13
9
JS58
RL73
1
10
CH01
CI43
RL05
TL34
RX05
JX58
RH20
DL73
TL14
3
RS62
LI10
2
1
LS61
2 CS15
JH51
RH10
DL13
RL15
9
LL26
E
7
CX01
RH05
3
RX43 BX02
TX15
20
RX22
P
N
JS70
DX01
RH02
JH06
4
RL06
C
8
5
LL05
RL72
6
7
8
21
RX02 CX02
JS69
JF56
JF55
BF01
5
RH03
RF11
B
3
M
CS68
RX56
RS63
RL71
VERT
1
RS51
CH05
TL51
RL51
CL52
DL21
CS59
CH06
BX01
CS13
CS12
K
A
G
L
RX24
CF12
K
RX01
RL12
RF06
BX50
J
CI53
RL49
DL48
RF13
9
6
4
TF01
RF03
V
RX28 LS63
CF11
1
LS62
IF01
RL42
LL22
DL22
9
RL48
CL41
TL42
JH54
TL41
RX27
RL70
RL41
Z
RL40
RF01
CS70
H
CF01
RS66
CS71
RS67
G
CF02
RS50
F
E
DL42
RF02
D
E C B
RF12
C
B
A
RP38
C
5
IP20
D
RP35
E
F
G
DP62
H
LR30
JS40
JS42
CR80
BS91
JS99
RS90
CR30 RR10
TR23
CR32
RR52
CR33
BS90
CR23
32
IR02
K
JR54
RR47
RR46
1
BR01
CR15
RR06
RR12
RR22
CR09
CR22
TR15
RR09
RR16
RR14
RR05
CR07
CR24
RR17 JR51
TR20
DR22
L
CR08
DR24
17
DR05
CR06
CR05
RR20
CR04
CR03
RR18
LR02
J
RS91
JX57
CV31
CR41
RR32
RR33
RR08
01
IR
JR52
1
RP71
RP69
JS51
RV13
CV14
RV08
LI50
RR69
CR98
16
TP72
CP61
IP61
RP66
DP63
DP40
DP60
RP60
DP19
DP18
TP21
RP68
TP67
RR87
RR03
DR21
RR01
CR12
1
80
RP62
DP61
RP26
RP22
RP21
DP24
RP23
RP25
CP23
1
1
RR21
LR34
RP64
DP01
DP02
RP27
TP57
RP09
RP53
DP70
DP03
DP04
DP58
RP24
DP16
RR53
CS94
BS80
CS95
TR40
RR02
RP73
1
5 IR03
RR43
RR41
DP67
RP61
RR49
JR53
B
CP38
1
RR96
RR30
RR44
RR42
JP45
DP17
RP30
DP54
RP31
CP56
RP58
RP55
TP42
DP52
RP41
RP42
DP42
RP45
CP59
TP58
RP98
TP59
A
DP56
DP57
RP83
RP40
TP44
DP66
TP71
RP57
JP44
RP56
TP50
RP47
RP48
RP59
RR95
JR64
FP01
CP10
E
RR55
RR40
CR96
RR93
RR31
1
LR31
CR11
BP01
DP09
CR95
CP57
RP43
CR93
JX43
RR48
CS92
CS93
JX42
JX44
TR60
RR68
CR20
DP50
C
RR91
RR94
13
LP01
2
RR80
CR90
CR91
14
JP51
B
RR64
RR90
CR21
16 15
RR56
RR81
RP06 RP01
17
JR58
RV10
CR01
18
BV01
JV55
JR59
RR60
BP15
CS81
JV56
1
DV09
RR62
RR66
19
21
CV07
RP15
JP15
RS95
JS43
CV06
6
CR97 CR92
RP16
CI60
JI57
CR94
RP17
3
2
1
RP28
RP18
RI64
RR63
RP14
TP15
CP12
RP78
TI60
JR66
CP92
JP14
9
RP08
8
6 RP92
RP12
RP13
4
5
LP50
3
RS98
CV05
CI72
RP90
TP14
0
JI58
03VC
2
CP89
RV12
RS01
-UA
JR63
RP77
RP70
RP75
TP75
RP72
RP11
1
JR62
TP76
RP74
IP87
RI63
RI61
JR65
4
3
CI59
JP71
JP70
RP89
JL80
JL81
RP88
7
RP91
+UA
TP90
USYS
JL82
JP46
DP89
1
2
3
JP47
5
TR13
RR15
M
ICC17
First issue 07 / 98
10 cm
5 cm
10 cm
10 cm
www.rtv-horvat-dj.hr
About this manual
This document is common to several television models. Therefore, certain functions or settings may not apply to
the model you have purchased
The position of the ON/OFF switch
differs depending on the model. It may be located on the front or on the
right-hand side of your set (see the drawing inside the cover page of your manual).
About safety
To ensure your own safety and safe operation of the equipment, observe the following instructions
thoroughly.
TV sets require sufficient ventilation to prevent their components from overheating, which will cause failure. Do not
block the ventilation openings at the rear. If you place your TV set in a special piece of furniture, make sure there
is enough space for unhindered air circulation. Do not place the TV set in the close vicinity of a heater.
The TV set has been designed for use in dry rooms. Should you use it, in exceptional
circumstances in the open air (example: on the balcony, in the veranda or tent), you must absolutely protect it
against moisture (dew, rain, splash water). Before switching on a cold TV set in a warm room, you should wait until
any condensation in the screen has dried by itself.
Maximum ambient temperature: 35°C
Maximum humidity: 85%
By the end of your TV evening or when away from home for a longer period, we recommend that you turn off the
TV set with the On/Off-switch.
Even when the On/Off-switch is in the Off-position, your TV set is not fully disconnected from the mains. To
disconnect the set completely, the mains plug must be pulled out.
The mains plug must be easily accessible.
In the following cases, we recommend that you pull out the mains connector:
1. During a thunderstorm. In such a case, it is advisable that you also disconnect the TV set from the aerial socket.
2. When odour or smoke emanates from the set.
Never attempt to open your TV set yourself.
Further information:
The TV set shielding is sufficient to prevent X-radiation to the exterior.
Any operation performed by a non skilled person, change of high voltage or replacement of the picture tube by a
model not complying with the manufacturer specification are likely to cause considerable increase in X-radiation.
A TV set modified in such a way no longer complies with the manufacturers’ specification and must not be used.
About cleaning
The screen is to be cleaned with liquid glass cleaners.
: Never use abrasive products.
: Clean the cabinet with a soft cloth soaked with neutral cleaner. Do not use solvents, such as white spirit or
alcohol-based cleaning products since they may damage your television.
: At regular intervals, clean the ventilation grids at the rear of the TV set.
About degaussing
The terrestrial magnetic field may have an influence on your TV set. This influence is revealed by the coloured
spots, which appear on the screen.
Should this be the case:
: Turn the equipment off by means of the On/Off-switch.
: Wait about one hour before switching the set on again.
This procedure performs automatic degaussing of the screen. Should there still be coloured spots on the screen,
repeat the operation.
www.rtv-horvat-dj.hr
1
GB
About the switch
Contents
GB
Using the remote control
and fitting the batteries.
How to call up a menu
and how to select a
function, a setting or an
option.
About this manual . . . . . . . . . . . . . . . . . . . 1
About the switch . . . . . . . . . . . . . . . . . . . . . 1
About safety . . . . . . . . . . . . . . . . . . . . . . . . 1
About cleaning . . . . . . . . . . . . . . . . . . . . . . 1
About degaussing . . . . . . . . . . . . . . . . . . . 1
Basic connections . . . . . . . . . . . . . . . . . . . . 3
Remote control . . . . . . . . . . . . . . . . . . . . . . . 4
Navigation principles . . . . . . . . . . . . . . . . . 5
Calling up the Installation main menu . . . 5
Calling up the Settings summary . . . . . . . 5
Page
Instructions for Use
Installation
Page 4
Daily viewing . . . . . . . . . . . . . . . . . . . . . . . 12
Picture Adjustment . . . . . . . . . . . . . . . . 12
Sound Settings . . . . . . . . . . . . . . . . . . . . 12
Time . . . . . . . . . . . . . . . . . . . . . . . . . . . . . 13
List of Channels . . . . . . . . . . . . . . . . . . . 14
Selecting Programmes . . . . . . . . . . . . . 15
Scrolling the Programmes . . . . . . . . . . . 15
Audio-visual (AV) Programmes . . . . . . 15
Volume Control . . . . . . . . . . . . . . . . . . . . 15
Muting the Sound . . . . . . . . . . . . . . . . . . 15
Zoom (16/9 models only) . . . . . . . . . . . 15
Calling up a Menu . . . . . . . . . . . . . . . . . . . 5
Displaying Information . . . . . . . . . . . . . . 15
Navigating within the Menus . . . . . . . . . . . 5
Television Lock . . . . . . . . . . . . . . . . . . . . 15
Installing your television for the
first time . . . . . . . . . . . . . . . . . . . . . . . . . . . . . 6
Switching Off the Television . . . . . . . . . 15
Teletext . . . . . . . . . . . . . . . . . . . . . . . . . . . . 16
Automatic installation . . . . . . . . . . . . . . . . . 7
Standard Functions . . . . . . . . . . . . . . . . 16
Programme organisation . . . . . . . . . . . . . . 8
Other Connections . . . . . . . . . . . . . . . . . . 17
Manual programming . . . . . . . . . . . . . . . . . 9
Other Possibilities . . . . . . . . . . . . . . . . . 17
Personal settings . . . . . . . . . . . . . . . . . . . 10
Connecting a HiFi or AV amplifier . . . . 17
Preferences . . . . . . . . . . . . . . . . . . . . . . . . 11
www.rtv-horvat-dj.hr
2
5
Basic connections
Basic connections
The mains plug (1) supplies power to the television. The
television must only be plugged in to a 220-240 V - 50 Hz
power supply. It must never be plugged in to a DC source. If
the plug comes away from the lead, never attempt to plug it
in: this could cause electrocution.
Continental
Europe
If you connect an appliance to the aerial jack, you must give
it a channel number. To do this, switch on the appliance, then
use the television to find the modulator channel (see the
appliance manual). Now give it a programme number and
memorise it (see Manual Programming of channels). Then,
when you wish to use the appliance, simply select its
programme number on the television. This procedure is not
required for VCR’s not equipped with a modulator.
GB
The aerial socket (2), located on the rear of the television, can
be used to connect an external aerial or other appliance
equipped with a modulator such as a VCR, satellite receiver,
etc.
United Kingdom
The plug is fitted with a fuse which protects your
television. If your television does not work, the fuse may
be blown. In this case, replace it with an identical 5 Amp
ASTA or lr BSI (BS 1362) certified fuse.
$
The SCART socket AV1 (3), located on the rear of the
television, is intended to connect a VCR or a camcorder
(VHS, 8 mm), a Canal+ decoder, a video games console or
RGB-signal emitting appliances.
The SCART socket AV2 (3), located on the rear of the
television, is intended to connect a VCR or a camcorder
(VHS, 8 mm, S-VHS or Hi-8).
Note: the mains lead of your television is fitted with a
moulded plug. This lead contains all the safety equipment,
so you are advised when replacing it not to use a
non-specific commercially-available model.
We strongly recommend the use of this type of connection,
which gives a better picture quality. To use the peripheral
appliance that you have connected, press the AV key on your
remote control (press once to select AV1; twice to select
AV2; three times for AV3: see ”Other Connections”). This
selection is automatic for some appliances. Pressing “”play”
on a VCR, or switching on a satellite receiver connected to
AV1 or AV2 will automatically switch on your television.
When you stop the VCR, if you have not changed channels
while watching the VCR, the television automatically
switches back to the channel you were watching beforehand.
If the television has been switched on from the VCR, it
switches to standby when the VCR is switched off. The
television automatically switches to 16/9 format if the
connected appliance delivers the corresponding signal.
2
www.rtv-horvat-dj.hr
3
Remote control
Remote control
Display of channel, time, sound (yellow
This key is active only when using
the Teletext (blue key)
button) (and zoom for models with zoom)
Call up programme list
Standby
GB
(green button)
Call up Teletext / Toptext /
Fastext function (purple button)
Reminder of picture
preferences (red button)
Right/Left Selection within
menus and
Zoom Function (for models with
this function)
Confirm an action or validate a
menu option
Go to adjustment function MENU
To leave a menu or Teletext
Move Up/Down in menus
Volume adjustment
Change programme
Sound mute
8
Go to programmes and enter
numerical values in menus
Selecting appliances
connected to the television
(AV1, AV2 ...)
For programme numbers higher
than 10, press the 0 key on the
remote control: ”- -” appears on
the screen. Now use the
number keys on the remote
control to enter first the tens
digit then the units digit.
The red, green, yellow and
blue keys are also used for
the Teletext.
Please respect the environment! Before throwing any batteries away, consult your
distributor who may be able to take them back for specific recycling.
www.rtv-horvat-dj.hr
4
Navigation principles
Navigation principles
Calling up the Installation main menu
INSTALLATION MAIN MENU
If there is no menu displayed on the screen,
key on the remote
press and hold the
control. The settings SUMMARY is displayed
first, followed by the INSTALLATION MAIN
MENU which you can use to operate your
television.
Exit
Manual programming
Auto installation
GB
Programme organisation
Personal settings
Calling up the Settings summary
SUMMARY
Press and release the
key on the
remote control to display the list of menus
available for using your television functions or
adjusting your television
Exit
Teletext
Picture
Sound
Calling up a Menu
List
Select the menu you wish using the Up/Down
key to validate..
keys. Press the
Time
Preferences
Navigating within the Menus
Use the Up/Down keys 1 to select a line.
Use the Left/Right keys 2 to:
- Increase or decrease a value:
for example:
Fine tuning
- Select an option:
Aerial
for example: Reception
Cable
Reception
- Activate or deactivate an option:
for example: Decoder
- Access a sub-menu:
for example: Picture preferences
You can use the
3
MANUAL PROGRAMMING
Return
Standard
Reception
Autosearch
Fine tuning
Store on PR number
Name
Decoder
External sound path
EURO BG
Cable
CH- -----
Enter channel number or start
autosearch with < or >.
key to:
- Activate or deactivate an option:
for example: Decoder
- Access a sub-menu:
for example: Picture preferences
- Validate an action:
for example: Store on PR number
Use the
4 key to exit a menu.
www.rtv-horvat-dj.hr
5
Installing your television for the first time
Installing your television for the first time
First plug the television into a mains power outlet and to the external aerial or a cable network, then switch on using
located on the front or the side of your set.
the ON/OFF switch
When you switch on your television for the first time, the language selection menu* is displayed (Fig. 1). If this does
key on the television until this menu appears.
not happen, set the television to standby then press and hold the
GB
Installation Instructions (start)
1. Use the Up/Down keys to select the
language in which you wish the menus to be
displayed.
.
2. Then validate using
3. A list of countries* is now displayed (Fig. 2).
Select the country in which you live, or the
country from which you wish to receive the
broadcasts if you live in a border area.
.
4. Then validate using
5. A welcome message is displayed.
6. Run the automatic installation sequence
.
using
7. A message appears to inform you that
automatic installation has started (Fig. 3).
Wait for a few minutes.
A new message will inform you when
automatic installation is completed.
8. If you wish to check or modify the channel
and see the
organisation, press
Programme organisation chapter.
If you do not wish to modify the channel
organisation, you can exit the menu by
then watch the channel of
pressing
your choice. Choose the desired channel
using the number keys (1, 2, 3, ...) and the
/
keys.
If you have a decoder, see the Manual
programming chapter.
Your television will only search for channels
corresponding to the country you have
selected.
See
the
Manual channel
programming chapter to install any channels
not found.
For cable networks, read the Automatic
channel installation chapter to install any
channels not found.
(Fig. 1)
English
Français
Deutsch
Italiano
Español
Português
Nederlands
Svenska
Dansk
Norwisch
(Fig. 2)
OK
COUNTRY SELECTION
Exit
United Kingdom
Eire
France
Germany
Italy
Spain
Portugal
Holland
Belgium and Luxembourg
Switzerland
Austria
Sweden
Denmark
Norway
Other
Select your country and press OK
(Fig. 3)
SEARCHING
*The list of languages and countries may vary
from one model to another.
Installation Instructions (end)
AUTO INSTALLATION
003 STATIONS FOUND
Searching for TV stations.
Please wait. To cancel press EXIT.
www.rtv-horvat-dj.hr
6
Automatic installation
Automatic installation
The Automatic installation function is useful if you have to go through the installation procedure again, such as
when moving house. This function deletes all previously memorised programmes. To install a new channel, you
should use the Manual programming function.
Your television will only search for channels corresponding to the selected country, so see the Manual
programming chapter to install any channels not found. For cable networks, if you have not found certain
channels, select Other instead of a country name in the PERSONAL SETTINGS menu, then run automatic
installation again.
INSTALLATION MAIN MENU
1. Press and hold the
key on the remote
control to display the INSTALLATION MAIN
MENU (The SUMMARY appears first,
followed by the INSTALLATION MAIN
MENU).
2. Select the Auto installation line.
3. Validate using
Exit
Manual programming
Auto installation
Programme organisation
Personal settings
.
A message will inform you that Automatic
installation has begun.
Wait for a few minutes.
A new message will inform you when
Automatic installation is completed.
SEARCHING
If you wish to check or reorganize your channel
key and see the
display, press the
Programme organisation chapter.
AUTO INSTALLATION
If you do not wish to reorganize your
programmes, you can exit this menu by
, then watch the programme of
pressing
your choice. Choose the desired programme
using the number keys (1, 2, 3, ...) and the
/
keys.
003 STATIONS FOUND
Searching for TV stations.
Please wait. To cancel press EXIT.
www.rtv-horvat-dj.hr
7
GB
Before running AUTO INSTALLATION, check the PERSONAL SETTINGS menu to ensure that the country
displayed is correct.
Programme organisation
Programme organisation
During automatic installation, your television will search for the channel name and assign it a programme number
according to the selected country. You can use the PROGRAMME ORGANISATION menu to name any channel
name not found, to change the order in which the channels are displayed, or to delete channels for which reception
is too poor. Follow the messages at the bottom of the screen. For further details, read the information below.
GB
If you wish to access the
PROGRAMME
ORGANISATION,
menu thereafter, first press and hold
key on the remote control to
the
display the INSTALLATION MAIN
MENU (the SUMMARY is displayed
first, followed by the INSTALLATION
MAIN MENU) then select Programme
.
organisation and validate using
- To delete a programme for which reception
is too poor:
1. Select the line marked Select program.
/
or Left/Right keys to list
2. Use the
your channels.
3. When you get to a channel you wish to delete,
select the line marked Delete program.
to delete the programme.
4. Press
.
5. .Validate using
- To organize your channels to suit you:
1. Select the line marked Select program..
2. Use the
/
or Left/Right keys and
the programmes logos to find the programme
to which you wish to give the No.1.
Its present number appears on the line
marked Select program..
3. Select the line marked Swap with PR.
4. Enter 01.
. The two programmes swap
5. Press
position and the desired programme
becomes N°1.
6. Repeat the above procedure for the other
channels.
INSTALLATION MAIN MENU
Exit
Manual programming
Auto installation
Programme organisation
Personal settings
PROGRAMME ORGANISATION
Return
Select program.
Swap with PR.
Change pr. name
Delete program.
13
-EURO
13
MTV
FR2
TF1
EURO
CH40
CC01
ARTE
CART
---ARD
Select programme number using
PR-/PR+ or </> or 0 to 9 keys.
Select the line marked Return to return to the previous
menu.
- To name your channels:
1. Select the line marked Change pr. name
2. Select the character you wish to modify using
the Left/Right keys.
3. Use the and keys to display the letter you
require.
The name you have entered will be
memorised when you move to another line or
exit the menu.
If you wish to change the order in which
your programmes are displayed or if
you wish to name other programmes,
repeat the procedures described
above.
When you have finished organizing the
.
programmes, exit the menu using
www.rtv-horvat-dj.hr
8
10
11
12
13
14
15
16
17
18
19
Manual programming
Manual programming
The manual installation function is useful if some programmes have not been installed even after AUTOMATIC
INSTALLATION.
, the SUMMARY is
1. Press and hold
displayed
first,
followed
by
the
INSTALLATION MAIN MENU.
2. Select the line marked
Manual
programming.
.
3. Display the menu using
4. Now continue by following the messages at
the bottom of the screen. For further details,
read the information below.
Standard :
Select the standard using Left/Right keys that
corresponds to your country from the list of
standards.
The number of standards proposed will differ
from one model to another.
France
for France and Luxemburg
DKK’
eg. for Eastern Europe and
the Middle-East
I
for the United Kingdom and
Ireland
Euro BG
for Western Europe
INSTALLATION MAIN MENU
Exit
Manual programming
GB
Auto installation
Programme organisation
Personal settings
MANUAL PROGRAMMING
Return
Standard
Reception
Autosearch
Fine tuning
Store on PR number
Name
Decoder
External sound path
EURO BG
Cable
CH- -----
Reception :
Your television can pick up channels either via
Enter channel number or start
an aerial (RF channels) or via a cable network.
autosearch with < or >.
Certain cable networks use the same
frequencies as the RF channels. If this is the
case, you must select Aerial instead of Cable.
Select the line marked Return to return to the previous
Autosearch :
Enter the programme number if you know it. If
not, search using the Left/Right keys. Your
television will stop at the first channel it tunes
into. If you wish to memorize it, go to the line
marked Store on PR number. If not, resume
the search using the Left/Right keys.
Fine tuning :
You can use this to improve the picture if the transmitter frequency is out of adjustment. Use the Left/Right keys
to obtain the best possible picture and sound.
Store on PR number :
.
Enter the programme number you wish to give the channel (e.g.: 01 for BBC1). Memorise using
Name :
If the station has been identified by the transmitter, its name will be inscribed automatically. You can change the
proposed name or enter it if it has not already been identified. Select the character you wish to modify using the
Left/Right keys. Use the or keys to display the character you desire.
Decoder :
Use the Left/Right keys to tick the box if the channel is coded and if a decoder is connected to the AV1 jack.
External sound path :
Switch on your decoder. If the sound is coded or if you have no sound, activate or deactivate the box as required
using the Left/Right keys.
Once you have made all the adjustments you wish to a programme, go to Store on PR number and press
to memorise these. Then move on to the next channel.
Once you have completed your Manual Programming, exit the menu using
.
www.rtv-horvat-dj.hr
9
Personal settings
Personal settings
GB
1. Press and hold the
key: the
SUMMARY is displayed first, followed by the
INSTALLATION MAIN MENU.
2. Select the line marked Personal settings.
INSTALLATION MAIN MENU
Exit
Manual programming
3. Display the menu using
.
4. Continue by following the messages at the
bottom of the screen.
Auto installation
For further details, read the information below.
Personal settings
Menu language :
Select the language in which the menus are to
be displayed.
PERSONAL SETTINGS
Country :
Indicate the country in which you are if you wish
to rerun Automatic Programming.
For cable networks, if certain channels
have not been found, select Other
instead of the country name before running automatic installation again.
You may find that the characters of certain teletext languages are inaccessible for the selected country.
Auto volume level :
This is a sound control function which aims to
equalise the volume level between different
channels, and between different programmes
on the same channel.
Activate or deactivate the auto volume level as
required.
Programme organisation
Return
Menu language
English
Country
UK
Auto volume level
AV1 name
AV2 name
AV3 name
VCR
---CAMC
Prog. to be used
for reference time
06
Select a station from which you want
to get the reference time.
Select the line marked Return to return to the previous
menu.
On models equipped with Virtual Dolby
Surround, this function remains
inactive if Dolby Virtual has been
selected in the SOUND menu (see
Volume Control).
AV1, AV2, AV3 name :
Use these to give a name to each of your
audio-visual programmes. Select the character
you wish to modify using the Left/Right keys.
or
keys to display the desired
Use the
character.
Prog. to be used for reference time :
key or to use
To display the time using the
the alarm function, the television clock must be
set to the correct time. Select the line marked
Prog. to be used for reference time and select
a channel which broadcasts teletext. The time
is set automatically and is displayed after the
channel number.
Exit the menu using
.
www.rtv-horvat-dj.hr
10
13:15
Preferences
Preferences
1. Display the SUMMARY by pressing and
releasing the
key on the remote
control .
2. Select the line marked Preferences.
.
3. Display the menu using
Show program. number :
If you wish to permanently display the number
of the programme you are watching, tick the box
using the Left/Right keys. Press the Left/Right
keys again to deactivate this function.
PREFERENCES
Return
Show program. number
AV2 video input
AV3 video input
Format control
Picture preferences
GB
Make your choice from the proposed
options. Use the information below to help
you.
Video
S-Video
Auto
AV2 video input :
Use the Left/Right keys to select the type of video signal received at the AV2 SCART socket (Video or S-Video).
AV3 video input :
Use the Left/Right keys to select the type of video signal received at the AV3 sockets (these sockets are located
on the front or the side of the television).
Format control :
Use the Left/Right keys to select the desired picture format:
Auto : if the transmitter (for 16/9 format TV’s) or the appliance connected to one of the peripheral jacks delivers
the switching signal, the television automatically adapts to the transmitted picture format.
16/9 : manually selects widescreen picture format.
4/3 : manually selects this picture format.
If you have selected 16/9 or 4/3, the television will switch back to Auto when you change channels or you
switch off.
Picture preferences :
To access the PICTURE PREFERENCES
.
menu, press
If you wish, you can personalize certain
picture settings. Select and set the
proposed options. Use the information
below to help you.
Settings :
Select Standard or Personal.
Standard corresponds to the factory settings.
Personal corresponds to the settings that you
have entered yourself.
The lines Brightness, Colour and
Contrast are displayed only if you have
selected Personal on the Settings line.
Select each line one after the other and enter
your required settings. You can recall these
picture settings by pressing the red key on the
remote control.
.
Exit the menu using
PICTURE PREFERENCES
Return
Settings
Brightness
Colour
Contrast
Personal
Select the line marked Return to return to the previous
menu.
www.rtv-horvat-dj.hr
11
Daily viewing
Daily viewing
Picture Adjustment
GB
Display the SUMMARY using the
key on
the remote control. Select Picture. Validate
. The PICTURE menu is displayed.
using
Select and set the proposed options. Use
the information below to help you.
Brightness, Colour, Contrast, Sharpness:
Select each of these lines one after the other and
set as required.
Contrast expand :
Select this line then choose the desired Contrast
expand setting (High or Low).
Tone :
Select this line then choose the desired colour
tone (Warm, Neutral or Cold).
Exit the menu using
.
PICTURE
Return
Brightness
Colour
Contrast
Sharpness
Neutral
Cold
Contrast expand
Tone
Select the line marked Return to return to the previous
menu.
Sound Settings
Display the SUMMARY using the
key on
the remote control. Select the line marked
. The SOUND menu
Sound. Validate using
is displayed.
Select and set the proposed options. Use
the information below to help you.
Sound type :
The choices available to you depend on
your television model and the broadcast.
Stereo, Dual or NICAM reception and the
corresponding choices are only available
on Stereo or NICAM Stereo televisions.
Select this line, then select the type of sound you
desire.
Sound mode :
Select this line, then choose the desired mode
using the Left/Right keys.
The choices available to you depend on
your television model and the type of
sound. Magic and Dolby Virtual modes
are only available in stereo on TV’s
equipped with Virtual Dolby Surround.
Stereo wide is only available on Stereo or
Nicam televisions not equipped with
Virtual Dolby Surround.
Balance L/R :
Select this line, then balance the sound between
the Left and Right loudspeakers.
Treble, Bass :
Select each of these lines and adjust to suit you.
Surround effect :
This line appears only if you have selected
Dolby Virtual on the Sound mode line.
Select this line and adjust the surround effect to
suit you.
Exit the menu using
.
SOUND
Return
Automatic
Normal
Sound type
Sound mode
Balance L/R
Treble
Bass
Surround effect
Broadcast
mono
stereo
dual
NICAM-3
AV
Mode
Choice
automatic - mono
mono - stereo
sound 1 - sound 2
sound 1 - sound 2 - sound 3
stereo - sound 1 - sound 2
Effect
Normal :
reproduces the original sound (
mono or stereo).
Wide :
gives a stereo effect on mono sounds.
Stereo wide : accentuates the stereo effect.
Magic :
accentuates the stereo effects and
adds echo.
Dolby Virtual : Virtual Dolby Surround.
Virtual Surround Dolby is based on Dolby Pro Logic
decoding for the reproduction of the Left, Right, Centre and
Virtual Surround sound channels using two loudspeakers.
“”Dolby”, “”Pro Logic” and the double -D symbol are trademarks of the
Dolby Laboratories Licensing Corporation.
Manufactured under licence from Dolby Laboratories Licensing
Corporation.
www.rtv-horvat-dj.hr
12
Daily viewing
Time
Display the SUMMARY using the
key on
the remote control. Select the line marked
. The TIME menu is
Time. Validate using
displayed.
Sleep timer :
Use the Left/Right keys to choose how long you
wish to view before the television switches off.
The television will switch off automatically at the
end of this period. To cancel, set to 00:00.
One minute before switching off, a message will
inform you that the television is about to go off.
If you wish to keep it on, press any key on the
remote control or the local keyboard.
The television switches to Child lock mode after
an automatic stop. It can only be switched on
again from the remote control.
TIME
Return
Sleep timer
00 : 00
Current time
11 : 28
Wake-up timer
Wake-up time
Programme number
Daily
07 : 07
01 BBC1
GB
You can use this menu to switch your
television on or off automatically at a set
time.
Select the line marked Return to return to the previous
menu.
Current time :
The current time is given by the Teletext (see PERSONAL SETTINGS menu). You can also set the time manually
using the number keys (0 to 9) on your remote control.
Wake-up timer :
If you wish to be woken up by your television on the channel of your choice, you must first set the television
clock to the correct time (see above).
Use the Left/Right keys to tick the box and display the Wake-up timer menu.
The lines Wake-up time, Programme number and Daily only appear if you have ticked the box on the
line marked Wake-up timer.
Wake-up time :
Use the number keys (0 to 9) on the remote control to set the time at which you wish to be woken.
Programme number :
Select the programme you wish to be woken by.
Daily :
Tick this box if you wish to be awakened at this time every day.
.
Exit the menu using
Set the television to standby using the
key on the remote control. The red indicator light on the television
flashes.
The television will come on automatically at the programmed time and will go off one hour later if you do not use
the remote control.
www.rtv-horvat-dj.hr
13
Daily viewing
List of Channels
GB
This list contains up to 10 pages. The number of pages depends on
the number of programmes memorized. For each programme, the list
indicates the station name or type and the programme number. The
3 AV programmes are listed on page 11.
To display the list, press the
key on the remote control
or
key on the remote control. Select the
Display the SUMMARY using the
.
line marked List. Validate using
The page displayed is the page containing the programme you are watching.
It is identified in the list by the symbol TV.
To display the next page, press the Right key.
To display the previous page, press the Left key.
If you wish to watch one of the programmes on the page displayed:
Enter the last digit of the programme number (e.g. for 25 simply enter 5) on the
remote control. The list disappears and your programme is selected.
Or,
- Select the programme using the Up/Down keys.
.
- Validate using
.
- Exit the menu using
www.rtv-horvat-dj.hr
14
LIST
Exit
01
02
03
04
05
06
07
08
09
BBC 1
BBC 2
FR 3
CC19
ARTE
M6
CNN
PREM
EURO
TV
Page -/+
Programme: 0 - 9
Daily viewing
Selecting Programmes
GB
For channels 1 to 9, press the number key corresponding to the desired channel on the remote control. For
programme numbers higher than 10, press the key on the remote control: ”- -” appears on the screen. Now use
the number keys on the remote control to enter first the tens digit then the units digit.
If you press
while ”- -” is already displayed, the display returns to 0- , in which case you can only select
programmes 1 to 9.
Scrolling the Programmes
You can scroll through the programmes using the
/
keys.
Audio-visual (AV) Programmes
Press the
key to call the last audio-visual (AV) programme watched. Press repeatedly to scroll the audio-visual
(AV) programmes on the screen.
Volume Control
Use the volume +/- keys to increase or decrease the volume.
Muting the Sound
Press the
key to mute the sound. Press again to restore the sound.
Zoom
(16/9 models only)
This function is useful for 4/3 or letterbox pictures (black bands at the top and bottom of the screen).
Use the Left/Right keys to select the desired zoom position:
ZOOM 0: 4/3 picture (black bands at the sides).
FULL SCREEN: for a 4/3 picture that fills the screen.
ZOOM 1: for letterbox pictures.
Displaying Information
Press the
of sound.
key to display the following information on the screen: channel number and name, time, zoom, type
Television Lock
You can use this function to prevent anyone from switching on the television using the buttons on the
television set.
The buttons on the television set are locked in the following cases:
- If you switch off the set by pressing and holding the
key on the remote control for more than 3 seconds,
- After a programmed stop,
- If the television is set to standby when the alarm has been set.
When the television is locked the red power will be light flashing.
The television can now only be operated from the remote control.
To release the lock, press any number key on the remote control.
Switching Off the Television
To switch off the television, press the Standby key on the remote control or press the ON/OFF switch on the
television set.
www.rtv-horvat-dj.hr
15
Teletext
Teletext
GB
Certain channels broadcast an electronic news page service with a range of different information services.
The presentation and use of the Teletext differ from one country to another and from one programme to
another (Teletext, Fastext or Toptext).
Press the
key to display the Teletext Index (page 100).
A message will inform you if the programme you are watching has no Teletext service.
To call up a page:
Enter the 3 digits of the page number you wish to consult (for example, 150 or 170).
After a moment, the page appears.
Use the Left/Right keys to consult the next or the previous page.
Standard Functions
Rolling pages:
Some information is displayed over several sub-pages. It is scrolled on your screen as it is received.
. Press
again to continue
To stop scrolling, select STOP using the Up/Down keys and validate using
scrolling.
Masked text:
To reveal a hidden answer (for example in a quiz programme), select ??? using the Up/Down keys and validate
. Press
again to hide the answers.
using
Zoom :
Select ZOOM using the Up/Down keys then press the
key once to magnify the top of the screen, twice to
magnify the bottom of the screen (the page will scroll from top to bottom) and a third time to return to the normal
display.
Display:
You can superpose the Teletext page over the TV picture. To do this, select MIX using the Up/Down keys then
validate by pressing the
key. Press again
to return to the normal display.
Sub-code:
You can use this to access a sub-page directly.
Select “- - - -” using the Up/Down keys. Then enter the four digits of the required sub-page number.
Certain programmes have Alarm pages that you can set to appear at the time you require. For example:
for 15h30 enter 1530 as the sub-page number then press
. You must of course leave the television
on the programme which is to transmit the Alarm page.
Index:
To call up the index page, select 100 using the Up/Down keys then validate using
.
Direct access:
You can use the yellow and blue keys to directly access the pages indicated in the bar at the bottom of the screen.
Fastext functions:
If the Teletext you receive is Fastext, a sub-menu at the bottom of the screen appears which you can use to select
from the 4 headings according to its colour.
To select a heading, press the key of the corresponding colour.
Toptext functions:
If the Teletext you receive is TOPtext, the pages are arranged into headings and sub-headings by subject.
You can select the first page of a heading directly by pressing the blue key, or the first page of a sub-heading by
pressing the yellow key.
Other functions:
With certain Teletext channels, it is possible to have sub-titles overlaid on the screen for certain broadcasts as well
as certain news flash updates.
The corresponding page number is indicated in the Telextext index.
Once you have found the page, the sub-title or the news flash will be overlaid onto the TV picture.
key.
The navigation status bar disappears after a few seconds. To display it again, press the
or
.
To exit Teletext, press
www.rtv-horvat-dj.hr
16
Other Connections
Other Connections
The CINCH Video and Audio sockets (1)* are provided to
connect a VHS or 8mm camcorder.
The S and CINCH Audio sockets (1)* are provided to connect
a S-VHS or Hi-8 camcorder.
GB
To use the appliance you have connected, press the
key several times until the AV3 programme is
selected on the screen. When you switch off the
connected appliance, the television will remain on
the AV3 programme and you must use the numerical
keys on the remote control to select a programme.
* on models equipped with this function
The headphone socket (2)* is provided to connect a
headphone or earphones.
Connecting headphones mute the sound from the
television loudspeakers.
Other Possibilities
Copying a cassette:
Plug the VCR you wish to record to into the SCART socket
AV2.
Plug the appliance you wish to copy from as follows: into
the peripheral jack AV1 for a VCR; into the CINCH AV3 jacks
for a camcorder (see table below).
RECORD
PLAY
Appliance
* on models equipped with this function
SCART Socket
Appliance
SCART Socket
CALL
PROGRAMME
Peripheral
AV1
VCR
ou
Camcorder
AV2
AV1
Cinches or
S-Video
AV3
VCR
ou
Camcorder
AV2
AV3
VCR
Camcorder
Connecting a HiFi or AV amplifier
If you wish to connect a HiFi or AV amplifier, plug it into the
peripheral jack AV2 using a SCART-CINCH type lead.
www.rtv-horvat-dj.hr
17
MANUEL D’UTILISATION - BEDIENUNGSANLEITUNG - MANUALE DI UTILIZZAZIONE - USER MANUAL
MANUAL DE UTILIZACIÓN - GEBRUIKSAANWIJZING - BRUKSANGVISNING
%(7-(1,1*69(-/('1,1* - FOLHETO DE UTILIZAÇÃO
www.rtv-horvat-dj.hr
0 ( 7 ( : (
10 cm
5 cm
10 cm
10 cm
www.rtv-horvat-dj.hr
About this manual
This document is common to several television models. Therefore, certain functions or settings may not apply to
the model you have purchased
The position of the ON/OFF switch
differs depending on the model. It may be located on the front or on the
right-hand side of your set (see the drawing inside the cover page of your manual).
About safety
To ensure your own safety and safe operation of the equipment, observe the following instructions
thoroughly.
TV sets require sufficient ventilation to prevent their components from overheating, which will cause failure. Do not
block the ventilation openings at the rear. If you place your TV set in a special piece of furniture, make sure there
is enough space for unhindered air circulation. Do not place the TV set in the close vicinity of a heater.
The TV set has been designed for use in dry rooms. Should you use it, in exceptional
circumstances in the open air (example: on the balcony, in the veranda or tent), you must absolutely protect it
against moisture (dew, rain, splash water). Before switching on a cold TV set in a warm room, you should wait until
any condensation in the screen has dried by itself.
Maximum ambient temperature: 35°C
Maximum humidity: 85%
By the end of your TV evening or when away from home for a longer period, we recommend that you turn off the
TV set with the On/Off-switch.
Even when the On/Off-switch is in the Off-position, your TV set is not fully disconnected from the mains. To
disconnect the set completely, the mains plug must be pulled out.
The mains plug must be easily accessible.
In the following cases, we recommend that you pull out the mains connector:
1. During a thunderstorm. In such a case, it is advisable that you also disconnect the TV set from the aerial socket.
2. When odour or smoke emanates from the set.
Never attempt to open your TV set yourself.
Further information:
The TV set shielding is sufficient to prevent X-radiation to the exterior.
Any operation performed by a non skilled person, change of high voltage or replacement of the picture tube by a
model not complying with the manufacturer specification are likely to cause considerable increase in X-radiation.
A TV set modified in such a way no longer complies with the manufacturers’ specification and must not be used.
About cleaning
The screen is to be cleaned with liquid glass cleaners.
: Never use abrasive products.
: Clean the cabinet with a soft cloth soaked with neutral cleaner. Do not use solvents, such as white spirit or
alcohol-based cleaning products since they may damage your television.
: At regular intervals, clean the ventilation grids at the rear of the TV set.
About degaussing
The terrestrial magnetic field may have an influence on your TV set. This influence is revealed by the coloured
spots, which appear on the screen.
Should this be the case:
: Turn the equipment off by means of the On/Off-switch.
: Wait about one hour before switching the set on again.
This procedure performs automatic degaussing of the screen. Should there still be coloured spots on the screen,
repeat the operation.
www.rtv-horvat-dj.hr
1
GB
About the switch
Contents
GB
Using the remote control
and fitting the batteries.
How to call up a menu
and how to select a
function, a setting or an
option.
About this manual . . . . . . . . . . . . . . . . . . . 1
About the switch . . . . . . . . . . . . . . . . . . . . . 1
About safety . . . . . . . . . . . . . . . . . . . . . . . . 1
About cleaning . . . . . . . . . . . . . . . . . . . . . . 1
About degaussing . . . . . . . . . . . . . . . . . . . 1
Basic connections . . . . . . . . . . . . . . . . . . . . 3
Remote control . . . . . . . . . . . . . . . . . . . . . . . 4
Navigation principles . . . . . . . . . . . . . . . . . 5
Calling up the Installation main menu . . . 5
Calling up the Settings summary . . . . . . . 5
Page
Instructions for Use
Installation
Page 4
Daily viewing . . . . . . . . . . . . . . . . . . . . . . . 12
Picture Adjustment . . . . . . . . . . . . . . . . 12
Sound Settings . . . . . . . . . . . . . . . . . . . . 12
Time . . . . . . . . . . . . . . . . . . . . . . . . . . . . . 13
List of Channels . . . . . . . . . . . . . . . . . . . 14
Selecting Programmes . . . . . . . . . . . . . 15
Scrolling the Programmes . . . . . . . . . . . 15
Audio-visual (AV) Programmes . . . . . . 15
Volume Control . . . . . . . . . . . . . . . . . . . . 15
Muting the Sound . . . . . . . . . . . . . . . . . . 15
Zoom (16/9 models only) . . . . . . . . . . . 15
Calling up a Menu . . . . . . . . . . . . . . . . . . . 5
Displaying Information . . . . . . . . . . . . . . 15
Navigating within the Menus . . . . . . . . . . . 5
Television Lock . . . . . . . . . . . . . . . . . . . . 15
Installing your television for the
first time . . . . . . . . . . . . . . . . . . . . . . . . . . . . . 6
Switching Off the Television . . . . . . . . . 15
Teletext . . . . . . . . . . . . . . . . . . . . . . . . . . . . 16
Automatic installation . . . . . . . . . . . . . . . . . 7
Standard Functions . . . . . . . . . . . . . . . . 16
Programme organisation . . . . . . . . . . . . . . 8
Other Connections . . . . . . . . . . . . . . . . . . 17
Manual programming . . . . . . . . . . . . . . . . . 9
Other Possibilities . . . . . . . . . . . . . . . . . 17
Personal settings . . . . . . . . . . . . . . . . . . . 10
Connecting a HiFi or AV amplifier . . . . 17
Preferences . . . . . . . . . . . . . . . . . . . . . . . . 11
www.rtv-horvat-dj.hr
2
5
Basic connections
Basic connections
The mains plug (1) supplies power to the television. The
television must only be plugged in to a 220-240 V - 50 Hz
power supply. It must never be plugged in to a DC source. If
the plug comes away from the lead, never attempt to plug it
in: this could cause electrocution.
Continental
Europe
If you connect an appliance to the aerial jack, you must give
it a channel number. To do this, switch on the appliance, then
use the television to find the modulator channel (see the
appliance manual). Now give it a programme number and
memorise it (see Manual Programming of channels). Then,
when you wish to use the appliance, simply select its
programme number on the television. This procedure is not
required for VCR’s not equipped with a modulator.
GB
The aerial socket (2), located on the rear of the television, can
be used to connect an external aerial or other appliance
equipped with a modulator such as a VCR, satellite receiver,
etc.
United Kingdom
The plug is fitted with a fuse which protects your
television. If your television does not work, the fuse may
be blown. In this case, replace it with an identical 5 Amp
ASTA or lr BSI (BS 1362) certified fuse.
$
The SCART socket AV1 (3), located on the rear of the
television, is intended to connect a VCR or a camcorder
(VHS, 8 mm), a Canal+ decoder, a video games console or
RGB-signal emitting appliances.
The SCART socket AV2 (3), located on the rear of the
television, is intended to connect a VCR or a camcorder
(VHS, 8 mm, S-VHS or Hi-8).
Note: the mains lead of your television is fitted with a
moulded plug. This lead contains all the safety equipment,
so you are advised when replacing it not to use a
non-specific commercially-available model.
We strongly recommend the use of this type of connection,
which gives a better picture quality. To use the peripheral
appliance that you have connected, press the AV key on your
remote control (press once to select AV1; twice to select
AV2; three times for AV3: see ”Other Connections”). This
selection is automatic for some appliances. Pressing “”play”
on a VCR, or switching on a satellite receiver connected to
AV1 or AV2 will automatically switch on your television.
When you stop the VCR, if you have not changed channels
while watching the VCR, the television automatically
switches back to the channel you were watching beforehand.
If the television has been switched on from the VCR, it
switches to standby when the VCR is switched off. The
television automatically switches to 16/9 format if the
connected appliance delivers the corresponding signal.
2
www.rtv-horvat-dj.hr
3
Remote control
Remote control
Display of channel, time, sound (yellow
This key is active only when using
the Teletext (blue key)
button) (and zoom for models with zoom)
Call up programme list
Standby
GB
(green button)
Call up Teletext / Toptext /
Fastext function (purple button)
Reminder of picture
preferences (red button)
Right/Left Selection within
menus and
Zoom Function (for models with
this function)
Confirm an action or validate a
menu option
Go to adjustment function MENU
To leave a menu or Teletext
Move Up/Down in menus
Volume adjustment
Change programme
Sound mute
8
Go to programmes and enter
numerical values in menus
Selecting appliances
connected to the television
(AV1, AV2 ...)
For programme numbers higher
than 10, press the 0 key on the
remote control: ”- -” appears on
the screen. Now use the
number keys on the remote
control to enter first the tens
digit then the units digit.
The red, green, yellow and
blue keys are also used for
the Teletext.
Please respect the environment! Before throwing any batteries away, consult your
distributor who may be able to take them back for specific recycling.
www.rtv-horvat-dj.hr
4
Navigation principles
Navigation principles
Calling up the Installation main menu
INSTALLATION MAIN MENU
If there is no menu displayed on the screen,
key on the remote
press and hold the
control. The settings SUMMARY is displayed
first, followed by the INSTALLATION MAIN
MENU which you can use to operate your
television.
Exit
Manual programming
Auto installation
GB
Programme organisation
Personal settings
Calling up the Settings summary
SUMMARY
Press and release the
key on the
remote control to display the list of menus
available for using your television functions or
adjusting your television
Exit
Teletext
Picture
Sound
Calling up a Menu
List
Select the menu you wish using the Up/Down
key to validate..
keys. Press the
Time
Preferences
Navigating within the Menus
Use the Up/Down keys 1 to select a line.
Use the Left/Right keys 2 to:
- Increase or decrease a value:
for example:
Fine tuning
- Select an option:
Aerial
for example: Reception
Cable
Reception
- Activate or deactivate an option:
for example: Decoder
- Access a sub-menu:
for example: Picture preferences
You can use the
3
MANUAL PROGRAMMING
Return
Standard
Reception
Autosearch
Fine tuning
Store on PR number
Name
Decoder
External sound path
EURO BG
Cable
CH- -----
Enter channel number or start
autosearch with < or >.
key to:
- Activate or deactivate an option:
for example: Decoder
- Access a sub-menu:
for example: Picture preferences
- Validate an action:
for example: Store on PR number
Use the
4 key to exit a menu.
www.rtv-horvat-dj.hr
5
Installing your television for the first time
Installing your television for the first time
First plug the television into a mains power outlet and to the external aerial or a cable network, then switch on using
located on the front or the side of your set.
the ON/OFF switch
When you switch on your television for the first time, the language selection menu* is displayed (Fig. 1). If this does
key on the television until this menu appears.
not happen, set the television to standby then press and hold the
GB
Installation Instructions (start)
1. Use the Up/Down keys to select the
language in which you wish the menus to be
displayed.
.
2. Then validate using
3. A list of countries* is now displayed (Fig. 2).
Select the country in which you live, or the
country from which you wish to receive the
broadcasts if you live in a border area.
.
4. Then validate using
5. A welcome message is displayed.
6. Run the automatic installation sequence
.
using
7. A message appears to inform you that
automatic installation has started (Fig. 3).
Wait for a few minutes.
A new message will inform you when
automatic installation is completed.
8. If you wish to check or modify the channel
and see the
organisation, press
Programme organisation chapter.
If you do not wish to modify the channel
organisation, you can exit the menu by
then watch the channel of
pressing
your choice. Choose the desired channel
using the number keys (1, 2, 3, ...) and the
/
keys.
If you have a decoder, see the Manual
programming chapter.
Your television will only search for channels
corresponding to the country you have
selected.
See
the
Manual channel
programming chapter to install any channels
not found.
For cable networks, read the Automatic
channel installation chapter to install any
channels not found.
(Fig. 1)
English
Français
Deutsch
Italiano
Español
Português
Nederlands
Svenska
Dansk
Norwisch
(Fig. 2)
OK
COUNTRY SELECTION
Exit
United Kingdom
Eire
France
Germany
Italy
Spain
Portugal
Holland
Belgium and Luxembourg
Switzerland
Austria
Sweden
Denmark
Norway
Other
Select your country and press OK
(Fig. 3)
SEARCHING
*The list of languages and countries may vary
from one model to another.
Installation Instructions (end)
AUTO INSTALLATION
003 STATIONS FOUND
Searching for TV stations.
Please wait. To cancel press EXIT.
www.rtv-horvat-dj.hr
6
Automatic installation
Automatic installation
The Automatic installation function is useful if you have to go through the installation procedure again, such as
when moving house. This function deletes all previously memorised programmes. To install a new channel, you
should use the Manual programming function.
Your television will only search for channels corresponding to the selected country, so see the Manual
programming chapter to install any channels not found. For cable networks, if you have not found certain
channels, select Other instead of a country name in the PERSONAL SETTINGS menu, then run automatic
installation again.
INSTALLATION MAIN MENU
1. Press and hold the
key on the remote
control to display the INSTALLATION MAIN
MENU (The SUMMARY appears first,
followed by the INSTALLATION MAIN
MENU).
2. Select the Auto installation line.
3. Validate using
Exit
Manual programming
Auto installation
Programme organisation
Personal settings
.
A message will inform you that Automatic
installation has begun.
Wait for a few minutes.
A new message will inform you when
Automatic installation is completed.
SEARCHING
If you wish to check or reorganize your channel
key and see the
display, press the
Programme organisation chapter.
AUTO INSTALLATION
If you do not wish to reorganize your
programmes, you can exit this menu by
, then watch the programme of
pressing
your choice. Choose the desired programme
using the number keys (1, 2, 3, ...) and the
/
keys.
003 STATIONS FOUND
Searching for TV stations.
Please wait. To cancel press EXIT.
www.rtv-horvat-dj.hr
7
GB
Before running AUTO INSTALLATION, check the PERSONAL SETTINGS menu to ensure that the country
displayed is correct.
Programme organisation
Programme organisation
During automatic installation, your television will search for the channel name and assign it a programme number
according to the selected country. You can use the PROGRAMME ORGANISATION menu to name any channel
name not found, to change the order in which the channels are displayed, or to delete channels for which reception
is too poor. Follow the messages at the bottom of the screen. For further details, read the information below.
GB
If you wish to access the
PROGRAMME
ORGANISATION,
menu thereafter, first press and hold
key on the remote control to
the
display the INSTALLATION MAIN
MENU (the SUMMARY is displayed
first, followed by the INSTALLATION
MAIN MENU) then select Programme
.
organisation and validate using
- To delete a programme for which reception
is too poor:
1. Select the line marked Select program.
/
or Left/Right keys to list
2. Use the
your channels.
3. When you get to a channel you wish to delete,
select the line marked Delete program.
to delete the programme.
4. Press
.
5. .Validate using
- To organize your channels to suit you:
1. Select the line marked Select program..
2. Use the
/
or Left/Right keys and
the programmes logos to find the programme
to which you wish to give the No.1.
Its present number appears on the line
marked Select program..
3. Select the line marked Swap with PR.
4. Enter 01.
. The two programmes swap
5. Press
position and the desired programme
becomes N°1.
6. Repeat the above procedure for the other
channels.
INSTALLATION MAIN MENU
Exit
Manual programming
Auto installation
Programme organisation
Personal settings
PROGRAMME ORGANISATION
Return
Select program.
Swap with PR.
Change pr. name
Delete program.
13
-EURO
13
MTV
FR2
TF1
EURO
CH40
CC01
ARTE
CART
---ARD
Select programme number using
PR-/PR+ or </> or 0 to 9 keys.
Select the line marked Return to return to the previous
menu.
- To name your channels:
1. Select the line marked Change pr. name
2. Select the character you wish to modify using
the Left/Right keys.
3. Use the and keys to display the letter you
require.
The name you have entered will be
memorised when you move to another line or
exit the menu.
If you wish to change the order in which
your programmes are displayed or if
you wish to name other programmes,
repeat the procedures described
above.
When you have finished organizing the
.
programmes, exit the menu using
www.rtv-horvat-dj.hr
8
10
11
12
13
14
15
16
17
18
19
Manual programming
Manual programming
The manual installation function is useful if some programmes have not been installed even after AUTOMATIC
INSTALLATION.
, the SUMMARY is
1. Press and hold
displayed
first,
followed
by
the
INSTALLATION MAIN MENU.
2. Select the line marked
Manual
programming.
.
3. Display the menu using
4. Now continue by following the messages at
the bottom of the screen. For further details,
read the information below.
Standard :
Select the standard using Left/Right keys that
corresponds to your country from the list of
standards.
The number of standards proposed will differ
from one model to another.
France
for France and Luxemburg
DKK’
eg. for Eastern Europe and
the Middle-East
I
for the United Kingdom and
Ireland
Euro BG
for Western Europe
INSTALLATION MAIN MENU
Exit
Manual programming
GB
Auto installation
Programme organisation
Personal settings
MANUAL PROGRAMMING
Return
Standard
Reception
Autosearch
Fine tuning
Store on PR number
Name
Decoder
External sound path
EURO BG
Cable
CH- -----
Reception :
Your television can pick up channels either via
Enter channel number or start
an aerial (RF channels) or via a cable network.
autosearch with < or >.
Certain cable networks use the same
frequencies as the RF channels. If this is the
case, you must select Aerial instead of Cable.
Select the line marked Return to return to the previous
Autosearch :
Enter the programme number if you know it. If
not, search using the Left/Right keys. Your
television will stop at the first channel it tunes
into. If you wish to memorize it, go to the line
marked Store on PR number. If not, resume
the search using the Left/Right keys.
Fine tuning :
You can use this to improve the picture if the transmitter frequency is out of adjustment. Use the Left/Right keys
to obtain the best possible picture and sound.
Store on PR number :
.
Enter the programme number you wish to give the channel (e.g.: 01 for BBC1). Memorise using
Name :
If the station has been identified by the transmitter, its name will be inscribed automatically. You can change the
proposed name or enter it if it has not already been identified. Select the character you wish to modify using the
Left/Right keys. Use the or keys to display the character you desire.
Decoder :
Use the Left/Right keys to tick the box if the channel is coded and if a decoder is connected to the AV1 jack.
External sound path :
Switch on your decoder. If the sound is coded or if you have no sound, activate or deactivate the box as required
using the Left/Right keys.
Once you have made all the adjustments you wish to a programme, go to Store on PR number and press
to memorise these. Then move on to the next channel.
Once you have completed your Manual Programming, exit the menu using
.
www.rtv-horvat-dj.hr
9
Personal settings
Personal settings
GB
1. Press and hold the
key: the
SUMMARY is displayed first, followed by the
INSTALLATION MAIN MENU.
2. Select the line marked Personal settings.
INSTALLATION MAIN MENU
Exit
Manual programming
3. Display the menu using
.
4. Continue by following the messages at the
bottom of the screen.
Auto installation
For further details, read the information below.
Personal settings
Menu language :
Select the language in which the menus are to
be displayed.
PERSONAL SETTINGS
Country :
Indicate the country in which you are if you wish
to rerun Automatic Programming.
For cable networks, if certain channels
have not been found, select Other
instead of the country name before running automatic installation again.
You may find that the characters of certain teletext languages are inaccessible for the selected country.
Auto volume level :
This is a sound control function which aims to
equalise the volume level between different
channels, and between different programmes
on the same channel.
Activate or deactivate the auto volume level as
required.
Programme organisation
Return
Menu language
English
Country
UK
Auto volume level
AV1 name
AV2 name
AV3 name
VCR
---CAMC
Prog. to be used
for reference time
06
Select a station from which you want
to get the reference time.
Select the line marked Return to return to the previous
menu.
On models equipped with Virtual Dolby
Surround, this function remains
inactive if Dolby Virtual has been
selected in the SOUND menu (see
Volume Control).
AV1, AV2, AV3 name :
Use these to give a name to each of your
audio-visual programmes. Select the character
you wish to modify using the Left/Right keys.
or
keys to display the desired
Use the
character.
Prog. to be used for reference time :
key or to use
To display the time using the
the alarm function, the television clock must be
set to the correct time. Select the line marked
Prog. to be used for reference time and select
a channel which broadcasts teletext. The time
is set automatically and is displayed after the
channel number.
Exit the menu using
.
www.rtv-horvat-dj.hr
10
13:15
Preferences
Preferences
1. Display the SUMMARY by pressing and
releasing the
key on the remote
control .
2. Select the line marked Preferences.
.
3. Display the menu using
Show program. number :
If you wish to permanently display the number
of the programme you are watching, tick the box
using the Left/Right keys. Press the Left/Right
keys again to deactivate this function.
PREFERENCES
Return
Show program. number
AV2 video input
AV3 video input
Format control
Picture preferences
GB
Make your choice from the proposed
options. Use the information below to help
you.
Video
S-Video
Auto
AV2 video input :
Use the Left/Right keys to select the type of video signal received at the AV2 SCART socket (Video or S-Video).
AV3 video input :
Use the Left/Right keys to select the type of video signal received at the AV3 sockets (these sockets are located
on the front or the side of the television).
Format control :
Use the Left/Right keys to select the desired picture format:
Auto : if the transmitter (for 16/9 format TV’s) or the appliance connected to one of the peripheral jacks delivers
the switching signal, the television automatically adapts to the transmitted picture format.
16/9 : manually selects widescreen picture format.
4/3 : manually selects this picture format.
If you have selected 16/9 or 4/3, the television will switch back to Auto when you change channels or you
switch off.
Picture preferences :
To access the PICTURE PREFERENCES
.
menu, press
If you wish, you can personalize certain
picture settings. Select and set the
proposed options. Use the information
below to help you.
Settings :
Select Standard or Personal.
Standard corresponds to the factory settings.
Personal corresponds to the settings that you
have entered yourself.
The lines Brightness, Colour and
Contrast are displayed only if you have
selected Personal on the Settings line.
Select each line one after the other and enter
your required settings. You can recall these
picture settings by pressing the red key on the
remote control.
.
Exit the menu using
PICTURE PREFERENCES
Return
Settings
Brightness
Colour
Contrast
Personal
Select the line marked Return to return to the previous
menu.
www.rtv-horvat-dj.hr
11
Daily viewing
Daily viewing
Picture Adjustment
GB
Display the SUMMARY using the
key on
the remote control. Select Picture. Validate
. The PICTURE menu is displayed.
using
Select and set the proposed options. Use
the information below to help you.
Brightness, Colour, Contrast, Sharpness:
Select each of these lines one after the other and
set as required.
Contrast expand :
Select this line then choose the desired Contrast
expand setting (High or Low).
Tone :
Select this line then choose the desired colour
tone (Warm, Neutral or Cold).
Exit the menu using
.
PICTURE
Return
Brightness
Colour
Contrast
Sharpness
Neutral
Cold
Contrast expand
Tone
Select the line marked Return to return to the previous
menu.
Sound Settings
Display the SUMMARY using the
key on
the remote control. Select the line marked
. The SOUND menu
Sound. Validate using
is displayed.
Select and set the proposed options. Use
the information below to help you.
Sound type :
The choices available to you depend on
your television model and the broadcast.
Stereo, Dual or NICAM reception and the
corresponding choices are only available
on Stereo or NICAM Stereo televisions.
Select this line, then select the type of sound you
desire.
Sound mode :
Select this line, then choose the desired mode
using the Left/Right keys.
The choices available to you depend on
your television model and the type of
sound. Magic and Dolby Virtual modes
are only available in stereo on TV’s
equipped with Virtual Dolby Surround.
Stereo wide is only available on Stereo or
Nicam televisions not equipped with
Virtual Dolby Surround.
Balance L/R :
Select this line, then balance the sound between
the Left and Right loudspeakers.
Treble, Bass :
Select each of these lines and adjust to suit you.
Surround effect :
This line appears only if you have selected
Dolby Virtual on the Sound mode line.
Select this line and adjust the surround effect to
suit you.
Exit the menu using
.
SOUND
Return
Automatic
Normal
Sound type
Sound mode
Balance L/R
Treble
Bass
Surround effect
Broadcast
mono
stereo
dual
NICAM-3
AV
Mode
Choice
automatic - mono
mono - stereo
sound 1 - sound 2
sound 1 - sound 2 - sound 3
stereo - sound 1 - sound 2
Effect
Normal :
reproduces the original sound (
mono or stereo).
Wide :
gives a stereo effect on mono sounds.
Stereo wide : accentuates the stereo effect.
Magic :
accentuates the stereo effects and
adds echo.
Dolby Virtual : Virtual Dolby Surround.
Virtual Surround Dolby is based on Dolby Pro Logic
decoding for the reproduction of the Left, Right, Centre and
Virtual Surround sound channels using two loudspeakers.
“”Dolby”, “”Pro Logic” and the double -D symbol are trademarks of the
Dolby Laboratories Licensing Corporation.
Manufactured under licence from Dolby Laboratories Licensing
Corporation.
www.rtv-horvat-dj.hr
12
Daily viewing
Time
Display the SUMMARY using the
key on
the remote control. Select the line marked
. The TIME menu is
Time. Validate using
displayed.
Sleep timer :
Use the Left/Right keys to choose how long you
wish to view before the television switches off.
The television will switch off automatically at the
end of this period. To cancel, set to 00:00.
One minute before switching off, a message will
inform you that the television is about to go off.
If you wish to keep it on, press any key on the
remote control or the local keyboard.
The television switches to Child lock mode after
an automatic stop. It can only be switched on
again from the remote control.
TIME
Return
Sleep timer
00 : 00
Current time
11 : 28
Wake-up timer
Wake-up time
Programme number
Daily
07 : 07
01 BBC1
GB
You can use this menu to switch your
television on or off automatically at a set
time.
Select the line marked Return to return to the previous
menu.
Current time :
The current time is given by the Teletext (see PERSONAL SETTINGS menu). You can also set the time manually
using the number keys (0 to 9) on your remote control.
Wake-up timer :
If you wish to be woken up by your television on the channel of your choice, you must first set the television
clock to the correct time (see above).
Use the Left/Right keys to tick the box and display the Wake-up timer menu.
The lines Wake-up time, Programme number and Daily only appear if you have ticked the box on the
line marked Wake-up timer.
Wake-up time :
Use the number keys (0 to 9) on the remote control to set the time at which you wish to be woken.
Programme number :
Select the programme you wish to be woken by.
Daily :
Tick this box if you wish to be awakened at this time every day.
.
Exit the menu using
Set the television to standby using the
key on the remote control. The red indicator light on the television
flashes.
The television will come on automatically at the programmed time and will go off one hour later if you do not use
the remote control.
www.rtv-horvat-dj.hr
13
Daily viewing
List of Channels
GB
This list contains up to 10 pages. The number of pages depends on
the number of programmes memorized. For each programme, the list
indicates the station name or type and the programme number. The
3 AV programmes are listed on page 11.
To display the list, press the
key on the remote control
or
key on the remote control. Select the
Display the SUMMARY using the
.
line marked List. Validate using
The page displayed is the page containing the programme you are watching.
It is identified in the list by the symbol TV.
To display the next page, press the Right key.
To display the previous page, press the Left key.
If you wish to watch one of the programmes on the page displayed:
Enter the last digit of the programme number (e.g. for 25 simply enter 5) on the
remote control. The list disappears and your programme is selected.
Or,
- Select the programme using the Up/Down keys.
.
- Validate using
.
- Exit the menu using
www.rtv-horvat-dj.hr
14
LIST
Exit
01
02
03
04
05
06
07
08
09
BBC 1
BBC 2
FR 3
CC19
ARTE
M6
CNN
PREM
EURO
TV
Page -/+
Programme: 0 - 9
Daily viewing
Selecting Programmes
GB
For channels 1 to 9, press the number key corresponding to the desired channel on the remote control. For
programme numbers higher than 10, press the key on the remote control: ”- -” appears on the screen. Now use
the number keys on the remote control to enter first the tens digit then the units digit.
If you press
while ”- -” is already displayed, the display returns to 0- , in which case you can only select
programmes 1 to 9.
Scrolling the Programmes
You can scroll through the programmes using the
/
keys.
Audio-visual (AV) Programmes
Press the
key to call the last audio-visual (AV) programme watched. Press repeatedly to scroll the audio-visual
(AV) programmes on the screen.
Volume Control
Use the volume +/- keys to increase or decrease the volume.
Muting the Sound
Press the
key to mute the sound. Press again to restore the sound.
Zoom
(16/9 models only)
This function is useful for 4/3 or letterbox pictures (black bands at the top and bottom of the screen).
Use the Left/Right keys to select the desired zoom position:
ZOOM 0: 4/3 picture (black bands at the sides).
FULL SCREEN: for a 4/3 picture that fills the screen.
ZOOM 1: for letterbox pictures.
Displaying Information
Press the
of sound.
key to display the following information on the screen: channel number and name, time, zoom, type
Television Lock
You can use this function to prevent anyone from switching on the television using the buttons on the
television set.
The buttons on the television set are locked in the following cases:
- If you switch off the set by pressing and holding the
key on the remote control for more than 3 seconds,
- After a programmed stop,
- If the television is set to standby when the alarm has been set.
When the television is locked the red power will be light flashing.
The television can now only be operated from the remote control.
To release the lock, press any number key on the remote control.
Switching Off the Television
To switch off the television, press the Standby key on the remote control or press the ON/OFF switch on the
television set.
www.rtv-horvat-dj.hr
15
Teletext
Teletext
GB
Certain channels broadcast an electronic news page service with a range of different information services.
The presentation and use of the Teletext differ from one country to another and from one programme to
another (Teletext, Fastext or Toptext).
Press the
key to display the Teletext Index (page 100).
A message will inform you if the programme you are watching has no Teletext service.
To call up a page:
Enter the 3 digits of the page number you wish to consult (for example, 150 or 170).
After a moment, the page appears.
Use the Left/Right keys to consult the next or the previous page.
Standard Functions
Rolling pages:
Some information is displayed over several sub-pages. It is scrolled on your screen as it is received.
. Press
again to continue
To stop scrolling, select STOP using the Up/Down keys and validate using
scrolling.
Masked text:
To reveal a hidden answer (for example in a quiz programme), select ??? using the Up/Down keys and validate
. Press
again to hide the answers.
using
Zoom :
Select ZOOM using the Up/Down keys then press the
key once to magnify the top of the screen, twice to
magnify the bottom of the screen (the page will scroll from top to bottom) and a third time to return to the normal
display.
Display:
You can superpose the Teletext page over the TV picture. To do this, select MIX using the Up/Down keys then
validate by pressing the
key. Press again
to return to the normal display.
Sub-code:
You can use this to access a sub-page directly.
Select “- - - -” using the Up/Down keys. Then enter the four digits of the required sub-page number.
Certain programmes have Alarm pages that you can set to appear at the time you require. For example:
for 15h30 enter 1530 as the sub-page number then press
. You must of course leave the television
on the programme which is to transmit the Alarm page.
Index:
To call up the index page, select 100 using the Up/Down keys then validate using
.
Direct access:
You can use the yellow and blue keys to directly access the pages indicated in the bar at the bottom of the screen.
Fastext functions:
If the Teletext you receive is Fastext, a sub-menu at the bottom of the screen appears which you can use to select
from the 4 headings according to its colour.
To select a heading, press the key of the corresponding colour.
Toptext functions:
If the Teletext you receive is TOPtext, the pages are arranged into headings and sub-headings by subject.
You can select the first page of a heading directly by pressing the blue key, or the first page of a sub-heading by
pressing the yellow key.
Other functions:
With certain Teletext channels, it is possible to have sub-titles overlaid on the screen for certain broadcasts as well
as certain news flash updates.
The corresponding page number is indicated in the Telextext index.
Once you have found the page, the sub-title or the news flash will be overlaid onto the TV picture.
key.
The navigation status bar disappears after a few seconds. To display it again, press the
or
.
To exit Teletext, press
www.rtv-horvat-dj.hr
16
Other Connections
Other Connections
The CINCH Video and Audio sockets (1)* are provided to
connect a VHS or 8mm camcorder.
The S and CINCH Audio sockets (1)* are provided to connect
a S-VHS or Hi-8 camcorder.
GB
To use the appliance you have connected, press the
key several times until the AV3 programme is
selected on the screen. When you switch off the
connected appliance, the television will remain on
the AV3 programme and you must use the numerical
keys on the remote control to select a programme.
* on models equipped with this function
The headphone socket (2)* is provided to connect a
headphone or earphones.
Connecting headphones mute the sound from the
television loudspeakers.
Other Possibilities
Copying a cassette:
Plug the VCR you wish to record to into the SCART socket
AV2.
Plug the appliance you wish to copy from as follows: into
the peripheral jack AV1 for a VCR; into the CINCH AV3 jacks
for a camcorder (see table below).
RECORD
PLAY
Appliance
* on models equipped with this function
SCART Socket
Appliance
SCART Socket
CALL
PROGRAMME
Peripheral
AV1
VCR
ou
Camcorder
AV2
AV1
Cinches or
S-Video
AV3
VCR
ou
Camcorder
AV2
AV3
VCR
Camcorder
Connecting a HiFi or AV amplifier
If you wish to connect a HiFi or AV amplifier, plug it into the
peripheral jack AV2 using a SCART-CINCH type lead.
www.rtv-horvat-dj.hr
17
BEDIENUNGSANLEITUNG - MANUALE DI UTILIZZAZIONE - USER MANUAL
Ο∆ΗΓΙΕ ΧΡΗΣΕΩ
www.rtv-horvat-dj.hr
0& 7&
10 cm
5 cm
10 cm
10 cm
www.rtv-horvat-dj.hr
About this manual
This document is common to several television models. Therefore, certain functions or settings may not apply to
the model you have purchased
The position of the ON/OFF switch
differs depending on the model. It may be located on the front or on the
right-hand side of your set (see the drawing inside the cover page of your manual).
About safety
To ensure your own safety and safe operation of the equipment, observe the following instructions
thoroughly.
TV sets require sufficient ventilation to prevent their components from overheating, which will cause failure. Do not
block the ventilation openings at the rear. If you place your TV set in a special piece of furniture, make sure there
is enough space for unhindered air circulation. Do not place the TV set in the close vicinity of a heater.
The TV set has been designed for use in dry rooms. Should you use it, in exceptional
circumstances in the open air (example: on the balcony, in the veranda or tent), you must absolutely protect it
against moisture (dew, rain, splash water). Before switching on a cold TV set in a warm room, you should wait until
any condensation in the screen has dried by itself.
Maximum ambient temperature: 35°C
Maximum humidity: 85%
By the end of your TV evening or when away from home for a longer period, we recommend that you turn off the
TV set with the On/Off-switch.
Even when the On/Off-switch is in the Off-position, your TV set is not fully disconnected from the mains. To
disconnect the set completely, the mains plug must be pulled out.
The mains plug must be easily accessible.
In the following cases, we recommend that you pull out the mains connector:
1. During a thunderstorm. In such a case, it is advisable that you also disconnect the TV set from the aerial socket.
2. When odour or smoke emanates from the set.
Never attempt to open your TV set yourself.
Further information:
The TV set shielding is sufficient to prevent X-radiation to the exterior.
Any operation performed by a non skilled person, change of high voltage or replacement of the picture tube by a
model not complying with the manufacturer specification are likely to cause considerable increase in X-radiation.
A TV set modified in such a way no longer complies with the manufacturers’ specification and must not be used.
About cleaning
The screen is to be cleaned with liquid glass cleaners.
: Never use abrasive products.
: Clean the cabinet with a soft cloth soaked with neutral cleaner. Do not use solvents, such as white spirit or
alcohol-based cleaning products since they may damage your television.
: At regular intervals, clean the ventilation grids at the rear of the TV set.
About degaussing
The terrestrial magnetic field may have an influence on your TV set. This influence is revealed by the coloured
spots, which appear on the screen.
Should this be the case:
: Turn the equipment off by means of the On/Off-switch.
: Wait about one hour before switching the set on again.
This procedure performs automatic degaussing of the screen. Should there still be coloured spots on the screen,
repeat the operation.
www.rtv-horvat-dj.hr
1
GB
About the switch
Contents
GB
Using the remote control
and fitting the batteries.
How to call up a menu
and how to select a
function, a setting or an
option.
About this manual . . . . . . . . . . . . . . . . . . . 1
About the switch . . . . . . . . . . . . . . . . . . . . . 1
About safety . . . . . . . . . . . . . . . . . . . . . . . . 1
About cleaning . . . . . . . . . . . . . . . . . . . . . . 1
About degaussing . . . . . . . . . . . . . . . . . . . 1
Basic connections . . . . . . . . . . . . . . . . . . . . 3
Remote control . . . . . . . . . . . . . . . . . . . . . . . 4
Navigation principles . . . . . . . . . . . . . . . . . 5
Calling up the Installation main menu . . . 5
Calling up the Settings summary . . . . . . . 5
Page
Instructions for Use
Installation
Page 4
Daily viewing . . . . . . . . . . . . . . . . . . . . . . . 12
Picture Adjustment . . . . . . . . . . . . . . . . 12
Sound Settings . . . . . . . . . . . . . . . . . . . . 12
Time . . . . . . . . . . . . . . . . . . . . . . . . . . . . . 13
List of Channels . . . . . . . . . . . . . . . . . . . 14
Selecting Programmes . . . . . . . . . . . . . 15
Scrolling the Programmes . . . . . . . . . . . 15
Audio-visual (AV) Programmes . . . . . . 15
Volume Control . . . . . . . . . . . . . . . . . . . . 15
Muting the Sound . . . . . . . . . . . . . . . . . . 15
Zoom (16/9 models only) . . . . . . . . . . . 15
Calling up a Menu . . . . . . . . . . . . . . . . . . . 5
Displaying Information . . . . . . . . . . . . . . 15
Navigating within the Menus . . . . . . . . . . . 5
Television Lock . . . . . . . . . . . . . . . . . . . . 15
Installing your television for the
first time . . . . . . . . . . . . . . . . . . . . . . . . . . . . . 6
Switching Off the Television . . . . . . . . . 15
Teletext . . . . . . . . . . . . . . . . . . . . . . . . . . . . 16
Automatic installation . . . . . . . . . . . . . . . . . 7
Standard Functions . . . . . . . . . . . . . . . . 16
Programme organisation . . . . . . . . . . . . . . 8
Other Connections . . . . . . . . . . . . . . . . . . 17
Manual programming . . . . . . . . . . . . . . . . . 9
Other Possibilities . . . . . . . . . . . . . . . . . 17
Personal settings . . . . . . . . . . . . . . . . . . . 10
Connecting a HiFi or AV amplifier . . . . 17
Preferences . . . . . . . . . . . . . . . . . . . . . . . . 11
www.rtv-horvat-dj.hr
2
5
Basic connections
Basic connections
The mains plug (1) supplies power to the television. The
television must only be plugged in to a 220-240 V - 50 Hz
power supply. It must never be plugged in to a DC source. If
the plug comes away from the lead, never attempt to plug it
in: this could cause electrocution.
Continental
Europe
If you connect an appliance to the aerial jack, you must give
it a channel number. To do this, switch on the appliance, then
use the television to find the modulator channel (see the
appliance manual). Now give it a programme number and
memorise it (see Manual Programming of channels). Then,
when you wish to use the appliance, simply select its
programme number on the television. This procedure is not
required for VCR’s not equipped with a modulator.
GB
The aerial socket (2), located on the rear of the television, can
be used to connect an external aerial or other appliance
equipped with a modulator such as a VCR, satellite receiver,
etc.
United Kingdom
The plug is fitted with a fuse which protects your
television. If your television does not work, the fuse may
be blown. In this case, replace it with an identical 5 Amp
ASTA or lr BSI (BS 1362) certified fuse.
$
The SCART socket AV1 (3), located on the rear of the
television, is intended to connect a VCR or a camcorder
(VHS, 8 mm), a Canal+ decoder, a video games console or
RGB-signal emitting appliances.
The SCART socket AV2 (3), located on the rear of the
television, is intended to connect a VCR or a camcorder
(VHS, 8 mm, S-VHS or Hi-8).
Note: the mains lead of your television is fitted with a
moulded plug. This lead contains all the safety equipment,
so you are advised when replacing it not to use a
non-specific commercially-available model.
We strongly recommend the use of this type of connection,
which gives a better picture quality. To use the peripheral
appliance that you have connected, press the AV key on your
remote control (press once to select AV1; twice to select
AV2; three times for AV3: see ”Other Connections”). This
selection is automatic for some appliances. Pressing “”play”
on a VCR, or switching on a satellite receiver connected to
AV1 or AV2 will automatically switch on your television.
When you stop the VCR, if you have not changed channels
while watching the VCR, the television automatically
switches back to the channel you were watching beforehand.
If the television has been switched on from the VCR, it
switches to standby when the VCR is switched off. The
television automatically switches to 16/9 format if the
connected appliance delivers the corresponding signal.
2
www.rtv-horvat-dj.hr
3
Remote control
Remote control
Display of channel, time, sound (yellow
This key is active only when using
the Teletext (blue key)
button) (and zoom for models with zoom)
Call up programme list
Standby
GB
(green button)
Call up Teletext / Toptext /
Fastext function (purple button)
Reminder of picture
preferences (red button)
Right/Left Selection within
menus and
Zoom Function (for models with
this function)
Confirm an action or validate a
menu option
Go to adjustment function MENU
To leave a menu or Teletext
Move Up/Down in menus
Volume adjustment
Change programme
Sound mute
8
Go to programmes and enter
numerical values in menus
Selecting appliances
connected to the television
(AV1, AV2 ...)
For programme numbers higher
than 10, press the 0 key on the
remote control: ”- -” appears on
the screen. Now use the
number keys on the remote
control to enter first the tens
digit then the units digit.
The red, green, yellow and
blue keys are also used for
the Teletext.
Please respect the environment! Before throwing any batteries away, consult your
distributor who may be able to take them back for specific recycling.
www.rtv-horvat-dj.hr
4
Navigation principles
Navigation principles
Calling up the Installation main menu
INSTALLATION MAIN MENU
If there is no menu displayed on the screen,
key on the remote
press and hold the
control. The settings SUMMARY is displayed
first, followed by the INSTALLATION MAIN
MENU which you can use to operate your
television.
Exit
Manual programming
Auto installation
GB
Programme organisation
Personal settings
Calling up the Settings summary
SUMMARY
Press and release the
key on the
remote control to display the list of menus
available for using your television functions or
adjusting your television
Exit
Teletext
Picture
Sound
Calling up a Menu
List
Select the menu you wish using the Up/Down
key to validate..
keys. Press the
Time
Preferences
Navigating within the Menus
Use the Up/Down keys 1 to select a line.
Use the Left/Right keys 2 to:
- Increase or decrease a value:
for example:
Fine tuning
- Select an option:
Aerial
for example: Reception
Cable
Reception
- Activate or deactivate an option:
for example: Decoder
- Access a sub-menu:
for example: Picture preferences
You can use the
3
MANUAL PROGRAMMING
Return
Standard
Reception
Autosearch
Fine tuning
Store on PR number
Name
Decoder
External sound path
EURO BG
Cable
CH- -----
Enter channel number or start
autosearch with < or >.
key to:
- Activate or deactivate an option:
for example: Decoder
- Access a sub-menu:
for example: Picture preferences
- Validate an action:
for example: Store on PR number
Use the
4 key to exit a menu.
www.rtv-horvat-dj.hr
5
Installing your television for the first time
Installing your television for the first time
First plug the television into a mains power outlet and to the external aerial or a cable network, then switch on using
located on the front or the side of your set.
the ON/OFF switch
When you switch on your television for the first time, the language selection menu* is displayed (Fig. 1). If this does
key on the television until this menu appears.
not happen, set the television to standby then press and hold the
GB
Installation Instructions (start)
1. Use the Up/Down keys to select the
language in which you wish the menus to be
displayed.
.
2. Then validate using
3. A list of countries* is now displayed (Fig. 2).
Select the country in which you live, or the
country from which you wish to receive the
broadcasts if you live in a border area.
.
4. Then validate using
5. A welcome message is displayed.
6. Run the automatic installation sequence
.
using
7. A message appears to inform you that
automatic installation has started (Fig. 3).
Wait for a few minutes.
A new message will inform you when
automatic installation is completed.
8. If you wish to check or modify the channel
and see the
organisation, press
Programme organisation chapter.
If you do not wish to modify the channel
organisation, you can exit the menu by
then watch the channel of
pressing
your choice. Choose the desired channel
using the number keys (1, 2, 3, ...) and the
/
keys.
If you have a decoder, see the Manual
programming chapter.
Your television will only search for channels
corresponding to the country you have
selected.
See
the
Manual channel
programming chapter to install any channels
not found.
For cable networks, read the Automatic
channel installation chapter to install any
channels not found.
(Fig. 1)
English
Français
Deutsch
Italiano
Español
Português
Nederlands
Svenska
Dansk
Norwisch
(Fig. 2)
OK
COUNTRY SELECTION
Exit
United Kingdom
Eire
France
Germany
Italy
Spain
Portugal
Holland
Belgium and Luxembourg
Switzerland
Austria
Sweden
Denmark
Norway
Other
Select your country and press OK
(Fig. 3)
SEARCHING
*The list of languages and countries may vary
from one model to another.
Installation Instructions (end)
AUTO INSTALLATION
003 STATIONS FOUND
Searching for TV stations.
Please wait. To cancel press EXIT.
www.rtv-horvat-dj.hr
6
Automatic installation
Automatic installation
The Automatic installation function is useful if you have to go through the installation procedure again, such as
when moving house. This function deletes all previously memorised programmes. To install a new channel, you
should use the Manual programming function.
Your television will only search for channels corresponding to the selected country, so see the Manual
programming chapter to install any channels not found. For cable networks, if you have not found certain
channels, select Other instead of a country name in the PERSONAL SETTINGS menu, then run automatic
installation again.
INSTALLATION MAIN MENU
1. Press and hold the
key on the remote
control to display the INSTALLATION MAIN
MENU (The SUMMARY appears first,
followed by the INSTALLATION MAIN
MENU).
2. Select the Auto installation line.
3. Validate using
Exit
Manual programming
Auto installation
Programme organisation
Personal settings
.
A message will inform you that Automatic
installation has begun.
Wait for a few minutes.
A new message will inform you when
Automatic installation is completed.
SEARCHING
If you wish to check or reorganize your channel
key and see the
display, press the
Programme organisation chapter.
AUTO INSTALLATION
If you do not wish to reorganize your
programmes, you can exit this menu by
, then watch the programme of
pressing
your choice. Choose the desired programme
using the number keys (1, 2, 3, ...) and the
/
keys.
003 STATIONS FOUND
Searching for TV stations.
Please wait. To cancel press EXIT.
www.rtv-horvat-dj.hr
7
GB
Before running AUTO INSTALLATION, check the PERSONAL SETTINGS menu to ensure that the country
displayed is correct.
Programme organisation
Programme organisation
During automatic installation, your television will search for the channel name and assign it a programme number
according to the selected country. You can use the PROGRAMME ORGANISATION menu to name any channel
name not found, to change the order in which the channels are displayed, or to delete channels for which reception
is too poor. Follow the messages at the bottom of the screen. For further details, read the information below.
GB
If you wish to access the
PROGRAMME
ORGANISATION,
menu thereafter, first press and hold
key on the remote control to
the
display the INSTALLATION MAIN
MENU (the SUMMARY is displayed
first, followed by the INSTALLATION
MAIN MENU) then select Programme
.
organisation and validate using
- To delete a programme for which reception
is too poor:
1. Select the line marked Select program.
/
or Left/Right keys to list
2. Use the
your channels.
3. When you get to a channel you wish to delete,
select the line marked Delete program.
to delete the programme.
4. Press
.
5. .Validate using
- To organize your channels to suit you:
1. Select the line marked Select program..
2. Use the
/
or Left/Right keys and
the programmes logos to find the programme
to which you wish to give the No.1.
Its present number appears on the line
marked Select program..
3. Select the line marked Swap with PR.
4. Enter 01.
. The two programmes swap
5. Press
position and the desired programme
becomes N°1.
6. Repeat the above procedure for the other
channels.
INSTALLATION MAIN MENU
Exit
Manual programming
Auto installation
Programme organisation
Personal settings
PROGRAMME ORGANISATION
Return
Select program.
Swap with PR.
Change pr. name
Delete program.
13
-EURO
13
MTV
FR2
TF1
EURO
CH40
CC01
ARTE
CART
---ARD
Select programme number using
PR-/PR+ or </> or 0 to 9 keys.
Select the line marked Return to return to the previous
menu.
- To name your channels:
1. Select the line marked Change pr. name
2. Select the character you wish to modify using
the Left/Right keys.
3. Use the and keys to display the letter you
require.
The name you have entered will be
memorised when you move to another line or
exit the menu.
If you wish to change the order in which
your programmes are displayed or if
you wish to name other programmes,
repeat the procedures described
above.
When you have finished organizing the
.
programmes, exit the menu using
www.rtv-horvat-dj.hr
8
10
11
12
13
14
15
16
17
18
19
Manual programming
Manual programming
The manual installation function is useful if some programmes have not been installed even after AUTOMATIC
INSTALLATION.
, the SUMMARY is
1. Press and hold
displayed
first,
followed
by
the
INSTALLATION MAIN MENU.
2. Select the line marked
Manual
programming.
.
3. Display the menu using
4. Now continue by following the messages at
the bottom of the screen. For further details,
read the information below.
Standard :
Select the standard using Left/Right keys that
corresponds to your country from the list of
standards.
The number of standards proposed will differ
from one model to another.
France
for France and Luxemburg
DKK’
eg. for Eastern Europe and
the Middle-East
I
for the United Kingdom and
Ireland
Euro BG
for Western Europe
INSTALLATION MAIN MENU
Exit
Manual programming
GB
Auto installation
Programme organisation
Personal settings
MANUAL PROGRAMMING
Return
Standard
Reception
Autosearch
Fine tuning
Store on PR number
Name
Decoder
External sound path
EURO BG
Cable
CH- -----
Reception :
Your television can pick up channels either via
Enter channel number or start
an aerial (RF channels) or via a cable network.
autosearch with < or >.
Certain cable networks use the same
frequencies as the RF channels. If this is the
case, you must select Aerial instead of Cable.
Select the line marked Return to return to the previous
Autosearch :
Enter the programme number if you know it. If
not, search using the Left/Right keys. Your
television will stop at the first channel it tunes
into. If you wish to memorize it, go to the line
marked Store on PR number. If not, resume
the search using the Left/Right keys.
Fine tuning :
You can use this to improve the picture if the transmitter frequency is out of adjustment. Use the Left/Right keys
to obtain the best possible picture and sound.
Store on PR number :
.
Enter the programme number you wish to give the channel (e.g.: 01 for BBC1). Memorise using
Name :
If the station has been identified by the transmitter, its name will be inscribed automatically. You can change the
proposed name or enter it if it has not already been identified. Select the character you wish to modify using the
Left/Right keys. Use the or keys to display the character you desire.
Decoder :
Use the Left/Right keys to tick the box if the channel is coded and if a decoder is connected to the AV1 jack.
External sound path :
Switch on your decoder. If the sound is coded or if you have no sound, activate or deactivate the box as required
using the Left/Right keys.
Once you have made all the adjustments you wish to a programme, go to Store on PR number and press
to memorise these. Then move on to the next channel.
Once you have completed your Manual Programming, exit the menu using
.
www.rtv-horvat-dj.hr
9
Personal settings
Personal settings
GB
1. Press and hold the
key: the
SUMMARY is displayed first, followed by the
INSTALLATION MAIN MENU.
2. Select the line marked Personal settings.
INSTALLATION MAIN MENU
Exit
Manual programming
3. Display the menu using
.
4. Continue by following the messages at the
bottom of the screen.
Auto installation
For further details, read the information below.
Personal settings
Menu language :
Select the language in which the menus are to
be displayed.
PERSONAL SETTINGS
Country :
Indicate the country in which you are if you wish
to rerun Automatic Programming.
For cable networks, if certain channels
have not been found, select Other
instead of the country name before running automatic installation again.
You may find that the characters of certain teletext languages are inaccessible for the selected country.
Auto volume level :
This is a sound control function which aims to
equalise the volume level between different
channels, and between different programmes
on the same channel.
Activate or deactivate the auto volume level as
required.
Programme organisation
Return
Menu language
English
Country
UK
Auto volume level
AV1 name
AV2 name
AV3 name
VCR
---CAMC
Prog. to be used
for reference time
06
Select a station from which you want
to get the reference time.
Select the line marked Return to return to the previous
menu.
On models equipped with Virtual Dolby
Surround, this function remains
inactive if Dolby Virtual has been
selected in the SOUND menu (see
Volume Control).
AV1, AV2, AV3 name :
Use these to give a name to each of your
audio-visual programmes. Select the character
you wish to modify using the Left/Right keys.
or
keys to display the desired
Use the
character.
Prog. to be used for reference time :
key or to use
To display the time using the
the alarm function, the television clock must be
set to the correct time. Select the line marked
Prog. to be used for reference time and select
a channel which broadcasts teletext. The time
is set automatically and is displayed after the
channel number.
Exit the menu using
.
www.rtv-horvat-dj.hr
10
13:15
Preferences
Preferences
1. Display the SUMMARY by pressing and
releasing the
key on the remote
control .
2. Select the line marked Preferences.
.
3. Display the menu using
Show program. number :
If you wish to permanently display the number
of the programme you are watching, tick the box
using the Left/Right keys. Press the Left/Right
keys again to deactivate this function.
PREFERENCES
Return
Show program. number
AV2 video input
AV3 video input
Format control
Picture preferences
GB
Make your choice from the proposed
options. Use the information below to help
you.
Video
S-Video
Auto
AV2 video input :
Use the Left/Right keys to select the type of video signal received at the AV2 SCART socket (Video or S-Video).
AV3 video input :
Use the Left/Right keys to select the type of video signal received at the AV3 sockets (these sockets are located
on the front or the side of the television).
Format control :
Use the Left/Right keys to select the desired picture format:
Auto : if the transmitter (for 16/9 format TV’s) or the appliance connected to one of the peripheral jacks delivers
the switching signal, the television automatically adapts to the transmitted picture format.
16/9 : manually selects widescreen picture format.
4/3 : manually selects this picture format.
If you have selected 16/9 or 4/3, the television will switch back to Auto when you change channels or you
switch off.
Picture preferences :
To access the PICTURE PREFERENCES
.
menu, press
If you wish, you can personalize certain
picture settings. Select and set the
proposed options. Use the information
below to help you.
Settings :
Select Standard or Personal.
Standard corresponds to the factory settings.
Personal corresponds to the settings that you
have entered yourself.
The lines Brightness, Colour and
Contrast are displayed only if you have
selected Personal on the Settings line.
Select each line one after the other and enter
your required settings. You can recall these
picture settings by pressing the red key on the
remote control.
.
Exit the menu using
PICTURE PREFERENCES
Return
Settings
Brightness
Colour
Contrast
Personal
Select the line marked Return to return to the previous
menu.
www.rtv-horvat-dj.hr
11
Daily viewing
Daily viewing
Picture Adjustment
GB
Display the SUMMARY using the
key on
the remote control. Select Picture. Validate
. The PICTURE menu is displayed.
using
Select and set the proposed options. Use
the information below to help you.
Brightness, Colour, Contrast, Sharpness:
Select each of these lines one after the other and
set as required.
Contrast expand :
Select this line then choose the desired Contrast
expand setting (High or Low).
Tone :
Select this line then choose the desired colour
tone (Warm, Neutral or Cold).
Exit the menu using
.
PICTURE
Return
Brightness
Colour
Contrast
Sharpness
Neutral
Cold
Contrast expand
Tone
Select the line marked Return to return to the previous
menu.
Sound Settings
Display the SUMMARY using the
key on
the remote control. Select the line marked
. The SOUND menu
Sound. Validate using
is displayed.
Select and set the proposed options. Use
the information below to help you.
Sound type :
The choices available to you depend on
your television model and the broadcast.
Stereo, Dual or NICAM reception and the
corresponding choices are only available
on Stereo or NICAM Stereo televisions.
Select this line, then select the type of sound you
desire.
Sound mode :
Select this line, then choose the desired mode
using the Left/Right keys.
The choices available to you depend on
your television model and the type of
sound. Magic and Dolby Virtual modes
are only available in stereo on TV’s
equipped with Virtual Dolby Surround.
Stereo wide is only available on Stereo or
Nicam televisions not equipped with
Virtual Dolby Surround.
Balance L/R :
Select this line, then balance the sound between
the Left and Right loudspeakers.
Treble, Bass :
Select each of these lines and adjust to suit you.
Surround effect :
This line appears only if you have selected
Dolby Virtual on the Sound mode line.
Select this line and adjust the surround effect to
suit you.
Exit the menu using
.
SOUND
Return
Automatic
Normal
Sound type
Sound mode
Balance L/R
Treble
Bass
Surround effect
Broadcast
mono
stereo
dual
NICAM-3
AV
Mode
Choice
automatic - mono
mono - stereo
sound 1 - sound 2
sound 1 - sound 2 - sound 3
stereo - sound 1 - sound 2
Effect
Normal :
reproduces the original sound (
mono or stereo).
Wide :
gives a stereo effect on mono sounds.
Stereo wide : accentuates the stereo effect.
Magic :
accentuates the stereo effects and
adds echo.
Dolby Virtual : Virtual Dolby Surround.
Virtual Surround Dolby is based on Dolby Pro Logic
decoding for the reproduction of the Left, Right, Centre and
Virtual Surround sound channels using two loudspeakers.
“”Dolby”, “”Pro Logic” and the double -D symbol are trademarks of the
Dolby Laboratories Licensing Corporation.
Manufactured under licence from Dolby Laboratories Licensing
Corporation.
www.rtv-horvat-dj.hr
12
Daily viewing
Time
Display the SUMMARY using the
key on
the remote control. Select the line marked
. The TIME menu is
Time. Validate using
displayed.
Sleep timer :
Use the Left/Right keys to choose how long you
wish to view before the television switches off.
The television will switch off automatically at the
end of this period. To cancel, set to 00:00.
One minute before switching off, a message will
inform you that the television is about to go off.
If you wish to keep it on, press any key on the
remote control or the local keyboard.
The television switches to Child lock mode after
an automatic stop. It can only be switched on
again from the remote control.
TIME
Return
Sleep timer
00 : 00
Current time
11 : 28
Wake-up timer
Wake-up time
Programme number
Daily
07 : 07
01 BBC1
GB
You can use this menu to switch your
television on or off automatically at a set
time.
Select the line marked Return to return to the previous
menu.
Current time :
The current time is given by the Teletext (see PERSONAL SETTINGS menu). You can also set the time manually
using the number keys (0 to 9) on your remote control.
Wake-up timer :
If you wish to be woken up by your television on the channel of your choice, you must first set the television
clock to the correct time (see above).
Use the Left/Right keys to tick the box and display the Wake-up timer menu.
The lines Wake-up time, Programme number and Daily only appear if you have ticked the box on the
line marked Wake-up timer.
Wake-up time :
Use the number keys (0 to 9) on the remote control to set the time at which you wish to be woken.
Programme number :
Select the programme you wish to be woken by.
Daily :
Tick this box if you wish to be awakened at this time every day.
.
Exit the menu using
Set the television to standby using the
key on the remote control. The red indicator light on the television
flashes.
The television will come on automatically at the programmed time and will go off one hour later if you do not use
the remote control.
www.rtv-horvat-dj.hr
13
Daily viewing
List of Channels
GB
This list contains up to 10 pages. The number of pages depends on
the number of programmes memorized. For each programme, the list
indicates the station name or type and the programme number. The
3 AV programmes are listed on page 11.
To display the list, press the
key on the remote control
or
key on the remote control. Select the
Display the SUMMARY using the
.
line marked List. Validate using
The page displayed is the page containing the programme you are watching.
It is identified in the list by the symbol TV.
To display the next page, press the Right key.
To display the previous page, press the Left key.
If you wish to watch one of the programmes on the page displayed:
Enter the last digit of the programme number (e.g. for 25 simply enter 5) on the
remote control. The list disappears and your programme is selected.
Or,
- Select the programme using the Up/Down keys.
.
- Validate using
.
- Exit the menu using
www.rtv-horvat-dj.hr
14
LIST
Exit
01
02
03
04
05
06
07
08
09
BBC 1
BBC 2
FR 3
CC19
ARTE
M6
CNN
PREM
EURO
TV
Page -/+
Programme: 0 - 9
Daily viewing
Selecting Programmes
GB
For channels 1 to 9, press the number key corresponding to the desired channel on the remote control. For
programme numbers higher than 10, press the key on the remote control: ”- -” appears on the screen. Now use
the number keys on the remote control to enter first the tens digit then the units digit.
If you press
while ”- -” is already displayed, the display returns to 0- , in which case you can only select
programmes 1 to 9.
Scrolling the Programmes
You can scroll through the programmes using the
/
keys.
Audio-visual (AV) Programmes
Press the
key to call the last audio-visual (AV) programme watched. Press repeatedly to scroll the audio-visual
(AV) programmes on the screen.
Volume Control
Use the volume +/- keys to increase or decrease the volume.
Muting the Sound
Press the
key to mute the sound. Press again to restore the sound.
Zoom
(16/9 models only)
This function is useful for 4/3 or letterbox pictures (black bands at the top and bottom of the screen).
Use the Left/Right keys to select the desired zoom position:
ZOOM 0: 4/3 picture (black bands at the sides).
FULL SCREEN: for a 4/3 picture that fills the screen.
ZOOM 1: for letterbox pictures.
Displaying Information
Press the
of sound.
key to display the following information on the screen: channel number and name, time, zoom, type
Television Lock
You can use this function to prevent anyone from switching on the television using the buttons on the
television set.
The buttons on the television set are locked in the following cases:
- If you switch off the set by pressing and holding the
key on the remote control for more than 3 seconds,
- After a programmed stop,
- If the television is set to standby when the alarm has been set.
When the television is locked the red power will be light flashing.
The television can now only be operated from the remote control.
To release the lock, press any number key on the remote control.
Switching Off the Television
To switch off the television, press the Standby key on the remote control or press the ON/OFF switch on the
television set.
www.rtv-horvat-dj.hr
15
Teletext
Teletext
GB
Certain channels broadcast an electronic news page service with a range of different information services.
The presentation and use of the Teletext differ from one country to another and from one programme to
another (Teletext, Fastext or Toptext).
Press the
key to display the Teletext Index (page 100).
A message will inform you if the programme you are watching has no Teletext service.
To call up a page:
Enter the 3 digits of the page number you wish to consult (for example, 150 or 170).
After a moment, the page appears.
Use the Left/Right keys to consult the next or the previous page.
Standard Functions
Rolling pages:
Some information is displayed over several sub-pages. It is scrolled on your screen as it is received.
. Press
again to continue
To stop scrolling, select STOP using the Up/Down keys and validate using
scrolling.
Masked text:
To reveal a hidden answer (for example in a quiz programme), select ??? using the Up/Down keys and validate
. Press
again to hide the answers.
using
Zoom :
Select ZOOM using the Up/Down keys then press the
key once to magnify the top of the screen, twice to
magnify the bottom of the screen (the page will scroll from top to bottom) and a third time to return to the normal
display.
Display:
You can superpose the Teletext page over the TV picture. To do this, select MIX using the Up/Down keys then
validate by pressing the
key. Press again
to return to the normal display.
Sub-code:
You can use this to access a sub-page directly.
Select “- - - -” using the Up/Down keys. Then enter the four digits of the required sub-page number.
Certain programmes have Alarm pages that you can set to appear at the time you require. For example:
for 15h30 enter 1530 as the sub-page number then press
. You must of course leave the television
on the programme which is to transmit the Alarm page.
Index:
To call up the index page, select 100 using the Up/Down keys then validate using
.
Direct access:
You can use the yellow and blue keys to directly access the pages indicated in the bar at the bottom of the screen.
Fastext functions:
If the Teletext you receive is Fastext, a sub-menu at the bottom of the screen appears which you can use to select
from the 4 headings according to its colour.
To select a heading, press the key of the corresponding colour.
Toptext functions:
If the Teletext you receive is TOPtext, the pages are arranged into headings and sub-headings by subject.
You can select the first page of a heading directly by pressing the blue key, or the first page of a sub-heading by
pressing the yellow key.
Other functions:
With certain Teletext channels, it is possible to have sub-titles overlaid on the screen for certain broadcasts as well
as certain news flash updates.
The corresponding page number is indicated in the Telextext index.
Once you have found the page, the sub-title or the news flash will be overlaid onto the TV picture.
key.
The navigation status bar disappears after a few seconds. To display it again, press the
or
.
To exit Teletext, press
www.rtv-horvat-dj.hr
16
Other Connections
Other Connections
The CINCH Video and Audio sockets (1)* are provided to
connect a VHS or 8mm camcorder.
The S and CINCH Audio sockets (1)* are provided to connect
a S-VHS or Hi-8 camcorder.
GB
To use the appliance you have connected, press the
key several times until the AV3 programme is
selected on the screen. When you switch off the
connected appliance, the television will remain on
the AV3 programme and you must use the numerical
keys on the remote control to select a programme.
* on models equipped with this function
The headphone socket (2)* is provided to connect a
headphone or earphones.
Connecting headphones mute the sound from the
television loudspeakers.
Other Possibilities
Copying a cassette:
Plug the VCR you wish to record to into the SCART socket
AV2.
Plug the appliance you wish to copy from as follows: into
the peripheral jack AV1 for a VCR; into the CINCH AV3 jacks
for a camcorder (see table below).
RECORD
PLAY
Appliance
* on models equipped with this function
SCART Socket
Appliance
SCART Socket
CALL
PROGRAMME
Peripheral
AV1
VCR
ou
Camcorder
AV2
AV1
Cinches or
S-Video
AV3
VCR
ou
Camcorder
AV2
AV3
VCR
Camcorder
Connecting a HiFi or AV amplifier
If you wish to connect a HiFi or AV amplifier, plug it into the
peripheral jack AV2 using a SCART-CINCH type lead.
www.rtv-horvat-dj.hr
17
M
a
d’
u
t
B
e
d
n
i
n
l
M
a
n
u
t
l
i
u
l
i
a
n
u
i
t
e
a
l
z
a
z
e
t
n
a
t
G
i
e
z
a
B
r
v
j
v
e
j
l
F
o
l
h
u
t
i
21DU21E
21MT21E
25DG21E
25DT21E
25DU23E
28DG21E
28WS21E
29DL21E
29MH21E
d
i
n
e
e
k
i
a
i
n
t
o
z
a
e
ó
n
s
-
n
g
n
-
n
n
d
e
l
i
i
n
i
r
z
n
e
l
g
o
c
s
s
t
j
k
e
i
i
i
u
B
n
d
a
u
w
i
-
l
z
r
n
s
a
a
i
b
g
u
u
l
n
e
n
n
o
e
a
M
l
i
u
s
m
a
s
e
U
u
i
i
a
u
g
g
i
ç
s
-
n
g
d
e
ã
o
21DU23E
24WK21E
25DH21E
25DU21E
25MH21E
28DT21E
29DH21E
29DU21E
33MS21E
www.rtv-horvat-dj.hr
10 cm
5 cm
10 cm
10 cm
www.rtv-horvat-dj.hr
About this manual
This document is common to several television models. Therefore, certain functions or settings may not apply to
the model you have purchased
The position of the ON/OFF switch
differs depending on the model. It may be located on the front or on the
right-hand side of your set (see the drawing inside the cover page of your manual).
About safety
To ensure your own safety and safe operation of the equipment, observe the following instructions
thoroughly.
TV sets require sufficient ventilation to prevent their components from overheating, which will cause failure. Do not
block the ventilation openings at the rear. If you place your TV set in a special piece of furniture, make sure there
is enough space for unhindered air circulation. Do not place the TV set in the close vicinity of a heater.
The TV set has been designed for use in dry rooms. Should you use it, in exceptional
circumstances in the open air (example: on the balcony, in the veranda or tent), you must absolutely protect it
against moisture (dew, rain, splash water). Before switching on a cold TV set in a warm room, you should wait until
any condensation in the screen has dried by itself.
Maximum ambient temperature: 35°C
Maximum humidity: 85%
By the end of your TV evening or when away from home for a longer period, we recommend that you turn off the
TV set with the On/Off-switch.
Even when the On/Off-switch is in the Off-position, your TV set is not fully disconnected from the mains. To
disconnect the set completely, the mains plug must be pulled out.
The mains plug must be easily accessible.
In the following cases, we recommend that you pull out the mains connector:
1. During a thunderstorm. In such a case, it is advisable that you also disconnect the TV set from the aerial socket.
2. When odour or smoke emanates from the set.
Never attempt to open your TV set yourself.
Further information:
The TV set shielding is sufficient to prevent X-radiation to the exterior.
Any operation performed by a non skilled person, change of high voltage or replacement of the picture tube by a
model not complying with the manufacturer specification are likely to cause considerable increase in X-radiation.
A TV set modified in such a way no longer complies with the manufacturers’ specification and must not be used.
About cleaning
The screen is to be cleaned with liquid glass cleaners.
: Never use abrasive products.
: Clean the cabinet with a soft cloth soaked with neutral cleaner. Do not use solvents, such as white spirit or
alcohol-based cleaning products since they may damage your television.
: At regular intervals, clean the ventilation grids at the rear of the TV set.
About degaussing
The terrestrial magnetic field may have an influence on your TV set. This influence is revealed by the coloured
spots, which appear on the screen.
Should this be the case:
: Turn the equipment off by means of the On/Off-switch.
: Wait about one hour before switching the set on again.
This procedure performs automatic degaussing of the screen. Should there still be coloured spots on the screen,
repeat the operation.
www.rtv-horvat-dj.hr
1
GB
About the switch
Contents
GB
Using the remote control
and fitting the batteries.
How to call up a menu
and how to select a
function, a setting or an
option.
About this manual . . . . . . . . . . . . . . . . . . . 1
About the switch . . . . . . . . . . . . . . . . . . . . . 1
About safety . . . . . . . . . . . . . . . . . . . . . . . . 1
About cleaning . . . . . . . . . . . . . . . . . . . . . . 1
About degaussing . . . . . . . . . . . . . . . . . . . 1
Basic connections . . . . . . . . . . . . . . . . . . . . 3
Remote control . . . . . . . . . . . . . . . . . . . . . . . 4
Navigation principles . . . . . . . . . . . . . . . . . 5
Calling up the Installation main menu . . . 5
Calling up the Settings summary . . . . . . . 5
Page
Instructions for Use
Installation
Page 4
Daily viewing . . . . . . . . . . . . . . . . . . . . . . . 12
Picture Adjustment . . . . . . . . . . . . . . . . 12
Sound Settings . . . . . . . . . . . . . . . . . . . . 12
Time . . . . . . . . . . . . . . . . . . . . . . . . . . . . . 13
List of Channels . . . . . . . . . . . . . . . . . . . 14
Selecting Programmes . . . . . . . . . . . . . 15
Scrolling the Programmes . . . . . . . . . . . 15
Audio-visual (AV) Programmes . . . . . . 15
Volume Control . . . . . . . . . . . . . . . . . . . . 15
Muting the Sound . . . . . . . . . . . . . . . . . . 15
Zoom (16/9 models only) . . . . . . . . . . . 15
Calling up a Menu . . . . . . . . . . . . . . . . . . . 5
Displaying Information . . . . . . . . . . . . . . 15
Navigating within the Menus . . . . . . . . . . . 5
Television Lock . . . . . . . . . . . . . . . . . . . . 15
Installing your television for the
first time . . . . . . . . . . . . . . . . . . . . . . . . . . . . . 6
Switching Off the Television . . . . . . . . . 15
Teletext . . . . . . . . . . . . . . . . . . . . . . . . . . . . 16
Automatic installation . . . . . . . . . . . . . . . . . 7
Standard Functions . . . . . . . . . . . . . . . . 16
Programme organisation . . . . . . . . . . . . . . 8
Other Connections . . . . . . . . . . . . . . . . . . 17
Manual programming . . . . . . . . . . . . . . . . . 9
Other Possibilities . . . . . . . . . . . . . . . . . 17
Personal settings . . . . . . . . . . . . . . . . . . . 10
Connecting a HiFi or AV amplifier . . . . 17
Preferences . . . . . . . . . . . . . . . . . . . . . . . . 11
www.rtv-horvat-dj.hr
2
5
Basic connections
Basic connections
The mains plug (1) supplies power to the television. The
television must only be plugged in to a 220-240 V - 50 Hz
power supply. It must never be plugged in to a DC source. If
the plug comes away from the lead, never attempt to plug it
in: this could cause electrocution.
Continental
Europe
If you connect an appliance to the aerial jack, you must give
it a channel number. To do this, switch on the appliance, then
use the television to find the modulator channel (see the
appliance manual). Now give it a programme number and
memorise it (see Manual Programming of channels). Then,
when you wish to use the appliance, simply select its
programme number on the television. This procedure is not
required for VCR’s not equipped with a modulator.
GB
The aerial socket (2), located on the rear of the television, can
be used to connect an external aerial or other appliance
equipped with a modulator such as a VCR, satellite receiver,
etc.
United Kingdom
The plug is fitted with a fuse which protects your
television. If your television does not work, the fuse may
be blown. In this case, replace it with an identical 5 Amp
ASTA or lr BSI (BS 1362) certified fuse.
$
The SCART socket AV1 (3), located on the rear of the
television, is intended to connect a VCR or a camcorder
(VHS, 8 mm), a Canal+ decoder, a video games console or
RGB-signal emitting appliances.
The SCART socket AV2 (3), located on the rear of the
television, is intended to connect a VCR or a camcorder
(VHS, 8 mm, S-VHS or Hi-8).
Note: the mains lead of your television is fitted with a
moulded plug. This lead contains all the safety equipment,
so you are advised when replacing it not to use a
non-specific commercially-available model.
We strongly recommend the use of this type of connection,
which gives a better picture quality. To use the peripheral
appliance that you have connected, press the AV key on your
remote control (press once to select AV1; twice to select
AV2; three times for AV3: see ”Other Connections”). This
selection is automatic for some appliances. Pressing “”play”
on a VCR, or switching on a satellite receiver connected to
AV1 or AV2 will automatically switch on your television.
When you stop the VCR, if you have not changed channels
while watching the VCR, the television automatically
switches back to the channel you were watching beforehand.
If the television has been switched on from the VCR, it
switches to standby when the VCR is switched off. The
television automatically switches to 16/9 format if the
connected appliance delivers the corresponding signal.
2
www.rtv-horvat-dj.hr
3
Remote control
Remote control
Display of channel, time, sound (yellow
This key is active only when using
the Teletext (blue key)
button) (and zoom for models with zoom)
Call up programme list
Standby
GB
(green button)
Call up Teletext / Toptext /
Fastext function (purple button)
Reminder of picture
preferences (red button)
Right/Left Selection within
menus and
Zoom Function (for models with
this function)
Confirm an action or validate a
menu option
Go to adjustment function MENU
To leave a menu or Teletext
Move Up/Down in menus
Volume adjustment
Change programme
Sound mute
8
Go to programmes and enter
numerical values in menus
Selecting appliances
connected to the television
(AV1, AV2 ...)
For programme numbers higher
than 10, press the 0 key on the
remote control: ”- -” appears on
the screen. Now use the
number keys on the remote
control to enter first the tens
digit then the units digit.
The red, green, yellow and
blue keys are also used for
the Teletext.
Please respect the environment! Before throwing any batteries away, consult your
distributor who may be able to take them back for specific recycling.
www.rtv-horvat-dj.hr
4
Navigation principles
Navigation principles
Calling up the Installation main menu
INSTALLATION MAIN MENU
If there is no menu displayed on the screen,
key on the remote
press and hold the
control. The settings SUMMARY is displayed
first, followed by the INSTALLATION MAIN
MENU which you can use to operate your
television.
Exit
Manual programming
Auto installation
GB
Programme organisation
Personal settings
Calling up the Settings summary
SUMMARY
Press and release the
key on the
remote control to display the list of menus
available for using your television functions or
adjusting your television
Exit
Teletext
Picture
Sound
Calling up a Menu
List
Select the menu you wish using the Up/Down
key to validate..
keys. Press the
Time
Preferences
Navigating within the Menus
Use the Up/Down keys 1 to select a line.
Use the Left/Right keys 2 to:
- Increase or decrease a value:
for example:
Fine tuning
- Select an option:
Aerial
for example: Reception
Cable
Reception
- Activate or deactivate an option:
for example: Decoder
- Access a sub-menu:
for example: Picture preferences
You can use the
3
MANUAL PROGRAMMING
Return
Standard
Reception
Autosearch
Fine tuning
Store on PR number
Name
Decoder
External sound path
EURO BG
Cable
CH- -----
Enter channel number or start
autosearch with < or >.
key to:
- Activate or deactivate an option:
for example: Decoder
- Access a sub-menu:
for example: Picture preferences
- Validate an action:
for example: Store on PR number
Use the
4 key to exit a menu.
www.rtv-horvat-dj.hr
5
Installing your television for the first time
Installing your television for the first time
First plug the television into a mains power outlet and to the external aerial or a cable network, then switch on using
located on the front or the side of your set.
the ON/OFF switch
When you switch on your television for the first time, the language selection menu* is displayed (Fig. 1). If this does
key on the television until this menu appears.
not happen, set the television to standby then press and hold the
GB
Installation Instructions (start)
1. Use the Up/Down keys to select the
language in which you wish the menus to be
displayed.
.
2. Then validate using
3. A list of countries* is now displayed (Fig. 2).
Select the country in which you live, or the
country from which you wish to receive the
broadcasts if you live in a border area.
.
4. Then validate using
5. A welcome message is displayed.
6. Run the automatic installation sequence
.
using
7. A message appears to inform you that
automatic installation has started (Fig. 3).
Wait for a few minutes.
A new message will inform you when
automatic installation is completed.
8. If you wish to check or modify the channel
and see the
organisation, press
Programme organisation chapter.
If you do not wish to modify the channel
organisation, you can exit the menu by
then watch the channel of
pressing
your choice. Choose the desired channel
using the number keys (1, 2, 3, ...) and the
/
keys.
If you have a decoder, see the Manual
programming chapter.
Your television will only search for channels
corresponding to the country you have
selected.
See
the
Manual channel
programming chapter to install any channels
not found.
For cable networks, read the Automatic
channel installation chapter to install any
channels not found.
(Fig. 1)
English
Français
Deutsch
Italiano
Español
Português
Nederlands
Svenska
Dansk
Norwisch
(Fig. 2)
OK
COUNTRY SELECTION
Exit
United Kingdom
Eire
France
Germany
Italy
Spain
Portugal
Holland
Belgium and Luxembourg
Switzerland
Austria
Sweden
Denmark
Norway
Other
Select your country and press OK
(Fig. 3)
SEARCHING
*The list of languages and countries may vary
from one model to another.
Installation Instructions (end)
AUTO INSTALLATION
003 STATIONS FOUND
Searching for TV stations.
Please wait. To cancel press EXIT.
www.rtv-horvat-dj.hr
6
Automatic installation
Automatic installation
The Automatic installation function is useful if you have to go through the installation procedure again, such as
when moving house. This function deletes all previously memorised programmes. To install a new channel, you
should use the Manual programming function.
Your television will only search for channels corresponding to the selected country, so see the Manual
programming chapter to install any channels not found. For cable networks, if you have not found certain
channels, select Other instead of a country name in the PERSONAL SETTINGS menu, then run automatic
installation again.
INSTALLATION MAIN MENU
1. Press and hold the
key on the remote
control to display the INSTALLATION MAIN
MENU (The SUMMARY appears first,
followed by the INSTALLATION MAIN
MENU).
2. Select the Auto installation line.
3. Validate using
Exit
Manual programming
Auto installation
Programme organisation
Personal settings
.
A message will inform you that Automatic
installation has begun.
Wait for a few minutes.
A new message will inform you when
Automatic installation is completed.
SEARCHING
If you wish to check or reorganize your channel
key and see the
display, press the
Programme organisation chapter.
AUTO INSTALLATION
If you do not wish to reorganize your
programmes, you can exit this menu by
, then watch the programme of
pressing
your choice. Choose the desired programme
using the number keys (1, 2, 3, ...) and the
/
keys.
003 STATIONS FOUND
Searching for TV stations.
Please wait. To cancel press EXIT.
www.rtv-horvat-dj.hr
7
GB
Before running AUTO INSTALLATION, check the PERSONAL SETTINGS menu to ensure that the country
displayed is correct.
Programme organisation
Programme organisation
During automatic installation, your television will search for the channel name and assign it a programme number
according to the selected country. You can use the PROGRAMME ORGANISATION menu to name any channel
name not found, to change the order in which the channels are displayed, or to delete channels for which reception
is too poor. Follow the messages at the bottom of the screen. For further details, read the information below.
GB
If you wish to access the
PROGRAMME
ORGANISATION,
menu thereafter, first press and hold
key on the remote control to
the
display the INSTALLATION MAIN
MENU (the SUMMARY is displayed
first, followed by the INSTALLATION
MAIN MENU) then select Programme
.
organisation and validate using
- To delete a programme for which reception
is too poor:
1. Select the line marked Select program.
/
or Left/Right keys to list
2. Use the
your channels.
3. When you get to a channel you wish to delete,
select the line marked Delete program.
to delete the programme.
4. Press
.
5. .Validate using
- To organize your channels to suit you:
1. Select the line marked Select program..
2. Use the
/
or Left/Right keys and
the programmes logos to find the programme
to which you wish to give the No.1.
Its present number appears on the line
marked Select program..
3. Select the line marked Swap with PR.
4. Enter 01.
. The two programmes swap
5. Press
position and the desired programme
becomes N°1.
6. Repeat the above procedure for the other
channels.
INSTALLATION MAIN MENU
Exit
Manual programming
Auto installation
Programme organisation
Personal settings
PROGRAMME ORGANISATION
Return
Select program.
Swap with PR.
Change pr. name
Delete program.
13
-EURO
13
MTV
FR2
TF1
EURO
CH40
CC01
ARTE
CART
---ARD
Select programme number using
PR-/PR+ or </> or 0 to 9 keys.
Select the line marked Return to return to the previous
menu.
- To name your channels:
1. Select the line marked Change pr. name
2. Select the character you wish to modify using
the Left/Right keys.
3. Use the and keys to display the letter you
require.
The name you have entered will be
memorised when you move to another line or
exit the menu.
If you wish to change the order in which
your programmes are displayed or if
you wish to name other programmes,
repeat the procedures described
above.
When you have finished organizing the
.
programmes, exit the menu using
www.rtv-horvat-dj.hr
8
10
11
12
13
14
15
16
17
18
19
Manual programming
Manual programming
The manual installation function is useful if some programmes have not been installed even after AUTOMATIC
INSTALLATION.
, the SUMMARY is
1. Press and hold
displayed
first,
followed
by
the
INSTALLATION MAIN MENU.
2. Select the line marked
Manual
programming.
.
3. Display the menu using
4. Now continue by following the messages at
the bottom of the screen. For further details,
read the information below.
Standard :
Select the standard using Left/Right keys that
corresponds to your country from the list of
standards.
The number of standards proposed will differ
from one model to another.
France
for France and Luxemburg
DKK’
eg. for Eastern Europe and
the Middle-East
I
for the United Kingdom and
Ireland
Euro BG
for Western Europe
INSTALLATION MAIN MENU
Exit
Manual programming
GB
Auto installation
Programme organisation
Personal settings
MANUAL PROGRAMMING
Return
Standard
Reception
Autosearch
Fine tuning
Store on PR number
Name
Decoder
External sound path
EURO BG
Cable
CH- -----
Reception :
Your television can pick up channels either via
Enter channel number or start
an aerial (RF channels) or via a cable network.
autosearch with < or >.
Certain cable networks use the same
frequencies as the RF channels. If this is the
case, you must select Aerial instead of Cable.
Select the line marked Return to return to the previous
Autosearch :
Enter the programme number if you know it. If
not, search using the Left/Right keys. Your
television will stop at the first channel it tunes
into. If you wish to memorize it, go to the line
marked Store on PR number. If not, resume
the search using the Left/Right keys.
Fine tuning :
You can use this to improve the picture if the transmitter frequency is out of adjustment. Use the Left/Right keys
to obtain the best possible picture and sound.
Store on PR number :
.
Enter the programme number you wish to give the channel (e.g.: 01 for BBC1). Memorise using
Name :
If the station has been identified by the transmitter, its name will be inscribed automatically. You can change the
proposed name or enter it if it has not already been identified. Select the character you wish to modify using the
Left/Right keys. Use the or keys to display the character you desire.
Decoder :
Use the Left/Right keys to tick the box if the channel is coded and if a decoder is connected to the AV1 jack.
External sound path :
Switch on your decoder. If the sound is coded or if you have no sound, activate or deactivate the box as required
using the Left/Right keys.
Once you have made all the adjustments you wish to a programme, go to Store on PR number and press
to memorise these. Then move on to the next channel.
Once you have completed your Manual Programming, exit the menu using
.
www.rtv-horvat-dj.hr
9
Personal settings
Personal settings
GB
1. Press and hold the
key: the
SUMMARY is displayed first, followed by the
INSTALLATION MAIN MENU.
2. Select the line marked Personal settings.
INSTALLATION MAIN MENU
Exit
Manual programming
3. Display the menu using
.
4. Continue by following the messages at the
bottom of the screen.
Auto installation
For further details, read the information below.
Personal settings
Menu language :
Select the language in which the menus are to
be displayed.
PERSONAL SETTINGS
Country :
Indicate the country in which you are if you wish
to rerun Automatic Programming.
For cable networks, if certain channels
have not been found, select Other
instead of the country name before running automatic installation again.
You may find that the characters of certain teletext languages are inaccessible for the selected country.
Auto volume level :
This is a sound control function which aims to
equalise the volume level between different
channels, and between different programmes
on the same channel.
Activate or deactivate the auto volume level as
required.
Programme organisation
Return
Menu language
English
Country
UK
Auto volume level
AV1 name
AV2 name
AV3 name
VCR
---CAMC
Prog. to be used
for reference time
06
Select a station from which you want
to get the reference time.
Select the line marked Return to return to the previous
menu.
On models equipped with Virtual Dolby
Surround, this function remains
inactive if Dolby Virtual has been
selected in the SOUND menu (see
Volume Control).
AV1, AV2, AV3 name :
Use these to give a name to each of your
audio-visual programmes. Select the character
you wish to modify using the Left/Right keys.
or
keys to display the desired
Use the
character.
Prog. to be used for reference time :
key or to use
To display the time using the
the alarm function, the television clock must be
set to the correct time. Select the line marked
Prog. to be used for reference time and select
a channel which broadcasts teletext. The time
is set automatically and is displayed after the
channel number.
Exit the menu using
.
www.rtv-horvat-dj.hr
10
13:15
Preferences
Preferences
1. Display the SUMMARY by pressing and
releasing the
key on the remote
control .
2. Select the line marked Preferences.
.
3. Display the menu using
Show program. number :
If you wish to permanently display the number
of the programme you are watching, tick the box
using the Left/Right keys. Press the Left/Right
keys again to deactivate this function.
PREFERENCES
Return
Show program. number
AV2 video input
AV3 video input
Format control
Picture preferences
GB
Make your choice from the proposed
options. Use the information below to help
you.
Video
S-Video
Auto
AV2 video input :
Use the Left/Right keys to select the type of video signal received at the AV2 SCART socket (Video or S-Video).
AV3 video input :
Use the Left/Right keys to select the type of video signal received at the AV3 sockets (these sockets are located
on the front or the side of the television).
Format control :
Use the Left/Right keys to select the desired picture format:
Auto : if the transmitter (for 16/9 format TV’s) or the appliance connected to one of the peripheral jacks delivers
the switching signal, the television automatically adapts to the transmitted picture format.
16/9 : manually selects widescreen picture format.
4/3 : manually selects this picture format.
If you have selected 16/9 or 4/3, the television will switch back to Auto when you change channels or you
switch off.
Picture preferences :
To access the PICTURE PREFERENCES
.
menu, press
If you wish, you can personalize certain
picture settings. Select and set the
proposed options. Use the information
below to help you.
Settings :
Select Standard or Personal.
Standard corresponds to the factory settings.
Personal corresponds to the settings that you
have entered yourself.
The lines Brightness, Colour and
Contrast are displayed only if you have
selected Personal on the Settings line.
Select each line one after the other and enter
your required settings. You can recall these
picture settings by pressing the red key on the
remote control.
.
Exit the menu using
PICTURE PREFERENCES
Return
Settings
Brightness
Colour
Contrast
Personal
Select the line marked Return to return to the previous
menu.
www.rtv-horvat-dj.hr
11
Daily viewing
Daily viewing
Picture Adjustment
GB
Display the SUMMARY using the
key on
the remote control. Select Picture. Validate
. The PICTURE menu is displayed.
using
Select and set the proposed options. Use
the information below to help you.
Brightness, Colour, Contrast, Sharpness:
Select each of these lines one after the other and
set as required.
Contrast expand :
Select this line then choose the desired Contrast
expand setting (High or Low).
Tone :
Select this line then choose the desired colour
tone (Warm, Neutral or Cold).
Exit the menu using
.
PICTURE
Return
Brightness
Colour
Contrast
Sharpness
Neutral
Cold
Contrast expand
Tone
Select the line marked Return to return to the previous
menu.
Sound Settings
Display the SUMMARY using the
key on
the remote control. Select the line marked
. The SOUND menu
Sound. Validate using
is displayed.
Select and set the proposed options. Use
the information below to help you.
Sound type :
The choices available to you depend on
your television model and the broadcast.
Stereo, Dual or NICAM reception and the
corresponding choices are only available
on Stereo or NICAM Stereo televisions.
Select this line, then select the type of sound you
desire.
Sound mode :
Select this line, then choose the desired mode
using the Left/Right keys.
The choices available to you depend on
your television model and the type of
sound. Magic and Dolby Virtual modes
are only available in stereo on TV’s
equipped with Virtual Dolby Surround.
Stereo wide is only available on Stereo or
Nicam televisions not equipped with
Virtual Dolby Surround.
Balance L/R :
Select this line, then balance the sound between
the Left and Right loudspeakers.
Treble, Bass :
Select each of these lines and adjust to suit you.
Surround effect :
This line appears only if you have selected
Dolby Virtual on the Sound mode line.
Select this line and adjust the surround effect to
suit you.
Exit the menu using
.
SOUND
Return
Automatic
Normal
Sound type
Sound mode
Balance L/R
Treble
Bass
Surround effect
Broadcast
mono
stereo
dual
NICAM-3
AV
Mode
Choice
automatic - mono
mono - stereo
sound 1 - sound 2
sound 1 - sound 2 - sound 3
stereo - sound 1 - sound 2
Effect
Normal :
reproduces the original sound (
mono or stereo).
Wide :
gives a stereo effect on mono sounds.
Stereo wide : accentuates the stereo effect.
Magic :
accentuates the stereo effects and
adds echo.
Dolby Virtual : Virtual Dolby Surround.
Virtual Surround Dolby is based on Dolby Pro Logic
decoding for the reproduction of the Left, Right, Centre and
Virtual Surround sound channels using two loudspeakers.
“”Dolby”, “”Pro Logic” and the double -D symbol are trademarks of the
Dolby Laboratories Licensing Corporation.
Manufactured under licence from Dolby Laboratories Licensing
Corporation.
www.rtv-horvat-dj.hr
12
Daily viewing
Time
Display the SUMMARY using the
key on
the remote control. Select the line marked
. The TIME menu is
Time. Validate using
displayed.
Sleep timer :
Use the Left/Right keys to choose how long you
wish to view before the television switches off.
The television will switch off automatically at the
end of this period. To cancel, set to 00:00.
One minute before switching off, a message will
inform you that the television is about to go off.
If you wish to keep it on, press any key on the
remote control or the local keyboard.
The television switches to Child lock mode after
an automatic stop. It can only be switched on
again from the remote control.
TIME
Return
Sleep timer
00 : 00
Current time
11 : 28
Wake-up timer
Wake-up time
Programme number
Daily
07 : 07
01 BBC1
GB
You can use this menu to switch your
television on or off automatically at a set
time.
Select the line marked Return to return to the previous
menu.
Current time :
The current time is given by the Teletext (see PERSONAL SETTINGS menu). You can also set the time manually
using the number keys (0 to 9) on your remote control.
Wake-up timer :
If you wish to be woken up by your television on the channel of your choice, you must first set the television
clock to the correct time (see above).
Use the Left/Right keys to tick the box and display the Wake-up timer menu.
The lines Wake-up time, Programme number and Daily only appear if you have ticked the box on the
line marked Wake-up timer.
Wake-up time :
Use the number keys (0 to 9) on the remote control to set the time at which you wish to be woken.
Programme number :
Select the programme you wish to be woken by.
Daily :
Tick this box if you wish to be awakened at this time every day.
.
Exit the menu using
Set the television to standby using the
key on the remote control. The red indicator light on the television
flashes.
The television will come on automatically at the programmed time and will go off one hour later if you do not use
the remote control.
www.rtv-horvat-dj.hr
13
Daily viewing
List of Channels
GB
This list contains up to 10 pages. The number of pages depends on
the number of programmes memorized. For each programme, the list
indicates the station name or type and the programme number. The
3 AV programmes are listed on page 11.
To display the list, press the
key on the remote control
or
key on the remote control. Select the
Display the SUMMARY using the
.
line marked List. Validate using
The page displayed is the page containing the programme you are watching.
It is identified in the list by the symbol TV.
To display the next page, press the Right key.
To display the previous page, press the Left key.
If you wish to watch one of the programmes on the page displayed:
Enter the last digit of the programme number (e.g. for 25 simply enter 5) on the
remote control. The list disappears and your programme is selected.
Or,
- Select the programme using the Up/Down keys.
.
- Validate using
.
- Exit the menu using
www.rtv-horvat-dj.hr
14
LIST
Exit
01
02
03
04
05
06
07
08
09
BBC 1
BBC 2
FR 3
CC19
ARTE
M6
CNN
PREM
EURO
TV
Page -/+
Programme: 0 - 9
Daily viewing
Selecting Programmes
GB
For channels 1 to 9, press the number key corresponding to the desired channel on the remote control. For
programme numbers higher than 10, press the key on the remote control: ”- -” appears on the screen. Now use
the number keys on the remote control to enter first the tens digit then the units digit.
If you press
while ”- -” is already displayed, the display returns to 0- , in which case you can only select
programmes 1 to 9.
Scrolling the Programmes
You can scroll through the programmes using the
/
keys.
Audio-visual (AV) Programmes
Press the
key to call the last audio-visual (AV) programme watched. Press repeatedly to scroll the audio-visual
(AV) programmes on the screen.
Volume Control
Use the volume +/- keys to increase or decrease the volume.
Muting the Sound
Press the
key to mute the sound. Press again to restore the sound.
Zoom
(16/9 models only)
This function is useful for 4/3 or letterbox pictures (black bands at the top and bottom of the screen).
Use the Left/Right keys to select the desired zoom position:
ZOOM 0: 4/3 picture (black bands at the sides).
FULL SCREEN: for a 4/3 picture that fills the screen.
ZOOM 1: for letterbox pictures.
Displaying Information
Press the
of sound.
key to display the following information on the screen: channel number and name, time, zoom, type
Television Lock
You can use this function to prevent anyone from switching on the television using the buttons on the
television set.
The buttons on the television set are locked in the following cases:
- If you switch off the set by pressing and holding the
key on the remote control for more than 3 seconds,
- After a programmed stop,
- If the television is set to standby when the alarm has been set.
When the television is locked the red power will be light flashing.
The television can now only be operated from the remote control.
To release the lock, press any number key on the remote control.
Switching Off the Television
To switch off the television, press the Standby key on the remote control or press the ON/OFF switch on the
television set.
www.rtv-horvat-dj.hr
15
Teletext
Teletext
GB
Certain channels broadcast an electronic news page service with a range of different information services.
The presentation and use of the Teletext differ from one country to another and from one programme to
another (Teletext, Fastext or Toptext).
Press the
key to display the Teletext Index (page 100).
A message will inform you if the programme you are watching has no Teletext service.
To call up a page:
Enter the 3 digits of the page number you wish to consult (for example, 150 or 170).
After a moment, the page appears.
Use the Left/Right keys to consult the next or the previous page.
Standard Functions
Rolling pages:
Some information is displayed over several sub-pages. It is scrolled on your screen as it is received.
. Press
again to continue
To stop scrolling, select STOP using the Up/Down keys and validate using
scrolling.
Masked text:
To reveal a hidden answer (for example in a quiz programme), select ??? using the Up/Down keys and validate
. Press
again to hide the answers.
using
Zoom :
Select ZOOM using the Up/Down keys then press the
key once to magnify the top of the screen, twice to
magnify the bottom of the screen (the page will scroll from top to bottom) and a third time to return to the normal
display.
Display:
You can superpose the Teletext page over the TV picture. To do this, select MIX using the Up/Down keys then
validate by pressing the
key. Press again
to return to the normal display.
Sub-code:
You can use this to access a sub-page directly.
Select “- - - -” using the Up/Down keys. Then enter the four digits of the required sub-page number.
Certain programmes have Alarm pages that you can set to appear at the time you require. For example:
for 15h30 enter 1530 as the sub-page number then press
. You must of course leave the television
on the programme which is to transmit the Alarm page.
Index:
To call up the index page, select 100 using the Up/Down keys then validate using
.
Direct access:
You can use the yellow and blue keys to directly access the pages indicated in the bar at the bottom of the screen.
Fastext functions:
If the Teletext you receive is Fastext, a sub-menu at the bottom of the screen appears which you can use to select
from the 4 headings according to its colour.
To select a heading, press the key of the corresponding colour.
Toptext functions:
If the Teletext you receive is TOPtext, the pages are arranged into headings and sub-headings by subject.
You can select the first page of a heading directly by pressing the blue key, or the first page of a sub-heading by
pressing the yellow key.
Other functions:
With certain Teletext channels, it is possible to have sub-titles overlaid on the screen for certain broadcasts as well
as certain news flash updates.
The corresponding page number is indicated in the Telextext index.
Once you have found the page, the sub-title or the news flash will be overlaid onto the TV picture.
key.
The navigation status bar disappears after a few seconds. To display it again, press the
or
.
To exit Teletext, press
www.rtv-horvat-dj.hr
16
Other Connections
Other Connections
The CINCH Video and Audio sockets (1)* are provided to
connect a VHS or 8mm camcorder.
The S and CINCH Audio sockets (1)* are provided to connect
a S-VHS or Hi-8 camcorder.
GB
To use the appliance you have connected, press the
key several times until the AV3 programme is
selected on the screen. When you switch off the
connected appliance, the television will remain on
the AV3 programme and you must use the numerical
keys on the remote control to select a programme.
* on models equipped with this function
The headphone socket (2)* is provided to connect a
headphone or earphones.
Connecting headphones mute the sound from the
television loudspeakers.
Other Possibilities
Copying a cassette:
Plug the VCR you wish to record to into the SCART socket
AV2.
Plug the appliance you wish to copy from as follows: into
the peripheral jack AV1 for a VCR; into the CINCH AV3 jacks
for a camcorder (see table below).
RECORD
PLAY
Appliance
* on models equipped with this function
SCART Socket
Appliance
SCART Socket
CALL
PROGRAMME
Peripheral
AV1
VCR
ou
Camcorder
AV2
AV1
Cinches or
S-Video
AV3
VCR
ou
Camcorder
AV2
AV3
VCR
Camcorder
Connecting a HiFi or AV amplifier
If you wish to connect a HiFi or AV amplifier, plug it into the
peripheral jack AV2 using a SCART-CINCH type lead.
www.rtv-horvat-dj.hr
17
B
e
a
n
l
M
a
n
u
t
d
i
l
i
e
e
n
i
u
i
u
t
a
z
z
a
m
a
g
u
n
l
V
U
n
e
z
i
o
n
H
n
u
s
-
g
·
d
i
e
·
U
a
l
·
ι
ε
ς
ω
ς
·
DF321C / DF421C / MF221C
Ο
χ
δ
ρ
η
η
γ
σ
ε
www.rtv-horvat-dj.hr
10 cm
5 cm
10 cm
10 cm
www.rtv-horvat-dj.hr
About this manual
This document is common to several television models. Therefore, certain functions or settings may not apply to
the model you have purchased
The position of the ON/OFF switch
differs depending on the model. It may be located on the front or on the
right-hand side of your set (see the drawing inside the cover page of your manual).
About safety
To ensure your own safety and safe operation of the equipment, observe the following instructions
thoroughly.
TV sets require sufficient ventilation to prevent their components from overheating, which will cause failure. Do not
block the ventilation openings at the rear. If you place your TV set in a special piece of furniture, make sure there
is enough space for unhindered air circulation. Do not place the TV set in the close vicinity of a heater.
The TV set has been designed for use in dry rooms. Should you use it, in exceptional
circumstances in the open air (example: on the balcony, in the veranda or tent), you must absolutely protect it
against moisture (dew, rain, splash water). Before switching on a cold TV set in a warm room, you should wait until
any condensation in the screen has dried by itself.
Maximum ambient temperature: 35°C
Maximum humidity: 85%
By the end of your TV evening or when away from home for a longer period, we recommend that you turn off the
TV set with the On/Off-switch.
Even when the On/Off-switch is in the Off-position, your TV set is not fully disconnected from the mains. To
disconnect the set completely, the mains plug must be pulled out.
The mains plug must be easily accessible.
In the following cases, we recommend that you pull out the mains connector:
1. During a thunderstorm. In such a case, it is advisable that you also disconnect the TV set from the aerial socket.
2. When odour or smoke emanates from the set.
Never attempt to open your TV set yourself.
Further information:
The TV set shielding is sufficient to prevent X-radiation to the exterior.
Any operation performed by a non skilled person, change of high voltage or replacement of the picture tube by a
model not complying with the manufacturer specification are likely to cause considerable increase in X-radiation.
A TV set modified in such a way no longer complies with the manufacturers’ specification and must not be used.
About cleaning
The screen is to be cleaned with liquid glass cleaners.
: Never use abrasive products.
: Clean the cabinet with a soft cloth soaked with neutral cleaner. Do not use solvents, such as white spirit or
alcohol-based cleaning products since they may damage your television.
: At regular intervals, clean the ventilation grids at the rear of the TV set.
About degaussing
The terrestrial magnetic field may have an influence on your TV set. This influence is revealed by the coloured
spots, which appear on the screen.
Should this be the case:
: Turn the equipment off by means of the On/Off-switch.
: Wait about one hour before switching the set on again.
This procedure performs automatic degaussing of the screen. Should there still be coloured spots on the screen,
repeat the operation.
www.rtv-horvat-dj.hr
1
GB
About the switch
Contents
GB
Using the remote control
and fitting the batteries.
How to call up a menu
and how to select a
function, a setting or an
option.
About this manual . . . . . . . . . . . . . . . . . . . 1
About the switch . . . . . . . . . . . . . . . . . . . . . 1
About safety . . . . . . . . . . . . . . . . . . . . . . . . 1
About cleaning . . . . . . . . . . . . . . . . . . . . . . 1
About degaussing . . . . . . . . . . . . . . . . . . . 1
Basic connections . . . . . . . . . . . . . . . . . . . . 3
Remote control . . . . . . . . . . . . . . . . . . . . . . . 4
Navigation principles . . . . . . . . . . . . . . . . . 5
Calling up the INSTALLATION
MAIN MENU . . . . . . . . . . . . . . . . . . . . . . . . 5
Calling up the SUMMARY . . . . . . . . . . . . . 5
Calling up a Menu . . . . . . . . . . . . . . . . . . . 5
Navigating within the Menus . . . . . . . . . . . 5
Page
Instructions for Use
Installation
Page 4
5
Daily viewing . . . . . . . . . . . . . . . . . . . . . . . 12
Picture Adjustment . . . . . . . . . . . . . . . . 12
Sound Settings . . . . . . . . . . . . . . . . . . . . 12
Time . . . . . . . . . . . . . . . . . . . . . . . . . . . . . 13
List of Channels . . . . . . . . . . . . . . . . . . . 14
Selecting Programmes . . . . . . . . . . . . . 15
Scrolling the Programmes . . . . . . . . . . . 15
Audio-visual (AV) Programmes . . . . . . 15
Volume Control . . . . . . . . . . . . . . . . . . . . 15
Muting the Sound . . . . . . . . . . . . . . . . . . 15
Zoom (16/9 models only) . . . . . . . . . . . 15
Displaying Information . . . . . . . . . . . . . . 15
Television Lock . . . . . . . . . . . . . . . . . . . . 15
Switching Off the Television . . . . . . . . . 15
Installing your television for
the first time . . . . . . . . . . . . . . . . . . . . . . . . . 6
Teletext . . . . . . . . . . . . . . . . . . . . . . . . . . . . 16
Automatic installation . . . . . . . . . . . . . . . . . 7
Standard Functions . . . . . . . . . . . . . . . . 16
Programme organisation . . . . . . . . . . . . . . 8
Other Connections . . . . . . . . . . . . . . . . . . 17
Manual programming . . . . . . . . . . . . . . . . . 9
Other Possibilities . . . . . . . . . . . . . . . . . 17
Connecting a HiFi or AV amplifier . . . . 17
Personal settings . . . . . . . . . . . . . . . . . . . 10
www.rtv-horvat-dj.hr
2
C17 / BASIC / 4000 / GB-TBA / I 6.3 / B
Preferences . . . . . . . . . . . . . . . . . . . . . . . . 11
Basic connections
Basic connections
The mains plug (1) supplies power to the television. The
television must only be plugged in to a 220-240 V - 50 Hz
power supply. It must never be plugged in to a DC source. If
the plug comes away from the lead, never attempt to plug it
in: this could cause electrocution.
Continental
Europe
If you connect an appliance to the aerial jack, you must give
it a channel number. To do this, switch on the appliance, then
use the television to find the modulator channel (see the
appliance manual). Now give it a programme number and
memorise it (see Manual Programming of channels). Then,
when you wish to use the appliance, simply select its
programme number on the television. This procedure is not
required for VCR’s not equipped with a modulator.
GB
The aerial socket (2), located on the rear of the television, can
be used to connect an external aerial or other appliance
equipped with a modulator such as a VCR, satellite receiver,
etc.
United Kingdom
The plug is fitted with a fuse which protects your
television. If your television does not work, the fuse may
be blown. In this case, replace it with an identical 5 Amp
ASTA or lr BSI (BS 1362) certified fuse.
$
The SCART socket AV1 (3), located on the rear of the
television, is intended to connect a VCR or a camcorder
(VHS, 8 mm), a Canal+ decoder, a video games console or
RGB-signal emitting appliances.
The SCART socket AV2 (3), located on the rear of the
television, is intended to connect a VCR or a camcorder
(VHS, 8 mm, S-VHS or Hi-8).
Note: the mains lead of your television is fitted with a
moulded plug. This lead contains all the safety equipment,
so you are advised when replacing it not to use a
non-specific commercially-available model.
We strongly recommend the use of this type of connection,
which gives a better picture quality. To use the peripheral
appliance that you have connected, press the AV key on your
remote control (press once to select AV1; twice to select
AV2; three times for AV3: see ”Other Connections”). This
selection is automatic for some appliances. Pressing “”play”
on a VCR, or switching on a satellite receiver connected to
AV1 or AV2 will automatically switch on your television.
When you stop the VCR, if you have not changed channels
while watching the VCR, the television automatically
switches back to the channel you were watching beforehand.
If the television has been switched on from the VCR, it
switches to standby when the VCR is switched off. The
television automatically switches to 16/9 format if the
connected appliance delivers the corresponding signal.
2
www.rtv-horvat-dj.hr
3
Remote control
Remote control
Display of channel, time, sound
This key is active only when
using the Teletext (blue key)
(yellow button) (and zoom for models
with zoom)
GB
Standby
Call up Teletext / Toptext /
Fastext function (purple button)
Call up programme list
(green button)
Right/Left Selection within
Reminder of picture
preferences (red button)
menus and
Zoom Function (for models with
this function)
Illumination of remote control
Confirm an action or validate
buttons
a menu option
To leave a menu or Teletext
Go to adjustment function MENU
Volume adjustment
Move Up/Down in menus
Sound mute
Change programme
Go to programmes and enter
numerical values in menus
Selecting appliances
connected to the television
For programme numbers higher
than 10, press the 0 key on the
remote control: ”- -” appears on
the screen. Now use the
number keys on the remote
control to enter first the tens
digit then the units digit.
(AV1, AV2 ...)
The red, green, yellow and
blue keys are also used for
the Teletext.
Please respect the environment! Before throwing any batteries away, consult your
distributor who may be able to take them back for specific recycling.
www.rtv-horvat-dj.hr
Navigation principles
Navigation principles
Calling up the Installation main menu
INSTALLATION MAIN MENU
If there is no menu displayed on the screen,
key on the remote
press and hold the
control. The settings SUMMARY is displayed
first, followed by the INSTALLATION MAIN
MENU which you can use to operate your
television.
Exit
Manual programming
Auto installation
GB
Programme organisation
Personal settings
Calling up the Settings summary
SUMMARY
Press and release the
key on the
remote control to display the list of menus
available for using your television functions or
adjusting your television
Exit
Teletext
Picture
Sound
Calling up a Menu
List
Select the menu you wish using the Up/Down
key to validate..
keys. Press the
Time
Preferences
Navigating within the Menus
Use the Up/Down keys 1 to select a line.
Use the Left/Right keys 2 to:
- Increase or decrease a value:
for example:
Fine tuning
- Select an option:
Aerial
for example: Reception
Cable
Reception
- Activate or deactivate an option:
for example: Decoder
- Access a sub-menu:
for example: Picture preferences
You can use the
3
MANUAL PROGRAMMING
Return
Standard
Reception
Autosearch
Fine tuning
Store on PR number
Name
Decoder
External sound path
EURO BG
Cable
CH- -----
Enter channel number or start
autosearch with < or >.
key to:
- Activate or deactivate an option:
for example: Decoder
- Access a sub-menu:
for example: Picture preferences
- Validate an action:
for example: Store on PR number
Use the
4 key to exit a menu.
www.rtv-horvat-dj.hr
5
Installing your television for the first time
Installing your television for the first time
First plug the television into a mains power outlet and to the external aerial or a cable network, then switch on using
located on the front or the side of your set.
the ON/OFF switch
When you switch on your television for the first time, the language selection menu* is displayed (Fig. 1). If this does
key on the television until this menu appears.
not happen, set the television to standby then press and hold the
GB
Installation Instructions (start)
1. Use the Up/Down keys to select the
language in which you wish the menus to be
displayed.
.
2. Then validate using
3. A list of countries* is now displayed (Fig. 2).
Select the country in which you live, or the
country from which you wish to receive the
broadcasts if you live in a border area.
.
4. Then validate using
5. A welcome message is displayed.
6. Run the automatic installation sequence
.
using
7. A message appears to inform you that
automatic installation has started (Fig. 3).
Wait for a few minutes.
A new message will inform you when
automatic installation is completed.
8. If you wish to check or modify the channel
and see the
organisation, press
Programme organisation chapter.
If you do not wish to modify the channel
organisation, you can exit the menu by
then watch the channel of
pressing
your choice. Choose the desired channel
using the number keys (1, 2, 3, ...) and the
/
keys.
If you have a decoder, see the Manual
programming chapter.
Your television will only search for channels
corresponding to the country you have
selected.
See
the
Manual channel
programming chapter to install any channels
not found.
For cable networks, read the Automatic
channel installation chapter to install any
channels not found.
(Fig. 1)
English
Français
Deutsch
Italiano
Español
Português
Nederlands
Svenska
Dansk
Norwisch
(Fig. 2)
OK
COUNTRY SELECTION
Exit
United Kingdom
Eire
France
Germany
Italy
Spain
Portugal
Holland
Belgium and Luxembourg
Switzerland
Austria
Sweden
Denmark
Norway
Other
Select your country and press OK
(Fig. 3)
SEARCHING
*The list of languages and countries may vary
from one model to another.
Installation Instructions (end)
AUTO INSTALLATION
003 STATIONS FOUND
Searching for TV stations.
Please wait. To cancel press EXIT.
www.rtv-horvat-dj.hr
6
Automatic installation
Automatic installation
The Automatic installation function is useful if you have to go through the installation procedure again, such as
when moving house. This function deletes all previously memorised programmes. To install a new channel, you
should use the Manual programming function.
Your television will only search for channels corresponding to the selected country, so see the Manual
programming chapter to install any channels not found. For cable networks, if you have not found certain
channels, select Other instead of a country name in the PERSONAL SETTINGS menu, then run automatic
installation again.
INSTALLATION MAIN MENU
1. Press and hold the
key on the remote
control to display the INSTALLATION MAIN
MENU (The SUMMARY appears first,
followed by the INSTALLATION MAIN
MENU).
2. Select the Auto installation line.
3. Validate using
Exit
Manual programming
Auto installation
Programme organisation
Personal settings
.
A message will inform you that Automatic
installation has begun.
Wait for a few minutes.
A new message will inform you when
Automatic installation is completed.
SEARCHING
If you wish to check or reorganize your channel
key and see the
display, press the
Programme organisation chapter.
AUTO INSTALLATION
If you do not wish to reorganize your
programmes, you can exit this menu by
, then watch the programme of
pressing
your choice. Choose the desired programme
using the number keys (1, 2, 3, ...) and the
/
keys.
003 STATIONS FOUND
Searching for TV stations.
Please wait. To cancel press EXIT.
www.rtv-horvat-dj.hr
7
GB
Before running AUTO INSTALLATION, check the PERSONAL SETTINGS menu to ensure that the country
displayed is correct.
Programme organisation
Programme organisation
During automatic installation, your television will search for the channel name and assign it a programme number
according to the selected country. You can use the PROGRAMME ORGANISATION menu to name any channel
name not found, to change the order in which the channels are displayed, or to delete channels for which reception
is too poor. Follow the messages at the bottom of the screen. For further details, read the information below.
GB
If you wish to access the
PROGRAMME
ORGANISATION,
menu thereafter, first press and hold
key on the remote control to
the
display the INSTALLATION MAIN
MENU (the SUMMARY is displayed
first, followed by the INSTALLATION
MAIN MENU) then select Programme
.
organisation and validate using
- To delete a programme for which reception
is too poor:
1. Select the line marked Select program.
/
or Left/Right keys to list
2. Use the
your channels.
3. When you get to a channel you wish to delete,
select the line marked Delete program.
to delete the programme.
4. Press
.
5. .Validate using
- To organize your channels to suit you:
1. Select the line marked Select program..
2. Use the
/
or Left/Right keys and
the programmes logos to find the programme
to which you wish to give the No.1.
Its present number appears on the line
marked Select program..
3. Select the line marked Swap with PR.
4. Enter 01.
. The two programmes swap
5. Press
position and the desired programme
becomes N°1.
6. Repeat the above procedure for the other
channels.
INSTALLATION MAIN MENU
Exit
Manual programming
Auto installation
Programme organisation
Personal settings
PROGRAMME ORGANISATION
Return
Select program.
Swap with PR.
Change pr. name
Delete program.
13
-EURO
13
MTV
FR2
TF1
EURO
CH40
CC01
ARTE
CART
---ARD
Select programme number using
PR-/PR+ or </> or 0 to 9 keys.
Select the line marked Return to return to the previous
menu.
- To name your channels:
1. Select the line marked Change pr. name
2. Select the character you wish to modify using
the Left/Right keys.
3. Use the and keys to display the letter you
require.
The name you have entered will be
memorised when you move to another line or
exit the menu.
If you wish to change the order in which
your programmes are displayed or if
you wish to name other programmes,
repeat the procedures described
above.
When you have finished organizing the
.
programmes, exit the menu using
www.rtv-horvat-dj.hr
8
10
11
12
13
14
15
16
17
18
19
Manual programming
Manual programming
The manual installation function is useful if some programmes have not been installed even after AUTOMATIC
INSTALLATION.
, the SUMMARY is
1. Press and hold
displayed
first,
followed
by
the
INSTALLATION MAIN MENU.
2. Select the line marked
Manual
programming.
.
3. Display the menu using
4. Now continue by following the messages at
the bottom of the screen. For further details,
read the information below.
Standard :
Select the standard using Left/Right keys that
corresponds to your country from the list of
standards.
The number of standards proposed will differ
from one model to another.
France
for France and Luxemburg
DKK’
eg. for Eastern Europe and
the Middle-East
I
for the United Kingdom and
Ireland
Euro BG
for Western Europe
INSTALLATION MAIN MENU
Exit
Manual programming
GB
Auto installation
Programme organisation
Personal settings
MANUAL PROGRAMMING
Return
Standard
Reception
Autosearch
Fine tuning
Store on PR number
Name
Decoder
External sound path
EURO BG
Cable
CH- -----
Reception :
Your television can pick up channels either via
Enter channel number or start
an aerial (RF channels) or via a cable network.
autosearch with < or >.
Certain cable networks use the same
frequencies as the RF channels. If this is the
case, you must select Aerial instead of Cable.
Select the line marked Return to return to the previous
Autosearch :
Enter the programme number if you know it. If
not, search using the Left/Right keys. Your
television will stop at the first channel it tunes
into. If you wish to memorize it, go to the line
marked Store on PR number. If not, resume
the search using the Left/Right keys.
Fine tuning :
You can use this to improve the picture if the transmitter frequency is out of adjustment. Use the Left/Right keys
to obtain the best possible picture and sound.
Store on PR number :
.
Enter the programme number you wish to give the channel (e.g.: 01 for BBC1). Memorise using
Name :
If the station has been identified by the transmitter, its name will be inscribed automatically. You can change the
proposed name or enter it if it has not already been identified. Select the character you wish to modify using the
Left/Right keys. Use the or keys to display the character you desire.
Decoder :
Use the Left/Right keys to tick the box if the channel is coded and if a decoder is connected to the AV1 jack.
External sound path :
Switch on your decoder. If the sound is coded or if you have no sound, activate or deactivate the box as required
using the Left/Right keys.
Once you have made all the adjustments you wish to a programme, go to Store on PR number and press
to memorise these. Then move on to the next channel.
Once you have completed your Manual Programming, exit the menu using
.
www.rtv-horvat-dj.hr
9
Personal settings
Personal settings
GB
1. Press and hold the
key: the
SUMMARY is displayed first, followed by the
INSTALLATION MAIN MENU.
2. Select the line marked Personal settings.
INSTALLATION MAIN MENU
Exit
Manual programming
3. Display the menu using
.
4. Continue by following the messages at the
bottom of the screen.
Auto installation
For further details, read the information below.
Personal settings
Menu language :
Select the language in which the menus are to
be displayed.
PERSONAL SETTINGS
Country :
Indicate the country in which you are if you wish
to rerun Automatic Programming.
For cable networks, if certain channels
have not been found, select Other
instead of the country name before running automatic installation again.
You may find that the characters of certain teletext languages are inaccessible for the selected country.
Auto volume level :
This is a sound control function which aims to
equalise the volume level between different
channels, and between different programmes
on the same channel.
Activate or deactivate the auto volume level as
required.
Programme organisation
Return
Menu language
English
Country
UK
Auto volume level
AV1 name
AV2 name
AV3 name
VCR
---CAMC
Prog. to be used
for reference time
06
Select a station from which you want
to get the reference time.
Select the line marked Return to return to the previous
menu.
On models equipped with Virtual Dolby
Surround, this function remains
inactive if Dolby Virtual has been
selected in the SOUND menu (see
Volume Control).
AV1, AV2, AV3 name :
Use these to give a name to each of your
audio-visual programmes. Select the character
you wish to modify using the Left/Right keys.
or
keys to display the desired
Use the
character.
Prog. to be used for reference time :
key or to use
To display the time using the
the alarm function, the television clock must be
set to the correct time. Select the line marked
Prog. to be used for reference time and select
a channel which broadcasts teletext. The time
is set automatically and is displayed after the
channel number.
Exit the menu using
.
www.rtv-horvat-dj.hr
10
13:15
Preferences
Preferences
1. Display the SUMMARY by pressing and
releasing the
key on the remote
control .
2. Select the line marked Preferences.
.
3. Display the menu using
Show program. number :
If you wish to permanently display the number
of the programme you are watching, tick the box
using the Left/Right keys. Press the Left/Right
keys again to deactivate this function.
PREFERENCES
Return
Show program. number
AV2 video input
AV3 video input
Format control
Picture preferences
GB
Make your choice from the proposed
options. Use the information below to help
you.
Video
S-Video
Auto
AV2 video input :
Use the Left/Right keys to select the type of video signal received at the AV2 SCART socket (Video or S-Video).
AV3 video input :
Use the Left/Right keys to select the type of video signal received at the AV3 sockets (these sockets are located
on the front or the side of the television).
Format control :
Use the Left/Right keys to select the desired picture format:
Auto : if the transmitter (for 16/9 format TV’s) or the appliance connected to one of the peripheral jacks delivers
the switching signal, the television automatically adapts to the transmitted picture format.
16/9 : manually selects widescreen picture format.
4/3 : manually selects this picture format.
If you have selected 16/9 or 4/3, the television will switch back to Auto when you change channels or you
switch off.
Picture preferences :
To access the PICTURE PREFERENCES
.
menu, press
If you wish, you can personalize certain
picture settings. Select and set the
proposed options. Use the information
below to help you.
Settings :
Select Standard or Personal.
Standard corresponds to the factory settings.
Personal corresponds to the settings that you
have entered yourself.
The lines Brightness, Colour and
Contrast are displayed only if you have
selected Personal on the Settings line.
Select each line one after the other and enter
your required settings. You can recall these
picture settings by pressing the red key on the
remote control.
.
Exit the menu using
PICTURE PREFERENCES
Return
Settings
Brightness
Colour
Contrast
Personal
Select the line marked Return to return to the previous
menu.
www.rtv-horvat-dj.hr
11
Daily viewing
Daily viewing
Picture Adjustment
GB
Display the SUMMARY using the
key on
the remote control. Select Picture. Validate
. The PICTURE menu is displayed.
using
Select and set the proposed options. Use
the information below to help you.
Brightness, Colour, Contrast, Sharpness:
Select each of these lines one after the other and
set as required.
Contrast expand :
Select this line then choose the desired Contrast
expand setting (High or Low).
Tone :
Select this line then choose the desired colour
tone (Warm, Neutral or Cold).
Exit the menu using
.
PICTURE
Return
Brightness
Colour
Contrast
Sharpness
Neutral
Cold
Contrast expand
Tone
Select the line marked Return to return to the previous
menu.
Sound Settings
Display the SUMMARY using the
key on
the remote control. Select the line marked
. The SOUND menu
Sound. Validate using
is displayed.
Select and set the proposed options. Use
the information below to help you.
Sound type :
The choices available to you depend on
your television model and the broadcast.
Stereo, Dual or NICAM reception and the
corresponding choices are only available
on Stereo or NICAM Stereo televisions.
Select this line, then select the type of sound you
desire.
Sound mode :
Select this line, then choose the desired mode
using the Left/Right keys.
The choices available to you depend on
your television model and the type of
sound. Magic and Dolby Virtual modes
are only available in stereo on TV’s
equipped with Virtual Dolby Surround.
Stereo wide is only available on Stereo or
Nicam televisions not equipped with
Virtual Dolby Surround.
Balance L/R :
Select this line, then balance the sound between
the Left and Right loudspeakers.
Treble, Bass :
Select each of these lines and adjust to suit you.
Surround effect :
This line appears only if you have selected
Dolby Virtual on the Sound mode line.
Select this line and adjust the surround effect to
suit you.
Exit the menu using
.
SOUND
Return
Automatic
Normal
Sound type
Sound mode
Balance L/R
Treble
Bass
Surround effect
Broadcast
mono
stereo
dual
NICAM-3
AV
Mode
Choice
automatic - mono
mono - stereo
sound 1 - sound 2
sound 1 - sound 2 - sound 3
stereo - sound 1 - sound 2
Effect
Normal :
reproduces the original sound (
mono or stereo).
Wide :
gives a stereo effect on mono sounds.
Stereo wide : accentuates the stereo effect.
Magic :
accentuates the stereo effects and
adds echo.
Dolby Virtual : Virtual Dolby Surround.
Virtual Surround Dolby is based on Dolby Pro Logic
decoding for the reproduction of the Left, Right, Centre and
Virtual Surround sound channels using two loudspeakers.
“”Dolby”, “”Pro Logic” and the double -D symbol are trademarks of the
Dolby Laboratories Licensing Corporation.
Manufactured under licence from Dolby Laboratories Licensing
Corporation.
www.rtv-horvat-dj.hr
12
Daily viewing
Time
Display the SUMMARY using the
key on
the remote control. Select the line marked
. The TIME menu is
Time. Validate using
displayed.
Sleep timer :
Use the Left/Right keys to choose how long you
wish to view before the television switches off.
The television will switch off automatically at the
end of this period. To cancel, set to 00:00.
One minute before switching off, a message will
inform you that the television is about to go off.
If you wish to keep it on, press any key on the
remote control or the local keyboard.
The television switches to Child lock mode after
an automatic stop. It can only be switched on
again from the remote control.
TIME
Return
Sleep timer
00 : 00
Current time
11 : 28
Wake-up timer
Wake-up time
Programme number
Daily
07 : 07
01 BBC1
GB
You can use this menu to switch your
television on or off automatically at a set
time.
Select the line marked Return to return to the previous
menu.
Current time :
The current time is given by the Teletext (see PERSONAL SETTINGS menu). You can also set the time manually
using the number keys (0 to 9) on your remote control.
Wake-up timer :
If you wish to be woken up by your television on the channel of your choice, you must first set the television
clock to the correct time (see above).
Use the Left/Right keys to tick the box and display the Wake-up timer menu.
The lines Wake-up time, Programme number and Daily only appear if you have ticked the box on the
line marked Wake-up timer.
Wake-up time :
Use the number keys (0 to 9) on the remote control to set the time at which you wish to be woken.
Programme number :
Select the programme you wish to be woken by.
Daily :
Tick this box if you wish to be awakened at this time every day.
.
Exit the menu using
Set the television to standby using the
key on the remote control. The red indicator light on the television
flashes.
The television will come on automatically at the programmed time and will go off one hour later if you do not use
the remote control.
www.rtv-horvat-dj.hr
13
Daily viewing
List of Channels
GB
This list contains up to 10 pages. The number of pages depends on
the number of programmes memorized. For each programme, the list
indicates the station name or type and the programme number. The
3 AV programmes are listed on page 11.
To display the list, press the
key on the remote control
or
key on the remote control. Select the
Display the SUMMARY using the
.
line marked List. Validate using
The page displayed is the page containing the programme you are watching.
It is identified in the list by the symbol TV.
To display the next page, press the Right key.
To display the previous page, press the Left key.
If you wish to watch one of the programmes on the page displayed:
Enter the last digit of the programme number (e.g. for 25 simply enter 5) on the
remote control. The list disappears and your programme is selected.
Or,
- Select the programme using the Up/Down keys.
.
- Validate using
.
- Exit the menu using
www.rtv-horvat-dj.hr
14
LIST
Exit
01
02
03
04
05
06
07
08
09
BBC 1
BBC 2
FR 3
CC19
ARTE
M6
CNN
PREM
EURO
TV
Page -/+
Programme: 0 - 9
Daily viewing
Selecting Programmes
GB
For channels 1 to 9, press the number key corresponding to the desired channel on the remote control. For
programme numbers higher than 10, press the key on the remote control: ”- -” appears on the screen. Now use
the number keys on the remote control to enter first the tens digit then the units digit.
If you press
while ”- -” is already displayed, the display returns to 0- , in which case you can only select
programmes 1 to 9.
Scrolling the Programmes
You can scroll through the programmes using the
/
keys.
Audio-visual (AV) Programmes
Press the
key to call the last audio-visual (AV) programme watched. Press repeatedly to scroll the audio-visual
(AV) programmes on the screen.
Volume Control
Use the volume +/- keys to increase or decrease the volume.
Muting the Sound
Press the
key to mute the sound. Press again to restore the sound.
Zoom
(16/9 models only)
This function is useful for 4/3 or letterbox pictures (black bands at the top and bottom of the screen).
Use the Left/Right keys to select the desired zoom position:
ZOOM 0: 4/3 picture (black bands at the sides).
FULL SCREEN: for a 4/3 picture that fills the screen.
ZOOM 1: for letterbox pictures.
Displaying Information
Press the
of sound.
key to display the following information on the screen: channel number and name, time, zoom, type
Television Lock
You can use this function to prevent anyone from switching on the television using the buttons on the
television set.
The buttons on the television set are locked in the following cases:
- If you switch off the set by pressing and holding the
key on the remote control for more than 3 seconds,
- After a programmed stop,
- If the television is set to standby when the alarm has been set.
When the television is locked the red power will be light flashing.
The television can now only be operated from the remote control.
To release the lock, press any number key on the remote control.
Switching Off the Television
To switch off the television, press the Standby key on the remote control or press the ON/OFF switch on the
television set.
www.rtv-horvat-dj.hr
15
Teletext
Teletext
GB
Certain channels broadcast an electronic news page service with a range of different information services.
The presentation and use of the Teletext differ from one country to another and from one programme to
another (Teletext, Fastext or Toptext).
Press the
key to display the Teletext Index (page 100).
A message will inform you if the programme you are watching has no Teletext service.
To call up a page:
Enter the 3 digits of the page number you wish to consult (for example, 150 or 170).
After a moment, the page appears.
Use the Left/Right keys to consult the next or the previous page.
Standard Functions
Rolling pages:
Some information is displayed over several sub-pages. It is scrolled on your screen as it is received.
. Press
again to continue
To stop scrolling, select STOP using the Up/Down keys and validate using
scrolling.
Masked text:
To reveal a hidden answer (for example in a quiz programme), select ??? using the Up/Down keys and validate
. Press
again to hide the answers.
using
Zoom :
Select ZOOM using the Up/Down keys then press the
key once to magnify the top of the screen, twice to
magnify the bottom of the screen (the page will scroll from top to bottom) and a third time to return to the normal
display.
Display:
You can superpose the Teletext page over the TV picture. To do this, select MIX using the Up/Down keys then
validate by pressing the
key. Press again
to return to the normal display.
Sub-code:
You can use this to access a sub-page directly.
Select “- - - -” using the Up/Down keys. Then enter the four digits of the required sub-page number.
Certain programmes have Alarm pages that you can set to appear at the time you require. For example:
for 15h30 enter 1530 as the sub-page number then press
. You must of course leave the television
on the programme which is to transmit the Alarm page.
Index:
To call up the index page, select 100 using the Up/Down keys then validate using
.
Direct access:
You can use the yellow and blue keys to directly access the pages indicated in the bar at the bottom of the screen.
Fastext functions:
If the Teletext you receive is Fastext, a sub-menu at the bottom of the screen appears which you can use to select
from the 4 headings according to its colour.
To select a heading, press the key of the corresponding colour.
Toptext functions:
If the Teletext you receive is TOPtext, the pages are arranged into headings and sub-headings by subject.
You can select the first page of a heading directly by pressing the blue key, or the first page of a sub-heading by
pressing the yellow key.
Other functions:
With certain Teletext channels, it is possible to have sub-titles overlaid on the screen for certain broadcasts as well
as certain news flash updates.
The corresponding page number is indicated in the Telextext index.
Once you have found the page, the sub-title or the news flash will be overlaid onto the TV picture.
key.
The navigation status bar disappears after a few seconds. To display it again, press the
or
.
To exit Teletext, press
www.rtv-horvat-dj.hr
16
Other Connections
Other Connections
The CINCH Video and Audio sockets (1)* are provided to
connect a VHS or 8mm camcorder.
The S and CINCH Audio sockets (1)* are provided to connect
a S-VHS or Hi-8 camcorder.
GB
To use the appliance you have connected, press the
key several times until the AV3 programme is
selected on the screen. When you switch off the
connected appliance, the television will remain on
the AV3 programme and you must use the numerical
keys on the remote control to select a programme.
* on models equipped with this function
The headphone socket (2)* is provided to connect a
headphone or earphones.
Connecting headphones mute the sound from the
television loudspeakers.
Other Possibilities
Copying a cassette:
Plug the VCR you wish to record to into the SCART socket
AV2.
Plug the appliance you wish to copy from as follows: into
the peripheral jack AV1 for a VCR; into the CINCH AV3 jacks
for a camcorder (see table below).
RECORD
PLAY
Appliance
* on models equipped with this function
SCART Socket
Appliance
SCART Socket
CALL
PROGRAMME
Peripheral
AV1
VCR
ou
Camcorder
AV2
AV1
Cinches or
S-Video
AV3
VCR
ou
Camcorder
AV2
AV3
VCR
Camcorder
Connecting a HiFi or AV amplifier
If you wish to connect a HiFi or AV amplifier, plug it into the
peripheral jack AV2 using a SCART-CINCH type lead.
www.rtv-horvat-dj.hr
17
M
a
n
d’
u
B
e
a
n
l
M
a
n
u
t
i
l
d
t
i
i
s
e
n
l
i
a
a
M
z
t
n
i
G
e
a
v
z
w
r
s
-
g
·
d
i
n
e
a
i
i
z
i
n
s
n
a
i
e
ó
k
s
n
·
d
i
k
s
l
c
j
·
r
l
u
u
i
o
a
a
r
n
B
u
i
b
·
e
u
l
n
i
n
o
e
a
n
a
l
g
u
l
z
i
n
t
a
z
t
u
i
u
e
s
m
a
i
e
U
u
u
-
g
n
n
·
·
-
·
g
B
e
t
j
e
n
i
n
g
s
-
v
e
j
l
e
d
n
i
n
g
·
DF321E / DF421E
F
u
o
t
l
i
h
l
e
i
t
z
o
a
ç
d
ã
www.rtv-horvat-dj.hr
o
e
·
10 cm
5 cm
10 cm
10 cm
www.rtv-horvat-dj.hr
About this manual
This document is common to several television models. Therefore, certain functions or settings may not apply to
the model you have purchased
The position of the ON/OFF switch
differs depending on the model. It may be located on the front or on the
right-hand side of your set (see the drawing inside the cover page of your manual).
About safety
To ensure your own safety and safe operation of the equipment, observe the following instructions
thoroughly.
TV sets require sufficient ventilation to prevent their components from overheating, which will cause failure. Do not
block the ventilation openings at the rear. If you place your TV set in a special piece of furniture, make sure there
is enough space for unhindered air circulation. Do not place the TV set in the close vicinity of a heater.
The TV set has been designed for use in dry rooms. Should you use it, in exceptional
circumstances in the open air (example: on the balcony, in the veranda or tent), you must absolutely protect it
against moisture (dew, rain, splash water). Before switching on a cold TV set in a warm room, you should wait until
any condensation in the screen has dried by itself.
Maximum ambient temperature: 35°C
Maximum humidity: 85%
By the end of your TV evening or when away from home for a longer period, we recommend that you turn off the
TV set with the On/Off-switch.
Even when the On/Off-switch is in the Off-position, your TV set is not fully disconnected from the mains. To
disconnect the set completely, the mains plug must be pulled out.
The mains plug must be easily accessible.
In the following cases, we recommend that you pull out the mains connector:
1. During a thunderstorm. In such a case, it is advisable that you also disconnect the TV set from the aerial socket.
2. When odour or smoke emanates from the set.
Never attempt to open your TV set yourself.
Further information:
The TV set shielding is sufficient to prevent X-radiation to the exterior.
Any operation performed by a non skilled person, change of high voltage or replacement of the picture tube by a
model not complying with the manufacturer specification are likely to cause considerable increase in X-radiation.
A TV set modified in such a way no longer complies with the manufacturers’ specification and must not be used.
About cleaning
The screen is to be cleaned with liquid glass cleaners.
: Never use abrasive products.
: Clean the cabinet with a soft cloth soaked with neutral cleaner. Do not use solvents, such as white spirit or
alcohol-based cleaning products since they may damage your television.
: At regular intervals, clean the ventilation grids at the rear of the TV set.
About degaussing
The terrestrial magnetic field may have an influence on your TV set. This influence is revealed by the coloured
spots, which appear on the screen.
Should this be the case:
: Turn the equipment off by means of the On/Off-switch.
: Wait about one hour before switching the set on again.
This procedure performs automatic degaussing of the screen. Should there still be coloured spots on the screen,
repeat the operation.
www.rtv-horvat-dj.hr
1
GB
About the switch
Contents
GB
Using the remote control
and fitting the batteries.
How to call up a menu
and how to select a
function, a setting or an
option.
About this manual . . . . . . . . . . . . . . . . . . . 1
About the switch . . . . . . . . . . . . . . . . . . . . . 1
About safety . . . . . . . . . . . . . . . . . . . . . . . . 1
About cleaning . . . . . . . . . . . . . . . . . . . . . . 1
About degaussing . . . . . . . . . . . . . . . . . . . 1
Basic connections . . . . . . . . . . . . . . . . . . . . 3
Remote control . . . . . . . . . . . . . . . . . . . . . . . 4
Navigation principles . . . . . . . . . . . . . . . . . 5
Calling up the Installation main menu . . . 5
Calling up the Settings summary . . . . . . . 5
Page
Instructions for Use
Installation
Page 4
Daily viewing . . . . . . . . . . . . . . . . . . . . . . . 12
Picture Adjustment . . . . . . . . . . . . . . . . 12
Sound Settings . . . . . . . . . . . . . . . . . . . . 12
Time . . . . . . . . . . . . . . . . . . . . . . . . . . . . . 13
List of Channels . . . . . . . . . . . . . . . . . . . 14
Selecting Programmes . . . . . . . . . . . . . 15
Scrolling the Programmes . . . . . . . . . . . 15
Audio-visual (AV) Programmes . . . . . . 15
Volume Control . . . . . . . . . . . . . . . . . . . . 15
Muting the Sound . . . . . . . . . . . . . . . . . . 15
Zoom (16/9 models only) . . . . . . . . . . . 15
Calling up a Menu . . . . . . . . . . . . . . . . . . . 5
Displaying Information . . . . . . . . . . . . . . 15
Navigating within the Menus . . . . . . . . . . . 5
Television Lock . . . . . . . . . . . . . . . . . . . . 15
Installing your television for the
first time . . . . . . . . . . . . . . . . . . . . . . . . . . . . . 6
Switching Off the Television . . . . . . . . . 15
Teletext . . . . . . . . . . . . . . . . . . . . . . . . . . . . 16
Automatic installation . . . . . . . . . . . . . . . . . 7
Standard Functions . . . . . . . . . . . . . . . . 16
Programme organisation . . . . . . . . . . . . . . 8
Other Connections . . . . . . . . . . . . . . . . . . 17
Manual programming . . . . . . . . . . . . . . . . . 9
Other Possibilities . . . . . . . . . . . . . . . . . 17
Personal settings . . . . . . . . . . . . . . . . . . . 10
Connecting a HiFi or AV amplifier . . . . 17
Preferences . . . . . . . . . . . . . . . . . . . . . . . . 11
www.rtv-horvat-dj.hr
2
5
Basic connections
Basic connections
The mains plug (1) supplies power to the television. The
television must only be plugged in to a 220-240 V - 50 Hz
power supply. It must never be plugged in to a DC source. If
the plug comes away from the lead, never attempt to plug it
in: this could cause electrocution.
Continental
Europe
If you connect an appliance to the aerial jack, you must give
it a channel number. To do this, switch on the appliance, then
use the television to find the modulator channel (see the
appliance manual). Now give it a programme number and
memorise it (see Manual Programming of channels). Then,
when you wish to use the appliance, simply select its
programme number on the television. This procedure is not
required for VCR’s not equipped with a modulator.
GB
The aerial socket (2), located on the rear of the television, can
be used to connect an external aerial or other appliance
equipped with a modulator such as a VCR, satellite receiver,
etc.
United Kingdom
The plug is fitted with a fuse which protects your
television. If your television does not work, the fuse may
be blown. In this case, replace it with an identical 5 Amp
ASTA or lr BSI (BS 1362) certified fuse.
$
The SCART socket AV1 (3), located on the rear of the
television, is intended to connect a VCR or a camcorder
(VHS, 8 mm), a Canal+ decoder, a video games console or
RGB-signal emitting appliances.
The SCART socket AV2 (3), located on the rear of the
television, is intended to connect a VCR or a camcorder
(VHS, 8 mm, S-VHS or Hi-8).
Note: the mains lead of your television is fitted with a
moulded plug. This lead contains all the safety equipment,
so you are advised when replacing it not to use a
non-specific commercially-available model.
We strongly recommend the use of this type of connection,
which gives a better picture quality. To use the peripheral
appliance that you have connected, press the AV key on your
remote control (press once to select AV1; twice to select
AV2; three times for AV3: see ”Other Connections”). This
selection is automatic for some appliances. Pressing “”play”
on a VCR, or switching on a satellite receiver connected to
AV1 or AV2 will automatically switch on your television.
When you stop the VCR, if you have not changed channels
while watching the VCR, the television automatically
switches back to the channel you were watching beforehand.
If the television has been switched on from the VCR, it
switches to standby when the VCR is switched off. The
television automatically switches to 16/9 format if the
connected appliance delivers the corresponding signal.
2
www.rtv-horvat-dj.hr
3
Remote control
Remote control
Display of channel, time, sound (yellow
This key is active only when using
the Teletext (blue key)
button) (and zoom for models with zoom)
Call up programme list
Standby
GB
(green button)
Call up Teletext / Toptext /
Fastext function (purple button)
Reminder of picture
preferences (red button)
Right/Left Selection within
menus and
Zoom Function (for models with
this function)
Confirm an action or validate a
menu option
Go to adjustment function MENU
To leave a menu or Teletext
Move Up/Down in menus
Volume adjustment
Change programme
Sound mute
8
Go to programmes and enter
numerical values in menus
Selecting appliances
connected to the television
(AV1, AV2 ...)
For programme numbers higher
than 10, press the 0 key on the
remote control: ”- -” appears on
the screen. Now use the
number keys on the remote
control to enter first the tens
digit then the units digit.
The red, green, yellow and
blue keys are also used for
the Teletext.
Please respect the environment! Before throwing any batteries away, consult your
distributor who may be able to take them back for specific recycling.
www.rtv-horvat-dj.hr
4
Navigation principles
Navigation principles
Calling up the Installation main menu
INSTALLATION MAIN MENU
If there is no menu displayed on the screen,
key on the remote
press and hold the
control. The settings SUMMARY is displayed
first, followed by the INSTALLATION MAIN
MENU which you can use to operate your
television.
Exit
Manual programming
Auto installation
GB
Programme organisation
Personal settings
Calling up the Settings summary
SUMMARY
Press and release the
key on the
remote control to display the list of menus
available for using your television functions or
adjusting your television
Exit
Teletext
Picture
Sound
Calling up a Menu
List
Select the menu you wish using the Up/Down
key to validate..
keys. Press the
Time
Preferences
Navigating within the Menus
Use the Up/Down keys 1 to select a line.
Use the Left/Right keys 2 to:
- Increase or decrease a value:
for example:
Fine tuning
- Select an option:
Aerial
for example: Reception
Cable
Reception
- Activate or deactivate an option:
for example: Decoder
- Access a sub-menu:
for example: Picture preferences
You can use the
3
MANUAL PROGRAMMING
Return
Standard
Reception
Autosearch
Fine tuning
Store on PR number
Name
Decoder
External sound path
EURO BG
Cable
CH- -----
Enter channel number or start
autosearch with < or >.
key to:
- Activate or deactivate an option:
for example: Decoder
- Access a sub-menu:
for example: Picture preferences
- Validate an action:
for example: Store on PR number
Use the
4 key to exit a menu.
www.rtv-horvat-dj.hr
5
Installing your television for the first time
Installing your television for the first time
First plug the television into a mains power outlet and to the external aerial or a cable network, then switch on using
located on the front or the side of your set.
the ON/OFF switch
When you switch on your television for the first time, the language selection menu* is displayed (Fig. 1). If this does
key on the television until this menu appears.
not happen, set the television to standby then press and hold the
GB
Installation Instructions (start)
1. Use the Up/Down keys to select the
language in which you wish the menus to be
displayed.
.
2. Then validate using
3. A list of countries* is now displayed (Fig. 2).
Select the country in which you live, or the
country from which you wish to receive the
broadcasts if you live in a border area.
.
4. Then validate using
5. A welcome message is displayed.
6. Run the automatic installation sequence
.
using
7. A message appears to inform you that
automatic installation has started (Fig. 3).
Wait for a few minutes.
A new message will inform you when
automatic installation is completed.
8. If you wish to check or modify the channel
and see the
organisation, press
Programme organisation chapter.
If you do not wish to modify the channel
organisation, you can exit the menu by
then watch the channel of
pressing
your choice. Choose the desired channel
using the number keys (1, 2, 3, ...) and the
/
keys.
If you have a decoder, see the Manual
programming chapter.
Your television will only search for channels
corresponding to the country you have
selected.
See
the
Manual channel
programming chapter to install any channels
not found.
For cable networks, read the Automatic
channel installation chapter to install any
channels not found.
(Fig. 1)
English
Français
Deutsch
Italiano
Español
Português
Nederlands
Svenska
Dansk
Norwisch
(Fig. 2)
OK
COUNTRY SELECTION
Exit
United Kingdom
Eire
France
Germany
Italy
Spain
Portugal
Holland
Belgium and Luxembourg
Switzerland
Austria
Sweden
Denmark
Norway
Other
Select your country and press OK
(Fig. 3)
SEARCHING
*The list of languages and countries may vary
from one model to another.
Installation Instructions (end)
AUTO INSTALLATION
003 STATIONS FOUND
Searching for TV stations.
Please wait. To cancel press EXIT.
www.rtv-horvat-dj.hr
6
Automatic installation
Automatic installation
The Automatic installation function is useful if you have to go through the installation procedure again, such as
when moving house. This function deletes all previously memorised programmes. To install a new channel, you
should use the Manual programming function.
Your television will only search for channels corresponding to the selected country, so see the Manual
programming chapter to install any channels not found. For cable networks, if you have not found certain
channels, select Other instead of a country name in the PERSONAL SETTINGS menu, then run automatic
installation again.
INSTALLATION MAIN MENU
1. Press and hold the
key on the remote
control to display the INSTALLATION MAIN
MENU (The SUMMARY appears first,
followed by the INSTALLATION MAIN
MENU).
2. Select the Auto installation line.
3. Validate using
Exit
Manual programming
Auto installation
Programme organisation
Personal settings
.
A message will inform you that Automatic
installation has begun.
Wait for a few minutes.
A new message will inform you when
Automatic installation is completed.
SEARCHING
If you wish to check or reorganize your channel
key and see the
display, press the
Programme organisation chapter.
AUTO INSTALLATION
If you do not wish to reorganize your
programmes, you can exit this menu by
, then watch the programme of
pressing
your choice. Choose the desired programme
using the number keys (1, 2, 3, ...) and the
/
keys.
003 STATIONS FOUND
Searching for TV stations.
Please wait. To cancel press EXIT.
www.rtv-horvat-dj.hr
7
GB
Before running AUTO INSTALLATION, check the PERSONAL SETTINGS menu to ensure that the country
displayed is correct.
Programme organisation
Programme organisation
During automatic installation, your television will search for the channel name and assign it a programme number
according to the selected country. You can use the PROGRAMME ORGANISATION menu to name any channel
name not found, to change the order in which the channels are displayed, or to delete channels for which reception
is too poor. Follow the messages at the bottom of the screen. For further details, read the information below.
GB
If you wish to access the
PROGRAMME
ORGANISATION,
menu thereafter, first press and hold
key on the remote control to
the
display the INSTALLATION MAIN
MENU (the SUMMARY is displayed
first, followed by the INSTALLATION
MAIN MENU) then select Programme
.
organisation and validate using
- To delete a programme for which reception
is too poor:
1. Select the line marked Select program.
/
or Left/Right keys to list
2. Use the
your channels.
3. When you get to a channel you wish to delete,
select the line marked Delete program.
to delete the programme.
4. Press
.
5. .Validate using
- To organize your channels to suit you:
1. Select the line marked Select program..
2. Use the
/
or Left/Right keys and
the programmes logos to find the programme
to which you wish to give the No.1.
Its present number appears on the line
marked Select program..
3. Select the line marked Swap with PR.
4. Enter 01.
. The two programmes swap
5. Press
position and the desired programme
becomes N°1.
6. Repeat the above procedure for the other
channels.
INSTALLATION MAIN MENU
Exit
Manual programming
Auto installation
Programme organisation
Personal settings
PROGRAMME ORGANISATION
Return
Select program.
Swap with PR.
Change pr. name
Delete program.
13
-EURO
13
MTV
FR2
TF1
EURO
CH40
CC01
ARTE
CART
---ARD
Select programme number using
PR-/PR+ or </> or 0 to 9 keys.
Select the line marked Return to return to the previous
menu.
- To name your channels:
1. Select the line marked Change pr. name
2. Select the character you wish to modify using
the Left/Right keys.
3. Use the and keys to display the letter you
require.
The name you have entered will be
memorised when you move to another line or
exit the menu.
If you wish to change the order in which
your programmes are displayed or if
you wish to name other programmes,
repeat the procedures described
above.
When you have finished organizing the
.
programmes, exit the menu using
www.rtv-horvat-dj.hr
8
10
11
12
13
14
15
16
17
18
19
Manual programming
Manual programming
The manual installation function is useful if some programmes have not been installed even after AUTOMATIC
INSTALLATION.
, the SUMMARY is
1. Press and hold
displayed
first,
followed
by
the
INSTALLATION MAIN MENU.
2. Select the line marked
Manual
programming.
.
3. Display the menu using
4. Now continue by following the messages at
the bottom of the screen. For further details,
read the information below.
Standard :
Select the standard using Left/Right keys that
corresponds to your country from the list of
standards.
The number of standards proposed will differ
from one model to another.
France
for France and Luxemburg
DKK’
eg. for Eastern Europe and
the Middle-East
I
for the United Kingdom and
Ireland
Euro BG
for Western Europe
INSTALLATION MAIN MENU
Exit
Manual programming
GB
Auto installation
Programme organisation
Personal settings
MANUAL PROGRAMMING
Return
Standard
Reception
Autosearch
Fine tuning
Store on PR number
Name
Decoder
External sound path
EURO BG
Cable
CH- -----
Reception :
Your television can pick up channels either via
Enter channel number or start
an aerial (RF channels) or via a cable network.
autosearch with < or >.
Certain cable networks use the same
frequencies as the RF channels. If this is the
case, you must select Aerial instead of Cable.
Select the line marked Return to return to the previous
Autosearch :
Enter the programme number if you know it. If
not, search using the Left/Right keys. Your
television will stop at the first channel it tunes
into. If you wish to memorize it, go to the line
marked Store on PR number. If not, resume
the search using the Left/Right keys.
Fine tuning :
You can use this to improve the picture if the transmitter frequency is out of adjustment. Use the Left/Right keys
to obtain the best possible picture and sound.
Store on PR number :
.
Enter the programme number you wish to give the channel (e.g.: 01 for BBC1). Memorise using
Name :
If the station has been identified by the transmitter, its name will be inscribed automatically. You can change the
proposed name or enter it if it has not already been identified. Select the character you wish to modify using the
Left/Right keys. Use the or keys to display the character you desire.
Decoder :
Use the Left/Right keys to tick the box if the channel is coded and if a decoder is connected to the AV1 jack.
External sound path :
Switch on your decoder. If the sound is coded or if you have no sound, activate or deactivate the box as required
using the Left/Right keys.
Once you have made all the adjustments you wish to a programme, go to Store on PR number and press
to memorise these. Then move on to the next channel.
Once you have completed your Manual Programming, exit the menu using
.
www.rtv-horvat-dj.hr
9
Personal settings
Personal settings
GB
1. Press and hold the
key: the
SUMMARY is displayed first, followed by the
INSTALLATION MAIN MENU.
2. Select the line marked Personal settings.
INSTALLATION MAIN MENU
Exit
Manual programming
3. Display the menu using
.
4. Continue by following the messages at the
bottom of the screen.
Auto installation
For further details, read the information below.
Personal settings
Menu language :
Select the language in which the menus are to
be displayed.
PERSONAL SETTINGS
Country :
Indicate the country in which you are if you wish
to rerun Automatic Programming.
For cable networks, if certain channels
have not been found, select Other
instead of the country name before running automatic installation again.
You may find that the characters of certain teletext languages are inaccessible for the selected country.
Auto volume level :
This is a sound control function which aims to
equalise the volume level between different
channels, and between different programmes
on the same channel.
Activate or deactivate the auto volume level as
required.
Programme organisation
Return
Menu language
English
Country
UK
Auto volume level
AV1 name
AV2 name
AV3 name
VCR
---CAMC
Prog. to be used
for reference time
06
Select a station from which you want
to get the reference time.
Select the line marked Return to return to the previous
menu.
On models equipped with Virtual Dolby
Surround, this function remains
inactive if Dolby Virtual has been
selected in the SOUND menu (see
Volume Control).
AV1, AV2, AV3 name :
Use these to give a name to each of your
audio-visual programmes. Select the character
you wish to modify using the Left/Right keys.
or
keys to display the desired
Use the
character.
Prog. to be used for reference time :
key or to use
To display the time using the
the alarm function, the television clock must be
set to the correct time. Select the line marked
Prog. to be used for reference time and select
a channel which broadcasts teletext. The time
is set automatically and is displayed after the
channel number.
Exit the menu using
.
www.rtv-horvat-dj.hr
10
13:15
Preferences
Preferences
1. Display the SUMMARY by pressing and
releasing the
key on the remote
control .
2. Select the line marked Preferences.
.
3. Display the menu using
Show program. number :
If you wish to permanently display the number
of the programme you are watching, tick the box
using the Left/Right keys. Press the Left/Right
keys again to deactivate this function.
PREFERENCES
Return
Show program. number
AV2 video input
AV3 video input
Format control
Picture preferences
GB
Make your choice from the proposed
options. Use the information below to help
you.
Video
S-Video
Auto
AV2 video input :
Use the Left/Right keys to select the type of video signal received at the AV2 SCART socket (Video or S-Video).
AV3 video input :
Use the Left/Right keys to select the type of video signal received at the AV3 sockets (these sockets are located
on the front or the side of the television).
Format control :
Use the Left/Right keys to select the desired picture format:
Auto : if the transmitter (for 16/9 format TV’s) or the appliance connected to one of the peripheral jacks delivers
the switching signal, the television automatically adapts to the transmitted picture format.
16/9 : manually selects widescreen picture format.
4/3 : manually selects this picture format.
If you have selected 16/9 or 4/3, the television will switch back to Auto when you change channels or you
switch off.
Picture preferences :
To access the PICTURE PREFERENCES
.
menu, press
If you wish, you can personalize certain
picture settings. Select and set the
proposed options. Use the information
below to help you.
Settings :
Select Standard or Personal.
Standard corresponds to the factory settings.
Personal corresponds to the settings that you
have entered yourself.
The lines Brightness, Colour and
Contrast are displayed only if you have
selected Personal on the Settings line.
Select each line one after the other and enter
your required settings. You can recall these
picture settings by pressing the red key on the
remote control.
.
Exit the menu using
PICTURE PREFERENCES
Return
Settings
Brightness
Colour
Contrast
Personal
Select the line marked Return to return to the previous
menu.
www.rtv-horvat-dj.hr
11
Daily viewing
Daily viewing
Picture Adjustment
GB
Display the SUMMARY using the
key on
the remote control. Select Picture. Validate
. The PICTURE menu is displayed.
using
Select and set the proposed options. Use
the information below to help you.
Brightness, Colour, Contrast, Sharpness:
Select each of these lines one after the other and
set as required.
Contrast expand :
Select this line then choose the desired Contrast
expand setting (High or Low).
Tone :
Select this line then choose the desired colour
tone (Warm, Neutral or Cold).
Exit the menu using
.
PICTURE
Return
Brightness
Colour
Contrast
Sharpness
Neutral
Cold
Contrast expand
Tone
Select the line marked Return to return to the previous
menu.
Sound Settings
Display the SUMMARY using the
key on
the remote control. Select the line marked
. The SOUND menu
Sound. Validate using
is displayed.
Select and set the proposed options. Use
the information below to help you.
Sound type :
The choices available to you depend on
your television model and the broadcast.
Stereo, Dual or NICAM reception and the
corresponding choices are only available
on Stereo or NICAM Stereo televisions.
Select this line, then select the type of sound you
desire.
Sound mode :
Select this line, then choose the desired mode
using the Left/Right keys.
The choices available to you depend on
your television model and the type of
sound. Magic and Dolby Virtual modes
are only available in stereo on TV’s
equipped with Virtual Dolby Surround.
Stereo wide is only available on Stereo or
Nicam televisions not equipped with
Virtual Dolby Surround.
Balance L/R :
Select this line, then balance the sound between
the Left and Right loudspeakers.
Treble, Bass :
Select each of these lines and adjust to suit you.
Surround effect :
This line appears only if you have selected
Dolby Virtual on the Sound mode line.
Select this line and adjust the surround effect to
suit you.
Exit the menu using
.
SOUND
Return
Automatic
Normal
Sound type
Sound mode
Balance L/R
Treble
Bass
Surround effect
Broadcast
mono
stereo
dual
NICAM-3
AV
Mode
Choice
automatic - mono
mono - stereo
sound 1 - sound 2
sound 1 - sound 2 - sound 3
stereo - sound 1 - sound 2
Effect
Normal :
reproduces the original sound (
mono or stereo).
Wide :
gives a stereo effect on mono sounds.
Stereo wide : accentuates the stereo effect.
Magic :
accentuates the stereo effects and
adds echo.
Dolby Virtual : Virtual Dolby Surround.
Virtual Surround Dolby is based on Dolby Pro Logic
decoding for the reproduction of the Left, Right, Centre and
Virtual Surround sound channels using two loudspeakers.
“”Dolby”, “”Pro Logic” and the double -D symbol are trademarks of the
Dolby Laboratories Licensing Corporation.
Manufactured under licence from Dolby Laboratories Licensing
Corporation.
www.rtv-horvat-dj.hr
12
Daily viewing
Time
Display the SUMMARY using the
key on
the remote control. Select the line marked
. The TIME menu is
Time. Validate using
displayed.
Sleep timer :
Use the Left/Right keys to choose how long you
wish to view before the television switches off.
The television will switch off automatically at the
end of this period. To cancel, set to 00:00.
One minute before switching off, a message will
inform you that the television is about to go off.
If you wish to keep it on, press any key on the
remote control or the local keyboard.
The television switches to Child lock mode after
an automatic stop. It can only be switched on
again from the remote control.
TIME
Return
Sleep timer
00 : 00
Current time
11 : 28
Wake-up timer
Wake-up time
Programme number
Daily
07 : 07
01 BBC1
GB
You can use this menu to switch your
television on or off automatically at a set
time.
Select the line marked Return to return to the previous
menu.
Current time :
The current time is given by the Teletext (see PERSONAL SETTINGS menu). You can also set the time manually
using the number keys (0 to 9) on your remote control.
Wake-up timer :
If you wish to be woken up by your television on the channel of your choice, you must first set the television
clock to the correct time (see above).
Use the Left/Right keys to tick the box and display the Wake-up timer menu.
The lines Wake-up time, Programme number and Daily only appear if you have ticked the box on the
line marked Wake-up timer.
Wake-up time :
Use the number keys (0 to 9) on the remote control to set the time at which you wish to be woken.
Programme number :
Select the programme you wish to be woken by.
Daily :
Tick this box if you wish to be awakened at this time every day.
.
Exit the menu using
Set the television to standby using the
key on the remote control. The red indicator light on the television
flashes.
The television will come on automatically at the programmed time and will go off one hour later if you do not use
the remote control.
www.rtv-horvat-dj.hr
13
Daily viewing
List of Channels
GB
This list contains up to 10 pages. The number of pages depends on
the number of programmes memorized. For each programme, the list
indicates the station name or type and the programme number. The
3 AV programmes are listed on page 11.
To display the list, press the
key on the remote control
or
key on the remote control. Select the
Display the SUMMARY using the
.
line marked List. Validate using
The page displayed is the page containing the programme you are watching.
It is identified in the list by the symbol TV.
To display the next page, press the Right key.
To display the previous page, press the Left key.
If you wish to watch one of the programmes on the page displayed:
Enter the last digit of the programme number (e.g. for 25 simply enter 5) on the
remote control. The list disappears and your programme is selected.
Or,
- Select the programme using the Up/Down keys.
.
- Validate using
.
- Exit the menu using
www.rtv-horvat-dj.hr
14
LIST
Exit
01
02
03
04
05
06
07
08
09
BBC 1
BBC 2
FR 3
CC19
ARTE
M6
CNN
PREM
EURO
TV
Page -/+
Programme: 0 - 9
Daily viewing
Selecting Programmes
GB
For channels 1 to 9, press the number key corresponding to the desired channel on the remote control. For
programme numbers higher than 10, press the key on the remote control: ”- -” appears on the screen. Now use
the number keys on the remote control to enter first the tens digit then the units digit.
If you press
while ”- -” is already displayed, the display returns to 0- , in which case you can only select
programmes 1 to 9.
Scrolling the Programmes
You can scroll through the programmes using the
/
keys.
Audio-visual (AV) Programmes
Press the
key to call the last audio-visual (AV) programme watched. Press repeatedly to scroll the audio-visual
(AV) programmes on the screen.
Volume Control
Use the volume +/- keys to increase or decrease the volume.
Muting the Sound
Press the
key to mute the sound. Press again to restore the sound.
Zoom
(16/9 models only)
This function is useful for 4/3 or letterbox pictures (black bands at the top and bottom of the screen).
Use the Left/Right keys to select the desired zoom position:
ZOOM 0: 4/3 picture (black bands at the sides).
FULL SCREEN: for a 4/3 picture that fills the screen.
ZOOM 1: for letterbox pictures.
Displaying Information
Press the
of sound.
key to display the following information on the screen: channel number and name, time, zoom, type
Television Lock
You can use this function to prevent anyone from switching on the television using the buttons on the
television set.
The buttons on the television set are locked in the following cases:
- If you switch off the set by pressing and holding the
key on the remote control for more than 3 seconds,
- After a programmed stop,
- If the television is set to standby when the alarm has been set.
When the television is locked the red power will be light flashing.
The television can now only be operated from the remote control.
To release the lock, press any number key on the remote control.
Switching Off the Television
To switch off the television, press the Standby key on the remote control or press the ON/OFF switch on the
television set.
www.rtv-horvat-dj.hr
15
Teletext
Teletext
GB
Certain channels broadcast an electronic news page service with a range of different information services.
The presentation and use of the Teletext differ from one country to another and from one programme to
another (Teletext, Fastext or Toptext).
Press the
key to display the Teletext Index (page 100).
A message will inform you if the programme you are watching has no Teletext service.
To call up a page:
Enter the 3 digits of the page number you wish to consult (for example, 150 or 170).
After a moment, the page appears.
Use the Left/Right keys to consult the next or the previous page.
Standard Functions
Rolling pages:
Some information is displayed over several sub-pages. It is scrolled on your screen as it is received.
. Press
again to continue
To stop scrolling, select STOP using the Up/Down keys and validate using
scrolling.
Masked text:
To reveal a hidden answer (for example in a quiz programme), select ??? using the Up/Down keys and validate
. Press
again to hide the answers.
using
Zoom :
Select ZOOM using the Up/Down keys then press the
key once to magnify the top of the screen, twice to
magnify the bottom of the screen (the page will scroll from top to bottom) and a third time to return to the normal
display.
Display:
You can superpose the Teletext page over the TV picture. To do this, select MIX using the Up/Down keys then
validate by pressing the
key. Press again
to return to the normal display.
Sub-code:
You can use this to access a sub-page directly.
Select “- - - -” using the Up/Down keys. Then enter the four digits of the required sub-page number.
Certain programmes have Alarm pages that you can set to appear at the time you require. For example:
for 15h30 enter 1530 as the sub-page number then press
. You must of course leave the television
on the programme which is to transmit the Alarm page.
Index:
To call up the index page, select 100 using the Up/Down keys then validate using
.
Direct access:
You can use the yellow and blue keys to directly access the pages indicated in the bar at the bottom of the screen.
Fastext functions:
If the Teletext you receive is Fastext, a sub-menu at the bottom of the screen appears which you can use to select
from the 4 headings according to its colour.
To select a heading, press the key of the corresponding colour.
Toptext functions:
If the Teletext you receive is TOPtext, the pages are arranged into headings and sub-headings by subject.
You can select the first page of a heading directly by pressing the blue key, or the first page of a sub-heading by
pressing the yellow key.
Other functions:
With certain Teletext channels, it is possible to have sub-titles overlaid on the screen for certain broadcasts as well
as certain news flash updates.
The corresponding page number is indicated in the Telextext index.
Once you have found the page, the sub-title or the news flash will be overlaid onto the TV picture.
key.
The navigation status bar disappears after a few seconds. To display it again, press the
or
.
To exit Teletext, press
www.rtv-horvat-dj.hr
16
Other Connections
Other Connections
The CINCH Video and Audio sockets (1)* are provided to
connect a VHS or 8mm camcorder.
The S and CINCH Audio sockets (1)* are provided to connect
a S-VHS or Hi-8 camcorder.
GB
To use the appliance you have connected, press the
key several times until the AV3 programme is
selected on the screen. When you switch off the
connected appliance, the television will remain on
the AV3 programme and you must use the numerical
keys on the remote control to select a programme.
* on models equipped with this function
The headphone socket (2)* is provided to connect a
headphone or earphones.
Connecting headphones mute the sound from the
television loudspeakers.
Other Possibilities
Copying a cassette:
Plug the VCR you wish to record to into the SCART socket
AV2.
Plug the appliance you wish to copy from as follows: into
the peripheral jack AV1 for a VCR; into the CINCH AV3 jacks
for a camcorder (see table below).
RECORD
PLAY
Appliance
* on models equipped with this function
SCART Socket
Appliance
SCART Socket
CALL
PROGRAMME
Peripheral
AV1
VCR
ou
Camcorder
AV2
AV1
Cinches or
S-Video
AV3
VCR
ou
Camcorder
AV2
AV3
VCR
Camcorder
Connecting a HiFi or AV amplifier
If you wish to connect a HiFi or AV amplifier, plug it into the
peripheral jack AV2 using a SCART-CINCH type lead.
www.rtv-horvat-dj.hr
17
M
a
d’
u
t
B
e
d
n
i
n
l
M
a
n
u
t
l
i
u
l
i
a
n
u
i
t
e
a
l
z
a
z
e
t
n
a
t
G
i
e
z
a
B
r
v
j
v
e
j
l
F
o
l
h
u
t
i
d
i
n
e
k
i
a
i
e
n
t
o
z
a
e
ó
n
s
-
n
g
n
-
n
n
d
e
l
i
i
n
i
r
z
n
e
l
g
o
c
s
s
t
j
k
e
i
i
i
u
B
n
d
a
u
w
i
-
l
z
r
n
s
a
a
i
b
g
u
u
l
n
e
n
n
o
e
a
M
l
i
u
s
m
a
s
e
U
u
i
i
a
u
g
g
s
i
ç
-
n
g
d
e
ã
o
2
8
W
S
2
3
E
3
2
W
S
2
3
E
www.rtv-horvat-dj.hr
10 cm
5 cm
10 cm
10 cm
www.rtv-horvat-dj.hr
About this manual
This document is common to several television models. Therefore, certain functions or settings may not apply to
the model you have purchased
The position of the ON/OFF switch
differs depending on the model. It may be located on the front or on the
right-hand side of your set (see the drawing inside the cover page of your manual).
About safety
To ensure your own safety and safe operation of the equipment, observe the following instructions
thoroughly.
TV sets require sufficient ventilation to prevent their components from overheating, which will cause failure. Do not
block the ventilation openings at the rear. If you place your TV set in a special piece of furniture, make sure there
is enough space for unhindered air circulation. Do not place the TV set in the close vicinity of a heater.
The TV set has been designed for use in dry rooms. Should you use it, in exceptional
circumstances in the open air (example: on the balcony, in the veranda or tent), you must absolutely protect it
against moisture (dew, rain, splash water). Before switching on a cold TV set in a warm room, you should wait until
any condensation in the screen has dried by itself.
Maximum ambient temperature: 35°C
Maximum humidity: 85%
By the end of your TV evening or when away from home for a longer period, we recommend that you turn off the
TV set with the On/Off-switch.
Even when the On/Off-switch is in the Off-position, your TV set is not fully disconnected from the mains. To
disconnect the set completely, the mains plug must be pulled out.
The mains plug must be easily accessible.
In the following cases, we recommend that you pull out the mains connector:
1. During a thunderstorm. In such a case, it is advisable that you also disconnect the TV set from the aerial socket.
2. When odour or smoke emanates from the set.
Never attempt to open your TV set yourself.
Further information:
The TV set shielding is sufficient to prevent X-radiation to the exterior.
Any operation performed by a non skilled person, change of high voltage or replacement of the picture tube by a
model not complying with the manufacturer specification are likely to cause considerable increase in X-radiation.
A TV set modified in such a way no longer complies with the manufacturers’ specification and must not be used.
About cleaning
The screen is to be cleaned with liquid glass cleaners.
: Never use abrasive products.
: Clean the cabinet with a soft cloth soaked with neutral cleaner. Do not use solvents, such as white spirit or
alcohol-based cleaning products since they may damage your television.
: At regular intervals, clean the ventilation grids at the rear of the TV set.
About degaussing
The terrestrial magnetic field may have an influence on your TV set. This influence is revealed by the coloured
spots, which appear on the screen.
Should this be the case:
: Turn the equipment off by means of the On/Off-switch.
: Wait about one hour before switching the set on again.
This procedure performs automatic degaussing of the screen. Should there still be coloured spots on the screen,
repeat the operation.
www.rtv-horvat-dj.hr
1
GB
About the switch
Contents
GB
Using the remote control
and fitting the batteries.
How to call up a menu
and how to select a
function, a setting or an
option.
About this manual . . . . . . . . . . . . . . . . . . . 1
About the switch . . . . . . . . . . . . . . . . . . . . . 1
About safety . . . . . . . . . . . . . . . . . . . . . . . . 1
About cleaning . . . . . . . . . . . . . . . . . . . . . . 1
About degaussing . . . . . . . . . . . . . . . . . . . 1
Basic connections . . . . . . . . . . . . . . . . . . . . 3
Remote control . . . . . . . . . . . . . . . . . . . . . . . 4
Navigation principles . . . . . . . . . . . . . . . . . 5
Calling up the INSTALLATION
MAIN MENU . . . . . . . . . . . . . . . . . . . . . . . . 5
Calling up the SUMMARY . . . . . . . . . . . . . 5
Calling up a Menu . . . . . . . . . . . . . . . . . . . 5
Navigating within the Menus . . . . . . . . . . . 5
Page
Instructions for Use
Installation
Page 4
5
Daily viewing . . . . . . . . . . . . . . . . . . . . . . . 12
Picture Adjustment . . . . . . . . . . . . . . . . 12
Sound Settings . . . . . . . . . . . . . . . . . . . . 12
Time . . . . . . . . . . . . . . . . . . . . . . . . . . . . . 13
List of Channels . . . . . . . . . . . . . . . . . . . 14
Selecting Programmes . . . . . . . . . . . . . 15
Scrolling the Programmes . . . . . . . . . . . 15
Audio-visual (AV) Programmes . . . . . . 15
Volume Control . . . . . . . . . . . . . . . . . . . . 15
Muting the Sound . . . . . . . . . . . . . . . . . . 15
Zoom (16/9 models only) . . . . . . . . . . . 15
Displaying Information . . . . . . . . . . . . . . 15
Television Lock . . . . . . . . . . . . . . . . . . . . 15
Switching Off the Television . . . . . . . . . 15
Installing your television for
the first time . . . . . . . . . . . . . . . . . . . . . . . . . 6
Teletext . . . . . . . . . . . . . . . . . . . . . . . . . . . . 16
Automatic installation . . . . . . . . . . . . . . . . . 7
Standard Functions . . . . . . . . . . . . . . . . 16
Programme organisation . . . . . . . . . . . . . . 8
Other Connections . . . . . . . . . . . . . . . . . . 17
Manual programming . . . . . . . . . . . . . . . . . 9
Other Possibilities . . . . . . . . . . . . . . . . . 17
Connecting a HiFi or AV amplifier . . . . 17
Personal settings . . . . . . . . . . . . . . . . . . . 10
www.rtv-horvat-dj.hr
2
C17 / BASIC / 4000 / GB-TBA / I 6.3 / B
Preferences . . . . . . . . . . . . . . . . . . . . . . . . 11
Basic connections
Basic connections
The mains plug (1) supplies power to the television. The
television must only be plugged in to a 220-240 V - 50 Hz
power supply. It must never be plugged in to a DC source. If
the plug comes away from the lead, never attempt to plug it
in: this could cause electrocution.
Continental
Europe
If you connect an appliance to the aerial jack, you must give
it a channel number. To do this, switch on the appliance, then
use the television to find the modulator channel (see the
appliance manual). Now give it a programme number and
memorise it (see Manual Programming of channels). Then,
when you wish to use the appliance, simply select its
programme number on the television. This procedure is not
required for VCR’s not equipped with a modulator.
GB
The aerial socket (2), located on the rear of the television, can
be used to connect an external aerial or other appliance
equipped with a modulator such as a VCR, satellite receiver,
etc.
United Kingdom
The plug is fitted with a fuse which protects your
television. If your television does not work, the fuse may
be blown. In this case, replace it with an identical 5 Amp
ASTA or lr BSI (BS 1362) certified fuse.
$
The SCART socket AV1 (3), located on the rear of the
television, is intended to connect a VCR or a camcorder
(VHS, 8 mm), a Canal+ decoder, a video games console or
RGB-signal emitting appliances.
The SCART socket AV2 (3), located on the rear of the
television, is intended to connect a VCR or a camcorder
(VHS, 8 mm, S-VHS or Hi-8).
Note: the mains lead of your television is fitted with a
moulded plug. This lead contains all the safety equipment,
so you are advised when replacing it not to use a
non-specific commercially-available model.
We strongly recommend the use of this type of connection,
which gives a better picture quality. To use the peripheral
appliance that you have connected, press the AV key on your
remote control (press once to select AV1; twice to select
AV2; three times for AV3: see ”Other Connections”). This
selection is automatic for some appliances. Pressing “”play”
on a VCR, or switching on a satellite receiver connected to
AV1 or AV2 will automatically switch on your television.
When you stop the VCR, if you have not changed channels
while watching the VCR, the television automatically
switches back to the channel you were watching beforehand.
If the television has been switched on from the VCR, it
switches to standby when the VCR is switched off. The
television automatically switches to 16/9 format if the
connected appliance delivers the corresponding signal.
2
www.rtv-horvat-dj.hr
3
Remote control
Remote control
Display of channel, time, sound
This key is active only when
using the Teletext (blue key)
(yellow button) (and zoom for models
with zoom)
GB
Standby
Call up Teletext / Toptext /
Fastext function (purple button)
Call up programme list
(green button)
Right/Left Selection within
Reminder of picture
preferences (red button)
menus and
Zoom Function (for models with
this function)
Illumination of remote control
Confirm an action or validate
buttons
a menu option
To leave a menu or Teletext
Go to adjustment function MENU
Volume adjustment
Move Up/Down in menus
Sound mute
Change programme
Go to programmes and enter
numerical values in menus
Selecting appliances
connected to the television
For programme numbers higher
than 10, press the 0 key on the
remote control: ”- -” appears on
the screen. Now use the
number keys on the remote
control to enter first the tens
digit then the units digit.
(AV1, AV2 ...)
The red, green, yellow and
blue keys are also used for
the Teletext.
Please respect the environment! Before throwing any batteries away, consult your
distributor who may be able to take them back for specific recycling.
www.rtv-horvat-dj.hr
Navigation principles
Navigation principles
Calling up the Installation main menu
INSTALLATION MAIN MENU
If there is no menu displayed on the screen,
key on the remote
press and hold the
control. The settings SUMMARY is displayed
first, followed by the INSTALLATION MAIN
MENU which you can use to operate your
television.
Exit
Manual programming
Auto installation
GB
Programme organisation
Personal settings
Calling up the Settings summary
SUMMARY
Press and release the
key on the
remote control to display the list of menus
available for using your television functions or
adjusting your television
Exit
Teletext
Picture
Sound
Calling up a Menu
List
Select the menu you wish using the Up/Down
key to validate..
keys. Press the
Time
Preferences
Navigating within the Menus
Use the Up/Down keys 1 to select a line.
Use the Left/Right keys 2 to:
- Increase or decrease a value:
for example:
Fine tuning
- Select an option:
Aerial
for example: Reception
Cable
Reception
- Activate or deactivate an option:
for example: Decoder
- Access a sub-menu:
for example: Picture preferences
You can use the
3
MANUAL PROGRAMMING
Return
Standard
Reception
Autosearch
Fine tuning
Store on PR number
Name
Decoder
External sound path
EURO BG
Cable
CH- -----
Enter channel number or start
autosearch with < or >.
key to:
- Activate or deactivate an option:
for example: Decoder
- Access a sub-menu:
for example: Picture preferences
- Validate an action:
for example: Store on PR number
Use the
4 key to exit a menu.
www.rtv-horvat-dj.hr
5
Installing your television for the first time
Installing your television for the first time
First plug the television into a mains power outlet and to the external aerial or a cable network, then switch on using
located on the front or the side of your set.
the ON/OFF switch
When you switch on your television for the first time, the language selection menu* is displayed (Fig. 1). If this does
key on the television until this menu appears.
not happen, set the television to standby then press and hold the
GB
Installation Instructions (start)
1. Use the Up/Down keys to select the
language in which you wish the menus to be
displayed.
.
2. Then validate using
3. A list of countries* is now displayed (Fig. 2).
Select the country in which you live, or the
country from which you wish to receive the
broadcasts if you live in a border area.
.
4. Then validate using
5. A welcome message is displayed.
6. Run the automatic installation sequence
.
using
7. A message appears to inform you that
automatic installation has started (Fig. 3).
Wait for a few minutes.
A new message will inform you when
automatic installation is completed.
8. If you wish to check or modify the channel
and see the
organisation, press
Programme organisation chapter.
If you do not wish to modify the channel
organisation, you can exit the menu by
then watch the channel of
pressing
your choice. Choose the desired channel
using the number keys (1, 2, 3, ...) and the
/
keys.
If you have a decoder, see the Manual
programming chapter.
Your television will only search for channels
corresponding to the country you have
selected.
See
the
Manual channel
programming chapter to install any channels
not found.
For cable networks, read the Automatic
channel installation chapter to install any
channels not found.
(Fig. 1)
English
Français
Deutsch
Italiano
Español
Português
Nederlands
Svenska
Dansk
Norwisch
(Fig. 2)
OK
COUNTRY SELECTION
Exit
United Kingdom
Eire
France
Germany
Italy
Spain
Portugal
Holland
Belgium and Luxembourg
Switzerland
Austria
Sweden
Denmark
Norway
Other
Select your country and press OK
(Fig. 3)
SEARCHING
*The list of languages and countries may vary
from one model to another.
Installation Instructions (end)
AUTO INSTALLATION
003 STATIONS FOUND
Searching for TV stations.
Please wait. To cancel press EXIT.
www.rtv-horvat-dj.hr
6
Automatic installation
Automatic installation
The Automatic installation function is useful if you have to go through the installation procedure again, such as
when moving house. This function deletes all previously memorised programmes. To install a new channel, you
should use the Manual programming function.
Your television will only search for channels corresponding to the selected country, so see the Manual
programming chapter to install any channels not found. For cable networks, if you have not found certain
channels, select Other instead of a country name in the PERSONAL SETTINGS menu, then run automatic
installation again.
INSTALLATION MAIN MENU
1. Press and hold the
key on the remote
control to display the INSTALLATION MAIN
MENU (The SUMMARY appears first,
followed by the INSTALLATION MAIN
MENU).
2. Select the Auto installation line.
3. Validate using
Exit
Manual programming
Auto installation
Programme organisation
Personal settings
.
A message will inform you that Automatic
installation has begun.
Wait for a few minutes.
A new message will inform you when
Automatic installation is completed.
SEARCHING
If you wish to check or reorganize your channel
key and see the
display, press the
Programme organisation chapter.
AUTO INSTALLATION
If you do not wish to reorganize your
programmes, you can exit this menu by
, then watch the programme of
pressing
your choice. Choose the desired programme
using the number keys (1, 2, 3, ...) and the
/
keys.
003 STATIONS FOUND
Searching for TV stations.
Please wait. To cancel press EXIT.
www.rtv-horvat-dj.hr
7
GB
Before running AUTO INSTALLATION, check the PERSONAL SETTINGS menu to ensure that the country
displayed is correct.
Programme organisation
Programme organisation
During automatic installation, your television will search for the channel name and assign it a programme number
according to the selected country. You can use the PROGRAMME ORGANISATION menu to name any channel
name not found, to change the order in which the channels are displayed, or to delete channels for which reception
is too poor. Follow the messages at the bottom of the screen. For further details, read the information below.
GB
If you wish to access the
PROGRAMME
ORGANISATION,
menu thereafter, first press and hold
key on the remote control to
the
display the INSTALLATION MAIN
MENU (the SUMMARY is displayed
first, followed by the INSTALLATION
MAIN MENU) then select Programme
.
organisation and validate using
- To delete a programme for which reception
is too poor:
1. Select the line marked Select program.
/
or Left/Right keys to list
2. Use the
your channels.
3. When you get to a channel you wish to delete,
select the line marked Delete program.
to delete the programme.
4. Press
.
5. .Validate using
- To organize your channels to suit you:
1. Select the line marked Select program..
2. Use the
/
or Left/Right keys and
the programmes logos to find the programme
to which you wish to give the No.1.
Its present number appears on the line
marked Select program..
3. Select the line marked Swap with PR.
4. Enter 01.
. The two programmes swap
5. Press
position and the desired programme
becomes N°1.
6. Repeat the above procedure for the other
channels.
INSTALLATION MAIN MENU
Exit
Manual programming
Auto installation
Programme organisation
Personal settings
PROGRAMME ORGANISATION
Return
Select program.
Swap with PR.
Change pr. name
Delete program.
13
-EURO
13
MTV
FR2
TF1
EURO
CH40
CC01
ARTE
CART
---ARD
Select programme number using
PR-/PR+ or </> or 0 to 9 keys.
Select the line marked Return to return to the previous
menu.
- To name your channels:
1. Select the line marked Change pr. name
2. Select the character you wish to modify using
the Left/Right keys.
3. Use the and keys to display the letter you
require.
The name you have entered will be
memorised when you move to another line or
exit the menu.
If you wish to change the order in which
your programmes are displayed or if
you wish to name other programmes,
repeat the procedures described
above.
When you have finished organizing the
.
programmes, exit the menu using
www.rtv-horvat-dj.hr
8
10
11
12
13
14
15
16
17
18
19
Manual programming
Manual programming
The manual installation function is useful if some programmes have not been installed even after AUTOMATIC
INSTALLATION.
, the SUMMARY is
1. Press and hold
displayed
first,
followed
by
the
INSTALLATION MAIN MENU.
2. Select the line marked
Manual
programming.
.
3. Display the menu using
4. Now continue by following the messages at
the bottom of the screen. For further details,
read the information below.
Standard :
Select the standard using Left/Right keys that
corresponds to your country from the list of
standards.
The number of standards proposed will differ
from one model to another.
France
for France and Luxemburg
DKK’
eg. for Eastern Europe and
the Middle-East
I
for the United Kingdom and
Ireland
Euro BG
for Western Europe
INSTALLATION MAIN MENU
Exit
Manual programming
GB
Auto installation
Programme organisation
Personal settings
MANUAL PROGRAMMING
Return
Standard
Reception
Autosearch
Fine tuning
Store on PR number
Name
Decoder
External sound path
EURO BG
Cable
CH- -----
Reception :
Your television can pick up channels either via
Enter channel number or start
an aerial (RF channels) or via a cable network.
autosearch with < or >.
Certain cable networks use the same
frequencies as the RF channels. If this is the
case, you must select Aerial instead of Cable.
Select the line marked Return to return to the previous
Autosearch :
Enter the programme number if you know it. If
not, search using the Left/Right keys. Your
television will stop at the first channel it tunes
into. If you wish to memorize it, go to the line
marked Store on PR number. If not, resume
the search using the Left/Right keys.
Fine tuning :
You can use this to improve the picture if the transmitter frequency is out of adjustment. Use the Left/Right keys
to obtain the best possible picture and sound.
Store on PR number :
.
Enter the programme number you wish to give the channel (e.g.: 01 for BBC1). Memorise using
Name :
If the station has been identified by the transmitter, its name will be inscribed automatically. You can change the
proposed name or enter it if it has not already been identified. Select the character you wish to modify using the
Left/Right keys. Use the or keys to display the character you desire.
Decoder :
Use the Left/Right keys to tick the box if the channel is coded and if a decoder is connected to the AV1 jack.
External sound path :
Switch on your decoder. If the sound is coded or if you have no sound, activate or deactivate the box as required
using the Left/Right keys.
Once you have made all the adjustments you wish to a programme, go to Store on PR number and press
to memorise these. Then move on to the next channel.
Once you have completed your Manual Programming, exit the menu using
.
www.rtv-horvat-dj.hr
9
Personal settings
Personal settings
GB
1. Press and hold the
key: the
SUMMARY is displayed first, followed by the
INSTALLATION MAIN MENU.
2. Select the line marked Personal settings.
INSTALLATION MAIN MENU
Exit
Manual programming
3. Display the menu using
.
4. Continue by following the messages at the
bottom of the screen.
Auto installation
For further details, read the information below.
Personal settings
Menu language :
Select the language in which the menus are to
be displayed.
PERSONAL SETTINGS
Country :
Indicate the country in which you are if you wish
to rerun Automatic Programming.
For cable networks, if certain channels
have not been found, select Other
instead of the country name before running automatic installation again.
You may find that the characters of certain teletext languages are inaccessible for the selected country.
Auto volume level :
This is a sound control function which aims to
equalise the volume level between different
channels, and between different programmes
on the same channel.
Activate or deactivate the auto volume level as
required.
Programme organisation
Return
Menu language
English
Country
UK
Auto volume level
AV1 name
AV2 name
AV3 name
VCR
---CAMC
Prog. to be used
for reference time
06
Select a station from which you want
to get the reference time.
Select the line marked Return to return to the previous
menu.
On models equipped with Virtual Dolby
Surround, this function remains
inactive if Dolby Virtual has been
selected in the SOUND menu (see
Volume Control).
AV1, AV2, AV3 name :
Use these to give a name to each of your
audio-visual programmes. Select the character
you wish to modify using the Left/Right keys.
or
keys to display the desired
Use the
character.
Prog. to be used for reference time :
key or to use
To display the time using the
the alarm function, the television clock must be
set to the correct time. Select the line marked
Prog. to be used for reference time and select
a channel which broadcasts teletext. The time
is set automatically and is displayed after the
channel number.
Exit the menu using
.
www.rtv-horvat-dj.hr
10
13:15
Preferences
Preferences
1. Display the SUMMARY by pressing and
releasing the
key on the remote
control .
2. Select the line marked Preferences.
.
3. Display the menu using
Show program. number :
If you wish to permanently display the number
of the programme you are watching, tick the box
using the Left/Right keys. Press the Left/Right
keys again to deactivate this function.
PREFERENCES
Return
Show program. number
AV2 video input
AV3 video input
Format control
Picture preferences
GB
Make your choice from the proposed
options. Use the information below to help
you.
Video
S-Video
Auto
AV2 video input :
Use the Left/Right keys to select the type of video signal received at the AV2 SCART socket (Video or S-Video).
AV3 video input :
Use the Left/Right keys to select the type of video signal received at the AV3 sockets (these sockets are located
on the front or the side of the television).
Format control :
Use the Left/Right keys to select the desired picture format:
Auto : if the transmitter (for 16/9 format TV’s) or the appliance connected to one of the peripheral jacks delivers
the switching signal, the television automatically adapts to the transmitted picture format.
16/9 : manually selects widescreen picture format.
4/3 : manually selects this picture format.
If you have selected 16/9 or 4/3, the television will switch back to Auto when you change channels or you
switch off.
Picture preferences :
To access the PICTURE PREFERENCES
.
menu, press
If you wish, you can personalize certain
picture settings. Select and set the
proposed options. Use the information
below to help you.
Settings :
Select Standard or Personal.
Standard corresponds to the factory settings.
Personal corresponds to the settings that you
have entered yourself.
The lines Brightness, Colour and
Contrast are displayed only if you have
selected Personal on the Settings line.
Select each line one after the other and enter
your required settings. You can recall these
picture settings by pressing the red key on the
remote control.
.
Exit the menu using
PICTURE PREFERENCES
Return
Settings
Brightness
Colour
Contrast
Personal
Select the line marked Return to return to the previous
menu.
www.rtv-horvat-dj.hr
11
Daily viewing
Daily viewing
Picture Adjustment
GB
Display the SUMMARY using the
key on
the remote control. Select Picture. Validate
. The PICTURE menu is displayed.
using
Select and set the proposed options. Use
the information below to help you.
Brightness, Colour, Contrast, Sharpness:
Select each of these lines one after the other and
set as required.
Contrast expand :
Select this line then choose the desired Contrast
expand setting (High or Low).
Tone :
Select this line then choose the desired colour
tone (Warm, Neutral or Cold).
Exit the menu using
.
PICTURE
Return
Brightness
Colour
Contrast
Sharpness
Neutral
Cold
Contrast expand
Tone
Select the line marked Return to return to the previous
menu.
Sound Settings
Display the SUMMARY using the
key on
the remote control. Select the line marked
. The SOUND menu
Sound. Validate using
is displayed.
Select and set the proposed options. Use
the information below to help you.
Sound type :
The choices available to you depend on
your television model and the broadcast.
Stereo, Dual or NICAM reception and the
corresponding choices are only available
on Stereo or NICAM Stereo televisions.
Select this line, then select the type of sound you
desire.
Sound mode :
Select this line, then choose the desired mode
using the Left/Right keys.
The choices available to you depend on
your television model and the type of
sound. Magic and Dolby Virtual modes
are only available in stereo on TV’s
equipped with Virtual Dolby Surround.
Stereo wide is only available on Stereo or
Nicam televisions not equipped with
Virtual Dolby Surround.
Balance L/R :
Select this line, then balance the sound between
the Left and Right loudspeakers.
Treble, Bass :
Select each of these lines and adjust to suit you.
Surround effect :
This line appears only if you have selected
Dolby Virtual on the Sound mode line.
Select this line and adjust the surround effect to
suit you.
Exit the menu using
.
SOUND
Return
Automatic
Normal
Sound type
Sound mode
Balance L/R
Treble
Bass
Surround effect
Broadcast
mono
stereo
dual
NICAM-3
AV
Mode
Choice
automatic - mono
mono - stereo
sound 1 - sound 2
sound 1 - sound 2 - sound 3
stereo - sound 1 - sound 2
Effect
Normal :
reproduces the original sound (
mono or stereo).
Wide :
gives a stereo effect on mono sounds.
Stereo wide : accentuates the stereo effect.
Magic :
accentuates the stereo effects and
adds echo.
Dolby Virtual : Virtual Dolby Surround.
Virtual Surround Dolby is based on Dolby Pro Logic
decoding for the reproduction of the Left, Right, Centre and
Virtual Surround sound channels using two loudspeakers.
“”Dolby”, “”Pro Logic” and the double -D symbol are trademarks of the
Dolby Laboratories Licensing Corporation.
Manufactured under licence from Dolby Laboratories Licensing
Corporation.
www.rtv-horvat-dj.hr
12
Daily viewing
Time
Display the SUMMARY using the
key on
the remote control. Select the line marked
. The TIME menu is
Time. Validate using
displayed.
Sleep timer :
Use the Left/Right keys to choose how long you
wish to view before the television switches off.
The television will switch off automatically at the
end of this period. To cancel, set to 00:00.
One minute before switching off, a message will
inform you that the television is about to go off.
If you wish to keep it on, press any key on the
remote control or the local keyboard.
The television switches to Child lock mode after
an automatic stop. It can only be switched on
again from the remote control.
TIME
Return
Sleep timer
00 : 00
Current time
11 : 28
Wake-up timer
Wake-up time
Programme number
Daily
07 : 07
01 BBC1
GB
You can use this menu to switch your
television on or off automatically at a set
time.
Select the line marked Return to return to the previous
menu.
Current time :
The current time is given by the Teletext (see PERSONAL SETTINGS menu). You can also set the time manually
using the number keys (0 to 9) on your remote control.
Wake-up timer :
If you wish to be woken up by your television on the channel of your choice, you must first set the television
clock to the correct time (see above).
Use the Left/Right keys to tick the box and display the Wake-up timer menu.
The lines Wake-up time, Programme number and Daily only appear if you have ticked the box on the
line marked Wake-up timer.
Wake-up time :
Use the number keys (0 to 9) on the remote control to set the time at which you wish to be woken.
Programme number :
Select the programme you wish to be woken by.
Daily :
Tick this box if you wish to be awakened at this time every day.
.
Exit the menu using
Set the television to standby using the
key on the remote control. The red indicator light on the television
flashes.
The television will come on automatically at the programmed time and will go off one hour later if you do not use
the remote control.
www.rtv-horvat-dj.hr
13
Daily viewing
List of Channels
GB
This list contains up to 10 pages. The number of pages depends on
the number of programmes memorized. For each programme, the list
indicates the station name or type and the programme number. The
3 AV programmes are listed on page 11.
To display the list, press the
key on the remote control
or
key on the remote control. Select the
Display the SUMMARY using the
.
line marked List. Validate using
The page displayed is the page containing the programme you are watching.
It is identified in the list by the symbol TV.
To display the next page, press the Right key.
To display the previous page, press the Left key.
If you wish to watch one of the programmes on the page displayed:
Enter the last digit of the programme number (e.g. for 25 simply enter 5) on the
remote control. The list disappears and your programme is selected.
Or,
- Select the programme using the Up/Down keys.
.
- Validate using
.
- Exit the menu using
www.rtv-horvat-dj.hr
14
LIST
Exit
01
02
03
04
05
06
07
08
09
BBC 1
BBC 2
FR 3
CC19
ARTE
M6
CNN
PREM
EURO
TV
Page -/+
Programme: 0 - 9
Daily viewing
Selecting Programmes
GB
For channels 1 to 9, press the number key corresponding to the desired channel on the remote control. For
programme numbers higher than 10, press the key on the remote control: ”- -” appears on the screen. Now use
the number keys on the remote control to enter first the tens digit then the units digit.
If you press
while ”- -” is already displayed, the display returns to 0- , in which case you can only select
programmes 1 to 9.
Scrolling the Programmes
You can scroll through the programmes using the
/
keys.
Audio-visual (AV) Programmes
Press the
key to call the last audio-visual (AV) programme watched. Press repeatedly to scroll the audio-visual
(AV) programmes on the screen.
Volume Control
Use the volume +/- keys to increase or decrease the volume.
Muting the Sound
Press the
key to mute the sound. Press again to restore the sound.
Zoom
(16/9 models only)
This function is useful for 4/3 or letterbox pictures (black bands at the top and bottom of the screen).
Use the Left/Right keys to select the desired zoom position:
ZOOM 0: 4/3 picture (black bands at the sides).
FULL SCREEN: for a 4/3 picture that fills the screen.
ZOOM 1: for letterbox pictures.
Displaying Information
Press the
of sound.
key to display the following information on the screen: channel number and name, time, zoom, type
Television Lock
You can use this function to prevent anyone from switching on the television using the buttons on the
television set.
The buttons on the television set are locked in the following cases:
- If you switch off the set by pressing and holding the
key on the remote control for more than 3 seconds,
- After a programmed stop,
- If the television is set to standby when the alarm has been set.
When the television is locked the red power will be light flashing.
The television can now only be operated from the remote control.
To release the lock, press any number key on the remote control.
Switching Off the Television
To switch off the television, press the Standby key on the remote control or press the ON/OFF switch on the
television set.
www.rtv-horvat-dj.hr
15
Teletext
Teletext
GB
Certain channels broadcast an electronic news page service with a range of different information services.
The presentation and use of the Teletext differ from one country to another and from one programme to
another (Teletext, Fastext or Toptext).
Press the
key to display the Teletext Index (page 100).
A message will inform you if the programme you are watching has no Teletext service.
To call up a page:
Enter the 3 digits of the page number you wish to consult (for example, 150 or 170).
After a moment, the page appears.
Use the Left/Right keys to consult the next or the previous page.
Standard Functions
Rolling pages:
Some information is displayed over several sub-pages. It is scrolled on your screen as it is received.
. Press
again to continue
To stop scrolling, select STOP using the Up/Down keys and validate using
scrolling.
Masked text:
To reveal a hidden answer (for example in a quiz programme), select ??? using the Up/Down keys and validate
. Press
again to hide the answers.
using
Zoom :
Select ZOOM using the Up/Down keys then press the
key once to magnify the top of the screen, twice to
magnify the bottom of the screen (the page will scroll from top to bottom) and a third time to return to the normal
display.
Display:
You can superpose the Teletext page over the TV picture. To do this, select MIX using the Up/Down keys then
validate by pressing the
key. Press again
to return to the normal display.
Sub-code:
You can use this to access a sub-page directly.
Select “- - - -” using the Up/Down keys. Then enter the four digits of the required sub-page number.
Certain programmes have Alarm pages that you can set to appear at the time you require. For example:
for 15h30 enter 1530 as the sub-page number then press
. You must of course leave the television
on the programme which is to transmit the Alarm page.
Index:
To call up the index page, select 100 using the Up/Down keys then validate using
.
Direct access:
You can use the yellow and blue keys to directly access the pages indicated in the bar at the bottom of the screen.
Fastext functions:
If the Teletext you receive is Fastext, a sub-menu at the bottom of the screen appears which you can use to select
from the 4 headings according to its colour.
To select a heading, press the key of the corresponding colour.
Toptext functions:
If the Teletext you receive is TOPtext, the pages are arranged into headings and sub-headings by subject.
You can select the first page of a heading directly by pressing the blue key, or the first page of a sub-heading by
pressing the yellow key.
Other functions:
With certain Teletext channels, it is possible to have sub-titles overlaid on the screen for certain broadcasts as well
as certain news flash updates.
The corresponding page number is indicated in the Telextext index.
Once you have found the page, the sub-title or the news flash will be overlaid onto the TV picture.
key.
The navigation status bar disappears after a few seconds. To display it again, press the
or
.
To exit Teletext, press
www.rtv-horvat-dj.hr
16
Other Connections
Other Connections
The CINCH Video and Audio sockets (1)* are provided to
connect a VHS or 8mm camcorder.
The S and CINCH Audio sockets (1)* are provided to connect
a S-VHS or Hi-8 camcorder.
GB
To use the appliance you have connected, press the
key several times until the AV3 programme is
selected on the screen. When you switch off the
connected appliance, the television will remain on
the AV3 programme and you must use the numerical
keys on the remote control to select a programme.
* on models equipped with this function
The headphone socket (2)* is provided to connect a
headphone or earphones.
Connecting headphones mute the sound from the
television loudspeakers.
Other Possibilities
Copying a cassette:
Plug the VCR you wish to record to into the SCART socket
AV2.
Plug the appliance you wish to copy from as follows: into
the peripheral jack AV1 for a VCR; into the CINCH AV3 jacks
for a camcorder (see table below).
RECORD
PLAY
Appliance
* on models equipped with this function
SCART Socket
Appliance
SCART Socket
CALL
PROGRAMME
Peripheral
AV1
VCR
ou
Camcorder
AV2
AV1
Cinches or
S-Video
AV3
VCR
ou
Camcorder
AV2
AV3
VCR
Camcorder
Connecting a HiFi or AV amplifier
If you wish to connect a HiFi or AV amplifier, plug it into the
peripheral jack AV2 using a SCART-CINCH type lead.
www.rtv-horvat-dj.hr
17