1
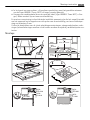
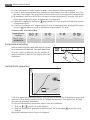
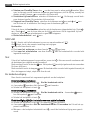
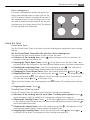
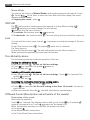
HK854220XB
Gebruiksaanwijzing
User manual
Notice d'utilisation
Benutzerinformation
Keramische
inductiekookplaat
Ceramic glass induction
hob
Table de cuisson
vitrocéramique à
induction
InduktionsGlaskeramikkochfeld
2
Inhoud
Wij danken u voor uw keuze voor een van onze producten van hoogwaardige
kwaliteit.
Lees deze gebruiksaanwijzing alstublieft zorgvuldig door, zo kunt u zeker zijn van
optimale en professionele prestaties van uw apparaat. De handleiding zal u in
staat stellen om alle processen perfect en op de meest efficiënte wijze te laten
verlopen. Wij adviseren u deze handleiding op een veilige plaats te bewaren, dan
kunt u hem te allen tijde raadplegen. Geef deze handleiding ook aan een
eventuele toekomstige eigenaar van het apparaat.
Wij wensen u veel plezier met uw nieuwe apparaat.
INHOUD
VEILIGHEIDSINFORMATIE
2
MONTAGE-INSTRUCTIES
BESCHRIJVING VAN HET PRODUCT
4
6
BEDIENINGSINSTRUCTIES
In- en uitgeschakeld
Schakelt de oven uit
Temperatuurinstelling
Automatisch opwarmen
De powerfunctie in- en uitschakelen
Timer gebruiken
STOP+GO
7
7
7
8
8
9
9
10
Slot
10
De kinderbeveiliging
10
OffSound Control (In- en uitschakelen van
de geluiden)
11
NUTTIGE AANWIJZINGEN EN TIPS
11
ONDERHOUD EN REINIGING
13
PROBLEMEN OPLOSSEN
MILIEUBESCHERMING
Verpakkingsmateriaal
13
15
15
Wijzigingen voorbehouden
VEILIGHEIDSINFORMATIE
Lees voor uw eigen veiligheid en correcte werking van het apparaat eerst deze handleiding aandachtig door, alvorens het apparaat te installeren. Bewaar deze instructies altijd
bij het apparaat, zelfs wanneer u deze verplaatst of verkoopt. Gebruikers moeten volledig
op de hoogte zijn van de bediening en veiligheidsfuncties van het apparaat.
Algemene veiligheid
WAARSCHUWING!
Mensen (met inbegrip van kinderen) met beperkte lichamelijke, zintuiglijke of verstandelijke vermogens of gebrek aan ervaring en kennis mogen dit apparaat niet gebruiken. Zij
moeten onder toezicht staan of instructies krijgen over het gebruik van dit apparaat van
iemand die verantwoordelijk is voor hun veiligheid.
Veiligheid kinderen
• Dit apparaat is alleen bedoeld voor gebruik door volwassenen. Kinderen moeten in de
gaten gehouden worden om te voorkomen dat zij met het apparaat gaan spelen.
Veiligheidsinformatie
3
• Houd alle verpakkingsmaterialen uit de buurt van kinderen. Gevaar voor verstikking.
• Houd kinderen uit de buurt van het apparaat als het aan staat.
WAARSCHUWING!
Om te voorkomen dat kleine kinderen of dieren per ongeluk het apparaat inschakelen,
adviseren wij de kinderbeveiliging te activeren.
Veiligheid tijdens het gebruik
• Verwijder al het verpakkingsmateriaal, stickers en folie van het apparaat, voordat u het
in gebruik neemt.
• Schakel de kookzones na ieder gebruik uit.
• Gevaar voor brandwonden! Leg geen metalen voorwerpen, zoals bestek of deksels op
de kookplaat; deze kunnen zeer heet worden.
• Gebruikers met geïmplanteerde pacemakers moeten hun bovenlichaam op een afstand
van ten minste 30 cm van ingeschakelde inductiekookzones houden.
WAARSCHUWING!
Brandgevaar! Oververhitte vetten en oliën kunnen snel in brand vliegen.
Gebruik conform de voorschriften
•
•
•
•
Controleer het apparaat altijd tijdens gebruik.
Dit apparaat is uitsluitend bedoeld voor huishoudelijk gebruik!
Het apparaat mag niet worden gebruikt als werkblad of aanrecht.
Plaats geen brandbare vloeistoffen, licht ontvlambare materialen of voorwerpen die
kunnen smelten (bijv. plastic folie, plastic, aluminium) op of in de buurt van het apparaat.
• Pas op als u het apparaat aansluit in de buurt van een stopcontact. Voorkom contact
tussen elektrische verbindingen en het apparaat of heet kookgerei. Voorkom dat elektrische verbindingen verstrikt raken.
Voorkoming van beschadiging van het apparaat
• Het glaskeramische oppervlak kan beschadigd raken als er voorwerpen op vallen.
• Kookgerei dat gemaakt is van gietijzer, aluminium of met beschadigde bodems, kunnen krassen veroorzaken op de glaskeramische plaat als deze over het oppervlak worden geschoven.
• Laat kookgerei niet droogkoken, om schade aan het kookgerei en het glaskeramische
oppervlak te voorkomen.
• Gebruik de kookzones niet met leeg kookgerei of zonder kookgerei erop.
• Leg nooit aluminiumfolie over welk deel van het apparaat ook.
• De ventilatieruimte van 5 mm tussen het werkblad en de voorzijde van het onderliggende apparaat mag niet worden afgedekt.
WAARSCHUWING!
Als er een scheur in het oppervlak zit, haalt u de stekker uit het stopcontact om
elektrische schokken te voorkomen.
4
Montage-instructies
MONTAGE-INSTRUCTIES
Noteer voor de installatie , het serienummer (ser. nr.) op het typeplaatje. Het typeplatje van het apparaat bevindt zich aan de onderkant van de behuizing.
949 593 273 01
HK854220X-B
58 GBD C2 AU 220-240 V 50-60-Hz Induction 7,4 kW
7,4 kW
AEG-ELECTROLUX
Veiligheidsinstructies
WAARSCHUWING!
Lees deze zorgvuldig!
Controleer of het apparaat niet beschadigd is tijdens het transport. Sluit een beschadigd
apparaat niet aan. Neem indien nodig contact op met de leverancier.
Alleen een geautoriseerde onderhoudstechnicus kan dit apparaat installeren, aansluiten
of repareren. Gebruik alleen originele reserveonderdelen.
Inbouwapparaten mogen alleen worden gebruikt nadat zij ingebouwd zijn in geschikte
inbouwunits of werkbladen die aan de normen voldoen.
Verander de specificaties van dit product niet en wijzig het niet. Gevaar voor letsel en
schade aan het apparaat.
De wetten, voorschriften, richtlijnen en normen die van kracht zijn in het land waar het
apparaat wordt gebruikt dienen in acht genomen te worden (veiligheidsvoorschriften, correcte recycling overeenkomstig de voorschriften, veiligheidsvoorschriften met betrekking
tot elektrische installaties, enz.)!
Houd de minimumafstanden naar andere apparaten en units in acht!
Tijdens de installatie moet een antistootbescherming zijn aangebracht, bijv. lades mogen
alleen worden aangebracht als er onder het apparaat een beschermende vloer aanwezig is!
De uitgezaagde oppervlakken van het werkblad moeten beschermd worden tegen vocht
met een geschikte afdichting!
Het juiste afdichtmiddel moet worden gebruikt om de opening tussen het apparaat en
het werkblad af te dichten!
Bescherm de onderkant van het apparaat tegen stoom en vocht, bijv. van een afwasmachine of oven!
Installeer het apparaat niet naast deuren of onder ramen! Anders kan het hete kookgerei
van de kookplaat worden gestoten, als de deuren of ramen worden geopend.
WAARSCHUWING!
Risico van verwonding door elektrische stroom. Volg de instructies voor de elektrische
aansluitingen nauwkeurig op.
•
•
•
•
De netaansluiting staat onder stroom.
Schakel de stroomtoevoer naar de netaansluiting uit.
Garandeer de bescherming tegen aanraking door een vakkundige inbouw.
Loszittende en onvakkundig aangebrachte stekkerverbindingen kunnen oververhitting
van de aansluiting veroorzaken.
• Laat de klemaansluitingen correct installeren door een gekwalificeerde elektricien.
• Zorg ervoor dat het snoer niet wordt belast door trekken.
Montage-instructies
5
• In het geval van een eenfase- of tweefase-aansluiting, moet het geschikte netsnoer
van het type H05BB-F Tmax. 90°C (of hoger) worden gebruikt.
• Vervang een voedingskabel door een speciale kabel (type H05BB-F Tmax 90°C; of hoger). Neem contact op met onze serviceafdeling.
Er moet een voorziening in de elektrische installatie aanwezig zijn die het mogelijk maakt
om het apparaat los te koppelen van alle polen van de netvoeding, met een contactopening van minstens 3 mm.
U dient te beschikken over de juiste scheidingsvoorzieningen: stroomonderbrekers, zekeringen (schroefzekeringen moeten uit de houder worden verwijderd), aardlekstrips en contacten.
Montage
min. 500 mm
min.
50 mm
min.
50 mm
min.
5 mm
R 5mm
=
600mm
490+1mm
750+1mm
=
min.
20 mm
min.
25 mm
min.
5 mm
min.
38 mm
min.
5 mm
6
Beschrijving van het product
Als u een beveiligingsdoos gebruikt (extra toebehoren), dan zijn de ventilatieruimte voor van 5
mm en de beschermmat onder het apparaat niet
nodig.
BESCHRIJVING VAN HET PRODUCT
Indeling kookplaat
1
2
180
300
mm
mm
180
145
5
4
mm
1 Inductiekookzone 1800 W met powerfunctie 2800 W
2 Inductiekookzone 2400 W met powerfunctie 3700 W
3 Bedieningspaneel
4 Inductiekookzone 1400 W met powerfunctie 2500 W
5 Inductiekookzone 1800 W met powerfunctie 2800 W
mm
3
Uitrusting bedieningsveld
1
2
10
3
4
9
8
5
7
6
Gebruik de sensorvelden om het apparaat te bedienen.
Sensorveld
te kiezen
1
schakelt de kookplaat in en uit
2
schakelt de toetsblokkering of het kinderslot in
en uit
3
Kookzoneweergaven van timer
tonen voor welke zone u de tijd instelt
4
Timerdisplay
toont de tijd in minuten
Bedieningsinstructies
Sensorveld
7
te kiezen
Schakelt de powerfunctie in
5
6
Een kookstanddisplay
toont de kookstand
7
Bedieningsstrip
Bedieningsknop brander
8
tijdsinstellingen verhogen of verlagen
/
9
Kookzone selecteren
10
schakelt in en uit STOP+GO
Kookstanddisplays
Display
Beschrijving
De kookzone is uitgeschakeld
De kookzone werkt
-
Warmhoudfunctie /
is ingeschakeld
De automatische opwarmfunctie is ingeschakeld
Powerfunctie is ingeschakeld
+ cijfer
Er is een storing
/
OptiHeat Control (3 staps restwarmte-indicatie): kookzone is nog
warm / warmhoudstand / restwarmte
/
Vergrendeling/kinderbeveiliging is ingeschakeld
Het kookgerei is niet geschikt of te klein, of er is geen kookgerei op
de kookzone geplaatst
Automatische veiligheidsuitschakeling is actief
OptiHeat Control (3-staps restwarmte-indicatie)
WAARSCHUWING!
\ \ Gevaar van brandwonden door restwarmte!
OptiHeat Control geeft het niveau van de restwarmte aan. De inductiekookzones creëren
de voor het koken benodigde warmte direct in de bodem van de pan. Het glaskeramiek
wordt verwarmd door de warmte van de pannen.
BEDIENINGSINSTRUCTIES
In- en uitgeschakeld
Raak
gedurende 1 seconde aan om het apparaat in- en uit te schakelen.
Schakelt de oven uit
De functie schakelt de kookplaat automatisch uit als:
• alle kookzones zijn uitgeschakeld.
8
Bedieningsinstructies
• u de kookstand niet hebt ingesteld nadat u de kookplaat hebt ingeschakeld.
• u een of meer sensorvelden door voorwerpen hebt bedekt (een pan, doeken, enz.) langer dan 10 seconden. Het geluid blijft klinken totdat u het voorwerp hebt weggenomen.
• de kookplaat raakt oververhit (bijv. wanneer een pan droogkookt). Voordat u de kookplaat opnieuw gebruikt moet de kookzone zijn afgekoeld.
• u gebruikt ongeschikt kookgerei. gaat branden en na 2 minuten schakelt de kookzone automatisch uit.
• u hebt een kookzone niet uitgeschakeld of hebt de kookstand niet gewijzigd. Na enige
tijd gaat branden en wordt de kookplaat uitgeschakeld. Zie tabel.
Automatische uitschakeltijden
Temperatuurinstelling
Wordt uitgeschakeld na
6 uur
-
-
-
5 uur
4 uur
1,5 uur
Temperatuurinstelling
Raak de bedieningsstrip daar aan waar de gewenste kookstand zich bevindt. Corrigeer naar links
of rechts, indien nodig Laat niet los voordat de
juiste kookstand is bereikt. Het display toont de
kookstand.
P
Automatisch opwarmen
12
11
10
9
8
7
6
5
4
3
2
1
0
1
2 3 4 5 6 7
8 9 10 11 12 13 14
U kunt de gewenste kookstand sneller verkrijgen als u de functie Automatisch opwarmen
inschakelt. Deze functie schakelt even de hoogste kookstand in (zie grafiek) en verlaagt
dan naar de gewenste kookstand.
De functie Automatisch opwarmen starten voor een kookzone:
1. Druk op ( verschijnt op de display).
2. Raak onmiddellijk de gewenste kookstand aan. Na 3 seconden verschijnt op de
display.
Wijzig de kookstand om de functie te stoppen.
Bedieningsinstructies
9
De powerfunctie in- en uitschakelen
De powerfunctie geeft gedurende max. 10 minuten extra vermogen aan een inductiekook. Om te
zone. Daarna wordt de inductiekookzone automatisch teruggeschakeld naar
starten raakt u aan, hierna gaat branden. Om te stoppen stelt u een kookstand in
.
tussen en
Vermogensbeheer
Het vermogensbeheer verdeelt het vermogen
tussen twee kookzones die als een paar samenwerken (zie afbeelding). De powerfunctie zorgt
voor een maximaal vermogen voor één kookzone in het kookpaar en verlaagt automatisch de
tweede kookzone tot een lager vermogen. Het
display voor de verlaagde zone wisselt.
Timer gebruiken
Timer met aftelfunctie
Gebruik de timer met aftelfunctie om in te stellen hoe lang de kookzone wordt gebruikt
voor één kooksessie.
Stel de timer met aftelfunctie in nadat de kookzone is geselecteerd.
U kunt de temperatuur instellen voordat of nadat u de timer hebt ingesteld.
• kookzone selecteren: raak net zo vaak aan tot het lampje van de gewenste kookzone gaat branden.
• De timer met aftelfunctie starten: Raak van de timer aan om de tijd in te stellen
( 00 - 99 minuten). Wanneer het lampje van de kookzone langzamer gaat knipperen,
telt de tijd terug.
• Resterende tijd controleren: selecteer de kookzone met . Het lampje van de kookzone knippert sneller. De resterende tijd verschijnt.
• De timer met aftelfunctie wijzigen: selecteer de kookzone met raak of aan .
• Timer uitschakelen: selecteer de kookzone met . Raak aan . De resterende tijd
telt af tot 00 . Het lampje van de kookzone gaat uit. Om de kookzone uit te schakelen
kunt u ook en gelijktijdig aanraken.
Als de ingestelde tijd verstreken is, klinkt er een geluidssignaal en gaat 00 knipperen.
Kookzone wordt uitgeschakeld.
• Geluid uitschakelen: raak aan
CountUp Timer (Timer met optelfunctie)
Gebruik de CountUp Timer om te controleren hoe lang de kookzone wordt gebruikt.
• Selectie van de kookzone (indien er meer dan 1 kookzone actief is): raak net
zo vaak aan tot het lampje van de gewenste kookzone gaat branden.
10
Bedieningsinstructies
• Starten van CountUp Timer: door van de timer aan te raken gaat branden. Wanneer het lampje van de kookzone langzamer gaat knipperen, telt de tijd op, waarbij het
display schakelt tussen en verstreken tijd (minuten)
• Verstreken tijd controleren: selecteer de kookzone met . Het lampje van de kookzone knippert sneller. De verstreken tijd verschijnt.
• Stoppen van CountUp Timer: selecteer de kookzone met en raak of aan
om de timer uit te schakelen. Het lampje van de kookzone gaat uit.
Kookwekker
U kunt de timer als kookwekker gebruiken als de kookzones uitgeschakeld zijn. Raak
aan . Raak of van de timer aan om de tijd te selecteren. Als de ingestelde tijd verstreken is, klinkt er een geluidssignaal en gaat 00 knipperen.
• Geluid uitschakelen: raak aan
STOP+GO
De
Als
-functie stelt alle kookzones in voor een warmhoudstand ( ).
loopt, kunt u de warmte-instelling niet wijzigen.
stopt de timerfunctie niet.
• Raak voor het activeren van deze functie
aan. gaat aan.
• Raak voor het uitschakelen van deze functie
aan. De kookstand die u eerder hebt
ingesteld verschijnt.
Slot
U kunt het bedieningspaneel vergrendelen, maar niet . Hiermee wordt voorkomen dat
de kookstand per ongeluk wordt veranderd.
Raak om deze functie te starten aan. Het symbool verschijnt gedurende vier seconden.
De timer blijft aan.
Raak om deze functie te stoppen aan. De kookstand die u eerder hebt ingesteld verschijnt.
Als u het apparaat stopt, stopt deze functie ook.
De kinderbeveiliging
Deze functie voorkomt het ongewenste gebruik van de kookplaat.
Kinderbeveiliging inschakelen
• Schakel de kookplaat in met . Stel de kookstand niet in .
• 4 seconden aanraken Het symbool gaat branden.
• Schakel de kookplaat uit met .
Kinderbeveiliging uitschakelen
• Schakel de kookplaat in met . Stel de kookstand niet in . 4 seconden aanraken Het symbool gaat branden.
• Schakel de kookplaat uit met .
Kinderbeveiliging tijdelijk uitschakelen voor een enkele kooksessie
• Schakel de kookplaat in met . Het symbool gaat branden.
• 4 seconden aanraken Stel de kookstand binnen 10 seconden in. U kunt het apparaat inschakelen.
• Wanneer u de kookplaat uitschakelt met , wordt de kinderbeveiliging weer geactiveerd.
11
Nuttige aanwijzingen en tips
OffSound Control (In- en uitschakelen van de geluiden)
Uitschakelen van de geluiden
Schakel het apparaat uit.
Raak 3 seconden aan. De displays gaan aan en uit. Raak
3 seconden aan.
aan, het geluid is aan. Raak aan, gaat aan, het geluid is uit.
Als deze functie is ingeschakeld, kunt u de geluiden alleen horen als:
• u aanraakt
• de kookwekker af gaat
• de timer af gaat
• als u iets op het bedieningspaneel plaatst.
Inschakelen van de geluiden
Schakel het apparaat uit.
3 seconden aan.
Raak 3 seconden aan. De displays gaan aan en uit. Raak
aan, omdat het geluid uit is. Raak aan, gaat aan. Het geluid is aan.
gaat
gaat
NUTTIGE AANWIJZINGEN EN TIPS
Gebruik de inductiekookzones met geschikte pannen.
Kookgerei voor inductiekookzones
Bij inductiekoken wekt een krachtig elektromagnetisch veld een vrijwel onmiddellijke
warmte in het kookgerei op.
Kookmaterialen
• geschikt: gietijzer, staal, geëmailleerd staal, roestvrij staal, een meerlaags bodem
(door de fabrikant specifiek gekenmerkt als geschikt).
• niet geschikt: aluminium, koper, messing, glas, keramiek, porselein.
Kookgerei is geschikt voor een inductiekookplaat als …
• ... een beetje water op de hoogste kookstand binnen korte tijd wordt verwarmd..
• ... een magneet vast blijft zitten aan de bodem van het kookgerei.
De bodem van het kookgerei moet zo dik en vlak mogelijk zijn.
Afmetingen kookgerei : Inductiekookzones passen zich automatisch aan de grootte van
de bodem van het kookgerei aan. Het magnetische deel van de bodem van het kookgerei
moet echter een minimale diameter hebben van ca. ¾ van de grootte van de kookzones.
Energie besparen
• Doe indien mogelijk altijd een deksel op de pan.
• Zet de pan op de kookzone voordat u deze inschakelt.
Öko Timer (Eco-timer)
Om energie te besparen schakelt het verwarmingselement van de kookzone zichzelf eerder uit dan het signaal van de timer met aftelfunctie klinkt. De verwarmingstijdreductie
wordt bepaald door het kookniveau en de kooktijd.
12
Nuttige aanwijzingen en tips
Voorbeelden van kooktoepassingen
De gegevens in de volgende tabel dienen slechts als richtlijn.
Temperatuurinstelling
Gebruik om:
Tijdstip
Tips
Bereide gerechten warmhouden
naar be- Afdekken
hoefte
1-3
Hollandaise saus, smelten: boter, chocolade, gelatine
5-25
min
Tussendoor mengen
1-3
Stollen: luchtige omeletten, gebakken
eieren
10-40
min
Met deksel bereiden
3-5
Zachtjes aan de kook brengen van rijst 25-50
en gerechten op melkbasis Reeds berei- min
de gerechten opwarmen
Voeg minstens tweemaal zoveel
vloeistof toe als rijst, melkgerechten tijdens het bereiden tussendoor roeren
5-7
Groenten stomen, vis smoren vlees
20-45
min
Voeg een paar eetlepels vocht toe
7-9
Aardappelen stomen
20-60
min
Gebruik max. ¼ l water voor 750 g
aardappelen
7-9
Bereiden van grotere hoeveelheden
voedsel, stoofschotels en soepen
60-150
min
Tot 3 l vloeistof plus ingrediënten
9-12
Licht gebraden: kalfsoester, kalfs cordonbleu, koteletten, rissoles, worstjes,
lever, roux, eieren, pannenkoeken, donuts
naar be- Halverwege de bereidingstijd omhoefte
draaien
12-13
Door-en-door gebraden, opgebakken
aardappelen, lendenbiefstukken, steaks
5-15
min
14
Aan de kook brengen van grotere hoeveelheden water, pasta koken, aanbraden van
vlees (goulash, stoofvlees), frituren van patates frites
1
Halverwege de bereidingstijd omdraaien
De Powerfunctie is geschikt voor het verwarmen van grote hoeveelheden water.
Informatie over acrylamide
Volgens recente wetenschappelijke informatie kan het intensief bruinen van levensmiddelen (met name in producten die zetmeel bevatten), een gezondheidsrisico vormen tengevolge van acrylamides. Om die reden adviseren wij levensmiddelen zoveel mogelijk bij lage temperaturen gaar te laten worden en de gerechten niet te veel te bruinen.
Geluiden tijdens de werking
Als u een van de volgende geluiden hoort
• krakend geluid: kookgerei is vervaardigd uit verschillende materialen (sandwichconstructie).
Onderhoud en reiniging
13
• fluiten: u gebruikt een of meer kookzones op hoog vermogen, en het kookgerei is gemaakt van verschillende materialen (sandwichconstructie).
• zoemen: u kookt op hoog vermogen.
• tikken: er vinden elektrische schakelprocessen plaats.
• sissen, zoemen: de ventilator is aan.
De geluiden zijn normaal en geven geen defecten aan.
ONDERHOUD EN REINIGING
Reinig het apparaat na elk gebruik.
Gebruik altijd kookgerei met een schone bodem.
WAARSCHUWING!
Scherpe voorwerpen en schurende reinigingsmiddelen beschadigen het apparaat.
Het reinigen van het apparaat met een stoomstraal- of hogedrukreiniger is om veiligheidsredenen verboden.
Krassen of donkere vlekken in de glaskeramiek hebben geen invloed op de werking van
het apparaat.
Vuil verwijderen:
1. – Verwijder direct: gesmolten plastic, gesmolten folie en suikerhoudende gerechten. Anders kan het vuil het apparaat beschadigen. Gebruik een speciale schraper
voor de glazen plaat. Plaats de schraper schuin op de glazen plaat en verwijder
resten door het blad over het oppervlak te schuiven.
– Verwijder nadat het apparaat voldoende is afgekoeld: kalkvlekken, waterkringen, vetvlekken, glimmende metaalachtige verkleuringen. Gebruik een speciaal
schoonmaakmiddel voor glaskeramiek of roestvrij staal.
2. Reinig het apparaat met een vochtige doek en een beetje afwasmiddel.
3. Wrijf het apparaat ten slotte droog met een schone doek.
PROBLEMEN OPLOSSEN
Probleem
Mogelijke oorzaak en oplossing
U kunt het apparaat niet inscha- • Er zijn 2 of meer sensorvelden tegelijk aangeraakt. Raak
kelen of gebruiken.
slechts één sensorveld tegelijk aan.
• Er ligt water op het bedieningspaneel of het paneel is met
vetspatten bedekt. Bedieningspaneel schoonmaken
• Schakel het apparaat opnieuw in en stel de temperatuur binnen 10 seconden in.
• De kinderbeveiliging of toetsblokkering Stop+Go is actief.
Zie het hoofdstuk "Bediening van het apparaat".
Er klinkt een geluid als het apparaat is uitgeschakeld.
Een of meer sensorvelden zijn bedekt. Maak de sensorvelden vrij.
14
Problemen oplossen
Probleem
Mogelijke oorzaak en oplossing
De restwarmte-indicatie gaat
niet branden.
De kookzone is niet heet omdat deze slechts kort was ingeschakeld. Als de kookzone heet moet zijn, neem dan contact op
met de Klantenservice.
De kookstand wisselt
Het vermogensbeheer is actief. Zie hoofdstuk "Vermogensbeheer".
Er klinkt een geluid en het apparaat wordt in- en uitgeschakeld. Na 5 seconden klinken er
een of meer geluiden.
U hebt
afgedekt . Maak het sensorveld vrij.
gaat branden
• De automatische uitschakeling is in werking getreden. Schakel het apparaat uit en weer in.
• Oververhittingsbeveiliging voor de kookzone is in werking getreden. Schakel de kookzone uit. Schakel de kookzone weer in.
gaat branden
• Geen pan op de kookzone. Zet een pan op de kookzone.
• Geen correcte pan. Gebruik een geschikte pan.
• De diameter van de bodem van de pan is te klein voor de
kookzone. Zet de pan op een kleinere kookzone.
en een cijfer gaan branden.
Het apparaat heeft een storing.
Koppel het apparaat enige tijd los van de elektrische voeding.
Haal de zekering uit de zekeringenkast in uw huis. Zet de zekering terug. Als
weer gaat branden, neem dan contact op
met de klantenservice.
gaat branden
Er klinkt geen signaal wanneer
u de toetsen van het bedieningspaneel aanraakt
Er is een storing opgetreden in het apparaat, omdat er een pan
is drooggekookt of omdat u een ongeschikte pan heeft gebruikt. Oververhittingsbeveiliging voor de kookzone is in werking getreden. De automatische uitschakeling is in werking getreden.
Schakel het apparaat uit. Verwijder de hete pan. Schakel de
kookzone na ongeveer 30 seconden opnieuw in.
zou moeten verdwijnen, restwarmte-indicatie kan blijven staan. Laat
het kookgerei afkoelen en controleer het aan de hand van het
hoofdstuk "Kookgerei voor de inductiekookzone".
De signalen gaan uit.
Schakel de signalen in.
Als u door het volgen van de bovenstaande suggesties het probleem niet kunt oplossen,
dient u contact op te nemen met uw vakhandelaar of de klantenservice. Geef de gegevens door van het typeplaatje, een driecijferige code voor de glaskeramische plaat (bevindt zich op de hoek van de kookplaat) en de foutmelding die wordt weergegeven.
Bij foutieve bediening van het apparaat wordt het bezoek van de technicus van de klantenservice of de vakhandelaar in rekening gebracht, zelfs tijdens de garantieperiode. De
instructies over de klantenservice en de garantiebepalingen vindt u in het garantieboekje.
Milieubescherming
15
MILIEUBESCHERMING
Het symbool
op het product of op de verpakking wijst erop dat dit product niet als
huishoudafval mag worden behandeld, maar moet worden afgegeven bij een
verzamelpunt waar elektrische en elektronische apparatuur wordt gerecycled. Als u
ervoor zorgt dat dit product op de juiste manier wordt verwijderd, voorkomt u mogelijke
negatieve gevolgen voor mens en milieu die zich zouden kunnen voordoen in geval van
verkeerde afvalverwerking. Voor gedetailleerdere informatie over het recyclen van dit
product, kunt u contact opnemen met de gemeente, de gemeentereiniging of de winkel
waar u het product hebt gekocht.
Verpakkingsmateriaal
De verpakkingsmaterialen zijn milieuvriendelijk en herbruikbaar. De kunststof onderdelen
zijn gemarkeerd, bijv.: >PE<,>PS<, etc. Gooi het verpakkingsmateriaal weg in de juiste
afvalcontainer bij uw plaatselijke afvalverwerkingsdienst.
16
Contents
Thank you for choosing one of our high-quality products.
To ensure optimal and regular performance of your appliance please read this
instruction manual carefully. It will enable you to navigate all processes perfectly
and most efficiently. To refer to this manual any time you need to, we
recommend you to keep it in a safe place. And please pass it to any future owner
of the appliance.
We wish you much joy with your new appliance.
CONTENTS
SAFETY INFORMATION
16
INSTALLATION INSTRUCTIONS
17
PRODUCT DESCRIPTION
20
OPERATING INSTRUCTIONS
21
On and Off
21
Automatic Switch Off
21
The heat setting
22
Automatic Heat Up
22
Switching on and off the power function
22
Using the Timer
23
STOP+GO
Lock
The child safety device
OffSound Control (Deactivation and
activation of the sounds)
HELPFUL HINTS AND TIPS
CARE AND CLEANING
24
24
24
WHAT TO DO IF…
27
ENVIRONMENT CONCERNS
Packaging material
28
28
24
25
26
Subject to change without notice
SAFETY INFORMATION
For your safety and correct operation of the appliance, read this manual carefully before
installation and use. Always keep these instructions with the appliance even if you move
or sell it. Users must fully know the operation and safety features of the appliance.
General safety
WARNING!
Persons (including children) with reduced physical sensory, mental capabilities or lack of
experience and knowledge must not use the appliance. They must have supervision or
instruction for the operation of the appliance by a person responsible for their safety.
Child safety
• Only adults can use this appliance. Children must get supervision to make sure that
they do not play with the appliance.
• Keep all packaging away from children. There is a risk of suffocation.
• Keep children away from the appliance when it is on.
Installation instructions
17
WARNING!
Start the child safety device to prevent small children and pets from an accidental activation of the appliance.
Safety during operation
• Remove all packaging, stickers and layers from the appliance before the first use.
• Set the cooking zones to "off" after each use.
• Risk of burns! Do not put metallic objects, for example cutlery or saucepan lids, on the
cooking surface, as they can become hot.
• Users with an implanted pacemaker must keep their upper body minimum 30 cm from
induction cooking zones that are switched on.
WARNING!
Fire danger! Overheated fats and oils can catch fire very quickly.
Correct operation
•
•
•
•
Always monitor the appliance during operation.
Only use the appliance for domestic cooking tasks!
Do not use the appliance as a work or a storage surface.
Do not put or keep very flammable liquids and materials, or fusible objects (made of
plastic or aluminium) on or near the appliance.
• Be careful when you connect the appliance to the near sockets. Do not let electricity
bonds touch the appliance or hot cookware. Do not let electricity bonds tangle.
How to prevent a damage to the appliance
• If the objects or cookware fall on the glass ceramic, the surface can be damaged.
• Cookware made of cast iron, cast aluminium or with damaged bottoms can scratch
the glass ceramic if you move them on the surface.
• Do not let cookware boil dry to prevent the damage to cookware and glass ceramics.
• Do not use the cooking zones with empty cookware or without cookware.
• Do not cover the parts of the appliance with aluminium foil.
• Do not cover the ventilation space of 5 mm between the worktop and front of the
unit below it.
WARNING!
If there is a crack on the surface, disconnect power supply to prevent the electric
shock.
INSTALLATION INSTRUCTIONS
Before the installation , note down the serial number (Ser. Nr.) from the rating plate.
The rating plate of the appliance is on its lower casing.
949 593 273 01
HK854220X-B
58 GBD C2 AU 220-240 V 50-60-Hz Induction 7,4 kW
7,4 kW
AEG-ELECTROLUX
18
Installation instructions
Safety instructions
WARNING!
You must read these!
Make sure that the appliance is not damaged because of transportation. Do not connect
a damaged appliance. If it is necessary, speak to the supplier.
Only an authorised service technician can install, connect or repair this appliance. Use
only original spare parts.
Only use built-in appliances after you assemble the appliance into correct built-in units
and work surfaces that align to the standards.
Do not change the specifications or modify this product. Risk of injury and damage to
the appliance.
Fully obey the laws, ordinances, directives and standards in force in the country where
you use the appliance (safety regulations, recycling regulations, electrical safety rules etc.)!
Keep the minimum distances to other appliances and units!
Install anti-shock protection, for example install the drawers only with a protective floor
directly below the appliance!
Protect the cut surfaces of the worktop against moisture with a correct sealant!
Seal the appliance to the work top with no space left with a correct sealant!
Protect the bottom of the appliance from steam and moisture, e.g. from a dishwasher or
oven!
Do not install the appliance adjacent to doors and below windows! If not, hot cookware
can be hit off the hob when you open doors or windows.
WARNING!
Risk of injury from electrical current. Carefully obey the instructions for electrical connections.
•
•
•
•
•
•
•
The electrical mains terminal is live.
Make electrical mains terminal free of voltage.
Install correctly to give anti-shock protection.
Loose and incorrect plug and socket connections can make the terminal become too hot.
A qualified electrician must install the clamping connections correctly.
Use a strain relief clamp on cable.
Use the correct mains cable of type H05BB-F Tmax 90°C (or higher) for a single-phase
or two-phase connection.
• Replace the damaged mains cable with a special cable (type H05BB-F Tmax 90°C; or
higher). Speak your local Service Force Centre.
The appliance must have the electrical installation which lets you disconnect the appliance from the mains at all poles with a contact opening width of minimum 3 mm.
You must have correct isolation devices: line protecting cut-outs, fuses (screw type fuses
removed from the holder), earth leakage trips and contactors.
Installation instructions
Assembly
min. 500 mm
min.
50 mm
min.
50 mm
min.
5 mm
R 5mm
=
600mm
490+1mm
750+1mm
=
min.
20 mm
min.
25 mm
min.
5 mm
If you use a protection box (additional accessory), the front ventilation space of 5 mm and protective floor directly below the appliance are not
necessary.
min.
38 mm
min.
5 mm
19
20
Product description
PRODUCT DESCRIPTION
Cooking surface layout
1
2
180
1 Induction cooking zone 1800W, with
the Power function 2800W
2 Induction cooking zone 2400W, with
the Power function 3700W
3 Control panel
4 Induction cooking zone 1400 W, with
Power function 2500W
5 Induction cooking zone 1800W, with
the Power function 2800W
300
mm
mm
180
145
5
4
mm
mm
3
Control panel layout
1
2
10
3
4
9
8
5
7
6
Use the sensor fields to operate the appliance. Indicators, displays and sounds tell
which functions operate.
sensor field
function
1
starts and stops the hob
2
starts and stops the key lock or child lock
3
cooking zones' indicators of timer
shows for which zone you set the time
4
the timer display
shows the time in minutes
starts the Power function
5
6
a heat setting display
shows the heat setting
7
a control bar
to set the heat setting
8
/
increases or decreases the time
9
selects the cooking zone
10
starts and stops STOP+GO
Operating instructions
21
Heat setting displays
Display
Description
The cooking zone is off
The cooking zone operates
-
Keep Warm /
function is on
The automatic heat-up function is on
Power function is on
+ digit
There is a malfunction
/
OptiHeat Control (3 step Residual heat indicator): still cooking / keep
warm / residual heat
/
Lock/Child safety function is on
Cookware unsuitable or too small or no cookware on the cooking zone
The automatic switch off is on
OptiHeat Control (3 step Residual heat indicator)
WARNING!
\ \ Risk of burns from residual heat!
OptiHeat Control indicates the level of the residual heat. The induction cooking zones
make the heat necessary for cooking directly in the bottom of the cookware. The glass
ceramic is heated by the heat of the cookware.
OPERATING INSTRUCTIONS
On and Off
Touch
for 1 second to start or stop the appliance.
Automatic Switch Off
The function stops the hob automatically if:
• all cooking zones are off.
• you do not set the heat setting after you start the hob.
• you cover a sensor field with an object (a pan, a cloth, etc.) for longer than 10 seconds. The sound operates until you remove the object.
• the hob gets too hot (e.g. when a saucepan boils dry). Before you use the hob again,
the cooking zone must be cool.
• you use incorrect cookware. comes on and after 2 minutes the cooking zone stops
automatically.
• you do not stop a cooking zone or change the heat setting. After some time comes
on and the hob stops. See the table.
22
Operating instructions
Automatic Switch Off times
Heat setting
Stops after
6 hours
-
-
-
5 hours
4 hours
1.5 hours
The heat setting
Touch the control bar at the heat setting.
Change to the left or the right, if it is necessary.
Do not release before you have a correct heat setting. The display shows the heat setting.
P
Automatic Heat Up
12
11
10
9
8
7
6
5
4
3
2
1
0
1
2 3 4 5 6 7
8 9 10 11 12 13 14
You can get a necessary heat setting in a shorter time if you activate the Automatic Heat
Up function. This function sets the highest heat setting for some time (see the graphic),
and then decreases to the necessary heat setting.
To start the Automatic Heat Up function for a cooking zone:
1. Touch ( comes on in the display).
2. Immediately touche the necessary heat setting. After 3 seconds comes on in the
display.
To stop the function change the heat setting.
Switching on and off the power function
The power function gives more power to an induction cooking zone for no longer than
.
10 minutes. After that time, the induction cooking zone automatically sets back to
.
To start it , touch and comes on. To stop it, set a heat setting between and
Operating instructions
23
Power management
The power management divides the power between two cooking zones in a pair (see the figure). The power function increases the power to
the maximum level for one cooking zone in the
pair and automatically decreases in the second
cooking zone to a lower power level. The display
for the reduced zone alternates.
Using the Timer
Count Down Timer
Use the Count Down Timer to set how long the cooking zone operates for one cooking
session.
Set the Count Down Timer after the selection of the cooking zone.
You can set the heat setting before or after you set the timer.
• Selection of the cooking zone: touch again and again until the indicator of a
necessary cooking zone comes on.
• Starting the Count Down Timer: touch of the timer to set the time ( 00 - 99
minutes). When the indicator of the cooking zone flashes slower, the time counts down.
• Checking the remaining time: select the cooking zone with . The indicator of
the cooking zone flashes faster. Display shows the remaining time.
• Changing the Count Down Timer: select the cooking zone with touch or .
• Stopping the timer: select the cooking zone with . Touch . The remaining time
counts backwards to 00 . The indicator of the cooking zone goes out. To switch off
You can also touch and at the same time.
When the time elapses, the sound operates and 00 flashes. The cooking zone switches
off.
• Stopping the sound: touch
CountUp Timer (Count up timer)
Use the CountUp Timer to monitor how long the cooking zone operates.
• Selection of the cooking zone (if more than 1 cooking zone operate): touch
again and again until the indicator of a necessary cooking zone comes on.
• Starting the CountUp Timer: touch of the timer comes on. When the indicator
of the cooking zone flashes slower, the time counts up, display switches between
and time elapsed (minutes)
• Checking the elapsed time: select the cooking zone with . The indicator of the
cooking zone flashes faster. Display shows the elapsed time.
• Stopping the CountUp Timer: select the cooking zone with and touch or
to switch off the timer. The indicator of the cooking zone goes out.
24
Operating instructions
Minute Minder
You can use the timer as a Minute Minder while cooking zones do not operate. Touch
. Touch or of the timer to select the time. When the time elapses, the sound
operates and 00 flashes.
• Stopping the sound: touch
STOP+GO
The
function sets all cooking zones that operate to a Keep Warm setting ( ).
operates, you cannot change the heat setting.
When
does not stop the timer function.
• To activate this function touch
. comes on.
• To deactivate this function touch
. The heat setting that you set before comes on.
Lock
You can lock the control panel, but not . It prevents an accidental change of the heat
setting.
To start this function touch . The symbol comes on for 4 seconds.
The Timer stays on.
To stop this function touch . The heat setting that you set before comes on.
When you stop the appliance, you also stop this function.
The child safety device
This function prevents an accidental operation of the hob.
Starting the child safety device
• Start the hob with . Do not set the heat settings .
• Touch for 4 seconds. The symbol comes on.
• Stop the hob with .
Switching off the child safety device
• Start the hob with . Do not set the heat settings . Touch for 4 seconds. The
symbol comes on.
• Stop the hob with .
Overriding the child safety device for one cooking session
• Start the hob with . The symbol comes on.
• Touch for 4 seconds. Set the heat setting in less than 10 seconds. You can operate the hob.
• When you stop the hob with , the child safety device operates again.
OffSound Control (Deactivation and activation of the sounds)
Deactivation of the sounds
Deactivate the appliance.
Touch for 3 seconds. The displays come on and go out. Touch for 3 seconds.
comes on, the sound is on. Touch , comes on, the sound is off.
When this function operates, you can hear the sounds only when:
• you touch
• the Minute Minder comes down
• the Count Down Timer comes down
Helpful hints and tips
25
• you put something on the control panel.
Activation of the sounds
Deactivate the appliance.
Touch for 3 seconds. The displays come on and go out. Touch for 3 seconds.
comes on, because the sound is off. Touch , comes on. The sound is on.
HELPFUL HINTS AND TIPS
Use the induction cooking zones with suitable cookware.
Cookware for induction cooking zones
In induction cooking a powerful electromagnetic field generates an almost instant heat
inside the cookware.
Cookware material
• correct: cast iron, steel, enamelled steel, stainless steel, a multi-layer bottom (marked
as correct by a manufacturer).
• not correct: aluminium, copper, brass, glass, ceramic, porcelain.
Cookware is correct for an induction hob if …
• ... some water boils very quickly on a zone set to the highest heat setting..
• ... a magnet pulls on to the bottom of the cookware.
The bottom of the cookware must be as thick and flat as possible.
Cookware dimensions : induction cooking zones adapt to the dimension of the bottom
of the cookware automatically to some limit. But, the magnetic part of the bottom of
the cookware must have a minimum diameter of approximately 3/4 of the cooking zones.
Energy saving
• If possible, always put the lids on the cookware.
• Put cookware on a cooking zone before you start it.
Öko Timer (Eco Timer)
To save the energy, the heater of the cooking zone switches itself off earlier than count
down timer signal. The heating time reduction depends on cooking level and cooking time.
Examples of cooking applications
The data in the table is for guidance only.
Heat
setting
1
1-3
Use to:
Keep cooked foods warm
Time
as required
Hollandaise sauce, melt: butter, choco- 5-25
late, gelatine
min
Hints
Cover
Mix occasionally
26
Care and cleaning
Heat
setting
Use to:
Time
10-40
min
Hints
1-3
Solidify: fluffy omelettes, baked eggs
Cook with a lid on
3-5
Simmer rice and milkbased dishes, heat- 25-50
ing up ready-cooked meals
min
Add at least twice as much liquid
as rice, stir milk dishes part way
through
5-7
Steam vegetables, fish, meat
20-45
min
Add a few tablespoons of liquid
7-9
Steam potatoes
20-60
min
Use max. ¼ l water for 750 g of potatoes
7-9
Cook larger quantities of food, stews
and soups
60-150
min
Up to 3 l liquid plus ingredients
9-12
Gentle fry: escalope, veal cordon bleu,
cutlets, rissoles, sausages, liver, roux,
eggs, pancakes, doughnuts
as required
Turn halfway through
12-13
Heavy fry, hash browns, loin steaks,
steaks
5-15
min
Turn halfway through
14
Boil large quantities of water, cook pasta, sear meat (goulash, pot roast), deep fry chips
The Power function is suitable for heating large quantities of water.
Information on acrylamides
According to the newest scientific knowledge, if you brown food (specially the one which
contains starch), acrylamides can pose a health risk. Thus, we recommend that you cook
at the lowest temperatures and do not brown food too much.
Operating noises
If you can hear
• cracking noise: cookware is made of different materials (Sandwich construction).
• whistling: you use one or more cooking zones with high power levels and the cookware is made of different materials (Sandwich construction).
• humming: you use high power levels.
• clicking: electric switching occurs.
• hissing, buzzing: the fan operates.
The noises are normal and do not refer to any defects.
CARE AND CLEANING
Clean the appliance after each use.
Always use cookware with clean bottom.
WARNING!
Sharp objects and abrasive cleaning agents will damage the appliance.
For your safety, do not clean the appliance with steam blasters or high-pressure cleaners.
What to do if…
27
Scratches or dark stains on the glass ceramic have no effect on how the appliance operates.
To remove the dirt:
1. – Remove immediately: melted plastic, plastic foil, and food with sugar. If not, the
dirt can cause damage to the appliance. Use a special scraper for the glass . Put
the scraper on the glass surface at an acute angle and move the blade on the surface .
– Remove after the appliance is sufficiently cool: limescale rings , water rings,
fat stains, shiny metallic discolorations. Use a special cleaning agent for glass ceramic or stainless steel.
2. Clean the appliance with a moist cloth and some detergent.
3. At the end rub the appliance dry with a clean cloth.
WHAT TO DO IF…
Problem
Possible cause and remedy
You cannot start the appliance
or operate it.
• You touched 2 or more sensor fields at the same time. Only
touch one sensor field.
• There is water or fat stains on the control panel. Clean the
control panel
• Start the appliance again and set the heat setting in 10 seconds.
• The child safety device or key lock or Stop+Go operates. See
the chapter Operating the appliance.
A sound operates when the ap- You covered one or more sensor fields. Uncover the sensor fields.
pliance is off.
The residual heat indicator
does not come on.
The cooking zone is not hot because it operated only for a
short time. If the cooking zone is supposed to be hot, speak to
the After Sales Service.
Heat setting alternates
The Power management is active. See the section Power management.
A sound operates and appliYou covered
ance starts and stops again. After 5 seconds one more sound
operates.
. Uncover the sensor field.
comes on
• The automatic switch-off operates. Stop the appliance and
start it again.
• Overheating protection for the cooking zone operates.
Switch off the cooking zone. Switch on the cooking zone
again.
comes on
• No cookware on the cooking zone. Put cookware on the cooking zone.
• Not correct cookware. Use the correct cookware.
• The diameter of the bottom of the cookware is too small for
the cooking zone. Move cookware to a smaller cooking zone.
28
Environment concerns
Problem
and number come on.
comes on
There is no signal when you
touch panel keys
Possible cause and remedy
There is an error in the appliance.
Disconnect the appliance from the electrical supply for some
time. Disconnect the fuse from the electrical system of the
house. Connect again. If
comes on again, speak to the after
sales service.
There is an error in the appliance, because a cookware boils dry
or you use not correct cookware. Overheating protection for
the cooking zone operates. The automatic switch-off operates.
Switch off the appliance. Remove the hot cookware. After approximately 30 seconds switch on the cooking zone
again.
should disappear, residual heat indicator can stay.
Cool down the cookware and check it with the section Cookware for the induction cooking zone.
The signals are off.
Switch on the signals.
If you tried the above solutions and cannot repair the problem, speak to your dealer or
the Customer Care Department. Give the data from the rating plate, three-digit-letter
code for the glass ceramic (it is in the corner of the cooking surface) and an error message that comes on.
If you operated the appliance incorrectly, the servicing by a customer service technician
or dealer will not be free of charge, even during the warranty period. The instructions
about the customer service and conditions of guarantee are in the guarantee booklet.
ENVIRONMENT CONCERNS
The symbol
on the product or on its packaging indicates that this product may not
be treated as household waste. Instead it should be taken to the appropriate collection
point for the recycling of electrical and electronic equipment. By ensuring this product is
disposed of correctly, you will help prevent potential negative consequences for the
environment and human health, which could otherwise be caused by inappropriate
waste handling of this product. For more detailed information about recycling of this
product, please contact your local council, your household waste disposal service or the
shop where you purchased the product.
Packaging material
The packaging materials are friendly to the environment and can be recycled. The plastic
components are identified by marking: >PE<,>PS<, etc. Discard the packaging materials
as household waste at the waste disposal facilities in your municipality.
Guarantee/Customer Service Centres
EURO-LINE APPLIANCES
LENGTH OF WARRANTY
EURO-LINE WILL PAY FOR:
TWO YEAR FULL WARRANTY
Replacement parts and/or labour to repair
defects in materials or workmanship. Service
must be provided by an authorized Euro-Line
company (unless advised otherwise).
from original date of purchase, including parts
and labour, to the first purchaser of this
appliance
THIS GUARANTEE DOES NOT COVER COMMERCIAL USE.
The name Euro-Line Appliances, for service matters, incorporates work performed
by authorized service agents or service companies.
EXCEPTIONS:
EURO-LINE APPLIANCES WILL NOT PAY FOR THE FOLLOWING SERVICE
CALLS:
1. To install or correct the installation of an appliance
2. To instruct the use of an appliance.
3. To replace house fuses, re-set circuit breakers or correct house wiring.
4. To correct house plumbing.
5. To clean drains, filters or garbage disposers.
6. To repair an appliance if it fails due to misuse or abuse.
EURO-LINE APPLIANCES WILL NOT PAY WHEN THE FOLLOWING OCCURS:
1. Damage resulting from fires, acts of God, alteration, improper installation, or
installation not in accordance with local building codes.
2. Pickup or delivery of major appliances requiring service. The appliances are
designed to be repaired in the home. However, Euro-Line will not be responsible
for travelling and labour costs if the customer lives in excess of 50 km/30 miles,
or if the travel time is in excess of 30 minutes from the nearest service center.
Any excess to this will not be covered by the warranty.
In no event, will Euro-Line be responsible for incidental or consequential damages.
For warranty service and parts, contact EURO-PARTS. Service will be provided
during normal business hours. Should you have a service problem that is not
resolved locally, contact:
For Service and Parts Contact:
35
EURO-PARTS, USA
EURO-PARTS, CANADA
EURO-LINE APPLIANCES
Tel: 1-800-561-4614
Tel: 1-800-678-8352
1-800-421-6332
Fax: 1-519-528-5001
Fax: 1-519-528 5001
Tel. Direct: 1-905-829-3980
Fax: 1-905-829-3985
User Instructions & Installation Manual
Service & Repair
To save you time and money please have the following information ready in case
you have to call for service:
• Name of the dealer from whom you purchased the appliance.
• Model number (shown on the rating plate)
• Serial number (shown on the rating plate)
• Date of purchase.
You should also retain the original purchase receipt to support any claim made
under the warranty. (We suggest you staple the receipt to this page).
If service is required, contact the Service Center:
EURO-PARTS, CANADA
EURO-PARTS, USA
Tel: 1 800 678 8352
Tel: 1-800-561-4614
Fax: 1-519-528-500
Fax: 1-519-528-5001
DISTRIBUTED BY: EURO-LINE APPLIANCES 2278 SPEERS ROAD OAKVILLE,
ONTARIO CANADA L6L 2X8 1-800-421-6332 Tel: 905-829-3980 Fax:
905-829-3985 www.euro-line-appliances.com
36