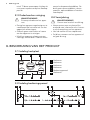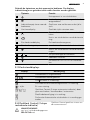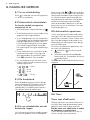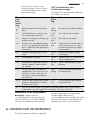
1
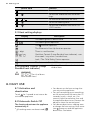
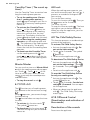
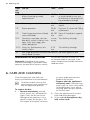
HK955070FB
NL Gebruiksaanwijzing
EN User manual
PT Manual de instruções
2
17
31
2
www.aeg.com
INHOUD
1.
2.
3.
4.
5.
6.
7.
8.
9.
10.
VEILIGHEIDSINFORMATIE . . . . . . . . . . . . . . . . . . . . . . . . . . . . . . . . . . . . . . . . . . . . . . . . . . . . 3
VEILIGHEIDSVOORSCHRIFTEN . . . . . . . . . . . . . . . . . . . . . . . . . . . . . . . . . . . . . . . . . . . . . . . . 4
BESCHRIJVING VAN HET PRODUCT . . . . . . . . . . . . . . . . . . . . . . . . . . . . . . . . . . . . . . . . . . . 6
DAGELIJKS GEBRUIK . . . . . . . . . . . . . . . . . . . . . . . . . . . . . . . . . . . . . . . . . . . . . . . . . . . . . . . . 8
NUTTIGE AANWIJZINGEN EN TIPS . . . . . . . . . . . . . . . . . . . . . . . . . . . . . . . . . . . . . . . . . . . 10
ONDERHOUD EN REINIGING . . . . . . . . . . . . . . . . . . . . . . . . . . . . . . . . . . . . . . . . . . . . . . . . 11
PROBLEEMOPLOSSING . . . . . . . . . . . . . . . . . . . . . . . . . . . . . . . . . . . . . . . . . . . . . . . . . . . . . 12
MONTAGE-INSTRUCTIES . . . . . . . . . . . . . . . . . . . . . . . . . . . . . . . . . . . . . . . . . . . . . . . . . . . 13
TECHNISCHE INFORMATIE . . . . . . . . . . . . . . . . . . . . . . . . . . . . . . . . . . . . . . . . . . . . . . . . . . 15
MILIEUBESCHERMING . . . . . . . . . . . . . . . . . . . . . . . . . . . . . . . . . . . . . . . . . . . . . . . . . . . . . . 16
VOOR PERFECTE RESULTATEN
Bedankt dat u voor dit AEG product heeft gekozen. Dit apparaat is ontworpen om vele jaren
uitstekend te presteren, met innovatieve technologieën die het leven gemakkelijker helpen
maken – functies die gewone apparaten wellicht niet hebben. Neem een paar minuten de tijd
om het door te lezen zodat u er optimaal van kunt profiteren.
Ga naar onze website voor:
Advies over gebruik, brochures, het oplossen van problemen en
onderhoudsinformatie:
www.aeg.com
Registreer uw product voor een betere service:
www.aeg.com/productregistration
Koop accessoires, verbruiksartikelen en originele reserveonderdelen voor uw
apparaat:
www.aeg.com/shop
KLANTENSERVICE
Wij raden altijd het gebruik van originele onderdelen aan.
Zorg er als u contact opneemt met de klantenservice voor dat u de volgende gegevens bij de
hand hebt.
De informatie staat op het typeplaatje. model, productnummer, serienummer.
Waarschuwing - Belangrijke veiligheidsinformatie.
Algemene informatie en tips
Milieu-informatie
Wijzigingen voorbehouden.
NEDERLANDS
3
1. VEILIGHEIDSINFORMATIE
Lees zorgvuldig de meegeleverde instructies voor installatie en gebruik van het apparaat. De fabrikant is
niet verantwoordelijk voor letsel en schade veroorzaakt
door een foutieve installatie. Bewaar de instructies van
het apparaat voor toekomstig gebruik.
1.1 Veiligheid van kinderen en kwetsbare mensen
WAARSCHUWING!
Gevaar voor verstikking, letsel of permanente invaliditeit.
• Dit apparaat kan worden gebruikt door kinderen van
8 jaar en ouder en door mensen met beperkte lichamelijke, zintuiglijke of verstandelijke vermogens of
een gebrek aan ervaring en kennis, indien zij onder
toezicht staan van een volwassene of van iemand die
verantwoordelijk is voor hun veiligheid.
• Laat kinderen niet met het apparaat spelen.
• Houd alle verpakkingsmaterialen uit de buurt van kinderen.
• Houd kinderen en huisdieren uit de buurt van het apparaat als het in werking is of afkoelt. Het apparaat is
heet.
• Als het apparaat is uitgerust met een kinderbeveiliging, raden wij aan dit te activeren.
• Reiniging en onderhoud mag niet worden uitgevoerd
door kinderen zonder toezicht.
1.2 Algemene veiligheid
• Het apparaat en de toegankelijke onderdelen ervan
worden heet tijdens gebruik. De verwarmingselementen niet aanraken.
• Bedien het apparaat niet met een externe timer of
een apart afstandbedieningssysteem.
4
www.aeg.com
• Zonder toezicht koken op een kookplaat met vet of
olie kan gevaarlijk zijn en brandgevaar opleveren.
• Probeer brand nooit met water te blussen, maar schakel in plaats daarvan het apparaat uit en bedek de
vlam, d.w.z. met een deksel of blusdeken.
• Bewaar geen voorwerpen op de kookplaten.
• Gebruik geen stoomreiniger om het apparaat schoon
te maken.
• Metalen voorwerpen, zoals messen, vorken, lepels en
deksels mogen niet op de kookplaat worden geplaatst, aangezien ze heet kunnen worden.
• Als de glaskeramische oppervlakte gebarsten is,
schakel het apparaat dan uit om het risico op elektrische schokken te voorkomen.
2.
VEILIGHEIDSVOORSCHRIFTEN
2.1 Montage
WAARSCHUWING!
Alleen een erkende installatietechnicus mag het apparaat installeren.
• Verwijder alle verpakkingsmaterialen.
• Installeer en gebruik geen beschadigd
apparaat.
• Volg de installatie-instructies op die
zijn meegeleverd met het apparaat.
• Houd de minimumafstand naar andere
apparaten en units in acht.
• Wees voorzichtig met het verplaatsen
van het apparaat, het is zwaar. Draag
altijd veiligheidshandschoenen.
• Dicht de oppervlakken af met kit om
te voorkomen dat ze gaan opzetten
door vocht.
• Bescherm de bodem van het apparaat
tegen stoom en vocht.
• Installeer het apparaat niet naast een
deur of onder een raam. Dit voorkomt
dat hete pennen van het apparaat val-
len als de deur of het raam wordt geopend.
• Als het apparaat geïnstalleerd is boven lades zorg er dan voor dat de
ruimte tussen de onderkant van het
apparaat en de bovenste lade voldoende is voor luchtcirculatie.
• De onderkant van het apparaat kan
heet worden. Wij raden aan om een
onbrandbaar scheidingspaneel te
plaatsen onder het apparaat om te
voorkomen dat de onderkant kan worden aangeraakt.
Aansluiting aan het
elektriciteitsnet
WAARSCHUWING!
Gevaar voor brand en elektrische
schokken.
• Alle elektrische aansluitingen moeten
door een gediplomeerd elektromonteur worden gemaakt.
• Dit apparaat moet worden aangesloten op een geaard stopcontact.
• Verzeker u ervan dat de stekker uit het
stopcontact is getrokken, voordat u
NEDERLANDS
•
•
•
•
•
•
•
•
•
welke werkzaamheden dan ook uitvoert.
Gebruik de juiste stroomkabel.
Voorkom dat de stroomkabels verstrikt
raken.
Zorg ervoor dat de stroomkabel of
stekker (indien van toepassing) het hete apparaat of heet kookgerei niet
aanraakt als u het apparaat op de nabijgelegen contactdozen aansluit
Zorg ervoor dat het apparaat correct
is geïnstalleerd. Losse en onjuiste
stroomkabels of stekkers (indien van
toepassing) kunnen ervoor zorgen dat
de contactklem te heet wordt.
Zorg ervoor dat er een schokbescherming wordt geïnstalleerd.
Zorg ervoor dat het snoer niet wordt
belast door trekken.
Zorg dat u de hoofdstekker (indien
van toepassing) of kabel niet beschadigt. Neem contact op met de serviceafdeling of een elektromonteur om
een beschadigde hoofdkabel te vervangen.
De elektrische installatie moet een isolatieapparaat bevatten waardoor het
apparaat volledig van het lichtnet afgesloten kan worden. Het isolatieapparaat moet een contactopening hebben met een minimale breedte van 3
mm.
Gebruik alleen de juiste isolatie-apparaten: stroomonderbrekers, zekeringen (schroefzekeringen moeten uit de
houder worden verwijderd), aardlekschakelaars en contactgevers.
2.2 Gebruik
WAARSCHUWING!
Gevaar op letsel, brandwonden
of elektrische schokken
• Gebruik dit apparaat in een huishoudelijke omgeving.
• De specificatie van het apparaat mag
niet worden veranderd.
• Bedien het apparaat niet met een externe timer of een apart afstandbedieningssysteem.
• Laat het apparaat tijdens het gebruik
niet onbeheerd achter.
5
• Bedien het apparaat niet met natte
handen of als het contact maakt met
water.
• Leg geen bestek of deksels van steelpannen op de kookzones. Ze zijn heet.
• Zet de kookzone op "uit" na elk gebruik.
• Het apparaat mag niet worden gebruikt als werkblad of aanrecht.
• Sluit het apparaat direct af van de
stroomtoevoer als het oppervlak van
het apparaat gebroken is. Dit om elektrische schokken te voorkomen.
WAARSCHUWING!
Brand- of explosiegevaar.
• Verhitte vetten en olie kunnen ontvlambare damp afgeven. Houd vlammen of verwarmde voorwerpen uit de
buurt van vet en olie als u er mee
kookt.
• De dampen die hete olie afgeeft kunnen spontane ontbranding veroorzaken.
• Gebruikte olie die voedselresten bevat kan brand veroorzaken bij een lagere temperatuur dan olie die voor de
eerste keer wordt gebruikt.
• Plaats geen ontvlambare producten of
items die vochtig zijn door ontvlambare producten in, bij of op het apparaat.
• Probeer niet om een brand te blussen
met water. Haal het apparaat uit het
stopcontact en dek de vlammen af
met een deksel of blusdeken.
WAARSCHUWING!
Risico op schade aan het apparaat.
• Zet geen hete pannen op het bedieningspaneel.
• Laat kookgerei niet droogkoken.
• Laat geen voorwerpen of kookgerei
op het apparaat vallen. Het oppervlak
kan beschadigen.
• Activeer de kookzones niet met lege
pannen of zonder pannen erop.
• Geen aluminiumfolie op het apparaat
leggen.
• Pannen van gietijzer, aluminium of
met beschadigde bodems kunnen
krassen veroorzaken in het glaskera-
6
www.aeg.com
miek. Til deze voorwerpen altijd op als
u ze moet verplaatsen op het kookoppervlak.
2.3 Onderhoud en reiniging
neutrale schoonmaakmiddelen. Gebruik geen schuurmiddelen, schuursponsjes, oplosmiddelen of metalen
voorwerpen.
2.4 Verwijdering
WAARSCHUWING!
Risico op schade aan het apparaat.
WAARSCHUWING!
Gevaar voor letsel of verstikking.
• Reinig het apparaat regelmatig om te
voorkomen dat het materiaal van het
oppervlak achteruitgaat.
• Gebruik geen waterstralen of stoom
om het apparaat te reinigen.
• Maak het apparaat schoon met een
vochtige, zachte doek. Gebruik alleen
• Neem contact met uw plaatselijke
overheid voor informatie m.b.t. correcte afvalverwerking van het apparaat.
• Haal de stekker uit het stopcontact.
• Snijd het netsnoer van het apparaat af
en gooi dit weg.
3. BESCHRIJVING VAN HET PRODUCT
3.1 Indeling kookplaat
1
2
3
145mm
1 Kookzone
170mm
145/210/270mm
180mm
2 Kookzone
265mm
3 Kookzone
4 Kookzone
180mm
5 Bedieningspaneel
6 Kookzone
6
5
4
3.2 Indeling bedieningspaneel
1
2
3
12
4
11
5
10
9
8
6
7
NEDERLANDS
7
Gebruik de tiptoetsen om het apparaat te bedienen. De displays,
indicatielampjes en geluiden tonen welke functies worden gebruikt.
Tiptoets
Functie
1
Het apparaat in- en uitschakelen.
2
Het bedieningspaneel vergrendelen/
ontgrendelen.
3
Indicatielampje timer voor de
kookzones
Geeft aan voor welke zone u de tijd instelt.
4
Het timerdisplay
Geeft de tijd in minuten weer.
5
Functie Automatisch opwarmen inschakelen.
6
Het in- en uitschakelen van de buitenste
ring.
7
Een kookstanddisplay
De kookstand weergeven.
8
Een bedieningsstrip
voor het instellen van de kookstand.
Het in- en uitschakelen van de buitenste
ringen.
9
De tijd verlengen of verkorten.
/
10
11
Kookzone instellen.
12
De functie STOP+GO in- en uitschakelen.
3.3 Kookstanddisplays
Display-
Beschrijving
De kookzone is uitgeschakeld.
De kookzone wordt gebruikt.
-
De
-functie is in werking.
De automatische verwarmingsfunctie is in werking.
+ cijfer
Er is een storing.
/
OptiHeat Control (3 staps restwarmte-indicatie): door
gaan met koken / warmhouden / restwarmte.
/
Slot/kinderbeveiliging is in werking.
De functie Automatische uitschakelen is in werking getreden.
3.4 OptiHeat Control (3 staps
restwarmte-indicatie)
WAARSCHUWING!
/
/
Verbrandingsgevaar
door restwarmte!
OptiHeat Control geeft het niveau van
de restwarmte aan.
8
www.aeg.com
4. DAGELIJKS GEBRUIK
4.1 In- en uitschakeling
Raak
1 seconde aan om het apparaat
in– of uit te schakelen.
4.2 Automatisch uitschakelen
De functie schakelt het apparaat
automatisch uit als:
• Alle kookzones uitgeschakeld zijn (
).
• U de kookstand niet instelt nadat u het
apparaat hebt ingeschakeld.
• U iets hebt gemorst of iets langer dan
10 seconden op het bedieningspaneel
hebt gelegd (een pan, doek, etc.). Er
klinkt een geluidssignaal en het apparaat wordt uitgeschakeld. Verwijder
het voorwerp of reinig het bedieningspaneel.
• U een kookzone niet uitschakelt of de
kookstand verandert. Na enige tijd
branden en wordt het appagaat
raat uitgeschakeld. Zie hieronder.
• De verhouding tussen warmte-instelling en tijden van de automatische uitschakelingsfunctie:
•
,
— 6 uur
•
-
•
-
•
-
/
aan om de buiRaak sensorveld
tenste ring in te schakelen. Het controlelampje gaat branden Voor meer buitenste verwarmingskringen hetzelfde sensorveld opnieuw aanraken. Het bijbehorende controlelampje gaat branden.
Voer de procedure opnieuw uit om de
buitenste ring uit te schakelen. Het controlelampje gaat uit.
4.5 Automatisch opwarmen
U kunt een gewenste kookstand sneller
verkrijgen als u de functie Automatisch
opwarmen inschakelt. Deze functie schakelt even de hoogste kookstand in (zie
afbeelding) en verlaagt dan naar de gewenste kookstand.
De functie Automatisch opwarmen starten voor een kookzone:
1.
aanraken (
verschijnt op de
display).
2. Selecteer meteen de benodigde
kookstand. Na 3 seconden verschijnt
op de display.
Verander de kookstand om de functie te
stoppen.
— 5 uur
12
11
— 4 uur
10
9
— 1,5 uur
4.3 De kookstand
Raak de bedieningsstrip aan bij de gewenste kookstand. Corrigeer naar links
of rechts, indien nodig. Laat niet los
voordat de juiste kookstand is bereikt.
Het display toont de kookstand.
8
7
6
5
4
3
2
1
0
1
2 3 4 5 6 7
8 9 10 11 12 13 14
4.6 Timer
Timer met aftelfunctie
4.4 In- en uitschakelen van de
buitenste ringen
Het verwarmingsvlak kan worden aangepast aan de grootte van het kookgerei.
Gebruik de timer met aftelfunctie om in
te stellen hoe lang de kookzone wordt
gebruikt voor slechts deze ene keer.
Stel de timer met aftelfunctie in nadat
de kookzone is geselecteerd.
U kunt de kookstand vóór of na het instellen van de timer selecteren.
NEDERLANDS
• Voor het afstellen van de kookzone:raak
meerdere malen aan tot
het lampje van de gewenste kookzone
brandt.
• De timer met aftelfunctie activeren:
van de timer aan om de tijd in
Raak
te stellen ( 00 - 99 minuten). Als het
lampje van de kookzone langzaam
knippert, wordt de tijd afgeteld.
• Resterende tijd weergeven: selecteer de kookzone met
. Het indicatielampje van de kookzone gaat sneller knipperen. Op het display wordt
de resterende tijd weergegeven.
• De timer met aftelfunctie wijzin.
gen:selecteer de kookzone met
of
aan.
Raak
• De timer uitschakelen: stel de kookzone in met
. Raak
aan. De resterende tijd telt terug tot 00 . Het indicatielampje van de kookzone gaat
uit. Om de kookzone uit te schakelen
kunt u ook
en
gelijktijdig aanraken.
Als de afteltijd verstreken is, klinkt er
een geluidssignaal en knippert 00 .
De kookzone wordt uitgeschakeld.
• Het geluid stoppen: aanraken
CountUp Timer (De timer met
optelfunctie)
Gebruik CountUp Timer om in de gaten
te houden hoelang de kookzone werkt.
• Voor het afstellen van de kookzone
(als meer dan één kookzone
meerdere malen aan
werkt):raak
tot het lampje van de gewenste kookzone brandt.
• Voor het inschakelen van CountUp
van de timer
gaat
Timer:raak
branden. Als het lampje van de kookzone langzaam knippert, wordt de tijd
opgeteld. De display schakelt tussen
en getelde tijd (minuten).
• Om in de gaten te houden hoelang
de kookzone werkt: stel de kookzone
. Het indicatielampje van de
in met
kookzone gaat snel knipperen. Het
display geeft de tijd aan die de kookzone werkt.
9
• Voor het uitschakelen van CountUp
en
Timer: stel de kookzone in met
raak
of
aan voor het inschakelen
van de timer. Het indicatielampje van
de kookzone gaat uit.
Kookwekker
U kunt de timer als Kookwekker gebruiken als de kookzones uitgeschakeld zijn.
Raak
aan. Raak
of
van de timer
aan om de tijd in te stellen. Als de tijd
verstreken is, klinkt er een geluidssignaal
en knippert 00 .
• Het geluid stoppen: aanraken
4.7 STOP+GO
De
-functie stelt alle kookzones in op
de laagste instelling (
).
Als
in werking is, kunt u de warmteinstelling niet wijzigen.
stopt de timerfunctie niet.
• Voor het inschakelen van deze functie, raakt u
aan. Het symbool
gaat branden.
• Raak voor het uitschakelen van deze
functie
aan. De kookstand die u
eerder hebt ingesteld, wordt weergegeven.
4.8 Slot
Wanneer de kookzones in gebruik zijn,
kunt u het bedieningspaneel vergrendelen, maar niet
. Hiermee wordt voorkomen dat de kookstand per ongeluk
wordt veranderd.
Stel eerst de kookstand in.
aan.
Raak om deze functie te starten
Het symbool
verschijnt gedurende
vier seconden.
De timer blijft aan.
Raak om deze functie te stoppen
aan.
De kookstand die u eerder hebt ingesteld, wordt weergegeven.
Als u het apparaat stopt, stopt deze
functie ook.
4.9 De kinderbeveiliging
Deze functie voorkomt dat het apparaat
onbedoeld wordt gebruikt.
10 www.aeg.com
De kinderbeveiliging inschakelen
• Schakel het apparaat in met
. Stel
geen kookstand in.
• Raak
4 seconden aan. Het symbool
gaat branden.
• Schakel het apparaat uit met
.
De kinderbeveiliging uitschakelen
• Schakel het apparaat in met
. Stel
geen kookstand in. Raak
4 seconden aan. Het symbool
gaat branden.
• Schakel het apparaat uit met
.
De kinderbeveiliging gedurende een
kooksessie onderdrukken
• Schakel het apparaat in met
. Het
symbool
gaat branden.
• Raak
4 seconden aan. Stel de
kookstand in binnen 10 seconden. U
kunt het apparaat bedienen.
• Als u het apparaat uitschakelt met
,
gaat de kinderbeveiliging weer werken.
3 seconden aan. De displays
Raak
gaan aan en uit. Raak
3 seconden
aan.
gaat aan, het geluid is aan. Raak
aan,
gaat aan, het geluid is uit.
Als deze functie is ingeschakeld, kunt u
alleen de geluiden horen als:
• u
aanraakt
• de kookwekker af gaat
• de Timer met aftelfunctie gaat af
• als u iets op het bedieningspaneel
plaatst.
Inschakelen van de geluiden
Schakel het apparaat uit.
Raak
3 seconden aan. De displays
gaan aan en uit. Raak
3 seconden
aan.
gaat aan, omdat het geluid uit
aan,
gaat aan. Het gestaat. Raak
luid is aan.
4.10 OffSound Control (In- en
uitschakelen van de geluiden)
Uitschakelen van de geluiden
Schakel het apparaat uit.
5. NUTTIGE AANWIJZINGEN EN TIPS
5.1 Kookgerei
Informatie over het kookgerei
• De bodem van het kookgerei moet zo
dik en vlak mogelijk zijn.
• Kookgerei gemaakt van geëmailleerd
staal of met aluminium of kopperen
bodems, kunnen tot verkleuringen leiden van de glazen keramische kookplaat.
• Doe indien mogelijk altijd een deksel
op de pan.
• Zet het kookgerei op de kookzone
voordat u deze inschakelt.
• Schakel voor het einde van de bereidingstijd de kookzones uit, om gebruik te maken van de restwarmte.
• De bodems van de pannen en kookzones dienen dezelfde afmeting te
hebben.
5.3 Öko Timer (Eco-timer)
5.2 Energie besparen
Energie besparen
Om energie te besparen schakelt
het verwarmingselement van de
kookzone eerder uit dan het signaal van de timer met aftelfunc-
NEDERLANDS
tie klinkt. Het verschil in werkingstijd hangt af van het niveau
van de kookstand en de lengte
van de bereiding.
Tem- Gebruik om:
peratuurinstelling
11
5.4 Voorbeelden van
kooktoepassingen
De gegevens in de volgende tabel dienen slechts als richtlijn.
Tijdsinstelling
Tips
Bereide gerechten warmhouden
zoals
nodig
Een deksel op de pan doen
1-3
Hollandaisesaus, smelten: boter, chocolade, gelatine
5-25
min
Van tijd tot tijd mengen
1-3
Stollen: luchtige omeletten, ge- 10-40
bakken eieren
min
Met deksel bereiden
3-5
Zachtjes aan de kook brengen
van rijst en gerechten op melkbasis, reeds bereide gerechten
opwarmen
25-50
min
Voeg minimaal twee keer zo
veel vocht toe als rijst, gerechten op melkbasis regelmatig roeren.
5-7
Stomen van groenten, vis en
vlees
20-45
min
Een paar eetlepels vocht
toevoegen.
7-9
Aardappelen stomen
20-60
min
Gebruik max. ¼ l water voor
750 g aardappelen.
7-9
Bereiden van grotere hoeveelheden voedsel, stoofschotels
en soepen
60-150
min
Tot 3 l vloeistof plus ingrediënten.
9-12
Lichtjes braden: kalfsoester,
cordon bleu van kalfsvlees, koteletten, rissoles, worstjes, lever, roux, eieren, pannenkoeken, donuts
zoals
nodig
Halverwege de bereidingstijd omdraaien.
5-15
min
Halverwege de bereidingstijd omdraaien.
1
12-13 Door-en-door gebraden, opgebakken aardappelen, lendenbiefstukken, steaks
14
Aan de kook brengen van grotere hoeveelheden water, pasta koken,
aanbraden van vlees (goulash, stoofvlees), frituren van friet.
Informatie over acrylamides
Belangrijk! Volgens recente
wetenschappelijke informatie kan het
intensief bruinen van levensmiddelen
(met name in producten die zetmeel
6. ONDERHOUD EN REINIGING
Reinig het apparaat telkens na gebruik
bevatten), een gezondheidsrisico
vormen tengevolge van acrylamides.
Om die reden adviseren wij
levensmiddelen zoveel mogelijk bij lage
temperaturen gaar te laten worden en
de gerechten niet te veel te bruinen.
12 www.aeg.com
Gebruik altijd kookgerei met een schone
bodem.
Krassen of donkere vlekken in de
glaskeramiek hebben geen invloed op de werking van het apparaat.
Vuil verwijderen:
– Verwijder direct:gesmolten plastic, gesmolten folie en suikerhoudende gerechten. Anders kan het
vuil het apparaat beschadigen.
Gebruik een speciale schraper
voor de glazen plaat. Plaats de
schraper schuin op de glazen
1.
plaat en verwijder resten door het
blad over het oppervlak te schuiven.
– Verwijder nadat het apparaat
voldoende is afgekoeld:kalkvlekken, waterkringen, vetvlekken,
glimmende metaalachtige verkleuringen. Gebruik een speciaal
schoonmaakmiddel voor glaskeramiek of roestvrij staal.
2. Reinig het apparaat met een vochtige doek en een beetje afwasmiddel.
3. Wrijf het apparaat ten slotte droog
met een schone doek.
7. PROBLEEMOPLOSSING
Probleem
Mogelijke oorzaak
U kunt het apparaat niet Het apparaat is niet aaninschakelen of bedienen gesloten op een stopcontact of is niet goed
geïnstalleerd.
Oplossing
Controleer of het apparaat goed is aangesloten
op het stopcontact (zie
aansluitdiagram).
Schakel het apparaat opnieuw in en stel de kookstand binnen 10 seconden in.
U hebt twee of meer tip- Raak slechts één tiptoets
toetsen tegelijk aangetegelijk aan.
raakt.
De STOP+GO-functie is
in werking.
Raadpleeg het hoofdstuk
"Dagelijks gebruik".
Er bevindt zich water of Reinig het bedieningspavetspatten op het bedie- neel.
ningspaneel.
Er klinkt een geluidssignaal en het apparaat
wordt uitgeschakeld.
Er weerklinkt een geluidssignaal als het apparaat uit is.
U hebt een of meer tiptoetsen afgedekt.
Verwijder het voorwerp
van de tiptoetsen.
Het apparaat wordt uitgeschakeld.
U hebt iets op de tipgezet.
toets
Verwijder het voorwerp
van de tiptoets.
De restwarmte-indicatie
gaat niet aan.
De kookzone is niet
heet, omdat hij slechts
kortstondig is gebruikt.
Als het lang duurt alvorens de kookzone voldoende heet is, neem
dan contact op met de
klantenservice.
NEDERLANDS
Probleem
De automatische opwarmfunctie start niet.
Mogelijke oorzaak
13
Oplossing
Kookzone is heet.
Laat de kookzone voldoende afkoelen.
De hoogste kookstand is De hoogste kookstand
ingesteld.
heeft hetzelfde vermogen
als de automatische opwarmfunctie.
U kunt de buitenste ring
niet inschakelen.
Schakel eerst de binnenring in.
De sensorvelden worden warm.
Het kookgerei is te
Plaats groter kookgerei
groot of staat te dicht bij op de achterste kookzohet bedieningspaneel.
nes indien nodig.
Er klinkt geen geluidssignaal wanneer u de
tiptoetsen van het bedieningspaneel aanraakt.
De signalen zijn uitgeschakeld.
Activeer de signalen (zie
In- en uitschakelen van
geluiden).
gaat branden.
De automatische uitschakeling is in werking
getreden.
Schakel het apparaat uit
en weer in.
gaat branden.
De kinderbeveiliging of Raadpleeg het hoofdstuk
toetsblokkering is actief. "Dagelijks gebruik".
en een getal gaat
branden.
Er heeft zich een fout in
het apparaat voorgedaan.
Als u door het volgen van de bovenstaande suggesties het probleem niet
kunt oplossen, dient u contact op te nemen met uw vakhandelaar of de klantenservice. Geef de gegevens door van het
typeplaatje, een driecijferige code voor
de glaskeramiek (bevindt zich op de
hoek van het glazen oppervlak) en de
foutmelding die wordt weergegeven.
Ontkoppel het apparaat
enige tijd van de stroomtoevoer. Ontkoppel de
zekering uit het elektrische systeem van het
huis. Sluit het apparaat
weer
opnieuw aan. Als
gaat branden, neem dan
contact op met de klantenservice.
Controleer of u het apparaat op de juiste manier gebruikt hebt. Bij onjuist gebruik van het apparaat wordt het bezoek
van de technicus van de klantenservice
of de vakhandelaar in rekening gebracht,
zelfs tijdens de garantieperiode. De instructies over de klantenservice en de
garantiebepalingen vindt u in het garantieboekje.
8. MONTAGE-INSTRUCTIES
WAARSCHUWING!
Zie het hoofdstuk 'Veiligheidsinformatie'.
Voor montage
14 www.aeg.com
Noteer voor montage van het apparaat
de onderstaande informatie van het typeplaatje. Het typeplaatje bevindt zich
aan de onderkant van de behuizing van
het apparaat.
• Model ...........................
• Productnummer
(PNC) ........................................
• Serienummer (S.N.)..............
8.1 Inbouwapparatuur
• Inbouwapparaten mogen alleen worden gebruikt nadat zij ingebouwd zijn
in geschikte inbouwunits of werkbladen die aan de normen voldoen.
8.2 Aansluitkabel
• In het geval van een eenfase- of tweefase-aansluiting, moet het geschikte
netsnoer van het type H05BB-F Tmax.
90°C (of hoger) worden gebruikt.
8.4 Montage
min.
500mm
min.
50mm
R 5mm
55mm
490+1mm
880+1mm
• Vervang de beschadigde voedingskabel door een speciale kabel (type
H05BB-F Tmax 90°C of hoger). Neem
contact op met een klantenservice bij
u in de buurt.
8.3 Het bevestigen van de
afdichtstrip.
• Het werkblad op de plaats van de uitsnijding reinigen.
• Trek de afdichtstrip rondom de onderrand van het apparaat langs de buitenrand van de glazen keramische
plaat. Rek het afdichtband daarbij niet
uit. De plaats van het punt waar de
strip samenkomt dient in het midden
van één van de zijden te liggen. Duw
de twee uiteinden tegen elkaar als u
de strip op lengte knipt (houd een
marge van een paar mm aan).
NEDERLANDS
min.
12 mm
15
min.
28 mm
min.
20 mm
Als u een beschermblok gebruikt (extra
toebehoren1)), is de beschermvloer direct onder het apparaat niet nodig.
U kunt het beschermblok niet gebruiken
als u het apparaat boven een oven installeert.
1) Het beschermblok is als toebehoren niet in elk land verkrijgbaar. Neem contact op met
uw plaatselijke leverancier.
9. TECHNISCHE INFORMATIE
HK955070FB
Typ 58 HCD AA AO
Prod.Nr. 949 595 124 01
220-240 V 50-60 Hz
Made in Germany
Ser.Nr. ..........
7,9 kW
AEG
Vermogen van kookzones
Kookzone
Nominaal vermogen (max warmteinstelling) [W]
Rechtsachter — 170 / 265 mm
1400 / 2200 W
Rechtsvoor — 180 mm
1800 W
Middenachter — 145 / 210 / 270 mm
1050 / 1950 / 2700 W
Linksachter — 145 mm
1200 W
Linksvoor — 180 mm
1800 W
16 www.aeg.com
10. MILIEUBESCHERMING
Recycle de materialen met het
symbool . Gooi de verpakking in
een geschikte verzamelcontainer om
het te recyclen.
Help om het milieu en de
volksgezondheid te beschermen en
recycle het afval van elektrische en
elektronische apparaten. Gooi
apparaten gemarkeerd met het
symbool niet weg met het
huishoudelijk afval. Breng het
product naar het milieustation bij u
in de buurt of neem contact op met
de gemeente.
ENGLISH
17
CONTENTS
1.
2.
3.
4.
5.
6.
7.
8.
9.
10.
SAFETY INFORMATION . . . . . . . . . . . . . . . . . . . . . . . . . . . . . . . . . . . . . . . . . . . . . . . . . . . . .
SAFETY INSTRUCTIONS . . . . . . . . . . . . . . . . . . . . . . . . . . . . . . . . . . . . . . . . . . . . . . . . . . . . .
PRODUCT DESCRIPTION . . . . . . . . . . . . . . . . . . . . . . . . . . . . . . . . . . . . . . . . . . . . . . . . . . . .
DAILY USE . . . . . . . . . . . . . . . . . . . . . . . . . . . . . . . . . . . . . . . . . . . . . . . . . . . . . . . . . . . . . . . .
HELPFUL HINTS AND TIPS . . . . . . . . . . . . . . . . . . . . . . . . . . . . . . . . . . . . . . . . . . . . . . . . . . .
CARE AND CLEANING . . . . . . . . . . . . . . . . . . . . . . . . . . . . . . . . . . . . . . . . . . . . . . . . . . . . . .
TROUBLESHOOTING . . . . . . . . . . . . . . . . . . . . . . . . . . . . . . . . . . . . . . . . . . . . . . . . . . . . . . .
INSTALLATION INSTRUCTIONS . . . . . . . . . . . . . . . . . . . . . . . . . . . . . . . . . . . . . . . . . . . . . .
TECHNICAL INFORMATION . . . . . . . . . . . . . . . . . . . . . . . . . . . . . . . . . . . . . . . . . . . . . . . . .
ENVIRONMENT CONCERNS . . . . . . . . . . . . . . . . . . . . . . . . . . . . . . . . . . . . . . . . . . . . . . . . .
18
19
21
22
25
26
27
28
30
30
FOR PERFECT RESULTS
Thank you for choosing this AEG product. We have created it to give you impeccable
performance for many years, with innovative technologies that help make life simpler –
features you might not find on ordinary appliances. Please spend a few minutes reading to get
the very best from it.
Visit our website for:
Get usage advice, brochures, trouble shooter, service information:
www.aeg.com
Register your product for better service:
www.aeg.com/productregistration
Buy Accessories, Consumables and Original spare parts for your appliance:
www.aeg.com/shop
CUSTOMER CARE AND SERVICE
We recommend the use of original spare parts.
When contacting Service, ensure that you have the following data available.
The information can be found on the rating plate. Model, PNC, Serial Number.
Warning / Caution-Safety information
General information and tips
Environmental information
Subject to change without notice.
18 www.aeg.com
1. SAFETY INFORMATION
Before the installation and use of the appliance, carefully read the supplied instructions. The manufacturer is
not responsible if an incorrect installation and use causes injuries and damages. Always keep the instructions
with the appliance for future reference.
1.1 Children and vulnerable people safety
WARNING!
Risk of suffocation, injury or permanent disability.
• This appliance can be used by children aged from 8
years and above and persons with reduced physical,
sensory or mental capabilities or lack of experience
and knowledge if they are supervised by an adult or a
person who is responsible for their safety.
• Do not let children play with the appliance.
• Keep all packaging away from children.
• Keep children and pets away from the appliance
when it operates or when it cools down. Accessible
parts are hot.
• If the appliance has a child safety device, we recommend that you activate it.
• Cleaning and user maintenance shall not be made by
children without supervision.
1.2 General Safety
• The appliance and its accessible parts become hot
during use. Do not touch the heating elements.
• Do not operate the appliance by means of an external timer or separate remote-control system.
• Unattended cooking on a hob with fat or oil can be
dangerous and may result in fire.
ENGLISH
19
• Never try to extinguish a fire with water, but switch off
the appliance and then cover flame e.g. with a lid or a
fire blanket.
• Do not store items on the cooking surfaces.
• Do not use a steam cleaner to clean the appliance.
• Metallic objects such as knives, forks, spoons and lids
should not be placed on the hob surface since they
can get hot.
• If the glass ceramic surface is cracked, switch off the
appliance to avoid the possibility of electric shock.
2.
SAFETY INSTRUCTIONS
2.1 Installation
WARNING!
Only a qualified person must install this appliance.
• Remove all the packaging.
• Do not install or use a damaged appliance.
• Obey the installation instruction supplied with the appliance.
• Keep the minimum distance from the
other appliances and units.
• Always be careful when you move the
appliance because it is heavy. Always
wear safety gloves.
• Seal the cut surfaces with a sealant to
prevent moisture to cause swelling.
• Protect the bottom of the appliance
from steam and moisture.
• Do not install the appliance adjacent
to a door or under a window. This prevents hot cookware to fall from the appliance when the door or the window
is opened.
• If the appliance is installed above
drawers make sure that the space, between the bottom of the appliance
and the upper drawer, is sufficient for
air circulation.
• The bottom of the appliance can get
hot. We recommend to install a non-
combustile separation panel under the
appliance to prevent access to the
bottom.
Electrical connection
WARNING!
Risk of fire and electrical shock.
• All electrical connections must be
made by a qualified electrician.
• The appliance must be earthed.
• Before carrying out any operation
make sure that the appliance is disconnected from the power supply.
• Use the correct electricity mains cable.
• Do not let the electricity mains cable
tangle.
• Make sure the mains cable or plug (if
applicable) does not touch the hot appliance or hot cookware, when you
connect the appliance to the near
sockets
• Make sure the appliance is installed
correctly. Loose and incorrect electricity mains cable or plug (if applicable)
can make the terminal become too
hot.
• Make sure that a shock protection is
installed.
• Use the strain relief clamp on cable.
• Make sure not to cause damage to the
mains plug (if applicable) or to the
20 www.aeg.com
mains cable. Contact the Service or an
electrician to change a damaged
mains cable.
• The electrical installation must have an
isolation device which lets you disconnect the appliance from the mains at
all poles. The isolation device must
have a contact opening width of minimum 3 mm.
• Use only correct isolation devices: line
protecting cut-outs, fuses (screw type
fuses removed from the holder), earth
leakage trips and contactors.
2.2 Use
WARNING!
Risk of injury, burns or electric
shock.
• Use this appliance in a household environment.
• Do not change the specification of this
appliance.
• Do not use an external timer or a separate remote-control system to operate the appliance.
• Do not let the appliance stay unattended during operation.
• Do not operate the appliance with wet
hands or when it has contact with water.
• Do not put cutlery or saucepan lids on
the cooking zones. They become hot.
• Set the cooking zone to “off” after
use.
• Do not use the appliance as a work
surface or as a storage surface.
• If the surface of the appliance is
cracked, disconnect immediately the
appliance from the power supply. This
to prevent an electrical shock.
WARNING!
Risk of fire or explosion.
• Fats and oil when heated can release
flammable vapours. Keep flames or
heated objects away from fats and oils
when you cook with them.
• The vapours that very hot oil releases
can cause spontaneous combustion.
• Used oil, that can contain food remnants, can cause fire at a lower tem-
perature than oil used for the first
time.
• Do not put flammable products or
items that are wet with flammable
products in, near or on the appliance.
• Do not try to extinguish a fire with water. Disconnect the appliance and cover the flame with a lid or a fire blanket.
WARNING!
Risk of damage to the appliance.
• Do not keep hot cookware on the control panel.
• Do not let cookware to boil dry.
• Be careful not to let objects or cookware fall on the appliance. The surface
can be damaged.
• Do not activate the cooking zones
with empty cookware or without cookware.
• Do not put aluminium foil on the appliance.
• Cookware made of cast iron, aluminium or with a damaged bottom can
cause scratches on the glass ceramic.
Always lift these objects up when you
have to move them on the cooking
surface.
2.3 Care and Cleaning
WARNING!
Risk of damage to the appliance.
• Clean regularly the appliance to prevent the deterioration of the surface
material.
• Do not use water spray and steam to
clean the appliance.
• Clean the appliance with a moist soft
cloth. Only use neutral detergents. Do
not use abrasive products, abrasive
cleaning pads, solvents or metal objects.
2.4 Disposal
WARNING!
Risk of injury or suffocation.
• Contact your municipal authority for
information on how to discard the appliance correctly.
• Disconnect the appliance from the
mains supply.
ENGLISH
21
• Cut off the mains cable and discard it.
3. PRODUCT DESCRIPTION
3.1 Cooking surface layout
1
2
3
145mm
1 Cooking zone
170mm
145/210/270mm
180mm
2 Cooking zone
265mm
3 Cooking zone
4 Cooking zone
180mm
5 Control panel
6 Cooking zone
6
5
4
3.2 Control panel layout
1
2
3
12
4
11
5
10
9
8
6
7
Use the sensor fields to operate the appliance. The displays, indicators and
sounds tell which functions operate.
Sensor field
Function
1
To activate and deactivate the appliance.
2
To lock / unlock the control panel.
3
Timer indicator of the cooking To show for which zone you set the
zones
time.
4
The timer display
To show the time in minutes.
5
To activate Automatic Heat Up function.
6
To activate and deactivate the outer
ring.
7
A heat setting display
To show the heat setting.
22 www.aeg.com
8
Sensor field
Function
A control bar
To set the heat setting.
To activate and deactivate the outer
rings.
9
To increase or decrease the time.
/
10
11
To set the cooking zone.
12
To activate and deactivate the STOP
+GO function.
3.3 Heat setting displays
Display
Description
The cooking zone is deactivated.
The cooking zone operates.
-
The
function operates.
The Automatic Heat Up function operates.
+ digit
There is a malfunction.
/
OptiHeat Control (3 step Residual heat indicator) : continue cook / stay warm / residual heat.
/
Lock / The Child Safety Device operates.
The Automatic Switch Off function operates.
3.4 OptiHeat Control (3 step
Residual heat indicator)
OptiHeat Control shows the level of the
residual heat.
WARNING!
/
/
The risk of burns
from residual heat!
4. DAILY USE
4.1 Activation and
deactivation
Touch
for 1 second to activate or deactivate the appliance.
4.2 Automatic Switch Off
The function deactivates the appliance
automatically if:
• All cooking zones are deactivated (
).
• You do not set the heat setting after
you activate the appliance.
• You spill something or put something
on the control panel for more than 10
seconds, (a pan, a cloth, etc.). An
acoustic signal sound some time and
the appliance deactivates. Remove the
object or clean the control panel.
• You do not deactivate a cooking zone
or change the heat setting. After some
comes on and the appliance
time
deactivates. See below.
ENGLISH
• The relation between heat setting and
times of the Automatic Switch Off
function:
•
,
— 6 hours
•
-
— 5 hours
•
-
— 4 hours
•
-
— 1.5 hours
4.3 The heat setting
Touch the control bar at the heat setting. Move your finger along the control
bar to change the setting. Do not release before you have a correct heat setting. The display shows the heat setting.
23
12
11
10
9
8
7
6
5
4
3
2
1
0
1
2 3 4 5 6 7
8 9 10 11 12 13 14
4.6 Timer
Count Down Timer
4.4 Activation and
deactivation of the outer rings
You can adjust the surface you cook to
the dimension of the cookware.
To activate the outer ring touch the sen/
. The indicator comes
sor field
on. For more outer rings touch the same
sensor field again. The subsequent indicator comes on.
Do the procedure again to deactivate
the outer ring. The indicator goes out.
4.5 Automatic Heat Up
You can get a necessary heat setting in a
shorter time if you activate the Automatic Heat Up function. This function sets
the highest heat setting for some time
(see the diagram), and then decreases to
the necessary heat setting.
To start the Automatic Heat Up function
for a cooking zone:
1.
Touch
(
comes on in the display).
2. Immediately touch the necessary
heat setting. After 3 seconds
comes on in the display.
To stop the function change the heat
setting.
Use the Count Down Timer to set how
long the cooking zone operates for only
this one time.
Set the Count Down Timer after the
selection of the cooking zone.
You can set the heat setting before or after you set the timer.
• To set the cooking zone: touch
again and again until the indicator of a
necessary cooking zone comes on.
• To activate the Count Down Timer:
touch
of the timer to set the time (
00 - 99 minutes). When the indicator
of the cooking zone start to flash slow,
the time counts down.
• To see the remaining time: set the
cooking zone with
. The indicator
of the cooking zone starts to flash
quickly. The display shows the remaining time.
• To change the Count Down Timer:
. Touch
set the cooking zone with
or
.
• To deactivate the timer: set the
cooking zone with
. Touch
. The
remaining time counts back to 00 .
The indicator of the cooking zone
goes out. To deactivate you can also
touch
and
at the same time.
When the countdown comes to an
end, the sound operates and 00 flashes. The cooking zone deactivates.
• To stop the sound: touch
24 www.aeg.com
CountUp Timer ( The count up
timer)
Use the CountUp Timer to monitor how
long the cooking zone operates.
• To set the cooking zone (if more
than 1 cooking zone operate ) :
again and again until the intouch
dicator of a necessary cooking zone
comes on.
• To activate the CountUp Timer:
touch
of the timer
comes on.
When the indicator of the cooking
zone starts to flash slow, the time
counts up. The display switches beand counted time (minutes).
tween
• To see how long the cooking zone
operates: set the cooking zone with
. The indicator of the cooking zone
starts to flash quickly. The display
shows the time that the cooking zone
operates.
• To deactivate the CountUp Timer:
and
set the cooking zone with
touch
or
to deactivate the timer. The indicator of the cooking zone
goes out.
Minute Minder
You can use the timer as a Minute Minder while the cooking zones do not operate. Touch
. Touch
or
of the
timer to set the time. When the time
comes to an end, the sound operates
and 00 flashes.
• To stop the sound: touch
4.7 STOP+GO
The
function sets all cooking zones
that operate to the lowest heat setting (
).
When
operates, you cannot change
the heat setting.
The
function does not stop the timer
function.
• To activate this function touch
.
The symbol
comes on.
• To deactivate this function touch
.
The heat setting that you set before
comes on.
4.8 Lock
When the cooking zones operate, you
can lock the control panel, but not
. It
prevents an accidental change of the
heat setting.
First set the heat setting.
. The symTo start this function touch
bol
comes on for 4 seconds.
The Timer stays on.
To stop this function touch
. The heat
setting that you set before comes on.
When you stop the appliance, you also
stop this function.
4.9 The Child Safety Device
This function prevents an accidental operation of the appliance.
To activate The Child Safety Device
• Activate the appliance with
. Do
not set the heat settings.
• Touch
for 4 seconds. The symbol
comes on.
• Deactivate the appliance with
.
To deactivate The Child Safety Device
• Activate the appliance with
. Do
not set the heat settings. Touch
for 4 seconds. The symbol
comes
on.
• Deactivate the appliance with
.
To override The Child Safety Device
for only one cooking time
• Activate the appliance with
. The
symbol
comes on.
• Touch
for 4 seconds. Set the heat
setting in 10 seconds. You can operate the appliance.
• When you deactivate the appliance
, The Child Safety Device opwith
erates again.
4.10 OffSound Control
(Deactivation and activation of
the sounds)
Deactivation of the sounds
Deactivate the appliance.
ENGLISH
Touch
for 3 seconds. The displays
come on and go out. Touch
for 3 seconds.
comes on, the sound is on.
,
comes on, the sound is
Touch
off.
When this function operates, you can
hear the sounds only when:
• you touch
25
Activation of the sounds
Deactivate the appliance.
Touch
for 3 seconds. The displays
come on and go out. Touch
for 3 seconds.
comes on, because the sound
is off. Touch
,
comes on. The
sound is on.
• the Minute Minder comes down
• the Count Down Timer comes down
• you put something on the control panel.
5. HELPFUL HINTS AND TIPS
5.1 Cookware
Information about the cookware
• The bottom of pans and cooking
zones must have the same dimension.
5.3 Öko Timer (Eco Timer)
• The bottom of the cookware must be
as thick and flat as possible.
• Cookware made of enamelled steel
and with aluminium or copper bottoms can cause the colour change on
the glass-ceramic surface.
5.2 Energy saving
How to save energy
To save energy, the heater of the
cooking zone deactivates before
the count down timer sounds.
The difference in the operation
time depends on the heat setting
level and the length of the cooking operation.
5.4 The examples of cooking
applications
• If it is possible, always put the lids on
the cookware.
• Put cookware on a cooking zone before you start it.
• Stop the cooking zones before the
end of the cooking time to use residual heat.
The data in the table is for guidance only.
Heat
setting
Use to:
Time
Keep cooked foods warm
as nec- Put a lid on a cookware.
essary
1
Hints
1-3
Hollandaise sauce, melt: butter, 5-25
chocolate, gelatine
min
Mix from time to time.
1-3
Solidify: fluffy omelettes, baked
eggs
Cook with a lid on.
10-40
min
26 www.aeg.com
Heat
setting
Use to:
Time
Hints
3-5
Simmer rice and milkbased
dishes, heating up readycooked meals
25-50
min
Add the minimum two times
as much liquid as rice, mix
milk dishes at some point of
the procedure through.
5-7
Steam vegetables, fish, meat
20-45
min
Add some tablespoons of
liquid.
7-9
Steam potatoes
20-60
min
Use max. ¼ l water for 750 g
of potatoes.
7-9
Cook larger quantities of food,
stews and soups
60-150
min
Up to 3 l liquid plus ingredients.
9-12
Gentle fry: escalope, veal cordon bleu, cutlets, rissoles, sausages, liver, roux, eggs, pancakes, doughnuts
as nec- Turn halfway through.
essary
12-13 Heavy fry, hash browns, loin
steaks, steaks
14
5-15
min
Turn halfway through.
Boil large quantities of water, cook pasta, sear meat (goulash, pot
roast), deep fry chips.
Information on acrylamides
Important! According to the newest
scientific knowledge, if you brown food
(specially the one which contains starch),
acrylamides can pose a health risk. Thus,
we recommend that you cook at the
lowest temperatures and do not brown
food too much.
6. CARE AND CLEANING
Clean the appliance after each use.
Always use cookware with clean bottom.
Scratches or dark stains on the
glass-ceramic cause no effect on
how the appliance operates.
To remove the dirt:
– Remove immediately: melted
plastic, plastic foil, and food with
sugar. If not, the dirt can cause
damage to the appliance. Use a
special scraper for the glass . Put
the scraper on the glass surface at
1.
an acute angle and move the
blade on the surface .
– Remove after the appliance is
sufficiently cool: limescale rings ,
water rings, fat stains, shiny metallic discolorations. Use a special
cleaning agent for glass ceramic
or stainless steel.
2. Clean the appliance with a moist
cloth and some detergent.
3. At the end rub the appliance dry
with a clean cloth.
ENGLISH
27
7. TROUBLESHOOTING
Problem
You cannot activate or
operate the appliance.
Possible cause
Remedy
The appliance is not
connected to an electrical supply or it is connected incorrectly.
Check if the appliance is
correctly connected to
the electrical supply (refer
to connection diagram).
Activate the appliance
again and set the heat
setting in less than 10
seconds.
You touched 2 or more
Touch only one sensor
sensor fields at the same field.
time.
The STOP+GO function
operates.
Refer to the chapter “Daily Use”.
There is water or fat
stains on the control
panel.
Clean the control panel.
An acoustic signal
sounds and the appliance deactivates.
An acoustic signal
sounds when the appliance is deactivated.
You put something on
one or more sensor
fields.
Remove the object from
the sensor fields.
The appliance deactivates.
You put something on
the sensor field
.
Remove the object from
the sensor field.
The residual heat indica- The cooking zone is not
tor does not come on.
hot because it operated
only for a short time.
The Automatic Heat Up
function does not operate.
If the cooking zone operated sufficiently long to
be hot, speak to the service centre.
The cooking zone is hot. Let the cooking zone become sufficiently cool.
The highest heat setting
is set.
You cannot activate the
outer ring.
The highest heat setting
has the same power as
the Automatic Heat Up
function.
Activate the inner ring
first.
The sensor fields become hot.
The cookware is too
large or you put it too
near to the controls.
Put large cookware on
the rear cooking zones if
necessary.
There is no acoustic signal when you touch the
panel sensor fields.
The signals are deactiva- Activate the signals (refer
ted.
to “OffSound Control”).
28 www.aeg.com
Problem
Possible cause
Remedy
comes on.
The Automatic Switch
Off operates.
Deactivate the appliance
and activate it again.
comes on.
The Child Safety Device
or the Lock function operates.
Refer to the chapter “Daily Use”.
There is an error in the
appliance.
Disconnect the appliance
from the electrical supply
for some time. Disconnect the fuse from the
electrical system of the
house. Connect it again.
comes on again,
If
speak to the service center.
and a number come
on.
If you tried the above solutions and cannot repair the problem, speak to your
dealer or the customer service. Give the
data from the rating plate, three digit
letter code for the glass ceramic (it is in
the corner of the glass surface) and an
error message that comes on.
Make sure, you operated the appliance
correctly. If not the servicing by a customer service technician or dealer will
not be free of charge, also during the
warranty period. The instructions about
the customer service and conditions of
guarantee are in the guarantee booklet.
8. INSTALLATION INSTRUCTIONS
WARNING!
Refer to "Safety information"
chapter.
Before the installation
Before the installation of the appliance,
record the information below from the
rating plate. The rating plate is on the
bottom of the appliance casing.
• Model ...........................
• PNC .............................
• Serial number ....................
8.1 Built-in appliances
• Only use the built-in appliances after
you assemble the appliance into correct built-in units and work surfaces
that align to the standards.
8.2 Connection cable
• Use the correct mains cable of type
H05BB-F Tmax 90°C (or higher) for a
single phase or two phase connection.
• Replace the damaged mains cable
with a special cable (type H05BB-F
Tmax 90°C or higher). Speak to your
local Service Centre.
8.3 To attach the seal.
• Clean the worktop in the area of the
cut out section.
• Bond the seal stripe supplied on the
lower edge of the appliance along the
outer edge of the glass ceramic. Do
not extend it. Let stay the cut ends in
the middle of one side. When, you cut
it to length (add some mm), push the
two ends together.
ENGLISH
29
8.4 Assembly
min.
500mm
min.
50mm
R 5mm
55mm
490+1mm
880+1mm
min.
12 mm
min.
28 mm
min.
20 mm
If you use a protection box (an additional
accessory1)), the protective floor directly
below the appliance is not necessary.
You can not use the protection box if
you install the appliance above an oven.
1) The protection box accessory may not be available in some countries. Please contact
your local supplier.
30 www.aeg.com
9. TECHNICAL INFORMATION
HK955070FB
Prod.Nr. 949 595 124 01
Typ 58 HCD AA AO
220-240 V 50-60 Hz
Ser.Nr. ..........
7,9 kW
Made in Germany
AEG
Cooking zones power
Cooking zone
Nominal Power (Max heat setting)
[W]
Right rear — 170 / 265 mm
1400 / 2200 W
Right front — 180 mm
1800 W
Middle rear — 145 / 210 / 270 mm
1050 / 1950 / 2700 W
Left rear — 145 mm
1200 W
Left front — 180 mm
1800 W
10. ENVIRONMENT CONCERNS
Recycle the materials with the
symbol . Put the packaging in
applicable containers to recycle it.
Help protect the environment and
human health and to recycle waste
of electrical and electronic
appliances. Do not dispose
appliances marked with the symbol
with the household waste. Return the
product to your local recycling
facility or contact your municipal
office.
PORTUGUÊS
31
ÍNDICE
1.
2.
3.
4.
5.
6.
7.
8.
9.
10.
INFORMAÇÕES DE SEGURANÇA . . . . . . . . . . . . . . . . . . . . . . . . . . . . . . . . . . . . . . . . . . . . .
INSTRUÇÕES DE SEGURANÇA . . . . . . . . . . . . . . . . . . . . . . . . . . . . . . . . . . . . . . . . . . . . . . .
DESCRIÇÃO DO PRODUTO . . . . . . . . . . . . . . . . . . . . . . . . . . . . . . . . . . . . . . . . . . . . . . . . . .
UTILIZAÇÃO DIÁRIA . . . . . . . . . . . . . . . . . . . . . . . . . . . . . . . . . . . . . . . . . . . . . . . . . . . . . . . .
SUGESTÕES E CONSELHOS ÚTEIS . . . . . . . . . . . . . . . . . . . . . . . . . . . . . . . . . . . . . . . . . . .
MANUTENÇÃO E LIMPEZA . . . . . . . . . . . . . . . . . . . . . . . . . . . . . . . . . . . . . . . . . . . . . . . . . .
RESOLUÇÃO DE PROBLEMAS . . . . . . . . . . . . . . . . . . . . . . . . . . . . . . . . . . . . . . . . . . . . . . .
INSTRUÇÕES DE INSTALAÇÃO . . . . . . . . . . . . . . . . . . . . . . . . . . . . . . . . . . . . . . . . . . . . . .
INFORMAÇÃO TÉCNICA . . . . . . . . . . . . . . . . . . . . . . . . . . . . . . . . . . . . . . . . . . . . . . . . . . . .
PREOCUPAÇÕES AMBIENTAIS . . . . . . . . . . . . . . . . . . . . . . . . . . . . . . . . . . . . . . . . . . . . . . .
32
33
35
37
40
41
42
43
45
46
PARA RESULTADOS PERFEITOS
Obrigado por escolher este produto AEG. Criámo-lo para lhe oferecer um desempenho
impecável durante vários anos, com tecnologias inovadoras que tornam a sua vida mais fácil –
funcionalidades que poderá não encontrar em aparelhos convencionais. Continue a ler
durante alguns minutos para tirar o máximo partido do produto.
Visite o nosso website para:
Resolver problemas e obter conselhos de utilização, catálogos e informações sobre
serviços:
www.aeg.com
Registar o seu produto para beneficiar de um serviço melhor:
www.aeg.com/productregistration
Adquirir acessórios, consumíveis e peças de substituição originais para o seu
aparelho:
www.aeg.com/shop
APOIO AO CLIENTE E ASSISTÊNCIA
Recomendamos a utilização de peças de substituição originais.
Quando contactar a Assistência, certifique-se de que tem os seguintes dados disponíveis.
A informação encontra-se na placa de características. Modelo, PNC, Número de Série.
Aviso / Cuidado - Informações de segurança.
Informações gerais e conselhos úteis
Informações ambientais
Sujeito a alterações sem aviso prévio.
32 www.aeg.com
1. INFORMAÇÕES DE SEGURANÇA
Leia atentamente as instruções fornecidas antes de instalar e utilizar o aparelho. O fabricante não é responsável por lesões ou danos resultantes da instalação e utilização incorrectas. Guarde sempre as instruções junto
do aparelho para futura referência.
1.1 Segurança para crianças e pessoas vulneráveis
ADVERTÊNCIA
Risco de asfixia, ferimentos ou incapacidade permanente.
• Este aparelho pode ser utilizado por crianças com 8
anos ou mais e por pessoas com capacidades físicas,
sensoriais ou mentais reduzidas ou com pouca experiência e conhecimento se forem supervisionadas por
um adulto que seja responsável pela sua segurança.
• Não permita que as crianças brinquem com o aparelho.
• Mantenha todos os materiais de embalagem fora do
alcance das crianças.
• Mantenha as crianças e os animais domésticos afastados do aparelho quando este estiver a funcionar ou a
arrefecer. As partes acessíveis estão quentes.
• Se o aparelho tiver um dispositivo de segurança para
crianças, recomendamos que o active.
• A limpeza e a manutenção básica não devem ser
efectuadas por crianças sem supervisão.
1.2 Segurança geral
• O aparelho fica quente durante a utilização. Não toque nos aquecimentos.
• Não utilize o aparelho com um temporizador externo
ou um sistema de controlo remoto separado.
PORTUGUÊS
33
• Deixar alimentos com gorduras ou óleos na placa,
sem vigilância, pode ser perigoso e provocar um incêndio.
• Nunca tente extinguir um incêndio com água. Em vez
disso, desligue o aparelho e cubra as chamas com
uma tampa de tacho ou manta de incêndio.
• Não coloque objectos sobre as zonas de cozedura.
• Não use uma máquina de limpar a vapor para limpar
o aparelho.
• Os objectos metálicos como facas, garfos, colheres e
tampas não devem ser colocados na superfície da
placa, uma vez que podem ficar quentes.
• Se a superfície da vitrocerâmica apresentar alguma
fenda, desligue o aparelho para evitar a possibilidade
de choque eléctrico.
2.
INSTRUÇÕES DE SEGURANÇA
2.1 Instalação
ADVERTÊNCIA
A instalação deste aparelho só
deve ser efectuada por uma pessoa qualificada.
• Remova todos os elementos da embalagem.
• Não instale nem utilize o aparelho se
este estiver danificado.
• Cumpra as instruções de instalação
fornecidas com o aparelho.
• Respeite as distâncias mínimas relativamente a outros aparelhos e unidades.
• Tenha sempre cuidado quando deslocar o aparelho porque é pesado. Use
sempre luvas de protecção.
• Vede as superfícies cortadas com um
vedante para impedir que a humidade
cause dilatações.
• Proteja a parte inferior do aparelho
contra vapor e humidade.
• Não instale o aparelho ao lado de
uma porta ou debaixo de uma janela.
Isso evita que a abertura de portas ou
janelas faça cair algum tacho quente
do aparelho.
• Se o aparelho for instalado por cima
de gavetas, certifique-se de que o espaço entre o fundo do aparelho e a
gaveta superior é suficiente para permitir a circulação de ar.
• A parte inferior do aparelho pode ficar
quente. Recomendamos a instalação
de um painel de separação não combustível debaixo do aparelho para evitar o acesso à parte inferior.
Ligação eléctrica
ADVERTÊNCIA
Risco de incêndio e choque eléctrico.
• Todas as ligações eléctricas têm de
ser efectuadas por um electricista qualificado.
• O aparelho tem de ficar ligado à terra.
34 www.aeg.com
• Antes de efectuar qualquer operação
de manutenção, certifique-se de que
o aparelho está desligado da corrente
eléctrica.
• Utilize um cabo de alimentação eléctrica adequado.
• Não permita que o cabo de alimentação fique enredado.
• Certifique-se de que o cabo e a ficha
de alimentação (se aplicável) não entram em contacto com o aparelho ou
com algum tacho quente quando ligar
o aparelho a uma tomada.
• Certifique-se de que o aparelho é instalado correctamente. Ligações de cabo de alimentação e ficha (se aplicável) soltas ou incorrectas podem provocar o sobreaquecimento dos terminais.
• Certifique-se de que a protecção contra choque é instalada.
• Utilize a braçadeira de fixação para libertar tensão do cabo.
• Certifique-se de que não causa danos
na ficha (se aplicável) e no cabo de alimentação. Contacte a Assistência Técnica ou um electricista para substituir
o cabo de alimentação se estiver danificado.
• A instalação eléctrica deve possuir um
dispositivo de isolamento que lhe permita desligar o aparelho da corrente
eléctrica em todos os pólos. O dispositivo de isolamento deve ter uma
abertura de contacto com uma largura
mínima de 3 mm.
• Utilize apenas dispositivos de isolamento correctos: disjuntores de protecção, fusíveis (os fusíveis de rosca
devem ser retirados do suporte), diferenciais e contactores.
2.2 Utilização
ADVERTÊNCIA
Risco de ferimentos, queimaduras ou choque eléctrico.
• Utilize este aparelho em ambiente doméstico.
• Não altere as especificações deste
aparelho.
• Não utilize um temporizador externo
ou um sistema de controlo remoto se-
•
•
•
•
•
•
parado para activar/desactivar o aparelho.
Não deixe o aparelho a funcionar sem
vigilância.
Não utilize o aparelho com as mãos
húmidas, nem se este tiver estado em
contacto com água.
Não coloque talheres ou tampas de
panelas sobre as zonas de cozedura.
Ficam quentes.
Desligue (off) a zona de cozedura
após cada utilização.
Não utilize o aparelho como superfície
de trabalho ou armazenamento.
Se a superfície do aparelho tiver rachada, desligue-o imediatamente da
corrente eléctrica. Isso evitará choques eléctricos.
ADVERTÊNCIA
Risco de incêndio ou explosão.
• As gorduras e os óleos podem libertar
vapores inflamáveis quando aquecidos. Mantenha as chamas e os objectos aquecidos afastados das gorduras
e dos óleos quando cozinhar com este
tipo de produtos.
• Os vapores que o óleo muito quente
liberta podem causar combustão espontânea.
• O óleo usado, que pode conter restos
de alimentos, pode inflamar a uma
temperatura inferior à de um óleo usado pela primeira vez.
• Não coloque produtos inflamáveis ou
objectos molhados com produtos inflamáveis no interior, ao lado ou em
cima do aparelho.
• Não tente extinguir o fogo com água.
Desligue o aparelho e cubra a chama
com uma tampa de tacho ou uma
manta de incêndio.
ADVERTÊNCIA
Risco de danos no aparelho.
• Não coloque nenhum tacho quente
sobre o painel de comandos.
• Não deixe que nenhum tacho ferva
até ficar sem água.
• Tenha cuidado e não permita que algum objecto ou tacho caia sobre o
aparelho. A superfície pode ficar danificada.
PORTUGUÊS
• Não active zonas de cozedura com um
tacho vazio ou sem tacho.
• Não coloque folha de alumínio no
aparelho.
• Os tachos de ferro fundido e de alumínio ou que tenham a base danificada podem riscar a vitrocerâmica. Levante sempre estes objectos quando
precisar de os deslocar na mesa de
trabalho.
2.3 Manutenção e limpeza
ADVERTÊNCIA
Risco de danos no aparelho.
• Limpe o aparelho com regularidade
para evitar que o material da superfície se deteriore.
• Não utilize jactos de água ou vapor
para limpar o aparelho.
• Limpe o aparelho com um pano macio
e húmido. Utilize apenas detergentes
neutros. Não utilize produtos abrasivos, esfregões, solventes ou objectos
metálicos.
2.4 Eliminação
ADVERTÊNCIA
Risco de ferimentos e asfixia.
• Contacte a sua autoridade municipal
para saber como eliminar o aparelho
correctamente.
• Desligue o aparelho da alimentação
eléctrica.
• Corte o cabo de alimentação eléctrica
e elimine-o.
3. DESCRIÇÃO DO PRODUTO
3.1 Disposição da mesa de trabalho
1
2
3
145mm
170mm
145/210/270mm
180mm
265mm
180mm
1 Zona de cozedura
2 Zona de cozedura
3 Zona de cozedura
4 Zona de cozedura
5 Painel de comandos
6 Zona de cozedura
6
5
4
35
36 www.aeg.com
3.2 Disposição do painel de comandos
1
2
3
12
4
5
11
10
9
8
6
7
Utilize os campos do sensor para controlar o aparelho. Os visores,
indicadores e sons indicam quais são as funções que estão em
funcionamento.
Campo do sensor
Função
1
Para activar e desactivar o aparelho.
2
Para bloquear/desbloquear o painel de
comandos.
3
Indicador do temporizador
das zonas de cozedura
Apresenta a zona de cozedura para a
qual está definido um tempo.
4
Visor do temporizador
Para indicar o tempo em minutos.
5
Para activar a função de Aquecimento
Automático.
6
Para activar e desactivar o circuito exterior.
7
Visor do grau de cozedura
Para indicar o grau de cozedura.
8
Barra de comandos
Para regular o grau de cozedura.
Para activar e desactivar os circuitos exteriores.
9
Para aumentar ou diminuir o tempo.
/
10
11
Para seleccionar a zona de cozedura.
12
Para activar e desactivar a função STOP
+GO.
3.3 Indicador do grau de cozedura
Display
Descrição
A zona de cozedura está desactivada.
-
A zona de cozedura está activada.
A função
está em funcionamento.
PORTUGUÊS
Display
37
Descrição
A função Aquecimento Automático está em funcionamento.
+ número
Existe uma anomalia.
/
OptiHeat Control (Indicador de calor residual de 3 etapas): continuar a cozinhar / manter quente / calor residual.
/
O dispositivo de Bloqueio/Segurança para Crianças está activo.
A função Desconexão Automática está activa.
3.4 OptiHeat Control
(indicador de calor residual de
3 etapas)
OptiHeat Control apresenta o nível de
calor residual.
ADVERTÊNCIA
/
/
Perigo de queimaduras devido ao calor residual!
4. UTILIZAÇÃO DIÁRIA
4.1 Activação e desactivação
Toque em
durante 1 segundo para
activar ou desactivar o aparelho.
•
-
— 5 horas
•
-
— 4 horas
•
-
— 1,5 horas
4.2 Desactivação Automática
4.3 Grau de cozedura
A função desactiva o aparelho
automaticamente se:
• Todas as zonas de cozedura estiverem
desactivadas (
).
• Não definir o grau de cozedura após
activar o aparelho.
• Derramar ou colocar alguma coisa sobre o painel de comandos durante
mais de 10 segundos (por exemplo,
um tacho, um pano, etc.). É emitido
um sinal sonoro durante algum tempo
e o aparelho desactiva-se. Retire o objecto ou limpe o painel de comandos.
• Não desactivar uma zona de cozedura
nem alterar o grau de cozedura. Após
acende-se e o apaalgum tempo,
relho desliga-se. Veja em baixo.
• A relação entre o grau de cozedura e
os tempos da função Desconexão Automática:
•
,
— 6 horas
Toque no grau de cozedura, na barra de
comandos. Se necessário, mude para a
esquerda ou para a direita Não solte enquanto não atingir o grau de cozedura
correcto. O display apresenta o grau de
cozedura.
4.4 Activação e desactivação
dos circuitos exteriores
É possível ajustar a superfície de cozedura ao tamanho do tacho.
Para activar o circuito exterior, toque no
/
. O indicador
campo do sensor
acende-se. Para mais circuitos exteriores, toque novamente no mesmo campo
38 www.aeg.com
do sensor. O indicador subsequente
acende-se.
Efectue novamente o procedimento para desactivar o circuito exterior. O indicador apaga-se.
4.5 Aquecimento Automático
Pode obter o grau de cozedura necessário num período de tempo mais curto se
activar a função de Aquecimento Automático. Esta função define o grau de cozedura mais elevado durante algum
tempo (consulte o diagrama) e, em seguida, diminui para o grau de cozedura
necessário.
Para activar a função de Aquecimento
Automático para uma zona de cozedura:
1.
Toque em
(
acende-se no display).
2. Toque imediatamente no grau de
cozedura necessário. Após 3 segundos,
acende-se no display.
Para desactivar a função, altere o grau
de cozedura.
12
11
10
9
• Para activar o temporizador da condo
tagem decrescente: toque em
temporizador para definir o tempo (
00 - 99 minutos). Quando o indicador da zona de cozedura começar a
piscar lentamente, a contagem decrescente começa.
• Para ver o tempo restante: seleccio. O inne a zona de cozedura com
dicador da zona de cozedura começa
a piscar rapidamente. O visor apresenta o tempo restante.
• Para alterar o Temporizador da Contagem Decrescente: seleccione a zo. Toque em
na de cozedura com
ou
.
• Para desactivar o temporizador: defina a zona de cozedura com
. Toque em
. O tempo restante entra
em contagem decrescente até 00 . O
indicador da zona de cozedura apaga-se. Para desactivar, pode também toe
em simultâneo.
car em
Quando a contagem decrescente termina, é emitido um som e 00 pisca. A
zona de cozedura é desactivada.
8
7
6
5
4
• Para desligar o som: toque em
3
2
1
0
• Para seleccionar a zona de cozeduvárias vezes até que
ra: toque em
o indicador da zona de cozedura necessária se acenda.
1
2 3 4 5 6 7
8 9 10 11 12 13 14
4.6 Temporizador
Temporizador da contagem
decrescente
Utilize o temporizador da contagem decrescente para definir o tempo de funcionamento da zona de cozedura apenas desta vez.
Defina o temporizador da contagem
decrescente após seleccionar a zona
de cozedura.
Pode definir o grau de cozedura antes
ou depois de definir o temporizador.
CountUp Timer (o
temporizador da contagem
crescente)
Utilize o CountUp Timer para monitorizar durante quanto tempo a zona de cozedura funciona.
• Para seleccionar a zona de cozedura
(se houver mais do que 1 zona de
cozedura em funcionamento): toque
várias vezes até que o indicaem
dor da zona de cozedura necessária se
acenda.
• Para activar o CountUp Timer: toque
em
do temporizador e
acende-se. Quando o indicador da zona de
cozedura começar a piscar lentamente, a contagem crescente começa. O
e o tempo
display alterna entre
contado (minutos).
PORTUGUÊS
• Para ver o tempo de funcionamento
da zona de cozedura: defina a zona
de cozedura com
. O indicador da
zona de cozedura começa a piscar rapidamente. O visor apresenta o tempo de funcionamento da zona de cozedura.
• Para desactivar o CountUp Timer:
e
defina a zona de cozedura com
toque em
ou
para desactivar o
temporizador. O indicador da zona de
cozedura apaga-se.
Cronómetro
Pode utilizar o temporizador como cronómetro enquanto as zonas de cozedu.
ra estiverem desligadas. Toque em
Toque em
ou
do temporizador
para definir o tempo. Quando o tempo
termina, é emitido um som e 00 pisca.
• Para desligar o som: toque em
4.7 STOP+GO
A função
define todas as zonas de
cozedura em funcionamento para o grau
).
de cozedura mais baixo (
Quando
está em funcionamento, não
é possível alterar o grau de cozedura.
A função
não desactiva a função de
temporizador.
• Para activar esta função, toque em
. O símbolo
acende-se.
• Para desactivar esta função, toque
em
. O grau de cozedura anteriormente definido acende-se.
4.8 Bloqueio
Quando as zonas de cozedura estão a
funcionar, é possível bloquear o painel
de comandos mas não
. Tal impede
uma alteração acidental do grau de cozedura.
Primeiro, defina o grau de cozedura.
.
Para activar esta função, toque em
O símbolo
acende-se durante 4 segundos.
O temporizador permanece ligado.
Para desactivar esta função, toque em
. O grau de cozedura anteriormente
definido acende-se.
39
Quando desliga o aparelho, também
desactiva esta função.
4.9 Dispositivo de Segurança
para Crianças
Esta função evita o funcionamento acidental do aparelho.
Para activar o Dispositivo de
Segurança para Crianças
• Active o aparelho com
. Não defina os graus de cozedura.
• Toque em
durante 4 segundos. O
símbolo
acende-se.
• Desactive o aparelho com
.
Para desactivar o Dispositivo de
Segurança para Crianças
• Active o aparelho com
. Não defina os graus de cozedura. Toque em
durante 4 segundos. O símbolo
acende-se.
• Desactive o aparelho com
.
Para ignorar o Dispositivo de
Segurança para Crianças por apenas
um período de cozedura
• Active o aparelho com
. O símbolo
acende-se.
• Toque em
durante 4 segundos.
Defina o grau de cozedura no espaço de 10 segundos. Pode utilizar o
aparelho.
• Quando desactivar o aparelho com
, o Dispositivo de Segurança para Crianças é novamente activado.
4.10 OffSound Control
(desactivação e activação dos
sons)
Desactivação dos sons
Desactive o aparelho.
Toque em
durante 3 segundos. Os visores acendem-se e apagam-se. Toque
em
durante 3 segundos.
acende-se e o som liga-se. Toque em
.
acende-se e o som desliga-se.
Quando esta função está activa, pode
ouvir os sons apenas quando:
• toca em
40 www.aeg.com
• o cronómetro inicia a contagem decrescente
• o temporizador da contagem decrescente inicia a contagem decrescente
• coloca algo sobre o painel de comandos.
durante 3 segundos. Os viToque em
sores acendem-se e apagam-se. Toque
em
durante 3 segundos.
acende-se, porque o som está desligado. To.
acende-se. O som está
que em
ligado.
Activação dos sons
Desactive o aparelho.
5. SUGESTÕES E CONSELHOS ÚTEIS
5.1 Tachos e panelas
Informação sobre tachos e panelas
• A base do tacho deve ser o mais espessa e plana possível.
• Os tachos feitos de aço esmaltado ou
que tenham fundos de alumínio ou
cobre poderão causar alterações de
cor na superfície de vitrocerâmica.
• Os fundos dos tachos deverão ter dimensão igual à das zonas de cozedura.
5.3 Öko Timer (temporizador
Eco)
Para poupar energia, o aquecimento da zona de cozedura é
desactivado antes que soe o
alarme do temporizador da contagem decrescente. A diferença
no tempo de funcionamento depende do grau de cozedura definido e da duração da cozedura.
5.2 Poupança de energia
Como poupar energia
• Sempre que possível, coloque as tampas nos tachos.
• Coloque o tacho na zona de cozedura
antes de ligar a mesma.
• Desligue as zonas de cozedura antes
do fim do tempo de cozedura para
utilizar o calor residual.
5.4 Exemplos de aplicações
de cozinha
Grau Utilize para:
de
cozedura
Tempo
Sugestões
conforme
necessário
Coloque uma tampa no tacho.
1
1-3
Manter os alimentos cozinhados quentes
Os dados apresentados na tabela seguinte servem apenas como referência.
Molho holandês, derreter: man- 5-25
teiga, chocolate, gelatina
minutos
Misture regularmente.
PORTUGUÊS
41
Grau Utilize para:
de
cozedura
Tempo
Sugestões
1-3
Solidificar: omeletas fofas, ovos
cozidos
10-40
minutos
Cozer com a tampa.
3-5
Cozer arroz e pratos com base 25-50
de leite em lume brando, aque- minucer refeições pré-cozinhadas
tos
Adicione, no mínimo, o dobro do líquido do arroz, mexa os pratos de leite durante
a cozedura.
5-7
Cozer a vapor legumes, peixe,
carne
20-45
minutos
Adicione algumas colheres
de sopa de líquido.
7-9
Cozer batatas a vapor
20-60
minutos
Utilizar, no máximo, ¼ l de
água para 750 g de batatas.
7-9
Cozer grandes quantidades de
alimentos, guisados e sopas
60-150
minutos
Até 3 l de líquido mais os ingredientes.
9-12
Fritura ligeira: escalopes, cordon bleu, costeletas, rissóis, salsichas, fígado, roux, ovos, panquecas, sonhos
conforme
necessário
Vire depois de decorrido
metade do tempo.
12-13 Fritura intensa, batatas fritas, bi- 5-15
fes do lombo, bifes
minutos
14
Vire depois de decorrido
metade do tempo.
Ferver grandes quantidades de água, cozer massa, estufar carne (gulache, assado), batatas fritas.
Informação relativa à
acrilamida
Importante De acordo com os
conhecimentos científicos mais recentes,
se deixar tostar alimentos
(especialmente alimentos que
contenham amido), a acrilamida pode
representar um risco para a saúde.
Assim, aconselhamos que cozinhe a
baixa temperaturas e não deixe tostar
demais os alimentos.
6. MANUTENÇÃO E LIMPEZA
Limpe o aparelho após cada utilização.
Utilize sempre tachos com a base limpa.
Riscos ou manchas escuras na
placa de vitrocerâmica não têm
qualquer efeito no funcionamento do aparelho.
Para remover sujidades:
1. – Remova imediatamente: plástico
derretido, película de plástico e
alimentos com açúcar. Caso contrário, a sujidade pode provocar
danos no aparelho. Utilize um raspador especial para vidro. Coloque o raspador sobre a superfície
de vidro em ângulo agudo e desloque a lâmina sobre a superfície.
42 www.aeg.com
– Remova após o aparelho ter arrefecido o suficiente: manchas
de calcário, água ou gordura e
descolorações nas partes metálicas brilhantes. Utilize um agente
de limpeza especial para vitrocerâmica ou aço inoxidável.
2.
Limpe o aparelho com um pano húmido e um pouco de detergente.
3. No final, seque o aparelho com um
pano limpo.
7. RESOLUÇÃO DE PROBLEMAS
Problema
Não consegue activar
ou utilizar o aparelho.
Causa possível
Solução
O aparelho não está ligado à corrente eléctrica ou não está ligado
correctamente.
Verifique se o aparelho
está ligado correctamente à corrente eléctrica
(consulte o diagrama de
ligações).
Active novamente o aparelho e defina o grau de
cozedura em menos de
10 segundos.
Tocou em 2 ou mais
Toque apenas num camcampos do sensor em si- po do sensor.
multâneo.
A função STOP+GO está em funcionamento.
Consulte o capítulo “Utilização diária”.
Há manchas de gordura
ou água no painel de
comandos.
Limpe o painel de comandos.
É emitido um sinal sono- Colocou algum objecto
ro e o aparelho desacti- sobre um ou mais camva-se.
pos do sensor.
É emitido um sinal sonoro quando o aparelho é
desactivado.
Retire o objecto dos campos do sensor.
O aparelho desactiva-se. Colocou algum objecto
sobre o campo do sen.
sor
Retire o objecto do campo do sensor.
O indicador de calor residual não acende.
A zona de cozedura não
está quente porque foi
activada apenas por
pouco tempo.
Se a zona de cozedura tiver funcionado tempo suficiente para estar quente, contacte a Assistência
Técnica.
A função Aquecimento
Automático não funciona.
A zona de cozedura está Deixe a zona de cozedura
quente.
arrefecer suficientemente.
PORTUGUÊS
Problema
Causa possível
Solução
Está definido o grau de
cozedura mais elevado.
O grau de cozedura mais
elevado tem a mesma
potência que a função
Aquecimento Automático.
Não consegue activar o
circuito exterior.
Os campos do sensor ficam quentes.
43
Active o circuito interior
primeiro.
O tacho é demasiado
grande ou foi colocado
demasiado perto dos
comandos.
Coloque o tacho numa
das zonas de cozedura
de trás, se necessário.
Não há qualquer sinal
Os sinais sonoros estão
sonoro quando toca nos desactivados.
campos do sensor do
painel.
Active os sinais sonoros
(consulte “Controlo de
som desligado”).
acende-se.
A Desactivação Automá- Desactive o aparelho e
tica está activa.
active-o novamente.
acende-se.
O Diapositivo de Segu- Consulte o capítulo “Utilirança para Crianças ou o zação diária”.
Bloqueio de Funções está activo.
e um número acendem-se.
O aparelho apresenta
um erro.
Se tiver experimentado as soluções acima indicadas e mesmo assim não for
possível reparar o problema, contacte o
fornecedor ou a Assistência Técnica. Indique os dados da placa de características, o código de três dígitos e letras da
placa vitrocerâmica (no canto da superfície de vidro) e a mensagem de erro
apresentada.
Desligue o aparelho da
alimentação eléctrica durante algum tempo. Desligue o disjuntor do quadro eléctrico da sua casa.
Volte a ligar. Se a indicaacender novação
mente, contacte a Assistência Técnica.
Certifique-se de que utilizou o aparelho
correctamente. Caso contrário, a manutenção efectuada pelo Técnico do Serviço de Assistência ou pelo fornecedor
não será gratuita, mesmo durante o período de garantia. As instruções relativas
à assistência técnica e as condições da
garantia encontram-se no folheto da garantia.
8. INSTRUÇÕES DE INSTALAÇÃO
ADVERTÊNCIA
Consulte o capítulo "Informações de segurança".
Antes da instalação
Antes de instalar o aparelho, anote em
baixo os seguintes dados que pode encontrar na placa de características. A
placa de características está no fundo da
estrutura do aparelho.
44 www.aeg.com
• Modelo ...........................
• PNC .............................
• Número de série ....................
8.1 Aparelhos de encastrar
• Utilize apenas os aparelhos de encastrar após a sua montagem nas unidades encastradas adequadas e nas superfícies de trabalho, de acordo com
as normas.
8.2 Cabo de ligação
• Utilize um cabo de alimentação correcto, do tipo H05BB-F Tmáx. 90 °C
(ou superior), para uma ligação monofásica ou bifásica.
8.4 Montagem
min.
500mm
min.
50mm
R 5mm
55mm
490+1mm
880+1mm
• Se o cabo se danificar, substitua-o por
um cabo especial (tipo H05BB-F
Tmáx. 90 °C ou superior). Contacte
um Centro de Assistência Técnica local.
8.3 Para fixar o vedante.
• Limpe a área de trabalho na zona da
secção cortada.
• Cole a tira vedante fornecida na extremidade inferior do aparelho, ao longo
da extremidade exterior da vitrocerâmica. Não estique a tira. Deixe as extremidades no meio de um dos lados.
Quando cortar a tira à medida, acrescente alguns milímetros. Pressione as
duas pontas uma contra a outra.
PORTUGUÊS
min.
12 mm
45
min.
28 mm
min.
20 mm
Se utiliza uma caixa de protecção (um
acessório adicional1)), o piso protector
directamente por baixo do aparelho não
é necessário.
Não pode utilizar a caixa de protecção
se instalar o aparelho por cima de um
forno.
1) A caixa de protecção acessória pode não estar disponível em alguns países. Contacte o
seu fornecedor local.
9. INFORMAÇÃO TÉCNICA
HK955070FB
Typ 58 HCD AA AO
Prod.Nr. 949 595 124 01
220-240 V 50-60 Hz
Made in Germany
Ser.Nr. ..........
7,9 kW
AEG
Potência das zonas de cozedura
Zona de cozedura
Potência nominal (grau de cozedura
máximo) [W]
Posterior direita — 170 / 265 mm
1400 / 2200 W
Anterior direita — 180 mm
1800 W
Posterior do meio — 145 / 210 / 270
mm
1050 / 1950 / 2700 W
Posterior esquerda — 145 mm
1200 W
Anterior esquerda — 180 mm
1800 W
46 www.aeg.com
10. PREOCUPAÇÕES AMBIENTAIS
Recicle os materiais que apresentem
o símbolo . Coloque a embalagem
nos contentores indicados para
reciclagem.
Ajude a proteger o ambiente e a
saúde pública através da reciclagem
de aparelhos eléctricos e
electrónicos. Não elimine os
aparelhos que tenham o símbolo
juntamente com os resíduos
domésticos. Coloque o produto num
ponto de recolha para reciclagem
local ou contacte as suas
autoridades municipais.
PORTUGUÊS
47
892952674-A-252012
www.aeg.com/shop