1
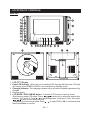
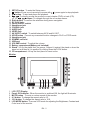
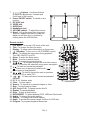
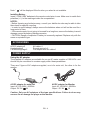
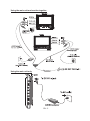
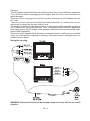
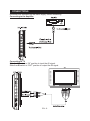
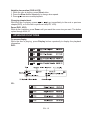
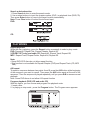
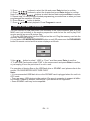
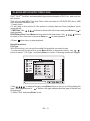
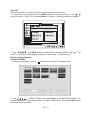
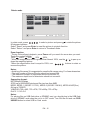
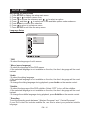
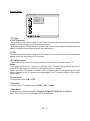
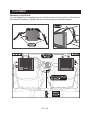
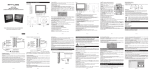
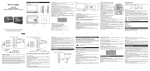
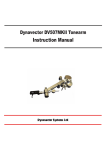
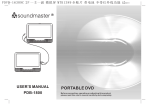
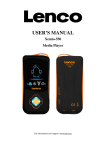
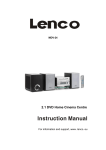
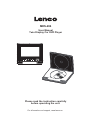
MES-204
User Manual
Twin Display Car DVD Player
Please read the instruction carefully
before operating the unit.
For information and support, www.lenco.eu
LOCATION OF CONTROLS
Main Unit
1. LCD (TFT) Display
2. Power ON indicator : When the unit is switched ON, the light will illuminate. The light
will change from GREEN to RED if unit is switched to Standby mode.
3. Charging indicator: The charging indicator will go off when the battery becomes fully
charged.
4. Remote sensor
5. LCD MODE / DVD/ USB/SD button: To access LCD mode and source mode.
Short press to enter LCD mode. Press
,
on main unit to select the aspect ratio
between 16:9 and 4:3. Press , to select Brightness, Contrast or Color, then press
,
on main unit to adjust its level.
Long press to enter source mode. Press , to select DVD, USB or Card mode and
then press Enter to confirm.
EN - 1
6. SETUP button : To enter the Setup menu
7.
button :Press once to pre-stop (resume with
), press again to stop playback.
8.
button : To start and pause the playback
9.
: To directly access the previous or next chapter (DVD) or track (CD).
, ,
,
buttons: To navigate through the on-screen menus.
10. Enter button: To confirm the selection during menu navigation.
11. DC IN 9V jack
12. Power ON/OFF switch
13. Headphone jack
14. COAXIAL jack
15. AUDIO jack
16. VIDEO jack
17. AV IN/OUT switch : To switch between AV IN and AV OUT.
18. HOLD button : Prevent any unwanted function changes in PLAY or STOP mode.
19. Headphone jack
20. SD/MMC card slot
21. USB port
22. VOLUME control : To adjust the volume
23. Battery compartment(Battery not included)
24. Stand : Lift up the stand from its groove; Support it against the stand or draw the
stand out and then fix it in position by clicking down the LOCK button.
25. CD compartment : Lift up the front panel to insert a disc.
Monitor
1.
2.
3.
4.
5.
6.
LCD (TFT) Display
Power ON indicator: When the monitor is switched ON, the light will illuminate.
MUTE button : To mute or restore sound of the monitor
4:3 button: To change the aspect ratio to 4:3.
16:9 button: To change the aspect ratio to 16:9.
LCD MODE button: To access LCD mode for adjusting the Brightness, Contrast and
Color level of the monitor.
EN - 2
buttons : Use these buttons
to adjust the Brightness, Contrast and
Color level of the monitor.
8. Power ON/OFF switch: To switch on the
monitor
9. DC IN 9V jack
10. VIDEO jack
11. AUDIO jack
12. Headphone jack
13. VOLUME control : To adjust the volume
14. Stand : Lift up the stand from its groove;
Support it against the stand or draw the
stand out and then fix it in position by
clicking down the LOCK button.
7.
Remote control
1. LCD Mode : To access LCD mode of the unit.
2. Title : To access the disc title menu
3. Display : To show status information on the screen.
4.
(Standby): To turn unit on /off (STANDBY mode).
5. Menu : To access the disc menu during playback ;
Turn PBC ON/OFF for VCD.
6. Setup: To enter the Setup menu
7. Mute : To mute or restore sound.
8. Zoom: To access the zoom function
9.
: To navigate through the on-screen menus.
Enter : To confirm the selection during menu navigation
10.
: To start and pause the playback
11.
: Press once to pre-stop (resume with
),
press again to stop playback.
12.
/
: To directly access the next or previous
chapter (DVD) or track (CD).
13.
/
: To start reverse or forward accelerated
playback.
14. 0,1,2…9 : Number entry
15. Clear : To clear inputs.
16. Search : To search for a desired chapter or time.
17. Step : To play frame by frame
18. A-B (Repeat A-B): To repeat section A to B
19. Repeat: To repeat playback .
20. Slow : To play at slow motion.
21. DVD/USB/SD : To select between DVD, USB and Card mode
22. Audio : To change the audio setting
23. Subtitle : To change the subtitle setting
24. Angle: To access the camera angle function for DVD disc
25. Program: To program playback sequences.
EN - 3
Note: “
” will be displayed if the function you select is not available.
Installing Battery
Insert 2 “AAA/ UM4” batteries to the remote control prior to use. Make sure to match their
polarities (+/-) to the markings inside the compartment.
NOTES:
- Before throwing any batteries away, consult your distributor who may be able to take
them back for specific recycling.
- In order to avoid leakage, always remove the batteries when unit will not be used for a
long period of time.
- If the remote control is not going to be used for a long time, remove the battery to avoid
damage caused by battery leakage corrosion.
- CAUTION: Danger of explosion if battery is incorrectly replaced. Replace only with the
same or equivalent type.
ACCESSORIES
AC/DC adaptor x2
Headphones x2
Car mounting bag x2
AV cable x1
Remote control x1
Car adaptor with AV cable x1
POWER SUPPLY
Using the AC adaptor
The supplied AC adaptors are suitable for use on AC mains supplies of 100-240V~ and
should only be connected to a mains supply within these parameters.
There are 2 types of AC adaptors supplied, one is for main unit, the other is for the
monitor.
AC/DC adaptor for main unit
Input: AC 100-240V~ 50/60Hz
Output: DC 9V
2A
AC/DC adaptor for Monitor
Input: AC 100-240V~ 50/60Hz
Output : DC 9V
1A
Caution: Only use AC adaptors of the type specified here. Failure to do so may
cause a fire or damage the player or the monitor.
EN - 4
Using the main unit and monitor together
Using the main unit only
EN - 5
Cautions:
*The AC adaptor included with this unit is for its use only. Do not use it with other equipment.
*Turn off the unit before unplugging the AC adaptor from the unit so as to avoid the unit
being damaged.
*When the unit is not going to be used for long time, disconnect the AC adaptor from the
AC outlet.
* Be sure to use it near the wall outlet and easily accessible. If a malfunction occurs,
disconnect the plug from the wall outlet at once.
*AC adaptor is used as the disconnect device. It shall remain readily operable and should
not be obstructed during intended use. To be completely disconnected the apparatus
from supply mains, the AC adaptor of the apparatus shall be disconnected from the mains
socket outlet completely.
*Never use an AC adaptor that is damaged, route power lead in a safe manner and make
sure it is not subjected to trapping or pinching. If the power lead is damaged refer to a
qualified service agent.
Using the car plug
WARNING: Disconnect this car power adaptor when not in use. Not for use in 24V
vehicles.
EN - 6
Cautions
• Use only the included 12V car power adaptor. Use of any other 12V car power adaptor
could damage the unit.
• The 12V car power adaptor included is for use with this unit only. Do not use it with any
other equipment.
• In the interest of traffic safety, drivers should not operate the unit or view videos while
driving.
• Make sure the unit is fastened correctly to prevent from falling in the vehicle in the event
of an accident.
• When the inside of the cigarette lighter socket is dirty with ashes or dust, the plug
section may become hot due to poor contact. Be sure to clean the cigarette lighter socket
before use.
• After use, disconnect the car power adaptor from both the unit and cigarette lighter
socket.
EN - 7
CONNECTIONS
Disconnect all devices from the mains supply before connecting.
Connecting to the Amplifier
Connecting to TV
Slide the AV switch to “IN” position to input the AV signal.
Slide the AV switch to “OUT” position to output the AV signal.
EN - 8
USING HEADPHONES / EARPHONRS
Maximum output voltage
150mV
HEADPHONE VOLUME WARNING
Connect earphones with the volume set low and increase it if required. Prolonged listening through some earphones at high volume settings can result in hearing damage. When
headphones/earphones are connected, no sound will be emitted from the unit’s speaker.
Caution: Avoid listening to sound at levels which may be harmful to your ears.
Continuous use of earphones at high volume can damage the user’s
hearing.
LCD MODE
Press LCD MODE/ DVD/USB/SD button on
main unit or LCD MODE button on remote control to enter LCD mode of the unit. Press
,
on main unit or , on remote control to
select the aspect ratio between 16:9 and 4:3.
Press
, on main unit or , on remote
control to select Brightness, Contrast or Color,
then press
,
on main unit or
, on
remote control to adjust its level.
DISC PLAYBACK
Region Management Information
Region Management Information: This unit is designed and manufactured to respond to
the Region Management Information that is encoded on DVD discs. If the Region number
printed on the DVD disc does not correspond to the Region number of this unit, this unit
cannot play that disc.
The region number of this unit is 2.
Basic Playback
1.Slide ON/OFF switch to “ON” position to turn ON the unit. The power ON indicator will
go on.
2.Lift up the front panel.
3.Insert a disc with label facing you until you hear a “click”.
4. Close the front panel. It takes a short while for your unit to load the disc. After loading,
the unit will automatically bring you to the main menu of the DVD or start playing the
DVD. If the unit does not automatically start playing the DVD, press
.
Warning: Do not touch and wait that the disc stops itself.
Accelerated play
While the disc is playing, press
or
direction of the accelerated play. Press
one or more times to vary the speed and
to resume normal playback.
Frame advance (DVD & VCD)
1. While the disc is playing, press Step once.
2. Press Step a number of times to advance forward image by image
3. Press
to resume normal playback.
EN - 9
Variable slow motion (DVD & VCD)
1. While the disc is playing, press Slow button.
2. Press the Slow button repeatedly to change slow speed.
3. Press
to resume normal playback.
Changing chapter/track
While the disc is playing, press
or
to go immediately to the next or previous
chapter(DVD), or to the next or previous track(CD, VCD).
Zoom (DVD, VCD)
While a disc is playing, press Zoom until you reach the zoom size you want. The button
cycles through x2,x4,x1.
ADVANCED FUNCTIONS
On screen display
While the disc is playing, press Display button repeatedly to display the playback
information.
DVD:
CD:
EN - 10
Search a desired section
1. Press Search button to enter the search mode.
2. Use number buttons to input the chapter number (DVD ) or playback time (DVD,CD).
Then press Enter button to jump to the target location immediately.
Note: Press Clear button to cancel the incorrect input.
DVD:
CD:
PLAY MODES
Repeat playback
While the disc is playing, press the Repeat button repeatedly to select a play mode:
DVD: Repeat All, Repeat Title, Repeat Chapter, Repeat Off;
VCD(PBC OFF only) and audio CD: Repeat All, Repeat Track, Repeat Off;
MP3: Repeat Track, Repeat Folder, Repeat All, Repeat Off.
Note:
• Some DVD/VCD discs do not allow repeat function.
• Skip function is not available for Repeat Chapter (DVD) and Repeat Track (CD, MP3
files).
A-B repeat
To repeat a sequence between two points A and B, press the A-B button at the beginning
of the sequence you want to repeat. Then press the A-B button again at the end of the
sequence. Then the sequence is played repeatedly until you press A-B to resume normal
playback.
Note: Some DVD discs do not allow A-B repeat function
Program playback (DVD,VCD and audio CD)
With this option, you can choose and program the playback order.
1. Insert a disc.
2. In playing or stop mode , press the Program button. The Program menu appears.
EN - 11
3. Press
buttons to select the title and press Enter button to confirm.
4. Press
buttons to select the chapter and press Enter button to confirm.
Note: For CD, press
buttons to select desired track and press Enter to confirm.
5. Repeat step 3-4 until you have finished programming your selections or when you have
programmed the maximum 20 tracks.
6. Press Clear or
button to delete.
7. Press
button to start playback. Press Program to cancel.
USB OR SD/MMC PLAYBACK
You can connect a USB flash drive (not included) to the USB connector port or a SD/
MMC card (not included) to the memory expansion card slot on the unit to play DivX
movies as well as sound & picture files.
1. Plug the USB flash drive into the USB port on the unit. Plug the memory card into the
memory expansion card slot.
2. Long press LCD MODE/DVD/USB/SD button on unit OR press once the DVD/USB/SD
button on remote control and the screen displays as follows:
3.Use
/
button to select “ USB” or “Card ” and then press Enter to confirm.
4. To exit USB/ Card mode, select “DVD” in the source menu and press Enter to confirm,
or just unplug it from the port when it is not in work.
For operation of playing files on the USB flash drive or SD/MMC card, please refer to the
section “PLAYING MP3/DIVX/PICTURE FILES”
Note:
• It is recommended USB flash drive or the SD/MMC card is plugged when the unit is in
OFF mode.
• There are many USB devices in the market. We cannot guarantee to support all different models. Please try another USB device if your device is not supported.
• Some SD/MMC card may be incompatible.
EN - 12
PLAYING MP3/DIVX/PICTURE FILES
DivX®, DivXTM Certified, and associated logos are trademarks of DivX, Inc. and used under license.
This unit can play MP3, DivX and Picture files recorded on CD-R/CD-RW discs, USB
flash drive and SD/MMC card.
1. Insert a disc.
2.It will take a short while for the system’s reading data and then playback starts
automatically.
3. MP3 files: Use
buttons to select a file in the menu and press Enter or
to
start playback.
DivX/Picture files: Press Menu button to return to the main menu. Use
buttons
to select a file in the menu and press Enter or
to start playback.
4.Press
button twice to stop playback.
Special functions:
File Type
With this function, you can set the media file types that you want to play.
1.In stop mode(For picture files, press Menu button to enter main menu), use
,
button to select “ File Type”, and press Enter to confirm. Following window will appear:
2.Use
to select a file type, press Enter button to turn on or off the display file
type. The disappearance of “
” before a file type indicates that this type of files will not
be displayed.
3. Select “Exit” and press Enter to exit .
EN - 13
*Sort file
With this function, you can set the file sorting method and sequence.
1. In stop mode (For picture files, press Menu button to enter main menu), use
,
button to select “ Sort File” and press Enter to confirm. Following window will appear:
2. Use
and Enter button to select the file sorting method ( “By type”, “By
name” or “ By date” ) and display sequence ( “ascending” or “descending “).
Picture (Jpeg) playback:
Thumbnail mode
1. During Jpeg playback, press
button once to enter Thumbnail mode.
2. Use
to select “Rotate” and press Enter to access Rotate mode ( For
operation refer to “Rotate mode” below). Or select “Slide Show” and press Enter button
to start picture slide show.
EN - 14
Rotate mode
In rotate mode, press
to select a picture and press
to rotate the picture
90 degree clockwise.
Select “Reset” and press Enter to reset the picture to original direction.
Select “Return” and press Enter to return to Thumbnail mode.
Zoom function:
* During Picture(Jpeg) playback, press Zoom until you reach the zoom size you want.
The button cycles through
200%
25%
50%
100%.
150%
* When the magnification level is greater than Normal 100%, use the / to pan up or
down the magnified picture.
*When the magnification level is equal to 100%, use
buttons to rotate or
reverse the picture.
Notes:
• Avoid long file names! It is suggested to name the file names using 11 or fewer characters.
• The total number of files on the disc should not exceed 254.
• The maximum number of directories should not exceed 32.
• The maximum depth level of directories should not exceed 4.
Supporting format:
MP3:32kbps-320kbps
JPEG:up to 8000X6000 pixels and file size less than 8MB
MPEG :MPEG-1 (ISO/IEC 11172-2), MPEG-2 (ISO/IEC 13818-2), MPEG-4 ASP(Divx)
AVI:up to 720X576
VOB(DVD):720 x 480i, 720 x 576i, 720 x 480p, 720 x 576p
DivX:3.11 / 4.0 /5.0
Notes:
For playing files on USB flash drive or SD/MMC card, you should plug in the USB flash
drive or SD/MMC card when the unit is in OFF mode. Turn ON the unit and use DVD/
USB/SD button to select USB or Card mode.
EN - 15
SETUP MENU
Navigating the setup menu
1. Press SETUP to display the setup main menu.
2. Press
or
to select a menu icon.
3. Press
to access the submenu and
,
to select an option.
4. Press
and then ,
to select one of the available options under submenu.
5. Press Enter to confirm your selection.
6. Press
to return to a previous menu.
7. Press SETUP to exit from the setup menu.
Language Setup
Language Setup
A B
C
A CB
OSD
Menu
Audio
Subtitle
* OSD
•To select the language of unit’s menus.
* Menu (menu language)
•To select the language of the DVD menus.
•If the selected language is not available on the disc, the disc’s language will be used
instead.
*Audio
•To select the dialog language.
•If the selected language is not available on the disc, the disc’s language will be used
instead.
•To change the dialog language during playback, press Audio on the remote control.
*Subtitle
•To select the language of the DVD subtitles. Select “OFF” to turn off the subtitles.
•If the selected language is not available on the disc, the disc’s language will be used
instead.
•To change the subtitle language during playback, press Subtitle on the remote control.
* Encoding
To set the encoding mode between “ Western European” and “ Central European”.
If your DivX video file includes subtitle file, use this to select your preferred subtitle
language.
EN - 16
Screen Setup
Screen Setup
A B
C
CB
TV AType
Screen Saver
TV System
View Mode
* TV Type
4:3 PS (Panscan)
• When wide-screen video is played, this mode clips the right and left sides of the image
so that it can be viewed on a conventional screen.
• Some wide-screen DVDs that do not permit Pan Scan mode playback are automatically
played in letterbox mode (black bands top and bottom).
4:3 LB
• When wide-screen video is played in this mode on a conventional screen, black bands
appear at the top and bottom of the screen.
16:9 (Wide screen)
• This is the correct mode for playing wide-screen videos on a wide-screen TV.
Notes :
•The visible picture size is preset on the DVD disc. Therefore the playback picture of
some DVD discs may not conform to the picture size you select.
•When you play DVD discs recorded in the 4:3 aspect ratio, the playback picture will
always appears in the 4:3 aspect ratio regardless of the TV shape setting in the function
setup menu.
*Screen saver
To set screen saver ON or OFF.
*TV System
•To select your TV system among NTSC , PAL or Auto.
* View Mode
To set the view mode among Fill, Original, Height Fit, Width Fit or Auto Fit.
Note: This function is only available for DivX playback.
EN - 17
Audio Setup
* Digital out
SPDIF/PCM
Choose this setting, if your DVD player is connected to a 2-channel digital stereo amplifier.
When playing a disc recorded with Dolby Digital and MPEG audio formats, audio signal
will be modulated into a 2-channel PCM signal and it will be output from the Coaxial
Output jack.
SPDIF/RAW
Choose this setting, if your DVD player is connected to a power amplifier with a coaxial
cable. When playing a disc recorded with Dolby Digital and MPEG audio formats, the
corresponding digital signals will be output from the Coaxial Output jack.
OFF
When digital output is not in use, it is recommended to turn “OFF” the digital output
setting for the purpose on minimizing circuit interference.
* Downmix
Lo/Ro: Stereo audio signal output
Lt/Rt: left and right soundtrack audio output
Custom Setup
EN - 18
*Parental ctrl
Some DVD discs are equipped with a password function and are rated according to their
content. The contents allowed by parental lock level and the way a DVD disc is controlled
may vary from disc to disc. For example, if the disc allows, you could lock-out violent
scenes unsuitable for children or you could lock out playback of the disc altogether.
You cannot play DVD discs rated higher than the level you selected unless you cancel the
parental lock function.
The parental lock levels are equivalent to the following ratings.
Level 1 : Kid Safe
Level 2 : G
Level 3 : PG
Level 4 : PG-13
Level 5 : PG-R
Level 6 : R
Level 7 : NC17
Level 8 : Adult
You must input the four-digit password to access the Parental settings. The initial password is 8888.
Then select the rating by
,
and then press Enter to confirm.
* Password
Enter the old password, the new password, and the new password again to verify and
change the Parental settings password. Restoring the player’s default settings will not
reset the password. Do not forget the password; this password cannot be reset.
* Style
To set the style of setup menu.
*Divx (R) VOD
• Some DivX Video-On-Demand files required registration code, please get the code of
your DVD player
.• Registration code is for DivX Video-On-Demand only, do not apply this code for another applications or websites.
* Angle mark
ON : To show angle mark when a disc with multiple camera angles is playing. You can
view different camera angles of a DVD disc by pressing Angle button on remote control.
OFF : To hide angle mark.
NOTE: This function is only available for discs encoded with multiple camera angles.
*Defaults
To reset all settings to their initial factory state, except for parental level and password.
EN - 19
PLACEMENT
Mounting in the Vehicle
Use the supplied car mounting bags to install the main unit and monitor on the back of
the vehicle's headrests. Tightly wrap the mounting strap around the headrest.
EN - 20
SAFETY WARNING!
•On no account should this unit be used by the driver of a moving motor vehicle, or left
unsecured in the vehicle whilst driving.
•If this unit is being used by a passenger in your vehicle, be sure that it is secured or held
safely, and does not obstruct any safety device (i.e. airbag, seat belt etc.) that is fitted.
• All passengers should wear seat belts when using this unit in a moving vehicle.
•If in doubt, please contact your vehicle manufacturer for further advice.
•Using other car power adaptors could damage the unit.
SAFETY INSTRUCTION
ATTENTION: To reduce the risk of electric shock, do not remove the cover or back. There are no user serviceable parts
inside the unit. Refer all servicing to qualified personnel.
The lightning flash with arrowhead symbol within the triangle is a warning sign
alerting the user of “dangerous voltage” inside the unit.
The exclamation point within the triangle is a warning sign alerting the user of
important instructions accompanying the product.
WARNING: TO PREVENT FIRE OR SHOCK HAZARD, DO NOT EXPOSE THIS APPLIANCE TO RAIN OR MOISTURE.
CAUTION: Invisible laser radiation when open and interlocks defeated. Avoid exposure
to beam. Class 1 laser product.
IMPORTANT SAFETY INSTRUCTIONS
NEVER fit make shift stands or legs with woodscrews. Use only approved supports and
fasteners specially designed for the equipment.
NEVER let anyone, especially children, push objects into holes, ventilation slots or any
other opening; this could result in fatal electric shock!
ALWAYS disconnect the AC adaptor when you are not going to use the unit for a long
period of time.
ENSURE that all electrical connections (including the mains plug, extension leads and
interconnections between pieces of equipment) are properly made in accordance with
the instructions given. Switch off the main supply when making or changing connections.
CONSULT your dealer if you are ever in doubt about the installation, operation or safety
of your equipment.
DON’T continue to operate the equipment if it is damaged in any way or if it does not
function normally. Disconnect the AC adaptor and consult your dealer.
DON’T leave equipment switched on when it is unattended unless it is part of it’s normal
function to operate in your absence, for example a video cassette recorder with timed
recording facility.
LISTEN to headphones at moderate volume levels; high volume levels can permanently
damage your hearing.
EN - 21
WARNING:
• AC adaptor is used as the disconnect device. It shall remain readily operable and should
not be obstructed during intended use. To be completely disconnected the apparatus
from supply mains, the AC adaptor of the apparatus shall be disconnected from the mains
socket outlet completely.
• Never use an AC adaptor that is damaged, route power lead in a safe manner and make
sure it is not subjected to trapping or pinching. If the power lead is damaged refer to a
qualified service agent.
• Place the unit on a flat and even surface.
• Do not restrict the air flow of the unit by placing it in a place with poor air flow, by
covering it with a cloth, or by placing it on carpeting.
• To avoid magnetized, do not place the unit near speaker or magnet.
• Do not use this unit in direct sunlight or leave the unit in a closed automobile (or yacht,
etc) where it would be exposed to high temperatures above 40°C.
• It also should not be placed in temperatures less than 5°C or greater than 35°C.
• No naked flame sources such as lighted candles should be placed on the AC adaptor
and main unit.
• Do not use the unit immediately after transportation from a cold place to a warm place,
condensation problem may result.
• The ventilation should not be impeded by covering the ventilation openings with items
such as newspapers, table-cloths, curtains, etc.
• No naked flame sources, such as lighted candles, should be placed on the apparatus.
• The use of apparatus in moderate climates.
• The apparatus should not be exposed to dripping or splashing.
• Ensure a minimum distance of 5cm around the apparatus for sufficient ventilation.
• Do not place objects filled with liquids, such as vases, on the apparatus.
• The marking plate is located on the back of unit.
• Do not throw batteries in fire!
• Excessive sound pressure from earphones and headphones can cause hearing loss.
• Under the influence of electrical fast transient or/and electrostatic phenomenon, the
product may malfunction and require user to power reset.
MAINTENANCE
Cleaning
Be sure to turn the unit off and disconnect the AC adaptor before maintaining the
unit.
- Use a soft, dry, clean cloth. Regularly dust the vents at the back or sides.
- Using solvents, abrasive or alcohol-based products risks damaging the appliance.
-If an object or liquid enters inside the appliance, unplug it immediately and have it checked
by an authorized engineer.
Note on disc
* Do not use irregular shape CDs (example: heart-shaped, octagonal ones). It may result
in malfunctions.
* Do not place more than one disc in the disc compartment.
* Do not try to open the disc compartment during playing.
* Do not touch the lens. Doing so may cause malfunction.
EN - 22
* If there is a scratch, dirt or fingerprints on the disc, it may cause tracking error. Before
playing, clean the disc with a cleaning cloth. Wipe the disc from the center out. Don’t
store discs in places with high temperatures or high humidity, they can become warped.
After playing, store the disc in its case.
Important Note
• Before transporting the unit, remove the disc from the disc compartment.
TROUBLE SHOOTING
No power.
• Ensure the AC adaptor is connected.
• Make sure that the unit is turned on.
The remote control does not function.
• Make sure the infrared remote sensor is not blocked.
• Point the remote directly at the infrared remote sensor on the unit.
• Replace the battery in the remote with a new one.
Very little or no sound is coming from a DVD.
• Make sure that the unit is turned ON.
• Make sure the unit is not paused. Press
.
• Make sure the unit is not in fast-forward or fast-reverse mode. Press
• Make sure that the connections are correct.
• Make sure the MUTE function is not on.
.
The player does not start playback
• Insert the disc with the printed side facing you.
• Check that the disc can actually be played by this device.
• Check that the disc’s regional code matches the player’s regional code. This player’s
regional code is 2.
• Clean the disc.
The picture is not clear.
• The DVD is dirty. Gently clean the disc.
• The disc is scratched.
If at any time in the future you should need to dispose of this product please note
that Waste electrical products should not be disposed of with household waste.
Please recycle where facilities exist. Check with your Local Authority or retailer
for recycling advice.(Waste Electrical and Electronic Equipment Directive)
EN - 23