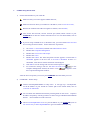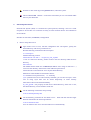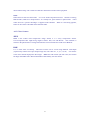
1
limHD200i User Manual (Version: 1.02) I limHD200i will bring you to the world of High Definition II Important Safety Precautions z To reduce the risk of fire, electric shock or product damage, do not expose the device to rain, humidity or any spilling of liquid. Do not place any water-holding vessels such as vase on the device. z For the purpose of good conditions of ventilating, do not set up the device or put it in bookcase, internal-inserted player cabinet or other airproof spaces. Keep the curtain or any other things from blocking the airway, in case that excessive heat of the device cause electric shock or fire by. z Never place any open flame devices such as the burning candles on the player. z Try to disuse and treat with the battery in a probable environment protecting way. z The device should be placed near the AC socket-outlet. The electricity pin should be placed easily accessible if any malfunctions occur. z The device might be interfered by the radio wave of mobile phone while using. the interference is obvious please keep the mobile phone away from the player. z Please read the instructions and methods of operation in the manual. manual well for future references. If Keep this Placement Put the player on a flat surface away from the sunlit/sunlight, high temperature, high humidity and frequent vibration. Otherwise it will cause damages to the cabin and its internal parts thus lessen its service life. Do not place any heavy loads. Keep it in a distance more than 20 cm away from the wall. In case of any personal accidents, do consider the safety of infants or children while placing it Overload Do not overload or trample on the device. Doing so may cause serious personal accidents and critical damage to the player. Ventilating ventilation The groove joints and cooling holes are designed for ventilating, avoiding overheat and working liability of the device. Do not block or cover it. Do not put the device on things like beds, sofa, and cloth in case the vent is blocked. Areas that can not III ventilate or places violating manufacturer’s instructions like bookshelf, frames (etc.) are also not permitted. Power sources Do not use voltage source over-high. Otherwise it will make the device overloaded and cause fire. Connect the AC power cable properly and make sure there are no defects. Poor connection or defected power cable will cause fire and electric shock. Do not pull, fold the power cable or make it heavy loaded. Do not overload the power supply in the socket-outlet. Be careful when the power cable, IC lead socket are lengthened, as they may cause electric shock or fire. Hold the plug to disconnect the AC supply. Do not plug in or unplug the pin with wet hands. Otherwise it might cause electric shock. Unplug the device from the socket-outlet to avoid damages caused by thunder or when you do not use the device for a long time. Doing so may keep it from damages caused by thunder or electric fluctuations efficiently. Heat sources The device should be kept away from heat sources, such as radiators, heat registers, stoves and other heat producers (including amplifiers). Water and Moisture Do not use the device near water, such as bathtub, wash bowl, kitchen sink or laundry tub and etc.; also avoid places like moist basement or near swimming pool . Dew Humidity and dews cause damages to the device. Therefore, read it carefully. Humidity and dews always happen. For instance, in summer you will find globs outside the glass if you pour iced drinks into it. Similarly, dews might appear in IV top cap of the device, which is the most sensible part in the player. appear in the following conditions: z z z Dews easily When you suddenly move the device from warm places to cold places. When you use the device in the room where you just open the heater or the device is right under the cooling areas of air conditioner. When you move the device from air-conditioner room and use it in places of high temperature and humidity in hot summer. Do not use the device if dew appears. Doing so might damage the internal parts. Plug the electric pin into the socket-outlet and press the power button. After 2 to 3 hours, the device will be heated and make dews evaporated. Object and liquid Entry Do not push any metal objects or liquid into the device. Otherwise it might lead to short-circuit and cause electric shock, fire or malfunctions. Unplug the electric pin and contact with the local agent if you carelessly drop any liquid into the device. + Do not spray pesticide to the surface or the internal part of the device. The sprinkler pesticide contains combustible gas that might cause fire if it enters inside the device. Cleaning Unplug the electric pin of AC supply before cleaning. Do not use any liquid cleaning solvent or aerosol detergent. Use soft damp cloth for cleaning. When cleaning the stains difficult to clean, immerse the soft cloth with liquid detergent and wring out the cloth before cleaning. Then wipe the device dry with soft dry cloth. Do not use any dissolvent like retarder thinternal and synasol as they will damage the surface of the device. Follow the instructions if you use the cloth after chemical water treatment while cleaning. Attachments Do not use attachments not recommended by the manufacturer as it might cause danger. Accessories Do not place the device on an unstable trolley, stand, tripod, bracket or desk. The device might fall, causing injuries to child or adult. Fix the device following the manufacturer’s instructions and use the recommended accessories. A product and V trolley combination should be moved with care. Quick-stop, excessive force and uneven surfaces may cause the product and trolley combination overturn. Headphones Turn the volume up to the middle position when using the headphone. It might cause hearing impairment if you listen to loud music by headphone for a long time. Services Do not try to repair the device. Repairing, disassembling or remodeling the device by unskilled people might cause electric shock or damages to the device. Unplug the electric pin of the AC supply and contact with the local agent or maintenance center, if the followings happen or other malfunctions not showed in the manual occur. a) If there is abnormal sound/picture, guiding light, or when the light of VFD panel go off and smoke occurs; b) When the power-supply cord or plug is damaged; c) If liquid has been spilled, or objects have fallen into the device; d) If the device has been exposed to rain or water; e) If the device does not operate normally by following the operating instructions. Adjust only those controls covered by the operating instructions, as an improper adjustment of other controls may result in damage. It often requires extensive work by even a qualified technician to restore the device to its normal operation; f) If the device has been dropped or damaged in anyway; g) When the device exhibits a distinct change in performance, this indicates a need for service. When parts replacement is required, make sure that the service technician has used the replacement parts specified by the manufacture or have the same characteristics as the original part. Unauthorized substitutions may result in fire, electric shock or other hazards. After any service and repair to the device, ask the technician to perform safety checks to make sure that the device is in proper operating conditions. VI Contents Chapter 1 limHD200i Brief Introduction __________________________________1 Chapter 2 limHD200i Technical Specifications _____________________________3 2.1 Storage Devices _______________________________________________________ 3 2.2 Files Systems _________________________________________________________ 3 2.3 Interfaces ____________________________________________________________ 3 2.3.2 Digital Media formats Supported ______________________________________________4 2.3.3 Subtitle Supported _________________________________________________________4 2.3.4 Display Devices Supported __________________________________________________4 2.3.5 Multinational language Supported _____________________________________________4 2.3.7 Firmware Upgrade Supported ________________________________________________5 Chapter 3 Precautions before the Operation of limHD200i____________________6 3.1 Buttons______________________________________________________________ 6 3.2 Set the Video Output Mode _____________________________________________ 6 3.3 Update when changing the newly connected USB devices ____________________ 6 3.4 Mega Capacity CD ____________________________________________________ 7 3.5 Turn on the player in suggested procedures________________________________ 7 3.6 Turn off the Player in suggested procedures _______________________________ 7 3.7 Website______________________________________________________________ 8 Chapter 4 Installation of Internal HDD of limHD200i _______________________9 4.1 Install the Internal HDD _______________________________________________ 9 4.2 Format the Internal HDD _____________________________________________ 12 4.3 Transfer files to Internal HDD__________________________________________ 13 Chapter 5 Physical Connection of limHD200i _____________________________14 5.1 DC Interface (12VDC) ________________________________________________ 14 5.2 USB 2.0 Device Interface ______________________________________________ 15 5.3 USB 2.0 Host ________________________________________________________ 16 5.4 10/100M LAN Interface(RJ45)_______________________________________ 16 5.5 A/V Interface ________________________________________________________ 16 5.5.1 Video Connection_________________________________________________________16 5.5.2 Audio Connection_________________________________________________________20 Chapter 6 VFD Panel of limHD200i_____________________________________24 Chapter 7 Remote Control of limHD200i _________________________________27 VII 7.1 Precautions before using the remote control ______________________________ 28 7.2 Functions of the Remote Control Buttons ________________________________ 29 Chapter 8 Instructions of limHD200i Buttons _____________________________33 Chapter 9 Setup and Adjustments of limHD200i ___________________________35 9.1 Audio Setup _________________________________________________________ 35 9.1.1 SPDIF out_______________________________________________________________36 9.1.2 Speakers out _____________________________________________________________36 9.2 Video Setup _________________________________________________________ 36 9.3 System Setup ________________________________________________________ 40 Chapter 10 limHD200i Media Playback __________________________________48 10.1 Play the Video Files__________________________________________________ 48 10.2 Play the Music Files _________________________________________________ 49 10.3 Browse the Photo Files _______________________________________________ 51 Chapter 11 limHD200i FAQ ___________________________________________52 11.1 Choppy while playing with USB CD/DVD drive __________________________ 52 11.2 Cannot find the USB devices newly connected____________________________ 52 11.3 Cannot find Internal HDD after turn on the player _______________________ 53 11.4 PC cannot find Internal HDD of limHD200i _____________________________ 53 Appendix High Definition Basics _______________________________________55 Appendix 1 Digital TV ___________________________________________________ 55 Appendix 2 HDTV ______________________________________________________ 55 Appendix 3 Definition ___________________________________________________ 55 Appendix 4 Scan Mode (Interlace and Progressive) ___________________________ 56 Appendix 5 HDMI Introduction ___________________________________________ 56 Appendix 6 Media Formats _______________________________________________ 57 A6.1 Moive formats____________________________________________________________57 A6.2 Music formats____________________________________________________________59 A6.3 Photo formats ____________________________________________________________61 VIII Chapter 1 limHD200i Brief Introduction limHD200i is a kind of High-end High Definition Multi-media HDD Player. match for your HDTV. It is a perfect You can enjoy HD movies, listen to music or browse digital photos by connecting limHD200i and HDTV(or other display devices such as High Definition Projectors)just by AV cable connection. Excellent Quality & Performance: High definition video with resolutions up to 1080p CD quality sound Crystal clear pictures Comparing with similar products, limHD200i has the following specific features: 1. Support resolution up to 1080p, perfect match for 1080p full HDTV; realizing the real pixel for pixel reproduction to obtain the best image quality. 2. Support H.264 & VC-1 Video Decoding. As H.264 & VC-1 coded videos become more and more popular, H.264 decoding is becoming a basic demand for players. 3. Optional Internal HDD with any capacity. safe and much more convenient. 4. Interface Variety. It has all kinds of video interfaces, varying from Analog Standard Definition(Composite Video Output), Analog High Definition(YPbPr component output and VGA output)to Digital High Definition(DVI and HDMI); 2 Channels analog stereo sounds output, coaxial /optical SPDIF digital 5.1 channels output for the audio interface; An RJ45 provided to place limHD200i on your 10/100BASE-T Ethernet network (100BASE-T recommended); One USB 2.0 device port which transfers data between limHD200i and PC; Two USB 2.0 Host interfaces which can be used to connect external USB HDD, Flash disk, USB CD/DVD drive and digital products such as digital camera, DV. 5. Can work as a mega-capacity CD player when connected to your A/V amplifiers (receivers) for home entertainment systems, thus keep you away from the troubles of changing CDs. 6. Popular Media files formats are widely supported. Video files– HD formats ( above 480p ) – WMV-HD/WMV9/VC-1,MPEG2-HD(.mpg/.tp /.ts),H.264,SD formats(480p below)– MPEG1/2/4,DVD(.iso/.vob);Music files – WAV/OGG/MP3/WMA/AAC;Image files – JPG/BMP/GIF formats and so on. Human-based designs make the HDD mounting 1 7. Convenient push buttons. You can operate limHD200i easily without remote control. 8. Dynamic color VFD helps you operate it more directly and efficiently. 2 Chapter 2 limHD200i Technical Specifications Main Technical Specifications of limHD200i - High Definition Multi-media HDD Player 2.1 Storage Devices ¾ HDD:IDE 3.5"HDD 2.2 Files Systems ¾ Support NTFS and FAT32. Notes:NTFS system is recommended, as FAT32 system only supports files no larger than 4GB. (while the size of HD video files usually excess this limited value). 2.3 Interfaces ¾ ¾ ¾ 2 USB2.0 Host interfaces(can be used to connect CD-ROM/DVD-ROM/External USB HDD/Flash Disk, and play stored media files); One USB2.0 Device Connection, which is used for PC connection and data transfer; One 10/100Mbps Local Network Connection: can be used to play shared video files. 2.3.1 Audio-Video Output Connection ¾ ¾ ¾ ¾ ¾ ¾ ¾ HDMI(Digital Audio Signals embedded); VGA interface(Output YPbPr Analog Component Signals or RGB+HV Analog VGA Signals); S-Video(Output Standard Definition PAL/NTSC Analog Video Signals); Composite Video interface(Output Standard Definition PAL/NTSC Analog Video Signals); Coaxial SPDIF OUT; Optical SPDIF OUT; Audio R/L: 24 bit/192khz sampling rate DAC, supports Dolby Pro-Logic and Pro-Logic II. 3 2.3.2 Digital Media formats Supported 1. 2. 3. Video Formats High Definition ¾ MPEG2-HD ----------------------- .mpg, .tp, .ts,.avi ¾ WMV-HD/VC-1 ------------------ .wmv, ts, .avi ¾ H.264(Mpeg4-AVC) ------------- .mov, .m2ts, .ts, .avi ¾ Mpeg4: DivX-HD, Xvid-HD --- .avi Standard Definition ¾ MPEG-1/2/4 ---------------------- .mpg, .mpeg, .mp4,. m4p,. m2t,. m2p,. m1v, .m2v, .m4v, .trp, .dat ¾ MPEG2: DVD ------------------- .ISO, .VOB ¾ MPEG4: DivXTM & XviD ------ .avi ¾ WMV ------------------------------ .wmv, .wmv9, .asf Audio Formats ¾ WAV ¾ MP3/MP2/MPA ¾ AAC (Advanced Audio Coding) ¾ WMA ¾ OGG ¾ RPCM Image formats ¾ JPG ¾ BMP ¾ GIF 2.3.3 Subtitle Supported Supporting subtitles of .srt, and other formats of subtitle by later upgrading the Firmware. 2.3.4 Display Devices Supported 1. 2. For TV: ¾ NTSC (480i / 480p) ; ¾ PAL (576i / 576p) ; ¾ HDTV (720p/1080i/1080p) ; ¾ Plasma TV (1366x768, 1280x768)。 For PC: ¾ PC Standard - VGA, SVGA, XGA, SXGA。 2.3.5 Multinational language Supported Support Chinese(Simple/complex)/English. More other foreign languages can be supported by 4 later upgrading the Firmware. 2.3.7 Firmware Upgrade Supported You can upgrade your Firmware with Internal HDD or Flash disk using the System Setup Menu. The upgrade Firmware is provided by TOMACRO. 5 Chapter 3 Precautions before the Operation of limHD200i In this chapter we will describe some problems you might have and demonstrate precautions when using the limHD200i. Also some operating skills are covered. 3.1 Buttons In case there are malfunctions of your remote control, the device is designed with commonly used function buttons on the top. Suggest using the remote control for operation in your daily time. 3.2 Set the Video Output Mode When you use limHD200i for the first time (The factory Default Video Output Mode Settings might do not match your display devices), or when you need to change your display devices (the Default Factory Video Output Mode Setup might not match the newly changed display devices), if there is abnormal display, please adjust the Video Output of limHD200i by selecting the Video Mode button on the remote control. alter the Video Output to normal display. Then press button and Press button and enter the System Setup Manu, adjust the Video Output Mode. The system will automatically save your settings after exit from the Manu. 3.3 Update when changing the newly connected USB devices When the limHD200 is in its normal operation and you need to change the USB devices. For instance: ¾ Disc changing of USB DVD DRIVE. ¾ DRIVE, change the disc. External USB HDD changing. …… Press to unmount the USB DVD After the above operations finished, you need to back to the main page (press 6 or press ). Move the cursor to USB icon and press OK. The system will research and refresh the USB device before you can visit it normally. 3.4 Mega Capacity CD You can use limHD200i as Mega Capacity CD Player. z Follow the instructions as below: z Select the physical device that stores MUSIC files (Internal HDD, external USB HDD or FLASH Disk and so on); Enter the MUSIC directory; z Select Music Playback Mode by pressing z z Select one MUSIC file to play; Select REPEAT Mode. button; Suggest using A/V receiver (amplifier)to achieve high fidelity sound effects. limHD200i supports Coax/Optical SPDIF in the convenience of building a perfect music hall for you. 3.5 Turn on the player in suggested procedures z z z Make sure that you have connected the limHD200i to your display device (such as TV) and Audio device (such as A/V receiver) with appropriate cables; Connect the DC output of accessory AC-DC adaptor to the power input of limHD200i; Insert the AC electric pin of the AC-DC adaptor to your power supply socket-outlet; z If the power light z z to switch on; Enter the Main Menu after system initialization; Operate limHD200i normally. on the VFD is off, press the power button on top of limHD200i Now you can enjoy High Definition videos, listen to music or browse the pictures on your demand. 3.6 Turn off the Player in suggested procedures z Stop playing the media files (Do not power off while playing the media files, doing so might damage your HDD or the device itself); 7 to go back to main Manu; z Press z If you have connected the device to USB CD/DVD drive, and there is disc in the drive, press on the remote control or UNMOUNT on the remote control then take out the disc; z Press z Press z z Press the power button on top of the device and switch power off;; Unplug the AC electric pin if you do not use the device for a long time. to back to main menu; Stand-by and let the device in sleeping state; 3.7 Website Suggest visiting our website (http://www.tomacro.com) often. Notice the new Firmware version announcement. Often upgrade your limHD200i to keep it in the best performances. 8 Chapter 4 Installation of Internal HDD of limHD200i limHD200i supports a internal IDE HDD ( General Hard Disk Drive for PC, Windows format). Please refer to the technical specs provided by the HDD manufacturer for more details. limHD200i supports FAT32 and NTFS File Systems. Suggest using NTFS as FAT32 does not support files larger than 4GB, while High Definition Files are usually larger than 4GB. 4.1 Install the Internal HDD Follow the simple procedures below and install your IDE HDD; Step 1: At the beginning, make sure that you have done the following preparations: a) Find a clean working area with enough light. It must be dry, no strong light, no dust. b) Prepare 2 screwdrivers and HDD fix screws (included in the gift box of limHD200i). c) Prepare one IDE HDD (formatted or unformatted). Step 2: Make sure that you have disconnected all the cables (including power cord) with limHD200i. Step 3: Remove the screw marked by an arrow in the picture below from the bottom base. Step 4: Off the bottom base from the player and expose the base board. 9 Step 5: Remove all the screws from the base board according to the picture below. Step 6:Off the base board from the player and expose the HDD frisket. Step 7: Draw out the HDD frisket along with the internal lead rails of the player. 10 Step 8: Take out your HDD and make sure to set your HDD as MASTER or Cable Select mode by correct jumper setting. Step 9: Mount the HDD with frisket in directions showed in the below picture and fix the screws. Step 10: Push the fixed HDD frisket along with the lead rails in directions showed in below picture. 11 Step 11: Connect the power cable and IDE data cable properly to the HDD. Step 12: Aline the screw holes of base board and screw poles of player. Fix all the screws back. Step 13: Fix the bottom base to the device with screw. Now, you can use the internal HDD. If HDD is still unformatted, please refer to the next part. 4.2 Format the Internal HDD If the HDD remains unformatted, please format the HDD in the following procedures: Step 1: Connect the limHD200i to the power supply near your computer; 12 Step 2: Press power button on top of limHD200i if the power signal on VDF does not light; Step 3: Wait for the normal presentation of the disc icon on VFD; Step 4: Connect limHD200i and PC by accessory USB link cable; Step 5: when shows on VFD, it indicates the computer has identified the Internal HDD of limHD200i; Step 6: Partition and format the HDD according to the recommended instructions and the requirements of your operating system. Notes: 1. limHD200i supports multi-partition, while the first partition of HDD must be initialized as the Main Partition. 2. limHD200i supports FAT 32 and NTFS File Systems. NTFS system is recommended for FAT 32 does not support files larger than 4 GB, while the HD video Files often excess the limits. 4.3 Transfer files to Internal HDD Using the same method in 4.2, connect the limHD200i to the computer by USB cable. Copy or move files between limHD200i and PC as if data transferred between 2 HDDs of PC itself. Unnecessary to go into any more details here. 13 Chapter 5 Physical Connection of limHD200i 5.1 DC Interface (12VDC) 12V DC Interface is used for providing power for limHD200i. Connect the power supply as picture instructed below: 14 Warnings: Do use the accessory 12VDC wide-voltage power Adapter. If not, it might damage your player; the power cord used must accord with the local country standards. Please contact with local agents if you need to change the power Adaptor. Step 1: Connect the power cord to accessory adaptor; Step 2: Connect the AC pin of power cord to the power supply socket; Step 2: Connect the 12VDC output of accessory adaptor to the player; Step 4: Turn on the power. You will notice that the green LED of the Adaptor is lightened. If the green light of VFD is off, please press the power button on top of limHD200i. 5.2 USB 2.0 Device Interface limHD200i has 1 USB2.0 device interface, which is used for the data transfer with USB2.0 host devices (such as PC,NAS and so on). When connected to the PC, limHD200i is used as USB 2.0 device. Its internal HDD can be used as mobile HDD for the PC and thus conveniently manage the files in HDD. 15 5.3 USB 2.0 Host limHD200i has 2 USB2.0 host ports, which can be conveniently linked to external USB devices for playing the stored multi-media files. The main functions of the USB2.0 host show as below: z Connect with USB devices. Can directly play the media files such as HD movies. Notice: Can not use USB CD/DVD drive to play DVD disc as normal DVD player, Or you can convert single DVD disc to an ISO file, limHD200i can play ISO/VOB files. z Connect with external USB HDD and play the stored multi-media files. z Connect with Flash disk. You can store digital music/photo files etc. z Connect with digital products like digital camera, DV and play the stored media files. When the limHD200i is connected with USB devices, the light on VFD will be on. 5.4 10/100M LAN Interface(RJ45) limHD200i has one RJ45 for fast Ethernet Network connection. You can connect limHD200i to your LAN to play the shared high-definition videos or other media files in media server or other computers connected to the network; you can also use limHD200i as VOD(Video On Demand)terminal when you link it to WAN. limHD200i can visit the NAS drive on the network. For IP setting, please refer to 9.3 System Setup. Notes: Even in the 100M network environment, High Definition video files with high bit-rate stream may not be played smoothly if your network is congested. 5.5 A/V Interface 5.5.1 Video Connection limHD200i supports 1080p resolution (1929x1080 progressive scan ), can realize real pixel to pixel (needs support by video file encoding). You can select the suitable video output mode and resolution according to different display equipments (such as TV/Projectors/Monitors and so on) and select suitable A/V cables. 16 Video Port Highest Resolution Notes Composite 480i Analog signals S-video 480i Analog signals YPbPr 1080i Analog signals DVI 1080p Pure digital signals HDMI 1080p Pure digital signals,embedded audio signals VGA 1920x1200 Analog signals 1 High Definition Connection 1) HDMI HDMI (High Definition Multimedia Interface) provides a high bandwidth up to 5Gbps, can transfer uncompressed audio signals and High resolution digital signals. It can ensure audio-video signals transferring with the highest quality. The advantage of HDMI: you can use only one HDMI cable to transfer the audio and video signals; meanwhile, as there is no signal attenuation and distortion in the transfer process, you can obtain higher quality video/audio transfer. HDMI uses the same cable for both audio/video and greatly simplifies the home theater system construction. We recommend you to use this connection if HDMI is supported by your display device. 17 2) DVI DVI (Digital Video Interface) is a common connection of High Definition display devices. Note that the main difference between DVI and HDMI is that DVI has no embedded audio signals. DVI can transfer uncompressed pure digital video signals. You can connect limHD200i by a HDMI-DVI cable with your display devices equipped with DVI interface. 3) VGA (RGB+HV) VGA connector is also called D-Sub interface (with 15 pins). Analog signals are still transferred by VGA. The digital images information is converted to R, G, B signals included H/V synchronizing signals by color palette D/A convertor, and then transferred to display devices by VGA cable. For the analog display devices such as CRT monitor, signals are transferred to relative processing circuit then control the CRT to generate images; for the digital display devices (such as LCD, DLP), relative A/D convertors are required to convert analog signals to digital signals again, image distortion is unavoidable after the D/A & A/D conversion. Therefore, VGA mode is more suitable to CRT display. 18 You can connect limHD200i to VGA display device by VGA cable. You can use VGA-RGBHV cable if your display devices are equipped with separate R, G, B, H (Horizontal synchronization), V (Vertical synchronization) plug. Check to make sure that the plug required is BNC or RCA, as both plugs are commonly used. 4) High Definition YPbPr Use VGA connector for this connection. One VGA-YPbPr cable is required (included in the accessories). You only need to connect one end of VGA-YPbPr cable with the VGA connector of limHD200i, the other end to a standard YPbPr cable, then connect standard YPbPr cable to your display device. 2 Standard Definition Connection 1) Component Video -YPbPr Use VGA connector for this connection. One VGA-YPbPr cable is required (included in the accessories). You only need to connect one end of VGA-YPbPr cable with the VGA connector of limHD200i, the other end to a standard YPbPr cable, then connect standard YPbPr cable to your display device. 19 2) S-VIDEO S-Video is one of the video interfaces most commonly used. Its full name is Separate Video. It transfers Luminance and Chroma signals separately. To a greater extent it avoids image distortion caused by signal-to-crosstalk and higher image quality can be provided. S-video is combined by five signals - two Y signals, two C signals and one common shield ground. 3) Composite Video The interface of composite Video is a standard yellow RCA plug, which is the most commonly used so far. Almost all the products like TV sets, Video Players are equipped with this kind of interface. Composite Video, composite by Y/C, is a kind of video signal that supports low quality image. Generally, the resolution can only reach to 350-450 scan lines and therefore is not recommended. 5.5.2 Audio Connection The audio output mode is divided into two kinds: Analog Stereo and Digital Output. select appropriate connection cables. 20 Please Audio cables Max. No. of Channels Notes L/R Audio 2 Analog Audio cable-the left and right channels Coax SPDIF 5.1 Digital signals, need to be connected with digital decoder (such as A/V receiver) Optical SPDIF 5.1 Digital signals, need to be connected with digital decoder (such as A/V receiver) 1 Digital Audio You can use A/V receiver to decode the digital audio stream (such as DTS) by connecting it to your limHD200i with appropriate cable. In such circumstances, the audio D/A conversion will be performed outside limHD200i. All the three digital audio output modes of limHD200i have the same sound effects. Please choose the appropriate mode according to practical situations. SPDIF output standard should be familiar to most of the music lovers. It shorts for Sony/Philips Digital Interface. It can output compressed audio signals like LPCM, Dolby Digital and DTS. SPDIF is divided into Coaxial and Optical according to different transfer medium (actually the signals they transfer are the same). However, the optical signal transfer will be a popular trend, without considering the signal level/resistance and with stronger flexibility and anti-interference capability. 1) Coaxial Cable Coaxial SPDIF is generally named as coaxial output, marked with a “COAXIAL” on the backboard of the equipment. The digital coaxial interface uses a coaxial cable as the transfer medium with its impedance 75Ω. It has a strong point of constant impedance and wide transfer frequency range. The transfer frequency of high quality coaxial cable can reach to several hundreds Mhz. As errors seldom occur in digital coaxial transferring, this way of transfer has good performances in sound quality. However, when you use coaxial cable please notice its impedance match. When using 75Ω coaxial cable, the constant impedance and correct signal transfer are guaranteed. Generally speaking, coaxial and optical output the same quality digital 21 audio. Therefore, some A/V devices are designed only with coaxial output instead of optical output. 2) Optical Cable Optical SPDIF, also named as Toslink, is a technical standard early developed by TOSHIBA. It is named by Toshiba + Link. It has a mark of OPTICAL. So far, almost all the digital A/V equipments are equipped such interface. Once Toslink optical interface was widely used in media players such as CD, LD, MD, DVD. Toslink transfers digital audio signals by optical fibre. Interfaces are mainly divided into two kinds, one is standard interface for home appliances, and another is mini-Tosilink for portable devices such as CD player. Optical transfer can realize electric isolation, prevent the digital noises from ground, and help increase the SNR of DAC. The time base error, however, is an important factor that affects the timbre. As the optical signals needs two conversion between emitter and receiver, it will produce serious time base jitter. Therefore, such kind of optical transfer though obtains clear sound, it seems to be lack of lingering charm and vitality because of a heavy digital sense. 3) HDMI embedded Digital Audio 22 2 Analog Audio Analog audio has 2-channels, supports Dolby Pro-Logic and Pro-Logic II coding signals to provide stereo sound effects. When using analog audio output, D/A conversion will be processed by high quality DAC and low noise amplifier of limHD200i. In some cases 2-channels analog audio output is connected to headphone. 23 Chapter 6 VFD Panel of limHD200i limHD200i has one VFD panel, which totally shows the functional state of the player making your operation more directly and efficiently. 1). Power light The power state of the limHD200i can be judged by the bright/dark of the power light. Dark – Power disconnected; Bright - Power connected. 2). Physical Storage Device Light Show the chosen physical storage device (at the same time only one of the lights could be lightened), from left to right in the above picture follows: - When this light is lightened, it shows that you select internal IDE HDD; (Left) - When this light is lightened, it shows that you select USB device1. (Right) - When this light is lightened, it shows that you select USB device2. - When this light is lightened, it shows that you select LAN device. 3). Media Playback State Light Show the playback state of the media files, from left to right in the above picture follows: – When this light is on, it shows that the player is playing media files; – When this light is on, it shows that the media playback is paused; 24 – When this light is on, it shows that the media playback is stopped; – When this light is on it shows that the player is in repeat mode (REPEAT TRACK or REPEAT ALL). 4). Media Playback Disc The functional state of limHD200i can be judged by the rotation/inaction of the disc Rotation – Under media playback conditions Inaction – Under menu or files browse conditions. 5). Video Output Mode Show the Video Output Mode of limHD200i. Press VIDEO MODE button (do not press the button too fast, in case it missed the matching video output mode) until there is a normal display. When you choose the video output mode, VFD shows as the picture below. 6). Play time of media files When playing files like Movies or Music, the VFD shows the elapsed time of the media files. When pressing INFO button the play time will also show. 7). PC Connection Light The functional state of limHD200i PC connection can be judged by the light. Dark- Has not been connected to PC; Bright- Has been connected to PC. 25 8). Select Movie Playback Under Movie Playback conditions 9). Select Music Playback Under Music Playback conditions 10). Select Photos Browse Under Photo Browse conditions 26 Chapter 7 Remote Control of limHD200i Using remote control is convenient for your operation. In this manual we indicate all the functions of remote control buttons. The reference picture of the remote control is as below: 27 7.1 Precautions before using the remote control Install the battery into the remote control before using it. limHD200i. 1 Open the battery case 2 Install the R6 batteries 3 Close the battery case Then you can use it to control Precautions of using battery Incorrect usage of battery might lead to battery leak or erosion. below: z z z z Please operate the instructions as Do not upside the positive and negative pole of the remote control battery (According to the “+”and “-” marks). Do not dissect, short circuited, heat or charge the battery, neither can throw it into fire. Do not leave the waste or run-out battery in the remote control. Mix use of different batteries, or the new and old battery prohibited. 28 z z z Take out the battery if you do not use the remote control for a long time, in case that it might lead to damages caused by battery leak and erosion. Please change all the batteries if the remote control does not work or has limited effective ranges. If there is a battery leak, please wipe clean the battery case on the remote control and replace the old battery. Remote Control Precautions z z z z z z Aim the remote control at the infred sense window of limHD200i then operate; Do not drop the remote control; Do not leave the remote control in places of high temperatures or humidity; Do not spill water or any other liquid to the remote control; Do not expound the remote control infred sense window to direct sunshine; Do not dissect the remote control. 7.2 Functions of the Remote Control Buttons SLEEP/WAKEUP BUTTON - When limHD200i is under normal working conditions, press this button will let it enter the sleep mode, while press again it will return to normal working. In the sleep status, limHD200i consumes little power. VFD ON/OFF - Select VFD ON/OFF VIDEO MODE SELECTING - Select the video output mode of limHD200i to match with the display mode (resolution etc.) of the TV or other display devices. The default video output mode of limHD200i might not match with your display devices. At this time your display devices might not have normal performance or do not show. In such circumstances, please press the VIDEO MODE button (do not press too fast, or you will miss the matching video mode) until your display devices have normal display. After that, please use SETUP button and enter the setup menu to adjust the video output mode right, and press EXIT button to exit. So your settings will be then memorized and it will show normally next time when you turn on limHD200i. You can also adjust the video output mode by press this button during media playing, however, it will not be autosaved. SYSTEM SETUP - Press SETUP button, then you can enter the system setup menu from the browsing mode. To set up relative items and upgrade the firmware, you only need to operate Up, Down, Left, Right and OK. DISPLAY CONTROL - Press SETUP button to adjust Brightness/Contrast/Saturation during moive playback. 29 PHYSICAL STORAGE DEVICES SELECTING - Press the DEVICE button to select effective physical storage devices such as IDE HDD/USB1/USB2/LAN. VIRTUAL CD BUTTON – Eenter the Virtual CD directory of selected physical devices and playing MUSIC files in repeat mode. The Virtual CD directory is equal to one CD. MOVIE PLAYBACK - It only shows MOVIE files in the file list. You can select a file to play (or repeat). MUSIC PLAYBACK - It only shows MUSIC files in the file list. You can select a file to play (or repeat). PHOTO BROWSE - It only shows PHOTO files in the file list. You can select a file to browse (or slide show). UP DOWN LEFT RIGHT - Used for menu operation or files browsing. PAGE UP - When the files are listed with many pages, press PAGE UP button to browse the previous pages. PAGE DOWN - When the files are not listed in one page, press PAGE DOWN button to browse the next pages. MENU - Enter the main menu for relative operations EXIT (BACK) – Go back to previous level menu OK (ENTER) - Used to confirm current settings or play selected media file (in this case, equal to PLAY button). IMAGE (ADJUST THE ASPECT RATIO OF DISPLAY) - In the menu mode or while playing media files, press this button will alter the aspect ratio display (16:9, 4:3 …). AUDIO (AUDIO TRACK SELECTING) - While playing multi-track MOVIE files, use this button to alter different tracks. SUBTITLE - While playing MOVIE files, this button is used to load or unload the subtitles. Notice that the format of subtitle files must be .srt, and should be named the same with relative MOVIE files. 30 TIME SEARCH - While playing MOVIE files, you can use this button selecting a specified time to play (the selected time starts from the very beginning). Press this button and a frame will be showed. You can use UP DOWN LEFT RIGHT to select time as you want in format of hh:mm:ss. Press OK to Confirm. REW - While playing MOVIE or MUSIC files, press this button will rewind the playback. Press it again will alter rewinding speed (REW8x – REW16x – REW32x), a relative ICON will be showed. Press the PLAY button to return to normal playback. FWD - While playing MOVIE or MUSIC files, press this button will forward the playback. Press it again will alter forwarding speed (FWD8x – FWD16x – FWD32x), a relative ICON will be showed. Press the PLAY button to return to normal playback. PREV - Press this button to play the previous media files or to show the previous page files in browse mode (equal to PAGE UP button). NEXT - Press this button to play the next media files or to show the next page files in browse mode (equal to PAGE DOWN button). PLAY - Play the selected media files. PAUSE - Press one time to pause; Press again to continue playing. STOP - Stop playing the media files and back to the present directory. VOLUME(+ -):Tune up or tune down the volume. MUTE - Press this button to mute the sound; Press again to turn on the sound. ZOOM - While watching the movies or browsing the images, press in or to zoom to zoom out (ZOOM level: 1-6 and OFF). ROTATE - While browsing images, press this button to rotate the showed image according to clockwise direction. Press once the image will rotate 90 degrees. FUNC - Press this button to enter Function Menu. Relative functional settings could be done such as load or unload of the subtitle (function of SUBTITLE button), Play Time Setup (function of TIME button), Repeat Mode - Repeat Clean/Repeat Track /Repeat All (function of REPEAT button), aspect ratio (function of IMAGE button). 31 INFO - While playing MOVIE files, press this button to show an information board which indicates the information of the playing file - file name, file size, elapsed time, total length, repeat mode etc. REPEAT - While playing MOVIE or MUSIC files, press this button to select the Repeat Mode - REPEAT CLEAR, REPEAT TRACK (repeat the playing files) and REPEAT ALL (repeat all the files at the current directory). UNMOUNT CD/DVD DRIVE - In the menu mode, press this button will unmount the CD/DVD Drive, then you can open the CD/DVD Drive cabin to take out the disc. Notice: Along with Firmware upgrade some button functions of remote control might have been changed. So please pay close attention to the related version descriptions when upgrading the Firmware. 32 Chapter 8 Instructions of limHD200i Buttons When the remote control gets lost or malfunctioned, you might press the buttons on the top of limHD200i to meet an emergency. In this case, please contract the local agent to buy a new remote control. on the remote control equal to OK button equal to on the remote control SETUP button equal to TV MODE button equal to MEDIA/FUNC button equal to on the remote control on the remote control on the remote control 33 DEVICE/INFO button equal to on the remote control Notes: Along with Firmware upgrade some button functions might have been changed. please pay close attention to the related version descriptions when upgrading the Firmware. 34 So Chapter 9 Setup and Adjustments of limHD200i When you finish the physical connection of limHD200i, you need to adjust the system properly to obtain the best image/audio quality. Connect limHD200i with power supply. Enter the Main menu after the initialization finished. Press on the remote control to enter setup menu Generally, you only need to use and on the remote control to operate the menu. Any time you want to quit this Setup mode and back to the Main file again or just press browsing page, you only need to press 9.1 Audio Setup 35 . 9.1.1 SPDIF out SPDIF is a standard interface agreement, short for SONY/PHILIPS Digital Interface Format. limHD200i supports optical SPDIF and coaxial SPDIF. SPDIF audio setup has 2 options: DPCM and Encoded Digital DPCM: (Differential Pulse Code Modulation), is a kind of digital stereo signal that can be recognized by most of the devices. Please select this option if you do not have any devices such as decoders/AV amplifiers for Dolby Digital and DTS signals decoding. Encoded Digital: Selecting this option, you can directly output the digital streams from the media files without any conversion. These digital streams later will be decoded by the outer decoders/ AV receivers (amplifiers). Notice: This option has no effects to the Analog Audio Output. 9.1.2 Speakers out Speaks Out setting has two options: 2 Channels: Left and Right Channel, suit for relative Analog Audio Out. 5.1 Channels:Use 5.1 Channels will obtain high fidelity music quality if you connect the powerful stereo systems by AV receiver (amplifier). 9.2 Video Setup Press button to enter the setup mode. Press the Video setting icon. Then press on the remote control to highlight to enter the video output mode setting. 36 According to your display devices, select the Active Output interface of the limHD200i to output video signals. For the instructions of video output interface connection, please refer to 5.5.1 Video Connection. VGA: Output RGBHV analog video signal; HDMI: Output pure digital video signal (with embedded digital audio signal); SD: Output standard definition analog video signals with S-Video or Composite Video Interface. HD YPbPr: Output analog component video signal with VGA-YPbPr conversion connector. DVI: Output pure digital video signal with HDMI-DVI conversion cable. 37 z VGA If you are using VGA as Active Output, please select the proper resolution settings according to your display device instructions. The highest resolution that limHD200i can support is 1920x1200 (with 60HZ Vertical Frequency). limHD200i VGA output supports the following resolutions: 640x480x60: 640x480 Progressive Scan; Vertical Scan Frequency: 60Hz; 800x600x60: 800x600 Progressive Scan; Vertical Scan Frequency:60Hz; 800x600x85: 800x600 Progressive Scan; Vertical Scan Frequency:85Hz; 1024x768x60: 1024x768 Progressive Scan; Vertical Scan Frequency:60Hz; 1024x768x85: 1024x768 Progressive Scan; Vertical Scan Frequency:85Hz; 1280x768x60: 1280x768 Progressive Scan; Vertical Scan Frequency:60Hz; 1280x1024x60: 1280x1024 Progressive Scan; Vertical Scan Frequency:60Hz; 1280x1024x75: 1280x1024 Progressive Scan; Vertical Scan Frequency:75Hz; 1360x768x60: 1360x768 Progressive Scan; Vertical Scan Frequency:60Hz; 1920x1200x60: 1920x1200 Progressive Scan; Vertical Scan Frequency: 60Hz. z HDMI 59(Vertical Scan Frequency: 59.97Hz) If you are using HDMI, please select proper resolution settings according to your display device instructions. The highest HDMI output Resolution that limHD200i can support is 1080p (1920x1080 Progressive Scan). Auto EDID (Extended Display Identification Data): limHD200i automatically negotiates with display device through the HDMI and confirms its resolution. If the resolution cannot be confirmed, it will display with default video output 640x480 resolution. At this time you need setup proper resolution manually. 480i: 720x480 Interlace Scan; 38 480p: 720x480 Progressive Scan; 720p: 1280x720 Progressive Scan; 1080i: 1920x1080 Interlace Scan; 1080p: 1920x1080 Progressive Scan. z SD Mode If you are using SD Modes, please connect your display device to limHD200i by S-Video or composite video cable according to the display device instructions. 39 If your TV standard is NTSC, SD output will be set to 480i automatically; if your TV standard is PAL, SD output will be set to 576i automatically. Select SD Mode and press circumstances. , you may select C/S-Video、C/YPbPr、C/RGB etc in specific Please coordinate it with your video connection. z HD YPbPr If you select HD YPbPr, please connect the display device to your limHD200i by YPbPr cable with the accessory VGA-YPbPr conversion connector following the display device instructions. limHD200i YPbPr supports the following resolutions: 480p: 720x480 Progressive Scan Output; 720p: 1280x720 Progressive Scan Output; 1080i: 1920x1080 Interlace Scan Output. 9.3 System Setup Press on the remote control to enter setup menu. Press System Setup icon . Then press , move the cursor to to enter the System Setup Sub-Menu. 40 z TV System Select NTSC or PAL according to the standard of your display devices (TV etc.) 41 z TV Shape First, please confirm the shape of your display devices - screen aspect ratio (length: width) before you select the relevant settings. 16:9: Please use this setting if your display device is wide-screen 4:3: Please use this setting if your display device is not wide-screen. z Network Setup 42 1. SAMBA Setup Instructions 1) Set the shared folder on your media PC Make sure that your router supports DHCP function; Make sure and note down your media PC’s IP address, such as '192.168.18.106'; Rename the media shares folder in English or Number, such as media; Turn off the host firewall, connect network port (RJ45) which connect to your limHD200i to an other PC station and make sure it can visit shared folder, such as media folder; If you are using win2000 server (or Windows XP), you must enable Guest Account for accessing the shared folder. Please follow the steps below: Go to Start > Control Panel, Double click Administrative Tools. Double click Computer Management. Double click Local Users and Groups. Double click Users. Double click Guest. The Guest Properties window appears. Confirm that no checkmark appears in the box next to Account is Disabled. If there is a checkmark, click the box and the checkmark will disappear. Click OK to save the change and close the Guest Properties window. To confirm the change, look for the Guest Account icon in the ) disappears. Close Computer Management window, the small x on it ( the Computer Management window. After the above steps then you can let your limHD200i share the folder you want. 2) LimHD200i - Samba Setup Choose Networkpath\SAMBA in setup menu. It will pop up a soft-keyboard. set the IP address of your shared PC and the path of the shared folder, such as '//192.168.18.106/media' You can delete the default IP and Path by selecting Back on the screen. Input the IP address and path by selecting numbers or letters using UP DOWN LEFT RIGHT buttons. Press ENTER to confirm and exit. Choose Networkpath\Static IP to set your IP address of your limHD200i (such as 192.168.18.108), or Networkpath\DHCP to get an IP address automatically. 43 Go back to main menu by pressing EXIT button, reboot the system. Choose NETWORK(Samba)on the main screen then you can visit shared media files on your shared PC. 2. NFS Setup Instructions Network File System (NFS) is a network file system protocol, allowing a user on a client computer to access files over a network as easily as if the network devices were attached to its local disks. NFS Server and Client (limHD200i) Configuration 1) How to setup NFS server login Linux server as root, edit the configuration file '/etc/exports', specify the shared directory and access permissions etc. Run the following command to edit /etc/exports: # vi /etc/exports Add the following content: /home/user/nfs 192.168.*.*(rw,sync,no_root_squash) // 'user' is a linux user directory, need to create a new 'nfs' directory under the 'user' directory Save and exit. The added content stands for: limHD200i(IP address in the range of 192.168.*.* ) can access the directory '/home/work' with read/write permissions. /home/user/nfs is also named as server export shared directory. Parameters in the blanket are described as below: rw: read/write access permissions, ro - read only sync: synchronous write in cache memory and Disk; you can also use async, in the case of using async data will be stored temporarily in cache memory rather than written in the disk immediately. no_root_squash:user property of NFS server shared directory; If the user is root, the shared directory can be treated as local root. run the following commend to start portmap: # /etc/rc.d/init.d/portmap start run the following command to start NFS service. NFS will then activate finger daemon and monitor the client requirements: # /etc/rc.d/init.d/nfs start User can reboot Linux server and start NFS service automatically. 44 After NFS server started, you need to check the firewall settings of Linux server (firewall service usually need to be turned off). Make sure that the using NFS port and communicating host are not masked. Mainly check option settings like iptables, ipchains of linux server and the files - /etc/hosts.deny, /etc/hosts.allow. loop test NFS server on linux server, check if shares directory can be visited or not. Run the following command on Linux server: # mount–t nfs 192.168.18.106:/home/user/nfs /mnt/nfs // need to creat a new 'nfs' directory under mnt # ls /mnt The command will export and mount 'nfs' directory onto to /mnt directory. Therefore, if NFS works normally, you can view the files of /home/user/nfs shared directory under /mnt. 2) LimHD200i - NFS client Setup Choose Networkpath\NFS in setup menu. It will pop up a soft-keyboard. set the IP address of your linux server and the path of the shared folder, such as '192.168.18.106:/home/user/nfs' You can delete the default IP and Path by selecting Back on the screen. Input the IP address and path by selecting numbers or letters using UP DOWN LEFT RIGHT buttons. Press enter to confirm and exit. Choose Networkpath\Static IP to set your IP address of your limHD200i, or Networkpath\DHCP to get an IP address automatically. Go back to main menu by pressing EXIT button, reboot the system. Choose NETWORK(NFS) on the main screen then you can visit shared movie files on your NFS server. z Restore to the Default Settings If there is a malfunction, or if you want to restore the device to original factory default settings, please enter the System Setup Menu and move the cursor to “Factory Set” and press RIGHT button on the remote control. When the following picture shows, press OK and the default settings will be restored. 45 z Upgrade the Firmware When the new software is issued, upgrade will make system of limHD200i in the best conditions and some functions optimized. You can save the files of firmware under the Update folder. limHD200i will search the firmware files from the folder. When the new Firmware is issued, please download the latest version. Probably some system functions are enhanced or optimized. Here is a brief upgrade instruction: 1) Download the latest version of Firmware, decompress and copy it to the Update folder in the first partition of limHD200i internal HDD. 2) Connect limHD200i to your display device. 3) Turn limHD200i on and wait. 4) Enter System Setup Menu using the SETUP button on remote control. 5) Select Software\Upgrade Boot. About 5 minutes later the display will be turned off (black screen, no video signal output) by system when the upgrade finished. Then you 6) 7) can turn limHD200i off safely. Repeat the above step 3) and 4). Select Software\Upgrade App. About 35 minutes later the display will be turned off (black screen, no video signal output) by system after the upgrade finished. Then you 8) 9) can turn limHD200i off safely. Repeat the above step 3) and 4). Select Software\Bak App. About 10 minutes later the display will be turned off (black screen, no video signal output) by system after the upgrade finished. Then you can turn limHD200i off safely. 10) Upgrade done. Now you can use limHD200i as usual. 46 Safe Recoverary (base on Version: Build 070707 or later firmware): In the future upgrade process, if you fail to escalate due to power fault and other unexpected factors, you can recover your limHD200i by the following step: Power on limHD200i by pressing the OK button (on the top of limHD200i) until all VFD lights are bright; Release the OK button, limHD200i upgrade firmware automatically; After about 35 minutes, all VFD lights black out, the upgrade procedure is complete; Reboot limHD200i, you can use limHD200i as usual. z Select Menu Language limHD200i currently supports 2 Language options: English and Chinese. Choose LANGUAGE in setup menu and select the Language. Go back to main menu by pressing EXIT button, reboot the system. Your Select Language become effective More Languages will be supported by the future Firmware upgrade. 47 Chapter 10 limHD200i Media Playback 10.1 Play the Video Files Video Formats Supported: limHD200i supports all the popular video formats. High-Definition video code stream includes: H.264(.avi, .ts, .mov), MPEG2-HD (.ts,, .tp, .avi), WMV-HD/VC-1, Divx-HD, Xvid-HD etc.; Standard Definition video code stream includes: MPEG-1/2/4, DivX™ , XviD, DVD files (.ISO and .VOB). INFO Screen When entering the video playback, we can get relative information of the playing video files by pressing INFO button. The information includes: File Name, File Size, length, Elapsed time and Play Mode. Info window shows as below: Video Playback Control 1. Press press to play (or pause), Press to stop. 48 to pause (or continue), 2. Press or to forward/rewind for video playback or quick browse. 3. Press or to skip to next/previous video files. 4. Press to alter video display ratio (16:9, 4:3 …). multi audio tracks, you can use to change audio track. with to its video file are available (.srt), you can press Press If subtitle file alone to on/off the subtitle. to select time to play. 5. Press and to tune the volume. 6. Press and to zoom in/out the image size. 7. Press If the playing video has Press off/on the sound. to setup relevant functions (subtitle setting, time search, repeat mode, etc.). 8. Press to show the playing video information. 9. Press to select Repeat Mode. 10. Press to adjust Brightness/Contrast/Saturation of display image. 10.2 Play the Music Files Audio Formats Supported limHD200i mainly supports two audio formats: Lossless format: WAV Lossy format: MP3,OGG (Ogg Vorbis),WMA(Windows Media Audio),AAC. Lossy format file removes sounds difficult for human to catch or even inaudible on the basis of audio psychology mode (an extremely low tone follows an extremely high tone for e.g.). MP3 belongs to such files. INFO Screen When playing the music files, a below Info. Screen will be showed: 49 The screen shows the following information: • File Name • File Size • Elapsed time – already played time; format: hh:mm:ss; • Length – whole length; format: hh:mm:ss • Repeat Mode Music Play Control 1. Press press to play (or pause), Press to pause (or continue), to stop. 2. Press and to forward /rewind. 3. Press and to skip to next/previous music file 4. Press 5. Press and to tune the volume, press to select Repeat Mode. 50 off/on the sound. 10.3 Browse the Photo Files Photo formats supported: So far limHD200 supports popular image formats. You are able to enjoy images with JPG and BMP formats. INFO Screen While browsing the photos, we can know the relevant image information by pressing INFO button, such as file name, file size, image size. Photo Browse Control 1. Press 2. Press and and to skip to next/previous image file; to enlarge/reduce images, press 3. Press to show the photo file information; 4. Press to set relevant functions, such as Slide-Show. 51 to rotate images; Chapter 11 limHD200i FAQ 11.1 Choppy while playing with USB CD/DVD drive Probably caused by the following reasons: ¾ Videos have too high Bit rate. USB CD/DVD drive generally supports an average bit rate of about 20Mbps (peak value is certainly higher than this value). We suggest you to copy the videos with high bit rate to the internal HDD to play. ¾ The video data has big BER which also affects the smoothness. A big BER is usually caused by disc distortion or dirtiness. It is also caused by poor error correcting capability of the USB CD/DVD drive, including the original data error. We suggest you not use discs with problems; neither can you use the USB CD/DVD drive with poor error correcting capability to play the movies. ¾ The USB interface cannot work under USB2.0. The reason is that the USB interface chip used by USB-IDE ADAPTER does not accord with the USB2.0 Standard. Or using a USB connection cable ill of rapid transmission capability. We suggest you to use the USB CD/DVD drive (or USB/IDE ADAPTER) allowed by USB2.0 standard and use the accessory USB connection cable. ¾ Other reasons not found yet. 11.2 Cannot find the USB devices newly connected When you just connect the USB devices like USB Mobile HDD, USB CD/DVD drive or need to change the disc, it displays empty and you can not visit the USB devices or newly changed disc. Such problems are probably caused by the following reasons: ¾ You have not refreshed your USB devices. At this time you need to go back to the main menu and refresh the USB devices (select USB icon on main menu.). For more details please refer to 3.3 Refresh when changing the newly connected USB devices. ¾ USB devices are not connected properly. Please check carefully whether there are some problems with the power supply (as some USB devices need outer power supply). To check whether it is in normal operation, the direct way is to connect the USB device to PC; to check if there are disc damages/problems, the direct way is to put the disc in the CD/DVD ROM of PC to see if it can work. ¾ USB connection cable problems. We suggest you use the accessory USB cable or other USB2.0 Standard cables. ¾ Other reasons not found yet. 52 11.3 Cannot find Internal HDD after turn on the player Probably caused by the following reasons: ¾ Internal HDD has not been formatted. Please format the Internal limHD200i HDD referring to 4.2 Format the Internal HDD. ¾ First partition of limHD200i internal HDD has not been formatted as the Master Partition. Please set first partition as master. ¾ limHD200i Internal HDD has been damaged. Please contact with HDD Manufacturer or change the Internal HDD. ¾ Other reasons not found yet. 11.4 PC cannot find Internal HDD of limHD200i Sometimes limHD200i is connected to the PC through USB while the PC can not recognize limHD200i automatically (cannot auto-refresh to show the Drive Letter). But it shows a USB device icon in the right-down corner on the screen . In such circumstances, you need adjust manually. Right click My Computer and select Manage, entering a picture as below: 53 Select Disk Management. The Disk0, Disk1,… … will appear (depends on the number of physical disks), find out a Disk not active, right click, it will show: “Convert to C:/ or basic Disk” (notes: this conversion will lead you to format HDD, option not recommended); you should select “convert to C:/” and double click “My Computer”, then you will see the Drive Letter. 54 Appendix High Definition Basics Appendix 1 Digital TV In order to know more about HDTV, let’s first take a look at DTV. DTV (Digital TV) is a TV system that uses digital technique during the whole process of sending, editing, programming, transmission and receiving (means that the signals are all expressed by 0 and 1). It is divided into four levels by its definition (from high to low): HDTV, EDTV, SDTV and PDTV. Between different definition levels of DTV it has a backward compatibility - the high-end products are compatible with the low-end products. That is to say, you can use HDTV to watch EDTV, SDTV, and PDTV programs. HDTV EDTV SDTV PDTV High Definition DTV Enhanced Definition DTV Standard Definition DTV Popular DTV Movie image Image better than DVD DVD image VCD image Appendix 2 HDTV HDTV is the format of the best image quality in DTV. HDTV is short for High-Definition Television. Established by usage, most people name the HD-Video as HDTV. Here HDTV mentioned in the latter part of the manual refers to High Definition Video rather than High-Definition Television. Appendix 3 Definition It is generally believed that the display definition of HDTV video is at least tree times higher than the present TV. With richer image details, it can completely meet Video fans’ strict demands for TV program definition. To reach this goal, HDTV derived three resolution standard, which are 720p (1280x720, Progressive Scan), 1080i (1920x1080, Interlace Scan) and 1080p (1920x1080, Progressive Scan) respectively. According to the video quality, 1080p resolution HDTV program has the best visual effects, follows 1080i and 720p. 1920x1080 Resolution supports Interlace/Progressive Scan mode of 24Hz, 30Hz and 60Hz. 1280x720 resolution only supports 24Hz, 30Hz, 60Hz in Progressive Scan mode. Refresh rate of 60Hz and 30Hz adapt to video playback, while 24Hz adapts to Movie playback. 55 Appendix 4 Scan Mode (Interlace and Progressive) Interlace scan (such as 480i, 1080i) refers to display separately the whole picture into two interactive pictures of odd field and even field. It helps to reduce the flicker degree of TV display. Progressive scan (such as 480p, 720p, 1080p) means to scan a whole picture line by line. Progressive scan picture is more stable than interlace scan picture. To divide the scan mode into Progressive and interlace are mainly for the purpose of giving attention to the traditional display device such as TV. Generally, Interlace scan does good to those motive images changing so fast, while Progressive scan adapts to displaying still images with high resolution. In the long run, Progressive scan has a brighter future in its application. Appendix 5 HDMI Introduction HDMI (High-Definition Multimedia Interface) is the first digital interface that supports transferring uncompressed digital HD Video, Multi-track Audio, intellective format and control command data in single cable in the industry. HDMI has already been the most advanced multi-media interface standard internationally. HDMI represents the direction of digital transmission development and intends to have greater influences. HDMI originates from DVI standard, and both of them center on the TMDS signal transmission technique of Silicon Image. Three groups of TMDS channels transfer the 24 bits pixel video data by R/G/B or Y/Cb/Cr formats with the highest frequency of 165MHz. The actual video transmission has a bandwidth near 4Gbps. Based on that, HDTV can easily deal with the HD Video system. Actually, the superior high HDMI standard is more than sufficient compared to the highest 1080p standard of HD video system (1080p needs a bandwidth of 2.2Gbps). HDMI has enough bandwidth being able to offer supports to higher standard video system in a long period of time in the future. Furthermore, HDMI also offers supports to high quality audio signal transmission with the highest 8 channel and each channel reaches up to 192 KHz (note: DVI does not include audio signals, the systematic audio signals must be transferred by other interfaces), but all these are done only in one cable. 56 Appendix 6 Media Formats A6.1 Moive formats High resolution movie programs will meet a lot of difficulties in both storage and transferring. The only solution is digital compression of signals. HDTV video usually adopts many coding formats such as MPEG2-TS, WMV-HD and H.264. The most common one is MPEG2-TS Code Standard HDTV program. These video files are usually video stream files with suffixes of ‘.tp, .ts, .mpg’. H.264 has an advantage of excellent structure originating from MPEG-4. It also has a technical advantage of 2-3 times higher than MPEG-2 digital compression rate and 1.5 times higher than that of MPEG-4. Based on that, it is greatly inclined to replace MPEF-2/4 code standard. Microsoft-dominant WMV-HD, however, becomes the most familiar coding mode among recent 1080p programs on the internet, as a result of its extremely high compression ratio and perfect support to PC platform. Usually its suffix is “.wmv.” H.264 On May, 2003, ITU and ISO MPEG (International Organization for Standardization’s Moving Picture Experts Group) together issued an H.264 video compression standard. It is formally named as MPEG-4 AVC(Advanced Video Coding), which is the chapter 10 of MPEG-4. H.264 has been authorized as one of the video formats of Blue Ray DVD and HD-DVD by DVD Forum and Blue Ray Disk Association. Now Japan adopts H.264 coding stream for its ISDB-T Digital Broadcast, while many satellite TV like BskyB, DirecTV, Dish Network, Euro1080, Sat1 HD also adopt H.264 format. Technically speaking, H.264 represents the most advanced video compression technique in the video digital processing field. It is able to provide high quality image transmission in the condition of low bandwidth (within 2M). According to the data analysis, H.264 averagely saves 64% transmission bandwidth compared with its previous MPEG2 in the same video quality. H.264 technique also has strong fault-tolerance and better support to network transmission. It introduces a coding format system apply to IP packet. WMV9/WMV-HD/VC-1 WMV (Windows Media Video) format, upgrades and extends from Windows Media centered ASF (Advanced Stream Format). WMV is a kind of coding format, through which multi-media information like audio, video, image and control command script transfer in the form of network data packet to realize the issuance of stream style multi-media contents. WMV has a great advantage of low bit rate, which is suitable to network transmission. WMV9 supports VBR coding, which is short for Variable Bit Rate. Still picture and motive picture of movie have different requirements of the Compression Sample Rate. It will affect the movie quality if you always keep the fixed bit rate. With the great popularization of WMV9 by 57 Microsoft, AVI - WMV9 conversion becomes a very popular way nowadays. WMV-HD is a kind of video compression format founded by Microsoft. It is a new member of WMV series with its compression rate even higher than MPEG-2 standard. For the same 2-hour High Definition video programs, they can be compressed to 30GB if with MPEG-2; while with WMV-HD such kind of high compression coding algorithm, they can be compressed to about 15GB without any video quality losing. Although WMV-HD is an unique standard of Microsoft, thanks to the wide propaganda by Microsoft, WMV format now has been a most frequently used video format by HD videos. Moreover, WMV-HD format is perfectly supported by Windows Media Player, which brings much convenience to our users. VC-1 is the informal name of SMPTE standard 421M Codec draft (superset of WMV-9 and WMV-HD). VC-1 originates from WMV9 technique of Microsoft. Microsoft submitted VC-1 technique to SMPTE (Society of Motion Picture and Television Engineers) for deliberation and formally issued as a standard named as SMPTE-421M on April 3rd, 2006. From then on VC-1 coding technique is no longer exclusively owned by Microsoft, instead, it becomes a video format that anyone can develop, support and use. MPEG-2 TS Different with DVD-adopted MPEG-2 format, HD video uses the MPEG-2 TS format. It is a kind of video stream format, mainly used for the real-time programs transmission. HD video with MPEG-2 TS format is very common on the broadcast network. It generally uses suffixes of .mpg, .tp, .ts.. HD video files using MPEG-2 TS format for compression are usually very large. Take a 90-minute movie for instance, its file size is usually above 8GB, some even larger than 15GB. It also has difficulty in playing the HD video files with suffixes of .tp and .ts. The reason is that the files contain AC’3 audio information and MPEG-2 video information so they need a professional software to play. MPEG-1 MPEG-1 standard was issued on August, 1993, which is a generic term of a group of audio & video coding system authorized by MPEG (Moving Picture Experts Group). It was used for transferring codes of motive pictures and its accompanying sound in digital media, with a digital transmission rate of 1.5 Mbps. Later the date rate was raised to 4 Mbps in order to obtain higher video quality. MPEG-1 now is mainly applied to digital medium like CD-ROM, Video-CD, CD-1 etc. MPEG-2 In 1994 MPEG organization issued MPEG-2 compression standard to realize the probability of mutual operation application and video/audio services. MPEG-2 standard aims at SDTV and HDTV compression proposal and detailed stipulation of system level in their various applications. The bit rate varies from 3 Mbps to 100 Mbps. The standard norms are in ISO/IEC13818. MPEG-2 is not a simple upgrade of MPEG-1, instead MPEG-2 developed more detailed standards and further complete in its aspects of system and transmission. MPEG-2 especially adapts to digital TV coding broadcasting and transmission, is recognized as the coding standard of SDTV 58 and HDTV. MPEG-4 On February, 1999 MPEG (Moving Picture Experts Group) formally issued the first version of MPEG-4 (ISO/IEC14496) Standard. It became the formal international standard in 2000. MPEG-4 is greatly different from MPEG-1 and MPEG-2. MPEG-4 is not only detailed compression algorithm, but also a international standard established according to the requirements of conformity and compression technique such as Digital TV, interactive graphics application (video-audio synthesis), interactive multi-media (WWW, information retrieving and dispersion) and so on. MPEG-4 standard concentrates numerous multi-media applications into a whole structure, with its purpose to provide a standard algorithm and tools for the multi-media communication and application environment. Thereby to build up a united digital format that can be commonly used in application fields like multi-media transmission, storage and search. DivX™ & XviD DivX and XviD use the compression method of second part of MPEG-4. These two formats are very popular as their Codec (software used for video and audio compression) is free of charge. These two formats have a perfect quality comparable to MPEG-4, while their bit rates compressed enough to be able to spread the videos on the internet. Thus it satisfies the practical demands of most users. DVD .ISO ISO image (.iso) is an informal term of disk image of ISO 9660 file system. The contents of CD/DVD disc can be converted to an ISO file. Generally, playing video ISO file is similar to playing DVD disc in DVD player. DVD .VOB VOB (DVD-Video Object) is a kind of DVD-Video Media format, which includes real-time video, audio, subtitle and operation menus. Single VOB file has the largest size of 1GB. Generally there will be many VOB files, including IFO and BUP files. .IFO file is a DVD data file, which stores relative information of DVD contents, subtitles and audio tracks. In the normal circumstances, visiting VIDEO_TS/.IFO files is similar to playing DVD discs in DVD player. VOB files can be directly visited. A6.2 Music formats WAV Microsoft and IBM developed this kind of format together, which is also a most popular lossless audio coding format. WAV files have flexible formats and can store many kinds of audio datum. It is a good choice for saving original record data. WAV is a format on the basis of RIFF file format. RIFF format is similar to AIFF and IFF format. 59 Now WAV has become a standard format of PC. Whereas due to great demand of large storage capacity (size of music files per minute is 10M), in most circumstances people choose to convert it to compression formats (MP3, WMA etc.). If the original sound quality of the music is required, you should choose lossless Audio Codec. MP3 MPEG-1 Audio Layer 3, normally named as MP3, was developed by Moving Picture Experts Group (MPEG). It is a popular digital audio coding and lossy compression format. It is designed to greatly reduce the audio data. To most users there is no apparent decline of the sound quality compared with the original uncompressed audio. It was created and standardized by an engineering group from Germany Erlangen Research Organization Fraunhofer-Gesellschaft in 1991. MP3 is a compression format. It removes unimportant audio component to human in PCM digital audio, therefore it yields a much smaller file size. Many techniques are applied in MP3 including audio psychology to confirm which part of audio could be removed. MP3 audio can be compressed according to bit rate. It provides a middle solution both considering data size and sound quality. WMA WMA (Windows Media Audio) is a kind of digital audio compression format opened by Microsoft. Some pure audio ASF, which adopts Windows Media Audio coding format to code its whole content also use WMA as its extended name. WMA format is primarily privately owned by Microsoft. However, with Apple iTunes’ surport, this format is becoming a competitor to MP3 format. It is compatible to the ID3 tag and supports extra tag at the same time. In addition, generally for WMA and MP3 audios with the same sound quality, the former has smaller sizes (in conditions of sound quality less than 192kbps). Windows Media Audio is a kind of audio coding format similar to MP3 and AAC, is a lossy audio format. AAC AAC is the abbreviation of Advanced Audio Coding, also named as MPEG-2 AAC or MPEG-2 NBC. AAC is a kind of audio format developed together by Fraunhofer IIS-A、Dolby and AT&T. It is a part of MPEG-2 standard. AAC adopts a different algorithm compared with MP3. AAC raises the coding efficiency by combining other functions. In its compression capability, the audio algorithm is much superior to former compression algorithm (such as MP3 etc.). It at the same time supports up to 48 tracks and 15 low frequency tone tracks, more varieties of Sampling Rate and Bit Rate, Multi-language Compatibility, and more efficient decoding capability. In all, AAC can provide higher sound quality on the premise that it is 30% smaller than MP3 files. After Apple declared to take AAC as the main format of the downloading digital music sold in its 60 iTunes Music Shop, AAC Codec has entered a mainstream world of music playback. OGG OGG format is short for OGG Vobis. It is a new audio compression format. Similar to existing MP3 formats, OGG has a unique feature - It is totally free, open and has no patent limits. OGG Vobis also has a specific advantage: it supports multi-channels. When it is becoming popular, OGG can be used to code DTS multi-channels audio. A6.3 Photo formats JPEG JPEG is the widest used compression image format, it is a lossy compression format. Over-compressed files might bring negative effects: blur, sots and Mosaic. This situation is similar to the phenomenon of image distortion discovered in DVD and VCD of low Bit Rate. BMP It is a name short for bitmap. This kind of files can be saved using different color-depth (expressed by number of bit per sample image dot, with value of 1, 2, 4, 8, 16, 24). It is relative to the color amount displayed in the images. BMP files with 24 bits (the real color) are lossless but larger than JPEG files. Microsoft Windows GDI usually uses this format. 61