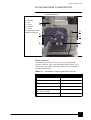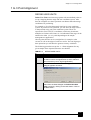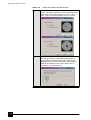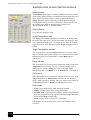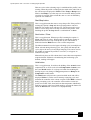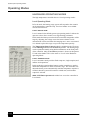
1
The Quanta FEG 200, 400, 600
User’s Operation Manual
4022 290 22211
1st Edition
31/03/2003
Copyright © 2003
FEI Company
All rights reserved
Trademark Acknowledgments
FrameMaker™ is a trademark of Adobe Systems Incorporated.
Microsoft® is a registered trademark of Microsoft Corporation.
Windows2000™ is a trademark of Microsoft Corporation.
Production Acknowledgments
This manual was produced using FrameMaker™ document publishing software
Technical Authors
Martin Dufek
Mike Hayles
Contents
Preface
About this Manual . . . . . . . . . . . . . . . . . . . . . . . . . . . . . . . . . . . . . . . -i
How to Use this Manual . . . . . . . . . . . . . . . . . . . . . . . . . . . . . . . . . . . -ii
Conventions for Controls . . . . . . . . . . . . . . . . . . . . . . . . . . . . . . . . . . . . . -ii
Finding What You Need . . . . . . . . . . . . . . . . . . . . . . . . . . . . . . . . . . -ii
Chapter 1
Safety and Handling
Site Requirements . . . . . . . . . . . . . . . .
Electron Column Precautions . . . . . . . .
Trained Service Personnel. . . . . . . . . . .
User Maintenance . . . . . . . . . . . . . . . . .
Terms and Symbols . . . . . . . . . . . . . . . .
.........
.........
.........
.........
.........
.........
.........
.........
.........
.........
. . . 1-1
. . . 1-1
. . . 1-2
. . . 1-2
. . . 1-3
Symbols and messages . . . . . . . . . . . . . . . . . . . . . . . . . . . . . . . . . . . . . 1-3
Voltages . . . . . . . . . . . . . . . . . . . . . . . . . . . . . . . . . . . . . . . . . . . . . . 1-4
Interlocks . . . . . . . . . . . . . . . . . . . . . . . . . . . . . . . . . . . . . . . . . . . . . . . .
Line Voltage . . . . . . . . . . . . . . . . . . . . . . . . . . . . . . . . . . . . . . . . . . . . . .
Cords/Cables . . . . . . . . . . . . . . . . . . . . . . . . . . . . . . . . . . . . . . . . . . . . .
Ground (Earth) . . . . . . . . . . . . . . . . . . . . . . . . . . . . . . . . . . . . . . . . . . . .
Cover/Panels . . . . . . . . . . . . . . . . . . . . . . . . . . . . . . . . . . . . . . . . . . . . .
Fuses . . . . . . . . . . . . . . . . . . . . . . . . . . . . . . . . . . . . . . . . . . . . . . . . . . .
1-4
1-4
1-4
1-6
1-6
1-6
Chemicals . . . . . . . . . . . . . . . . . . . . . . . . . . . . . . . . . . . . . . . . . . . . 1-7
Solvents . . . . . . . . . . . . . . . . . . . . . . . . . . . . . . . . . . . . . . . . . . . . . . . . . 1-7
Nitrogen . . . . . . . . . . . . . . . . . . . . . . . . . . . . . . . . . . . . . . . . . . . . . . . . . 1-7
Liquid Nitrogen . . . . . . . . . . . . . . . . . . . . . . . . . . . . . . . . . . . . . . . . . . . . 1-7
Miscellaneous Precautions . . . . . . . . . . . . . . . . . . . . . . . . . . . . . . .1-8
Electric Fans. . . . . . . . . . . . . . . . . . . . . . . . . . . . . . . . . . . . . . . . . . . . . . 1-8
Pump Exhaust . . . . . . . . . . . . . . . . . . . . . . . . . . . . . . . . . . . . . . . . . . . . 1-8
Corrosion . . . . . . . . . . . . . . . . . . . . . . . . . . . . . . . . . . . . . . . . . . . . . . . . 1-8
Chapter 2
System Overview
The Quanta FEG SEM . . . . . . . . . . . . . . . . . . . . . . . . . . . . . . . . . . 2-1
System Capabilities . . . . . . .
How Quanta FEG Works . . .
The SEM Principle . . . . . . . .
Image Viewing and Capture .
System Vacuum . . . . . . . . . .
Positioning of the stage . . . .
User Interface . . . . . . . . . . . .
User accounts. . . . . . . . . . . .
..
..
..
..
..
..
..
..
..
..
..
..
..
..
..
..
..
..
..
..
..
..
..
..
.
.
.
.
.
.
.
.
..
..
..
..
..
..
..
..
..
..
..
..
..
..
..
..
..
..
..
..
..
..
..
..
..
..
..
..
..
..
..
..
.
.
.
.
.
.
.
.
..
..
..
..
..
..
..
..
..
..
..
..
..
..
..
..
..
..
..
..
..
..
..
..
..
..
..
..
..
..
..
..
.
.
.
.
.
.
.
.
..
..
..
..
..
..
..
..
..
..
..
..
..
..
..
..
..
..
..
..
..
..
..
..
..
..
..
..
..
..
..
..
2-1
2-1
2-2
2-2
2-3
2-3
2-3
2-3
System Layout of Quanta FEG . . . . . . . . . . . . . . . . . . . . . . . . . . . . 2-4
2 22 11
Chapter 3
Vacuum System
Overview. . . . . . . . . . . . . . . . . . . . . . . . . . . . . . . . . . . . . . . . . . . . . . . . . 3-1
Vacuum Status . . . . . . . . . . . . . . . . . . . . . . . . . . . . . . . . . . . . . . . . .3-3
Pump. . . . . . . . . . . . . . . . . . . . . . . . . . . . . . . . . . . . . . . . . . . . . . . . . . . . 3-4
Vent . . . . . . . . . . . . . . . . . . . . . . . . . . . . . . . . . . . . . . . . . . . . . . . . . . . . . 3-4
Vacuum Modes. . . . . . . . . . . . . . . . . . . . . . . . . . . . . . . . . . . . . . . . .3-5
High Vacuum (HiVac) . . . . . . . . . . . . . . . . . . . . . . . . . . . . . . . . . . . . . . . 3-5
Low Vacuum and ESEM Modes . . . . . . . . . . . . . . . . . . . . . . . . . . . . . . . 3-5
Purge . . . . . . . . . . . . . . . . . . . . . . . . . . . . . . . . . . . . . . . . . . . . . . . . . . . 3-7
Quanta FEG System States . . . . . . . . . . . . . . . . . . . . . . . . . . . . . . .3-8
Log On / Log Off . . . . . . . . . . . . . . . . . . . . . . . . . . . . . . . . . . . . . . . . . .
Full Operation state. . . . . . . . . . . . . . . . . . . . . . . . . . . . . . . . . . . . . . . .
Overnight and Standby states. . . . . . . . . . . . . . . . . . . . . . . . . . . . . . . .
Shutdown state . . . . . . . . . . . . . . . . . . . . . . . . . . . . . . . . . . . . . . . . . . .
Complete Shutdown state. . . . . . . . . . . . . . . . . . . . . . . . . . . . . . . . . . .
Emergency Shutdown . . . . . . . . . . . . . . . . . . . . . . . . . . . . . . . . . . . . . .
Chapter 4
. 3-9
3-10
3-11
3-12
3-13
3-14
User Interface
Overview. . . . . . . . . . . . . . . . . . . . . . . . . . . . . . . . . . . . . . . . . . . . . . . . . 4-1
Other Software and Hardware . . . . . . . . . . . . . . . . . . . . . . . . . . . . . . . . 4-1
User Access Privileges . . . . . . . . . . . . . . . . . . . . . . . . . . . . . . . . . . . . . . 4-1
Software Interface Elements . . . . . . . . . . . . . . . . . . . . . . . . . . . . . .4-2
Icon . . . . . . . . . . . . . . . . . . . . . . . . . . . . . . . . . . . . . . . . . . . . . . . . . . . . .
Pulldown Menus . . . . . . . . . . . . . . . . . . . . . . . . . . . . . . . . . . . . . . . . . . .
Dialogue Boxes. . . . . . . . . . . . . . . . . . . . . . . . . . . . . . . . . . . . . . . . . . . .
Radio Buttons . . . . . . . . . . . . . . . . . . . . . . . . . . . . . . . . . . . . . . . . . . . . .
Check Boxes. . . . . . . . . . . . . . . . . . . . . . . . . . . . . . . . . . . . . . . . . . . . . .
Command Buttons . . . . . . . . . . . . . . . . . . . . . . . . . . . . . . . . . . . . . . . . .
List Boxes . . . . . . . . . . . . . . . . . . . . . . . . . . . . . . . . . . . . . . . . . . . . . . . .
Continuous Control Adjusters . . . . . . . . . . . . . . . . . . . . . . . . . . . . . . . . .
Ramp Control Adjusters . . . . . . . . . . . . . . . . . . . . . . . . . . . . . . . . . . . . .
Two-Dimensional X-Y Controls . . . . . . . . . . . . . . . . . . . . . . . . . . . . . . . .
Text Boxes . . . . . . . . . . . . . . . . . . . . . . . . . . . . . . . . . . . . . . . . . . . . . . .
Drop-Down Combo Boxes . . . . . . . . . . . . . . . . . . . . . . . . . . . . . . . . . . .
Tabbed Dialogues . . . . . . . . . . . . . . . . . . . . . . . . . . . . . . . . . . . . . . . . . .
Help Functions . . . . . . . . . . . . . . . . . . . . . . . . . . . . . . . . . . . . . . . . . . . .
4-2
4-2
4-2
4-3
4-3
4-3
4-3
4-3
4-3
4-4
4-4
4-4
4-5
4-6
xT microscope Server software . . . . . . . . . . . . . . . . . . . . . . . . . . . .4-7
xT microscope Control software . . . . . . . . . . . . . . . . . . . . . . . . . . . .4-8
The Main Window . . . . . . . . . . . . . . . . . . . . . . . . . . . . . . . . . . . . . . . . . . 4-8
The Title Bar . . . . . . . . . . . . . . . . . . . . . . . . . . . . . . . . . . . . . . . . . . . . . . 4-9
The Menu Bar . . . . . . . . . . . . . . . . . . . . . . . . . . . . . . . . . . . . . . . . . . . . . 4-9
Preferences... . . . . . . . . . . . . . . . . . . . . . . . . . . . . . . . . . . . . . . . . .4-19
The Preferences Dialogue . . . . . . . . . . . . . . . . . . . . . . . . . . . . . . . . . . 4-19
2 22 11
The Tool Bar . . . . . . . . . . . . . . . . . . . . . . . . . . . . . . . . . . . . . . . . . 4-20
Auto Functions . . . . . . . . . .
Additional Scan Functions .
Lens Alignment (F4) . . . . . .
Lens and Scan Functions . .
Scan Speeds. . . . . . . . . . . .
Pixel Resolution . . . . . . . . .
Additional Scan Functions .
Filtering . . . . . . . . . . . . . . . .
Movie . . . . . . . . . . . . . . . . .
Help (F1). . . . . . . . . . . . . . .
.
.
.
.
.
.
.
.
.
.
..
..
..
..
..
..
..
..
..
..
..
..
..
..
..
..
..
..
..
..
..
..
..
..
..
..
..
..
..
..
.
.
.
.
.
.
.
.
.
.
..
..
..
..
..
..
..
..
..
..
..
..
..
..
..
..
..
..
..
..
..
..
..
..
..
..
..
..
..
..
..
..
..
..
..
..
..
..
..
..
.
.
.
.
.
.
.
.
.
.
..
..
..
..
..
..
..
..
..
..
..
..
..
..
..
..
..
..
..
..
..
..
..
..
..
..
..
..
..
..
..
..
..
..
..
..
..
..
..
..
.
.
.
.
.
.
.
.
.
.
..
..
..
..
..
..
..
..
..
..
..
..
..
..
..
..
..
..
..
..
..
..
..
..
..
..
..
..
..
..
.
.
.
.
.
.
.
.
.
.
4-20
4-20
4-20
4-20
4-21
4-21
4-21
4-22
4-22
4-22
The Data Bar . . . . . . . . . . . . . . . . . . . . . . . . . . . . . . . . . . . . . . . . . 4-23
Data Bar Colour coding . . . . . . . . . . . . . . . . . . . . . . . . . . . . . . . . . . . . 4-23
Pages and Modules . . . . . . . . . . . . . . . . . . . . . . . . . . . . . . . . . . . . 4-24
Startup Page . . . . . . . . . . . . . . . . . . . . . . . . . . . . . . . . . . . . . . . . . 4-25
Vacuum. . . . . . . . . . . . . . . . . . . . . . . . . . . . . . . . . . . . . . . . . . . . . . . . .
Mode. . . . . . . . . . . . . . . . . . . . . . . . . . . . . . . . . . . . . . . . . . . . . . . . . . .
Electron column . . . . . . . . . . . . . . . . . . . . . . . . . . . . . . . . . . . . . . . . . .
Detectors . . . . . . . . . . . . . . . . . . . . . . . . . . . . . . . . . . . . . . . . . . . . . . .
Imaging . . . . . . . . . . . . . . . . . . . . . . . . . . . . . . . . . . . . . . . . . . . . . . . . .
Source Control . . . . . . . . . . . . . . . . . . . . . . . . . . . . . . . . . . . . . . . . . . .
Status . . . . . . . . . . . . . . . . . . . . . . . . . . . . . . . . . . . . . . . . . . . . . . . . . .
4-25
4-26
4-26
4-26
4-27
4-27
4-28
Work Page . . . . . . . . . . . . . . . . . . . . . . . . . . . . . . . . . . . . . . . . . . . 4-29
Option Page. . . . . . . . . . . . . . . . . . . . . . . . . . . . . . . . . . . . . . . . . . 4-30
Enhance Image. . . . . . . . . . . . . . . . . . . . . . . . . . . . . . . . . . . . . . . . . . . 4-30
Alignments Page . . . . . . . . . . . . . . . . . . . . . . . . . . . . . . . . . . . . . . 4-31
Final Lens Strip Aperture
1 Gun Alignment . . . . . . .
2 Stigmator Alignment. . .
3 Stage Rotation Center .
4 PLA Centering . . . . . . .
5 Emitter Startup . . . . . . .
..
..
..
..
..
..
.
.
.
.
.
.
..
..
..
..
..
..
..
..
..
..
..
..
..
..
..
..
..
..
.
.
.
.
.
.
..
..
..
..
..
..
..
..
..
..
..
..
..
..
..
..
..
..
..
..
..
..
..
..
.
.
.
.
.
.
..
..
..
..
..
..
..
..
..
..
..
..
..
..
..
..
..
..
..
..
..
..
..
..
.
.
.
.
.
.
..
..
..
..
..
..
..
..
..
..
..
..
..
..
..
..
..
..
.
.
.
.
.
.
4-31
4-31
4-31
4-31
4-31
4-31
Temperature Control Page (Option) . . . . . . . . . . . . . . . . . . . . . . . 4-32
Temperature Stage Control . . . . . . . . . . . . . . . . . . . . . . . . . . . . . . . . . . 4-32
FEI User management. . . . . . . . . . . . . . . . . . . . . . . . . . . . . . . . . . 4-33
Control possibilities. . . . . . .
FEI Account Administrators
File . . . . . . . . . . . . . . . . . . .
Account. . . . . . . . . . . . . . . .
Userdata (menu). . . . . . . . .
Help . . . . . . . . . . . . . . . . . .
Account Logging . . . . . . . . .
2 22 11
.
.
.
.
.
.
.
..
..
..
..
..
..
..
..
..
..
..
..
..
..
..
..
..
..
..
..
..
.
.
.
.
.
.
.
..
..
..
..
..
..
..
..
..
..
..
..
..
..
..
..
..
..
..
..
..
..
..
..
..
..
..
..
.
.
.
.
.
.
.
..
..
..
..
..
..
..
..
..
..
..
..
..
..
..
..
..
..
..
..
..
..
..
..
..
..
..
..
.
.
.
.
.
.
.
..
..
..
..
..
..
..
..
..
..
..
..
..
..
..
..
..
..
..
..
..
.
.
.
.
.
.
.
4-33
4-33
4-34
4-34
4-35
4-36
4-36
Hardware Interface Elements . . . . . . . . . . . . . . . . . . . . . . . . . . . . .4-37
The System Control Panel . . . . . . . . . . . . . . . . . . . . . . . . . . . . . . . . . .
Stage Controls . . . . . . . . . . . . . . . . . . . . . . . . . . . . . . . . . . . . . . . . . . .
Final Lens Strip Aperture . . . . . . . . . . . . . . . . . . . . . . . . . . . . . . . . . . .
Manual User Interface (MUI). . . . . . . . . . . . . . . . . . . . . . . . . . . . . . . . .
4-37
4-38
4-38
4-39
Entering Commands . . . . . . . . . . . . . . . . . . . . . . . . . . . . . . . . . . . .4-40
Using the Mouse . . . . . . . . . . . . . . . . . . . . . . . . . . . . . . . . . . . . . . . . . . 4-40
Using the Keyboard . . . . . . . . . . . . . . . . . . . . . . . . . . . . . . . . . . . . . . . 4-41
Chapter 5
Operations
Overview. . . . . . . . . . . . . . . . . . . . . . . . . . . . . . . . . . . . . . . . . . . . . . . . . 5-1
Preparing a Specimen . . . . . . . . . . . . . . . . . . . . . . . . . . . . . . . . . . .5-2
Needed items . . . . . . . .
Natural specimen . . . . .
Coated Specimen . . . . .
Mounting the Specimen
..
..
..
..
..
..
..
..
.
.
.
.
..
..
..
..
..
..
..
..
..
..
..
..
..
..
..
..
.
.
.
.
..
..
..
..
..
..
..
..
..
..
..
..
..
..
..
..
.
.
.
.
..
..
..
..
..
..
..
..
..
..
..
..
.
.
.
.
..
..
..
..
..
..
..
..
..
..
..
..
.
.
.
.
5-2
5-2
5-2
5-2
Inserting a Specimen . . . . . . . . . . . . . . . . . . . . . . . . . . . . . . . . . . . .5-3
Operation Pre-Check . . . . . . . . . . . . . . . . . . . . . . . . . . . . . . . . . . . .5-4
Selecting Vacuum Modes . . . . . . . . . . . . . . . . . . . . . . . . . . . . . . . . .5-5
High Vacuum. . . . . . . . . . . . . . . . . . . . . . . . . . . . . . . . . . . . . . . . . . . . . . 5-5
Low Vacuum and ESEM Modes . . . . . . . . . . . . . . . . . . . . . . . . . . . . . . . 5-6
Obtaining an Image . . . . . . . . . . . . . . . . . . . . . . . . . . . . . . . . . . . . .5-8
Imaging Procedure . . . . . . . . . . . . . . . . . . . . . . . . . . . . . . . . . . . . . . . . . 5-8
Setting up Working Conditions - Optimising the Image . . . . . . . . . .5-9
Principle of SEM imaging . . . . . . . . . . . . . . . . . . . . . . . . . . . . . . . . . . . . 5-9
Magnification. . . . . . . . . . . . . . . . . . . . . . . . . . . . . . . . . . . . . . . . . . . . . . 5-9
Contrast and Brightness . . . . . . . . . . . . . . . . . . . . . . . . . . . . . . . . . . . . 5-11
Focusing . . . . . . . . . . . . . . . . . . . . . . . . . . . . . . . . . . . . . . . . . . . . . . . . 5-13
Correcting Astigmatism. . . . . . . . . . . . . . . . . . . . . . . . . . . . . . . . . . . . . 5-15
Beam Spotsize . . . . . . . . . . . . . . . . . . . . . . . . . . . . . . . . . . . . . . . . . . . 5-16
Mixing Live images from Two Detectors . . . . . . . . . . . . . . . . . . . . . . . . 5-17
Detector Types and Usage . . . . . . . . . . . . . . . . . . . . . . . . . . . . . . .5-18
ETD (SE). . . . . . . . . . . . . . . . . . . . . . . . . . . . . . . . . . . . . . . . . . . . . . . .
GSED . . . . . . . . . . . . . . . . . . . . . . . . . . . . . . . . . . . . . . . . . . . . . . . . . .
LFD . . . . . . . . . . . . . . . . . . . . . . . . . . . . . . . . . . . . . . . . . . . . . . . . . . . .
discharges between the Gaseous detectors and the sample . . . . . . . .
Standard Insert . . . . . . . . . . . . . . . . . . . . . . . . . . . . . . . . . . . . . . . . . . .
5-18
5-19
5-21
5-23
5-23
X-ray Analysis for different Vacuum Modes . . . . . . . . . . . . . . . . . .5-24
High Vacuum. . . . . . . . . . . . . . . . . . . . . . . . . . . . . . . . . . . . . . . . . . . . . 5-24
ESEM using the GSED. . . . . . . . . . . . . . . . . . . . . . . . . . . . . . . . . . . . . 5-24
ESEM with LFD and X-ray PLA . . . . . . . . . . . . . . . . . . . . . . . . . . . . . . 5-25
2 22 11
Capturing and Handling Single Image (Still) . . . . . . . . . . . . . . . . . 5-27
Using Pause button . . . . . . .
Using Snapshot Button . . . . .
Using Integration function . . .
Saving single images (Stills) .
Open... . . . . . . . . . . . . . . . . .
Image Printing (Ctrl + P) . . . .
..
..
..
..
..
..
..
..
..
..
..
..
..
..
..
..
..
..
.
.
.
.
.
.
..
..
..
..
..
..
..
..
..
..
..
..
..
..
..
..
..
..
..
..
..
..
..
..
.
.
.
.
.
.
..
..
..
..
..
..
..
..
..
..
..
..
..
..
..
..
..
..
..
..
..
..
..
..
.
.
.
.
.
.
..
..
..
..
..
..
..
..
..
..
..
..
..
..
..
..
..
..
.
.
.
.
.
.
5-27
5-27
5-27
5-28
5-29
5-29
Recording Movie . . . . . . . . . . . . . . . . . . . . . . . . . . . . . . . . . . . . . . 5-30
Movie TAB Preferences Dialogue. . . . . . . . . . . . . . . . . . . . . . . . . . . . . 5-30
Movie Procedure . . . . . . . . . . . . . . . . . . . . . . . . . . . . . . . . . . . . . . 5-33
Start, Pause and Stop . . . . . . . . . . . . . . . . . . . . . . . . . . . . . . . . . . . . . . 5-33
Recording a Movie . . . . . . . . . . . . . . . . . . . . . . . . . . . . . . . . . . . . . . . . 5-33
TIF Movie Creator . . . . . . . . . . . . . . . . . . . . . . . . . . . . . . . . . . . . . 5-35
Movie Creator . . . . . . . . . . . . . . . . . . . . . . . . . . . . . . . . . . . . . . . . . . . . 5-35
Playing a Movie . . . . . . . . . . . . . . . . . . . . . . . . . . . . . . . . . . . . . . . . . . 5-38
Setting Preferences... . . . . . . . . . . . . . . . . . . . . . . . . . . . . . . . . . . 5-39
The Preferences Tab Dialogues
ESEM Tab. . . . . . . . . . . . . . . . .
DataBar Tab . . . . . . . . . . . . . . .
Units Tab . . . . . . . . . . . . . . . . . .
Presets Tab . . . . . . . . . . . . . . . .
Scan Tab . . . . . . . . . . . . . . . . . .
Movie Tab . . . . . . . . . . . . . . . . .
Language Tab . . . . . . . . . . . . . .
Chapter 6
..
..
..
..
..
..
..
..
..
..
..
..
..
..
..
..
.
.
.
.
.
.
.
.
..
..
..
..
..
..
..
..
..
..
..
..
..
..
..
..
..
..
..
..
..
..
..
..
..
..
..
..
..
..
..
..
.
.
.
.
.
.
.
.
..
..
..
..
..
..
..
..
..
..
..
..
..
..
..
..
..
..
..
..
..
..
..
..
..
..
..
..
..
..
..
..
.
.
.
.
.
.
.
.
..
..
..
..
..
..
..
..
..
..
..
..
..
..
..
..
..
..
..
..
..
..
..
..
.
.
.
.
.
.
.
.
5-39
5-40
5-42
5-43
5-44
5-45
5-46
5-46
Alignment
Overview. . . . . . . . . . . . . . . . . . . . . . . . . . . . . . . . . . . . . . . . . . . . . . . . . 6-1
FEG Systems Alignments . . . . . . . . . . . . . . . . . . . . . . . . . . . . . . . . 6-2
Tips for X and Y Corrective Movement . . . . . . . . . . . . . . . . . . . . . . . . . . 6-3
Final Lens Strip Aperture Alignment . . . . . . . . . . . . . . . . . . . . . . . . 6-4
1 - Gun Alignment . . . . . . . . . . . . . . . . . . . . . . . . . . . . . . . . . . . . . . 6-5
2 - Stigmator Alignment . . . . . . . . . . . . . . . . . . . . . . . . . . . . . . . . . . 6-8
Final Check. . . . . . . . . . . . . . . . . . . . . . . . . . . . . . . . . . . . . . . . . . . . . . . 6-9
3 - Stage Rotation Center . . . . . . . . . . . . . . . . . . . . . . . . . . . . . . . 6-10
4 - PLA Centering . . . . . . . . . . . . . . . . . . . . . . . . . . . . . . . . . . . . . 6-12
5 - Emitter Startup . . . . . . . . . . . . . . . . . . . . . . . . . . . . . . . . . . . . . 6-13
2 22 11
Chapter 7
Stages
Overview. . . . . . . . . . . . . . . . . . . . . . . . . . . . . . . . . . . . . . . . . . . . . . . . . 7-1
Quanta FEG 200 . . . . . . . . . . . . . . . . . . . . . . . . . . . . . . . . . . . . . . .7-2
50 x 50 mm Stage (4 Axes Motor) . . . . . . . . . . . . . . . . . . . . . . . . . . . . . 7-2
50 x 50 mm Stage (5 Axes Motor) . . . . . . . . . . . . . . . . . . . . . . . . . . . . . 7-3
Quanta FEG 200 Standard Sample holders . . . . . . . . . . . . . . . . . . . . . . 7-5
Quanta FEG 400 . . . . . . . . . . . . . . . . . . . . . . . . . . . . . . . . . . . . . . .7-6
100 x100 mm Stage . . . . . . . . . . . . . . . . . . . . . . . . . . . . . . . . . . . . . . . . 7-6
Quanta FEG 600 . . . . . . . . . . . . . . . . . . . . . . . . . . . . . . . . . . . . . . .7-8
150 x 150 mm Stage . . . . . . . . . . . . . . . . . . . . . . . . . . . . . . . . . . . . . . . . 7-8
Quanta FEG 400, 600 Standard Sample Holders. . . . . . . . . . . . . . . . . 7-10
Software Stage Functions . . . . . . . . . . . . . . . . . . . . . . . . . . . . . . .7-11
Stage . . . . . . . . . . . . . . . . . . . . . . . . . . . . . . . . . . . . . . . . . . . . . . . . . . .
Map tab . . . . . . . . . . . . . . . . . . . . . . . . . . . . . . . . . . . . . . . . . . . . . . . . .
Map Elements. . . . . . . . . . . . . . . . . . . . . . . . . . . . . . . . . . . . . . . . . . . .
Map dialogue . . . . . . . . . . . . . . . . . . . . . . . . . . . . . . . . . . . . . . . . . . . .
Coordinates tab. . . . . . . . . . . . . . . . . . . . . . . . . . . . . . . . . . . . . . . . . . .
7-11
7-11
7-12
7-13
7-15
Stage Movements. . . . . . . . . . . . . . . . . . . . . . . . . . . . . . . . . . . . . .7-19
Track . . . . . . . . . . . . . . . . . . . . . . . . . . . . . . . . . . . . . . . . . . . . . . . . . . .
Get . . . . . . . . . . . . . . . . . . . . . . . . . . . . . . . . . . . . . . . . . . . . . . . . . . . .
Beam Shift . . . . . . . . . . . . . . . . . . . . . . . . . . . . . . . . . . . . . . . . . . . . . .
Stage Frame Shift . . . . . . . . . . . . . . . . . . . . . . . . . . . . . . . . . . . . . . . . .
Compucentric Rotation . . . . . . . . . . . . . . . . . . . . . . . . . . . . . . . . . . . . .
7-19
7-20
7-21
7-21
7-22
About Specimen Alignment . . . . . . . . . . . . . . . . . . . . . . . . . . . . . .7-23
Alignment Wizard . . . . . . . . . . . . . . . . . . . . . . . . . . . . . . . . . . . . . . . . . 7-23
1 to 3 Point Alignment . . . . . . . . . . . . . . . . . . . . . . . . . . . . . . . . . .7-25
Define User Units . . . . . . . . . . . . . . . . . . . . . . . . . . . . . . . . . . . . . . . . . 7-25
User Units . . . . . . . . . . . . . . . . . . . . . . . . . . . . . . . . . . . . . . . . . . . . . . . 7-28
Stage Related Functions . . . . . . . . . . . . . . . . . . . . . . . . . . . . . . . .7-29
Specimen Holder Wizard . . . . . . . . . . . . . . . . . . . . . . . . . . . . . . . . . . . 7-29
Scan Rotation . . . . . . . . . . . . . . . . . . . . . . . . . . . . . . . . . . . . . . . . . . . . 7-34
Clamp . . . . . . . . . . . . . . . . . . . . . . . . . . . . . . . . . . . . . . . . . . . . . . . . . . 7-34
2 22 11
Chapter 8
Maintenance
Overview. . . . . . . . . . . . . . . . . . . . . . . . . . . . . . . . . . . . . . . . . . . . . . . . . 8-1
8.1 Cleaning Procedures Overviev . . . . . . . . . . . . . . . . . . . . . . . . . 8-2
8.1.1 List of Applied Cleaners. . . . . . . . . . . . . . . . . . . . . . . . . . . . . . . . . 8-2
8.1.2 Cleaning Column Parts . . . . . . . . . . . . . . . . . . . . . . . . . . . . . . . . . 8-3
8.1.3 Materials and Technique . . . . . . . . . . . . . . . . . . . . . . . . . . . . . . . . 8-3
8.2 Gaseous Detectors . . . . . . . . . . . . . . . . . . . . . . . . . . . . . . . . . . 8-4
8.2.1 Cleaning the GSED or LFD . . . . . . . . . . . . . . . . . . . . . . . . . . . . . . 8-4
8.2.2 Cleaning the GBSD . . . . . . . . . . . . . . . . . . . . . . . . . . . . . . . . . . . . 8-4
8.3 The Standard Insert . . . . . . . . . . . . . . . . . . . . . . . . . . . . . . . . . . 8-5
8.3.1 Removal / Assemble Tools . . . . . . . . . . . . . . . . . . . . . . . . . . . . . .
8.3.2 Insert Removing and Disassembling . . . . . . . . . . . . . . . . . . . . . . .
8.3.3 Insert Housing Cleaning . . . . . . . . . . . . . . . . . . . . . . . . . . . . . . . .
8.3.4 Platinum Apertures Cleaning . . . . . . . . . . . . . . . . . . . . . . . . . . . . .
8.3.5 Platinum Apertures Installing . . . . . . . . . . . . . . . . . . . . . . . . . . . . .
8-5
8-5
8-7
8-7
8-7
8.5 Strip Aperture Module . . . . . . . . . . . . . . . . . . . . . . . . . . . . . . . . 8-9
8.5.1 Removing the Aperture rod . . . . . . . . . . . . . . . . . . . . . . . . . . . . . . 8-9
8.5.2 Cleaning the Aperture Module . . . . . . . . . . . . . . . . . . . . . . . . . . . 8-10
8.5.3 Replacing the Aperture Module . . . . . . . . . . . . . . . . . . . . . . . . . . 8-10
8.5.4 Replacing the Aperture rod . . . . . . . . . . . . . . . . . . . . . . . . . . . . . 8-10
8.5.5 Aperture availability . . . . . . . . . . . . . . . . . . . . . . . . . . . . . . . . . . . 8-10
8.6 Stage maintenance . . . . . . . . . . . . . . . . . . . . . . . . . . . . . . . . . 8-11
8.6.1 Specimen Holders . . . . . . . . . . . . . . . . . . . . . . . . . . . . . . . . . . . . 8-11
8.6.2 Stage mechanics . . . . . . . . . . . . . . . . . . . . . . . . . . . . . . . . . . . . . 8-11
8.7. Refilling the Water Bottle . . . . . . . . . . . . . . . . . . . . . . . . . . . . 8-12
8.8 Rotary pump Oil level check . . . . . . . . . . . . . . . . . . . . . . . . . . 8-13
8.8.1 Periodic check . . . . . . . . . . . . . . . . . . . . . . . . . . . . . . . . . . . . . . . 8-13
8.8.2 Topping-Up . . . . . . . . . . . . . . . . . . . . . . . . . . . . . . . . . . . . . . . . . 8-13
2 22 11
Chapter 9
System Options
Overview. . . . . . . . . . . . . . . . . . . . . . . . . . . . . . . . . . . . . . . . . . . . . . . . . 9-1
Completion Packages. . . . . . . . . . . . . . . . . . . . . . . . . . . . . . . . . . . .9-2
Application Completion Packages . . . . . . . . . . . . . . . . . . . . . . . . . .9-2
General contents. . . . . . . . . . . . . . . . . . . . . . . . . . . . . . . . . . . . . . . . . . . 9-2
Gaseous Detectors . . . . . . . . . . . . . . . . . . . . . . . . . . . . . . . . . . . . . .9-3
GBSD . . . . . . . . . . . . . . . . . . . . . . . . . . . . . . . . . . . . . . . . . . . . . . . . . . . 9-3
GAD and BSD. . . . . . . . . . . . . . . . . . . . . . . . . . . . . . . . . . . . . . . . . . . . . 9-6
Solid State Detectors . . . . . . . . . . . . . . . . . . . . . . . . . . . . . . . . . . .9-10
Solid State Detector-BSD . . . . . . . . . . . . . . . . . . . . . . . . . . . . . . . . . . . 9-10
Peltier Cooled Specimen Stage . . . . . . . . . . . . . . . . . . . . . . . . . . .9-13
Hardware Description . . . . . . . . . . . . . . . . . . . . . . . . . . . . . . . . . . . . . . 9-13
Components of the Cold systems . . . . . . . . . . . . . . . . . . . . . . . . . . . . . 9-14
Cold Stage Assembly . . . . . . . . . . . . . . . . . . . . . . . . . . . . . . . . . . . . . . 9-16
Installation of the Quanta FEG Cold Stage . . . . . . . . . . . . . . . . . .9-17
Cable and Cooling Hose connection. . . . . . . . . . . . . . . . . . . . . . . . . . . 9-18
Installing the Water Flow Box . . . . . . . . . . . . . . . . . . . . . . . . . . . . . . . . 9-18
Using the Cold Stage . . . . . . . . . . . . . . . . . . . . . . . . . . . . . . . . . . .9-20
Changing the Temperature Units . .
Temperature Stage Control Module
Sample mounting tips . . . . . . . . . . .
Locking the Stage Rotation Axis . . .
Pressure vs.Temperature control . .
Keeping the sample wet . . . . . . . . .
Selecting working distance . . . . . . .
Using bulk samples. . . . . . . . . . . . .
Condensation and detector type . . .
High magnification imaging. . . . . . .
Cooling below zero . . . . . . . . . . . . .
Disconnecting the Water Lines . . . .
..
..
..
..
..
..
..
..
..
..
..
..
..
..
..
..
..
..
..
..
..
..
..
..
.
.
.
.
.
.
.
.
.
.
.
.
..
..
..
..
..
..
..
..
..
..
..
..
..
..
..
..
..
..
..
..
..
..
..
..
..
..
..
..
..
..
..
..
..
..
..
..
..
..
..
..
..
..
..
..
..
..
..
..
.
.
.
.
.
.
.
.
.
.
.
.
..
..
..
..
..
..
..
..
..
..
..
..
..
..
..
..
..
..
..
..
..
..
..
..
..
..
..
..
..
..
..
..
..
..
..
..
.
.
.
.
.
.
.
.
.
.
.
.
..
..
..
..
..
..
..
..
..
..
..
..
..
..
..
..
..
..
..
..
..
..
..
..
..
..
..
..
..
..
..
..
..
..
..
..
9-20
9-20
9-22
9-22
9-23
9-23
9-23
9-24
9-24
9-24
9-24
9-25
Heating Stage Option Overview . . . . . . . . . . . . . . . . . . . . . . . . . . .9-26
1000° C Heating Stage . . . . . . . . . . . . . . . . . . . . . . . . . . . . . . . . . . . . . 9-27
1500° C Heating Stage . . . . . . . . . . . . . . . . . . . . . . . . . . . . . . . . . . . . . 9-28
Heating Stages Common Components . . . . . . . . . . . . . . . . . . . . .9-30
Heating Stage Module. . . . . . . . . . . . . . . . . . . . . . . . . . . . . . . . . . . . . .
High Temperature Stage controller . . . . . . . . . . . . . . . . . . . . . . . . . . . .
Chamber Feedthrough Assembly (CFA) . . . . . . . . . . . . . . . . . . . . . . . .
Water Flow Box (WFB) . . . . . . . . . . . . . . . . . . . . . . . . . . . . . . . . . . . . .
9-30
9-31
9-34
9-34
Heating Stages Diverse Components . . . . . . . . . . . . . . . . . . . . . .9-35
1500° C Bias Supply Controller (BSC) . .
1000° C Heat Shield Assembly (HSA) . .
1500° C Heat Shield Assembly (HSA) . .
High Temperature GSED . . . . . . . . . . . .
.
.
.
.
..
..
..
..
..
..
..
..
..
..
..
..
..
..
..
..
.
.
.
.
..
..
..
..
..
..
..
..
..
..
..
..
.
.
.
.
..
..
..
..
..
..
..
..
..
..
..
..
9-35
9-37
9-37
9-38
1000° C and 1500° C Heating Stages Operation . . . . . . . . . . . . . .9-39
Temperature Stage Control Module . . . . . . . . . . . . . . . . . . . . . . . . . . . 9-40
2 22 11
Operating Modes . . . . . . . . . . . . . . . . . . . . . . . . . . . . . . . . . . . . . . 9-42
Hardware Operating Modes . . . . . . . . . . . . . . . . . . . . . . . . . . . . . . . . . 9-42
Software Operating Mode . . . . . . . . . . . . . . . . . . . . . . . . . . . . . . . . . . . 9-43
Heating Stages Basic Operation . . . . . . . . . . . . . . . . . . . . . . . . . . 9-44
Powering On the HTS Controller .
Performing a Heating Cycle . . . . .
Setting up a Temperature Profile .
Fault Conditions . . . . . . . . . . . . . .
Powering Off the HTS Controller .
..
..
..
..
..
.
.
.
.
.
..
..
..
..
..
..
..
..
..
..
..
..
..
..
..
..
..
..
..
..
.
.
.
.
.
..
..
..
..
..
..
..
..
..
..
..
..
..
..
..
..
..
..
..
..
.
.
.
.
.
..
..
..
..
..
..
..
..
..
..
..
..
..
..
..
.
.
.
.
.
9-45
9-45
9-47
9-48
9-48
1000° C HS General Operation . . . . . . . . . . . . . . . . . . . . . . . . . . . 9-49
Calibration and Temperature Accuracy. . . . . . . . . . . . . . . . . . . . . . . . . 9-49
High Temperature GSED . . . . . . . . . . . . . . . . . . . . . . . . . . . . . . . . . . . 9-50
1500° C HS General Operation . . . . . . . . . . . . . . . . . . . . . . . . . . . 9-51
Calibration and Temperature Accuracy. . . . . . . . . . . . . . . . . . . . . . . . . 9-51
High Temperature GSED . . . . . . . . . . . . . . . . . . . . . . . . . . . . . . . . . . . 9-52
Imaging Samples with the 1500° C HS . . . . . . . . . . . . . . . . . . . . .9-53
Selecting a Crucible . . . . . . . . .
Obtaining an Image . . . . . . . . .
Imaging Guidelines. . . . . . . . . .
Removing the Sample Crucible
Checking Calibration. . . . . . . . .
..
..
..
..
..
..
..
..
..
..
.
.
.
.
.
..
..
..
..
..
..
..
..
..
..
..
..
..
..
..
..
..
..
..
..
.
.
.
.
.
..
..
..
..
..
..
..
..
..
..
..
..
..
..
..
..
..
..
..
..
.
.
.
.
.
..
..
..
..
..
..
..
..
..
..
..
..
..
..
..
.
.
.
.
.
9-53
9-54
9-55
9-56
9-56
Using the HS with EDX Detectors . . . . . . . . . . . . . . . . . . . . . . . . . 9-57
Inclined Crystal EDX Detectors . . . . . . . . .
Positioning the High Temperature GSED . .
EDX Performance . . . . . . . . . . . . . . . . . . . .
Window Contamination . . . . . . . . . . . . . . . .
..
..
..
..
..
..
..
..
.
.
.
.
..
..
..
..
..
..
..
..
..
..
..
..
..
..
..
..
.
.
.
.
..
..
..
..
..
..
..
..
..
..
..
..
.
.
.
.
9-57
9-58
9-59
9-59
Operation Characteristics . . . . . . . . . . . . . . . . . . . . . . . . . . . . . . . 9-60
Thermal Emission . . . . . . . . . . . . . . . . . . . . . . . . . . . . . . . . . . . . . . . . . 9-60
Degassing Samples . . . . . . . . . . . . . . . . . . . . . . . . . . . . . . . . . . . . . . . 9-60
Locking the Stage Rotation Axis . . . . . . . . . . . . . . . . . . . . . . . . . . . . . . 9-60
Installation and Maintenance for the 1000° C and 1500° C HS . . .9-61
Installing the High Temperature GSED . . . . . . . . . . . . . . . . . . . . . . . . .
Installing the Heating Stage Module . . . . . . . . . . . . . . . . . . . . . . . . . . .
Installing the Sample Bias Feedthrough Plate . . . . . . . . . . . . . . . . . . .
Installing the Chamber Feedthrough Assembly (CFA)
and Water Flow Box (WFB) . . . . . . . . . . . . . . . . . . . . . . . . . . . . . . . . .
Removing the Heating Stage Module . . . . . . . . . . . . . . . . . . . . . . . . . .
Changing the Stage Heater Assembly . . . . . . . . . . . . . . . . . . . . . . . . .
Adjusting the Heat Shield . . . . . . . . . . . . . . . . . . . . . . . . . . . . . . . . . . .
2 22 11
9-61
9-62
9-64
9-66
9-67
9-69
9-70
1500° C HS Troubleshooting . . . . . . . . . . . . . . . . . . . . . . . . . . . . .9-71
Bias Supply Connections . . . . . . . . . . . . . . . . . . . . . . . . . . . . . . . . . . .
Sample Crucible Conductivity. . . . . . . . . . . . . . . . . . . . . . . . . . . . . . . .
Sample Bias Continuity. . . . . . . . . . . . . . . . . . . . . . . . . . . . . . . . . . . . .
Heat Shield Continuity . . . . . . . . . . . . . . . . . . . . . . . . . . . . . . . . . . . . .
Controller Thermocouple Faults . . . . . . . . . . . . . . . . . . . . . . . . . . . . . .
Vibration . . . . . . . . . . . . . . . . . . . . . . . . . . . . . . . . . . . . . . . . . . . . . . . .
Refurbishing the HSM. . . . . . . . . . . . . . . . . . . . . . . . . . . . . . . . . . . . . .
9-71
9-72
9-72
9-72
9-72
9-73
9-74
Specimen Holder Kit Option . . . . . . . . . . . . . . . . . . . . . . . . . . . . . .9-75
Location positions . . . . .
Older Interface Adapter.
Interface pillar . . . . . . . .
Multi-Holders. . . . . . . . .
Polished Mount Holders
Clamp Stubs . . . . . . . . .
Eucentric Stub Holders .
Torx Drivers. . . . . . . . . .
..
..
..
..
..
..
..
..
..
..
..
..
..
..
..
..
.
.
.
.
.
.
.
.
..
..
..
..
..
..
..
..
..
..
..
..
..
..
..
..
..
..
..
..
..
..
..
..
..
..
..
..
..
..
..
..
.
.
.
.
.
.
.
.
..
..
..
..
..
..
..
..
..
..
..
..
..
..
..
..
..
..
..
..
..
..
..
..
..
..
..
..
..
..
..
..
.
.
.
.
.
.
.
.
..
..
..
..
..
..
..
..
..
..
..
..
..
..
..
..
..
..
..
..
..
..
..
..
.
.
.
.
.
.
.
.
..
..
..
..
..
..
..
..
..
..
..
..
..
..
..
..
..
..
..
..
..
..
..
..
9-76
9-76
9-77
9-77
9-79
9-79
9-80
9-80
2 22 11
List of Figures
Preface
Chapter 1
Safety and Handling
Chapter 2
System Overview
SEM Schematic Overview . . . . . . . . . . . . . . . . . . . . . . . . . . . . . . . . . . . . . 2-2
Quanta FEG Standard Layout . . . . . . . . . . . . . . . . . . . . . . . . . . . . . . . . . . 2-4
Chapter 3
Vacuum System
The Quanta FEG Vacuum system
Quanta FEG States Tree . . . . . . .
Emergency Breaker Switch . . . . .
Emergency UPS Switch . . . . . . . .
Chapter 4
..
..
..
..
..
..
..
..
..
..
..
..
..
..
..
..
.
.
.
.
..
..
..
..
..
..
..
..
..
..
..
..
.
.
.
.
..
..
..
..
..
..
..
..
..
..
..
..
..
..
..
..
.
.
.
.
..
..
..
..
. . 3-2
. . 3-8
. 3-14
. 3-14
..
..
..
..
..
..
..
..
..
..
..
..
..
..
..
..
..
..
..
..
..
..
..
..
..
..
.
.
.
.
.
.
.
.
.
.
.
.
.
..
..
..
..
..
..
..
..
..
..
..
..
..
..
..
..
..
..
..
..
..
..
..
..
..
..
..
..
..
..
..
..
..
..
..
..
..
..
..
..
..
..
..
..
..
..
..
..
..
..
..
..
.
.
.
.
.
.
.
.
.
.
.
.
.
..
..
..
..
..
..
..
..
..
..
..
..
..
. . 4-5
. . 4-6
. . 4-8
. . 4-9
. . 4-9
. 4-19
. 4-20
. 4-23
. 4-33
. 4-37
. 4-37
. 4-38
. 4-39
User Interface
Preferences Tabs . . . . . . . . . . . . . . . . . . . . .
On-Line Help . . . . . . . . . . . . . . . . . . . . . . . . . .
The Main Window . . . . . . . . . . . . . . . . . . . . .
The Title Bar . . . . . . . . . . . . . . . . . . . . . . . . .
The Menu Bar . . . . . . . . . . . . . . . . . . . . . . . . .
Preferences Dialogue . . . . . . . . . . . . . . . . . .
The Tool Bar . . . . . . . . . . . . . . . . . . . . . . . . .
The Data Bar . . . . . . . . . . . . . . . . . . . . . . . . .
FEI Account Administrators control overview
Hardware elements . . . . . . . . . . . . . . . . . . . .
System Control Panel . . . . . . . . . . . . . . . . . .
Final Lens Strip Aperture Control Knob . . . . .
MUI . . . . . . . . . . . . . . . . . . . . . . . . . . . . . . . .
Chapter 5
..
..
..
..
..
..
..
..
..
..
..
..
..
..
..
..
..
..
..
..
..
..
..
..
..
..
..
..
..
..
Operations
Brightness vs Pressure . . . . . . . . . . . . . . . . . . . . . . . . . . . . . . . . . . . . . . . 5-7
Monitor Image and Scanned Sample . . . . . . . . . . . . . . . . . . . . . . . . . . . . 5-9
ACB Dialogue Box . . . . . . . . . . . . . . . . . . . . . . . . . . . . . . . . . . . . . . . . . . 5-12
Auto Stigmator Dealogue Box . . . . . . . . . . . . . . . . . . . . . . . . . . . . . . . . . 5-15
Preferences... Dialogue for Detectors Signal Mixing . . . . . . . . . . . . . . . . 5-17
ETD Configuration Dialogue . . . . . . . . . . . . . . . . . . . . . . . . . . . . . . . . . . 5-18
Gaseous SE Detector (GSED) . . . . . . . . . . . . . . . . . . . . . . . . . . . . . . . . . 5-19
Standard GSED Configuration . . . . . . . . . . . . . . . . . . . . . . . . . . . . . . . . . 5-19
The GSED Installed in the SEM . . . . . . . . . . . . . . . . . . . . . . . . . . . . . . . 5-20
Large Field Detector (LFD) . . . . . . . . . . . . . . . . . . . . . . . . . . . . . . . . . . . . 5-21
Large Field of View with LFD . . . . . . . . . . . . . . . . . . . . . . . . . . . . . . . . . . 5-21
Low kV PLA . . . . . . . . . . . . . . . . . . . . . . . . . . . . . . . . . . . . . . . . . . . . . . . 5-22
Hot Stage PLA Cone . . . . . . . . . . . . . . . . . . . . . . . . . . . . . . . . . . . . . . . . 5-22
Standard Insert . . . . . . . . . . . . . . . . . . . . . . . . . . . . . . . . . . . . . . . . . . . . 5-23
X-ray Imaging in HiVac Mode . . . . . . . . . . . . . . . . . . . . . . . . . . . . . . . . . 5-24
X-ray Imaging with the GSED . . . . . . . . . . . . . . . . . . . . . . . . . . . . . . . . . 5-24
Configuration for the X-ray PLA Cone . . . . . . . . . . . . . . . . . . . . . . . . . . . 5-25
X-ray PLA . . . . . . . . . . . . . . . . . . . . . . . . . . . . . . . . . . . . . . . . . . . . . . . . 5-26
Fitting the X-ray PLA Cone . . . . . . . . . . . . . . . . . . . . . . . . . . . . . . . . . . . 5-26
2 22 11
Save As... Dialogue . . . . . . . . . . . . . . . . . . . . . . . . . . . . . . . . . . . . . . . . . 5-28
Open Dialogue . . . . . . . . . . . . . . . . . . . . . . . . . . . . . . . . . . . . . . . . . . . . . 5-29
Printer Setup Dialogue . . . . . . . . . . . . . . . . . . . . . . . . . . . . . . . . . . . . . . . 5-29
The Preferences Movie Tab Dialogue . . . . . . . . . . . . . . . . . . . . . . . . . . . 5-30
Movie Creator TAB: File . . . . . . . . . . . . . . . . . . . . . . . . . . . . . . . . . . . . . . 5-35
Browse Dialogue . . . . . . . . . . . . . . . . . . . . . . . . . . . . . . . . . . . . . . . . . . . 5-35
Movie Creator TAB:Databar . . . . . . . . . . . . . . . . . . . . . . . . . . . . . . . . . . . 5-37
Movie Creator TAB: Preview . . . . . . . . . . . . . . . . . . . . . . . . . . . . . . . . . . 5-38
ESEM Preferences . . . . . . . . . . . . . . . . . . . . . . . . . . . . . . . . . . . . . . . . . 5-40
Databar Preferences . . . . . . . . . . . . . . . . . . . . . . . . . . . . . . . . . . . . . . . . 5-42
Unit Preferences . . . . . . . . . . . . . . . . . . . . . . . . . . . . . . . . . . . . . . . . . . . 5-43
Presets Preferences . . . . . . . . . . . . . . . . . . . . . . . . . . . . . . . . . . . . . . . . 5-44
Scan Preferences . . . . . . . . . . . . . . . . . . . . . . . . . . . . . . . . . . . . . . . . . . 5-45
Language Preferences . . . . . . . . . . . . . . . . . . . . . . . . . . . . . . . . . . . . . . . 5-46
Chapter 6
Alignment
Chapter 7
Stages
4-axes Motor Drive Controls with Manual Override . . . . . . . . . . . . . . . . . . 7-2
Quanta FEG 200 Stage Controls (5-axes Motor) . . . . . . . . . . . . . . . . . . . . 7-3
50 X 50 mm Stage Movement . . . . . . . . . . . . . . . . . . . . . . . . . . . . . . . . . . 7-4
Eucentric Adjuster for 50 X 50 Stages . . . . . . . . . . . . . . . . . . . . . . . . . . . . 7-4
Standard Sample Holder . . . . . . . . . . . . . . . . . . . . . . . . . . . . . . . . . . . . . . 7-5
Quanta FEG 400 Stage Controls . . . . . . . . . . . . . . . . . . . . . . . . . . . . . . . . 7-6
100 x100 mm Stage Movement . . . . . . . . . . . . . . . . . . . . . . . . . . . . . . . . . 7-7
Quanta FEG 600 Stage Controls . . . . . . . . . . . . . . . . . . . . . . . . . . . . . . . . 7-8
150 x150 mm Stage Movement . . . . . . . . . . . . . . . . . . . . . . . . . . . . . . . . . 7-9
Standard Sample Holders . . . . . . . . . . . . . . . . . . . . . . . . . . . . . . . . . . . . 7-10
Map Elements . . . . . . . . . . . . . . . . . . . . . . . . . . . . . . . . . . . . . . . . . . . . . 7-12
Map Magnification (ZOOM) . . . . . . . . . . . . . . . . . . . . . . . . . . . . . . . . . . . 7-14
Track Function . . . . . . . . . . . . . . . . . . . . . . . . . . . . . . . . . . . . . . . . . . . . . 7-19
Get Function . . . . . . . . . . . . . . . . . . . . . . . . . . . . . . . . . . . . . . . . . . . . . . 7-20
Arrow Keys for Stage Frame Shift . . . . . . . . . . . . . . . . . . . . . . . . . . . . . . 7-21
Compucentric Rotation . . . . . . . . . . . . . . . . . . . . . . . . . . . . . . . . . . . . . . 7-22
Alignment Wizard . . . . . . . . . . . . . . . . . . . . . . . . . . . . . . . . . . . . . . . . . . . 7-23
User Units for X and Y . . . . . . . . . . . . . . . . . . . . . . . . . . . . . . . . . . . . . . . 7-28
Clear Holder Image Leaving Map . . . . . . . . . . . . . . . . . . . . . . . . . . . . . . 7-33
Scan Rotation . . . . . . . . . . . . . . . . . . . . . . . . . . . . . . . . . . . . . . . . . . . . . 7-34
Chapter 8
Maintenance
Removing the GSED Assembly . . . . . . . . . . . . . . . . . . . . . . . . . . . . . . . . . 8-4
Disassembling the GBSD . . . . . . . . . . . . . . . . . . . . . . . . . . . . . . . . . . . . . 8-4
Standart Insert with Removal / Assemble Tools . . . . . . . . . . . . . . . . . . . . 8-5
Standard Insert Components . . . . . . . . . . . . . . . . . . . . . . . . . . . . . . . . . . . 8-5
Removing the Insert . . . . . . . . . . . . . . . . . . . . . . . . . . . . . . . . . . . . . . . . . . 8-6
Disassembling the Insert . . . . . . . . . . . . . . . . . . . . . . . . . . . . . . . . . . . . . . . 8-6
Standard Insert Components . . . . . . . . . . . . . . . . . . . . . . . . . . . . . . . . . . . 8-8
Aperture Module . . . . . . . . . . . . . . . . . . . . . . . . . . . . . . . . . . . . . . . . . . . . . 8-9
2 22 11
Chapter 9
System Options
Gaseous BE Detector (GBSD) . . . . . . . . . . . . . . . . . . . . . . . . . . . . . . . . . . 9-3
GBSD Installed and Operating . . . . . . . . . . . . . . . . . . . . . . . . . . . . . . . . . 9-3
Detector Preferences ror the GBSD . . . . . . . . . . . . . . . . . . . . . . . . . . . . . 9-5
The GAD and BSD Diode Units . . . . . . . . . . . . . . . . . . . . . . . . . . . . . . . . . 9-6
The Amplifier Switch GAD / BSD . . . . . . . . . . . . . . . . . . . . . . . . . . . . . . . . 9-6
GAD Configuration in ESEM Mode . . . . . . . . . . . . . . . . . . . . . . . . . . . . . . 9-7
GAD Instalation . . . . . . . . . . . . . . . . . . . . . . . . . . . . . . . . . . . . . . . . . . . . . 9-8
Home Position for GAD and BSD . . . . . . . . . . . . . . . . . . . . . . . . . . . . . . . 9-8
The Solid State Backscatter Detector . . . . . . . . . . . . . . . . . . . . . . . . . . . 9-10
SSD-BSD Configuration Dialogue . . . . . . . . . . . . . . . . . . . . . . . . . . . . . . 9-11
Cold Stage System Block Diagram . . . . . . . . . . . . . . . . . . . . . . . . . . . . . 9-13
QUANTA FEG Cold Stage Module . . . . . . . . . . . . . . . . . . . . . . . . . . . . . 9-14
Chamber Feedthrough Plate . . . . . . . . . . . . . . . . . . . . . . . . . . . . . . . . . . 9-14
Cables and Hoses . . . . . . . . . . . . . . . . . . . . . . . . . . . . . . . . . . . . . . . . . . 9-15
Basic Thermoelectric Module . . . . . . . . . . . . . . . . . . . . . . . . . . . . . . . . . 9-16
Cold Stage Aseembly . . . . . . . . . . . . . . . . . . . . . . . . . . . . . . . . . . . . . . . 9-16
Stage Adapter and Sample Mount . . . . . . . . . . . . . . . . . . . . . . . . . . . . . . 9-17
Cold Stage Installed . . . . . . . . . . . . . . . . . . . . . . . . . . . . . . . . . . . . . . . . . 9-17
Connecting the Water Flow Box . . . . . . . . . . . . . . . . . . . . . . . . . . . . . . . 9-18
Sample Holder Stub Types . . . . . . . . . . . . . . . . . . . . . . . . . . . . . . . . . . . 9-22
Adding Water to Stage Base . . . . . . . . . . . . . . . . . . . . . . . . . . . . . . . . . . 9-23
1000° C Hardware Layout . . . . . . . . . . . . . . . . . . . . . . . . . . . . . . . . . . . . 9-27
1500° C Hardware Layout . . . . . . . . . . . . . . . . . . . . . . . . . . . . . . . . . . . . 9-29
Heating Stage Module . . . . . . . . . . . . . . . . . . . . . . . . . . . . . . . . . . . . . . . 9-30
Stage Components . . . . . . . . . . . . . . . . . . . . . . . . . . . . . . . . . . . . . . . . . 9-30
Front View HTS Controller . . . . . . . . . . . . . . . . . . . . . . . . . . . . . . . . . . . . 9-32
Rear View HTS Controller . . . . . . . . . . . . . . . . . . . . . . . . . . . . . . . . . . . . 9-33
The Chamber Feedthrough Assembly . . . . . . . . . . . . . . . . . . . . . . . . . . . 9-34
The Water Flow Box Front . . . . . . . . . . . . . . . . . . . . . . . . . . . . . . . . . . . . 9-34
1500° C Bias Supply Controller (Front ) . . . . . . . . . . . . . . . . . . . . . . . . . 9-35
1500° C Bias Supply Controller (Rear ) . . . . . . . . . . . . . . . . . . . . . . . . . . 9-36
Heat Shield for 1000° C Stage . . . . . . . . . . . . . . . . . . . . . . . . . . . . . . . . . 9-37
1500° C Heat Shield Assembly . . . . . . . . . . . . . . . . . . . . . . . . . . . . . . . . 9-37
High Temperature GSED . . . . . . . . . . . . . . . . . . . . . . . . . . . . . . . . . . . . . 9-38
Temperature Profile . . . . . . . . . . . . . . . . . . . . . . . . . . . . . . . . . . . . . . . . . 9-47
Temperature and Conductivity 1000° C . . . . . . . . . . . . . . . . . . . . . . . . . . 9-50
Temperature and Conductivity 1500° C . . . . . . . . . . . . . . . . . . . . . . . . . . 9-52
Crucible Types . . . . . . . . . . . . . . . . . . . . . . . . . . . . . . . . . . . . . . . . . . . . . 9-53
Position of the Stage and Heat Shield . . . . . . . . . . . . . . . . . . . . . . . . . . . 9-54
Removal of the Sample Crucible . . . . . . . . . . . . . . . . . . . . . . . . . . . . . . . 9-56
Inclined Crystal EDX Detectors . . . . . . . . . . . . . . . . . . . . . . . . . . . . . . . . 9-57
Position of the High Temperature GSED . . . . . . . . . . . . . . . . . . . . . . . . . 9-58
Positioning for EDX Performance . . . . . . . . . . . . . . . . . . . . . . . . . . . . . . 9-59
Removal of the Sample Holder Adapter . . . . . . . . . . . . . . . . . . . . . . . . . 9-62
Installing the Heating Stages Module . . . . . . . . . . . . . . . . . . . . . . . . . . . 9-62
Connections to the Heating Stage . . . . . . . . . . . . . . . . . . . . . . . . . . . . . . 9-63
Installing the Ground Wire . . . . . . . . . . . . . . . . . . . . . . . . . . . . . . . . . . . . 9-64
2 22 11
Sample Bias Cable Connector . . . . . . . . . . . . . . . . . . . . . . . . . . . . . . . . . 9-65
Re-Installing the Ground Wire . . . . . . . . . . . . . . . . . . . . . . . . . . . . . . . . . 9-65
Connecting the Water Flow Box . . . . . . . . . . . . . . . . . . . . . . . . . . . . . . . 9-67
Chamber Feedthrough (Inside) . . . . . . . . . . . . . . . . . . . . . . . . . . . . . . . . 9-68
The Heater Assembly . . . . . . . . . . . . . . . . . . . . . . . . . . . . . . . . . . . . . . . 9-69
Adjustment of the 1500° C Heat Shield . . . . . . . . . . . . . . . . . . . . . . . . . . 9-70
Adjustment of the Swing Arm . . . . . . . . . . . . . . . . . . . . . . . . . . . . . . . . . . 9-70
Banding Problem on Image . . . . . . . . . . . . . . . . . . . . . . . . . . . . . . . . . . . 9-71
Vibration Problem on Image . . . . . . . . . . . . . . . . . . . . . . . . . . . . . . . . . . 9-73
Sample Crucible with Alumina Paper . . . . . . . . . . . . . . . . . . . . . . . . . . . . 9-73
Specimen Holder Kit Option . . . . . . . . . . . . . . . . . . . . . . . . . . . . . . . . . . . 9-75
QUANTA 400 Location Positions . . . . . . . . . . . . . . . . . . . . . . . . . . . . . . . 9-76
Older Interface Adapter . . . . . . . . . . . . . . . . . . . . . . . . . . . . . . . . . . . . . . 9-76
Interface Pillar for Multi-Holders . . . . . . . . . . . . . . . . . . . . . . . . . . . . . . . . 9-77
The Multi-Holders . . . . . . . . . . . . . . . . . . . . . . . . . . . . . . . . . . . . . . . . . . . 9-77
Polished Mount Holders / Clamp Stubs . . . . . . . . . . . . . . . . . . . . . . . . . . 9-79
Eucentric Stub Holders . . . . . . . . . . . . . . . . . . . . . . . . . . . . . . . . . . . . . . 9-80
2 22 11
List of Tables
Preface
Chapter 1
Safety and Handling
DC power wire coding. . . . . . . . . . . . . . . . . . . . . . . . . . . . . . . . . . . . . . . . . 1-5
AC Cable Coding . . . . . . . . . . . . . . . . . . . . . . . . . . . . . . . . . . . . . . . . . . . . 1-5
Chapter 2
System Overview
Chapter 3
Vacuum System
Vacuum Status . . . . . . . . . . . . . . . . . . . . . . . . . . . . . . . . . . . . . . . . . . . . . . 3-3
Description of Quanta FEG States . . . . . . . . . . . . . . . . . . . . . . . . . . . . . . . 3-8
Log On / Log Off Procedure . . . . . . . . . . . . . . . . . . . . . . . . . . . . . . . . . . . . 3-9
Going to Full Operation. . . . . . . . . . . . . . . . . . . . . . . . . . . . . . . . . . . . . . . 3-10
Going to Overnight and Standby. . . . . . . . . . . . . . . . . . . . . . . . . . . . . . . . 3-11
Going to Standby . . . . . . . . . . . . . . . . . . . . . . . . . . . . . . . . . . . . . . . . . . . 3-12
Going to Complete Shutdown. . . . . . . . . . . . . . . . . . . . . . . . . . . . . . . . . . 3-13
Chapter 4
User Interface
Menus. . . . . . . . . . . . . . . . . . . . . . . . . . . . . . . . . . . . . . . . . . . . . . . . . . . . . 4-9
Databar Status . . . . . . . . . . . . . . . . . . . . . . . . . . . . . . . . . . . . . . . . . . . . . 4-23
Pages List . . . . . . . . . . . . . . . . . . . . . . . . . . . . . . . . . . . . . . . . . . . . . . . . . 4-24
Guidelines for Aperture Sizes and their Use . . . . . . . . . . . . . . . . . . . . . . . 4-38
MUI Software Equivalents. . . . . . . . . . . . . . . . . . . . . . . . . . . . . . . . . . . . . 4-39
Mouse Button Functions. . . . . . . . . . . . . . . . . . . . . . . . . . . . . . . . . . . . . . 4-40
Dedicated Windows Keys . . . . . . . . . . . . . . . . . . . . . . . . . . . . . . . . . . . . . 4-41
Function Key Short-cuts . . . . . . . . . . . . . . . . . . . . . . . . . . . . . . . . . . . . . . 4-42
Specific Key Short-cuts . . . . . . . . . . . . . . . . . . . . . . . . . . . . . . . . . . . . . . . 4-42
Chapter 5
Operations
Inserting Specimen . . . . . . . . . . . . . . . . . . . . . . . . . . . . . . . . . . . . . . . . . . . 5-3
Vacuum Modes Checklist . . . . . . . . . . . . . . . . . . . . . . . . . . . . . . . . . . . . . . 5-4
Setting HiVac Mode . . . . . . . . . . . . . . . . . . . . . . . . . . . . . . . . . . . . . . . . . . 5-5
Setting LowVac / ESEM Mode . . . . . . . . . . . . . . . . . . . . . . . . . . . . . . . . . . 5-6
Obtaining an Image . . . . . . . . . . . . . . . . . . . . . . . . . . . . . . . . . . . . . . . . . . 5-8
C & B Operation. . . . . . . . . . . . . . . . . . . . . . . . . . . . . . . . . . . . . . . . . . . . 5-11
Correcting C & B . . . . . . . . . . . . . . . . . . . . . . . . . . . . . . . . . . . . . . . . . . . . 5-12
Correcting Focus . . . . . . . . . . . . . . . . . . . . . . . . . . . . . . . . . . . . . . . . . . . 5-13
Correcting Astigmatism. . . . . . . . . . . . . . . . . . . . . . . . . . . . . . . . . . . . . . . 5-15
Optimum Spotsizes. . . . . . . . . . . . . . . . . . . . . . . . . . . . . . . . . . . . . . . . . . 5-16
Image Mixing Procedure. . . . . . . . . . . . . . . . . . . . . . . . . . . . . . . . . . . . . . 5-17
Image Capturing Procedure . . . . . . . . . . . . . . . . . . . . . . . . . . . . . . . . . . . 5-28
Set-Up and Recording a Movie. . . . . . . . . . . . . . . . . . . . . . . . . . . . . . . . . 5-33
Tabbed Preferences . . . . . . . . . . . . . . . . . . . . . . . . . . . . . . . . . . . . . . . . . 5-39
Default Purging Settings for different PLA Sizes . . . . . . . . . . . . . . . . . . . 5-41
2 22 11
Chapter 6
Alignment
Alignment Procedures. . . . . . . . . .
Alignning the Final Lens Aperture.
Gun Alignment . . . . . . . . . . . . . . .
Stigmator Alignment . . . . . . . . . . .
Stage Rotation Center. . . . . . . . . .
PLA Centering. . . . . . . . . . . . . . . .
Emitter Startup . . . . . . . . . . . . . . .
Chapter 7
..
..
..
..
..
..
..
.
.
.
.
.
.
.
..
..
..
..
..
..
..
..
..
..
..
..
..
..
..
..
..
..
..
..
..
.
.
.
.
.
.
.
..
..
..
..
..
..
..
..
..
..
..
..
..
..
..
..
..
..
..
..
..
.
.
.
.
.
.
.
..
..
..
..
..
..
..
..
..
..
..
..
..
..
..
..
..
..
..
..
..
..
..
..
..
..
..
..
.
.
.
.
.
.
.
. . . 6-2
. . . 6-4
. . . 6-5
. . . 6-8
. . 6-10
. . 6-12
. . 6-13
..
..
..
..
..
..
..
..
..
..
..
..
..
..
..
..
..
..
..
..
..
..
..
..
..
..
..
.
.
.
.
.
.
.
.
.
..
..
..
..
..
..
..
..
..
..
..
..
..
..
..
..
..
..
..
..
..
..
..
..
..
..
..
.
.
.
.
.
.
.
.
.
..
..
..
..
..
..
..
..
..
..
..
..
..
..
..
..
..
..
..
..
..
..
..
..
..
..
..
..
..
..
..
..
..
..
..
..
.
.
.
.
.
.
.
.
.
. . . 7-2
. . . 7-3
. . . 7-6
. . . 7-8
. . 7-13
. . 7-24
. . 7-25
. . 7-28
. . 7-29
Stages
Movement Types. . . . . . . . . . . . . . . . . . .
Movement Types for Quanta FEG 200 . .
Movement Types for Quanta FEG 400 . .
Movement Types for Quanta FEG 600 . .
Map Elemet Functions . . . . . . . . . . . . . .
Using Alignment Wizard . . . . . . . . . . . . .
Define User Units . . . . . . . . . . . . . . . . . .
Alignment Type Differences . . . . . . . . . .
Using Specimen Holder Wizard . . . . . . .
Chapter 8
..
..
..
..
..
..
..
Maintenance
Household Cleaners . . . . . . . . . . . . . . . . . . . . . . . . . . . . . . . . . . . . . . . . . . 8-2
Chapter 9
System Options
Diode Switch GAD / BSD . . . . . . . . . . . . . . . . . . . . . . . . . . . . . . . . . . . . . . 9-7
Diode Switch SSD-BSD . . . . . . . . . . . . . . . . . . . . . . . . . . . . . . . . . . . . . . 9-11
1000° C and 1500° C Consumable Parts . . . . . . . . . . . . . . . . . . . . . . . . . 9-74
2 22 11
PREFACE
About this Manual
This Manual for your Quanta FEG Scanning Electron Microscope is
divided into the following chapters:
1. SAFETY AND HANDLING provides important information
required during operation and maintenance for product safety and
personal safety.
2. SYSTEM OVERVIEW gives the basics about your system’s
capabilities.
3. SYSTEM ON/OFF gives procedures for several system on/off
modes, including Startup, Standby Mode, Overnight Mode,
Complete Shutdown, and Emergency Shutdown.
4. USER INTERFACE describes the interface that controls system
operation, giving the function of each Tool, Menu item and
Control Page.
5. OPERATIONS gives procedures for how to use the system.
6. ALIGNMENT explains how to align the Column and Stage to
achieve optimal performance.
7. STAGES gives a full description of functionality for each stage
and the software control.
8. MAINTENANCE step by step cleaning procedures.
9. HARD AND SOFTWARE OPTIONS relevant options that are
integrated in or accessory to the Quanta FEG system.
-i
22 211
How to Use this Manual
How to Use this Manual
At the beginning is a main Contents, List of Figures and a List of
Tables covering the whole Manual. Each chapter has a Contents of the
subjects specific to that chapter. Included in some chapters are easyto-follow tables outlining task-oriented procedures. High-lighted text
can also be found in descriptive paragraphs to aid association of
items.
CONVENTIONS FOR CONTROLS
References to specific knobs, buttons, labelled functions on the
system and software are labelled in small capitals or highlighted text.
A sentence such as: “Click on the MEASUREMENT button to start this
function” refers to the software button itself.
Finding What You Need
This manual has been organized so you can find information in
several ways. You can read the manual from beginning to end (highly
recommended but rarely done). Be sure to read the safety section,
before operation, in Chapter 1.
Once your system is up and running, you can search for information
in the main contents or the individual contents preceding each chapter.
Major headings have been hung in the left column to help you scan for
the basics within a chapter. That column provides space for your own
notes as well.
Tables and Figures are numbered within each chapter and are listed
after the main Contents for the whole manual.
-ii
2 2 2 11
Chapter 1
Safety and Handling
Site Requirements . . . . . . . . . . . . . . . . . 1-1
Electron Column Precautions . . . . . . . . . 1-1
Trained Service Personnel . . . . . . . . . . . 1-2
User Maintenance. . . . . . . . . . . . . . . . . . 1-2
Terms and Symbols . . . . . . . . . . . . . . . . 1-3
Symbols and messages . . . . . . . . . . . . . . 1-3
Voltages . . . . . . . . . . . . . . . . . . . . . . . . . 1-4
Interlocks. . . . . . . . . . . . . . . . . . . . .
Line Voltage . . . . . . . . . . . . . . . . . .
Cords/Cables . . . . . . . . . . . . . . . . .
DC Cable Colour-Coding System
AC Cords . . . . . . . . . . . . . . . . . . .
Miscellaneous Cables . . . . . . . . .
Main Power . . . . . . . . . . . . . . . . .
Ground (Earth) . . . . . . . . . . . . . . . .
Cover/Panels . . . . . . . . . . . . . . . . .
Fuses . . . . . . . . . . . . . . . . . . . . . . .
..
..
..
..
..
..
..
..
..
..
..
..
..
..
..
..
..
..
..
..
.
.
.
.
.
.
.
.
.
.
1-4
1-4
1-4
1-5
1-5
1-5
1-5
1-6
1-6
1-6
Chemicals . . . . . . . . . . . . . . . . . . . . . . . . 1-7
Solvents . . . . . . . . . . . . . . . . . . . . . . . . . . 1-7
Nitrogen . . . . . . . . . . . . . . . . . . . . . . . . . . 1-7
Liquid Nitrogen . . . . . . . . . . . . . . . . . . . . . 1-7
Miscellaneous Precautions . . . . . . . . . . . 1-8
Electric Fans . . . . . . . . . . . . . . . . . . . . . . . 1-8
Pump Exhaust. . . . . . . . . . . . . . . . . . . . . . 1-8
Corrosion . . . . . . . . . . . . . . . . . . . . . . . . . 1-8
22 211
2 2 2 11
1
SAFETY AND HANDLING
Site Requirements
Verify that the safety and environmental requirements of the
workstation site, which are the responsibility of the customer, are
satisfied. In particular, the pump exhaust requirements, the electrical
supply and grounding (earthing) requirements, floor loading, and any
local codes regarding earthquake safety are important safety issues.
If applicable, install a drip pan to collect potential oil spills and drips
from the vacuum pumps.
Electron Column Precautions
The Whole system conforms to:
• IEC61010-1
•
•
•
•
Safety requirements for electrical equipment:
general requirements
IEC61326-1
Electrical equipment for measurement,
control and laboratory use - EMC requirements
EN50081
EMC Generic emission standard
EN50082
EMC Generic immunity standard
96/29/EURATOM Ionizing radiation
Never attempt maintenance or service of any kind on the electron
column, other than that described for the user, in this User Manual.
1-1
22 211
Safety and Handling Trained Service Personnel
Trained Service Personnel
Before starting any service task on an FEI Company product, such as
an electron microscope or ion beam equipment, or any related
accessories or third party equipment, the service engineer concerned
must first have read and understood the relevant sections of the FEI
Service Safety Manual.
The FEI Service Safety Manual, order code number 4022 190 50058,
contains explicit instructions on safe working methods, descriptions
of the various warning symbols and labels used on FEI equipment,
and Material Safety Data Sheets for all toxic gases and materials
which may be present.
A hardcopy of the FEI Service Safety Manual is shipped with every
FEI Company electron microscope or ion beam instrument, and it is
also present in electronic form on the FEI Customer Service
CD-ROM.
User Maintenance
There may be additional limitations to safety and handling not
mentioned in this manual.
Allow only trained personnel to perform maintenance procedures.
Always observe appropriate safety practices in dealing with electronic
circuitry. Read and understand the safety precautions in this chapter
and throughout the manual. Observe industry-approved safety
methods and procedures.
If you have any doubt regarding approved safety procedures, contact
safety personnel at your company, or representatives of your state,
territory or province, or federal government.
1-2
2 2 2 11
Safety and Handling Terms and Symbols
Terms and Symbols
SYMBOLS AND MESSAGES
The following messages are used throughout FEI manuals to highlight
information.
NOTE:
Text of the note.....
A note emphasizes information requiring special attention.
CAUTION!
Text of the caution....
A Caution message appears where special handling is required to
prevent product damage.
WA R N I N G !
Text of the warning...
A Warning message appears where special handling is required to
prevent personal injury or death.
DAN GER !
Text of the danger message....
A Danger message identifies an immediate personal risk of injury or
death and gives appropriate precautions.
DANGER! High Voltage
Protective ground (earth) terminal
!
ATTENTION! Refer to manual
1-3
22 211
Safety and Handling Voltages
Voltages
According to the American National Standards Institute (ANSI)
guidelines, a shock hazard exists when voltage levels are present
which are 30 V rms or 42.4 V peak. Use extreme caution whenever a
shock hazard is present. As a good safety precaution, always expect a
hazardous voltage in an unknown circuit before measuring.
Operators and service personnel must be trained on potential safety
hazards and safe techniques, and must observe all warnings and
cautions encountered on the system and in the manuals. No person
should perform any operations without prior training.
INTERLOCKS
Components include safety interlocks to minimize high voltage
hazards. Safety interlock circuitry is provided to protect system users.
Overriding interlocks is dangerous and should never be done by
untrained personnel.
After completing procedures for which an interlock was disconnected,
always reset (or reconnect) and test the interlock before proceeding.
Cover interlocks reset automatically when the covers are replaced.
LINE VOLTAGE
Line voltage (120 to 240 V AC) may be present in various locations
within the system, even when the system or instrument is turned off.
Completely disconnect the unit from line voltage by disconnecting the
AC plug from the AC power source before performing service or
maintenance.
Service or troubleshooting in these areas is performed only by Service
engineers.
CORDS/CABLES
Never connect or disconnect any cables or connections while power is
applied to the system or components. Doing so is potentially
hazardous to service personnel and could cause damage to the system
or its components.
WA R N I N G :
Components may have potentially lethal voltages (up to 30 kV).
1-4
2 2 2 11
Safety and Handling Voltages
DC Cable Colour-Coding System
Internal DC power wiring in the main console is colour-coded
according to TABLE 1-1.
TABLE 1-1
DC POWER WIRE CODING
Colour
Voltage
Blue
0
Yellow
+5
Gray
+15
Lavender
-15
AC Cords
Plug the unit AC cords only into an approved power source. Use only
power cords that are in good condition. If replaced, use AC cords
rated to at least the rating of the original AC cord.
Each power cable is labelled with a destination and origin and are
colour-coded according to TABLE 1-2. .
TABLE 1-2
AC CABLE CODING
North American
Colour
International
Colour
Solid Green
Green
with Yellow Stripe
Ground
Black
Brown
Line
White
Blue
Neutral
Meaning
Miscellaneous Cables
Check cables periodically for possible wear, cracks, or breaks. If any
defects are found, contact service personnel.
Main Power
The system main power should only be plugged into the approved
power receptacle, as identified by system documentation.
1-5
22 211
Safety and Handling Voltages
GROUND (EARTH)
Some components must be grounded to operate safely. Do not defeat
grounding or use an ungrounded power source. In the event of loss of
a protective ground connection, all accessible conductive parts
(including knobs and controls that may appear as insulating) can
render an electric shock.
COVER/PANELS
Do not operate or plug in any electrical unit without the protective
covers or panels installed. Only qualified persons aware of the
electrical hazards should perform maintenance or service operations.
FUSES
Only trained service personnel should replace fuses. Replace fuses
only with fuses of the same type, voltage rating, and current rating.
WARN I NG !
Do not exceed 30 Volts RMS Between the input connector and
ground.
During testing, do not touch any object which could provide a current
path to the common side of the circuit being tested or to ground.
1-6
2 2 2 11
Safety and Handling Chemicals
Chemicals
Before using any chemicals, obtain and read a Material Safety Data
Sheet relating to the substance. Be aware of hazards and how to avoid
them, before using or handling any chemical.
SOLVENTS
Use solvents carefully and in sparing quantities. Before using any
solvent, read the Material Safety Data Sheet. Avoid hazards listed on
the Material Safety literature, and avoid spillage, skin contact, eye
contact, and vapour inhalation.
Volatile and corrosive substances can diffuse through contact
lenses despite reasonably well ventilated conditions. Moreover,
contact lenses are difficult to remove when an irritant chemical enters
the eye, making irrigation ineffective. Care must be taken to address
the issue of contact lens worn by those coming into contact with such
solvent fumes.
NITROGEN
Nitrogen may be used to vent the system. Nitrogen is not poisonous,
but is a potential asphyxiant.
LIQUID NITROGEN
Liquid nitrogen, used in the EDX system, has the potential to cause
frostbite if direct contact with skin occurs.
On standing, liquid nitrogen picks up oxygen from the air and forms
liquid oxygen in solution. Treat any liquid nitrogen that is not fresh as
though it had all the hazards of liquid oxygen.
WA R N I N G !
Suffocation is possible if nitrogen or liquid nitrogen is released in an
enclosed room without adequate ventilation.
1-7
22 211
Safety and Handling Miscellaneous Precautions
Miscellaneous Precautions
ELECTRIC FANS
Some instruments in the system may be air-cooled. Do not block the
air flow to or from the fans. Do not operate fans with the protective
covers or filters removed. Keep fingers, loose clothing, etc. away
from fans. Periodic filter maintenance may be required to prevent
overheating.
PUMP EXHAUST
Failure to provide proper exhaust filtering may discharge oil mist into
the environment. Such oil mist may be an environmental hazard as
well as a health hazard in an enclosed room.
CORROSION
Components are painted, plated, or otherwise treated to resist
corrosion. However, the components must be handled and stored
properly to prevent corrosion. Observe precautions carefully.
1-8
2 2 2 11
Chapter 2
System Overview
The Quanta FEG SEM . . . . . . . . . . . . . . 2-1
System Capabilities. . . . . . . .
How Quanta FEG Works. . . .
The SEM Principle . . . . . . . .
Image Viewing and Capture .
System Vacuum . . . . . . . . . .
Positioning of the stage. . . . .
User Interface . . . . . . . . . . . .
User accounts. . . . . . . . . . . .
.
.
.
.
.
.
.
.
..
..
..
..
..
..
..
..
..
..
..
..
..
..
..
..
..
..
..
..
..
..
..
..
..
..
..
..
..
..
..
..
.
.
.
.
.
.
.
.
2-1
2-1
2-2
2-2
2-3
2-3
2-3
2-3
System Layout of Quanta FEG . . . . . . . . 2-4
22 211
2 2 2 11
2
SYSTEM OVERVIEW
The Quanta FEG SEM
SYSTEM CAPABILITIES
The Quanta FEG Scanning Electron Microscope (SEM) produces
enlarged images of a variety of specimens, achieving magnifications
of over 100000x providing high resolution imaging in a digital
format. This important and widely used analytical tool provides
exceptional depth of field, minimal specimen preparation, and the
ability to combine the technique with X-ray microanalysis.
The Quanta FEG has 3 operating vacuum modes to deal with different
types of sample. High Vacuum (HiVac) is the conventional operating
mode associated with all scanning electron microscopes. The two
other application modes are Low Vacuum (LowVac) and ESEM. In
these modes the column is under high vacuum, and the specimen
chamber is at a high pressure range of 0.1 to 30 Torr
(15 to 4000 Pa). Either mode can use water vapour from a built-in
water reservoir, or auxiliary gas which is supplied by the user, and
connected to a gas inlet provided for this purpose. Observation of
outgassing or highly charging materials can be made using one of
these modes without the need to metal coat the sample, which is
common to the HiVac mode.
HOW QUANTA FEG WORKS
Four main components combine to produce the images from the
sample: an electron gun, a dem agnification unit, a scan unit and a
detection unit. The electron gun, which is the source em itter, produces
electrons within a sm all spatial volume with a sm all angular spread and
a selectable energy. This beam enters the dem agnification unit,
consis ting of s everal electron lenses, and exits to arrive at the specim en
surface with a much s maller diameter than that produced by the gun.
Electrons striking the specimen react with the atoms of the sample
surface and produce three types of signals: X-rays, electrons, and
photons. The main detector system picks up the electrons, amplifies
them and converts them into electrical voltage, which is sent to the
Monitor to control the intensity of the scanning spot.
The scan generator signal, fed to the deflection system of the Monitor,
moves the beam in a raster pattern over the specimen area. The
electrical voltage changes as it rasters, which provides serial
information of the specimen surface. This signal, modulated by the
one from the detection system, produces the onscreen image.
2-1
22 211
System Overview The Quanta FEG SEM
THE SEM PRINCIPLE
FIGURE 2-1 SEM SCHEMATIC OVERVIEW
FILAMENT PINS
ELECTRON GUN
SUPPRESSOR
EMITTER
DEMAGNIFICATION
UNIT
CONDENSER
LENSES
SCAN UNIT
DEFLECTION
SYSTEM
SCAN GENERATOR
M
FINAL LENS
TE
DE
OR
CT
DETECTION UNIT
SPECIMEN
IMAGE VIEWING AND CAPTURE
Because the beam is scanning the specimen in synchronism with the
signal from the detector, there is a correspondence between the
brightness of an image point on the Monitor screen and the signal
detected at a point on the specimen.
Magnification is the ratio of the size of the viewing Monitor screen
and the size of the area scanned on the specimen. Increased
magnification is achieved by reducing the size of the area scanned on
the specimen.
Digital scanning provides a completely digital image, and image
capture is performed by scanning one frame a time at a High
resolution of pixel format.
2-2
2 2 2 11
System Overview The Quanta FEG SEM
SYSTEM VACUUM
The entire electron path from gun to specimen must be under vacuum
so the electrons won’t collide with air molecules and be absorbed.
Various levels of vacuum are necessary, a Turbo Molecular Pump
(TMP) backed by a rotary pre-vacuum pump obtains the necessary
specimen chamber vacuum. The exception to this rule is the LowVac
and ESEM modes associated with the Quanta SEM Series where
water vapor or gas is introduced to the specimen chamber.
Specimen exchanges take place through a chamber door, when
opened it exposes the specimen stage. Exchange time takes a few
minutes.
Vacuum /software interlocks ensure that the system is fully protected
against operating failures.
POSITIONING OF THE STAGE
A choice of computer-controlled multi-axis stages offer precision
specimen manipulation for overall spatial orientation on highly
repetitive or extremely irregular samples.
USER INTERFACE
The user interface consists of a single high-level user shell employing
application programs within a Windows 2000™ operating
environment.
Vector parameter files defining specific instrument settings for
particular applications ensure reproducibility of complex procedures.
An intermediate software layer, acting on instructions from the
application layer controls the column, detector(s), stage, EDX and
vacuum functions. This layer also provides management of image
capture, storage, and data output devices.
USER ACCOUNTS
All user account levels:
•
•
•
•
FEI Account Administrator
FEI Supervisor Users
FEI Microscope users
FEI Non-active Users
created via FEI User management software ensures for the particular
users admission to both the operating system Windows 2000 and the
xT microscope Control software.
See Chapters 3 and 4 for more information on LogOn / LogOff, the
start-up of the system and the User Management utilities.
2-3
22 211
System Overview System Layout of Quanta FEG
System Layout of Quanta FEG
The Standard layout of the Quanta FEG 200, 400 and 600 systems is
based around a dedicated Microscope Controller along with a
Electrical Console to power the Microscope Console i.e. Vacuum,
Gun, Column, and Stage.
The Support Computer contains various other items that are generally
accepted as essentials or are dedicated to a particular application for
example, Forensics or Failure analysis.
The User interface devices are peripherals to the Microscope
Controller, either software or hardware. The Completion Packages
differ in content depending on the demand of the application or the
wishes of the customer. Therefore it is not possible to specify all
possible combinations here. The following diagram shows the
Standard system layout:
FIGURE 2-2 QUANTA FEG STANDARD LAYOUT
For more information on the Types of Completion packages and
overall content, refer to Chapter 9 ‘Options’.
2-4
2 2 2 11
Chapter 3
Vacuum System
Overview . . . . . . . . . . . . . . . . . . . . . . . . . . 3-1
Vacuum Status . . . . . . . . . . . . . . . . . . . . 3-3
Pump. . . . . . . . . . . . . . . . . . . . . . . . . . . . . 3-4
Vent . . . . . . . . . . . . . . . . . . . . . . . . . . . . . . 3-4
Vacuum Modes . . . . . . . . . . . . . . . . . . . . 3-5
High Vacuum (HiVac) . . . . . . . . . . . . . . . .
Low Vacuum and ESEM Modes . . . . . . . .
Low Vacuum (LowVac) . . . . . . . . . . . . .
ESEM . . . . . . . . . . . . . . . . . . . . . . . . . . .
Pressure. . . . . . . . . . . . . . . . . . . . . . . .
Pressure, the PLA and Cones . . . . . . .
Pole Piece Configuration dialogue . . . . .
Using Gas . . . . . . . . . . . . . . . . . . . . . . .
Purge . . . . . . . . . . . . . . . . . . . . . . . . . . . .
Vent Water Bottle . . . . . . . . . . . . . . . . . .
3-5
3-5
3-5
3-5
3-6
3-6
3-6
3-6
3-7
3-7
Quanta FEG System States . . . . . . . . . . 3-8
Log On / Log Off . . . . . . . . . . . . . . . . .
Full Operation state . . . . . . . . . . . . . . .
Overnight and Standby states. . . . . . .
ESEM, LowVac and Overnight state
Shutdown state . . . . . . . . . . . . . . . . . .
Complete Shutdown state . . . . . . . . . .
Power Off . . . . . . . . . . . . . . . . . . . . .
Emergency Shutdown . . . . . . . . . . . . .
22 211
..
..
..
..
..
..
..
..
. 3-9
3-10
3-11
3-11
3-12
3-13
3-13
3-14
2 2 2 11
3
VACUUM SYSTEM
OVERVIEW
This chapter describes:
• The Quanta FEG vacuum system
- Vacuum status and relevant actions
(Pump, Vent)
- Vacuum modes and relevant actions
(HiVac, LowVac, ESEM)
• Quanta FEG System States
- Log On / Log Off
- Full Operation State
- Overnight State
- StandBy State
- Complete Shutdown State
- Emergency Shutdown
- Power Failure
There are three main vacuum sections: Gun, Column and Specimen
Chamber. Under operation the Gun and Column sections are always
in HiVac. Specimen chamber is at the pressure required for the given
status (Pump, Vent) or mode (HiVAc, LowVac, ESEM). All valve and
pumps operations are fully automatic.
3-1
22 211
Vacuum System
FIGURE 3-1 THE QUANTA FEG VACUUM SYSTEM
Legend:
AGV . . . . Auxiliary Gas Valve
BPV . . . . . By Pass Valve
BTG . . . . BaraTron Gauge
CCG . . . . Cold Cathode Gauge
CIV . . . . . Column Isolation Valve
EBV . . . . Environmental Backing Valve
ChEV . . . Chamber Evacuation Valve
ChIV . . . . Chamber Isolation Valve
IGP . . . . . Ion Getter Pump
PVP . . . . . Pre Vacuum Pump
SFV . . . . . Servo Flow Valve
SIV . . . . . Servo Isolation Valve
TVV . . . . . Turbo Venting Valve
VV . . . . . . Venting Valve
WBV . . . . Water Bottle Valve
3-2
2 2 2 11
Vacuum System Vacuum Status
Vacuum Status
The Vacuum Status item in the Status module at the bottom of any
page displays the actual vacuum system setting, as given in the
following table.
TABLE 3-1
VACUUM STATUS
Vacuum Status
Condition
Pumping
Transition between Vented and Vacuum status.
Also indicates Purging procedure.
The Pressure item located in Status module indicates numerical value
of the pressure. Progress is indicated by a YELLOW box.
Vacuum
Pumped to HiVac, LowVac or ESEM mode.
When adjusted vacuum is reached, it is indicated by a GREEN box.
Venting
Transition between Vacuum and Vented status.
Progress is indicated by a YELLOW box.
Vented
The specimen chamber is in Vented status.
When atmospheric pressure is reached, it is indicated by a RED box.
Purging
The specimen chamber is in Purging process (see page 3-7).
Progress is indicated by a YELLOW box.
Error
An error occured and is handled. After some time this leads to Off or All
Off status. Progress is indicated by a GREY box.
Off
An error occurred in the vacuum system, IGPs are still in operation.
Pumps off, specimen chamber could be in Vented or Vacuum status.
When Off is reached, it is indicated by a GREY box.
All Off
An error occurred in the vacuum system, IGPs out of operation.
Pumps off, specimen chamber could be in Vented or Vacuum status.
When All Off is reached, it is indicated by a GREY box.
IGP Start
System tries to start IGP. This transition leads to Off status when
successful or All Off when not. Progress is indicated by a YELLOW
box.
The vacuum controls are in the Vacuum module, located at the top of
the Startup, Work and Option pages. The Pump button controls
pumping for the column and chamber vacuum, the Vent button
controls venting for a sample or detector exchange.
In the Vacuum status possible vacuum modes are:
High Vacuum (HiVac), Low Vacuum (LowVac) or ESEM.
The mode controls are in the Mode module. This is determined by the
setting of the automatic environmental backing valve (EBV). The
automatic EBV is closed for HiVac mode and is open for LowVac
and ESEM modes.
3-3
22 211
Vacuum System Vacuum Status
PUMP
When the Pump button is selected in Vented status or when changing
vacuum mode, the target pressure that the system will pump to will
depend on the target vacuum mode. The Pump button is pressed in
and not accessible. The magnification changes to 100x.
For HiVac the system will achieve the best vacuum (lowest pressure)
possible. For LowVac and ESEM, it will go to the pressure specified
in the Pressure text box at the bottom of the Mode area. For the
LowVac and ESEM modes, the purge function can be defined in
Preferences / ESEM / Purge. When finished the Vacuum Status in
Status module should indicate Vacuum.
If the Pump button is selected when just venting, the venting
procedure stops and the system starts to pump immediately to the
target vacuum mode.
VENT
When the Vent button is selected and the system is in any Vacuum
status, the confirmation dialogue appears. After confirmation the
system gently switches off the detectors, high voltage supplies, the
pumps and uses the appropriate valves to vent the system.
The Vent button is pressed in and not accessible. After a specified
venting time the venting valve will close and the Vacuum Status in
the Status module should indicate Vented. The button will pop out
again.
If the Vent button is selected when just pumping, the dialogue
appears and after confirmation the pumping procedure stops and starts
the venting procedure.
When the Vent button is selected when Vented status was reached,
the dialogue appears and after confirmation the valves will re-open.
After the specified venting time, the valves will close.
NOTE:
If you vent the system for a detector change purpose, wait until RED
box asppears in the Status module, otherwise one risks the nondetection of the detector and therefore the PLA (see further) will not
be known by the system.
3-4
2 2 2 11
Vacuum System Vacuum Modes
Vacuum Modes
This area includes three radio buttons used to select the target operating mode that the instrument will be placed in when a Pump
sequence is initiated. The vacuum system recognizes High Vacuum,
Low Vacuum and ESEM modes. All of these modes are operative at
the user level, to allow the user to be precise about the detector
configuration installed in the chamber.
HIGH VACUUM (HIVAC)
This is the conventional operating mode associated with all s canning
electron micros copes . The high vacuum condition is common throughout
the colum n and s pecimen cham ber. The ETD or any optional HiVac
detectors can be used, but no gaseous detectors will operate.
LOW VACUUM AND ESEM MODES
The LowVac and ESEM modes will be used most often in viewing
images with the microscope. Which of these is used will depend on
what detector is installed.
In either of these modes, the gun and column sections are under
higher vacuum than the specimen chamber where pressure ranges
from 0.08 to 30 Torr (10 to 4000 Pa).
The system automatically detects the gaseous detector and offers a
relevant vacuum Mode in Mode module.
Low Vacuum (LowVac)
This mode is meant to be used with the Large Field Detector (LFD).
When Low Vacuum mode is entered from ESEM mode, by selecting
the Low Vacuum mode radio button, nothing will happen unless there
is a different gas type being used for the two modes. In this case, the
appropriate gas type will be selected.
When Low Vacuum mode is entered from High Vacuum, by
selecting the Low Vacuum mode radio button, the system will prompt
the user with the Pole Piece Configuration as a graphical dialogue.
This happens only for the first time after particular Vent procedure.
ESEM
This mode is meant to be used with the GSED or GBSD.
When ESEM mode is entered from Low Vacuum mode, by selecting
the ESEM mode radio button, nothing will happen unless there is a
different gas type being used for the two modes. In this case, the
appropriate gas type will be selected.
When ESEM mode is entered from High Vacuum, by selecting the
ESEM mode radio button, the system will prompt the user with the
Pole Piece Configuration as a graphical dialogue. This happens only
for the first time after particular Vent procedure.
3-5
22 211
Vacuum System Vacuum Modes
Pressure
The Pressure slider bar is used to set the target chamber pressure.
Torr, Pascal or Millibar are available, and can be selected in
Preferences / Units (see the end of Chapter 5).
When the system is in LowVac or ESEM mode, and the pressure
value is changed in the Pressure slider bar, the pressure will
automatically start changing to the new value. When the system is in
any other status besides Vacuum - LowVac or ESEM, and the Pressure
slider is changed, the new value will be used as the target pressure
when the system pumps to an Low Vacuum or ESEM mode.
The actual specimen chamber pressure is displayed in the Pressure
item of the Status module at the bottom of all pages. Minimum and
maximum values are given.
Pressure, the PLA and Cones
The maximum allowed pressure in LowVac or ESEM mode is
determined by the size of the PLA (Pressure Limiting Apperture). If
the PLA is incorporated in the detector, due to the contact connector,
the system will determine the installed detector type, thereby knowing
the size of the PLA and setting the Pressure slider range accordingly.
In all other cases the Pole Piece Configuration dialogue appears to
select the appropriate cone.
This pressure will be the same for the LowVac and ESEM modes.
From that point on, this information will automatically be used until
the system is vented again.
The PLA can only be changed when the system is in Vented status.
For that reason the vacuum system sets the PLA to unknown
whenever the system is vented. When pumping to HiVac mode the
PLA size is not critical and need not be known. However, when
pumping to LowVac or ESEM mode, or when switching to either of
these from pumped or pumping HiVac mode, the PLA must be
known. The Pole Piece Configuration dialogue prompts to inform
the system about the used PLA.
Pole Piece Configuration dialogue
Clicking on the OK button will stay with the default ‘No Accessory’.
Clicking on any other option cone will inform the system that the
respective cone is installed and after OK is clicked the PLA size is
known. Clicking on Cancel will revert the system back to it’s initial
operating mode.
Using Gas
ESEM and Low Vacuum m odes allow the user to im age samples in a
gaseous atm osphere, which can be selected in the Mode drop down box:
• water vapour from a built-in water reservoir,
• auxiliary gas which is supplied by the user, and connected to a gas
inlet provided for this purpose.
Auxiliary gas requires a regulator on the gas cylinder to provide a very
low gas flow, on the order of 200 SC CM (Std Cubic Centim etres per
Minute). Since most regulators do not offer this type of control, a s mall
needle valve placed between the ESEM and the Gas cylinder is required.
3-6
2 2 2 11
Vacuum System Vacuum Modes
The reason this control is needed lies in the ESEM metering valve.
The pressure of water vapour in the flask is around 27 Torr
(3600 Pa), and flow from the flask to the chamber set at 5 Torr
(670 Pa) is fairly slow. The pressures in most gas cylinders must be
reduced using a two stage regulator. Flow out of the cylinder can only
be achieved if the gas pressure out of the regulator is above 760 Torr
(100 kPa). The flow of gas from 760 Torr to 5 Torr is greater than the
metering valve can handle and causes the valve to oscillate. By
placing an additional metering valve in the line between the ESEM
and the Gas regulator, the user can reduce the flow of gas and stop the
oscillation of the metering valve.
PURGE
This is a procedure where the specimen chamber is flooded several
times with the selected gas to replace the current chamber gas with a
new gas determined by the target operating mode. This is applied
when the system is:
• just turned to Low Vacuum or ESEM mode from vented status,
• the system is in Low Vacuum or ESEM modes and the the gas type
is changed.
Generally speaking, this process involves pumping down the chamber
to a low value, to remove the old gas, then “flooding” the chamber
with the new gas to the desired pressure until the old gas is removed
and the chamber is mostly filled with the new gas.
This function includes options for setting up, initiating and
termination of chamber purging operations. The setup and detailed
description is found by Preferences / ESEM.
NOTE:
This procedure can take several minutes, according to Preferences
setting. Wait until Vacuum status indicates Vacuum, because
detectors do not start operation till vacuum is reached.
See Setting Preferences ESEM TAB at the end of Chapter 5 “Operations” for more details.
Vent Water Bottle
On occasion the water reservoir needs to be filled. The vacuum
system must be in a Vented status before this function can be
performed.
• Vent system.
• The Bottle and Gas inlets can be found at the back of the column
console.
• Turn off any gas supply connected to the Auxiliary Gas inlet.
• detach the bottle and fill to 2/3 full.
• Reconnect the bottle.
• Pump the vacuum system and allow the purge to operate to flush
any air out of the bottle and connecting tubes.
3-7
22 211
Vacuum System Quanta FEG System States
Quanta FEG System States
There are several system states listed in the following table and the
tree. The transitions among them depend on their initial and final
conditions and are accessible from a particular user account.
TABLE 3-2
DESCRIPTION OF QUANTA FEG STATES
Switched off
components
Steps to Return
to Full Operation
During transportation
or service actions
System Vacuum
(with IGPs),
Emitter, Electronics
and Computer
Service Start
Supervisor Log On
Supervisor Emitter On
User High Voltage On
2) Emergency
Shutdown
During power failure
as for 1)
as for 1) - up to 2 hours
from emergency shutdown
Supervisor IGP Start
3) Shutdown
When not using the system
for more than 10 days.
System vacuum
Supervisor Log On
(except IGPs),
Supervisor Emitter On
Emitter, Electronics User High Voltage On
and Computer
State
When to Use
1) Complete
Shutdown
4) Full Operation*) Working
-
-
5) Overnight
When not using the system
overnight.
High Voltage
User Log On
User High Voltage On
6) Standby
When not using the system
for more than 1 day.
High Voltage,
PC + monitor
PC On, User Log On
User High Voltage On
FIGURE 3-2 QUANTA FEG STATES TREE
1)
Complete Shutdown
3)
Shutdown
Out of power < 2 hours
User
Log On / Off
HV On / Off
5)
Overnight
ff
f
Of
4)
Full operation
rO
we
Po
er
Supervisor
Log On / Off,
Emitter On / Off
xT microscope Server
Shutdown
2)
Emergency Shutdown
ow
User
xT microscope Server
Shutdown
Supervisor
IGP start
P
**)
2 ho
u rs
Po w
er O
ff
Ou t
of p
o we r
>
Service
Start
6)
Standby
User
PC On / Off
xT microscope Server Start / Stop
NOTE:
*)
Full Operation state represents two actual states for this partition purpose:
with High Voltage On or Off.
**) xT microscope Server shutdown when Emitter is On is not optimal and sparing way for it.
User should not shutdown xT microscope Server, only in case of emergency need.
3-8
2 2 2 11
Vacuum System Quanta FEG System States
LOG ON / LOG OFF
Before starting the system, check for the presence of electrical po-wer,
cooling water, and nitrogen for venting and cooling. With the
exception of nitrogen, interlocks prevent the vacuum system from
operating if the others are not present.
Once you have your FEI Microscope user (or Supervisor) account
set via FEI User management software by FEI Account
Administrator (see Chapter 4 - User Interface), you can use your
name and password to access both Windows 2000 system followed by
the xT microscope Server and Control software. (Take note of the
case sensitive passwords necessary at Win 2000 and xT microscope
Control server Log On points. A password is advisable for logging on
for protection of individual conditions and results.)
TABLE 3-3
LOG ON / LOG OFF PROCEDURE
Step
Action
1)
Push the ON button found on the front control panel of
the microscope.
Switch on the computer, the operating system will load
and display the appropriate Icons on the monitor
desktop.
2)
Click on the xT microscope Server Icon, wait until it´s
dialogue is fully functional (All LEDs needs to be green Gun&Vacuum, Optics, Motion, Imaging). Click on the
Start button.
3)
The xT microscope Control main window appears
behind the XTUI Log On dialogue. Fill in your
Username and Password.
The Supervisor has to Log On to bring the system from
the Standby state to the Full operation state because it
is necessary to start the Emitter on (see Chapter 6 Alignments: 5 - Emitter Startup).
4)
Clicking Log Off User in the File menu, with the left
mouse button, will Log Off the present user (any kind of
account) and provide the Log On dialogue for entering
another user to the microscope. Waiting for a new user
leaves the system in the Overnight state (Emitter is on if
it was before Log Off, HV switches automatically off).
3-9
22 211
Vacuum System Quanta FEG System States
FULL OPERATION STATE
When you are logged on and the system is in the overnight state, you
can bring the system to the full operation state.
TABLE 3-4
3-10
GOING TO FULL OPERATION
Step
Action
1)
Check the Status module at the bottom of any page for
the Vacuum Status. If the specimen chamber is Vented,
press the Pump Button in the Vacuum module . The
system will begin to pump in High vacuum mode as
default or to another mode as selected (red box - vented
- changes to yellow one - pumping - in status field).
More detailed information on Mode operation can be
found in the Chapter 5 - Operations.
2)
It is necessary to start Emitter on (when you start from
Shutdown state) from the 5 - Emitter Startup page
which is the Supervisor operation (see Chapter 6 Alignments).
When you are to bring the system to Full Operation state
and the Emitter is on (indicated by Emission Current
approximatelly from 100 to 300 µA), it is user operation
(Log On).
3)
When the Vacuum Status response is Vacuum together
with the green box, click on the HV button in the
Electron column module of the Startup, Work or
Option Page. You are now in the Full Operation State.
2 2 2 11
Vacuum System Quanta FEG System States
OVERNIGHT AND STANDBY STATES
Overnight state is used overnight. Standby state is used, when the
system would be out of operation for more than 1 day. This allows
quick resumption of daily operation without having to start the system
from Shutdown, Complete or Emergency shutdown states. The
electron beam is off but the vacuum system and the Emitter is in
operation.
TABLE 3-5
GOING TO OVERNIGHT AND STANDBY
Step
Action
1)
Switch off the HV by clicking off the HV button either on
the Startup, Work or Option page in the Electron
column module.
Vent the system, remove all samples and pump the
system to the High vacuum mode.
2)
Log-Off by Clicking Log Off User in the File menu.
Switch off the display monitor. The system is now in
Overnight state.
2a)
Log-Off by Clicking Log Off User in the File menu. Stop
xT microscope Server and Control software via Stop UI
and Stop button. Shutdown Windows operatin system
correctly, switch off the Computer. The system is now in
Standby state.
3)
The system can be brought back to full operation by
reversing the previous sequence 2 respectively 2a to 1.
Log-on dialogue appears automatically.
The system can be left in this state if electrical power and cooling
water are supplying the instrument.
NOTE:
If a Peltier stage is installed on the specimen stage, it should be
removed for overnight or longer periods of non-use.
If it is necessary the system could be left in Overnight state also with
cooling water switched off. After bringing the system to Full
operation state, the time required for stabilization could be longer.
ESEM, LowVac and Overnight state
The sample chamber should not be left in LowVac or ESEM mode
when the microscope is not being used, as water vapour is likely to
accumulate in the rotary pumps. The pumps have to be serviced at
regular intervals, and this will be required more often if the chamber
is left in either of these modes. The chamber should be left in HiVac
mode when not being used, in this case the GSED insert can be left in
place.
3-11
22 211
Vacuum System Quanta FEG System States
SHUTDOWN STATE
This state is used, when the system would be out of operation for
more than 10 days.
TABLE 3-6
3-12
GOING TO STANDBY
Step
Action
1)
Switch off the HV by clicking off the HV button either on
the Startup, Work or Option page in the Electron
column module.
2)
Bring the Emitter Off from the Emitter Startup page
which is the Supervisor operation. (see Chapter 6 Alignments).
3)
Press the Vent button in the Vacuum module. Wait till
venting is complete.
4)
To close the xT microscope Control and Server
software and shut down the operating system press
Alt+Tab on the keyboard untill the xT microscope Server
dialogue appears.
If this dialogue indicates that the xT microscope
Control software is running, click on the Stop UI button.
The xT microscope Control will close. Click on the Stop
button, and then click on the Shutdown button. A
confirmation dialogue appears, confirm xT microscope
Server shutdown. The PC is left running with the
dialogue on-screen, wait untill the operation is finished.
The other way is to click on the Shutdown button straight
away and then wait untill all actions take place
automatically and are finished.
5)
Shut down the Windows operating system correctly.
Switch off the computer and the monitor.
Switch off the flow of the cooling water and nitrogen inlet
if used.
2 2 2 11
Vacuum System Quanta FEG System States
COMPLETE SHUTDOWN STATE
Complete shutdown should be performed only if absolutely necessary
and for the shortest possible time, so as to recover the column vacuum
without the necessity of a bakeout. Normally, you would only do a
complete shutdown for transportation of the system or for service
actions, like repair to essential systems such as electrical, water and
air supplies.
The shutdown procedure also takes into account a cool down period
for the FEG tip where the current and extraction voltage are brought
to zero. The shutdown procedure brings the system to the nonpowered situation, where the vacuum at the column area is no longer
supported by running pumps and IGPs. All valves are closed and
column and specimen chamber areas are vented.
TABLE 3-7
GOING TO COMPLETE SHUTDOWN
Step
Action
1)
Bring the system to the Shutdown state.
2)
Disconnect all power supplies, inputs and outputs.
3)
Switch of the UPS unit - use a pencil to push the On / Off
button on it´s front panel through the rear perforated
cabinet cover (the right hole is marked by a red edge).
Power Off
The system is protected against power failures in the sense that the
various components of the system are not damaged. However a power
failure, especially with an FEG module in Operating mode is never
good for the system. It might affect the brightness of the tip, the high
vacuum levels of the column and the stability of the system. Therefore
sufficient measures must be taken to avoid power failures as much as
possible.
If a power failure occurs during normal operation of the system, it
comes down to a safe state and the following happens:
• The HV is switched off abruptly and the cooling down is similar to
that of a normal shutdown procedure.
• The specimen chamber vents gently, automatically.
• The momentary adjustments of all the system parameters (high
voltage, magnification, stage positions) are lost if they were not
saved.
• Because the Emitter IGPs are supported by a UPS, which can hold
it´s operation for approximatelly for 2 hours, some parts of the
microscope are still under power. This is useful if you want to bring
the microscope back to full operation as soon as possible after
power failure.
When you start the IGP in a short time after a power failure event,
there is a possibility a service person is not needed. The system
could be started by Supervisor - IGP start and Emitter On.
(see Chapter 6 - Alignments: 5 - Emitter Startup).
3-13
22 211
Vacuum System Quanta FEG System States
EMERGENCY SHUTDOWN
An emergency shutdown is similar to that which would happen if the
MAINS power was lost while the instrument was completely running
(see Power Failure on the next page).
In case of emergency it can be handled by the system. Strike the
EMERGENCY button (if available) to switch off the electrical power
completely. If there is not one present, proceed to press the Breaker
switch in the hole at the back of the Electronics Cabinet. This breaker
switch is inside the top-back cabinet cover opening.
FIGURE 3-3 EMERGENCY BREAKER SWITCH
If this is not easily accessible turn off the mains wall switch (if
present), and disconnect the mains plug from the mains socket.
Because the Emitter IGPs are supported by a UPS, which can hold it´s
operation for approximatelly another 2 hours, some parts of the
microscope are still under power.
If you are required to Switch Off this UPS unit, push the On / Off
button on it´s front panel.
FIGURE 3-4 EMERGENCY UPS SWITCH
3-14
2 2 2 11
Chapter 4
User Interface
Overview . . . . . . . . . . . . . . . . . . . . . . . . . . 4-1
Other Software and Hardware . . . . . . . . . 4-1
User Access Privileges . . . . . . . . . . . . . . . 4-1
Software Interface Elements. . . . . . . . . . 4-2
Icon . . . . . . . . . . . . . . . . . . . . . . . . . . . . . .
Pulldown Menus . . . . . . . . . . . . . . . . . . . .
Selecting with the Mouse . . . . . . . . . . . .
Selecting with Keyboard Commands . . .
Dialogue Boxes. . . . . . . . . . . . . . . . . . . . .
Radio Buttons . . . . . . . . . . . . . . . . . . . . . .
Check Boxes. . . . . . . . . . . . . . . . . . . . . . .
Command Buttons . . . . . . . . . . . . . . . . . .
List Boxes . . . . . . . . . . . . . . . . . . . . . . . . .
Continuous Control Adjusters . . . . . . . . . .
Ramp Control Adjusters . . . . . . . . . . . . . .
Two-Dimensional X-Y Controls . . . . . . . . .
Text Boxes . . . . . . . . . . . . . . . . . . . . . . . .
Drop-Down Combo Boxes . . . . . . . . . . . .
Tabbed Dialogues . . . . . . . . . . . . . . . . . . .
Help Functions . . . . . . . . . . . . . . . . . . . . .
Tool-Tips . . . . . . . . . . . . . . . . . . . . . . . .
On-Line help (F1) . . . . . . . . . . . . . . . . . .
Hyperlinked Help . . . . . . . . . . . . . . . . . .
4-2
4-2
4-2
4-2
4-2
4-3
4-3
4-3
4-3
4-3
4-3
4-4
4-4
4-4
4-5
4-6
4-6
4-6
4-6
xT microscope Server software . . . . . . . 4-7
Server state module / UI State module .
Microscope module . . . . . . . . . . . . . . . .
Start and Stop . . . . . . . . . . . . . . . . . . .
Start UI and Stop UI. . . . . . . . . . . . . . .
Shutdown . . . . . . . . . . . . . . . . . . . . . . .
Advanced . . . . . . . . . . . . . . . . . . . . . . .
22 211
4-7
4-7
4-7
4-7
4-7
4-7
xT microscope Control software. . . . . . . 4-8
The Main Window . . . . . . . . . . . . . . . . . . . 4-8
The Title Bar . . . . . . . . . . . . . . . . . . . . . . . 4-9
The Menu Bar . . . . . . . . . . . . . . . . . . . . . . 4-9
The File Menu . . . . . . . . . . . . . . . . . . . 4-10
Open . . . . . . . . . . . . . . . . . . . . . . . . . 4-10
Save (Ctrl + S) . . . . . . . . . . . . . . . . . . 4-10
Save As . . . . . . . . . . . . . . . . . . . . . . . 4-10
Record Movie . . . . . . . . . . . . . . . . . . . 4-10
Print (Ctrl + P) . . . . . . . . . . . . . . . . . . 4-10
Log Off User. . . . . . . . . . . . . . . . . . . . 4-10
Exit . . . . . . . . . . . . . . . . . . . . . . . . . . . 4-10
The Magnification Menu. . . . . . . . . . . . 4-11
Magnification range . . . . . . . . . . . . . . 4-11
Degauss (F8) . . . . . . . . . . . . . . . . . . . 4-11
The Beam Menu . . . . . . . . . . . . . . . . . 4-11
Spotsizes . . . . . . . . . . . . . . . . . . . . . . 4-11
High Voltage . . . . . . . . . . . . . . . . . . . 4-11
Lens Alignment (F4). . . . . . . . . . . . . . 4-11
Preferences... (Ctrl + O - letter) . . . . . 4-11
The Scan Menu . . . . . . . . . . . . . . . . . . 4-12
Pause (F6) . . . . . . . . . . . . . . . . . . . . . 4-12
Snapshot (F2) . . . . . . . . . . . . . . . . . . 4-12
Videoscope (F3). . . . . . . . . . . . . . . . . 4-12
Reduced area (F7). . . . . . . . . . . . . . . 4-12
Full Frame . . . . . . . . . . . . . . . . . . . . . 4-12
Spot . . . . . . . . . . . . . . . . . . . . . . . . . . 4-12
Line . . . . . . . . . . . . . . . . . . . . . . . . . . 4-12
External . . . . . . . . . . . . . . . . . . . . . . . 4-12
Beam Blank . . . . . . . . . . . . . . . . . . . . 4-12
Slow Scan . . . . . . . . . . . . . . . . . . . . . 4-13
Fast Scan. . . . . . . . . . . . . . . . . . . . . . 4-13
Slower Scan. . . . . . . . . . . . . . . . . . . . 4-13
Faster Scan . . . . . . . . . . . . . . . . . . . . 4-13
Mains Lock. . . . . . . . . . . . . . . . . . . . . 4-13
Live . . . . . . . . . . . . . . . . . . . . . . . . . . 4-13
Average . . . . . . . . . . . . . . . . . . . . . . . 4-13
Integrate. . . . . . . . . . . . . . . . . . . . . . . 4-13
Scan Rotation (Shift + F12) . . . . . . . . 4-13
Preferences... (Ctrl + O - letter) . . . . . 4-13
The Detector Menu . . . . . . . . . . . . . . . 4-14
Detector list . . . . . . . . . . . . . . . . . . . . 4-14
Mix . . . . . . . . . . . . . . . . . . . . . . . . . . . 4-14
External video source 1 (or 2) . . . . . . 4-14
Preferences.... . . . . . . . . . . . . . . . . . . 4-14
The Stage Menu. . . . . . . . . . . . . . . . . . 4-15
Alignment Wizard... . . . . . . . . . . . . . . 4-15
Compucentric Rotation (F12) . . . . . . . 4-15
Define User Units... . . . . . . . . . . . . . . 4-15
User Units. . . . . . . . . . . . . . . . . . . . . . 4-15
Clamp . . . . . . . . . . . . . . . . . . . . . . . . . 4-15
Beam Shift Reset . . . . . . . . . . . . . . . . 4-15
Zero Beam Shift . . . . . . . . . . . . . . . . . 4-15
Auto Beam Shift Zero . . . . . . . . . . . . . 4-15
Home Stage (Shift + F3). . . . . . . . . . . 4-15
Home Stage without Rotation. . . . . . . 4-16
Center Position (Ctrl + 0 - zero) . . . . . 4-16
Touch Alarm Enabled . . . . . . . . . . . . . 4-16
Couple Z to FWD (Shift + F9). . . . . . . 4-16
Reference Position . . . . . . . . . . . . . . . 4-16
Specimen Holder Wizard . . . . . . . . . . 4-16
Clear Holder Image . . . . . . . . . . . . . . 4-16
The Tools Menu . . . . . . . . . . . . . . . . . . 4-17
Auto Contrast Brightness (F9) . . . . . . 4-17
User Auto Contrast Brightness. . . . . . 4-17
Auto focus (F11) . . . . . . . . . . . . . . . . . 4-17
Auto Stigmator (Shift F11) . . . . . . . . . 4-17
Lab Notes . . . . . . . . . . . . . . . . . . . . . . 4-17
Movie Creator . . . . . . . . . . . . . . . . . . . 4-17
Application status... . . . . . . . . . . . . . . 4-17
Preferences... (Ctrl + O - letter) . . . . . 4-17
The Window Menu . . . . . . . . . . . . . . . . 4-17
Center Cross (Shift + F5) . . . . . . . . . . 4-17
Alignment rectangle (Shift + F6). . . . . 4-18
CCD 10 mm Marker . . . . . . . . . . . . . . 4-18
Single/Quad-Image Mode (F5). . . . . . 4-18
1 / 2 / 3 /4 . . . . . . . . . . . . . . . . . . . . . . 4-18
The Help Menu . . . . . . . . . . . . . . . . . . . 4-18
About XtUI (xT microscope Control). . 4-18
On-line help (F1) . . . . . . . . . . . . . . . . 4-18
Preferences.... . . . . . . . . . . . . . . . . . . . 4-19
The Preferences Dialogue . . . . . . . . . . . . 4-19
The Tool Bar. . . . . . . . . . . . . . . . . . . . . 4-20
Auto Functions. . . . . . . . . . .
Additional Scan Functions . .
Lens Alignment (F4) . . . . . .
Lens and Scan Functions . .
Scan Speeds . . . . . . . . . . . .
Pixel Resolution. . . . . . . . . .
Additional Scan Functions . .
Filtering . . . . . . . . . . . . . . . .
Filter value . . . . . . . . . . . .
Movie . . . . . . . . . . . . . . . . . .
Help (F1) . . . . . . . . . . . . . . .
..
..
..
..
..
..
..
..
..
..
..
..
..
..
..
..
..
..
..
..
..
..
.
.
.
.
.
.
.
.
.
.
.
..
..
..
..
..
..
..
..
..
..
..
..
..
..
..
..
..
..
..
..
..
..
.
.
.
.
.
.
.
.
.
.
.
4-20
4-20
4-20
4-20
4-21
4-21
4-21
4-22
4-22
4-22
4-22
The Data Bar . . . . . . . . . . . . . . . . . . . . 4-23
Data Bar Colour coding . . . . . . . . . . . . . . 4-23
2 2 2 11
Pages and Modules . . . . . . . . . . . . . . . 4-24
Startup Page. . . . . . . . . . . . . . . . . . . . . 4-25
Vacuum. . . . . . . . . . . . . . . . . . . . . . . . . .
Pump . . . . . . . . . . . . . . . . . . . . . . . . . .
Vent . . . . . . . . . . . . . . . . . . . . . . . . . . .
Mode. . . . . . . . . . . . . . . . . . . . . . . . . . . .
Electron column . . . . . . . . . . . . . . . . . . .
HV (High Voltage) . . . . . . . . . . . . . . . .
Spotsize . . . . . . . . . . . . . . . . . . . . . . . .
High Voltage . . . . . . . . . . . . . . . . . . . .
Detectors . . . . . . . . . . . . . . . . . . . . . . . .
Contrast . . . . . . . . . . . . . . . . . . . . . . . .
Brightness . . . . . . . . . . . . . . . . . . . . . .
Imaging . . . . . . . . . . . . . . . . . . . . . . . . . .
Magnification . . . . . . . . . . . . . . . . . . . .
Stigmator . . . . . . . . . . . . . . . . . . . . . . .
Beam Shift . . . . . . . . . . . . . . . . . . . . . .
Source Control . . . . . . . . . . . . . . . . . . . .
Tilt . . . . . . . . . . . . . . . . . . . . . . . . . . . .
Cross Over. . . . . . . . . . . . . . . . . . . . .
Lens Alignment . . . . . . . . . . . . . . . . . .
Modulator. . . . . . . . . . . . . . . . . . . . . .
Status . . . . . . . . . . . . . . . . . . . . . . . . . . .
4-25
4-25
4-25
4-26
4-26
4-26
4-26
4-26
4-26
4-26
4-26
4-27
4-27
4-27
4-27
4-27
4-28
4-28
4-28
4-28
4-28
Work Page . . . . . . . . . . . . . . . . . . . . . . 4-29
Option Page . . . . . . . . . . . . . . . . . . . . . 4-30
Enhance Image. . . . . . . . . . . . . . . . . . . . 4-30
Alignments Page . . . . . . . . . . . . . . . . . 4-31
Final Lens Strip Aperture . . . . . . . . . . . .
1 Gun Alignment . . . . . . . . . . . . . . . . . . .
2 Stigmator Alignment. . . . . . . . . . . . . . .
3 Stage Rotation Center . . . . . . . . . . . . .
4 PLA Centering . . . . . . . . . . . . . . . . . . .
5 Emitter Startup . . . . . . . . . . . . . . . . . . .
4-31
4-31
4-31
4-31
4-31
4-31
Temperature Control Page (Option) . . . 4-32
Temperature Stage Control. . . . . . . . . . . 4-32
Heating Stages . . . . . . . . . . . . . . . . . . 4-32
Cooling stages . . . . . . . . . . . . . . . . . . . 4-32
2 22 11
FEI User management . . . . . . . . . . . . . 4-33
Control possibilities . . . . . . . . . . . . . . . . .
Context menu . . . . . . . . . . . . . . . . . . . .
Drag & Drop actions . . . . . . . . . . . . . . .
FEI Account Administrators. . . . . . . . . . .
File. . . . . . . . . . . . . . . . . . . . . . . . . . . . . .
LogOn . . . . . . . . . . . . . . . . . . . . . . . . . .
LogOff . . . . . . . . . . . . . . . . . . . . . . . . . .
Refresh . . . . . . . . . . . . . . . . . . . . . . . . .
Exit . . . . . . . . . . . . . . . . . . . . . . . . . . . .
Account . . . . . . . . . . . . . . . . . . . . . . . . . .
Create . . . . . . . . . . . . . . . . . . . . . . . . . .
Remove . . . . . . . . . . . . . . . . . . . . . . . .
Set password . . . . . . . . . . . . . . . . . . . .
Set user group . . . . . . . . . . . . . . . . . . .
Properties. . . . . . . . . . . . . . . . . . . . . . .
Userdata (menu) . . . . . . . . . . . . . . . . . . .
Copy . . . . . . . . . . . . . . . . . . . . . . . . . . .
Paste . . . . . . . . . . . . . . . . . . . . . . . . . .
Remove . . . . . . . . . . . . . . . . . . . . . . . .
Help . . . . . . . . . . . . . . . . . . . . . . . . . . . . .
Legend . . . . . . . . . . . . . . . . . . . . . . . . .
About . . . . . . . . . . . . . . . . . . . . . . . . . .
Account Logging . . . . . . . . . . . . . . . . . . .
Log File Header Contents . . . . . . . . . .
Log File Record Contents
(one Log File Line) . . . . . . . . . . . . . . . .
4-33
4-33
4-33
4-33
4-34
4-34
4-34
4-34
4-34
4-34
4-34
4-34
4-35
4-35
4-35
4-35
4-35
4-35
4-35
4-36
4-36
4-36
4-36
4-36
4-36
Hardware Interface Elements . . . . . . . . 4-37
The System Control Panel. . . . . . . . . . . .
Stage Controls. . . . . . . . . . . . . . . . . . . . .
Final Lens Strip Aperture. . . . . . . . . . . . .
Recommended Apertures . . . . . . . . . .
Changing Final Lens Aperture Sizes . .
Manual User Interface (MUI) . . . . . . . . . .
MUI controls . . . . . . . . . . . . . . . . . . . . .
Equivalent software controls . . . . . . . .
4-37
4-38
4-38
4-38
4-39
4-39
4-39
4-39
Entering Commands . . . . . . . . . . . . . . . 4-40
Using the Mouse . . . . . . . . . .
Using the Keyboard. . . . . . . .
Dedicated Windows Keys. .
Function and Specific Keys
.
.
.
.
..
..
..
..
..
..
..
..
..
..
..
..
..
..
..
..
4-40
4-41
4-41
4-42
2 2 2 11
4
USER INTERFACE
OVERVIEW
This chapter gives an overview of the xT microscope Control (UI or
xTUI sometimes in dialogue boxes), xT microscope Server and FEI
User management software and describes the functionality of each
part of the user interface. It takes you from the first main window and
menu bar through each item on the pulldown menus. Graphics
illustrating most of the choices help you locate specific features.
The software interface controls most system functions including
detection and analysis, scanning, image gathering, manipulation and
output, magnification and vacuum.
For more detailed information about Windows 2000, refer to the
Microsoft® Windows™ Users’ Guide shipped with your system.
OTHER SOFTWARE AND HARDWARE
Call Customer Service for advice before installing software or
hardware that is not required for system operation. Other software,
such as screen savers, or hardware network cards may corrupt the
xT microscope Control software under some circumstances and may
invalidate warranty.
USER ACCESS PRIVILEGES
There are following user accounts in priority order:
•
•
•
•
FEI Account Administrators
FEI Supervisor Users
FEI Microscope Users
FEI Non-active Users
Each of these accounts has it´s own opportunity to operate the
xT microscope Server and Control software to create and remove
accounts and to give some rights to particular user etc. The first FEI
Account Administrator is created during the system installation.
4-1
22 211
User Interface Software Interface Elements
Software Interface Elements
ICON
Icon is a small symbol indicating a specific software application. For
example, the software can be shrunk to an icon at the bottom of the
screen. An application shown as an icon is running in the background
of the computer memory. Double-click on the icon to restore the
program.
There are also icons in the Tool bar for selecting system functions
quickly (as seen on the left).
PULLDOWN MENUS
The microscope uses menu-oriented software; you perform functions
by choosing items from the Menu bar. The Menu bar selections
contain pulldown menus that display group listings of available
commands or settings. Some menu items are shown in grey and
cannot be selected. You might also get a beeping sound if you try to
select unavailable functions.
Selecting with the Mouse
To select a pulldown menu, click on the menu item in the Menu bar,
then drag the cursor down to the desired selection and release the left
mouse button.
Pulldown menu selections followed by points (...) indicate a dialogue
box will display. Selections with a right arrow indicate an additional
submenu of choices will display.
If a selection is a parameter value, the new value is updated
immediately and a check mark appears in the pulldown menu. If the
selection is a command, a new popup menu or dialogue box appears.
Selecting with Keyboard Commands
To use keyboard commands for selecting top level menu items, press
ALT plus the underlined letter (for example, ALT + D for the Detector
menu), and then select from the choices with the left mouse button or
with the up or down arrow keys.
DIALOGUE BOXES
A dialogue box appears when the system needs more information
from you before it can carry out a command. You can input
information using text boxes, option buttons and command buttons.
Some dialogue boxes do not let you access other functions until you
exit the box. Other dialogue boxes let you perform other tasks while
they remain onscreen and active. For example, the Preferences
dialogue boxes can remain open while you do other tasks.
4-2
2 2 2 11
User Interface Software Interface Elements
RADIO BUTTONS
Use round option buttons to make selections. Within a group of
related option buttons, only one selection can be active at any time.
CHECK BOXES
Use square check boxes to make selections. Single or within a group
of check boxes, items can be switched on or off by clicking in the
individual boxes. A ‘tick’ means ‘ON’ or active and an empty box
means ‘OFF’ or inactive
COMMAND BUTTONS
Rectangular command buttons carry out or cancel a function.
Command buttons have labels that describe the action. Examples: OK,
CANCEL, RESET.
Click on OK to close the dialogue box. The software updates all
information shown in the dialogue box. Click on CANCEL to quit the
dialogue box without updating the information.
LIST BOXES
List boxes contain available choices, such as magnification settings. If
a list box is too small to show all the selections, click on the up or
down arrow in the vertical scroll bar or click and drag the slider to see
more of the list.
CONTINUOUS CONTROL ADJUSTERS
A continuous control adjuster allows you to change parameters, such
as contrast, brightness and scan rotation, in a continuous way by
clicking and dragging the middle slider or clicking in the grey bar.
• middle slider — for large or small adjustments, depending where
you release it. The further from center the middle slider is pulled,
the larger the change. Unlike a scroll bar, the middle slider always
snaps back to the center of the adjuster. This is Logarithmic.
• grey bar — for larger adjustments, single step increments.
• end arrow — for finer adjustments, single step increments.
• small slider — for Linear adjustment, continuous
These adjusters always have a label in the upper left and right corners
for readout information.
RAMP CONTROL ADJUSTERS
A ramp control adjuster allows you to change parameters, such as
Voltage in an incremental way by clicking and dragging the end slider
to the right. Dragging the adjuster to the left reverses the function to a
zero value.
4-3
22 211
User Interface Software Interface Elements
TWO-DIMENSIONAL X-Y CONTROLS
These two-dimensional continuous controls are represented by an XY box. The position of the crosshair is related to the actual settings,
the full range of the parameters being represented by the perimeter of
the box.
Absolute
Absolute
(really Relative)
Click and hold down the left mouse button in the grid to display a
crosshair in the image area. The cursor changes to a 4 axis cross and
can be moved in four directions that correspond to the X, Y screen
values. To fix the values, release the mouse button and the position of
the crosshair updates.The sensitivity of the X-Y control can depend
on the magnification chosen. At higher magnification, you may click
on the center square with the right mouse button to open a dialogue
showing a choice of Zero, Absolute (ticked or unticked). Zero will
bring the 2D control to the center. Absolute (ticked) will give a linear
movement and Absolute (unticked) will give a Logarithmic response
for high sensitivity at higher magnification.
TEXT BOXES
Type information in a text box. This direct keyboard input is used to
produce text such as filenames, passwords, user labels in the data bar,
and specified values of certain parameters.
DROP-DOWN COMBO BOXES
The Drop-Down Combo box has a number of features to achieve
total control over one function.The left end button toggles between a
slider mechanism to a drop-down list function. Items on the slider/
drop-down change accordingly to the function chosen. Clicking on
the -/+ buttons on the right of the drop-down steps through the values
(up or down) in the list, but only shows one value at any time in the
text area. Clicking on the down-arrow next to the toggle button will
drop-down the list. If the list extends further than is visible a scroll
slider appears on the right side of the list. Clicking on a value in the
list highlights that value and enters it as current value in the text area
displayed at the top. The slider has fine control of all values and the
drop-down contains values that have been chosen from the
Preferences dialogue for either Spotsize, HV and Pressure.
4-4
2 2 2 11
User Interface Software Interface Elements
TABBED DIALOGUES
Tabbed Dialogues form either across the operating page or in a Quad
(lower right). These can be alternately opened by clicking on the label
tab along the top of the dialogue area. Preferences and other
conditions can be changed and stored in these dialogues.
FIGURE 4-1
PREFERENCES TABS
4-5
22 211
User Interface Software Interface Elements
HELP FUNCTIONS
Tool-Tips
The first line help is integrated in the software as Tool-Tips. These are
activated when the cursor is left over an item on the user interface for
2 seconds. A short explanation of the item will appear until the cursor
is moved away from the item.
On-Line help (F1)
The On-Line Help function is a true HTML based help function that
can be switched on from the Help menu. The Help dialogue area is
defaulted to the bottom right Quad, and can be expanded to all Quads
for more detailed help including diagrams and images. It can also be
dragged to any position on the available screen.
Hyperlinked Help
The opened Help pages have hyperlinks to subjects such as operation
procedures, Tips and other useful information.
FIGURE 4-2 ON-LINE HELP .
The Back and Forward arrows quickly move through already
viewed pages. The Hide button hides the Help window and recreates
the microscope interface. The Print button calls print menu, the
Refresh button recreates data viewed in the help window. The
Content and Index tabs at the top of the Help page are for searching
the contents or index. The contents on the left hyperlink to their
subject. Items high-lighted in the text body jump to associated
subjects.
4-6
2 2 2 11
User Interface xT microscope Server software
xT microscope Server software
This software starts and stops the basic microscope functions and
makes possible to open and close the xT microscope Control
software. Double-click on the icon found on the Windows desktop.
The main xT microscope Server window appears.
Server state module / UI State module
Displays RUNNING or STOPPED state of the xT microscope Server
services and of the xT microscope Control software. During
Transition between these states STARTING or STOPPING is
displayed.
Microscope module
Here you can find six buttons controling individual features:
Start and Stop
By clicking on these buttons xT microscope Server services start or
stop.
Start UI and Stop UI
By clicking on these buttons xT microscope Control software (UI)
opens or closes.
Shutdown
This button shuts down xT microscope Server software in three steps:
1) same as Stop UI button,
2) same as Stop button,
3) switches power off - inverse procedure to pushing ON button found
on the front control panel of the microscope.
Advanced
Here you can find detailed settings and operational conditions used
for accurate situation specification when calling service.
4-7
22 211
User Interface xT microscope Control software
xT microscope Control software
The following elements make up the xT microscope Control
(see Figure 4-3 for numbering):
1. The Title Bar - labels the application and the owner/user
2. The Menu Bar - contains all operation menus and submenus
3. Preferences... dialogue - presetting of operating conditions (call
out window)
4. The Tool Bar - contains all iconised button functions
5. The Data Bars - contains all data information entered by
preference for storage/printout of the image.
6. Pages and Modules - contains all pages made up of one or more
modules:
THE MAIN WINDOW
The Main Window displays status and control features for the
xT microscope Control (formerly xTUI or UI), including the image
window, application bar, menu bar, tool bar, data bar and pages.
FIGURE 4-3 THE MAIN WINDOW
1
2
6
4
3
5
4-8
2 2 2 11
User Interface xT microscope Control software
THE TITLE BAR
The Title Bar displays the application currently running.
FIGURE 4-4
THE TITLE BAR
This bar will change displayed information depending on the
associated program currently running e.g. EDX, Image analysis.
THE MENU BAR
The Menu Bar displays pulldown menus across the top of the screen
below the Title Bar.
FIGURE 4-5
THE MENU BAR
The following menus are available:
TABLE 4-1
MENUS
Menu Item
Use
File
Administrative files functions
Magnification
Choice of magnification presets
Beam
Choice of Accelerating Voltages and Spot Sizes
as preset
Scan
Associated scan functions
Detector
List of available detectors and control functions
Stage
Associated stage functions
Tools
Image Auto functions and useful items
Window
The image windows functions
Help
About xT microscope Control software
and On-line help
Select pulldown menus from the menu bar by:
- using the left mouse button,
- pressing ALT + induced underscored keyboard letters,
- pressing ALT and then use keyboard arrows.
4-9
22 211
User Interface xT microscope Control software
The File Menu
Clicking on the File name in the Menu bar, with the left mouse button
opens administrative functions:
Open
Opens a dialogue for opening images (tif, jpg, bmp formats), map
files (holds stage location and surveyed positions) or par files (holds
particular working conditions parameters).
Save (Ctrl + S)
Saves the image with a given name and incremental label at a
predetermined location (all can set at user´s first time log on). Any
time you save an image, it is saved as a new file.
Save As
Opens a dialogue for saving images (this provides an opportunity to
change the file name, it´s label or location), map or par files.
Record Movie
Immediately starts the process of recording video sequence from any
or all of the first 3 Quads (see Chapter 5 - Procedures for details).
Print (Ctrl + P)
Opens the printer dialogue so that choice of printer and conditions can
be established ready to print an image. Pressing OK in the printer
dialogue will activate the printer to print the job.
Log Off User
This will log off the present user and provide a Log On dialogue for
the entering of another user to the microscope.
The following conditions apply:
• When logging off the system goes to a safe state: the HV is
switched off automatically.
• When closing the xT microscope Control software the current user
is automatically logged off first.
Exit
Exits the xT microscope Control software and leaves the user in the
operating system environment. xT microscope Server is still running
and controls the microscope in operation.
4-10
2 2 2 11
User Interface xT microscope Control software
The Magnification Menu
Clicking on the Magnification name in the Menu bar, with the left
mouse button, opens the Magnification menu.
Magnification range
12 levels of magnification can be held in this menu. To change any
level requires entering the Preferences.../ Presets / Magnification
and by selecting the magnification level. This in turn will update the
Magnification Menu. Values entered that are not rounded values will
slot in between the closest values, so keeping a progressive list.
Degauss (F8)
Degauss the objective lens and correct magnification relative to focal
distance. Although this function is performed automatically, for some
procedures it can be peformed manually any time by this menu item.
The Beam Menu
Clicking on the Beam name in the Menu bar, with the left mouse
button, opens the Beam menu.
Spotsizes
The Spotsizes are displayed in the Beam m enu in 7 positions as
arbitrary values running between 1 to 7. The sm allest is 1 and the largest
is 7. These, of cours e, have differing values relative to the kV used. By
selecting from this lis t the spotsize can be changed while the microscope
operation is ongoing. To change any values in the list requires entering
the Preferences.../ Presets / Spotsize and s electing or inputting the
required value. This in turn will update the Beam Spot M enu.
Smaller spotsizes are generally used for high magnification /
resolution, and large spotsizes are for low magnification and X-ray
Analysis.
High Voltage
12 values of High Voltage can be held in this menu. To change any
values requires entering the Preferences.../ Presets / High Voltage
and selecting the required value. This in turn will update the Beam
HV Menu. Values entered that are not rounded values will slot in
between the closest values, so keeping a progressive list.
Lens Alignment (F4)
Clicking on this item activates and deactivates the lens alignment
mode for final lens fine alignment. The scanning condition changes to
the fastest scan value, lens modulator turns on and the alignment cross
appears in the center of all imaging quads.
Pressing and holding the left mouse button activates a quad arrow
ended cursor, by moving the mouse the final lens alignment begins.
The user should achieve no image shift considering the middle
alignment cross.
Preferences... (Ctrl + O - letter)
Opens the total preferences dialogue. Beam and Magnification
choices can be found under the tab labelled ‘Presets’.
4-11
22 211
User Interface xT microscope Control software
The Scan Menu
Clicking on the Scan name in the Menu bar, with the left mouse
button, opens the Scan menu.
Pause (F6)
The Pause function pauses the image. In the appropriate imaging
Quad a green box surrounding two vertical green bars appears. This
function is used automatically with Snapshot.
Click once so that the scan continues to the end of the frame before
pausing. Click twice to pause will stop the scan at that immediate
point of the scanned frame. When Pause is active clicking again will
release the pause function and return the scanning to the original
condition prior to pause.
Snapshot (F2)
Clicking on Snapshot at any time will activate a single scan which
will pause at the end of the scan. The result can be stored to the
harddrive. Scan speed for this function is predefined in the
Preferences / Scan dialogue.
Videoscope (F3)
Videoscope toggles the display of the videoscope on or off, showing
the video intensity along the currently scanned horizontal line.
Reduced area (F7)
This mode is useful when focusing and stigmating. The Reduced
area appears in the middle of the screen, it´s area and position is
adjustable by mouse. It is also possible to adjust scan parameters
independently on the fullframe setting.
Full Frame
Full Frame is the default scanning mode. This is the normal scanning
mode, typical for general navigation.
Spot
Clicking on Spot brings you in Spot mode. The image pauses and the
scaning is switched off. The spot position is represented by a green
cross. You can drag the spot around the screen with the left mouse
button.
Line
Clicking on Line brings you in Line mode. The image pauses and a
green horizontal line displays on the screen. The beam scans along
this line, using the line time defined for the selected scan speed. You
can drag the line Up / Down with the left mouse button.
External
External is a switch to activate external control of the scanning
system, such as beam control from an EDX X-ray system.
Beam Blank
The Beam Blank activates deflection of the beam high in the column.
4-12
2 2 2 11
User Interface xT microscope Control software
Slow Scan
Clicking on Slow Scan will bring the scanning condition to the preset
value, represented by the Tortoise, held in the Preferences/Scan dialogue.
Fast Scan
Clicking on Fast Scan will bring the scanning condition to the preset
value, represented by the Hare, held in the Preferences/Scan dialogue.
Slower Scan
Clicking on Slower Scan will bring the scanning condition to the next
slower scan value held in the Preferences/Scan list dialogue.
Faster Scan
Clicking on Faster Scan will bring the scanning condition to the next
faster scan value held in the Preferences/Scan list dialogue.
Mains Lock
When checked, the scanning and mains frequencies are synchronized
resulting in smooth image edges at higher magnifications, not
influenced by mains frequency.
Live
With Live selected, the image remains unfiltered for collecting direct
images, mostly in Live/Slow scan.
Average
Select Average to continuously average a specified number of frames,
resulting in a better signal-to-noise ratio. This is used mostly for fast
scaning to reduce image noise.
During averaging, the image is updated continuously and actions such
as focusing, moving the stage, etc. can still be performed. The number
of frames can be selected as a preset in the Tool bar drop down list
box associated with the Average function.
Integrate
The Integrate feature allows accumulative noise reduction by true
integration over a number of frames, and freezes the final image.
During and after image accumulation, you cannot change the focus or
perform other image-influencing actions. The number of frames can
be selected as a preset in the Tool bar drop down list box associated
with the Integrate function.
Scan Rotation (Shift + F12)
Clicking on Scan Rotation activate the onscreen tool to rotate the
scan and align the image. It has no effect on the stage movements and
is solely a scan coil function but is used to orientate the image relative
to mechanical rotation and detector direction. The onscreen tool
automatically deactivates when not used for 10 seconds.
A non-zero scan rotation is displayed over the CCD image in the 4th
Quad upper right corner.
Preferences... (Ctrl + O - letter)
Opens the total preferences dialogue. Scan choices can be found
under the tab labelled ‘Scan’.
4-13
22 211
User Interface xT microscope Control software
The Detector Menu
Clicking on the Detector name in the Menu bar, with the left mouse
button, opens the Detector menu.
Detector list
This list may contain various detectors for High Vac, Low Vac and
ESEM operation. Depending on the vacuum mode in operation only
the relevant detectors will appear in black. All others will be greyed
out. Only the selected detector will show a tick next to it’s label.
Mix
Clicking on Mix will produce a dialogue that invites one to choose a
percentage of one detector to mix with another. This is achieved with
a single slider representing 100% output signal. The positioning of
this slider varies the amount of input signal from the two detectors
that are to be mixed. If a SE image is in Quad 1 and a BSE image is in
Quad 2 the resultant mix will be displayed in Quad 3. Mixed live
images are always displayed in Quad 3.
External video source 1 (or 2)
An external videosignal to the X7 or X8 connector on the VDRV
board in the vacuum can be selected in the second or third quad. The
signal, detector and mode is indicated as “Ext” in the databar.
Preferences...
Opens the preferences dialogue for the Detector selected. Conditions
of bias/grid voltage or switching of segments can be initiated here.
4-14
2 2 2 11
User Interface xT microscope Control software
The Stage Menu
Clicking on the Stage name in the Menu bar, with the left mouse
button, opens the Stage menu.
Alignment Wizard...
Clicking on Alignment Wizard opens a procedure that helps one to
navigated along a feature that extends off the screen at the current
magnification.
Compucentric Rotation (F12)
Clicking on Compucentric Rotation in the Stage Menu places a
green circle in the active quad. By rotating the circle a different
viewing orientation of the sample area can be achieved. This is
compucentric stage rotation. The onscreen tool automatically
deactivates when not used for 10 seconds.
Define User Units...
Clicking Define User Units on activates a series of dialogues that
guide the user to determine User Unit values for X and Y movements
of the stage. These are used in relative movements associated with
stage mapping of regular features, in particular in IC applications.
User Units
Clicking on User Units organises the stage software to recognise the
defined user units rather than the default metric measurements. The X
and Y coordinates now operate in User Units and is shown in the
Location module by the UU symbol.
Clamp
This is found only on the stages with a securing Clamp. The Clamp
can be activated from this menu.
Beam Shift Reset
Use this function to begin the Beam Shift Reset procedure to zero
beam shift and move the feature to the center of the field of view with
the stage.
Zero Beam Shift
When beam shift has reached maximum limits, choose Zero Beam
Shift to restore X and Y beam shifts to zero values.
Auto Beam Shift Zero
Select Auto Beam Shift Zero to automatically set beam shift to zero
after a stage move. When selected it prevents Get moves from using
beam shift.
Home Stage (Shift + F3)
Clicking on Home Stage will home the Stage - all five coordinates
will be set to default factory settings. When the stage is homing the
Stage Active dialogue box flashes onscreen. These settings (see Work
page stage module) in general will be as follows:
X = 0.0, Y = 0.0, R = 0°, T = 0°
Z = preset long working distance relative to stage type
4-15
22 211
User Interface xT microscope Control software
Home Stage without Rotation
This is useful when a large specimen is inserted and stage rotation
could cause a collision with equipment inside the chamber.
At the start of xT microscope Control software a dialogue appears to
ask for the homing of the stage. A choice is given to home with or
without rotation by means of a check box. When the box is checked
the rotation is included in the homing sequence. When the stage is
homed without rotation the stage reference for Rotation is greyed out
(see Work page stage module).
Center Position (Ctrl + 0 - zero)
The stage will proceed to it’s 0,0 position in X and Y.
Touch Alarm Enabled
Clicking on Touch Alarm Enabled will activate the Touch Alarm for
the stage. This function is enabled by default and is reverted to this
state each time the venting procedure starts.
Couple Z to FWD (Shift + F9)
Clicking on Couple Z to FWD sets the Z coordinate value to actual
Free Working Distance (FWD) value. This allows then accurate
movement between the known height of the sample and the end of the
lens.
If any user logged on tries to couple Z to FWD for the first time, he is
prompted by the dialogue to focus on the highest specimen point
before continuing. This message is possible to suppress by clicking in
the box.
Reference Position
When Reference Position is clicked on the stage coordinate values
for X,Y, R and Tilt are zeroed to establish a reference position for all
further coordinates to refer to. The coordinate values in the Stage
Coordinates module on the Work Page will indicate the new
reference position.
Specimen Holder Wizard
Clicking on Specimen Holder Wizard will start a process to capture
an image of the specimen holder, with specimen stubs, by means of
the CCD chamber camera and display it with accuracy in the Work
page Stage module. The wizard progresses through a number of steps
with confirmation dialogues to prevent any specimen / detector / lens
collision due to the 45o Tilt needed to capture the image. The Image
Map can then be used to recognise the specimens on the multiple
holder, and by clicking on the specimen image the stage will drive to
that specimen.
Clear Holder Image
Clicking on Clear Holder Image will delete the Specimen Holder
Image from the Work page Stage module. This is used when the
specimen holder is to be reloaded with new specimen stubs and the a
new Image will be needed.
4-16
2 2 2 11
User Interface xT microscope Control software
The Tools Menu
Clicking on the Tools name in the Menu bar, with the left mouse
button, opens the Tools menu.
Auto Contrast Brightness (F9)
Click on Auto Contrast Brightness to activate the automatic contrast
and brightness routine. This function is available only for High
vacuum mode.
User Auto Contrast Brightness
Click on Auto contrast brightness Calibration to store the present
user contrast and brightness settings, which are used by the Auto
Contrast Brightness function from that point on. A check mark
indicates this situation.
Auto focus (F11)
Click on Auto focus to activate the automatic focus routine.
Auto Stigmator (Shift F11)
Click on Auto Stigmator to activate the automatic stigmator routine.
Lab Notes
Clicking on Lab Notes opens a Windows Notepad in Quad 4 for entry
of relevant information at any time. After entry of a note the file can
be stored with the text suffix .TXT. Any previous note can also be
opened in Lab notes.
Movie Creator
Clicking on Movie Creator will provide a tabbed dialogue in the 4th
Quad for setting up a collection of sequenced Tif images, and
constructing them into an AVI movie.
Application status...
Clicking on Application Status... will display a dialogue in the 4th
Quad showing any appropriate system reports. The reports seen will
depend on the level of login operating at the time, i.e. Service login
will show service reports.
Preferences... (Ctrl + O - letter)
Opens the total preferences dialogue. Choices can be found under the
tabs labelled: ESEM, Databar, Units, Presets (High Voltage, Spot
Size, Magnification, Pressure), Scan, Movie, Language.
The Window Menu
Clicking on the Window name in the Menu bar, with the left mouse
button, opens the Window menu.
Center Cross (Shift + F5)
Clicking on Center Cross places a cross in the center of either the
single screen or each quad depending on the display mode selected.
This function is used in the Adjustment procedures to aid centering of
features.
4-17
22 211
User Interface xT microscope Control software
Alignment rectangle (Shift + F6)
Clicking on Alignment rectangle places a staggered rectangle in the
center of either the single screen or each quad depending on the
display mode selected. This function is used in the Adjustment
procedures to aid controlling illumination.
CCD 10 mm Marker
Clicking on CCD 10 mm Marker places a short horizontal line with
the text ‘10 mm’ below onto the 4th Quad where the CCD image
resides. This is to indicate the 10 mm FWD position in relationship to
the Z distance of the sample.
The position of this marker can be changed by double-clicking with
the left mouse button on the desired position.
Single/Quad-Image Mode (F5)
Choice can be made to either view the image window as a Full screen
or as Quads. Clicking on this function toggles the image display area
from a single screen to a quad screen and vice-versa.
1 / 2 / 3 /4
The Active Quad (1 - 4) can be selected from the Window menu by
ticking the respective number. Quad 1 is top left and Quad 4 is bottom
right with the others running horizontally. There are some differences
in particular quad use:
• Quad 1:
displays a signal from a selected Detector.
• Quad 2:
displays a signal from a selected Detector or External video source
1.
• Quad 3:
displays a signal from a selected Detector, Mixed signal from
detectors in Quad 1 and 2, or External video source 2.
• Quad 4:
is dedicated to the CCD camera use and is paused when:
- switching on the external mode (see Scan menu)
- switching on the BSE or the CL detector
- after 30 minutes of stage non activity
Quad 4 switches on when venting of the chamber starts.
The Help Menu
Clicking on the Help name in the Menu bar, with the left mouse
button, opens the Help menu.
About XtUI (xT microscope Control)
When clicked on this item displays the software version and date of
release.
On-line help (F1)
Clicking on On-line help displays in the right-lower quadrant the
paging for the On-line help function. This can also be activated by
pressing F1 in the function key area of the keyboard.
4-18
2 2 2 11
User Interface Preferences...
Preferences...
The Preferences dialogue can be found at the end of some of the
menus.
The exception to this is the Preferences attached to the Detector menu
which handles individual choices of Detectors with direct dialogue.
THE PREFERENCES DIALOGUE
The Preferences dialogue consists of tabbed sections for ESEM,
DataBar, Units, Presets, Scan, Movie and Language. By clicking on
the required tab a section will open to allow changes and presetting of
conditions for the function chosen.
FIGURE 4-6
PREFERENCES DIALOGUE
How to make use of these Preferences, further information can be
found at the end of Chapter 5 - Operations under ‘Setting
Preferences’.
4-19
22 211
User Interface The Tool Bar
The Tool Bar
The Tool Bar, displayed below the Menu bar lets you select system
functions by their icons.
FIGURE 4-7 THE TOOL BAR
Rest the cursor on the icon for two seconds without clicking on it to
see its highlighted caption (Tool-tips). ToolTips will display the use of
the tool.
Whenever you select a function the corresponding icon is highlighted.
Icons that activate an automated procedure are not highlighted.
AUTO FUNCTIONS
This section of the Tool bar contains functions Auto contrast and
Brightness (F9) and Auto focus (F11). Clicking either of these items
will start a procedure of automatic correction.
ADDITIONAL SCAN FUNCTIONS
This section of the Tool bar contains functions Videoscope (F3) for
correcting contrast and brightness, and Reduced Area (F7) for
specific focus and astigmatism correction. Clicking on these icons
switches the corresponding function On / Off.
LENS ALIGNMENT (F4)
Clicking on this item activates and deactivates the lens alignment
mode for final lens fine alignment. The scanning condition turns into
the fastest scan value, the lens modulator turns on and the alignment
cross appears in the center of all imaging quads.
Pressing and holding the left mouse button activates a quad arrow
ended cursor, by moving the mouse the final lens alignment (gun
shift) begins. The user should achieve no image shift considering the
middle alignment cross (see Chapter 6 - Alignment).
LENS AND SCAN FUNCTIONS
This section of the Tool bar contains Magnification correction
(Degauss) and Couple Z to FWD functions.
The Degauss function puts the final lens in a normalized state
(hysteresis correction) with the most accurate readout of the true
FWD, Magnification and HFW.
The Couple Z to FWD function, if enabled, sets the actual Z position
of the stage equal to the current WD. The Z to FWD button can be in
one of the following 3 conditions:
4-20
2 2 2 11
User Interface The Tool Bar
• Greyed-out - the function is disabled. This occurs, when the system
is vented, till the vacuum is res tored to HV switching on.
• Coloured icon with red line diagonally across - the function is
enabled, but the Z-coordinate for the current sample has not been
coupled to the FWD yet (See page 16).
• Coloured icon - the function is enabled, and has been already used
for the current sample. It is still possible to re-set the sample's Zcoordinate by pressing this button.
SCAN SPEEDS
This section of the Tool bar contains four function buttons to provide
slow or fast scanning capabilities. The Tortoise icon is the predefined
slowscan and the Hare icon is the predefined fastscan. These can be
selected for direct access to the preset value, the chosen icon is
highlighted. The Minus(-) is for decreasing the scan speed and the
Plus(+) is for increasing the scan speed according to the preset values,
which have been setup via the Preferences / Scan dialogue.
PIXEL RESOLUTION
This section of the Tool bar displays a dropdown list box that contains
the Pixel Resolutions possible for viewing or recording an image.
Clicking on the arrow to the right will drop the list so that all
resolutions can be seen, selecting will result in immediate change of
the scan resolution. Since the current Dwell time remains unchanged,
the actuall scanning frequency changes when a new pixel resolution is
selected.
ADDITIONAL SCAN FUNCTIONS
Clicking on Beam Blanker (the Icon button is an eclipsed light circle
with an arrow leading the eclipse) will deflect the beam off axis and
protect the sample. This is useful at the end of scanning when ready to
save the image so that the sample is not continuously scanned before
the next image. When the beam is blanked the Icon button will be
highlighted, clicking again on the button will release the blanker and
return the beam to scan the sample.
Clicking on Snapshot (F2) (the Icon button is a camera) activates a
single scan and pauses at the end of the scan (see page 12).
Clicking once on Pause (F6) (the icon button is 2 vertical bars) will
stop the scan (see page 12). Black will change to orange momentarily,
and then back to black with the button remaining pressed in when the
scan has stopped. To release Pause click once on the pressed in button,
the button will pop out and the bars remain black.
Clicking the Snapshot or Pause Icon button while holding the Shift
Key will activate the respective function in all three imaging Quads
simultaneously (this has no influence to the CCD camera quad).
4-21
22 211
User Interface The Tool Bar
FILTERING
This section contains 4 items related to the scanned image filtering.
• The first icon with 3 bricks (frames) represent Live imaging as one
frame follows the other. Therefore there is no filtering and this is
the raw scanned image.
• The second icon with 6 ascending bricks (frames) denote an
improving image with successive Average of 2 or more frames.
This process will continue until stopped by change of scanning
condition or by freezing the result.
• The third icon with 6 stairway bricks (frames) shows an increasing
number of frames that Integrate to an end value. This process will
continue until the predefined number of frames is reached, and then
stop and freeze automatically.
Filter value
The dropdown list box contains the number of frames for each value
of Average or Integrate. Clicking on the arrow to the right will drop
the list so that all Integration values can be seen. Clicking further on
one of these values will change the setting for the current Quad and
filtering mode. Frame values for average and Integrate are
independent of each other and in any quad, so values can be preset for
particular scan conditions.
Note:
The Integrate function is not available for Quad 4. The Average
function is not advisible for Quad 4 when procesing stage movements.
MOVIE
The RED dot is the start command button that starts the recording of
three videos, one for each of the three image quads at the same
moment. If a quad is paused when starting the video, only the first
image with a time stamp is stored. When the red dot, representing
‘Start’, is pressed it turns to a black box, representing ‘Stop’.
Pressing the Black square stops the recording of the video of all three
quads and closes the files.
HELP (F1)
Clicking on the Question mark displays a window in the right-lower
quadrant for the On-line help function.
4-22
2 2 2 11
User Interface The Data Bar
The Data Bar
The Data Bar displays Instrument, Image and labelling information,
as preset in the Preferences / Databar dialogue. This can be a
combination of, for instance, kV, Detector, Spot, X and Y coordinates
etc. They can be placed in any order and will expand or contract to fit.
There is also a micron bar above the user’s label area.
FIGURE 4-8
THE DATA BAR
How to setup the Data Bar can be found in Chapter 5 under ‘Setting
Preferences’.
DATA BAR COLOUR CODING
The following table defines the status conditions of the DataBar.:
TABLE 4-2
Quad Status
DATABAR STATUS
Scan Condition
Background Colour
Text Colour
Selected
Live
Light Blue
White Text
Not Selected
Live
Grey
White Text
Selected
Pause
Light Blue
Black Text
Not Selected
Pause
Grey
Black Text
4-23
22 211
User Interface Pages and Modules
Pages and Modules
The software controls on the right side of the screen are organized into
Pages. Pages are further divided into smaller Modules that hold
specific functions. The frequently used modules appear as modules on
more than one page.
Select the control area from the Tool bar or the dropdown Pages
menu. The required page can be selected either from the Pages menu
or by pressing the corresponding icon button on the right side of the
Tool bar.
TABLE 4-3
4-24
PAGES LIST
Pages
Modules
Startup
Vacuum, Mode, Electron column, Detectors,
Imaging, Source control, Status
Work
Vacuum, Mode, Electron column, Detectors,
Imaging, Stage (Map, Coordinates), Status
Option
Vacuum, Mode, Electron column, Detectors,
Imaging, Enhanced Image, Status
Alignments
Alignments (individual steps), Status
Temperature
Control
Vacuum, Mode, Electron column, Detectors,
Temperature Stage Control, Status
2 2 2 11
User Interface Startup Page
Startup Page
The Startup Page is a FEI Supervisor User level page. It contains the
essential components divided into seven modules:
•
•
•
•
•
•
•
Vacuum
Mode
Electron column
Detectors
Imaging
Source Control
Status
The Vacuum module is used to pump and vent the system.
The Mode module brings the system into either HiVac, LowVac or
ESEM mode.
The Electron column module controls High Voltage switching
On / Off and High Voltage and Spotsize value setting.
The Detectors module allows adjustment of contrast and brightness
for the currently used detector.
The Imaging module contains Magnification, Stigmator and Beam
Shift controls.
The Source control module allows gun tilt tuning to optimize the
electron source brightness for big spotsizes. It also centers the final
lens via the Lens Alignment Modulator.
The Status module, common for all Pages contains important
information about the system.
VACUUM
Pump
The Pump button starts the pumpdown procedure for the column and
specimen chamber. When the chamber is evacuated, the system
allows high voltage to be switched on when pressure in the chamber
and the column is ready for operation.
Vent
Click on Vent to slowly switch off the high voltage and the pumping
system of the specimen chamber. The parameters of the column are
not affected; only high voltage is set to zero. Venting the chamber
opens the specimen chamber valve for a period of time and then
closes it. If the valve is closed again before the chamber is at ambient
pressure, another click on Vent repeats the procedure.
4-25
22 211
User Interface Startup Page
MODE
In this module section the choice can be made for either:
• HiVac operation when observing conventional samples.
• LowVac for observing normally charging samples.
• ESEM Mode for observing natural status of samples.
According to the detector used, the system sets the default condition.
The purging medium can be selected from the dropdown list boxes to
suit the sample observation. The Pressure adjuster can be used to
adjust the pressure to suit the operation of either LowVac or ESEM
modes. This is chosen either by the slider, which is continuous, or by
the list where a preset value can be selected.
ELECTRON COLUMN
HV (High Voltage)
Click on the HV button to ramp up the high voltage to the value
described on the display of the High Voltage adjuster. Clicking on the
HV button consequently will ramp down the high voltage to zero
value.
Spotsize
This adjuster allows a change of the Spotsize in integral values from 1
to 7 from a dropdown list. The selected spotsize is displayed in the
text area of the adjuster and in the data bar (if selected). The adjuster
also has a slider mechanism for finer adjustment.
High Voltage
Use High Voltage adjuster to change the applied accelerating voltage.
The actual value of the high voltage displays in text area of the
adjuster and in the data bar (if selected). A preset value can be chosen
by selecting one of the voltages from the dropdown list. The adjuster
also has a slider mechanism for finer adjustment.
DETECTORS
Contrast
Use this adjuster to control the contrast of the active detector. The
contrast range is from 0 to 100.
Brightness
Use this adjuster to control the brightness of the active detector. The
brightness range is from 0 to 100.
The linear mini sliders keep their actual position and are placed below
the non-linear main sliders which return back to the centre after a
movement. The end arrows give a finer control.
4-26
2 2 2 11
User Interface Startup Page
IMAGING
Magnification
This is a variable control of Magnification. Slider behaviour is the
same as for the Detectors with another features:
• clicking the end arrow increases magnification about 5%
• clicking between the end arrow and the slider increases
magnification about 20%
• by dragging the slider magnification changes exponentially further from the centre the greater magnification change
• by dragging the mini slider magnification changes linearly and
coarsely.
Stigmator
This is a direct access to the Stigmator via a 2D box for image
astigmatism correction.
Pressing and holding the left mouse button anywhere inside the 2D
box causes cursor move to the screen position corresponding to the
actual astigmatism value (in the middle of the screen minimum while
at the edges maximum level). Moving the Mouse activates a quad
arrow ended cursor with which one can correct the astigmatism.
Pressing the right mouse button above the Stigmator 2D box displays
a menu, enabling stigmator reset (Zero) and toggle between the linear
(Absolute checked) and logarithmic control response.
Beam Shift
This 2D box indicates and controls the beam shift setting in relation to
the final lens axis. It is useful for fine image shift without stage
movement. Control behaviour is the same as described for the
Stigmator.
SOURCE CONTROL
The Source Control module enables fine electron source alignment for
all user accounts, providing the aperture is mechanically well aligned
at 20 kV and spot 3 and a coarse pre-alignment via the Gun alignment
procedure is done (by the FEI Supervisor Users only).
The alignment stored by the Gun Alignment procedure is not
overriden by this module control.
4-27
22 211
User Interface Startup Page
Tilt
This 2D X-Y control indicates the actual electronic gun tilt setting.
Gun tilt changes the effective angle of illumination of the beam
coming out from the gun area into the electron column. Use it to
center illumination (maximize beam brightness) through the final lens
aperture manually, especially for spots bigger than 4. The Cross Over
mode is helpful when Gun Tilt is highly misaligned.
Control behaviour is the same as described for the Stigmator.
Cross Over
Cross over allows the electron source to be viewed in all live image
Quads. When Cross over is turned on (pushed in) a green cross apears
near the center of the image Quad, marking the correct position of the
electron source image. Sample scanning is switched off but the
electron source scanning is on. The scan speed is automatically
adjusted. When Cross over is turned off (pushed out) previous
scanning conditions are restored.
Lens Alignment
This 2D X-Y control indicates the actual position of the beam relative
to the final lens aperture - electronic gun shift. Gun shift changes the
position of the beam coming out from the gun area into the electron
column to remove beam shift during focusing. Use it to center the
image rotation in conjunction with the final Lens Modulator (see
further).
Control behaviour is the same as described for the Stigmator.
Modulator
The Modulator switches on an automatic focus modulation. At the
actual focus, it periodically under- and overfocus the image in a
narrow range. Use this function at fast scanning rates to immediately
view the system response to the modulation.
The screen rotation center should be identical with the one of the
image. At higher magnification (<20,000X), you can see the image
move from the center instead of rotation, because of a large rotation
diameter. If the system is well aligned, image movements are not
present during focus modulation or during operational focusing
actions.
STATUS
The Status module displays important actual system parameters.
(Pointing the mouse cursor shortly above one of the the last three
items gives other informations as a tool tip window):
•
•
•
•
Vacuum Status: indicated by description and coloured box
High voltage: HV value
Pressure: Specimen chamber (Column) pressure value
Gun Pressure: IGP Upper (IGP Lower) electron source space
pressure value
• Emission Current: electron source outgoing current (Coloumb
tube - specimen current) value
4-28
2 2 2 11
User Interface Work Page
Work Page
The Work Page is a FEI Microscope User level page. It contains the
essential components divided into six modules:
•
•
•
•
•
•
Vacuum
Mode
Electron column
Detectors
Stage
Status
The Vacuum module is used to pump and vent the system.
The Mode module brings the system into either HiVac, LowVac or
ESEM mode.
The Electron column module controls High Voltage switching
On / Off and High Voltage and Spotsize value setting.
The Detectors module allows adjustment of contrast and brightness
for the currently used detector.
The Stage module integrates various functions related to the specimen
stage. All functionality is described in the Chapter 7 - Stages.
The Status module, common for all Pages contains important
information about the system.
4-29
22 211
User Interface Option Page
Option Page
The Option Page is a FEI Microscope User level page. It contains the
components essential for specimen imaging divided into seven
modules:
•
•
•
•
•
•
•
Vacuum
Mode
Electron column
Detectors
Imaging
Enhance Image
Status
The Vacuum module is used to pump and vent the system.
The Mode module brings the system into either HiVac, LowVac or
ESEM mode.
The Electron column module controls High Voltage switching
On / Off and High Voltage and Spotsize value setting.
The Detectors module allows adjustment of contrast and brightness
for the currently used detector.
The Imaging module contains Magnification, Stigmator and Beam
Shift controls.
The Enhance Image module offers instruments for image
improvements.
The Status module, common for all Pages contains important
information about the system.
ENHANCE IMAGE
These functions are applicable separately to any image Quad, while
live imaging, and in contrast to similar detector functions.
• Digital Contrast:
enables contrast to be set in range from -5 to +5 (negative values
lead to an inverse imaging).
• Digital Brightness:
enables brightness to be set in range from 0.85 to 1.15.
• Gamma:
corrects image brightness non-linearly.
• Reset:
brings the above described function settings for active Quad back
to the default values (no modifications).
4-30
2 2 2 11
User Interface Alignments Page
Alignments Page
Use the Alignments Pages to align the column and determine fine
tuning for the electromagnetic system. The software stores column
parameters such as Gun Tilt X, Y, Gun Shift X, Y, and other data that
ensures minimum image shift when focusing and stigmating images.
When you click on the list box arrow, various available adjustments
are displayed. For more detail as to the procedures of each alignment
in the list refer to Chapter 6 ’Alignment’.
FINAL LENS STRIP APERTURE
This mechanical alignment eliminates image shift when focusing. The
position of the final aperture should remain constant and should not be
changed further during the alignment procedure. Objective lens coil
modulation (wobbler) is used to show optical center of rotation. X and
Y 2D box is used to bring the rotation center under the screen center
cross.
1 GUN ALIGNMENT
Precenters the electron source for several spot sizes and high voltages.
2 STIGMATOR ALIGNMENT
X and Y correction of each X and Y stigmator. Minimise the
movement seen in both X and Y procedures to eliminate image shift
during normal stigmator correction.
3 STAGE ROTATION CENTER
When enabled this function defines a new stage rotation center at any
specimen point. Rotation around the field-of-view center is then
accomplished via the mechanical rotation and automatic X / Y stage
shift.
4 PLA CENTERING
This alignment centers the PLA projection at low magnification to the
screen center to eliminate cut-off of the image.
5 EMITTER STARTUP
This procedure enables electron gun - Emitter switching On / Off. In
cases of emergency shut down it makes also possible to start the IGP
(Ion Getter Pump) to pump the electron gun vacuum.
The Particular alignment functionality is described in the Chapter 6 Alignment.
4-31
22 211
User Interface Temperature Control Page (Option)
Temperature Control Page (Option)
The Temperature Control Page is an optional page which is
delivered with either a Heating Stage(s) or a Peltier Cooling Stage. It
is a FEI Microscope User level page. It contains the essential
components divided into six modules:
•
•
•
•
•
•
Vacuum
Mode
Electron column
Detectors
Temperature Stage Control
Status
The Vacuum module is used to pump and vent the system.
The Mode module brings the system into either HiVac, LowVac or
ESEM mode.
The Electron column module controls High Voltage switching
On / Off and High Voltage and Spotsize value setting.
The Detectors module allows adjustment of contrast and brightness
for the currently used detector.
The Status module, common for all Pages contains important
information about the system.
TEMPERATURE STAGE CONTROL
This module switches between the Heating Stage or the Peltier
Cooling Stage via the two buttons at the top of the module. The
modules appearances are only slightly different (no ramp for the
Cooling stage). If only one of these items is present on the Quanta
FEG system then the other is greyed out.
Heating Stages
Full functionality of the Temperature Stage Control for the Heating
stages can be found in Chapter 9 ‘Options\Heating Stages’.
Cooling stages
Full functionality of the Temperature Stage Control for the Cooling
stages can be found in Chapter 9 ‘Options\Cooling Stages’.
The cooling module is shown here.
4-32
2 2 2 11
User Interface FEI User management
FEI User management
This is a software program which allows to FEI Account
Admistrators, FEI Supervisors and FEI Microscope Users to organise
users and accounts that could possibly be applied to the Quanta FEG.
It allows to create and remove user accounts, set user password, set
user group membership, copy and remove user data.
You can start the software by clicking the desktop icon
(FEIUsermanagement.exe). This calls out LogOn dialogue box to
enter User Management software containing Username and
Password editable fields.
CONTROL POSSIBILITIES
Context menu
You can reach some context options by clicking right mouse button.
Use of these options is the same as described below.
Drag & Drop actions
Instead of using menu options, you can sometimes simply
Drag & Drop items from one icon to another (set user group).
FEI ACCOUNT ADMINISTRATORS
FEI Account Administrators as the highest customer level have rights
that allow them to create, delete users and change their properties over
following user groups (in order of significance):
•
•
•
•
FEI Account Administrator
FEI Supervisor Users
FEI Microscope Users
FEI Non-active Users
FIGURE 4-9
FEI ACCOUNT ADMINISTRATORS
CONTROL OVERVIEW
4-33
22 211
User Interface FEI User management
FILE
The File menu contains the following items:
LogOn
Click on to log in (active when user is logged out).
LogOff
Click on to log off (active when user is logged on).
Refresh
Click on to refresh the User tree.
Exit
Click on to exit the FEI User management program.
ACCOUNT
The Account menu contains the following items, which are accessible
only for FEI Acount administrators (with the exception of Set
password function).
Create
Click on Create to add a new user or supervisor.
Remove
The user must be highlighted first. Click on Remove then to remove
an existing user.
If FEI Microscope User has user data, account administator is warned,
that user data will be removed also. If any other user is to be removed,
his data are untouched and no warning appears.
4-34
2 2 2 11
User Interface FEI User management
Set password
The user must first be highlighted in the tree then click on Set
password to make a password for the user. Any User is able to change
his own password, FEI Account Administrator can change password
for any user from the lower level account. Password has to be
confirmed twice.
Set user group
The user must first be highlighted in the tree then click on Set user
group to set the group for the user. When confirmed, user is moved to
selected group. When moving user from FEI Microscope Users group
to FEI Non-active Users group, it's user data will be removed.
Warning exclamation is displayed in this case.
Properties
The user must first be highlighted in the tree then click on Properties
to see and change the conditions for that user.
USERDATA (MENU)
The Userdata menu contains the following items.
Copy
Click on Copy to copy userdata from same or lower group level user.
Paste
Click on Paste to paste userdata into your own account or into the
accounts of lower group level. It is not possible to copy userdata
inside FEI Supervisors User group.
Remove
Click on Remove to delete your own userdata or userdata from an
account of lower group level.
4-35
22 211
User Interface FEI User management
HELP
The Help menu contains the following items.
Legend
Clicking on Legend provides an explanation of icons used in the tree.
About
Displays the User Management software version and copyright.
ACCOUNT LOGGING
There is an accounting server running next to the xT server. This
server monitors User, logOn and logOff actions, session time,
filament lifetime and the UI status. It works with two log files, one as
a temporary running file during use of the equipment at each user
session. It is updating every 15 seconds so that any power down or
windows crash situation can be time logged. When a new session is
started the previous data is sent to the second permanent log file
which is only readable by the FEI Supervisor User or higher level.
These files can only be deleted at factory or service level, each one is
a text - CSV file so it can be loaded into Microsoft Excel for
processing. Their location is: c:\Program Files\FEI\data\accounting\
accounting.log respectively accounting.tmp. Optionally it can be
placed on a protected virtual drive (Biomedion solution).
Log File Header Contents
• Instrument type (Quanta FEG 200, Quanta FEG 400,
Quanta FEG 600, Quanta FEG 200 HV, …)
• D-number
• Software version, build date and number
• Date and time of creation
Log File Record Contents (one Log File Line)
•
•
•
•
•
•
User name and SID
User level (Factory, Service, Supervisor, User)
Record type (Session, Report, Action)
Starting date and time
Ending date and time
Category (Emiss ion current, High Tension, M icroscope status, Save
image, AVI Save im age, AVI R ecording, Print im age, Security)
• Severity (Info, Warning, Error)
• Two optional texts (depending on the type of record)
4-36
2 2 2 11
User Interface Hardware Interface Elements
Hardware Interface Elements
The Microscope controller (Acer computer) controls conditions of
the microscope from a software base. The support computer
connects your working place with the network and can hold some
other software utilities. The switch box switches between the two
computers. The control software facilities and data are displayed
graphically on the LCD monitor and are superimposed around and on
the image. To control software utilities you can use a keyboard,
mouse or the Manual User Interface (see further).
FIGURE 4-10 HARDWARE ELEMENTS
THE SYSTEM CONTROL PANEL
To complete the activation of the sub-system hardware the ON button
below the column table top should be pressed. All other functions to
change the status of the microscope (Standby and Shutdown / OFF
conditions) are activated via software control.
FIGURE 4-11 SYSTEM CONTROL PANEL
4-37
22 211
User Interface Hardware Interface Elements
STAGE CONTROLS
The stage is software / hardware controlled up to five axes: X, Y, Z,
Rotation and Tilt depending on the stage type.
For detailed Stage Control description see Chapter 7 - stages.
FINAL LENS STRIP APERTURE
Recommended Apertures
Aligning the final lens aperture is a mechanical process. The present
apertures (superseded all others) are in a Mo/Si strip form (module 2),
so it is a case of choosing the one most applicable to your imaging
needs. For more detail over the types of aperture strips see Chapter 8.
TABLE 4-4 provides guidelines for the use of aperture sizes.
TABLE 4-4
GUIDELINES FOR APERTURE SIZES AND THEIR
USE
Aperture
Use
1000 µm
Service Alignment (hole in frame)
100 µm
High current applications
50 µm
X-ray mapping of low-Z elements at low kV
40 µm
General imaging or X-ray analysis
30 µm
Dynamic experiments
30 µm
High resolution imaging
FIGURE 4-12 FINAL LENS STRIP APERTURE CONTROL KNOB
4-38
2 2 2 11
User Interface Hardware Interface Elements
Changing Final Lens Aperture Sizes
The external control of the final lens aperture is used to change from
one aperture to the next one. It has a click-stop mechanism.
The lefthand turn of the large ring moves the aperture holder outwards
towards the larger aperture. After you change the aperture, use the
inner knob and the one on the right side to tune its position. These two
knobs control the X, Y movement in a horizontal plane.
For Final Lens Strip Aperture alignment see Chapter 6 - Alignment.
MANUAL USER INTERFACE (MUI)
The Manual User Interface provides knobs to perform functions that
can also be performed with the software.
FIGURE 4-13 MUI
MUI controls
•
•
•
•
•
Imaging: Brightness and Contrast control
Stigmator: X and Y control
Magnification: continuous control of magnification up or down.
Shift: X and Y Image shift control
Focus: Coarse and fine control
Equivalent software controls
TABLE 4-5
MUI SOFTWARE EQUIVALENTS
MUI
Software Equivalent
Image
Contrast and brightness adjusters on pages,
or Auto Contrast and Brightness Icon button
on Tool bar.
Stigmator
Shift + right mouse button
Magnification
+/- keys on numeric keypad.
Shift + Mouse wheel for fine control.
Ctrl + Mouse wheel for coarse control.
Shift
Ctrl + Left mouse button
Focus
Right mouse button
4-39
22 211
User Interface Entering Commands
Entering Commands
USING THE MOUSE
The mouse buttons control imaging correction, selecting functions,
scrolling magnification up/down and moving the stage in X and Y
with TRACK mode. Mouse buttons are activated by a click or doubleclick or in conjuction with a key on the keyboard.
TABLE 4-6
MOUSE BUTTON FUNCTIONS
(Key +) Button Function
4-40
Left
Control Areas: makes selection in control areas
(single arrow cursor).
On Screen: click and Drag a selected area to
zoom up in Magnification to full view
(Quad or full screen).
Lens Alignment Mode: click and Drag provides
the final lens fine alignment
(quad arrow ended cursor).
Quad 1 / 2 / 3 double click: move the selected
point to the middle of the Quad.
Quad 4 double click: 10 mm marker placing.
Shift + Left
On Screen: click and Drag a selected area to
zoom down in Magnification the screen
(Quad or full screen) to fit the selected area.
Ctrl + Left
Activates Beam Shift (hand cursor)
Right
To focus with the mouse, press and move the
mouse to the left or right (double ended arrow
cursor). Release the button to set the focus.
Shift + Right
To Stigmate the image, press and move the
mouse to the left or right, or up or down to correct
(quad ended arrow cursor). Release the buttons
to finish.
Shift + Wheel
Up / Down
Fine Control: moving the wheel
increases / decreases the magnification.
Ctrl + Wheel
Up / Down
Coarse Control: moving the wheel
increases / decreases the magnification.
Wheel
Press
Quad 1, 2, 3: with the wheel pressed like a button
the TRACK mode for joystick - like movement
over the sample surface is activated.
Quad 4 (CCD mode): activates the stage Z
movement. With the wheel pressed, moving the
mouse up / down move the Z up / down. This
activity can be seen live in the CCD Quad 4
window.
2 2 2 11
User Interface Entering Commands
USING THE KEYBOARD
Dedicated Windows Keys
TABLE 4-7
DEDICATED WINDOWS KEYS
Key (+ Key)
Function
Enter
Equivalent of OK in a dialogue box.
Esc
1. Equivalent for the Cancel button.
2. Stops stage movement at any time.
3. Cancels the click and drag function.
Tab
Step key to highlight items in a dialogue box.
Arrows
1. Use to select between items in a group when in
an edit box.
2. When any of Quad 1, 2, 3 is active and on
focus, the stage can be moved approximately
80% of the field of view in any direction by
clicking on the appropriate Arrow key on the
keyboard (or 50% with Shift button pressed
simultaneusly).
Alt
When pressed at the same time with an
underlined character in the menu bar items
unrolls the pulldown menu in the active
application.
(For example, pressing ALT + M at the same time
brings up the Magnification pulldown menu.)
Alt + Tab
(simultaneously)
Use these keys to switch over the resident
applications. This starts from the last used one,
continue to press the TAB key (while holding down
the ALT key) and applications are shown one by
one. Releasing the ALT key at any time brings
application just listed active again.
Alt + F4
(simultaneously
Exit Application software which is active, shut
down Windows operating system.
Del
Deletes an item in an edit box
(a selection or a sign).
4-41
22 211
User Interface Entering Commands
Function and Specific Keys
Function Keys can be found at the top of the Keyboard.
TABLE 4-8
FUNCTION KEY SHORT-CUTS
Key (+ Key)
Function
F1
On-Line Help (only switches ON)
F2
Snapshot
F3
Toggle Videoscope
Shift + F3
Home Stage
F4
Lens Alignment
F5
Toggle Quad Screen / Full Screen
Shift + F5
Toggle Center Cross
F6
Toggle Pause / UnPause
Shift + F6
Toggle Alignment rectangle
F7
Toggle Reduced area On / Off
F8
Degauss
F9
Auto Contrast and Brightness
F11
Auto Focus
Shift + F11
Auto Stigmator
F12
Toggle Compucentric Rotation.
Shift + F12
Toggle Scan Rotation
TABLE 4-9
SPECIFIC KEY SHORT-CUTS
Key (+ Key) Function
4-42
Ctrl + 0
Centers X and Y stage axes to 0,0
Ctrl + F
Sets FWD to 10 mm
Ctrl + O
Preferences dialogue
Ctrl + P
Prints to selected device
Ctrl + S
Save
Tab
Steps between controls
Ctrl + Tab
Steps between Quads
+
Increases magnification
-
Decreases magnification
*
Rounds off magnification to nearest rounded
number.
(Shift +)
Arrows
Move (50%) 80% of viewed field in the direction of
the arrow.
2 2 2 11
Chapter 5
Operations
Overview . . . . . . . . . . . . . . . . . . . . . . . . . . 5-1
Preparing a Specimen. . . . . . . . . . . . . . .5-2
Needed items . . . . . . . .
Natural specimen . . . . .
Coated Specimen . . . . .
Mounting the Specimen.
..
..
..
..
..
..
..
..
.
.
.
.
..
..
..
..
..
..
..
..
..
..
..
..
..
..
..
..
.
.
.
.
5-2
5-2
5-2
5-2
Inserting a Specimen. . . . . . . . . . . . . . . . 5-3
Operation Pre-Check. . . . . . . . . . . . . . . . 5-4
Selecting Vacuum Modes . . . . . . . . . . . . 5-5
High Vacuum . . . . . . . . . . . . . . . . . . . . . . . 5-5
Low Vacuum and ESEM Modes . . . . . . . . 5-6
Pressure and Working Distance . . . . . . . 5-7
Obtaining an Image. . . . . . . . . . . . . . . . . 5-8
Imaging Procedure . . . . . . . . . . . . . . . . . . 5-8
Setting up Working Conditions - Optimising the
Image . . . . . . . . . . . . . . . . . . . . . . . . . . 5-9
22 211
Principle of SEM imaging . . . . . . . . . . . . . 5-9
Magnification . . . . . . . . . . . . . . . . . . . . . . . 5-9
Mouse control. . . . . . . . . . . . . . . . . . . . 5-10
Keyboard control (+/-/*) . . . . . . . . . . . . 5-10
Selected Area Zooming Up / Down . . . 5-10
Contrast and Brightness . . . . . . . . . . . . . 5-11
Using Videoscope (F3) . . . . . . . . . . . . . 5-11
Auto Contrast Brightness Function
(ACB) . . . . . . . . . . . . . . . . . . . . . . . . . . 5-12
Auto Contrast Brightness Calibration . . 5-12
Focusing . . . . . . . . . . . . . . . . . . . . . . . . . 5-13
Using Reduced area (F7) . . . . . . . . . . . 5-13
Moving the Reduced Area . . . . . . . . . 5-13
Changing the Size
of the Reduced Area . . . . . . . . . . . . . 5-13
Auto Focus Function (F11) . . . . . . . . . . 5-14
Correcting Astigmatism . . . . . . . . . . . . . . 5-15
Auto Stigmator Function (Shift F11) . . . 5-15
Beam Spotsize. . . . . . . . . . . . . . . . . . . . . 5-16
Adjusting Spotsize for Imaging. . . . . . . 5-16
Mixing Live images from Two Detectors . 5-17
Detector Types and Usage . . . . . . . . . 5-18
ETD (SE). . . . . . . . . . . . . . . . . . . . . . . . .
Preference for the ETD . . . . . . . . . . . .
GSED . . . . . . . . . . . . . . . . . . . . . . . . . . .
Installing the GSED . . . . . . . . . . . . . . .
Removing the GSED . . . . . . . . . . . . . .
LFD . . . . . . . . . . . . . . . . . . . . . . . . . . . . .
Installing the LFD . . . . . . . . . . . . . . . . .
PLA Cones. . . . . . . . . . . . . . . . . . . . . .
discharges between
the Gaseous detectors and the sample .
Standard Insert . . . . . . . . . . . . . . . . . . . .
5-18
5-18
5-19
5-20
5-20
5-21
5-22
5-22
5-23
5-23
X-ray Analysis
for different Vacuum Modes . . . . . . . . 5-24
High Vacuum. . . . . . . . . . . . . . . .
ESEM using the GSED . . . . . . . .
ESEM with LFD and X-ray PLA .
X-ray PLA. . . . . . . . . . . . . . . . .
.
.
.
.
..
..
..
..
..
..
..
..
.
.
.
.
5-24
5-24
5-25
5-26
Capturing and Handling Single Image
(Still) . . . . . . . . . . . . . . . . . . . . . . . . . . 5-27
Using Pause button. . . . . . . . .
Using Snapshot Button . . . . . .
Using Integration function . . . .
Saving single images (Stills) . .
Save (Ctrl + S) . . . . . . . . . . .
Save As.... . . . . . . . . . . . . . .
Open... . . . . . . . . . . . . . . . . . .
Image Printing (Ctrl + P) . . . . .
..
..
..
..
..
..
..
..
.
.
.
.
.
.
.
.
..
..
..
..
..
..
..
..
..
..
..
..
..
..
..
..
.
.
.
.
.
.
.
.
5-27
5-27
5-27
5-28
5-28
5-28
5-29
5-29
Recording Movie . . . . . . . . . . . . . . . . . 5-30
Movie TAB Preferences Dialogue . . . . . .
Timer . . . . . . . . . . . . . . . . . . . . . . . . . .
Check box Movie . . . . . . . . . . . . . . . .
Check box TIF . . . . . . . . . . . . . . . . . .
Information field . . . . . . . . . . . . . . . . . .
File . . . . . . . . . . . . . . . . . . . . . . . . . . . .
File name . . . . . . . . . . . . . . . . . . . . . .
Save in . . . . . . . . . . . . . . . . . . . . . . . .
Numeric Seed . . . . . . . . . . . . . . . . . .
Video file size . . . . . . . . . . . . . . . . . . .
File type . . . . . . . . . . . . . . . . . . . . . . .
Record databar . . . . . . . . . . . . . . . . .
5-30
5-31
5-31
5-31
5-31
5-32
5-32
5-32
5-32
5-32
5-32
5-32
TIF Movie Creator . . . . . . . . . . . . . . . . 5-35
Movie Creator . . . . . . . . . . . . . . . . . . . . . 5-35
File (tab) . . . . . . . . . . . . . . . . . . . . . . . . 5-35
Name Prefix:. . . . . . . . . . . . . . . . . . . . 5-35
Time Period: . . . . . . . . . . . . . . . . . . . . 5-36
From: (Frame numbering) . . . . . . . . . 5-36
Save in: (Path) . . . . . . . . . . . . . . . . . . 5-36
File Name: . . . . . . . . . . . . . . . . . . . . . 5-36
Databar Preview: . . . . . . . . . . . . . . . . 5-36
Status: . . . . . . . . . . . . . . . . . . . . . . . . 5-36
Create Movie . . . . . . . . . . . . . . . . . . . 5-36
Stop . . . . . . . . . . . . . . . . . . . . . . . . . . 5-36
Close . . . . . . . . . . . . . . . . . . . . . . . . . 5-36
Databar (tab) . . . . . . . . . . . . . . . . . . . . 5-37
Available / Selected . . . . . . . . . . . . . . 5-37
Add . . . . . . . . . . . . . . . . . . . . . . . . . . . 5-37
Add All . . . . . . . . . . . . . . . . . . . . . . . . 5-37
Remove . . . . . . . . . . . . . . . . . . . . . . . 5-37
Remove All . . . . . . . . . . . . . . . . . . . . . 5-37
Move Up / Move Down . . . . . . . . . . . . 5-37
Preview (tab) . . . . . . . . . . . . . . . . . . . . 5-38
Start / Pause / Stop buttons . . . . . . . . 5-38
Create Movie . . . . . . . . . . . . . . . . . . . 5-38
Close . . . . . . . . . . . . . . . . . . . . . . . . . 5-38
Playing a Movie . . . . . . . . . . . . . . . . . . . . 5-38
Setting Preferences.... . . . . . . . . . . . . . 5-39
The Preferences Tab Dialogues . . . . . .
ESEM Tab . . . . . . . . . . . . . . . . . . . . . . .
System Behaviour
when Applying a new purge condition
DataBar Tab. . . . . . . . . . . . . . . . . . . . . .
Units Tab . . . . . . . . . . . . . . . . . . . . . . . .
Presets Tab . . . . . . . . . . . . . . . . . . . . . .
Scan Tab . . . . . . . . . . . . . . . . . . . . . . . .
Movie Tab . . . . . . . . . . . . . . . . . . . . . . .
Language Tab . . . . . . . . . . . . . . . . . . . .
. 5-39
. 5-40
.
.
.
.
.
.
.
5-41
5-42
5-43
5-44
5-45
5-46
5-46
Movie Procedure . . . . . . . . . . . . . . . . . 5-33
Start, Pause and Stop . . . . . . . . . . . . . . . 5-33
Recording a Movie . . . . . . . . . . . . . . . . . 5-33
Quad Indicators . . . . . . . . . . . . . . . . . . 5-34
2 2 2 11
5
OPERATIONS
OVERVIEW
This chapter describes how to use the Microscope system from a taskoriented point of view. The following subjects are covered:
•
•
•
•
•
•
•
•
•
•
Information on specimen preparation for the Vacuum Modes
Inserting specimens
Operational precheck
Selecting the Vacuum Modes:
High Vacuum (HiVac), Low Vacuum (LowVac), ESEM
Obtaining and optimising the onscreen image
Detector types and usages
X-ray configurations for the Vacuum Modes
Capturing single images:
Saving and Opening images, Printing images
Movies: Recording movies, Movie Creator
Setting Preferences
These procedures assume you are familiar with the software User
Interface described in chapter 4 - User Interface.
5-1
22 211
Operations Preparing a Specimen
Preparing a Specimen
The specimen material for HiVac mode must be able to withstand a
high vacuum environment without outgassing and the bombardment
of electrons. It must be clean and conductive. Oil and dust may
contaminate the chamber, which could hinder or even prevent
evacuation.
NOTE:
Always wear lint-free clean room gloves when reaching into the
specimen chamber to reduce leaving oils, dust, or other contaminants
inside the chamber.
NEEDED ITEMS
•
•
•
•
Class 100 clean room gloves
Specimen stubs and conductive adhesive material
Tools: tweezers, hex wrench, screwdriver
Specimen
NATURAL SPECIMEN
Alternatively if no coating is the requirement then the LowVac Mode
can be used to stabilise the specimen for observation. This mode is
useful in case alteration of the specimen is suspect by means of
coating.
If the specimen contains any volatile components such as water or oil,
and therefore will not withstand coating then the ESEM mode can be
utilised with the correct environment and pressure to allow true
observation of the specimen in it’s natural state without creating a
problem for the microscope.
For more information on specific preparation techniques, see
Scanning Electron Microscopy and X-Ray Microanalysis, 2nd ed. by
Joseph Goldstein et al., Plenum Press, New York, 1992.
COATED SPECIMEN
If the specimen is nonconductive (plastic, fibre, polymer, or other
substance with an electrical resistance greater than (1010 ohms), the
specimen may be coated with a 1 - 5 nm layer of Platinum/Palladium Pt/Pd.
Rough surfaced specimens must be evenly coated from every direction.
This conductive layer increases beam stability and improves image quality.
Biological, cloth and powder specimens may require carbon or other
conductive painting on portions of the specimen that are hard to coat.
MOUNTING THE SPECIMEN
Attach the specimen to the specimen holder using any suitable SEM
vacuum-quality adhesive, either silver or carbon. The specimen must
be electrically grounded to the sample holder to minimize specimen
charging. If you are using a vice mechanism, make sure the specimen
is attached to the holder in some way for grounding.
5-2
2 2 2 11
Operations Inserting a Specimen
Inserting a Specimen
Inserting a specimen will need the specimen chamber to be at
atmospheric pressure. If the high voltage is on when starting to vent
the specimen chamber the vent condition is interlocked to switch off
various voltages supplies before actual venting occurs.
TABLE 5-1
INSERTING SPECIMEN
Step
Action
1.
In the Vacuum module found on the Start-up or Work
page click on the Vent button. The following dialogue
will appear for confirmation.
After a High Voltage switch off cycle the vacuum
system will switch off the pumps and open / close the
appropriate valves to vent the system. After a specified
venting time (this is set up in the Vacuum tab of the
Preferences menu), the venting valve will close. The
Status vacuum should indicate ‘Vented’.
2.
When vented, open the specimen chamber and using
lint-free gloves or tweezers place a specimen into the
specimen holder. Secure the specimen stub with an
appropriate hexkey unless a spring-clip type holder
has been used.
3.
Set the stage to its lowest position.
Check and if necessary adjust the X, Y, Z, Rotation or
Tilt before closing the chamber door.
4.
Install an appropriate detector if it is not already done
(procedure as follows).
5-3
22 211
Operations Operation Pre-Check
Operation Pre-Check
To ensure correct operation in any Vacuum mode, check the following
list before continuing. When obtaining a first acceptable image you
can experiment with your own setting further ahead.
TABLE 5-2
5-4
VACUUM MODES CHECKLIST
Setting
Optimum Value
kV
(Accelerating
Voltage)
Select kV relative to specimen type:
- low kV for nonconductors
- high kV for conductors
For example:
- biological sample HV = (1 - 10) kV
- metal sample HV = (10 - 20) kV
Vacuum mode
- medium
HiVac: none
LowVac and ESEM: H2 O
Spotsize
HiVac and LowVac: 3
ESEM: 3 or 4
Scan rate
HiVac: fastest (dwell time 0.1 µs)
LowVac and ESEM: slow (dwell time 0.3 µs)
Free Working
Distance (FWD)
Set the highest specimen point
approximately to 10 mm.
(yelow mark in Quad 4 - Z movement)
Magnification
Set to lowest - from 100x to 200x
Standard
Detector
HiVac: ETD (SED)
LowVac: LFD
ESEM: GSED
Filtering
HiVac: live
LowVac and ESEM: live
Contrast
and Brightness
Regulate contrast to zero and adjust
brightness so that the screen just turns from
black to gray. Then regulate the contrast to
approximately:
HiVac:
Start with values:
Brightness = 48, Contrast = 24.
LowVac and ESEM:
Start with values:
Brightness = 48, Contrast = 24.
2 2 2 11
Operations Selecting Vacuum Modes
Selecting Vacuum Modes
When a specimen and appropriate detector(s) are inserted correctly,
close the specimen chamber door and follow the instructions:
HIGH VACUUM
This is the conventional operating mode associated with all scanning
electron microscopes. The high vacuum condition is common
throughout the column and specimen chamber.
TABLE 5-3
SETTING HIVAC MODE
Step
Action
1.
In Mode module, select the High vacuum radio button
if it is not already active.
2.
In the Vacuum module click on the Pump button.
3.
Wait for the vacuum status message ‘Vacuum’ in the
Status module at the base of the page.
5-5
22 211
Operations Selecting Vacuum Modes
LOW VACUUM AND ESEM MODES
The SEM modes (LowVac or ESEM) will be used most often in
viewing images with the microscope. Which one of these is used will
depend on what detector is installed, as certain detectors are
optimized for these modes: the LFD corresponds to LowVac, and the
GSED corresponds to ESEM.
In either of these modes, the gun and column sections are under
higher vacuum than the specimen chamber where pressure ranges
from 1 to 40 Torr (14 to 5300 Pa).
Either mode can use the imaging gas selected in the Mode drop down
box:
• water vapour from a built-in water reservoir located behind the
column
• auxiliary gas which is supplied by the user, and connected to a gas
inlet provided for this purpose.
The microscope also provides automatic sequencing for purging the
specimen chamber according to the settings of Purge mode in the
ESEM tab found in the Preferences dialogue (see the end of this
chapter). This sequence replaces the current chamber gas with a new
gas determined by the target operating mode.
TABLE 5-4
5-6
SETTING LOWVAC / ESEM MODE
Step
Action
1.
In Mode module, select the Low vacuum / ESEM
radio button if it is not already active. Select the
appropriate gas from the dropdown list also.
2.
In the Vacuum module click on the Pump button.
The target pressure that the system will pump to then
is specified in the Pressure text box at the bottom of
the Mode module.
As the system is pumping, it will automatically purge
the chamber.
3.
Under normal operation, the system will know the PLA
size for the detector installed. This will allow the
system to set automatic pressure range limits for the
aperture installed, thus avoiding vacuum errors when
setting chamber pressure. In some cases the user will
be prompted for the PLA size, select “No Accessory”
for the LFD or appropriate Cone if installed.
4.
Wait for the vacuum status message ‘Vacuum‘ to
appear in the Status module at the bottom of the page.
2 2 2 11
Operations Selecting Vacuum Modes
Pressure and Working Distance
It is assumed that the system is in either LowVac or ESEM mode, and
that the sample is visible in the image display area.
For standard imaging choose the highest specimen point and bring it
to the 10 mm Working Distance (yellow line in Quad 4). Focus the
image and then click on the Z to FWD icon button on the Tool Bar.
Adjust chamber pressure to achieve the brightest possible image.
Lower the pressure 0.5 Torr (67 Pa) from this point. This should place
the pressure in the appropriate range on the curve in the following
figure.
FIGURE 5-1
BRIGHTNESS VS PRESSURE
Adjust to personal taste contrast and brightness to obtain a clear
image. An image which is optimized should allow small changes
(approximately 0.5 mm) in working distance without the need to alter
chamber pressure.
Higher resolution imaging is achieved by moving the sample closer
to the pole piece; the final lens performs better when the sample is at
about 6 - 8 mm working distance. At this closer distance, the chamber
pressure will need to be higher.
Some experimentation may be necessary, as the relationship between
working distance and chamber pressure is largely sample-dependent.
5-7
22 211
Operations Obtaining an Image
Obtaining an Image
IMAGING PROCEDURE
Use the following procedure to obtain an image of the specimen:
TABLE 5-5
5-8
OBTAINING AN IMAGE
Step
Action
1.
On the Start-up or Work page, click on the HV button,
found in the Electron column module, to ramp up the
high voltage.
2.
An image will appear in the active Quad (1, 2 or 3).
Choose the highest specimen point and bring it to the
10 mm Working Distance (yellow line in Quad 4). Focus
the image and then click on the Z to FWD icon button on
the Tool Bar.
3.
Correct the contrast and brightness with the adjusters in
the Detectors module.
4.
Correct the focus and astigmatism. (fuller explanation
later in this Chapter).
2 2 2 11
Operations Setting up Working Conditions - Optimising the Image
Setting up Working Conditions - Optimising the Image
PRINCIPLE OF SEM IMAGING
All scanning beam microscopes produce images with the same
fundamental technique. The primary beam is scanned across the
specimen surface in a regular pattern called a raster. Normally, this
raster consists of a series of lines in the horizontal (X) axis, shifted
slightly from one another in the vertical (Y) axis. The lines are made
up of many dwell points and the time of each dwell point can be
shortened or prolonged (dwell time). The number of points per line
can be increased or decreased, and also the number of effective lines.
The result is a picture point (Pixel) array. By manipulating these
factors low or high resolution images can be obtained. The larger the
pixel array the higher the resolution in the end image. Simultaneously,
a spot of controllable brightness is scanned over the display area of a
monitor in the same pattern. This is then represented as pixel points
on the monitor at the required resolution.
The signal emitted by the sample surface as it is illuminated with the
primary beam is collected by the detector, amplified, and used to
adjust the intensity of the spot scanning over the video monitor.
Because of this direct correspondence, the image displayed on the
monitor is directly related to the sample surface.
MAGNIFICATION
Magnification is calculated due to this relationship of image viewed
dimension (L) divided by the sample scanned dimension (l) (see
Figure 5-2).
FIGURE 5-2
MONITOR IMAGE AND SCANNED SAMPLE
Viewed Area (L)
Magnification =
Scanned Area (l)
5-9
22 211
Operations Setting up Working Conditions - Optimising the Image
If the size of the raster on the sample is made smaller while the raster
on the monitor remains constant in size, the magnification of the
image increases. At low magnification, you will see a large field of
view. At medium magnification, you see a portion of the original
scanned area. At high magnification, you are zoomed in on only a
small portion of the original total scanned area.
Use the Magnification settings from the pulldown menu to select from
a list of predefined values. If the current value is in the list, it is
indicated with a check mark. Selecting a different magnification
results in a change of magnification on the screen during live imaging.
Mouse control
The mouse wheel can be used for changing magnification.
Coarse / fine control can be operated with Ctrl / Shift keys from the
keyboard. Moving the wheel up / down increases / decreases the
magnification.
Keyboard control (+/-/*)
Magnification can also be changed with the Keypad keys.
The Plus button (+) increases the magnification 2x.
The Minus button (-) decrease the magnification 0.5x.
The Star (*) key rounds off the magnification value before storing the
image in case the value is odd e.g. 10 063x would become 10 000.
The condition also takes into account the image size by zooming and
the micron bar scaling.
Selected Area Zooming Up / Down
This is a quick way of zooming, up or down, the area of interest that is
required on either a Quad (1, 2 or 3) or Full screen.
One activates the Selected Area Zoom function by clicking, with the
left mouse button, a position on either a Quad or the full screen and
dragging to make a staggered box over the area of interest. The cursor
changes to a magnifying glass with + sign in the bottom right corner
of the dragged area. Once the left mouse button is released the
selected area zooms up in magnification to fill the Quad or full screen.
The longest side of the selected area drawn has priority for the end
magnification.
Using Shift + the left mouse button will reverse the zoom affect by
reducing the Quad or full screen area down to fit the selected area
drawn, longest side having priority for the end magnification. In this
case the cursor changes to a magnifying glass with a - sign in the
bottom right corner in the dragged area.
5-10
2 2 2 11
Operations Setting up Working Conditions - Optimising the Image
CONTRAST AND BRIGHTNESS
This Detector module contains 2 logarithmic and 2 linear adjusters
which allow you to change contrast and brightness by clicking and
dragging the middle slider on the large bar, or the same on the pointer
in the small bar. The functionality is as follows:
TABLE 5-6
C & B OPERATION
Item
Function
middle slider
For large or small adjustments, depending where
you release it. The further from center the middle
slider is pulled, the larger the change. Unlike a
scroll bar, the middle slider always snaps back to
the center of the adjuster. This is Logarithmic.
grey bar
For larger adjustments, single step increments.
end arrow
For finer adjustments, single step increments.
small slider
For Linear adjustment, continuous.
These adjusters always have a label in the upper left and right corners
for readout value information.
Using Videoscope (F3)
The contrast and brightness settings in Videoscope mode can be
adjusted to optimise the image to give the best range of greyscale for
viewing or output as a stored image. The Videoscope can be chosen
from the Tool bar. When the button is pressed the Quad or full screen
displays an overlay of two separated green horizontal lines indicating
white (top line) and Black (bottom line). A green monitor waveform
is displayed between or overlapping the two lines. This represents the
overall contrast of the scanned image by the magnitude of the
waveform and the central position of the waveform between the two
lines as the brightness. Overlapping in any way means that the signal
level is clipping in either black or white and should be avoided in
normal imaging. Controlling the waveform exactly between the two
lines for the entire scanned image indicates full greyscale capability in
that image. For harder contrast conditions when more black and white
is needed sometimes in BSE images, the amplitude of the waveform
can be made to overshoot the two lines to give this effect. In reverse
the shortening of the amplitude between the two line will decrease the
contrast accordingly.
5-11
22 211
Operations Setting up Working Conditions - Optimising the Image
TABLE 5-7
CORRECTING C & B
Step
Action
1.
Select a slow scan in an active Quad
2.
Click on the Videoscope button on the Tool bar.
3.
Reduce the contrast to zero and adjust the brightness
level to the lower dashed line (black).
4.
Adjust the contrast up so that the signal level just clips
the upper dashed line (white).
5.
If necessary, adjust the brightness level once more to
have the average signal level roughly in the middle.
6.
The high and low peaks should just clip the dashed lines.
Auto Contrast Brightness Function (ACB)
Auto Contrast Brightness can be activated by pressing the ACB icon
button on the Tool bar or the item in the Tools menu. The system will
attempt a correcting of the contrast and brightness levels to suit the
sample so that a the majority of greylevels are displayed. When
activated the following dialogue appears to show the progress of the
function.
FIGURE 5-3 ACB DIALOGUE BOX
The function can be interrupted by clicking on the Stop Now button.
This will leave the image at the stage of progress at stopping. clicking
Cancel before the function ends will return the image back to it’s
original status.
Auto Contrast Brightness Calibration
Clicking on User Contrast Brightness in the Tools menu will store
the settings of contrast and brightness that are currently being used.
While the item is ticked the Auto Contrast Brightness function will
only return to these user values rather than the settings found by the
Auto algorithm. Click User Contrast Brightness off to use Auto
Contrast Brightness with the algorithm.
5-12
2 2 2 11
Operations Setting up Working Conditions - Optimising the Image
FOCUSING
The easiest way to focus is to find a feature of interest on a specimen
with distinct edges. Use a combination of contrast, brightness,
magnification, and focus adjustments to maximize the image quality.
TABLE 5-8
CORRECTING FOCUS
Step
Action
1.
Hold down the right mouse button while the cursor is in
the active Quad
2.
The focus cursor, which is a double ended arrow will
appear. Move the focus cursor from side to side until the
image is sharp.
3.
When engaged, the focus cursor is active over the
whole screen but will not interfere with other controls
4.
Move the specimen to a desired area with the X and Y
stage controls and refocus until the image is sharp.
5.
If this was the first time focusing the new specimen then
click on the Z to FWD icon button on the Tool Bar to
confirm focal distance to the Z value on the Work page.
Using Reduced area (F7)
When Reduced area is chosen, the smaller area appears in the middle
of the screen. This can be used as a Focus aid as the scan speed is
faster in the smaller area.
Moving the Reduced Area
Click and hold the left mouse button in the selected area. The arrow
changes to a hand. Drag the selected area to the desired position and
release the mouse button.
Changing the Size of the Reduced Area
Place the cursor outside of the selected area and make sure Get or
Shift are not activated. The cursor should be the normal arrow
symbol. Move the cursor to where you want the left upper corner of
the selected area to be. Click the left mouse button and drag the cursor
until the rectangle onscreen includes the area you want to select.
Release the left mouse button.
5-13
22 211
Operations Setting up Working Conditions - Optimising the Image
Auto Focus Function (F11)
Auto Focus can be activated by pressing the Auto focus icon button
on the Tool bar or the item in the Tools menu. The system will attempt
to correct the focus independent of the working distance or focus set.
When activated the following dialogue appears to show the progress
of the function.
The function can be interrupted by clicking on the Stop Now button.
This will leave the image at the stage of progress at stopping. clicking
Cancel before the function ends will return the image back to it’s
original status.
FIGURE 5-4 Auto Focus Dialogue Box
5-14
2 2 2 11
Operations Setting up Working Conditions - Optimising the Image
CORRECTING ASTIGMATISM
You need to correct astigmatism of the image (also known as
“stigmate”) when you change apertures, samples or working distance.
conditions.
TABLE 5-9
CORRECTING ASTIGMATISM
Step
Action
1.
Focus the image as well as possible using the mouse.
2.
Bring the image just slightly out of focus in one direction
to see any astigmatic distortion.
3.
Defocus in the other direction to observe a different
astigmatic distortion.
4.
Focus to the midpoint between the two distortions.
5.
Press shift and the right mouse button down while in the
active Quad. This will result in a 4 arrowed cross
appearing on the screen with the cursor position at its
center. Still holding the right mouse button down, move
the center of the cross around the screen to achieve
astigmatism correction (when the image is at its
sharpest).
6.
When you are satisfied with the image, release the right
mouse button.
If as tigmatism is severe and the cross is close to the edge of the screen
when nearing correction, release the right m ouse button, and reposition
the cross in the center of the screen. Then repeat the procedure above to
perform further astigm atis m correction. You can use reduced area
advantageously in a similar way as was described for focus ing.
Auto Stigmator Function (Shift F11)
This can be activated by clicking Auto Stigmator in the Tools menu.
The system will attempt to correct the stigmator independent of the
working distance or focus set. When activated the following dialogue
appears to show the progress of the function. The function can be
interrupted by clicking on the Stop Now button. This will leave the
image at the stage of progress at stopping. clicking Cancel before the
function ends will return the image back to it’s original status.
FIGURE 5-5
AUTO STIGMATOR DEALOGUE BOX
5-15
22 211
Operations Setting up Working Conditions - Optimising the Image
BEAM SPOTSIZE
The actual focused area of the single beam on the sample at any point
is referred to as spotsize. Spotsize has assigned numbers that range
from 1 to 7 with values corresponding to beam current. For each
ascending high voltage, from 200V to 30kV, the range of beam
currents increases in value accordingly. There are 11 user definable
spotsizes and these can be found in the pulldown menu labelled
Beam.
The best spotsizes for obtaining particular results are listed in TABLE
5-10:
TABLE 5-10 OPTIMUM SPOTSIZES
Spotsize
Best Use
1, 2
Very high resolution (mag >50 000x)
3, 4, 5
Standard imaging, SE, BSE, LFD, GSED
6, 7
BSE, CL, X-ray analysis, EBSP
Adjusting Spotsize for Imaging
Spotsize is considered to be close to ideal when the edges of the beam
just touch when adjacent lines are scanned. If the spotsize is too large,
overlaps occur and the image appears out of focus. If the diameter is
too small, electronic noise appears in the image. Additionally, too
small a beam diameter can miss important information on the
specimen surface.
Deciding which spotsize is correct for a particular magnification can
be determined when you achieve good focus and astigmatism
correction easily at the chosen magnification.
Use the focus control with the right mouse button to correct the
sharpness of the image. Focusing at 2x - 3x the magnification needed
for the final result makes the lower magnification sharper. For
example, set capture magnification to 2000x, and focus with
magnification at 4000x - 8000x.
When you change spotsize, readjustment of the Contrast/Brightness
in the Detector module may be necessary to refresh the image
onscreen. An alternate approach is to press the Auto Contrast and
Brightness button found on the Tool bar.
5-16
2 2 2 11
Operations Setting up Working Conditions - Optimising the Image
MIXING LIVE IMAGES FROM TWO DETECTORS
If you choose different detectors (if they are installed) for Quads 1 and
2, you can choose the MIX option for Quad 3. Clicking on
Preferences... will produce a dialogue that invites one to choose a
percentage of one detector to mix with another. This is achieved with
a single slider representing 100% output signal.
FIGURE 5-6
PREFERENCES... DIALOGUE
FOR DETECTORS SIGNAL MIXING
The positioning of the slider varies the amount of input from Quad 1
to that of Quad 2, and presents the mixed result always displayed in
Quad 3. One can even choose the Inverted mode for either detector,
which gives another possibility to find the best presentation of a
particular image.
TABLE 5-11
IMAGE MIXING PROCEDURE
Step
Action
1.
Make Quad 1 active by clicking in the quad with the left
mouse button. Select the detector to image in Quad 1.
Correct the image for Focus, Stigmation and C&B.
2.
Repeat the procedure above for Quad 2 in the same way.
3.
Click on Quad 3. Click on MIX in the Detector menu.
4.
Then click on Preferences... a dialogue appears that
invites the balancing of Signals from Quads 1 and 2 and
inverting of signal from each detector. All changes will be
display in Quad 3 in live time.
5.
To correct the Contrast, Brightness and Gamma use the
Enhance Image module in the Option page.
5-17
22 211
Operations Detector Types and Usage
Detector Types and Usage
The Detectors pulldown menu shows the detector(s) installed on your
system. Select the detector to be used for imaging. When you select a
detector, the contrast and brightness adjusters in the Detectors
module of the page in use default the settings for that detector.
ETD (SE)
The Everhart Thornley Detector (ETD) is a Secondary Electron (SE)
detector, which is a scintillator type monitoring secondary electrons
generated by the primary beam interaction with the sample to produce
an image. It is moun-ted in the chamber above and to one side of the
sample. It is a photo-multiplier detector.
When the Everhart Thornley - SE detector is activated for contrast
and brightness adjusters control the ETD parameters. The ETD
switches off during venting of the specimen chamber. This detector is
permanently fitted to the chamber.
Preference for the ETD
The Detector Configuration dialogue box contains an adjuster to
control grid bias voltage. When grid bias is negative, secondary
electrons are repelled from the ETD-SE detector and only backscattered electrons are detected. Use a range of -25 to -150 V to obtain
backscattered electrons. The range for grid bias voltage is from -150
V to + 300 V. The normal operating setting for imaging is 300 V.
These settings are ordinarily preset at the factory but you may need to
adjust them for optimum imaging on individual specimens.
FIGURE 5-7 ETD CONFIGURATION DIALOGUE
5-18
2 2 2 11
Operations Detector Types and Usage
GSED
The Gaseous Secondary Electron Detector (GSED) is integrated into
a flexible PC board and plugs into the signal connector behind the
conical lens. The GSED contains a 500 mm aperture, allowing 20 Torr
(2600 Pa) maximum chamber pressure. It is a standard detector with
all ESEM systems.
FIGURE 5-8
GASEOUS SE DETECTOR (GSED)
The lower magnification range is about 240x at 7 mm working
distance. This is used for general high pressure, wet and resolution
imaging. The overall image consists of a very pure secondary electron
signal with very little backscattered electron signal component, due to
the detector design and chamber geometry. This pure secondary signal
makes this detector best suited for resolution imaging. The field of
view is less than the LFD when at the lowest magnification.
FIGURE 5-9
STANDARD GSED CONFIGURATION
5-19
22 211
Operations Detector Types and Usage
Installing the GSED
With your gloved right hand, grasp the detector by the rigid connector
end. Hold it with the detector head facing back towards you, and the
yellow Torlon ring facing up. Insert the detector (gold fingers facing
forward) into the connector located at the back of the chamber, behind
the conical lens. This is made easier by inserting the right side of the
detector in to the visible portion of the connector, then rotating the
detector into position. A keyed position in the connector will prevent
the user from inserting the detector up-side-down.
Next, place the yellow Torlon ring of the detector head under the lens
insert and press the detector head up onto the insert. This requires
little force and can be done with one finger. The yellow Torlon seal
should be fully in contact with the lens.
FIGURE 5-10 THE GSED INSTALLED IN THE SEM
Signal Connector
Flexible PC board
Mounting collar
Removing the GSED
CAUTION!
DO NOT pull the detector from the connector first, then pull down to
remove the detector head from the insert. This will damage the
detector. To prevent damaging the detector, it is important to remove it
as described here.
To remove the GSED, first remove the detector head from the lens
insert. Do this by catching a fingernail or thumbnail (of the gloved
hand) on the FRONT of the yellow Torlon ring and pull down. There
is a shoulder machined into the Torlon ring which is specifically
designed for this purpose. Next, pull the other end of the detector out
from the connector.
5-20
2 2 2 11
Operations Detector Types and Usage
LFD
The Large Field Detector (LFD) is used in the LowVac mode. The
LFD is standard on all ESEMs and is used for imaging most samples.
This detector is used with the standard insert, at the low pressure
range of 0.1 Torr (14 Pa) to about 1.0 Torr (134 Pa). With this detector
in place, the field of view is unrestricted and the magnification range
will be identical to that of HiVac mode.
FIGURE 5-11 LARGE FIELD DETECTOR (LFD)
The signal from the LFD contains more backscattered electron
information than the GSED signal. This makes the detector ideal for
general imaging; it is also the only gaseous secondary detector that
can be used simultaneously with a BSE Detector.
FIGURE 5-12 LARGE FIELD OF VIEW WITH LFD
5-21
22 211
Operations Detector Types and Usage
Installing the LFD
The LFD plugs into the signal connector behind the conical lens. In
some cases the user will be prompted for the PLA size. Select No
Accessory in the Pole Piece Configuration dialogue or appropriate
Cone if installed. The vacuum system will be automatically limited to
the pressure range according to this selection.
NOTE:
After inserting LFD Purge mode changes from No Purge to
Automatic (see Setting Preferences... ESEM TAB at the end of this
Chapter).
PLA Cones
The LFD is also the preferred detector for low kV imaging (i.e. below
5 kV) to reduce beam loss in the gas. In this case a Low kV PLA is
installed onto the standard insert. This PLA is used when imaging at
shorter working distances (< 9 mm). It contains a 500 µm aperture,
allowing a maximum chamber pressure of 20 Torr (2600 Pa).
FIGURE 5-13 LOW KV PLA
Hot Stage Cone is used with the heating stage.
FIGURE 5-14 HOT STAGE PLA CONE
The X-ray PLA cone is used for EDX analysis (see further) at longer
working distances (> 9 mm).
5-22
2 2 2 11
Operations Detector Types and Usage
DISCHARGES BETWEEN THE GASEOUS
DETECTORS AND THE SAMPLE
The contrast control adjusts the voltage on the underneath of the
GSED; contrast of 100% is approximately 550V. Excessive voltage
may cause a “breakdown” between the detector (+550V) and the
sample (at ground). This could damage the sample (but will not
damage the GSED). This condition is indicated by white flashes or
streaks across the image window.
There are several factors that could cause detector voltage breakdown:
•
•
•
•
•
Contrast (voltage) set too high
Sample is too close to the detector
Gas pressure is too low
Air in the chamber (water vapour purge cycle not complete)
Sample is not grounded to the stage, or the stage is not fully
grounded (BNC plug not connected). This last item is usually the
cause of continuity breakdown, when all of the other items have
been corrected.
STANDARD INSERT
The standard insert is installed at all times, except when the optional
Heating stage is in use.
FIGURE 5-15 STANDARD INSERT
Environmental detectors such as the GBSD and GSED, and the PLA
cones, press onto the insert to form a gas seal. Chamber gas that flows
through the detector apertures are pumped out through the holes in the
sides of the insert (EC1 area). A gas restricting aperture is found at the
top of the insert. This aperture also acts as a final or objective
aperture. The pressure above this aperture is considered to be high
vacuum, therefore, any foreign material that accumulates on this
aperture will greatly affect the image.
5-23
22 211
Operations X-ray Analysis for different Vacuum Modes
X-ray Analysis for different Vacuum Modes
HIGH VACUUM
HiVac operation gives the most accurate X-ray results, but the sample
must be electrically conducting.
FIGURE 5-16 X-RAY IMAGING IN HIVAC MODE
ESEM USING THE GSED
The ESEM mode of operation allows observation of electrically
insulating samples, but care must be taken when using this mode to
collect X-ray results.
FIGURE 5-17 X-RAY IMAGING WITH THE GSED
5-24
2 2 2 11
Operations X-ray Analysis for different Vacuum Modes
Some of the electron beam will be deflected due to interaction with
the chamber gas. The deflected electrons form a “skirt” around the
main beam. The skirt electrons will hit the sample at points that are
remote from the area of interest, and generate X-rays from these
points.
The number of skirt electrons increases with chamber pressure and the
distance that the beam travels through the gas. The effect of these skirt
electrons can be minimized by reducing gas pressure, or by shortening
the distance between the sample and the final PLA.
The X-ray detector is designed for the sample to be at 10 mm FWD.
This working distance is too long for use with a high pressure detector
such as the GSED. For this reason, the ESEM is supplied with a
special X-ray PLA which is used in conjunction with the LFD to give
the best results.
ESEM WITH LFD AND X-RAY PLA
The following figure shows the lens configuration for X-ray analysis
using the X-ray PLA cone. This cone has a 500um aperture and fits
over the standard insert. It is used along with the LFD.
FIGURE 5-18 CONFIGURATION FOR THE X-RAY PLA CONE
EDX analysis should be performed at the lowest possible gas
pressure, so it should be done with the LFD. Normally, X-ray analysis
is performed with a relatively high beam current so that there should
be enough signal for a good LFD image even at very low gas pressure.
5-25
22 211
Operations X-ray Analysis for different Vacuum Modes
X-ray PLA
The X-ray PLA has a longer working distance profile extending down
to 8.5 mm. Samples are imaged at 10 mm working distance, which is
both the eucentric point of the stage and the collection point of the
EDX detector. It is used in conjunction with the LFD.
The longer profile of this cone minimizes the the low kV beam
dispersion and skirting of the primary beam in the gaseous
environment of the chamber, allowing for a cleaner EDX collection.
The aperture is 500 µm and has the same pressure limits as the
standard GSED. When the Pole Piece Configuration dialogue appears
the ‘X-ray Cone’ option should be selected
FIGURE 5-19 X-RAY PLA
To Fit the X-ray PLA cone remove any existing detector or PLA cone
from the lens insert, then press on the X-ray PLA cone.
FIGURE 5-20 FITTING THE X-RAY PLA CONE
5-26
2 2 2 11
Operations Capturing and Handling Single Image (Still)
Capturing and Handling Single Image (Still)
Setup the file name label and harddrive destination for the image to be
saved or archived using the next available label / number prior to the
capture session. Enter the correct information into the Data Bar (see
Preferences... DataBar tab), which is important if archiving.
The conditions for good image quality are:
• Slow scan speed for longer dwell time of the beam.
• Select a pixel resolution from the dropdown list box to suit the
detail in the image, i.e. no tearing pixelated edges.
• When focusing, increase the magnification at least 2x, Focus and
Stigmate using the reduced area, then return the magnification to
desired values.
• Use the Videoscope to correct the Contrast and Brightness
accurately, otherwise use the Auto C&B.
USING PAUSE BUTTON
Clicking once on Pause in the Tool Bar will stop the scan at the end
of the current scan frame and the 2 vertical bars will change to orange
with the button pressed in. This function is used automatically with
Snapshot, but can be used independently to capture an image - this
allows the user to use the Average function (the second ascending 6
bricks - frames) and the ability to save the image manually through
the File menu. To release Pause click once on the pressed in button,
the button will pop out and remain black.
The second ascending 6 bricks (frames) denote an improving image
with successive Average of 2 or more frames. This process will
continued until stopped by change of scanning condition or by
freezing the result.
USING SNAPSHOT BUTTON
The Snapshot icon button is represented as a camera on the Tool Bar.
When an image is required at any time one can click on Snapshot (or
press F2 button) and a single scan with use of predetermined scan
setting (see Preferences... Scan tab) will be activated which pauses at
the end of the scan.
USING INTEGRATION FUNCTION
The third stairway 6 bricks - frames shows an increasing number of
frames that Integrate to an end value. This process will continue until
the predefined number of frames is reached, and then stops and pauses
automatically. During and after image accumulation, you cannot
change the focus or perform other image-influencing actions. The
number of frames can be selected as a preset in the Tool bar drop
down list box associated with the Integrate function.
5-27
22 211
Operations Capturing and Handling Single Image (Still)
TABLE 5-12 IMAGE CAPTURING PROCEDURE
Step
Action
1.
Select the area of interest and set:
- the Magnification
- the Scan condition
- the Pixel resolution
that are required in the captured image.
2.
Make the best image with use of any method you are
familiar with and which is suitable.
3.
Click on the Snapshot / Pause button on the Tool Bar
or press F2 / F6 on the keyboard. The scan will make
one Screen / Quad pass (or several passes vhen
average function is selected) and pause.
4.
The image can now be saved by clicking on Save in the
File menu or by Ctrl +S.
5.
The scan can be released by clicking on the Pause
button on the Tool Bar or by pressing F6 button.
SAVING SINGLE IMAGES (STILLS)
Save (Ctrl + S)
After Snapshot or any activity that pauses the full scan frame, Save in
the File menu can be clicked on to store the image to the
predetermined location. The image is given the last known label
including a number that is incremental with successive images, i.e.
Label_001.tif, Label_002.tif, etc.
Save As...
Clicking on Save As opens a dialogue for saving an image, map file
etc. The dialogue displays, by default, the position to save files
associated to the imaging function e.g. image file location used by
Snapshot. With this command, files will not be saved automatically
to their existing labels if labels exists.This provides an opportunity to
change the label and save the same file with a different label. You can
also choose whether to save the image with (without) Databar by
checking (unchecking) Save image with Databar box.
FIGURE 5-21 SAVE AS... DIALOGUE
5-28
2 2 2 11
Operations Capturing and Handling Single Image (Still)
OPEN...
Opening a single image file to restore to a Quad or the full screen can
be achieved by clicking on Open in the File menu. Clicking on Open
displays a dialogue for opening an image, map file etc. The dialogue
displays, by default, the position to open files associated to the
imaging function e.g. image file location used by Snapshot.
FIGURE 5-22 OPEN DIALOGUE
Restoring to either Quad or full screen will be at the correct display
magnification, i.e. Quad 10x, full screen 20x.
IMAGE PRINTING (CTRL + P)
Clicking on Print... opens the printer setup dialogue so that choice of
printer and conditions can be established ready to print an image, or
any other printable product from the microscope. Pressing OK in the
printer setup dialogue will activate the printer to print the job.
The Print... word in the menu will only be highlighted when the active
Quad is on Pause. You can achieve this for instace by the procedure
described in Capturing Single Image.
NOTE:
For higher resolutions the printer may need a larger memory buffer.
FIGURE 5-23 PRINTER SETUP DIALOGUE
5-29
22 211
Operations Recording Movie
Recording Movie
This feature provides the making of digital video files (AVI) for
dynamic experiments performed within the Quanta FEG microscope.
Up to 3 quads can be recorded at the same time with synchronized
start and the possibility to switch between quad and full screen while
the video is recording. Movie has the following embedded features:
•
•
•
•
•
•
•
•
•
•
Resolution at 512 x 422 or 1024 x 884
Databar image optionally included in the video
Average or Integration changeable during recording
Scan speed changeable during recording
Reduced area pauses Quad for focus or C&B change
Time remaining indicator
Single frame Tif images recordable during video sequence
File format compressed AVI (*.avi)
Start, Stop and Pause onscreen indicators
Preferences set-up dialogue
MOVIE TAB PREFERENCES DIALOGUE
The Preferences dialogue can be found at the end of some of the
menus. The Movie tab provides two groups one to choose set-up
conditions for timing labelled Timer, and the other to set-up save
conditions for the resultant movie labelled File.
FIGURE 5-24 THE PREFERENCES MOVIE TAB DIALOGUE
5-30
2 2 2 11
Operations Recording Movie
Timer
The parameters in this section can be changed when the digital video
is inactive, for set-up purposes, but are disabled during the digital
video recording.
The digital video is timed asynchronously with the scanning. The
recording is controlled by two timers:
1. Digital Video (AVI) timer. After video delay time the acquisition
buffer of each unpaused quad is stored as a new frame in the video
stream. The frame optionally includes image of the databar and a
time stamp.
2. TIF timer. After TIF delay time the system will wait until the
running scan in unpaused quads is finished and saves a complete
image in the TIF format including the databar data for xT Docu.
The first image is saved immediately when its scanning is
completed.
The Tif delay must be always longer than or equal to the Video delay.
Check box Movie
This is a check box to determine that the movie should be stored.
Check it to store the movie at the end of a recording session. The
dropdown combo box lists the choice of delay times for the AVI
function. These are represented in seconds. Click on a delay time
value and it will be highlighted below the check box.
Check box TIF
This is a check box to determine that the Tif files should be stored.
Check it to store the Tif files at the end of a recording session. The
dropdown combo box lists the choice of delay times for the Tif
function. These are represented in seconds. Click on a delay time
value and it will be highlighted below the check box.
If the delay time is shorter than what the system can achieve for the
current setting, the recording runs as fast as possible.
If both AVI and Tif are recorded, the Tif delay must be longer than or
equal to the Movie delay. If this is not true the system reduces the
movie delay timing after pressing OK or Apply.
At all times one of these checkboxes remains checked. If the TIF
checkbox is unchecked the delay box for TIF is disabled. Equally, if
the AVI checkbox is unchecked the delay box for Movie is disabled.
Information field
This read only area is found below the AVI and TIF combo boxes and
contains additional information for the user about the number of
frames per time unit (seconds, minutes) and further movie data stored
to the completed files. This data is calculated from the image
resolution valid when the preference dialogue was opened.
5-31
22 211
Operations Recording Movie
File
All parameters in this section can not be changed for the currently
running video. Changes made are only valid for the next video
recording.
Digital video can be stored in *.avi files from the quads 1 to 3. The
video name contains: generic filename, quad name and a numeric
seed.
For example: myvideo (Quad1) 001. avi
The filename and the numeric seed are set by the user. The numeric
seed is automatically incremented, after the recording has stopped.
Optionally the *.tif files can be stored besides the *.avi. Name of the
tif files contains: generic filename, quad name, numeric seed and
number of the image in the series.
For example: myvideo (Quad2) 003 - 00123.tif. The series number
has always 5 digits filled by zeros on the left; the first Tif file has
number 00001.
File name
Enter here a generic file name valid for the next video recording. A
suitable file name must be entered here, if this field is not filled the
Movie dialogue can not be closed.
Save in
Enter a suitable path to the directory. If this field is not filled the
Movie dialogue can not be closed. If the path is long and cannot be
read in the field space the Tool tip can be used to give full
information.
Numeric Seed
Enter any number 1 to 999 which is converted to the three digit form
with zeros on the left, if necessary.
Video file size
This value specifies the maximal size of video file in MB. Enter a size
value lower than 2000 MB. After reaching this size, the video is saved
and a recording is started. If this field is not filled the Movie dialogue
can not be closed. A dialogue warning appears if there is a Out of
Memory condition with the Hard drive.
File type
List box with types of supported digital movie formats. Only
compressed formats are used.
Record databar
This checkbox allows the databar to be included in the video when
checked. The databar in the video is updated every second.
5-32
2 2 2 11
Operations Movie Procedure
Movie Procedure
START, PAUSE AND STOP
The RED dot is the start command button that starts the recording of
three videos, one for each of the three image quads at the same
moment.
If a quad is paused when starting the video, only the first image with a
time stamp is stored. When the quad is paused during the video
recording, storing of the video frames is interrupted but the video
streams keep synchronization for the next unpausing. After reaching
the maximal file size, the video is paused, saved and a new video is
started with the same name and incremented numeric seed.
When the Red dot, representing ‘Start’, is pressed it turns to a Black
square, representing ‘Stop’. When pressed the Black square then
stops the recording of the video of all three quads and closes the files.
RECORDING A MOVIE
The following procedure describes how to set-up and record a movie.
TABLE 5-13 SET-UP AND RECORDING A MOVIE
Step
Action
1.
Select Preferences at the base of the Scan menu. Click
on the Movie tab. In the Timer section check the Movie
check box and select from the Delay time combo box
the desired time. Select the TIF function by checking the
TIF check box if required and select from the TIF combo
box the desired time.
2.
In the File section fill in the File name and give the
‘Save in’ directory path. Fill in the Numeric seed value
and the Video file size. Select the File type and choose
whether the Databar need be recorded with the Record
databar check box. Choose Apply to change temporary
to the new values or OK for permanent fixing of the
values entered or Cancel to return to the original values
at opening of Preferences.
3.
Choose which quads will NOT be active during
recording by clicking on the quads in turn and pressing
the Pause button on the button bar. This applies only to
quads 1 - 3.
5-33
22 211
Operations Movie Procedure
TABLE 5-13 SET-UP AND RECORDING A MOVIE
Step
Action
4.
Set up the imaging in the live quad and press the RED
dot on the button bar or Record Movie in the File
menu.The first frame with a time stamp of all quads is
recorded. Next the recording starts and the duration is
dependant on the set-up in the Preferences.When the
video is started and the scan resolution is higher than
1024 the following dialogue occurs:
5.
Choose either of the resolution values and click on OK.
The Movie continues to record at the selected
resolution.
6.
The Movie will stop when the Black square button is
pressed on the button bar. The stop command stops
recording of the video of up to all three quads and
closes the files.
Quad Indicators
A Red dot indicates that recording is active in this quad. It is
displayed in the top right hand corner below the timer display.
A Red dot with the Pause symbol indicates that the record is running
but the data from this quad is not stored. It is displayed in the top right
hand corner below the timer display.
An estimation of the time remaining till the end of the video is
displayed in the upper right corner. The time is displayed in the format
hh:mm:ss. The time is calculated from the average disk space
consumption and the free space on the disk.
5-34
2 2 2 11
Operations TIF Movie Creator
TIF Movie Creator
MOVIE CREATOR
Click on the item Movie Creator in the Tools menu to activate the
tabbed dialogues for creating a movie from a sequence of TIF images.
File (tab)
The File tab contains the set-up facilities for creating a movie from a
captured sequence of TIF images made while using the Movie facility.
FIGURE 5-25 MOVIE CREATOR TAB: FILE
Name Prefix:
Enter here the prefix label for the sequence of TIF images. Click on
the dotted button to the right of the dialogue box to browse directories
and files for the TIF sequence prefix.
FIGURE 5-26 BROWSE DIALOGUE
5-35
22 211
Operations TIF Movie Creator
Time Period:
Either select a custom time for the playback of the movie by clicking
on the millisecond radio button, or on the TIF time radio button to
select real time (acquisition = playback). To find the best custom
timing one may need to create the movie a few times. Unless the AVI
file name is changed the next created AVI file will overwrite the last
one made.
From: (Frame numbering)
Enter here the numbers of the starting frame and the ending frame.
These will represent the sequence beginning to end.
Save in: (Path)
Enter here the path where the AVI file should be saved. Click on the
dotted button to the right of the dialogue box to browse the directories
for the path needed.
File Name:
Enter here the file name for the AVI file to be saved. If this is not
filled in the default prefix (first image) will be used, and is filled
automatically.
Databar Preview:
This displays the databar chosen from settings made in the Databar
tag dialogue. Changes can be made by clicking on the Databar tab and
reorganising the databar components.
Status:
This displays the progress of creation of the movie.
Create Movie
Clicking on the CREA TE M OV IE button starts the creation process of
the TIF files to a single AVI file.
Stop
The ST OP button stops the creation process.
Close
The CL OSE button closes down the whole dialogue.
5-36
2 2 2 11
Operations TIF Movie Creator
Databar (tab)
The DataBar Tab contains two lists, one labelled Available and the
other Selected. Items in the Available list can be added individually or
as a whole to the Selected list. The Selected list when completed
contains all items that will be displayed in the DataBar at the base of
the movie display. The order of the items in the Selected list can be
moved up or down due to priority or preference. This will in turn
change the order of the displayed items in the DataBar. Items can be
removed from the Selected list singularly or in total back to the
Available list. This facility does not affect the Quad and Full screen
Databar and is only dedicated to the Movie Creator.
FIGURE 5-27 MOVIE CREATOR TAB:DATABAR
Available / Selected
Two lists, Available for all the items that can be entered in the Databar
and Selected for all items that will be present in the Databar.
Add
Add one item from the Available list to the Selected list.
Add All
Add all items from the Available list to the Selected list.
Remove
Remove one item from the Available list to the Selected list.
Remove All
Remove all items from the Available list to the Selected list.
Move Up / Move Down
Move an item up or down in the Selected list.
5-37
22 211
Operations TIF Movie Creator
Preview (tab)
Once the movie is created opening the Preview tab will automatically
display the first image of the movie sequence. By clicking on the Play
button the movie will start to play and the progress slider below the
movie will move from left to right at a speed depending on the play
timing of the movie.
FIGURE 5-28 MOVIE CREATOR TAB: PREVIEW
Start / Pause / Stop buttons
Click on these buttons to Start, Pause or Stop the movie. By holding
the slider one can run forward or backwards through the movie.
Create Movie
Clicking on the CRE ATE MOV IE button will bring one back to the File
tab dialogue and starts the creation process of the TIF files to a single
AVI file.
Close
The CL OSE button closes down the whole dialogue.
PLAYING A MOVIE
The AVI file movie can be played on the Windows Multimedia player
installed on the system or exported to another Windows PC with more
advanced movie editing programs. Programs used to play the movie
need to recognise the *.avi file type.
5-38
2 2 2 11
Operations Setting Preferences...
Setting Preferences...
The preferences dialogue can be activated by selecting Preferen-ces...
at the end of any of the following menus:
Magnification, Beam, Scan and Tools.
The exception to this is the Preferences attached to the Detector menu
which handles individual choices of Detectors with direct dialogue.
THE PREFERENCES TAB DIALOGUES
The background setting for day to day or individual personal
operation can be made by entering or changing characteristic in any of
the tabbed dialogues found in the Preferences...
It will depend on the opened menu where Preferences... is chosen that
dictates the tab opened on entry to the Preferences dialogue. Once
the Preferences dialogue is opened any of the tabs can be chosen.
Only one tab can be opened at any time.
At the bottom of any Tab there are three buttons:
• OK button to bring the new settings into operation
• Cancel button to return to the original setting
Either of these will close the Preferences dialogue
• Apply button to suspend the closing of the Preferences dialogue
but save the settings if one needs to move to other Tabbed
dialogues to change further settings.
The Items chosen and changed from any of the Preferences Tab
dialogue will remain with the operating system until changed.
TABLE 5-14 TABBED PREFERENCES
Tab
Settings
ESEM
Set purge choice: No purge / Automatic / custom.
Displays relevant pressure and purge cycles.
Databar
Selection of items for entry on the Databar.
Units
Selection of pressure, temperature and
measurement units for the system to operate
under.
Presets
Select and change entries to High Voltage,
Spotsize, Magnification and Pressure.
Scan
Selection of presets for the scan speed defaults
found on the Tool Bar.
Movie
Set-up for Movie parameters
Language
Language selection for local environment
5-39
22 211
Operations Setting Preferences...
ESEM TAB
The ESEM Tab displays the capability to change conditions in the
Purge Mode (the default condition is Automatic). The Purge
Settings will reflect the internal pressure and cycle settings depending
on the mode selected in the Purge Mode dialogue.
FIGURE 5-29 ESEM PREFERENCES
There may be certain applications (e.g., working with the optional
Peltier stage) where the operator needs to change the purge
parameters seen above.
Click on No Purge when purging of the sample chamber is not
desired during Low Vac or ESEM operation. With no purge cycle
initiated the chamber will go to the set pressure directly and the gas
mixture in the chamber will slowly change to the new gas type. The
Purge Settings will be greyed out.
Click on Automatic will use pre-defined values for Number of
cycles and Pressure limits based on the PLA size. The Purge
Settings will display the system default values. The following
defaults (TABLE 5-15) apply specifically to the Automatic mode.
Click on Custom to be able to change the pressure limits (Minimum
Pressure, Maximum Pressure) and the Number of cycles within the
Edit boxes. The default values for Custom mode are the same as the
Automatic mode and are show in the Edit boxes when first opened.
Enter new values in by the keyboard.
5-40
2 2 2 11
Operations Setting Preferences...
TABLE 5-15 DEFAULT PURGING SETTINGS
FOR DIFFERENT PLA SIZES
PLA
size
[µm]
Minimum
Purge
Pressure
[Torr / Pa]
Maximum
Purge
Pressure
[Torr / Pa]
Number
of cycles
NONE
0.5 / 67
1 / 134
5
1000
1 / 134
5 / 660
5
500
1 / 134
10 / 1340
2
300
1 / 134
10 / 1340
2
The maximum allowed pressure depends on the PLA. If the
Maximum pressure defined for Custom is higher than allowed with
the current PLA size, the pressure should be reduced automatically to
the maximum allowed. No warning is given to the user when this
happens; instead the Preferences / Presets (see further pages)
dialogue, where the Custom values are entered, warns the user of this
possibility in the Tool-Tips for the maximum value edit control.
System Behaviour
when Applying a new purge condition
When you set a new purge condition and press OK / Apply button:
• If the chamber is not being purged, no action is undertaken,
• If a purge procedure is active, it will immediately change to the
new parameters, both pressure and number of purge cycles,
• Active purge cycle can be aborted by selecting No Purge radio
button.
• If a new auxiliary gas type is selected during purge procedure is
active, the new gas type will be used the next time the microscope
is pumped to either Low Vac or ESEM.
NOTE:
Purging can take several minutes, according to Preferences setting.
Wait until Vacuum status indicates Vacuum, because detectors does
not start operation till that.
Purge mode changes from No Purge to Automatic after inserting
LFD.
See Chapter 3 - Quanta FEG Vacuum system for more details.
5-41
22 211
Operations Setting Preferences...
DATABAR TAB
The DataBar Tab contains two lists, one labelled Available and the
other Selected. Items in the Available list can be added individually or
as a whole to the Selected list. The Selected list when completed
contains all items that will be displayed in the DataBar at the base of
the imaging screen or screens. The order of the items in the Selected
list can be moved up or down due to priority or preference. This will
in turn change the order of the displayed items in the DataBar. Items
can be removed from the Selected list singularly or in total back to the
Available list.
The Micron Bar will scale to the magnification but also will change
size to accommodate other items added to the DataBar. It can be
chosen also from the Available list.
The Label (area) expands or contracts depending on the other items
on the Databar. It can be chosen also from the Available list.
The Label is edited another way. By clicking on the databar label a
choice dialogue appears to edit and copy the label to any of the other
quads.
The limit for entries is displayed in the dialogue as it is updated.
FIGURE 5-30 DATABAR PREFERENCES
5-42
2 2 2 11
Operations Setting Preferences...
UNITS TAB
The Units Tab displays the capability to change the units for pressure,
temperature and measure. The Microscope system will from time to
time need to display values of Pressure, especially in ESEM mode.
Units of Pascal, Torr, or Bar can be selected to suit. By clicking on the
list arrow a selection can be made for the respective unit of pressure.
The Temperature can be displayed in a desired unit value by clicking
on the list arrow and selecting a unit from the list. The list contains
Kelvin, Celsius and Fahrenheit.
The Units of Measure can be selected from the list by clicking on the
list arrow and choosing the unit. The list contains Meter, Millimetre,
Inch and Foot.
FIGURE 5-31 UNIT PREFERENCES
5-43
22 211
Operations Setting Preferences...
PRESETS TAB
The Presets tab displays the capability to change values in the High
Voltage, Spotsize, Magnification and Pressure ranges. Either single or
numerous values can be inserted in the lists. Changing values can be
accomplished by entering values in the edit box just below the
respective title.
The High Voltage list can be changed to span any values from 200V
to 30kV. As the values are displayed in Volts the entry value in the edit
box can be specific in value.
The Spotsize list can be changed to specific values between 1 and 7,
totalling 7 values in all. The larger the Spotsize number the larger the
beam diameter (higher the beam current).
The Magnification list can be changed to hold regular used values or
general values. Magnification values that are in the list but do not
apply because of the Working distance condition will be greyed out in
the Magnification menu on the Menu Bar. Magnification range is
from 10x to 300 000x.
The Pressure list can be changed to hold specific values regularly
used in the Low Vac and ESEM modes.
FIGURE 5-32 PRESETS PREFERENCES
5-44
2 2 2 11
Operations Setting Preferences...
SCAN TAB
The Scan tab displays the capability to change scan times and make
presets to the slow and fast scan buttons on the Tool bar. On the left of
the dialogue box there is a Dwell-time preset list, similar to the High
Voltage, etc., preset lists. There are two differences: two icons
indicate with which items in the list the ‘Slow’ and ‘Fast’ preset
buttons correspond. The list of dwell times has a fixed number of
entries. By selecting an entry it can be edited in the edit box above the
list and set back in the list with the Set button. The Hare and Tortoise
icons indicate which value corresponds to the preset Icon buttons on
the Tool Bar; these can be moved by selecting a value and then
clicking the corresponding Hare or Tortoise buttons below the list.
The Camera icon in the list indicates the preset for the Snapshot
function. This can be moved by selecting a value and then clicking the
Camera button below the list. The Default button restores the default
list and icon positions.
On the right the details for the new and the current setting are shown.
The New settings section on the right displays the resulting line time,
frame time, and refresh rate for the value being edited. The Current
setting section displays the data for the current system setting.
FIGURE 5-33 SCAN PREFERENCES
5-45
22 211
Operations Setting Preferences...
MOVIE TAB
The Movie tab provides two groups one to choose set-up conditions
for timing labelled Timer, and the other to set-up save conditions for
the resultant movie labelled File.
This Tab is described in detail in the section: ‘Record Movie’.
LANGUAGE TAB
The Language tab allows selection of various languages to suit world
local choice. The language change influences the whole User
Interface to make operation easier.
The default language is English. Additional languages will be
included in future releases of the UI software.
FIGURE 5-34 LANGUAGE PREFERENCES
Click on the preferred language to bring the User Interface under that
language control.
5-46
2 2 2 11
Chapter 6
Alignment
Overview. . . . . . . . . . . . . . . . . . . . . . . . . . . 6-1
Recommendation . . . . . . . . . . . . . . . . . . 6-1
FEG Systems Alignments. . . . . . . . . . . . 6-2
Tips for X and Y Corrective Movement . . . . 6-3
Final Lens Strip Aperture Alignment. . . . 6-4
1 - Gun Alignment. . . . . . . . . . . . . . . . . . 6-5
2 - Stigmator Alignment . . . . . . . . . . . . . 6-8
Final Check. . . . . . . . . . . . . . . . . . . . . . . . . 6-9
3 - Stage Rotation Center . . . . . . . . . . . 6-10
4 - PLA Centering. . . . . . . . . . . . . . . . . 6-12
5 - Emitter Startup . . . . . . . . . . . . . . . . 6-13
22 211
2 2 2 11
ALIGNMENT
6
OVERVIEW
This section describes the set-up for gun and column, i.e. the emitter
start, the proper final lens alignment and the electronic alignment of
the column using the software in the Pages ‘Alignments’.
The gun alignment can either be completed by the experienced
supervisor or left to a service arrangement with the local FEI service
department.
When all alignments are done properly the image should stay within
focus range, its rotation will be corrected and will not show a
substantial image displacement when changing kV and/or spot.
Recommendation
Total alignment of the system should be made whenever necessary (or
given time period) in the following order:
•
•
•
•
•
•
Final Lens Strip Aperture Alignment
1 - Gun Alignment (about once per month)
2 -Stigmator Alignment
3 -Stage Rotation Center
4 - PLA Centering (if any PLA is used)
5 - Emitter Startup
The above column alignments should only be attempted when the
column has been misaligned. Correcting of only one procedure may
influence others, therefore care should be taken to monitor the
influence of actions made.
Reasons for using any or all of the column procedures are as follows:
• A Final lens aperture change: correct only Final Lens Strip
Aperture Alignment and 2 - Stigmator Alignment
6-1
22 211
Alignment FEG Systems Alignments
FEG Systems Alignments
All alignment procedures should be operated in a fast scan mode.
TABLE 6-1
ALIGNMENT PROCEDURES
Procedure
Function
Final Lens
Strip Aperture
Alignment
Objective lens coil modulation (wobbler) to show
optical center of rotation. X and Y are used to
bring the rotation center under the cross in the
screen center. This eliminates image shift when
focusing.
1 - Gun
Alignment
X and Y correction of Spot size / aperture to
screen center displayed by a cross. The image
circles are centered on the cross. This aligns the
illumination to the mechanical column alignment.
2 - Stigmator
Alignment
X and Y correction of each X and Y stigmator.
Minimise the movement seen in both X and Y
procedures to eliminate image shift during normal
stigmator correction.
3 - Stage
Rotation
Center
Corrects center of rotation at any point on the
specimen by computer correction of the X, Y
offset from the stage mechanical center.
4 - PLA
Centring
Corrects the center of the projected PLA aperture
to the center of the display screen.
5 - Emitter
Startup
Enables electron gun switching on/off. In case of
emergency shut down it makes also possible to
start IGP (Ion Getter Pump).
Use the Alignment Pages to align the column and determine fine
tuning for the electromagnetic system. The software stores column
parameters such as Gun Tilt X, Y, Gun Shift X, Y, and other data that
ensures minimum image shift when focusing and stigmating images.
When you click on the list box arrow, various available adjustments
are displayed.
6-2
2 2 2 11
Alignment FEG Systems Alignments
TIPS FOR X AND Y CORRECTIVE MOVEMENT
Alignments 1, 2 and 4 all require some corrective movements, but this
is simplified by X and Y being represented as a 2D Graphical adjuster.
When the 2D box is clicked on, and the left-hand mouse button is held
in, a cross-hair shows on the screen with a small 4 ended arrow cursor
located in the center. By moving the mouse the cross-hairs move and
therefore affect the image as required. Due to the fact that the image
rotation correction is switched off automatically in some alignment
procedures the X and Y movements may not always appear to be in
the same directions.
NOTE: Do not use Beam Shift at any time during the adjustment
procedures, other than where specified, as this is set to zero value at
each alignment section, and extra movement can offset the zero
condition. All movement of the specimen can be made using the
stage, either mechanical or motor driven, where appropriate.
Place a stable, regularly structured specimen in the microscope. When
the vacuum is OK, select HV at 20 kV and spot size 3. The Center
Cross and Alignment Rectangle found under the Window menu will
be automatically switched on when Alignments is selected. The Next
button on the pages will take one to the following task, the Previous
button will return one to the task prior to the present one, and Cancel
will stop all activity and return one to the original setting with nothing
stored from the last open procedure. Save will save new parameters
from a section of a large procedure and Finish will save outstanding
new parameters and close the alignment procedure, returning to
normal operation.
6-3
22 211
Alignment Final Lens Strip Aperture Alignment
Final Lens Strip Aperture Alignment
Before you align the column, be sure that the final lens aperture is
correctly aligned. Use 20 kV and spot 3 with the specimen at a
working distance of 10 mm.
When the aperture is well aligned, the image does not rotate at low
magnification or move at high magnification during focusing. The
position of the final aperture should remain constant and should not be
changed further during the alignment procedure.
TABLE 6-2
ALIGNNING THE FINAL LENS APERTURE
Step
Action
1.
Select HV 20 kV, Spot 3, Go to 10 mm FWD.
Select Zero Beam Shift from the Stage menu.
Select Zero Lens Alignment by clicking the right
mouse button on the 2D box center square (see
Chapter 4 for more detailed description).
2.
Make an image at a magnification of about
1000x.
3.
Move the stage to find a good area of interest
and focus as best one can.
4.
Center a feature with the Get function.
5.
Click on the Lens Alignment icon in the tool bar.
The scanning condition turns into the fastest
scan value, the lens modulator turns on and the
alignment cross appears in the center of all
imaging quads. The image rotates about a point
(maybe different from the image center).
6.
Adjust the position of the aperture so that the
center of the rotation is under the cross.
7.
Increase the magnification to 20 000x and
realign. If necessary, repeat at 40 000x. At
higher magnification the image moves very
slightly in a certain direction. By tuning the
aperture, you can minimize this movement
8.
When corrected, switch off the Lens Alignment.
There should be no image shift when the focus
control is used.
Note:
After mechanical alignment you can apply step 5 separately for fine
electrical alignment (gun shift) of the final lens. Pressing and holding
the left mouse button in image area activates a quad arrow ended
cursor. By moving the mouse the final lens alignment begins. The user
should achieve no image shift considering the middle alignment cross.
This alignment could be used any time.
6-4
2 2 2 11
Alignment 1 - Gun Alignment
1 - Gun Alignment
The Gun Alignment corrects the Gun Shift X and Y for beam
diameter center to screen center. The image circles are centered on a
cross displayed at the center of the screen. This procedure electrically
aligns the illumination to the mechanical column alignment - one
series of various Spot sizes for each High voltage value: 500 V, 1 kV,
2 kV, 5 kV, 10 kV, 20 kV and 30 kV.
After finishing of this procedure there should be no image shift, no
final lens out of focus and no brightness change.
TABLE 6-3
GUN ALIGNMENT
Order
Action
Start
Click on the Alignments Icon. Open the list box by
clicking on the right-hand corner. Click on 1 - Gun
Alignment. An explanation of the procedure is
displayed in the text box immediately below the title.
Click on the Start button.
Follow the instructions displayed in the text box on all
pages.
Click on the Cancel button (any time) to return to the
start without having changed the original settings.
Step 0
By moving the stage bring a recognisable image
feature under the screen central cross. Adjust Focus
and the Contrast and Brightness sliders if necessary.
Click on the Next button.
Step 1
Magnification automatically enlarges. Choose the
High Voltage value one needs to align the necessary
spotsizes.
Adjust Focus and the Contrast and Brightness
sliders if necessary. Bring selected image feature
back under the screen central cross using the 2D
box Image Shift. Press the Next button to continue.
6-5
22 211
Alignment 1 - Gun Alignment
TABLE 6-3
6-6
GUN ALIGNMENT
Order
Action
Step 2 - 8
Optimize brightness by using the Gun Tilt 2D box. If
there is a large brightness drop for big spot sizes,
use Cross Over mode for coarse Gun Tilt
adjustment.
Switch on the Modulator and tune the Gun Shift so
that the screen central cross is identical with the
image rotation center, i.e. there is no image shift.
If the image shifts horizontal / vertical, correct the
Gun Shift by the 2D box in the same direction.
Switch off the Modulator. Using the Image Shift 2D
box bring the selected image feature back under the
screen central cross.
When large Spot Sizes are used (5, 6, 7), Image
Shift, Gun Tilt and Gun Shift operations influence
each other, therefore particular tuning should be
checked and repeated if required.
If you are satisfied with tuning, click the Finish
button, if you want to repeat it click the Previous
button.
Finish
When you complete Step 8 for the last spot size (7),
The next button changes to the Finish button. By
clicking on it, all tuned parameters are saved and
from that point on are used as working parameters.
2 2 2 11
Alignment 1 - Gun Alignment
Gun Alignment Pages (continued)
6-7
22 211
Alignment 2 - Stigmator Alignment
2 - Stigmator Alignment
The Stigmator procedure aligns the X and Y accuracy of the
Stigmator to reduce shift of the image when in use.
TABLE 6-4
6-8
STIGMATOR ALIGNMENT
Order
Action
Start
Click on the Alignments Icon. Open the list box by
clicking on the right-hand corner. Click on 2 - Stigmator
Alignment. An explanation of the procedure is displayed
in the text box immediately below the title. Click on the
Start button.
Follow the instructions displayed in the text box on all
pages.
Click on the Cancel button (any time) to return to the
start without having changed the original settings.
Step 0
The default magnification is 6400x (this is valid only for
single screen mode), therefore use a suitable specimen
to show regular structure at this magnification.
Adjust Focus and the Contrast and Brightness sliders
if necessary.Click on the Next button.
Step 1
Follow the instructions displayed in the text box. Move a
suitable area of the specimen to the center of view
(under Center Cross) using the 2D box labelled Beam
Shift. Stage movement could also be used to place a
suitable area under the Center Cross. Click on the Next
button.
Step 2 to
Step 3
The procedure starts with the X Stigmator moving in a
set direction. Using the 2D box, labelled Stigmator X
alignment, eliminate excessive movement from the
image.
Click on the Next button when the X Stigmator is
corrected. This enables the Y Stigmator and can be
corrected in the same way by using the 2D box labelled
Stigmator Y alignment. If a mistake is made it is
possible to backtrack with the Previous button.
Magnification is increased to approximatelly 27400x for
these 2 steps.
Finish
Click on the Finish button to complete the procedure.
2 2 2 11
Alignment 2 - Stigmator Alignment
Stigmator Pages (continued)
FINAL CHECK
A final check on the quality of the new alignments can be seen by
choosing 2000x (screen magnification) and changing spotsize from 6
to 1 and kV’s from 30 kV to 1 kV. If there is very little difference in
the position of the objects on the screen during focusing and changing
stigmator alignment, the alignment is good.
The Gun and Column User Alignments are now completed.
6-9
22 211
Alignment 3 - Stage Rotation Center
3 - Stage Rotation Center
The rotation of the stage has a mechanical center and movement by
rotation can be made by changing the value in the text box for R on
the Work page. This will move the stage about the stage mechanical
center. In some circumstances this is not desired and rotation about
the center of the field of view would be more useful. The following
correction is the alignment procedure for the Compucentric Rotation
function found in the Stage menu. The offset of X and Y are
calculated in this procedure so that the Compucentric Rotation at any
time later, when computed, will be correct.
TABLE 6-5
6-10
STAGE ROTATION CENTER
Order
Action
Start
Click on the Alignments Icon. Open the list box by
clicking on the right-hand corner. Click on 3 - Stage
Rotation Center. An explanation of the procedure is
displayed in the text box immediately below the title.
Click on the Start button.
Follow the instructions displayed in the text box on all
pages.
Click on the Cancel button (any time) to return to the
start without having changed the original settings.
Step 0
The magnification should be between 500x to 2000x,
therefore use a suitable specimen to show regular
structure at this magnification. Move a suitable feature of
the specimen to the center of view (under Center Cross)
using the mechanical stage movement. A readout of the
X and Y coordinates is displayed on the pages.
Click on the Next button. The stage automatically rotates
the view 180º.
Step 1
Wait until the stage movement is finished. Bring the
recognisable feature back under the center cross on
screen with mechanical stage movement. A new readout
of the X and Y coordinates is displayed on the pages.
Proceed with one of the following:
Click on the Next button to proceed to Step 2.
Click on the Previous button if the procedure for Step 1
needs to be repeated.
Step 2
Wait until the stage movement is finished. Click on Finish
to store the new settings.
2 2 2 11
Alignment 3 - Stage Rotation Center
Stage Rotation Center Pages (continued)
6-11
22 211
Alignment 4 - PLA Centering
4 - PLA Centering
The PLA Centering alignment is for correcting the position of the
projected PLA aperture seen on-screen at the lowest magnification
when a PLA device is installed. The device holding a PLA can either
be a detector or a cone. By using this alignment the area of image can
be centered on-screen.
TABLE 6-6
6-12
PLA CENTERING
Order
Action
Start
Click on the Alignments Icon. Open the list box by
clicking on the right-hand corner. Click on 7, PLA
Centering. An explanation of the procedure is displayed
in the text box immediately below the title. Click on the
Start button.
Follow the instructions displayed in the text box on all
pages.
Click on the Cancel button (any time) to return to the
start without having changed the original settings.
Step 0
Click on the 2D box, labelled PLA Centering, with the
left mouse button, hold down and move the area of
image on-screen to the center of the screen. Release
the mouse button. Click on the Finish button to store
position.
2 2 2 11
Alignment 5 - Emitter Startup
5 - Emitter Startup
This procedure enables electron gun switching On / Off. In cases of
emergency shut down it allows one to start the IGP (Ion Getter Pump)
to pump the electron gun vacuum..
TABLE 6-7
EMITTER STARTUP
Order
Action
Start
Click on the Alignments Icon. Open the list box by
clicking on the right-hand corner. Click on 5 - Emitter
Startup. An explanation of the procedure is
displayed in the text box immediately below the title.
Click on the Start button.
Follow the instructions displayed in the text box on all
pages.
Step 0
Check Gun vacuum status:
if it is OK click on the Next button.
If it is OFF click on the IGP button to automatically
start the ion pump. This procedure takes a few
minutes. If the ion pump start is not successful, call
service.
Step 1
Click on the Emitter On / Off button to start / stop the
emission of electrons.
Watch the Time to go information field to check the
time needed for the respective operation.
Finish
When you reach the required emitter condition click
on Finish or Cancel button to close the procedure.
6-13
22 211
Alignment 5 - Emitter Startup
Emitter Startup Pages (continued)
6-14
2 2 2 11
Chapter 7
Stages
Overview . . . . . . . . . . . . . . . . . . . . . . . . . . 7-1
Quanta FEG 200 . . . . . . . . . . . . . . . . . . . 7-2
50 x 50 mm Stage (4 Axes Motor) . . . . . . . 7-2
Stage movement . . . . . . . . . . . . . . . . . . 7-2
50 x 50 mm Stage (5 Axes Motor) . . . . . . . 7-3
Stage movement . . . . . . . . . . . . . . . . . . 7-3
Using Z (height) adjustment . . . . . . . . . . 7-4
Quanta FEG 200 Standard Sample holders 7-5
Quanta FEG 400 . . . . . . . . . . . . . . . . . . . 7-6
100 x100 mm Stage. . . . . . . . . . . . . . . . . . 7-6
Stage movement . . . . . . . . . . . . . . . . . . 7-6
Using Z (height) adjustment . . . . . . . . . . 7-7
Quanta FEG 600 . . . . . . . . . . . . . . . . . . . 7-8
150 x 150 mm Stage . . . . . . . .
Stage movement . . . . . . . . .
Using Z (height) adjustment .
Quanta FEG 400, 600
Standard Sample Holders . . . .
22 211
. . . . . . . . . 7-8
. . . . . . . . . 7-8
. . . . . . . . . 7-9
. . . . . . . . 7-10
Software Stage Functions . . . . . . . . . . 7-11
Stage . . . . . . . . . . . . . . . . . . . . . . . . . . . .
Map tab . . . . . . . . . . . . . . . . . . . . . . . . . .
Radarview . . . . . . . . . . . . . . . . . . . . . .
Holder Maps . . . . . . . . . . . . . . . . . . . . .
Location . . . . . . . . . . . . . . . . . . . . . . . .
Open. . . . . . . . . . . . . . . . . . . . . . . . . . .
Save . . . . . . . . . . . . . . . . . . . . . . . . . . .
Clear. . . . . . . . . . . . . . . . . . . . . . . . . . .
Map Elements . . . . . . . . . . . . . . . . . . . . .
Map Area . . . . . . . . . . . . . . . . . . . . . . .
Map dialogue . . . . . . . . . . . . . . . . . . . . . .
Add current stage position . . . . . . . . . .
Update to current stage position . . . . .
Remove selected position . . . . . . . . . .
Center view . . . . . . . . . . . . . . . . . . . . .
Auto center on target . . . . . . . . . . . . . .
Zero radarview . . . . . . . . . . . . . . . . . . .
Stage location overlay . . . . . . . . . . . . .
Magnification (Zoom) . . . . . . . . . . . . .
Coordinates tab . . . . . . . . . . . . . . . . . . . .
X, Y, Z, R, T . . . . . . . . . . . . . . . . . . . . .
When in Absolute mode: . . . . . . . . . .
Editing a coordinate:. . . . . . . . . . . . . .
Using the Escape key. . . . . . . . . . . . .
When in Relative mode: . . . . . . . . . . .
Units of measure . . . . . . . . . . . . . . . . .
Changed. . . . . . . . . . . . . . . . . . . . . . . .
Locked . . . . . . . . . . . . . . . . . . . . . . . . .
Location . . . . . . . . . . . . . . . . . . . . . . . .
Absolute . . . . . . . . . . . . . . . . . . . . . . . .
Relative . . . . . . . . . . . . . . . . . . . . . . . .
Add . . . . . . . . . . . . . . . . . . . . . . . . . . . .
Update . . . . . . . . . . . . . . . . . . . . . . . . .
Remove . . . . . . . . . . . . . . . . . . . . . . . .
GoTo . . . . . . . . . . . . . . . . . . . . . . . . . .
When in Absolute mode: . . . . . . . . . .
When in Relative mode: . . . . . . . . . . .
7-11
7-11
7-11
7-11
7-11
7-12
7-12
7-12
7-12
7-12
7-13
7-13
7-13
7-14
7-14
7-14
7-14
7-14
7-14
7-15
7-15
7-15
7-15
7-15
7-15
7-16
7-16
7-16
7-16
7-17
7-17
7-17
7-17
7-17
7-18
7-18
7-18
About Specimen Alignment . . . . . . . . . .7-23
Alignment Wizard . . . . . . . . . . . . . . . . . . 7-23
Using Alignment Wizard . . . . . . . . . . . 7-24
1 to 3 Point Alignment . . . . . . . . . . . . . .7-25
Define User Units . . . . . . . . . . . . . . . . . . 7-25
User Units . . . . . . . . . . . . . . . . . . . . . . . . 7-28
Using 1-, 2- or 3- Point Alignments . . . 7-28
Stage Related Functions . . . . . . . . . . . .7-29
Specimen Holder Wizard . . .
Using the Wizard . . . . . . . .
Using the Holder Image . . .
Changing Magnification . . .
Clearing the Holder Image.
Scan Rotation . . . . . . . . . . . .
Using Scan Rotation . . . . .
Clamp . . . . . . . . . . . . . . . . . .
..
..
..
..
..
..
..
..
..
..
..
..
..
..
..
..
.
.
.
.
.
.
.
.
..
..
..
..
..
..
..
..
..
..
..
..
..
..
..
..
7-29
7-29
7-33
7-33
7-33
7-34
7-34
7-34
Stage Movements. . . . . . . . . . . . . . . . . 7-19
Track . . . . . . . . . . . . . . . .
Get . . . . . . . . . . . . . . . . . .
Beam Shift . . . . . . . . . . . .
Beam Shift Reset . . . . .
Zero Beam Shift . . . . . .
Auto Beam Shift Zero . .
Stage Frame Shift . . . . . .
Compucentric Rotation . .
..
..
..
..
..
..
..
..
..
..
..
..
..
..
..
..
..
..
..
..
..
..
..
..
.
.
.
.
.
.
.
.
..
..
..
..
..
..
..
..
..
..
..
..
..
..
..
..
.
.
.
.
.
.
.
.
7-19
7-20
7-21
7-21
7-21
7-21
7-21
7-22
222 11
7
STAGES
OVERVIEW
The Stages covered in this Chapter are the following:
•
•
•
•
Quanta FEG 200, 50 x 50 mm Motor 4 axes.
Quanta FEG 200, 50 x 50 mm Motor 5 axes.
Quanta FEG 400, 100 x 100 mm Motor 5 axes.
Quanta FEG 600, 150 x 150 mm Motor 5 axes.
The software control for each stage is similar and is an integrated part
of the overall control software.The Work Page layout remains the
same so that it is easily recognised by users of either stage systems.
The significant differences are with such controls as Tilt angle limit,
total Z movement, X and Y dimensions and clamping.
The clamping mechanism are via electrical valve and software
control.
The Quanta FEG 200 has a choice of 2 stage types, a 4 or 5 motor
axes stage. With the exception of the Tilt being manual for the 4 axes
stage they are the same in dimensional movement, software control of
other axes and stage fittings.
7-1
22 211
Stages Quanta FEG 200
Quanta FEG 200
50 X 50 MM STAGE (4 AXES MOTOR)
This 50 x 50 mm stage is a 4 or 5 axes motorised version. The stage
has motors driving the X, Y, Z, Rotation and Tilt controls (not 4 axes),
all with manual override except Tilt (Tilt manual on 4 axes). All
movements are read out on screen, under software control.
The Z height of the specimen can be regulated by the external 25 mm
Z control and or the 25 mm internal Z movement. The Z is eucentric
at FWD = 10 mm for this stage.
FIGURE 7-1 4-AXES MOTOR DRIVE CONTROLS
WITH MANUAL OVERRIDE
Legend:
A = Negative end stop
B = 30° stop
C = 45° stop
D = 75° stop
E = Tilt Scale
F = Stage Lock
G = Stage ground
1 = Tilt lever
2 = Tilt monitor
3 = X axis
4 = Rotation
5 = Z height
Stage movement
A live image can be positioned with either stage movement (manual
or software) or beam shift.
TABLE 7-1
MOVEMENT TYPES
Stage Movement
Beam Shift
Get (icon) X and Y
Get (above 6200X only)
Track (icon) X and Y
Shift (icon) X and Y
Tilt (1) and Z height (5)
Scanrotation
Rotation (4)
Manual X (3), Y (6), Z, T, R
Stage Position Controls / Map
7-2
2 2 2 11
Stages Quanta FEG 200
50 X 50 MM STAGE (5 AXES MOTOR)
FIGURE 7-2
QUANTA FEG 200 STAGE CONTROLS
(5-AXES MOTOR)
Legend:
1 = Z height
2 = Tilt
3 = Y axis
4 = Rotation
5 = X axis
6 = Stage ground and
Interface connector
2
6
5
3
4
1
Stage movement
The motorised movements of the stage can be operated under
software control for more advanced mapping and location. A live
image can be repositioned with either stage movement (manual or
software) or beam shift.
TABLE 7-2
MOVEMENT TYPES FOR QUANTA FEG 200
Stage Movement
Beam Shift
Get (Mouse) X and Y
Shift (Mouse) X and Y
Track (Mouse) X and Y
Tilt (2) and Z height (1)
Rotation (4)
Scanrotation
Manual X (5), Y (3), Z (1), R (4),
(Tilt, only on 4 axes)
Stage Edit Controls / Location
7-3
22 211
Stages Quanta FEG 200
Software controls for movement include the Shift, Get and Track and
the Work Page functionality. You can access the Work Page by
Clicking on the appropriate icon above the pages. The stage can be
tilted over 90o . The tilt axis always intersects the electron optical axis
of the column at the same height (10 mm FWD) for eucentric tilt.
When the specimen is positioned at this height, the specimen can be
tilted in the eucentric plane.
NOTE:
When you move the stage or tilt the specimen, you may need to lower
the magnification so you do not lose the feature of interest on the
screen.
FIGURE 7-3 50 X 50 MM STAGE MOVEMENT
Using Z (height) adjustment
With the standard specimen holder it is possible to change the
specimen height inside the chamber, to bring the sample to a eucentric
position and have flexibility to then move Z from outside the chamber
to another position if required. The internal distance Z is 25 mm of
movement, and the external distance Z (5) is also 25 mm. This allows
a flexibility to load large or different height specimens onto the stage
by reducing the internal Z but still be able to manipulate the difference
in height from outside.
FIGURE 7-4 EUCENTRIC ADJUSTER FOR 50 X 50 STAGES
7-4
2 2 2 11
Stages Quanta FEG 200
To set the specimen height to the eucentric position, and at the same
time prevent any possibility that the specimen should touch the lens
pole if the Z is increased, can be done as follows:
• Load a specimen onto the specimen holder.
• With the stage still open adjust the external Z (5) to the highest
position.
• Set the Eucentric Height Adjuster on the stage base.
• Bring the highest specimen or point on the specimen to the 2 mm
position on the Height Adjuster by turning the internal screw of the
specimen holder. Lock the position with the locking cone.
• Reduce the Z so that the specimen now coincides to the Eucentric
position on the Height Adjuster by use of the external Z control (5).
• Close the chamber, and pump down.
• When the beam is switched on focus the sample and click on the
Z<->FWD button icon on the Tool bar. The FWD will be
recognised by the system as the value of Z in the Coordinates tab of
the Work page.
Now the Z can be changed from the external Z control (5) around the
eucentric position and further, but for safety, not less than 2 mm from
the lens.
QUANTA FEG 200
STANDARD SAMPLE HOLDERS
The sample holders provided with the Quanta FEG 200 consist of a
single stub holder and multiple holder.The single holder has spring
clip fitting and screw secure fitting facilities. The multiple holder is a
7 stub holding disc with spring clip fitting only. Both holders have the
same threaded shaft fitting to the stage center and can be hard fixed to
the stage by the conical locking piece.
FIGURE 7-5
STANDARD SAMPLE HOLDER
7-5
22 211
Stages Quanta FEG 400
Quanta FEG 400
100 X100 MM STAGE
The 100 x 100 mm stage is a motorised version with manual override
in all axes. Read-out of positioning is on-screen for all axes.
FIGURE 7-6 QUANTA FEG 400 STAGE CONTROLS
Legend:
1
2
1 = Z height
2 = Tilt
3 = Y axis
4 = Rotation
5 = X axis
6 = Stage ground and
Interface connector
4
3
6
5
Stage movement
On the motorised stage the X, Y, Z, Rotation and Tilt movements can
be operated under software control, with manual override. The stage
can be tilted over 75°. The tilting mechanism can be locked for more
stability at high magnifications using the software ‘Clamp’ feature. A
live image can be positioned with either stage movement (manual or
software) or beam shift.
TABLE 7-3
MOVEMENT TYPES FOR QUANTA FEG 400
Stage Movement
Beam Shift
Track (icon) X and Y
Shift (icon) X and Y
Tilt (2) and Z height (1)
Rotation (4)
Scanrotation
Manual X (5), Y (3), Z (1), T (2), R (4)
Stage Position Controls / Map
7-6
2 2 2 11
Stages Quanta FEG 400
Software controls for movement include Shift, Get, Track and the
Work Page functionality. You can access the Work Page by Clicking
on the appropriate icon above the Pages.
NOTE:
When you move the stage or tilt the specimen, you may need to lower
the magnification so you do not lose the feature of interest on the
screen.
FIGURE 7-7
100 X100 MM STAGE MOVEMENT
The Z height of the specimen can be regulated by the external 60 mm
Z control and by the Z prime internal movement. The Z prime is
eucentric at 11.6 mm from the stage base to sample top surface
otherwise is fococentric.
Using Z (height) adjustment
With the standard specimen holder it is possible to move Z to another
position if required from outside the chamber. The external movement
(Z) is 60 mm. This allows a flexibility to load large height specimens
onto the stage.
To set the specimen height and at the same time prevent any
possibility that the specimen should touch the lens pole if the Z is
increased can be done as follows:
• Load a specimen onto the specimen holder.
• Adjust the Z, so that the specimen is approximately 10 mm below
the lens.
• Close the chamber, and pump down.
• When the beam is switched on focus the sample and click on the
Z<->FWD button icon on the Tool bar. The FWD will be
recognised by the system as the value of Z in the Coordinates tab of
the Work page.
Now the Z can be changed by the software interface or the manual
external Z control to other positions, but for safety, not less than 2 mm
or from the lens.
7-7
22 211
Stages Quanta FEG 600
Quanta FEG 600
150 X 150 MM STAGE
The 150 x 150 mm stage is a 5 axes motorised version.
The stage has motors driving the X, Y, Z, Rotation and Tilt controls,
all with manual override. All movements are read out on screen, under
software control.
FIGURE 7-8 QUANTA FEG 600 STAGE CONTROLS
Legend:
1 = Z height
2 = Tilt
3 = Y axis
4 = Rotation
5 = X axis
6 = Stage ground and
interface connector
1
2
3
4
6
5
Stage movement
The stage can be tilted over 75°. The tilting mechanism can be locked
for more stability at high magnifications using the ‘Clamp’ feature. A
live image can be positioned with either stage movement (manual or
software) or beam shift.
TABLE 7-4
MOVEMENT TYPES FOR QUANTA FEG 600
Stage Movement
Beam Shift
Track (icon) X and Y
Shift (icon) X and Y
Tilt (2) and Z height (1)
Rotation (4)
Scanrotation
Manual X (5), Y (3), Z (1), T (2), R (4)
Stage Position Controls / Map
7-8
2 2 2 11
Stages Quanta FEG 600
Software controls for movement include the Shift, Get, Track and the
Work Page functionality. You can access the Work Page by Clicking
on the appropriate icon above the Pages.
NOTE:
When you move the stage or tilt the specimen, you may need to lower
the magnification so you do not lose the feature of interest on the
screen.
FIGURE 7-9
150 X150 MM STAGE MOVEMENT
The Z height of the specimen can be regulated by the external 60 mm
Z control and by the Z prime internal movement. The Z prime is
eucentric at 29.2 mm from the stage base to sample top surface
otherwise is fococentric.
Using Z (height) adjustment
With the standard specimen holder it is possible to move Z to another
position if required from outside the chamber. The external movement
(Z) is 60 mm. This allows a flexibility to load large height specimens
onto the stage.
To set the specimen height and at the same time prevent any
possibility that the specimen should touch the lens pole if the Z is
increased can be done as follows:
• Load a specimen onto the specimen holder.
• Adjust the Z, so that the specimen is approximately 10 mm below
the lens.
• Close the chamber, and pump down.
• When the beam is switched on focus the sample and click on the
Z<->FWD button icon on the Tool bar. The FWD will be
recognised by the system as the value of Z in the Coordinates tab of
the Work page.
• Now the Z can be changed by the software interface or the manual
external Z control to other positions, but for safety, not less than 2
mm or from the lens.
7-9
22 211
Stages Quanta FEG 600
QUANTA FEG 400, 600
STANDARD SAMPLE HOLDERS
The 2 Standard Stub Holders are to bring a eucentric condition to the
400 and 600 stages.
The 400 and 600 stages are fococentric and therefore need to have a Z
prime position at a set height from the stage rotation head surface to
the sample surface to create a eucentric condition. The shorter holder
is for the Quanta FEG 400 stage and the longer for the Quanta FEG
600 stage.
The eucentric holder is screwed into the center of the rotation head of
the stage. When the stub with specimen is fitted, by tilting the stage,
the position of tilt should be at the plane of the specimen. The
specimen should not be of excessive height as this will not work. The
specimen should be within 1 to 2 mm thick.
FIGURE 7-10 STANDARD SAMPLE HOLDERS
7-10
2 2 2 11
Stages Software Stage Functions
Software Stage Functions
The Work Page has a number of modules including the Vacuum,
Mode, Electron Column, Detectors, Stage and Status. The Stage
module controls movements of the stage to locate the positioning of
the specimen by reference to coordinated points.
STAGE
The Stage module consists of 2 planes at present, Map and
Coordinates. These are accessed by horizontal tabs at the top of the
module.
MAP TAB
The Map tab displays a list box labelled Location for listing and
selecting positions store on the map. The stage maximum cover is
displayed as a large rectangular area with an inscribed circle
displaying a center axis cross. All positions to be located and stored
will be shown on this large circle.
In the top right corner there is another smaller circle known as the
Radarview, and represents the true rotational condition of the stage at
any time.
Radarview
The small circle in the top right of the stage area relates to the rotation
position of the stage at one-time. By holding the left mouse button
down on the black triangle on the perimeter of the circle and moving it
round to another angle position the stage will follow the action
promoted on release of the mouse button. The large circle remains in
the same state to represent true X and Y directions. All positions that
incurred rotation of the stage in their stored locations Maps will
display rotation condition in the radar view when restored to the
current position. Orientation is seen by the update of the small triangle
and the ‘clock hand’ lines in the radar view circle.
Holder Maps
The area covered by the 7 sample holder is highlighted in light gray,
this is standard with the Quanta FEG. The darker gray outer diameter
plus the light gray area covers the optional 16 sample holder provided
with the Universal sample holder kit, described in Chapter 9
‘Options’.
Location
The Location list shows the Current Position as default. When
expanded it shows the list of positions with a scroll facility. The one
selected becomes the current active position. When a position is
selected it highlights in the list and also on the map as a point with a
red circle. More information on the relationship of Map and Location
is described in the following sections.
7-11
22 211
Stages Software Stage Functions
Open
Click on the Open button to open a stored Map file.
Save
Click on the Save button to save a Map file to disk. When closing the
GUI the register stores the present Map file and allocates it to the
specific User name. This can then be accessed and loaded only by that
User on start-up of the GUI after log-in.
Clear
Click on the Clear button to clear the existing Map file from the
Stage page, which includes the Location list.
MAP ELEMENTS
Map Area
The Map area represents the total movement distance of the stage in X
and Y. In that area can be placed a sample holder outline, as seen here
by the darker rim. In the locatable area representative positions can be
specimen positions or just positions on a single specimen. They are
only numbered, by default or intent, in the drop down list box under
the label Location and not on the map area. The positions and other
elements are shown in the map area.
FIGURE 7-11 MAP ELEMENTS
The numbers on the figure above are represented in the list below with
association to their function.
7-12
2 2 2 11
Stages Software Stage Functions
TABLE 7-5
MAP ELEMET FUNCTIONS
No.
Function
1.
White cross with red background in black circle.
A stored location in the Location list. Without rotation.
White, smller vertical cross on a green background
indicates that a stored position is highlighted in the
location list
2.
White cross with red background in black circle. A stored
location in the Location list. With rotation noted by
position of the black key.
3.
Black cross. Mechanical stage center.
4.
Blue cross with red circled cross. The blue cross is a new
location not stored and the red circled cross is the current
targeted position.
5.
Black triangle. The moveable rotation angle positioner.
6.
Grey ‘clock hands’. Denote rotation position as 5.
7.
Grey crosses. Stored positions as on the map.
8.
1x to 100x. Magnification factor of the map.
9.
X slider to move the mapped area in a X (stage) direction
at different zoomed out magnifications.
10.
Y slider to move the mapped area in a Y (stage) direction
at different zoomed out magnifications.
MAP DIALOGUE
The Map dialogue can be accessed by clicking with the right mouse
button in the map area. The different stage sizes will be represented
by a different sized shaded circle at default 1x.
Add current stage position
Clicking with the mouse left button anywhere on the radar view circle
area will present a blue cross. Then clicking on the right mouse button
will give a dropdown menu overlaying the Stage module to invite the
adding of the Blue cross position to the Location list. By clicking on
‘Add current stage position’ this function is carried out. In this way
the list can be compiled for particular applications. The blue cross
turns black and receives a black circle around it. The end functionality
is the same as the Add button.
Update to current stage position
Clicking on this stores the (edited) position under the currently
selected name. The end functionality is the same as the Update
button.
7-13
22 211
Stages Software Stage Functions
Remove selected position
Clicking on this in the dialogue list will remove position from the map
and the highlighted label in the location list. The end functionality is
the same as the Remove button.
Center view
In the same menu clicking on the item Center view will bring the
location center to the center of view rather than the stage axial center.
Auto center on target
When using the ‘Magnification’ (Zoom) function the location that is
the present active location can remains in the center of view relative to
the Map area if ‘Auto center on target’ is clicked ON in the fixed
dropdown menu. ON is represented as a tick mark.
Zero radarview
Clicking on Zero radar view will bring the radar view circle to zero
position (12 o’clock), and rotate the stage mechanically to the home
condition for rotation movement only.
Stage location overlay
Clicking on toggles position indication display of detectors and
chamber door in relationship to a sample.
Magnification (Zoom)
Clicking on the right mouse button, when over the Map area, will give
the fixed dropdown menu for Magnification (Zoom). By clicking on
the item labelled ‘Magnification’ the magnification factor of the
Map area can be selected from a further dropdown menu.
FIGURE 7-12 MAP MAGNIFICATION (ZOOM)
The resulting multiple value is seen in the bottom right-hand corner of
the Map area. Scroll bars are present to move over the whole Map
area in zoomed condition.
7-14
2 2 2 11
Stages Software Stage Functions
COORDINATES TAB
By clicking on the Coordinates tab a dialogue overlays the Stage
area displaying a numerical layout for X, Y, Z, R and T. There is a
similar Location list so that a position can be selected. Default is
Current Position. Other facilities on the Coordinates tab are listed
below.
X, Y, Z, R, T
Five editable text boxes are available for X, Y, Z, R and T (5 axes
motor stage only), these are separately editable or can be filled from
the selection made at the Location list. The 4 axis motor stage shows
4 editable boxes as seen on the left. An edit box is only updated in
absolute mode, when the current position is selected in the Location
list. Conditions of use for Absolute and Relative movement are
described below.
When in Absolute mode:
• Selecting Current Position in the Location list will fill the edit
boxes with the current position and will cause the contents to
update.
• Selecting any other position will fill the edit boxes with the saved
position.
Editing a coordinate:
• With Current Position selected: will de-select the current position
(so no position is selected at all), will check the corresponding
Changed checkbox and will disable the Update button.
• With any other position selected: will check the corresponding
Changed checkbox and will enable the Update button (the position
remains selected).
• With no position selected: will check the corresponding Changed
checkbox only.
Using the Escape key
• Pressing the Escape key in the position edit boxes with no position
selected (in other words the last selected position was the current
position): will clear the whole column of Changed checkboxes,
will update all edit boxes to the current position (overwriting any
changes the user made), and the Current Position is selected in the
Location list.
• With any other position selected: will clear the whole column of
Changed checkboxes and will update all edit boxes to the selected
position.
When in Relative mode:
• Editing a coordinate will cause the corresponding Changed
checkbox to become checked.
• Pressing the Escape key in one of the position edit boxes will clear
the whole column of Changed checkboxes and all edit boxes are set
to zero.
7-15
22 211
Stages Software Stage Functions
Units of measure
The units of measure (to the right of the position edit boxes) follow
the Units setting in the Preferences dialogue, unless User Units is
active (Stage menu), then UU will be displayed for X and Y).
Changed
The Changed check boxes are automatically checked when the user
edits the value in the corresponding position edit box.
• A Goto will only act on the boxes with a checkmark (and the edit
box where the Enter key was pressed, if applicable).
• Pressing the Escape key will clear all check boxes (in Absolute
mode the Current Position will be selected, in Relative mode all
positions will be reset to zero).
• In Absolute mode all the checkboxes are cleared after a Goto, Add,
or Update command. In Relative mode the checkboxes are
unchanged after a Goto command.
• Un-checking a Changed checkbox by clicking it will have no
immediate effect in Relative mode (the contents of the
corresponding edit box will not be changed). In Absolute mode the
corresponding edit box will restore its contents to the selected
position (no action if no position is selected, i.e. when the Current
Position was edited).
• Checking a Changed checkbox by clicking it will have no
immediate effect, except that if the Current Position was selected, it
will become de-selected.
Locked
This is a software lock to prevent inadvertent movement of any or all
axis during particular applications. Default is unchecked.
Location
This shows the Current Position as default. When expanded it shows
the list of positions with a scroll facility. The one selected becomes
the current active position. To move to that position requires clicking
on the GoTo button. The behaviour is as follows:
It is enabled in Absolute mode and disabled in Relative mode.
• Clicking a non-selected item will select it, which causes the
corresponding position to be displayed and the Changed
checkboxes to be cleared.
• Clicking a position when it is already selected will start in-line
editing of the item’s name (renaming it). Pressing the Enter key or
clicking a different item confirms the new name. If the new name is
already in the list a warning is given and the editing is resumed
(with the incorrect name). When the user presses the Escape key
the old name is restored, cancelling the renaming.
• Double-clicking an item is the same as clicking it and then press ing
Goto; it immediately moves the stage to the double-clicked pos ition.
• The list always contains the Current Position. Selecting Current
Position will display the current stage position and changes to this
position will be updated as long as the Current Position item is selected.
7-16
2 2 2 11
Stages Software Stage Functions
• The list always contains the last pos ition. Each time a Goto is done
the last pos ition is updated with the coordinates jus t before the move.
• When the stage coordinates are edited manually the selected
position will be de-selected if it is the Current Position or last
position, while for any other position the Update button will
become enabled (and the item will remain selected).
Absolute
If this radio button is checked it will bring movement of the stage in
an Absolute mode. In this mode more general movements can be
made and locations stored.
Relative
If this radio button is checked it will bring movement of the stage in a
Relative mode. In this mode the stage coordination can be used with
User Units and for more precise movements.
Add
Pressing the Add button will create a new entry in the Location list,
using the currently displayed position.
• The Add button is disabled in Relative mode (you cannot store a
relative position), and is enabled in Absolute mode.
• The new entry is called Position xx, where xx is 01, 02, 03, etc. If
an item with the new xx already exists (because the user loaded a
Map list from file), the value is incremental until a unique name is
obtained. The user can rename the new entry, see Location list.
Update
The Update button stores the (edited) position under the currently
selected name.
• The Update button is disabled in Relative mode.
• In Absolute mode it is enabled only when a position is selected in
the Location list, if this position is not Current Position or last
position and if this position’s coordinates have been edited.
• Pressing the Update button will store the coordinates under the
currently selected position (overwriting the old position), without
asking for confirmation.
Remove
The Remove button deletes the currently selected item in the
Location list.
• It is disabled in Relative mode.
• It is enabled when a position is selected in the Location List, but
only if this position is not Current Position or last position.
7-17
22 211
Stages Software Stage Functions
GoTo
Pressing the Goto button will cause the stage to go to the currently
displayed position (in Absolute mode) or to move relative to the
current position (in Relative mode).
• The Goto button is disabled if the Current Position is selected in
the Location list; it is enabled in all other cases.
• Pressing the Enter key in any of the position edit boxes acts as a
short-cut for the Goto button.
• Double-clicking a position acts as a short-cut for selecting that
position and pressing Goto.
When in Absolute mode:
• If no position is selected in the Location list (because the user
edited the current position), then only those axes with a check in
the Changed checkbox will move.
• In this case, if the user pressed the Enter key to start the move,
then also the currently selected axis will move.
• If a saved position is selected then all axes will move.
• After the move all checkboxes are cleared and the Current Position
item is selected.
When in Relative mode:
• Only those axes with a check in the Changed checkbox will move.
• If the user pressed the Enter key in a position edit box, then the
corresponding axis will also move.
• The Changed checkboxes are not affected and no changes are made
to the edit boxes. This means that it is possible to temporarily
disable an axis, without having to type a 0 and later having to
retype the previous value.
7-18
2 2 2 11
Stages Stage Movements
Stage Movements
TRACK
The Track function allows continuous directional movement of the
stage with variable speed. The speed range is coupled to the
magnification and selectable within certain limits.
Select the Track function by pressing on the Mouse Wheel while in
an active Quad (1 - 3) or on full screen. A Yellow enhanced Dot and
Arrow appear onscreen. The Dot will occur where the mouse
command cursor was when the wheel was pressed and the Arrow will
denote the direction to move. The speed will depend on the distance
the Arrow is separated from the Dot. The direction can be changed by
moving the mouse in a circular motion to obtain the correct traverse.
The movement axis center will depend on the initial positioning of the
command cursor, which can be at any position on the image. Moving
away from the Dot with the Arrow increases the stage speed; moving
toward the Dot decreases stage speed.The direction of movement is
always toward the central Dot along a straight line. You can move the
cursor around on the field of view; direction and speed change
accordingly. When you are done release the mouse wheel and the
action will stop, Dot and Arrow disappear from the image.
FIGURE 7-13 TRACK FUNCTION
In Quad 4 (CCD mode) the same function activates the Z movement.
With the wheel pressed, moving the mouse up will move the Z up and
moving the mouse down will move the Z down. This activity can be
seen live in the CCD Quad 4 window. Representation of direction is
indicated by a centered yellow arrow, either pointing up or down
either side of a 10 mm bar indication point.
7-19
22 211
Stages Stage Movements
GET
When you select an image object with the cursor and double-click the
left mouse button, Get brings that detail to the center of the screen.
The movement engine automatically calculates, due to magnification,
whether to use Beam Shift or Stage movement. Beam Shift will
bring the object to the screen center by moving the beam (image field)
to a off set position (high magn). Stage movement will center the
object by mechanical movement of the stage and therefore will be
limited to a useable range of magnification (lower magn). When
Beam Shift comes to the limit in any direction on a Get command, the
Beam Shift will zero and the Stage will be updated for the movement
necessary to bring the object to center. The maximum range for
successive Get operations equals the range of the stage movement. At
high magnifications, the range is not limited by the maximum beam
shift as the stage updates.
FIGURE 7-14 GET FUNCTION
7-20
2 2 2 11
Stages Stage Movements
BEAM SHIFT
When you select a position on screen with the cursor and press Ctrl +
the left mouse button, Beam Shift controls the cursor (Hand) that
allows the image area to be moved in any direction. Releasing the
mouse button will leave the image area repositioned. The stage does
not move during beam shift. When the limit of beam shift has been
reached either ‘Beam Shift Reset’ or ‘Zero Beam Shift’ will need to
be clicked on, unless ‘Auto Beam Shift Zero’ is active. In this case
any stage movement will automatically zero beam shift and correct
with mechanical movement so that Beam Shift cannot in reality run to
the limit of movement.
Beam Shift Reset
Use this function to begin the Beam Shift Reset procedure to zero
beam shift and move the feature to the center of the field of view with
the stage.
Zero Beam Shift
When beam shift has reached maximum limits, choose Zero Beam
Shift to restore X and Y beam shifts to zero values. The computer
beeps when maximum limits are reached.
Auto Beam Shift Zero
Select Auto Beam Shift Zero to automatically set beam shift to zero
after a stage move. When not selected it prevents Get moves from
updating beam shift.
STAGE FRAME SHIFT
The stage can be moved approximately 80% of the field of view in
any direction by clicking on the appropriate Arrow key on the
keyboard, or 50% with Shift button pressed simultaneusly. The
movement engine automatically calculates, due to magnification,
whether to use Beam Shift or Stage movement. When Beam Shift
comes to the limit in any direction, the Beam Shift will zeroed and the
Stage will be updated for the movement necessary to move the frame.
The maximum range for successive Frame Shift operations equals the
range of the stage movement.
FIGURE 7-15 ARROW KEYS FOR STAGE FRAME SHIFT
7-21
22 211
Stages Stage Movements
COMPUCENTRIC ROTATION
Clicking on Compucentric Rotation in the Stage Menu places a
green circle in the active quad. At a point on the perimeter of the
green circle is a green triangle which denotes, by its position, the
angle orientation of the sample relative to its original position when
placed on the stage. To start with this will be at 12 o’clock. By
keeping the left mouse button down on the green triangle it can be
moved around the circle to chose a new orientation of the sample
relative to the detection position. On release of the left mouse button
the computer software updates the position orientation and offset from
the mechanical stage center to deliver the same object center but
rotated to the angle selected. This creates a different direction of
illumination for the sample while keeping the object of interest in the
center of the display area. With the sample at the eucentric height this
can be performed at any position on the sample irrespective of the
mechanical stage center. Clicking on or close to the numbered angles
around the perimeter of the circle will cause the stage to drive to that
angle and the green triangle will update on screen.
FIGURE 7-16 COMPUCENTRIC ROTATION
The read-out positions displayed at the bottom of the Quad provide
information on the ‘Actual Rotation’ (original position in °), the
‘Target Rotation’ (the selected position in °) and the ‘Rotation
Change’ (the difference in ° of rotation). The screen dialogue can also
be activated by selecting F12 on the keyboard.
7-22
2 2 2 11
Stages About Specimen Alignment
About Specimen Alignment
ALIGNMENT WIZARD
Designed specifically for long features or when there is need to
navigated along a feature that extends off the screen at the
magnification require for observation. Align Feature applies the deskew process across the entire length bringing the long feature either
to the chosen horizontal or vertical axis to make it easier to navigate.
This can be performed at any point within the stage field limits and
takes into account the off-set for rotation by computer programming
of the stage. Point 1 is first located and then point 2. When this occurs
point 2 is not fixed but subtends point 1 with an elastic cord until the
left mouse button is released. At this position point 2 is located. The
longer distance involved results in greater accuracy.
FIGURE 7-17 ALIGNMENT WIZARD
7-23
22 211
Stages About Specimen Alignment
Using Alignment Wizard
TABLE 7-6
USING ALIGNMENT WIZARD
Step
Action
1.
Select a long feature on the sample.
2.
Click on ALIGNMENT WIZARD from the Stage menu . Follow
the directions in the dialogue box that appears and
choose either Horizontal or Vertical that relates to the orientation
needed on the sample. Click on Next .
7-24
3.
A second dialogue box prompts you to click on the first
point along the feature. Click on Next.
4.
A second dialogue box prompts you to click on the
second point along the feature. Click on Finish.
5.
After doing so, the stage will move to that location and
apply the alignment across the length of the feature
2 2 2 11
Stages 1 to 3 Point Alignment
1 to 3 Point Alignment
DEFINE USER UNITS
Define User Units associates stage points with user-defined points to
set up a mapping between stage and user coordinate system. After
that, the computer uses these specimen coordinates rather than stage
coordinates for positioning.
For example, a die of an integrated circuit has its own coordinate
system. If you choose a 0,0 position, you can drive the stage relative
to that position using your own coordinate system. These are
expressed in User Unit (UU) coordinates, which may be microns,
multiples or fractions of microns, etc. Coordination of the stage can be
anchored to either 1, 2 or 3 points depending on the sample
management or application.
Choose points that are not in a straight line, for example, at the
corners of a die or the edges of an area or wafer. You can align up to
three points but you will have the greatest accuracy with three.
The following procedure sets up the 1 - 3 Point alignment for any
given sample where repeated structures are checked.
TABLE 7-7
DEFINE USER UNITS
Step
Action
1.
Select a feature on the sample surface and bring it into
the field of view at a magnification so that it relates to
other structures (not too high magnification).
2.
Click on Define User Units in the Stage menu. A
dialogue appears as follows.
Select from the Start dialogue the Define New User
Units process by clicking on the radio button. Click on
the Next button.
7-25
22 211
Stages 1 to 3 Point Alignment
TABLE 7-7
3.
DEFINE USER UNITS
The Alignment Point One (0,0) dialogue appears.
Follow the instruction in the dialogue to move to a point
and click on it with the left mouse button. The
coordinates of that point (0,0) will appear next to the
User X and User Y readout positions in the Details...
section of the dialogue. Choose the next step either:
• Click on the Previous button to return to the previous
dialogue.
• Click on Finish to end the alignment at One Point.
• Click on the Next button to continue to two points
• Click on the Cancel button to exit the procedure.
4.
After clicking on the Next button the Alignment Point Two
(1,0) dialogue appears.
Repeat the procedure selecting and clicking on a new
location point. The User read-out positions will show the
coordinates for the new Point Two location. Choose the
next step from the bottom line of buttons as in Step 3. To
continue click on the Next button
5.
After clicking on the Next button the Alignment Point
Three (0,1) dialogue appears.
Repeat the process as in Step 4.
7-26
2 2 2 11
Stages 1 to 3 Point Alignment
TABLE 7-7
DEFINE USER UNITS
6.
After clicking on the Next button a confirmation dialogue
appears as follows.
7.
By clicking on the Details button at any stage, either 1, 2
or 3 Points, will cause a display of the resultant
coordinates.
This concludes Define User Units
There are a number of choices on the Define User Unit Start dialogue.
These are listed here to explain their functionality:
• Define New User Units - as explained in this chapter.
• Redefine User Units - for changing / updating User Units.
• Redefine User Units with Shift - for changing / updating with
Beam Shift.
• Show how User Units are now defined - Displays the current
details.
During the establishing of points in the procedure any incorrect point
made can be overwritten by just clicking on a new point in the active
Quad.
7-27
22 211
Stages 1 to 3 Point Alignment
USER UNITS
To activate User Units as the basis of the stage coordination system,
click on User Units in the Stage menu. A tick mark will appear next
to the label. The stage coordinate system will revert to the last defined
user unit configuration for 1, 2 or 3 Point Alignment. From this point
on the stage can operate in Absolute or Relative mode with User Units
to perform specific movements.
FIGURE 7-18 USER UNITS FOR X AND Y
Using 1-, 2- or 3- Point Alignments
The following table shows the different uses between alignment types.
TABLE 7-8
ALIGNMENT TYPE DIFFERENCES
Use
1-Point Alignment
2-Point Alignment
3-Point Alignment
Major Use
Aligning to an new point
directly offset from the
existing location
Aligning the stage axes
with the specimen X-Y
orientation to correct for
any skew
Re-scaling to
nonstandard units on dies
or RAM arrays; correcting
for any skew
Change in Scale
None
Scales the axes together
X can be scaled
differently from Y
Change in
Orientation
None
Rotates both axes with a
fixed 90° angle between
axes
X and Y orientations can
be different
7-28
2 2 2 11
Stages Stage Related Functions
Stage Related Functions
SPECIMEN HOLDER WIZARD
The Specimen Holder Wizard creates a image representation of a
multiple holder (loaded with samples) in the Map area of the Stage
module in the Work Page. The holders available for the wizard are
the Standard 7 hole multiple holder (available with each Quanta
FEG), and the optional 16 hole multiple holder which is available
with the Universal Holder Kit.
The wizard differs slightly with the 4 and 5 axes 50 x 50 mm stages,
in that the tilt has to be set manually for the 4 axes stage. All 5 axes
motorized stages work automatically with this wizard.
During the procedure for capturing the image of the holder an angle of
45° Tilt will be attained by the stage, therefore there are confirmation
steps in the procedure to secure the samples and the lens.
Using the Wizard
The following table gives the procedure for using the Specimen
Holder Wizard.
TABLE 7-9
USING SPECIMEN HOLDER WIZARD
Step
Action
1.
Open the Stage menu and click on Specimen Holder
Wizard.
2.
The Couple Z to FWD dialogue box appears. Follow the
directions in the dialogue box for correcting focus and
couple Z to FWD. The NEXT button will be greyed until
these functions have been performed. Click on the NEXT
button .
3.
The next dialogue will show either the 7 stub holder and
the 16 stub holder or just the 7 stub holder. This is due to
the fact that the 16 stub holder is an option with the
Universal Holder Kit.
7-29
22 211
Stages Stage Related Functions
TABLE 7-9
7-30
USING SPECIMEN HOLDER WIZARD
4.
The Holder Type dialogue box appears with a choice of
holder. select the holder that is in use by clicking on the
radio button next to the holder. Click PR E VIOU S to go
back, CANCEL to stop the wizard or NEXT to continue.
5.
The next dialogue is for the Stage Position.
The dialogue asks for confirmation that there are no
obstructions for the stage to tilt to 45°. Observe the
Stage positions shown on the left side of the dialogue.
When all is satisfactory then click in the tick box to
activate the SET button and text.
2 2 2 11
Stages Stage Related Functions
TABLE 7-9
USING SPECIMEN HOLDER WIZARD
6.
For manual tilt stages the dialogue will first ask for the
stage to be set to 0° Tilt.
7.
Both stage types will display the dialogue below. Click
on the set button to start the movement to the image
capture position. When the movement is completed the
N EXT button becomes active. Click on the N EXT button to
continue.
8.
After the last step the manual tilt stages will ask for the
Tilt to be set to 45°. When the movement is completed
the NE XT button becomes active. Click on the N EX T
button to continue.
7-31
22 211
Stages Stage Related Functions
TABLE 7-9
7-32
USING SPECIMEN HOLDER WIZARD
9.
In case the Stage couldn´t reach a desired position,
following dialogue appears. Click OK button (this
cancels the whole setting), vent the specimen chamber
and make the stage height fits operation´s need. Then
repeat the procedure.
10.
The Outline Box dialogue appears. Follow the
instructions and fit the green box around the top surface
of the holder onscreen. Refer to the diagram in the
dialogue for guidance. Click P R EVIO US to go back,
C AN C EL to stop the wizard or FINISH TO END THE WIZARD.
11.
For the manual tilt stages there is a further dialogue
asking for the Tilt to be set back to 0°.
12..
When these steps are completed the image taken from
the 45° angle is transformed to the Map of the Stage
module in the Work Page. Clicking on any sample
image will drive the stage to place that sample in the
field of view.
2 2 2 11
Stages Stage Related Functions
Using the Holder Image
The Holder Image is a bit map of the loaded holder in the Quanta
FEG. The positions of the samples can be clicked on and driven to the
field of view onscreen. The holder is first represented without
positions in the Location list. These can be added later to map the
positions of all samples seen on the Holder Image. Follow the
procedures in the section Software Stage Functions to add or remove
positions in the Location list.
Changing Magnification
The bit map image can be increased to a maximum of 5x from the
expanded Magnification section in the floating dialogue found by a
right mouse button click while over the Map.
Clearing the Holder Image
Open the Stage menu and click on Clear Holder Image to remove
the holder image from the Map. When this is done any location
positions stored while in the holder image mode will be retained in the
Map. Map location positions can be cleared with the CL EA R button on
the Stage module.
FIGURE 7-19 CLEAR HOLDER IMAGE LEAVING MAP
7-33
22 211
Stages Stage Related Functions
SCAN ROTATION
This button is used activate the onscreen tool to rotate the scan and
align the image. It has no effect on the stage movements and is solely
a scan coil function but is used to orientate the image relative to
mechanical rotation and detector direction.
Using Scan Rotation
Clicking on Scan Rotation, in the Scan Menu, places a large green
circle in the active Quad with a small circle in the top right corner. At a
point on the perimeter of the large green circle is a green triangle which
denotes, by its position, the angle orientation of the sample relative to
its original pos ition when placed on the stage. To s tart with this will be
at 12 o’clock. By keeping the left mouse button down on the green
triangle it can be m oved around the circle to choose a new orientation
of the scan, the s mall circle follows suit.The computer software
continuously updates the position orientation of the s can.This creates a
different orientation on the viewing screen but retains the scanning
direction on the specimen. The read-out positions displayed at the
bottom of the Quad provide information on the ‘Actual Rotation’
(original position in °), the ‘Target Rotation’ (the s elected pos ition in °)
and the ‘Rotation Change’ (the difference in ° of rotation).
FIGURE 7-20 SCAN ROTATION
Clicking on or close to the numbered angles around the perimeter of
the circle will cause the beam to drive to that angle and the green
triangle will update on screen on both circles. The smaller circle in the
top right of the Quad 4 remains on-screen when Scan Rotation is
switched off, if the angle is greater than 0°, to inform the user of the
orientation. The screen dialogue can also be activated by selecting
Shift + F12 on the keyboard.
CLAMP
Select the Clamp function by clicking on Clamp found in the Stage
menu. While the stage is clamped, normal operation of x/y movement
and rotation is possible, but the Z height and Tilt cannot be changed.
This feature is dedicated to all stages except the 50 x 50 mm 4 and 5
Axes Stage which has no Clamp.The 4 axes stage has a Tilt lock.
7-34
2 2 2 11
Chapter 8 Maintenance
Overview. . . . . . . . . . . . . . . . . . . . . . . . . . . 8-1
8.1 Cleaning Procedures Overviev . . . . . 8-2
8.1.1 List of Applied Cleaners.
8.1.2 Cleaning Column Parts .
8.1.3 Materials and Technique
Cleaning Tips. . . . . . . . . . . .
..
..
..
..
..
..
..
..
..
..
..
..
..
..
..
..
.
.
.
.
.
.
.
.
8-2
8-3
8-3
8-3
8.2 Gaseous Detectors . . . . . . . . . . . . . . 8-4
8.2.1 Cleaning the GSED or LFD . . . . . . . . 8-4
8.2.2 Cleaning the GBSD . . . . . . . . . . . . . . 8-4
8.3 The Standard Insert . . . . . . . . . . . . . 8-5
8.3.1 Removal / Assemble Tools . . . . . . . .
8.3.2 Insert Removing and Disassembling .
8.3.3 Insert Housing Cleaning . . . . . . . . . .
8.3.4 Platinum Apertures Cleaning. . . . . . .
Method 1:. . . . . . . . . . . . . . . . . . . . . . . . .
Method 2:. . . . . . . . . . . . . . . . . . . . . . . . .
8.3.5 Platinum Apertures Installing. . . . . . .
8-5
8-5
8-7
8-7
8-7
8-7
8-7
8.5 Strip Aperture Module. . . . . . . . . . . . 8-9
8.5.1 Removing the Aperture rod . . . .
8.5.2 Cleaning the Aperture Module . .
8.5.3 Replacing the Aperture Module .
8.5.4 Replacing the Aperture rod . . . .
8.5.5 Aperture availability . . . . . . . . . .
..
..
..
..
..
.
.
.
.
.
. 8-9
8-10
8-10
8-10
8-10
8.6 Stage maintenance. . . . . . . . . . . . . 8-11
8.6.1 Specimen Holders . . . . . . . . . . . . . . 8-11
Cleaning . . . . . . . . . . . . . . . . . . . . . . . . 8-11
8.6.2 Stage mechanics . . . . . . . . . . . . . . . 8-11
Cleaning Stage parts. . . . . . . . . . . . . . . 8-11
8.7. Refilling the Water Bottle. . . . . . . . 8-12
22 211
8.8 Rotary pump Oil level check. . . . . . 8-13
8.8.1 Periodic check . . . . . . . . . . . . . . . . . 8-13
8.8.2 Topping-Up . . . . . . . . . . . . . . . . . . . 8-13
2 2 2 11
8
MAINTENANCE
OVERVIEW
This section describes the maintenance procedures necessary for the
microscope that can be carried out by the Supervisor / User. For the
FEG User maintenance is at a minimum due to Gun and Column
design and the long uptime expected from this class of
instrumentation. Therefore the more complicated maintenance is
normally contained in a service contract to be performed by a
qualified XL FEG service engineer.
At the user level items such as the following can be maintained:
• Gaseous Detectors
Cleaning GSED or LFD
Cleaning GBSD
• The Standard Insert
Platinum Apertures
• Strip Aperture Module
• Stage Maintenance
Specimen Holders
Stage Mechanics
• Miscellaneous Maintenance
Refilling the Water Bottle
Rotary Pump maintenance
CAU TION !
Parts that operate in vacuum should be handled carefully using clean
gloves. Parts not in use should be stored in suitable containers or
packed in aluminium foil.
NOTE:
Gas back fill (N2 ) should be maintained while the specimen chamber
is at ambient pressure. However, to avoid gas wastage it is
recommended that the chamber should be left open no longer than
necessary.
The structure of this Chapter of the User Manual is different in
construction to make it easier to find particular procedural items. The
sections are numbered for example:
•
•
•
•
Main section 8.1
Sub-section 8.1.1 - 8.1.3
Main section 8.2
Sub-section 8.2.1 - 8.2.2, etc., etc.
8-1
22 211
Maintenance 8.1 Cleaning Procedures Overviev
8.1 Cleaning Procedures Overviev
Frequency of cleaning is, in most cases, determined by necessity due
to poor image quality or gross astigmatism level. Recommended
cleaning procedures are given below for parts which operate in
vacuum and that are subject to possible contamination. These
procedures are common to all Quanta FEG instrument configurations.
8.1.1 LIST OF APPLIED CLEANERS
•
•
•
•
•
De-ionized or distilled water
Ethanol - C2 H5OH
Ethanol p/a (Pro Analysis: 99.8% pure) - C 2H5OH
Isopropanol
CIF* or SOFT SCRUB (household fine abrasive cleaner)
TABLE 8-1
HOUSEHOLD CLEANERS
Country
Name
Austria
CIF
Australia
CIF
Finland
CIF
France
CIF
Germany
CIF
Italy
CIF
Japan
CIF
Netherlands
CIF
Switzerland
CIF
UK
CIF
USA
Soft Scrub
WA R N I N G !
The cleaning solvents Ethanol and Isopropanol are highly flammable!
Do not use open flames and do not smoke while cleaning. Ventilate
the room properly.
8-2
2 2 2 11
Maintenance 8.1 Cleaning Procedures Overviev
8.1.2 CLEANING COLUMN PARTS
All column parts are polished before the instrument is delivered. For
this reason only occasional light polishing is required to remove
contamination that may build up on components in the column and
specimen chamber as part of normal operation. Any part that is
exposed to the electron beam should be highly polished, and free of
contamination and/or scratches that can charge and thus degrade the
image.
Only GSED / LFD components can be removed by the general
Supervisor / User and polished.
8.1.3 MATERIALS AND TECHNIQUE
To polish components, place a lint-free cloth on a flat surface (a glass
block is ideal) and apply a small amount Soft Scrub or Cif and
distilled water to the cloth.
Place the part to be cleaned on the polish and rub with a circular
motion until all contamination has been removed. For inner surfaces,
use a Q-tip or wooden dowel as an applicator. A toothpick can be used
for small holes.
Lint-free nylon (not cotton) or latex surgical gloves should be worn
while handling parts to avoid contaminating just-cleaned surfaces.
Tweezers should be used to hold small parts.
After the part has been polished, remove the Soft Scrub/CIF cleaner
by washing in hot water. Inspect the part under a stereo microscope at
20× magnification to ensure that there is no remaining contamination
or polish residue. Wash the part in De-ionized or distilled water in a
beaker with an ultrasonic cleaner for several minutes.Transfer the part
to a clean beaker with alcohol or isopropanol and ultrasonic again for
several minutes.
NOTE:
Do not use an ultrasonic bath to clean the GSED or LFD detector.
When the components are dry (a compressed air ‘duster’ can speed
drying), re-assemble and return to the column. If a part is stained, heat
it with hot water and immediately rinse with alcohol and dry using
compressed air.
Cleaning Tips
Parts contacted by the electron beam require periodic polishing. This
will ensure maximum performance of the instrument for many years.
Do not use metal polishes such as POL or WENOL to clean parts as
these can leave outgassing material. Be aware that threaded surfaces
should not be polished as these do not have contact to the beam and
are a source of outgassing if polish is trapped. Wash threads with
alcohol or isopropanol if absolutely necessary.
After cleaning, inspect all parts for residue and stains using a light
microscope.
8-3
22 211
Maintenance 8.2 Gaseous Detectors
8.2 Gaseous Detectors
8.2.1 CLEANING THE GSED OR LFD
This section will describe how to remove and disassemble the GSED
assembly for cleaning.
FIGURE 8-1 REMOVING THE GSED ASSEMBLY
1. Vent the chamber before beginning.
2. Pull the end of the GSED detector head down to remove it from
the STAN DA RD IN SERT. The insert will remain inside of the polepiece.
3. Pull the GSED pin contact board out of the signal connector
mounted to the chamber ceiling.
The PLA is part of the GSED detector and can be cleaned by inserting
a toothpick (or something similar) into the hole. The signal ring is
permanently attached to the underside of the detector, and can be
cleaned in a similar manner.
8.2.2 CLEANING THE GBSD
1. Perform steps 1 and 2 above to remove the GBSD PC board from
the chamber.
2. The GBSD is easily cleaned with a toothbrush, Soft Scrub/CIF
cleaner and water, as with the GSED. To access the PLA and
converter plate, remove the two screws holding the collector grid
to the PC board as shown in Figure 8-2. Scrub the SE grid gently,
as this can be easily damaged.
FIGURE 8-2 DISASSEMBLING THE GBSD
8-4
2 2 2 11
Maintenance 8.3 The Standard Insert
8.3 The Standard Insert
8.3.1 REMOVAL / ASSEMBLE TOOLS
These tools are used to install and remove the standard insert from the
lens pole and to assemble Pressure Limiting Apertures and the Insert
body.
FIGURE 8-3
STANDART INSERT
WITH REMOVAL / ASSEMBLE TOOLS
8.3.2 INSERT REMOVING AND DISASSEMBLING
The following instructions describe how to remove and disassemble
the STA NDA RD INSERT assembly.
FIGURE 8-4
STANDARD INSERT COMPONENTS
1. Insert the UNIVERSAL DETECTOR TOOL pins into the matching slots in
the insert assembly, as shown in Figure 8-5. Once the pins are
engaged, twist counterclockwise to unscrew the insert from the
pole-piece.
8-5
22 211
Maintenance 8.3 The Standard Insert
FIGURE 8-5 REMOVING THE INSERT
2. Use the APERTURES POSITIONING TOOL to remove the C-CLIP and FINAL
APERTURES from the insert. To do this, insert the pin of the tool into
the wide end of the insert and push the parts out of the narrow end
of the insert. Be sure the parts have a safe, clean place to drop
onto.
FIGURE 8-6 DISASSEMBLING THE INSERT
Aperture positioning
tool
Housing
Final Apertures + Cclip
3. Inspect the o-ring at the bottom of the insert. If the o-ring looks
deformed or damaged, replace it. This is a critical seal between
EC1 and EC2, which is in high vacuum. The surface of the o-ring
must be flush against the insert.
4. Inspect the threads on the insert for dirt, scratches on the threads,
etc. Clean the insert threads and if damaged, replace the insert.
8-6
2 2 2 11
Maintenance 8.3 The Standard Insert
8.3.3 INSERT HOUSING CLEANING
Once the entire assembly has been removed and taken apart:
1. clean the STA NDA RD
Scrub/CIF.
IN SERT HO USING
with a toothbrush and Soft
2. Rinse with de-ionized or distilled water.
3. Rinse in alcohol or isopropanol and dry with compressed air.
Under normal use, the insert should be inspected weekly.
8.3.4 PLATINUM APERTURES CLEANING
To clean apertures, use one of the following methods:
Method 1:
Heat the aperture (held in special tweezers with platinum points) in a
clean gas flame until yellow-hot for 15 - 30 seconds. Take care that
the aperture does not melt or become stuck to the tweezers.
Method 2:
Connect a V-shaped Molybdenum foil boat (about 2 cm long) across
the low voltage/high current contacts of a Vacuum Evaporator unit.
Use a vacuum of 1x10⁻⁵ Torr (1.3x10⁻³ Pa) and heat until white hot to
flash of contamination. Do not let the Vacuum Evaporator to
atmosphere until the Tungsten foil boat is cool. When cooled down
place the aperture on the foil, vacate, and reheat the foil to yellow heat
on the aperture for 15 - 30 seconds. Take care that the aperture does
not melt or become stuck to the foil. Again, do not let the Vacuum
Evaporator to atmosphere until the Tungsten foil boat and aperture is
cool.
CAU TION !
Do not attempt to clean apertures just by washing in solvent, this can
have an adverse affect just by shifting contamination back onto the
aperture.
8.3.5 PLATINUM APERTURES INSTALLING
To reinstall the insert assembly, follow these directions:
1. Place the APERTU RE HOL DE R with its open slotted end on the
aperture positioning tool pin. Set the nut height so that the top of
the spike is below the holder top to leave enough space to put
apertures in.
2. Using TW EEZ ERS , step by step carefully insert all the APERT UREs
(5 pcs.), sharp edge uppermost, into the seating on the upper end of
the holder. Gradually screw the nut down.
3. Again using the tweezers, insert the C - CLIP into the tube of the
INJ ECTO R provided.
8-7
22 211
Maintenance 8.3 The Standard Insert
FIGURE 8-7 STANDARD INSERT COMPONENTS
4. Depress the PLU NGE R slightly until the plane of the C -CLIP within
the tube is approximately at a right angle to the axis of the tube.
Release the plunger.
5. Place the IN JECT OR vertically into the APE RT URE HO LD ER, so that
the tube rests on top of the aperture.
6. Depress the plunger to push out the c-clip. The pressure must be
continued while retracting the body of the injector so that the cclip remains in place in the holder seating.
7. Remove the injector and check that the aperture is properly
clamped by the c-clip. This can be done either by inverting the
holder over a Petri dish and tapping lightly; or by observing the
position of the c-clip with a magnifying glass.
NOTE:
Always check the mounted aperture under a binocular microscope or with a
magnifying glass to make sure that no hairs or other contaminants are on
the aperture or between the aperture and the c-clip.
Be careful not to lose a small parts, especially the spring!
The following additional instructions on inserting the apertures should
also be noted:
• The PL AT IN UM APERT UREs must be installed so that the polished
side faces up, or towards the electron beam source.
• Installing the C - CLIP into the insert is done using both the
APERT URE TO OL in Figure 8-6 and the INJ ECTO R/ PL UNG ER TO OL in
Figure 8-7. Use tweezers to insert the C -CL IP into the IN JECT OR
TOO L, then use the INJ ECTO R TO OL to install the C - CLIP into the
aperture insert.
• To put on the O- RIN G, push it onto and over the top of the insert,
making sure not to roll or deform it in any way.
8-8
2 2 2 11
Maintenance 8.5 Strip Aperture Module
8.5 Strip Aperture Module
This is the aperture using more axial stable materials with a
Molybdenum finish. The strip has 5 aperture positions with a 1 mm
alignment hole in the frame and not the aperture. The strip comes
prealigned in a metal module which is connected to the end of the
Aperture rod by a Titanium screw. The module is considered a
consumable and therefore would be normally replaced when heavily
contaminated. If a Fischione plasma cleaner is available these
aperture modules can be cleaned while still connected to the rod.
There is also a heater in the rod to assist the cleaning mechanism for
high water vapour or expected high contamination levels. Otherwise
the heater is not necessary for this type of strip aperture. All screws
are of Titanium as to have no magnetic effect.
FIGURE 8-8
APERTURE MODULE
8.5.1 REMOVING THE APERTURE ROD
1. With the high voltage off, let the specimen chamber up to
atmospheric pressure. The Aperture rod is held at the same
vacuum as the specimen chamber so no special vacuum need be
broken to remove it.
2. If connected remove the heater cable from the outer end of the rod.
3. Unscrew the end of the Aperture rod and carefully remove it from
the microscope.
NOTE:
Preparation to clean or replace apertures should be immediately
available as the specimen chamber has to stay at atmospheric pressure
for the duration of maintenance.
8-9
22 211
Maintenance 8.5 Strip Aperture Module
8.5.2 CLEANING THE APERTURE MODULE
This is only possible if a Fischione Plasma cleaner is available.
1. Take the complete rod with module attached and place in the TEM
opening on the plasma cleaner. The screw at the end of the
Aperture rod screws into the TEM opening and seals against the
rod ‘o’ ring.
2. Give the rod 5 minutes at 4.5 volts plasma generation. This should
remove all hydrocarbon base contamination. If the contamination
is stubborn longer times will be necessary, this should not damage
the aperture as the plasma only removes organic bases.
8.5.3 REPLACING THE APERTURE MODULE
The new Aperture Module comes in a fluoroware container, has been
pre-cleaned. and is ready to be fitted to the rod.
1. Unscrew the Titanium screw holding the old module onto the rod.
Keep the screw in the hole of the rod and let the module fall away.
2. Open the new module pack and let the new module sit with the
connection end uppermost to the edge of the container base.
3. Pick up the new module with the Titanium screw end and fasten,
making sure of a good fit.
8.5.4 REPLACING THE APERTURE ROD
1. Check that there are no fibres on the rod ‘o’ ring. Do not grease the
‘o’ ring.
2. Replace the Aperture rod back into the Aperture Adjuster
assembly on the column and turn the end screw mechanism until
the holder is hand tight.
3. Pump the microscope specimen chamber
4. Reconnect the heater cable to the outer end of the rod if necessary.
5. Set the aperture at a 30 micron hole so that alignment can be
performed.
8.5.5 APERTURE AVAILABILITY
These apertures are the present used and come in two size types.
1. FP 6174/33 Mo Strip Aperture (30, 30, 40, 50, 100 micron)
This type can be used for general applications including EDX.
2. FP 6174/53 Mo Strip Aperture (30, 30, 50, 30, 30 micron)
This type can be used for high resolution applications such as low
voltage.
NOTE:
These apertures are purpose made for the 7 position Aperture Adjuster
assembly, although they will fit the earlier 4 position design not all
apertures can be accessed.
8-10
2 2 2 11
Maintenance 8.6 Stage maintenance
8.6 Stage maintenance
8.6.1 SPECIMEN HOLDERS
Recommended cleaning procedures are given below for parts which
operate in vacuum and that are subject to possible contamination.
Frequency of cleaning is, in most cases, determined by necessity
(image quality or astigmatism level).
Cleaning
1. Clean these parts using cotton wool and a mild abrasive domestic
cleaner (see list of preferred cleaners at the end of this chapter).
2. Rinse in tap water.
3. Clean in an ultrasonic cleaner for 5 minutes using distilled water.
4. Clean in an ultrasonic cleaner for 5 minutes using alcohol p/a or
isopropanol.
5. Rinse in alcohol p/a.
CAU TION !
Do not place parts together in the beakers, wash separate as damage
can occur to the metal surfaces.
6. First blow dry with a compressed air canister, then dry thoroughly
under an infra-red lamp (15 min. to 1 hr.) at a temperature of
between 80° C and 100° C. Do not bake in an oven!
8.6.2 STAGE MECHANICS
Checking the condition of the stage should be a weekly exercise as
many differing samples may be exchanged in this time period. Some
samples may be powders or composite materials that inadvertently
drop particles on or in the stage. If a Silicon wafer breaks in the
chamber it can shatter into hundreds of pieces. In this case the stage
should be thoroughly cleaned before attempting movement again
Cleaning Stage parts
Abrasives and solvents must not be used on the stage moving parts.
Cleaning should be made by using dry nitrogen gas bursts around the
stage mechanics to blow out any foreign materials. Make sure the
final lens and detectors are protected from the turbulence. Do not use
sharp metal objects to scrape away debris. A fine pair of plastic
tweezers can be used to pick up difficult particles. Spillages on the
stage should be wiped up using a lint-free cloth, followed by blowing
with N2.
8-11
22 211
Maintenance 8.7. Refilling the Water Bottle
8.7. Refilling the Water Bottle
The water bottle in the instrument will typically need to be filled,
about once a month if the instrument is used on a regular basis. The
water reservoir is located in the rear of the column console, beneath
the frame. To fill the bottle, do the following:
1. Vent the system.
2. Turn off any gas connected to the gas inlet.
3. Once this is done, pop off the stopper on the water bottle and add
distilled water until 2/3 full.
4. Re-install the stopper on the bottle.
5. Pump the system. Switch to Low Vac or ESEM mode to force
automatic purging.
NOTE:
The first time the system is pumped in LowVac or ESEM mode after
filling the bottle, Auto-purging may be erratic until the bottle vacuum
has recovered.
8-12
2 2 2 11
Maintenance 8.8 Rotary pump Oil level check
8.8 Rotary pump Oil level check
The Rotary pump supplied with the FEG has a dual roll by giving
primary pumping to parts of the system such as the specimen
chamber, when changing sample, and a secondary roll for backing the
main pumping system, either Oil Diffusion (ODP) or Turbo
Mechanical (TMP). Because of the frequency the pump has to process
large volumes of air loss of oil level over time is inevitable. Therefore
a check on the oil level at frequent periods is advised.
8.8.1 PERIODIC CHECK
This should be planned no less than every month, although every 3
months is more realistic.
The Rotary pump becomes very hot while in use, be careful not to
touch the main frame of the pump.
Rotary pumps can be switched off for short periods of time, although
necessary when changing the total oil reserve (Service function) it is
not absolutely necessary when only topping up the oil level. The
switch for ON/OFF can be found on the side of the pump.
The level indicator window is usually found on the front end of the
Rotary pump, and shows minimum and maximum level markers.
8.8.2 TOPPING-UP
The filling position is a plastic hand screw stopper on the top of the
same end as the level indicator.
1. Switch off the pump if felt necessary.
2. Unscrew the stopper.
3. Clean around the stopper hole with a lint-free cloth.
4. Fill with the recommended oil to the upper level.
5. Clean up any spillage on the pump.
6. Replace the stopper.
7. Switch on the pump.
Never fill the pump through the exhaust hole by removing the exhaust
pipe, as this will result in the oil being removed from the pump by
pressure build-up. Excessive back pressure in the exhaust pipe will
eventually over-heat the pump, so it is important to allow good
passage for the exhaust gases, preferably via an installed factory
exhaust system.
CAU TION !
Do not allow the Rotary pump to emit gases into the work place, as
this can be a health hazard.
8-13
22 211
Maintenance 8.8 Rotary pump Oil level check
8-14
2 2 2 11
Chapter 9
System Options
Overview. . . . . . . . . . . . . . . . . . . . . . . . . . . 9-1
Completion Packages. . . . . . . . . . . . . . . 9-2
General contents . . . . . . . . . . . . . . . . . . . 9-2
Application Completion Packages . . . . . 9-2
General contents . . . . . . . . . . . . . . . . . . . . 9-2
Gaseous Detectors. . . . . . . . . . . . . . . . . 9-3
GBSD . . . . . . . . . . . . . . . . . . . . . . . . . . . . . 9-3
Operation. . . . . . . . . . . . . . . . . . . . . . . . . 9-4
Installing the GBSD . . . . . . . . . . . . . . . . . 9-4
Removing the GBSD . . . . . . . . . . . . . . . . 9-4
Obtaining an images with the GBSD . . . . 9-5
SE Mode . . . . . . . . . . . . . . . . . . . . . . . . 9-5
BSE Mode . . . . . . . . . . . . . . . . . . . . . . . 9-5
Mix Mode . . . . . . . . . . . . . . . . . . . . . . . . 9-6
Enhanced Contrast . . . . . . . . . . . . . . . . . 9-6
GAD and BSD . . . . . . . . . . . . . . . . . . . . . . 9-6
GAD / BSD Diode switching . . . . . . . . . . 9-7
ESEM X-ray Mode with the GAD. . . . . . . 9-7
Installing the GAD or BSD Diode. . . . . . . 9-8
Detector home position . . . . . . . . . . . . . . 9-8
Obtaining an Image in BSE Mode . . . . . . 9-9
Solid State Detectors . . . . . . . . . . . . . . 9-10
Solid State Detector-BSD . . . . . . . . . . . . . 9-10
Preferences for SSD-BSD . . . . . . . . . . . 9-11
SSD-BSD Diode switching . . . . . . . . . . 9-11
Installing the SSD-BSD . . . . . . . . . . . . . 9-12
Obtaining an Image . . . . . . . . . . . . . . . . 9-12
Peltier Cooled Specimen Stage . . . . . . 9-13
22 211
Hardware Description . . . . . . . . . . .
Components of the Cold systems. .
The Cold Stage Module. . . . . . . .
Chamber Feedthrough Plate . . . .
Cables . . . . . . . . . . . . . . . . . . . . .
Water Flow Box (WFB) . . . . . . . .
Thermoelectric Module . . . . . . . .
Cold Stage Assembly . . . . . . . . . . .
..
..
..
..
..
..
..
..
..
..
..
..
..
..
..
..
.
.
.
.
.
.
.
.
9-13
9-14
9-14
9-14
9-15
9-15
9-16
9-16
Installation of the Quanta FEG
Cold Stage . . . . . . . . . . . . . . . . . . . . . 9-17
Cable and Cooling Hose connection . . .
Connecting the stage to the Chamber
Feedthrough Plate . . . . . . . . . . . . . . . .
Connecting the Chamber
Feedthrough Plate to the Controller . .
Installing the Water Flow Box . . . . . . . . .
. 9-18
. 9-18
. 9-18
. 9-18
Using the Cold Stage . . . . . . . . . . . . . . 9-20
Changing the Temperature Units . . . . . . . 9-20
Temperature Stage Control Module . . . . . 9-20
Cooling button. . . . . . . . . . . . . . . . . . . . 9-20
Heating button. . . . . . . . . . . . . . . . . . . . 9-20
Actual Temperature text . . . . . . . . . . . . 9-20
Target Temperature edit box . . . . . . . . 9-20
GoTo button . . . . . . . . . . . . . . . . . . . . . 9-20
Profile edits. . . . . . . . . . . . . . . . . . . . . . 9-21
Start / Stop button. . . . . . . . . . . . . . . . . 9-21
Next / Clear button . . . . . . . . . . . . . . . . 9-21
Hold button . . . . . . . . . . . . . . . . . . . . . . 9-21
Sample mounting tips . . . . . . . . . . . . . . . 9-22
Sample Stubs . . . . . . . . . . . . . . . . . . . . 9-22
Flat stub . . . . . . . . . . . . . . . . . . . . . . . 9-22
Dual cup . . . . . . . . . . . . . . . . . . . . . . . 9-22
Deep cup. . . . . . . . . . . . . . . . . . . . . . . 9-22
Locking the Stage Rotation Axis . . . . . . . 9-22
Pressure vs.Temperature control . . . . . . . 9-23
Keeping the sample wet. . . . . . . . . . . . . . 9-23
Selecting working distance. . . . . . . . . . . . 9-23
Using bulk samples . . . . . . . . . . . . . . . . . 9-24
Condensation and detector type . . . . . . . 9-24
High magnification imaging . . . . . . . . . . . 9-24
Cooling below zero . . . . . . . . . . . . . . . . . 9-24
Disconnecting the Water Lines . . . . . . . . 9-25
Heating Stage Option Overview . . . . . . 9-26
1000° C Heating Stage . . .
1000° C HTS Controller
Temperature Range . . . .
Hardware Description . . .
1500° C Heating Stage . . .
Temperature Range . . . .
Hardware Description . . .
. . . . . . . . . . . 9-27
..
..
..
..
..
..
..
..
..
..
..
..
..
..
..
.
.
.
.
.
..
..
..
..
..
..
..
..
..
..
9-27
9-27
9-28
9-28
9-28
Heating Stages Common Components 9-30
Heating Stage Module . . . . . . . . . . . . . . . 9-30
1. Cover Plate . . . . . . . . . . . . . . . . . . . 9-31
2. Top Insulator . . . . . . . . . . . . . . . . . . 9-31
3. Bottom Insulator . . . . . . . . . . . . . . . 9-31
4. Heater Assembly. . . . . . . . . . . . . . . 9-31
5. Stage Base . . . . . . . . . . . . . . . . . . . 9-31
High Temperature Stage controller . . . . . 9-31
Display Window . . . . . . . . . . . . . . . . . 9-32
Setpoint Adjust . . . . . . . . . . . . . . . . . . 9-32
Operating Mode . . . . . . . . . . . . . . . . . 9-32
Fault . . . . . . . . . . . . . . . . . . . . . . . . . . 9-32
Shield Voltage. . . . . . . . . . . . . . . . . . . 9-32
Heater Power . . . . . . . . . . . . . . . . . . . 9-32
On/Off Switch . . . . . . . . . . . . . . . . . . . 9-32
Fan . . . . . . . . . . . . . . . . . . . . . . . . . . . 9-33
RS232 . . . . . . . . . . . . . . . . . . . . . . . . . 9-33
A/C Fuse . . . . . . . . . . . . . . . . . . . . . . . 9-33
Shield Bias (1500° C stage only) . . . .
A/C Power . . . . . . . . . . . . . . . . . . . . .
K Type Thermocouple . . . . . . . . . . . .
B Type Thermocouple . . . . . . . . . . . .
Chamber Interface . . . . . . . . . . . . . . .
Chamber Feedthrough Assembly (CFA).
Water Flow Box (WFB) . . . . . . . . . . . . . .
9-33
9-33
9-33
9-33
9-33
9-34
9-34
Heating Stages Diverse Components . .9-35
1500° C Bias Supply Controller (BSC) . .
Shield Bias Read-out . . . . . . . . . . . . .
Sample Bias Read-out . . . . . . . . . . . .
Shield Bias Voltage . . . . . . . . . . . . . .
Sample Bias Voltage . . . . . . . . . . . . .
Power On/Off . . . . . . . . . . . . . . . . . . .
Power On Indicator . . . . . . . . . . . . . .
Fan . . . . . . . . . . . . . . . . . . . . . . . . . . .
Sample Bias Voltage . . . . . . . . . . . . .
Shield Bias Voltage . . . . . . . . . . . . . .
A/C Interlock . . . . . . . . . . . . . . . . . . .
A/C Fuse . . . . . . . . . . . . . . . . . . . . . .
A/C Power . . . . . . . . . . . . . . . . . . . . .
1000° C Heat Shield Assembly (HSA) . .
Using the heat shield . . . . . . . . . . . . . .
1500° C Heat Shield Assembly (HSA) . .
Heat Shield . . . . . . . . . . . . . . . . . . . .
Swing Arm . . . . . . . . . . . . . . . . . . . . .
Swing Arm Adjustments. . . . . . . . . . .
Swing Arm Knob . . . . . . . . . . . . . . . .
Heat Shield Feedthrough Plate . . . . .
Shield Bias Voltage Cable . . . . . . . . .
X-ray Shield . . . . . . . . . . . . . . . . . . . .
High Temperature GSED . . . . . . . . . . . .
9-35
9-35
9-35
9-35
9-35
9-35
9-35
9-36
9-36
9-36
9-36
9-36
9-36
9-37
9-37
9-37
9-37
9-37
9-37
9-38
9-38
9-38
9-38
9-38
1000° C and 1500° C Heating Stages
Operation . . . . . . . . . . . . . . . . . . . . . . .9-39
Temperature Stage Control Module . . . .
Heating button . . . . . . . . . . . . . . . . . . .
Cooling button . . . . . . . . . . . . . . . . . . .
Actual Temperature text. . . . . . . . . . . .
Target Temperature edit box . . . . . . . .
Ramp edit box . . . . . . . . . . . . . . . . . . .
GoTo button . . . . . . . . . . . . . . . . . . . . .
Profile edits . . . . . . . . . . . . . . . . . . . . .
Start/Stop button . . . . . . . . . . . . . . . . .
Next button / Clear . . . . . . . . . . . . . . . .
Hold button. . . . . . . . . . . . . . . . . . . . . .
22 211
9-40
9-40
9-40
9-40
9-40
9-40
9-40
9-40
9-41
9-41
9-41
Operating Modes . . . . . . . . . . . . . . . . . .9-42
Operation Characteristics . . . . . . . . . . .9-60
Hardware Operating Modes. . . . . . . . . . . 9-42
Local Operating Mode . . . . . . . . . . . . . 9-42
Local / manual mode . . . . . . . . . . . . . 9-42
Local / automatic mode. . . . . . . . . . . . 9-42
Software Operating Mode . . . . . . . . . . . . 9-43
Temperature control mode . . . . . . . . . . 9-43
Profile . . . . . . . . . . . . . . . . . . . . . . . . . 9-43
Actual temperature . . . . . . . . . . . . . . . 9-43
Temperature Units . . . . . . . . . . . . . . . 9-43
Thermal Emission . . . . . . . . . . . . . . . . . . 9-60
Degassing Samples . . . . . . . . . . . . . . . . . 9-60
Locking the Stage Rotation Axis . . . . . . . 9-60
Heating Stages Basic Operation . . . . . .9-44
Powering On the HTS Controller . . . . . . .
Performing a Heating Cycle . . . . . . . . . . .
In Local / Manual Mode . . . . . . . . . . . .
In Local / Automatic Mode . . . . . . . . . .
In Remote / Automatic Mode . . . . . . . .
Setting up a Temperature Profile . . . . . . .
Fault Conditions. . . . . . . . . . . . . . . . . . . .
Thermocouple Fault . . . . . . . . . . . . . .
Heater fault . . . . . . . . . . . . . . . . . . . . .
Powering Off the HTS Controller . . . . . . .
9-45
9-45
9-45
9-45
9-46
9-47
9-48
9-48
9-48
9-48
1000° C HS General Operation. . . . . . .9-49
Calibration and Temperature Accuracy
Heating Stage Calibration . . . . . . . . .
Temperature and Conductivity . . . . .
High Temperature GSED . . . . . . . . . . .
Using the 1000° C HS with BSED . .
Using the 1000° C HS with EDX . . . .
..
..
..
..
..
..
9-49
9-49
9-49
9-50
9-50
9-50
1500° C HS General Operation. . . . . . .9-51
Calibration and Temperature Accuracy
Heating Stage Calibration . . . . . . . . .
Temperature and Conductivity . . . . .
High Temperature GSED . . . . . . . . . . .
Using the 1500° C HS with BSED . .
Using the 1500° C HS with EDX . . . .
..
..
..
..
..
..
9-51
9-51
9-51
9-52
9-52
9-52
Imaging Samples with the 1500° C HS .9-53
Selecting a Crucible . .
Obtaining an Image . .
Imaging Guidelines . .
Removing the Sample
Checking Calibration .
.. .. .. . ..
.. .. .. . ..
.. .. .. . ..
Crucible . .
.. .. .. . ..
..
..
..
..
..
..
..
..
..
..
..
..
..
..
..
9-53
9-54
9-55
9-56
9-56
Using the HS with EDX Detectors . . . . .9-57
Inclined Crystal EDX Detectors . . . . . . . .
Positioning the High Temperature GSED
EDX Performance . . . . . . . . . . . . . . . . . .
Window Contamination . . . . . . . . . . . . . .
2 22 11
9-57
9-58
9-59
9-59
Installation and Maintenance
for the 1000° C and 1500° C HS . . . . .9-61
Installing the High Temperature GSED . . 9-61
Installing the Heating Stage Module. . . . . 9-62
Installing the Sample Bias
Feedthrough Plate . . . . . . . . . . . . . . . . . . 9-64
Connecting the bias supply controller . . 9-65
Removing the heating stage . . . . . . . . . 9-65
Installing the Chamber
Feedthrough Assembly (CFA)
and Water Flow Box (WFB) . . . . . . . . . . . 9-66
Connecting the stage module . . . . . . . . 9-66
Connecting the HTS controller . . . . . . . 9-66
Installing the Water Flow Box (WFB) . . 9-66
Removing the Heating Stage Module. . . . 9-67
Disconnecting the Water Lines . . . . . . 9-67
Installing the Feedthrough Water Plugs9-68
Changing the Stage Heater Assembly . . . 9-69
Adjusting the Heat Shield . . . . . . . . . . . . . 9-70
Adjusting the Swing Arm. . . . . . . . . . . . 9-70
1500° C HS Troubleshooting. . . . . . . . .9-71
Bias Supply Connections . . . . . . . . . . . . .
Sample Crucible Conductivity . . . . . . . . .
Sample Bias Continuity . . . . . . . . . . . . . .
Heat Shield Continuity . . . . . . . . . . . . . . .
Controller Thermocouple Faults. . . . . . . .
Vibration . . . . . . . . . . . . . . . . . . . . . . . . . .
Refurbishing the HSM . . . . . . . . . . . . . . .
9-71
9-72
9-72
9-72
9-72
9-73
9-74
Specimen Holder Kit Option . . . . . . . . .9-75
Location positions . . . . . . . . . . . . . . . . . .
Older Interface Adapter . . . . . . . . . . . . . .
Interface pillar. . . . . . . . . . . . . . . . . . . . . .
Multi-Holders . . . . . . . . . . . . . . . . . . . . . .
16 Position Stub Holder . . . . . . . . . . . .
Angled Stub Holder. . . . . . . . . . . . . . . .
Analytical Holder . . . . . . . . . . . . . . . . . .
Polished Mount Holders. . . . . . . . . . . . . .
Clamp Stubs. . . . . . . . . . . . . . . . . . . . . . .
Eucentric Stub Holders. . . . . . . . . . . . . . .
Torx Drivers . . . . . . . . . . . . . . . . . . . . . . .
9-76
9-76
9-77
9-77
9-78
9-78
9-78
9-79
9-79
9-80
9-80
22 211
9
SYSTEM OPTIONS
OVERVIEW
This chapter covers hardware and software that is an option either
integrated in, or accessory to the Quanta System Series.
The items covered here are:
•
•
•
•
•
•
•
Completion Packages
Application Completion Packages
Gaseous Detectors options
Solid State Detector options
Peltier Stage System option
Heating Stages option
Specimen Holder Kit option
Other options will be added to this chapter when the hard or software
becomes available in future releases.
For further information on any of these items please contact your local
FEI representative.
9-1
22 211
System Options Completion Packages
Completion Packages
Completion Packages are available for all the Quanta systems. They
all comprise of a Support Computer with extended software
functionality, plus additional hardware items that are essential
upgrades to the Standard Quanta system. The composition of the
Completion Package can vary due to regional demands or the
preference of the customer.
General contents
These items are present in all packages:
•
•
•
•
Support computer
On-line database access (webrace)
GAD preamplifier kit
Low kV solid state BSED
These items can be part of the Completion Package:
• GAD low kV SSBSED
• Manual User Interface USB
Application Completion Packages
This category of Completion packages are designed to bring the
essential tools together for specific applications. All packages contain
the Support Computer and relevant software for the application plus
other hard ware such as detectors for BSE and EDX
The applications covered for these Completion kits are as follows:
• Industrial Failure Analysis
• Forensic
• Pharmaceutical
GENERAL CONTENTS
Although the contents of these packages are specific to the
application, individual items may be changed at any time due to new
or redundant techniques, therefore listing the contents is not done
here. Further, up to date information on any of these product can be
obtained from your local FEI representative.
9-2
2 2 2 11
System Options Gaseous Detectors
Gaseous Detectors
GBSD
The Gaseous Backscattered Electron Detector (GBSD) is an optional
detector used in place of the standard GSEDs and LFDs.This detector
is integrated into a flexible PC board and plugs into the signal
connector behind the conical lens.
FIGURE 9-1
GASEOUS BE DETECTOR (GBSD)
Unlike the ESEM detectors, which use gas in the chamber for
imaging, classic backscattered electron detectors such as the
Robinson, Centaurus, or the SSD_BSE typically do not produce
satisfactory images at pressures above 3 to 4 Torr (400 to 534 Pa).
This is primarily due to the scattering of the backscattered electrons
(signal) by the gas. This poor imaging tends to preclude work at
higher pressures where liquid water can be maintained, such as the 5
to 8 Torr (666 to 1066 Pa) range. The GBSD was specifically
designed to image at pressures above 4 Torr (534 Pa) (predominantly
in the range of 6 to 9 Torr (800 to 1200 Pa). This makes the GBSD
best suited for use with the Peltier when both SE and BSE images are
required.
FIGURE 9-2
GBSD INSTALLED AND OPERATING
9-3
22 211
System Options Gaseous Detectors
Operation
The grid on the bottom of the GBSD board is used to collect all SE
signals from the gas. This grid, the surface of the board around the
grid and the PLA1 are connected to high voltages up to +/-600V
during ESEM operation.
In the BSE mode, backscattered electrons generated by the prim ary
beam, strike the B SE converter plate and generate secondary electrons.
Thes e secondary electrons are accelerated (repelled) by a negative
voltage placed on the BSE converter plate. A zero voltage potential is
applied to the SE collection grid. When the electrons strike a gas
molecule with enough energy, they will ionize the gas m olecule. The
two electrons will be further accelerated, causing m ore collis ions . The
SE signal is “amplified” in the gas with gains up to a few thousand, and
the resulting signal is “backscattered” in appearance.
In SE mode, the voltage on the converter plate is reversed and a
second positive voltage is applied to the SE collection grid. Secondary
electrons from the sample will be collected directly and the image will
be secondary in appearance, similar to the GSED image. All
secondary electrons generated by backscattered electrons at the
converter plate will be drawn back to the converter plate.
A combination of a negative potential on the converter plate and a
positive potential on the SE grid will generate a mixed SE-BSE image
in the mixed mode.
Installing the GBSD
Installing and especially removing the GBSD should be performed
with the same caution as with the GSED.
With your gloved right hand, grasp the detector by the rigid connector
end. Hold it with the detector head facing back towards you, and the
green Torlon ring facing up. Insert the detector (gold fingers facing
forward) into the connector located at the back of the chamber, behind
the conical lens. This is made easier by inserting the right side of the
detector in to the visible portion of the connector, then rotating the
detector into position. A keyed position in the connector will prevent
the user from inserting the detector up-side-down.
Next, place the green Torlon ring of the detector head under the lens
insert and press the detector head up onto the insert. This requires
little force and can be done with one finger. The green Torlon seal
should be fully in contact with the lens.
Removing the GBSD
Caution! DO NOT pull the detector from the connector first, then
pull down to remove the detector head from the insert. This will
damage the detector. To prevent damaging the detector, it is important
to remove it as described here.
To remove the GBSED, first remove the detector head from the lens
insert. Do this by catching a fingernail or thumbnail (of the gloved
hand) on the FRONT of the green Torlon ring and pull down. There is
a shoulder machined into the Torlon ring which is specifically
designed for this purpose. Next, pull the other end of the detector out
from the connector.
9-4
2 2 2 11
System Options Gaseous Detectors
Obtaining an images with the GBSD
SE Mode
1. If necessary, install the standard insert.
2. Install the GBSD.
3. Pump down and flush the chamber.
4. In the Detector menu, select Gaseous - BSE:
FIGURE 9-3
DETECTOR PREFERENCES ROR THE GBSD
5. Now select Preferences from the Detectors menu. The Detector
Preferences dialogue will appear. From the list box at the top,
select GBSD SE.
6. Obtain an image. Move the sample to a working distance of 9.5 to
10.5 mm, with a pressure of 5 to 7 Torr (666 to 934 Pa). Slowly
increase the contrast. A secondary image should appear on the
screen.
BSE Mode
1. Obtain an SE image. Move the sample to a working distance of 8.5
to 9.5 mm, with a pressure of 5 to 7 Torr (666 to 934 Pa). The
closer the sample is to the detector, the stronger the BSE signal
will be.
2. The detector may break down to the sample. If so, decrease the
detector contrast. (In SE mode, the closer the sample is to the
detector the greater the likelihood of detector breakdown. This
does not apply in BSE mode).
3. Select Preferences. from the Detector menu. The Detector
Preferences dialogue will appear. From the list box at the top,
select GBSD BSE. The voltage will be changed automatically for
BSE imaging.
4. Slowly increase the contrast until a BSE image appears.
9-5
22 211
System Options Gaseous Detectors
Mix Mode
1. Select Preferences. from the Detector menu. The Detector
Preferences dialogue will appear. From the list box at the top,
select GBSD MIX.
2. The image will now be a mix of the SE and BSE signals.
Enhanced Contrast
The GBSD, like other backscattered electron detectors, works best
with high beam currents and voltages. Since backscattered electron
yield is low for light atomic number elements, using high kVs and
high beam currents may not be a suitable option for these samples.
To solve this, an additional contrast expansion circuit is provided.
This control is located in the Detector menu Preferences... dialogue.
GAD AND BSD
The GAD or BSD is used in parallel with the LFD. This sys tem allows
simultaneous use of SE, BSE and X-ray detectors in a gaseous
environment. Two low kV SSBSD diodes are provided, one with a 500
µm PLA cone for X-ray use and is called the GAD, the other with no
PLA for large field of view work is called the BSD. B oth diodes connect
to a dual input pre-am plifier with an external switch for selecting the
GAD or BSD diode. The GAD conical PLA extends down from the unit
to 8.5 mm. This reduces the gas path length for X-ray collection to an
efficient 1.5 mm at the standard analytical working distance of 10 mm .
Either backs cattered diode is positioned directly above the sample,
providing atomic number contrast. The GAD and BSD have a different
fixing method to the SSD-BSD s o that a vacuum seal is accom plished
through a Torlon press -on s eal on the backside of the detector housing.
FIGURE 9-4 THE GAD AND BSD DIODE UNITS
FIGURE 9-5 THE AMPLIFIER SWITCH GAD / BSD
9-6
2 2 2 11
System Options Gaseous Detectors
When ever the GAD or BSD diode is selected a Pause symbol is
displayed in the 4th Quad. This is to denote that the C CD cam era LED’s
have been switched off so that there is no interference on the image.
GAD / BSD Diode switching
From the Solid State- BSE Preferences dialogue box the Diode
switching can be operated to give the required image type.
TABLE 9-1
DIODE SWITCH GAD / BSD
Option
Use
A
Left segment—uses shadows to create strong
topographic and atomic number contrast.
B
Right segment—uses shadows to create strong
topographic and atomic number contrast.
A+B
Use for normal BSE image. Gives suppressed
topographic contrast with maximum atomic number
contrast.
A-B
Use for a pseudo-topographical (shadow) image with
atomic number contrast suppressed.
ESEM X-ray Mode with the GAD
The following figure illustrates the configuration of the GAD during
X-ray analysis in ESEM Mode.
FIGURE 9-6
GAD CONFIGURATION IN ESEM MODE
The optimum FWD for EDX analysis is 10 mm. The point of the
GAD cone is at 8.5 mm WD, which reduces the gas path to only 1.5
mm, compared to 5 mm with the standard GSED. This reduces the
amount of beam in the skirt and also reduces the spread of the skirt.
This detector should be used at the lowest possible gas pressure,
preferably less than 2 Torr (266 Pa). Normally X-ray analysis is
performed with a relatively high beam current so that there should be
enough signal.
9-7
22 211
System Options Gaseous Detectors
Installing the GAD or BSD Diode
FIGURE 9-7 GAD INSTALATION
1. Hold the detector by it’s sides and push up the back of the GAD or
BSD diode onto the Standard Insert, do not touch the cone or
diode.
2. Once the required diode is installed, place the pre-amplifier switch
on the outside of the chamber into the GAD or BSD position.
3. Installation is complete.
Detector home position
While the Quanta system has the BSD and the GAD detectors, only
one diode can be used at a time. The second diode that is not used is
placed into a holder which is mounted on the upper edge of the pole
piece. This keeps the unused diode clear from hitting the stage and
samples (both diodes are shown housed):
FIGURE 9-8 HOME POSITION FOR GAD AND BSD
9-8
2 2 2 11
System Options Gaseous Detectors
Obtaining an Image in BSE Mode
Press one of the diodes (BSD or GAD) onto the Standard insert. For
accurate x-ray analysis, use the GAD diode; for low magnification
imaging, use the BSD diode.
If using the GAD diode, place the pre-amplifier select switch on the
outside of the chamber into the GAD position. If using the BSD diode,
place it in the BSD position:
Close the chamber door and pump down the chamber. When the BSD
diode is installed, No Accessory must be selected in the Pole Piece
Configuration dialogue when this appears. The vacuum system will
automatically limit the chamber pressure range to 0.1 to 1.5 Torr (14
to 200 Pa).
When the GAD is installed the GAD Cone option should be selected
when the Pole Piece Configuration dialogue appears. This will limit
the chamber pressure to 0.1 to 5 Torr (14 to 666 Pa).
Select Solid State- BSE from the Detector menu.
Slowly increase contrast and brightness to obtain an image.
9-9
22 211
System Options Solid State Detectors
Solid State Detectors
SOLID STATE DETECTOR-BSD
The SSD-BSD is a two segment Solid-State Backscatter Detector. It is
mounted underneath the pole piece to obtain maximum detector
efficiency. When not in use, the SSD-BSD can be positioned in a
special holder at the top of the specimen chamber. Since the detector
is mounted underneath the final lens, it will cause some limitation in
the tilt range when working at the eucentric working distance. The
SSD-BSD connects to the dual input pre-amplifier. The external
switch on this pre-amplifier is set to BSD when the SSD-BSD is to be
used for imaging.
FIGURE 9-9 THE SOLID STATE BACKSCATTER DETECTOR
The two segments can be switched independently, enabling the
enhancement of either atomic number contrast (A+B) or topographic
contrast (A-B). Operation is fully integrated in the main software.
The SSD-BSD has a resolving power of better than 0.1 Delta Z at a Z
value of 20. It will operate at TV rate for large spotsizes of 6 or more.
Automatic contrast and brightness routines are not applicable.
Depending on the model type of SSD-BSD employed sensitivity can
be as low as a minimum high voltage of 1kV. Maximum detector
response is around 8.5 mm working distance.
The SSD-BSD has an active area of approximately 125 mm2 per
segment, and allows simultaneous use of backscattered electrons with
EDX at the eucentric working distance (10 mm).
NOTE:
The BSD is sensitive to mechanical damage so the active area should
never be touched.
9-10
2 2 2 11
System Options Solid State Detectors
Preferences for SSD-BSD
The Detector configuration dialogue box contains option buttons to
select how the two detector segments A and B are switched.
FIGURE 9-10 SSD-BSD CONFIGURATION DIALOGUE
When ever the SSD-BSD is selected a Pause symbol is displayed in
the 4th Quad. This is to denote that the LED’s have been switched off
to the CCD camera so that no interference can be added to the SolidState detection.
SSD-BSD Diode switching
From the Slide State - BSE Preferences dialogue box the Diode
switching can be operated to give the required image type.
TABLE 9-2
DIODE SWITCH SSD-BSD
Option
Use
A
Left segment—uses shadows to create strong
topographic and atomic number contrast.
B
Right segment—uses shadows to create strong
topographic and atomic number contrast.
A+B
Use for normal BSE image. Gives suppressed
topographic contrast with maximum atomic number
contrast.
A-B
Use for a pseudo-topographical (shadow) image with
atomic number contrast suppressed.
9-11
22 211
System Options Solid State Detectors
Installing the SSD-BSD
1. Hold the detector by it’s sides and slide the metal clip on the back
of the detector over the end of the Standard Insert until it stops. Do
not touch the diode.
2. Once the diode is installed, place the pre-amplifier switch on the
outside of the chamber into the BSD position.
3. Installation is complete.
Obtaining an Image
When using the SSD-BSD diode, place the amplifier switch in the
BSD position:
Close the chamber door and pump down the chamber. When the BSD
diode is installed, No Accessory must be selected in the Pole Piece
Configuration dialogue when this appears. The vacuum system will
automatically limit the chamber pressure range to 0.1 to 1 Torr (14 to
134 Pa).
Select Solid State- BSE from the Detector menu.
Slowly increase contrast and brightness to obtain an image.
9-12
2 2 2 11
System Options Peltier Cooled Specimen Stage
Peltier Cooled Specimen Stage
The Peltier Cooled Specimen Stage is used to maintain water on
samples inside the Quanta specimen chamber. It uses a thermoelectric
module to alter temperature, and this in conjunction with specimen
chamber pressure creates condensation on the sample. The primary
applications for this effect is to produce moisture on the sample or to
keep the sample wet.
The system comprise of the thermoelectric stage, a stage adapter, a
temperature controller, a Chamber Feedthough, Port “C”, an
additional Water Flow Box, Chiller and water connections to the
Chamber Feedthough Interface.
The stage itself is primarily com posed of a thermoelectric module and a
resistive temperature device (RTD), which measures the temperature of
the sample. The thermoelectric stage is mounted onto the Quanta
motorized stage using the stage adapter, and is controlled by UI software.
Microproces sor-controlled servo algorithms are incorporated into the
controller to provide accurate and stable automatic temperature control.
These servo parameters have been pre-program med and optim ized for
the characteris tics of the Quanta thermoelectric module s o that no
operator tuning adjus tments are required. The temperature measurement
accuracy of the controller is determined by the standard error limits for
the RTD, and by the accuracy of the temperature meas urement module
in the controller. These specifications are as follows:
RTD accuracy:
Normal operating range:
Maximum temperature range:
±0.5° C
±20° C from ambient
from -25° C to +55° C
HARDWARE DESCRIPTION
The Cold stage system comprises of the following:
Chamber feed through assembly, including chamber feed through
plate Port “C”, cooling water lines, water chiller and water flow box;
Thermoelectric stage with 3 sample holders; Controller (two boards in
the detector rack) and cables.
The following figure shows a basic diagram of the Cold stage system.
FIGURE 9-11 COLD STAGE SYSTEM BLOCK DIAGRAM
9-13
22 211
System Options Peltier Cooled Specimen Stage
COMPONENTS OF THE COLD SYSTEMS
The Cold Stage Module
FIGURE 9-12 QUANTA FEG COLD STAGE MODULE
NOTE:
The Quanta FEG 400, 600 uses longer water hoses and
communication cables compared with the ones represented in Figure
9-12.
Chamber Feedthrough Plate
The chamber feed through plate for the Quanta FEG fits onto the
chamber over Port “C”. It provides feed through connectors for the
cables that connect the stage, which are inside the chamber, to the rest
of the system. The following figure shows the feed through plate.
FIGURE 9-13 CHAMBER FEEDTHROUGH PLATE
9-14
2 2 2 11
System Options Peltier Cooled Specimen Stage
Cables
The cables used to interconnect the components of the Cold stage
system are shown in the following figure.
FIGURE 9-14 CABLES AND HOSES
Figure 9-18A shows the C HAM BER INTER FACE CABLE. This cable
goes between the outside of the feed through plate to the PSC board.
Figure 9-18B shows six COOLING WATER HOSES. The shortest set
of these will be connected to the stage on one end; the other end goes
to the inside of the feed through plate. The next longer set of hoses
will go from the outside of the chamber feed through plate to the
water flow box. Finally, another longer set of hoses will come with the
water chiller, and go between it and the corresponding connectors on
the water flow box.
Figure 9-18C above shows the SIGNAL / CONTROL CABLE. This
cable is permanently attached to the thermoelectric stage on one end,
and the other end goes to the 9-pin D-type connector on the inside of
the feed through plate.
Water Flow Box (WFB)
When using the Cold stage, there is a risk that water could leak into
the chamber, for instance if a water hose were to break or disconnect
for some reason. In the Quanta FEG, the HiVac port is located on the
bottom of the chamber. Water leaking into the port could seriously
damage the vacuum system.
The water flow box monitors flow between the chiller and the stage,
and shuts off the flow if a problem is detected. It is installed between
the chiller and the Chamber Feedthrough Plate. It contains a sensor on
each line, and solenoid valves, both of which will close if either of the
sensors detects a failure.
9-15
22 211
System Options Peltier Cooled Specimen Stage
Thermoelectric Module
The thermoelectric module is a small wafer composed of PN
semiconductor elements. When current is passed through these
elements, one side of the wafer will heat and the opposite side will
cool; when current is reversed, the two sides of the wafer will reverse
heating and cooling as well. This is referred to as the Peltier effect. the
following figure shows a basic diagram of the thermoelectric module,
to illustrate how it works.
FIGURE 9-15 BASIC THERMOELECTRIC MODULE
Rejected heat, on the bottom of the thermoelectric module, must be
removed. If the heat is not removed, it will build up and move back up
to the cold surface, raising the sample temperature. For this reason, an
external water chiller is provided. The chiller will efficiently remove
excess heat from the module and allow continuous operation with no
interruption.
CAUTION!
If the cooling stage is used without a heat sink connection, severe
damage may result to the thermoelectric module. Do not operate the
Quanta FEG Cold stage for longer than 15 minutes without cooling
water, else damage will occur to the device.
COLD STAGE ASSEMBLY
The Cold Stage is made up of various components.
FIGURE 9-16 COLD STAGE ASEEMBLY
9-16
2 2 2 11
System Options Installation of the Quanta FEG Cold Stage
The primary cons tituents of the stage are the THER MO ELEC TRIC M ODULE ,
which alters temperature, and the R TD , which m easures temperature. The
RTD is located inside of the S P EC IM EN S TUB HOLDE R, a plate into which
the S P EC IM EN ST UB is inserted. The thermoelectric module and stub
holder are held onto the main body of the stage using therm al grease; and
the DE LRIN C OVER holds the entire ass embly in place. When fully
as sem bled, the RTD will be situated between the sample and the
thermoelectric module, thus giving accurate tem perature readings.
The signal cable is permanently attached to the stage base, and
connects to the inside of the Chamber Feedthrough Assembly.
Installation of the Quanta FEG Cold Stage
The Cold stage is mounted onto the motorized stage through a Stage
Adapter. The following instructions describe how to install the Cold stage.
Vent the specimen chamber and open the stage door.
Remove any other sample mount from the stage rotation head.
FIGURE 9-17 STAGE ADAPTER AND SAMPLE MOUNT
Place the Stage Adapter on the rotation head of the stage and, through
the center, screw in the Sample Mount supplied with the Stage
Adapter piece. Make finger tight.The Sample Mount is not Click-fit
so the Rotation control will need to be LOCKED.
Slacken off the set screw on the right of the base of the Peltier module
using a metric 2 mm hex wrench, then place the module on and over
the Sample Mount.
The water hose connectors go towards the rear of the chamber.
Tighten the set screw with the 2 mm hex wrench.
FIGURE 9-18 COLD STAGE INSTALLED
9-17
22 211
System Options Installation of the Quanta FEG Cold Stage
CABLE AND COOLING HOSE CONNECTION
Before starting, refer to Section ‘Hardware Description’ to become
familiar with the names and locations of the connectors in the system.
Remove chamber Port C and replace with Chamber Feedthrough
Assembly if necessary.
Connecting the stage to the Chamber Feedthrough Plate
Install the Signal Cable. This is the 9-pin D-type connector that is
attached to the thermoelectric stage. The loose end of this connector
should be installed on the corresponding connector on the inside of
the feedthrough plate.
Connect the Cooling Water Hoses. The short set of hoses on the
thermoelectric stage go to the inside of the feedthrough plate.
Connecting the Chamber Feedthrough Plate
to the Controller
One end of this cable will go to the outside of the Chamber
Feedthrough Plate on the connector labelled PELTIER; and the other
end to the rear of the PSC board in the detector rack.
INSTALLING THE WATER FLOW BOX
Check that the water dam is fitted into the HiVac port in the bottom of
the chamber.
Hook up the Water Flow Box between the chiller and the feedthrough
plate by installing the water line tubing on the corresponding connectors.
The larger hose should connect from the chiller OUTLET to the box
input marked FROM CHILLER. The water flow path should make a
loop between the chiller, through the water flow box and stage, then
back. The following figure shows the box hooked up to the chamber. It is
important to keep the box on the electronics console to reduce vibrations.
FIGURE 9-19 CONNECTING THE WATER FLOW BOX
Install the POWER cable on the Water Flow Box, but leave the power
switch off. The other end of this cable connects to the SSIB +24V
output in the Quanta console.
Turn on the water chiller. Water will not flow at this point, since the
valves in the box are closed when it is off.
9-18
2 2 2 11
System Options Installation of the Quanta FEG Cold Stage
Turn on power to the box. An alarm will sound, indicating that there is
no flow through the box. Push and hold the START FLOW button.
Keep holding this button down until all the air is out of the water
lines; this can be seen as water flows through them. Once the lines are
flowing clear, release the START FLOW button.
Make sure that the FLOW OK light on the box is on. This indicates
that water flow is working; i.e., that there are no leaks in the system.
The FLOW OK light will remain illuminated until there is a leak, or if
the STOP FLOW button is pressed.
The STOP FLOW button can be pressed at any tim e to close the valves
and shut off the water flow, for whatever reason. If STOP FLOW is
pres sed, an alarm will sound. The START FLOW button must be
pres sed and held again to re-establish flow through the sys tem .
CAUTION!
Never pump the specim en chamber without checking for water leaks first.
The Cold stage system is now ready to use.
9-19
22 211
System Options Using the Cold Stage
Using the Cold Stage
This section will provide the basic operation of the Cold stage system,
including setting up temperature parameters and selecting an
appropriate sample holder. It will also give some general guidelines
for operating the thermoelectric stage (such as how to correct for
calibration deviations, how to mount samples for maximum heat
transfer and how to control condensation and keeping samples wet).
CHANGING THE TEMPERATURE UNITS
The Heating Stage m odule defaults to displaying tem perature in
° Celsius. This can be changed through the Units tab on the
Preferences menu. Celsius, Fahrenheit and Kelvin are available. As
soon as a selection is m ade, the selected unit will affect all temperature
values reported in the controller display window and the Heating Stage
module (see Chapter 5 - Setting Preferences -Units tab).
TEMPERATURE STAGE CONTROL MODULE
Cooling button
The Cooling button toggles to enable or disable the software control
of the Peltier stage from the UI (switches the manual mode on or off).
When the cooling stage software control is enabled the button is
Yellow. When the Cooling button is grey with black lettering the
Heating button can be pressed to activate the software interface for the
Heating stage. When no cooling stage is installed or is disconnected
the button is completely Grey.
Heating button
N/A...Only for the Heating stage.
Actual Temperature text
This displays the Actual temperature measured by the cooling stage
hardware. The same value is used in the databar. The display is also
active when the cooling stage is in manual mode. When the cooling
stage controller is off or disconnected the Target temperature text is
greyed.
Target Temperature edit box
This is an edit box to set the Target temperature. It is active when a
stage is enabled and no profile running. It is checked for limit values.
Immediately after a new temperature is set the Hold button is
switched on.
GoTo button
When the GoTo button is pressed the temperature starts to proceed to the
Target tem perature in Temperature control mode. After any change in
the edit box for Target temperature the GoTo button is active.
9-20
2 2 2 11
System Options Using the Cold Stage
Profile edits
• Temp - target temperature, which should be reached
• Soak hh - mm - ss specifies time in hours, minutes and seconds for
how long should the heating stage hold the target temperature after
it has reached Target temperature
Soak time countdown
This is a display for the soak time as a countdown.
Edited values are checked for limits, values out of limits are not accepted.
Edits are active when a cooling stage is enabled and the profile is not
running. When the profile is running the box mark at the end of the
line, for the current step, is displayed in Yellow. When Temp is not
filled the steps are not executed and the profile execution is stopped.
If the column hh, mm or ss are not filled they represent zero condition.
Start / Stop button
This is a toggle button that starts or stops the Temperature profile. If
the profile is running the caption is Stop and the target temperature
control is disabled. The profile starts with step one. The first step with
a non-filled value will stop execution of the profile. After finishing
the profile the Stop button is switched back to Start.
Next / Clear button
This is a toggle button. When no profile is running the caption is
Clear and resets all values. When profile is running the caption is
Next and increases the step of the profile by one. The button is
disabled when the Hold button is active on the temperature.
The Next command is used to bypass a cooling cycle in a multiple set.
When selected during a cooling cycle, the system will interrupt the
cycle, skip to the next cycle. This can be used in the middle of
temperature profiles to save time, or to bypass an undesired set-point.
Next will only have an effect when there is more than one temperature
setpoint defined. If Next is selected during the last cooling cycle
defined, nothing will happen.
Hold button
This is a toggle button. It switches the holding of the Actual current
temperature on or off. It is always activated after enabling the cooling
stage or any change of Target temperature.
Clicking on the Hold button will turn the button Yellow and place the
system into hold mode. The system can be taken out of hold mode by
pressing the yellow Hold button again. When the Hold button is
inactive it is displayed Grey.
9-21
22 211
System Options Using the Cold Stage
SAMPLE MOUNTING TIPS
When determining the condensation point for the thermoelectric
stage, use the flat cup stub. This will position the sample closer to the
RTD, thus giving a more accurate reading. The farther away the
sample is from the measuring device, the more deviation there will be
in the condensation point. Use carbon paint or carbon tape to hold
samples onto the stub. Better contact between the sample and the stub
will yield better heat transfer.
Sample Stubs
The thermoelectric stage comes with three different sample holders
which are used for various sample types.
FIGURE 9-20 SAMPLE HOLDER STUB TYPES
Flat stub
The flat stub should be used for flat samples, such as sheets, powders,
etc. It can also be used for small bulk samples (4 mm or smaller).
Dual cup
The dual cup stub is reversible; it has a shallow cup on one side, and a
larger cup on the other.The shallow cup can be used to hold some
types of powders, tiny particles, or beads. The larger cup should be
used for thick liquids, and bulk samples between 4 mm and 8 mm.
Deep cup
The deep cup stub should be used for all other liquids and bulk
samples larger than 8 mm.
All of the stubs have a groove cut beneath the bottom of the cup. This
allows condensation to escape from beneath the stub, so that the water
caused by heating will not force the stub out of the holder.
Sample stubs are obtainable from FEI.
LOCKING THE STAGE ROTATION AXIS
The thermoelectric module is mounted onto the rotation module of the
stage, and will therefore rotate if the stage rotation axis is used. The
presence of water hoses and signal wires on the thermoelectric
module causes a risk of damage in the event the stage is rotated. This
could further endanger the vacuum system, if the hoses are pulled out
of the stage and water spilled into the HiVac port in the bottom of the
chamber. To prevent this, the stage rotation axis must be locked.
To lock the stage rotation axis, click in the tick box next to the rotation
read-out on the Work page. When Lock items are ticked they are in
locked state. Other axis can be locked in the same way.
9-22
2 2 2 11
System Options Using the Cold Stage
PRESSURE VS.TEMPERATURE CONTROL
As a general rule, condensation is achieved by first setting the
pressure to 4.0 Torr (540 Pa), bringing the sample to 5°C, then raising
the pressure until water condenses on the sample, making sure to keep
the pressure below the condensation point 6.5 Torr (860 Pa). It is
better to use pressure to control condensation, as opposed to
temperature. There are two main reasons for this. Firstly, the heat
pumping capability of the thermoelectric module is very small;
therefore temperature is harder to control accurately. Secondly, by
controlling pressure, it is easier to keep it below the condensation
point, which will prevent water from raising the temperature of the
sample. When water has to cool, it takes longer to reach the setpoint.
KEEPING THE SAMPLE WET
Water in the sample will tend to evaporate during the pump-down
cycle. The following are some hints for keeping samples wet. The first
and simplest way to keep the sample wet is to add enough fluid to the
sample during preparation so that it will still retain moisture after
pump-down.
FIGURE 9-21 ADDING WATER TO STAGE BASE
Another method for keeping the sample wet is as follows. After
mounting the sample and before it is put into the chamber, cool the
sample to its operating temperature, then add several drops of water to
the stage base; this will displace air faster during pump-down. There
is an indentation on each corner of the base for this purpose.
Once the sys tem enters Wet mode and the chamber pressure has reached
the s etpoint value, the cham ber will automatically Purge. It repeats this
proces s 5 tim es. Wait until the pressure returns to the setpoint.
SELECTING WORKING DISTANCE
When using shorter working distances, water from the sample can
splash onto the GSED. To avoid this, start with a longer working
distance until the sample has equilibrated, then move to a shorter
working distance to optimize the image. With the Quanta 200 Peltier
the tilt angle allowed is restricted to +20°, when using a BSD or GAD
detector, due to the heatsink braids.
9-23
22 211
System Options Using the Cold Stage
USING BULK SAMPLES
There are some considerations to take into account when using bulk
samples in the stage; these are discussed as follows. For more
accurate temperature readings, bulk samples should be placed as flat
as possible on the stub. The further away from the surface of the stub
the sample is, the less accurate the temperature at that point will be.
Another way to ensure accurate temperature readings with bulk
samples is to maintain the temperature of the sample for about 5
minutes before condensing. This will equilibrate the sample so that
the temperature will be the same throughout.
CONDENSATION AND DETECTOR TYPE
When imaging with the GSED, water droplets on the sample will
appear darker than the surrounding features. When imaging with the
SSD-BSD, however, water will appear lighter than the surroundings.
One exception to this occurs when imaging an oil/water emulsion, in
which case the oil will always appear darker than water.
HIGH MAGNIFICATION IMAGING
At magnifications above 20,000x, water moving through the Peltier
stage will cause small vibrations. To prevent this, shut the water off
temporarily using the valve on the water hose line attached to the
chiller. The Peltier will continue to cool the sample for about 15
minutes with out water cooling. After this time the sample
temperature will rise.
CAUTION!
If the cooling stage is used without a heat sink connection, severe
damage may result to the thermoelectric module. Do not operate the
Quanta FEG Cold stage for longer than 15 minutes without cooling
water, else damage will occur to the device.
COOLING BELOW ZERO
In most cases, the power of the thermoelectric module is not sufficient
to freeze large quantities of bulk water. Small water drops can be
frozen on the stage using the following procedure:
One can set the external water chiller to 5°C. Allow the chiller time to
cool the water. Keep the pressure in the chamber below 6 Torr (800
Pa), to keep water from condensing on the cooling lines.
Set the temperature of the cooling stage to -5°C. As the temperature
drops, decrease the pressure stepwise to 3 Torr (400 Pa), at the same
time as the temperature reaches -5°C. If the pressure is dropped too
quickly, the bulk water in the sample will evaporate; conversely, if the
pressure is reduced too slowly, water will condense onto the sample
and raise the temperature.
9-24
2 2 2 11
System Options Using the Cold Stage
DISCONNECTING THE WATER LINES
When one has finished using the Peltier stage, the water must be
drained out of the tubing and the connectors inside of the chamber.
The following instructions describe how to do this.
• Allow the stage to cool to room temperature.
• IMPORTANT: Shut down the water chiller.
• Disconnect one of the water lines inside the chamber and elevate it
to keep water from dripping out. While holding it up, push START
FLOW on the water flow box and hold it down until all the water is
drained out of the tubes. Make sure the system is drained before
disconnecting the other hose. This will prevent excess water from
dropping into the chamber and slowing the time it takes for the
chamber to pump down again.
• Connect the water line plugs into the Feedthrough plate.
• Once the stage has been drained and both water lines have been
removed, blot out any remaining water from the connectors using a
cotton swab or paper towel. A second way to remove water from
the connectors is to pump down directly to Wet mode (this will
cause the pump down time to take longer than usual). When
pumping down to Hivac mode after the Peltier stage is used, always
enter Wet mode first, or else the system may not pump down to
Hivac mode on the first attempt.
9-25
22 211
System Options Heating Stage Option Overview
Heating Stage Option Overview
There are two Heating Stages as options. These are the 1000° C and
the 1500° C Stages. Some components of these stages are the same
when it comes to hardware and the Basic Operation is similar.
To be able to distinguish the differences the following is split into
descriptions of both heating stage hardware options. The common
operation is covered for both stages. The Installation has
commonality, but also differences which are indicated in this section.
The 1000° C and 1500° C heating stage information is organized into
the following topics:
• 1000° C Hardware Description
• 1500° C Hardware Description
• Common components
Heating Stage Module (HSM)
High Temperature Stage Controller (HTSC)
Chamber Feedthough Assembly (CFA)
Water Flow Box (WFB)
• Diverse components
1500× Bias Supply Controller (BSC)
1000× Heat Shield Assembly (HSA)
1500× Heat Shield Assembly (HSA)
High Temperature GSED
Commonality sections
•
•
•
•
•
9-26
Software Description
Operation
Installation and Maintenance
Troubleshooting
Consumables
2 2 2 11
System Options Heating Stage Option Overview
1000° C HEATING STAGE
The 1000° C Heating Stage System is used to heat samples in the
Quanta. The heating stage module is an ass em bly which is mounted
onto the s am ple holder adapter. It is controlled by a complete
temperature measurement and control system . One therm ocouple input
provides temperature m easurement from room tem perature to 1000° C.
Microprocessor controlled proportional, integral, and derivative (PID)
servo algorithms are incorporated into the controller to provide accurate
and stable automatic tem perature control. These servo parameters have
been optim ized for the characteristics of the Quanta heating s tage so
that no operator tuning adjustm ents are required.
1000° C HTS Controller Temperature Range
Although the programmable controller operates over two temperature
ranges, this manual will be primarily concerned with the lower range
heating stage using the type K thermocouple. Because the controller
can be used in either range, and does not have internal temperature
limits for the different heating stages, there are some precautions to be
taken. This information will be given where necessary.
CAUTION!
It is possible to run the 1000° C stage above its maximum temperature
limit. This will greatly reduce lifetime. To avoid premature heater
failure, be sure and heed all cautions and warnings.
Hardware Description
The 1000° C heating stage system includes the following:
• Heating Stage Module (HSM)
• High Temperature Stage Controller (HTSC)
• Chamber Feedthrough Assembly (CFA), including chamber
feedthrough plate, cooling water lines, water chiller and Water
Flow Box (WFB);
• High Temperature GSED
FIGURE 9-22 1000° C HARDWARE LAYOUT
9-27
22 211
System Options Heating Stage Option Overview
1500° C HEATING STAGE
The 1500° C heating stage is used to heat samples in the Quanta 200.
It is only available for the 50 x 50 mm stage.
The heating stage module is mounted onto the sample holder adapter.
It is controlled by the high temperature controller, which is a complete
temperature measurement and control system. This can in turn be
controlled by UI software or manually. One individual thermocouple
input provides temperature measurement from 800° C to 1500° C.
Microprocessor controlled proportional, integral, and derivative (PID)
servo algorithms are incorporated into the controller to provide
accurate and stable automatic temperature control. These servo
parameters have been optimized for the characteristics of the heating
stage so that no operator tuning adjustments are required.
Temperature Range
Because the type B thermocouple is designed for high temperatures,
the 1500° C heating stage is not accurate at temperatures below 800°
C. Because of this limitation, a 1000° C heating stage module is
included with the 1500° C stage system. This module operates in a
range between room temperature and 1000° C, and must be installed
for temperatures below 800° C. Both stages are otherwise identical
and operate in exactly the same way.
CAUTION!
It is possible to run the 1500° C stage above its maximum temperature
limit. This will greatly reduce lifetime. To avoid premature heater
failure, be sure and heed all cautions and warnings.
Hardware Description
The 1500° C high temperature specimen heating system is a
revolutionary design in heating stages. The heater assembly is a
micro-furnace; samples are heated from the sides, not just from the
bottom, which allows for more uniform temperature gradients around
the sample.
The sample is placed onto a magnesium oxide crucible. The cup and
the sides of this crucible are coated with a conductive platinum paste,
and a platinum wire is run along the side of the crucible, allowing a
bias voltage to be applied directly under the sample. At low
temperatures, this bias is negative with respect to ground and ‘pushes’
the electrons to the detector. At higher temperatures, this bias is
reversed and is used to suppress the thermal electrons which are
generated by the sample.
9-28
2 2 2 11
System Options Heating Stage Option Overview
The 1500 oC heating stage system includes the following:
• Heating Stage Modules (HSM) (1000° C and 1500° C)
• Chamber Feedthrough Assembly (CFA), including chamber feed
through plate, cooling water lines, water chiller and Water Flow
Box (WFB)
• High Temperature GSED
• Heat Shield Assembly (HSA)
• Sample Bias Feedthrough Assembly (SBFA)
• Bias Supply Controller (BSC)
• High Temperature Stage Controller (HTSC) (dual range/
programmable)
The following block diagram shows how the above components are
interconnected.
FIGURE 9-23 1500° C HARDWARE LAYOUT
9-29
22 211
System Options Heating Stages Common Components
Heating Stages Common Components
HEATING STAGE MODULE
The Heating Stage Module (HSM) fits onto a stage adapter. Once the
stage assembly is in place, it can be moved on the X, Y and Z axes.
FIGURE 9-24 HEATING STAGE MODULE
The 1000° C heating stage and the 1500° C heating stage modules
look identical, except for the pins on the thermocouple connectors.
The 1500° C stage has copper leads, and the 1000° C stage has silver
tone leads. Each stage is appropriately labelled on the base and
engraved on the top surface.
FIGURE 9-25 STAGE COMPONENTS
9-30
2 2 2 11
System Options Heating Stages Common Components
1. Cover Plate
The cover plate holds the internal components of the heating stage in
place. The heat shield (not shown) sits on top of it.
2. Top Insulator
The top insulator is a disk-shaped pad made of zirconium dioxide, and
sits on top of the heater assembly. It has a hole in the center through
which the crucible part of the assembly protrudes. It also contains a
wedge on one side to accommodate the cover plate.
3. Bottom Insulator
The bottom insulator is a disk-shaped pad made of zirconium dioxide.
It sits down inside the stage, and the heater assembly sits on top of it.
4. Heater Assembly
The heater assembly sits between the top and bottom insulators. It
includes the heating element, thermocouple, and crucible, in which
the sample is placed. The thermocouple and heater power connectors
are attached to the base of the heater assembly. The top insulator
contains a hole in the center which fits over the heating element.
When the heating stage is assembled, the two insulators are pressed
together with the heater assembly in the middle.
5. Stage Base
The base of the heating stage module holds the stage components. It
mounts onto a dovetail base which is included in the sample holder
adapter assembly. This adapter allows the stage to be moved.
NOTE: While ±20° rotation is possible with the heating stage in
place, it is recommended that the rotation axis be locked. See Locking
the Stage Rotation Axis.
CAUTION!
Do not home the stage with the heating stage attached.
HIGH TEMPERATURE STAGE CONTROLLER
The High Temperature Stage Controller (HTSC) is a microprocessorbased control system which regulates and controls the parameters of
the heating stage and interfaces this information with the Quanta. The
controller is connected to the heating stage through the chamber feed
through plate, and to the instrument through an RS-232 link.
9-31
22 211
System Options Heating Stages Common Components
FIGURE 9-26 FRONT VIEW HTS CONTROLLER
Display Window
The display window shows status information. It has several data
fields which will display different parameters depending on the
operating mode that the controller is in.
Setpoint Adjust
The setpoint adjustment buttons are used in local/automatic mode to
set the stage heating temperature.
Operating Mode
The operating mode indicators are four green LEDs which will reflect
the current mode of the controller: RE M OTE , LO CAL, AU TO and
M ANU AL.
For details on operating modes and how to use them, see Operating
Modes.
Fault
The fault indicators are two red LEDs which will illuminate when
there is a system fault. There are two types of faults: a heater fault and
a thermocouple fault.
Shield Voltage
Not used.
Heater Power
The heater power knob is used in local/manual mode to control stage
temperature directly.
On/Off Switch
The power on/off switch turns the stage controller on and off. When
the controller is turned off, the heating stage will not operate.
9-32
2 2 2 11
System Options Heating Stages Common Components
FIGURE 9-27 REAR VIEW HTS CONTROLLER
Fan
Used for internal cooling.
RS232
The stage controller uses an RS232 serial link to communicate with
the control software in the system computer.
A/C Fuse
3 Amp.
Shield Bias (1500° C stage only)
The shield bias signal is used for the 1500° C stage heat shield. This
cable connects to the outside of the heat shield feedthrough plate.
WA R N I N G !
This cable supplies HIGH VOLTAGE. Make sure that the bias
controller is turned off before making or removing any connections.
A/C Power
A/C line cord receptacle, 230 VAC.
K Type Thermocouple
This connector is used for the thermocouple input on the low range
temperature heating stage (1000° C). The cable for this signal is part
of the chamber interface cable; the connector is split off at the
controller end.
B Type Thermocouple
The type B thermocouple is used for the high range temperature
heating stage (1500° C). This is not used for the 1000° C stage.
The cable for this signal is part of the chamber interface cable; the
connector is split off at the controller end.
Chamber Interface
The chamber interface connector on the controller takes the heater
power side of the chamber interface cable.
9-33
22 211
System Options Heating Stages Common Components
CHAMBER FEEDTHROUGH ASSEMBLY (CFA)
The chamber feedthrough plate mounts onto the specimen chamber
Port C. It provides feedthrough connectors for cooling water, and
heating stage power and thermocouple inputs.
FIGURE 9-28 THE CHAMBER FEEDTHROUGH ASSEMBLY
WATER FLOW BOX (WFB)
The chamber feedthrough assembly includes a device called the water
flow box. When using the heating stage, there is a risk that water
could leak into the chamber, for instance if a water hose were to break
or disconnect for some reason. In the Quanta, the HiVac port is
located on the bottom of the chamber. Water leaking into the port
could seriously damage the vacuum system.
FIGURE 9-29 THE WATER FLOW BOX FRONT
The water flow box monitors flow between the chiller and the stage,
and shuts off the flow if a problem is detected. It is installed between
the chiller and the chamber feed through plate. It contains a sensor on
each line, and solenoid valves, both of which will close if either of the
sensors detects a failure.
9-34
2 2 2 11
System Options Heating Stages Diverse Components
Heating Stages Diverse Components
1500° C BIAS SUPPLY CONTROLLER (BSC)
The Bias Supply Controller (BSC) for the 1500° C heating stage
provides voltages for the sample and the heat shield. It also contains a
connection for the A/C interlock circuit.
FIGURE 9-30 1500° C BIAS SUPPLY CONTROLLER (FRONT )
Shield Bias Read-out
Displays heat shield bias.
Sample Bias Read-out
Displays sample bias.
Shield Bias Voltage
Puts a 0 to +300V bias on the heat shield.
Sample Bias Voltage
-50 to +50 V, used to control thermal electron emission on the sample.
WA R N I N G !
HIGH VOLTAGE.
Power On/Off
Turns the bias controller on and off.
Power On Indicator
Illuminates when the bias controller power is turned on. The LEDs on
the controller will not illuminate until the chamber is in ESEM mode.
9-35
22 211
System Options Heating Stages Diverse Components
FIGURE 9-31 1500° C BIAS SUPPLY CONTROLLER (REAR )
Fan
Used for internal cooling.
Sample Bias Voltage
-50 to +50 V, used to control thermal electron emission on the sample.
WA R N I N G !
High Voltage.
Shield Bias Voltage
Puts a 0 to +300V bias on the heat shield.
A/C Interlock
This interlock causes the bias voltages to shut off whenever the
specimen chamber is vented. Connects to the A/C distribution system
in the instrument console.
A/C Fuse
2.5 Amp.
A/C Power
A/C line cord receptacle, 230 VAC.
9-36
2 2 2 11
System Options Heating Stages Diverse Components
1000° C HEAT SHIELD ASSEMBLY (HSA)
The 1000° C heat shield is a small assembly which sits on top of the
crucible. The heat shield is used primarily as a reflector, to limit
radiant heat loss.
FIGURE 9-32 HEAT SHIELD FOR 1000° C STAGE
Using the heat shield
The heat shield is most effective above 600° C, where the sample will
be more prone to heat loss. In this environment the heat shield will
create an "oven" effect which will help to keep the temperature
consistent throughout the sample.
1500° C HEAT SHIELD ASSEMBLY (HSA)
FIGURE 9-33 1500° C HEAT SHIELD ASSEMBLY
Heat Shield
The 1500° C heat shield is attached to the end of the swing arm. It
comprises multiple layers of alumina paper supported by perforated
stainless steel disks. A bias voltage is applied to the disks, which
draws the electrons from the sample through a small opening in the
disk. These electrons are collected by the high temperature GSED,
which will be positioned just above the heat shield.
Swing Arm
The swing arm is used to move the shield out from under the detector
when needed. This is done using the knob on the outside of the
feedthrough plate.
The swing arm can be adjusted so that the heat shield is in the proper
position under the GSED. See Adjusting the Heat Shield.
Swing Arm Adjustments
The swing arm adjustments allow the position of the heat shield on the
end of the swing arm to be moved on the X, Y and Z axes. X and Y
are not typically changed. Z is used to adjust the heat shield to the
correct height relative to the detector. See Adjusting the Heat Shield.
9-37
22 211
System Options Heating Stages Diverse Components
Swing Arm Knob
When this knob is turned counterclockwise as indicated by the arrow
on the knob, the heat shield will move to the right, towards the rear of
the chamber. This is most often done when the heating stage is used
with EDX detectors.
The heat shield position relative to the detector can be adjusted using
the swing arm adjustments.
Heat Shield Feedthrough Plate
The 1500° C heat shield assembly is attached to a feedthrough plate
which mounts onto Port A (Quanta 200/400). The swing arm on the
inside of the chamber is moved on three axes by a knob on the outside
of the feedthrough plate. The shield bias signal is also fed through the
feedthrough plate.
Shield Bias Voltage Cable
This cable puts a 0 to +300V bias on the heat shield. It connects from
the heat shield assembly to the feedthrough plate on the inside of the
chamber. Another cable on the outside of the chamber goes to the bias
supply controller.
WA R N I N G !
The bias supply produces HIGH VOLTAGE when the interlock is
activated. The bias supply is interlocked with the system vacuum
software so that voltages will shut off when the chamber is vented;
however make sure that the supply is turned off before making or
removing any connections.
X-ray Shield
The x-ray shield is attached to the inside of the feedthrough plate with
a stand-off, and covers the shield bias BNC connector. The shield
stops stray x-rays from leaking out of the connector.
HIGH TEMPERATURE GSED
This is the detector to use for temperatures above 500C. It is designed to
withstand high tem peratures without becom ing damaged. The high
temperature GSED is a PLA cap which is pressed onto the insert. This cap
com es with an adapter PC board which plugs into the signal connector on
the cham ber ceiling. On the other end of this board is a wire which clips
onto the cap. The cap (with cone) fits over the Heating Stage Insert.
FIGURE 9-34 HIGH TEMPERATURE GSED
9-38
2 2 2 11
System Options 1000° C and 1500° C Heating Stages Operation
1000° C and 1500° C Heating Stages Operation
Operating the 1000° C heating stage involves the following:
Operating Modes discusses the different operating modes, including
descriptions of the software and hardware controls which are used in
each.
Basic Operation gives instructions for using the basic features of the
stage, such as performing heating cycles in the different operating
modes and setting up temperature profiles.
General Operating Guidelines contains some helpful guidelines to
take into consideration when operating the heating stage; i.e., factors
to consider before imaging samples.
Imaging Samples gives specific information for preparing samples
and setting up instrument parameters to obtain the best results. More
specific to the 1500° C stage.
Using the Heating Stage with EDX Detectors discusses the issues
involved in using the 1000° C and 1500° C stage with EDX systems.
WA R N I N G !
When operating the heating stage, please be aware that the stage
surfaces can become hot. The following warning label on the top
surface of the stage module is intended to remind the user of hot
surfaces:
9-39
22 211
System Options 1000° C and 1500° C Heating Stages Operation
TEMPERATURE STAGE CONTROL MODULE
Heating button
The Heating button toggles to enable or disable the software control
of the heating stage from the UI (switches the manual mode off or on).
When the heating stage software control is enabled the button is
Yellow. When the Heating button is grey with black lettering the
Cooling button can be pressed to activate the software interface for
the Cooling stage.When no heating stage is installed or is
disconnected the button is completely Grey.
Cooling button
N/A...Only for the Peltier stage.
Actual Temperature text
This displays the Actual temperature measured by the heating stage
hardware. The same value is used in the databar. The display is also
active when the heating stage is in manual mode. When the heating
stage controller is off or disconnected the Target temperature text is
greyed.
Target Temperature edit box
This is an edit box to set the Target temperature. It is active when a
stage is enabled and no profile running. It is checked for limit values.
Immediately after a new temperature is set the Hold button is
switched on.
Ramp edit box
This is an edit box to set the speed of temperature change used in the
Temperature control mode. It is active when the heating stage is
enabled and no profile running. It is checked for limit values.
Immediately after a new Ramp is set the Hold button is switched on.
GoTo button
When the GoTo button is pressed the ramping starts to proceed to the
Target temperature in Temperature control mode. It is disabled
when a ramp or profile is running. After any change in the edit boxes
for Target temperature or Ramp the GoTo button is active.
Profile edits
• Temp - target temperature, which should be reached
• Ramp - specifies speed of increasing temperature
• Soak hh - mm - ss specifies time in hours, minutes and seconds for
how long should the heating stage hold the target temperature after
it has reached Target temperature
• Soak - display for the soak time as a countdown.
Edited values are checked for limits, values out of limits are not
accepted.
9-40
2 2 2 11
System Options 1000° C and 1500° C Heating Stages Operation
Edits are active when a heating stage is enabled and the profile is not
running. When the profile is running the box mark at the end of line of
the current step is displayed in Yellow. When Temp or Ramp is not
filled or the Ramp is zero the steps are not executed and the profile
execution is stopped. If the column hh, mm or ss are not filled they
represent zero condition.
Start/Stop button
This is a toggle button that starts or stops the profile. If the profile is
running the caption is Stop and the target temperature control is
disabled. The profile starts with step one. The first step with a nonfilled or a zero ramp value will stop execution of the profile. After
finishing the profile the Stop button is switched back to Start.
Next button / Clear
This is a toggle button. When no profile is running the caption is
Clear and resets all values. When profile is running the caption is
Next and increases the step of the profile by one. The button is
disabled when the Hold button is active on the temperature.
The Next command is used to bypass a heating cycle in a multiple set.
When selected during a heating cycle, the system will interrupt the
cycle, skip to the next cycle and begin ramping. This can be used in
the middle of temperature profiles to save time, or to bypass an
undesired set-point.
Next will only have an effect when there is more than one temperature
setpoint defined. If Next is selected during the last heating cycle
defined, nothing will happen.
Hold button
This is a toggle button. It switches the holding of the Actual current
temperature on or off. It works in both Temperature Control (seen
here) and Profile modes. It is always activated after enabling the
heating stage or any change of Target temperature or Ramp in the
Temperature control mode.
The Hold button will place the system into hold mode and will be
displayed Yellow. It can be used to interrupt a ramping cycle and
maintain the controller at the current set-point. When Hold is selected
during a ramping cycle, the controller will record the current setpoint, reset to that value, then hold it at that temperature indefinitely
until the system is taken out of hold mode by pressing the button out.
When the Hold button is inactive it is displayed Grey.
9-41
22 211
System Options Operating Modes
Operating Modes
HARDWARE OPERATING MODES
The high temperature controller has two Local operating modes:
Local Operating Mode
In Local mode, the heating stage system will respond to the controls
on the temperature controller only. Two local modes are available:
manual and automatic.
Local / manual mode
Local / manual is the default (power-up) operating mode. It allows the
operator to have direct control over stage heating parameters.
In this mode the heater power knob will control the temperature of the
stage by adjusting the voltage across the heater element. Local /
manual mode can be used when the ramping rate is not a concern and
it is desired to place the stage at a specific temperature quickly.
The Temperature Stage Control module is disabled in the UI except
for the Heating button and the Actual temperature. The heating stage
can be operated manually using knobs and buttons on the front panel
of the controller. Only the Actual temperature is shown in the Quanta
UI and in the databar. This is the same as ‘Local’ in the Hardware
operating Mode.
Local / automatic mode
Local / automatic mode provides fixed ramp rate, single setpoint, and
infinite soak operations.
In this mode the setpoint adjust buttons on the controller are used to
define the temperature to which to heat the stage. The controller will
adjust the heater power automatically until the temperature setpoint is
reached, then the system will remain in a hold state, until another
setpoint is selected.
1000° C HS Basic Operation describes how to use the controller in
Local mode.
9-42
2 2 2 11
System Options Operating Modes
SOFTWARE OPERATING MODE
In the Software Control Interface (UI), the heating stage is controlled
through a software module, the Temperature Stage Control module.
Through this module the operator can control and monitor the
measured temperature.
The Software UI module provides three modes of operation:
Temperature control mode
In this mode the Temp and Ramp can be set using edit boxes in the
Temperature Stage Control module.
Profile
In the Profile mode the heating stage performs a predefined
temperature profile. The profile can not be changed during execution.
The edit boxes in this area are used to define temperature profiles or
cycles. There are three columns, labelled Temp, Ramp and Soak; and
five rows, each pertaining to a single heating cycle. For each cycle
there is the destination temperature for the stage (Temp); the rate at
which the controller will vary temperature (Ramp); and the amount of
time that the stage will be kept at the set temperature once it has been
reached (Soak).
Once a ramp cycle(s) has been entered into the profile field, press the
Start button to begin ramping. All of the numbers in the table will be
greyed and the box mark of the cycle that is in progress will turn
Yellow. When the system is done with that cycle, it will move to the
next one (if defined). The previous row will be greyed and the new
row box mark will turn Yellow to indicate that it is active.
The heating profile controls can be used to heat the stage to a single
temperature, or to several consecutive temperatures (up to five) with
separate ramp and soak times in between. This is useful for creating a
temperature profile, a series of heating cycles which together perform
some particular function. Once a heating cycle (or temperature
profile) is initiated, it can be altered or redefined dynamically.
Actual temperature
This read-out displays the most recent temperature value transmitted
by the stage controller. It will be the same as the read-out in the
display area of the controller and the databar on screen.
Temperature Units
The temperature units that are displayed in the Temperature Stage
Control module can be changed through the Units tab in the
Preferences menu (see Chapter 5 - Setting Preferences -Units tab).
9-43
22 211
System Options Heating Stages Basic Operation
Heating Stages Basic Operation
This section contains instructions for setting up the heating stage
inside the chamber and using it in the various manual operating
modes. It also contains some general guidelines to be used when
imaging in the Quanta using the heating stage.
Refer to the following before using the heating stage:
• If using the 1000° C Heating Stage: Calibration and Temperature
Accuracy, 1000° C Stage
• If using the 1500° C Heating Stage: Calibration and Temperature
Accuracy, 1500° C Heating Stage
• It may also be helpful to become familiar with the features of the
High Temperature Stage Controller.
This section is organised into the following topics:
•
•
•
•
•
9-44
Powering on the HTS Controller
Performing a Heating Cycle
Setting up a Temperature Profile
Fault Conditions
Powering off the HTS Controller
2 2 2 11
System Options Heating Stages Basic Operation
POWERING ON THE HTS CONTROLLER
CAUTION!
Make sure the heater power knob is set to zero before turning on the
controller.
1. To power on the heating stage system, press the on/off switch on
the controller to the "on" position. The display window will show
the following: CALIBRATING SYSTEM
2. The above message will be displayed for about 5 seconds, then the
window will display the actual temperature and heater current
along the top line, as follows: 25° C 0.0 A
3. The local and manual LED's will illuminate. From this point the
system will remain in a ready state until further action is taken.
PERFORMING A HEATING CYCLE
A heating cycle is the process of heating the stage to a defined
setpoint using the parameters defined for that setpoint (this will
depend on the operating mode used). The following instructions will
describe how to perform a heating cycle in local/manual and local/
automatic modes, using the controls on the stage controller; and in
remote/automatic mode, using the Hot Stage module.
In Local / Manual Mode
• From local/automatic mode: press both setpoint adjust buttons on
the controller at the same time and hold them in for a moment.
• From remote/automatic mode: select the Stop button in the Hot
Stage module.
• A power cycle from either mode will cause the controller to reset
into local/manual mode.
To use local/manual mode, make sure the manual LED on the
controller is illuminated, then turn the heater power knob until the
actual temperature reading in the controller display window shows the
desired temperature.
In Local / Automatic Mode
1. To enter local/automatic, press the right (up) setpoint adjust button
on the controller. The display window will show the setpoint on
the bottom line: 25° C 0.0 A / SP = 500° C
2. The setpoint adjust button can be pressed in single increments, to
adjust the setpoint slowly, or it can be held in continuously, which
will cause the setpoint value to increase automatically. In the latter
case the rate at which the temperature read-out increases will
accelerate as the button is held in.
3. Once the desired setpoint value has been reached, release the
setpoint adjust button. The system will pause for 5 seconds to
await further input. If another setpoint value is not entered within
this time, the system will begin the automatic ramping cycle. At
this time the local and auto LEDs will illuminate, and the
following message will appear in the display window:
30° C 1.0 A / SP = 500° C RAMPING
9-45
22 211
System Options Heating Stages Basic Operation
4. During the ramp cycle the controller will automatically adjust the
heater power until the target temperature is reached. At this time
the display window will indicate the holding cycle, shown next.
The system will hold this temperature indefinitely, until another
ramping cycle is initiated.
500° C 1.8 A / SP = 500° C HOLDING
5. It is possible to stop a ramp cycle at any time while in local/
automatic mode by pressing both setpoint adjust buttons
simultaneously and holding them there for a moment. Turning the
controller off and on will also perform this function. When the
controller is reset in this manner, the setpoint and status message
fields in the display window will disappear, and the controller will
return to local/manual mode.
In Remote / Automatic Mode
Remote automatic mode uses the Hot Stage module, which becomes
available when the controller is powered on. The Hot Stage module
allows the operator to take advantage of automatic ramping and
soaking, and to define multiple setpoints.
The following steps describe how to use this mode using one setpoint.
To set up multiple setpoints, see Setting up a Temperature Profile.
1. In the Hot Stage module, enter the desired setpoint temperature,
ramp rate, and soak times into the heating profile data field. For
example, in row 1 under Temp enter “500”, and for Ramp enter
“60” (60°/min.). The Soak column will remain at zero; when there
is only one cycle defined, the soak time will automatically be
indefinite.
2. To initiate the heating cycle, select Start. The controller will begin
increasing the temperature to the first setpoint defined in the Temp
column, and the controller display window will show the
following (assuming the actual temperature is 100° C to start):
100° C 9 A / SP = 500° C RAMPING
3. As the temperature is being increased, the controller will
automatically decelerate the heating rate as it nears the setpoint.
This reduces overshoot at fast ramp rates (the rate of deceleration
will depend on the ramp rate). When the controller reaches the
setpoint, the display window will display the soak time in the
bottom right corner:
500° C 1.8 A / SP = 500° C 0:01:00
4. The soak time in the controller display window will begin at the
value defined in the Soak column. This value will begin to count
down, in seconds, for the length of the soak time, until it reaches
zero, at which time the display window will show:
500° C 1.8 A / SP = 500° C HOLDING
5. If an other setpoint is defined, the controller will jump to the next
setpoint value and begin ramping to that temperature. If only one
setpoint is defined, the controller will continue to hold indefinitely
at that temperature until another cycle is initiated using the Start
button.
9-46
2 2 2 11
System Options Heating Stages Basic Operation
SETTING UP A TEMPERATURE PROFILE
The heating profile data field in the Hot Stage module can be used to
set up a temperature profile, which is a series of heating cycles (up to
five) consisting of a setpoint temperature, ramping rate, and soaking
time. The controller will perform each cycle in succession, starting
with the first setpoint and going through each one until finished. This
feature is useful for performing dynamic experiments with specific
temperatures and heating times.
An example temperature profile is shown below. There are four
setpoints defined, each with its own ramp and soak time. The ramp
(Rn) and soak (Sn) periods are pointed out.
FIGURE 9-35 TEMPERATURE PROFILE
When Start is selected, the system will first begin ramping to 300° C
at a rate of 60°/min. Once the setpoint is reached it will soak for 1
minute. When the soak time has elapsed, the controller will begin to
ramp to the next setpoint, which is 500° C, and so forth, until all four
setpoints have been reached.
Note that the third setpoint (800° C) has no soaking time; this is
reflected as two continuous ramping cycles.
When the last cycle is finished, the controller will hold at 600° C (the
last setpoint) indefinitely until further action is taken.
9-47
22 211
System Options Heating Stages Basic Operation
FAULT CONDITIONS
The high temperature controller checks for two types of fault
conditions: one involving the thermocouple circuitry; and the other
involving the stage heater.
Thermocouple Fault
The thermocouple circuitry measures the current temperature, and the
output of this reading is displayed in the actual temperature read-out
in the display window of the controller. A thermocouple fault will
occur if there is an open circuit in the thermocouple connection.
The thermocouple fault LED will illuminate and the controller will go
into local/manual mode. The controller will not shut down during a
thermocouple fault, but will hold the current power where it is until
the condition is corrected. A message will appear in the actual
temperature read-out in the display window: 99999 1.0 A
For a thermocouple fault, an error dialogue will also appear on the
user interface screen:
Possible causes for a thermocouple fault:
• Loose thermocouple cable
• Broken cable / wire
• Thermocouple plugged into wrong connector
Once the fault condition is corrected, the thermocouple fault LED will
turn off, and the controller will remain in local/manual mode.
Heater fault
A heater fault will occur if the controller cannot drive the heating
element for some reason. This condition is monitored by checking
heater power against current flow. If the power is set above a small
threshold level and no current flows, the fault will occur. The heater
fault LED will illuminate and the controller will turn off heater power
until the condition is corrected. A heater fault is not recoverable. The
power needs to be turned off, then on again to reset.
Possible causes for heater fault:
• Loose heater wire
• Heater wire open (burned out)
• Broken heater wire
POWERING OFF THE HTS CONTROLLER
When the controller is shut off, the following message will appear on
the user interface screen:
‘Press OK to acknowledge this message’.
9-48
2 2 2 11
System Options 1000° C HS General Operation
1000° C HS General Operation
Generally speaking, setting up imaging parameters for the 1000° C
heating stage is the same as when using the standard stage. However,
there is an important relationship between the type of detector
installed, the temperatures at which the stage will be operating,
working distance, and whether or not any other detectors are installed.
The following items are considered:
•
•
•
•
•
Heating Stage Calibration and Temperature Accuracy
GSED Ceramic High Temperature Detector Assembly
Backscattered Electron Detector
X-ray Detectors
Using the Heat Shield
CALIBRATION AND TEMPERATURE ACCURACY
It is important that the following information be read carefully, so that
temperature measurements can be made according to the actual
operating characteristics of the heating stage.
Heating Stage Calibration
Before shipment, the heating stage is calibrated for temperature
accuracy. A thin coating of 760° C melting point compound is first
dried onto the ceramic crucible. The stage is then heated slowly until
the compound is melted to a full liquid state. This slow heating is
done to avoid overshooting the target temperature, and to ensure that
the sample is heated uniformly. When the compound melts, the
temperature reading is checked against a general range of ±30° C. If
the reading falls outside of this range, the thermocouple position is
adjusted and the entire procedure is repeated until the reading
complies to specification.
Final calibration is performed with the heating stage installed in the
chamber. Here the temperature reading must fall within ±20° C (at
760° C) before the stage is accepted for shipment. Typical error
discrepancy results found in the factory applications laboratory range
from around 10° C at temperatures below 200° C; and 15° C at
temperatures above 200° C.
Temperature and Conductivity
The above calibration method sets the temperature of the sample
crucible so that it matches the thermocouple reading. The actual
sample temperature however, will vary, depending on the thermal
conductivity of the sample and its thickness. With conductive
samples, the temperature at the surface of the sample will be closer to
that at the crucible, as heat will be more likely to spread throughout.
However, if a sample is non-conductive and relatively thick, the
temperature at the top of the sample will be lower than that at the
bottom. This differential will increase with thickness.
9-49
22 211
System Options 1000° C HS General Operation
FIGURE 9-36 TEMPERATURE AND CONDUCTIVITY 1000° C
With large samples, the exposed surface area provides a great deal of
heat loss through radiation; therefore the exposed surface will be
cooler than the bottom, which is in contact with the crucible. Also,
higher chamber pressures will cause more heat loss through
convection.
It is recommended that when using non-conductive sam ples that the
sam ple be thin, in order to maintain accurate temperature readings. To
obtain accurate heat conduction through the sample, it should be
cemented or otherwise firmly mounted onto the crucible with a good
thermal contact. Use conductive carbon paint for temperatures below
900° C; and a high temperature adhesive for temperatures above 900° C.
HIGH TEMPERATURE GSED
The High Temperature GSED must be installed if the heating stage is
going to be operated at temperatures above 500° C, as the standard
GSED could be damaged at these high temperatures. Any working
distance can be used with the high temperature GSED.
If the heating stage is going to be operated at temperatures below 500°
C, it is not necessary to install the high temperature GSED; the GSED
can be used. A general rule when using the GSED is that higher
temperatures will require greater working distances.
NOTE:
The operating characteristics of the GSED and the high temperature
GSED will be slightly different.
Using the 1000° C HS with BSED
If the 1000° C heating stage is being operated with the BSED (which
should only be installed for temperatures up to 400° C), the working
distance should be kept greater than 9 mm.
Using the 1000° C HS with EDX
There are several important considerations to take into account when
using the heating stage with EDX detectors. See the section on: Using
the HS with EDX detectors
9-50
2 2 2 11
System Options 1500° C HS General Operation
1500° C HS General Operation
Generally s peaking, setting up imaging parameters for the 1500° C
heating stage is the same as when using the standard stage. However,
there is an important relationship between the type of detector installed,
the temperatures at which the stage will be operating, working distance,
and whether or not any other detectors are installed. The topics in this
section cover guidelines and factors to consider before imaging samples .
•
•
•
•
•
Stage Calibration and Temperature Accuracy
GSED Ceramic High Temperature Detector Assembly
Backscattered Electron Detector
X-ray Detectors
Using the Heat Shield
CALIBRATION AND TEMPERATURE ACCURACY
It is important that the following information be read carefully, so that
temperature measurements can be made according to the actual
operating characteristics of the heating stage.
Heating Stage Calibration
Before shipment, the heating stage is calibrated for tem perature
accuracy. A thin coating of 1204° C melting point com pound is firs t
dried onto the ceramic crucible. The s tage is then heated slowly until
the compound is melted to a full liquid s tate. This s low heating is done
to avoid overshooting the target temperature, and to ensure that the
sample is heated uniform ly. When the compound melts, the tem perature
reading is checked against a general range of ±30° C . If the reading
falls outs ide of this range, the therm ocouple position is adjusted and the
entire procedure is repeated until the reading complies to specification.
Final calibration is performed with the heating stage installed. Here the
temperature reading must fall within ±25° C (at 1204° C) before the
stage is accepted for shipment. Typical error discrepancy results found
in the factory applications laboratory range from around 10° C at
temperatures below 200° C; and 15° C at temperatures above 200° C.
Temperature and Conductivity
The above calibration method sets the temperature of the sample crucible
so that it matches the thermocouple reading. The actual sample temperature
however, will vary, depending on the thermal conductivity of the sample
and its thickness. With conductive samples, the temperature at the surface
of the sample will be closer to that at the crucible, as heat will be more
likely to spread throughout. However, if a sample is non-conductive and
relatively thick, the temperature at the top of the sample will be lower than
that at the bottom; and this differential will increase with thickness.
The 1500° C stage is designed to minimize sample temperature
discrepancies. The heater is essentially a micro-furnace which
provides heating from the bottom and from the sides.
For thick samples, a short crucible is provided, which sits well within
the heater to ensure that the sample is heated uniformly on three sides.
9-51
22 211
System Options 1500° C HS General Operation
The picture below illustrates this effect. With large sam ples the s urface
area exposed provides a great deal of heat loss through radiation;
therefore the exposed surface will be cooler than the bottom, which is
in contact with the crucible (the heat s hield will m inimize this). Also,
higher cham ber pressures will cause more heat los s through convection.
FIGURE 9-37 TEMPERATURE AND CONDUCTIVITY 1500° C
Heating stage temperature readings correspond to the surface temperature of
the sample stub. The accuracy of this temperature reading will be affected
by the thermal conductivity of the sample relative to its thickness. With
conductive samples, the temperature at the surface of the sample will be
closer to that at the stub, as heat will be more likely to spread throughout.
However, if a sample is non-conductive and relatively thick, the temperature
at the top of the sample will be lower than that at the bottom; and this
differential will increase with thickness. It is therefore recommended that
when using non-conductive thick samples with the heating stage that the
shorter crucible is used. This crucible will sit more deeply into the heater,
thus helping to maintain accurate temperature readings.
HIGH TEMPERATURE GSED
The High Temperature GSED must be installed if the heating stage is
going to be operated at temperatures above 500° C, as the standard
GSED could be damaged at these high temperatures.
If the heating stage is going to be operated at temperatures below
500° C, it is not necessary to install the high temperature GSED; the
GSED can be used. A general rule when using the GSED is that
higher temperatures will require greater working distances.
NOTE:
The operating characteristics of the GSED and the high temperature
GSED will be slightly different.
Using the 1500° C HS with BSED
If the 1500° C heating stage is being operated with the BSED (which
should only be installed for temperatures up to 400° C), the working
distance should be kept greater than 9 mm.
Using the 1500° C HS with EDX
There are several important considerations to take into account when
using the heating stage with EDX detectors. See the section on: Using
the Heating Stage with EDX detectors
9-52
2 2 2 11
System Options Imaging Samples with the 1500° C HS
Imaging Samples with the 1500° C HS
The topics in this section cover specific information on preparing
samples and setting up instrument parameters to obtain the best results
when using the 1500° C heating stage. If necessary, read General
Operating Guidelines to become familiar with factors and guidelines
to consider before imaging samples with the heating stage.
•
•
•
•
•
Selecting a Crucible
Obtaining an Image
Imaging Guidelines for the 1500° C Stage
Removing the Sample Crucible
Checking Stage Calibration
SELECTING A CRUCIBLE
There are two sets of crucibles supplied with the 1500° C heating
stage. The first set of crucibles are composed of MgO (magnesia),
with a conductive Pt strip painted down the side for conductivity of
the sample bias voltage. The MgO crucibles can be used for all
atmospheres.
FIGURE 9-38 CRUCIBLE TYPES
There are two sizes of magnesia crucibles provided, one short the
other tall. The shorter crucible is provided for tall or bulky samples.
This crucible sits lower in the heater for more uniform heating. The
taller crucible is used for thin samples and powders.
CAUTION!
Platinum will react with silicon. The heating filaments are also made
of Platinum, therefore always avoid free silicon.
The second set of crucibles is composed of graphite. These crucibles
are to be used only in inert or reducing atmospheres. Graphite will
decompose in oxidizing atmospheres above 800° C. Each of the above
crucibles have a finite lifetime, and are meant to be disposable when
either the platinum wears out or the crucible becomes too
contaminated and can no longer be cleaned.
When inserting the crucibles into the heater, align the painted Pt strip
with the bias wire running along the inside of the heater wall. Failure
to do this will result in poor images.
9-53
22 211
System Options Imaging Samples with the 1500° C HS
OBTAINING AN IMAGE
1. Place the sample onto the crucible. Since the heater is designed to
act as a micro-furnace, it is not necessary to cement the sample
down for thermal conductivity.
2. Slowly close the stage door, making sure that the heating unit
clears the heat shield. If it doesn’t, lower the Z height.
3. Pump down the chamber and set the pressure for 3 Torr (400 Pa).
Raise the heating stage until it just clears the heat shield by
1 - 2 mm. The focused working distance will be about 18 - 20 mm
depending on sample height. The photo below shows the proper
positions of the stage and heat shield relative to the GSED (2 mm
distance between each).
FIGURE 9-39 POSITION OF THE STAGE AND HEAT SHIELD
1. Swing the heat shield out of the way. Turn on the bias supply. Set
the sample bias to -50 V and observe that the sample image
becomes brighter. Swing the heat shield back over the stage and
center the hole in the shield over the sample. The image of the
sample will now be dark. Increase the voltage on the heat shield to
~220 V. The image of the sample should reappear. (If there is no
image at this point see Troubleshooting). Adjust the voltage on the
heat shield for maximum brightness.
2. Adjust the contrast and brightness controls (approx. 60 - 70%) to
achieve the desired image levels
3. Set-up the required heating profile using the directions given in
Performing a Heating Cycle. Note: all heating rates for
temperatures above 1000° C should be set for 20° C/min. or less. It
is easier to control the contrast changes that will occur when the
temperature changes slowly.
4. IMPORTANT: There are specific instructions and guidelines to
consider when imaging with the 1500° C stage, because of the
high temperatures involved. Continue to Imaging Guidelines for
the 1500° C Stage for this information.
9-54
2 2 2 11
System Options Imaging Samples with the 1500° C HS
IMAGING GUIDELINES
The following instructions are to be used only as a guideline, as only a
small variety of samples have been imaged with the 1500° C heating
stage. The actual changes that will occur above 1000° C are very
much sample dependent. For first time users, it is recommended to run
through the following steps with no samples in the crucible, several
times until general familiarity is achieved.
1. Start the heating profile by selecting Begin or by manually turning
up the heater current. Remember, the type B thermocouple is not
accurate at temperatures below 800° C. A slow darkening of the
image will occur as the temperature rises to 1000° C. This
darkening can be offset by increasing the pressure, the heat shield
voltage or the contrast.
2. Once 1000° C has been reached, slow the heating rate to less than
120° C/min. Between 1000° C and 1250° C, the image may begin
to brighten. This is caused by thermal electrons from the sample.
To offset this effect, begin slowly decreasing the heat shield bias.
Do not lower the heat shield voltage to less than 25V.
3. Above 1200° C but below 1300° C, most of the secondary
electrons will need to be suppressed. However, by varying the
shield voltage (up or down depending on where it is) and very
slowly increasing the sample voltage, a weak secondary image can
be seen. Decreasing the brightness will also help remove the
thermal emission noise.
4. Above 1300° C the sample bias voltage is used to suppress the
thermal electron noise. Slowly turn the voltage from -50 to +50 V
as needed. At some point around -10 V, the image will become
solid white. At this point, continue turning the voltage up past
+10V and the image will again return. The image will become
backscattered in appearance only, as all secondary electrons will
have been suppressed. Also, the closer the sample gets to 1500° C,
the less signal will be amplified by the detector. To overcome this,
increase the beam current by either increasing the objective
aperture or by increasing the probe current (decrease spot size).
The brighter the electron source, the less the condenser will need
to be changed.
5. If thermal emission continues to increase, lowering the shield
voltage will help. However, a minimum of +10V should be
maintained on the heat shield at all times. Lowering the voltage
below this setting will result in an extremely noisy image and
voltage break down of the GSED.
6. Once the experiment is complete, turn down both the sample bias
and the heat shield bias voltage to zero.
9-55
22 211
System Options Imaging Samples with the 1500° C HS
REMOVING THE SAMPLE CRUCIBLE
To remove the crucible from the stage module, grasp the edge of the
crucible with a pair of tweezers and lift it out. There is a hole in the
bottom of the stage which can be used to remove the crucible, should
it become stuck in the heater. Use a small rod or wooden stick to
access the crucible through this hole:
FIGURE 9-40 REMOVAL OF THE SAMPLE CRUCIBLE
CHECKING CALIBRATION
All 1500° C heating stages are checked and calibrated before
shipping, to an accuracy of ±25° C. This calibration typically does not
change over the life of the heater. However, if greater precision is
required in the actual temperature read-out, calibration can performed
with a gold mesh sample. Gold is an ideal sample for calibration since
it will not oxidize, and has a sharp melting point at 1 064° C. Enough
gold mesh is provided for several trials.
Calibration is performed as follows:
1. Tack a small piece of gold mesh onto the crucible with carbon
paint.
2. In the Hot Stage module, program step 1 on the heating profile
data field for 950° C to 50° C/min. ramp rate. Set the holding
(soak) time to 30 sec.
3. Program step 2 to 1050° C at 20° C/min. Hold for 10 sec.
4. Program step 3 for 1080° C at 10° C/min. Leave soak time to zero.
5. Gold should melt somewhere within this range. If it doesn’t, select
the Hold button, then slowly increment the Set value until the
sample melts. Note this melting temperature, then power down the
stage by selecting the Stop button.
If the temperature is outside the specified accuracy, contact your local
FEI service representative.
9-56
2 2 2 11
System Options Using the HS with EDX Detectors
Using the HS with EDX Detectors
To perform EDX analysis, the stage temperature must be below 400°
C. Infrared radiation given off by the heater at temperatures above
400° C will blind the EDX detector. Once cooled, swing the heat
shield out of the way of the stage. (Note: The CCD camera may be
helpful here, to see into the chamber.) Raise the stage to a working
distance of 12 mm (the GSED is 8 mm), then collect X-rays as usual.
There are a number of variables to be taken into account then
selecting operating temperatures for EDX detectors. Some of these
include window materials, window thickness, window support
structure and the closeness of the window. Some detectors may be
more light sensitive than others. Because these factors will vary
between different EDX companies, it is very important to consult the
detector manufacturer when determining operating limits.
EDX operation with the heating stage is covered in the following topics:
•
•
•
•
Inclined Crystal EDX Detectors
Positioning the High Temperature GSED
EDX Performance
Window Contamination
INCLINED CRYSTAL EDX DETECTORS
The illustration below shows a typical inclined crystal EDX detector
configuration. The detector comes in at a take-off angle (TOA) of 35°
C, and the sample is not tilted. This illustration is shown with the high
temperature GSED installed.
FIGURE 9-41 INCLINED CRYSTAL EDX DETECTORS
CAUTION!
Be very careful when determining operating temperatures for an x-ray
detector, to avoid damaging it. Always consult the EDX manufacturer
for guidelines and operating limits.
9-57
22 211
System Options Using the HS with EDX Detectors
POSITIONING THE HIGH TEMPERATURE GSED
The high temperature GSED must be installed so that the collection
ring does not interfere with the angle of the EDX detector. This can be
done by simply rotating the detector so that one of the gaps in the ring
faces the EDX detector. In the following photo, note that the bars on
the collection ring are oriented so that the path from the EDX detector
to the GSED is clear.
FIGURE 9-42 POSITION OF THE HIGH TEMPERATURE GSED
Also note that the working distance given may be longer than the
recommended 10 mm working distance. It has been found that
different EDX manufacturers may have optimum collection below
10 mm. Each system should be tested to find the optimum working
distance before using the heating stage.
9-58
2 2 2 11
System Options Using the HS with EDX Detectors
EDX PERFORMANCE
Elemental analysis can be performed while heating; the heat radiated
from the heating stage to the EDX detector is very small and will
generally not affect the EDX detector. However, above 400° C the
sample will begin to radiate infrared light, and this will blind the EDX
detector, preventing further analysis. For this reason, do not perform
elemental analysis above 400° C. It is also advisable to retract the
EDX detector fully when temperatures above 400° C are to be
attempted.
The sides of the crucible and the top edges of the stage will interfere
with the collection of x-rays from the sample. Therefore, all EDX
analysis should be performed on the sample opposite to the EDX
detector:
FIGURE 9-43 POSITIONING FOR EDX PERFORMANCE
Tilting the stage by no more than 5° toward the EDX detector will
improve x-ray signal collection as well. Count rates for EDX analysis
may be slightly lower than normal using this heating stage.
WINDOW CONTAMINATION
Upon heating, certain samples may evolve gases or burn off various
residual components such as binders or fillers. If the EDX detector is
located close to the sample, these evaporated components may
condense onto the EDX window. To prevent this, keep the EDX
detector retracted away from the stage until it is needed.
9-59
22 211
System Options Operation Characteristics
Operation Characteristics
Here are some operation characteristics to consider before operation
of either the 1000° C or the 1500° C stage.
• Thermal Emission
• Degassing Samples
• Locking the Stage Rotation Axis
THERMAL EMISSION
Higher temperatures (around 1000° C) can create an effect called
thermal emission, in which electrons are emitted from the sample and
extracted by the high temperature GSED. This can cause white noise
on the image. To minimize this, turn down the brightness. It may also
be necessary to turn down the contrast, in which case the beam current
can be increased to compensate for the loss in signal.
DEGASSING SAMPLES
Some types of samples may contain compounds which will evaporate
under high temperatures. This will not affect the vacuum in the
chamber. However, if large quantities of compounds are given off,
they may condense on the GSED. This will not degrade image quality
unless the compounds get on the aperture inside of the GSED
assembly (PLA2), and then astigmatism could result. If this happens,
the detector must be cleaned.
LOCKING THE STAGE ROTATION AXIS
The heating stage is mounted onto the rotation module of the stage,
and will therefore rotate if the stage rotation axis is used. The
presence of water hoses and signal wires on the stage causes a risk of
damage in the event the stage is rotated. This could further endanger
the vacuum system, if the hoses are pulled out of the stage and water
spilled into the HiVac port in the bottom of the chamber. To prevent
this, the stage rotation axis must be locked. To lock the stage rotation
axis, open the Work Page, then click on Coordinates in the Stage
module and click in the check box under the Lock label for Rotation.
9-60
2 2 2 11
System Options Installation and Maintenance for the 1000° C and 1500° C HS
Installation and Maintenance for the 1000° C and 1500° C HS
The heating stage and insert may need to be installed and removed
from the chamber on occasion, to accommodate different
applications. It may also be necessary to replace parts in the heating
stage module. See the following for this information:
•
•
•
•
•
•
•
Installing the High Temperature GSED
Installing the Heating Stage Module
Removing the Heating Stage Module
Changing the Stage Heater Assembly
Adjusting the 1500° C Heat Shield
1500° C HS Troubleshooting
Consumable Parts Lists
INSTALLING THE HIGH TEMPERATURE GSED
1. Install the Heating Stage Insert.
2. The high temperature GSED is a PLA cap which is pressed onto
the insert. This cap comes with an adapter PC board which plugs
into the signal connector on the chamber ceiling. On the other end
of this board is a wire which clips onto the cap.
3. Installing the clip wire is easiest if the wire hook on the PC board
is snapped onto the cap first:
4. Now plug the hook wire adapter into the connector on the chamber
ceiling, then press the cap onto the hot stage insert.
9-61
22 211
System Options Installation and Maintenance for the 1000° C and 1500° C HS
INSTALLING THE HEATING STAGE MODULE
1. Vent the specimen chamber and open the stage door.
2. Home the stage.
3. If the sample holder adapter is installed (as shown below), it must
be removed. Unscrew the set screw on the right of the base using a
metric 2 mm hex wrench (1), then slide the sample holder from the
dovetail base underneath (2). The dovetail base is mounted onto
the stage rotation platform.
FIGURE 9-44 REMOVAL OF THE SAMPLE HOLDER ADAPTER
4. If the assembly shown above is not installed, remove the existing
sample holder and install the dovetail base included with the
sample holder adapter assembly.
5. Install the heating s tage m odule as shown below. Slide the stage
module onto the dovetail base from the rear forward, until it stops
(1). The stage has a pin in the dove-tail groove underneath that will
pos ition it so that the sample is centered beneath the beam. Once the
stage is positioned, tighten the set screw on the right of the base (2).
FIGURE 9-45 INSTALLING THE HEATING STAGES MODULE
6. Install the heater power cable. This is the red/black twisted pair
cable with two female connector ends. One end goes to the heater
power connector on the stage (male side), and the other end goes
to the corresponding connector on the inside of the chamber
feedthrough plate.
9-62
2 2 2 11
System Options Installation and Maintenance for the 1000° C and 1500° C HS
7. If using the 1000° C stage module:
Install the type K thermocouple cable. This is the yellow cable with
the two male connector ends. One end goes to the yellow type K
connector on the stage (female side), and the other to the
corresponding connector on the feedthrough plate.
If using the 1500° C stage module:
Install the type B thermocouple cable. This is the gray cable with the
two male connector ends. One end goes to the gray type B connector
on the stage, and the other to the corresponding connector on the
feedthrough plate.
8. If using the 1500° C stage module:
Attach the sample bias cable between the BNC connector on the
inside of the sample bias feedthrough plate, and the connector on the
heating stage:
FIGURE 9-46 CONNECTIONS TO THE HEATING STAGE
9. Connect the two shorter cooling water hoses between the stage
and the corresponding hookups on the feedthrough plate. If water
plugs were previously installed, these will first have to be
removed. The water plugs are installed any time the heating stage
is removed from the chamber, to prevent vacuum leaks.
There are important considerations when removing the heating stage
module from the chamber. See Removing the Heating Stage
Module.
9-63
22 211
System Options Installation and Maintenance for the 1000° C and 1500° C HS
INSTALLING THE SAMPLE BIAS
FEEDTHROUGH PLATE
The sample bias feedthrough plate will replace the standard stage
grounding plate on Port F, next to the stage controls on the chamber
door. The standard plate will be installed when the heating stage is not
in the chamber. To remove it first open the stage door.
FIGURE 9-47 INSTALLING THE GROUND WIRE
The STAGE GROUND WIRE is attached to the inside of the plate
and fed through the PORT F opening. It is attached in two places: on a
clip next to the port (A), and into a connector down on the stage (B).
Before the plate can be removed, this wire must be unclipped from the
clip and pulled out of the stage ground connector, as shown.
Remove the stage grounding plate by taking out the 3 screws on the
front, then pulling out the grounding wire from inside the chamber.
Once the stage grounding plate is removed, a red GROUND WIRE
must be attached to the stage to ground it. One end of this wire
attaches onto a Torx screw on the stage (A), and the other end plugs
into the connector (B) that the stage grounding wire was just removed
from.
Install the sample bias feedthrough plate onto Port F.
Attach the internal SAMPLE BIAS CABLE to the BNC connector on
the inside of the sample bias feedthrough plate.
Plug the opposite end of the sample bias cable into the connector on
the heating stage.
9-64
2 2 2 11
System Options Installation and Maintenance for the 1000° C and 1500° C HS
FIGURE 9-48 SAMPLE BIAS CABLE CONNECTOR
Connect the external SAMPLE BIAS CABLE from the outside of the
feedthrough plate to the sample bias BNC connector on the rear of the
bias supply controller.
Connecting the bias supply controller
Install the AC INTERLOCK CABLE from the bias controller to the
VCU.
Connect AC POWER. The bias controller power cord goes from the
rear panel to a Quanta 220 VAC line outlet.
The sample bias feedthrough assembly is now installed.
Removing the heating stage
When the heating stage is removed from the chamber, the stage
ground wire must be re-installed. So that the feedthrough plate used
for the heating stage can stay in place, an additional wire is used to
connect the BNC to the stage ground.
FIGURE 9-49 RE-INSTALLING THE GROUND WIRE
9-65
22 211
System Options Installation and Maintenance for the 1000° C and 1500° C HS
INSTALLING THE CHAMBER FEEDTHROUGH
ASSEMBLY (CFA) AND WATER FLOW BOX (WFB)
If necessary, install the Chamber Feedthrough Assembly (CFA) onto
chamber Port C.
Connecting the stage module
Install the HEATER POWER CABLE. This is the red/black twisted
pair cable with two female connector ends. One end goes to the heater
power connector on the stage, and the other and goes to the
corresponding connector on the inside of the feedthrough plate.
a) Install the TYPE B THERMOCOUPLE CABLE. This is the gray
cable with two male connector ends. One end goes to the gray type B
connector on the stage, and the other to the corresponding connector
on the inside of the feed through plate.
b) If using the 1000° C stage module, install the TYPE K
THERMOCOUPLE CABLE. This is a yellow cable.
Connect the two shorter COOLING WATER HOSES between the
stage and the corresponding hookups on the inside of the feedthrough
plate.
Connecting the HTS controller
Install the CHAMBER INTERFACE CABLE. The end with the
single connector goes to the outside of the chamber feed through
plate, on the connector labelled HEATING. The other end, which has
three connectors, will attach to the programmable controller. On this
end the large cylindrical connector goes to the controller chamber
interface port; and the smaller connectors go to the thermocouple
input.
Install the RS232 CABLE. This cable goes between the controller and
P1 serial connector on the Quadcable attached to the Rocket Port card
in the system PC.
Connect AC POWER. The controller power cord goes from the rear
panel to an Quanta 220 VAC line outlet.
Installing the Water Flow Box (WFB)
Check that the water dam is fitted into the HiVac port in the bottom of
the chamber.
Hook up the water flow box between the chiller and the feedthrough
plate by installing the water line tubing on the corresponding
connectors. The water flow path should make a loop between the
chiller, through the water flow box and stage.
Install the POWER cable on the water flow box, but leave the power
switch off. The other end of the power cable goes to the DDB +24V
output in the Quanta console.
Turn on the water chiller. Water will not flow at this point, since the
valves in the box are close when it is off.
Turn on power to the box. An alarm will sound, indicating that there is
no flow through the box.
9-66
2 2 2 11
System Options Installation and Maintenance for the 1000° C and 1500° C HS
FIGURE 9-50 CONNECTING THE WATER FLOW BOX
Push and hold the START FLOW button. Keep holding this button
down until all the air is out of the water lines; this can be seen as water
flows through them. Once the lines are flowing clear, release the
START FLOW button.
Make sure that the FLOW OK light on the box is on. This indicates
that water flow is working; i.e., that there are no leaks in the system.
The FLOW OK light will remain illuminated until there is a leak, or if
the STOP FLOW button is pressed.
The STOP FLOW button can be pressed at any time to close the
valves and shut off the water flow, for whatever reason. If STOP
FLOW is pressed, an alarm will sound. The START FLOW button
must be pressed and held again as in step 4, to re-establish flow
through the system.
CAUTION!
Never pump the specimen chamber without checking for water leaks
first.
REMOVING THE HEATING STAGE MODULE
Whenever the 1500° C heating stage is removed from the chamber,
the water lines must be drained and the fittings sealed to prevent
vacuum leaks.The following instructions describe how to do this. If
necessary, refer to Installing and Operating the Water Flow Box for
information on operating the water flow box.
Disconnecting the Water Lines
1. Allow the stage to cool to room temperature.
2. IMPORTANT: Shut down the water chiller.
3. Disconnect one of the water lines inside the chamber and elevate it
to keep water from dripping out. While holding it up, push STA RT
FLOW on the water flow box and hold it down until all the water is
drained out of the tubes.
Make sure the system is drained before disconnecting the other hose.
This will prevent excess water from dropping into the chamber and
slowing the time it takes for the chamber to pump down again.
9-67
22 211
System Options Installation and Maintenance for the 1000° C and 1500° C HS
4. Once the stage has been drained and both water lines have been
removed, blot out any remaining water from the connectors using
a cotton swab or paper towel. A second way to remove water from
the connectors is to pump down directly to Wet or Aux mode (this
will cause the pump down time to take longer than usual). When
pumping down to Hivac mode after the stage is used, always enter
Wet mode first, or else the system may not pump down to Hivac
mode on the first attempt.
Installing the Feedthrough Water Plugs
The water fittings on the inside of the feedthrough plate are designed
to create a vacuum seal whenever the water lines on the heating stage
are not connected. If there is any debris in the cooling water, it can
collect on the fitting o-ring seals and cause a vacuum leak. To prevent
this, water plugs must be installed over the fittings on the inside of the
feedthrough plate whenever the heating stage is removed.
1. Disconnect the stage water lines from the inside of the chamber
feedthrough plate, as described above.
2. Install one plug into each water fitting on the inside of the chamber
feedthrough.
FIGURE 9-51 CHAMBER FEEDTHROUGH (INSIDE)
3. The water fitting plugs should be installed whenever the heating
stage is not installed.
CAUTION!
To avoid water leaks in the chamber, the stage must be removed and
water plugs installed before going into HiVac mode.
Once the water lines are disconnected and the water plugs installed,
the heating stage module can be removed from the chamber in the
reverse order of the instructions given in Installing the Heating
Stage Module.
9-68
2 2 2 11
System Options Installation and Maintenance for the 1000° C and 1500° C HS
CHANGING THE STAGE HEATER ASSEMBLY
The heater assembly is part of the heating stage module. The central
part of the heater contains the heating element, the thermocouple and
the crucible, in which the sample is placed. Attached to this module
are the heater power and thermocouple connectors, which extend out
the sides of the stage.
FIGURE 9-52 THE HEATER ASSEMBLY
When the assembly is in place, it will be situated between the two
insulating pads inside of the heating stage, and the sample bias wire
will be connected to the heater assembly up through the bottom of the
stage.
The heater assembly will need to be replaced from time to time, when
it burns out. The lifetime of the heater assembly is variable; this will
depend on the temperatures at which it is operated and how often it is
used. When the heater assembly burns out, it will no longer heat the
sample. One way to determine if the heater is inoperative is to check
the fault indicators on the front panel of the controller. The red heater
fault indicator will illuminate when power is applied, but no current is
flowing through the heating element.
The heater assembly is not a user serviceable item. To replace the
heater, the entire stage module (minus the power and thermocouple
cables) should be sent back to the factory. Current prices for heater
replacements are available on request from sales and service
representatives.
9-69
22 211
System Options Installation and Maintenance for the 1000° C and 1500° C HS
ADJUSTING THE HEAT SHIELD
If the heat shield touches the high temperature GSED or sits farther
than 2 mm from the GSED, the arm will need to be adjusted. It may
also need to be adjusted in the X and Y directions.
FIGURE 9-53 ADJUSTMENT OF THE 1500° C HEAT SHIELD
1. X and Y will not typically need to be adjusted. To determine if the
heat shield is centered under the detector in the X/Y directions,
loosen the Z adjustment hex head screw and move the heat shield
up so that the tip of the GSED sits in the deflector hole. Use the X
and Y adjustment screws to make any necessary centring
adjustments. If the arm has been moved from center, use the value
above (165 mm) to roughly center it. Measure from the feed
through to the center of the heat shield hole, as shown above.
2. Once the heat shield is centered, move the arm to the correct
height (2 mm from the GSED), and re-tighten the screw.
Adjusting the Swing Arm
The swing arm adjustments allow the position of the heat shield on the
end of the swing arm to be moved on the X, Y and Z axes. X and Y
are not typically changed. Z is used to adjust the heat shield to the
correct height relative to the detector.
FIGURE 9-54 ADJUSTMENT OF THE SWING ARM
9-70
2 2 2 11
System Options 1500° C HS Troubleshooting
1500° C HS Troubleshooting
The 1500° C heating stage requires multiple bias voltages to work
properly. If any one of these voltages are not working, no images can
be acquired. Most of the problems with the heating stage can be seen
in the image; e.g., lack of contrast or image quality. Testing for
problems in the stage requires a digital volt meter (DVM) or a
continuity tester.
Problems with the following are discussed:
•
•
•
•
•
•
Bias Supply Connections
Sample Crucible Conductivity
Sample Bias Continuity
Controller Thermocouple Faults
Vibration
Heat Shield Continuity
BIAS SUPPLY CONNECTIONS
The bias supply controller, which produces voltages for the heat
shield and the sample, is interlocked with the instrument. The supply
will not turn on until the chamber is pumped down to the selected
vacuum. If any of the connections have come loose, imaging will be
greatly affected; this will appear as alternating light and dark bands
across the image:
FIGURE 9-55 BANDING PROBLEM ON IMAGE
9-71
22 211
System Options 1500° C HS Troubleshooting
SAMPLE CRUCIBLE CONDUCTIVITY
A platinum strip is painted onto each magnesia crucible. This strip
provides the electrical path for the sample bias voltage, from the wires
in the heater to directly under the sample. If this Pt strip is worn off or
cracked, changing the sample bias will have no effect on the image.
At low temperatures, the image will lack good contrast.
As the temperature is increased, the image will go white (due to
thermal electrons) and again, changing the sample bias will have no
effect.
The Pt strip on the crucible should be checked for electrical continuity
from the top of the crucible to the bottom. If the platinum has worn off
or has become non conductive, the crucible should be replaced.
SAMPLE BIAS CONTINUITY
To check for continuity of the sample bias, disconnect the BNC cable
from the back of the bias box labelled SAMPLE BIAS. Touch the
center connector of the BNC with the DVM probe and touch either the
sample crucible, if placed in the heater, or the bias wires in the heater.
The DVM should indicate continuity. Also touch the heating stage. If
the DVM indicates continuity then a short has developed in the
system. In this case, contact your local FEI service representative for
assistance.
HEAT SHIELD CONTINUITY
To check for continuity of the 1500° C heat shield, remove the BNC
connector from the back of the bias box labelled HEAT SHIELD,
place one probe from the DVM onto the center connector of the BNC
and touch the heat shield with the second DVM probe. The DVM
should indicate continuity. If not, disconnect the opposite end of the
BNC cable and the heat shield until the fault is found. Usually any
problem here is a connector that is not attached completely
CONTROLLER THERMOCOUPLE FAULTS
The type B thermocouple used for the 1500° C heating stage is not
accurate blow 800° C. Depending on the temperature of the heater
when it is set up, a thermocouple fault may be given by the system. If
this should occur, do the following: Set the water chiller temperature
to 30 or 40° C. This will raise the temperature of the stage to 2° C,
which will clear the fault condition. The chiller can then be set down
to 20° C after the heating ramp has started.
9-72
2 2 2 11
System Options 1500° C HS Troubleshooting
VIBRATION
The following photo shows small vibration patterns on an image at
relatively low magnifications:
FIGURE 9-56 VIBRATION PROBLEM ON IMAGE
The vibrations are caused by the sample crucible. Over time, the
crucible will shrink, and as a result will not fit as tightly in the heater.
A sheet of alumina paper provided with the stage is used to correct
this problem. Cut a strip of the paper to a size of 2 mm by 4 mm, and
use tweezers to place it between the heater and the crucible, as shown
below. Two strips may be required.
FIGURE 9-57 SAMPLE CRUCIBLE WITH ALUMINA PAPER
9-73
22 211
System Options 1500° C HS Troubleshooting
1000° C
AND
1500° C HS CONSUMABLES
REFURBISHING THE HSM
When the heater or other part breaks down the Heating Stage Module
(HSM) can be sent back to FEI for refurbishing of the unit. This is
done this way to ensure that the heating assembly functions correctly
through testing after repair.
The items considered consumable parts are in the table below:
TABLE 9-3
Item
1000° C AND 1500° C CONSUMABLE PARTS
Part #
Description
Crucible, Standard
100-378-002
Crucible, Short
100-378-004
Crucible, Graphite
100-444-002
All for the 1500° C Stage
Detector Cap
300-066-000
for 1000° C and 1 500° C
Stages
Hook Wire for 1000° C
and 1500° C Stages
9-74
300-065-000
2 2 2 11
System Options Specimen Holder Kit Option
Specimen Holder Kit Option
The Specimen Holder Kit option is Universal. The interfacing parts
allow the fitting of all the common components to the 200, 400 and
600 stages. Major holders in the kit locate with a 2 pin system
originating from the stage rotation head, through the interface piece,
to the holder. All interfacing parts have a 3 point contact to minimize
vibration. The Specimen Holder Kit comprises of:
•
•
•
•
•
•
•
•
•
•
•
Older type 50 x 50 mm stage adapter
Interface pillar for all multi-fittings
16 Position stub holder (spring held)
Angled stub holder, 4 at 45°, 2 at 0°
Analytical holder 2x 1 inch samples
25 mm and 32 mm diameter Polished mount holders
2x Clamp stubs
Eucentric stub holder Quanta 400
Eucentric stub holder Quanta 600
1x No.10 Torx driver
1x No.6 Torx driver
FIGURE 9-58 SPECIMEN HOLDER KIT OPTION
9-75
22 211
System Options Specimen Holder Kit Option
LOCATION POSITIONS
The interface parts and all fitting holders have a 2 pin / 2 hole location
system. This is present so that holders can be positioned in the same
orientation each time they are fitted. All stages have 2 holes, one is
round and the other is a slot. This will allow the stage location system
to work with a holder for precise specimen position.
This works directly from the Home condition of the stage. The stage
needs to be homed before fitting of the Holder interface components.
FIGURE 9-59 QUANTA 400 LOCATION POSITIONS
SINGL E
HO LDE R
TH READ ED
LO CATIO N
HO LE
SLO T
LO CATIO N
HO LE
OLDER INTERFACE ADAPTER
This adapter is used on pre-Quanta 50 x 50 mm stages that had no 2
pin locating holes. The old center rotation head needs to be removed
from the stage and this component should replace it. It is available for
those who have pre-Quanta 50 x 50 mm stage XL30 instruments and
want to use this kit.
NOTE:
This is not used on Quanta stages.
FIGURE 9-60 OLDER INTERFACE ADAPTER
9-76
2 2 2 11
System Options Specimen Holder Kit Option
INTERFACE PILLAR
This component is used to attach the 3 multi-holders individually to
the stage. It is fixed to the stage by the captive center screw.
FIGURE 9-61 INTERFACE PILLAR FOR MULTI-HOLDERS
LOCAT ION
PIN S
T OP AND
BOTT OM
SCRE W
POSITIO NS
FOR THE
AN ALY TICAL
HO LDE R
MULTI-HOLDERS
The Multi-Holders fit individually on the Interface pillar using the
same pin location system. The Multi-Holders comprise of:
• 16 Position stub holder (spring held)
• Angled stub holder, 4 at 45°, 2 at 0°
• Analytical holder 2 x 1 inch samples
Numbers 1 and 2 have a captive center screw for fixing to the
Interface pillar, where as number 3 has two captive screws offset from
the center.
FIGURE 9-62 THE MULTI-HOLDERS
9-77
22 211
System Options Specimen Holder Kit Option
16 Position Stub Holder
This can be used for 12.5 mm pin stubs, the Clamp stubs, the Polished
mount holders or any pinned small holder. The pins are held by spring
pressure to prevent vibration or falling out. Using the location pin
position, with homing of the stage, each time will allow one to map
the holder into the stage location system. The 16 Position Stub Holder
fits to the Interface pillar by a captive center screw.
Angled Stub Holder
This holder can be used for a pre-tilt condition where either there is no
wish to tilt the stage, or additional tilt is needed beyond the stage tilt
capabilities. The set angle is 45° and holds 4 x 12.5 mm stubs at this
angle. There are also 2 positions on the top of the holder for 2x 12.5
mm stubs. All stubs are screw fixed. The Angled Stub Holder fits to
the Interface pillar by a captive center screw.
Analytical Holder
The Analytical Holder is use in conjunction with an EDX system. 2
polished 1inch mounts can be slotted from below into the retaining
holes until they become flush to the top of the holder. Here they can
be locked in place by screws in the side wall of the holder. This gives
the specimens a common height with a Faraday cup position drilled
into the top of the holder and therefore can be common during x-ray
analysis.
There are also 2 positions for 12.5 mm stubs or for standards
necessary for the analysis. The 2 stubs are each held by a screw in the
side wall. The Analytical Holder fits to the Interface pillar by two
captive screws equally off-set from the center.
All screws are either Torx or Hex-key ended
9-78
2 2 2 11
System Options Specimen Holder Kit Option
POLISHED MOUNT HOLDERS
These comprise of 2 shallow cup holders of different diameters. The
sizes are 25 mm and 32 mm. These are the general size of
encapsulated mounts either for Metallurgy or Geology. The holders
have a split in the side of the cup so as to grip the mount when it is
pushed in. They have a simple pin the same as the 12.5 mm stubs,
therefore can be mounted on any of the same fittings as the standard
stub.
FIGURE 9-63 POLISHED MOUNT HOLDERS / CLAMP STUBS
CLAMP STUBS
These are generally used for holding thin objects such as a piece of IC
wafer. Also can be used when adhesive is prohibited. They have Hexkey screws that clamp with Nylon bushes onto the object. Grounding
of the specimen may need to be made by another method other than
just touch contact.
9-79
22 211
System Options Specimen Holder Kit Option
EUCENTRIC STUB HOLDERS
The 2 Eucentric Stub Holders are to bring a eucentric condition to the
400 and 600 stages.
The 400 and 600 stages are fococentric and therefore need to have a Z
prime position at a set height from the stage rotation head surface to
the sample surface to create a eucentric condition. The shorter holder
is for the Quanta 400 stage and the longer for the Quanta 600 stage.
The eucentric holder is screwed into the center of the rotation head of
the stage. When the stub with specimen is fitted, by tilting the stage,
the position of tilt should be at the plane of the specimen. The
specimen should not be of excessive height as this will not work. The
specimen should be within 1 to 2 mm thick.
FIGURE 9-64 EUCENTRIC STUB HOLDERS
TORX DRIVERS
Within the kit are two Torx drivers to complete the fitting of the
interfacing parts. All screws for interfacing connections are Torx. All
screws for clamping sample stubs are of the Hex-key type. The
appropriate Hex-key tool is standard with the Quanta instrument and
not found in this kit.
9-80
2 2 2 11