1
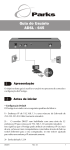
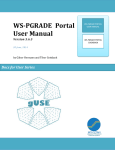
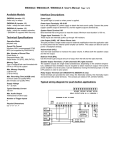
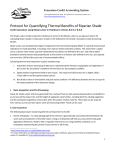
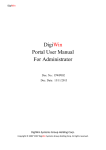
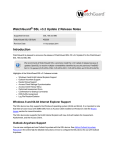
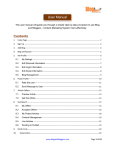
UNIVERSITY OF ULM, KARLSRUHE INSTITUTE OF TECHNOLOGY
Gatlet User Manual
A user manual for Gatlet based grid portals
Stefan Bozic, Bastian Boegel
14.02.2011
[Geben Sie hier das Exposee für das Dokument ein. Das Exposee ist meist eine Kurzbeschreibung des
Dokumentinhalts. Geben Sie hier das Exposee für das Dokument ein. Das Exposee ist meist eine
Kurzbeschreibung des Dokumentinhalts.]
First Steps with Gatlet ............................................................................................................................. 3
Welcomepage...................................................................................................................................... 3
Login .................................................................................................................................................... 3
With grid certificate......................................................................................................................... 3
With Username and Password ........................................................................................................ 4
MyProxy Portlet....................................................................................................................................... 5
File Browser Portlet ................................................................................................................................. 6
GridFTP Upload Applet ........................................................................................................................ 7
GridFTP Download Applet ................................................................................................................... 8
Web Upload......................................................................................................................................... 9
Web Download .................................................................................................................................... 9
Job Submit Portlet (Globus) .................................................................................................................. 10
Job Definition .................................................................................................................................... 10
Select Resource and Queue............................................................................................................... 11
Select Queue ..................................................................................................................................... 11
Job Monitoring Portlet .......................................................................................................................... 12
Submitted Jobs View ......................................................................................................................... 12
Job Detail View .................................................................................................................................. 13
Tab Parameter ............................................................................................................................... 13
Tab Runtime .................................................................................................................................. 13
Tab Files ......................................................................................................................................... 14
SSH Term Portlet ................................................................................................................................... 15
Select Resource View .................................................................................................................... 15
SSHTerm-Applet View ................................................................................................................... 15
SRM Portlet ........................................................................................................................................... 16
GLite Portlet .......................................................................................................................................... 16
Appendix A: Gatlet Job states ............................................................................................................... 16
Gatlet User Manual
Page 2
First Steps with Gatlet
Welcomepage
A grid portal based on Gatlet and GridSphere provides a WelcomePage to all visitors.
The page shows a welcome text and a short instruction about what has to be done to get an user
account for the portal.
1: Login Link: Click on this link to login to the portal
Login
With grid certificate
Gatlet based grid portals usually supports user login with DFN grid certificates. To use this feature the
portal provider has to store the distinguished name (DN) of the user’s grid certificate on the portal.
On the other hand the user has to import his certificate in his web browser. During the login process
the portal will ask automatically for your grid certificate.
1: Certificate Select box: Select the suitable grid certificate from the list
2: OK Button: Click on the OK button to submit the certificate data to the server
Gatlet User Manual
Page 3
If the certificate is accepted by the portal a message will be shown:
1: Login button: Finally click on the button to login to the portal
With Username and Password
If you want to access your portal account without your DFN grid user certificate (e.g. from another
computer or browser), you can set a password for your account after logging in with your DFN grid
user certificate. Please use "Profile / Change Password" (available only if you are logged in) to change
your password. Please see "Profile / Profile settings" to find out your local "User Name" in the portal.
The "Profile" link can be found in the upper right area, after "Welcome, your name ...".
1: Login button: Click on login to send username and password for authentication to the portal
server.
Gatlet User Manual
Page 4
MyProxy Portlet
The MyProxy Portlet is the heart of Gatlet. The access to grid resources is restricted to users that
have a valid grid certificate. Due to the fact that the portal will access grid resources on behalf of the
user there must be a mechanism to share the user’s grid certificate. It’s absolutely forbidden to save
the private key of the user on the portal. But this key is needed to access the grid. So there must be
another approach to delegate the user’s rights to the portal.
The user has the ability to upload a short lived proxy certificate (which is derived from his grid
certificate) to a MyProxy server. The uploaded proxy is secured by a name and password which are
chosen by the user. A good tool for creating and uploading a proxy is the “Grid Proxy Manager”
which is a Firefox plugin that has access to all certificates stored in the user’s browser.
A resource (e.g. the portal) that knows the name and the password under which a proxy is stored on
a MyProxy server can download a copy of it and therefore gets access to the grid on behalf of the
user.
The MyProxy portlet of Gatlet implements the usage proxy certificates as a Single Sign On (SSO)
mechanism to grid resources. The user enters the access data to the proxy only one time in the
portlet. After this the portal can automatically download new instances of the proxy when accessing
the grid.
1: MyProxy Server: Defines the server where the user has been uploaded the proxy certificate
2: MyProxy User Name: The name under which the user has stored the proxy on the server.
3: MyProxy Password: The password which protects the proxy on the server
4: Virtual Organization: Is needed to create a VOMS proxy certificate when using gLite.
5: Save button: Click on the save button to store the entered data on the portal. The portal will
instantly try to download a proxy from the MyProxy server to validate the user’s data.
6: Remove button: Click on the remove button to delete the MyProxy data from the portal.
Gatlet User Manual
Page 5
File Browser Portlet
For accessing GridFTP resources Gatlet provides the File Browser Portlet. The portlet supports a set
of common actions (cd, rm, less, upload, download etc.) that a user can execute on files and
directories. The portlet allows accessing 2 GridFTP resources at the same time. A file transfer
between these resources is supported too. The list of resources a user can connect to depend on the
VOs that are allowed on the GridFTP server and the VOs the user belongs to.
1: Message Field: Shows messages to user. E.g. if the deletion of a file/folder was successful
2: Resource selector: This selector contains a list with GridFTP servers that are available to the user.
When the user change the selection the portlet is automatically connecting to the home directory of
the user on the selected resource.
3: Show resource: In case of JavaScript is disabled the user has to press this button to connect to the
selected resource.
4: Home button: Pressing this button will change the view to the home directory of the user
5: Refresh button: A click on this button will refresh the list of files shown in the portlet.
6: Rename button: Select one or more files or directories which you want to rename. The portlet will
switch to an edit mode where you can assign new names.
7: Delete button: Select one or more files or directories which you want to delete. The portlet will
switch to confirmation dialog where the deletion must be confirmed by the user.
Gatlet User Manual
Page 6
NOTE: Only empty directories can be deleted by the portlet!
8 : Change Directory button: A click on this button will change to the selected directory.
NOTE: Exactly one directory has to be selected.
9: Make directory button: A click on this button will make a new directory in the current folder. The
portlet will switch to an edit mode where the user can enter the name of the new directory.
10: Upload button: A click on this button will upload a file to the current folder.
There are 2 upload modes available:
-
-
Direct upload via applet from the browser to the selected resource. This is the preferable
way to upload files.
NOTE: To use the upload applet there must be a JRE 6 installed on the user’s computer.
Web upload via the portal. This is the fallback strategy and not preferable because it
consumes web server resources and therefore is limited in uploadable file size.
11: Download button: A click on this button will download the selected file(s) from the current folder.
There are 2 download modes available:
-
Direct download from the resource via applet. This is the preferable way to download files.
NOTE: To use the download applet there must be a JRE 6 installed on the user’s computer.
Web download via the portal. This is the fallback strategy and not preferable because it
consumes web server resources and therefore is limited in downloadable file size.
12: Show Content button: A click on this file will show the content of a file/directory. Id a file is
selected it will be downloaded from the resource and shown in a new window. If a folder is selected
the file browser will make a change directory to this folder. Only one file/directory must be selected.
13: Select all button: A click on this button will select all files and directories in the file browser.
14: Deselect all button: A click on this button will deselect all files and directories in the file browser.
15: Copy left to right button: A click on this button will copy the selected files/directories from the
left resource to the selected folder on the right resource. Directories will be copied recursively.
16: Copy right to left button: A click on this button will copy the selected files/directories from the
right resource to the current folder on the left resource. Directories will be copied recursively.
17: File Browser Window: Shows the files and directories that are located in the current folder on the
selected resource.
GridFTP Upload Applet
The GridFTP Upload Applet is a comfortable tool to copy files from the user’s local file system to a
remote GridFTP storage resource. The applet creates a direct connection to the GridFTP server. That
avoids interaction with the portal and consequently save resources on the portal. Additional a direct
data transfer is much faster and not limited in the size of files.
Gatlet User Manual
Page 7
1: Browse button: Click on this button to open a file browser of the user’s file system. Select a file to
upload. The file size is only limited by the target system.
2: Progress bar: Shows you the status of the copy process.
3: Upload button: A click on this button starts the upload. The button is disabled until a file has been
selected.
GridFTP Download Applet
The GridFTP Download Applet is a tool for copying data from a GridFTP storage resource directly to
the users file system. Like the upload applet there is a direct connection between the user’s
computer and the GridFTP resource. That avoids interaction with the portal and therefore saves
resources on the portal. Additional a direct data transfer is much faster and not limited in the size of
files.
1: File label : Shows the path of the selected file on the GridFTP resource
2: Browse button: A click on this button will open a file browser of the user’s file system. Select a
directory where the downloaded file should be stored.
3: Progress bar: Shows you the status of the copy process.
Gatlet User Manual
Page 8
4: Download button: A click on this file starts the download. The button is disabled until a directory
has been selected.
Web Upload
There are several causes that will make the usage of the GridFTP Upload Applet impossible. The most
common reason is that no Java Runtime is installed on the user’s computer. Furthermore there is a
firewall in the user’s network or on the GridFTP resource that forbids a communication over the
GridFTP port. In these cases there is a workaround for uploading files via the portal server. This
approach is slower than the applet. Also the size of the uploaded file is limited (1 MB) to save portal
resources. A portal server should not be use as a distributer for storage resources.
In the just specified causes a click on the Upload button in the File Browser portlet will open the Web
Upload view which is similar to the upload applet.
1: Path label: Shows the target path of the file on the GridFTP resource
2: Browse button: Click on this button to open a file browser of the user’s file system. Select a file to
upload. The file size is limited by the portal administrator.
3: New File Name: Specify a name for the uploaded file on the GridFTP resource
4: Upload button: A click on this button starts the upload. The button is disabled until a file has been
selected.
5: Back Button: A click on the button will change to the File Browser.
Web Download
Similar to the Web Download there are causes when the GridFTP Download Applet cannot be used. A
click on the download button will start a download of the selected files via the portal. This download
via portal is slower than the applet. Also the size of the downloaded file is limited (1 MB) to save
portal resources. A portal server should not be use a distributer for storage resources.
Gatlet User Manual
Page 9
Job Submit Portlet (Globus)
Gatlet includes a portlet for submitting bash scripts to Globus resources. To submit a bash sript job
the user has to follow a workflow shown in the picture below. The single steps are explained in the
following sections.
Job Definition
In this step the user defines the base data for the grid job.
1: Job Name: A name for the job
2: Bash-Script: Enter a bash script into the textbox
Gatlet User Manual
Page 10
3: Next button: A click on this button will validate the user input. If no error is detected the workflow
continues with “Select Resource and Queue” mask.
4: Clear Fields button: Removes the value from Job Name and Bash-Script
Select Resource and Queue
In this workflow steps the user can specify the job requirement in more detail. For instance he can
define parameters like the wall time, max. memory or the processors per node that his job needs.
1: Back button: A click on this button will change to the Job Definition step of the workflow.
2: Select queue button: A click on this button will change to the Select Queue step of the workflow.
3: Submit button: A click on this button will submit the job to a Globus resource that is automatically
determined by Gatlet.
Select Queue
The table shows all queues that are assigned to Globus resources which match to the user’s VOs. The
user can manually select a queue or delegate the decision to Gatlet which will automatically select a
suitable queue.
1: Back button: A click on this button will change to the Select Resource and Queue step of the
workflow.
Gatlet User Manual
Page 11
2: Submit button: A click on this button will submit the job to the selected queue.
Job Monitoring Portlet
The Job Monitoring Portlet is the central place to get details of the submitted jobs.
Submitted Jobs View
The job table shows some common job information like the name, state and submission date. Click
on the column header to change the order of the jobs. The filter section will help the user to find
previously submitted jobs.
In the last column of the job table the user find some action buttons that are assigned to each job.
The visibility of the refresh and stop button depends on the status of the current job. Only jobs that
are not in a final state (DONE, ABORTED, CANCELED) will have these two buttons.
NOTE: The refresh, stop and details action will take long because the portal must connect to the
Globus resource to complete the action.
1: Filter JobId button: A click on this button will trigger a search for a special job.
2: Filter button: A click on this button will filter the user’s jobs for a name or state.
3: Refresh button: A click on this button will call the portal to refresh the status of the job.
4: Stop button: A click on this button will terminate a scheduled or running job.
5: Details button: A click on this button will change to the Job Detail View
6: Remove button: A click on this button will remove the job permanently from this view. The job is
not deleted and accessible via its id.
7: Remove selected button: A click on this button will remove the selected jobs permanently from
this view. The jobs are not deleted and still accessible via their ids.
8: Refresh selected: A click on this button will call the portal to refresh the status of the selected jobs.
Gatlet User Manual
Page 12
Job Detail View
The Job Detail View gives the user information about a single job that has been submitted with the
portal. The view is abstract and used to show the most common attributes of different middlewares.
To improve the view, the job information has been group onto 3 tabs.
Tab Parameter
The parameter tab shows the static job parameters that have been chosen by the user. These are for
instance the job name and the resource. Also the requirements to the computing resource like wall
time and processors per node will be shown here.
1: Back button: A click on this button will change to the Submitted Jobs View
2: Filter button: A click on this button will trigger the portal to refresh the status of the job.
Tab Runtime
This tab presents the jobs dynamic runtime information to the user. This information depends on
numerousness parameters and will be updated whenever the user triggers a job refresh either on
this view or the Submited Job View. Runtime parameters are for instance the current state of the job,
the destination host where the job will be executed or the start and stop time.
Gatlet User Manual
Page 13
1: Back button: A click on this button will change to the Submitted Jobs View
2: Filter button: A click on this button will trigger the portal to refresh the status of the job.
Tab Files
The Tab Files shows the working directory of the current job. The user has the ability to execute
common file operations in this directory. See the file Browser Portlet for a detailed description of the
actions.
1: Back button: A click on this button will change to the Submitted Jobs View
2: Filter button: A click on this button will trigger the portal to refresh the status of the job.
Gatlet User Manual
Page 14
SSH Term Portlet
The SSH Term Portlet allows user to open a ssh client (embedded in the browser) to an interactive
grid resource. This portlet is using an the SSH-term Applet hence a Java Virtual Machine is required
on the users computer. For authentication issues a proxy certificate is used. The user must only
select the resource he wants to connect to.
Select Resource View
When switch to this portlet the user has to select the interactive resource he wants to connect to.
1: Filter button: A click on this button will change the
SSHTerm-Applet View
After selecting an interactive resource this view contains the SSHTerm Applet which will
automatically connects to the interactive resource. The connection establishment will take some
time in cause of downloading the applet libraries from the portal and updating the CA certificates
and revocation lists on the client. The applet offers a lot of additional functionality. You will get an
overview of the features in the help section of the SSHTerm applet.
Gatlet User Manual
Page 15
SRM Portlet
This porlet allows access to SRM-resources such as dCache or Castor. It provides several common file
operations on the storage resource. See the file Browser Portlet for a detailed description of the
actions.
GLite Portlet
Appendix A: Gatlet Job states
Gatlet supports Globus and gLite and each middleware come with its own set of job states. To
provide the user a middleware independent view on his jobs, Gatlet is hiding the specific states by
transferring them to a Gatlet job model. See the table below which states are supported by Gatlet.
PRE_SUBMIT
SUBMITTING
SUBMITTING_ABORTED
INITIAL
PRE_STAGING
READY
SCHEDULED
RUNNING
SUSPENDED
POST_STAGING
CLEARED
SUBMISSION_ERROR
ABORTED
CANCELED
DONE
DONE_SUCCESS
DONE_FAILURE
UNKNOWN
Gatlet User Manual
initial state
Gatlet is preparing to submit the job.
Gatlet was unable to submit the job
Job has been submitted by Gatlet and has the state initial on the
middleware
Job is pre staging files
Job has been assigned to a computing element but not yet transferred to it
Job is scheduled to the local resource manager (e.g. PBS) of the cluster
Job is running on the cluster
Job is suspended
Job is done and post staging files
output sandbox was transferred to the user or removed due to the
timeout
Error while job submission
Job was aborted from the server
Job was canceled by user
Job is finished with unknown result
Job finished with success
Job finished with a failure
Job status is unknown
Page 16