1
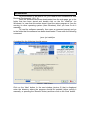
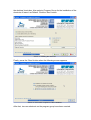
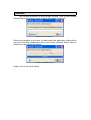
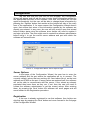
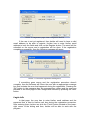
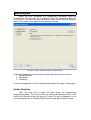
Plagiarism Detection
Client Manual
Table of contents
Table of contents...............................................................................................2
Introduction........................................................................................................3
Installation..........................................................................................................4
Uninstall.............................................................................................................7
User interface.....................................................................................................8
Elements of the User interface.......................................................................9
Configuration....................................................................................................11
Server Options.............................................................................................11
Registration..................................................................................................11
Login info......................................................................................................12
Main program...................................................................................................14
Folder Selection...........................................................................................14
Similarities....................................................................................................15
Manual Selection......................................................................................16
Automatic Selection..................................................................................17
Clustering results..........................................................................................17
Introduction
It is common knowledge among the higher education community that a
number of students are engaged in some forms of academic dishonesty.
Plagiarism in programming assignments is a conventional form of such
dishonesty and it constitutes a major menace to the educational procedure.
Therefore, detection of plagiarism in programming assignments is an
essential task for each instructor to carry out. Certainly, it is a time-consuming
and toilsome task to be performed manually, since the evaluation of n
programs requires the contrast of [n*(n-1)]/2 pairs of programs. Moreover, this
task’s difficulty is quite extensive owing to the fact that students tend to modify
the plagiarized code in order to avoid detection. Thus the automation of
plagiarism detection in programming assignments has motivated the research
community since mid-1970s.
The current software accepts as input a set of program sources and
extracts subsets (the clusters of plagiarism) such that each program within a
particular subset has been derived from the same original. Furthermore, a
cluster analysis is performed in order to provide information beneficial to the
plagiarism detection process.
Installation
For the software to be able to run, you need to have installed the Java
Runtime Environment 1.5.0_12.
Once the software has been downloaded from the web page, go to the
folder that has been stored and double click on the file ‘install.jar’ (on
Windows). In case that this action doesn’t load the setup program or you are
running on other operating system (than Windows), then you have to do it
manually.
To load the software manually, then open a command prompt and go
to the folder that the software has been downloaded. There enter the following
command:
java –jar install.jar
A window like the following should appear.
Picture 1. Initial screen
Click on the ‘Next’ button. In the next window (picture 2) that is displayed
enter the directory where the program should be installed (either writing it
manually, or pressing the ‘Browse’ button) and then click on the ‘Next’ button.
Picture 2. Selecting Installation path
Click the ‘OK’ button if a message that says ‘The target directory will be
created’ appears to the screen (Picture 3).
Picture 3. Message box informing the creation of the target directory.
The copy of the files on the local hard disk will start. When it finishes, click the
‘Next’ button for one more time. On the next dialog (picture 4), select the
‘Create shortcuts in the Start-Menu’ and/or the ‘Create additional shortcuts on
the desktop’ check box. Also select a Program Group for the installation of the
shortcuts or leave it as Default. Click the ‘Next’ button.
Picture 4. Installing the shortcuts.
Finally, press the ‘Done’ button when the following screen appears.
Picture 5. Successfull completion of the installation.
After that, two new shortcuts on the program group have been created.
Uninstall
The uninstall procedure is quite straight forward. Click on the uninstall
shortcut that is on the start menu. A dialog will appear (picture 6).
Picture 6. The Uninstaller.
Select the checkbox on the form. All data inside the application folder will be
removed (including configuration files). Click on the ‘Uninstall’ button. When it
finishes the next dialog will appear.
Picture 7. Uninstall finished.
Finally, click on the ‘Quit’ button.
User interface
The software is split in 2 parts. The first part is the configuration
interface and the second is the main form of the program where all of the work
is being done. Both parts are implemented in a Wizard style making it easier
for the user to be more effective and get better and faster results.
Picture 8. Configuration Wizard.
Picture 9. Main form of the application.
Elements of the User interface
All the forms in the application are split in 4 different sections. These are:
• The page information
• The software Main Panel
• The Navigation Buttons
• Other Buttons
Picture 10. Sections of the application.
Page Information Section
In that section the software informs us in which page we are. In both
the main application form and the configuration wizard there are 3 different
pages. In the main application form the 3 pages are: 1) Folder Selection, 2)
Similarities and 3) Clustering. In the Configuration Wizard, the 3 pages are: 1)
Server options, 2) Registration and 3) Login info.
Software Main panel
In that section, there is an interaction between the user and the
software. The user inputs some data in each of the pages of the software and
also gets the output of the results.
Navigation Buttons
By using these buttons, the user can navigate between the pages of
the application.
Other Buttons
In all the dialogs of the application there exist 2 buttons. These are the
'?' button which displays the help system, and the 'Close' or 'Cancel' button
which terminates the application or closes the dialog respectively. In the main
dialog of the application, there is also a 3rd button. This is the 'Options' button
which displays the Configuration Wizard.
Configuration
The first time that the user will run the program, the Configuration
Wizard will appear and will ask the user to enter some information needed for
the appropriate execution of the software. After that, the wizard will not load
again automatically, but the user will be able to change these information by
pressing the 'Options' button that resides at the bottom-left side of the main
form of the application. If, for some reason the Configuration Wizard doesn't
open, that means that some of the information needed by the software are
already pre-entered. In any case, the user will still need to open that wizard
before he/she starts using the software since he/she will need to register it
and sign up for this. The user might need to contact the software administrator
before using it, to get the correct server address and port with which the
software will communicate.
Picture 11. Configuration Wizard. Server Options Page.
Server Options
In that page of the Configuration Wizard, the user has to enter the
server address and the port where the application will try to connect. The
currently default values that are working are 'iiwm.teikav.edu.gr' as the host
address and 57922 as the port. If wrong values are entered here, the software
will not be able to communicate with the server. If the values are already
populated then leave them as they are. If not, then the user will need to
contact the software administrator to get the correct values. After entering
them, by pressing the 'Next' button the software will scroll pages and will
move forward to the Registration procedure.
Registration
If the user is already registered to use that software, then he/she can
skip that step by pressing the 'Next' button and move forward to the 3rd page
of the Configuration Wizard.
Picture 12. Registration page of the Configuration Wizard.
If the user is not yet registered, then he/she will need to have a valid
email address to be able to register. He/she has to enter his/her email
address to both the fields and click on the Register button. The email will be
submited on the server and a registration will be done. If the registration
completes successfully, then the following message will apear:
Picture 13. Successful registration message box.
If something goes wrong and the registration procedure doesn't
complete, then the software will inform the user with an appropriate message
box that includes the error that happened during the registration. Pressing the
'OK' button in the message box, the message box closes and the user can
proceed to the third page of the Configuration Wizard by pressing the 'Next'
button.
Login info
In that page, the user has to enter his/her email address and the
password that is sent to his/her mail box during the registration procedure.
After entering them, he/she can click the 'Finish' button located on the lowerright corner of the dialog and then, he/she will be able to work with the
program.
Picture 14. Login info page of the Configuration Wizard.
Note: If the user has just registered, the server will send a valid
password for him/her to the mail box. This should take a couple of minutes.
There is a possibility that due to Internet traffic, the email may take some few
hours to arrive to the mail box. In such case, the user can click the 'Finish'
button without entering the password. When the user recieves the email
he/she can open again the Configuration Wizard by pressing the 'Options'
button in the main form of the application. Then by simply pressing two times
the 'Next' button the Login info page will be displayed and then he/she can
enter the correct values.
Main program
When the user completes the configuration procedure using the
'Configuration Wizard' then he is presented with the following dialog box.
From now on, the user can work whenever he/she wants with the program,
without the need to enter again the configuration wizard.
Picture 15. Folder Selection page of the Main Dialog
In the main application form there are 3 pages that the user can work on:
1. Folder Selection
2. Similarities
3. Clustering
In the next paragraphs it will be explained thoroughly the usage of each page.
Folder Selection
Here, the user has to select the path where the programming
assignments reside. This can be done by clicking the 'Browse' button. After
clicking the 'Browse' button the dialog of Picture 16 will be displayed. In our
case we selected the 'C:\StudentProgs' directory and then clicked on Open.
Picture 16. 'Select Directory' dialog box.
By pressing the 'Next' button (picture 15), all the programming
assignment files that reside into that directory will be uploaded to the server.
Then the server will run the Plagiarism Detection procedure on these files and
will return us the results. All other programming assignment files and results
from previous jobs that are stored on the server, will be deleted (local copies
of programming assignments will remain intact).
If we had uploaded some files on the server from a previous job, then
we do not need to browse for the programs path in our local computer and we
only need to click the 'Load files from server' button. The server will
immediately send us the results.
Similarities
In that page of the program (picture 17), the similarity results between
the programming assignment files are displayed. The first 2 columns of the
table display the 2 files that are compared. The 3rd column (Similarity) displays
how much similar are the files. A value of 1 denotes that the files are exactly
the same and a value of 0 that they are not similar at all (totally different). In
the table will apear only pais of files that have similarity larger than 0.6. The
last column of the table contains check boxes where the user can click on
them.
The software has one more task to do. It has to do cluster analysis to detect
the clusters of plagiarism. This is very important because plagiarism in
programming students' assignments tends to occur in the form of clusters.
Picture 17. Similarities page of the Main Dialog.
Also, two programming assignment programs, which are not
associated as plagiarism transcripts before clustering, may be associated
after clustering as being member of the same cluster. This page of the
application can be used by the user so that he/she can help the software do
better detection of the plagiarism clusters. This can be done with 2 different
ways: 1) using the Manual Selection and 2) using the Automatic Selection of
the application. Further details for them are on the next two paragraphs.
Manual Selection
Here, the user after checking the files and their similarities he can
select which pairs of programming assignment files found to be similar
(plagiarized). This can be done by clicking on the appropriate check box in the
4th column of the table (near the pair). Of course to be able to judge if a pair of
files is similar, he/she has to open the files in an editor and see what changes
have been done to the files. After finding the similar pairs of files, then he can
click on the 'Next' button to proceed to the Clustering analysis.
Note that the process of checking if the pairs of files are similar is a
time consuming process. The user can interrupt at any time this process by
clicking the 'Save & Exit' button in that page. Later, when he loads the
program again, he/she can click the 'Load files from server' button located in
the 'Folder selection' page (picture 15) of the software and all the selections
he/she has done will reappear in that page.
Automatic Selection
In case the user doesn't want to find similar pairs of programming
assignment files manually (because it is time consuming), the program can do
it for him/her automatically. This can be done by selecting the 'Clustering over
a specified similarity value' check box. After doing that, an edit box with a
threshold value will get enabled. There, the user can enter a value from 0.6 to
1.0. By pressing the 'Next' button, the software will start doing clustering
analysis to all pairs of files that have similarity value equal or larger than the
thresshold value the user entered (in our case 0.75).
Picture 18. Automatic Selection of similar files.
Clustering results
This is the last page of the application. In that page the user can see
the plagiarism clusters that resulted from the clustering analysis done to the
selected files. It displays the plagiarism clusters that the software found and
the files contained in each cluster.
Picture 19. Clustering results.


![Executive Summary - My[Q]Box Homepage](http://vs1.manualzilla.com/store/data/005689294_1-efed73d1171b025bf94e9512efc2f094-150x150.png)