1
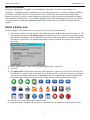
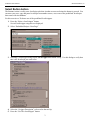
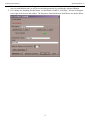
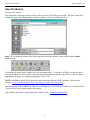
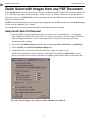
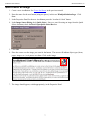
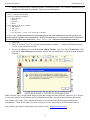
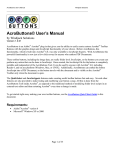
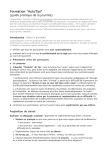
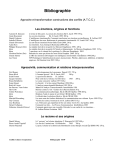
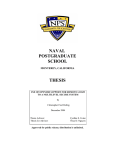
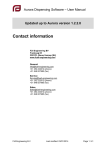
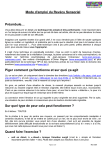
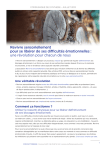
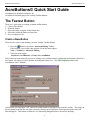
AcroButtons User’s Manual
WindJack Solutions, Inc.
AcroButtons© Quick Start Guide
AcroButtons by Windjack Solutions, Inc.
An Adobe® Acrobat® plug-in for creating Toolbar Buttons.
The Fastest Button
There are 5 quick steps to creating a custom toolbar button..
1. Create a New Button
2. Name the button.
3. Select the image to appear on the button face.
4. Select the Action the button will perform.
5. Save to button to a file.
Create a New Button
There are two ways to start making your own Acrobat Toolbar Button.
1. Press the
button on Acrobat’s Advanced Editing Toolbar.
If this toolbar is not visible, then activate it from the menu option
View–> Toolbars–> Advanced Editing.
2. Select the menu option
Advanced–>AcroButtons–>Create New AcroButton
Each of these Actions starts the process of creating a new toolbar button by displaying the Properties Panel for a
new button. All values are set to defaults, including the button icon. (See The Properties Panel in the
AcroButtons User’s Manual)
At this point you could press “Ok” and a new toolbar button would appear on Acrobat’s toolbar. The image on
the new button would be the icon that’s currently showing in the Properties Panel (question mark with a red
slash through it). This button wouldn’t be very interesting though because it doesn’t do anything.
1
AcroButtons User’s Manual
WindJack Solutions, Inc.
Name the Button
Change the default name, “Untitled0”, to something more descriptive. For this example change it to
“NextPage”. The button’s name is important for several different reasons. It’s used for creating and deleting
the button, as a default value for several operations, and as a root name for functions and variables in the
button’s JavaScript. As such, it cannot contain any white space or special characters and cannot be changed
after the button is saved to a file. If you want to change the name after the button has been save you will have
to copy the button (see Advance Properties Panel in the AcroButtons User’s Manual) and then delete the
original.
Select a button icon
For this example we’ll used the easiest way to get an icon, The Quick Select Method.
1. Click on the “Acrobat 7.0 Icon” button. This icon will work for both Acrobat 6.0 and Acrobat 7.0. The
first dialog in this process is the Image Source. This dialog gives you 3 options for selecting the image
to be placed on the button. The Quick Select option is by far the easiest option for getting a button fast.
The other two options give you a much greater range of image selection, but require you to do some
extra work.
2. Select “Quick Select”. Leave “Don’t Open QuickSelect Doc” unchecked.
3. Click Ok
4. The Quick Select PDF document will open. This document is a sheet of over 250 icons, all ready to be
used. Below is a small section of the Quick Select PDF document. As the cursor passes over an image
on the page, the outlines of the image are highlighted and text is added to the cursor that indicates the
type of image that will be selected on a click. For this exercise choose the Right Arrow image.
5. Place the cursor on the Right Arrow and click once.
6. Image Selection is complete. The right arrow icon should now be displayed on the Properties Panel.
2
AcroButtons User’s Manual
WindJack Solutions, Inc.
Select Button Action
The Buttons Action is really some JavaScript code that Acrobat executes each time the button is pressed. You
can enter your own, copy and paste JavaScript from another source, or use one of the predefined JavaScripts
that comes with AcroButtons.
For this exercise we’ll choose one of the predefined JavaScrippets.
1. Press the “Select a JavaScrippet” button.
Several JavaScrippet categories are displayed.
2. Select “Embedded Scripts->Next Page”
3. Selecting a JavaScrippet brings up the JavaScrippet Pre-viewer dialog. Use this dialog to verify that
this is the JavaScript you want to use.
4. Select the “Scrippet Description” to be used as the tool tip.
5. Press the “Use This JavaScrippet” button.
3
AcroButtons User’s Manual
WindJack Solutions, Inc.
6. The code for the selected JavaScrippet has now been written to the Properties Panel. Advanced users
can view and edit this code, as well as several other properties, by pressing the Advanced Button.
7. Let’s change one last thing for this button. Set the Button’s Label to “Next Page”, this text will appear
to the right of the Icon on the toolbar. The Properties Panel should now look like the one shown below.
4
AcroButtons User’s Manual
WindJack Solutions, Inc.
Save the Button
Click the “Ok” button.
This button has not been previously saved to a file so the Save File Dialog is activated. The name of the file is
defaulted to name of the Button, but it could be anything. Leave it as is and press “Save”.
Done!! The AcroButton with the Next Page image and JavaScript function is now on the Acrobat Add-on
Tools Toolbar.
The button will appear grayed in there aren’t any documents open. Try out the ToolTip by leaving the cursor
over top the button for a few seconds, and if the current document has multiple pages click on your new Next
Page button, the page view changes appropriately. Pretty Cool!
NOTE: AcroButtons Quick Select can also be used with images from any PDF document. Please see the
Tutorial “Using AcroButtons Quick Select with Images from any PDF Document.”
Have fun playing with AcroButtons! There are more things you can do with this tool than we can think of, but
if you have any special requests please let us know.
Any problems, questions or suggestions please send us email: [email protected].
5
AcroButtons User’s Manual
WindJack Solutions, Inc.
Quick Select with Images from any PDF Document
In the “Quick Start” tutorial we showed how to create AcroButtons using the Quick Select PDF document with
over 250 ready to go images for the button face. In this exercise, we’ll show you how to use the Quick Select
Preferences, how to use Quick Select to choose an image from any open PDF document, and how to modify the
button’s JavaScript action.
NOTE: For detailed information on selecting images appropriate for AcroButtons please see the Button Images
section of the AcroButtons User’s Manual.
The final product will be a logo button that displays information about the company.
Setup Quick Select Preferences:
1. Open the PDF document containing the image you want to use for the button face. Your company
logo would be an excellent choice, but since I can’t show you yours here, for this example I’ll use the
logo for Windjack Solutions. For the JavaScrippet action we’ll put up a dialog box providing
information on the company.
2. Activate the AcroButtons Preferences from the Acrobat menu Edit–>Preferences–>AcroButtons.
3. Check 32 pixels in the Quick Select Button Height box.
4. Change the mask color to match the background of the image you want to select.
Quick Select automatically scales all images to this height. It is possible to Quick Select an entire
page for your button icon, but large reductions can produce poorer quality images on the button face.
Note: The 32 pixel height is only valid for toolbar buttons in Acrobat 6.0.
6
AcroButtons User’s Manual
WindJack Solutions, Inc.
Quick select an Image
1. Create a new AcroButton. See Create the Button in the previous tutorial.
2. Enter the name for the new button (using no spaces), in this case WindjackSolutionsLogo. Click
Save.
3. In the Properties Panel for the new AcroButton press the “Acrobat 6.0 Icon” button.
4. In the Image Source Dialog check Quick Select. Since we won’t be using an image from the Quick
Select document, check the Don’t Open Quick Select Doc box.
5. Click OK.
6. Place the cursor over the image you want for the button. The cursor will indicate object type (forms,
pages, images, etc.) as it passes over them. Click on the image.
7. The image should appear, scaled appropriately, in the Properties Panel.
7
AcroButtons User’s Manual
WindJack Solutions, Inc.
Add and Modify the JavaScript Action
We’ll start off with one of the pre-defined JavaScrippets that comes with AcroButtons and modify it fit our
needs.
1. On the Properties panel, push on the “Select a JavaScrippet” button.
2. Select “JavaScript Examples->Display an Alert Box”.
3. Click “Use This JavaScippet” on the JavaScrippet Pre-Viewer dialog.
4. On the Properties panel, press the “Advanced>>>” button.
The advanced properties are now available at the bottom of the Properties Panel.
.
5. The Action Code for this JavaScrippet simply displays an alert box. It’s useful though because is
comes with documentation on how to use the alert box.
Press the “Edit” button for the “Action Code” to display an edit window for the code.
8
AcroButtons User’s Manual
WindJack Solutions, Inc.
6. Below, the full text of the “Display Alert Box” JavaScript is shown. We’ve already changed it to say
something useful about the company. Enter your own information.
// This Function Has 4 input parameters
// cMsg: Text Displayed in AlertBox
// nIcon: Icon to display in AlertBox
//
0: Error (default)
//
1: Warning
//
2: Question
//
3: Status
// nType: Buttons to display on AlertBox
//
0: OK (default)
//
1: OK, Cancel
//
2: Yes, No
//
3: Yes, No, Cancel // cTitle: Text on Title Bar of AlertBox
app.alert({cMsg: "Windjack Solutions has been developing plug-ins and Adobe solutions since 1997. Our specialty is the
rapid development of modules and small applications. We have developed and/or were team members in the development of
several successful products on the market today", nIcon: 3, nType: 0, cTitle: "Information about Windjack Solutions"});
7. Click “Ok”.
8. That’s it. Click on “Save” or close the Advanced options with the “<<<Advanced” button and click
on “Ok” to save the button to a file.
9. The new AcroButton is now on the Acrobat Add-on Toolbar. Notice the larger 32 pixel size. Click
on it and the Alert Dialog box will pop-up with the title and information we typed in about Windjack
Solutions.
Note: The Red Line is on the button image because this example was done with an Evaluation Copy. Be sure
to enter your paid for Serial Number in the AcroButtons About Box to produce buttons without the red line.
Now is that cool or what? This example shows how to use just one of the JavaScrippets included with
AcroButtons. Check out the others too- there are sure to be a few that will help your Document Process.
Any problems, questions or suggestions please send us email: [email protected].
9