1
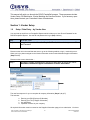
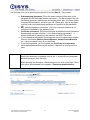
Digital Intelligence Systems PeopleSoft Vendor User Manual (Setup and Guide) Version 9.1 [Type text] This manual will guide you through the DISYS PeopleSoft process. Those processes include Vendor Setup, Re-Submission, Invoice Matching and Voucher Review. If you have any questions, please contact your Consultant Liaison for assistance. Section 1: Vendor Setup 1.0 Setup / Data Entry – by Vendor User You received an email from our PeopleSoft System which includes your User ID and Password for the DISYS PeopleSoft System. Use this ID and password to log in (Step 1 below). Step Step 1 DESCRIPTION Using the link provided from the PeopleSoft Email, click and enter your user ID and Password Please use the link in the email that was sent or go to the following weblink to login: vendor.disys.com. When you log in please navigate to the Vendor Information section under Maintain Supplier Information (Step 2 below). Please see the screen shots below…. Step 2 Navigate to Vendor Information by clicking on Main Menu in the top left corner. Main Menu->Maintain Supplier Information->Vendor Information. The next few steps are for you to complete all company information (Steps 3, 4, 6, 7). This includes: a. b. c. d. Entering your EIN (Employer ID Number) Entering your TIN (Taxpayer ID Number) Any addresses Important Contacts in your company All required information must be entered on the Supplier Information page prior to submission. You have Data contained on this sheet is proprietary to DISYS and shall not be distributed. 2 DISYS Vendor Manual Version 9.1 the option to save your entered information and return later to submit your profile. You will receive a prompt if any required field is blank. Step 3 Click on the tab. Scroll towards the bottom of page to the left: Click on the triangle next to “Additional ID Numbers” to expand that section. See Screen shot below… Next, go to the ID Numbers section. You will enter the type of company ID for your company by choosing the Type and entering the required information. To select the Type, click on the magnifying glass to choose the correct type of company identification (EIN/TIN/FEIN, for example). Then enter the ID Number in the "ID Number" field. Click the triangle next to Additional Reporting elements located a few sections down. Step 4 Click on the Data contained on this sheet is proprietary to DISYS and shall not be distributed. next to “Additional Reporting Elements” to expand that section 3 DISYS Vendor Manual Version 9.1 and enter other information (if applicable) as shown below. Data contained on this sheet is proprietary to DISYS and shall not be distributed. 4 DISYS Vendor Manual Version 9.1 Step 5 Keep saving as you go along by clicking on the ton is at the bottom left corner of the screen. button. The Save but- View and update Address (if needed) on the Address tab Step 6 Enter Contacts details under the Contacts tab Step 7 View and update required fields below: Description field Under the Details section Type Name Title Address—to choose the address, click on the magnifying glass and choose the option. Internet web address Email ID Phone information—only enter numbers in the telephone section, no dashes needed. Click Data contained on this sheet is proprietary to DISYS and shall not be distributed. 5 DISYS Vendor Manual Version 9.1 The final step is for you to upload your documents for review (Step 8). They include: a. Subcontracting Agreement- Fill out the vendor company information in first paragraph & initial each page (bottom right corner). On the last page of the subcontracting agreement, please enter the company name, print your name (under Company Representative), and enter your title. Please print, sign (on the signature line), scan, and upload as an attachment in PeopleSoft in the Attachment tab. b. W9—please complete the information. Print, sign, scan and upload as an attachment in PeopleSoft in the Attachment tab. c. Certificate of Insurance. DISYS must be listed as additional insured (Insurance Requirements are listed in Section 7 of the Subcontracting Agreement). A Sample Certificate of Insurance is also shown in the DISYS Forms link. d. If you indicated on the Supplier Profile page that you’re Company has a Supplier Diversity Certification (Minority Owned Business, Women Owned Business etc.), you must upload a copy of your certificate. e. If you are incorporated, you must upload your Certificate of Incorporation. f. Other applicable documents may be required. It depends on your type of business. Step 8 Click on the Attachments tab and attach/upload all of the required documents. After the first document is uploaded, click on the “+” to add a line to upload each additional document, then click save. Before attaching the documents, please make sure you click on the Disys Forms link to get to the acceptable form templates. Please see examples below. Data contained on this sheet is proprietary to DISYS and shall not be distributed. 6 DISYS Vendor Manual Version 9.1 Please make sure the correct Certificate of Insurance is uploaded. On the next page, you will see our insurance requirements. Data contained on this sheet is proprietary to DISYS and shall not be distributed. 7 DISYS Vendor Manual Version 9.1 Insurance Requirements INSURANCE SECTION REQUIRED COVERAGES. While Consultant performs services under this Agreement and for one year thereafter, Consultant shall carry, at its sole expense, insurance in the following types and minimum amounts, and such other insurance as the Company may require from time to time: (1) comprehensive general liability coverage in the minimum amount of $1,000,000 each occurrence and annual aggregate; (2) workers' compensation insurance, providing statutory benefits (must be so marked on insurance certificate); (3) employer's liability insurance in the minimum amounts of $100,000/$500,000/$100,000; (4) owned or non-owned automobile liability insurance in the minimum amount of $1,000,000 each accident; and (5) umbrella liability coverage in the minimum amount of $1,000,000 each occurrence and annual aggregate. RATED COMPANIES. All such insurance policies shall be carried with companies rated A or better by A.M. Best. ADDITIONAL INSUREDS. All such insurance policies, other than for worker's compensation, shall name the Company (and its Client, if requested) as additional insureds. CERTIFICATE HOLDER ADDRESS. Company’s corporate address must be used: 8270 Greensboro Drive, Suite 1000, McLean, VA 22102, Attn: Contracts Dept. NOTICE OF CANCELLATION. All such insurance policies shall contain a requirement that the Company be given written notice at least thirty (30) days prior to cancellation. EVIDENCE OF COVERAGE. Consultant shall provide to the Company certificates evidencing the coverage required under this Agreement (and, if requested, certified copies of the policies) at the time of execution of this Agreement, and annually upon renewal of such coverage. COMPANY COVERAGE. SHOULD CONSULTANT BE UNABLE OR UNWILLING TO MEET ALL OF THE INSURANCE REQUIREMENTS DETAILED ABOVE, AN AMOUNT EQUAL TO TWO PERCENT (2%) OF ALL FEES INVOICED BY CONSULTANT TO COMPANY SHALL BE CHARGED TO OFFSET THE COST OF COVERING CONSULTANT’S INSURANCE REQUIREMENTS. SUCH FEE SHALL BE DEDUCTED FROM ALL CONSULTANT INVOICES, EXCLUDING PRE-APPROVED AND PROPERLY DOCUMENTED EXPENSES. Data contained on this sheet is proprietary to DISYS and shall not be distributed. 8 DISYS Vendor Manual Version 9.1 Once you have uploaded the required documents, return to the Identifying Information Tab and change your Vendor Status to “submitted” and click save at the bottom of the page. (Step 9). This step will allow you to submit your profile to our Contracts Department for approval. After you submit your profile, DISYS will review your submission. If you have any questions, please contact your Consultant Liaison for assistance. Step 9 When ready to submit, change the Vendor Status on the Identifying Information Tab to ‘Submitted’ and click Save at the bottom left corner of the page. Step 10 DISYS will be notified that the documents have been submitted by the Vendor and are ready for review. Data contained on this sheet is proprietary to DISYS and shall not be distributed. 9 DISYS Vendor Manual Version 9.1 Section 2: Resubmission / Data Entry 2.0 Re-Submission / Data Entry - Vendor User Step Step 1 DESCRIPTION Vendor will receive a notification as to what their vendor status is currently. Those include Approved, Provisional, or Rejected. If you are provisionally approved or rejected, you need to follow the steps in this section to make the proper corrections and resubmit for approval. Step 2 Using the link provided from the PeopleSoft Email, click and enter your user ID and Password Step 3 Step 4 Click on the tab and then click on the next to “Comments” to expand that section and see what steps you need to complete before re-submitting your profile for approval. You will go back to the Attachments tab to upload the necessary documents that missed. When you ready to submit after the necessary changes have been made, change the Vendor Status on the Identifying Information Tab to ‘Submitted’ and click Save at the bottom left corner of the page. Data contained on this sheet is proprietary to DISYS and shall not be distributed. 10 DISYS Vendor Manual Version 9.1 Section 3: Vouchers 3.0 Review Vouchers At the end of each month, your 1099 consultant will log into PeopleSoft and enter his/her time for the hours worked the month prior. The 1099 consultant will also send an approved timesheet to the Consultant Liaison. The Consultant Liaison will review and approve the time. Once the time is approved, DISYS will create invoice vouchers and the invoice will be paid by the net payment terms. Please make sure that your 1099 consultant submits their time by the 7th of each month. Vouchers invoices are created from the 1st-7th of each month. If the time is approved outside of that window, the vouchers will be created the following month. To review voucher information, please follow the steps below. Step Step 1 Step 2 DESCRIPTION Using the link provided from the PeopleSoft Email, click and enter your user ID and Password Navigate to Regular Entry page by using the below navigation Main Menu > Review Payment Information > Regular Entry. Step 3 Vendor user should be able to view Regular Entry page. Step 4 Step 5 Choose DISUS as your Business Unit and Click the Search button. Vendor user should be able to see all their Vouchers listed. Select the particular Voucher ID. Data contained on this sheet is proprietary to DISYS and shall not be distributed. 11 DISYS Vendor Manual Version 9.1 Step 6 Step 7 Vendor user should be able to review all the information listed under various tabs – Summary, Related Document, Invoice Information, Payments, Voucher Attributes and Error Summary. You have successfully reviewed Voucher details. Data contained on this sheet is proprietary to DISYS and shall not be distributed. 12 DISYS Vendor Manual Version 9.1