1
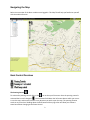
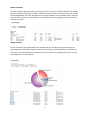
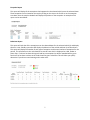
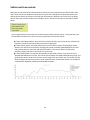
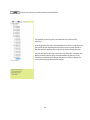
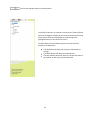
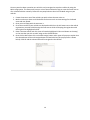
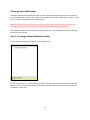
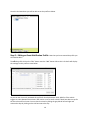
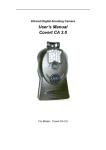
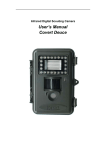
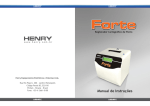
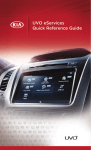
Welcome To Autotrak Alert + Help Menu
Dear Valued Customer welcome to Alert+. In this document you will find an easy to follow break down
of the Alert+ website and examples to help you along the way. Please enjoy and do not hesitate to
contact us on 08600 ALERT (25378) or e-mail: [email protected] for any further queries.
Index:
Navigating the Map
The Panning Control
Zooming-In / Out Controls
World Map Control
Alert+ Menu Tabs
Log Out
Help
Reports
Maps
Areas
Vehicle Settings
Vehicle and Driver Reports
Drawing Areas
Vehicle and area controls
Viewing Vehicle/s
Finding streets and calculating a routes
Map Viewing Settings
Setting Up Event Notifications
User Manual
1
Navigating the Map
Below is an overview of the Alert+ website once logged in. This help file will help you familiarise yourself
with the website features.
Basic Control Overview
The Panning Control
To activate the panning control click on the
icon at the top of the menu. Once the panning control is
activated the icon will change to
. Once activated hold down the left mouse button while your cursor
is over the map, and move the mouse in any direction you wish to pan the map. The panning function
works at any zoom level. Holding down the Shift button while trying to Pan will allow you to draw a
zoom box without changing to the Zoom Control.
2
Zooming-In / Out Controls
When wanting to zoom in on the map or on a vehicle's position click on the zoom icon
. The icon will
change to
when this control is active
once activated just hold down the left mouse button while the mouse cursor is over the map, and drag
the mouse to draw a box over the area you wish to zoom into. You can monitor what level you are on,
by looking at the map scale bar. An example of this bar is shown below. There are many other ways of
zooming in and out on the map. You can scroll up and down with the mouse wheel to zoom in and out,
you may use the Zoom bar shown below to zoom in and out and when the panning control is active you
can hold shift on your keyboard while holding down the left mouse button and dragging the mouse to
draw a zoom box.
This is the picture of the zoom bar found at the top left of the map page.
Bar can be used to zoom in and out on the map. Arrows above the bar
can be used for panning around the zoomed in area.
World Map Control
To return to the full view of the world while at any zoom level just click on this icon
bottom of the map controls.
3
found at the
Alert+ Menu
The Alert+ Menu items are simple and easy to use. The menu can be found above the map, an example
of the menu items can be found below.
Log Out
The Log Out menu item will log you out of the Alert+ website and take you back to the log in screen
were you can choose to log into another page.
Help
The Help tab will take you to this help file.
Reports
This menu item shows all the reports available to you. Move your mouse over this menu item and it will
drop down a menu to allow you choose a report. Clicking on the report you require will take you to a
calendar, where you can choose the period for which you would like to generate the report.
Maps
This menu item drops down a selection that allows you to use either the standard map set or a number
of Google map sets. You can not follow your vehicle when using the Google map sets due to bandwidth
limits imposed by Google. Google satellite maps show a more detailed picture, including buildings, trees,
parks and other interesting features.
Draw Areas
This menu item will drop down a list to create operational, no-go and guard areas. Click on the area you
would like to create for the selected vehicle and this will activate the control. Once activated you may
draw the area and then save it by double clicking the last position and clicking the Save button.
Vehicle Settings
This menu item will let you change the maximum allowed speed of the vehicle highlighted in blue. This
will set the vehicle’s maximum speed and if it travels over the set speed a Max Speeding exception will
be generated and displayed.
4
Vehicle Reports
Once you have chosen the report you wish to view the calendars will be displayed as seen below with
the normal calendar on the left and the exception report on the right. A quick select allows you to
choose an entire month, an entire week or a single day of information. Once you have selected the
dates you wish to view, click on the next button to show the desired report. Scroll down to view the
different available to you.
Tax Logbook (SARS Report)
Below is an example of the Tax Logbook once it has loaded. As you can see below, you can edit this
report to separate the business from the private trips. There are two different ways of separating this
info. Firstly you can set a time bracket that will contain either business or private or you may select
whether the trip was business or private on the right hand side of the trip. Once you have sorted all your
business from your private trips you will see a separate kilometer reading for both. Once you are happy
you may print, email or save the report onto your PC.
5
Movement Report
Once the report has been generated it will show you all the trips your vehicle has done for the selected
period. By selecting View Trip the report will take you back to the map to show you where your vehicle
drove geographically. The menu bar allows you to change the dates, view a printable report, email the
report or save the report to your hard drive. To return back to the main page just click on the 'back to
tracking' menu item.
Waypoint Report
Once the report has been generated for the selected vehicle it will display a pie chart showing the
percentages of the different waypoints entered by the vehicle over the selected dates. below the pie
chart your will find a detailed list of the trips. If the trip is clicked on it will display the trip on the map.
An example of this is shown below.
6
Exception Report
This report will display all the exceptions that happened on the selected vehicle over the selected dates.
These exceptions can be viewed on the map by clicking on the trip on the far left or on the exception
start date. Once the map has loaded it will display the position on the exception. An example of this
report can be seen below.
Behaviour Report
This report will take the all the exceptions over the selected dates for the selected vehicle(s) and display
them on a user-friendly report that will display the behavior of the vehicle and how it has been driven.
This report will display the number of each type of exception and the total number of exceptions for the
period. This information is then calculated as an overall score which is displayed as a Red, Amber or
Green face. If a driver has been driving well and has no exceptions he will be rewarded with a green
face but if he has been careless on the roads he will be given a Red face. This will allow you quickly
determine if your drivers need training and in what areas.
7
Drawing Areas
Below you will find all the different area that you can create for your vehicles. It is very important that
you create areas they will work as early warning systems and will help you manage your fleet of vehicles
without having to be in front of the PC. Please scroll down to learn about the feature of each area and
how they can help you.
Operational Areas
The operational area is used to help us respond quickly in the event that your vehicle is hijacked and
leaves the normal operational area. Once you have selected the vehicle for which you wish to create this
area, select the operational area menu item, and then start to draw on the map by clicking each position
defining the boundary of the area. Double-click the last position to complete the area. Once this has
been done you may name the area in the space provided at the top of the map, then click Save to save
the area.
NB* only one operational area is allowed per vehicle and if a new area is created it will automatically
replace the old one.
No-Go Zones
No-Go areas are the opposite of operational areas. They are areas that your vehicle should never enter.
The procedure is similar to defining an operational area. You may define your No-Go areas on the map
by clicking each position and on your last position double click to complete the area. Once this has been
done you may name the area in the space provided at the top of the map, then click Save to save the
area. You may create No-Go areas inside your operational areas and may create as many No-Go areas as
you wish.
8
Guard Areas
When creating your guard area you must first select the vehicle you wish to create the area for, then
click on the Guard area menu item. Once activated you may start to click on the map to draw points for
the perimeter of your area, double click the last position to complete the area. Once this has been done
you may name the area in the space provided at the top of the map, then click Save to save the area.
Once saved proceed to the area section to change the guarding times.
The settings for a guard area configure the time range that your vehicle should not leave the area. For
example if you define a guard area around your house, the time range might be before 05h00 or
after 23h00 as you typically never leave home before five in the morning or after eleven at night. If your
vehicle leaves your guard area before or after the designated time a sms will be sent to your cell phone
as well as to our control room were a controller will then call you to check up on the event.
Below is an example of the Guard area settings.
Waypoint Areas
Waypoint areas are used for the areas that drivers visit frequently. If you create a waypoint area around
that area it will display it in the reports as the waypoint you have named it. For example if the driver
frequently visits a Spar in your area you may create a waypoint around the spar and label it "Spar". If
you pull up any report it will display "Spar" on the report, indicating that they have visited this area.
Edit Area Settings
To edit an area's settings or delete areas, click on the Areas Tab, this will redirect you to the Area
Settings Page. On the Area Settings Page you can select the area you wish to edit and change the
settings for it, by selecting the Edit Settings menu or by clicking on the area shown on the map.
9
Vehicle and Area controls
Below are the overviews of the vehicle and area controls that can be found on the left hand side of the
map. These controls are divided into three sections by the three tabs above the white box where your
vehicles will be found. By clicking on each tab you will be shown a different set of controls, from being
able to watch your vehicle's every move to finding a street. The tabs are visually marked and are listed
below.
The tick boxes above can be found at the bottom of the vehicle and area control. Ticking the boxes you
activate different features for the current trip and position of the chosen vehicle.
"Show all checked vehicles" when this box is ticked it will allow you to view all your vehicles that
have been checked in the left tick box of the vehicle registration.
"Show vehicle popup" will show and hide the current vehicles’ popups. These popups display
details of the vehicle current position including spot speed, maximum speed between the current
and previous position, date, time and vehicle’s position. If you wish to view any of the other
positions’ popups just click on the arrow icon on the map.
"Show speed profile" To view the speed profile you will need to select a trip. Once the trip is
selected and loaded on the screen, just tick this box to display the speed profile above the map. This
speed profile will be shown for the current trip through to the start of the next. This profile will also
show exceptions during the trip such as harsh brake and harsh acceleration. Below is an example of
a speed profile displaying a Road speed exceeded exception.
10
Click to view vehicle/s, ten days of history and Exceptions.
The example on the left is the tree view where you will find your
vehicle(s).
By clicking on the plus sign it will drop down a list of all the trips driven by
that vehicle in that day along with the times. Once you have clicked on
the desired trip it will display the trip and the start and stop positions.
You will also notice a plus sign next to the trip, when this is clicked it will
display all the exceptions that have happened during that trip. If the
Exception is clicked on it will display the position in the trip where this
occurred by marking it with position popup.
11
Click to Find a Street or calculate a route.
Using the find a street will allow you to search for the streets.
When you enter the first street name into the space provided
click "find" and it will allow you to select the correct street in
the drop down menu below your entered street name. Once
this has been selected it will mark the street with the "A"
marker seen next to the drop down menu.
12
Click to view and edit Areas for selected vehicle.
On the left hand side is an example of the area tab. These tick boxes
allow you to toggle the display of your areas and routes on the map.
Please note that the areas displayed here will belong to the
highlighted vehicle in the vehicle list section.
The Edit, delete and save visibility options can be found at the
bottom of the display box.
The edit button will allow you to edit the selected area’s
settings.
The delete button will delete the selected area.
The save visibility button will allow you to save the status of
the visibility on the map of the area selected.
13
Once any area has been created on one vehicle it can be assigned to any other vehicles by using the
Multi-assign option. This feature will save you a lot of time and hassle trying to create the same area on
all or selected vehicles manually. Follow the easy steps below to learn how to Multi-assign on your
vehicles.
1. Create the area on one of the vehicles you wish to have the area active on.
2. Make sure that you have set all the details for that area such as times settings for the Guard
areas and max speeds.
3. Once you area happy with the area save it.
4. Go to the area where your vehicles are displayed and click on the tick boxes next to the vehicle
registrations you wish to Multi-assign the new area to while still keeping the registration with
the original area highlighted in blue.
5. Return the area section and click (area will now be highlighted in blue and shown on the map)
on the area that you wish to multi-assign to the clicked vehicles.
6. Once this has been done click on the Multi-assign button and a menu will pop up to explain that
the selected area will be multi-assigned onto the listed vehicles (This pop up menu is shown
below). Click Ok and the selected area will be assigned to the vehicles.
14
Setting up Event Notifications
The Event Notification Profile will allow you to create a profile and establish specific times to monitor
the movement of your vehicles. Once these restrictions are in place your vehicles will sms you an “event
alert” if it starts moving during the set profile times.
NB: Please note that these sms will only be sent to you and not the control room but if we are need
please give us a call on our 24hr recovery number( 08600 25378) and we will gladly help.
Please follow the below instructions you on how to create your “Event Notification Profile” and assign
an event to your vehicles.
Step 1 – Creating an Event Notification Profile:
Click on the Event Notification tab seen on the image below.
As you can see there is no “Event Notification Profile” created yet so you will need to click on the add
button to do so. Once you have clicked on add you will be asked for a Profile name. For this example I
created one called “Rob”.
15
Once this has been done you will be able to see the profile as below
Step 2 – Editing an Event Notification Profile:
Now that you have created the profile you
will need to edit it.
To edit the profile click on the “Edit” button next the “Add” button. When this is clicked it will display
the settings for this profile as seen below.
As you can see I have only activated this profile for Sunday between 7h30 -16h45 so if the vehicle
triggers an event between these times I will receive a sms or email or both if both have been set up for
the event that will be chosen. You can alter the times by sliding the gray blocks left and right and
activate the days by clicking on the tick box next to the day.
16
If you wish to invert the times so that the event notification messages are sent before 7h30 and after
16h45 this is possible by simply clicking the invert box next to the day. Once this has been ticked the
coloured area will change as seen below.
Once happy with the settings click on the save button found in the bottom right of the box and you will
be returned to the “Event Notification Profile” tab.
To assign this created profile to your vehicles you will need to click on the assign button found next to
the delete button. The section on assigning this profile is described below.
Step 3 - Assigning an Event Notification Profile to Vehicles
Please select the vehicles you wish to assign to your profile by clicking the tick box next to the vehicle
registration as seen above. Once this tick box has been ticked it will highlight the selected registration in
green.
17
Once the vehicles have been selected you will need to allocate an event type to these vehicles, currently
movement alert is the only event type available but keep a close eye on this as new events are currently
in the pipe line. The Movement Alert event will alert you and any selected user of movement within the
restrictions created on your profile. This is also known as the Curfew Alert.
The event name section allows you to name the event as many events can be added to one profile and
this will help you distinguish between different events. This has been named Curfew Alert for this
example. After the vehicles have been selected and the event chosen you must save this profile by
clicking on the Save button.
Step 4 – Assigning Users to an Event Notification
Now that you have created your profile, edited the settings, assigned it your vehicles and assigned an
event you will need to allocate which users will receive the notifications. To do this you will need to go
to the “Areas” tab found next to the “Event Notification Profile” tab. An example of this is below.
You will find your event name (Curfew Alert) under the event section as seen above. Click on the area as
I have above so it highlights it blue and then click on edit. Once you have done this it will display the
settings for your profile again but the Users tab (third tab) will now be selectable.
Click on the Users tab and you may select which users you wish to receive the event notifications as
seen below
18
Once you have done this click Save and you would have successfully set up your “Event Notification” for
your first event type (Movement Alert/Curfew Alert).
User Manual
After a Alert + unit has been fitted in a vehicle a user manual will be give to the owner of the vehicle.
In this user manual is a description of the unit and the process that will take place, installation and how
to log into the Alert+ website.
19