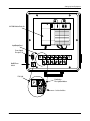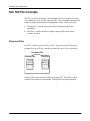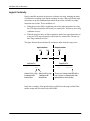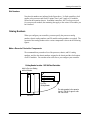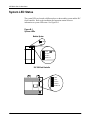
1
Preface ............................................................................................. ? Who Should Use this Manual ........................................................................... Purpose of this Manual .................................................................................... Common T echniques Used in this Manual ..................................................... ? ? ? Setting Up Your Equipment ........................................................... 1œ1 Hardware Requirements .................................................................................. Controller Styles ............................................................................................... Setting Up a Demo Unit ................................................................................... Setting Up a Field-Wired Controller ................................................................. Connecting the Controller to a Personal Computer ......................................... Installing the Software ...................................................................................... Running APS ................................................................................................... APS Display Format ......................................................................................... 1œ2 1œ3 1œ4 1œ6 1œ7 1œ9 1œ10 1œ11 Control Basics ................................................................................. 2œ1 SLC 500 File Concepts .................................................................................... How External I/O Devices Communicate with the Processor .......................... Addressing External I/O ................................................................................... Ladder Logic Concepts .................................................................................... 2œ2 2œ5 2œ6 2œ8 Creating a Processor File ............................................................... 3œ1 Configuration of SLC 500 Controllers .............................................................. Creating a Processor File................................................................................. 3œ2 3œ5 Online Operations, Quick Edit ....................................................... 4œ1 Restoring (Downloading) a Processor File ....................................................... Testing the Program ........................................................................................ Editing the Program with Quick Edit ................................................................. Monitoring Data Files ....................................................................................... 4œ2 4œ5 4œ7 4œ10 Creating and Printing Reports ....................................................... 5œ1 Creating Reports .............................................................................................. Printing Reports ............................................................................................... 5œ2 5œ4 Additional Ladder Program Exercises .......................................... ? Entering an Input and Output Branch .............................................................. Entering a Timer Instruction ............................................................................. ? .01 Troubleshooting .............................................................................. ? APS Error Messages ........................................................................................ System LED Status .......................................................................................... Processor Error Codes ..................................................................................... ? ? ? Glossary ........................................................................................... ? Preface Preface Read this preface to familiarize yourself with the rest of the manual. This preface covers the following topics: • • • who should use this manual the purpose of this manual conventions used in this manual P–1 APS Quick Start for New Users Preface Who Should Use this Manual The APS Quick Start for the New User is intended as an introduction of APS software to first-time users. The simple tasks and practice exercises in this manual do not include important user information for actual control applications. Purpose of this Manual This manual is an introductory document, designed to allow you to install APS and begin programming in the shortest time possible. It does this by focusing on a simple controller and a simple program. Basic concepts are presented, but only with enough detail to get you started and let you know that there is more to be learned. Read chapter 1 first. It will acquaint you with the rest of the manual. Contents of this Manual Chapter Title Purpose Preface Describes the purpose, background, and scope of this manual. Also specifies the audience for whom this manual is intended. 1 Setting up Your Equipment Lists hardware requirements and shows you how to set up a controller, connect your PC to the controller, and install APS software on your PC. 2 Control Basics Presents basic information you will need to know before you can begin programming with APS. 3 Creating a Processor File Shows you how to create a processor file, enter a ladder program and add a rung comment. 4 Online Operations, Quick Edit Shows you how to restore (download) your processor file to the controller, monitor and test the program, and use quick edit. 5 Creating and Printing Reports Guides you through creating and printing reports. These include program listing, cross reference, processor configuration, and data tables. Appendix A Additional Ladder Program Exercises Introduces you to branching of instructions and the timer instruction. Appendix B Troubleshooting Errors Provides a listing of error messages that you may encounter while working through the manual. Also, offers possible solutions for these errors. Glossary P–2 Provides a listing of terms used throughout this manual. Preface Related Documentation The table below is a partial list of publications that contain information about installation, programming, and operation of SLC 500 controllers. To obtain a copy, contact your local Rockwell Software office or distributor. For Read this Document A description on how to install and use your Modular SLC 500 programmable controller Installation & Operation Manual for Modular Hardware Style Programmable Controllers, Publication Number 17476.2 A description on how to install and use your Fixed SLC 500 programmable controller Installation & Operation Manual for Fixed Hardware Style Programmable Controllers, Publication Number 1747NI001 A procedural manual for technical personnel who use APS to develop control applications Advanced Programming Software (APS) User Manual A reference manual that contains status file data, instruction set, and troubleshooting information about APS Advanced Programming Software (APS) Reference Manual A training and quick reference guide to APS SLC 500 Software Programmer's Quick Reference Guide, Publication Number ABT1747TSG001available on PASSPORT at a list price of $50.00 A guide of common procedures used in APS SLC 500 Software Common Procedures Guide, Publication Number ABT1747TSJ50available on PASSPORT at a list price of $50.00 A complete listing of current AllenBradley documentation, including ordering instructions. Also indicates whether the documents are available on CDROM or in multilanguages. AllenBradley Publication Index, Publication Number SD499 A glossary of industrial automation terms and abbreviations AllenBradley Industrial Automation Glossary, Publication Number AG7.1 P–3 APS Quick Start for New Users Preface Common Techniques Used in this Manual The following conventions are used throughout this manual: • • • • • Bulleted lists such as this one provide information, not procedural steps. Numbered lists provide sequential steps or hierarchical information. Italic type is used for emphasis. Text in this font indicates words or phrases you should type. Key names match the names shown and appear in bold, capital letters within brackets (for example, [ENTER]). A function key icon matches the name of the function key you should press, such as CONFIG OFFLINE SAVE & . EXIT CONFIG F8 P–4 Setting Up Your Equipment 1 Setting Up Your Equipment This chapter briefly describes hardware requirements and SLC 500t controller styles, then shows you how to set up your equipment in preparation for the exercises in later chapters. Topics include: • • • • • • • • hardware requirements controller styles setting up a demo unit setting up a field-wired controller connecting the controller to a personal computer installing the software running APS APS display format 1–1 APS Quick Start for New Users Preface Hardware Requirements To perform the tasks provided in this manual we recommend the following hardware: • • • • • 1–2 An SLC 500 modular or fixed controller with external inputs and outputs. An SLC 500 demo unit would be ideal. The programs and examples used in this manual are based on using a modular controller demo unit (catalog number 1747-DEMO 3 or 1747-DEMO 4). A compatible personal computer (PC). Refer to the Advanced Programming Software User Manual for more information. An RS-232/DH-485 Interface Converter (catalog no. 1747-PIC). A communications cable for connecting the Interface Converter to the controller (catalog number. 1747-C10). This cable is supplied with the Interface Converter. A compatible printer, if you choose to use the “Print Reports” capability described in chapter 5. Setting Up Your Equipment Controller Styles The SLC 500 comes in two different styles: modular and fixed. These styles are illustrated below. The modular controller consists of a chassis, power supply, processor (CPU), and Input/Output (I/O) modules. The fixed controller consists of a power supply, processor (CPU), and a fixed number of I/O contained in a single unit. An expansion chassis can be added to the fixed controller. Power Supply Processor Input Modules Output Module SLC 500 Modular Controller slot 0 1 2 3 Output Terminals Power Supply Processor (CPU) Input Terminals SLC 500 Fixed Controller slot 0 Further information on hardware is found in the Installation and Operation Manuals, catalog number 1747-NI001 (fixed controllers) and publication number 1747-6.2 (modular controllers). 1–3 APS Quick Start for New Users Preface Setting Up a Demo Unit SLC 500 demo units are available with either a fixed controller or modular controller. This manual assumes you are using a modular controller demo unit for all the programming exercises. If you use a fixed controller demo unit, you will need to use different configuration information and I/O addresses in the exercises. This is explained later. The figure that follows shows an SLC 500 modular controller demo unit. It is completely wired, with 12 external inputs (6 push buttons and 6 selector switches) and 8 external outputs (pilot lights). In setting up your system, place the demo unit near your personal computer. Note the On/Off Power Switch and the Power Supply Receptacle on the demo. Make certain that the power switch is Off, then insert one end of the power cord into the power supply receptacle and the other end into an electrical socket. 1–4 Setting Up Your Equipment SLC 500 Modular Controller Input/Output Panel Power Supply Receptacle On/Off Power Switch Pilot Light 0 1 2 0 O 6 F F O O N F F 60 6 O N Combination Pilot Light/Pushbuttons Selector Switches 1–5 APS Quick Start for New Users Preface Setting Up a Field-Wired Controller The details of installing and wiring the controller and external input/output devices are beyond the scope of this manual. If you are using a field-wired fixed or modular controller, refer to the Installation and Operation Manuals, catalog number 1747-NI001 (fixed controllers) and publication number 1747-6.2 (modular controllers), for information on installation and wiring of the controller and external input/output devices. We recommend that your controller have at least two external input devices and two external output devices connected to complete the exercises in this manual. 1–6 Setting Up Your Equipment Connecting the Controller to a Personal Computer To connect the controller to a personal computer, you need a communications cable, catalog number 1747-C10, and an RS-232/DH-485 interface converter, catalog number 1747-PIC. Note This procedure does not apply to SLC 5/04 processors. For these processors, you need to connect a 1747-CP3 cable from channel 0 of the processor to the personal computer serial port, or you need to use a KT, KTX, KT2, or PCMK card. 1. Locate the communications channel of the controller. The figure below shows where it is located on modular and fixed controllers. Processor Module (Modular Controller) SLC 500 Fixed Controller Communications Channel Communications Channel 2. Insert one end of the 1747-C10 cable into the communications port of your controller. 3. Insert the other end of the 1747-C10 cable into the DH-485 connector of the 1747-PIC interface converter. The DH-485 connector is shown in the following illustration. 1–7 APS Quick Start for New Users Preface SLC 500 DH485 Connector Personal Computer Interface Converter RS232 Connector 4. ALLENBRADLEY Insert the RS-232 connector (see figure above) of the interface converter into the serial communication port of your computer. If your computer has a 9-pin serial port, use the 9–25 pin adapter provided with the interface converter. The figure below shows a modular controller connected to a personal computer. SLC Controller Personal Computer DH485 RS232 1747C10 Cable 1747PIC 1–8 Setting Up Your Equipment Installing the Software Before installing the software, make sure your personal computer meets the memory and RAM requirements needed to run APS. Refer to the Advanced Programming Software User Manual for more detailed information on personal computer requirements and APS software installation. Locating the Software’s Serial Number During the installation process you are asked for the serial number of your software. The serial number you enter is used to personalize the software. The serial number is not found on the disks. It can be found in several places though. These are: • • • Note the software registration card the registration change card the outside of the shipping carton If you enter the serial number incorrectly or enter the wrong serial number and accept the entry, you will be unable to correct this situation later. Therefore, verify your serial number carefully, before committing your work. Installing the Software To install the software, do the following: Note 1. Insert the diskette labeled Disk 1 into the appropriate disk drive (either drive A or drive B). For this example, we are using drive A. 2. Type: A:INSTALL, then press [ENTER]. 3. During the installation process, instructions appear on the screen to prompt you through the procedure. Follow the instructions and type in the information requested. You can install APS to run in a windows environment, however, that procedure is beyond the scope of this manual. See the Advanced Programming Software User Manual for this information. 1–9 APS Quick Start for New Users Preface Running APS To run APS, follow these steps; If necessary, change the drive specified to the drive where the software is installed (typically C). To do this, type: 1. C: and press [ENTER]. 2. If you are using the default directory, at the DOS prompt, type: CD \IPDS\ATTACH\SLC500 and press [ENTER]. If you specified a different directory path, enter that directory instead. Type: AP and press [ENTER]. The main APS menu appears. 3. Display Area SLC-500 ADVANCED PROGRAMMING SOFTWARE Rockwell Software Incorporated, Copyright 1989-1995 9323-PA2E All Rights Reserved This software is licensed to: Fri. Nov. 3, 1995 TERM Address: Your name Your company name 0000000000 Current Offline File: 09 0 11:03:09 am Current Device: 1747-PIC (DH-485) PROC Address: 1 Press a function key ONLINE ONLINE CONFIG OFFLINE PRG/DOC OFFLINE CONFIG WHO SYSTEM CONFIGR FILE OPTIONS PRINT REPORTS SYSTEM UTILS EXIT SYSTEM F1 F2 F3 F4 F5 F6 F7 F8 F9 F10 Message 1–10 Prompt Data Entry Status Main Functions Setting Up Your Equipment Exiting the System: You can exit APS software and return to DOS by accessing the APS menu, shown above, and pressing CONFIG OFFLINE EXIT SYSTEM . CONFIG F10 APS Display Format The APS screen is divided into three areas: • • • display area message, prompt, data entry, and status lines main functions The following figure indicates what appears in these areas. 1–11 APS Quick Start for New Users Preface • Display Area: The five APS displays appear here the APS menu, offline program directory (shown here), offline monitor file, online program directory, and online monitor file. Various option windows overlay these displays, de pending on the function you are accessing. Also, the status data file and other data files, force tables, and the memory map appear in this area. PROGRAM DIRECTORY FOR PROCESSOR: 05TEST FILE 0 1 2 3 NAME TYPE system reserved ladder ladder SIZE (words) 217 0 9 4 Press a key, enter file number or file name offline SLC 5/02 Series B PROCSSR FUNCTNS SAVE RETURN TO MENU CHANGE FILE CREATE REPORTS FILE OPTIONS MONITOR FILE DATA MONITOR MEMORY MAP F1 F2 F3 F4 F6 F7 F8 F9 F10 • Message, Prompt, Data Entry, and Status Lines Message: Error codes/descriptions and information concerning terminal or processor operation appears here. Prompt: Indicates action you should take. Data Entry: Information entered from the terminal keyboard appears on this line. Status: Status information concerning the processor and program file appears on this line. 1–12 File 05TEST • Main Functions: APS functions appear here. They are accessed by terminal keys F1 to F10. Pressing a main function key calls up subfunctions and sometimes option windows. Control Basics 2 Control Basics This chapter introduces you to basic concepts essential for understanding how the SLC 500 controller operates. It covers: • • • • SLC 500 file concepts how external I/O devices communicate with the processor addressing external I/O ladder logic concepts 2–1 APS Quick Start for New Users Preface SLC 500 File Concepts The CPU, or processor, provides control through the use of a program you create. The program you create is called a processor file. This file contains other files that break your program down into more manageable sections. These sections are: • • Program Files - provide storage and control of the main program and subroutines. Data Files - contains the status of inputs, outputs, the processor, timers, counters, and so on. Processor Files Each CPU can hold 1 processor file at a time. The processor file is made up of program files (up to 256 per controller) and data files (up to 256 per controller). Processor File Program Files Data Files Processor files are created in the offline mode using APS. These files are then restored, also referred to as downloaded, to the processor for online operation. 2–2 Control Basics Program Files Program files contain controller information, the main control program, and any subroutine programs. The first three program files are required for each processor file. These are: • File 0 - System Program This file stores the controller configuration and other system information. • File 1 This file is reserved for internal controller use. • File 2 - Main Ladder Program This file stores the main control program. • Files 3 255 - Subroutine Ladder Program These files are optional and used for subroutine programs. Most of your work with program files will be in file 2, the main program file. This file contains your ladder logic program which you create to control your application. 2–3 APS Quick Start for New Users Preface Data Files Data files contain the data associated with the program files. Each processor file can contain up to 256 data files. These files are organized by the type of data they contain. Each piece of data in each of these files has an address associated with it that identifies it for use in the program file. For example, an input point has an address that represents its location in the input data file. Likewise, a timer in the timer data file has an address associated with it that allows you to represent it in the program file. The first 9 data files (0 - 8) have default types. You designate the remainder of the files (9 - 255). The default types are: • File 0 Output Data This file stores the status of the output terminals for the controller. • File 1 Input Data This file stores the status of the input terminals for the controller. • File 2 Status Data This file stores controller operation information. • Files 3 7 These files are pre-defined as Bit, Timers, Counters, Control, and Integer data storage, respectively. • File 8 Float Data This file is used by SLC 5/03t OS301, OS302 processors and SLC 5/04t OS400, OS401 processors for Float data storage. • Files 9 255 These files are user-defined as Bit, Timer, Counters, Control, Integer, Float, String, and ASCII data storage. Most of your work with data files will be in files 0 and 1, the output and input files. Refer to appendix A for an example of the Timer data file. 2–4 Control Basics How External I/O Devices Communicate with the Processor The figures that follow apply to a modular controller demo unit having an input module in slot 1 and an output module in slot 3. See page 1–3 for a diagram of the slot location. To simplify the illustration, only pushbutton 0 and pilot light 0 of the external I/O are shown. Each of the external input circuits is represented by a status bit in the input data file of the processor file. Each of the external output circuits is represented by a status bit in the output data file of the processor file. During controller operation, the processor applies the input data to the program, solves the program based on the instruction you enter, and energizes and de-energizes external outputs. SLC 5/01 CPU INPUT INPUT INPUT Input Module in slot 1 Input Data File address I:1 F8 0 Pushbutton 0 is wired to terminal 0. Pressing pushbutton 0 will cause the corresponding status bit in the input data file to go from 0 to 1. data 0000 IN 0 IN 1 IN 2 IN 3 Status bit 0 corresponds to terminal 0 of the input module in slot 1. Closing an external input circuit changes the corresponding status bit from 0 to 1. Opening an external input circuit changes the corresponding status bit from 1 to 0. 2–5 APS Quick Start for New Users Preface OUTPUT Output Module in slot 3 Output Data File 0 OUT 0 OUT 1 Pilot light 0 is wired to terminal 0. The pilot light will be energized when the processor has completed evaluation of the program and transfers the ON/OFF status to the outputs. address O:3 data 0000 0000 OUT 2 OUT 3 OUT 4 4 OUT 5 OUT 6 Status bit 0 corresponds to terminal 0 of the output module in slot 3. OUT 7 When an output data file status bit is a 1, the corresponding external output circuit will be energized (ON). When an output data file status bit is a 0, the corresponding external output circuit is deenergized (OFF). Addressing External I/O As pointed out in the last section, external inputs and outputs are linked to the input data file and output data file of the processor file. Each status bit in these files has an address. You specify the appropriate address when you enter an instruction in your ladder program. For our purposes, input addresses have the form I:e/b where I= Input data file := Element or slot delimiter e= Slot number of the input module /= Bit or terminal delimiter b= Terminal number used with input device 2–6 Control Basics Similarly, output addresses have the form O:e/b where O= Output data file := Element or slot delimiter e= Slot number of the output module /= Bit or terminal delimiter b= Terminal number used with output device Examples: I:1/0= Input, slot 1, terminal 0 I:2/0= Input, slot 2, terminal 0 O:3/0= Output, slot 3, terminal 0 O:3/7= Output, slot 3, terminal 7 O:0/7= Output, slot 0, terminal 7 (fixed controllers only because of slot 0) I:0/4= Input, slot 0, terminal 4 (fixed controllers only because of slot 0) Eventually, you will be addressing other data files, such as Status, Bit, Timer, Counter, Control, Integer, String, ASCII, and Float. Addressing of these files is discussed in the APS programming manual. 2–7 APS Quick Start for New Users Preface APS Display of Instructions/Addresses APS displays I/O addresses as shown below. When you enter an XIC instruction (defined later) and the address I:1/0, APS will display the address with the instruction as follows: I:1 ] [ 0 Explanation: Input data file, slot 1 I:1 ] [ 0 Terminal 0 XIC instruction Ladder Logic Concepts As we mentioned earlier, the program files you create contain the program used for your controlling application. The programs are written in a programming language called Ladder Logic. This name is derived from its ladder-like appearance. A ladder logic program consists of a number of rungs, on which you place instructions. Instructions each have a data address associated with them and based on the status of these instructions the rung is solved. 2–8 Control Basics The figure below shows a simple 1-rung ladder program. The rung includes two input instructions and an output instruction. Note, in the example below each instruction has a name (Examine if Closed), a mnemonic (XIC), and an address (I:1/0). Input Instructions Output Instruction XIC XIO OTE I:1 ] [ 0 I:1 ]/[ O:3 ( ) 0 1 XIC = Examine if Closed XIO = Examine if Open OTE = Output Energize Address I:1/0 Address I:1/1 Address O:3/0 A simple rung, using bit instructions. True/False Status The data file bits that these instructions are addressed to will be either a logic 0 (OFF) or a logic 1 (ON). This determines whether the instruction is regarded as “true” or “false”: The status of the instruction is XIC Examine if Closed ] [ XIO Examine if Open ]/[ OTE Output Energize ( ) Logic 0 False True False Logic 1 True False True If the data file bit is 2–9 APS Quick Start for New Users Preface Logical Continuity During controller operation, the processor evaluates each rung, changing the status of instructions according to the logical continuity of rungs. More specifically, input instructions set up the conditions under which the processor will make an output instruction true or false. These conditions are: • • When the processor finds a continuous path of true input instructions in a rung, the OTE output instruction will become (or remain) true. We then say that “rung conditions are true”. When the processor does not find a continuous path of true input instructions in a rung, the OTE output instruction will become (or remain) false. We then say that “rung conditions are false”. The figure below indicates the data file conditions under which the rung is true: Input Instructions Output Instruction XIC XIO OTE I:1 ] [ 0 I:1 ]/[ O:3 ( ) 0 1 Input Data File address I:1 data 0001 Status bit I:1/1 is a logic Status bit I:1/0 is a logic 0, making the XIO 1, making the XIC instruction true. instruction true. Output Data File address O:3 data 0000 0001 The processor changes status bit O:3/0 to a logic 1, because a continuous path of true input instructions exist in the rung. In the above example, if the input data file was 0000, then the rung would be false and the output data file would read as 0000 0000. 2–10 Control Basics The Processor Operating Cycle The diagram below indicates the events that occur during the processor operating cycle. This sequence is repeated many times each second. Event Input Scan Description F8 0 Input Data File address data I:1 0001 1 The status of external input circuits is read. The input data file is updated with this information. activated Program Scan I:1 ] [ 0 1 Output Data File Output Scan The ladder program is executed. The input data file is evaluated, the ladder rung is solved, and the output data file is updated. O:3 ( ) 0 I:1 ]/[ 0 address data O:3 0000 0001 Illuminated ( ) Communications Housekeeping The output data file information is transferred to the external output circuit, thus energizing or deenergizing it. Communications with the programming terminal and other network devices takes place. Processor internal housekeeping takes place. 2–11 Creating a Processor File 3 Creating a Processor File In this chapter you create a processor file. The tasks you will perform: • • • • • • • • For modular controllers: Make a record of the processor module catalog number, the chassis catalog number(s), the I/O module catalog numbers, and the slot locations of I/O modules. For fixed controllers: Make a record of the controller catalog number (and I/O module catalog numbers and slot locations if you are using the 1746-A2 expansion chassis). Run APS software and initiate the creation of a processor file. Name the processor file GETSTART. Enter the controller configuration. Enter a 1-rung ladder program. Add a rung comment. Save the processor file to disk. 3–1 APS Quick Start for New Users Preface Configuration of SLC 500 Controllers The following paragraphs briefly describe SLC 500 controllers and indicate the location of catalog numbers on the devices. This information will help you when you create a processor file and enter the specific controller configuration that will run the file. To make the best use of this manual, you should have access to an SLC 500 Demonstration Unit, which includes completely wired external inputs and outputs. For the exercises in this manual, we arbitrarily assumed that you are using a Demo unit using a modular controller with the components listed on page 3–5. Controller Styles As previously mentioned, SLC 500 controllers are available in two styles-the fixed controller and the modular controller. Examples are shown in the figure below. SLC 500 Fixed Controller Processor & Power Supply SLC 500 Modular Controller Expansion Chassis 7Slot Chassis Processor Power Supply Slot 0 1 2 Slot 0 1 2 3 4 5 6 The fixed controller combines a power supply, processor (CPU), and a fixed number of I/O points in a single unit. You have the option of adding a 2-slot expansion chassis if you want to add I/O points. The modular controller consists of a power supply, 1–3 I/O chassis, a processor module which you insert in slot 0 of the first chassis, and various I/O modules which you insert in the remaining slots of the chassis. 3–2 Creating a Processor File Slot Numbers Note that slot numbers are indicated in the figure above. In fixed controllers, slot 0 applies to the processor and fixed I/O points; slots 1 and 2 apply to I/O modules located in the expansion chassis. In modular controllers, slot 0 is always reserved for your processor module; the remaining slots apply to the various I/O modules you have inserted. Catalog Numbers When you configure your controller, you must specify the processor catalog number, chassis catalog numbers, and I/O module catalog numbers as required. The location of the catalog number on the various components is shown in the following figures. Make a Record of Controller Components We recommend that you make a list of the processor, chassis, and I/O catalog numbers, and also the chassis numbers assigned to the chassis and the slot locations of all I/O modules. You can then refer to this list as you configure your controller. Catalog Number Location SLC 500 Fixed Controllers Label for Processor Catalog and Serial Number SLC 500 CAT 1747-L _ _ _ Processor Catalog Number The catalog number for the expansion chassis is 1746A2. It appears on the side of the chassis. Side View 3–3 APS Quick Start for New Users Preface Catalog Number Location - SLC 500 Modular Controllers Processor (CPU) Modules Label for Processor Catalog and Serial Number I/O Modules SLC 500 CAT 1747-L _ _ _ Catalog Number 1746_ _ _ Processor Catalog Number The catalog number and serial number for I/O modules also appears on the side of the module. Side View Label for Chassis Catalog and Serial Number SLC 500 CAT 1746-_ _ _ Chassis Chassis Catalog Number Side View 3–4 Creating a Processor File Arbitrary Controller Used in this Manual In the following procedures, we have arbitrarily assumed that the controller you are configuring in your processor file is a modular demo unit including the following components: • • • • • Chassis 1746-A4, 4-slot chassis Processor 1747-L524 in slot 0 Input module 1746-IA4 in slot 1 Input module 1746-IA8 in slot 2 Output module 1746-OA8 in slot 3 The ladder program shown on page 3–10 contains I/O addresses that are consistent with the configuration indicated above. If you are using some other controller configuration, keep in mind that these addresses may not be valid for your controller. Creating a Processor File A processor file is always created offline, in the terminal workspace. In creating the processor file, you will: • • • • Name the file and configure the controller. Enter a ladder program. Add a rung comment. Save the processor file to disk. If you are not already running APS, refer to “Running APS,” page 1–10. The following procedure begins at the APS menu display. Name the Processor File and Configure the Controller Complete the following steps: 1. Access the create processor file window. Press CONFIG CONFIG OFFLINE OFFLINE OFFLINE CREATE . CONFIG , then FILE CONFIG CONFIG F4 F6 3–5 APS Quick Start for New Users Preface The display shown below appears. PROCESSOR Bul. 1761 1747-L511 1747-L514 1747-L524 1747-L532 1747-L541 INPUTS OUTPUTS MicroLogix 1000 5/01 CPU - 1K USER 5/01 CPU - 4K USER 5/02 CPU - 4K USER 5/03 CPU -12K USER 5/04 CPU -12K USER MEMORY MEMORY MEMORY MEMORY MEMORY CREATE PROCESSOR FILE NAME: F2 Processor: Bul. 1761 MicroLogix 1000 ESC exits/Alt-U aborts changes Press a Function key or Enter File Name SELECT PROC CONFIGR I/O ADJUST FILTERS SAVE & EXIT F2 F5 F6 F8 2. Enter the name GETSTART. The prompt line asks you to enter a file name. Type GETSTART, then press [ENTER]. GETSTART appears in the Create Processor File window. 3. Enter the appropriate processor catalog number. The Create Processor File window lists the default processor, Bul. 1761. Our controller uses the 1747-L524 processor. Cursor down to highlight it. (If you are using a different processor, use the cursor keys to locate the appropriate processor in the upper option window.) Press 4. CONFIG OFFLINE SELECT . PROC CONFIG F2 If you have selected a fixed controller and are not using an expansion chassis, the controller configuration is complete at this point. Press CONFIG OFFLINE SAVE & EXIT and go to CONFIG F8 step 8. 3–6 Creating a Processor File 5. Configure the chassis of your controller. Press CONFIG OFFLINE CONFIGR I/O . The following option window appears. Note that chassis 1 is CONFIG F5 specified as 1746-A4, the default selection. This is correct for our controller. If you are using a different chassis, press CONFIG OFFLINE MODIFY RACKS , then F4 CONFIG OFFLINE RACK 1 . Select the CONFIG F1 appropriate chassis, using the cursor keys, and press [ENTER]. If you are using more than one chassis, follow the same procedure for chassis 2 and 3. I/O CONFIGURATION FOR:GETSTART RACK 1 RACK 2 RACK 3 = = = SLOT *0 *1 *2 *3 4 5 6 7 8 1746-A4 4-SLOT Backplane NOT INSTALLED NOT INSTALLED CATALOG # 1747-L524 CARD DESCRIPTION 5/02 CPU - 4K USER MEMORY ESC exits Press a function key READ CONFIG ONLINE CONFIG MODIFY RACKS MODIFY SLOT DELETE SLOT UNDEL SLOT EXIT SPIO CONFIG F1 F2 F4 F5 F6 F7 F8 F9 Note the asterisks next to slots 0 thru 3. This indicates that we have configured these slots and can now configure I/O modules. Slot 0 is already configured with our processor. 3–7 APS Quick Start for New Users Preface 6. Configure the I/O modules. The cursor is located on slot 1. To configure it, press CONFIG OFFLINE MODIFY SLOT . The CONFIG F5 following option window appears: I/O MODULE SELECTION FOR SLOT: 1 CATALOG CARD DESCRIPTION 1746-I*8 Any 8pt. Discrete Input Module 1746-I*16 Any 16pt. Discrete Input Module 1746-I*32 Any 32pt. Discrete Input Module 1746-O*8 Any 8pt. Discrete Output Module 1746-O*16 Any 16pt. Discrete Output Module 1746-O*32 Any 32pt. Discrete Output Module 1746-IA4 4 - Input 100/120 VAC 1746-IA8 8 - Input 100/120 VAC 1746-IA16 16 - Input 100/120 VAC 1746-IB8 8 - Input (SINK) 24 VDC 1746-IB16 16 - Input (SINK) 24 VDC 1746-IB32 32 - Input (SINK) 24 VDC ESC exits Press ENTER to select I/O Module Enter Module ID Code > SELECT MODULE F2 This window allows you to select a module for slot 1. Use the up/down cursor keys to place the cursor on the appropriate module catalog number, then press CONFIG OFFLINE SELECT MODULE . This returns the display to the I/O configuration window with the CONFIG F2 selected module indicated. Cursor down to the next open slot and repeat the configuration steps. 3–8 Creating a Processor File For our controller, the completed option window appears as follows: I/O CONFIGURATION FOR:GETSTART RACK 1 RACK 2 RACK 3 = = = SLOT *0 *1 *2 *3 4 5 6 7 8 1746-A4 4-SLOT Backplane NOT INSTALLED NOT INSTALLED CATALOG # 1747-L524 1746-IA4 1746-IA8 1746-OA8 CARD DESCRIPTION 5/02 CPU - 4K USER MEMORY 4-Input 100/120 VAC 8-Input 100/120 VAC 8-Output(TRIAC) 100/240 VAC ESC exits Press a function key READ CONFIG ONLINE CONFIG MODIFY RACKS MODIFY SLOT DELETE SLOT UNDEL SLOT EXIT SPIO CONFIG F1 F2 F4 F5 F6 F7 F8 F9 7. Create the archive file GETSTART. Press CONFIG CONFIG OFFLINE EXIT OFFLINE SAVE & EXIT , then . Archive file GETSTART is created on your CONFIG CONFIG F8 F8 computer hard disk and placed in the Offline Processor File window. 8. Press CONFIG OFFLINE SAVE TO FILE to save GETSTART as the new default file. CONFIG F9 3–9 APS Quick Start for New Users Preface Enter the Ladder Program The following rung consists of an XIC input instruction and an OTE output instruction. The addresses conform to the controller configuration indicated on page 3–5. If you have entered a different controller configuration, make certain that the addresses are consistent with your configuration. It is also important that you have an external input, such as a pushbutton, and an external output, such as a pilot light, at the terminal addresses used. You will be using these external devices in later chapters of this manual. O:3 ( ) 0 I:1 ] [ 0 The rung can be entered by completing the following steps: 1. Access the Program Directory of file GETSTART. Press CONFIG OFFLINE OFFLINE PRG/DOC . CONFIG F1 2. Monitor Program File 2. Press CONFIG OFFLINE MONITOR FILE . CONFIG F8 3. Insert a rung. Press CONFIG CONFIG OFFLINE EDIT OFFLINE INSERT , then RUNG . CONFIG CONFIG F10 4. Enter the Input instruction on the rung. Press CONFIG CONFIG CONFIG OFFLINE INSERT OFFLINE BIT OFFLINE XIC INSTR -] [, then , then CONFIG CONFIG CONFIG. Type the address I:1/0, F4 then press [ENTER]. 3–10 F4 F1 F1 Creating a Processor File 5. Enter the Output instruction on the rung. Press CONFIG CONFIG OFFLINE BIT OFFLINE OTE , then -( )- . Type the address O:3/0, then press CONFIG CONFIG F1 F3 [ENTER]. 6. Accept the rung. Press [ESC], then CONFIG OFFLINE ACCEPT RUNG , then [ESC]. CONFIG F10 Add a Rung Comment Complete the following steps to add a rung comment: 1. Configure the display so that rung comments will be visible. CONFIG CONFIG OFFLINE CONFIG OFFLINE SUPPRSS Press DISPLAY . Make sure [F7] reads RNG COM . If it does not, press CONFIG CONFIG F2 F7 CONFIG OFFLINE DISPLAY RNG COM to CONFIG toggle [F7], before moving to the next step. F7 Press CONFIG OFFLINE SAVE CONFIG , then [ESC]. The display is now configured so that rung CONFIG F10 comments are visible. 2. Add the rung comment. CONFIG CONFIG OFFLINE DOCUMNT OFFLINE RUNG Press , then COMMENT . Type the comment Input pushbutton CONFIG CONFIG F5 F1 turns on output pilot light. 3. Accept and save the comment. Press CONFIG CONFIG OFFLINE ACCEPT OFFLINE SAVE /EXIT , then DOCUMNT , then [ESC]. CONFIG CONFIG F8 F10 3–11 APS Quick Start for New Users Preface Your completed ladder program and rung comment should look like this: Input pushbutton turns on output pilot light O:3 ( ) 0 I:1 ] [ 0 END Press a function key (file 2, rung 0) offline no forces File GETSTART CONFIG DISPLAY EXIT DOCUMNT SEARCH GENERAL UTILITY DATA MONITOR FORCE EDIT F2 F3 F5 F6 F7 F8 F9 F10 Save the Processor File Complete the following steps to save the processor file to disk: 1. Return to the Program Directory. Press CONFIG OFFLINE EXIT CONFIG. F3 2. Save the file to disk. Press CONFIG CONFIG OFFLINE SAVE OFFLINE YES . Accept the default Save options by pressing CONFIG CONFIG. F2 3. Return to the APS menu. Press CONFIG OFFLINE RETURN TO MENU . CONFIG F3 3–12 F8 Online Operations, Quick Edit 4 Online Operations, Quick Edit In this chapter you will complete the following tasks: • • • • • • download (restore) processor file GETSTART monitor the ladder program in the run mode test the program edit the program using quick edit test the edited program monitor the input and output data files 4–1 APS Quick Start for New Users Preface Restoring (Downloading) a Processor File There are two tasks to complete in restoring processor file GETSTART to the processor: • • Check the Online Configuration parameters. Go online and download (restore) processor file GETSTART. The procedures begin at the APS menu display. Check the Online Configuration Parameters Complete these steps: 1. Access the Online Configuration window. Press CONFIG OFFLINE ONLINE CONFIG . From the menu, choose a 1747-PIC (DH-485) by cursoring CONFIG F2 to it and pressing CONFIG OFFLINE DRIVER CONFIG . This display appears: CONFIG F2 ONLINE CONFIGURATION F1 Port Current Device F3 Baud Rate F4 Terminal Address F5 PROC Address F6 MAX Node Address COM1 1747-PIC (DH-485) 19200 0 1 31 F9 Save to File ESC exits/Alt-U aborts changes Press a function key Note 4–2 PORT SELECT DEVICE BAUD RATE TERM ADDRESS PROC ADDRESS MAX ADDRESS SAVE TO FILE F1 F2 F3 F4 F5 F6 F9 This does not apply to SLC 5/04 processors. For these processors, you need to select a driver that corresponds to your specific hardware configuration. Refer to the Advanced Programming Software User Manual for more information. Online Operations, Quick Edit 2. Verify the parameters. The default values are shown for items F1 to F6. If you used the COM1 port of your computer and used a catalog 1747-PIC Interface Converter when connecting your computer to the controller, chances are that you will be able to establish processor-computer communications. If any of these default parameters are incorrect, change them with the function keys, then: Press CONFIG OFFLINE SAVE TO FILE , then [ESC]. This returns the display to the APS menu. CONFIG F9 Go Online and Restore (Download) Processor File GETSTART Complete these steps: 1. Access the Restore File window. Press CONFIG OFFLINE ONLINE . CONFIG F1 If the message MESSAGE TIMEOUTS - LOSS OF COMMUNICATIONS appears, one or more of the Online Configuration parameters is incorrect and/or there is an improper connection between the computer and the processor. Refer to appendix B. Once you establish communications with the processor, the program directory display will appear. Do one of these three things: a. If the default program directory appears, (the directory is named DEFAULT, and only the system file is listed) press b. CONFIG OFFLINE RESTORE . CONFIG F2 If a file exists in the processor, and no matching disk file is found on the computer hard disk, you will be asked “Read Processor Program?”. Press CONFIG CONFIG OFFLINE NO OFFLINE , then press RESTORE . CONFIG CONFIG F10 F2 c. If a file exists in the processor, and a matching disk file is found on the computer hard disk, press CONFIG CONFIG OFFLINE SAVE OFFLINE RESTORE RESTORE , then PROGRAM . CONFIG CONFIG F2 F4 4–3 APS Quick Start for New Users Preface After you have done a), b), or c), the following display appears: \IPDS\ARCH\SLC500 Name Size Date GETSTART 8586 01-03-92 Press a Function Key or Enter File Name REM PROG L524 PROC Addr 1 BEGIN RESTORE DEFINE DIR F1 F7 2. Select and accept file GETSTART. The cursor is located in the right-hand window, which lists all of the processor files saved on disk. Move the cursor to the file GETSTART if it is not already there. Press CONFIG BEGIN OFFLINE RESTORE . If the processor is in the program mode, the file is CONFIG F1 restored (downloaded). If the processor is in the run mode, you are asked “Change Processor Mode to Program?”. Press restored (downloaded). 4–4 CONFIG OFFLINE YES . File GETSTART is CONFIG F8 Online Operations, Quick Edit When the restoring (downloading) process is complete, you are asked to “Press Any Key to Continue”. After you press any key, the program directory for file GETSTART appears: PROGRAM DIRECTORY FOR PROCESSOR: GETSTART FILE 0 1 2 NAME TYPE system reserved ladder SIZE (words) 72 0 3 Press a key, enter file number or file name REM PROG SLC 5/02 Series C FRN 5 PROC Addr 1 PROCSSR FUNCTNS SAVE RESTORE RETURN TO MENU CHANGE LNK ADR WHO ACTIVE CREATE REPORTS FILE OPTIONS MONITOR FILE DATA MONITOR MEMORY MAP F1 F2 F3 F4 F5 F6 F7 F8 F9 F10 Testing the Program To test the ladder program you entered in chapter 3, we will now monitor program file 2, and change the processor mode from program to run. Then activate the external input having address I:1/0 and observe the effect on the external output at address O:3/0. Begin at the program directory display for processor file GETSTART. 1. Monitor program file 2 and enter the Run mode. Press CONFIG OFFLINE MONITOR FILE . The ladder program appears. CONFIG F8 Press CONFIG CONFIG CONFIG OFFLINE OFFLINE RUN OFFLINE YES CHANGE , then MODE , then MODE CONFIG CONFIG CONFIG. (Note that the status line F1 F3 F8 now indicates REM RUN instead of program.) If you get a fault code on the status line, refer to appendix B to clear the fault. 2. Test the program. 4–5 APS Quick Start for New Users Preface The following diagram shows the rung you entered if you are using the modular controller demo unit discussed on page 3–5. If you are using some other controller configuration, make certain that your external input device and output device are wired to the controller input and output that you addressed in your ladder program. 1 F8 0 0 Address I:1/0 corresponds to pushbutton 0 of the demo unit Address O:3/0 corresponds to pilot light 0 of the demo unit O:3 ( ) 0 I:1 ] [ 0 END To test the program, press pushbutton 0. Pilot light 0 should go on. The display should show both the XIC and OTE instructions highlighted to indicate that they are true. Processor operation: When you pressed pushbutton 0, the input instruction went from false to true. This resulted in a path of true input instructions in the rung, causing the output instruction to go from false to true. Now release the pushbutton. Pilot light 0 should go off. Neither instruction in the rung should be highlighted. When you released pushbutton 0, the input instruction went from true to false; this broke the path of true input instructions, causing the output instruction to go from true to false. 4–6 Online Operations, Quick Edit Editing the Program with Quick Edit The quick edit feature of APS software allows you to move quickly from online monitoring to offline editing, then back to online monitoring. To give you experience at doing this, we will edit the program by adding an input instruction on the rung. The effect of the edit: Selector switch 6 must be on (closed) to allow pushbutton 0 to turn on pilot light 0. We will place an XIC instruction in series with (to the right of) the XIC instruction already entered. It will have address I:2/2, corresponding to selector switch 6 of the demo unit. See the figure below. Add this instruction I:1 ] [ 0 O:3 ( ) 0 I:2 ] [ 2 Complete the following six steps to edit and test the edited program. The starting point for this procedure is the online monitor file display, with the processor in the run mode: Input pushbutton turns on output pilot light O:3 ( ) 0 I:1 ] [ 0 END Press a function key (file 2, rung 0) REM RUN no forces PROC Addr 1 CHANGE MODE CONFIG DISPLAY EXIT DOCUMNT SEARCH GENERAL UTILITY DATA MONITOR FORCE F1 F2 F3 F5 F6 F7 F8 F9 1. EDIT F10 Go offline and edit the disk version of the file. Press CONFIG CONFIG OFFLINE OFFLINE OFFLINE DISK EDIT , then . Note that the status line of the display now CONFIG CONFIG F10 F3 indicates that you are offline, at file GETSTART. 4–7 APS Quick Start for New Users Preface 2. Select Modify Rung and position the cursor. Press CONFIG OFFLINE MODIFY . RUNG CONFIG F5 3. We want to append an instruction to the XIC instruction, so use the cursor keys to position the cursor on the existing XIC instruction. 4. Enter an XIC instruction, address I:2/2. Press CONFIG CONFIG CONFIG OFFLINE BIT OFFLINE XIC OFFLINE APPEND , then , then -] [. INSTR CONFIG CONFIG CONFIG F3 F1 F1 Type the address “I:2/2”, then press [ENTER], then [ESC]. 5. Accept the rung. Press CONFIG OFFLINE ACCEPT . RUNG CONFIG F10 6. Save the edit and go back online. Press CONFIG CONFIG OFFLINE YES OFFLINE SAVE/GO . Accept the default Save options by pressing ONLINE CONFIG. CONFIG F1 F8 Before the software restores the program it asks “Change Processor Mode to Program?”. Press CONFIG OFFLINE YES CONFIG. When the program is successfully restored, the F8 CONFIG OFFLINE YES software asks “Change Processor Mode to Run?”. Press CONFIG. F8 You are now back online with the edited program, in the run mode. 7. 4–8 Test the edited program. Online Operations, Quick Edit The following diagram shows the rung you have modified if you are using the modular controller demo unit discussed on page 3–5. If you are using some other controller configuration, make certain that your external input devices and output device are wired to the controller inputs and output that you addressed in your ladder program. 1 F8 O 6 F F 0 Address I:1/0 corresponds to pushbutton 0 of the demo unit I:1 ] [ 0 O N Address I:2/2 corresponds to selector switch 6 of the demo unit 0 Address O:3/0 corresponds to pilot light 0 of the demo unit O:3 ( ) 0 I:2 ] [ 2 END To test the program, first turn selector switch 6 to the on position. Note that the corresponding input instruction in the rung is highlighted, indicating that it is true. Now press pushbutton 0. Pilot light 0 should go on. The rung should show all instructions highlighted to indicate that they are true. Processor operation: When you pressed pushbutton 0, the corresponding input instruction went from false to true. This resulted in a path of true input instructions in the rung, causing the output instruction to go from false to true. Now turn selector switch 6 to the off position. Note that the corresponding input instruction in the rung is no longer highlighted, indicating that it is false. Press pushbutton 0. Note that the corresponding input instruction is highlighted, but the output instruction does not go from false to true. This is because a continuous path of true input instructions does not exist in the rung. 4–9 APS Quick Start for New Users Preface Monitoring Data Files In this procedure, you will monitor the input data file and the output data file. These files include a status bit for each of the configured I/O terminals of the controller. You will monitor data file changes as you operate pushbutton 0 and selector switch 6. To end the exercise, you will go offline to the APS menu. The starting point is the online monitor file display with the processor in the run mode: Input pushbutton turns on output pilot light I:1 ] [ 0 O:3 ( ) 0 I:2 ] [ 2 END Press a function key (file 2, rung 0) REM RUN no forces PROC Addr 1 CHANGE MODE CONFIG DISPLAY EXIT DOCUMNT SEARCH GENERAL UTILITY DATA MONITOR FORCE F1 F2 F3 F5 F6 F7 F8 F9 1. EDIT F10 Position the ladder cursor and access the input data file. Use the cursor key to position the cursor on the XIC instruction having address I:1/0, then press CONFIG OFFLINE DATA MONITOR . The input data file appears, with the cursor located CONFIG F8 on status bit I:1/0. This is shown below. address 15 I:1 0000 I:2 0000 0000 data Press a key or enter value I:1/0 = REM RUN no forces 4–10 0 address 15 binary data data 0 decimal addr PROC Addr 1 CHANGE RADIX SPECIFY ADDRESS FORCE MONITOR NEXT FILE PREV FIILE F1 F5 F6 F7 F8 Online Operations, Quick Edit 2. Monitor input data changes resulting from input device operation. Press pushbutton 0. Note that the status bit goes from 0 to 1, as the instruction goes from false to true. Now turn selector switch 6 to the on position. Note that status bit I:2/2 goes from 0 to 1, as the instruction goes from false to true. 3. Access the output data file. The output data file precedes the input data file in the data table. Press CONFIG OFFLINE PREV FILE . The output data file appears. Since we didn’t specify a particular CONFIG F8 bit address, the cursor is located on the status bit having the lowest address, O:3/0. This is also the status bit for pilot light 0 in our program. This is shown below. address O:3 15 data 0 0000 0000 Press a key or enter value O:3/0 = REM RUN no forces address 15 binary data data 0 decimal addr PROC Addr 1 CHANGE RADIX SPECIFY ADDRESS FORCE MONITOR NEXT FILE PREV FIILE F1 F5 F6 F7 F8 4. Monitor output data changes resulting from input device operation. Press pushbutton 0 with selector switch 6 in the on position. Note that status bit O:3/0 goes from 0 to 1, as the output instruction of our program goes from false to true. Continue to press pushbutton 0, as you turn selector switch 6 to the off position. Note that bit O:3/0 goes from 1 to 0. This is because there is no longer a path of true input instructions in the rung, causing the output instruction to go false. 4–11 APS Quick Start for New Users Preface 5. Return to the APS menu. Press [ESC]. This returns you to the online monitor file display. Press CONFIG OFFLINE EXIT CONFIG. This returns you to the online program directory display. F3 Press CONFIG OFFLINE RETURN TO MENU . This takes you offline, returning you to the APS menu CONFIG F3 display. 4–12 Creating and Printing Reports 5 Creating and Printing Reports This chapter shows you how to create and print reports. The following four hard copy reports can be created and printed: • • • • Program Listing - Can include a) the main program file and all subroutine files, b) a single file, c) a range of files, or d) a range of rungs. Cross Reference - Provides an alphabetical list of addresses and their rungs, in either address or symbol order. Processor Configuration - Details the configuration of the processor and associated hardware in the system. Data Tables - Details the contents of the offline or online data files. If you do not have a printer set up in your system, we suggest that you go through these procedures anyway, to familiarize yourself with report capabilities. 5–1 APS Quick Start for New Users Preface Creating Reports A report can be created at the program directory display, either offline or online. In the following procedure, reports are created offline. The starting point is the APS menu. Complete the following steps: 1. Access the documentation (reports) and options windows. CONFIG OFFLINE OFFLINE Press PRG/DOC . This accesses the program directory display. CONFIG F3 Press CONFIG OFFLINE CREATE REPORTS . The following windows appear in the display area: CONFIG F6 PROGRAM LISTING OPTIONS Starting File: Rung Ending File: Rung 2 2 Power Rail Address Comments Address Display Rung Comments Ladder Cross Reference Output Cross Reference YES YES SYMBOL YES ALL YES DOCUMENTATION Program Listing Cross Reference Processor Config Data Tables Save to File ESC exits ESC exits/Alt-U aborts changes Press a function key or press ENTER to perform operation offline 5–2 SLC 5/02 File GETSTART SELECT ALL TOGGLE REPORT RESET REPORTS REPORT OPTIONS GENERAL OPTIONS TITLE F2 F3 F4 F5 F6 F8 Creating and Printing Reports 2. Specify documentation. The “Documentation” window lists the four reports you can create. The cursor is located on the “Program Listing” report. Options for the Program Listing are shown in the window at the left. Function key F5 allows you to change items in the options window. Move the cursor to “Cross Reference”, then “Processor Config”, then “Data Tables”. Note that as you do this, the option window changes to match the report the cursor is located on. An explanation of the various options is beyond the scope of this manual. For our purposes, the default options are suitable. 3. Press CONFIG OFFLINE SELECT ALL . In doing this, you have selected all four reports. CONFIG F2 This is verified by the appearance of asterisks at the left of each report in the Documentation window. 4. Specify a title and create the reports. CONFIG OFFLINE TITLE Press CONFIG. Type GETPRINT in the window that appears. F8 Press [ENTER] to accept the title. Then press [ENTER] to perform the create reports operation. When the reports have been created, DOCUMENTATION COMPLETE appears in the display area, and PRESS A KEY TO CONTINUE appears on the prompt line. Press any key. The program directory appears. 5. Return to the APS menu. Press CONFIG OFFLINE RETURN TO MENU . You will be asked to “Save Cross Reference, Comment, and CONFIG F3 Symbol Files?” Since we have not changed the ladder program in any way, a Save is not required. Press CONFIG OFFLINE NO CONFIG. The APS menu appears. F10 5–3 APS Quick Start for New Users Preface Printing Reports Printing reports is done from the APS menu. Complete the following steps: 1. Access file GETSTART in the Report Directory. Press CONFIG OFFLINE PRINT REPORTS . The report directory appears. It lists the processor file names CONFIG F8 for which reports have been created: Use the up/down cursor key to move the cursor to GETSTART, then press [ENTER]. The display shows the reports you have created for file GETSTART: PRINT GETSTART Report Size Program Listing Cross Reference Data Table Processor Config Date 2660 2064 3657 1739 01-04-92 01-04-92 01-04-92 01-04-92 ESC exits Press a function key or press ENTER to perform operation SELECT ALL TOGGLE SELECT CLEAR ALL PRINTER CONFIG SELECT PROCESS PRINT FILES F2 F3 F4 F5 F6 F7 2. Configure the printer and prepare it for operation. Press CONFIG OFFLINE PRINTER CONFIG . Change configuration parameters if necessary, then press CONFIG F5 [ENTER]. Prepare the printer for operation. 5–4 Creating and Printing Reports 3. Select the reports to be printed and initiate printing. Press CONFIG OFFLINE SELECT ALL . Your choice is verified by the appearance of asterisks at the CONFIG F2 left of the four reports you have created. Press CONFIG OFFLINE PRINT FILES to perform the CONFIG F7 printing operation. If your printer is not ready for some reason, PRINTER NOT READY appears on the message line. The prompt line asks “Continue Printing?” You can correct the problem and press CONFIG OFFLINE NO CONFIG OFFLINE YES , or you can cancel printing by pressing CONFIG F8 . CONFIG F10 After the printing operation, you can return to the APS menu by pressing [ESC]. 5–5 Additional Ladder Program Exercises A Additional Ladder Program Exercises This appendix lets you apply what you have learned in the previous chapters. It covers: • • entering a program with I/O branches entering a program with a timer instruction A–1 APS Quick Start for New Users Preface Entering an Input and Output Branch The important feature of this program is the output and input branch. The input branch is based on what is called OR or parallel logic. This means that if either input #0 OR input #1 is true, then output #0 and #1 turn on. Exercise 1: Entering an Input and Output Branch We are assuming you have created a new file, configured it and you are now ready to begin entering an instruction. See chapter 3 for help with the above. Begin offline at the edit screen. 1. Enter the rung and XIC instruction. Press CONFIG CONFIG CONFIG CONFIG OFFLINE INSERT OFFLINE INSERT OFFLINE BIT OFFLINE XIC RUNG -] [, then INSTR , then , then CONFIG CONFIG CONFIG CONFIG. Type the F4 F4 F1 F1 address I:1/0 then press [ENTER], then [ESC]. I:1 ] [ 0 I:1 ] [ 1 2. Enter a branch and another XIC instruction. CONFIG OFFLINE BRANCH Cursor left once, so your cursor is on the XIC instruction. Press CONFIG, then CONFIG OFFLINE INSERT BRANCH , F2 CONFIG CONFIG OFFLINE BIT OFFLINE XIC , then -] [CONFIG CONFIG. F1 A–2 CONFIG OFFLINE INSERT INSTR , CONFIG then CONFIG then CONFIG F4 then CONFIG OFFLINE TARGET B , F1 F4 F1 Additional Ladder Program Exercises Type the address I:1/1 then press [ENTER]. O:3 ( ) I:1 ] [ 1 0 I:1 ] [ 1 3. Enter an OTE instruction. Cursor up, then cursor right so your cursor is at the far right power rail. Press CONFIG CONFIG OFFLINE BIT OFFLINE OTE , then -( )- . Type the address O:3/1 then press [ENTER], CONFIG CONFIG F1 F3 then [ESC]. 4. Enter a branch and another OTE instruction. Cursor left once so you are on the OTE instruction. Press CONFIG OFFLINE BRANCH CONFIG, then F1 CONFIG CONFIG CONFIG CONFIG OFFLINE INSERT OFFLINE TARGET OFFLINE INSERT OFFLINE BIT C BRANCH , then , then INSTR , then CONFIG CONFIG CONFIG CONFIG, then F4 F3 CONFIG OFFLINE OTE -( ). F4 F1 CONFIG Type the address O:3/2 then press [ENTER], then [ESC]. F3 5. Accept the rung. Press CONFIG OFFLINE ACCEPT RUNG , then [ESC]. CONFIG F10 O:3 ( ) 1 I:1 ] [ 0 O:3 ( ) 2 I:1 ] [ 1 END A–3 APS Quick Start for New Users Preface 6. Enter the rung comment. CONFIG CONFIG OFFLINE DOCUMNT OFFLINE RUNG , then COMMENT . Type the comment Either input CONFIG CONFIG Press F5 F1 pushbutton #0 or #1 turns on output pilot lights #1 and #2. 7. Accept and save the comment. CONFIG CONFIG OFFLINE ACCEPT OFFLINE SAVE /EXIT , then DOCUMNT , then [ESC]. CONFIG CONFIG Press F8 F10 Your completed ladder program and rung comment should look like this: Either input pushbutton #0 or #1 turns on output pilot lights #1 and #2 I:1 ] [ 0 O:3 ( ) 1 I:1 ] [ O:3 ( ) 2 1 END Press a function key (file 2, rung 0) offline no forces File GETSTART CONFIG DISPLAY EXIT MULTI POINT DOCUMNT SEARCH GENERAL UTILITY DATA MONITOR FORCE EDIT F2 F3 F4 F5 F6 F7 F8 F9 F10 Save the Processor File Complete the following steps to save the processor file to disk: 1. Return to the Program Directory. CONFIG OFFLINE EXIT Press CONFIG. F3 A–4 Additional Ladder Program Exercises 2. Save the file to disk. Press CONFIG CONFIG OFFLINE SAVE OFFLINE YES . Accept the default Save options by pressing CONFIG CONFIG. F2 3. F8 Return to the APS menu. Press CONFIG OFFLINE RETURN TO MENU . CONFIG F3 Test the Ladder Program Complete the following steps to test the processor file: 1. Go online with your processor and restore the new file. Refer to chapter 4 for help. 2. Monitor the file. Refer to chapter 4 for help. 3. Place the processor in the RUN mode. See chapter 4 for help. 4. Press pushbutton #0. Outputs #1 and #2 turn ON. 5. Release pushbutton #0. Outputs #1 and #2 turn OFF. 6. Press pushbutton #1. Outputs #1 and #2 turn ON. 7. Release pushbutton #1. Outputs #1 and #2 turn OFF. A–5 APS Quick Start for New Users Preface Entering a Timer Instruction In exercise 2, you enter a timer instruction with a time delay of 10 seconds. Two different types of timer status bits activate output pilot lights #0 and #1. The first type, called a “timer timing” status bit turns on output #0 for 10 seconds. The second type, called a “done” status bit, turns on output #1 after 10 seconds. Exercise 2: Entering a Timer Instruction We are assuming you have created a new file, configured it and you are now ready to begin entering an instruction. See chapter 3 for help with the above. Begin offline at the edit screen. 1. Enter a rung and an XIC instruction. Press CONFIG CONFIG CONFIG CONFIG OFFLINE APPEND OFFLINE INSERT OFFLINE BIT OFFLINE XIC RUNG , then INSTR , then , then -] [CONFIG CONFIG CONFIG CONFIG. Type the F3 F4 F1 F1 address I:1/0 then press [ENTER]. I:1 ] [ 0 END 2. Enter the timer instruction. Press CONFIG CONFIG OFFLINE TIMER OFFLINE TON COUNTER , then CONFIG CONFIG. F2 F1 Type the address T4:0 then press [ENTER]. This is the Timer Address. Type the timebase .01 then press [ENTER]. This is the timebase in seconds. Type 1000 then press [ENTER]. This is the Timer Preset Value in hundredths of a second. A–6 Additional Ladder Program Exercises Type 0 then press [ENTER]. This is the Timer Accumulated Value. TON TIMER ON DELAY Timer T4:0 Time Base 0.01 Preset 1000 Accum 0 I:1 ] [ 0 (EN) (DN) END 3. Accept the rung. Press [ESC], then CONFIG OFFLINE ACCEPT RUNG . CONFIG F10 4. Enter a second rung and an XIC instruction. Press CONFIG CONFIG CONFIG OFFLINE INSERT OFFLINE BIT OFFLINE XIC INSTR , then , then -] [CONFIG CONFIG CONFIG. Type the address F4 F1 F1 T4:0/TT then press [ENTER]. “TT” represents the timer timing bit. TON TIMER ON DELAY Timer T4:0 Time Base 0.01 Preset 1000 Accum 0 I:1 ] [ 0 (EN) (DN) O:3 ( ) 3 T4:0 ] [ TT END 5. Enter an OTE instruction. Press CONFIG CONFIG OFFLINE BIT OFFLINE OTE , then -( )- . Type the address O:3/3, then press CONFIG CONFIG F1 F3 [ENTER]. A–7 APS Quick Start for New Users Preface 6. Accept the rung. Press [ESC], then CONFIG OFFLINE ACCEPT RUNG . CONFIG F10 7. Enter a third rung and an XIC instruction. Press CONFIG CONFIG CONFIG OFFLINE INSERT OFFLINE BIT OFFLINE XIC INSTR , then , then -] [CONFIG CONFIG CONFIG. Type the address F4 F1 F1 T4:0/DN, then press [ENTER]. “DN” represents the timer done bit. 8. Enter an OTE instruction. Press CONFIG CONFIG OFFLINE BIT OFFLINE OTE , then -( )- . Type the address O:3/4, then press CONFIG CONFIG F1 F3 [ENTER]. 9. Accept the rung. CONFIG OFFLINE ACCEPT Press [ESC], then RUNG , then [ESC]. CONFIG F10 10. Exit the edit mode. Press [ESC]. A–8 Additional Ladder Program Exercises Your completed ladder program should look like this: TON TIMER ON DELAY Timer Time Base Preset Accum I:1 ] [ 0 T4:0 0.01 1000 0 (EN) (DN) T4:0 ] [ TT O:3 ( ) 3 T4:0 ] [ DN O:3 ( ) 4 END Press a function key (file 2, rung 0) offline no forces File GETSTART CONFIG DISPLAY EXIT MULTI POINT DOCUMNT SEARCH GENERAL UTILITY DATA MONITOR FORCE EDIT F2 F3 F4 F5 F6 F7 F8 F9 F10 Save the Processor File Complete the following steps to save the processor file to disk: 1. Return to the Program Directory. CONFIG OFFLINE EXIT Press CONFIG. F3 2. Save the file to disk. Press CONFIG CONFIG OFFLINE SAVE OFFLINE YES . Accept the default Save options by pressing CONFIG CONFIG. F2 F8 A–9 APS Quick Start for New Users Preface 3. Return to the APS menu. Press CONFIG OFFLINE RETURN TO MENU . CONFIG F3 Test Your Ladder Program Complete the following steps to test the timer instruction file: A–10 1. Go online with your processor and restore the new file. Refer to chapter 4 for help. 2. Monitor the file. Refer to chapter 4 for help. 3. Place the processor in the RUN mode. See chapter 4 for help. 4. Press pushbutton #0 for at least 10 seconds. During the first 10 seconds, output #3 turns ON and #4 stays OFF. 5. After 10 seconds, output #3 turns OFF and output #4 turns ON. 6. Release pushbutton #0; the timer resets and both outputs #3 and #4 turn OFF. Troubleshooting B Troubleshooting This appendix shows you how to identify and correct errors that you may encounter while working through this manual. They include: • • • APS error messages system LEDs status processor error codes B–1 APS Quick Start for New Users Preface APS Error Messages Table B.A details APS error messages. Refer to the Advanced Programming Software User Manual for a complete list of error messages. Table B.A APS Error Messages Error Message APS Timeout Loss of Communications B–2 Possible Causes Corrective Action Wrong baud rate Select different baud rate in F2 Online Config"; Processor default is 19200. Wrong processor node address Select different processor address in F2 Online Config"; Processor default is 1. Wrong device type Device type in F2 Online Config" should be 1747PIC. Incompatible or wrong computer Serial Port Select different COM port in F2 Online Config"; verify PC COM port works. Bad cable Check continuity in 1747C10 cable; contact local AllenBradley distributor for replacement. Bad 1747PIC Contact your local AllenBradley distributor for replacement. Incompatible 925 Pin Adaptor Consult PC manual for Serial Port type (DCE or DTE); 925 Pin Adaptor supplied with 1747PIC is for a DTE Serial port. If serial port is DCE, you may need a nullmodem adaptor. Not enough power to 1747PIC Check line power to SLC power supply; check position of power supply jumper for modular systems. Database Read Error Files and buffers are not set up correctly Use a word processor or DOS Edline to verify/change your CONFIG.SYS file to contain minimum values of Files = 40 and Buffers = 40. (Minimum values of 46 are required if running APS in a Windowst environment.) If the file is modified, reboot PC. Fatal Communication Hardware Error Incompatible or nonexistent Serial COM port on PC Select different COM port by pressing F2 Online Config"; verify COM port works. Illegal Data or Parameter Value Maximum node address of the processor exceeds 31 Reduce the maximum node address of the processor to 31 by pressing F5 WHO"; F5 Who Active"; F7 Max Address". Troubleshooting Table B.A APS Error Messages (continued) Error Message Possible Causes Corrective Action I/O Address Not Configured Processor/system configuration does not match entered addresses Verify correct address format (I:slot/terminal or O:slot/terminal); verify system configuration by pressing F3 Offline Prg/Doc"; F1 Procssr Functns"; F1 Change Procssr"; F5 Configr I/O". No Matching Disk File Found Processor program does not exist on hard disk To read the processor program (upload), press F8 Yes"; otherwise press F10 No" to continue with other online activities. No Memory Left or Not Enough Memory to Load Communication Driver PC does not have enough free RAM memory to continue Verify your PC has >250K of free RAM to execute APS. (>369K free RAM is required if you are running the INTERCHANGE software). Exit APS and type CHKDSK" at DOS prompt. The last line should read >250K bytes free" (or >369K). If not, disable TSR, drivers, menus, shells, etc. loaded in AUTOEXEC.BAT or CONFIG.SYS that may be running in background. Reboot PC. Incompatible Processor Type The processor configuration of the program you are restoring does not match your hardware Verify that processor configuration of your program matches your hardware by pressing F3 Offline Prg/Doc"; F1 Procssr Functns; F1 Change Procssr". B–3 APS Quick Start for New Users Preface System LED Status The system LEDs are located at different places on the modular system and the SLC fixed controller. Refer to the installation and operation manual for more information on system LED status. See Figure B.1. Figure B.1 System LEDs Modular System POWER PC RUN COMM CPU FAULT FORCED I/O BATTERY LOW SLC 500 Fixed Controller POWER PC RUN CPU FAULT FORCED I/O BATTERY LOW B–4 Troubleshooting Table B.B LED Status - Error Conditions Processor LED RUN (Color: red) CPU FAULT (Color: red) FORCED I/O (Color: red) BATTERY LOW (Color: red) COMM (Color: red) When It Is Indicates that On (steadily) The processor is in the Run mode. Off The processor is in a mode other than Run. Flashing (at power up) The processor has not been configured. Flashing (during operation) The processor detects a major error either in the processor, expansion chassis or memory. On (steadily) A fatal error is present (no communication). Off There are no errors. Flashing One or more input or output addresses have been forced to an On or Off state but the forces have not been enabled. On (steadily) The forces have been enabled. Off No forces are present or enabled. On (steadily) The battery voltage has fallen below a threshold level or the battery and the battery jumper are missing. Off The battery is functional, or the battery jumper is present. On (steadily) The SLC 5/02 is receiving data. Off The SLC 5/02 is not receiving data. B–5 APS Quick Start for New Users Preface Processor Error Codes Table B.C details some of the processor error codes. Refer to the Instruction Set Reference Manual for a complete list of error codes and troubleshooting information. Table B.C Processor Error Codes Error Code Cause Corrective Action 0001 RAM program is corrupt due to noise, lightning, improper grounding or loss of capacitor or bat tery backup. Check wiring, layout, grounding. If using a 4K CPU, verify that a battery is installed to retain RAM memory when power is removed. See CPU FAULTFlashing under system LED status. Restore the program using APS or an HHT. 0012 RAM program is corrupt or RAM itself is bad due to noise, lightning, im proper grounding, or loss of capacitor or bat tery backup. Check wiring, layout, grounding. If using a 4K CPU, verify that a battery is installed to retain RAM memory when power is removed. See CPU FAULTFlashing under system LED status. Restore the program using APS or an HHT. XX50, XX51, XX52 XX53, XX54, XX55 (xx = slot #) I/O module configura tion/conflict or runtime problem. Verify that processor configuration matches your hardware by pressing F3 Offline Prg/Doc"; F1 Procssr Functns"; F1 Change Procssr"; F5 Configr I/O"; See CPU FAULTFlashing under the system LED status. Chassis configuration error. Verify that chassis configuration in your program matches your hardware by pressing F3 Offline Prg/Doc"; F1 Procssr Functns"; F1 Change Procssr"; F5 Configr I/O". If multiple chassis system, verify proper installation of chassis in terconnect cable. See CPU FAULT Flashing under system LED status. XX56 (xx = slot #) B–6 Glossary Glossary The following terms are used throughout this manual. Refer to the Allen-Bradley Industrial Automation Glossary, publication number AG-7.1, for a complete guide to Allen-Bradley technical terms. address: A character string that uniquely identifies a memory location. For example, I:1/0 is the memory address for the data located in the Input file location 1/0. APS (Advanced Programming Software): Software used to monitor and develop SLC 500 ladder logic programs. bit: Binary digit. The smallest unit of information in the binary numbering system. Represented by the digits 0 and 1. The smallest unit of memory. branch: A parallel logic path within a ladder logic rung. chassis: A hardware assembly that houses devices such as I/O modules, adapter modules, processor modules, and power supplies. comment: Text included within a program to explain what the program is doing. Comments do not affect the operation of the program in any way. communication scan: A part of the SLC CPUs operating cycle in which communication takes place with other devices, such as APS on a personal computer. controller: A unit, such as a programmable controller or relay panel, that controls machine or process elements. CPU (central processing unit): The decision-making and data storage section of a programmable controller. cross reference: A report listing addresses, instructions, and their rung numbers where used. data file: An area within a processor file that contains the status of inputs, outputs, the processor, timers, counters, and so on. data table report: A report documenting the contents of the data files. DOS: The operating system used to operate a personal computer. edit: To create or modify a ladder program. expansion chassis: A 2-slot chassis used only with fixed controllers. G–1 APS Quick Start for New Users Preface false: The status of an instruction that does not provide a continuous logical path on a ladder rung. file: A collection of information organized into one group. fixed controller: A controller with a power supply, CPU, and I/O integrated into a single package. function keys: Keys on a personal computer keyboard labeled F1, F2, F3, and so on. The operation of each of these keys is defined by software and a key may have a different function for each menu display. hard disk: A disk storage device for storing relatively large amounts of data. hardware: Mechanical, electrical, and electronic components and assemblies. I/O (Inputs and Outputs): Consists of input and output devices that provide and/or receive data from the programmable controller. input device: A digital or analog device, such as a limit switch, push-button switch, pressure sensor, or temperature sensor, that supplies input data through an input circuit to a programmable controller. input scan: A part of the SLCs operating cycle. Status of the input modules are loaded into the Input data file. instruction: A mnemonic and data address defining an operation to be performed by the processor. A rung in a program consists of a set of input and output instructions. The input instructions are evaluated by the controller as being true or false. In turn, the controller sets the output instructions to true or false. interface converter: An Allen-Bradley device, Catalog Number 1747-PIC, used to establish communication between the personal computer and a SLC 500 programmable controller. ladder logic: A program written in a format resembling a ladder-like diagram. The program is used by a programmable controller to control devices. mnemonic: A simple and easy to remember term that is used to represent a complex or lengthy set of information. modular controller: SLC 500 system consisting of a power supply, chassis, CPU, and input and output modules. module: An interchangeable plug-in device that may inserted into a chassis. network: A series of stations (nodes) connected by some type of communication medium. A network may be made up of a single link or multiple links. G–2 Glossary off line: Describes devices not under direct communication. For example, when programming the software. online: Describes devices under direct communication. For example, when the software is monitoring the program file in a controller. operating cycle: The sequential order of operations performed by a programmable controller when in the run mode. OTE (OuTput Energize): An instruction that energizes when a rung is true and de-energizes when a rung is false. output device: A device, such as a pilot light or a motor starter coil, that receives data from the programmable controller. output scan: A part of the SLCs operating cycle. During this scan the output data file information is transferred to the output modules. processor: A Central Processing Unit. (See CPU.) processor configuration: A report detailing the configuration of the processor. processor file: The set of program and data files used by the SLC to control output devices. Only one processor file may be stored in the SLC at a time. processor overhead: The part of the operating cycle used for housekeeping and setup purposes. program file: The area within a processor file that contains the ladder logic program. program listing: A report containing a range of program files or a range of rungs. program mode: When the SLC is not executing the processor file and all outputs are de-energized. program scan: A part of the SLCs operating cycle. During the scan the ladder program is executed and the Output data file is updated based on the program and the Input data file. rack: See chassis. read: To acquire data from a storage place. For example, the processor READs information from the input data file to solve the ladder program. report: A printable document containing information about a processor file. For example, a ladder listing, a cross reference, the data tables, and the processor configuration. G–3 APS Quick Start for New Users Preface restore: To download (transfer) a program from a personal computer to a SLC. run mode: When the processor file in the SLC is being executed, inputs are read, the program is scanned, and outputs are energized and de-energized. rung: Ladder logic is comprised of a set of rungs. A rung contains input and output instructions. During Run mode, the inputs on a rung are evaluated to be true or false. If a path of true logic exists, the outputs are made true. If all paths are false, the outputs are made false. save: To upload (transfer) a program stored in memory from a SLC to a personal computer; OR to save a program to a computer hard disk. SLC (Small Logic Controller): A controller that comes in 1 of 2 styles: fixed or modular. slot: The area in a chassis that a module plugs into. software: Executable programming package used to develop SLC ladder diagrams. status: The condition of a circuit or system, represented as logic 0 (OFF) or 1 (ON). terminal: A point on an I/O module that external I/O devices, such as a pushbutton or pilot light, are wired to. true: The status of an instruction that provides a continuous logical path on a ladder rung. write: To copy data to a storage device. For example, the processor WRITEs the information from the output data file to the output modules. eXamine If Closed (XIC): An input instruction that is logically true when the status of the bit located at its address is a 1; false when it’s a 0. eXamine If Open (XIO): An input instruction that is logically true when the status of the bit located at its address is a 0; false when it’s a 1. G–4 Index A additional ladder program exercises entering a timer instruction, A-6 entering an input and output branch, A-2 addressing external I/O, 2-6 APS display format, 1-11 instructions/addresses, 2-8 error messages, B-2 installing, 1-9 running, 1-10 C catalog numbers, 3-3 communicating with the processor, 2-5 configuring controllers, 3-2 catalog numbers, 3-3 styles, 3-2 contents of manual, P-2 control basics, 2-1 controllers configuration, 3-2 connecting to a personal computer, 1-7 setting up a fieldwired controller, 1-6 styles, 1-3 , 3-2 used in this guide, 3-5 creating a processor file, 3-5 adding a rung comment, 3-11 entering the ladder program, 3-10 naming the file, 3-5 saving the processor file, 3-12 creating and printing reports creating reports, 5-2 printing reports, 5-4 types of reports cross reference, 5-1 data table, 5-1 processor configuration, 5-1 program listing, 5-1 cross reference report, 5-1 , 5-3 D data files, monitoring, 4-10 data table report, 5-1 , 5-3 demo unit, setting up, 1-4 downloading processor files, 4-2 E editing, using quick edit, 4-7 equipment, setting up, 1-1 error messages, B-2 exercises entering a timer instruction, A-6 entering an input and output branch, A-2 external I/O devices addressing, 2-6 how they communicate with the processor, 2-5 F fieldwired controller, setting up, 1-6 file concepts, 2-2 data files, 2-4 processor files, 2-2 program files, 2-3 H hardware requirements, 1-2 I installing the software, 1-9 instructions, true/false status, 2-9 L ladder logic concepts, 2-8 logical continuity, 2-10 processor operating cycle, 2-11 true/false status, 2-9 ladder program entering, 3-10 exercises, A-2 , A-6 testing, 4-5 , A-5 , A-10 LED, status, B-4 logical continuity, 2-10 M manuals, related, P-3 monitoring data files, 4-10 I–2 Index P personal computer, connecting to the controller, 1-7 printing reports, 5-4 processor error codes, B-6 operating cycle, 2-11 processor configuration report, 5-1 , 5-3 processor files, 2-2 creating, 3-5 data files, 2-4 naming, 3-5 program files, 2-3 restoring (downloading), 4-2 saving, 3-12 , A-4 , A-9 data table, 5-1 processor configuration, 5-1 program listing, 5-1 restoring processor files, 4-2 rung comments, adding, 3-11 S saving the processor file, 3-12 , A-4 , A-9 setting up your equipment, 1-1 slot numbers, 3-3 program listing report, 5-1 , 5-3 software display format, 1-11 instructions/addresses, 2-8 installing, 1-9 running, 1-10 publications, related, P-3 system LED status, B-4 Q quick edit, 4-7 R reports cross reference, 5-1 T testing the program, 4-5 , A-5 , A-10 troubleshooting, B-1 APS error messages, B-2 processor error codes, B-6 system LED status, B-4 Copyright Notice E1995 Rockwell Software Inc. All rights reserved Printed in the United States of America Portions copyrighted by Allen-Bradley Company, Inc. and used with permission This manual and any accompanying Rockwell Software products are copyrighted by Rockwell Software Inc. Any reproduction and/or distribution without prior written consent from Rockwell Software Inc. is strictly prohibited. Please refer to the license agreement for details. Trademark Notices WINtelligent Series is a registered trademark and the Rockwell Software logo, AdvanceDDE, ControlView, INTERCHANGE, Packed DDE, WINtelligent, WINtelligent EMULATE5, WINtelligent EMULATE 500, WINtelligent LINX, WINtelligent LOGIC 5, WINtelligent TREND, WINtelligent VIEW are trademarks of Rockwell Software, Inc. PLC, PLC-2, PLC-3, and PLC-5 are registered trademarks of Allen-Bradley Company, Inc. SLC, SLC 500, SLC 5/01, SLC 5/02, SLC 5/03, SLC 5/04, PanelView, RediPANEL, and Dataliner are trademarks of Allen-Bradley Company, Inc. Microsoft, MS-DOS, Windows, Microsoft Access and Visual Basic are registered trademarks, and Windows NT is a trademark of the Microsoft Corporation. All other trademarks are the property of their respective holders and are hereby acknowledged. Important User Information This Rockwell Software product is warranted in accord with the product license. The product’s performance will be affected by system configuration, the application being performed, operator control and other related factors. The product’s implementation may vary among users. This manual is as up-to-date as possible at the time of printing; however, the accompanying software may have changed since that time. Rockwell Software reserves the right to change any information contained in this manual or the software at anytime without prior notice. The instructions in this manual do not claim to cover all the details of variations in the equipment, procedure, or process described, not to provide directions for meeting every possible contingency during installation, operation, or maintenance.