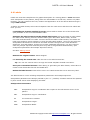
1
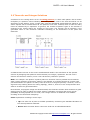
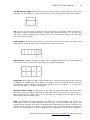
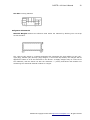
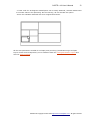
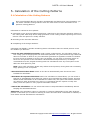
CORTE v 4.0 User’s Manual
1
CORTE v 4.0 USER´S MANUAL
Welcome to Corte, the ideal software solution for both Rectangular Sheets and
Longitudinal Bars Cutting Stock Optimization. Corte is supported by a powerful
mathematical model designed to find true-optimum solutions to those cutting tasks in
which a parts order must be fulfilled with a minimum amount of existing material.
By using Corte you will be able to:
Design and document highly optimized cutting plans with a little effort and time.
Minimize waste material.
Make the most of your stocks.
Calculate exact orders for your suppliers quickly.
Reduce production costs significantly making your products more competitive.
Corte v 4.0 Copyright © 2003-2006 http://www.CorteOptimo.com All rights reserved
CORTE v 4.0 User’s Manual
2
INDEX
1. Welcome to Corte.
1.1 Why Corte?
1.2 What’s New in Corte 4
1.3 Technical Requirements
1.4 How to register the evaluation copy?
2. Basic Concepts
2.1 Cutting Patterns
2.2 Theoretic and Integer Solutions
2.3 Launches and Templates
2.4 The Corte’s Window
3. Preparing Data
3.1 The Parts and Materials Sheets
3.2 Importing Data from Excel
4. Configuring the Launch
4.1 Launch Options
4.2 Technological Options
4.3 Special Cutting Types
4.4 Labels
5. Calculation of the Cutting Patterns
5.1 Calculation of the Cutting Patterns
6. Analyzing Results
6.1 The Results Sheet
6.2 The Patterns Sheet
6.3 Filtering the Patterns
6.4 Sorting the Patterns
7. Editing the Solution Manually
7.1 Introduction
7.2 Modifying the Repetition
7.3 Adding and Deleting Patterns
7.4 Editing Semiproducts
7.5 Copying Semiproducts
7.6 Adjusting the Patterns
7.7 Editing Labels
8. Outputs
8.1 Reports
8.2 Exporting to Excel
8.2 Exporting to AutoCAD™
Corte v 4.0 Copyright © 2003-2006 http://www.CorteOptimo.com All rights reserved
CORTE v 4.0 User’s Manual
3
1- Welcome to Corte
1.1 Why Corte?
Nowadays, optimum exploitation of existing material is one of the most important problems in
industry due to its incidence in production costs. Even in well-organized manufacture processes, a
high rate of waste material seems to be a natural consequence of stock cutting. Aside from other
factors, a critical one is that designing optimum cutting patterns becomes a very hard task, almost
always impossible of doing manually due to the great number of different variants that can arise
even if a few parts are ordered.
Corte offers a highly optimized software solution to the problem of minimizing waste material when
cutting a virgin material into rectangular or longitudinal pieces. The Corte’s Calculation Engine, which
is designed to find true-optimum solutions, combines classical techniques in the field of Mathematical
Optimization, like Linear and Dynamic Programming, with an original Completing Heuristic and a
sophisticated algorithm for generating the cutting patterns. Most of the times, Corte will came up
with an optimum solution for the given task and when it won’t a nearly-optimum solution is
guaranteed.
The program can be effectively applied in cutting of several different kinds of materials: metal,
plastic, glass, wood and so on, in many different practical situations. That can be achieved by
defining Technological Options which will condition the parts/cuts layout of the generated patterns in
order to they can always be realized in practice with the available technology.
Stock Cutting is a process always affected by a great number of technological, economic and human
variables. In that sense, Corte arise as a powerful tool that automates a critical phase of that
process contributing this way to the global reduction of costs.
In short, the main facilities of Corte are:
·
·
·
·
·
·
·
·
·
·
·
·
·
·
Easy and friendly interface.
Fully automatic calculation of the cutting patterns.
Background calculations with options to automatically save results and shut-down the system.
Combination of several material types (dimensions), each of them given at either limited or
unlimited availability.
Technological options conditioning the generated patterns in order to fulfill technological and
material requirements.
Configurable length units with wide support for both Metric and English systems.
Configurable label formats.
No limit to the number of different part types.
No limit to the number of different material types.
Several optimization levels to set up an agreement between quality and speedy of the calculations.
Full manual edition of the calculated solution which includes: definition, modification and
elimination of cutting patterns; incorporation of new parts or materials; changing in the order
and location of the cuts; deletion of redundant cuts.
A number of printed reports containing the scaled graphics, zoomed details and all the necessary
information related to the calculated cutting patterns in order to document and execute in
practice the cutting plan.
Import and export of Excel spreadsheets containing all the inputs and outputs of the program.
Export of AutoCAD® drawings.
Corte v 4.0 Copyright © 2003-2006 http://www.CorteOptimo.com All rights reserved
CORTE v 4.0 User’s Manual
4
1.2 What’s new in Corte 4?
La Versión Corte 4 enriquece las versiones anteriores del programa con:
Corte 4.0 enhances previous versions of the program with:
•
Incorporation of the Launch Templates: Instead of disposing, as usual so far, of a sole default
configuration, with launch templates you can permanently keep as many different
configurations as you wish and use any of them later to create new launches.
•
Two new technological options: Restrict Cutting Levels and Material Margins: With the first
option you can reduce complexity in the generated cutting patterns. The second option will
allow you to adjust the effective dimensions of the material. The combined use of this two
new options and the others existing already will provide the program with a greater
extensibility facilitating its adaptation to some special cutting technologies such as Bars
Cutting at Angle and CNC Punch Press Parts Layout Optimization.
•
Four Default Label Types and wide support for generating their formats.
•
Substantial improvement of the Completing Algorithm inside the calculation engine: Now
Corte optimizes even more by using the offcut from the theoretic solution first and then
generating best optimized completing variants. All that increases the probability of reaching
the integer optimum in the exact solution.
•
A new group of Calculation Options: This new group of options will allow you greater control
over the whole calculation process and a chance for increasing its effectiveness manually.
Now you can decide which phases of the calculation will be applied, modify the rounding
criteria, increase performance of the calculations by reducing the number of cuts to analyze,
force the use of certain patterns in the calculated solution, and so on.
•
New tools of wide use such as Windows Calculator and Multiply Quantities: Now you can
easily show the Windows calculator from within the Corte’s environment or quickly calculate
new quantities of parts and/or materials by multiplying the current quantities by a factor (or
dividing if such a factor is lesser than unity).
•
New facilities for introducing data: When editing part or material data, you can entirely select
rows or columns just by a click in the row’s Id or the column’s title, respectively. If you use
the TAB or <down arrow> key to move the focus cell beyond the last row, a blank row will be
automatically added. Conversely, if you return from the last row, being it empty, it will be
automatically deleted.
•
Exporting to Excel: Now you can export all the outputs of the program, including the graphics
of the calculated cutting patterns, as Excel’s spreadsheets. This new tool will help you
integrating Corte to other CAD or industrial management applications as well as generating
fully customized printouts.
•
More intuitive and ergonomic interface: Grouping of options in the menus is more logic and
intuitive. The Adjust menu containing options to modify the generated patterns is created
new. The new option Step Back will allow you undoing changes. The Report view is now
inside the launch window. Generating a report will automatically update that view hence you
no longer have to close the current report to generate a new one. All the options configuring
the working environment, being of general purpose, are now located in the Preferences
dialog box, accessible from the Tools menu. New tool bars are created and the status bar is
improved. You can choice whether to show any of these bars or not.
Corte v 4.0 Copyright © 2003-2006 http://www.CorteOptimo.com All rights reserved
CORTE v 4.0 User’s Manual
5
1.3 Technical Requirements
Corte runs on Windows 95 or later systems. The program does not require an advanced hardware
although it does use extensively the system RAM. We recommend the following hardware
configuration:
• Pentium I processor or later.
• 128 Mb of RAM (minimum 64 Mb).
• Printer with graphic capabilities.
Corte v 4.0 Copyright © 2003-2006 http://www.CorteOptimo.com All rights reserved
CORTE v 4.0 User’s Manual
6
1.4 How to register the evaluation copy?
Before registering the evaluation copy, you should obtain your user’s license at our web site:
http://www.corteoptimo.com
Where you will be informed about prices and payment
Important: We will need your Product ID in order to assign you a license number. To get the
Product ID, from the Help menu select About Corte and then look at the bottom of the window
displayed. Also, you can select Register from this window and copy from the Product ID box.
Also send to us:
•
•
•
•
•
•
•
•
Entity name:
Address:
Provincy or State
Country:
Phone:
Contact name:
Contact Email:
Product and version:
Once the license number is in your hands:
1 From the About window select Register.
2 Type the data requested and select OK.
If registration is successful, your name and license number will appear at the bottom of the About
window and all of the restrictions to the evaluation copy will be disabled.
We will be complacent attending to any doubt or suggestion you email us at:
[email protected]
Corte v 4.0 Copyright © 2003-2006 http://www.CorteOptimo.com All rights reserved
CORTE v 4.0 User’s Manual
7
2- Basic concepts
2.1 Cutting Patterns
A cutting pattern describes
graphically how a material should
be cut off. With the aim of
simplifying both graphical
description and editing actions,
patterns are shown at two stages
of realization. In the first stage,
the material is cut off into
cut semiproducts, via vertical or
horizontal cuts until reaching
part semiproducts (each of which
always distributes a single part) or
offcuts. In the second stage, from
each part semiproduct the
corresponding part is extracted.
Cut semiproducts are considered
intermediate semiproducts as they
exist temporally in the process of
realizing a cutting pattern. Both
part semiproducts and offcuts are
considered final semiproducts.
The figure shows a typical Corte’s cutting pattern. The blue lines are
intermediate semiproduct cuts and the red-dashed lines are part
cuts.
Important:
Although the proposed cutting sequence will guarantee correctness in pattern realization, it won’t
necessarily imply that such cutting order must be followed in practice just as given. For example, a
final semiproduct cut can always be omitted if part strips exist in the same direction as the cut.
This omission should be realized whenever a hold length is defined. (See Technological Options)
Corte v 4.0 Copyright © 2003-2006 http://www.CorteOptimo.com All rights reserved
CORTE v 4.0 User’s Manual
8
2.2 Theoretic and Integer Solutions
A solution for the cutting task is a set of cutting patterns, in which each pattern has a certain
multiplicity or repetition value indicating how many material units in the stock should be cut off
according to that pattern. Since a single part could be distributed among different patterns, the
whole request will be fulfilled when all the patterns have been realized, each of them as many
times as indicated by its repetition. In general, the number of pattern types in the solution is
expected to be closely above the number of part types. The solution will be optimum if the
generated offcut is the minimum reachable according to the dimensions of the parts and
materials.
A characteristic inherent in the Corte‘s mathematical model is the calculation of the optimal
solution by assigning their patterns with fractional (not integer) repetitions. We call such a
solution the theoretic solution, since it can’t be directly realized in practice.
Note: For example: The phrase “repeat a pattern 3.56 times” has no practical sense because
what “cutting a pattern 0.56 times” means is not defined. It could be thought as “extract each
part distributed in the pattern as many times as 0.56 of its original quantity”. However, such an
argument says nothing about the cutting topology, which is, how to cut the new quantities and
what to do with the generated offcut.
Nevertheless, as program usage has demonstrated, the theoretic solution does constitute a good
starting point in order to obtain an integer solution realizable in practice and having a high
probability of being optimal too. In Corte, such integer solution is obtained via a suitable
rounding of the theoretical multiplicity.
Corte implements rounding in three ways:
• Up: The order list of parts is fulfilled upwards by minimizing the standard deviation of
the actual quantities obtained.
• Down: With the same above criteria the order list is fulfilled downwards.
Corte v 4.0 Copyright © 2003-2006 http://www.CorteOptimo.com All rights reserved
CORTE v 4.0 User’s Manual
•
9
Exact: The rounded-down integer solution is complemented with additional cutting
variants (patterns) until satisfying exactly each part request. We call these variants
the completing variants. They can be easily identified as the ones having zero
theoretic repetition since they are all calculated outside the mathematical model.
In fact, there will be three integer solutions, one for each rounding. A pattern is considered out
of the corresponding integer solution whether its multiplicity gets a null (zero) value after
rounding it. To the mathematical model point of view, the only feasible integer solution is the
one corresponding to the exact rounding. It can make sure of this solution is optimal if, for each
material, the theoretic total repetition rounds up to the integer total repetition. The other integer
solutions are optimal only for the part quantities that they actually get which are not, in general,
the requested ones.
Note: In the rest of this manual, unless stated explicitly, as solution of the cutting task should
be understood the rounded-exact integer solution.
Corte v 4.0 Copyright © 2003-2006 http://www.CorteOptimo.com All rights reserved
CORTE v 4.0 User’s Manual
10
2.3 Launches and Templates
Launches are the working documents generated by Corte which are permanently saved as
launch files (LAN extension).
A Launch will contain all the data necessary to elaborate and execute in practice an optimized
cutting plan for a specific cutting type and material, this last one characterized by its thickness
and/or chemistry composition. In other words, a launch will contain all the parts and materials,
differed by their dimensions, but that can be combined freely in the same cutting plan.
To create a new launch, select New from the File menu, chose the Initial Configuration and push
OK.
You can use a Launch Template to read the initial configuration of the launch. Launch templates
are special files (PLA extension) used to keep permanently different cutting configurations. They
have the same structure as the launch file which means that you can use any launch to create a
template. Templates are commonly used to save only options specific to a cutting type or
technology, although nothing prevents them from saving other data like the materials, parts or
even the calculated cutting patterns.
Note: Corte maintains internally two default templates for configuring Bars and Sheets cutting,
respectively. These templates are the files deafultbars.pla and defaultsheets.pla which is both
located in the installation folder and will be automatically loaded when selecting the
corresponding default initial configuration.
To open an existing launch or template, select Open from the File menu and choose the file type
in the box at the bottom of the window displayed.
To save changes, select Save from the File menu.
To save under a different name the launch or template, select Save As from the File menu.
Tip: You can use this option to create duplicate files.
To create a launch template, first configure a launch and then save it as a template.
There exist two special folders from which Corte always starts loading launches and templates.
By default they are, respectively, the sub-folders Launches and Templates of the installation
folder.
To change the default folders, select Preferences from the Tools menu. Templates saved in their
default folder will be automatically available for selection when creating a new launch.
Corte v 4.0 Copyright © 2003-2006 http://www.CorteOptimo.com All rights reserved
CORTE v 4.0 User’s Manual
11
2.4 The Corte’s Window
In the Corte’s Window you can see, from top to bottom, the following items:
• Menu Bar: Groups by categories all the options of the program.
• Tools Palette: Shows the Corte’s Tool Bars which contain icons for accessing directly the
more used options of the program.
To see a short explanation about the icon, put the arrow cursor over and don’t move.
To change the visualization state of a tool bar, select Tool Bars from the View menu or
right -click in the palette to show a context menu.
To change the position of a tool bar, drag from the separator on the left.
•
Desktop: The desktop is where the Launch Windows are located. By default, this windows
are maximized when creating or opening Launches. Corte is a Multiple Document
Interface (MDI) application which means that you can work on several launches at the
same time, each of them in a different MDI window.
To arrange Launch Windows in the desktop, select the options in the Window menu.
To activate a launch, bringing it to front, click in its window or select in the list at the
bottom of the Window menu.
The information contained in a launch is shown via the different sheets of the Launch
Window: Parts, Materials, Results, Patterns and Report.
To bring a sheet to front, select it from the View menu or in the tabs at the bottom of the
Launch window.
Tip: You can right-click in active sheet to show a context menu containing the more used
options related to that view of the launch.
•
Status Bar: Contains, from left to right, three panels showing, respectively, the full path
to the active launch, a description of the active pattern (id, dimensions and repetition) and
the items counter of the active view.
Corte v 4.0 Copyright © 2003-2006 http://www.CorteOptimo.com All rights reserved
CORTE v 4.0 User’s Manual
12
3- Preparing Data
3.1 The Parts and Materials Sheets
Shortcut to Parts Sheet
Shortcut to Materials Sheet
From the Parts and Materials sheets of the Launch Window you should introduce data for the
parts to extract and the materials to cut off, respectively.
Note: The Parts Sheet is automatically activated when creating or opening a launch.
Each of the above sheets contains a table with the following columns:
Id: Defines a consecutive number for the part or material. Corte assigns this index
automatically in order to use it as a reference in the other views of the launch.
Length, Width: Define the dimensions of the part or material.
Quantity: For a part, defines the number of units needed that is its request (order). For a
material, defines its availability (existence). A blank or zero value means unlimited
availability.
Desc1, Desc2: These fields can be optionally filled for documentation purposes.
Act: Defines the activation state of the part or material
Important: Inactive parts or materials are not taken into account when calculating the
cutting patterns.
When editing part or material data you can do the following actions:
Insert rows: Activate the row before which you want to insert and select Insert
from the Edit menu.
Append rows: Select Append from the Edit menu or press the <down arrow> key
from the last row of the table.
Edit cells: Click in or use the arrow keys to select a cell. To overwrite, type directly the new
value with the keyboard. To edit, double-click or press ENTER. Press either ENTER or TAB to
end the modification. You may also change the focus cell.
Note: Pressing TAB from the last cell of the table will automatically add a blank row.
Important: To change the activation state, enter “0” (disabled) or “1” (enabled) in the Act
column. You can also double-click to alternate.
Select a block of cells: Drag the cursor inside the table or uses the arrow keys while
keeping the SHIFT key pressed.
Corte v 4.0 Copyright © 2003-2006 http://www.CorteOptimo.com All rights reserved
CORTE v 4.0 User’s Manual
13
Tip: To quickly extend the current selection, use End, Home, PgUp or PgDn keys while
holding the SHIFT key. The short cuts CTRL+SHIFT+[Home, End] extend, respectively, to
the first and last cell of the table.
Select blocks of rows and columns entirely: Click in the row Id or column Title to select
the first element of the block. Repeat for another row or column with SHIFT pressed.
Modify several cells at the same time: You can assign a whole block of cells with the
same value in a single action. To do that, first select the block and then type the
modification. The new value will be edited in the first selected cell of the block.
Multiply Quantities: Select a block of cells including the rows whose quantities you wish to
modify. Then select Multiply Quantities from the Tools menu.
Tip: To divide quantities, multiply by a factor lesser than unity, e.g., 0.5 divides by 2, 0.25
divides by 4, etc.
Delete rows: Select entirely one or more rows and then Delete from the Edit
menu.
Erase cells: Delete with the row(s) not selected entirely.
Cut
Copy
Paste
First select a block of cells and then Cut or Copy from the Edit menu. In
the same table or a similar one from another launch, select the cell from
which the copied data will be pasted in. Lastly, select Paste from the
Edit menu.
Note: Pasted data always overwrite the current selection.
Important: If you had calculated the cutting patterns, then every action modifying either the
dimensions or indexes (nor the quantities or descriptions) of the parts or materials will purge the
calculated optimum solution since it wouldn’t be possible to guarantee correspondence between
current data and their references in the cutting patterns. A handy exception of that is the
addition of new parts or materials at the end of their corresponding tables since it would not
affect the indexes currently referenced.
Corte v 4.0 Copyright © 2003-2006 http://www.CorteOptimo.com All rights reserved
CORTE v 4.0 User’s Manual
14
3.2 Importing Data from Excel
You can import parts or materials data from Excel spreadsheets (tables).
To import data from Excel:
1. Create or open a launch.
2. Activate the Parts/Materials sheet.
3. Select Import from Excel in the File menu.
The Import from Excel Window will be displayed.
4. Configure the import parameters and select Import.
Imported data never overwrite but are added to existing data.
5. Close the import window.
Before importing, you must select an Excel book and a sheet from which data will be read. Check
the correspondence between fields in Corte and columns in Excel. If the first row in the Excel
sheet contains the names of the Corte fields, mark the corresponding option to match
automatically.
You can configure importation from the very Excel. To do that, select Go to Excel in the Import
Window and, from the Excel application, load a book and activate a sheet. These actions will be
automatically reflected in Corte.
Corte v 4.0 Copyright © 2003-2006 http://www.CorteOptimo.com All rights reserved
CORTE v 4.0 User’s Manual
15
4- Configuring the Launch
4.1 Launch Options
The Launch Options will allow you a great flexibility to customize important aspects concerning
data input, calculations, optimization, cutting technology and outputs.
To configure your Launch Options, Select Launch Options from the Tools menu.
Tip: To update the template from which the launch was created, check Save in the template at
the bottom of the Launch Options window before pressing OK.
The Launch Options window consists of the following pages:
Units: In this page you can define the Length Units Format in either Metric or English
systems by using a specific precision. You can also make the Conversion of Existing Data
after modifying the unit’s format.
To make the conversion of existing data to the new units, first you must define a conversion
scale between current (existing) and new (just defined) units and then select Convert. You
always can Undo the conversion if unexpected results.
Example: To convert from inches to millimetres, use the scale 1 = 25.4.
Important: To preserve current units after a change of precision, you should realize a 1 = 1
scale conversion.
Calculation: Modify the Optimization Level to set an agreement between quality and speedy
of the optimization. The calculation process could be slowed down as much as the number of
different parts types (no the quantities requested) is increased. You can set until three
optimization levels which will be all consecutively applied when calculating the theoretic
solution.
Tip: Select Force in the Calculation Window to force passing to the next level.
If you are an advanced user of Corte already, you can take a risk to change the default
configuration of the Calculation Options whether you realize that either the whole process or
some particular results can be improved manually. In spite of being that a rule exception, a
number of situations could be found in which, for example, one of the calculation phases
(Theoretic Solution, Rounding or Completing) is not necessary. Some of these situations are
listed below:
- Calculation of the theoretic solution is unnecessary.
When little material consumption is expected (1 or 2 units), you can disable both Calculate
theoretic solution and Rounding... since a high probability exists that the whole theoretic
multiplicity will be nullified (zero values) after rounding down.
Tip: To have an idea of how much material is needed; select Minimum Reachable
Consumption from the Tools menu.
In general, optimizing with the completing phase only, although accelerates the calculation
process, could lead to rather poor yields. You could be pleasantly disappointed of verifying
the difference among optimizations realized with and without the calculation of the theoretic
Corte v 4.0 Copyright © 2003-2006 http://www.CorteOptimo.com All rights reserved
CORTE v 4.0 User’s Manual
16
solution.
Note: When the theoretic solution is deactivated, Corte will still attempt to use the solution
calculated previously, if this one is not empty. Therefore, to guarantee that the new solution
will be realized by using completing variants only, you should clean the current solution first.
To do that, select Reset Solution from the Tools menu.
Certain patterns must be included in the solution.
You can force the new solution to include certain patterns calculated previously or defined
manually. To do that, configure the current solution, by inserting or deleting patterns, so that
only the patterns you wish to keep are left. Then, enable Keep current patterns... and repeat
the calculation.
See also: Editing the Solution Manually.
-
The exact solution exceeds the probable integer optimum.
If the material theoretic total consumption does not round up to the real total from the
integer solution, try to change the rounding criteria (minimize standard deviation or total
area) and repeat calculation but now using the theoretic solution just calculated. To do that,
uncheck Calculate theoretic solution.
Note: If the optimization is being realized for several materials, the above criteria don’t hold
on the whole, although it could be separately applied to each material.
- It’s a matter of interest to prioritize usage of material trims.
The completing algorithm implicitly tends to use the materials of larger dimensions. If the
launch contains several materials as reusable trims and you wish to prioritize their usage,
mark Prefer usage of several materials…That would force the completing phase to select
the variants with greater yields over those distributing greater number of parts.
Note: Nevertheless what pointed above, the more effective way of forcing trims usage is
by limiting the availability of the virgin material, in which case not only the completing
but also the theoretic solution phase would be forced to.
- The calculation slows down excessively.
The existence of parts too small in relation to material dimensions could rather slow down
the theoretic solution calculation process, especially in those launches containing a big
number of parts (about 40).
You can speed up the calculation process, at the price of a possible slight decrease in the
yield, by activating Extend dimensions.
Since the completing algorithm first will try to use the offcut generated by the theoretic
solution, you may also do the following:
1. In the Parts Sheet, deactivate the smaller parts of the launch.
2. Calculate the cutting patterns with both Theoretic Solution and Rounding activated,
but Completing deactivated.
Corte v 4.0 Copyright © 2003-2006 http://www.CorteOptimo.com All rights reserved
CORTE v 4.0 User’s Manual
17
3. Activate the smaller parts and repeat calculation again but now activating the
Completing phase only.
See also: Theoretic and Integer Solutions.
The Results Sheet
Cutting: In this page you can configure the Cut Type, the reusable Offcut and the
Technological Options.
The Cut Type options define whether rectangles (sheets) or lengths (bars) are to be cut
off. When bars cutting are activated, all the data introduced for the Width dimension are
ignored and the optimization is realized just by combining parts lengths into material
lengths.
To let the program detecting the offcut automatically, mark Enable in the Offcut frame
and define the minimum reusable dimensions. The reusable offcut will be labelled in the
cutting patterns and documented in the reports.
See also: Technological Options
Labels: See Labels
Outputs: In this tab you can modify the page configuration of the Cutting Patterns report to
make it permanent and/or locate several graphics per each printed page. You can also
choose here whether to include or not into the outputs of the program the parts, materials
and patterns nullified in the integer solution (they are all excluded by default).
See also: Reports.
Corte v 4.0 Copyright © 2003-2006 http://www.CorteOptimo.com All rights reserved
CORTE v 4.0 User’s Manual
18
4.2 Technological Options
The Technological Options condition the cuts/parts layout in the cutting patterns in order to
fulfil the technological requirements demanded by both the cutting tool and the material,
adjusting this way the cutting variants generated by the calculation engine to the existing
technology.
To configure your technological options, select Launch Options from the Tools menu and access
the Cutting tab.
The first default assumed technological option is the guillotine cutting restriction which should
condition the way the calculation engine generates cutting variants and not necessarily the
cutting technology used. Rip cutting, for example, always contains guillotine cutting. Since
Corte can really reach striking optimizations, we’re sure the program can be used with high
efficacy wherever rectangular pieces are to be cut off even if the technology used is less
restrictive than guillotine cutting.
Important: Enabling of a technological option must be realized in at most two steps: first you
check the option and then introduce its value when required.
The configurable technological options are:
Cut Width: Defines material strips of the specified width that the cutting tool smoothes out.
Geometrically, it corresponds to a distance or separation between parts in the cutting
patterns.
Residue Minimum Length: Defines a minimum length for the residue, offcut or scrap that
may be left in a semiproduct beyond the last cut. When active, cuts generating smaller
residues are not considered.
Corte v 4.0 Copyright © 2003-2006 http://www.CorteOptimo.com All rights reserved
CORTE v 4.0 User’s Manual
19
Cut Maximum Length: Defines the maximum length that the cutting tool can reach when
making a cut. For example, in plate shears cutting it corresponds to the length of the blade.
Tip: You can use this option to force the first-cut direction. For instance, when a material is
horizontally oriented (Length dimension is greater than Width dimension), you can force the
first cut to vertical by activating this option with a value equal to or greater than the Width
but lesser than the Length.
Hold Length: Guarantees that wherever a cut is given there exists a safety zone (also called
dead zone) of length at least as the specified one to hold the material.
Rotate Parts: Indicates whether the parts can be rotated 90 degrees in the cutting patterns
or not. When active, chances for optimizing are increased significantly.
Important: Activating this option without defining its value will mean that all the parts can
be rotated. To indicate that only a subset of the parts should be rotated, define a commaseparated list of part indexes or ranges as the option’s value. For example: 1, 3, 5-10 (note
the use of the dash “-“ to define the ranges).
Restrict Cutting Levels: A cutting level is the action of executing parallel cuts at the same
dimension. Every time the cut direction changes, the number of levels are incremented by 1.
When restricting the cutting levels you’re reducing the complexity of the cutting variants
generated by the calculation engine.
Note: The number of levels restriction only applies to cut semiproducts and not to part
semiproducts which are always assumed of level 0, that is, when activating this option, you
are limiting the number of levels until reaching parts semiproducts or offcuts. Therefore, the
actual number of levels in a pattern may be one or two units greater than the maximum
number you specified, since it won’t include the levels necessary to extract parts and offcuts.
Corte v 4.0 Copyright © 2003-2006 http://www.CorteOptimo.com All rights reserved
CORTE v 4.0 User’s Manual
20
See also: Cutting Patterns
Márgenes del Material
Material Margins: Reduce the effective area within the material by defining non-cut strips
at their borders.
The value of this option is a comma-separated list containing the strip widths for left (Lef),
right (Rig), bottom (bot) and top (Top) margins, in this order. By default, the margins will be
applied the same to all of the materials in the launch. To apply margins only to a sub-set of
the materials, end the above list with the character “:” (colon) and follow with another list
containing the restricted material indexes or ranges.
Corte v 4.0 Copyright © 2003-2006 http://www.CorteOptimo.com All rights reserved
CORTE v 4.0 User’s Manual
21
4.3 Special Cutting Types
The Technological Options provide Corte with a great flexibility to configure a wide range of
different cutting types, in many different practical environments. However, there could exists
some special cutting types for which such a configuration is neither evident nor straightforward
as it would require both a suitable selection of the technological options involved and the
imposition of certain rules in data definition. As a way of exemplifying this, we show next two
of such special cutting types:
Bars Cutting at Angle: In aluminium carpentry, window and door frame profiles are often
needed to be cut at angle. Under symmetry conditions, the material will be best optimized as
much as the profiles could be joined together in the cutting patterns so that none residue is
left between two contiguous profiles. This situation conforms to a special case of bars cutting
that can be configured as follows:
- For each profile to cut, introduce a part of Length equal to the straight (rectangular)
area of the profile, without including any of its two extremes bevelled at angle.
- Define the Cut Width as the length of the cut at angle, measured horizontally along the
profile.
- Define Left and Right Margins with the same value as the Cut Width in order to the first
and last profiles can be correctly cut.
Parts Layout Optimization for CNC Punch Presses: CNC Punch Press programs define
punching patterns allowing to manufacture parts by using a set of standard-shaped punches.
Such programs generally support code for multiple part punching, that is, simple instructions
that repeat incrementally the punching pattern for a single part in order to extract, with no
extra effort, multiple instances from the same plate.
When breaking down a complex equipment or product into their component parts, often
occurs that several part types need to be all manufactured from the same material and each
part type at a certain quantity. Here a cutting optimization problem arises: to find optimum
part layouts on the available material so that the CNC press manufacture restrictions are all
fulfilled and the material consumption is minimized. Such a problem can be configured in
Corte as follows:
- Define different launches for different materials according to material thickness and
composition.
- For each punched part type, find the rectangle circumscribing its punching pattern
(external contour punches generally suffices it) to define the corresponding part in Corte.
- Define the Cut Width as the distance that should be left between external contour
punches in order to guarantee material strength.
- Define the necessary Margins, specially the Inferior one that would guarantee a safety
zone for holding the material.
- Define the Cut Maximum Length as the auto-repositioning distance of the press in order
to all the parts within a final semiproduct can be extracted without repositioning.
Corte v 4.0 Copyright © 2003-2006 http://www.CorteOptimo.com All rights reserved
CORTE v 4.0 User’s Manual
22
- If CNC code for 90-degress-rotated parts can be easily obtained, activate Rotate Parts
to increase chances for optimizing. On the contrary, do not activate this option.
- Enter the available materials with their original dimensions.
All the CNC parameters needed for multiple parts punching (coordinates origin and part
layout of each final semiproduct) can be obtained from the Cutting Parameters report and
also the Patterns Sheet.
Corte v 4.0 Copyright © 2003-2006 http://www.CorteOptimo.com All rights reserved
CORTE v 4.0 User’s Manual
23
4.4 Labels
Labels are texts that complement the graphic description of a cutting pattern. Corte associates
each semiproduct of the pattern, being either an intermediate or a final one, with an only label.
However, you can customize the text, location and appearance of all the above labels through a
single label format.
To define the label format, select Launch Options from the Tools menu and show the Labels tab.
Here you can:
Load different formats supplied by Corte: Select Load to choose one of the format files
(fmt) available in the Corte’s installation folder.
Generate the label format from the default label types: Select Generate to easily obtain
the label format starting from four default label types: Part Label, Offcut Label, VerticalCut Label and Horizontal-Cut Label. From the Generate Label Format window, first select the
Label Type and then press Configure to show the Edit Label window. Here you can select the
Semiproduct Parameters to show with the label and also configure their visual attributes:
alignment, font and clipping. Unless you’re using conditional sequences, you won’t need to
enter any escape sequence manually since they will be all generated automatically. (See
semiproduct parameters and escape sequences below)
See also: Editing Labels.
Restore the original format: Select Original.
Edit manually the format text: Edit the text in the Label Format box.
Tip: You can use context menus to copy the format template showed here below.
Save your customized formats: After editing or generating the label format, select Save to
create a new format file that can be loaded later.
Delete the label format: Erase all the text in the Label Format box not to show any label.
The label format is a text including semiproduct parameters and escape sequences.
Semiproduct parameters are always prefixed by the “#” (number) character and will be replaced
by their actual values when displaying the label.
Semiproduct Parameters
#OX
Semiproduct origin X coordinates with respect to the left-bottom corner of the
pattern.
#OY
Semiproduct origin Y coordinates.
#C
Cut consecutive number.
#SL
Semiproduct Length.
#SW
Semiproduct Width.
Corte v 4.0 Copyright © 2003-2006 http://www.CorteOptimo.com All rights reserved
CORTE v 4.0 User’s Manual
#PL
Part Length.
#PW
Part Width.
#RX
Part repetition in the horizontal direction.
#RY
Part repetition in the vertical direction.
#DESC1
First part description
#DESC2
Second part description
#OFFX
Length of the offcut left within the semiproduct in the horizontal direction.
#OFFY
Length of the offcut left within the semiproduct in the vertical direction
#P
Part index: =0 if the semiproducts do not distribute any part.
#ROT
Part rotation: =0 not rotated, =1 rotated 90 degrees.
#DIR
Cut direction: =1 vertical, =-1 horizontal, =0 no cut (final semiproduct).
#DIM1
First cut dimension. Distance from the left side of the semiproduct if the cut if
vertical or the bottom side if the cut is horizontal.
#DIM2
Second cut dimension. Distance from the cut to the opposite side of the
semiproduct.
#SP
Semiproduct consecutive number.
#OFF
Offcut consecutive number. =0 no reusable.
#LM
Left margin.
#RM
Right margin
#BM
Bottom margin.
#TM
Top margin.
24
Escape sequences are always prefixed by the “\” (backslash) character and will control
generation, location and appearance of the label.
\vin
Vertical alignment is realized inside the semiproduct.
\vout
Vertical alignment is realized outside the semiproduct.
\vcut
Vertical alignment is realized with respect to the cut.
\hin,\hout,\hcut
Idem for horizontal alignment.
\top,\bot,\lef,\rig,\vcen,hcen Respectively, align with respect to the top, bottom, left, right,
vertical center and horizontal center of the semiproduct.
Corte v 4.0 Copyright © 2003-2006 http://www.CorteOptimo.com All rights reserved
CORTE v 4.0 User’s Manual
25
Alignment Sequences
\if<condición>\then
<formato1>
[\else
<formato2>]
\endif
Conditional sequence. if <condition> holds then
<format1> is applied, else <format2> is
applied.<condition> is an expression of the kind
<operand><comp><operand>, where <operand> is
either a semiproduct parameter or an integer value and
<comp> is any of the comparison operators:
=,<,>,<=,>= and <>.
\font [<nombre>][,<tamaño>]
[,bold][,italic]\endfont
Font sequence. Defines the font of the label. By default,
the sequence \fontArial,8\endfont is applied.
\clipon,\clipoff
Clipping sequences. Respectively, enable and disable
clipping of the label text within the semiproduct. \clipon is
active by default.
\n
New line sequence. Put the text following it into a new
line.
Note: Text within brackets [ ] can be omitted.
Important remarks about the label format
• Parameters indicating dimension or distance will take their values according to the length units
format.
• Escape sequences of the same type will be applied from left to right which will keep in active
the last one applied, that is, latter sequences overwrites former sequences. When resolving
alignment sequences, the previous ones resulting in a contradiction are ignored.
• Conditional sequences can be nested providing the label format with a great flexibility. It allows
labels to be generated in a different way according to the semiproduct type. Some widely
used conditions are listed below:
#DIR=0
Final semiproduct condition.
#DIR<>0
Cut semiproduct condition.
#OFF>0
Reusable offcut condition.
#P<>0
Part semiproduct condition.
The nested use of the above conditions will allow you to completely identify any type of
semiproduct. You can use the next example as a template when creating the label format
(comments between “<>” should be omitted):
\if #DIR=0 \then
<final semiproduct. Whether it is a part, offcut or scrap remains to be determined>
\if #P<>0 \then
<part semiproduct>
\else
< Whether it is an offcut or scrap remains to be determined >
\if #OFF>0 \then
<offcut>
\else
<scrap>
Corte v 4.0 Copyright © 2003-2006 http://www.CorteOptimo.com All rights reserved
CORTE v 4.0 User’s Manual
26
\endif
\endif
\else
<cut semiproduct. Whether it is vertically or horizontally cut remains to be
determined >
\if #DIR=1 \then
<vertically cut>
\else
<horizontally cut>
\endif
\endif
• Since Corte internally works with integer units, when comparing against a constant value
indicating length or distance, provided that either decimal or fractional units are being used
in the launch, place the macro “toint” in front of such constant in order to realize the
conversion. For example: #SL>toint34.45, #SW<=toint23 4/5.
• The font sequence do not include any specification to modify the label color. To do that, select
Preferences from the Tools menu.
• Clipping will only be applied if the label is aligned within the semiproduct.
• Carriage Returns (Enter key) used directly in format text definition will not be applied when
generating the label. However, carriage returns introduced when editing from the Edit Label
window will automatically generate the \n sequence.
• The characters “( ) ;” are all used internally by Corte as delimiters in the launch file. You may
still continue using them when defining the label format as they will be automatically
replaced by the escape sequences “\1 \2 \3”, respectively
Corte v 4.0 Copyright © 2003-2006 http://www.CorteOptimo.com All rights reserved
CORTE v 4.0 User’s Manual
27
5- Calculation of the Cutting Patterns
5.1 Calculation of the Cutting Patterns
Once introduced all data for the Parts and Materials and defined the Launch Options, you
can select Calculate Cutting Patterns from the Tools menu to start calculation of the
optimum cutting patterns.
Calculation is realized in three phases:
1. Calculation of the Theoretic Optimum Solution: Searches for the theoretic optimum solution of
the cutting task. Each step at this stage generates a new cutting variant improving the current
solution until the optimum is finally reached.
2. Rounding of the Theoretic Solution.
3. Completing of the Integer Solution.
Calculation will display a window containing status information about the whole process. From
this window you also can:
• Force the next calculation process: Under certain configurations, the calculation might go
into a long cycle of bringing near the theoretical optimum: the yield reaches a high value and
does not increase or does at very low rates after generated a significant number of variants.
In front of such a situation or at any time you decide, you can click in the Force button to
force the next process of the calculation. Nevertheless what pointed here, we always
recommend to let the program finishing itself the calculations since any interruption could
affect the final optimum yield.
Note: Since each calculation phase may realize several process, forcing does not necessarily
imply passing to the next phase.
• Save the launch when done: Check in this box to automatically save the launch once
finished the calculation.
• Shut down the system when done: When the calculation is slowed down, you can check in
this box to automatically shut down the system once concluded the whole process. As Corte
allows several calculations to be realized at the same time, this option will become effective
only when no other processes are in active. To guarantee that the system is really shut
down, check the option in every opened calculation window.
• Cancel the calculation: You can select this button to stop calculations immediately without
keeping the calculated solution.
Important: The calculation engine is executed in a process independent of the main program
process. It will allow you to continue working on other launches while a calculation is realized, or
even realize several simultaneous calculations.
Corte v 4.0 Copyright © 2003-2006 http://www.CorteOptimo.com All rights reserved
CORTE v 4.0 User’s Manual
28
6- Analyzing Results
6.1 The Results Sheet
The Results Sheet numerically describes the calculated optimum solution. It looks
alike a spreadsheet in which all the calculated cutting patterns are listed.
To activate the Results Sheet, select Results from the View menu.
Each pattern in the solution is described through the following column sections:
• Pattern: Shows the consecutive index of the pattern and the material used.
• Percentages: Shows the yield, offcut and waste percentages.
Note: The yield percentage is calculated hardly, that is, it will not include either reusable
offcut or Cut Width option areas (the last one is considered waste).
• Repetition: Indicates the pattern’s multiplicity, that is, the number of times it should be
repeated. Both a Theoretic value for the theoretic solution and a Real value for the
integer solution are shown.
• Parts/Pattern: This section contains as many columns as parts are in the launch. The
values in these columns indicate the number of times the corresponding parts are
repeated in the pattern.
When analyzing calculation results keep in mind the following:
• The last three rows of the spreadsheet show totals for both solutions.
• Patterns with null (zero) repetition are considered outside the integer solution.
• The real total of repetition indicates the total amount of material used.
• The theoretic total of yield is an upper bound of the maximum yield reachable by the
integer solution. For a single material, the theoretic total of repetition is a lower bound
for the real optimum repetition value. Whether the theoretic repetition rounds up to the
real repetition, the integer solution is optimum too.
Note: This is true for the rounded-exact integer solution only which is the only feasible
one according to the mathematical model. Both the rounded-up and the rounded-down
solutions could have either greater or lesser yields as they are optimum only for the part
quantities actually obtained which are not, in general, the requested ones.
• A low value of yield is a sign of that a better optimization will need:
- To include more parts in the launch.
- To change the material dimensions.
- To modify the technological options.
• The total (global) percentage of yield is calculated as follows:
PartsTotalArea/MaterialsTotalArea =
SUM(PatternPartsArea(i)*PatternRepetition(i))/SUM(PatternMaterialArea(i)*PatternRepeti
tion(i))
for i=1,2,...,number of pattern
Corte v 4.0 Copyright © 2003-2006 http://www.CorteOptimo.com All rights reserved
CORTE v 4.0 User’s Manual
29
which will not coincide, in general, with the average of all the values in the column. The
offcut and waste percentages are calculated in a similar way.
• Each part total in both solutions is calculated by adding the product:
<pattern repetition>*<part repetition>
over all the patterns. The Parts Total (as a whole) should coincide with the Parts Request
in both the theoretic and the rounded-exact integer solutions provided enough material is
available.
• The last row shows the real total yield broken down per parts.
• All the repetitions and totals in the integer solution are shown according to the active
rounding. To change the active rounding, select Rounding from the View menu
Corte v 4.0 Copyright © 2003-2006 http://www.CorteOptimo.com All rights reserved
CORTE v 4.0 User’s Manual
30
6.2 The Patterns Sheet
The Patterns Sheet will allow you both to visualize and modify each of the cutting patterns in the
optimum solution of the cutting task. It consists of two sizable panels containing, respectively,
the Pattern Inspector (on the left) and the Pattern View (on the right).
To activate the Patterns Sheet, select Patterns from the View menu.
At the bottom of the Pattern Inspector you can alternate the Miniature and Semiproducts tabs.
The Miniatures tab shows rather reduced views (like icons) of all the patterns. Here you can
select the active pattern. The Semiproducts tab allows you to visualize and/or modify the
properties of all the semiproducts conforming to active pattern. It consists of (from top to
bottom) the Semiproducts Tree and the Semiproducts Inspector.
The Semiproducts Tree defines a hierarchy containing all the semiproducts being generated
when realizing the cutting pattern. Each node in this tree corresponds to a semiproduct in the
pattern: non-leave nodes to intermediate (cut) semiproducts and leave nodes to final (part and
offcut) semiproducts. In particular, the root node corresponds to the original material. As each
cut will break up a semiproduct into two pieces, non-leave nodes always have two children
nodes. The labels identifying a node indicate the dimensions and the coordinates origin of the
corresponding semiproduct.
The Semiproducts Inspector shows the properties of the semiproduct previously selected in the
pattern. These are:
Cut Dir: Indicates either cut direction or a non-existing cut (a blank value).
Cut Dim: Indicates cut dimension, that is, the distance measured at right angle from the
left side of the semiproduct if the cut is vertical or the bottom side if the cut is horizontal.
(next properties only apply to final semiproducts)
Part: Index of the part distributed within the semiproduct.
Rotated: Indicates whether the part is rotated or not.
Layout: Indicates multiple part layout within the semiproduct by using the notation
<qty_x>x<qty_y>. Note that the total repetition of the part can be easily obtained by
multiplying the above two quantities.
Note: In bars (one-dimensional) cutting, this property will take a single value.
Offcut_x: Indicates the length of the offcut left within the semiproduct beyond the last part
in the horizontal direction.
Offcut_y: The same as the above property but in the vertical direction.
See also: Semiproduct Parameters.
From the Patterns Sheet you can also:
Select semiproducts: Click inside the pattern. The final semiproduct enclosing the click
point will be selected. Also you can select nodes in the Semiproducts Tree or drag a rectangle
in the Pattern View and hold SHIFT before releasing. The first semiproduct in the hierarchy
being entirely contained in the rectangle will be selected.
Corte v 4.0 Copyright © 2003-2006 http://www.CorteOptimo.com All rights reserved
CORTE v 4.0 User’s Manual
31
The selected semiproduct will be framed in the graphic of the pattern. Tip: To quickly
navigate through all of the semiproducts in the pattern, first select a semiproduct and then
use arrow keys to move the selection backward or forward.
Deselect a semiproduct: Click anywhere outside the pattern or,
Select Deselect from the Adjust menu or,
Change the active pattern and go back.
Change the active pattern: Select in the Miniatures Tab or,
Access the navigator in the Standard tool bar or,
Use the arrow keys provided none semiproduct is selected.
Zoom in/Zoom out the pattern view: Select the options from Zoom Pattern in the View
menu, the Pattern bar or the context menu. The Zoom to Fit
option will adjust the view in order to show all the pattern in the
graphics window.
Tip: Drag a rectangle in the pattern view to zoom in the framed zone.
Note: The active pattern will be automatically zoomed to fit once selected or when
resizing the graphics window.
Show/Hide the labels: Press the label buttons in the Pattern bar or select Labels from the
View menu.
Corte v 4.0 Copyright © 2003-2006 http://www.CorteOptimo.com All rights reserved
CORTE v 4.0 User’s Manual
32
6.3 Filtering the Patterns
You can restrict the patterns showed in both the Results Sheet and Patterns Sheet to a certain
filtered set. Filters are useful to generate partial reports and totals.
To select Patterns Filtering
Important: In both the Reports and Patterns Sheet will be showed the filtered patterns only.
To filter patterns in the solution:
1. Select Filter Patterns from the Edit menu to show the Filter Patterns window.
2. In the Field from… box, select the field from the Result Sheet for which the filter will be
applied.
3. In the Filter List box, enter a comma-separated list of values and/or ranges, e.g.:
3,5,10-15,34-50
4. Press OK.
Only the patterns in the filter list will be showed.
To delete the filter, select Remove Filter from the Edit menu.
Important: When filtering by material do not use dimension but index values.
Tip: You can filter columns indicating quantity (Repetition, P1, P2,…) by defining a range from 1
to a large number being greater than the maximum possible value in the column. For example,
to see “only the patterns that distributes the part #1” , apply the filter “1-1000” to column P1
provided no patterns distributes P1 more than 1000 times. To get the maximum value in a
column, you can sort descending and then look at the first row.
Corte v 4.0 Copyright © 2003-2006 http://www.CorteOptimo.com All rights reserved
CORTE v 4.0 User’s Manual
33
6.4 Sorting the Patterns
You can sort the patterns in the Result Sheet, either ascending or descending, according to the
values in the active column.
To sort patterns in the solution:
1. In the Result Sheet, click in the column to sort by.
2. Select Sort ascending or Sort descending from the Edit menu.
Ascending sort
Descending sort
Corte v 4.0 Copyright © 2003-2006 http://www.CorteOptimo.com All rights reserved
CORTE v 4.0 User’s Manual
34
7- Editing the Solution Manually
7.1 Introduction
Although Corte realizes the calculation of the optimum cutting patterns in a fully automatic way,
it could arise practical situations in which manual modification, or even full definition, of some
patterns may be necessary. For example:
- Patterns with a very complex geometry are generated.
- It’s a matter of interest to complete the integer solution manually since the exact-rounding
goes beyond the probable integer optimum.
- The smaller parts in the launch are disabled to increase calculation performance. Later,
those parts are distributed in either the generated offcut or newly added patterns.
- New parts/materials are added to the calculated solution.
- Some patterns are in need of adjusting their cuts in order to facilitate practical execution.
Important: Before manually editing a cutting pattern, you should know how to select
semiproducts. See the Patterns Sheet.
Tip: To see the difference between the real and order list of parts while editing patterns
manually, select Real vs Order from the View menu.
Clarifying ideas, it is suitable at this point to distinguish among actions that condition cutting
patterns generation and actions that modify those patterns once generated. In the first group of
actions you have:
- Definition of Technological Options.
- Deactivation of parts and/or materials.
Actions modifying the calculated solution are:
Modifying the Repetition
Adding and Deleting Patterns
Editing Semiproducts
Copying Semiproducts
Adjusting the Patterns
Tip: Select Step Back from the Adjust menu to get the solution back to its previous state before
the last modification.
Corte v 4.0 Copyright © 2003-2006 http://www.CorteOptimo.com All rights reserved
CORTE v 4.0 User’s Manual
35
7.2 Modifying the Repetition
You can modify pattern repetition values in the integer solution.
Note: Modifying a repetition value will also change all real totals for the active rounding.
To modify a pattern repetition, edit the corresponding value in the Real column of the Results
Sheet.
To assign the active pattern with the maximum possible repetition without exceeding the parts
request, select Assign Maximum Repetition form the Tools menu.
Corte v 4.0 Copyright © 2003-2006 http://www.CorteOptimo.com All rights reserved
CORTE v 4.0 User’s Manual
36
7.3 Adding and Deleting Patterns
You can add or delete patterns from the solution.
Add patterns
Delete patterns
To add a pattern to the solution:
1. From the Materials Sheet, select in the row of the material to add to.
2. Activate either the Patterns Sheet or the Results Sheet and select Append from the Edit
menu.
A blank pattern with zero repetition will be inserted for the material selected.
3. In the Patterns Sheet, build the cuts/parts layout of the pattern.
4. In the Results Sheet, modify the pattern repetition.
To delete a pattern from the solution:
From either the Patterns Sheet or the Results Sheet, activate the pattern to delete. Then
select Delete from the Edit menu.
To delete several patterns in a single action:
In the Results Sheet, select a block of cells (not necessarily entire rows) containing the
patterns to delete. Then select Delete from the Edit menu.
To reset the current solution by deleting all the patterns, select Reset Solution from the
Tools menu.
Corte v 4.0 Copyright © 2003-2006 http://www.CorteOptimo.com All rights reserved
CORTE v 4.0 User’s Manual
37
7.4 Editing Semiproducts
You can modify the cut/part layout of a pattern by editing their semiproducts.
To clean semiproducts
To add vertical cut
To add horizontal cut
To edit a semiproduct:
1. In the Patterns Sheet, activate the pattern to modify.
2. Select a semiproduct.
3. Edit the properties in the Semiproduct Inspector.
When modifying semiproduct properties keep in mind the following:
• Always end property modifications by pressing ENTER or changing the focus to another
property, even so the new value is selected in a drop-down list.
• Be careful with the syntax when entering values with the keyboard:
- To define a cut, type “vertical” or “horizontal” in the Cut Dir property.
- To change the part distributed, type a part index in the Part property.
- Don’t forget the “x” between both repetition values in the Layout property whether
parts are rectangles.
• You can define vertical/horizontal cuts at final semiproducts only. Therefore, before
modifying a cut semiproduct you must clean it first.
• To clean a semiproduct (make it an offcut), select Adjust | Clean or else delete both
Cut Dir and Part properties.
• To add vertical/horizontal cuts, select Adjust | Cut vertically , Adjust | Cut horizontally .
• The Part, Rotated and Layout properties are disabled at cut semiproducts.
• When modifying a property, some other properties could take default values according to
the current layout of the semiproduct. For example:
- Whether an offcut is vertically (horizontally) cut, the Cut Dim property is initialized with
a value equal to half the length (width) of the semiproduct. This value should be adjusted
later.
- Whether a part (or its rotation) changes, several instances of the part will be
automatically distributed to fit the entire semiproduct, that is, as many times in both
directions as it can be contained. You can adjust later with the Layout property.
- A final semiproduct distributing a part already can be vertically (horizontally) cut
whether an offcut exists in the length (width) direction, in which case the Dim Cut
property will take a value equal to the sum of all parts lengths( widths). Hence, the new
left (bottom) child semiproduct will exactly contain all the part lengths (widths) and the
right (top) child will become the offcut.
Corte v 4.0 Copyright © 2003-2006 http://www.CorteOptimo.com All rights reserved
CORTE v 4.0 User’s Manual
38
7.5 Copying Semiproducts
You can copy a semiproduct into another of equal or bigger dimensions.
To cut a semiproduct
To copy a semiproduct
To paste a semiproduct
To copy a semiproduct:
1. In the Patterns Sheet select a semiproduct.
2. Select Copy or Cut from the Edit menu.
3. Activate the target pattern.
4. Select the target semiproduct.
5. Select Paste from the Edit menu.
Note: Paste actions will automatically clean target semiproducts just before replacing them with
the clipboard’s copied content.
Corte v 4.0 Copyright © 2003-2006 http://www.CorteOptimo.com All rights reserved
CORTE v 4.0 User’s Manual
39
7.6 Ajusting the Patterns
Whenever allowed topologically, you can modify the order, location and direction of the cuts in a
cutting pattern, even delete redundant cuts, by preserving the current quantity of each part
distributed. In other words, you can modify cuts layouts without modifying part distributions.
This manual adjustment is intended to help simplifying practical execution of the patterns.
Important: All of the adjustment actions will operate on a selected parent semiproduct by
modifying their two children. You can access them via the Adjust menu.
The Adjustment actions are:
Join Children: Joins the two semiproducts resulting from a vertical/horizontal cut to
form a single semiproduct by deleting the cut. Two semiproducts can join together if:
− They are both final semiproducts and at least one of them is an offcut, or
- They are both distributing the same part with the same repetition in the cut
direction.
Exchange children: Exchange the two children semiproducts modifying the location
of the cut in the parent semiproduct.
Extend cut: In a sequence of several consecutive cuts being all at the same direction,
this option transfers the cut in the selected (parent) semiproduct to the cut in its
right/top child extending the dimension of the original cut.
Diminish cut: This option is symmetrically the same as the above one but now
transferring the original cut to the left/bottom child semiproduct diminishing the
dimension of the original cut.
Cut to horizontal: When a parent semiproduct is:
- vertically cut and one of their children is horizontally cut and the other is an offcut,
or
- both children are horizontally cut at the same dimension,
parent and children cuts are exchanged so that the parent semiproduct and their two
children are now left, respectively, horizontally and vertically cut.
Cut to vertical: This option is symmetrically the same as the above one but for
horizontally cut semiproducts.
Corte v 4.0 Copyright © 2003-2006 http://www.CorteOptimo.com All rights reserved
CORTE v 4.0 User’s Manual
40
The figure below shows how the above options can be used to optimize the cuts in a pattern.
The aim is to join the semiproducts distributing parts 2 and 3.
Corte v 4.0 Copyright © 2003-2006 http://www.CorteOptimo.com All rights reserved
CORTE v 4.0 User’s Manual
41
7.7 Editing Labels
To Edit labels
Aside from the label format implicitly used to generate the whole of the labels (default format),
Corte maintains a particular label format for each of the semiproducts in a cutting pattern and
initially assigns all of them with the escape sequence \def meaning “apply the default format”.
When you’re editing a label, what you are really doing is overwriting the default format.
To edit a label in particular, select the corresponding semiproduct in the Patterns Sheet and
access Edit Label from the Adjust menu.
The Edit Label window constitutes a visual interface that remarkably simplifies label format
generation as it will automatically generate the correct escape sequences according to the
alignment, font and clipping defined by the user. This window will also allow you easier access to
all of the semiproduct parameters that can be used when defining a format.
Besides the above mentioned aspects, from the Edit Label window you can do the following
actions:
Delete label: Select Delete to fully erase the format text.
Restore label: Select Restore to assign the format text with the sequence \def restoring the
label to its default original form.
Propagate format: When enabled, after pressing OK the edited format will be copied into all
the semiproducts descending from the selected one. This option allows entire label groups to
be modified in a single action.
Note: This option is disabled when generating the default format.
You can conditionally propagate changes if conditionals sequences are included in the format.
For example, it is not recommended to propagate alignment directly as it generally differs from
cut to part semiproducts. In this case, you should use a conditional sequence containing the
alignment changes:
\def\if#P<>0\then\top\lef\endif
Here, the default format will be applied first and then its alignment will be modified only if the
semiproduct is of part type. This technique can be used to propagate any attribute of the label.
If unexpected results, you can undo the modification by doing the following:
- Restore by propagating the format, or
- Select Step Back from the Adjust menu.
Corte v 4.0 Copyright © 2003-2006 http://www.CorteOptimo.com All rights reserved
CORTE v 4.0 User’s Manual
42
8- Outputs
8.1 Reports
Reports act as a preliminary step when obtaining printouts with all the necessary information to
document and execute in practice the calculated cutting patterns.
To preview the reports, access the Reports menu.
All the reports will be generated from the integer solution according to its current state in the
Results Sheet and the Patterns Sheet, that is, both the active rounding and patterns filter will be
applied and the hidden labels will not be printed. By default, the parts and materials with null
real total will be excluded as well as the patterns with zero repetition. To include nullified parts,
materials and patterns into the outputs of the program, select Launch Options from the Tools
menu and uncheck the corresponding options in the Outputs tab.
Corte generates the following reports:
• Cutting Patterns
Shows the scaled graphics of all the patterns.
To permanently keep the page configuration of this report, included the number of
patterns per printed page, select Launch Options from the Tools menu and access the
Printing tab.
•
Pattern Detail
Prints the current view of the pattern such as showed in the Patterns Sheet. This report
results useful to print zoomed views of those areas within the pattern that are not clearly
viewed.
•
Cutting Parameters
Lists cutting parameters for each pattern:
- The cut dimensions at cut semiproducts.
- The dimensions and quantities of all the parts and offcuts in the pattern.
- The properties of all the final semiproducts. Note: The asterisk “*” after the part Id
indicates rotation.
See also: Semiproduct Parameters.
•
Listing of Coordinates
Lists the coordinates of all the cuts, including both semiproducts and parts, for each
pattern.
•
Listing of Materials and Parts
Lists the materials and parts at their quantities actually obtained, the yield, offcut and
waste percentages for each material and the contribution of each part to the total yield.
•
Listing of Offcuts
Lists all the reusable offcuts generated.
Corte v 4.0 Copyright © 2003-2006 http://www.CorteOptimo.com All rights reserved
CORTE v 4.0 User’s Manual
43
To modify the report page configuration, select Page Setup from the File menu.
To print the report, select Print from the File menu. Corte will show a window to configure
other printing parameters such as the number of copies and the pages interval.
Important: Reports of listing type (all but Cutting Patterns and Pattern Detail) are all designed
for the Letter paper size and a default page orientation. Selecting any other size or orientation
can lead to some data not to be showed. You can export any of these reports to either Text or
CVS file formats. To do that, select Export Report from the File menu and choose the output
format in the Save as files of type box.
Tip: Since reports are highly-RAM-consumer components, you are recommended to close the
active report as soon as you finish working with. To do that, select Close Report from the Reports
menu. Generating a new report will automatically close the current one if existed.
Corte v 4.0 Copyright © 2003-2006 http://www.CorteOptimo.com All rights reserved
CORTE v 4.0 User’s Manual
44
8.2 Exporting to Excel
Excel exportation constitutes a powerful tool to both integrate Corte with other applications and
obtain fully customized printouts. Corte allows exporting all of its outputs as Excel spreadsheets.
To export an Excel book containing the outputs from the active launch, select Export Excel Book
from the File menu.
Important: Excel tables and graphics are exported under the same restrictions as Reports
generation and will use the Paper colour configuration. To change the colour configuration, select
Preferences from the Tools menu.
Corte v 4.0 Copyright © 2003-2006 http://www.CorteOptimo.com All rights reserved
CORTE v 4.0 User’s Manual
45
8.3 Exporting to AutoCAD™
The Corte’s package includes the AutoLisp™ utility Corte4.lsp which is located in the installation
folder. This utility allows all the cutting pattern graphics to be loaded from within AutoCAD™.
To export the graphics of the cutting patterns to AutoCAD:
1.
2.
3.
4.
Start AutoCAD.
Create a new drawing.
From the Corte’s installation folder, load the AutoLisp application Corte4.lsp.
Execute the command “CORTE4” at the AutoCAD prompt.
A window to select a launch file will be displayed.
5. Select the launch file and press Open.
All of the cutting patterns in the launch will be automatically drawn.
Fig 2 2
Fig 2 2
Corte v 4.0 Copyright © 2003-2006 http://www.CorteOptimo.com All rights reserved