1
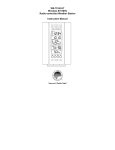
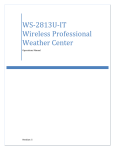
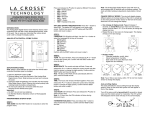
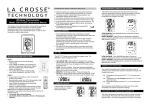
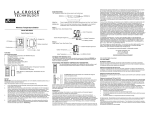
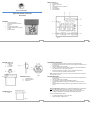
DISPLAY (see Fig. 1) A. B. C. D. E. F. G. Battery Indicator AM/PM for 12 hour time Time DST (Daylight Savings Time) Indicator Temperature MIN Temperature MAX Temperature Digital Solar Window Thermometer Model 306-605 FEATURES Clear Functional Design Maximum and Minimum Values with Auto Reset Clock Easy Removal for Cleaning Automatic Backlight for Easy reading in the Dark Weather Resistant Fig. 1 1 BUTTONS (see Fig. 2) H. I. J. K. 2 QUICK INSTALLATION GUIDE MODE Button + 1 Button +/- 1hr Button ECO Slide Thoroughly clean the window where the thermometer holder will be attached. Remove the thermometer holder from the thermometer by sliding it towards the bottom of the thermometer. Pull off the protection foil on the display Attach the thermometer holder to the outside of the window with the enclosed adhesive tape. (Be sure to mount with the frame “bar” down.) Check that the bottom bar is in place to “catch” the thermometer, then hang the thermometer on the holder by sliding it down into the holder. Note: The thermometer is fragile. . When you mount or remove the thermometer, avoid action that would bend or pull on it. Fig. 3 SETUP INSTRUCTIONS HOUSING (see Fig. 3) L. M. N. Temperature Probe Battery Compartment Solar Panel Remove the thermometer holder from the thermometer by sliding it towards the bottom of the thermometer. Pull off the protection foil on the display. Open the battery compartment with a small Phillips screwdriver. Insert the NiMh AAA battery (included) on the left. Make sure to observe the correct polarity. Insert the alkaline AAA battery (included) on the right. Make sure to observe the correct polarity. Fig. 2 Ensure the NiMh Battery is Charged: The 1.2V NiMh rechargeable battery for the backlight is not fully charged when shipped. For maximum efficiency it is recommended to either: a) charge the battery fully (place thermometer outside on a sunny day) before first use b) Recharge the NiMh battery in an appropriate NiMh-capable battery charger. HOLDER (see Fig. 4) O. Holder After the rechargeable battery is charged: Re-insert the NiMh battery (if a charger was used). Replace the battery compartment cover. Fig. 4 3 4 All LCD segments will light up for a few seconds. The thermometer is now ready to use. On the display, 0:00 is flashing and the DST symbol (see Fig. 1, D) is flashing. If you are setting up the thermometer during Daylight Savings Time, press the +/-1 button for confirmation while the DST symbol is flashing and the DST symbol will remain, indicating that the unit is in DST mode. If there is no confirmation within 15 seconds, the DST symbol will stop flashing and will disappear. If this has happened and you need to put your thermometer into DST mode, see the section on Daylight Savings Time later in this manual. Note: The left NiMh battery (when holding the thermometer with the display at the bottom) is the illumination battery The right non-rechargeable alkaline battery provides powers all other functions. CHANGE BETWEEN DAYLIGHT SAVINGS TIME / STANDARD TIME Press the +/-1hr (underneath the top part of the thermometer to enable/disable DST mode. Note: When the display is in DST mode, the DST indicator is shown (see Fig.1, D). Backlight To set the backlight mode, find the ECO slide switch underneath the top section of the thermometer (see Fig. 3). The display will automatically turn on the backlight for night viewing. The backlight can be set to one of two modes: Full Power: When the ECO switch is OFF, the backlight comes on at dark and turns off at dawn), as soon as the solar panel no longer detects light (with appropriate battery charge). ECO MODE – When the ECO switch is ON, the backlight turns on at dark, but only between 5:00PM and 9:00PM. . SET THE CLOCK Press the MODE button and the hour digits in the upper display start flashing. Press the +1 button to adjust the hour value. Note: Hour is 24h at this point. Press the MODE button again to confirm. The minute digits start flashing. Press the +1 button to adjust the minutes value. Press the MODE button to confirm. TEMPERATURE DISPLAY The middle display shows the current e. The lower display shows the history of minimum and maximum temperature. The black pin close to the +/-1hr button and ECO slide is the temperature probe. It has no adjustments, and should not be moved or twisted. Please take care not to break this probe. CHANGE THE DISPLAY There are two display modes for your thermometer. Press the +1 button to change between Mode 1 and Mode 2 or back. Mode 1: All temperatures are in Celsius, and the time mode is 24-hour time. Mode 2: All temperatures are in Fahrenheit, and the time mode is 12-hour (AM/PM) time. IMPORTANT NOTICE Due to heat emission and the protected location of your window, it is possible for the temperature displayed to be higher than the outdoor temperature would be read at another nearby unsheltered location. MAX/MIN TEMPERATURES The Max temperature is updated each day at 8:00AM, and the Min temp is updated each day at 8:00PM. . 5 SPECIFICATIONS Measuring Range: Batteries: -13F to +158F (-24C to +70C) 1 x 1.2V AAA NiMh Rechargeable Battery (included) 1 x 1.5V AAA Non-rechargeable Alkaline Battery (included) WARRANTY INFORMATION La Crosse Technology, Ltd provides a 1-year limited warranty on this product against manufacturing defects in materials and workmanship. This limited warranty begins on the original date of purchase, is valid only on products purchased and used in North America and only to the original purchaser of this product. To receive warranty service, the purchaser must contact La Crosse Technology, Ltd for problem determination and service procedures. Warranty service can only be performed by a La Crosse Technology, Ltd authorized service center. The original dated bill of sale must be presented upon request as proof of purchase to La Crosse Technology, Ltd or La Crosse Technology, Ltd’s authorized service center. La Crosse Technology, Ltd will repair or replace this product, at our option and at no charge as stipulated herein, with new or reconditioned parts or products if found to be defective during the limited warranty period specified above. All replaced parts and products become the property of La Crosse Technology, Ltd and must be returned to La Crosse Technology, Ltd. Replacement parts and products assume the remaining original warranty, or ninety (90) days, whichever is longer. La Crosse Technology, Ltd will pay all expenses for labor and materials for all repairs covered by this warranty. If necessary repairs are not covered by this warranty, or if a product is examined which is not in need or repair, you will be charged for the repairs or examination. The owner must pay any shipping charges incurred in getting your La Crosse Technology, Ltd product to a La Crosse Technology, Ltd authorized service center. La Crosse Technology, Ltd will pay ground return shipping charges to the owner of the product to a USA address only. 6 Your La Crosse Technology, Ltd warranty covers all defects in material and workmanship with the following specified exceptions: (1) damage caused by accident, unreasonable use or neglect (including the lack of reasonable and necessary maintenance); (2) damage occurring during shipment (claims must be presented to the carrier); (3) damage to, or deterioration of, any accessory or decorative surface; (4) damage resulting from failure to follow instructions contained in your owner’s manual; (5) damage resulting from the performance of repairs or alterations by someone other than an authorized La Crosse Technology, Ltd authorized service center; (6) units used for other than home use (7) applications and uses that this product was not intended or (8) the products inability to receive a signal due to any source of interference. This warranty covers only actual defects within the product itself, and does not cover the cost of installation or removal from a fixed installation, normal set-up or adjustments, claims based on misrepresentation by the seller or performance variations resulting from installation-related circumstances. LA CROSSE TECHNOLOGY, LTD WILL NOT ASSUME LIABILITY FOR INCIDENTAL, CONSEQUENTIAL, PUNITIVE, OR OTHER SIMILAR DAMAGES ASSOCIATED WITH THE OPERATION OR MALFUNCTION OF THIS PRODUCT. THIS PRODUCT IS NOT TO BE USED FOR MEDICAL PURPOSES OR FOR PUBLIC INFORMATION. THIS PRODUCT IS NOT A TOY. KEEP OUT OF CHILDREN’S REACH. This warranty gives you specific legal rights. You may also have other rights specific to your State. Some States do no allow the exclusion of consequential or incidental damages therefore the above exclusion of limitation may not apply to you. For warranty work, technical support, or information contact: La Crosse Technology 2817 Losey Blvd. South La Crosse, WI 54601 www.lacrossetechnology.com/support 7 8