1
Manual
Radio with Navigation
Complete manual for the Scania
Radio with Navigation
This manual can be downloaded at www.scania.com/manuals
1
2
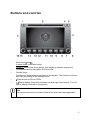
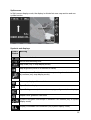
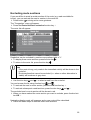
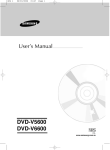
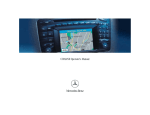
Buttons and controls
1
Arrow keys and
In radio mode: Automatic tuning
CD/MP3: Select track (short press), fast searching forward (long press).
2
CD compartment for Navigation DVD and CDs.
3
Function keys
Functions for these buttons are shown in the display. The functions of these
keys vary according to the selected menu.
4
5
Eject button for CDs or DVDs.
Switch display illumination between day and night (short press); Turn off
and on display illumination (long press).
Note
The manual refers to the numbers listed in this overview where applicable.
3
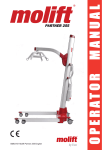
Activate navigation menu for traffic disturbances.
6
8
Right multi-function button.
In a menu: (turn): Make selection, change setting
(press): Open menu; Confirm setting
Radio:
(turn): Tune into station
CD/MP3:
(turn): Select track
ESC Exit menu in operating mode (radio, CD/MP3, Navi).
9
MAP Show map/Reconnect map type.
10
NAVI Start navigation mode.
11
AUX Start operation of an external audio/video source.
12
CD Start CD/MP3 mode.
13
RADIO Start radio mode/MW, LW, FM1, FM2 or FM3 (memory banks).
14
INFO Activate info menu ("System settings", "TIM messages", etc).
15
Left multi-function button:
(turn) Select volume
(short press) Switch on radio, switch off sound/Mute
(long press) Turn off radio
Radio: (short press) Cancel traffic announcement
CD/MP3: (short press) Stop playback/pause
16
Set flagged destination (vehicle position) for navigation.
7
Note
You can also activate the "System settings" menu in the
radio, CD and navigation mode main menus.
Note
It is often possible to browse in the menu with the right multi-function button
and the function keys. This manual describes browsing with the function keys.
ContentsManual Radio with Navigation ...................................................................... 1
Complete manual for the Scania Radio with Navigation
1
Buttons and controls................................................................................................... 3
Important information.................................................................................................. 9
Warning notices
Important!
9
9
Operation .......................................................................................................................................................... 9
Cleaning
Disposal (EU countries)
Instructions for handling CDs and DVDs
Suitable DVDs to use in the navigation system
About the Radio with Navigation manual
12
12
12
12
13
4
Switching the Radio Medium on and off ....................................................................14
Steering wheel buttons
14
Anti-theft protection ...................................................................................................15
Entering code (PIN code)
If you have entered the number incorrectly
Activating anti-theft protection
Deactivating anti-theft protection
15
15
16
17
Configuring the display ..............................................................................................18
Switching the display on and off
18
Changing display lighting from day to night. ....................................................................................................18
Setting display contrast....................................................................................................................................18
Setting the volume.....................................................................................................20
Switching on and off sound reduction (Mute)
Muting when receiving incoming telephone call
Basic volume settings
20
20
21
Changing sound properties........................................................................................23
Selecting language ....................................................................................................24
Operating modes .......................................................................................................26
Navigating..................................................................................................................27
Instrument cluster display
How the navigation system works
Corridor function
Installing the navigation software
Starting navigation
Entering vehicle and load specifics
27
27
28
28
29
29
Navigating - entering destinations .............................................................................31
Entering destinations - an overview
31
Entering characters (letters, numbers, etc.) .....................................................................................................31
Entering characters..........................................................................................................................................32
Deleting............................................................................................................................................................32
Confirming destination input and browsing the result list .................................................................................32
Expanding abbreviated list items .....................................................................................................................33
Selecting route, entering address
33
Entering a country............................................................................................................................................34
Entering towns .................................................................................................................................................35
Entering street, house number and junction ....................................................................................................36
Destination on map..........................................................................................................................................37
POI near the destination area ..........................................................................................................................38
Entering POI destinations
39
POI near destination area (POI) ......................................................................................................................40
POI in area (Vehicle position) ..........................................................................................................................41
POI in town area ..............................................................................................................................................41
POI name.........................................................................................................................................................42
POI: Petrol station............................................................................................................................................42
POI: Parking ....................................................................................................................................................43
Destination from destination memory
43
The last 10 destinations ...................................................................................................................................43
Destination from destination memory ..............................................................................................................44
To flagged destination .....................................................................................................................................44
To home address (Home) ................................................................................................................................45
Destination on map
45
Changing the map scale ..................................................................................................................................46
Other ways to enter destinations - destination position
Other ways to enter destinations - stopover
46
47
5
Deleting stopovers ...........................................................................................................................................48
Navigating - route guidance.......................................................................................49
Starting navigation
49
Route calculation .............................................................................................................................................49
Navigating without Navigation DVD .................................................................................................................50
Route guidance
50
Voice guidance ................................................................................................................................................50
Route guidance................................................................................................................................................51
Symbols and displays ......................................................................................................................................52
Map settings
53
Changing the map scale ..................................................................................................................................53
Automatic zoom ...............................................................................................................................................53
Selecting map type ..........................................................................................................................................54
Map alignment .................................................................................................................................................54
Time format - remaining travel time or arrival time...........................................................................................55
Displaying map content....................................................................................................................................55
Switching audio source
Cancelling route guidance - navigation
Displaying route list
Dynamic navigation
56
56
57
58
New route suggestion when traffic congestion is detected ..............................................................................58
Activating dynamic navigation..........................................................................................................................58
Tuning in to a TMC station...............................................................................................................................58
Reading TMC messages .................................................................................................................................59
Manually entering traffic congestion
Excluding route sections
Setting route options
60
62
63
Route calculation type .....................................................................................................................................63
Excluding/including a route ..............................................................................................................................63
Deactivating dynamic navigation .....................................................................................................................63
Route option symbols ......................................................................................................................................64
Navigating - destination memory ...............................................................................66
Saving new destination
Saving last destination
Flagging and saving destinations
66
67
67
To flag a destination: .......................................................................................................................................68
Saving flagged destination...............................................................................................................................68
Saving current position
Saving your home address
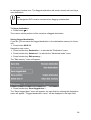
Editing the destination memory
69
71
72
Activating destination memory .........................................................................................................................72
Renaming destinations ....................................................................................................................................73
Sorting destinations in the memory..................................................................................................................73
Deleting destinations .......................................................................................................................................74
Deleting destination memory ...........................................................................................................................75
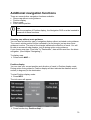
Additional navigation functions ..................................................................................76
Showing map without route guidance ..............................................................................................................76
Position display................................................................................................................................................76
Demo mode .....................................................................................................................................................77
Entering vehicle position ..................................................................................................................................78
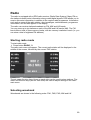
Radio .........................................................................................................................80
Starting radio mode
Selecting waveband
Tuning into stations
80
80
81
Automatic tuning ..............................................................................................................................................81
Manual tuning ..................................................................................................................................................81
Selecting stations from the station list..............................................................................................................81
Storing stations
82
Saving stations automatically (Autostore) ........................................................................................................82
6
Storing stations manually.................................................................................................................................82
Retrieving stored stations
Scanning receivable stations (SCAN)
Radio settings
82
83
83
RDS functions (AF, REG) ................................................................................................................................83
Using the second tuner ....................................................................................................................................84
Traffic information priority
84
Activating/deactivating traffic announcement priority .......................................................................................84
TIM - Traffic Information Memory.....................................................................................................................85
Activating/deactivating recording times............................................................................................................86
Setting standby time ........................................................................................................................................87
Playing CDs...............................................................................................................88
Playing CDs
88
Inserting a CD:.................................................................................................................................................88
Selecting a track
Fast searching
Random play (MIX)
Scanning all tracks (SCAN)
Repeating tracks (REPEAT)
Pausing playback (Pause)
Stopping playback (Stop)
89
89
90
90
90
91
91
MP3 ...........................................................................................................................92
Tips for burning CDs
Starting MP3 playback
Inserting a CD
Selecting folder/title
92
93
93
94
Selecting folders in the MP3 main menu..........................................................................................................94
Selecting tracks in the MP3 main menu...........................................................................................................94
Activating the MP3 browser .............................................................................................................................94
Fast searching
Random play (MIX)
Scanning all tracks on a CD (SCAN)
Repeating tracks (REPEAT)
Pausing playback (Pause)
Stopping playback (Stop)
96
96
96
97
97
97
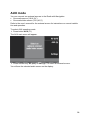
AUX mode .................................................................................................................98
Factory settings .........................................................................................................99
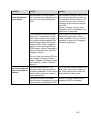
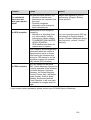
Troubleshooting (FAQ) ............................................................................................100
GENERAL......................................................................................................................................................100
The Radio with Navigation does not switch on automatically when the ignition key is turned........................100
RADIO ...........................................................................................................................................................100
Station search only finds a few radio stations. ...............................................................................................100
The radio automatically switches to another radio programme......................................................................100
CD (AUDIO/MP3) ..........................................................................................................................................100
Playback stops/..............................................................................................................................................100
CD skips or makes strange noises ................................................................................................................100
NAVIGATION.................................................................................................................................................101
Navigation mode won't start...........................................................................................................................101
Route guidance is not accurate .....................................................................................................................102
It is not possible to enter a destination address. ............................................................................................102
The calculated route does not meet your requirements .................................................................................103
No GPS reception..........................................................................................................................................103
No TMC reception..........................................................................................................................................103
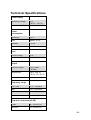
Technical Specifications ..........................................................................................104
Power supply .................................................................................................................................................104
Power consumption ......................................................................................................................................104
7
Fuse...............................................................................................................................................................104
Output ............................................................................................................................................................104
Frequency range............................................................................................................................................104
Frequency response (±3 dB) .........................................................................................................................104
Temperature range ........................................................................................................................................105
Dimensions and weights ................................................................................................................................105
Glossary ..................................................................................................................106
8
Important information
This Radio with Navigation has been manufactured according to the latest technological developments and in compliance of applicable technical safety regulations.
However, the failure to comply with these safety instructions could lead to damage or
injury.
!
!
!
Read carefully and completely through the entire manual before using any of the
functions.
Store the manual in a place that is easily accessible for all users.
Store anti-theft protection codes in a safe place.
Warning notices
The manual contains the following important warning notices:
Note
This symbol is used for certain important information.
Caution
This symbol is used when there is a risk of personal injury or damage to
physical property.
Important!
Operation
The Radio with Navigation is equipped with an operating voltage of 12 V. The system
is intended for installation in a truck.
Consult a professional to perform repairs, installation and removal as needed.
9
Important information!
Do not adjust settings or input information into the navigation system while the
truck is in motion. Stop before you enter a new destination or change system
settings! The navigation system must be used in a way that does not place
you or other road users in danger. Traffic safety must always take top priority.
The risk of serious accident is great if you neglect to keep your full attention on
the traffic situation.
The route and guidance provided by the navigation system are only suggestions. You must always demonstrate good driving behaviour and give your full
attention to the traffic situation. Signs, temporary directions and other regulations always take priority over route guidance from the navigation system.
If you are using vehicle-specific navigation (Truck Navigation), make sure that
you are aware of the applicable conditions for the route the navigation system
has suggested. This applies, for example, to the bearing capacity of roads or
bridges, local regulations, etc.
!
!
!
Familiarize yourself will all functions before you begin driving.
Only use the Radio with Navigation and other functions when traffic situations permit.
The navigation system provides route guidance during navigation. Follow
them only on condition that you do not break any traffic rules!
!
The Scania navigation system has been designed for use in trucks.
!
Adjust the volume to the current traffic situation. You must be able to hear
sounds from emergency vehicles clearly and in good time.
The SCANIA navigation system has been designed for use in trucks.
You can set the navigation system to consider height or axle weight restrictions when it calculates the route. It can then avoid roads or road sections that
cannot be used by the truck, to the extent that this information is available on
the Navigation DVD. This is referred to in the manual as Truck Navigation.
! While driving, always be observant of road traffic restrictions, even when
you are following the recommendations provided by SCANIA in the manual. The information stored on the Navigation DVD may not be complete or
current.
! This Radio with Navigation may only be used in conjunction with the original SCANIA Navigation DVD.
!
Make sure that your vehicle specifics and current load are always input
completely into the navigation system to prevent the system from recommending unsuitable or hazardous routes.
10
Note
Use the demo mode when the truck is stationary to familiarize yourself with
the functions available in the Scania navigation system. Read the section entitled "Demo mode" in the chapter Additional navigation functions".
Risk of injury
Do not open or make alterations to the inside of the Radio with Navigation!
The CD player contains a Class 1 laser which emits invisible laser beams that
could damage your eyes.
! Do not repair or otherwise modify the Radio with Navigation.
! Consult a trained professional to repair and maintain the Radio with Navigation.
Risks associated with improper use of the Radio with Navigation
Do not use Mini-CDs (8 cm diameter) or contoured CDs (Shape CDs) as these
can damage the CD drive.
We do not accept any responsibility for damage to the CD drive caused by the
use of unsuitable CDs.
11
Cleaning
Only use mild detergents to prevent damage to the plastic surface of the Radio with
Navigation. The display should be cleaned with a treated screen wipe designed for
viewing screens and displays. Clean other surfaces with a dry or lightly moistened
cloth and, when needed, a mild detergent.
Disposal (EU countries)
Do not throw electronic products out with the household waste!
Take them to a suitable recycling and recovery centre for disposal.
Instructions for handling CDs and DVDs
To ensure optimal performance, only use clean and undamaged CDs. Damaged or
dirty CDs/DVDs can lead to device malfunction.
Handle CDs and DVDs carefully.
! Avoid damaging CDs/DVDs (e.g. scratches). Store CDs/DVDs in a protective
cover.
! Keep CDs/DVDs free of dirt, dust, fingerprints, etc. Only handle the edges of the
disc.
! Do not expose CDs and DVDs to direct sunlight.
Do not use a circular motion to clean a dirty CD/DVD.
Instead, use a soft, lint-free cloth and wipe the disc from the
centre outwards.
Suitable DVDs to use in the navigation system
Only use original SCANIA media storage devices in conjunction with the Radio with
Navigation.
Note
The DVD drive is not designed for use with burned DVDs. Impaired function
caused by the use of burned DVDs is not covered by the warranty.
12
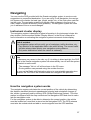
About the Radio with Navigation manual
Read carefully through the manual before using the Radio with Navigation and store
the manual in the truck. The manual describes all functions to help you use the radio,
CD player and navigation system safely and efficiently.
To help you quickly locate safety instructions, these have been marked using the
symbol
with a grey background.
Useful information is indicated by symbol
.
You will also find the following special symbols and fonts used in the manual:
" Identifies an action to be performed.
!
Identifies sequences and lists.
Buttons (e.g. button NAVI 10)
Function keys (e.g. function key Route guidance 3)
Note
The sequence and accessibility of the menu items vary according to the Navigation DVD used and can therefore differ from the images used in the following instructions.
13
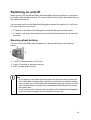
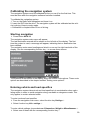
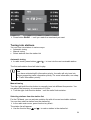
Switching on and off
When you turn on and off the Radio with Navigation with the ignition key, the last active audio mode will be activated. The volume will be at the level it was when the system was last turned off.
You can also switch on the Radio with Navigation without the ignition on. It will then
run for a maximum of one hour.
" To switch on the Radio with Navigation, press the left multi-function button.
" To switch it off, press and hold down the left multi-function button for at least two
seconds.
Steering wheel buttons
You can control the Radio with Navigation by using the buttons on the steering
wheel.
" 1 and 3: Change station or CD track.
" 2 and 4: Increase or decrease volume.
" SRC: Change audio source.
Note
! If you switch on the Radio with Navigation by using the multi-function button, it will switch off again after one hour to preserve the vehicle's battery.
You can then turn on the Radio with Navigation again as often as you like.
You can also stop the system from automatically switching off by turning
the ignition key.
! If you use the multi-function button to switch off the Radio with Navigation,
it will not switch on again when the ignition is turned on.
14
Anti-theft protection
The Radio with Navigation is equipped with anti-theft protection which is activated by
entering a code.
Anti-theft protection means that the Radio with Navigation cannot be switched on
again once it has been disconnected from the battery until a code has been entered.
If you have activated anti-theft protection, the code number must be entered every
time the Radio with Navigation is disconnected from the vehicle battery.
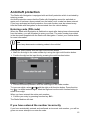
Entering code (PIN code)
When the Radio with Navigation is switched on again after having been disconnected
from the battery, you will be asked to enter your code. The code number is provided
in the document supplied with the Radio with Navigation. Contact your Scania dealer
for more information.
Note
Never keep documents containing codes in the vehicle!
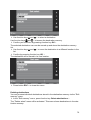
Entering the code number with the right multi-function button 7.
" Mark the first digit in the code number by turning the right multi-function button.
" Confirm the digit on the input line by pressing the multi-function button.
" Perform the same procedure with the other digits in the code number.
To type over digits, select and with the right multi-function button. Press function
key
3 to delete entered digits. Mark the digit and use the multi-function button to
select a new digit.
When you have entered the entire code number:
" Confirm your entry by pressing function key OK 3.
The Radio Medium will start.
If you have entered the number incorrectly
If you have accidentally entered and confirmed an incorrect code number, you will be
given one more attempt to re-enter the code.
15
The Radio with Navigation will lock down after two incorrect attempts to enter the
code. This is to ensure that an unauthorized person cannot attempt to decipher the
correct code. To make another attempt, the Radio with Navigation must remain
switched on for one hour. If the Radio with Navigation is switched off during this time,
the wait time will be reset and will begin to count down from one hour again the next
time it is switched on.
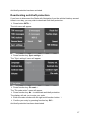
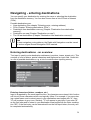
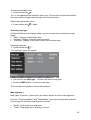
Activating anti-theft protection
To activate anti-theft protection:
" Press button INFO14.
The info menu will appear.
" Press function key Syst. settings. 3.
The "Syst. settings" menu will appear.
" Press function key Pin code 3.
The "Pin-code active" menu will appear.
" Press function key Yes 3 to activate the anti-theft protection.
The display will ask you to enter your code.
" Enter the code number with the right multi-function button 7.
" Confirm your entry by pressing function key OK 3.
16
Anti-theft protection has been activated.
Deactivating anti-theft protection
If you have to disconnect the Radio with Navigation from the vehicle's battery several
times in one day, you may wish to deactivate anti-theft protection.
" Press button INFO14.
The info menu will appear.
" Press function key Syst. settings. 3.
The "Syst. settings" menu will appear.
" Press function key Pin code 3.
The "Pin-code active" menu will appear.
" Press function key No 3 to deactivate anti-theft protection.
The display will ask you to enter your code.
" Enter the code number with the right multi-function button 7:
" Confirm your entry by pressing function key OK 3.
Anti-theft protection has been deactivated.
17
Configuring the display
The Radio with Navigation display shows information from the navigation system,
such as route guidance graphics, CD and CD/MP3 audio sources and the external
audio source (AUX).
You can adjust the level of illumination and thereby the readability of the display to
meet your requirements.
Caution! Damage to the display
The display is not a touch screen. Be careful when using the display and do
not touch it.
! Touching the display with a sharp object will cause damage to the cover
panel.
! Only use a lint-free cloth or special cleaning wipe designed for viewing
screens to clean the display. Do not use any solvents, such as turpentine
or petrol, as these will corrode and damage the display.
Switching the display on and off
The Radio with Navigation display can be switched on and off.
5 for more than two seconds.
" To switch off the display, press and hold button
" To switch on the display, briefly press button
5.
Changing display lighting from day to night.
The illumination of the display can be changed from day to night mode.
" To switch between the two, press button
5.
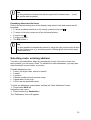
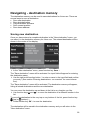
Setting display contrast
The contrast of the display can be configured separately for day and night.
" Press button INFO14.
The info menu will appear.
" Press function key Syst. settings. 3.
The "Syst. settings" menu will appear. The "Contrast day" and "Contrast night" settings each have their own status bars.
18
" Set desired contrast level using function keys "Contrast day" and "Contrast night" 3.
As you change the contrast level, the contrast of the display will increase or decrease
by corresponding degrees.
" Press button ESC 8 to close the menu.
19
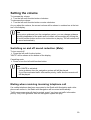
Setting the volume
To increase the volume:
" Turn the left multi-function button clockwise.
To decrease the volume:
" Turn the left multi-function button counter-clockwise.
As you adjust the volume, the current volume will be shown in a status bar at the bottom of the display.
Note
During voice guidance from the navigation system, you can change guidance
volume independent of the audio source's basic volume setting by turning the
left multi-function button as the voice instruction is playing. The set volume will
be saved automatically.
Switching on and off sound reduction (Mute)
To turn sound off:
" Press the left multi-function button.
"MUTE" will be shown at the bottom of the display.
Cancelling mute:
" Press or turn the left multi-function button.
Note
Even if MUTE is activated:
! Voice guidance from the navigation system will still be played.
! If you have activated traffic information priority, traffic announcements will
still be played.
Muting when receiving incoming telephone call
If a mobile telephone has been connected to the Radio with Navigation and a telephone call comes in, the Radio with Navigation will be muted automatically.
Traffic announcements will also be muted, even if you have set traffic information
priority. Only voice guidance from the navigation system will play.
20
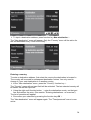
Basic volume settings
The following basic settings can be adjusted in the Radio with Navigation:
! "GALA" (Graduated Audio Level Adjustment): Sensitivity of speed-dependent volume regulation (due to noise from the truck)
! "TA min": Minimum volume for traffic announcements
! "NAV for tel": Navigation system volume for voice guidance during telephone
calls.
! "NAV min": Minimum volume for navigation system
! "NAV mute": Permanent mute of navigation system voice guidance.
To change basic volume settings:
" Press button INFO14.
The info menu will appear.
" Press function key Syst. settings 3.
The "Syst. settings" menu will appear.
" Press function key Volume 3.
The "Volume" menu will appear. Status bars will appear for each setting.
" Use the function keys 3 to set the desired values for each setting.
As you adjust the settings, the volume will increase or decrease by corresponding
degrees.
21
Note
Settings that cannot be changed are shown in grey-tone.
" Press button ESC 8 to close the menu.
22
Changing sound properties
You can change sound properties separately for each audio source:
! "Treble": High frequency volume
! "Mid": Middle frequency volume
! "Bass": Low frequency volume
Balance is set concurrently for all audio sources:
! "Balance": distribution of volume between right and left speakers.
Note
It is not possible to change sound properties during a traffic announcement or
telephone call.
To change sound properties:
" Select RADIO 13, CD 12, or AUX 11, to switch to the audio source you wish to
adjust settings on.
" Press the INFO button 14.
The info menu will appear.
" Press function key Sound 3.
The sound properties menu will appear, in this case for FM radio.
" Use the function keys 3 to set the desired values for each setting.
Note
Sound property values can also be adjusted by using the right multi-function
button 7.
" Press the ESC button 8 to close the sound properties menu.
23
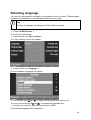
Selecting language
You can set a language for navigation voice guidance and for menus. The languages
available vary depending on the Navigation DVD you are using.
Note
To select a language, the Navigation DVD must be inserted.
Setting a language:
" Press the INFO button 14.
The info menu will appear.
" Press function key Syst. settings 3.
The "Syst. settings" menu will appear.
" Press function key Language 3.
A list of available languages will appear.
" Use function keys
and
3 to select the language you want to use.
You can use function keys and 3 to browse the language lists.
" Confirm your selection by pressing function key OK 3.
The selected language will be displayed.
24
" Press ESC 8 to close the menu.
25
Operating modes
You can choose between the following operating modes:
! Navigation system
! Radio
! CD/MP3
! AUX (external source).
Use the RADIO 13, CD 12, AUX 11 and NAVI 10 buttons to select operating mode.
If you have activated route guidance but find yourself in another operating mode (radio mode, for example), you can use the MAP 9 button to switch quickly back to
navigation display.
The function keys 3 change function according to how the Radio with Navigation is
used. The currently applicable function will be shown on the display next to the button.
Note
Settings that cannot be changed are shown in grey-tone.
26
Navigating
You can use the DVD provided with the Scania navigation system to receive route
suggestions to a specified destination. If you are using Truck Navigation, the navigation system will consider the load type, length, weight, etc. of the truck when calculating the route. The navigation system will provide route guidance in the form of arrows, maps or spoken directions (voice guidance). The navigation system will warn
you in advance of turns or road changes.
Instrument cluster display
The navigation system is designed to show information in the instrument cluster display window. See the section entitled "Display Menus" in the Driver's Manual for
more information on activating the navigation system instrument cluster display.
Risk of accident
The navigation system will not notify you of road signs, traffic directions, etc.
! Pay attention to the applicable traffic rules while driving. The current traffic
situation always takes priority over navigation route guidance.
! Only enter destinations when the vehicle is stationary.
Note
If it becomes very warm in the cab, e.g. if it is sitting in direct sunlight, the DVD
drive in the Scania navigation system will automatically turn off and the system
will switch to radio mode.
!
!
The message "No int. cd" will be shown in the CD menu.
Route guidance can proceed using the corridor function.
As soon as the Radio with Navigation returns to a permissible operating temperature, the DVD drive will be reactivated and navigation will proceed.
How the navigation system works
The navigation system calculates the current position of the vehicle by determining
the distance travelled (electronic speedometer signals) and orientation changes in
the vehicle (gyroscope) and by utilizing GPS (Global Positioning System). This information is compared with the map contents on the Navigation DVD and used to calculate the navigation route.
For the navigation system to be able to determine the current position, the vehicle
must be located on a road that is stored on the Navigation DVD. The GPS antenna
must also be unobstructed and able to receive signals from the GPS satellites.
27
Corridor function
The corridor function makes it possible for you to remove the Navigation DVD during
route guidance and play an audio/MP3 CD.
If you input a destination and then start route guidance, the navigation system will
save the calculated route and its surroundings as a "corridor". Navigation is possible
within the corridor without the Navigation DVD. Route guidance will appear in the
display as arrows indicating driving direction (symbol mode).
If the corridor has been saved, the Navigation DVD can be ejected with the 4 button. If the corridor has only been partially saved, the corridor status will be shown
instead. You now have two options:
1. You can wait a moment for the corridor to finish saving. Then press the 4 button
again. (This may take up to 20 minutes, depending on the size of the corridor).
2. You can also stop the saving process by pressing the 4 button again. The DVD
will be ejected.
Note
You will need to insert the Navigation DVD again:
! If you leave the corridor during your trip.
! If you start a new route guidance.
! If the Radio with Navigation is switched off.
In these cases, you will be asked to insert the Navigation DVD again.
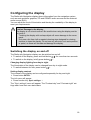
Installing the navigation software
The navigation software will be stored in the system's memory the first time the Navigation DVD is inserted.
Note
Only use original SCANIA Navigation DVDs. The Radio with Navigation cannot read other navigation DVDs or burned navigation DVDs. "No NAVI DVD"
will appear in the display. Insert a DVD for navigation.
Installing the navigation software:
" Insert a Navigation DVD with the printed side up in the drive and push it into the
CD compartment 2, until you feel a slight resistance.
The DVD will be drawn automatically into the drive and inspected.
Installation of the navigation software will begin and a status bar illustrating the progress of the installation will appear in the display. Wait several minutes before initiating route guidance. You can activate radio mode while waiting.
28
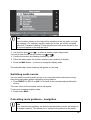
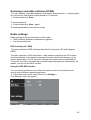
Calibrating the navigation system
The navigation system must be calibrated before you use it for the first time. This
must be done after the navigation software has been installed.
To calibrate the navigation system:
1. Turn on the Radio with Navigation and leave it on.
2. Insert the DVD into the drive. The navigation system will be calibrated as the vehicle is driving. Keep to major roads.
3. Calibration is complete after 50 km of driving.
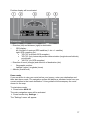
Starting navigation
" Press button NAVI 10
The navigation system main menu will appear.
The last destination entered will be shown on the left side of the display. The first
time the system is used, a message will appear, indicating that no destination has
been defined.
The navigation main menu headings are listed in a row on the right hand side of the
display. Use the corresponding function key 3 to access these menus.
The symbols at the bottom of the display show the current route options. These route
options are described in the chapter entitled "Setting route options".
Entering vehicle and load specifics
The navigation system takes truck and load specifics into consideration when calculating routes in order to avoid navigation along unsuitable or dangerous roads. This
only applies to certain selected roads.
To enter truck and load specifics
" From the navigation main menu, select function key Settings 3.
" Select function key Veh. settings 3.
To enter vehicle settings, choose between Dimensions, Weight or Miscellaneous 3.
" Select one of these with the corresponding function key 3.
29
" Select the desired vehicle setting with the function key 3.
" Turn the right multi-function button 7 to set the values and confirm by pressing.
Press the ESC 8 button to go back to the main menu "Veh. settings.":
To enter load specifics,
" Select load specifics with function key Load 3.
" Press function key 3 in the "Load" menu to change hazardous goods classification from "Yes" to "No."
To get back to the "Veh. settings" main menu
" Press the ESC 8 button.
Change the specifics you consider to be important according to the instructions
above. Each selection is saved when you press ESC.
Note
If you change the vehicle and load specifics during active route guidance, the
route will be recalculated as soon as you exit the "Settings" menu. The
changed settings will be taken into consideration when calculating new routes.
30
Navigating - entering destinations
You can specify your destination by entering the name or selecting the destination
from the destination memory. You can also choose from a list of Points of Interest
(POIs).
Possible destinations are:
! New destination (See chapter "Selecting route, entering address).
! POIs (Chapter "Entering destinations, POIs").
! Destination from destination memory (Chapter "Destination from destination
memory").
! Destination on map (Chapter "Destination on map").
! The 10 last destinations (Chapter "Destination from destination memory").
Note
To start navigation route guidance, the Radio with Navigation must be turned
on and an original Scania Navigation DVD inserted.
Entering destinations - an overview
Text input is used to enter destination addresses (countries, towns, streets, etc). This
consists of a list of letters, special characters and digits and an input field. Under this
is a list of possible destinations, e.g. a list of countries when inputing country.
Entering characters (letters, numbers, etc.)
Input is supported by the smart spell function. As characters are entered, this function
will list only those characters which can logically follow. For example, if you are entering a street name and no street name in your destination area begins with "A", then
"A" will be shown in grey tone. Similarly, "C" will appear in grey-tone if you enter "B"
as the first letter and no street in your destination area begins with the letter combination "BC". If the final entry can be determined from the first input letters, the entry will
be completed automatically.
31
Entering characters
Return to these instructions when you would like to enter a destination or other information.
" Select a character by turning the right multi-function button. 7.
" Confirm your selection by pressing the right multi-function button 7.
The character will then appear on the input line.
" Follow the same steps for all additional characters to enter your destination address.
Using the right multi-function button 7, select the
and to type over a character.
symbol to insert a space or
Deleting
To delete an incorrect character:
" Press function key
3.
The cursor will shift one position to the left. Smart spell entry completions for this
character will also be deleted.
Confirming destination input and browsing the result list
" To confirm your destination entry, press function key OK 3.
The input destination address will appear in a result list, e.g. a list of countries if entering a country.
" You can use the
other country).
and
3 function keys to select another destination (e.g. an-
" To browse in the list, press the
and
3 function keys.
If an arrow appears in grey-tone, you have reached the end of the list.
" To select an item from the list, press function key OK 3.
The destination address will be activated for navigation.
32
Note
It is also possible to browse lists with the right multi-function button 7 (turn)
and confirm entries (press).
Expanding abbreviated list items
Due to the limited viewing area of the display, long items in lists and menus are abbreviated.
" To show an abbreviated item in its entirety, press function key 3.
" To return to list view, press one of the following buttons:
!
!
!
Function key 3
Function key OK 3
The ESC button 8
Note
It is often possible to browse the menus by using the right multi-function button
and the function keys, e.g. activating menus. Browsing with the function keys
is described here.
Selecting route, entering address
To enter a new destination, begin by entering the country. Once the country has
been entered, you can input a town. To indicate the exact destination, you may then
enter the street, house number or junction.
Possible destinations are:
! A town (for larger cities, centre or district)
! A street
! A junction
! A house number/a house number range
! A destination on the map
! A POI near the destination area
To enter an address as a destination, activate the "New destination" menu.
" Press button NAVI 10
Navigation main menu.
" Press function key Destination 3.
The "Destination" menu will appear.
33
" To input a destination address, press function key New destination 3.
The "New destination" menu will appear. Only the "Country" menu will be active for
the first destination entry. Enter the country.
Entering a country
To enter a destination address, first select the country the destination is located in.
The country will be saved for subsequent destination entries. You only need to
change it if your next destination is in another country.
" In the "New destination" menu, press the "Country" function key 3.
The "Country" menu with an input field will be activated. The last selected country will
be shown on the text input line.
" Using the right multi-function button 7, enter the destination country on the input
line and confirm the entry. (See section "Entering destinations - an overview").
The list of countries will appear.
" Re-confirm your selection by pressing the function key OK 3.
The "New destination" menu will appear again. The "Town/postcode" menu is now
active.
34
Note
The selected destination country must be re-entered when you insert a new
Navigation DVD.
Entering towns
Enter a town name or a postcode for the destination.
Entering the postcode allows the destination town to be located automatically. In
smaller communities, one postcode may be used for several towns or areas. In this
case, select the town after entering the postcode.
Note
! Only postcodes listed on the Navigation DVD can be entered.
! Postcodes belonging to post boxes cannot be used for entering destinations.
" In the "New destination" menu, press the Town/postcode function key 3.
The "Town" menu and input field will be activated. The last selected town will be
shown in the text input field.
Note
The 20 last entered towns are stored. If you enter the first letters in one of the
20 last towns, this town will appear on the display. If no matches are found,
the first matching entry from the full list of towns will appear.
" Using the right multi-function button 7, enter the town name or postcode in the
input field and confirm your entry. (See section "Entering destinations - an overview").
The list of towns will appear.
Note
If there is more than one town of this name in the country, you can specify the
exact town from a further list.
" Re-confirm your selection by pressing the function key OK 3.
The town will be input as the destination country. The "New destination" menu will
appear again.
Choose from among the following options:
! "Street": Enter the name of the street you want to go to. (See section "Entering
street numbers and junctions").
! "Dest. area": You can select a specific Point of Interest from a list of places in the
selected area. (See section "POI near the destination area").
! "Dest on map": Indicate the destination with using the crosshairs on the map.
(See section "Destination on map").
! "Route guidance": Start route guidance (See chapter "Navigating").
35
!
"Save": Save a destination address. (See chapter "Navigating - destination memory").
Entering street, house number and junction
To enter a house number or a junction, you must first select a street.
Street
" In the "New destination" menu, press the Street function key 3.
The "Street" menu will be activated. You can now enter the street number.
" Using the right multi-function button 7, enter the name of the street in the input
field and confirm your entry. (See section "Entering destinations - an overview").
The list of streets will appear.
Note
! To simplify searching, long street names may be listed several times in
different ways, e.g. "RAABE-WEG, WILHELM-" and "WILHELM-RAABEWEG".
! If there is more than one street of this name in the town, you can specify
the exact street from a further list.
" Re-confirm your selection by pressing the function key OK 3.
The street will be shown as the selected street. The "New destination" menu will appear again.
Choose from among the following options:
! "House number"/"Intersection"/"Dest. on map": This is the precise destination
specification with house number, junction or with crosshairs the map. (See section
"House number", "Junction" or "Destination on map").
! "Dest. area": Point of Interest in destination area. (See section "POI near the destination area,).
! "Route guidance": Start route guidance (See chapter "Navigating - route guidance").
! "Save": Save a destination address. (See chapter "Navigating - destination memory").
Note
If there is no data available for house numbers, junctions and destinations for
the selected town/area, these will be shown in grey-tone.
House number
Enter the house number in the input field.
" In the "New destination" menu, press the House number function key 3.
The "House number" menu will be activated. An input field will appear.
36
" Using the right multi-function button 7, enter the house number or the house number range in the input field and confirm your entry. (See section "Entering destinations - an overview").
If the house number entered is not listed in the Navigation DVD, a list of available
house numbers will appear. Select one of these.
The house number will be input as the destination address. The "New destination"
menu with the complete travel destination will appear.
Choose from among the following options:
! "Route guidance": Start route guidance - navigation. (See chapter "Navigating").
! "Save": Save the destination address. (See chapter "Navigating - destination
memory").
Intersection Junction
The ”Intersection " menu shows all the cross-streets for the entered street.
" In the "New destination" menu, press the Intersection function key 3.
The "Junction" menu will be activated. The menu will display a list of junctions.
" Using function keys and 3, select a junction from the list.
(See section "Entering destinations - an overview").
" Confirm your selection by pressing function key OK 3.
The junction will be input as the destination address. The "New destination" menu
with the complete travel destination will appear.
Choose from among the following options:
! "Route guidance": Start route guidance - navigation. (See chapter "Navigating").
! "Save": Save the destination address. (See chapter "Navigating - destination
memory").
Destination on map
Once you have entered a destination town/area, you can mark the exact destination
on the map with the crosshairs.
Note
The crosshairs will always be positioned in the centre of the specified
town/area. When used to mark a street, the crosshairs will be aligned with the
street.
" In the "New destination" menu, press the Dest. on map function key 3.
The map will appear.
The crosshairs will be positioned in the middle of the map, in the centre of the selected town/area.
37
" You can change the map scale by turning the right multi-function button 7.
" Use the four function keys
lected destination.
,
,
and
3 to move the crosshairs to the se-
As the crosshairs move over a street or square, it will be identified by name in the
upper display list. When you move the crosshairs outside the edge of the map, the
map quadrant will be moved correspondingly.
" To confirm the town/address as your destination, press function key OK 3.
Navigation will begin with a route calculation. For more information, see chapter
"Navigating - route guidance".
POI near the destination area
Once you have entered a town/area destination, you can choose a special destination ("POI") near the destination area. POI = Point of interest.
POIs may include:
! Motorway link roads, petrol stations
! Railway stations, airports
! Hotels, restaurants
! Shopping centres
! Other public establishments
" In the "New destination" menu, press the Dest. area function key 3.
The "POI" menu will be activated. It will show ten categories of POI.
" Use the function keys 3 to select a "POI" main category.
An overview of the sub-categories will appear. For example, if you select "Car" as the
main category, you can then choose between "Car dealer", "Petrol station" and "Driving schools".
38
Note
! Point of Interest categories that are not found in the destination area are
shown in grey-tone.
! Available Points of Interest vary according to the Navigation DVD used and
may differ from the examples given here.
" Use the function keys
and
3 to select a sub-category.
You can browse the Points of Interest list using the function keys
" Confirm the sub-category with function key OK 3.
and
3.
A list of available POI will appear. The distance to the destination will be given.
" Using function keys and 3, select a POI and confirm by pressing function
key OK 3.
Navigation will begin with a route calculation.
For more information, see "Navigating - route guidance".
Entering POI destinations
This function permits the selection of POI in the area where the vehicle is located or
in the entire country.
You can also select petrol stations and parking areas directly in your area ("POI: Petrol station" and "POI: Parking")
Open the "POI" menu
" Press button NAVI 10
Navigation main menu.
" Press function key Destination 3.
The "Destination" menu will appear.
" Press POI 3.
The "POIs" menu will appear.
39
Choose from among the following options:
! "Dest. area" POI near the last entered travel destination. (Section "POI near the
destination area")
! "Position area": POI near the current vehicle position. (Section "POI in area")
! "Town area": POI near a town. (Section "POI in town area")
! "Country": POI in another country or a foreign area (See section "POI name" or
"POI in town area")
! "Name search": POI throughout country. (See section "POI name").
Note
Available Points of Interest vary according to the Navigation DVD used and
may differ from the examples given here.
POI near destination area (POI)
The destination area in 'POI near the destination area' always refers to the last entered travel destination. First select the main category POIs, then the sub-category
and finally a specific POI.
" In the "POI" menu, press the Dest. area function key 3.
The "POI" menu will be activated. It will show ten categories of POI.
" Select a POI main category by pressing the corresponding function key 3.
40
A list of sub-categories will appear. For example, if you select "Car" as the main
category, you can then choose between "Car dealer", "Petrol station" and "Driving
schools".
" Use the function keys and 3 to select a POI sub-category.
You can browse the POI list using function keys
" Confirm by pressing function key OK 3.
and
.
A list of available POIs will appear. The distance to the destination will be given.
" Using function keys and 3, select a POI and confirm by pressing function
key OK 3.
Navigation will begin with a route calculation. For more information, see "Navigating route guidance".
POI in area (Vehicle position)
This function allows you to simply and conveniently find POI near the current vehicle
location.
" In the "POIs" menu, press the Position area function key 3.
The "POI" menu will be activated. The menu will show ten categories of POI.
" Select a POI main category by pressing the corresponding function key 3.
A list of sub-categories will appear. For example, if you select "Car" as the main
category, you can then choose between "Car dealer", "Petrol station" and "Driving
schools".
" Use the function keys and 3 to select a POI sub-category.
You can browse the POI list using function keys
" Confirm by pressing function key OK 3.
and
.
A list of available POIs will appear. The distance to the destination will be given.
" Using function keys and 3, select a POI and confirm by pressing function
key OK 3.
Navigation will begin with a route calculation. For more information, see "Navigating route guidance".
POI in town area
You can select POI in a specific town area.
" In the "POI" menu, press the Town area function key 3.
The "POI" menu will be activated. An input field for a town/area will appear.
Note
! The last entered town/area will be automatically offered as the destination.
You can select this by pressing the OK function key 3.
! The first time you enter a destination, the "Town area" will be shown in
grey-tone (not active). First enter the country where the POI is located.
(See chapter "Selecting route, entering address).
! ".)
41
" Use the right multi-function button 7 to enter the town name in the input field and
confirm your entry. (See section "Entering destinations - an overview").
The "POI" menu will be activated and show ten categories of POI.
" Select a main category by pressing the corresponding function key 3.
An overview of the sub-categories will appear. For example, if you select "Car" as the
main category, you can then choose between "Car dealer", "Petrol station" and "Driving schools".
" Use function keys and 3 to select a sub-category.
You can browse the POI list using function keys
" Confirm by pressing function key OK 3.
and
.
A list of available POIs will appear. The distance to the destination will be given.
" Using function keys and 3, select a POI and confirm by pressing function
key OK 3.
Navigation will begin with a route calculation. For more information, see "Navigating route guidance".
POI name
You can search the Navigation DVD for any POI by entering the name.
" In the "POI" menu, press the Name search function key 3.
The "Name search" menu will be activated and an input field for entering the POI
name will appear.
Note
The first time you enter a destination, the "Name search" menu will be shown
in grey-tone (not active). First enter the country where the POI is located. (See
chapter "Selecting route, entering address).
" Enter the POI name in the input field and confirm your entry. (See section "Entering destinations - an overview").
A POI name list will appear.
" Re-confirm your selection by pressing the function key OK 3.
Navigation will begin with a route calculation. For more information, see chapter
"Navigating - route guidance".
POI: Petrol station
You can simply and conveniently start route guidance to a petrol station nearby.
" In the "Destination" menu, press the Petrol station function key 3.
A list of petrol stations in your area will appear.
" Using function keys and 3, select a petrol station and confirm by pressing
function key OK 3.
42
Navigation will begin with a route calculation. For more information, see chapter
"Navigating".
POI: Parking
You can simply and conveniently find the nearest parking area and begin navigating
there.
" In the "Destination" menu, press the Parking function key 3.
A list of parking options in your area will appear.
" Using function keys and 3, select a parking option and confirm by pressing
function key OK 3.
Navigation will begin with a route calculation. For more information, see "Navigating route guidance".
Destination from destination memory
You can retrieve saved destinations from the destination memory and start navigation
to these destinations.
Open the "Destination" memory.
" Press button NAVI 10
Navigation main menu.
" Press function key Destination 3.
The "Destination" menu will appear.
Select from among the following destinations in the destination memory:
! "Last 10": The last ten travel destinations
! "Dest. memory": Destinations saved in the destination memory
! "Advanced" "To flagged destination": Set flag destination
! "Home": Home address
The last 10 destinations
The navigation system automatically saves the last ten destinations entered. You can
use these destinations directly as needed. When the memory becomes full, the oldest destinations will be replaced as new destinations are entered.
To retrieve one of the last 10 destinations:
" In the "Destination" menu, press the Last 10 function key 3.
The last ten travel destinations will appear.
" Use the corresponding function key 3 to select one of the last ten destinations.
Navigation will begin with a route calculation. For more information, see "Navigating route guidance".
43
Destination from destination memory
You can save often used destinations in the destination memory (Chapter "Destination memory") and start navigation from there.
To retrieve destinations from the destination memory:
" In the "Destination" menu, press the Dest. memory function key 3.
The destination memory will be activated. This will show a list of the saved destinations.
" Use function keys and 3 to select a destination from the destination memory.
You can browse the list using function keys and .
" Confirm the destination by pressing function key OK 3.
Navigation will begin with a route calculation. For more information, see "Navigating route guidance".
To flagged destination
A flag destination marks a position that you set en route with the 16 button. (See
section "Flagging and saving destinations" in the "Destination memory" chapter).
44
To start navigation to a flagged destination:
" In the "Destination" menu, press the Advanced function key 3.
The "Advanced" menu will appear.
" Press function key To flagged dst. 3.
Navigation will begin with a route calculation. For more information, see "Navigating route guidance".
To home address (Home)
You can save your home address (section "Saving home address" in the "Destination
memory" chapter) and quickly begin navigation home.
To start navigation to your saved home address:
" In the "Destination" menu, press the Home function key 3.
Navigation will begin with a route calculation. For more information, see "Navigating route guidance".
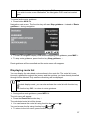
Destination on map
You can enter a destination in map display mode by moving the crosshairs over the
map and placing them on the destination.
You can adjust the map scale to, for example, quickly move the crosshairs over large
distances.
Note
Entering a destination on the map will be quicker if you have already entered a
destination (town or street). See section "Entering a town" in the "Entering
destination - address" chapter).
" Press button NAVI 10
Navigation main menu.
" Press function key Destination 3.
45
The "Destination" menu will appear.
" In the "Destination" menu, press the Advanced function key 3.
The "Advanced" menu will appear.
" Press function key Dest. on map 3.
The map will appear. The crosshairs will be centred on the map around the last destination entered. If no destination has been entered yet, the crosshairs will indicate
the vehicle's current location.
" Use the four function keys
destination.
,
,
and
3 to move the crosshairs to the travel
As the crosshairs move over a street or square, it will be identified by name in the
display.
When you move the crosshairs outside the edge of the map, the map quadrant will
be moved correspondingly.
" Press function key OK 3 to confirm travel destination.
Navigation will begin with a route calculation. For more information, see "Navigating route guidance".
Changing the map scale
To change the map scale:
" Turn the right multi-function button 7.
The map scale will be reduced or increased in increments from a minimum area of 50
m to a maximum area of 200 km.
Other ways to enter destinations - destination position
You can also enter a destination by inputting geographic coordinates (longitude and
latitude).
To start navigation to a destination position:
" In the "Destination" menu, press the Advanced function key 3.
The "Advanced Mode" menu will appear.
" Press function key Position dest. 3.
46
The "Destn. position" menu will appear.
" Use the Latitude and Longitude function keys 3 to enter the coordinates for
each.
Changing coordinates:
" Mark a coordinate unit (degrees, minutes or seconds) by turning the right multifunction button 7.
" Press the right multi-function button 7 to select the coordinate unit.
The coordinate unit will appear with a coloured background, indicating that changes
can be made.
" Change the coordinates by pressing the right multi-function button 7.
" Confirm the set values by turning the right multi-function button 7.
" Follow the same steps for all other coordinates.
To start navigation to the coordinates shown:
" Press function key OK 3.
Navigation will begin with a route calculation. For more information, see "Navigating route guidance".
Other ways to enter destinations - stopover
You can enter a stopover destination at any time, even during active route guidance.
To enter a stopover destination:
" Press button NAVI 10
Navigation main menu.
" Press function key Stopover 3.
The "Stopover" menu will appear.
47
Enter the destination by selecting from among the options in the same way as in the
"Destination" menu.
! New destination (Chapter "Selecting route, entering address - address")
! POI (Chapter "Entering destinations - POI")
! Destination from the destination memory (Chapter "Entering destinations - Destination from destination memory")
! Destination on the map (Chapter "Destination on map")
! The last 10 destinations (Chapter "Destination from destination memory")
" Enter a destination as described in chapter "Navigating - entering destination")
" After entering the stopover destination, press function key Route Guidance 3 to
start navigation.
Navigation will begin with a route calculation. For more information, see "Navigating route guidance".
Deleting stopovers
A stopover destination can be deleted at any time. The route to the final destination is
recalculated and navigation will continue.
" Press button NAVI 10
Navigation main menu.
" Press function key Stopover 3.
The "Stopover" menu is activated and shows the entered stopover destination.
" Press function key Del. stopover 3.
The route is recalculated and navigation will continue.
48
Navigating - route guidance
Traffic safety
Traffic safety must always come first. You are at risk for serious accidents if
you do not keep your full attention on the traffic situation.
The navigation system provides route guidance during navigation. Follow
these recommendations only on condition that you do not break any traffic
rules! Traffic signs and rules always take priority over route guidance.
Starting navigation
After a destination is entered, the destination address will be shown in the display.
To start navigation to this destination:
" Press the Route guidance function key 3.
Navigation will begin with a route calculation.
Note
If you deviate from the recommended route, the navigation system will automatically calculate a new route.
Route calculation
Once you initiate route guidance, the navigation system will calculate the route. This
may take a few seconds.
If dynamic navigation is activated, a notice stating that the second tuner will be used
for route calculation will also be displayed (See chapter "Dynamic navigation").
49
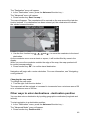
Navigating without Navigation DVD
The corridor function makes it possible for you to remove the Navigation DVD during
navigation and play an audio or MP3 CD.
Because the corridor must first be saved, do not remove the Navigation DVD until the
corridor has been completely saved. The saving process may take up to 20 minutes.
The status of the corridor will be displayed when the corridor has been only partially
saved and you press button 4 to eject the Navigation DVD. You then have the following options:
! Press button 4 again. This will cancel navigation.
! Or wait until the corridor has been saved completely.
Corridor navigation uses graphics such as arrows to show the direction of travel.
Route guidance
If the vehicle is positioned on a road stored in the Navigation DVD, route guidance
will consist of voice guidance and display graphics.
Note
In the following situations, only an arrow will be shown on the display during
navigation:
! The truck is positioned on a road that is not stored on the Navigation DVD.
! The navigation system cannot calculate a route to the selected destination.
! You have left the area stored on the Navigation DVD.
In these situations, follow the arrow symbol. When you return to a road recognized by the navigation system, normal route guidance will resume.
Voice guidance
The navigation system supports voice guidance navigation and notifies you in advance of turns ahead. Voice guidance also announces names of highways, freeways
and motorways.
To repeat the last voice guidance instruction:
" Press function key
3.
Note
Use the left multi-function button to change the voice guidance volume as an
instruction is playing. The setting will be saved and used for the remainder of
the voice guidance instructions.
50
Route guidance
Route guidance is provided during navigation. You can choose from among three
types of navigation guidance. These are described below.
To switch between display types:
" Press the MAP button 9 until the desired type of route guidance is shown.
Note
If you use the saved corridor during navigation, the system will automatically
switch to symbol mode and you will not be able to select a different display
mode.
Map display mode
In map display mode, the entire display is used to show the map. The calculated
route is marked in blue. The current vehicle position is shown with a red triangle
pointing in the direction of travel. If the navigation system maps for the current area
support Truck Navigation, a white truck symbol will be shown. If the navigation system cannot provide Truck Navigation support, a cross will appear over the truck.
The navigation system supports Truck
Navigation on the current road.
The navigation system does not support
Truck Navigation on the current road.
Symbol display mode
In symbol display mode, arrow symbols will be used to support voice guidance. It will
also indicate if dynamic navigation is active (TMC) and if there is GPS reception.
The navigation system supports Truck
Navigation on the current road.
The navigation system does not support
Truck Navigation on the current road.
51
Split-screen
In Split-screen display mode, the display is divided into one map section and one
symbol section.
Symbols and displays
Symbol
window
Meaning
Distance to destination
Arrival time/remaining time
Map scale (only in map display mode)
Map alignment (north or in direction of travel)
Automatic zoom: Small scale on motorways, enlarged scale in cities and
at junctions (only map display mode).
Move map display with crosshairs
Open Position display
Open Settings menu (submenus, i.e. map type, alignment, time display)
Repeat voice guidance instruction
Dynamic navigation and receipt of available TMC stations (only in symbol
display mode)
Display of available GPS satellites (only symbol display mode)
52
Map settings
In Map and Split-screen display modes, you can adjust map scale and alignment.
Symbol display does not use any map. That is why map display is not possible here.
Note
The display illumination for the function keys will disappear after approx. 20
seconds. To show the functions again, press one of the function keys 3.
Changing the map scale
It is possible to change the map scale during navigation in Map or Split-screen display modes. There is one exception - map scale cannot be changed in "Oversight"
map type mode.
" Turn the right multi-function button 7 to increase or decrease map scale (zoom in
or out).
The map scale will be reduced or increased in increments from a minimum area of
50 m to a maximum area of 200 km.
Automatic zoom
During navigation, the navigation system can automatically adapt the map scale to
the current driving situation.
While driving on motorways, a smaller map scale will be used to provide a better
overview. In cities and at junctions, the scale will be larger to provide greater detail.
53
Activating automatic zoom:
3.
" Press function key
An "A" will appear on the automatic zoom icon. This function will be deactivated if
the map scale is changed with the right multi-function button 7.
Deactivating automatic zoom:
" Press function key
3 again.
Selecting map type
In Map and Split-screen display modes, you can choose from among these map
types:
! "Dest.": Display of destination area
! "Location": Display of current vehicle position
! "Overview": Display of the entire route on an overview map
Selecting map type:
" Press function key
3.
The "Settings" menu will appear.
" Use function key Map type 3 to select the desired map type.
" Press the MAP button 9 to return to the map.
The selected route guidance format will be shown.
Map alignment
Map types "Overview" (entire route) are always shown in north-south alignment.
Only the "Current position" and "Destination" map type mode permits selection
from among the following map alignment formats:
!
!
"North": North-south map alignment
"Travel": Map alignment in direction of travel
54
!
"Auto": Map alignment is adapted automatically to the map scale. For example,
detailed maps (e.g. town areas) are aligned in the direction of travel and overview
maps (e.g. freeways) are aligned in north-south direction.
To select map alignment (only for "Location" map type):
3.
" Press function key
The "Settings" menu will appear.
" Use function key "Alignment" 3 to select desired map alignment.
" Press the MAP button 9 to return to the map.
The selected route guidance alignment format will be shown.
Time format - remaining travel time or arrival time
During navigation, the calculated travel time "Time t." or arrival time "arrival" can be
displayed.
Note
The navigation system receives the current time via the vehicle's instrument
cluster. Arrival time is only available when a CAN connection exists.
" Press function key
3.
The "Settings" menu will appear.
" Use the Time format function key 3 to select the desired time format.
" Press the MAP button 9 to return to navigation display mode.
The time format selected will appear in the navigation display.
Displaying map content
In MAP and Spilt-screen display modes, you can display icons for special locations
listed in map content, i.e. symbols for petrol stations, freeway service, restaurants,
hotels/motels, etc.
3.
" Press function key
The "Settings" menu will appear.
" Press the Map content function key 3.
A list of locations available in map content will appear. Checked locations will appear
as an icon on the map.
55
Note
Some locations shown on the map will be compiled in the list under one location category. For example, airports, harbours, ferries, etc. will be compiled
under the "Transport" heading. These specific items will not be shown on the
list, but will appear on the map as icons.
" Use function keys
and
3 to select a location under map content.
You can browse the list using function keys and .
" Confirm the location by pressing function key OK 3.
" Follow the same steps for all other locations you would like to display.
" Press the MAP button 9 to return to navigation display mode.
The selected map content locations will appear on the map.
Switching audio source
You can switch to another audio source or a connected audio/video source at any
time during navigation without cancelling route guidance.
" Press RADIO 13, CD 12 or AUX 11 to switch to the corresponding audio/video
source.
The main menu for the selected source will appear.
To return to navigation display mode:
" Press button MAP 9.
Cancelling route guidance - navigation
Note
If you cancel route guidance, the data for the applicable corridor will remain in
the system memory. This allows you to restart route guidance to the latest
56
destination without inserting the Navigation DVD.
If you wish to enter a new destination, the Navigation DVD must be inserted
again.
To cancel active route guidance:
" Press button NAVI 10.
Navigation main menu. The function key will read Stop guidance 3 instead of Route
guidance 3 during navigation.
" To return to navigation display mode without stopping route guidance, press MAP 9.
" To stop route guidance, press function key Stop guidance. 3.
Route guidance will be cancelled and the main menu will reappear.
Displaying route list
You can display the calculated route sections in the route list. The route list is continuously updated throughout the journey and the sections you have already travelled
through will be deleted. Only sections remaining will be displayed.
Note
In Symbol display mode, you can also activate the route list with function key
3.
Use function key OK 3 to return to route guidance.
" During active route guidance, press INFO 14.
The info menu will appear.
" Press the Route list function key 3.
The calculated route list will be shown.
" You can browse the route list using function keys
and
3.
You can browse the list using function keys and .
" To return to the info menu, press function key OK 3.
57
" To return to navigation display mode, press MAP 9.
Dynamic navigation
In dynamic navigation, the navigation system will digitally assess traffic messages
and take these into account while planning routes. Traffic messages are received
from radio stations that support TMC (Traffic Message Channel) and transmit digital
traffic messages.
The radio uses a second Tuner (radio receiver) that is used to receive TMC during
dynamic navigation. This allows you to listen to another radio station, i.e. not necessarily a TMC station, during navigation.
New route suggestion when traffic congestion is detected
When the navigation system receives a relevant TMC message, it will automatically
check to see if there is another, quicker route to the specified destination. A voice
guidance message will announce the route recalculation.
If the alternative route turns out to be less advantageous, you will be led through the
traffic disturbance. You will then receive a voice message announcing that the route
contains traffic congestion.
Activating dynamic navigation
" Press button NAVI 10.
Navigation main menu.
Route options are depicted as symbols at the bottom right hand side of the display.
The TMC symbol indicates that dynamic navigation has been activated.
" Press the Route options function key 3.
The "Route options" menu will appear.
" Press function key TMC 3 to switch between "On" and "Off".
Dynamic navigation is activated when TMC is activated.
" To return to navigation display mode, press MAP 9.
Tuning in to a TMC station
If you activate dynamic navigation, the navigation system will search for a TMC station and use the second tuner to tune into the station. This allows you to listen to another station that does not offer TMC.
You can set a favourite TMC station or select TMC stations automatically. In automatic selection, the navigation system will search for a TMC station at random.
Tuning into a TMC station:
" Press INFO.
The info menu will appear.
" Use function key Second tuner 3 option "TMC" to use the second tuner for TMC
reception.
" Press the TMC stations function key 3 to activate the TMC station menu.
58
The TMC station list will appear. "TMC automatic" and all available TMC stations will
be listed.
" Use function keys and 3 to select "TMC AUTOMATIC" if you would like the
system to search for available TMC stations or choose a favourite TMC station
from the list.
You can browse the list using function keys and .
" Confirm your selection by pressing function key OK 3.
The info menu will appear again.
TMC reception status can be viewed in the info menu:
" Press INFO.
The info menu will appear.
TMC reception is shown beside function button TMC stations 3.
Reading TMC messages
The navigation system offers the opportunity to show messages coming in via TMC
(Traffic Message Channel) on the display.
Note
In Symbol display mode, you can also activate TMC messages with the function key
3.
Press ESC 8 to return to navigation.
To display TMC messages:
" Press INFO.
The info menu will appear.
" Press function key TMC messages 3.
The "TMC messages" menu will be activated. It will show a list of incoming TMC
messages, sorted by road number.
59
Note
So that only those TMC messages that are relevant to you are displayed, the
navigation system assesses traffic situations in a 100 km radius.
If no TMC messages are found, the "TMC messages" menu will be shown in
grey-tone and cannot be activated.
To show additional information (e.g. construction sites, traffic jam length) in TMC
messages:
" Use function keys and 3 to select a TMC message.
You can browse the list using function keys
" Press function key OK or 3.
and
.
The complete TMC message will be shown. Use function keys
the closest TMC message in its entirety.
" To return to the list, press ESC 8.
and
3 to display
" To return to navigation display mode, press
" MAP 9.
Manually entering traffic congestion
You can manually enter a traffic disturbance that you would like the navigation system to take into account. Dynamic navigation does not need to be active to do this.
Bypassing traffic congestion
Press button
6 during active route guidance.
The "Congestion" menu will appear.
" Press the Congest. ahead function key 3.
The "Congest. ahead" input field is now active.
60
" Enter the distance to the end of congestion by turning the right multi-function button 7.
" Confirm your entry by pressing the right multi-function button 7.
Navigation display mode will reappear and a new route will be calculated.
Cancelling bypass of congestion
" Press button
6.
The "Congestion" menu will appear.
" Press the Congest. ahead Cancelfunction key 3.
Navigation display mode will reappear and a new route will be calculated.
61
Excluding route sections
If you would like to avoid a certain section of the route (e.g. road unsuitable for
trucks), you can exclude the road or section in the route list.
" Press button
6 during active route guidance.
The "Congestion" menu will appear.
" Press the Route list Enter exclusion function key 3.
The route list will appear.
Roads that can be excluded by sections are prefaced with a "+".
" To display these route sections, press function key 3.
" To return to the route list, press function key 3.
Note
! If the route is long, only roads in the immediate vicinity will be shown in the
route list.
! Route sections that cannot be excluded (i.e. when no other alternative is
viable) will be shown in grey-tone.
" Use function keys
and
3 to select a road from the route list.
You can browse the list using function keys and .
" To exclude the road or route section, press the OK function key 3.
" To exclude subsequent roads/sections, press function keys
and
3.
The excluded road or route section will be shown in red.
" When you have marked the route section you want to exclude, press function button OK 3.
Navigation display mode will reappear and a new route will be calculated.
" Follow the same steps to exclude other route sections.
62
Cancelling route list exclusions
" Press button
6.
The "Congestion" menu will appear.
" Press the Route list Cancel exclusion option function key 3.
Navigation display mode will reappear and a new route will be calculated.
Setting route options
You can adapt route options to your needs before or after route guidance. The following options are available:
Route calculation type
! "Fast": Quickest route
! "Short": Shortest route
! "Econ": Optimal route in regard to both time and route. Comparable to a driver
familiar with the area.
Note
You can choose one route calculation type at a time.
Excluding/including a route
! Motorway
! Ferry
! Toll roads
Note
Excluded options may be calculated into the route anyway in order to avoid
considerable detours. For example, if avoiding a motorway would lead to considerable detours, the system will still guide you via the motorway.
Deactivating dynamic navigation
"TMC on" and "TMC off" options.
For more information, see the section entitled "Dynamic navigation".
Note
You can activate the "Route option" menu at any time by pressing
6 and
then function button Route options 3. Press ESC 8 to return to route guidance.
63
Setting route options:
" Press button NAVI 10.
Navigation main menu.
" Press the Route options function key 3.
The "Route options" menu will appear. The currently set route options are marked
with a check.
" Press function key Route 3 to select "fast", "short" or "econ".
" Use the function keys to select "use" or "avoid" for Motorway, Ferry and Toll 3.
" Use the TMC function key 3 to turn dynamic navigation on or off.
To return to the main navigation menu:
" Press the ESC 8 button.
To switch navigation display mode:
" Press button MAP9.
Route option symbols
Route options are shown as icons in the main navigation menu at the bottom of the
display list.
Symbol
Meaning (route option)
Route calculation type: "econ" (optimal time and route). Other options:
"fast" and "short".
Include motorways in the route.
Include ferries in the route.
64
Symbol
Meaning (route option)
Include toll roads in the route.
Dynamic navigation (automatic bypass of traffic congestion) is activated.
65
Navigating - destination memory
The destination memory can be used to save destinations for future use. There are
several ways to save a destination:
! Save new destination
! Save last destination
! Flag destination and save
! Save current position
! Save home address
Saving new destination
Once you have entered a complete destination in the "New destination" menu, you
can save it in the destination memory for future use. The entered destination will be
shown in the centre of the display.
" In the "New destination" menu, press function key Save 3.
The "Save destination" menu will be activated. An input field will appear for entering
the destination name.
" Use the right multi-function button 7 to enter a name in the input field and confirm
your entry. (See section "Entering destinations - an overview" for more information).
The "Save destination" menu will be activated. The destination memory will appear,
listing all stored destinations and the new destination.
You can move the destination up and down in the list to any location you like.
" Use function keys and 3 to move the destination to a different location in the
list.
To move the destination to the very top or very bottom of the list, press function key
(top) or (bottom) 3.
" Press function key OK 3 to save the destination.
The destination will be saved in the destination memory and you will return to the
"New destination" menu.
66
Saving last destination
You can save the last destination entered in the destination memory.
" Press button NAVI 10
Navigation main menu. The last destination entered in the memory will be shown on
the left-hand side of the display.
" Press function key Destination 3 to activate the "Destination" menu.
" Press function key Advanced 3 to activate the "Advanced mode" menu.
" Press function key Edit memory 3.
The "Edit memory" menu will appear.
" Press function key Save dest. 3.
The "Save destination" menu will be activated. An input field will appear for entering
the destination name.
" Use the right multi-function button 7 to enter the name of the destination in the
input field and confirm your entry. (See section "Entering destinations - an overview").
The "Save destination" menu will be activated. The destination memory will appear,
listing all stored destinations and the new destination.
You can move the destination up and down in the list to any location you like.
" Use function keys and 3 to move the destination to a different location in the
list.
To move the destination to the very top or very bottom of the list, press function key
(top) or (bottom) 3.
" Press function key OK 3 to save the destination.
The destination will be saved in the destination memory and you will return to the
"Edit memory" menu.
Flagging and saving destinations
A destination flag is a position marker that can be set to identify the vehicle's current
position. Flags can be set while route guidance is active or inactive. This function
comes in handy, for example, if you drive by an interesting place that you would like
67
to visit again another time. The flagged destination will remain stored until you flag a
new destination.
Note
The Navigation DVD must be inserted when flagging a destination.
To flag a destination:
" Press button 16.
The current vehicle position will be saved as a flagged destination.
Saving flagged destination
If you like, you can save the flagged destination in the destination memory for future
use.
" Press button NAVI 10.
Navigation main menu.
" Press function key Destination 3 to activate the "Destination" menu.
" Press function key Advanced 3 to activate the "Advanced mode" menu.
" Press function key Edit memory 3.
The "Edit memory" menu will appear.
" Press function key Save flagged dest. 3.
The "Save flagged dest." menu will appear. An input field for entering the destination
name will appear. "Flagged destination <time>" will be displayed in the input field.
68
This default text will be replaced as you enter the first letters in the name.
" Use the right multi-function button 7 to enter a name for the flagged destination
and confirm your entry. (See section "Entering destinations - an overview").
The "Save destination" menu will be activated. The destination memory will appear,
listing all saved destinations and the new destination.
You can move the destination up and down in the list as you like.
" Use function keys and 3 to move the destination to a different location in the
list.
To move the destination to the very top or very bottom of the list, press function key
(top) or (bottom) 3.
" Press function key OK 3 to save the destination.
The flagged destination will be saved in the destination memory and you will return to
the "Edit memory" menu.
Saving current position
You can save the current vehicle position in the destination memory whether route
guidance is active or not.
" Press button NAVI 10.
Navigation main menu.
" Press function key Destination 3 to activate the "Destination" menu.
" Press function key Advanced 3 to activate the "Advanced mode" menu.
" Press function key Edit memory 3.
The "Edit memory" menu will appear.
69
" Press function key Save position 3.
The "Save position" menu will appear. An input field will appear for entering the destination name. "Location" will be shown in the input field.
This default text will be replaced as you enter the first letters in the name.
" Using the right multi-function button 7, enter a name for the current position and
confirm your entry. (See section "Entering destinations - an overview").
The "Save position" menu will be activated. The destination memory will appear, listing all saved destinations and the new destination. You can move the destination up
and down in the list as you like.
" Use function keys and 3 to move the destination to a different location in the
list.
To move the destination to the very top or very bottom of the list, press function key
(top) or (bottom) 3.
" Press function key OK 3 to save the destination.
The current position will be saved as a destination in the memory and you will return
to the "Edit memory" menu.
70
Saving your home address
If you save your home address in the destination memory, you can then use it to activate route guidance to guide you directly home.
To save your home address:
" Press button NAVI 10
Navigation main menu.
" Press function key Destination 3 to activate the "Destination" menu.
" Press function key Advanced 3.
The "Advanced mode" menu will appear.
" Press function key Edit home 3.
The "Home" menu will appear.
You can now enter an address (see chapter "Entering destinations") or enter the current vehicle position as your home address ("Home"):
" Confirm your current position with function key Here 3.
71
The coordinates of your home address will be shown.
" Press function key Save 3 to save your home address.
You will return to the "Destination" menu.
Editing the destination memory
All destinations saved in the destination memory can be renamed, moved or deleted.
Activating destination memory
" Press button NAVI 10
Navigation main menu.
" Press function key Destination 3 to activate the "Destination" menu.
" Press function key Advanced 3 to activate the "Advanced mode" menu.
" Press function key Edit memory 3.
The "Edit memory" menu will appear.
Choose from among the following options:
! "Rename destination"
! "Sort destinations"
! "Delete destination"
! "Clear dest. memory" (Delete destination memory)
72
Renaming destinations
You can rename destinations in the destination memory via the "Edit memory" menu.
" In the "Edit memory" menu, press function key Rename destination 3.
The "Rename: select" menu will be activated. This menu shows destinations in the
destination memory.
" Use function keys
and
3 to select a destination.
Use function keys and 3 to browse the destination memory.
" Confirm your selection by pressing function key OK 3.
The "Rename destination" menu will be activated. An input field will appear. The
name of the destination will be shown in the input field.
" Use the right multi-function button 7 to enter a new name for the destination and
confirm your entry by pressing OK 3. (See section "Entering destinations - an
overview").
You will return to the "Edit memory" menu.
Sorting destinations in the memory
You can relocate destinations saved in the destination memory via the "Sort destinations" menu.
" In the "Edit memory" menu, press function key Sort destinations 3.
The "Sort: select" menu will be activated. This menu shows destinations in the destination memory.
73
" Use function keys
and
3 to select a destination.
Use function keys and 3 to browse the destination memory.
" Confirm your selection by pressing function key OK 3.
The selected destination can now be moved up and down the destination memory
list.
" Use function keys and 3 to move the destination to a different location in the
list.
" Confirm by pressing function key OK 3.
The destination will be saved in its new location.
" Press button ESC 8 to close the menu.
Deleting destinations
You can rename individual destinations stored in the destination memory via the "Edit
memory" menu.
" In the "Edit memory" menu, press function key Delete destinations 3.
The "Delete select" menu will be activated. This menu shows destinations in the destination memory.
74
" Use function keys
and
3 to select a destination.
Use function keys and 3 to browse the destination memory.
" To delete the destination, press function key OK 3.
To prevent unintentional deletion, you will be asked to confirm your decision.
" If you would like to cancel the deletion and keep the destination saved in the
memory, press function key Cancel 3.
" To delete the destination, press function key Delete 3.
You will return to the "Edit memory" menu.
Deleting destination memory
You can delete the entire destination memory or the last 10 destinations via the "Edit
memory" menu.
Note
When you clear the entire destination memory, all saved destinations and
flagged destinations will be deleted.
" To delete the last 10 destinations, press function key Delete last 10 3 in the "Edit
memory" menu.
" To delete the entire destination memory, press function key Clear dest. memory
3 in the "Edit memory" menu.
To prevent unintentional deletion, you will be asked to confirm your decision.
" If you would like to cancel the deletion and keep the destination saved in the
memory, press function key Cancel 3.
" To delete the destination, press function key Delete 3.
The destination memory/last 10 memory will be cleared and you will return to the
"Edit memory" menu.
75
Additional navigation functions
There are several other navigation functions available:
! Show map without route guidance
! Position display
! Demo mode
! Enter vehicle position
Note
With the exception of Position display, the Navigation DVD must be inserted to
access all of these functions.
Showing map without route guidance
You can also activate this type of navigation display without activated route guidance.
The current vehicle position will be indicated by a red triangle, just as when route
guidance is active. The point of the triangle indicates the direction of travel. You will
be able to access all map displays, just as during active route guidance.
If you choose map type "Overview" or "Destination", data will be used from the latest
navigation. (See chapter "Navigating")
To display map:
" Press button MAP 9.
Position display
You can view your current position and direction of travel in Position display mode.
During active route guidance, Position display will also indicate the distance and direction (in degrees) to the destination.
To start Position display mode:
" Press INFO.
The info menu will appear.
" Press function key Position displ. 3.
76
Position display will be activated.
1 Direction (left) and distance (right) to destination
2
GPS display:
left: Number of received GPS satellites (1 dot = 1 satellite),
right: GPS reception (fix):
! "3D FIX" (sufficient GPS reception)
! "2D FIX" (only horizontal position determination (longitude and latitude),
not altitude)
! "NO FIX" (no GPS reception)
3 Direction of travel (triangle) and direction of destination (dot)
4
Geographic position:
Latitude (upper), longitude (lower)
5 Altitude (0=sea level)
Demo mode
If you would like to view your route before your journey, enter your destination and
then start demo mode. The navigation system will display a simulated route from your
current position to the travel destination. Voice guidance will accompany the route
shown on the map.
To start demo mode:
" Press button NAVI 10
The main navigation menu will be activated.
" Press function key Settings. 3.
The "Settings" menu will appear.
77
" Use function key Demo 3 to select "active" or "inactive" to activate or deactivate
demo mode.
You will return to the main navigation menu.
" Press function key Route guidance 3 to start demo navigation.
Demo navigation will continue until a new destination is entered or the demo mode is
inactivated in the "Settings" menu.
Entering vehicle position
If you do not have GPS reception ("No fix") at your current position, you can manually
enter the current vehicle position on the map.
" Press button NAVI 10
The main navigation menu will be activated.
" Press function key Settings. 3.
The "Settings" menu will appear.
" Press function key Pos. on map 3.
The map will appear. The red triangle
indicates the vehicle position.
" Turn the right multi-function button 7 to increase or decrease map scale (zoom in
or out).
78
" To move the map section, use function keys
triangle over the edge of the map.
,
,
and
3 to move the red
" Select the vehicle's position on the map (red triangle) with the four function keys
, , and 3.
As the red triangle moves over a street or square, its name will appear in the display.
" Press function key OK 3 to confirm the vehicle position.
You will return to the main navigation menu.
Note
If the vehicle is transported by train or ferry, GPS reception may be lost temporarily. Once you leave the train or ferry, the navigation system will automatically reset GPS reception when you have driven about 100 metres.
79
Radio
The radio is equipped with a RDS radio receiver (Radio Data System). Many FM radio stations transmit extra information along coded digital signals. RDS allows you to
receive this extra information in addition to the regular radio programme. Information
such as the name of the radio station, short messages, advertisements, programme
information, etc will then appear in the display.
The radio can receive stations broadcast on FM, MW and LW bands.
You can store up to six stations on each of the MW and LW bands (AM). The FM
band offers a total of three memory banks, with six memory locations in each (i.e. you
can store a total of eighteen FM stations).
Starting radio mode
To start radio mode,
" Press button RADIO 13.
The radio main menu will appear. The current radio station will be displayed in the
middle of the screen, followed by the current TMC station.
The six upper function keys (three on each side) can be used to store stations. The
lower four function keys (two on each side) are used to adjust settings in the radio
main menu.
Selecting waveband
Wavebands are shown in the following order: FM1, FM2, FM3, MW and LW.
80
" Press button RADIO 13 until you reach the waveband you want.
Tuning into stations
You can tune into stations in various ways:
! Automatic tuning
! Manual tuning
! Select stations from the station list
Automatic tuning
" In radio mode, press buttons
and
1 to tune into the next receivable station.
The first radio station found will start to play.
Note
If you have activated traffic information priority, the radio will only tune into
stations supporting traffic information priority. For more information, see chapter "Traffic information priority".
Manual tuning
Turn the right multi-function button to manually tune into different frequencies. You
can adjust the frequency in increments of 10 kHz.
" Turn the right multi-function button 7 until the radio finds a station.
Selecting stations from the station list.
For the FM band, you can activate a station list with all current receivable stations.
You can then select a station from the station list.
" In the radio main menu, press function key List 3.
The station list will appear.
" Use the function keys and
3 to mark a station in the station list.
81
Use function keys and to browse the station lists.
" Press function key OK 3 to save a station.
The selected station will start to play.
Storing stations
There are several ways to save radio stations:
! Autostore (save automatically)
! Store stations manually
Saving stations automatically (Autostore)
The Autostore function allows you to automatically locate and save the six stations
with the strongest signals on the FM, MW and LW bands. FM stations will be saved
in memory bank FM3.
Note
Stations previously stored in memory banks FM2, MW and LW will be deleted.
" In the main radio menu, press function key Autostore 3.
A status bar will display the progress of Autostore. When the procedure is complete,
the first saved station will be played. The station names and frequencies will be
shown on the display next to their assigned function keys.
Storing stations manually
" Use the RADIO button 13 to select a waveband.
" Tune into a station.
" Assign the station to a function key by pressing one of the function keys 3 and
holding it down for more than two seconds.
The station will be saved and the station name and frequency will be shown on the
display beside the assigned function key.
Retrieving stored stations
" Use the RADIO button 13 to select a waveband.
" Use the function keys to select the desired station, e.g. station "NDR2" with function key NDR2 3.
The selected station will start to play.
82
Scanning receivable stations (SCAN)
You can "sample" receivable stations in the area by scanning them, i.e. playing each
for a short time. Each station will be played for 10 seconds.
" Press function key Scan 3.
To cancel scanning
" Press function key Scan 3 again.
The last played station will continue to play.
Radio settings
Radio settings boost the performance of the radio:
! RDS functions (alternative frequencies, regional)
! Use the second tuner
RDS functions (AF, REG)
The radio utilizes the RDS functions Alternative Frequencies (AF) and Regional
(REG).
The radio searches for FM transmitters - radio stations supporting the AF function and then switches to the station's strongest frequency (alternative frequency) if reception deteriorates. The AF function is always active and cannot be switched off.
To prevent the radio from switching to another regional programme broadcast by the
station, you can use the REG function.
Using the RDS REG function
You can choose whether or not to allow the radio to switch to an alternative frequency with a different regional programme.
" In the radio main menu, press function key Settings 3.
The "Settings" menu will appear.
83
The following settings are available:
! "RDS Reg Auto": If reception is poor, the radio will only switch to the station's alternative frequencies which are broadcasting the same regional programme. If the
selected regional programme can no longer be received, the radio will automatically tune into the strongest regional programme or the strongest transmission.
! "RDS Off": The radio will always tune into the station's strongest frequency. This
will permit switching between different regional programmes.
" Press function key RDS Reg. 3 to select "Auto" or "Off".
" To return to the radio main menu, press RADIO13
Using the second tuner
If dynamic navigation is not active, the second tuner can receive radio transmissions
instead of TMC.
" Press INFO.
The info menu will appear.
" Use function key to mark Second tuner 3 option "sound" to activate the second
tuner for radio reception.
" To return to the main radio menu, press RADIO 13.
Traffic information priority
The radio is equipped with an RDS-EON receiver. EON is an acronym for Enhanced
Other Network. This function means that reception automatically moves from a radio
station that is not broadcasting traffic information to another radio station that is currently broadcasting a traffic announcement. After the traffic announcement, the radio
will automatically switch back to the radio station and programme you were listening to.
Activating/deactivating traffic announcement priority
" In the radio main menu, press function key Settings 3.
The "Settings" menu will appear.
" Press function key TA 3 to select "On" or "Off".
84
Traffic announcement priority is activated when TA is switched on ("On").
" To exit the "Settings" menu, press the ESC button 8.
You will return to the radio main menu. "TA" will appear in the upper right centre of
the display.
Note
When you leave the broadcast area of the station broadcasting traffic information or switch to another station that is not broadcasting traffic information,
"NO TA" will be shown in the display. The radio will automatically tune into a
station broadcasting traffic information when one is available.
TIM - Traffic Information Memory
The TIM (Traffic Information Memory) function records up to nine traffic messages,
for a total maximum length of four minutes. When the memory is full, the oldest messages will be replaced as new announcements come in.
For TIM to function, traffic announcement priority must be activated and a station
broadcasting traffic information must be receivable. (See chapter "Traffic information
priority")
Listening to TIM messages
To listen to the recorded messages:
" Press INFO.
The info menu will appear. The number of messages will be shown next to the TIM
messages function key 3.
" Press function key TIM messages 3.
The "TIM messages" menu will be activated. The menu will show a list of station
names and the time the messages were recorded. The recorded traffic messages will
be played, the latest first.
When all traffic messages have been played, you will return to the info menu and the
radio programme you were listening to before.
85
Note
While a traffic message is being recorded, you will not be able to access the
TIM message list.
" To listen to a traffic message from the list, mark the message with the function
keys and 3.
You can browse the lists using function keys
and
3.
" To stop playback of a traffic message, press the left multi-function button or the
ESC button 8.
The info menu will appear again.
TIM settings
Traffic messages can also be recorded when the radio and ignition are switched off.
To do this, activate the TIM "Settings" menu:
" Press INFO.
The info menu will appear.
" Press function key TIM inst. 3.
The TIM "Settings" menu will appear.
The following recording times are available:
! "TIM time 1"/" TIM time 2": Traffic message recording times. The messages will
be recorded 1.5 hours / 0.5 hours after the specified time.
! "TIM-Standby": Traffic messages will be recorded for two hours after the radio has
been turned off.
Activating/deactivating recording times
To set recording times for traffic messages:
" In the TIM "Settings" menu, press function key TIM Time 1 to set the first recording time or TIM Time 2, 3 to set the second recording time.
The recording times will be marked.
" Use the right multi-function button 7 to enter the time:
86
! Turn the right multi-function button 7 to set the hour and confirm by pressing.
! Turn the right multi-function button 7 to set the minute and confirm by pressing.
" To exit the menu, press the ESC button 8.
To deactivate recording times:
" Press function key TIM Time 1 or TIM Time 2 3 to mark "off".
Setting standby time
Standby time is two hours. To activate standby time:
" In the TIM "Settings" menu, use function key TIM standby 3 to select "02:00".
" To exit the menu, press the ESC button 8.
To deactivate standby time:
" Use function key TIM standby 3 to select "off."
87
Playing CDs
In CD mode, you can play standard audio CDs, CD-Rs and CD-RWs with audio titles
and a diameter of 12 cm. For optimal performance, only use CDs with the Compact
Disc logo. CDs with MP3 or regular audio tracks can usually be played.
Due to the variable quality of burned and copy-protected CDs, Scania cannot guarantee that the device will function properly when playing these sorts of CDs.
Risk of injury
The internal CD player is a Class 1 laser product. It contains an invisible laser
beam may be potentially hazardous to humans. The CD player may only be
used according to the following instructions.
! Never open the cover panel of the Radio with Navigation.
! Never perform repairs yourself.
! Repairs and maintenance must only be performed by trained professionals.
Risk of severe damage to the CD player!
Small CDs with a diameter of 8 cm and Shape CDs are not suitable for use in
the Radio with Navigation and can damage the CD drive.
We do not accept any responsibility for damage to the CD drive caused by the
use of unsuitable CDs.
Only use CDs with the Compact Disc logo.
Note
If the ambient Radio with Navigation temperature exceeds 70 degrees Celsius, some of the system functions will switch off. "OVERTEMP" and "CDOFF"
will be shown in the display. When the temperature falls below 70 degrees
Celsius, you can resume using the CD player and other functions as usual.
Playing CDs
CD playback will start automatically when you insert a CD with audio tracks into the
CD drive.
Inserting a CD:
" Insert the CD into the drive (printed side up) and push it carefully into the CD
compartment 2 until you feel a slight resistance.
At this point, the drive will automatically pull the CD in.
CD playback will begin immediately after the CD has been inspected.
88
The main CD menu will be activated. The track number and the playing time will be
shown in the display.
Selecting a track
You can move to different tracks while the CD is playing.
To move to the next track:
" Press function key 3.
When you have reached the last track of the CD, pressing this key will bring you to
the first track on the CD.
To repeat the current track or select the previous track:
" Press function key 3 once (to repeat track) or several times (to move to previous tracks).
When you reach the first track of the CD, pressing this key will bring you to the last
track of the CD.
Note
You can also select tracks using buttons
and
1.
Fast searching
Fast searching helps you find a particular part of a track while it is playing.
To search forward:
" Press
3 and hold down during playback.
The track will skip ahead audibly.
To search backward:
" Press
3 and hold down during playback.
89
The track will skip backwards audibly.
Note
You can also search by holding buttons
and
1 pressed down.
Random play (MIX)
It is possible to play all tracks in random order.
" Press function key Mix CD 3.
The tracks of the CD will be chosen and played in random order. "Mix" will appear in
the centre of the display.
Function key Mix CD 3 will become Mix Off 3.
To cancel MIX mode:
" Press function key Mix Off 3.
The current track will continue to play. "Play" will appear in the centre of the display.
Scanning all tracks (SCAN)
You can play the first seconds of all tracks on the CD.
" Press function key Scan 3.
All tracks will play in order for 10 seconds each.
To cancel scanning:
" Press function key Scan 3 again.
Repeating tracks (REPEAT)
After the last track has been played, the CD will begin again at the first track. It is
possible to repeat playback on the track currently playing.
" Press function key Track Repeat 3.
The centre of the display will show "Rpt. Track". Function key Track Repeat 3 will
become CD Repeat 3.
To stop track repeat:
" Press function key CD Repeat 3.
The current track will continue to play. "Play" will appear in the centre of the display.
90
Pausing playback (Pause)
To pause playback and continue from the same place at a later time:
" Press function key 3.
Playback will stop. Function key
3 will become function key
3.
When you want to continue playback:
" Press function key 3.
Stopping playback (Stop)
To stop playback of a CD:
" Press function key 3.
"Stop" will appear in the centre of the display.
When you want to continue playback:
" Press function key 3.
91
MP3
The CD player can read and play CDs, CD-Rs, CD-RWs and MP3 CDs. The Radio
with Navigation supports ID3, i.e. supplementary information such as the track name,
artist and album will be shown on the display.
Tips for burning CDs
The quality of a burned CD depends on the quality of the original CD, burning software settings and burner speed. This may limit the Radio with Navigation's ability to
play burned CDs or may mean that it cannot play them at all.
If a CD containing MP3 files does not play correctly:
" Set a lower burn speed. (Recommended: 16x)
" Switch to a different colour or brand of blank CDs.
The Radio with Navigation can only play CDs with MP3 files and display information
correctly if you ensure the following when burning CDs:
! The CD contains only MP3 tracks, no CD-audio-data or other formats.
! CD format must correspond to ISO 9660 Level 1/Level 2 or Joliet.
! Bitrate: from 128 to 256 kBit/s (recommendation: 160 to 192 kBit/s)
! ID3 tags: Version 1 or 2
! Number of directories/tracks: maximum 2400.
You can use your computer's file manager to name your folders. Name and save the
directories according to the instructions provided with your burning software.
Note
For MP3 tracks to be shown correctly on the display, you must observe the
following when naming tracks and directories:
! Avoid using special characters or accents (such as å, é, ç).
! Do not use more than 32 characters (including the file ending ".mp3").
If no ID3 tags are available, name the directory after the artist and the MP3 file after
the title.
92
A Folders
B Title
Starting MP3 playback
MP3 playback begins automatically when a CD containing MP3 tracks is inserted.
Inserting a CD
" Insert the CD into the drive (printed side up) and push it carefully into the CD
compartment 2 until you feel a slight resistance.
The Radio with Navigation will automatically draw in the CD; do not push it in.
When you have inserted a CD, MP3 playback will begin automatically with the first
track in the first folder.
The MP3 main menu will be activated.
The file name and track playing time will appear on the display. If the MP3 track contains ID3 tags, the name of the artist will be shown on the first line and the track
name underneath (maximum 2 lines).
93
Selecting folder/title
You can select the next or previous track and the next or previous folder in the MP3
main menu. Or you can display all directories and tracks and browse to make your
selection.
Note
You can also select folders/tracks with buttons
and
1.
Selecting folders in the MP3 main menu
To select the next folder:
" Press function key 3.
If you have reached the last folder, playback will begin on the first track of the first
folder.
To repeat the current folder or select the previous folder:
" Press function key 3 once (to repeat folder) or several times (to move to previous folders).
If you have reached the first folder, playback will begin on the first track of the last
folder.
Selecting tracks in the MP3 main menu
To move to the next track:
" Press function key 3.
When you have reached the last track, pressing this key will bring you to the first
track in the next folder.
To repeat the current track or select the previous track:
" Press function key 3 once (to repeat track) or several times (to move to previous tracks).
When you reach the first track, pressing this key will bring you to the last track in the
previous folder.
Activating the MP3 browser
" Press function key Browser 3 during playback.
The MP3 browser with the current folder contents will appear.
If the folder contains additional folders, these will be displayed at the beginning of the
list and the MP3 tracks will be shown below.
94
Note
If the line does not have enough space for all of the characters in the title, it
will be shortened. You can display the complete title by pressing function key
3. An information window will appear. To close the information window,
press any function key.
To exit the MP3 browser:
" Press the ESC 8 button.
You will return to the MP3 main menu.
Folder/Selecting headings in the browser
To move to a higher folder level:
" Press function key
3.
To move to the highest folder level:
" Press and hold down function key
To select a folder:
" Use function keys
and
3.
3 to select and confirm your selection by pressing OK 3.
The selected folder will open.
To select a track:
" Use function keys
and
3 to select and confirm your selection by pressing OK 3.
The selected track will start to play.
Note
You can also select folders/tracks with the right multi-function button 7 and
play tracks by pressing function key 3.
95
Fast searching
Fast searching helps you find a particular part of a track while it is playing.
To search forward:
3 and hold down during playback.
" Press
The track will skip forward audibly.
To search backward:
3 and hold down during playback.
" Press
The track will skip backward audibly.
Note
You can also search by holding buttons
and
1 pressed down.
Random play (MIX)
You can play all tracks in a directory and all tracks on a CD in random order.
To play tracks in a directory in random order:
" Press function key Mix Folder 3.
The tracks in the folder will be chosen and played in random order. "Mix Folder" will
appear in the centre of the display.
Function key Mix Folder 3 will become Mix CD 3.
To play all tracks in the current CD in random order:
" Press function key Mix CD 3.
"Mix CD" will appear in the centre of the display.
Function key Mix CD 3 will become Mix Off 3.
To cancel MIX mode:
" Press function key Mix Off 3.
The current track will continue to play. "Play" will appear in the centre of the display.
Scanning all tracks on a CD (SCAN)
You can play the first seconds of all tracks on the CD:
" Press function key Scan 3.
All tracks will play in order Scanning will play 10 seconds of each track.
To cancel scanning:
" Press function key Scan 3 again.
96
Repeating tracks (REPEAT)
After the last track has been played, the CD will begin again at the first track. It is
possible to repeat playback on the folder or track currently playing:
To repeat the current track:
" Press function key Track Repeat 3.
The centre of the display will show "Rpt. Track". Function key Track Repeat 3 will
become Folder Repeat 3.
To repeat the current folder:
" Press function key Folder Repeat 3.
The centre of the display will show "Rpt. Folder". Function button Folder Repeat 3
will become CD Repeat 3.
To stop folder repeat:
" Press function key CD Repeat 3.
The current track will continue to play. "Play" will appear in the centre of the display.
Pausing playback (Pause)
To pause playback and continue from the same place at a later time:
" Press function key 3.
Playback will stop. Function key
3 will become function key
3.
When you want to continue playback:
" Press function key 3.
Stopping playback (Stop)
To stop playback of a CD: When you restart the CD, playback will resume with the
first track in the current folder.
" Press function key 3.
"Stop" will appear in the centre of the display.
When you want to continue playback:
" Press function key 3.
97
AUX mode
You can connect two external sources to the Radio with Navigation.
! One audio source ("AUX (A)")
! One audio/video source ("AV (A/V)")
Refer to the user's manual for the external source for instructions on correct installation and operation.
To select AUX operating mode:
" Press button AUX (11).
The AUX main menu will appear.
" Press function key AV (A/V) or AUX (A) 3 to select an external source.
You will see the selected audio source on the display.
98
Factory settings
You can restore the Radio with Navigation to its original factory settings. All user settings will then be deleted. Saved destinations and navigation settings will be retained.
" Press INFO.
" Press function key Syst. settings 3.
The "Syst. settings" menu will appear.
" Press function key Fact. set. 3.
You will be asked to confirm your selection.
" Press function key No 3 to cancel the procedure.
" Press function key Yes 3 to restore factory settings.
The Radio with Navigation's factory settings will be restored.
99
Troubleshooting (FAQ)
Problem
Cause
Action
GENERAL
The Radio with Navigation was
The Radio with
turned off manually with the left
Navigation does
multi-function button while the igninot switch on
tion was in drive or radio position.
automatically when
the ignition key is
turned.
Turn the ignition key to radio position. Switch on the Radio with Navigation with the left multi-function
button. Switch off the Radio with
Navigation by turning the ignition
key to locked position. The next
time you turn the ignition key to
radio position, the Radio with Navigation will switch on.
RADIO
Traffic information priority is actiDeactivate the "TA" setting and
Station search only vated (setting "TA ON"). The radio restart station search. (Chapter
finds a few radio
is only searching for stations send- "Radio settings").
stations.
ing traffic information.
The radio automatically switches
to another radio
programme.
The radio is equipped with RDS
function AF (alternative frequencies), which is always activated.
This means that the radio will
switch to a station's alternative
frequency when reception is poor.
Activate setting "RDS Reg.". The
radio will now only switch to frequencies broadcasting the same
regional programme (Chapter
"Radio settings").
The CD is damp. In cold or damp
weather conditions, condensation
may form on the CD or in the Radio with Navigation. If this occurs,
the laser will not be able to read
the CD.
Wait. The Radio with Navigation
will warm up as it operates and the
condensation will evaporate. Playback will begin.
The CD is damaged or dirty. The
Radio with Navigation will not be
able to read the CD properly.
Clean the CD and protect it from
damage. (Chapter "Instructions for
handling CDs and DVDs").
The CD is copy-protected and
cannot be read properly.
Scania cannot guarantee that the
Radio with Navigation will be able
to play copy-protected CDs.
CD (AUDIO/MP3)
Playback stops/
CD skips or makes
strange noises
100
Problem
Cause
Action
Device temperature is too high,
e.g. cab is sitting in direct sunlight
and has become too hot. Message
"No int. CD" is displayed.
As soon as the Radio with Navigation returns to a permissible operating temperature, the CD/DVD
drive will be activated.
If a burned CD is not working or
audio is "skipping," it may be because:
! The CD is defective or was not
burned correctly.
When you burn a CD, you should
follow the recommendations listed
in chapter "MP3".
If your home audio system is able
to play the CD correctly, this does
not necessarily mean that the Radio with Navigation's CD player is
defective. Home audio systems
are not exposed to the considerable mechanical stresses that vehicle audio systems are exposed
to (e.g. vibrations, high temperatures, etc.).
NAVIGATION
Navigation mode
won't start
The Radio with Navigation cannot
read burned navigation DVDs.
Only use original SCANIA Navigation DVDs.
The Navigation DVD is damaged
Clean the DVD and protect it from
or dirty. The Radio with Navigation damage. (Chapter "Instructions for
will not be able to read the DVD
handling CDs and DVDs").
properly.
The DVD is damp. In cold or damp
weather conditions, condensation
may form on the DVD or in the
Radio with Navigation. If this occurs, the laser will not be able to
read the DVD.
Wait. The Radio with Navigation
will warm up as it operates and the
condensation will evaporate. Navigation mode will be ready for operation again.
Device temperature is too high,
e.g. cab is sitting in direct sunlight
and has become too hot. Message
"No int. CD" is displayed.
As soon as the Radio with Navigation returns to a permissible operating temperature, the DVD drive
will be activated and navigation will
continue. (Corridor navigation will
also continue to be possible).
101
Problem
Cause
Action
Route guidance is
not accurate
You are either on a new road or
the route has been changed and is
not yet stored on the Navigation
DVD.
Use a map to find your way or continue driving along the current route if possible. Route guidance will
continue as soon as you reach a
road that is stored on the Navigation DVD.
Check if a newer version of the
Navigation DVD is available if you
often drive in that area.
GPS reception is experiencing interference. To determine the precise vehicle position, the navigation system receives satellite signals from the Global Positioning
System (GPS). If the navigation
system is not receiving sufficient
GPS signals, it cannot calculate a
precise route (also see "No GPS
reception" below).
Use a map to find your way or continue driving along the current
route if possible. As soon as GPS
reception is improved, navigation
will proceed properly.
You can view the current GPS signal strength in Position display
mode. (Chapter "Additional navigation functions", section "Position
display").
The post code entered is conIt is not possible to nected to a post box (common in
enter a destination company addresses). These sorts
address.
of post codes cannot be used to
enter destinations.
Enter the town name instead of the
post code. Note that in larger cities, there may be more than one
street with the same name.
The street is new or the street
Check if a newer version of the
route has been changed and is not Navigation DVD is available.
yet stored on the Navigation DVD.
102
Problem
The calculated
route does not
meet your requirements
No GPS reception
Cause
Action
The user-set route options, e.g.
! Shortest or fastest route
! Motorways are excluded from
the route
! Dynamic navigation
(automatic route change for
traffic disturbances)
Adjust route options to your requirements. (Chapter "Setting
route options")
Interference in GPS reception
caused by
! Reflection or shielding (from
e.g. tall buildings, tunnels,
mountains or dense foliage).
! THUNDERSTORM AND/OR
HEAVY RAINFALL
! GPS satellites shut down for
maintenance or repairs
You can view the current GPS signal strength in Position display
mode. (Chapter "Additional navigation functions", section "Position
display").
GPS reception will be temporarily
interrupted when the vehicle is
transported on trains or ferries.
After leaving the transport and
driving for 100 metres or so, the
navigation system will automatically restore GPS reception.
No TMC reception
No TMC station can be found.
TMC (Traffic Message Channel) is
currently available in the following
countries: Belgium, Denmark,
Germany, the United Kingdom,
Finland, France, Italy, the Netherlands, Norway, Austria, Spain,
Sweden, Switzerland and the
Czech Republic. It will soon also
be available in Hungary and Portugal.
If you require further assistance, please consult your SCANIA Service Workshop.
103
Technical Specifications
Power supply
Operating voltage
12 V
(10.8 V - 15.6 V)
Power
consumption
Operating
1,3 A
max.
approx. 4.0 A
Standby
< 3 mA
Fuse
Current rating
10 A
Output
Nominal output
4 x 20 Watt/
≥ 4 Ohm
Output level
(UB = 14.4 V):
≥ 8.0 V / K = 2.5 %
Frequency range
VHF (FM)
87.5 - 108 MHz
MW
531 - 1,602 kHz
LW
153 - 279 kHz
Frequency response (±3 dB)
Tuner
35 - 16,000 Hz
MP3/CD
20 - 20,000 Hz
104
Temperature range
Operating
temperature
-20 °C to +70 °C
Storage temperature -40 °C to +85 °C
Dimensions and weights
2-DIN covers
(WxDxH)
190 x 159 x 110
mm
Cap (WxH):
192.3 x 123.9 mm
Weight
2.7 kg
Subject to changes.
105
Glossary
AF Alternative frequencies (RDS service). This function automatically tunes into the
strongest frequency broadcast by the current station.
Dynamic navigation is made possible by TMC. The radio receives TMC traffic messages and checks the traffic situation. If traffic flow, queues and permitted speed
makes an alternative route preferable, the navigation system will automatically recalculate the route to guide you around traffic disturbances and safely to your destination.
Electronic speedometer signal Measures the distance travelled by using a speedometer sensor in the vehicle.
EON Enhanced Other Network (RDS Service). The EON function automatically
switches from a radio station that is not broadcasting traffic information to a radio station that is broadcasting traffic information within the broadcast chain. After the traffic
message, the radio will switch back to the previous station.
FM Frequency Modulation. Also: VHF (Very High Frequency). Electromagnetic
waves in frequency range 87.5 to 108.0 MHz. Less sensitive waveband for radio
transmissions.
GPS Global Positioning System. Facilitates global navigation and positioning via satellites for position calculation.
Gyroscope Component in the navigation system. The gyroscope registers changes
in the vehicle's direction, e.g. in curves.
ID3-Tag "Identity" for MP3 files, i.e. additional information on the artist, track and album linked to MP3 data.
Corridor function
During route calculation, the navigation system will save the area to the right and left
of the route (corridor) in addition to the route itself. This allows the navigation system
to provide route guidance even when the Navigation DVD is not inserted.
LW Longwave band (AM broadcast band, only ITU Region 1). Electromagnetic
waves in frequency range 148.5 to 283.5 kHz. Commonly used for broadcasting national radio programmes over national borders.
MW Medium waveband (AM broadcast band). Electromagnetic waves in frequency
range 531 to 1,666 kHz. For radio broadcasts and marine radio transmissions.
MP3 MP3 is a method for compressing audio data. The method was developed by
German research institute Fraunhofer IIS. The degree of compression will determine
the extent to which the amount of data is reduced. The loss of sound quality is minimal and scarcely audible in normal conditions.
106
RDS Radio Data System. A service offered by radio stations in which extra information is transmitted in addition to music and other radio programmes as coded digital
signals. This information is not audible, but is instead received as text which is then
shown on the Radio with Navigation display. RDS information includes radio station
names, short news bulletins, advertisements, programme information, etc.
RDS service includes:
! AF (Alternative frequencies)
! EON (Enhanced Other Networks)
! REG (Regional)
! RT (Radio Text)
! TA (Traffic Announcement)
! TP (Traffic Program)
REG Regional (RDS-Service). Some radio stations periodically divide their programming into regional programmes with different content. The REG function prevents the
radio from automatically switching to a station's alternative frequencies with different
programme contents.
Broadcasting networks
Broadcasting networks are offered by some radio companies that have several stations with different programme contents.
TA Traffic Announcement (RDS-Service). Radio traffic messages which can be
played at a preset volume and which temporarily interrupt CD playback.
TIM Traffic Information Memory (RDS Service). Unique function developed by Blaupunkt. Plays traffic messages even when the radio is turned off.
TMC Traffic Message Channel (RDS-Service). TMC radio transmitters also send digital traffic messages. You will not be able to hear the messages. The navigation system receives them and uses the information to automatically guide you around traffic
disturbances.
TP Traffic Programme (RDS-Service). Radio mode setting to exclusively receive radio stations broadcasting traffic information.
Tuner Radio receiver unit. There are two tuners in the radio.
Navigation - how it works
The navigation system calculates the current position of the vehicle by determining
the distance travelled (via electronic speedometer signals), calculating orientation
changes in the vehicle (via a gyroscope) and by utilizing the Global Positioning System (GPS). This information is compared with the map content on the Navigation
DVD and used to calculate the navigation route.
For the navigation system to be able to determine the current vehicle position, the
vehicle must be located on a road that is stored in the Navigation DVD. The GPS antenna must also be unobstructed and able to receive signals from the GPS satellites.
You can view current GPS reception ("Fix") in Position display mode.
107