1
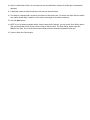
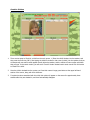
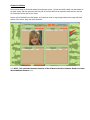
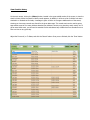
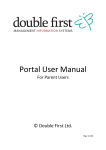
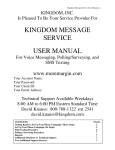
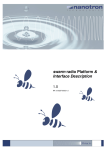
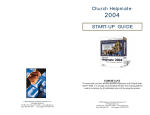
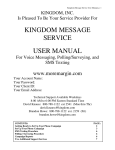
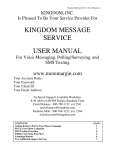
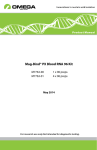
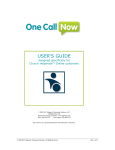
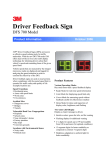
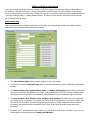
Children’s Check-In Instructions
Thank you for using the Children’s Check-In software. The first five pages of this document outline the Basic features of
the software: 1) General ministry info, 2) Entering new children into the system, 3) Checking children into the system,
and 4) Checking children out of the system. The last four pages of this document outline the following additional features:
1) Printing Classroom Rosters, 2) Editing Existing Children, 3) Deleting a Child’s Record, 4) Sorting the Classroom lists,
and 5) Viewing Check-In History.
Enter General Info
When you run the Children’s Check-In software for the first time, you’ll automatically be taken to the Admin Settings,
where you’ll enter some general information (shown below).
1. The ‘Church (Short) Name’ field is primarily used on the classroom rosters.
2. If you have purchased an Activation Code, enter it in this field. Otherwise, leave this field blank to evaluate the
software.
3. The Default Children City, Default Children State, and Default Children Zip fields are all used each time a
new child is entered into the database. For example, if you entered Wichita, KS 67207 into their respective fields,
each time you enter a new child into the database, these fields would be pre-populated to help save you time.
4. The Class #1 Name, Class #2 Name, Class #3 Name, Class #4 Name, etc. fields allow you to customize
the software to your congregation. For example, you may only have two classrooms in your church: Toddler, and
Elementary. In this example, you would change the Class #1 Name to Toddler, Change the Class #2 Name to
Elementary, and uncheck the Active checkboxes next to Class #3 and Class #4 (to de-activate these extra
classrooms).
5. By default, the 1st child entered will have a number of 1, and the next child will have a number 2, and so on. You
can change this by specifying your own Starting Child Number.
6. The Show on Main Screen checkboxes are used to indicate which four classrooms you want to appear on the
main screen of the Check-In software. This has no effect on the functionality of the software.
7. Click the ‘Next >>’ button.
If you have not entered an Activation Code, you will see the message below each time you run the software. Click
the ‘OK’ button, to continue. If you have entered an Activation Code, you will not see the message, and instead
be taken directly to the Main Check-In screen.
You will now see the Main Check-In screen, where you can access all the features the check-in software has to
offer. From here you’ll be able to check-in children, view all children who are currently checked-in, print rosters,
enter new children, edit existing children, change settings, and view check-in history. Here you’ll see the four
default classrooms, located in the four sections of the screen. Once children are added to the system and
checked-in, you’ll see them show up in these classroom areas.
Enter New Children
1. To begin entering a new child into the system, click on the ‘Enter New Child’ button, located in the lower-middle
section of the main screen.
2. There are only four required fields when entering a new child: Number, First Name, Last Name, and Class.
3. The Number field is used to quickly check-in the child from the Main screen. The system initially chooses a
random number, but if you’d prefer, you can change this number.
4. Enter the child’s First and Last name, then select their Class. *** NOTE: The ‘Class’ drop-down list is
customized to show the names you provided for Class #1 – Class #10, in the previous ‘Enter General Info’ steps.
5. Click the ‘Save’ button.
*** Entering the information below is Optional ***
6. Enter the child’s Address, City, State, Zip and Phone number. No specific format is required for Zip code or Phone
number.
7. If a digital photo of the child is available, click the ‘Add Photo’ button and then select the photo. NOTE: Any photo
size and resolution is acceptable, the system automatically re-sizes the photo to the precise size for performance.
8. Enter the names of the child’s parents.
9. The Points Total field is often used for congregations who utilize a points system to reward children’s behavior /
achievements. In this scenario, each child’s Points Total field is usually updated on a weekly basis.
10. Enter the child’s Date of Birth. As a convenience, once the DOB field is entered, the child’s Age is automatically
displayed.
11. If applicable, select the child’s Grade level, and enter any pertinent Notes.
12. The Allergies / Message field is printed on the Roster for that child’s class. This field is also often used for children
who require special needs / attention, which must to be brought to the teacher’s attention.
13. Click the ‘Save’ button.
14. NOTE: If you are entering multiple children from the same family (siblings), you can use the ‘Enter Sibling’ button
after you have Saved the info for the previous child, to help save time. The ‘Enter Sibling’ button copies the
Address, City, State, Zip, Phone & Parent’s names fields, and also increases the Number field by one.
15. Close the Enter New Child window.
Check-In Children
1. There are two ways to Check-In a child from the main screen, 1) Enter the child’s Number into the textbox, and
then press the Enter key, OR 2) Start typing the child’s first name or last name (or both) into the textbox, and you
will temporarily see search results appear directly below the textbox, and the results will narrow after each letter
that you type. In the search results, you will see a ‘Check-In’ button located next to each record. Click this button
to Check-In the child.
2. Once the child is checked into the system, you’ll see their name in large green letters at the upper left-hand
section of the screen, along with their classroom.
3. If a photo has been associated with this child, their photo will appear on the screen for approximately three
seconds after they are checked-in, and then automatically disappear.
Check-Out Children
There are two ways to Check-Out children from the main screen, 1) Enter the child’s number into the textbox on
the main screen, and then press the Enter key, OR 2) Find the child in their respective classroom list, and click
the ‘Check-Out’ button next to their name.
Once a child is Checked-Out of the system, you’ll see their name in large orange letters at the upper-left-hand
section of the screen, along with their classroom.
*** NOTE: This concludes the basic functions of the Children’s Check-In Software. Read-on to learn
about additional features. ***
Print Classroom Roster(s)
On the main screen, each classroom has its own Print Roster button, located at the upper-right-hand corner of its
list of children. To Print a Roster for a classroom, click the appropriate Print Roster button. For example, if a
classroom is named ‘Nursery’, then the button will be named ‘Print Nursery Roster’. After you’ve clicked a Print
Roster button, a Print Preview screen appears, which allows you to see what the Roster will look like before it’s
actually printed. On the Print Preview screen, click the Printer icon, located in the upper-left-hand corner of the
screen. NOTE: If you click on a Print Roster button when no children are currently checked-in for that classroom,
instead of seeing an empty Roster, you will receive a message stating that no children are checked-into that
classroom, and the Print Preview screen will not appear.
Edit Existing Child
There are three ways you can Edit the information for a child that already exists in the system, 1) Start typing the
child’s first or last name into the textbox on the main screen, and then click the ‘Edit’ button next to their name,
OR 2) If they are currently checked into the system, you can simply double-click their name in the classroom list,
OR 3) Click the ‘Directory’ button located in the upper-right-hand section of the screen, then scroll through the list
to find the child and simply double-click their name in the list.
After changing the child’s information, click the ‘Save’ button and then close the Edit Child window.
Delete Child
Once you are on the ‘Edit Child’ screen (shown above), click the ‘Delete Child’ button. A prompt will appear, that
makes sure you want to delete the child’s record. Click the ‘Yes’ button. Then finally, close the Edit Child window.
Sort the Classroom Lists
By default, the children list for each classroom is sorted by First Name. To sort all lists by Last Name, click the
‘Sort Last’ button located in the upper-middle section of the screen. If you click the same button a second time,
the sort order is reversed (Ex: If the lists are currently sorted by First Name, and you then click the ‘Sort First’
button, the list will be sorted by First Name beginning with the end of the alphabet (Z – A).
View Check-In History
On the main screen, click on the ‘History’ button, located in the upper-middle section of the screen, to view the
check-in history. When the Check-In History screen appears, by default, it will show a list of children who were
checked-in or checked-out for today. A message in green is shown in the upper-middle section of the screen,
showing you how many records were found for the given date range. This record count can be used to get an
approximate count of how many children attended your children’s ministry on a given day, week, month, etc. To
get an exact child count, you will need to examine the list and subtract any children that were checked-in more
than one time on any given day.
Adjust the From and / or To Dates, and click the ‘Search’ button. Once you are finished, click the ‘Close’ button.