1
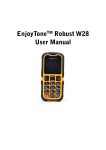
MAFE DUAL SIM FEATURE PHONE USER MANUAL 1 Content Preface………………………………………………………………………………………………….....3 Phone appearance…………………………………………………………………………………….4 Getting Started………………………………………………………………………………………….5 Call logs…………………………………………………………………………………………………….7 Contacts …………………………………………………………………………………………………..8 Mzone………………………………………………………………………………………………………9 FM Radio………………………………………………………………………………………………….9 Message………………………………………………………………………………………………….10 My files…………………………………………………………………………………………………...12 Video……………………………………………………………………………………………………...13 Camera…………………………………………………………………………………………………..13 Audio……………………………………………………………………………………………………..14 Organizer……………………………………………………………………………………………….15 Settings…………………………………………………………………………………………………..16 Profiles…………………………………………………………………………………………………..21 Game……………………………………………………………………………………………………...23 Bluetooth ……………………………………………………………………………………………….23 Gallery……………………………………………………………………………………………………23 Calculator……………………………………………………………………………………………....23 Alarm……………………………………………………………………………………………………..24 Torch……………………………………………………………………………………………………..24 2 Preface Thank you for purchasing Mafe cellular phone. Please go through the instructions in this user manual to avoid any probable failure, breakdown or incident and to assure your cellular phone works perfectly. User manual is the best illustrative document and design to assist you to receive all possible answer concerning devices’ optimal performance. Follow all safety warnings to avoid injury or property damage. Mafe Mobiles has been striving to improve their cellular products. Therefore, we reserve the rights to revise this user manual or withdraw it at any time without prior notice. 3 Phone Appearance 1.Receiver 2.Display Screen 3.Left soft key 4.Direction key 5.Dial Key 6.Number keys 7.* Key 8.Right Soft key 9.OK key 10. Power/ End key 11. # key 12. Speaker 13. Camera 14. Battery Cover 4 Getting Started Inserting the SIM Card and the battery Remove the back cover Make sure the phone is switched off. You need to remove the back cover of your phone before you can insert the SIM card. Hold the phone with the front facing downwards; lift the back cover up to remove it. Remove the battery Put your finger on the top of the battery slot and lift the battery up to remove it. Insert the SIM card Make sure that the clipped corner of the SIM card is facing the correct direction and the metallic Sim area is facing downwards. Slide the SIM card into the card slot until it stops. Inserting a T-Flash (External Memory) Card Slide MicroSD card into memory card frame with metallic chips facing downwards and push it in until it stops. Install the battery With the metallic frame of the battery facing the metallic contacts in the battery slot, press the battery down into its slot until it locks into place. 5 Install the back cover Put the back cover on the battery slot and then stack the back cover until it locks into place. Turning the phone on To turn the phone on, press and hold the Power key. If you have already enabled the Sim Lock function then enter the PIN code (the 4 to 8 digit secret code of your SIM card). It is preconfigured and provided to you by your network operator or retailer. If you enter an incorrect PIN code 3 times in succession, your SIM card will be locked. To unlock it, you must obtain the PUK code from your network operator. Charging the Battery Ensure the battery is inserted in the handset. To charge the battery, plug in the charger connector at bottom of your phone with 5-pin connector charger. The battery symbol indicates the charging status. While charging, the charge indicators will scroll. When all the scroll bars are steady, the battery is fully charged. It takes about 4 hours to fully charge the battery. Disconnect the charger from the phone. Disconnect the charger from the AC power socket. Note: If the battery is powerless, the battery icon will reappear after a few minutes of charging. Keypad Lock and Unlock In standby interface, if the time expires, the keypad will be locked automatically. Lock: press left soft key and then * key in standby interface. Unlock: firstly press unlock key (left soft key) and then press * key in standby interface. 6 Call logs You can view your recent call situation. [Missed calls]: Show all missed calls list; select a view after a missed call occurred the date and time, phone number and times. [Dialed Calls]: Show all dialed calls list. Select a view after a dialed number occurred in the date, time phone number and times. [Received calls]: Show all answered the phone list; select a view after a phone that has the date, time of occurrence, telephone number, and frequency. [Rejected calls]: Show all refused to answer the phone list, select a view after a missed call occurred the date and time, phone number and times. Details: View the current record date, time, type. Call: Call the current number. Save: You can save the current record to the phone or SIM card Write message: send the current record of SMS. Add to contacts: The number of the log record can be added as a new contact Add to blacklist: The current record to avoid a call Delete: Delete the currently selected record Delete all: Delete all call records—Warning will pop up to delete all call logs. [Call times]: Last time zero starting time for last call statistics, a total of dialed calls, received calls, all calls total, all the time can also be zero. [GPRS counter]: Display the SIM card GPRS data. 7 Contacts You have 2 type of memory for phonebooks in this mobile phone: SIM card and 2nd one is mobile memory. The mobile can store 298 phone numbers and the SIM card’s capacity depends on SIM type. In standby mode, enter a number, press the call key pieces to make a call, press the OK key to save If ‘To SIM 1/2’ is selected, users can edit name and number. If ‘To phone’ is selected, the user can edit the name, mobile number, home number, e-mail address, image, ringtone, and caller groups (if you save contact in phone memory, than you save his picture for display if you call on same number or received a call from this number. Into the phone book list, the list on the left displays a small icon indicates that the record exists SIM card or mobile phone, the right is the record of the name and number information). Standby mode, press the right soft key to enter into the address book or from the menu into the address book, do the following: New: Create a record to phone or SIM Delete multiple: Choose one or more records to delete Import/Export: Copy/Import/Export records to T-Card or phone Others: Own number, service number or memory status Memory status: Query the current SIM card and mobile phone storage capacity. 8 Mzone [Internet]: Use the function of Internet. [Facebook]: Connect to Facebook. [Google]: Connect to Google. [Twitter]: Connect to twitter. [Yahoo]: Connect to yahoo. FM radio [Auto search and save]: Channel auto search and save [Channel list]: View channel list [Save]: Save the channel to the channel list [Manual search]: Manually enter the channel and find [Open speaker]: Choose to open speaker for FM Radio instead of handsfree. [Background play]: Run FM Radio to play at the background of phone display, it helps user not to turn off radio while doing some other tasks on phone. [Record]: Record the FM [Timing record]: Set the time to record [Record file list]: The list of FM record file [Storage]: Set the location of storage [Help]: FM Help. 9 Message The Messaging function is a network service. Sending and receiving text can only be used if the service is proposed by your network operator. You can send ordinary Text messages. The SMS is sent to the Text messages center in the network firstly, and then to the target user. If the receiver’s mobile is power off or cannot receive messages, the network will store the message temporarily and the store duration is determined by the user configuration and the service provider. The message will be directly stored in the SIM card if the capacity is not full. A blinking icon at the head row of the main screen will be displayed if the capacity is full. Messages unread If the Text message has been sent to the receiver, a beep will sound. (If the tone for Text messages and message report are activated). [Write message] [New SMS] Send: Enter the appropriate number of the recipient or from the phonebook add Insert template: to the content of the message currently being edited into the common language Add contact info: Insert the contact person Add Phiz: emoticons into the meaning of the representative (icon). Save as Draft: will save the information to Drafts Exit: Exit message 10 [Inbox] Reply: Reply to SMS to each other. Delete: Delete short message Call: choose a voice call or a call to the sender IP calls Lock: lock cannot be deleted Move: Move the message to SIM or phone Copy: Copy the message to SIM or phone Mark: single marker or markers in whole or in text messages stored in SIM1/SIM2, mark or unmark after delete records Sort: In accordance with time / contact / theme / message type sort Add sender to: Add the sender to contacts Delete repeated number: choose to delete the same number of records. Add to blacklist: Add the sender to blacklist [Outbox]: Reading or processing stored in the Outbox of the SIM card message. [Drafts]: Reading or processing stored in the Drafts of the SIM card message. [Sentbox]: Read and process the mail stored in the SIM card has been sent information. [Security inbox]: View the message which is locked. [Templates]: Use the function of templates. 11 My files [MemoryCard]: SD card needs to support T card. [New folder]: Create a new folder. [Delete]: Delete the specified folder. [Details]: View the folder or file for more information [Edit]: The selected folder or rename the file or copy [Search]: Enter the folder name to find out. [Sort]: By the way you choose to sort the files. [Mark]: Select Mark / Unmark single / all [More] Phone Memory capacity: View the phone memory capacity Memory Card Capacity : view the memory card capacity Format Phone Memory: Delete/ format phone memory. Format Memory Card: Format memory card. Rename Memory card: Change name of Memory card for phone. 12 Video Use the function of video player Camera The phone supports Camera, so you can capture your favorite scenes anywhere. Photos will be saved in the phone comes with a file system, photographs as JPG format, you can phone provides photographs sent to a computer via USB connection to view, can also be set Image for the standby Note: This function can work without driver under Windows XP by directly connecting your mobile to the computer. Capture: press OK key to catch the picture and press the left key into the “option” function [More options]: Set more options (also can access by press direction key on right side). Shoot Mode: to select DC (Camera) or DV (Video) mode. Size: users can select size of pictures to make their pixel quality better. Brightness: to enhance the brightness of picture. Contrast: to increase the contrast of photo. Continuous shoot: 3 or 6 pictures can be shooting on same time. White Balance: users have option to select various modes to click pictures like fluorescent, sunny day, cloud and so on. 13 Effect: pictures can be click on different color textures like black & white, blue, negative etc., [Image viewer]: View saved photo [Settings]: Set camera parameters Audio To play audio files such as MP3 songs, press the Up and Down keys to adjust the volume and left and right keys going to help you to change your tracks. In Addition, for fast forward users needs to keep pressing right or left directional key. Central softkey is to pause and play ongoing track. [Music list]: Into playlist interface. Can be added to the play list editing and other operations [Add]: Add songs or music playlist bookmark [Set as ringtone]: The song is set to call or alarm tone [Shuffle]: Choose shuffle to play the music [Repeat]: Choose one/all repeat [Settings]: Display image, equalizer, BT stereo out/headset 14 Display settings: Select Open / backlight are on and constant on / off display lyrics, etc. Equalizer: Choose a variety of equalizer effects. BT stereo output: Set the BT output. BT stereo headset: Set the BT headset [Exit]: Exit menu audio player Organizer [Digital video]: The function of video recorder [Recorder] Start recording: Start recording Record file list: The memory card inside the recording file list Storage: Set the locate of storage File format: Set the format of record file (AMR or WAV) [Calendar] Press the left soft key to access the calendar display interface, the first line shows the year, month, and the third line shows the week, the middle section shows the specific date of a month, the last line shows the right and left soft key in the message. Interface in the calendar, press the arrow keys on the date forward one week, press the arrow keys to move one week after the date, press the left arrow key date forward one day, press the right arrow keys to move the day after the date, select the date to a dark display. 15 Add new schedule: A new agenda View schedule: View the schedule one day saves All schedule: View the schedule all day Clear tasks today: Clear the calendar day Clear all: Empty all the schedules Go to date: Enter the dates you want to find, the cursor will jump to that date quickly Weekly: the week / month display calendar. [Sim Services] Full name of the SIM card application toolkit (SIM Application Toolkit) and can provide you with flexible information functions, such as stock information, traffic information, and weather and so on. Its functionality provided by the network operator decision. The business needs the support of SIM cards and network. Settings [Phone settings] [Date & time] Set time: set the phone to display the time Set date: set the phone to display the date Time format: Set the display time format Date display type: Set the date display format Update time settings: Set update 16 [Language settings]: Display Language: Users can select language for phone display. Writing Language: Select phone’s Font language (Hindi or English). [Auto power on/off]: Set the time and frequency of Automatic on/off [Power management]: Check the battery's current charge. [Restore factory settings]: Restore the factory settings: (code-1234) [Display settings] Wallpaper settings: Set wallpaper from memory. Idle display settings: Select whether the standby time / operator / day schedule / personal terms can be added on standby screen. Contrast: Adjust the screen's backlight brightness. Backlight: Set the backlight time for screen. Keypad backlight time: Set the keypad backlight time Auto keypad lock: Set the auto keypad lock time 17 [Security settings] PIN: Select open or modify the phone's PIN code (provide by network) Modify PIN2: PIN2 choose to modify the phone code (provide by network) Phone locked: Set the phone locked (password 1234) Modify the cellphone password: Modify the password of phone Privacy: Set access to enter the password to view functionality. (Including: call log / messages / camera / address book / document management / e-book / calendar schedule / U disk). Lock screen by end-key: press the end key to select whether the off-screen function Mobile tracker: Mobile tracker is unique feature to tracker your cellphone. Whenever anybody inserts their sim to phone, mobile tracker will flash a message from their number with IMEI number and his/her contact info to saved number by you. Fixed dialing: Set the fixed dialing function. (PIN2 – network provider will assist you to have pin2 to access fixed dialing feature). Blacklist: Set the blacklist [Call settings] [Dual-SIM] Standby mode: Dual SIM standby or standby only SIM1 or SIM2 only or can go to flight mode. Reply by original SIM: Reply the call & SMS by original SIM (master sim) Set SIM name: SIM1 and SIM2 in the card slot to set the display name [Call divert]*: transfer a call, respectively SIM1/SIM2 (function by network provider) 18 Call forwarding unconditional: Set a forwarding number, for forwarding all calls are. (function by network provider) Call forwarding on busy: set the forwarding number, transfer calls when in busy (function by network provider) Call forwarding on no reply: Set a forwarding number, in case of no response transfer (function by network provider) Diver if unreachable: to set the forwarding number in the phone unable to connect the case of transfer (function by network provider) Cancel all diverts: cancel all of the transfer [Call waiting]*: Open call waiting, respectively SIM1/SIM2 (function by network provider) [Call barring]*: Respectively SIM1/SIM2 call for restrictions (function by network provider) * SIM card, operators need to support [Others] Call time minute remind: when users receive or make any call, they can keep reminder for respective seconds, and also they customize it. Auto redial: Select to automatically redial function Vibration when connected: Vibration will get active once user connects any call. Reply SMS after connected: Choose reply SMS after reject calling Auto record voice call: Set auto record [Connection] 19 [Network account] New connection: Create a new Internet account Add from list: From the system built-in Internet account to add a new account Search: From the current logged on to Internet search to the card account information, which added to the list after the selected [GPRS Service]: Select open or off [Data Connection Setting]: Users have option to always connect to GPRS or they can select when they needed. [Network selection]: Select the network parameters [Bluetooth] Open Bluetooth: Choose to activate the Bluetooth Bluetooth visibility: Bluetooth visibility set Paired device: Search and paired Bluetooth devices Device name: Local Bluetooth name Bluetooth file storage: Storage location Help: Help Documentation Profiles Normal: 20 Silent: Meeting: Indoor: Outdoor: Profiles1, 2 & 3: Customize by users. [Options] [Add]: Add the new profile [Delete]: Delete the profile [Settings]: set the selected mode [Rename]: Rename the profile [Ring settings] SIM call ring: Set the SIM card of the ringing tone SIM message ring: Set the SIM card message tone [Adjust volume] Caller ringtone: set the ringing tone volume Message ringtone: ring volume settings information 21 Alarm & calendar volume: set the alarm tone Call volume: Set the volume of calls [Ring type] Call alert: A ring, vibration, quiet, vibration and ringing and ringing after the first five vibration incoming call alert for you to choose Message alert: A ring, vibration, mute, ringing and message alert vibration four ways for you to choose Alarm & calendar remind: A ring, vibration, mute, ringing and message alert vibration four ways for you to choose [Other alert rings] Key tone: set the key tone of voice Battery low alert: Choose open the alert of battery low Games One game (Snake) in phone for you and can enjoy move snake from all direction using direction keys or 2 for up, 4 for left, 6 for right and 8 for down. Bluetooth [Open Bluetooth]: Choose to activate the Bluetooth 22 [Bluetooth visibility]: Bluetooth visibility set [Paired device]: Search and paired Bluetooth devices [Mobile Bluetooth name]: Mafe, user can rename their Bluetooth name to their desired one. [Bluetooth file storage]: Storage location or memory card change by user [Help]: Help Documentation Gallery View the image which in phone or card memory Calculator Can be continuously mixed arithmetic, the operation is simple, practical, and convenient Alarm This mobile has three alarm times available for your settings. Access any time, you can set its status to on / off, ring time, repeat mode, ring tones, alarm clock name, etc. Torch Choose to open or close the torch. Users can also open torch by long pressing ZERO key 23