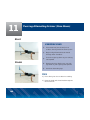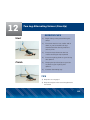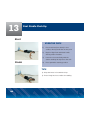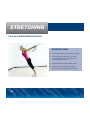
1
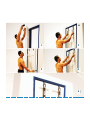
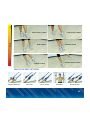
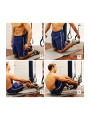
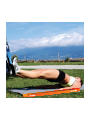
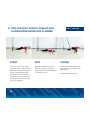
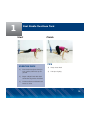
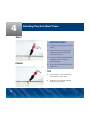
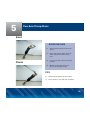
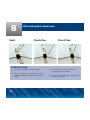
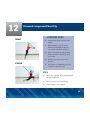
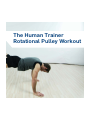
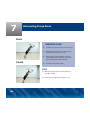
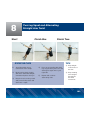
USER MANUAL
w w w. t h e h u m a n t r a i n e r. c o m
1
CONTENTS
4
6
8
10
12
14
16
18
20
24
26
28
30
32
34
36
38
40
42
46
74
96
112
124
Important Safety Guidelines
The Human Trainer Components & Anchoring Attachments
Door Anchor Attachment
Attaching Dual Suspension Door Anchor
Versatility Anchor Attachment
Dual Suspension Versatility Anchor Attachment
Ceiling Mount Attachment
Modular Quick Clip System
Micro-Adjustments Using the Main Straps
Photos of Indoor / Outdoor Use
Base of Support Guidelines
Handle Attachment
Olympic Ring Guidelines
Pulley Guidelines
Correct Technique Principles
Dynamic Angled Resistance
Foot Cradle Instructions and Clipping Positions
Lying Down Supine Exercises
Plank Position Exercises
The Human Trainer Manual - Sample Exercises
The Human Trainer Full Body Express Workout
The Human Trainer Pulley Workout
The Human Trainer Stretching
Workout Log
IMPORTANT SAFETY GUIDELINES
The Human Trainer is constructed with the highest grade industrial materials and is designed
to provide the ultimate body weight workout. The Human Trainer is built to last and withstand
the most intense training programs. However, improper storage or usage of The Human Trainer
may cause premature wear and breakage, which could potentially lead to both severe and
minor injuries.
Ensure you always protect The Human Trainer from potential damaging elements when the
unit is not in use. Keeping The Human Trainer exposed to sunlight, damp conditions, and
extreme heat and cold temperatures for prolonged periods can weaken the nylon and metal
components.
Never attach The Human Trainer to a sharp edged anchoring point. Repetitive rubbing
against a sharp edge can potentially weaken or tear the nylon material. (Be Careful: Certain
door hinges, overhead beams, and support structures may have sharp corners and edges)
If the components of The Human Trainer shows signs of wear and tear, immediately replace
the components.
Always perform a warm-up of 5 -10 minutes to prepare your muscles prior to using The
Human Trainer. (Examples: Jump rope, jogging or other dynamic movements)
- Never swing or play on The Human Trainer.
- Never hang upside down on The Human Trainer.
- Always follow the instructions in the Human Trainer Manual for installation and safe use.
4
Before each use, always:
Be sure to always inspect your Human Trainer and all its components before use. Never use The
Human Trainer if any of the components are worn or damaged. Always replace any damaged or
worn components immediately.
It is very important to use a strong and secure anchoring point that can fully support your body
weight. The anchoring point must allow The Human Trainer to safely attach without causing
any quick and excessive wear to it. When using any or all of the anchoring attachments, always
weight test The Human Trainer by pulling hard on the anchoring point and main straps.
For additional safety, make sure the floor surface you will be performing the exercises on is not
wet or slippery. Failure to do so could potentially lead to both severe and minor injuries.
When performing exercises using the handles, make sure you have a secure grip and always
ensure the carabiners are correctly attached to the D-Rings on the main straps. For additional
safety, weight test The Human Trainer handles by pulling hard before using.
Failure to adhere to The Human Trainer Manual safety
guidelines may result in minor or severe injury. The user
assumes the full risk of injury and all liability resulting from
the use of The Human Trainer and all of its components.
If you have any questions about how to care for your
Human Trainer or how to use or install, feel free to contact
us at www.thehumantrainer.com or call 1-866-497-9012.
IMPORTANT: Always consult with a physician before
beginning this or any other exercise program.
5
THE HUMAN TRAINER COMPONENTS &
ANCHORING ATTACHMENTS
The Human Trainer has these available components:
1
2
3
4
5
6
7
8
9
10
Main Straps
Foot Cradles(x2)
Door Anchor Attachments (x2)
Standard Handles (x2)
Versatility Anchor Attachments (x2)*
Ceiling Mounts (x2)*
Ab Straps (x2)*
Carry Bag (x1)*
Rotational Pulley*
Olympic Rings*
The Human Trainer can be used both indoors and outdoors. For the safest and most optimal use,
you will need a surface that is non-slip, and a training area that measures approximately 8 by
6 ft. (2.40 by 1.80m) wide. When using The Human Trainer both indoors and outdoors, always
attach the anchor attachments to a strong secure anchoring point that fully supports your body
weight. The chosen anchoring point should be approximately 7 to 9ft (2.10 to 2.75 m) off the
ground. After a secure anchoring point is established and the main straps have been attached,
ensure the bottom handle is approximately 4 to 6 inches (10-15 cm) off the ground.
When using the versatility anchor attachment, the bottom D-ring should hang at about 6 ft
(1.80m) off the ground.
*Optional equipment, not included in Essential Pack.
1) Main Straps
1
c
2
a) top section loop
b) cambuckle
c) D-ring (x5)
b
3
a
2) Foot cradle
3) Door Anchors
4
4) Standard Handles
5) Versatility Anchor Attachment*
a) intermediate loops
b) carabiner
c
5
a
c) D-ring (x1)
c) x 1 D-ring
b
6) Ceiling Mounts*
7) Ab Straps*
8) Carry Bag*
*Optional equipment, not included in Essential Home Kit.
9) Rotational Pulley*
10) Olympic Rings*
7
DOOR ANCHOR ATTACHMENT INSTRUCTIONS
Important information for the Safe use of The Human Trainer Door Anchor Attachment:
To ensure safe use and correct technique for attaching The Human Trainer Door Mount, it must
only be used with professionally constructed doors that can fully support your
body weight.
The most secure and safest door will open away from your body. Your body weight will pull
the door closed. When using any hinge style door, always ensure it is completely closed before
using. Test the door by pushing or pulling to ensure the door is fully secured and closed before
using. For additional safety, use a door locking option if this is available.
Safety Tip:
Always use a Workout in Progress Door Sign when performing any exercises with The Human
Trainer. Place the sign on the opposite side of the door to prevent anyone from unexpectedly
opening the door and potentially causing an injury while using the product.
WARNING *** DO NOT use The Human Trainer on glass doors, sliding doors or any
lightweight doors such as closet doors or kitchen cabinet doors.
9
PROPER TECHNIQUE FOR ATTACHING
DUAL SUSPENSION DOOR ANCHOR
ATTACHMENT
Dual Door Anchor Suspension Gym
10
1
Place two door anchors (dual suspension gym) over the top of the door and close.
2
Both door anchors should be approximately 18-25” apart depending on the width of
the door being used. Both door anchors should be equal distance to the side frame as
to each other.
3
Make sure the door is completely closed, then pull the bottom of both door anchor
straps to ensure that they are both fully lengthened and secured to the top of the door.
4
Before using The Human Trainer with the door anchor attachments, a weight-test
must be performed by pulling firmly on both door anchors before attaching the Human
Trainer main straps.
5
Attach the carabiners on the main straps to the D-rings on the door anchors.
11
1
2
3
4
511
VERSATILITY ANCHOR ATTACHMENT
INSTRUCTIONS
To ensure safe use and correct technique for attaching The Human Trainer versatility anchor
attachment, it must only be used with professionally constructed support structures and indoor
and outdoor support structures that can fully support your body weight.
The versatility anchor attachments are safest when properly secured to the Human Trainer
ceiling mounts, permanently secured outdoor swing sets and playground bars, indoor
professionally manufactured fitness facility cable machines, smith machines or ceiling beams
and posts. For higher anchor points, wrap around the anchor point once and clip the carabiner
into the chosen intermediate loop. For lower anchor points, wrap around the anchor point as
many times as needed to shorten it, and then clip the carabiner into the selected intermediate
loop that will provide the correct height. Ensure that the carabiner is securely attached to
the intermediate loop on the versatility anchors before attaching the main straps. Test the
versatility anchors are safely secured by firmly pulling the bottom D-ring downward.
IMPORTANT- Never clip the carabiner of the main straps into the intermediate
loops of the versatility anchor attachment. Always clip the main straps into the D-ring on the
versatility anchor attachments.
12
13
PROPER TECHNIQUE FOR ATTACHING
DUAL SUSPENSION VERSATILITY
ANCHOR ATTACHMENT
Dual Suspension Gym
14
1
Wrap both Versatility Anchors over or around the anchor point.
2
Test that the Versatility Anchors are safely secured by firmly pulling the bottom
D-ring downward.
3
Clip the carabiners into the appropriate selected intermediate loops. Ensure that
both Versatility Anchors are hanging evenly into the same intermediate loops.
4
Attach the carabiners on the main straps to the D-rings on the Versatility Anchor.
15
1
2
3
415
CEILING MOUNT ATTACHMENT INSTRUCTIONS
Important information for the Safe use of The Human Trainer Ceiling Mount Attachment.
To ensure safety and proper installation, The Human Trainer ceiling mounts should only
be secured to professionally constructed doors, load-bearing walls and ceilings, and other
structures that can fully support your body weight.
The most secure and safest use of the ceiling mounts is when it is tightly screwed into the wall
with no movement of any hardware components and with no additional space between the wall
and the mounts. Always use a stud finder when installing the ceiling mounts and professional
installation is recommended. To provide additional safety, locate multiple points along the stud
for confirmation of its center location.
Safety Tip:
Always use a Workout in Progress Door Sign when performing any exercises with The Human
Trainer. Place the sign on the opposite side of the door to your body to prevent anyone from
unexpectedly opening the door and potentially causing an injury while using the product.
WARNING *** DO NOT use The Human Trainer on glass doors, sliding doors or any
lightweight doors such as closet doors or kitchen cabinet doors.
16
17
MODULAR QUICK CLIP SYSTEM
Main Strap Modular D-Ring System
The Human Trainer main straps are designed with
5 heavy duty D-rings permanently sewn into the
main straps to enable the user to maximize workout
efficiency by reducing the time needed to adjust the
main straps length between exercises.
The user can have multiple handles attached to
different heights at one time or with one carabiner clip,
the user can change the exercise difficulty and exercise
selection by choosing a higher or lower D-ring on the
main straps.
18
D-Ring Height
Change Technique
The D-Ring Height Change Technique has
two methods to shorten the height of the
straps and to minimize any excess strap
from hanging in front of the body during
workout:
1
1
1a
1b
1c
Clipping any of the lower D-Rings
into the top carabiner on the main
straps.
Foot Cradle D-Ring
Height Adjustment
2
After attaching an accessory to
a D-Ring on the main straps, clip
the carabiner from the accessory
into a higher D-Ring to shorten
the length of main straps.
FOOT CRADLE
FULL LENGTH
FOOT CRADLE D-RING
CLIP UP SHORTENED
19
MICRO-ADJUSTMENTS USING THE
MAIN STRAPS
The Human Trainer main straps are designed with cambuckles at the top of the main straps to
provide the user with 10” of micro-adjustments for precise range of motion and to provide you
with the resistance you desire. To shorten or lengthen the main straps, depress the cambuckle
and adjust the strap to the length that you desire.
The Micro-Adjustments are used in two situations:
1
To provide a staggered workout with less than the 10” height difference available
using the multiple D-ring heights.
2
To ensure that both of the main straps are set up to be equal height.
To Shorten:
With the Cambuckle fully depressed, pull down on the front portion of the main straps.
To Lengthen:
With the Cambuckle fully depressed, pull down on the back portion of the main straps.
20
21
22
23
INDOOR / OUTDOOR WORKOUT LOCATIONS
The Human Trainer can be used in a variety of locations, both indoors as well as outdoors.
Suitable anchoring points for The Human Trainer include trees, fences, weight racks, heavy
bag mounts, railings, sturdy beams, soccer net posts, children jungle gyms and doors.
The Human Trainer has multiple anchor attachment options to provide for additional versatility
and portable use. These include the door hook anchor, the versatility anchor and the ceiling
mounts.
INDOOR
24
OUTDOOR
25
Base Of Support Guidelines
When exercising using The Human Trainer Suspension Gym, changing the base of support will alter
the level of difficulty of the exercise.
Offset Foot Position
Performing some exercises in an offset foot position will enable the user to achieve a greater
range of motion. An offset position also reduces the resistance to help make the movement and
exercise easier.
Offset foot positioning is achieved by placing one foot in front of the other. A longer offset
distance will provide more stability and help to provide less resistance. A shorter offset position
will provide less stability and greater resistance. It is best to try out several positions until the
user finds the optimal foot positioning for their level of fitness.
Base Of Support Options
26
1
VERY EASY - The least level of difficulty is performing an exercise with one foot in front of the
other in a short or long offset stance.
2
EASY - The second level of difficulty is performing an exercise with both feet hip width apart as
this provides the greatest base of support.
3
MEDIUM - To increase the level of difficulty during an exercise you can bring both feet together
as this decreases your base of support.
4
ADVANCED - To further increase the level of difficulty during an exercise you can lift one leg off
the ground as this requires more core engagement for stability.
EASY
SHORT OFFSET STANCE
LONG OFFSET STANCE
MEDIUM
NARROW STANCE
WIDE STANCE
ADVANCED
ONE LEG OFFSET STANCE
ONE LEG STANCE
MULTIPLE GRIP OPTIONS
Neutral/Hammer
Palms Up
Palms Down
Wide Grip
Rotating Grip
27
HANDLE INSTRUCTIONS AND CLIPPING
POSITIONS FOR SAMPLE EXERCISES
The Human Trainer main straps are designed with 5 heavy duty D-rings permanently sewn into the
main straps to enable you to maximize workout efficiency by reducing the time needed to adjust the
main straps length between exercises. You can have multiple handles attached to different heights at
one time or with one carabiner clip, you can also change the exercise difficulty and exercise selection
by choosing a higher or lower D-ring on the main straps.
SINGLE HANDLE EXERCISES AND GUIDELINES
The Human Trainer can also be used with only one main strap. Using only one Human Trainer
main strap to perform single-sided and rotational exercises will increase the users core
stabilization and provide additional challenging exercises.
28
29
Standing two arm side
overhead crunch / twist
Start
Finish
Standing two arm side
to side torso twist
Start
Finish
Start
Finish
Standing one arm
bicep curl
29
Olympic Ring Guidelines
The Human Trainer Olympic Rings easily attaches to all anchoring
options to provide you with additional exercises like dips, pull-ups,
push-ups, rows and more.
The Olympic Rings are constructed with a heavy duty anti-slip grip to
provide you superior control and comfort.
The Olympic Rings can be attached to any of the D-Rings to perform the
desired exercise.
30
31
Pulley Guidelines
The Human Trainer Rotational Pulley allows you to unlock dozens of
sport specific movements. The Pulley easily attaches to any anchoring
options and add-ons.
Built with commercial grade materials for sturdy attachment and
safety, the Pulley will tone and build muscle as well as increase speed
and endurance.
Using the Rotational Pulley you can mimic or replicate many sport
specific exercises such as golf, hockey, tennis, and many more.
To add resistance, you can clip kettle bells, resistance bands to one end
of the cable, or even use two Pulleys in tandem while doing chest flies.
Attaching foot cradles to the Rotational Pulley allows a free motion
lower body workout.
32
33
CORRECT TECHNIQUE PRINCIPLES
Posture Tips:
To safely use The Human Trainer, always engage your core muscles and maintain a neutral
spine with your shoulders, hips and ears in alignment.
1
Correct posture push-up foot cradle (aligned low back)
2
Incorrect posture push-up foot cradle (low back compressed)
Main Strap Tight:
To correctly use The Human Trainer main straps, the straps should be kept tight while
performing all exercises. Never let the straps hang loose and dangle at any time throughout
the exercise. The key to keeping the straps tight is applying even pressure throughout the
entire movement.
No Rubbing:
To correctly use The Human Trainer, never allow the main straps to rub against your
arms to help provide stability. Change the position of your hands to be higher to help
prevent rubbing.
34
17
1
2
STRAPS LOOSE
STRAPS TIGHT
RUBBING
NOT RUBBING
DYNAMIC ANGLED RESISTANCE
The Human Trainer uses a dynamic angled resistance system that allows users to adjust
the level of resistance by changing your body angle. A deeper body angle will create more
resistance, and an upright body angle will create less resistance.
Push Up:
1
Push up with more vertical resistance
2
Push up with less vertical resistance
Two Arm Row:
1
Two arm row with more vertical resistance
2
Two arm row with less vertical resistance
Adjusting body angle
Moving your feet towards the anchor point will increase the resistance during the exercise.
When your body is at a steeper, more vertical angle, the resistance will less.
36
1
More resistance - standing two arm row (body parallel to ground)
2
Less resistance - standing two arm row (body vertical)
37
1
2
1
2
FOOT CRADLE INSTRUCTIONS AND CLIPPING
POSITIONS FOR SAMPLE EXERCISES
The Human Trainer foot cradle allows you to suspend your feet in the Human Trainer and
perform a variety of prone (face down) and supine (face up) exercises.
For exercises that involve putting your feet in the foot cradles, choose a D-ring height so that
the bottom of the foot cradles are approximately 8-12 inches (20 to 30 centimeters) off the
ground.
For prone (face down) exercises, you will put your toes in
the foot cradles.
1
Kneel down in front of the Human Trainer facing away from the main straps, with your
feet directly in front of the foot cradles.
2
Reach behind you and put one foot in the foot cradle, and then repeat the process with your
other foot in the other Human Trainer foot cradles.
For supine (face up) exercises, you will put your heels in
the foot cradles.
38
1
Begin by facing towards the main straps with your feet directly in front of the foot cradles
and sit down in front of the Human Trainer.
2
While holding onto the foot cradles, lie backwards and then slip the foot cradles over
your heels.
39
1
2
1
39
2
LYING DOWN SUPINE EXERCISES
Using the foot cradles to perform supine (lying down) exercises with your heels can provide
more and less resistance in relation to the angle of The Human Trainer main straps to the floor.
More Resistance
To increase resistance, begin the exercise with your body farther away from the neutral
anchor position.
Less Resistance
To decrease resistance, begin the exercise with your body closer or beyond the neutral
anchor position.
40
41
PLANK POSITION EXERCISES
When performing plank position exercises with The Human Trainer, the elbow is a more stable
position and requires less upper body muscle recruitment and core strength than a standard
push up plank.
42
1
Plank on elbows under shoulders (more stable)
2
Plank on two hands under shoulders (more strength and core)
43
1
243
44
45
The Human Trainer Manual - Sample Exercises
NOTE - Before beginning these exercises or any other workout programs using The Human
Trainer, ensure that you have selected and tested the chosen support structure for safety and
stability. Next, attach the accessory handle to the chosen D-ring height on The Human Trainer
main straps. Be sure to always inspect your Human Trainer and all its components before use.
Never use The Human Trainer if any of the components are worn or damaged. Always replace
any damaged or worn components immediately.
Safety Tip:
Always use a Workout in Progress Door Sign when performing any exercises with The Human
Trainer. Place the sign on the opposite side of the door to your body to prevent anyone from
unexpectedly opening the door and potentially causing an injury while using the product.
WARNING ***
DO NOT use The Human Trainer on glass doors, sliding doors or any
lightweight doors such as closet doors or kitchen cabinet doors.
46
1) TWO ARM PUSH UP WITH TWO KNEE TUCK
CHEST AND CORE
START
MID
FINISH
Place one foot in each of the
suspended foot cradles, toes in.
Walk your hands forward until
they are directly under your
shoulders. Keep your hands
placed firmly on the ground in
a push up plank position. Keep
your core engaged.
Bend your elbows out to the
sides as you lower until your
body and arms reach 90 degrees
or parallel to floor.
Press back up to the top of the
push up plank position as you
lift your hips upwards and draw
both knees in towards your
elbows.
47
2) TWO LEG FOOT CRADLE PUSHUP AND
ALTERNATING MOUNTAIN CLIMBER
CHEST AND CORE
START
MID
FINISH
Place one foot in each of the
suspended foot cradles, toes in.
Walk your hands forward until
they are directly under your
shoulders. Keep your hands
placed firmly on the ground in
a push up plank position. Keep
your core engaged.
Bend your elbows out to the
sides as you lower until your
body and arms reach 90 degrees
or parallel to floor.
Lift the tailbone and draw the
right knee to the outside of the
right elbow.
48
Continue alternating legs.
3) TWO ARM PUSH UP WITH PIKE
CHEST AND CORE
START
MID
FINISH
Place one foot in each of the
suspended foot cradles, toes in.
Walk your hands forward until
they are directly under your
shoulders. Keep your hands
placed firmly on the ground in
a push up plank position. Keep
your core engaged.
Bend your elbows out to the
sides as you lower until your
body and arms reach 90 degrees
or parallel to floor.
Keeping your legs straight
raise hips toward the ceiling.
Make sure your core muscles
are engaged throughout the
movement.
49
4) TWO ARM ROTATING GRIP ROW
BACK
START
FINISH
Firmly grasp one handle with each hand and
keep your palms facing down. Facing the door,
extend both arms forward as you shift your
weight backwards until you are resting on the
heels of both feet.
Maintain a straight spine with engaged core
muscles as you retract both arms backwards
and rotate your arms 180 degrees towards
the body. Ensure your hands smoothly rotate
as your body shifts forward and backward
throughout the movement.
50
5) TWO ARM FRONTAL RAISE
BACK
START
FINISH
Firmly grasp one handle with each hand and
keep your palms facing down. Facing the door,
extend both arms forward as you shift your
weight backwards until you are resting on the
heels of both feet.
Maintain a straight spine with engaged core
muscles as you retract both arms backwards
and raise your hands above your head. Ensure
your hands raise smoothly and slowly for
maximum resistance. Keep the tension in the
straps by leaning back as much as possible.
51
6) ONE ARM ROW
BACK
START
FINISH
Firmly grasp one handle with one hand. Facing
the door, extend your arm forward as you shift
your weight backwards until you are resting
on the heels of both feet.
Maintain a straight spine with engaged core
muscles as you retract your arm backwards.
Ensure your hand comes in smoothly as your
body shifts forward and backward throughout
the movement. Alternate arms once each set
is completed.
52
7) SINGLE ARM BICEP CURL
BICEPS
START
FINISH
Firmly grip one handle with your left hand and
keep your palm facing up. Position your body
facing the door with both feet together. Extend
your left arm towards the support structure as
you shift your weight away from the door.
Maintain a straight spine with engaged core
muscles as you bend your left arm and bring the
handle towards your left shoulder. Keep your right
arm resting by your right hip during the movement.
Return to the starting position and repeat until the
desired number of repetitions is completed, then
repeat with your right arm.
53
8) ALTERNATING BICEP CURL
BICEPS
START
FINISH
Stand facing towards the main straps. Begin
in a leaning back position with arms extended
straight at shoulder height, palms facing
up. Curl one hand towards eye level keeping
elbows lifted. Extend opposite arm downward.
Maintain a straight spine with engaged core
muscles as you curl your right arm and bring it to
eye level. Push your opposite hand down as you
curl. Keep your elbow lifted as much as possible.
Maintain tension in the straps through the entire
motion. Continue alternating arms until the desired
number of repititions is completed.
54
9) SINGLE ARM SIDE ANGLE BICEP CURL
BICEPS
START
FINISH
Firmly grip one handle with your right hand
and keep your palm facing up. Position your
body facing away from the door with both feet
together. Extend your right arm towards the
support structure as you shift your weight
away from the door.
Maintain a straight spine with engaged core
muscles as you bend your right arm and bring the
handle towards your right shoulder. Keep your left
arm resting by your left hip during the movement.
Return to the starting position and repeat until the
desired number of repetitions is completed, then
repeat with your left arm.
55
10) TWO KNEE SIDE-TO-SIDE TUCK
ABS & CORE
START
FINISH
Place one foot in each of the suspended foot
cradles, then walk your hands forward until
your hands are directly under your shoulders.
Keep your hands firmly placed on the ground
in a high push up plank position, with your
core engaged.
Keeping your arms in a high plank position,
draw both knees in towards your left elbow,
then return to starting position and then draw
both knees into your right elbow. Continue
alternating sides until the desired number of
repetitions is completed.
56
11) TWO KNEE PIKE
ABS & CORE
START
FINISH
Place one foot in each of the suspended foot
cradles, then walk your hands forward until
your hands are directly under your shoulders.
Keep your hands firmly placed on the ground
in a high push up plank position, with your
core engaged.
Keeping your legs straight raise hips toward
the ceiling. Make sure your core muscles are
engaged throughout the movement.
57
12) FOOT CRADLE TWO ARM PLANK
ON FOREARM
ABS & CORE
START
FINISH
Place one foot in each of the suspended foot
cradles, then walk your hands forward until
your hands are directly under your shoulders.
Keep your forearms firmly placed on the
ground in a plank position, with your core
engaged.
Keep your forearms in a plank position and
hold for as long as possible.
58
13) TWO ARM CHEST PRESS
CHEST
START
FINISH
Stand facing away from the main straps. Begin
with both arms extended forwards at chest
height, palms facing down.
Lower chest with elbows bending 90 degrees to
the sides in a push-up motion. Press back up and
maintain body alignment.
59
14) CHEST FLY
CHEST
START
FINISH
Begin leaning forward slightly with the arms
extended straight at chest height, palms
facing in.
Lower your chest and body with your arms
reaching out to the sides. Press back up and
maintain body alignment.
60
15) TWO LEG FOOT CRADLE HIGH PLANK
PUSHUP
CHEST
START
FINISH
Place one foot in each of the suspended foot
cradles, then walk your hands forward until
your hands are directly under your shoulders.
Keep your hands firmly placed on the ground
in a high push up plank position, with your
core engaged.
Bend your elbows out to the sides as you lower
until your body and arms reach 90 degrees or
parallel to floor.
61
62
63
16) ONE LEG SUSPENDED SPLIT SQUAT
LEGS
START
FINISH
Place your right foot in the suspended foot
cradle and then walk or hop your left foot
forward about 2 feet from the support
structure to ensure your left knee doesn’t go
past your left toes as you lower. Keep your
core muscles engaged with your hands at your
hips in a suspended split stance.
Press your suspended right leg backward as you
lower your leg and body. Keep your right foot and
knee above the floor, and do not bend your front left
knee more than 90 degrees or forward over your left
toes. Return to the starting position and repeat until
the desired number of repetitions is completed, then
repeat with your left leg.
64
17) TWO LEG LYING DOWN HAMSTRING CURL
LEGS
START
FINISH
Begin sitting on the ground facing the main
straps, then place both of your heels inside
each of the foot cradles. Lie down on your
back with both heels in each of the suspended
foot cradles with your palms facing down
beside your body.
Stabilize your core by tightening your
midsection, then lift your hips, glutes and
lower back off the floor. Maintain the position
with your hips and lower back off the floor as
you pull your feet in towards your body. Return
to starting position and repeat.
65
18) STRAIGHT ARM SQUAT
LEGS
START
FINISH
Grasp one handle in each hand while standing
with feet hip width apart, facing towards the
main straps. Begin in a leaning back position
with the arms extended forward, palms facing
inward.
Keep the heels on the ground, press the hips back
and down. Press up to standing with both legs
66
19) TWO LEG SQUAT AND ROW
LEGS & BACK
START
FINISH
Firmly grasp one handle with each hand and
keep your palms facing in towards your body
with your feet hip width apart. Facing the door,
extend both arms forward as you shift your
weight backwards until you are resting on the
heels of both feet.
Maintain a straight spine and engaged core
muscles, then press your hips back and bend your
knees to 90 degrees or until your upper thighs
are parallel to the floor. Keep your arms extended
towards the support structure as you lower. Press
your hips forward to a straight standing position as
you pull both your arms back towards your ribs.
67
20) TWO ARM OVERHEAD TRICEP PRESS
TRICEPS
START
FINISH
Firmly grasp one handle with each hand with
your feet hip width apart and approximately
2 to 3 feet away from the door. Extend both
arms above your head with both palms facing
down and your body facing away from the
door. Shift your weight forward until you are
resting your weight on your toes.
With your body leaning forward and your
spine straight, keep your core muscles
engaged and bend both upper arms until
they are directly above your head. Press both
hands to starting position and repeat.
68
21) TWO ARM TRICEP PRESSDOWN
TRICEPS
START
FINISH
Firmly grasp one handle with each hand with
your feet hip width apart. Begin in a leaning
back position with palms down, elbows at the
sides and hands extended forward.
Press both hands downward until they reach
waist level. Keep your core engaged.
69
22) SUSPENDED DIPS
TRICEPS
START
FINISH
Stand directly in the middle of both straps and
grasp handles at waist level, palms facing in.
Keep elbows tight to body, lower your upper
body until hands reach chest level.
Firmly grasp one handle with each hand. Press
upward on the handles until both feet are off
the ground and arms are straight .
70
Slowly return to starting position.
71
72
73
The Human Trainer Full Body Express Workout
The Human Trainer Full Body Express workout is designed to be
performed nearly anywhere. This is a full body workout designed with
functional exercises to increase muscle, strength, balance, coordination
and core endurance. Every user has total control of the intensity of each
exercise and can instantly modify the resistance to make the workout
easier or more difficult at anytime during the program. The modular
quick clip system allows users to have the quickest possible transistions
from one exercise to the next creating the most time-efficient, fullbody workout. This full body training routine will take approximately 30
minutes to complete.
LEARNING THE MOVEMENTS
Begin the Full Body Blast workout with a 30 second work interval and a 45
second rest interval. As your strength and conditioning increases using The
Human Trainer, progress to a 60 second work interval and a 20 second rest
interval.
WARM UP
Always perform a 3-10 minute warm-up to prepare the body for the workout
(Examples: jump rope, jumping jacks, running in the spot, or a Human Trainer
based cardio warm-up)
74
1
Foot Cradle Two Knee Tuck
Start
EXERCISE CUES
1)
Place both feet (toes down) in
foot cradles, lift knees up off
ground
2)
Begin in High Plank with both
hands directly under shoulders
3)
Lift the tailbone and draw both
knees to chest
Finish
TIPS
1)
Keep chest lifted
2)
Lift hips slightly
75
2
Foot Cradle Two Arm Plank on Forearm
EXERCISE CUES
76
1)
Place both feet (toes down) in foot cradles
2)
Place both elbows on the ground under the shoulders
3)
Keep the core engaged and back straight
TIPS
1)
Keep core engaged
2)
Lift hips slightly
3
Start
Two Leg Alternating Mountain Climber
Finish One
Finish Two
EXERCISE CUES
1) Place both feet (toes down) in foot
cradles
3) Lift tailbone and bring left knee
to outside left elbow
2) Begin in High Plank with both
hands directly under shoulders
4) Return to starting position and
continue to alternate legs
77
4
Standing Two Arm Chest Press
Start
EXERCISE CUES
Finish
1)
Stand facing away from the main
straps
2)
Begin with both arms extended
forwards at chest height with
palms facing down
3)
Lower chest with elbows bending
90 degrees to the sides in a
push-up motion
4)
Press back up and maintain body
alignment
TIPS
78
1)
Avoid rubbing - keep both straps
lifted slightly off the arms
2)
Keep the core engaged and with
body properly aligned
5
Two Arm Tricep Press
Start
EXERCISE CUES
1)
Stand facing away from the main
straps
2)
Begin with palms down and both
arms extended forward at eye
level
3)
Lower body and head towards the
handles
4)
Maintain body alignment and
elbows at shoulder height
Finish
TIPS
1)
Keep body straight and chest lifted
2)
Keep elbows in line with the shoulders
79
6
One Arm Squat and Reach (30 seconds per side)
Start
EXERCISE CUES
1)
Stand facing towards the main
straps
2)
Hold onto one handle with the
free hand reaching towards
the strap
3)
Eyes follow the hand as you
press back into a squat and
reach your hand towards the
ground
4)
Rotate your body with the core
engaged and maintaining body
alignment
5)
Return to start position,
pressing hips forward and
using rotational movement
Finish
80
7
Two Arm Bicep Curls
Start
EXERCISE CUES
1)
Stand facing towards the main
straps
2)
Begin with the elbows extended
and palms up
3)
Curl both hands towards eye
level, keeping elbows lifted
and aligned at shoulder level
throughout the movment
Finish
TIPS
1)
Keep elbows in line with the shoulders
throughout the movement
2)
Keep the core engaged maintaining
body alignment
81
8
Alternating Arm Superman
Start
Finish One
Finish Two
EXERCISE CUES
1) Stand facing towards the main straps
3)
Pull the straps in opposite direction
keeping both arms straight
2) Begin in a leaning back positition with arms
extended straight at shoulder height, palms
down
4)
One arm is in a frontal raise, opposite arm
in a tricep extension
82
9
Kneeling Two Arm Rollout
Start
EXERCISE CUES
1)
Face away from the main straps
2)
Kneel with both knees under each
anchor points
3)
Begin with both arms extended
down, palms facing down
4)
With control, slowly lean forward
keeping arms extended
5)
Keep the core engaged and back
straight
Finish
83
10
Reverse Balance Lunge (30 seconds per leg)
EXERCISE CUES
Start
1)
Stand facing towards the main
straps
2)
Begin with the elbows flexed
under shoulders and palms facing
each other
3)
Press your right leg back and
behind into a reverse lunge,
keeping it off the ground while
extending elbows
4)
Press up through your front heel
and foot to start position
Finish
TIPS
84
1)
Use a slight pull with the arms for
assistance returning to start position
2)
Keep the head and chest lifted throughout
the movement
3)
Drop the back knee, don’t press back with
a straight leg
11a
Start
Rotating Grip Pullups
Finish
EXERCISE CUES
1)
Stand directly in the middle of
both straps and grasp overhead
handles with palms facing away
2)
Pull elbows down towards the
chest as your head lifts above
handle level
3)
Rotate hands during the
movement 180 degrees. Hands
finish facing in towards the body
4)
Slowly return to starting position
TIPS
1)
Keep head and chest lifted
2)
Keep core engaged
85
11b
Two Arm Rotating Grip Row (Option for 11)
Start
EXERCISE CUES
Finish
1)
Stand facing towards the main
straps
2)
Begin leaning back with arms
extended and palms facing down
3)
Pull the arms back towards the
chest as you move your body up
towards the anchor point
4)
Rotate hands during the
movement 180 degree. Hands
finish facing in towards the body
TIPS
86
1)
Keep head and chest lifted
2)
Keep core engaged and maintain
body in straight alignment
12
Forward Lunge and Chest Fly
EXERCISE CUES
Start
1)
Stand facing away from the main
straps
2)
Begin sligthly leaning forward
with arms extended straight at
chest level and palms facing in
3)
Take a long lunging step forward
until your knee is directly aligned
over ankle
4)
Reach arms out to sides to a T
position
5)
Press back to starting postion and
continue to alternate legs
Finish
TIPS
1)
Keep core engaged and maintain body in
straight alignment
2)
Don’t arch the low and mid back
3)
Don’t lunge too far forward
87
13
One Leg Alternating Squat and Row
Start
Finish One
Finish Two
EXERCISE CUES
Stand facing the main straps, keep
arms extended straight at eye level and
palms facing in
TIPS
1)
Keep weight in the heels of the feet
2)
Press hips and buttocks towards floor
2)
Both hands pull until elbows reach
ribs
3)
Keep head and chest lifted
3)
Don’t lift back heel
4)
Press up through standing leg and pull
with both hands up to starting position
4)
Should feel like your sitting back
and down
1)
5)
88
Continue to alternate legs
14
Foot Cradle Sprinter
Start
Finish
EXERCISE CUES
1)
Stand facing away from the main straps
and place one foot in one foot cradle
2)
Extend forward the opposite arm from
the suspended foot with the other arm
resting at the side of the body
3)
Press suspended foot down and back into
a reverse lunge as you reach resting arm
forward
4)
Press up through the front foot to return
to starting position
TIPS
1)
Keep the suspended foot close to being
under the anchor point
2)
Lower the front knee to 90 degrees or
knee over ankle
89
15
Foot Cradle Two Leg Hamstring Curl and Air Split Combo
Start
Finish One
Finish Two
EXERCISE CUES
1)
Begin sitting on the ground facing the straps
2)
Place heels in foot cradles and lie down on your back with both legs
extended and feet direclty under the anchor points
3)
Press the heels down into the foot cradles and lift your hips upwards
4)
Press both legs out towards the side, pause and return to center
with legs extended
5)
Pull both heels in towards the body keeping the hips lifted
90
TIPS
1)
Keep the knees in line
with the hips
2)
Press heels firmly
into foot cradles for
stability
Cool Down
Always perform a 3-10 minute cool down to lower the heart rate after the
workout and help increase muscle recovery time. Perform static stretching and
gentle movements with the dual straps.
91
92
93
94
The Human Trainer
Rotational Pulley Workout
95
1
Chest Press
Start
EXERCISE CUES
Finish
1)
Stand facing away from the main straps
2)
Begin leaning forward slightly with the
arms extended straight at chest height,
palms facing down
3)
Lower chest and body with arms
reaching out to the sides
4)
Press back up and maintain body
alignment
TIPS
1) Keep the body in a straight alignment with
core engaged
2) Keep the weight on the toes
96
2
Reverse Fly
Start
EXERCISE CUES
1)
Stand facing towards the main straps
2)
Begin leaning back with arms extended
straight at shoulder height, palms
facing in
3)
Pull the straps out to each side of
the body keeping both arms straight
creating a T shape
Finish
TIPS
1) Keep the core engaged and back aligned
with the spine
2) To decrease the level of difficulty stand in
an offset position
97
3
One Leg Squat
Start
EXERCISE CUES
Finish
1)
Stand facing the main straps, keep
arms extended straight at eye level and
palms facing in
2)
Lift one leg off the ground and extend
forward
3)
Press hips and buttocks back and down
towards floor
4)
Press up through standing leg to
starting position
TIPS
1) Keep weight in the stationary foot
2) Don’t lift back heel off the ground
3) Should feel like your sitting back and down
4) Pull your arms towards the chest for
assistance when returning to standing
position
98
4
Alternating Bicep Curls
Start
EXERCISE CUES
1)
Stand facing towards the main straps
2)
Begin leaning back with arms extended
straight at shoulder height, palms
facing up
3)
Curl right hand towards eye level
keeping elbows lifted, extend left arm
downward
4)
Continue alternating sides
Finish
TIPS
1) Keep elbows in line with the shoulders
throughout the movement
2) Keep the core engaged maintaining body
alignment
99
5
Two Leg Squat and Alternating Row
Start
Finish One
TIPS
EXERCISE CUES
1)
2)
3)
100
Stand hip width, facing
towards the main straps
Begin leaning back slightly
with arms extended forward
and palms facing in
Keep the heels on the ground
and press the hips back and
down into a squat
Finish Two
4) Press up to standing
with both legs as you
pull the left arm back
towards the chest
5) Repeat and continue
alternating sides
1) Keep weight in the heels
of the feet
2) Both hands pull until
elbows reach ribs
3) Don’t lift back heels off
the ground throughout
the movement
4) Should feel like your
sitting back and down
6
Straight Arm Chest Twist
Start
EXERCISE CUES
1)
Stand facing away from the main straps
2)
Begin leaning forward slightly with the
arms extended straight at chest height,
palms facing in
3)
Lower chest and body as you extend
your left arm forward and down and
your right arm rotates upward directly
above the body
4)
Pull your right arm down and forward
as your left arm rotates upward to the
left directly above the body
5)
Continue alternating sides
Finish
TIPS
1) Keep the core engaged
2) Keep the weight on the toes throughout the
movement
101
7
Alternating Tricep Press
Start
EXERCISE CUES
Finish
1)
Stand facing away from the main straps
2)
Begin with palms down and both arms
extended forward at eye level
3)
Bend right hand toward the right ear,
extend right arm forward as you bend
the left hand toward the left ear.
4)
Continue alternating sides
TIPS
1) Maintain body alignment and elbows at
shoulder height
2) Keep body straight with engaged core
102
8
Two Leg Squat and Alternating
Straight Arm Twist
Start
Finish One
Finish Two
TIPS
EXERCISE CUES
1)
Stand hip width, facing
towards the main straps
2)
Begin leaning back slightly
with arms extended straight
forward and palms facing in
3)
Keep the heels on the ground
and press the hips back and
down into a squat
4)
5)
Press up to standing with both
legs as you twist your torso and
extend your right arm to your
right side
Repeat and continue
alternating sides
1) Keep weight
in the heels of
the feet
2) Keep rotating
arm straight
throughout
the twist
movement
103
9
Two Leg Hamstring Curl
Start
EXERCISE CUES
Finish
1)
Begin sitting on the ground facing the
straps
2)
Place heels in foot cradles and lie down
on your back with both legs extended
and feet directly under the anchor
points
3)
Press the heels down into the foot
cradles and lift your hips upwards
4)
Pull both heels in towards the body
keeping the hips lifted
TIPS
1) Keep the knees in line with the hips
2) Press heels firmly into foot cradles for
stability
104
10
Two Leg Alternating Hamstring Curl
Start
Finish One
Finish Two
TIPS
EXERCISE CUES
1)
Begin sitting on the ground
facing the straps
2)
Place heels in foot cradles
and lie down on your back
with both legs extended
and feet directly under the
anchor points
3)
Press the heels down into
the foot cradles and lift
your hips upwards
4)
Pull the right leg in
towards the body keeping
the hips lifted, return to
start position and pull the
left leg in towards the body
5)
Continue alternating legs
1) Keep the knees in
line with the hips
2) Press heels firmly
into foot cradles
for stability
105
11
Two Leg Alternating Scissor (Face Down)
Start
EXERCISE CUES
Finish
1)
Place both feet (toes down) in foot
cradles, directly under the anchor point
2)
Begin in High Plank with both hands
directly under shoulders
3)
Press the right leg down as your left leg
lifts upward
4)
Keeping the hips lifted, press your left
leg down as your right leg lifts upward
5)
Continue alternating legs
TIPS
1) Press firmly into foot cradles for stability
2) Keep the head and chest lifted throughout
the movement
106
12
Two Leg Alternating Scissor (Face Up)
EXERCISE CUES
Start
Finish
1)
Begin sitting on the ground facing the
straps
2)
Place both heels in foot cradles and lie
down on your back with both legs
extended and feet directly under the
anchor points
3)
Press the heels down into the foot
cradles and lift your hips upwards
4)
Press the right leg down as your left leg
lifts upward
5)
Keeping the hips lifted, press your left
leg down as your right leg lifts
upward
6)
Continue alternating legs
TIPS
1) Keep the core engaged
2) Keep the weight on the toes throughout the
movement
107
13
Foot Cradle Push Up
Start
EXERCISE CUES
Finish
1)
Place both feet (toes down) in foot
cradles, directly under the anchor point
2)
Begin in High Plank with both hands
directly under shoulders
3)
Lower the chest and body with the
elbows bending 90 degrees to the side
4)
Press upward to starting position
TIPS
1) Keep the knees in line with the hips
2) Press firmly into foot cradles for stability
108
14
Standing Frontal Straight Arm Swing
Start
Finish One
TIPS
EXERCISE CUES
1)
Stand facing away from the
main straps
2)
Begin leaning forward
slightly with the arms
extended straight at chest
height, palms facing down
3)
Finish Two
4)
5)
Press your right arm
down and lift your left
arm upward above the
head
Continue alternating
sides
1) Keep the body in a
straight alignment with
core engaged
2) Keep the weight on the
toes throughout the
movement
Lift your right arm upward
as your left arm presses
down
109
110
111
STRETCHING
One-Leg Foot Cradle Hamstring Stretch
EXERCISE CUES
112
1)
Sit down on the ground facing the
main straps
2)
Attach the foot cradle to the desired
D-ring height for optimal stretch
3)
Place one foot (toes up) inside the
foot cradle
4)
Gently lie down on your back keeping
both legs straight
STRETCHING
One-Leg Foot Cradle Quadricep Stretch
EXERCISE CUES
1)
Stand with your body facing away from
the main straps
2)
Attach the foot cradle to the desired
D-ring height for optimal stretch
3)
Firmly grasp one main strap and place
your foot (toes down) inside the foot
cradle
4)
Stand tall, press your hips forward and
draw both knees towards each other
5)
Repeat on other side
113
STRETCHING
Two-Arm Behind Body Stretch
EXERCISE CUES
114
1)
Stand facing away from the main straps
2)
Firmly grasp one handle in each arm
and walk forward 2-3 steps from the
overhead anchor point
3)
Stand with both feet hip width apart
4)
Extend both arms behind the body,
palms down and gently lean forward
STRETCHING
Two-Arm Overhead Lat Stretch
EXERCISE CUES
1)
Stand facing away from the main straps
2)
Firmly grasp one handle in each arm
and walk forward 2-3 steps from the
overhead anchor point
3)
Stand in a split stance with one leg
forward
4)
Extend both arms above the body as
you gently lean forward
115
STRETCHING
Standing Hamstring Stretch
EXERCISE CUES
116
1)
Attach one foot cradle on each main
strap at desired level
2)
Place one foot through the foot cradle,
toes facing up
3)
Lean forward slightly
STRETCHING
Two Arm Overhead Side Twist
EXERCISE CUES
1)
Stand facing away from the
main straps
2)
Firmly grasp one handle
in each arm and walk
forward 2-3 steps from the
overhead anchor point
3)
Stand in a split stance with
the left leg forward
4)
Extend both arms above
the body as you gently
press your hips to the right
and both arms reach to the
left side
5)
Repeat on the other side
117
STRETCHING
Two Arm Rounding Mid / Low Back Stretch
EXERCISE CUES
118
1)
Stand facing the main straps
2)
Firmly grasp one handle in each arm
and walk backwards 2-3 steps from the
overhead anchor point
3)
Bend both knees and press your hips
backwards as you tuck your chin in
4)
Round the lower, mid and upper back
STRETCHING
Two Arm Chest Stretch
EXERCISE CUES
1)
Stand facing away from the main straps
2)
Firmly grasp one handle in each arm
and walk forward 2-3 steps from the
overhead anchor point
3)
Stand in a split stance with 1 leg
forward
4)
Extend both arms to the sides and
slightly behind the body as you gently
lean forward
119
STRETCHING
One Strap & One Arm Side body stretch
EXERCISE CUES
120
1)
Stand with your body facing to the side
of the main straps
2)
Firmly grasp one handle in your left arm
and walk to the side 2-3 steps from the
overhead anchor point
3)
Stand with both feet together and
extend your left arm up towards the
anchor point
4)
Keep your right arm resting on your
hips
5)
Repeat on the right side
122
123
WORKOUT LOG
Track your Human Trainer workouts with the provided template below.
Exercise
124
Week
Set 1
Set 2
Set 3
Set 4
Set 5
Exercise
Week
Set 1
Set 2
Set 3
Set 4
Set 5
125
Never use The Human Trainer in any circumstance where you could fall more than 18 inches (.25 meters) to stable ground. Using The Human Trainer in any
situation where you are suspended in any way that could potentially increase the chance of injury is not recommended and by doing so, the user assumes full
responsibility of their actions.
By using The Human Trainer you agree to the full terms discussed in this manual. Moreover, any usage that is not in compliance with the recommended usage of
The Human Trainer is done so at the user’s own risk. Astone Fitness Ltd. does not accept any liability for any misuse of The Human Trainer and/or its accessories.
Furthermore, by using The Human Trainer you are accepting the responsibility of your actions and are hereby waiving any rights to legal action against Astone
Fitness Ltd. Should you decide not to waive your legal rights, do not use the product and promptly return it. Should you do so within 90-days, you will be granted a
full refund for the cost of the product.
1 866 497 9012 | www.astonefitness.com | contact@astonefitness.com
128