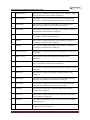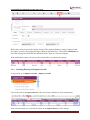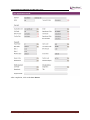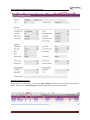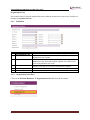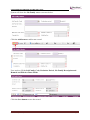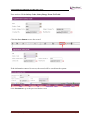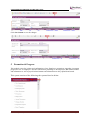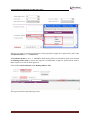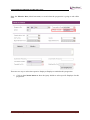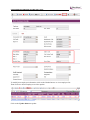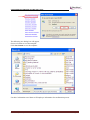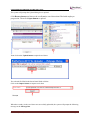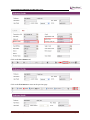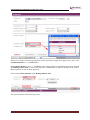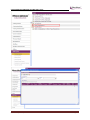
1
STARVISION INFORMATION TECHNOLOGY (SDA) HUMAN RESOURCE INFORMATION SYSTEM (HRIS) USER MANUALS FOR EMPLOYEE PROFILE MANAGEMENT SYSTEM VERSION 1.0 STARVISION INFORMATION TECHNOLOGY (SDA) Table of Contents 1 INTRODUCTION ...................................................................................................................................... 3 2 MASTER FILE MAINTENANCE .................................................................................................................. 4 3 EMPLOYEE PROFILE MAINTENANCE........................................................................................................ 4 3.1 CREATING AN EMPLOYEE PROFILE..................................................................................................................... 4 3.1.1 Definition ........................................................................................................................................ 4 3.1.2 Employee Profile Flow ..................................................................................................................... 8 3.1.3 Updating/Deleting an Employee Profile ....................................................................................... 14 3.2 NEW APPOINTMENT .................................................................................................................................... 16 3.2.1 Definition ...................................................................................................................................... 16 3.2.2 New Appointment Flow ................................................................................................................ 18 4 POSITION DATABASE ............................................................................................................................ 23 ORGANISATION UNIT ............................................................................................................................................. 26 4.1.1 Definition ...................................................................................................................................... 26 4.1.2 Organisation Unit Flow ................................................................................................................. 26 4.2 SEGMENT CODE .......................................................................................................................................... 30 4.2.1 Definition ...................................................................................................................................... 30 4.2.2 Segment Code Flow....................................................................................................................... 30 4.3 JOB FAMILY ................................................................................................................................................ 33 4.3.1 Definition ...................................................................................................................................... 33 4.3.2 Job Family Flow ............................................................................................................................. 33 5 PROMOTION & PROGRESS.................................................................................................................... 39 5.1.1 Updating New Appointment ......................................................................................................... 40 5.2 CONFIRMING AN EMPLOYEE .......................................................................................................................... 44 5.2.1 Definition ...................................................................................................................................... 44 5.2.2 Confirmation Flow......................................................................................................................... 45 5.3 RE-EMPLOYMENT........................................................................................................................................ 53 5.3.1 Definition ...................................................................................................................................... 53 5.3.2 Re- Employment Flow ................................................................................................................... 54 5.4 CREATING A MERIT INCREMENT ......................................................................................................................... 61 5.4.1. Definition ........................................................................................................................................... 61 5.4.2. Merit Increment Flow ........................................................................................................................ 62 5.5 PROMOTION OF AN EMPLOYEE .......................................................................................................................... 73 5.5.1 Definition ............................................................................................................................................ 73 5.5.2 Promotion Flow .................................................................................................................................. 74 5.6 CREATING DEPLOYMENT FOR EMPLOYEE(S) .......................................................................................................... 82 5.6.1. Definition ........................................................................................................................................... 82 5.6.2 Deployment Flow ............................................................................................................................... 84 5.7 CREATING ANNUAL INCREMENT ......................................................................................................................... 91 5.7.1. Definition ........................................................................................................................................... 91 5.7.2. Annual Increment Flow ..................................................................................................................... 92 5.8 CHANGE MODULE ........................................................................................................................................... 95 5.8.1. Definition ........................................................................................................................................... 95 5.8.2. Change Module Flow ......................................................................................................................... 98 5.9 IMPORTING EMPLOYEE’S PROGRESS INFORMATION ............................................................................................. 101 5.9.1. Promotion & Progress Excel Template ....................................................................................... 101 5.10 Promotion & Progress Progression Import ................................................................................... 104 6 LEAVING SERVICE................................................................................................................................ 109 6.1 TERMINATION........................................................................................................................................... 109 6.1.1 Definition .................................................................................................................................... 109 User Manual | HRIS | Version 1.0 Page 1 STARVISION INFORMATION TECHNOLOGY (SDA) 6.1.2 Termination Flow ........................................................................................................................ 110 6.2 VACATION OF OFFICE ................................................................................................................................. 115 6.2.1 Definition .................................................................................................................................... 115 6.2.2 Vacation of Office Flow ............................................................................................................... 115 6.3 RETIREMENT ............................................................................................................................................ 120 6.3.1 Definition .................................................................................................................................... 120 6.3.2 Retirement Flow .......................................................................................................................... 120 6.4 DEATH .................................................................................................................................................... 126 6.4.1 Definition .................................................................................................................................... 126 6.4.2 Death Flow .................................................................................................................................. 126 6.5 RESIGNATION ........................................................................................................................................... 131 6.5.1 Definition .................................................................................................................................... 131 6.5.2 Resignation Flow ......................................................................................................................... 131 7 AD-HOC QUERY / REPORTS ................................................................................................................. 137 7.1 7.2 AD-HOC QUERY ........................................................................................................................................ 137 REPORTS ................................................................................................................................................. 140 User Manual | HRIS | Version 1.0 Page 2 STARVISION INFORMATION TECHNOLOGY (SDA) Human Resources Information System (HRIS) 1 Introduction MecWise®.Net HR is a fully integrated Human Resource system designed for Human Resource Professionals to streamline administration and maximize strategic management. It aids HR to keep track of all the Employees within the organization and empowers them to administer their own requirements. Features available: Employee Profile New / Change Appointment, Resignation and Rejoin of Employee Promotion / Merit Increment / Upgrading Termination / Retirement / Resignation Personnel Report Export to Excel Reports User Manual | HRIS | Version 1.0 Page 3 STARVISION INFORMATION TECHNOLOGY (SDA) 2 Master File Maintenance You only need to maintain the master files (Admin and Personnel) when there are changes such as creation of new course or country. Otherwise, you may ignore this step. 3 Employee Profile Maintenance Employee Records maintain employee’s current and historical information; records of joining, promotion and resignation. This module captures and maintains employee’s information such as personal particulars, payroll details, next of kin details, bank details, fund details and career progression. It allows creation, amendment or viewing of an employee’s record. Each employee is assigned a unique identification number (ID) that will be used in payroll entry. 3.1 Creating an Employee Profile This option allows users to create an Employee profile for a newly joined employee. 3.1.1 Definition a) No. 1 Definition – Employee Profile Header Field Employee ID User Manual | HRIS | Version 1.0 Description For ‘Add’ mode, Employee ID will be auto-generated by system Page 4 STARVISION INFORMATION TECHNOLOGY (SDA) based on format: YYNNN (YY-Current Year, NNN-Running No. And resets at beginning of year. 2 Salutation 3 Name 4 Alias Name 5 Chinese Name 6 7 8 9 10 11 12 13 14 15 16 17 18 19 20 This field is to capture the salutation of the Employee. This field is to capture the name of the Employee. This field is to capture the alias name of the Employee. This field is to capture the salutation of the Employee. Building # This field is to capture the building number of the Employee’s address. Flr # This field is to capture the floor number of the Employee’s address. Unit # This field is to capture the unit number of the Employee’s address. Street Name This field is to capture the Street name of the Employee’s address. State Name This field is to capture the State name of the Employee’s address. Postal Code This field is to capture the postal code of the Employee’s address. Country Code This field is to capture the country code of the Employee’s address. Email ID This field is to capture the email address of the Employee. Home Tel # This field is to capture the home contact number of the Employee. Office Tel # This field is to capture the office contact number of the Employee. Hand phone # This field is to capture the mobile phone number of the Employee. Birth Date This field is to capture the Date of Birth of the Employee. Calendar is provided for the user to select the date. Birth place This field is to capture the place of Birth of the Employee. Help key is provided to select from the existing list. Age This field is to capture the age of the Employee and is generated by the system according to the birth-date. Gender This field is to capture the gender of the Employee. Help key is provided to select from the existing list. User Manual | HRIS | Version 1.0 Page 5 STARVISION INFORMATION TECHNOLOGY (SDA) 21 22 23 24 25 26 27 28 29 30 31 32 33 34 35 36 37 38 Marital Status This field is to capture the marital status of the Employee. Help key is provided to select from the existing list. Marriage Date This field is to capture the date of marriage if the Employee is not single. Calendar is provided for the user to select the date. Citizenship This field is to capture the citizenship code of the Employee. Help key is provided to select from the existing list. Nationality This field is to capture the citizenship of the Employee. Help key is provided to select from the existing list. Race This field is to capture the race of the Employee. Help key is provided to select from the existing list. Dialect This field is to capture the dialect of the Employee. Help key is provided to select from the existing list. Religion This field is to capture the religion of the Employee. Help key is provided to select from the existing list. Converted Date This field is to capture the date when the Employee is converted to Muslim. NRIC/ UIN # This field is to capture the identification number of the Employee. NRIC Color This field is to capture the colour the identification card. Help key is provided to select from the existing list. FIN # This field is to capture the foreigner identification number of the Employee. Passport # This field is to capture the foreigner passport number of the Employee. Issue Place This field is to capture the issue place of the identification card. Help key is provided to select from the existing list. Issue Date This field is to capture the issue date of the identification card. Calendar is provided for the user to select the date. CPF Ref. This field is to capture the Central Provident Fund reference number of the Employee. CPF Type This field is to capture the type of CPF. Help key is provided to select from the existing list. Tax Ref. This field is to capture the income revenue tax reference number of the Employee. CPF Voluntary This field is to capture the CPF Voluntary. Help key is provided to select from the existing list. User Manual | HRIS | Version 1.0 Page 6 STARVISION INFORMATION TECHNOLOGY (SDA) 39 40 41 42 43 44 45 46 47 48 49 50 51 52 53 54 55 56 Date of Technical Entry This field is to capture the issue date of the old identification card. Calendar is provided for the user to select the date. Access Code This field is to capture the access code of the Employee. Include in Headcount This field is to capture the status of Headcount. Granted Date This field is to capture the date when the Employee was granted the Permanent Resident. Calendar is provided for the user to select the date. Expiry Date This field is to capture the P/R expiry date of the Employee. Calendar is provided for the user to select the date. Citizenship Granted Date This field is to capture the date when the Employee is granted citizenship. Calendar is provided for the user to select the date. W/P # This field is to capture the Work Permit number of the Employee. Issue Date This field is to capture the Issue Date of the Work Permit. Calendar is provided for the user to select the date. Expiry Date This field is to capture the Expiry Date of the Work Permit. Calendar is provided for the user to select the date. Emp Pass # This field is to capture the Employment Pass number of the Employee. Issue Date This field is to capture the Issue Date of the Employment Pass. Calendar is provided for the user to select the date. Expiry Date This field is to capture the Expiry Date of the Employment Pass. Calendar is provided for the user to select the date. NS Code This field is to capture the National Service code of male Employee. Help key is provided for user to select from the existing list. Place This field is to capture the place where the National Service is held. Help key is provided for user to select from the existing list. Start Date This field is to capture the start date of the National Service. Calendar is provided for the user to select the date. End Date This field is to capture the end date of the National Service. Calendar is provided for the user to select the date. Unit This field is to capture the unit which the Employee is during National Service. Length of Srv This field is to capture the length of Employee’s National User Manual | HRIS | Version 1.0 Page 7 STARVISION INFORMATION TECHNOLOGY (SDA) Service. 57 58 59 60 61 62 63 64 65 66 67 68 69 70 71 72 73 74 Rank This field is to capture the rank of Employee during National Service. Vocation This field is to capture the vocation of the National Service. Conduct This field is to capture the conduct of the National Service. Help key is provided for user to select from the existing list. Performance This field is to capture the performance of the National Service. Help key is provided for user to select from the existing list. Pay Frequency This field is to capture the type of payroll frequency. Help key is provided for user to select from the existing list. Tenure of Officer This field is to capture the tenure of Officer code. Help key is provided for user to select from the existing list. Medical Code This field is to capture the medical code of the Employee. Help key is provided for user to select from the existing list. MSO CPF This field is to capture the MSO CPF. Help key is provided for user to select from the existing list. Shift Code This field is to capture the Shift Code of the Employee. Help key is provided for user to select from the existing list. Employer CPF This field is to capture the Employer CPF account number. Help key is provided for user to select from the existing list. FWL Type This field is to capture the Foreign Worker Levy Type of the Employee. Help key is provided for user to select from the existing list. Retire Due date This field is to capture the retire date of the Employee. Optional Retire This field is to capture the optional retire date of the Employee. Payment Method This field is to capture the type of Payment Method. Service: Years This field is to capture the service year of the Employee. Months This field is to capture the month of service of the Employee. Calculate This command calculates the year, month of the Employee’s service. Remark This field is to capture the remark. 3.1.2 Employee Profile Flow To begin with, go to Employee Profile > Employee Profile. User Manual | HRIS | Version 1.0 Page 8 STARVISION INFORMATION TECHNOLOGY (SDA) System will show the following screen: Click on the Add button to create a new record. User Manual | HRIS | Version 1.0 Page 9 STARVISION INFORMATION TECHNOLOGY (SDA) Enter the Employee information under Name, Address, Personal, and identification, Foreigner (if the Employee is non-local), NS, Payroll, Remark and the 21 Tabs found below. You need to fill up those fields that are highlighted, as they are the mandatory fields before you can save the whole record. System will prompt for missing information if you leave out any mandatory field when you are saving the Employee record. Under the Identification Tab, for Employee that contributes to CPF, you need to fill up the CPF Type. ‘1’ for normal CPF contribution, ‘Y1’ is for PR 1st year and ‘Y2’ is for PR 2nd year. And make sure that the CPF Ref. And Tax Ref. follows the Employee’s NRIC number (which will affect CPFLine and CPFPAL Export). User Manual | HRIS | Version 1.0 Page 10 STARVISION INFORMATION TECHNOLOGY (SDA) Click on the CPF Type pick list to choose the CPF Type. System will launch the Pick List which shows existing CPF type record then select a CPF type by clicking on that record. After the record is selected, system will display the select record on the screen. Under the Payroll Tab, you need to define Pay Frequency (as defined under Payroll > Master File > Company > Pay Period, which will affect on the payment time; which is Bi-monthly or Monthly), Shift Code (as defined under Payroll > Master File > Company > Working Hours, which will affect the prorated salary, no pay leave), Employer CPF, Payment Method. User Manual | HRIS | Version 1.0 Page 11 STARVISION INFORMATION TECHNOLOGY (SDA) For the 21 Tabs at the below screen, with the respective Tab selected, click on the New icon to create new records. The Tabs capture skills sets and Employee’s personality assets, which can be used to access Employee’s capability. The system will show below User Manual | HRIS | Version 1.0 Page 12 STARVISION INFORMATION TECHNOLOGY (SDA) After all the mandatory Tabs information are entered, click on the Save button and click Exit to go back to the previous page and then click Save button the Employee Profile main page. User Manual | HRIS | Version 1.0 Page 13 STARVISION INFORMATION TECHNOLOGY (SDA) Before the record is saved, the system checks if the required fields are empty. If these fields are empty, system will prompt messages which are shown below. Click on the OK button to close the message box and fills the indicated fields. Then save the record again. If the information entered is correct, the record will be saved into the system. 3.1.3 Updating/Deleting an Employee Profile To begin with, go to Employee Profile > Employee Profile Click on the click on the Query button to show the listing of Employees in the Organization. Then select the Employee record link and click on the Update button to make changes. User Manual | HRIS | Version 1.0 Page 14 STARVISION INFORMATION TECHNOLOGY (SDA) After making the changes, click on the Save button. Note: System does not allow deletion of created Employee profile (even though record maybe wrongly input). Records of resigned Employees are still required to be printed for the IR8A form. An Employee’s records can remove by adding his record under Resignation Module User Manual | HRIS | Version 1.0 Page 15 STARVISION INFORMATION TECHNOLOGY (SDA) 3.2 New Appointment After creating a new Employee profile, make sure you create a new appointment record for the new Employee profile. Prior to data-entry for New Appointment Details, please ensure that the following information have been completed: - Employee Profile, Position Database, Personnel Master File and Payroll Master File. 3.2.1 Definition No. 1 2 3 Field Description Employee This field is to capture the Employee ID. Help key is provided for user to select from the existing list. Action This field display the system generated action code (NA). Transaction Date This field is to capture the date of Created of this User Manual | HRIS | Version 1.0 Page 16 STARVISION INFORMATION TECHNOLOGY (SDA) document. Its default value is the system date. 4 5 6 7 8 9 10 11 12 13 14 15 16 17 18 19 20 Organisation Unit This field is to capture the Organisation Unit. Help key is provided to select from the existing list. Appointment Code This field is to capture the appointment code. Help key is provided to select from the existing list. Job Family This field is to capture the Job Family. Help key is provided to select from the existing list. Division Status This field is to capture the division status. Help key is provided to select from the existing list. Effective Date This field is to capture the effective date. Calendar is provided for the user to select the date. Join Date This field is to capture the joined date. Calendar is provided for the user to select the date. Confirm Date This field is to capture the confirmation date. Calendar is provided for user to select date. Appointment Date This field is to capture the appointment date. Calendar is provided for the user to select the date. Next Inctl Date This field is to capture the next incremental date. Calendar is provided for the user to select the date. Payroll Mode This field is to capture the payroll mode. Help key is provided to select from the existing list. Salary Code This field is to capture the current salary code. Help key is provided to select from the existing list. Basic Salary This field is to capture the basic salary. Help key is provided to select from the existing list. Cost Centre Code This field is to capture the cost centre code. Help key is provided to select from the existing list. Basic 1 This field is to capture the Basic amount 1. NWC Amount This field is to capture the NWC amount. Monthly Salary This field display the Monthly Salary = Basic Salary + NPC Amount. Gross Salary This field display the Gross Salary = Monthly Salary + NPVP Amount. User Manual | HRIS | Version 1.0 Page 17 STARVISION INFORMATION TECHNOLOGY (SDA) 21 22 23 24 25 26 27 28 29 30 Reason Code This field is to capture the reason of leaving. Help key is provided to select from the existing list. Position Code This field is to capture the position code. Help key is provided to select from the existing list. Essential Post This field is to capture the essential position. Help key is provided to select from the existing list. Essential Category This field is to capture the essential category. Help key is provided to select from the existing list. Job Family This field is to capture Job Family. Help key is provided to select from the existing list. Designation This field is to capture the designation. Help key is provided to select from the existing list. Appointment This field is to capture the appointment code of the Employee. Help key is provided to select from the existing list. Title This field is to capture the title. Progress Remark This field is to capture the progress remark. Basic 2 This field is to capture the Basic amount 2. 3.2.2 New Appointment Flow To begin with, go to Promotion & Progress > New Appointment. System will show the following screen: User Manual | HRIS | Version 1.0 Page 18 STARVISION INFORMATION TECHNOLOGY (SDA) Click on the Add button to create a new record. User Manual | HRIS | Version 1.0 Page 19 STARVISION INFORMATION TECHNOLOGY (SDA) Define all the fields highlighted in purple accordingly. Those fields with pick-list are defined under the Payroll > Master File > Company. Add or amend the necessary details to suit your Organization needs. User Manual | HRIS | Version 1.0 Page 20 STARVISION INFORMATION TECHNOLOGY (SDA) After completion, click on the Save button User Manual | HRIS | Version 1.0 Page 21 STARVISION INFORMATION TECHNOLOGY (SDA) Deleting existing record(s) If the created record is wrong, click on the Query button and select the record that you wanted to delete. Then click on the Delete button and the record will be removed permanently. User Manual | HRIS | Version 1.0 Page 22 STARVISION INFORMATION TECHNOLOGY (SDA) Updating existing record(s) If the created record needs amendments, select the Employee ID link and then click on the Update button amend the details record. After the changes have been made, click Save button to save the changes. 4 Position Database Introduction of Position Database master files and setup: Operation Modes available: Addition of New Records. Enquiry and Updating Records. Enquiry and Deletion of Records. Printing of Master File listing. This sub system consists of 3 Modules. This sub system allows the user to set the Segment Codes relevant to a Organization’s structure. Segment Codes form the levels that make up the Organization units existing in a Organization. User Manual | HRIS | Version 1.0 Page 23 STARVISION INFORMATION TECHNOLOGY (SDA) Note that the Segment Name is not unique for each organization unit, i.e. multiple segment codes exist for a single segment name. Segment 0 Finance Department (FIN) Segment 1 Accounting Section (ACC) A Organization Unit 1 FIN-ACC-ACC1 Segment 2 Accounting Team 1(ACC1) Segment 0 Human Resource Dept.(HR) Segment 1 Support Team (SPT) A Organization Unit 2 HR-SPT-CS Segment 2 Customer Service (CS) User Manual | HRIS | Version 1.0 Page 24 STARVISION INFORMATION TECHNOLOGY (SDA) User Manual | HRIS | Version 1.0 Page 25 STARVISION INFORMATION TECHNOLOGY (SDA) Organisation Unit This module captures different organization units within the Organization. Reports are available for printing by Organisation Unit. 4.1.1 Definition No 1 2 Field 3 Segment 0 - 9 4 Description 5 6 Created By Modified By Organisation Unit Cost Centre Description User defined abbreviation representing this Organisation Unit. A pick-list is available to select the Cost Centre this organization unit is under. A pick-list is available to pick up the segment from Segment Code master file. Note that multiple segment code selected will form an Organisation Unit Code. Default from segment code master file as a segment code is selected. User may over-write the description is required. Record created user and created date. Record modified user and modified date. 4.1.2 Organisation Unit Flow Click on the Position Database Organisation Unit link from the left menu. User Manual | HRIS | Version 1.0 Page 26 STARVISION INFORMATION TECHNOLOGY (SDA) System will show the following screen: Click the Add button to add a new record. User Manual | HRIS | Version 1.0 Page 27 STARVISION INFORMATION TECHNOLOGY (SDA) System will show as follow. User needs to fill the Cost Centre, Segment 0, etc.. Click the Save button to save the record. User Manual | HRIS | Version 1.0 Page 28 STARVISION INFORMATION TECHNOLOGY (SDA) Before the record is saved, the system checks if the required fields are empty. If these fields are empty, system will prompt messages which are shown below. Click on the OK button to close the message box and fills the indicated fields. Then save the record again. Below is the sample of the message box prompt. If the information entered is correct, the record will be saved into the system. User Manual | HRIS | Version 1.0 Page 29 STARVISION INFORMATION TECHNOLOGY (SDA) 4.2 Segment Code This master file allows entry of different segment code. The different segment code will help to form the organization unit code in the Organisation Unit Master file. Note that the organization unit code can accept max 40 characters only. 4.2.1 Definition No 1 Field Description Segment Name 2 Segment Code 3 4 5 6 Description Abbr. Description Choose from system default drop down list. 10 segments available (0-9). Unique code for particular segment defined by user (Max 10 Characters). Description for this segment. Optional abbreviation description for segment. Created By Modified By Record created user and created date. Record modified user and modified date. 4.2.2 Segment Code Flow Click on the link through the left menu Position Database Segment Code System will show the skill set master screen as below. User Manual | HRIS | Version 1.0 Page 30 STARVISION INFORMATION TECHNOLOGY (SDA) Click the Add button to add a new record. User needs to fill the Segment Name, Segment Code and Description Fields. User Manual | HRIS | Version 1.0 Page 31 STARVISION INFORMATION TECHNOLOGY (SDA) Click the Save button to save the record. Before the record is saved, the system checks if the required fields are empty. If these fields are empty, system will prompt messages which are shown below. Click on the OK button to close the message box and fills the indicated fields. Then save the record again. Below is the sample of the message box prompt. If the information entered is correct, the record will be saved into the system. User Manual | HRIS | Version 1.0 Page 32 STARVISION INFORMATION TECHNOLOGY (SDA) 4.3 Job Family This Job Family master file screen is for the user to setup/maintain the Job Family and description. 4.3.1 Definition No 1 Field Job Family Code Description 2 This field is to capture the Job Family description. 3 Job Family Description Probation period 4 Remark This field is to capture the remark. 5 Eff. Date From This field is to capture Effective Date From. Calendar is provided for the user to select the date. 6 Eff. Date To 7 8 Created By Modified By This field is to capture Effective Date To. Calendar is provided for the user to select the date. Record created user and created date. Record modified user and modified date. This field is to capture the Job Family code. Help key is provided for user to select from the existing Job Family list. This field is to capture the probation period. 4.3.2 Job Family Flow Click on the link through the left menu Position Database Job Family User Manual | HRIS | Version 1.0 Page 33 STARVISION INFORMATION TECHNOLOGY (SDA) System will show the Job Family master screen as below. Click the Add button to add a new record. User needs to fill the Job Family Code, Probation Period, Job Family Description and Remark and Effective Dates Fields. Click the Save button to save the record. User Manual | HRIS | Version 1.0 Page 34 STARVISION INFORMATION TECHNOLOGY (SDA) Before the record is saved, the system checks if the required fields are empty. If these fields are empty, system will prompt messages which are shown below. Click on the OK button to close the message box and fills the indicated fields. Then save the record again. Or Or Or If the information entered is correct, the record will be saved into the system. User Manual | HRIS | Version 1.0 Page 35 STARVISION INFORMATION TECHNOLOGY (SDA) To add detail information Click on the click on the Query button to view the existing record (s). Then select a record to add detail information and click on the Update button to make changes. Click the Add button to create the detail record of Appointment Code. The System will show the screen below. User Manual | HRIS | Version 1.0 Page 36 STARVISION INFORMATION TECHNOLOGY (SDA) User needs to fill the Appointment Code, Description and Abbrev. Description. Click the Save button to save the record. If the information entered is correct, the record will be saved into the system. Click the Add button to create the detail record of Salary Code. User Manual | HRIS | Version 1.0 Page 37 STARVISION INFORMATION TECHNOLOGY (SDA) User needs to fill the Salary Code, Salary Range From /To Fields. Click the Save button to save the record. If the information entered is correct, the record will be saved into the system. Click Exit button to go to the previous Header screen. User Manual | HRIS | Version 1.0 Page 38 STARVISION INFORMATION TECHNOLOGY (SDA) Click Save button to save the changes. 5 Promotion & Progress This module caters for joining and confirmation of new Employee; promotion, upgrading, increment progression for an Employee. Personal information pertaining to the Employee, HR-related matters and information as well as payroll-related matters and information are duly captured and stored. This system consists of the following sub-systems listed as below: User Manual | HRIS | Version 1.0 Page 39 STARVISION INFORMATION TECHNOLOGY (SDA) Updating of Appointment After an Employee has been assigned with a new appointment, changes can be made under the Promotion & Progress to track the changes. 5.1.1 Updating New Appointment To begin with, go to Promotion & Progress New Appointment. System will show the following screen: User Manual | HRIS | Version 1.0 Page 40 STARVISION INFORMATION TECHNOLOGY (SDA) User Manual | HRIS | Version 1.0 Page 41 STARVISION INFORMATION TECHNOLOGY (SDA) Click on the Query button show a listing of Employees in the Organization. The list of Employee will be shown in the header browse. Select the desire Employee from the listing and the information will be displayed on the page. Then click on the Update button to make changes. User Manual | HRIS | Version 1.0 Page 42 STARVISION INFORMATION TECHNOLOGY (SDA) After making changes, click on the Save button User Manual | HRIS | Version 1.0 Page 43 STARVISION INFORMATION TECHNOLOGY (SDA) 5.2 Confirming an Employee This module records confirmation of Employee after his/her probation period. 5.2.1 Definition No. 1 2 3 4 5 6 7 8 9 Field Description Progress No This field display the system generated Run Number of this document. Transaction Date This field is to capture the date of Created of this document. Its default value is the system date. Action This field display the system generated action code (RJ). Confirmation Date From/To This field is to capture the date of Confirmed of this document. Its default value is the system date. Organisation Unit This field is to capture the Organisation as search criteria. Job Family This field is to capture the Job Family as search criteria. Division Status This field is to capture the division status as search criteria. Appointment From This field is to capture the appointment code from range as search criteria. Appointment To This field is to capture the appointment code to range as User Manual | HRIS | Version 1.0 Page 44 STARVISION INFORMATION TECHNOLOGY (SDA) search criteria. 10 Circulation Status This field is to capture the Circulation Status of the document in the workflow. Help key is provided for user to select from the existing list. 5.2.2 Confirmation Flow To begin with, go to Promotion & Progress > Confirmation. The System will show the following screen: Click on the Add button to add a new record. User Manual | HRIS | Version 1.0 Page 45 STARVISION INFORMATION TECHNOLOGY (SDA) Define the Confirmation Date From and To which the newly joined Employees confirmation date fall between this periods. User Manual | HRIS | Version 1.0 Page 46 STARVISION INFORMATION TECHNOLOGY (SDA) There are 2 ways to select the respective Employee/Employees entitled to this confirmation. 1) Specify the Organisation Unit, Job Family, Division Status, Appointment From and Appointment To for the filtering. 2) Click on the Criteria button to show the Query builder to select specific Employee base on an Employee progression (e.g. Organisation Unit, Appointment Code, etc). User Manual | HRIS | Version 1.0 Page 47 STARVISION INFORMATION TECHNOLOGY (SDA) Define the criteria from the Query builder. (i) (ii) (iii) (iv) (v) Select parameter that you want to filter Click this button to see the selected parameter list Select record to set Click Insert button to place the criteria Click OK button to filter the record After defining the criteria from the Query builder, click on the corresponding Check button to see if the query retrieves the correct Employee records. Note: The List Employees button will display a list of Employees based on the selection filtering done in a. and b and in Section 4.1.3. Thus, all fields left as default denote all the records. User Manual | HRIS | Version 1.0 Page 48 STARVISION INFORMATION TECHNOLOGY (SDA) After specifying the conditions for the specific group of Employees for confirmation, click on the List Employees button to select the desire Employee(s). 3) Click to List Employees button. Select the Employee ID and Click Close button. The selected Employee(s) are added under the Employees Tab. User Manual | HRIS | Version 1.0 Page 49 STARVISION INFORMATION TECHNOLOGY (SDA) Under the Employees Tab, click the Employee record and select the New icon to check that the Approval status must reflect as ‘A’ (approve) for the specify Employee confirmation to take effect. Then click on Exit button to return to previous page. User Manual | HRIS | Version 1.0 Page 50 STARVISION INFORMATION TECHNOLOGY (SDA) Change Circulation Status to one of the following status to proceed: ‘0’ (NEW) , ‘1’ (SUBMIT), ‘3’ (APPROVED), ‘4’ (REJECT) User Manual | HRIS | Version 1.0 Page 51 STARVISION INFORMATION TECHNOLOGY (SDA) If there is no need to route this progression to other personnel’s approval to approve this, just set the Circulation Status to ‘3’ (APPROVED). However, if there is a need for other personnel’s approval, set the status to ‘1’ (SUBMIT). If Circulation Status is set to ‘1’ (SUBMIT), there is a need to entry for the Routing Officer Tab to add the respective recommender or approver (Email will be send to them respective to seek for their approval). The system will show the following screen: After setting up the Routing list, click Exit to go back to main page. Once the entry is saved, the record cannot be updated or deleted and the Circulation Status is to be set to ‘1’ (SUBMIT), ‘3’ (APPROVED), ‘4’ (REJECT). User Manual | HRIS | Version 1.0 Page 52 STARVISION INFORMATION TECHNOLOGY (SDA) Re-Employment This module is used to perform re-employment for certain employee(s) who are going to retired in a few months and has been approved do re-employment within organisation. 5.2.3 Definition No. 1 2 3 4 5 6 7 8 Field Description Progress No This field display the system generated Run Number of this document. Transaction Date This field is to capture the date of Created of this document. Its default value is the system date. Action This field displayed the system generated action code (AI). Organisation Unit This field is to capture the Organisation as search criteria. Job Family This field is to capture the Job Family as search criteria. Division Status This field is to capture the division status as search criteria. Appointment From This field is to capture the appointment code from range as search criteria. Appointment To This field is to capture the appointment code to range as search criteria. User Manual | HRIS | Version 1.0 Page 53 STARVISION INFORMATION TECHNOLOGY (SDA) 9 10 Progress Remark This field is to capture any progress remark. Circulation Status This field is to capture the Circulation Status of the document in the workflow. Help key is provided for user to select from the existing list. 5.2.4 Re- Employment Flow To begin with, go to Promotion & Progress > Re-Employment. The System will show the following screen: Click on the Add button to add a new record. User Manual | HRIS | Version 1.0 Page 54 STARVISION INFORMATION TECHNOLOGY (SDA) Click on the List Employees to choose individual or several Employees from a listing entitled for this progression. Then click on the Close button. User Manual | HRIS | Version 1.0 Page 55 STARVISION INFORMATION TECHNOLOGY (SDA) The selected Employee(s) are added automatically under the Employees Tab. To update employee information, click on the Employee’s record link under the Employees Tab. When the detail screen is shown as follows: User Manual | HRIS | Version 1.0 Page 56 STARVISION INFORMATION TECHNOLOGY (SDA) Click on the New Tab, to update information. Update employee information such as salary information, division, Job Family, etc. After the changes has been made, click on the Save button to save the record. User Manual | HRIS | Version 1.0 Page 57 STARVISION INFORMATION TECHNOLOGY (SDA) To go to the previous header screen, click on the Exit button. Change Circulation Status to one of the following status to proceed: ‘0’ (NEW), ‘1’ (SUBMIT), ‘3’ (APPROVED), ‘4’ (REJECT) User Manual | HRIS | Version 1.0 Page 58 STARVISION INFORMATION TECHNOLOGY (SDA) If there is no need to route this progression to other personnel’s approval to approve this, just set the Circulation Status to ‘3’ (APPROVED). If Circulation Status is set to ‘1’ (SUBMIT), then routing officer(s) information needs to be inserted the Routing Officer Tab to route to the respective recommender or approver (Email will be send to them respective to seek for their approval). Click on the Add New button in the Routing Officers Tab. The System will show the following screen: User Manual | HRIS | Version 1.0 Page 59 STARVISION INFORMATION TECHNOLOGY (SDA) After setting up the Routing list, click Exit button to go back to main page. Click on the Save button to save the record.. To view progression history, go to Employee Profile Employee Profile Screen. Select on the desired employee to retrieve employee information. Click on the Progression to check on the progression history records. User Manual | HRIS | Version 1.0 Page 60 STARVISION INFORMATION TECHNOLOGY (SDA) 5.4 Creating a Merit Increment This module is to maintain salary increment in employees’ progression. 5.4.1. Definition No. 1 2 3 4 5 6 7 8 Field Description Progress No This field display the system generated Run Number of this document. Transaction Date This field is to capture the date of Created of this document. Its default value is the system date. Action This field display the system generated action code (RJ). Effective Date This field is to capture the Effective Date of this document. Its default value is the system date. Organisation Unit This field is to capture the Organisation as search criteria. Job Family This field is to capture the Job Family as search criteria. Division Status This field is to capture the division status as search criteria. Appointment From This field is to capture the appointment code from range as search criteria. User Manual | HRIS | Version 1.0 Page 61 STARVISION INFORMATION TECHNOLOGY (SDA) 9 10 11 12 Appointment To This field is to capture the appointment code to range as search criteria. Increment Percent This field is to capture the increment percent. Increment Amount This field is to capture the increment amount. Circulation Status This field is to capture the Circulation Status of the document in the workflow. Help key is provided for user to select from the existing list. 5.4.2. Merit Increment Flow To begin with, go to Promotion & Progress > Merit Increment. The System will show the following screen: User Manual | HRIS | Version 1.0 Page 62 STARVISION INFORMATION TECHNOLOGY (SDA) Click on the Add button to add a new record. User Manual | HRIS | Version 1.0 Page 63 STARVISION INFORMATION TECHNOLOGY (SDA) Enter the Effective Date (Merit Increment) to record when the progression is going to take effect from. There are two ways to select the respective Employee/Employees entitled to this progression. 1) Click on the Criteria button to show the Query builder to select specific Employee for this progression. User Manual | HRIS | Version 1.0 Page 64 STARVISION INFORMATION TECHNOLOGY (SDA) Define the criteria from the Query builder. (i) (ii) (iii) (iv) (v) Select parameter that you want to filter Click this button to see the selected parameter list Select record to set Click Insert button to place the criteria Click OK button to filter the record After defining the criteria from the Query builder, click on the Check button to see if the query retrieves the correct Employee records. User Manual | HRIS | Version 1.0 Page 65 STARVISION INFORMATION TECHNOLOGY (SDA) Note: The Check button will show the Employee records that are defined with the Criteria button and also the Organisation Unit, Job Family, Grade, Appointment From and Appointment To. Thus, a “%” denotes all the records. 2) Alternatively, user can click on the List Employees to choose individual or several Employees from a listing entitled for this progression. Then click on the Close button User Manual | HRIS | Version 1.0 Page 66 STARVISION INFORMATION TECHNOLOGY (SDA) The selected Employee(s) are added under the Employees Tab. Enter either Increment Percentage or Increment Amount given to the Employee(s) defined. (If either of the two above fields is filled, then the system will increase salary based on the entered value for ALL employees listed in the Employees Tab.) User Manual | HRIS | Version 1.0 Page 67 STARVISION INFORMATION TECHNOLOGY (SDA) If increment is different for all individual Employees, you need not enter the Increment percentage or amount. You need to select each Employee’s record link under the Employees Tab. When the details are shown, click on the New Tab. Enter the increment amount at the NWC Amount and then click on the Save button to save the changes. User Manual | HRIS | Version 1.0 Page 68 STARVISION INFORMATION TECHNOLOGY (SDA) To modify next employee information, click on the Header Browse to view employee list. Then click on a desired employee record to update. Click on the Update button to update. User Manual | HRIS | Version 1.0 Page 69 STARVISION INFORMATION TECHNOLOGY (SDA) Click on the New Tab to update. Change necessary information such as salary information. After the changes have been made, click on the Save button to save. To go back to the previous header screen, click on the Exit button. Change Circulation Status to one of the following status to proceed: ‘0’ (NEW), ‘1’ (SUBMIT), ‘3’ (APPROVED), ‘4’ (REJECT) User Manual | HRIS | Version 1.0 Page 70 STARVISION INFORMATION TECHNOLOGY (SDA) If there is no need to route this progression to other personnel’s approval to approve this, just set the Circulation Status to ‘3’ (APPROVED). If Circulation Status is set to ‘1’ (SUBMIT), then routing officer(s) information needs to be inserted the Routing Officer Tab to route to the respective recommender or approver (Email will be send to them respective to seek for their approval). Click on the Add New button in the Routing Officers Tab. The System will show the following screen: User Manual | HRIS | Version 1.0 Page 71 STARVISION INFORMATION TECHNOLOGY (SDA) After setting up the Routing list, click Exit button to go back to main page. Click on the Save button to save. To view progression history, go to Employee Profile Employee Profile Screen. Select on the desired employee to retrieve employee information. Click on the Progression Tab to check on the progression history records. User Manual | HRIS | Version 1.0 Page 72 STARVISION INFORMATION TECHNOLOGY (SDA) 5.5 Promotion of an Employee This module is used to keep track of employee’s promotion in the organisation. 5.5.1 Definition No. 1 2 3 4 5 6 7 Field Description Progress No This field display the system generated Run Number of this document. Transaction Date This field is to capture the date of Created of this document. Its default value is the system date. Action This field display the system generated action code (RJ). Promotion Date This field is to capture the Promotion Date of this document. Its default value is the system date. Organisation Unit This field is to capture the Organisation as search criteria. Job Family This field is to capture the Job Family as search criteria. Division Status This field is to capture the division status as search criteria. User Manual | HRIS | Version 1.0 Page 73 STARVISION INFORMATION TECHNOLOGY (SDA) 8 9 10 11 12 Appointment From This field is to capture the appointment code from range as search criteria. Appointment To This field is to capture the appointment code to range as search criteria. Increment Percent This field is to capture the increment percent. Increment Amount This field is to capture the increment amount. Circulation Status This field is to capture the Circulation Status of the document in the workflow. Help key is provided for user to select from the existing list. 5.5.2 Promotion Flow To begin with, go to Promotion & Progress > Promotion. The System will show the following screen: User Manual | HRIS | Version 1.0 Page 74 STARVISION INFORMATION TECHNOLOGY (SDA) Click on the Add button to add a new record. User Manual | HRIS | Version 1.0 Page 75 STARVISION INFORMATION TECHNOLOGY (SDA) Enter the Promotion Date to record when this progression is going to take effect from. There are 2 ways to select the respective Employee/Employees entitled to this progression. 1) Click on the Criteria button to show the Query builder to select specific Employee for this progression. Define the criteria from the Query builder. (i) Select parameter that you want to filter User Manual | HRIS | Version 1.0 Page 76 STARVISION INFORMATION TECHNOLOGY (SDA) (ii) (iii) (iv) (v) Click this button to see the selected parameter list Select record to set Click Insert button to place the criteria Click OK button to filter the record After defining the criteria from the Query builder, click on the Check button to see if the query retrieves the correct Employee records. Note: The Check button will show the Employee records that are defined with the Criteria button and also the Organisation Unit, Job Family, Grade, Appointment From and Appointment To. Thus, a “%” denotes all the records. 2) Click on the List Employees to choose individual or several Employees from a listing entitled for this progression. Then click on the Close button to add. User Manual | HRIS | Version 1.0 Page 77 STARVISION INFORMATION TECHNOLOGY (SDA) The selected Employee(s) are added under the Employees Tab. Enter either Increment Percentage or Increment Amount given to the Employee(s) defined. (If either of the two above fields is filled, then the system will increase salary based on the entered value for ALL employees listed in the Employees Tab.) User Manual | HRIS | Version 1.0 Page 78 STARVISION INFORMATION TECHNOLOGY (SDA) If increment is different for all individual Employees, you need not enter the Increment percentage or amount. You need to select each Employee’s record link under the Employees Tab. When the details are shown, click on the New Tab to update. Enter new information for promotion and then click on the Save button to save the changes. User Manual | HRIS | Version 1.0 Page 79 STARVISION INFORMATION TECHNOLOGY (SDA) To modify next employee information, click on the Header Browse to view employee list. Then click on a desired employee record to update. Click on the Update button to update. User Manual | HRIS | Version 1.0 Page 80 STARVISION INFORMATION TECHNOLOGY (SDA) Click on the New Tab to update. Change necessary information such as salary information. After the changes have been made, click on the Save button to save. To go back to the previous header screen, click on the Exit button. Change Circulation Status to one of the following status to proceed: ‘0’ (NEW), ‘1’ (SUBMIT), ‘3’ (APPROVED), ‘4’ (REJECT) User Manual | HRIS | Version 1.0 Page 81 STARVISION INFORMATION TECHNOLOGY (SDA) If there is no need to route this progression to other personnel’s approval to approve this, just set the Circulation Status as ‘3’ (APPROVED). If Circulation Status is set as ‘1’ (SUBMIT), then routing officer(s) information needs to be inserted the Routing Officer Tab to route to the respective recommender or approver (Email will be send to them respective to seek for their approval). Click on the Add New button in the Routing Officers Tab. The System will show the following screen: After setting up the Routing list, click Exit button to go back to main page. Click on the Save button to save the record. To view progression history, go to Employee Profile Employee Profile Screen. Select on the desired employee to retrieve employee information. Click on the Progression Tab to check on the progression history records. 5.6 Creating deployment for Employee(s) This module is used to keep track of employee’s deployment within the organisation. 5.6.1. Definition User Manual | HRIS | Version 1.0 Page 82 STARVISION INFORMATION TECHNOLOGY (SDA) No. 1 2 3 4 5 6 7 8 10 11 Field Description Progress No This field display the system generated Run Number of this document. Transaction Date This field is to capture the date of Created of this document. Its default value is the system date. Action This field display the system generated action code (RJ). Organisation Unit This field is to capture the Organisation as search criteria. Job Family This field is to capture the Job Family as search criteria. Division Status This field is to capture the division status as search criteria. Appointment From This field is to capture the appointment code from range as search criteria. Appointment To This field is to capture the appointment code to range as search criteria. Remark This field is to capture any remark. Circulation Status This field is to capture the Circulation Status of the document in the workflow. Help key is provided for user to select from the existing list. User Manual | HRIS | Version 1.0 Page 83 STARVISION INFORMATION TECHNOLOGY (SDA) 5.6.2 Deployment Flow To begin with, go to Promotion & Progress > Deployment. The System will show the following screen: Click on the Add button to add a new record. User Manual | HRIS | Version 1.0 Page 84 STARVISION INFORMATION TECHNOLOGY (SDA) There are 2 ways to select the respective Employee/Employees entitled to this progression. 1) Click on the Criteria button to show the Query builder to select specific Employee for this progression. Define the criteria from the Query builder. User Manual | HRIS | Version 1.0 Page 85 STARVISION INFORMATION TECHNOLOGY (SDA) (i) (ii) (iii) (iv) (v) Select parameter that you want to filter Click this button to see the selected parameter list Select record to set Click Insert button to place the criteria Click OK button to filter the record After defining the criteria from the Query builder, click on the Check button to see if the query retrieves the correct Employee records. Note: The Check button will show the Employee records that are defined with the Criteria button and also the Organisation Unit, Job Family, Grade, Appointment From and Appointment To. Thus, a “%” denotes all the records. 2) Alternatively, click on the List Employees to choose individual or several Employees from a listing entitled for this progression. Then click on the Close button. User Manual | HRIS | Version 1.0 Page 86 STARVISION INFORMATION TECHNOLOGY (SDA) The selected Employee(s) are added automatically under the Employees Tab. To modify employee’s information for deployment, click on an Employee’s record link under the Employees Tab. User Manual | HRIS | Version 1.0 Page 87 STARVISION INFORMATION TECHNOLOGY (SDA) When the details are shown, click on the New Tab to update. Enter new information for employee’s deployment and then click on the Save button to save the changes. To modify next employee information, click on the Header Browse to view employee list. Then click on a desired employee record to update. User Manual | HRIS | Version 1.0 Page 88 STARVISION INFORMATION TECHNOLOGY (SDA) Click on the Update button to update. Click on the New Tab to update. Change necessary information such as salary information. After the changes have been made, click on the Save button to save. To go back to the previous header screen, click on the Exit button. Change Circulation Status to one of the following status to proceed: ‘0’ (NEW), ‘1’ (SUBMIT), ‘3’ (APPROVED), ‘4’ (REJECT) User Manual | HRIS | Version 1.0 Page 89 STARVISION INFORMATION TECHNOLOGY (SDA) If there is no need to route this progression to other personnel’s approval to approve this, just set the Circulation Status as ‘3’ (APPROVED). If Circulation Status is set as ‘1’ (SUBMIT), then routing officer(s) information needs to be inserted the Routing Officer Tab to route to the respective recommender or approver (Email will be send to them respective to seek for their approval). Click on the Add New button in the Routing Officers Tab. The System will show the following screen: After setting up the Routing list, click Exit button to go back to main page. Click on the Save button to save the record. User Manual | HRIS | Version 1.0 Page 90 STARVISION INFORMATION TECHNOLOGY (SDA) To view progression history, go to Employee Profile Employee Profile Screen. Select on the desired employee to retrieve employee information. Click on the Progression Tab to check on the progression history records. 5.7 Creating Annual Increment This module is used to keep track of employee’s annual increment within the organisation. 5.7.1. Definition No. 1 2 3 4 5 Field Description Progress No This field display the system generated Run Number of this document. Transaction Date This field is to capture the date of Created of this document. Its default value is the system date. Action This field displayed the system generated action code (AI). AI Date From This field is to capture AI date from. Calendar is provided for the user to select the date. AI Date To This field is to capture AI date to. Calendar is provided for the user to select the date. User Manual | HRIS | Version 1.0 Page 91 STARVISION INFORMATION TECHNOLOGY (SDA) 6 7 8 9 10 11 12 13 Organisation Unit This field is to capture the Organisation as search criteria. Job Family This field is to capture the Job Family as search criteria. Division Status This field is to capture the division status as search criteria. Appointment From This field is to capture the appointment code from range as search criteria. Appointment To This field is to capture the appointment code to range as search criteria. Increment Percent This field is to capture the increment percent. Increment Amount This field is to capture the increment amount. Circulation Status This field is to capture the Circulation Status of the document in the workflow. Help key is provided for user to select from the existing list. 5.7.2. Annual Increment Flow To begin with, go to Promotion & Progress > Annual Increment. The System will show the following screen: User Manual | HRIS | Version 1.0 Page 92 STARVISION INFORMATION TECHNOLOGY (SDA) Click on the Add button to add a new record. User Manual | HRIS | Version 1.0 Page 93 STARVISION INFORMATION TECHNOLOGY (SDA) Enter the AI Date From (Annual Increment) and To fields to record when t this progression is going to take effect from. There are 2 ways to select the respective Employee/Employees entitled to this progression. The rest steps are the same as Merit Increment. See Merit Increment 5.8. User Manual | HRIS | Version 1.0 Page 94 STARVISION INFORMATION TECHNOLOGY (SDA) 5.8 Change Module Change Module allows the administrator to make changes to the current progression of any employee. This module is best used to make minor adjustments or correction as the changes are not tracked. Changes that need to be tracked should be made under the Promotion & Progress. 5.8.1. Definition No. Field User Manual | HRIS | Version 1.0 Description Page 95 STARVISION INFORMATION TECHNOLOGY (SDA) 1 2 3 4 5 6 7 8 9 10 11 12 13 14 15 Employee ID This field is to capture the Employee ID. Help key is provided for user to select from the existing list. Action This field display the system generated action code (NA). Transaction Date This field is to capture the Created date of the transaction. Its default value is the system date. Organisation Unit This field is to capture the Organisation Unit of the Employee. Help key is provided for user to select from the existing list. Division Status This field is to capture the divisional status of the Employee. Help key is provided for user to select from the existing list. Job Family This field is to capture the Job Family code of the Employee. Help key is provided for user to select from the existing list. Appointment Code This field is to capture the appointment code of the Employee. Help key is provided for user to select from the existing list. Effective Date This field is to capture the effective date of the Employee. Calendar is provided for the user to select the date. Joined Date This field is to capture the joined date of the Employee. Calendar is provided for the user to select the date. Confirm Date This field is to capture the confirmed date of the Employee. Calendar is provided for the user to select the date. Appointment Date This field is to capture the appointment date of the Employee. Calendar is provided for the user to select the date. Next Conf. Date This field is to capture the next confirmation date of the Employee. Calendar is provided for the user to select the date. Next Inctl. Date This field is to capture the next incremental date of the Employee. Calendar is provided for the user to select date. Last day of service This field is to capture the last day of service the Employee. Calendar is provided for the user to select date. Payroll Mode This field is to capture the payroll mode of the Employee. Help key is provided for user to select from the existing list. User Manual | HRIS | Version 1.0 Page 96 STARVISION INFORMATION TECHNOLOGY (SDA) 16 17 18 19 20 21 22 23 24 25 26 27 28 29 30 31 Salary Code This field is to capture the salary code of the Employee. Help key is provided for user to select from the existing list. Basic Salary This field is to capture the basic salary of the Employee. Help key is provided for user to select from the existing list. Cost Centre Code This field is to capture cost centre code of Employee. Help key is provided for user to select from the existing list. Basic 1 This field is Basic amount 1. NWC Amount This field is to capture the NWC amount. Monthly Salary This field display the Monthly Salary = Basic Salary + NPC Amount. Gross Salary This field display the Gross Salary = Monthly Salary + NPVP Amount. Reason Code This field is to capture the reason code of the resignation. Help key is provided for user to select from the existing list. Position Code This field is to capture the reason code of the resignation. Help key is provided for user to select from the existing list. Essential Category This field is to capture the essential category of the Employee. Help key is provided for user to select from the existing list. Job Family This field is to capture the hold against Job Family of the Employee. Help key is provided for user to select from the existing list. Designation This field is to capture the designation code of the Employee. Help key is provided for user to select from the existing list. Appointment This field is to capture the appointment of the Employee. Title This field is to capture the new designation title of the Employee and is generated by the system according to the selected Designation code. Progress Remark This field is to capture any progress remark. Basic 2 This field is Basic amount 2. User Manual | HRIS | Version 1.0 Page 97 STARVISION INFORMATION TECHNOLOGY (SDA) 5.8.2. Change Module Flow To begin with, go to Promotion & Progress > Change Module. The System will show the following screen: User Manual | HRIS | Version 1.0 Page 98 STARVISION INFORMATION TECHNOLOGY (SDA) Click on the Query button to retrieve of employee within organisation. User Manual | HRIS | Version 1.0 Page 99 STARVISION INFORMATION TECHNOLOGY (SDA) The list of Employee will be shown in the header browse. Click the desired Employee from the Header Browse to modify Then click on the Update button to make changes. Enter/make changes in information for an employee if needed. After the changes have been made, click on the Save button to save the record. User Manual | HRIS | Version 1.0 Page 100 STARVISION INFORMATION TECHNOLOGY (SDA) To view progression history, go to Employee Profile Employee Profile Screen. Select on the desired employee to retrieve employee information. Click on the Progression Tab to check on the progression history records. 5.9 Importing Employee’s Progress Information 5.9.1. Promotion & Progress Excel Template This module is to download excel template to import progression information for employee(s) via import function. 5.9.1.1. Excel Template Flow To begin with, go to Promotion & Progress Excel Template. User Manual | HRIS | Version 1.0 Page 101 STARVISION INFORMATION TECHNOLOGY (SDA) The System will show the following screen: Assume that employees’ confirmation records are needed to import. Then click on the Confirmation Template. The system will prompt the download dialog box. Click on the Save button to save the excel template. User Manual | HRIS | Version 1.0 Page 102 STARVISION INFORMATION TECHNOLOGY (SDA) The following save dialog box will appear. Choose a location to save the template. Click Save button to save the template. Use this Confirmation excel sheet to fill employee information for confirmation process. User Manual | HRIS | Version 1.0 Page 103 STARVISION INFORMATION TECHNOLOGY (SDA) 5.10 Promotion & Progress Progression Import This module is to upload progression information via import function. 5.10.1. Definition User Manual | HRIS | Version 1.0 Page 104 STARVISION INFORMATION TECHNOLOGY (SDA) 5.10.1.1. Progression Import Flow To begin with, go to Promotion & Progress > Progression Import The System will show the following screen: User Manual | HRIS | Version 1.0 Page 105 STARVISION INFORMATION TECHNOLOGY (SDA) Click Action’s list box, and then choose desired progression action. Assume that the users need to process employee’s confirmation. Then choose “Confirmation” from the Action field. Then the Date From and To fields will become visible. Enter Date information in both fields. Click on the Insert Detail pick-list field to import excel sheet. User Manual | HRIS | Version 1.0 Page 106 STARVISION INFORMATION TECHNOLOGY (SDA) The system will prompt the Upload dialog box to upload. Click Browse button and choose the confirmation excel sheet that filled with employee progression. Then click Open button to upload. Then click on the Upload button to upload excel sheet. The selected file filled in the Insert Detail field as follow. Click on the Import button to import excel sheet. When the record(s) in the excel sheet are successfully uploaded, the system will prompt the following message in the Message Box. User Manual | HRIS | Version 1.0 Page 107 STARVISION INFORMATION TECHNOLOGY (SDA) User Manual | HRIS | Version 1.0 Page 108 STARVISION INFORMATION TECHNOLOGY (SDA) 6 Leaving Service This module allows user to set the last day of service for a group of Employee or specific individuals (For example, Termination / Vacation of Office/ Death / Retirement / Resignation reasons). It is important to enter the Last Day of Service and Effective Date as the prorated salary will be based on both of them. The Leaving Service consists of the following sub-modules: 6.1 Termination This option allows users to terminate the Employee(s) from the Organization. 6.1.1 Definition No. 1 2 3 4 Field Description Progress No This field display the system generated Run Number of this document. Transaction Date This field is to capture the date of Created of this document. Its default value is the system date. Action This field display the system generated action code (TM). Progress Remark This field is to capture the progress remark. User Manual | HRIS | Version 1.0 Page 109 STARVISION INFORMATION TECHNOLOGY (SDA) 5 Circulation Status This field is to capture the Circulation Status of the document in the workflow. Help key is provided for user to select from the existing list. 6.1.2 Termination Flow To begin with, go to Leaving Service > Termination. The system will show the following screen: Click on the Add button to create a new record. Action code is default as ‘TM’. User Manual | HRIS | Version 1.0 Page 110 STARVISION INFORMATION TECHNOLOGY (SDA) Click on the List Employees button to view all active Employees within the Organization. Here, you may wish to terminate a group of Employee and select Employee and click Close button to terminate the service. The selected Employee(s) are added automatically under the Employees Tab. User Manual | HRIS | Version 1.0 Page 111 STARVISION INFORMATION TECHNOLOGY (SDA) Under the Employees Tab, click the Employee record link to set different resignation date for different individual. The system will display the following details screen. Select the New Tab to update the Notice Date, Last Day of Service and Effective Date. Then click on the Save button to save the record. Note: Effective date should be one day after the Employee Last day of service. User Manual | HRIS | Version 1.0 Page 112 STARVISION INFORMATION TECHNOLOGY (SDA) Then click on the Exit button to return to the previous page. Change Circulation Status to one of the following status to proceed: ‘0’ (NEW), ‘1’ (SUBMIT), ‘3’ (APPROVED), ‘4’ (REJECT) If there is no need to route this progression to other personnel’s approval to approve this, just set the Circulation Status as ‘3’ (APPROVED). If Circulation Status is set as ‘1’ (SUBMIT), then routing officer(s) information needs to be inserted the Routing Officer Tab to route to the respective recommender or approver (Email will be send to them respective to seek for their approval). User Manual | HRIS | Version 1.0 Page 113 STARVISION INFORMATION TECHNOLOGY (SDA) Click on the Add New button in the Routing Officers Tab. The System will show the following screen: After setting up the Routing list, click Exit button to go back to main page. Click on the Save button. The system will capture the details of the Employee(s) termination. And their salary will be pro-rated according to their last day of service. User Manual | HRIS | Version 1.0 Page 114 STARVISION INFORMATION TECHNOLOGY (SDA) 6.2 Vacation of Office This option allows users to set the vacation of officer for employee(s) in the Organization. 6.2.1 Definition 6.2.2 Vacation of Office Flow To begin with, go to Leaving Service > Vacation of Office. The system will show the following screen: User Manual | HRIS | Version 1.0 Page 115 STARVISION INFORMATION TECHNOLOGY (SDA) Click on the Add button to create a new record. Action code is default as ‘VO’ Here, you may wish to terminate a group of employee under this record and set different resignation date for individual employee. Click on the List Employees button to view all active employees in the company. Next, select the desire employee(s). User Manual | HRIS | Version 1.0 Page 116 STARVISION INFORMATION TECHNOLOGY (SDA) The selected Employee(s) are added automatically under the Employees Tab. Under the Employees tab, click the employee record link to update. The following screen will be displayed. User Manual | HRIS | Version 1.0 Page 117 STARVISION INFORMATION TECHNOLOGY (SDA) Select the New Tab to update the Notice Date, Last Day of Service and Effective Date. Note: Effective date should be one day after the employee Last day of service. Click on the Save button to save the record. Then click on the Exit icon to return to the previous page. User Manual | HRIS | Version 1.0 Page 118 STARVISION INFORMATION TECHNOLOGY (SDA) This created record’s circulation status can be set as ‘0’, ‘1’, ‘3’, ‘4’ depending on the user who create this progression records wants to do with it. If there is no need to route this progression to other personnel’s approval to approve this, just set the circulation status to ‘3’. However, if there is a need for other personnel’s approval, set the status to ‘1’. If circulation status is set to ‘1’, there is a need to entry for the Routing Officer tab to add the respective recommender or approver (Email will be send to them respective to seek for their approval). Click on the Save button. The system will capture the details of the employee(s) termination. And their salary will be pro-rated according to their last day of service. User Manual | HRIS | Version 1.0 Page 119 STARVISION INFORMATION TECHNOLOGY (SDA) 6.3 Retirement This option allows users to prepare retirement for Employee(s) in the Organization. 6.3.1 Definition 6.3.2 Retirement Flow To begin with, go to Leaving Service > Retirement. The system will show the following screen: User Manual | HRIS | Version 1.0 Page 120 STARVISION INFORMATION TECHNOLOGY (SDA) Click on the Add button to create a new record. Define the Retirement Date From and To. Click on the List Employees button to view all Employees with their retirement dates (fall within the period defined in Section 5.2.3) and the filtering defined at the Organisation Unit, Job Family, Grade, Appointment From and Appointment To. User Manual | HRIS | Version 1.0 Page 121 STARVISION INFORMATION TECHNOLOGY (SDA) Select Employee and click Close button to retire the service. User Manual | HRIS | Version 1.0 Page 122 STARVISION INFORMATION TECHNOLOGY (SDA) The selected Employee(s) are added automatically under the Employees Tab. Under the Employees Tab, click the Employee record link to set different retirement date for individual Employee. Then select the New Tab to update the Notice Date, Last Day of Service and Effective Date. User Manual | HRIS | Version 1.0 Page 123 STARVISION INFORMATION TECHNOLOGY (SDA) Click on the Save button and Click on the Exit button to return to the previous page. User Manual | HRIS | Version 1.0 Page 124 STARVISION INFORMATION TECHNOLOGY (SDA) Change Circulation Status to one of the following status to proceed: ‘0’ (NEW), ‘1’ (SUBMIT), ‘3’ (APPROVED), ‘4’ (REJECT) If there is no need to route this progression to other personnel’s approval to approve this, just set the Circulation Status as ‘3’ (APPROVED). If Circulation Status is set as ‘1’ (SUBMIT), then routing officer(s) information needs to be inserted the Routing Officer Tab to route to the respective recommender or approver (Email will be send to them respective to seek for their approval). Click on the Add New button in the Routing Officers Tab. The System will show the following screen: User Manual | HRIS | Version 1.0 Page 125 STARVISION INFORMATION TECHNOLOGY (SDA) After setting up the Routing list, click Exit button to go back to main page. Click on the Save button to capture the details for the Employee(s) retirement. And their salary will be pro-rated according to their last day of service. 6.4 Death This option provides for Leaving Service due to Death of employee(s) from the Company. 6.4.1 Definition 6.4.2 Death Flow To begin with, Go to Leaving Service > Death. User Manual | HRIS | Version 1.0 Page 126 STARVISION INFORMATION TECHNOLOGY (SDA) Click on the Add button to create a new record. Here, you may wish to terminate a group of employee under this record and set different resignation date for individual employee. Click on the List Employees button to view all active employees in the company. Next, select the desire employee(s). User Manual | HRIS | Version 1.0 Page 127 STARVISION INFORMATION TECHNOLOGY (SDA) Under the Employees tab, click the employee record link to modify. The following detail screen will be shown. Click on the New Tab to update. Enter the Last Day of Service and Effective Date field. User Manual | HRIS | Version 1.0 Page 128 STARVISION INFORMATION TECHNOLOGY (SDA) Note: Effective date should be one day after the employee Last day of service. Click on the Save icon and click on the Back icon to return to the previous page. Change Circulation Status to one of the following status to proceed: ‘0’ (NEW), ‘1’ (SUBMIT), ‘3’ (APPROVED), ‘4’ (REJECT) User Manual | HRIS | Version 1.0 Page 129 STARVISION INFORMATION TECHNOLOGY (SDA) If there is no need to route this progression to other personnel’s approval to approve this, just set the Circulation Status as ‘3’ (APPROVED). If Circulation Status is set as ‘1’ (SUBMIT), then routing officer(s) information needs to be inserted the Routing Officer Tab to route to the respective recommender or approver (Email will be send to them respective to seek for their approval). Click on the Add New button in the Routing Officers Tab. The System will show the following screen: After setting up the Routing list, click Exit button to go back to main page. Click on the Save button to capture the details for the Employee(s) termination. And their salary will be pro-rated according to their last day of service. User Manual | HRIS | Version 1.0 Page 130 STARVISION INFORMATION TECHNOLOGY (SDA) 6.5 Resignation This option allows you to resign the Employee(s) from the Organization. 6.5.1 Definition 6.5.2 Resignation Flow To begin with, go to Leaving Service > Resignation. The system will show the following screen: User Manual | HRIS | Version 1.0 Page 131 STARVISION INFORMATION TECHNOLOGY (SDA) Click on the Add button to create a new record. Click on the List Employees button to view all Employees with their retirement dates (fall within the period defined in Section 5.2.3) and the filtering defined at the Organisation Unit, Job Family, Grade, Appointment From and Appointment To. Select Employee and click Close button to retire the service. User Manual | HRIS | Version 1.0 Page 132 STARVISION INFORMATION TECHNOLOGY (SDA) The selected Employee(s) are added automatically under the Employees Tab. Under the Employees Tab, click the Employee record link to set different retirement date for individual Employee. Then select the New Tab to update the Notice Date, Last Day of Service and Effective Date. User Manual | HRIS | Version 1.0 Page 133 STARVISION INFORMATION TECHNOLOGY (SDA) Click on the Save button. Click on the Exit button to return to the previous page. Change Circulation Status to one of the following status to proceed: ‘0’ (NEW), ‘1’ (SUBMIT), ‘3’ (APPROVED), ‘4’ (REJECT) User Manual | HRIS | Version 1.0 Page 134 STARVISION INFORMATION TECHNOLOGY (SDA) If there is no need to route this progression to other personnel’s approval to approve this, just set the Circulation Status as ‘3’ (APPROVED). If Circulation Status is set as ‘1’ (SUBMIT), then routing officer(s) information needs to be inserted the Routing Officer Tab to route to the respective recommender or approver (Email will be send to them respective to seek for their approval). Click on the Add New button in the Routing Officers Tab. The System will show the following screen: User Manual | HRIS | Version 1.0 Page 135 STARVISION INFORMATION TECHNOLOGY (SDA) After setting up the Routing list, click Exit button to go back to main page. Click on the Save button. The system will capture the details of the employee(s) resignation. And their salary will be pro-rated according to their last day of service. User Manual | HRIS | Version 1.0 Page 136 STARVISION INFORMATION TECHNOLOGY (SDA) 7 Ad-hoc Query / Reports This section explains how to do Ad-hoc Query and print Reports. 7.1 Ad-hoc Query This module allows user to view information using ad-hoc queries. There are sub-modules as follows: - Employee Queries Personnel Record Queries Audit Queries To begin with, go to Adhoc Query. The sub-modules will be shown. User Manual | HRIS | Version 1.0 Page 137 STARVISION INFORMATION TECHNOLOGY (SDA) Click on any sub-module e.g. Employee Queries and the list of queries in the sub-module will be shown. Click on any Query in the list e.g. Past Employment and the Ad-hoc query for List of Training Application will be shown User Manual | HRIS | Version 1.0 Page 138 STARVISION INFORMATION TECHNOLOGY (SDA) User Manual | HRIS | Version 1.0 Page 139 STARVISION INFORMATION TECHNOLOGY (SDA) Enter or Select the Employee ID From pick list to Set Parameters. After entering the Set Parameters, process the Query by clicking the ‘Execute’ icon (circled above). Data from the Query will be displayed as above. 7.2 Reports This section explains how to print reports. To begin with, go to any Report sub-module e.g. Personnel Reports. Click on the Report sub-module e.g. Personnel Reports and the list of reports in the submodule will be shown. User Manual | HRIS | Version 1.0 Page 140 STARVISION INFORMATION TECHNOLOGY (SDA) Click on the process button (circled above) of any Report in the list e.g. Employee Profile Listing and the Employee Profile Listing will be shown User Manual | HRIS | Version 1.0 Page 141 STARVISION INFORMATION TECHNOLOGY (SDA) Click the ‘Select Criteria’ and the Query Builder screen will be displayed for you to enter or select the parameters for printing the report. After entering or selecting the parameters, click ‘OK’. Enter or select the ‘Report Parameters’ and enter the parameters for printing the report. After entering or selecting the parameters, click the ‘Click Here’ button. The report will be printed. User Manual | HRIS | Version 1.0 Page 142