1
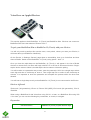
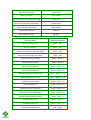
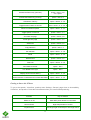
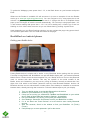
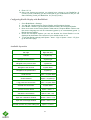
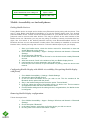
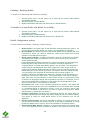
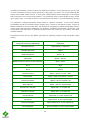
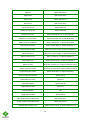
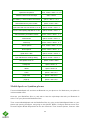
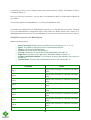
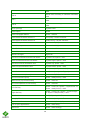
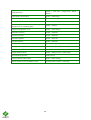
The BraillePen with Mobile Solutions
Table of Contents
VoiceOver on Apple iDevices............................................................................................................... 2
To pair your BraillePen Slim or BraillePen 12 (Touch) with your iDevice:....................................... 2
iDevices Affected: ............................................................................................................................ 2
Keystrokes: ...................................................................................................................................... 2
Getting to know the iPhone ............................................................................................................ 4
Handy hints...................................................................................................................................... 5
Using BraillePen with Webpages in Safari on iOS devices .............................................................. 6
BrailleBack on Android phones ........................................................................................................... 7
Pairing your Braille device ............................................................................................................... 7
Configuring Braille Display with BrailleBack .................................................................................... 8
Available keystrokes ........................................................................................................................ 8
Mobile Accessibility on Android phones ............................................................................................. 9
Pairing Braille Devices: .................................................................................................................... 9
Configuring Braille Display with Mobile Accessibility (Post pairing Braille display with phone) .... 9
Removing Braille Display configuration........................................................................................... 9
Enabling / Disabling Braille ............................................................................................................ 10
To disable or to stop Braille with Mobile Accessibility:................................................................. 10
Braille Configuration options: ....................................................................................................... 10
Grades and Braille Table configurations: ...................................................................................... 11
Braille Connection Settings: .......................................................................................................... 11
Enabling Braille Support outside Mobile Accessibility .................................................................. 11
Quick Menu > Edit options ............................................................................................................ 12
Entering and Editing Text Using Braille ......................................................................................... 12
Braille Output Mode ...................................................................................................................... 12
Talks on Symbian Phones .................................................................................................................. 15
The BraillePen 12 (Touch) Driver:.................................................................................................. 16
Setting Up: ..................................................................................................................................... 16
Talks keystrokes: ........................................................................................................................... 16
MobileSpeak on Symbian phones ..................................................................................................... 17
BraillePen keystrokes for MobileSpeak ......................................................................................... 18
1
VoiceOver on Apple iDevices
This section applies to both BraillePen 12 (Touch) and BraillePen Slim. iDevices can connect to
BraillePen Slim since the release of iPhone OS 4.3.
To pair your BraillePen Slim or BraillePen 12 (Touch) with your iDevice:
You will only need to perform this exercise once; once paired, unless you reset your iDevice, it
will know about your BraillePen indefinitely.
On the iDevice, in Settings, General, page down to accessibility, then go to VoiceOver and then
down to Braille. Switch on the BraillePen 12 (Touch) using space + dots 1,3.
Once you hear the triple-beep on the BraillePen 12 (Touch), it will appear in the list of Braille
devices to choose from; its name will begin with BP 12 in the list of discovered devices. Singletap the device name to select it; double-tap the device name to initiate the pairing.
You will be taken to a passcode entry screen; enter the passcode 1234. Use a single tap to select
each digit and then a double-tap to enter it. Then single-tap Pair to select it and double-tap to
activate. It is important to enter the passcode and complete the process within the short time
allowed.
You will hear a single beep to tell you that BraillePen 12 (Touch) is now connected to the iDevice.
iDevices Affected:
iPod touch (3rd generation), iPhone 4, iPhone 3GS (8GB), iPod touch (4th generation), iPad 2,
iPad Mini.
When using a BraillePen12 with VoiceOver using iOS 4.1 or later, or a BraillePen Slim using iOS
4.3 or later, you can use the following key commands, or chords, to navigate.
Keystrokes:
VoiceOver action
BraillePen 12 (Touch) Joystick and Pan keys
2
Move to previous item
Joystick Left
Move to next item
Joystick Right
Move to previous item using rotor setting
Joystick Up
Move to next item using rotor setting
Joystick Down
Select item under your finger
Joystick Enter
Pan Braille to the left
Pan left
Pan Braille to the right
Pan right
VoiceOver action
BraillePen Keystroke
Move to previous item
space + dot 1
Move to next item
space + dot 4
Move to previous item using rotor setting
space + dot 3
Move to next item using rotor setting
space + dot 6
Select previous rotor setting
space + dots 2, 3
Select next rotor setting
space + dots 5, 6
Move to the first element
space + dots 1, 2, 3
Move to the last element
space + dots 4, 5, 6
Read page starting at selected item
space + dots 1, 2, 3, 5
Read page starting at the top
space + dots 2, 4, 5, 6
Activate the Home button
space + dots 1, 2, 5
Go to the Status bar
space + dots 2, 3, 4
Activate the Volume Up button
space + dots 3, 4, 5
Activate the Volume Down button
space + dots 1, 2, 6
Activate the Back button if present
space + dots 1, 2
Activate the Eject key
space + dots 3, 4
Activate the Delete key
space + dots 1, 4, 5
Activate the Backspace key
shift + space
3
Activate the Return key (new line)
space + dots 1, 5 or
ctrl + space
Activate the Return key (choose)
space + dots 3, 6
Activate the Tab key
space + dots 2, 3, 4, 5
Toggle Screen Curtain on and off
space + dots 1, 2, 3, 4, 5, 6
Pause or Continue speech
space + dots 1, 2, 3, 4
Toggle speech on and off
space + dots 1, 3, 4
Scroll left one page
space + dots 2, 4, 6
Scroll right one page
space + dots 1, 3, 5
Select text
space + dots 2, 5, 6
Copy selection
space + dots 1, 4
Cut selection
space + dots 1, 3, 4, 6
Paste
space + dots 1, 2, 3, 6
Deselect text
space + dots 2, 3, 5
Select all
space + dots 2, 3, 5, 6
Pan Braille to the left
space + dot 2
Pan Braille to the right
space + dot 5
Display announcement history
space + dots 1, 3, 4, 5
Switch between contracted and uncontracted Braille
space + dots 1, 2, 4, 5
Getting to know the iPhone
To go to the speech, VoiceOver, practice area: Settings, General, page down to Accessibility,
VoiceOver, and practice. Press the Home Button when you have finished practicing.
Function
Key or Gesture
Switch on or off
Hold down power button for 5 seconds
Unlock iPhone
Right swipe bottom of screen
Explore icons
One finger right or left swipe or one finger touch
4
and move about screen
Turn speech off or on
Three presses home button
Stop or start podcast/video
Two finger tap anywhere
Privacy screen curtain on or off
Three finger triple tap
Turn app switcher on or off (just four icons per
screen, less confusing)
Double tap home button
Volume control
Two rectangular buttons top left side
Read strength of phone signal
Very top left of screen
Read time
Middle of very top of screen
Battery strength
Right of very top of screen
Rotary choices (words or characters, links or
headings and so on)
Two fingers, like turning a knob
Reset iPhone
Hold the home button and press the power
button (you don't lose date)
Handy hints
Editing your text in a note or text message
•
•
•
Set your Rotor to Characters using space + dots 2,3 or space + dots 5,6.
Then use the "move using rotor settings" keystroke: space + dot 3 to move left, and
space + dot 6 to move right.
The standard movement keystrokes - space + dot 1 and space + dot 4 - will still move
you from element to element within the Notes app or the Messaging app.
Selecting text to copy/cut/paste
Using the rotor settings (space 2, 3 or space 5, 6) select the steps by which you want to select
text (characters, words, or lines) and then use following keystrokes:
•
•
Select text: space + dots 2, 5, 6
Deselect text: space + dots 2, 3, 5
Placing the cursor in the right position before you select a desired fragment is a bit tricky.
When you move from left to right by word, you will hear the word you want to begin your selection
from. Before you press space + dots 2, 5, 6, you will need to push Joystick Up to place the cursor
at the beginning of your selection. Now you can begin highlighting your word(s).
Note: When you move from right to left, you can begin selecting once you hear the word you want
to start your selection from. Upon selecting text, press space + dots 1 4 for copying, or space +
5
dots 1 3 4 6 for pasting. When you copy your selection, VoiceOver reads it out and says Selected.
Now you can move your insertion point to the location where you want to paste your selection.
Press space + dots 1 2 3 6 for paste.
Should for some reason the keystrokes for copying/cutting/pasting did not work for you, you can
change the Rotor Settings to Edit, then by pressing Joystick Up go to Copy or Cut, and push
Joystick Enter.
Your next step is to paste the selection to a new location. Using the Rotor Settings, switch to
Words, move the cursor to your required location, change the Rotor Settings back to Edit and
using the Joystick down or up select Paste. Eventually, push Joystick Enter and your selection
will be pasted. Having finished this operation, go back to the navigation steps
(Words/Character/Lines) to continue to edit your document.
Using BraillePen with Webpages in Safari on iOS devices
1.Entering a URL:
When you run Safari, the focus sits on the last item when you left off. You need then go to top
with space dots 1 2 3, and then arrow towards the address bar with space 4 or space 5. The latter
is faster because it does not advance the information on the Braille display (in case of BP 12).
Once you land on the address bar, push Joystick Enter or space 3 6 twice to activate the text field.
If there is no previous Website, you can start typing your URL, otherwise you need to delete the
current address. The most effective way is to select all and then overwrite it with new text.
To select text, press space dots 2 3 5 6 and push Joystick Enter or space 3 6. Alternatively you
can change your Rotor Settings to Edit, push Joystick Up or press space 3 until you hear select
all and then either push Joystick Enter or press space dots 3 6.
Your text gets selected and you can type a new URL. For dots (or periods) use dots 4 6 when in
the uncontracted Braille mode, or dots 256 when in the contracted Braille mode. When your URL
is complete press Selection Enter (Joystick Enter or space dots 1 5). Now you can begin
browsing your newly open page. Use different navigation combinations of space with dots 1, 4, 3,
or 6.
2. Navigating Webpages:
Use rotor settings to change between available options: Heading, Link, Form Controls,
Characters, Words, Lines, or Containers. Whatever your selection VO will announce how many of
them are available on the particular Webpage.
Use space 3 or space 6 to navigate by your selected steps. Even if the focus is on the task bar,
once you press one of the above combinations it will be automatically moved to the first item, e.g.
the first heading.
Once you hear an item of your interest you can press space 2 or space 5 to navigate through
elements that belong to your item, e.g. You have found a heading, now you want to check
information under this heading. Or you are at top of a list, and now you want to browse the list.
When you land on a link that interests you, select it by pressing space dots 3 6.
6
To go back a Webpage, press space dots 1 2 3, to the Back button on your browser and press
Enter.
Whenever the Reader is available VO will announce it (to see an example of how the Reader
works go to www.aph.org/training/index.html). You can navigate to it by using space dot 4 and
activate it by pressing Joystick Enter or space dots 3 6. A page with text in a simplified format
pops up and VO begins to read the content automatically. You can stop it using space dots 1 2 3
4, and resume reading with space dots 1 2 3 5. As VO is reading text, it informs you if text is a
heading or a link. All the links are active so you can follow them by pushing Joystick Enter.
Again depending on your Rotor Settings selection you can navigate the page using space dots 3
or 6 and then space dots 2 and 4 to read the content of the page.
BrailleBack on Android phones
Pairing your Braille device
Pairing Braille device is simple and is similar to any Bluetooth device pairing with the phone.
First step in using Braille with BrailleBack is to pair the Braille display with your Android powered
Mobile device. Please check the documentation for your Braille device to find out the passcode
used to connect with other devices. This may be specific to the serial number of the
Braille device unit. Otherwise, you may use any string of numbers, normally no shorter than four
digits, like 1234 which is the default passcode used by most Bluetooth-enabled devices. All
Bluetooth devices use an authentication number when users attempt to establish a connection
between them, thereby securing that connection. Follow the below steps to pair your display.
1. Turn your braille device on and enable Bluetooth on the device.
2. Switch on your BraillePen 12 (Touch) (Touch)
3. If they are not running yet, enable both TalkBack and BrailleBack on your mobile
device. Both of these apps are located in Settings - Accessibility
4. Pair your BraillePen 12 (Touch) (Touch) with your mobile device
5. Go to Settings - Bluetooth. Scroll down to see if your BraillePen is visible.
6. If it is not listed use "Scan Devices" to let the device scan nearby Bluetooth
devices.
7. After few seconds, Scroll in the window to find your BraillePen 12 (Touch)
(Touch).
8. It will prompt you to enter passcode / pin for the device.
7
9. Enter 1 2 3 4
10. Once your devices are paired, you should hear a beep in your BraillePen 12
(Touch) (Touch) indicating you are connected to your mobile device and you can
start controlling it with your BraillePen 12 (Touch) (Touch)
Configuring Braille Display with BrailleBack
1.
2.
3.
4.
Go to BrailleBack > Settings.
You will find 3 sections there: Device, Braille, and Developer Options.
Go to Braille > Braille Type and select between Literary and Computer Braille.
Next move down to the Literary Braille Table and/or Computer Braille Table to set
the correct language as well as contracted (grade 2) vs uncontracted (grade 1)
Braille where available.
5. Under the Developer Options you can set whether the Visual Braille is to be
displayed at the bottom of the screen of your mobile device or not.
6. To exit the Braille settings push Space + dots 1 2 (b) or Space + dots 1 2 5 (h) to
go to the Home page
Available keystrokes
Pan right
Right Pan Key
Pan left
Left pan Key
Navigate to the next item
Joystick right
Navigate to the previous item
Joystick left
Navigate to the next line
Joystick down
Navigate to the previous line
Joystick up
Scroll forward
Space + Joystick down
Scroll backward
Space + Joystick up
Long press the current item
Space + Joystick Enter
Activate the current item
Joystick Enter
Activate the back button
Space + dots 1 2
Activate the home button
Space + dots 1 2 5
Open the notifications window
Space + dots 1 3 4 5
Open the recent apps window
Space + dots 1 2 3 5
Activate the enter key when editing text
Space + Control
8
Delete backwards when editing text
Space + Shift
Help
Space + dots 1 2 3
Mobile Accessibility on Android phones
Pairing Braille Devices:
Pairing Braille device is simple and is similar to any Bluetooth device pairing with the phone. First
step in using Braille with Mobile Accessibility is to pair the Braille display with your Android
powered Mobile device. Please check the documentation for your Braille device to find out the
passcode used to connect with other devices. This may be specific to the serial number of the
Braille device unit. Otherwise, you may use any string of numbers, normally no shorter than four
digits, like 1234 which is the default passcode used by most Bluetooth-enabled devices. All
Bluetooth devices use an authentication number when users attempt to establish a connection
between them, thereby securing that connection. Follow the below steps to pair your display.
1. Start your braille device, check the device manual for instructions to start and
enable Bluetooth on the device.
2. Go to Mobile Accessibility > Apps > Settings> Wireless and Network > Bluetooth
Settings.
3. Check the option "Bluetooth".
4. In the same window use, "Scan Devices" to let the device scan nearby Bluetooth
devices.
5. After few seconds, Scroll in the window to find your Braille display device.
6. It will prompt you to enter passcode / pin for the device.
7. Enter the pin of the device, for pin information for pairing, check the device user
manual.
Configuring Braille Display with Mobile Accessibility (Post pairing Braille display
with phone)
1. Go to Mobile Accessibility > Settings > Braille Settings.
2. Activate the option "Braille Device"
3. In the list select the Braille device you wish to use. This list contains all the
Bluetooth device paired with the phone.
4. Stay in the braille settings and activate the option "Device Model"
5. In the list, select the model of the braille device you wish to use. The list contains
all supported models with their manufacturer name.
6. Exit the Braille settings and the setting window, congratulations, the braille device
is configured.
Removing Braille Display configuration.
Follow the steps below
1. Go to Mobile Accessibility > Apps > Settings> Wireless and Network > Bluetooth
Settings.
2. Check the option "Bluetooth".
3. In the same window, scroll down to find the device you wish to remove.
4. Hit Long enter on the device and select "Unpair"
9
Enabling / Disabling Braille
To enable or to start braille with Mobile Accessibility:
1. Activate quick menu, use the menu key or triple tap the screen within Mobile
Accessibility window.
2. Select the option "Enable Braille".
3. Mobile Accessibility will beep and will announce "Braille Ready".
To disable or to stop Braille with Mobile Accessibility:
1. Activate quick menu, use the menu key or triple tap the screen within Mobile
Accessibility window.
2. Select the option "Disable Braille".
3. Mobile Accessibility will beep and will announce "Braille off".
Braille Configuration options:
Location: Mobile Accessibility > Settings > Braille Settings:
1. Braille Device: the option lists all the Bluetooth devices paired the phone, you
need to select the braille display you wish to use with Mobile Accessibility.
2. Device Model: the option lists all the supported Braille device models with their
manufacturer name, you need to select the model of the braille device been
selected in the Braille device option.
3. Show control Indicator: checkbox (selected by default) - apart from text, Mobile
Accessibility also helps you determine if focus is on a control, and to know the
control type and state.
Language-dependent Braille indicators for control information are also displayed
before the label of the control in focus. Indicators are always displayed in
computer Braille, no matter what Braille grade is set, and dots 7 and 8 appear in
all their cells to help distinguish them from regular text. If the control does not
change state, then the Braille indicator consists of only two characters which are
letters that relate to the control type name. The letters used in the indicators also
vary according to the language of the selected text-to-speech engine. For
example, a button is indicated by the letters bt in English, but by the letters kn in
Dutch where a button is called "knop". On the other hand, if the control changes
state, then there is a third character in the indicator, which is a symbol that is kept
constant in all languages though the dot patterns may differ. For example, a full 6dot cell will indicate that a checkbox or radio button is checked/pressed, while
dots 3,6 means that it is not checked or selected.
4. Uncontract word under cursor checkbox (selected by default) - this option will
cause the word under the cursor to be expanded to its uncontracted form if Grade
2 / contracted Braille is selected for output. It lets you route the cursor more
quickly on a character in that word if you want to insert text at that point, delete
that character, or delete the one before it.
5. Supress capital Sign: checkbox (note selected by default), the option allow you
to enable supressing of the capital sign when displaying test in he braille display.
This option is useful for small braille device so the maximum text can be
displayed.
6. Show control Prompts: check box (selected by default), the option allow you to
see prompts associated with certain controls. If the option is disabled, the help
prompt if available for the control, will not be available on the Braille display.
7. Automatically Mute Speech: checkbox (not selected by default) the option allow
you to mute speech as soon as braille is enabled. This option is useful for Deaf
10
blind users and for those wish to use the phone with braille display in meeting
place.
8. Display Caller ID: allow you to select the action that Mobile Accessibility will
perform when the device receives a call. The available options are: Display caller
ID-on the braille device, shows the caller information on the braille display as long
as the phone keeps ringing, Braille Flash-shows caller information on braille
device as a flash message and Do Nothing- will not show the caller information
on the device.
Grades and Braille Table configurations:
Location: Mobile Accessibility > Settings > Braille Settings > Grades and Tables
1. Input Braille Grade: allow to select the braille grade for input (typing text using
Braille keys).
2. Out Braille Grade: allow to select braille grade for output (text displayed on the
braille device).
3. 6 Dot computer Braille table: allow to select the 6 dot computer braille table for
output and input in 6 dot computer braille.
4. 8 Dot computer Braille table: allow to select the 8 dot computer braille table for
output and input in 8 dot computer braille.
5. Grade 1 Braille table: allow to select the Grade 1 braille table for output and input
in grade 1 literary braille.
6. Grade 2 Braille table: allow to select the grade 2 braille table for output and input
in grade 2 (contracted) braille.
Braille Connection Settings:
Location: Mobile Accessibility > Braille Settings> Connection Settings
1. Keep Phone On: check box (not selected by default) allows preventing the phone
to go in sleep, so when the braille device is connected, the phone would not go in
sleep and will enable user to stay connected.
2. Automatically Reconnect: checkbox (deselected by default) - if this option is
enabled, Mobile Accessibility will attempt to reconnect your phone with the Braille
device if the connection was dropped or after the mobile device starts up. It will
attempt the reconnection 30 seconds after the devices were disconnected or the
end of the start-up process.
3. Automatically Turn off Bluetooth: checkbox (deselected by default) - if this option
is enabled, Mobile Accessibility will automatically disable Bluetooth as soon as
the command to disable Braille off is performed to break the connection between
the Braille device and the mobile phone.
4. Speak Braille Status: check box (selected by default), enable Mobile Accessibility
to announce the connection status when activating / deactivating Braille.
Enabling Braille Support outside Mobile Accessibility
In order to have Braille support outside MA, it is important to:
11
1. Mobile Accessibility Screen reader service enabled under Accessibility settings.
Check user manual section 5.3.2 Enabling the system wide virtual keyboard
2. Mobile Accessibility Virtual keyboard must be enabled for system wide use.
Check User manual section 5.3.2 Enabling the system wide virtual keyboard
Please note, navigation, typing text and text review functionality should will not work if MA screen
reader and Virtual keyboard are not correctly set.
Quick Menu > Edit options
(Version 1.9)
The option is only available if the currently focussed control is an edit field. The option allows you
to perform editing options, like selection, copy, cut and paste. Braille commands are available for
performing edit action when using a braille display with Mobile Accessibility. In specific the
options are:
1. 1. Select all, allow selecting the entire text in the edit field so to be able to copy or
cut or delete text.
2. 2. Copy, allow copying the text to the clip board and retaining the text in he edit
field as well.
3. 3. Cut, allow to cut the text to the clip board and also deletes the text from edit
field.
4. 4. Paste, allow to paste the text from the clip board to the edit field.
Entering and Editing Text Using Braille
When focus lands on an edit control, Braille output automatically switches to edit mode so that
Mobile Accessibility displays the text cursor by raising dots 7 and 8. At present, this tactile cursor
is only available when 6- or 8-dot computer Braille is selected. If there is an uppercase character
at the cursor position, the dots will alternate; meaning that dot 8 is raised while dot 7 is not. If text
selection commands are used, dots 7 and 8 will both appear in all the cells of the selected text.
When typing text using Grade 1 or 2 Braille, remember that the text is not translated until you
press Space or Enter, or perform a command that moves focus or displays a message. Keep in
mind that the Braille grade used for input is not necessarily the same one set for Braille output, so
use the appropriate commands for configuring input and output Braille grades in order to be
certain.
You can use the backspace command assigned to the key combination specific to your Braille
device while typing in whichever grade to delete the character to the left of the text cursor. Note
that this command may be used even before the text typed in grade 1 or 2 Braille is translated. If
you wish to clear everything you have typed so far that has not yet been translated, use the
Braille Escape command available on all supported Braille devices.
Braille Output Mode
12
In Mobile Accessibility, screen contents are displayed in Braille in a way that will give you an idea
of visual information such as format, hierarchy, control type, and state. This is the default Braille
output mode called "Braille format". In this mode, Mobile Speak sends information to the display
that is relevant to the current cursor position. The information sent includes things such as control
type, dialog name, or number of items in a list (where the list index is not really displayed visually).
It is possible to change the Braille Output mode to "Speech emulation". In this mode, Mobile
Accessibility sends to the Braille display exactly what it sends to the speech engine. Instead of
Braille indicators for control information, the words that are spoken by Mobile Accessibility when it
comes across that control are displayed. For example, in Braille Format mode, li and bt are used
to indicate the list and button. In Speech Emulation mode, the words "list" and "button" are shown
in Braille instead.
Each Braille device has its own Braille command for switching between these two Braille output
modes.
Command Description (ANDROID)
Keystrokes
Simulate Enter key
Joystick Enter, or Space+E
Simulate Space key
Space
Braille Backspace
Space + B
Delete Key
Space + dots 4 5
Braille Escape (to clear G1 or G2 text buffer)
Shift + Space
Dot 7
Shift
Dot 8
Control
Previous Control
Space + dots 2 3 or Ctrl + Shift
Next Control
Space + dots 5 6 or Space + Control
Previous character
Space + dot 3 or Joystick Left
Next character
Space + dot 6 or Joystick Right
Previous line / List Item
Space+dot 1, or Joystick Up
Next line / List Item
Space+dot 1, or Joystick Up
Previous Word
Space+dot 2, or Ctrl+Joystick Left
Next Word
Space+dot 5, or Ctrl+Joystick Right
Previous Paragraph
Space+Shift+dot 3, or Ctrl+Joystick Up
Next Paragraph
Space+Ctrl+dot 6, or Ctrl+Joystick Down
13
Page Up
Space+Shift+dot 2
Page Down
Space+Ctrl+dot 5
Start of Line
Space+Shift+dot 1
End of Line
Space+Ctrl+dot 4
Top of Text or List
Space+dots 123
Bottom of Text or List
Space+dots 456
Read from the top
Space+Shift+dots 123, or Ctrl+Left Pan
Read from cursor position
Space+Ctrl+dots 456, or Ctrl+Right Pan
Select Previous Character
Shift+Joystick Left, or Space+Shift+dot 3
Select Next Character
Shift+Joystick Right, or Space+Shift+dot 4
Select Previous Word
Shift+Ctrl+Joystick Left, or Space+Shift+dot 2
Select Next Word
Shift+Ctrl+Joystick Right, or Space+Shift+dot 5
Select Previous Line
Shift+Joystick Up, or Space+Shift+dot 1
Select Next Line
Shift+Joystick Down, or Space+Shift+dot 4
Select All Text
Shift+Ctrl+Joystick Up, or Space+Shift+Ctrl+dot 3
Select Text from Cursor
Shift+Ctrl+Joystick Down, Space+Shift+Ctrl+dot 6
Toggle Navigation Mode
Space+Shift+dot 6, or Space+Right Pan
Open Configuration Screen
Space+Ctrl+C
Speak Date and Time
Space+D
Open Quick Menu
Space+Ctrl+M
Toggle Braille Cursor
Space+N
Interrupt Speech
Ctrl
Toggle Speech Mute
Space+Ctrl+U
Open Web Browser Address Bar
Space+Ctrl+dot 1
Speak Position inside Web Page
Space+Shift+dot 4
Simulate Dial (Answer) Key
Shift+Joystick Center, or Space+Shift+dots 15
14
Simulate Hang Up Key
Ctrl+Joystick, or Space+Shift+dots 125
Toggle Puntuation Level
Space+Ctrl+P
Speak Device Status Battery, Signal, etc.)
Space+Ctrl+S
Cut Text
Space+dots 13467
Copy Text
Space+dots
pace+dots 147
Paste Text
Space+dots 12367
Toggle Secret Mode
Space+dots 16
Change only input Braille Grade
Space+I
Change both output and input Braille Grades
Space+G
Change Braille Output Mode
Space+O
Close Current Window
Space+X, or Shift+Space+Ctrl
Shift+Space+Ct
Pan Left
Left Pan
Pan Right
Right Pan
Talks on Symbian Phones
This section applies only to BraillePen 12 (Touch).
(Touch) BraillePen Slim
im does not yet connect to Talks
on a Symbian OS phone.
The BraillePen12 can display the screen contents of your Symbian phone running Talks, while
you use the BraillePen12 keyboard to type notes, make calls and send SMS. Read on for all the
information on how to set it up:
15
The BraillePen 12 (Touch) Driver:
Click this link to download the driver for Symbian OS version 9.xx Check with your Talks supplier
if you aren't sure of the Symbian OS version on your phone.
Setting Up:
Talks must be installed and working on your phone before you begin; then follow these steps.
•
•
•
•
•
•
•
•
Turn Talks off.
Set Bluetooth on.
Turn your BraillePen12 on and wait for the triple-beep that tells you Bluetooth is active.
On your phone, pair the phone with the BraillePen12. When you are asked for the
passcode, enter 1234.
If you are asked the question: "Authorise device to make connections automatically?"
answer: yes.
Install the BP 12 braille driver you have downloaded from the link above. We
recommend that you install the driver on your phone's Memory Card.
Go into the Talks menu. Check the Braille tab; make sure that "Braille" is set to "BP 12
Driver", and "Keep Braille on" is set to "Yes".
Turn Talks on.
Your BraillePen is now ready to act as your input and output to your phone.
Tip: To make sure you can read messages and notes on the Braille display line by line, check
that in the Advanced tab, the "Cursor Mode" setting is set to "Letters".
Talks keystrokes:
soft key left
space + shift
soft key right
space + control
star key
dots 3, 4
hash or pound key
dots 3, 4, 5, 6
call
control + dot 5
end call
control + dot 4
cursor down
space + dot 4
cursor left
space + dot 3
cursor right
space + dot 6
cursor up
space + dot 1
enter (joystick enter)
shift + space + control
menu
space + dots 1, 3, 4
16
repeat the last phrase
space, control + dots 3, 4, 5, 6
read the names of the soft keys
shift + control
give battery + network status information
space + dots 2, 4, 5, 6
switch between key echo modes
space, control + dot 1
uppercase letter announcement on or off
space, control + dots 1, 2
turn the nato spelling alphabet on or off
space, control + dots 1, 4
switch between punctuation modes
space, control + dots 1, 4, 5
volume down
space, control + dots 1, 5
volume up
space, control + dots 1, 2, 4
slower speech
space, control + dots 1, 2, 4, 5
faster speech
space, control + dots 1, 2, 5
speak time + date
space, control + dots 2, 4
open talks&zooms settings dialog
space, control + dots 3, 5
turn speech off or on
space, control + dot 6
backspace
space + dots 1,2
delete
space + dots 4,5
home
space + dots 1,2,3
page down
space + dots 3,4,5
page up
space + dots 1,2,6
MobileSpeak on Symbian phones
First turn MobileSpeak off, and then set Bluetooth on your phone to On. Make sure your phone is
in discoverable mode.
Now turn your BraillePen Slim on, and wait to hear the triple-beep that tells you Bluetooth is
active. Pair your phone with BraillePen Slim.
Then connect MobileSpeak and the BraillePen Slim, by going to the MobileSpeak folder on your
phone and opening Configure, and going to the Options, Braille, Configure Devices menu item.
Choose Easylink Braille Keyboard from the list of devices. Then choose Options, Connect. After
17
connecting, go back to the Configure menu and choose Options, Braille, Turn Braille On/Off to
turn Braille output on.
Once you have the connection, you are able to use BraillePen Slim as a Bluetooth keyboard to
your phone.
This section applies to both BraillePen 12 (Touch) and BraillePen Slim.
Connecting your BraillePen12 to MobileSpeak requires you to first pair with your phone, and then
to go into MobileSpeak's Configuration Menu and choose the Braille device and connect to it.
MobileSpeak has drivers built in for the BraillePen12; choose the EasyLink12 drivers from the list.
BraillePen keystrokes for MobileSpeak
Braille Key Assignments
•
•
•
•
•
•
•
•
Dots 1 through 6: Braille input keys labeled from left to right as 3, 2, 1, 4, 5, 6.
Space: The middle of three keys in front of the Braille keyboard.
Shift: Key to the left of the Space key.
Control: Key to the right of the Space key.
Left Pan: Round key on the left end of the Braille display of the BP 12.
Right Pan: Round key on the right end of the Braille display of the BP 12.
Joystick Up/Down/Left/Right: Four directions of the joystick between dots 1 and 4 of
the BP 12.
Joystick Enter: Center of the joystick between dots 1 and 4 on the BP 12.
Command
Action
Dial 1
Braille dots according to selected translation
table
Dial 2
Braille dots according to selected translation
table
Dial 3
Braille dots according to selected translation
table
Dial 4
Braille dots according to selected translation
table
Dial 5
Braille dots according to selected translation
table
Dial 6
Braille dots according to selected translation
table
Dial 7
Braille dots according to selected translation
table
Dial 8
Braille dots according to selected translation
table
Dial 9
Braille dots according to selected translation
18
table
Dial 0
Braille dots according to selected translation
table
Dial *
Braille dots according to selected translation
table
Dial #
Braille dots according to selected translation
table
Enter (Accept)
Joystick Enter
Insert space
Space
Insert Paragraph Marker
Space + dots46
Insert Braille character with dot 7
dot7(Shift) + Braille character
Insert Braille character with dot 8
dot8(Control) + Braille character
Braille Escape
Space + dot7(shift)
Braille Backspace
Space + dots12(b)
Clear/Delete
Space + dots45
Braille Pan Left
Left Pan
Braille Pan Right
Right Pan
Previous Character/Grid Item/Tab Sheet
Joystick Left, Space + dot3
Next Character/Grid Item/Tab Sheet
Joystick Right, Space + dot6
Previous Line/List Item/Menu Item
Joystick Up, Space + dot1
Next Line/List Item/Menu Item
Joystick Down, Space + dot4
Previous Word
dot8(Control) + Joystick Left, Space + dot2
Next Word
dot8(Control) + Joystick Right, Space + dot5
Start of current line (Home)
Space + dot7(Shift) + dot1
End of current line (End)
Space + dot8(Control) + dot4
Start of text (Top of edit control)
Space + dots123
End of text (Bottom of edit control)
Space + dots456
Left Soft key
Space + Left Pan, Space + Joystick Left -orSpace + dot8(Control) + dot3
Right Soft key
Space + Right Pan, Space + Joystick Right or- Space + dot8(Control) + dot6
Dial/Send
dot7(Shift) + Joystick Enter
Hang-Up/End Call
dot8(Control) + Joystick Enter
Applications Menu
Space + dot8(Control), Space + dots134(m)
List of Open Applications
Space + dots135(o)
Quick List
Space + dots12345(q)
19
Read Soft keys
Space + Left Pan + Right Pan, Space +
dots36
Read Status Information
Space + dots234(s)
Open Configure Mobile Speak screen
Space + dots14(c)
Change User Profile
Space + dots1234(p)
Press * key in whichever Braille grade (to open
Space + dots35
Symbols list or unlock keypad)
Repeat Last Spoken Text
Space + dots1235(r)
Decrease Volume
Space + dots236
Increase Volume
Space + dots356
Decrease Speed
Space + dots126
Increase Speed
Space + dots345
Change Punctuation Level
Space + dot8(Control) + dots1234(p)
Change Keyboard Echo
Space + dot8(Control) + dots15(e)
Read Date and Time
Space + dots145(d)
Toggle Speech Mute
Space + dot8(Control) + dots136(u)
Interrupt/Stop Speech
dot8(Control)
Change Braille Input Grade
Space + dots1245(g)
Route System Focus to Braille Cursor
Joystick Enter, Space + dots15(e)
20