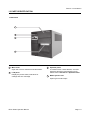
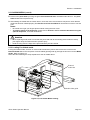
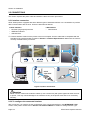
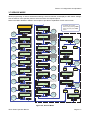
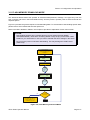
1
Operator Manual For printer model: GZ4e Series Read this Operator Manual before using this product. Keep this document available for future reference. NOTE: The printer complies with the requirements in Part 15 of FCC Rules for a Class B Computing Device. Operating the printer in a residential area may cause unacceptable interference to radio and TV reception. If the interference is unacceptable, you can reposition the equipment, which may improve reception. Be sure to ask your SATO representatives about our maintenance contracts to ensure peace of mind during your usage of SATO products. Please visit our SATO home page at www.satoworldwide.com for extensive contact information of our worldwide SATO Group Member Company closest to your location. Copyrights Any unauthorized reproduction of the contents of this document, in part or whole, is strictly prohibited. Limitation of Liability SATO Corporation and its subsidiaries in Japan, the U.S and other countries make no representations or warranties of any kind regarding this material, including, but not limited to, implied warranties of merchantability and fitness for a particular purpose. SATO Corporation shall not be held responsible for errors contained herein or any omissions from this material or for any damages, whether direct, indirect, incidental or consequential, in connection with the furnishing, distribution, performance or use of this material. Specifications and contents in this document are subject to change without notice. Trademarks SATO is a registered trademark of SATO Corporation and its subsidiaries in Japan, the U.S. and other countries. All other trademarks are the property of their respective owners. Version: STLG-GZ4e-01rC-14-01-13OM ©2013 SATO Corporation. All rights reserved. Safety Precautions Safety Precautions Please read the following information carefully before installing and using the printer. Pictographic Symbols This instruction manual and the printer labels use a variety of pictographic symbols to facilitate safe and correct use of the printer and to prevent injury to others and property damage. The symbols and meanings for them are given below. Be sure to understand these symbols well before reading the main text. Example Pictographs Warning Caution Ignoring the instructions marked by this symbol and erroneously operating the printer could result in death or serious injury. Ignoring the instructions marked by this symbol and erroneously operating the printer could result in injury or property damage. The pictograph means “Caution is required.” A specific warning symbol is contained inside this pictograph (The symbol at left is for electric shock). The pictograph means “Should not be done.” What is specifically prohibited is contained in or near the pictograph (The symbol at left means “Disassembly prohibited”). The pictograph means “Must be done.” What is specifically to be done is contained in the pictograph (The symbol at left means “Unplug the power cord from the outlet”). Warning Do not set on an unstable area • Do not set on an unstable area, such as a wobbly table or slanted area or an area subject to strong vibration. If the printer falls off or topples over, it could injure someone. Do not place containers full of water or other liquid on the printer • Do not place flower vases, cups, or other containers holding liquids, such as water or chemicals, or small metal objects near the printer. If they are spilled and get inside the printer, immediately turn off the power switch, unplug the power cord from the outlet, and contact your SATO reseller or technical support center. Using the printer in this condition could cause a fire or electric shock. Do not put objects inside the printer • Do not insert or drop in metal or burnable objects inside the printer’s openings (cable outlets, etc.). If foreign objects do get inside the printer, immediately turn off the power switch, unplug the power cord from the outlet, and contact your SATO reseller or technical support center. Using the printer in this condition could cause a fire or electric shock. GZ4e Series Operator Manual Do not use other than the specified voltage • Do not use other than the specified voltage. Doing so could result in fire or electric shock. Always ground the connections • Always connect the printer’s ground wire to a ground. Not grounding the ground wire could result in electric shock. Handling of the power cord • Do not damage, break, or modify the power cord. Also, do not place heavy objects on the power cord, heat it, or pull it because doing so could damage the power cord and cause a fire or electric shock. • If the power cord becomes damaged (core is exposed, wires broken, etc.), contact your SATO reseller or technical support center. Using the power cord in this condition could cause a fire or electric shock. • Do not modify, excessively bend, twist, or pull the power cord. Using the power cord in such a condition could cause a fire or electric shock. When the printer has been dropped or broken • If the printer is dropped or broken, immediately turn off the power switch, unplug the power cord from the outlet, and contact your SATO reseller or technical support center. Using the printer in this condition could cause a fire or electric shock. Do not use the printer when something is abnormal about it • Continuing to use the printer in the event something is abnormal about it, such as smoke or unusual smells coming from it, could result in fire or electric shock. Immediately turn off the power switch, unplug the power cord from the outlet, and contact your SATO reseller or technical support center for repairs. It is dangerous for the customer to try to repair it, so absolutely do not attempt repairs on your own. Do not disassemble the printer • Do not disassemble or modify the printer. Doing so could result in fire or electric shock. Contact your SATO reseller or technical support center to conduct internal inspections, adjustments, and repairs. Page i Safety Precautions Warning Regarding the cutter • Do not touch the cutter with your hands or do not put something into the cutter. Doing so could result in an injury. Using the head cleaning fluid • Use of flame or heat around the head cleaning fluid is prohibited. Absolutely do not heat it or subject it to flames. • Keep the fluid out of reach of children to prevent them from accidentally drinking it. If the fluid is drunk, immediately consult with a physician. Do not place in areas with high humidity • Do not place the printer in areas with high humidity or where condensation forms. If condensation forms, immediately turn off the power switch and do not use the printer until it dries. Using the printer while condensation is on it could result in electric shock. Power supply • Do not operate the power switch or plug in/unplug the power cord with wet hands. Doing so could result in electric shock. Caution Carrying the Printer • When moving the printer, always unplug the power cord from the outlet and check to make sure all external wires are disconnected before moving it. Moving the printer with the wires still connected could damage the cords or connecting wires and result in a fire or electrical shock. • Do not carry the printer with paper loaded in it. The paper could fall out and cause an injury. • When setting the printer on the floor or a stand, make sure not to get your fingers or hands pinched under the printer feet. Page ii Power cord • Keep the power cord away from hot devices. Getting the power cord close to hot devices could cause the cord’s covering to melt and cause a fire or electrical shock. • When unplugging the power cord from the outlet, be sure to hold it by the plug. Pulling it by the cord could expose or break the core wires and cause a fire or electric shock. • The power cord set that comes with the printer is especially made for this printer. Do not use it with any other electrical devices. Top cover • Be careful not to get your fingers pinched when opening or closing the top cover. Also be careful the top cover does not slip off and drop. Print head • The print head is hot after printing. Be careful not to get burned when replacing paper or cleaning immediately after printing. • Touching the edge of the print head immediately after printing could result in injury. Use caution when replacing the label or cleaning the print head. • You should not replace the print head without having received the proper training. Loading paper • When loading roll paper, be careful not to get your fingers pinched between the paper roll and the supply unit. When not using the printer for a long time • When not using the printer for a long time, unplug the power cord from the outlet to maintain safety. During maintenance and cleaning • When maintaining and cleaning the printer, unplug the power cord from the outlet to maintain safety GZ4e Series Operator Manual Safety Precautions Precautions for Installation and Handling Printer operation can be affected by the printer environment. Refer to the following instructions for installation and handling of GZ4e Series printer. Select a Safe Location Place the printer on a surface that is flat and level. If the surface is not flat and level, this may result in poor print quality. This may also cause malfunction and shorten the life span of the printer. Do not place the printer on a location that produces vibration. Giving serious vibration or shock to the printer may cause malfunction and shorten the life span of the printer. Keep the printer out of high temperature and humidity. Avoid locations subject to extreme or rapid changes in temperature or humidity. Do not place the printer in a location subject to water or oil. Do not place the printer in a location where it will be splashed with water or oil. Water or oil entering inside the printer may cause a fire, electric shock, or malfunction. Avoid dust. Dust build up may result in poor print quality. Keep out of direct sunlight. This printer has a built-in optical sensor. Exposure to direct sunlight will make the sensor less responsive and may cause the label to be sensed incorrectly. Close the top cover when printing. Power Supply This printer requires an AC power supply. Be sure to connect the printer to an AC power supply. Provide a stable source of electricity to the printer. When using the printer, do not share its power outlet with other electrical devices that could result in power fluctuations and performance issues with your printer. Connect the power cord to a grounded power outlet. Make sure that the printer is plugged into a grounded power outlet. GZ4e Series Operator Manual Page iii Table of Contents TABLE OF CONTENTS Introduction 1-1 1.1 Features of the Printer................................................................................................. 1.2 Unpacking ................................................................................................................... 1.2.1 Included Accessories ......................................................................................... 1.3 Parts Identification....................................................................................................... Installation 2-1 2.1 Site Location................................................................................................................ 2.2 Media Selection........................................................................................................... 2.3 Loading Media............................................................................................................. 2.3.1 Loading Roll media ............................................................................................ 2.3.2 Loading Fan-folded media ................................................................................. 2.3.3 To route the label when using the optional dispenser ....................................... 2.3.4 To route the label when using the optional cutter .............................................. 2.4 Loading the Carbon Ribbon ........................................................................................ 2.5 Connections ................................................................................................................ 2.5.1 Interface connection .......................................................................................... 2.5.2 To configure the connected interface ................................................................ 2.5.3 Connecting the Power Cable ............................................................................ 2.5.4 Turning On the Power ....................................................................................... 2.5.6 Turning Off the Power........................................................................................ Operation and Configuration 1-2 1-2 1-2 1-3 2-2 2-2 2-3 2-3 2-5 2-6 2-6 2-7 2-8 2-8 2-8 2-9 2-9 2-9 3-1 3.1 Operator Panel ............................................................................................................ 3 - 2 3.1.1 Potentiometer Adjustment ................................................................................. 3 - 3 3.2 DIP Switch Settings..................................................................................................... 3 - 4 3.2.1 Software DIP switches Configuration ................................................................ 3 - 4 3.3 Software DIP switch Command................................................................................... 3 - 7 3.3.1 DSW 2 Setting Command (SBPL command) .................................................... 3 - 7 3.3.2 DSW 3 Setting Command (SBPL command) .................................................... 3 - 8 3.3.3 DSW 2 Setting Command (SZPL command)..................................................... 3 - 9 3.3.4 DSW 3 Setting Command (SZPL command)................................................... 3 - 10 3.4 Operating Modes....................................................................................................... 3 - 11 3.5 Normal Mode............................................................................................................. 3 - 12 3.6 Advanced Mode ........................................................................................................ 3 - 14 3.7 Service Mode ............................................................................................................ 3 - 17 3.7.1 To set the Input threshold voltage level for Gap sensor .................................. 3 - 20 3.7.2 To set the Input threshold voltage level for I-Mark sensor ............................... 3 - 21 3.8 Counter Mode............................................................................................................ 3 - 23 3.9 Emulation Mode ........................................................................................................ 3 - 25 3.10 Test Print Mode ....................................................................................................... 3 - 29 3.11 Flash Memory Download Mode............................................................................... 3 - 31 3.12 Default Setting Mode............................................................................................... 3 - 33 3.13 Hex Dump Mode ..................................................................................................... 3 - 34 3.14 Non Standard Mode ................................................................................................ 3 - 34 3.15 Protocol Download Mode ........................................................................................ 3 - 35 Cleaning and Maintenance 4-1 4.1 Cleaning The Print Head, Platen and Rollers.............................................................. 4 - 2 Page iv GZ4e Series Operator Manual Table of Contents 4.2 How To Clean The Printer (Cleaning Kit) .................................................................... 4.3 How To Clean The Printer (Cleaning Sheet)............................................................... 4.4 Replacement Procedures............................................................................................ 4.4.1 Print Head Replacement.................................................................................... 4.4.2 Fuse Replacement............................................................................................. 4.5 Adjusting Print Quality ................................................................................................. 4.5.1 Adjusting Print Darkness ................................................................................... 4.5.2 Adjusting Print Speed ....................................................................................... Troubleshooting 5.1 Error signal Troubleshooting ....................................................................................... 5.1.1 More about Head Check Function ..................................................................... 5.2 Troubleshooting Table................................................................................................. 5.3 Interface Troubleshooting............................................................................................ 5.4 Test Print Troubleshooting .......................................................................................... 5.4.1 Hex Dump .......................................................................................................... 5.4.2 Test label printing .............................................................................................. Basic Specifications 4-2 4-3 4-4 4-4 4-6 4-7 4-7 4-7 5-1 5-2 5-4 5-5 5-7 5-8 5-8 5-9 6-1 6.1 Printer Basic Specifications......................................................................................... 6 - 1 Interface Specifications 7-1 7.1 Interface Types............................................................................................................ 7 - 1 7.2 RS232C High Speed Serial Interface.......................................................................... 7 - 2 7.2.1 Basic Specifications ........................................................................................... 7 - 2 7.2.2 Printer Configuration Setting when using Serial Interface ................................. 7 - 2 7.2.3 READY/BUSY Flow Control .............................................................................. 7 - 2 7.2.4 X-ON/X-OFF Flow Control ................................................................................. 7 - 4 7.3 IEEE 1284 Parallel Interface ....................................................................................... 7 - 5 7.3.1 Basic Specifications .......................................................................................... 7 - 5 7.3.2 Pin Assignments ................................................................................................ 7 - 6 7.3.3 Input and Output Signals ................................................................................... 7 - 7 7.4 Universal Serial Bus (USB) Interface .......................................................................... 7 - 8 7.4.1 Basic Specifications .......................................................................................... 7 - 8 7.4.2 Pin Assignments ................................................................................................ 7 - 8 7.5 Local Area Network (LAN) Ethernet ............................................................................ 7 - 9 7.5.1 Basic Specifications .......................................................................................... 7 - 9 7.5.2 DIP switch settings ........................................................................................... 7 - 9 7.5.3 Software Specifications .................................................................................. 7 - 10 7.6 External Signal Interface (EXT)................................................................................. 7 - 11 7.6.1 Basic Specifications ........................................................................................ 7 - 11 7.6.2 Pin Assignments ............................................................................................. 7 - 11 7.6.3 Timing charts ................................................................................................... 7 - 12 Appendix 8.1 Positions of Sensors and Options ............................................................................... 8.2 Operation Mode Selection........................................................................................... 8.3 Base Reference Point ................................................................................................. 8.4 Base Reference Point Adjustment .............................................................................. 8.4.1 Adjustment of Base Reference Point for Printing .............................................. 8.4.2 Adjustment of option Stop Position .................................................................... 8.5 Information on Media when using Optional Cutter ...................................................... GZ4e Series Operator Manual 8-1 8-2 8-3 8-4 8-5 8-5 8-6 8-7 Page v Table of Contents 8.5.1 Cutting of Labels ................................................................................................ 8 - 7 8.5.2 Cutting Media with Perforation .......................................................................... 8 - 7 8.5.3 Cutter replacement ............................................................................................ 8 - 7 Page vi GZ4e Series Operator Manual Section 1: Introduction INTRODUCTION Thank you for your investment in this SATO printer product. This Operator Manual contains the basic information about the installation, setup, configuration, operation and maintenance of the printer. A total of eight topics are covered herein, and they are organized as follows: Section 1: Introduction Section 2: Installation Section 3: Configuration and Operation Section 4: Cleaning and Maintence Section 5: Troubleshooting Section 6: Basic Specifications Section 7: Interface Specifications Section 8: Appendix It is recommended that you read carefully and become familiar with each section before installing and maintaining the printer. Refer to the Table Of Contents at the front of this manual to search for the relevant information needed. All page numbers in this manual consist of a section number followed by the page number within the stated section. This section assists you in unpacking the printer from the shipping container. You will also be guided through a familiarization tour of the main parts and controls. The following information is provided herein: • • • Features of the printer Unpacking Parts Identification GZ4e Series Operator Manual Page 1-1 Section 1: Introduction 1.1 FEATURES OF THE PRINTER The SATO GZ4e Series printers (Thermal Transfer or Direct Thermal) are complete, high-performance labeling systems designed specifically for printing labels. The key features of the GZ4e Series are: • • • • • • • Combo Interface (Equipped with High speed RS-232C, Parallel IEEE1284 and USB interface and EXT port) GB18030 Chinese Codepage Support (Only for China model) European Codepage Support (Only for European model) SZPL emulation ready Cutter, Dispenser with liner (backing paper) internal rewinder options Easy Media Loading Easy Maintenance 1.2 UNPACKING When unpacking the printer, take note of the following: 1. The box should stay right-side up. Lift the printer out of the box carefully. 2. Remove all the packaging from the printer. 3. Remove the accessory items from their protective containers. 4. Set the printer on a solid, flat surface. Inspect the shipping container and printer for any sign of damage that may have occurred during shipping. Please note that SATO shall hold no liability of any damage of any kind sustained during shipping of the product. Notes: • • If the printer has been stored in the cold, allow it to reach room temperature before turning it on. Please do not discard the original packaging box and cushioning material after installing the printer. They may be needed in future, if the printer needs to be shipped for repairs. 1.2.1 Included Accessories After unpacking the printer, verify that you have the following materials: User Documents (Quick Guide, Warranty, etc) AC Power cord* Cleaning Sheet Set Ribbon Core USB cable (for Combo interface model) * The shape of the power plug may vary, depending on the location where it was purchased. Page 1-2 GZ4e Series Operator Manual Section 1: Introduction 1.3 PARTS IDENTIFICATION Front view 1 2 3 4 1 Main cover 3 Open this cover to load the media and ribbon. 2 It consists of two contact buttons, one LED indicators and three potentiometers (VR). Please refer to Section 3.1 Operator Panel. LCD panel Display the printer status, selections for settings and error message. Operator panel 4 Media ejection slot Opening for media output. GZ4e Series Operator Manual Page 1-3 Section 1: Introduction 1.3 PARTS IDENTIFICATION (cont’d) Back view 5 6 7 8 9 10 11 5 USB Interface connector 9 Press this switch to turn the power on ( I ) or off (O) To connect printer to the host computer using the USB interface. 6 RS-232C Interface connector 10 PARALLEL IEEE1284 Interface connector To connect printer to the host computer using the IEEE 1284 interface. 8 External connector (EXT) Interface connector for external signals. Connect the optional application to this terminal. Page 1-4 FUSE (T3.15A H 250V) holder Used to hold a fuse which protect the printer from unstable power supply surge. Use fuse with rating, T3.15A H 250V only. To connect printer to the host computer using the RS-232C serial interface. 7 Power (I/O) switch 11 AC IN power terminal Supplies power to the printer by inserting the power cable. Before connection, ensure that the AC voltage of your region is within the range of AC 200 to 240V, 50/60 Hz. GZ4e Series Operator Manual Section 1: Introduction 1.3 PARTS IDENTIFICATION (cont’d) Internal view when Main cover is opened (Side view) 12 21 13 14 22 15 16 17 23 18 19 20 12 Roll media holder 18 Used to open and close the print head. Used to load the roll media. 13 Ribbon supply spindle 19 Ribbon rewind spindle Used to wind up the used ribbon. 15 16 21 GZ4e Series Operator Manual Media holder guide Set to meet the size of the media used. 22 External media slot Open this slot to allow loading of Fan-folded media or media from external unwinder. Platen roller Feeds the media. Perform maintenance at regular intervals. Front cover lock lever Press to open the front cover. Print head assembly This component is used to print on the media. Perform maintenance at regular intervals. 17 20 Ribbon roller Enable smooth movement of the ribbon. Front cover Open this cover to access the optional dispenser unit or cutter unit if installed. Used to load the ribbon. 14 Print head lock lever 23 Media guide shaft Used to guide the flow of loaded media. Page 1-5 Section 1: Introduction This page is intentionally left blank. Page 1-6 GZ4e Series Operator Manual Section 2: Installation INSTALLATION This section helps you in loading the consumable media in the printer, and provides adjustment instructions and as well as interface connection with host computer and other optional attachment units. The following information is provided: • 2.1 Site Location • 2.2 Media Selection • 2.3 Loading Media • 2.4 Loading the Carbon Ribbon • 2.5 Connections GZ4e Series Operator Manual Page 2-1 Section 2: Installation 2.1 SITE LOCATION Consider the following when setting up the printer: • Place the printer on a solid flat surface with adequate space. Make sure there is enough space above the printer to provide clearance for the top cover to swing open. • Place it away from hazardous materials or dusty environments. • Place it within operational distance of the host computer if connected, within interface cable specifications. 2.2 MEDIA SELECTION The size and type of the labels to be printed should have been taken into consideration before printer purchase. Ideally, the media width will be equal to, or just narrower than, the print head. Using media that does not cover the print head will allow the platen roller to tread on it and wear it out. The media edge will also wear a groove in the platen roller, which can affect print quality. Note: For optimal print performance and durability, please use SATO-certified media and ribbon supplies on this printer. Using supplies not tested and approved for use by SATO can result in unnecessary wear and damage to vital parts of the printer, and may void the warranty. This printer can print on roll or fan-folded media. The printer uses sensors to detect I-Marks or Gaps on the media in order to precisely position the print content. 1.5mm (0.06”) 1.5mm (0.06”) 3mm (0.12”) 3mm (0.12”) I-Mark Label 3mm (0.12”) 14mm (0.55”) 3mm (0.12”) Gap Label 14mm (0.55”) I-Mark Journal paper Figure 2-1, Media Selection Page 2-2 GZ4e Series Operator Manual Section 2: Installation 2.3 LOADING MEDIA There are two general media types that may be loaded and used; rolled and fan-folded. Rolled media of standard diameter is loaded within the printer and suspended by the media holder. Larger, non-standard rolled media would be suspended outside the printer at its rear and fed inward. Fan-folded media would also be fed inward from the rear but is stacked as opposed to suspended. 2.3.1 Loading Roll media 1. Lift up the Main cover. Note: Make sure that the cover rests firmly so that it will not fall forward and injure your hands. 2. Adjust the green Media holder guide to the widest position. 3. Load the media onto the Media holder. Refer to Figure 2-2. Make sure the media leader is pull out from the bottom and the printed side is facing upwards. Push the roll firmly towards the side of the frame. Then adjust the Media holder guide inward till the Media holder guide press lightly against the media roll. Turn the media roll lightly by hand and confirm that it rotates smoothly. Otherwise, media may not be fed correctly during operation. Media holder Media holder guide ME D ME D IA IA Print head lock lever Figure 2-2, Rolled Media Loading GZ4e Series Operator Manual Page 2-3 Section 2: Installation 2.3 LOADING MEDIA (cont’d) 4. Release the green Print head lock lever by turning counter clockwise. The print head assembly will be lifted up to allow media loading. 5. Pull out the media from the rear, pass the media under the Media guide shaft, through the Label sensor assembly, underneath the Print head assembly and place the leading edge of the media on top of the platen roller. Refer to the Figure 2-3. Note: Make sure the printed side of the media is facing upwards. Media holder guide Roll media Fan-folded media Platen roller Label sensor assembly Media guide Media guide shaft Figure 2-3, Label loading path 6. Slide the Media guide inward so the media is prevented from moving horizontally. 7. Adjust the Label sensor assembly loosening the green Sensor adjust knob located on the bottom side of the Label sensor assembly and moving the assembly to the correct position. After it is correctly positioned, retighten the green Sensor adjust knob. Sensor Assembly Sensor Adjust Knob Figure 2-4, Sensor Position Adjustment Page 2-4 GZ4e Series Operator Manual Section 2: Installation 2.3 LOADING MEDIA (cont’d) 8. Remount the print head by turning the green Print head lock lever clockwise until it latch on. The print head should lock into place firmly. 9. After loading the media and the carbon ribbon, close the main cover and do a test print to check that the media roll has been loaded properly. See Section 3.10 Test Print Mode for instructions on how to run test print. Notes: • • Be careful not to get your fingers pinched while closing the main cover. To load the media in the dispenser, please refer to Section 2.3.3 To route the label when using the optional dispenser, for further instructions. • When replacing media, bear in mind that the print head and its surrounding area remain hot. Keep your fingers away from these areas to prevent injury. Avoid touching even the edge of the print head with your bare hands. • Caution 2.3.2 Loading Fan-folded media If using fan-folded media, set them on a flat surface behind the printer and remove the cover from the External media slot on the rear panel. Pass the labels (printing side up) through the slot and over the Media holder. Refer to Figure 2-5. Route the label following the steps explained for the roll media above. External media slot Media holder guide Figure 2-5, Fan-folded Media Loading GZ4e Series Operator Manual Page 2-5 Section 2: Installation 2.3 LOADING MEDIA (cont’d) 2.3.3 To route the label when using the optional dispenser 1. Follow the procedures in Section 2.3.1 Loading Roll media, from step 1 to 7, to load the roll media onto the media holder. 2. Press the Front cover lock lever to open the Front cover. 3. Peel off the first three leading labels from the liner (backing paper) and then pull out the leading liner (backing paper) from the media holder. Pass the liner (backing paper) over the dispenser plate and route liner (backing paper) as shown on the Figure 2-6. Roll media Dispenser plate Label Liner Rewind spindle GZ4e Series printer with optional Dispenser installed Figure 2-6, Label Dispenser routing 4. Wrap the liner (backing paper) under and around the Rewind spindle, routing it under the two retainer prongs. 5. Manually turn the Rewind spindle counter-clockwise to take up all the slack in the liner (backing paper). 6. Close the Front cover until the Front cover lock lever engages and remount the print head. 2.3.4 To route the label when using the optional cutter Route the label following the steps explained for the roll media above in Section 2.3.1 Loading Roll media. Roll media GZ4e Series printer with optional Cutter installed Figure 2-7, Label Cutter routing Page 2-6 GZ4e Series Operator Manual Section 2: Installation 2.4 LOADING THE CARBON RIBBON The GZ4e series printer enables two types of printing, Thermal transfer and Direct thermal. Thermal transfer paper media requires the use of carbon ribbon for print application. In such a scenario, it is the carbon ribbon that contains the ink that will be transferred to the media. Direct thermal paper media has a coating on the surface that is made visible through the application of heat from the print head. In this case, there is no need of loading the carbon ribbon. • • Caution When replacing carbon ribbon, bear in mind that the print head and its surrounding area remain hot. Keep your fingers away from these areas to prevent injury. Avoid touching even the edge of the print head with your bare hands. 1. Lift up the Main cover. Note: Make sure that the cover rests firmly so that it will not fall forward and injure your hands. 2. Turn the green Print head lock lever counter clockwise to release it. The print head assembly will be lifted up. 3. Open the carbon ribbon package, and then load the ribbon on the ribbon supply spindle. Push it inwards all the way, with the ribbon winding in a counter-clockwise direction. The dull side (inked side) of the ribbon should be facing down as it travels through the print head assembly. Note: Use only genuine SATO carbon ribbons for maximum print quality and printer durability. 4. Mount the empty ribbon core on the ribbon rewind spindle. When loading the carbon ribbon for the first time, an empty ribbon core is supplied with the printer. However, the subsequent ribbon core can be obtained from the last used up ribbon roll. 5. From the ribbon supply spindle, pass the carbon ribbon underneath the print head assembly to the ribbon rewind spindle. Refer to Figure 2-8 for ribbon routing path. Route the ribbon behind and over the top of the ribbon rewind spindle and tape the leader portion of the carbon ribbon to the ribbon core. Then turn the rewind spindle several times in the direction of counter-clockwise to wind the ribbon around the core. Remount the print head assembly and close the main cover. Ribbon Rewind Spindle Ribbon Supply Spindle Head Lock Lever Figure 2-8, Ribbon routing path GZ4e Series Operator Manual Page 2-7 Section 2: Installation 2.5 CONNECTIONS This section explains the power cable and interface cable connection procedures. 2.5.1 Interface connection GZ4e Series printers equipped with three different types of standard interface or a LAN interface to perform data communication with the host. These are described as follows. Combo Interface: LAN Interface: • • • • RS-232C (High-speed) interface IEEE1284 interface USB interface LAN interface 1. Connect interface cable from the printer to the host computer. Use the cable that is compatible with the standard of the interface board as stated in Section 7: Interface Specifications. Make sure the cable is correctly oriented before you insert it. 1 USB RS232C 2 IEEE AC IN 200V-240V 3 Figure 2-9, Basic Connection Caution Never connect or disconnect interface cables (or use a switch box) with power applied to either the host or printer. This may caused damage to the interface circuitry in the printer/ host and is not covered by warranty. 2.5.2 To configure the connected interface After connection, you need to set the configuration of the connected interface in the INTERFACE TYPE screen of the printer. Please refer to Section 3.6 Advanced Mode for details on setting Interface Type. Page 2-8 GZ4e Series Operator Manual Section 2: Installation 2.5 CONNECTIONS (cont’d) 2.5.3 Connecting the Power Cable • • Warning Be sure to connect the ground wire. Failure to do so may cause an electric shock. Do not operate the power button or plug in/ unplug the power cable while your hands are wet. Doing so may cause an electric shock. Caution The power cable provided with this printer are for use with this printer only. They cannot be used with other electrical devices. 2. Connect the power cable to the AC IN power terminal on the rear panel of the printer. Make sure that the connector is correctly oriented. Refer to Figure 2-9 on previous page. Secure the printer with one hand, and insert the connector firmly. 3. Insert the power plug into a AC power outlet. Make sure that the AC voltage of your region is within the range of AC 200 - 240V, 50/60 Hz. If your local voltage does not fall within the stated range, please contact your SATO reseller or technical support center for more information. A 3-pin plug is attached to the power cord provided with your printer. One of these pins is the ground wire. If the power outlet that you plan to use is a 3-pin type, simply insert the power plug as is. * The shape of the power plug may vary depending on the location where the printer was purchased. 2.5.4 Turning On the Power Warning Do not operate the power switch or insert/remove the power cable while your hands are wet. Doing so may cause an electric shock. Turn on the power switch located below the printer’s operator panel. Press the side of the switch marked “-”. • When you turn on the power, the printer start-up and “ONLINE” appears on the display. POWER ONLINE [S] QTY: XXXXXX 2.5.5 Turning Off the Power When you have completed the printing job, turn the printer off. POWER 1. Press the LINE button to put the printer offline. Be sure to confirm that the printer is in the offline status before turning it off. If there is any printed media remaining in the printer, press FEED button to forward feed the media and cut it off. OFFLINE XXXXXX 2. Turn off the power switch on the printer’s operator panel. Press the side of the switch marked “O”. GZ4e Series Operator Manual Page 2-9 Section 2: Installation This page is intentionally left blank. Page 2-10 GZ4e Series Operator Manual Section 3: Configuration and Operation OPERATION AND CONFIGURATION Before using the printer, it is best to read this manual thoroughly first. Otherwise, you may disturb default settings around which the instructional procedures in this manual are based upon. The printer may be manually configured via the LINE and FEED buttons with the LCD display or the potentiometers on the operator panel of printer. All of the printer’s buttons are used either singularly, or in conjunction, to perform configuration activities. Many of these settings can also be controlled via software commands and, as well as with our SATO All-InOne Tool software application. In case of conflict between software and control panel settings, the printer will always use the last valid setting. If you load a label job that includes software settings and then enter a new setting via the LCD panel, the manually set values will be used by the printer. If you set the values manually and then download a job with software settings, the software settings will be used. GZ4e Series Operator Manual Page 3-1 Section 3: Configuration and Operation 3.1 OPERATOR PANEL The operator panel locate on the front consist of one two-color (red and green) LED indicator, two momentary contact buttons, three adjustment potentiometers and one LCD display. Note: There are two DIP switches, one LED and one potentiometer located behind the operator panel cover. These are not accessible and are only for SATO authorised service personnel. LCD screen Status LED FEED button LINE button Print Potentiometer Pitch Potentiometer Offset Potentiometer LED Indicator Status Buttons Functions • Illuminates green when online and off when offline. • Blinks green when receiving data or the buffer is near full. • Illuminates red when detecting a printer error. Functions LINE Moves the printer from an online to offline state and vice versa, scrolls menu options, and performs other special functions as identified in flow charts throughout this manual where applicable. This button acts as a pause during a print job by taking the printer offline. FEED Advances the label media when pressed, selects menu options, and performs other special functions as identified in flow charts throughout this manual where applicable. Potentiometers Functions Print Potentiometer to adjust print darkness (fine tuning). Offset Potentiometer to adjust amount of back/forward feed for dispenser/ cutter/ tear-off bar position (+/- 3.75mm, +/- 0.15”). Pitch Potentiometer to adjust home position of the label (+/- 3.75mm, +/- 0.15”). Affects stop position of label feed, print position and dispense. Page 3-2 GZ4e Series Operator Manual Section 3: Configuration and Operation 3.1 OPERATOR PANEL (Cont’d) 3.1.1 Potentiometer Adjustment Pitch potentiometer After the pitch has been set with the LCD control panel, it is sometimes desirable to make minor adjustments. This can be done using the PITCH potentiometer on the front operator panel. This potentiometer is set at the factory so that it has a range of +/- 3.75 mm (+/- 0.15”). The midpoint setting should have no effect on the pitch. Turning the potentiometer all the way clockwise should move the print position 3.75 mm (0.15”) up towards the top edge of the label. Turning it all the way counterclockwise should move the print position down 3.75 mm (0.15”). 1. While depressing the FEED button on the front panel, power the printer on. 2. When you hear one beep from the printer, release the FEED button and the printer will ask for the type of Test Label you want to print. 3. Use the LINE button to choose the CONFIGURATION selection and press FEED button to accept the selection. 4. Use the LINE button to select the Test Label Size. After the size is selected, press the FEED button to accept the selection and the printer will begin to print test labels continuously. 5. Adjust the PITCH potentiometer on the front panel until the first print position is at the desired location on the label. If the potentiometer does not have enough range, then you will have to change the pitch setting using the front panel display. 6. Press the FEED button to stop the printer. 7. To exit the Test Label mode, power the printer off and then back to on. Adjusting the PITCH potentiometer will affect the stop position of the label. Offset potentiometer When a label is printed, it must be correctly positioned for dispensing and application. The Backfeed adjustment is used to position the label so that it is fully dispensed and ready for application. It may then be necessary to reposition the next label before printing. The Backfeed (repositioning of the label) operation is enabled if DSW3-4 is in the OFF position. If Backfeed is enabled, placing DSW3-1 in the OFF position will cause the backfeed operation to be performed immediately before each label is printed. If DSW3-1 is in the ON position, the backfeed operation is performed as soon as the dispensed label has printed and taken from the printer. The amount of backfeed is controlled by the OFFSET potentiometer on the front operator panel. When turned all the way clockwise, the amount of backfeed is +3.75 mm (+0.15”), and -3.75 mm (-0.15”) when turned all the way counterclockwise. 1. Turn the printer on. 2. Press the LINE button to place the printer in offline mode. 3. Press the FEED button to feed out a blank label. 4. Adjust the position using the OFFSET potentiometer on the operator panel and feed another label by depressing the FEED button. Repeat this procedure until the label is fully released from the liner. Print potentiometer The PRINT potentiometer is used to adjust the amount of heat (i.e., power) applied to the print head for printing. It provides a continuous range of adjustment, allowing you to make precise changes. Maximum print darkness is obtained by turning the potentiometer all the way clockwise and maximum counter-clockwise setting will give the lightest print. Note: The PRINT potentiometer adjustment will affect the darkness regardless of the speed and darkness ranges setting. GZ4e Series Operator Manual Page 3-3 Section 3: Configuration and Operation 3.2 DIP SWITCH SETTINGS This chapter identifies the functions of the printer’s integrated DIP switches (DSW 2 and DSW 3). The configuration of the DIP switches enable/disable the various operational features of the printer as shown below. • Thermal transfer or direct thermal mode • Label sensor enable/ disable • Head check mode • Hex dump mode • Single job or Multi-job Receive buffer (Not available in SZPL emulation specification) • Download mode • Hardware/ software DIP switch mode • Print mode • External signal operation mode The GZ4e printer can use either hardware or software DIP switches to configure printer settings. Hardware DIP switches refer to physical DIP switches located behind the operator panel cover. Software DIP switches refer to virtual DIP switches controlled by software commands and stored in non volatile printer memory. The method used to configure printer settings is determined by state of hardware DIP switch DSW2-8. However, hardware DIP switches are only accessible by SATO authorised service personnel. The factory default setting for hardware DIP switch DSW2-8 is ON, resulting in the software DIP switches being used to configure the printer settings. 3.2.1 Software DIP switches Configuration There are two virtual software DIP switches (DSW2 and DSW3) stored in non volatile printer memory. Software DIP switch DSW2 contains seven switches (DSW2-1 through DSW2-7) while software DSW3 contains eight switches (DSW3-1 through DSW3-8). Software commands must be used to change the software DIP switches settings. The software DIP switch commands will not become effective however until the power is cycled. Alternately, the software DIP switches can also be set with SATO All-In-One Tool software application. To change software DIP switches settings verify that hardware DIP switch DSW2-8 is ON then power ON the printer. However, this step is not necessary as the printer is factory preset the DIP switch DSW2-8 toON, enabling software DIP switches configuration. Send software DIP switch commands to change the settings and then power the printer OFF. Finally, power the printer back to on. The software DIP switches settings are read by the printer electronics during the power up sequence. Refer to the tables below on switch designation, their specific functions and the commands to set the switches. ATTENTION: Each DIP switch must be set for the printer to properly function. Address all eight switches individually, but some may not require change. Page 3-4 GZ4e Series Operator Manual Section 3: Configuration and Operation 3.2 DIP SWITCH SETTINGS (Cont’d) SOFTWARE DSW 2 DEFAULT SETTINGS 2-1 2-2 OFF 2-3 OFF OFF 2-4 2-5 OFF 2-6 OFF OFF 2-7 OFF SOFTWARE DSW 2 CONFIGURATION DSW FUNCTION 2-1 Transfer/ Direct 2-2 Media Sensor Selection 2-3 Head Check 2-4 Hex Dump*1 2-5 Multi-Job Receive Buffer*2 2-6 Download Mode 2-7 Protocol Code (Fixed at OFF)*1 SETTING CONFIGURATION OFF Thermal Transfer ON Direct Thermal OFF Gap Sensor ON I-Mark Sensor OFF Head Check Disabled ON Head Check Enabled OFF Hex Dump Disabled ON Hex Dump Enabled OFF Single Job Receive Buffer ON Multi-Job Receive Buffer OFF Disabled ON Enabled OFF Standard Protocol Mode ON Non-Standard Protocol Mode *1 Hex Dump mode and Protocol Code will be fixed to OFF when the printer is in SZPL emulation mode. *2 DSW2-5 (1 item/ Multi-Job Receive Buffer) is not valid when the printer is in SZPL emulation mode. DSW 2 FUNCTION DESCRIPTIONS FUNCTION Transfer/ Direct DESCRIPTION This printer can set as Direct Thermal or Thermal Transfer. Media Sensor Selection Selects between a Gap or I-Mark sensor. Head Check When enabled, will check for malfunctioning head elements. Hex Dump Allows hexadecimal printing of all data received to the print buffer. Multi-Job Receive Buffer Allows to continuously receive print jobs while compiling and printing other jobs. Firmware Download Mode Places printer in mode for downloading software into flash ROM. Protocol Code Selects the command codes used for protocol control. GZ4e Series Operator Manual Page 3-5 Section 3: Configuration and Operation 3.2 DIP SWITCH SETTINGS (Cont’d) SOFTWARE DSW 3 DEFAULT SETTINGS 3-1 OFF 3-2 3-3 OFF OFF 3-4 3-5 OFF OFF 3-6 3-7 OFF OFF 3-8 OFF SOFTWARE DSW 3 CONFIGURATION DSW 3-1 3-2 FUNCTION SETTING Operation Mode 3-1 OFF CONFIGURATION 3-2 OFF Continuous OFF ON Tear Off ON OFF Cutter ON ON Dispenser 3-3 Pitch/ Label Sensor OFF ON Sensor Not Used 3-4 Backfeed OFF Enabled ON Disabled OFF Disabled ON Enabled 3-5 Print Start Signal 3-6 3-7 External Signal Type 3-8 Sensor Used 3-6 Repeat Print via EXT Signal 3-7 OFF OFF Type 4 OFF ON Type 3 ON OFF Type 2 ON ON Type 1 OFF Disabled ON Enabled DSW 3 FUNCTION DESCRIPTIONS FUNCTION DESCRIPTION Operation Mode Continuous, Tear-Off, Cutter, Dispenser Pitch/ Label Sensor Enabled – detects the label’s edge and positions it automatically. Disabled – it is under software control. Backfeed Enabled – positions the last printed label for dispensing and retracts the media for printing the next. Print Start Signal Allows an external device to initiate a label print for synchronization with the applicator. When on, the unit is in the Continuous print mode, Backfeed is disabled and External Signals are ignored. External Signal Refer to the Interface Specifications unit for information. Repeat Print External Signal Allows an external device to repeat the print sequence. Page 3-6 GZ4e Series Operator Manual Section 3: Configuration and Operation 3.3 SOFTWARE DIP SWITCH COMMAND This section describes the new software commands to set the DSW 2 and DSW 3 when DSW 2-8 is set to ON. According to the command language, the software DIP switch commands are separated between SATO and SZPL modes. 3.3.1 DSW 2 Setting Command (SBPL command) DSW 2 SETTING Hex code Default Value ESC + DW2 ESC DW2 Parameter <1B>16 <44>16<57>16<32>16 ,a,b,c,d,e,f,g ,0,0,0,0,0,0,0 FUNCTION To set the DSW-2 settings by software command FORMAT <ESC> + DW2,a,b,c,d,e,f,g PARAMETER a b c d e f g [DSW 2-1] [DSW 2-2] [DSW 2-3] [DSW 2-4] [DSW 2-5] [DSW 2-6] [DSW 2-7] = 0 : OFF / 1 : ON = 0 : OFF / 1 : ON = 0 : OFF / 1 : ON = 0 : OFF / 1 : ON = 0 : OFF / 1 : ON = 0 : OFF / 1 : ON = 0 : OFF / 1 : ON [Transfer / Direct] [Gap / I-Mark] [Head check Disable / Enable] [Hex Dump & Factory Mode Disable /Enable] [1-item / Multi-Buffer] [Download Disable / Enable] [Standard / Non Standard] EXAMPLE <ESC>A <ESC>DW2,0,1,0,0,0,0,0 <ESC>Z Above code snippets will set the DSW 2-2 to ON and so, the printer sensor type will be set at I-Mark when the printer restarts. SPECIAL NOTES 1 This command is valid only when DSW 2-8 is ON. 2 The parameters of this command cannot be omissible. The command will be ignored if the parameters are missing or incorrect. 3 The LCD menu and DSW settings will become effective after the printer restarts. 4 Users can send this command to printer in Normal mode and Flash Download mode. 5 If software DSW 2-4 is switch to ON, it can be switch to OFF from HEXDUMP MODE LCD under Service Mode. 6 When software DSW 2-4 is ON, press LINE and FEED buttons while power-up will get the printer into the Factory Mode directly. The software DSW 2-4 will be switch to OFF automatically. 7 Selection from HEXDUMP MODE LCD under Service Mode will change software DSW 2-4 accordingly. 8 Printer factory clear and default settings will not reset the software DSW 2 settings. 9 This command cannot be used to set the DSW 2-8. 10 When hardware DSW 2-8 is switch to ON from OFF position, software DSW-2 command setting will be automatically set to default values (software DSW2 default setting: DSW 25 OFF (1-item), DSW 2-8 ON (Software DSW) and other DSW OFF). GZ4e Series Operator Manual Page 3-7 Section 3: Configuration and Operation 3.3 SOFTWARE DSW COMMAND (Cont’d) 3.3.2 DSW 3 Setting Command (SBPL command) DSW 3 SETTING Hex code Default Value ESC + DW3 ESC DW3 Parameter <1B>16 <44>16<57>16<33>16 ,a,b,c,d,e,f,g,h ,0,0,0,0,0,0,0,0 FUNCTION To set the DSW-3 settings by software command FORMAT <ESC> + DW3,a,b,c,d,e,f,g,h PARAMETER a b c d e f g h [DSW 3-1] [DSW 3-2] [DSW 3-3] [DSW 3-4] [DSW 3-5] [DSW 3-6] [DSW 3-7] [DSW 3-8] = 0 : OFF / 1 : ON = 0 : OFF / 1 : ON = 0 : OFF / 1 : ON = 0 : OFF / 1 : ON = 0 : OFF / 1 : ON = 0 : OFF / 1 : ON = 0 : OFF / 1 : ON = 0 : OFF / 1 : ON [Operation Mode] [Pitch Sensor Used / Not Used] [Backfeed Enabled / Disabled] [Print Signal Disabled / Enabled] [External Signal Type] [Repeat Print Signal Disabled / Enabled] EXAMPLE <ESC>A <ESC>DW3,0,0,0,0,1,0,0,0 <ESC>Z Above code snippets will set the DSW 3-5 to ON and so, the print start signal (external trigger) is Enabled when the printer restarts. SPECIAL NOTES 1 This command is valid only when DSW 2-8 is ON. 2 The parameters of this command cannot be omissible. The command will be ignored if the parameters are missing or incorrect. 3 The LCD menu and DSW settings will become effective after the printer restarts. 4 Users can send this command to printer in Normal mode and Flash Download mode. 5 Selection from PRINTER TYPE LCD under Advanced Mode will change software DSW 3-1 & 3-2 accordingly. 6 Printer factory clear and default settings will not reset the software DSW 3 settings. 7 When hardware DSW 2-8 is switched to ON from OFF position, software DSW-3 command settings will be automatically set to default values (software DSW3 default setting: DSW all OFF). Page 3-8 GZ4e Series Operator Manual Section 3: Configuration and Operation 3.3 SOFTWARE DIP SWITCH COMMAND (Cont’d) 3.3.3 DSW 2 Setting Command (SZPL command) DSW 2 SETTING Hex code Default Value ~ESC + DS2 ~ ESC DS2 Parameter <7E>16 <1B>16 <44>16<53>16<32>16 ,a,b,c,d,e,f,g ,0,0,0,0,0,0,0 FUNCTION To set the DSW-2 settings by software command FORMAT ~ + <ESC> + DS2,a,b,c,d,e,f,g PARAMETER a b c d e f g EXAMPLE ^XA ~ <ESC>DS2,0,1,0,0,0,0,0 ^XZ Above code snippets will set the DSW 2-2 to ON and so, the printer sensor type will be set at I-Mark when the printer restarts. SPECIAL NOTES 1 This command is valid only when DSW 2-8 is ON. 2 The parameters of this command cannot be omissible. The command will be ignored if the parameters are missing or incorrect. 3 The LCD menu and DSW settings will become effective after the printer restarts. 4 Users can send this command to printer in Normal mode and Flash Download mode. 5 DSW 2-4 is always fixed at “OFF” regardless of input ‘d’ parameter. Note: User can enter the Hex Dump Mode by using the ~<ESC>HX command and Factory Mode by using ~<ESC>ME command. 6 *DSW 2-5(1 item/ Multi-Job Receive Buffer) is not valid in this specification (SZPL emulation). 7 DSW 2-7 is always fixed at “OFF” regardless of input ‘g’ parameter. Note: Non-standard Protocol is not supported in SZPL Emulation Firmware. This is valid only for SATO SBPL commands. 8 The DSW settings will be fixed and maintained until the next ~<ESC>DS2 command is sent. 9 DSW-2 software command settings will be maintained when printer factory clear and default settings are performed. 10 This command cannot be used to set the DSW 2-8. 11 When hardware DSW 2-8 is switch to OFF, software DSW-2 command setting will be automatically set to default values (software DSW2 default setting: DSW 2-5 OFF (1item), DSW 2-8 ON (Software DSW) and other DSW OFF). GZ4e Series Operator Manual [DSW 2-1] [DIW 2-2] [DSW 2-3] [DSW 2-4] [DSW 2-5] [DSW 2-6] [DSW 2-7] = 0 : OFF / 1 : ON = 0 : OFF / 1 : ON = 0 : OFF / 1 : ON = 0 : OFF (fixed) = 0 : OFF / 1 : ON = 0 : OFF / 1 : ON = 0 : OFF (fixed) [Transfer / Direct] [Gap / I-Mark] [Head check Disable / Enable] [Hex Dump Disable (fixed)] [1-item / Multi-Buffer] *Not Valid [Download Disable / Enable] [Standard Protocol Mode (fixed)] Page 3-9 Section 3: Configuration and Operation 3.3 SOFTWARE DIP SWITCH COMMAND (Cont’d) 3.3.4 DSW 3 Setting Command (SZPL command) DSW 3 SETTING Hex code Default Value ~ESC + DS3 ~ ESC DS3 Parameter <7E>16 <1B>16 <44>16<53>16<33>16 ,a,b,c,d,e,f,g,h ,0,0,0,0,0,0,0,0 FUNCTION To set the DSW-3 settings by software command FORMAT ~ + <ESC> + DS3,a,b,c,d,e,f,g,h PARAMETER a b c d e f g h [DSW 3-1] [DSW 3-2] [DSW 3-3] [DSW 3-4] [DSW 3-5] [DSW 3-6] [DSW 3-7] [DSW 3-8] = 0 : OFF / 1 : ON = 0 : OFF / 1 : ON = 0 : OFF / 1 : ON = 0 : OFF / 1 : ON = 0 : OFF / 1 : ON = 0 : OFF / 1 : ON = 0 : OFF / 1 : ON = 0 : OFF / 1 : ON [Operation Mode] [Pitch Sensor Used / Not Used] [Backfeed Enabled / Disabled] [Print Signal Disabled / Enabled] [External Signal Type] [Repeat Print Signal Disabled / Enabled] EXAMPLE ^XA ~ <ESC>DS3,0,0,0,0,1,0,0,0 ^XZ Above code snippets will set the DSW 3-5 to ON and so, the print start signal (external trigger) is Enabled when the printer restarts. SPECIAL NOTES 1 This command is valid only when DSW 2-8 is ON. 2 The parameters of this command cannot be omissible. The command will be ignored if the parameters are missing or incorrect. 3 The LCD menu and DSW settings will become effective after the printer restarts. 4 Users can send this command to printer in Normal mode and Flash Download mode. 5 Selection from PRINTER TYPE LCD under Advanced Mode will change software DSW 3-1 & 3-2 accordingly. 6 The DSW settings will be fixed and maintained until the next ~<ESC>DS3 command is sent. 7 DSW-3 software command settings will be maintained when printer factory clear and default settings are performed. 8 When hardware DSW 2-8 is switch to OFF, software DSW-3 command settings will be automatically set to default values (software DSW3 default setting: DSW all OFF). Page 3-10 GZ4e Series Operator Manual Section 3: Configuration and Operation 3.4 OPERATING MODES This chapter provides an overview of the various configuration modes of the operation menu. All of the configuration activities are performed via the use of the operator panel located on the printer’s face. However, many settings may also be controlled via external software commands. In the case of conflict between external software commands and internal software commands (control panel settings) the printer will always use the last valid setting (the default is software commands). If you load a label job that includes software settings and then enter a new setting via the operator panel, the manually set values will be used by printer. If you set the values manually and then download a job with software settings, the software settings will be used. There are several modes of operation. To enter the desired mode, the button sequence combination listed below must be performed. POWER: OFF Normal mode Power on ONLINE QTY: 000000 [S] Advanced mode LINE + Power on Service mode FEED ADVANCED MODE Emulation mode Counters mode FEED FEED EMULATION MODE SERVICE MODE FEED COUNTERS MODE User Test Print mode FEED + Power on TEST PRINT MODE CONFIGURATION Download mode DSW2-6 ON + Power on FLASH DOWNLOAD READY Default setting mode LINE + FEED + Power on DEFAULT SETTING YES NO HEX Dump DSW2-4 ON + Power on ONLINE QTY: 000000 [S] Non Standard mode DSW2-7 ON + LINE + FEED + Power on ALT. PROTOCOL DEFAULT COMPLETE Protocol Download mode DSW2-7 ON + LINE + Power on USER DOWNLOAD PRESS LINE KEY Figure 3-1, Operating Mode GZ4e Series Operator Manual Page 3-11 Section 3: Configuration and Operation 3.5 NORMAL MODE This mode allows configuration of printing features that are prone to change from job to job. These are some of the most basic and common adjustments of all of the configuration modes. Refer to the Menu Definition Tables in this chapter to provide an explanation of each menu screen. POWER: ON ONLINE QTY: 000000 LINE [S] FEED CANCEL PRINT JOB YES NO Reprints last label if enabled. LINE NO FEED YES FEED All print jobs saved All print jobs canceled OFFLINE XXXXXX QTY: 000000 LINE FEED Feeds one label if DSW3-3 is OFF. LINE + FEED USER TEST PRINT YES NO PRINT DARKNESS 1 2 3 4 5 LINE FEED Scrolls options NO FEED PRINT SPEED >> 2 3 4 5 6 PRINT DARKNESS << 7 8 9 10 Scrolls options LINE YES FEED TO TEST PRINT MENU LINE FEED PITCH OFFSET +00MM LINE Selects and advances Scrolls options FEED 7RGLVSOD\WKHSUHYLRXV VFUHHQkeep pressing FEED button and then press LINE button. Figure 3-2, Normal Mode Page 3-12 GZ4e Series Operator Manual Section 3: Configuration and Operation 3.5 NORMAL MODE (Cont’d) NORMAL MODE (TABLE 3-1) MENU ONLINE DESCRIPTION [S] QTY: XXXXXX OFFLINE XXXXXX Displays the printer’s operational status. The ONLINE status is displayed on the top line and the label quantity status is on the bottom. The message will be changed to OFFLINE whenever the printer is switched offline by pressing the LINE button. When a print job is received, the quantity line will indicate the number of labels to be printed. As the label job prints, the display status indicates the quantity of labels remaining to be printed. Displays the printer’s operational status. The OFFLINE status is displayed on the top line and the label quantity status is on the bottom. The message will be changed to ONLINE whenever the printer is switched online by pressing the LINE button. Permits the adjustment of print density. Higher print density equates to darker pint images. PRINT DARKNESS 1 2 3 4 5 Permits the printer’s printing speed to be established based on inches per second. The print speed setting range differs by print resolution and print mode as follows. GZ408e [8dots/mm] Continuous/ Tear-off mode: 2, 3, 4, 5, 6, 7, 8, 9, 10 (inches per second) PRINT SPEED 2 3 4 5 6 Cutter/ Dispenser mode: >> (50, 75, 100, 125, 150, 175, 200, 225, 250 mm/sec) 2, 3, 4, 5, 6 (inches per second) (50, 75, 100, 125, 150 mm/sec) GZ412e [12dots/mm] PRINT SPEED << 7 8 9 10 Continuous/ Tear-off mode: 2, 3, 4, 5, 6, 7, 8 (inches per second) Cutter/ Dispenser mode: (50, 75, 100, 125, 150, 175, 200 mm/sec) 2, 3, 4, 5, 6 (inches per second) (50, 75, 100, 125, 150 mm/sec) The default setting is 4 (inches per second). Select >> or << and then press FEED button to switch to the next screen for more selections. PITCH OFFSET +00MM The label pitch is the distance from the leading edge (the edge that comes out of the printer first) of a label and the leading edge of the next label. Once the position has been set, it can be fine adjusted using the PITCH potentiometer. Positive (+) digit settings moves the leading edge forward and away from the print head while a negative (-) setting moves the label’s leading edge incrementally back into the mechanism. CANCEL PRINT JOB YES NO Print data that has previously been received, can be cleared. If YES is selected, the print data will be deleted and then the printer will go offline. If the NO option is selected, the printer will go offline without deleting data in buffer. USER TEST PRINT YES NO Provides the specific sequence of events required by the operator, the printer, and the printer’s software for a test label to be printed. Select YES to enter User Test Print menu while select NO will advance to Online mode. GZ4e Series Operator Manual Page 3-13 Section 3: Configuration and Operation 3.6 ADVANCED MODE The Advanced Mode is provided to make basic printer operational adjustments. Typically, once these adjustment settings have been made, they will not require additional address unless a new job is downloaded. Use the buttons of the printer’s operator panel to select and enter the required options. Refer to the Menu Definition Tables in this chapter to provide an explanation of each menu screen. LINE + POWER ADVANCED MODE 7RGLVSOD\WKHSUHYLRXV VFUHHQkeep pressing FEED button and then press LINE button. Toggles Service Mode LINE Display only when DSW 2-8 is ON. FEED DARKNESS RANGE A B Scrolls options Scrolls options FEED Scrolls options Scrolls options Scrolls options FEED Display only when RS232 is selected. Scrolls options FEED Scrolls options DATA BIT SELECT 8BIT 7BIT LINE FEED Selects and advances Scrolls options NON LINE FEED STOP BIT SELECT 1BIT 2BIT IGNORE YES Scrolls options FEED Selects and advances LINE No FEED LINE IEE/USB FEED PARITY SELECT EVEN ODD FEED CALENDAR YY / MM / DD HH : MM Scrolls options LINE RS232 FEED LINE LINE Yes FEED USB LINE PRINT OFFSET V: +XXXX H: +XXXX SET CALENDAR YES NO FEED INTERFACE TYPE IEEE RS232 AUTO ONLINE YES NO Only if calendar is installed LINE LINE ZERO SLASH YES NO Scrolls options PRINTER TYPE DIS TEAR CUT CNT Scrolls options CR/LF NO LINE Scrolls options Display only when DSW 2-3 is ON. Scrolls options FEED BAUD RATE SELECT 9600 19200 >> BAUD RATE SELECT << 38400 57600 FEED CHARACTER PITCH PROP FIXED LINE Scrolls options LINE FEED LINE FEED PROTOCOL SELECT RD/BSY XON/OF >> PROTOCOL SELECT << BICOM3 BICOM4 HEAD CHECK NORMAL BARCODE LINE FEED Scrolls options LINE FEED Figure 3-3, Advanced Mode Page 3-14 GZ4e Series Operator Manual Section 3: Configuration and Operation 3.6 ADVANCED MODE (Cont’d) ADVANCED MODE (TABLE 3-2) MENU ADVANCED MODE DARKNESS RANGE A B DESCRIPTION Is the first menu screen of the Advanced Mode. The Advanced Mode is provided to make basic printer operational adjustments. Typically, once these adjustments or settings have been made, they will not require additional address unless a new job is downloaded. Allows the darkness (print density) selection of the printed image. Has two selection options, A or B. ZERO SLASH YES NO This setting determines if zero is printed with a slash or with out a slash. This setting can also be controlled via software commands. When YES is selected, the printer internal fonts will have a slash through the center of the zero character. AUTO ONLINE YES NO The printer can be set to automatically go into the online mode when powered on. Otherwise, the printer starts in the offline state and must be manually placed online before it is ready to print. PRINT OFFSET V: +XXXX H: +XXXX Print offset refers to the vertical and horizontal shifting of the entire print area relative to the label and the print start position. The movement is incremental by dots in the positive (+) or negative (-) direction. Positive and negative vertical adjustment is toward and away from the print head respectively. Positive and negative horizontal adjustment is to the left and right of the reference point respectively. This setting changes the base reference point for all subsequent label jobs. It’s effect is identical to the <ESC>A3 Base Reference point command. SET CALENDAR YES NO The calendar is an optional feature that allows the date and time to be manually set using the operator panel or through command codes. This screen will not be displayed if the calendar chip (real-time clock) is not installed. This menu allows the operator to choose if the calendar settings are to be altered. CALENDAR 00 / 00 / 00 00:00 This menu screen allows the calendar settings to be altered. The calendar is divided into five sets of two digits. The first two allows for the year to be set, followed by the month, the day, the hour, then the minute. The clock is in 24 hour format. IGNORE YES CR/LF NO Determines whether the print data code requires deletion. Hexadecimal graphic data will not be deleted. Select YES to delete all carriage return (CR) and line feed (LF) commands in the data stream - including graphics and 2D codes. CHARACTER PITCH PROP FIXED This setting determines whether each character occupies a designated space (fixed) regardless of the character’s width, or if the character’s space is representative of its width (proportional). Proportional is contemporarily preferred. HEAD CHECK NORMAL BARCODE This selection tells the printer the type of head check to perform. You can specify the print head checking to be performed unconditionally (Normal), or only when barcodes are being printed (Barcode). This screen displays only when DSW 2-3 is set to ON. GZ4e Series Operator Manual Page 3-15 Section 3: Configuration and Operation 3.6 ADVANCED MODE (Cont’d) ADVANCED MODE (TABLE 3-2) MENU DESCRIPTION PRINTER TYPE DIS TEAR CUT CNT This selection determines which print mode (Dispenser mode/ Tear-off mode/ Cutter mode/ Continuous mode) the printer use. This screen displays only when DSW 2-8 is set to ON. The Print Type selection from this LCD will affect and change on software DSW 3-1 and 3-2 accordingly. INTERFACE TYPE IEEE RS232 Select the type of interface according to the connection to the host. Either IEEE, RS232 or USB interface can be selected. If IEEE or USB is selected, the display will return to the Advanced Mode. If RS232 is selected, the display will advance to the Data Bit Select display. If the LAN interface board is installed, this menu will not be displayed. USB Select the Data bit for serial interface. Sets the printer to receive either 7 or 8 bits of data for each byte transmitted.8 bit is set as default. DATA BIT SELECT 8BIT 7BIT Select the type of Parity used for error detection in serial interface. PARITY SELECT EVEN ODD NON Selects the number of stop bits to end each byte transmission. STOP BIT SELECT 1BIT 2BIT BAUD RATE SELECT 9600 19200 >> Select the data rate (bps) for the RS232 port. Either 9600, 19200, 38400 or 57600 can be selected. 9600bps is set as default. Select >> or << and then press FEED button to switch to the next screen for more selections. BAUD RATE SELECT << 38400 57600 PROTOCOL SELECT RD/BSY XON/OF >> Selects the flow control and status reporting protocols for serial interface.The selections are RD/BSY, XON/OF, BICOM3 or BICOM4. RD/BSY is set as default. Select >> or << and then press FEED button to switch to the next screen for more selections. PROTOCOL SELECT << BICOM3 BICOM4 Page 3-16 GZ4e Series Operator Manual Section 3: Configuration and Operation 3.7 SERVICE MODE Allows programming of various dimensional settings, sensor thresholds, and display the DIP switch settings. Use the buttons of the operator panel to select and enter the required options. Refer to the Menu Definition Tables in this chapter to provide an explanation of each menu screen. 7RGLVSOD\WKHSUHYLRXV VFUHHQkeep pressing FEED button and then press LINE button. LINE + POWER PRIORITY SETTING COMMAND LCD ADVANCED MODE LINE FEED Toggles Service Mode LINE IGNORE YES SERVICE MODE Toggles Counters Mode LINE Display only when Multi-item is selected for IEEEE, or Status 4 is selected for USB/ LAN/RS232C. CAN/DLE NO FEED [ X.XV ] [ X.XV ] IEEE1284 ACK SIGNAL LINE 00.5 LINE AUTO ONLINE FEED YES NO LINE FEED LINE FEED LINE FEED ____-__12345678 LINE/FEED EXT PIN9 SELECT MODE1 MODE2 ONLINE DISABLE FEED KEY ENABLE LINE FEED Scrolls options HEXDUMP YES EURO CODE Display only when DIPSW 2-8 is ON. FEED NO FEED ________ 12345678 LINE/FEED RESET NO SOFT YES DIPSW YES FEED NO FEED Scrolls options Scrolls options LINE Scrolls options MODE NO LINE D5 Scrolls options YES FEED Scrolls options LINE FEED VIEW DIPSW-3 NO YES ON/OFF FEED LINE FEED Scrolls options BACKFEED SPEED NORMAL FAST LINE FORWARD / BACKFEED DISTANCE DEFAULT Scrolls options ON/OFF LINE LINE Scrolls options Scrolls options BACKFEED MOTION AFTER BEFORE FEED REPRINT W/FEED YES NO Scrolls options NO FEED YES FEED FEED FEED ON ERROR YES NO Scrolls options Display only when 1-item is selected for IEEEE. Display only when Status 3 is selected for RS232C. RIBBON NEAR END ENABLE DISABLE LINE Scrolls options Scrolls options Scrolls options FEED FEED Scrolls options VIEW DIPSW-2 NO YES LINE FEED LINE GAP INPUT Scrolls options Scrolls options SOFT DIPSW RESET COMPLETED LINE FEED LINE/FEED Figure 3-4, Service Mode GZ4e Series Operator Manual Page 3-17 Section 3: Configuration and Operation 3.7 SERVICE MODE (Cont’d) SERVICE MODE (TABLE 3-3) MENU SERVICE MODE GAP INPUT [ X.XV ] [ X.XV ] EYE INPUT [ X.XV ] [ X.XV ] DESCRIPTION The Service Mode allows the programming of various dimensional settings, sensor thresholds, and language options. When setting the sensor threshold, the voltage shown on the top line is the measurement using media placed over the sensor. The lower line displays the value set for the threshold. Please refer to the detail procedure in the Section 3.7.1 To set the Input threshold voltage level for Gap sensor or Section 3.7.2 To set the Input threshold voltage level for I-Mark sensor for setting the threshold level. DSW2-2 determines which sensor will be enabled for use. GAP will displayed on the screen when Gap sensor is enabled, EYE will displayed when I-Mark sensor is enabled. AUTO ONLINE FEED YES NO Allows it to be determined if the printer will feed a label when it is placed online to ensure proper media placement for printing. Allows it to be determined if the printer will feed a label when an error condition is cleared. FEED ON ERROR YES NO Allows it to be determined if the printer will print the last label in memory when the FEED button is pressed in the normal, online mode. REPRINT W/FEED YES NO FORWARD / BACKFEED DISTANCE DEFAULT FORWARD / BACKFEED DISTANCE XXXMM Allows the selection of whether to accept the default setting or to set the backfeed distance other than the default setting. This display will only appear when Backfeed is enabled (DSW 3-4 = OFF). Allows the backfeed distance to be set. If using thermal transfer for printing, set the feed distance less than 30mm to avoid detection of the ribbon end by accident. The maximum backfeed distance is 255mm. EXT PIN9 SELECET MODE1 MODE2 Allows selection of the conditions that regulates Pin-9 of the EXT connector. MODE1 enables Pin-9 when the printer goes online and a print quantity is displayed. MODE2 enables Pin-9 when the printer goes online without consideration of print quantity. EURO CODE Allows the hexadecimal value to be specified for the character replaced with the Euro Character. Euro Code functionality is not available in SZPL emulation. The default is D5 Hex. D5 Page 3-18 GZ4e Series Operator Manual Section 3: Configuration and Operation 3.7 SERVICE MODE (Cont’d) SERVICE MODE (TABLE 3-3) MENU DESCRIPTION Allows the selection of which type of operator programming will take priority precedence. By selecting the COMMAND option, downloaded command codes will be recognized by the printer as most important where conflicting data exists. Selecting LCD, places programming through the operator panel as taking precedence. PRIORITY SETTING COMMAND LCD This menu screen allows user to choose to ignore CAN (18H) and DLE (10H) commands used in the bi-directional communications. IGNORE CAN/DLE YES NO This menu screen allows the pulse width to be set if single-item buffer has been chosen. If single-item buffer has not been chosen, this setting will not have effect. IEEE1284 ACK SIGNAL XX.X To set the printer to automatically notify when ribbon is nearly end. RIBBON NEAR END ENABLE DISABLE BACKFEED MOTION AFTER BEFORE Allows the selection of the speed of the backfeed movement. Two setting options are available, Normal or Fast. FAST is set as default. BACKFEED SPEED NORMAL FAST ONLINE DISABLE KEY ENABLE FEED Allows of the backfeed movement to be applied before print out or after print out. Two setting options are available. Select the Online FEED button as Enable or Disable. If Enable is selected, pressing FEED button will feed a label when printer is in online mode. Change printer communication mode to Hex Dump. HEXDUMP MODE YES NO To view the software DSW-2 setting. VIEW DIPSW-2 NO YES ON/OFF -_____12345678 Is an informational screen that provides the Software DIP switch setting. The “–” mark on top position shows DSW ON, while the “_” mark on the lower position shows DSW OFF. GZ4e Series Operator Manual Page 3-19 Section 3: Configuration and Operation 3.7 SERVICE MODE (Cont’d) SERVICE MODE (TABLE 3-3) MENU DESCRIPTION To view the software DSW-3 setting. VIEW DIPSW-3 NO YES RESET NO SOFT YES DIPSW Allows the determination of whether or not to reset the software DSW-2 and DSW-3 setting. Is an informational screen only and confirms that reset activity is complete. SOFT DIPSW RESET COMPLETED 3.7.1 To set the Input threshold voltage level for Gap sensor This procedure allows you to manually set the threshold voltage level of the Gap sensor, between the maximum and minimum light levels. The input threshold sets the minimum acceptable voltage level based on overall sensor voltage levels. Once the overall sensor thresholds have been established, the input voltage may be set. NOTE: The input threshold is an average of the low and high voltages. 1. When SERVICE MODE appears on the LCD, press the FEED button. NOTE: The next menu screen should display the sensor type selected and its relative threshold levels. 2. Ensure the correct sensor is selected. GAP should be displayed on the screen. GAP INPUT [ X.XV ] [ X.XV ] GAP sensor threshold INPUT threshold Figure 3-5, GAP sensor threshold display 3. If GAP is not display, change the sensor type by altering DIP switch DSW2-2 (either software or hardware DIP switch depending on DSW 2-8 setting). 4. Physically position the media’s liner (backing paper, portion without the label) so that its rests over the Gap sensor. To stabilize the sensor level, make sure the print head assembly is latched and the media is threaded correctly after setting the media. 5. Record the voltage shown on the top line of the LCD panel. The voltage ranges measured should be 0.5 V or less. This is the low voltage value. 6. Physically re-position media (label and liner combined) so that its rests over the Gap sensor. Page 3-20 GZ4e Series Operator Manual Section 3: Configuration and Operation 3.7 SERVICE MODE (Cont’d) 7. Observe the threshold level displayed on the top line of LCD and the reading should be increased more than 1.0 V to the last reading. This is the high voltage value. The voltage ranges measured should be within the following range: Liner without label = 0.5V or less Label and liner ≥ 1.0V + the low value (Liner without label) If the measured values are outside this range, you may have trouble in finding a value that will work properly under all conditions. If this is the case, a higher quality label may be needed to get adequate performance. 8. Calculate the input threshold voltage using the formula. (High Voltage Level + Low Voltage Level) x 0.5 = INPUT threshold voltage value 9. To set the input threshold, press the LINE button repeatedly until the calculated values displayed. The maximum voltage can be set is 3.3 V. If a value of 0.0 V is set, the printer will automatically set the level each time the printer is powered on with labels loaded or the print head is closed. 10.Once the setting is correct, pressing the FEED button will accept the setting and advance to the AUTO ONLINE FEED display. 3.7.2 To set the Input threshold voltage level for I-Mark sensor This procedure allows you to manually set the threshold voltage level of the I-Mark sensor, between the maximum and minimum light levels. The input threshold sets the minimum acceptable voltage level based on overall sensor voltage levels. Once the overall sensor thresholds have been established, the input voltage may be set. NOTE: The input threshold is an average of the low and high voltages. 1. When SERVICE MODE appears on the LCD, press the FEED button. NOTE: The next menu screen should display the sensor type selected and its relative threshold levels. 2. Ensure the correct sensor is selected. EYE should be displayed on the screen. EYE INPUT [ X.XV ] [ X.XV ] I-Mark sensor threshold INPUT threshold Figure 3-6, I-Mark sensor threshold display 3. If EYE is not display, change the sensor type by altering DIP switch DSW2-2 (either software or hardware DIP switch depending on DSW 2-8 setting). 4. Physically position the media (portion without the I-Mark) so that its rests over the I-Mark sensor. To stabilize the sensor level, make sure the print head assembly is latched and the media is threaded correctly after setting the media. 5. Record the voltage shown on the top line of the LCD panel. The voltage ranges measured should be between 0.3 and 0.7 V. This is the low voltage value. 6. Physically re-position the media so that the I-Mark is oriented over the sensor directly. GZ4e Series Operator Manual Page 3-21 Section 3: Configuration and Operation 3.7 SERVICE MODE (Cont’d) 7. Observe the threshold level displayed on the LCD and the reading should has increased more than 1.2 V to the last reading. The voltage ranges measured should be within the following range: Media only= 0.3 to 0.7 V I-Mark ≥ 1.2V + the low value Calculate the input threshold voltage using the formula. (High Voltage Level + Low Voltage Level) x 0.5 = INPUT threshold voltage value If the measured values are outside this range, you may have trouble in finding a value that will work properly under all conditions. If this is the case, a higher quality label may be needed to get adequate performance. 8. To set the input threshold, press the LINE button repeatedly until the calculated values displayed. The maximum voltage can be set is 3.3 V. If a value of 0.0 V is set, the printer will automatically set the level each time the printer is powered on with labels loaded or the print head is closed. 9. Once the setting is correct, pressing the FEED button will accept the setting and advance to the AUTO ONLINE FEED display. Page 3-22 GZ4e Series Operator Manual Section 3: Configuration and Operation 3.8 COUNTER MODE The printer has integrated counters to measure the accumulative activity of some features. The unit of measure is based on linear meters and includes a print head counter and a life counter. The head counter records the length of the media that has been printed since the print head was installed and should be reset each time the print head is replaced. The life counter measures the total length of media the printer has printed. This counter would only be reset in case of circuitry replacement. The printer’s Counter Mode allows the operator to view the accumulated measurement and also allows the print head counter to be reset to zero. Use the buttons of the printer’s operator panel to select and enter the required options. Refer to the Menu Definition Tables in this chapter to provide an explanation of each menu screen. LINE + POWER ADVANCED MODE Toggles Servivce Mode LINE SERVICE MODE Counter Counter Mode LINE COUNTERS MODE Toggles Emulation Mode LINE FEED COUNTERS HD DSP CUT LIFE Scrolls options HD FEED CUT FEED DSP FEED HEAD COUNTER X.XM DISPENSE COUNTER X.XM FEED X.XM FEED FEED CUT COUNT CLEAR YES NO LINE FEED LIFE COUNTER X DSP COUNT CLEAR YES NO LINE LIFE FEED CUT COUNTER FEED HEAD COUNT CLEAR YES NO Scrolls options LINE LINE FEED FEED Figure 3-7, Counters Mode GZ4e Series Operator Manual Page 3-23 Section 3: Configuration and Operation 3.8 COUNTER MODE (Cont’d) COUNTERS MODE (TABLE 3-4) MENU COUNTERS MODE COUNTERS HD DSP CUT LIFE HEAD COUNTER XX.XM DISPENSE COUNTER XX.XM DESCRIPTION Is the first menu screen of the Counters Mode. The Counters Mode allows the printers various internal counters to be reset to zero or to view count in meters printed thus far. Allows the selection of which counter to be viewed and to reset. HD: Head counter DSP: Dispense counter CUT: Cutter counter LIFE: Life counter Is an informational screen that provides the printed length of media using the existing print head. The head counter should be reset each time the print head is replaced. Is an informational screen that provides the dispense cycles of media since dispenser installation or use. Is an informational screen that provides the cut cycles of media since cutter installation or use. CUT COUNTER X Is an informational screen that provides the printed the length of media since printer setup. LIFE COUNTER XX.XM Allows the determination of whether or not to reset the print head counter to zero. HEAD COUNT CLEAR YES NO Allows the determination of whether or not to reset the dispenser counter to zero. DSP COUNT CLEAR YES NO Allows the determination of whether or not to reset the cutter counter to zero. CUT COUNT CLEAR YES NO Page 3-24 GZ4e Series Operator Manual Section 3: Configuration and Operation 3.9 EMULATION MODE The emulation mode was to create a similar LCD menu options as compared to the targeted printer, providing similar functionality for the end users. Use the buttons of the printer’s operator panel to select and enter the required options. Refer to the Menu Definition Tables in this chapter to provide an explanation of each menu screen. LINE + POWER ADVANCED MODE Toggles Service Mode Scrolls options LINE SIZE MODE CMD AUTO SENSOR TYPE N B G LINE FEED LCD LINE Scrolls options LINE Scrolls options LINE Scrolls options LINE Scrolls options LINE Scrolls options LINE Scrolls options FEED SERVICE MODE CONTROL HEADER CHAR 126 LABEL TYPE D T Toggles Counters Mode LINE Scrolls options LINE FEED FEED COUNTERS MODE Toggles Emulation Mode LABEL SIZE WIDTH LINE Scrolls options EMULATION MODE Toggles Advanced Mode LINE Scrolls options EMULATION SELECT AUTO MANUAL Scrolls options MANUAL FEED Scrolls options Scrolls options FEED Scrolls options LINE FEED EXTRA STORAGE SRAM ROM 0000 LINE FEED FEED LOWEST BAUDRATE 9600BPS 1200BPS LINE LINE FEED FEED Scrolls options NETWORK ID ID 000 LINE FEED TEAR OFFSET V : +000 LINE Selects and Advanced FEED AUTO Scrolls options Scrolls options FEED DIPSW SETTING NO YES 15 PROTOCOL N A Z SZPL FEED Scrolls options SIZE MODE CMD DELIMIT CHAR CHAR 044 1424 LINE SATO FEED FEED LINE HEAD CHECK LABEL EMULATION SELECT SZPL SATO Scrolls options FEED PRINT MODE MODE LINE AUTO FEED LINE LABEL SIZE HEIGHT FEED COMMAND HEADER CHAR 094 0832 LINE FEED COMM DIAG OFF ON Scrolls options LINE FEED FEED 7RGLVSOD\WKHSUHYLRXV VFUHHQkeep pressing FEED button and then press LINE button. 7RLQFUHDVHWKHYDOXHpress LINE button. 7RGHFUHDVHWKHYDOXH keep pressing LINE button and then press FEED button. Figure 3-7, Emulation Mode GZ4e Series Operator Manual Page 3-25 Section 3: Configuration and Operation 3.9 EMULATION MODE (Cont’d) EMULATION MODE (TABLE 3-5) MENU EMULATION MODE EMULATION SELECT AUTO MANUAL EMULATION SELECT SZPL SATO SIZE MODE CMD AUTO DESCRIPTION Is the first menu screen of the Emulation Mode. The emulation mode was to create similar LCD menu options of the emulated printer, providing similar functionality for the end users. Allows the selection of the Emulation mode, Auto or Manual. Default setting is Manual. Allows the selection between SZPL emulation or SATO. Default setting is SATO. Note: When changing SZPL emulation mode to SATO mode, execute DEFAULT SETTING before starting the operation, and vice versa. Allows the selection of size mode for SATO, CMD (command) or AUTO. If AUTO is selected, the EMULATION SELECT mode will automatically change from MANUAL to AUTO. Default setting is CMD. Allows the Tear Offset Position to be set. The range of setting is -999 to +999. TEAR OFFSET V : +000 SENSOR TYPE N B G Allows the selection of the Media Sensor type. N: No sensor B: I-Mark G: Gap sensor The default setting follows DSW 2-2 setting. LABEL TYPE D T Allows the selection of the Label type. D: Direct Thermal T: Thermal Transfer The default setting follows DSW 2-1 setting. LABEL SIZE WIDTH Allows to set the label width. The default value is set as 832 dots. (GZ412e:1248 dots) The range of label width setting is 0000 to 0896 dots and changes with increments of 8 dots. (GZ412e: 12 dots) LABEL SIZE HEIGHT Page 3-26 0832 1424 Allows to set the label height. The default value is set as 1424 dots. (GZ412e:2136 dots) The range of label height setting is 0000 to 9992 dots and changes with increments of 8 dots. (GZ412e: 12 dots) GZ4e Series Operator Manual Section 3: Configuration and Operation 3.9 EMULATION MODE (Cont’d) EMULATION MODE (TABLE 3-5) MENU DESCRIPTION Allows to set the Print mode with combination of Operation mode, Pitch sensor and Backfeed functions. The Print mode setting range from 00 to 15 as shown in the table below. The default setting follows the DSW-3 setting. Mode PRINT MODE MODE HEAD CHECK LABEL 15 3-2 3-3 3-4 Motion mode Pitch Sensor Backfeed 0 ON ON ON ON Dispenser Not valid 1 OFF ON ON ON Tear off Not valid Not valid 2 ON OFF ON ON Cut Not valid Not valid 3 OFF OFF ON ON Continuous Not valid Not valid 4 ON ON OFF ON Dispenser Valid Not valid 5 OFF ON OFF ON Tear off Valid Not valid 6 ON OFF OFF ON Cut Valid Not valid 7 OFF OFF OFF ON Continuous Valid Not valid 8 ON ON ON OFF Dispenser Not valid Valid 9 OFF ON ON OFF Tear off Not valid Valid 10 ON OFF ON OFF Cut Not valid Valid 11 OFF OFF ON OFF Continuous Not valid Valid 12 ON ON OFF OFF Dispenser Valid Valid 13 OFF ON OFF OFF Tear off Valid Valid 14 ON OFF OFF OFF Cut Valid Valid 15 OFF OFF OFF OFF Continuous Valid Valid Not valid Allows to set the Head Check. The range of setting is 0000 to +9999. The default value is set as 0000 (Disable). 0000 Allows to set the SZPL Communication Protocol. N: None A: ACK Z: SZPL The default setting is (N)one. PROTOCOL N A Z NETWORK ID ID 3-1 Allows to set the RS-485 Network ID. The range of setting is 000 to 999. The default value is set as 000 (Unused) 000 Allows the activation of the Communication Diagnostics (Hex Dump Mode) for troubleshooting. The default setting is OFF. COMM DIAG OFF ON Note: Communication Diagnostics is only valid when DSW 2-4 is set to OFF. SIZE MODE CMD AUTO LCD Allows the determination on the source for information of the label size. CMD: Command AUTO: When AUTO is selected, the printer will automatically feed 2 blank labels during power on stage to calibrate correct label size. LCD: LCD setting GZ4e Series Operator Manual Page 3-27 Section 3: Configuration and Operation 3.9 EMULATION MODE (Cont’d) EMULATION MODE (TABLE 3-5) MENU CONTROL HEADER CHAR 126 COMMAND HEADER CHAR 094 DELIMIT CHAR CHAR 044 DIPSW SETTING NO YES EXTRA STORAGE SRAM ROM LOWEST BAUDRATE 9600BPS 1200BPS Page 3-28 DESCRIPTION Allows to set the Control Header Character, ranging from 000(00H) to 255(FFH). The default value is 126(7EH). Allows to set the Command Header Character, ranging from 000(00H) to 255(FFH). The default value is 094(5EH). Allows to set the Delimit Character, ranging from 000(00H) to 255(FFH). The default value is 044(2CH). Allows to determine the setting of items based on DSW setting or on the LCD setting in the Emulation menu. The default setting is YES. NO: EEPROM, the printer will be overridden by corresponding LCD items in Emulation menu. YES: Printer, the items are based on the setting of the DSW set in printer. The items mentioned above are the Sensor type, Label type and the Print mode. Allows the selection of the Extra Storage. SRAM or ROM is available. The default setting is SRAM. Allows the setting of the Lowest Baudrate for serial communication. 9600 bps or 1200bps can be selected. 9600 bps is set as default. The lowest baud rate setting becomes valid only when the RS232 interface baud rate set to 9600 through LCD in Advance mode menu. GZ4e Series Operator Manual Section 3: Configuration and Operation 3.10 TEST PRINT MODE Provides the specific sequence of events required by the operator, the printer, and the printer’s software for a test label to be printed. Test labels are designed to identify failures in configuration, adjustments problems, and mechanical defects. Use the buttons of the printer’s operator panel to select and enter the required options. Refer to the Menu Definition Tables in this chapter to provide an explanation of each menu screen. FEED + POWER TEST PRINT MODE CONFIGURATION BARCODE HEADCHECK FACTORY Scrolls options LINE Configuration Barcode Headcheck FEED TEST PRINT SIZE XXCM Scrolls options Factory FEED PRINT SIZE SMALL LARGE LINE Scrolls options LINE FEED Test printing begins PRESS FEED KEY TO STOP PRINTING USER TEST PRINT YES NO FEED NO FEED PRINT CONTINUE YES NO Scrolls options Scrolls options LINE Test printing stops YES FEED ONLINE MODE [S] QTY: XXXXXX LINE YES FEED NO FEED Figure 3-8, Test Print Mode GZ4e Series Operator Manual Page 3-29 Section 3: Configuration and Operation 3.10 TEST PRINT MODE (Cont’d) TEST PRINT MODE (TABLE 3-6) MENU DESCRIPTION TEST PRINT MODE CONFIGURATION BARCODE HEADCHECK FACTORY Is the initial screen of the Test Print Mode. • CONFIGURATION: The printer’s configuration settings. • BARCODE: The printer’s installed barcodes. • HEAD CHECK: A pattern to check print head elements. • FACTORY: A factory test label will be printed. This menu screen only appears if CONFIGURATION, BARCODE, or HEAD CHECK was chosen in the previous menu. The increments of measure is 1cm. TEST PRINT SIZE XXCM For factory test prints, this screen appears instead of the previous screen for setting print size. Large (10cm) and small (4cm) are the only two options. PRINT SIZE SMALL LARGE Is a directional screen prompting action on how to terminate print activity. Press FEED button to stop printing and press again to resume printing. PRESS FEED KEY TO STOP PRINTING A confirmation screen to stop test printing or to continue the label test printing. If YES is selected, the printer will goes back to TEST PRINT MODE selection menu. If NO is selected, the test print mode will stop and proceed to Online mode. PRINT CONTINUE YES NO USER TEST PRINT YES NO ONLINE [S] QTY: XXXXXX Page 3-30 Provides the specific sequence of events required by the operator, the printer, and the printer’s software for a test label to be printed. Select YES to enter User Test Print menu while select NO will advance to Online mode. Displays the printer’s operational status. The ONLINE status is displayed on the top line and the label quantity status is on the bottom. Ready for print job. GZ4e Series Operator Manual Section 3: Configuration and Operation 3.11 FLASH MEMORY DOWNLOAD MODE This download feature allows the operator to download data (firmware, font/logo, True type font), from the host computer and write in the Flash ROM memory. Use the printer’s operator panel to select and enter the required options. Figure 3-9 provides the general sequence of downloading data. For more details in downloading specific data, please refer to SATO authorized technical personnel. Refer to the Menu Definition Tables in this chapter to provide an explanation of each menu screen. CAUTION: • Downloading firmware will re-initialize all the previous settings (Normal MODE, ADVANCED MODE). Write down its setting details or keep a copy of FACTORY TEST PRINT for your information in case you wish to maintain the same settings in the future. • Do not turn the power on/off while downloading. This may damage the CONT board (main PCB). Send command (ESC+DW2/~ESC+DS2) to configure DSW2-6 to ON + POWER on FLASH DOWNLOAD READY Send data from host. Printer begins receiving data PROGRAM DOWNLOAD START > > > END Download completed DOWNLOAD COMPLETE PRESS FEED KEY NO Send command (ESC+DW2/~ESC+DS2) to configure DSW2-6 to OFF + POWER off the printer. More data to download? YES FEED Figure 3-9, Flash Memory Download Mode GZ4e Series Operator Manual Page 3-31 Section 3: Configuration and Operation 3.11 FLASH MEMORY DOWNLOAD MODE (Cont’d) FLASH DOWNLOAD MODE (TABLE 3-7) MENU FLASH DOWNLOAD READY DESCRIPTION Is an informational screen only and confirms that the printer is ready to receive the data. Provides download status that the data is being received and its progression. PROGRAM DOWNLOAD START > > > END DOWNLOAD COMPLETE PRESS FEED KEY Page 3-32 This menu screen appears when all of the data has been received and the process is complete. Also prompts the operator on how to proceed. GZ4e Series Operator Manual Section 3: Configuration and Operation 3.12 DEFAULT SETTING MODE The Default Settings Mode allows the operator to return the printer to the configuration state as received from the factory. Use the printer’s buttons to select and enter the required options. Refer to the Menu Definition Tables in this chapter to provide an explanation of each menu screen. LINE + FEED + POWER DEFAULT SETTING YES NO Scrolls options LINE Yes FEED No FEED No action, no change Printer returned to default settings DEFAULT SETTING COMPLETED Power printer off and then on again to exit. Figure 3-10, Default Setting Mode DEFAULT SETTING MODE (TABLE 3-8) MENU DEFAULT SETTING YES NO DESCRIPTION Is the first menu screen of the printer’s Default Setting Mode. The Default Setting Mode allows the printer to be reset to the programmed condition as received from the factory. The selection of YES confirms the operator wants to proceed and the selection of NO allows for exit without default reset. If YES is selected, resetting will immediately begin. Reboot the printer to return to normal operation. Is an informational screen only indicating that reset activity is complete. DEFAULT SETTING COMPLETED GZ4e Series Operator Manual Page 3-33 Section 3: Configuration and Operation 3.13 HEX DUMP MODE The contents of the print buffer and the contents received before it may be examined through the use of the Hex Dump Mode. Each line of the printed data is enumerated in the first column, the second column contains the data in hexadecimal format, and the right column contains the same data in ASCII format. This feature is valid only for SBPL specification. Send ESC+HX command or Send ESC+DW2 command to configure DWS2-4 to ON + Power On ONLINE [S] QTY: XXXXXX Printer receives data Printer begins Hex Dump printing Power printer off , to exit Figure 3-11, Hex Dump Mode 3.14 NON STANDARD MODE Allows non-standard protocol code to be returned to the default value. The default value is: STX (7BH), ETX (7DH), ESC (5EH), ENQ (40H), NULL (7EH), CAN (21H), Offline (5DH), EuroCode (D5H). This feature is valid only for SBPL specification. Send ESC+DW2 command to configure DWS2-7 to ON + LINE + FEED + POWER On ALT. PROTOCOL DEFAULT COMPLETE Protocol code is initialized Power printer off , to exit Figure 3-12, Protocol Initialization Mode Page 3-34 GZ4e Series Operator Manual Section 3: Configuration and Operation 3.15 PROTOCOL DOWNLOAD MODE Allows the operator to download user specific data from a host system. Use the buttons of the printer’s operator panel to select and enter the required options. This feature is valid only for SBPL specification. Refer to the Menu Definition Tables in this chapter to provide an explanation of each menu screen. Send ESC+DW2 command to configure DWS2-7 to ON + LINE + POWER On USER DOWNLOAD PRESS LINE KEY LINE FEED No action, no change USER DOWNLOAD WAITING Send download data Printer Receives data Power printer off, to exit Figure 3-13, User Download Mode USER DOWNLOAD MODE (TABLE 3-9) MENU USER DOWNLOAD PRESS LINE KEY USER DOWNLOAD WAITING DESCRIPTION Is the first menu screen of the User Download Mode and provides a prompt to proceed. Pressing the LINE button will place the printer in a condition waiting for the data to be received. Confirms the printer is on standby for receiving user download data. The downloaded data received from the host shall be written in the main ROM. Entry is not required. GZ4e Series Operator Manual Page 3-35 Section 3: Configuration and Operation This page is intentionally left blank. Page 3-36 GZ4e Series Operator Manual Section 4: Cleaning and Maintence CLEANING AND MAINTENANCE This section provides information on user maintenance for the GZ4e series printer. The following information is covered here: • 4.1 Cleaning The Print Head, Platen and Rollers • 4.2 How To Clean The Printer (Cleaning Kit) • 4.3 How To Clean The Printer (Cleaning Sheet) • 4.4 Replacement Procedures • 4.5 Adjusting Print Quality • • • • • Caution When cleaning the print head, bear in mind that the print head and its surroundings may be hot. Wait until the printer cools down before proceeding to clean the printer. Be sure to turn off the power before cleaning. The suggested cleaning schedules here are just guidelines. If necessary, clean as appropriate, depending on the degree of contamination. Use a cleaning pen, cotton swab or cotton cloth, from an approved cleaning kit, to clean the printer units. Use only soft, lint-free materials for cleaning. Avoid using hard objects for the cleaning process, as they will damage the components. GZ4e Series Operator Manual Page 4-1 Section 4: Cleaning and Maintence 4.1 CLEANING THE PRINT HEAD, PLATEN AND ROLLERS The print head not only generates printouts of barcodes, but also graphics and text. To produce optimal printing, it must be kept clean in spite of the dirt and adhesive that constantly accumulates on its print surface. Furthermore, dirt can accumulate along the label path, affecting parts like sensors and guides, and reducing their performance. Therefore, it is important to clean these important components periodically. The printer cleaning kit and cleaning sheets can be purchased from your authorized SATO representative. When to clean with a cleaning kit For the printer head, platen roller, paper sensor, and media guide: clean after using up every other roll of media. For other parts: clean after finishing every six rolls of media. When to clean with the cleaning sheet For print head: clean after using every six rolls of media, or when you find any burned glaze on the surface of the print head. 4.2 HOW TO CLEAN THE PRINTER (CLEANING KIT) If you are using a carbon ribbon, be sure to remove it before cleaning. Follow the instructions supplied with the cleaning kit. Use the items to clean the following parts. 1. Before starting, get ready an approved cleaning kit from your SATO representative. Make sure the printer is powered off, and remove the power cable. 2. Lift up the main cover. 3. Release the green print head lock lever by turning counter-clockwise. The print head is now accessible. Ribbon roller Platen roller 4. Wipe off the dirt on the print head, platen roller and ribbon roller using a cleaning pen or a cotton swab dabbed with the cleaning liquid. (See figure on the right) Print head Page 4-2 GZ4e Series Operator Manual Section 4: Cleaning and Maintence 4.2 HOW TO CLEAN THE PRINTER (CLEANING KIT) (Cont'd) 5. Lightly pull out the pitch sensor guide, remove it and clean its bottom area with a cotton cloth moisten with cleaning liquid. Fix back the pitch sensor guide after cleaning. Pitch sensor guide 4.3 HOW TO CLEAN THE PRINTER (CLEANING SHEET) If certain stains on the print head cannot be removed easily with cotton swabs dabbed in cleaning solution, the cleaning sheet is used for clearing such stubborn debris on the print head. 1. Make sure the printer is powered off and remove the power cable. 2. Lift up the main cover. 3. Release the green print head lock lever by turning counter-clockwise. The print head is now accessible. 4. Remove the media and the ribbon. 5. Put the head cleaning sheet between the print head and the platen roller. The coarse side of the cleaning sheet should face the surface of the print head elements. 6. Now remount the print head by turning the head lock lever clockwise until it latch on. The print head should lock into place firmly. 7. Using both hands, pull the cleaning sheet outwards, toward your body. This will remove any dirt stuck to the print head. 8. When the cleaning sheet has been removed, perform steps 5 to 7 to repeat the cleaning procedure one or two more times. Cleaning sheet 9. When no more additional dirt appears on the cleaning sheet after it has been pulled out, you can stop cleaning with the sheet. 10.Unlatch the print head and use the cleaning pen from the cleaning kit to gently remove any remaining dirt from the print head. GZ4e Series Operator Manual Page 4-3 Section 4: Cleaning and Maintence 4.4 REPLACEMENT PROCEDURES This chapter provides in-depth instruction on all primary component and assembly replacement, in addition to most secondary components. Use the text in conjunction with their accompanied graphics to ensure complete comprehension throughout the process. Especially observe all cautionary or warning notations. 4.4.1 Print Head Replacement If the print head becomes damaged or worn, it can be easily removed and replaced without having to make critical adjustments. Before replacing the print head, check the head counter values by printing a test pattern. Instructions relating to the Head Counter may be found in the Configuration unit of this manual. 1. Switch off the printer and disconnect power supply cord. 2. Open the main cover and ensure the print head lock lever is latched. 3. Remove screw (2, Figure 4-1a) from upper print assembly (3) securing defective print head. 2 3 1 Figure 4-1a, Print Head Replacement Page 4-4 GZ4e Series Operator Manual Section 4: Cleaning and Maintence 4.4 REPLACEMENT PROCEDURES (Cont'd) 3 1 4 Figure 4-1b, Print Head Replacement 4. Unlatch print head lock lever (1, Figure 4-1b) and withdraw defective print head (4) from within print assembly (3). 5. Disconnect the two wiring harnesses (not shown) from defective print head (4). 6. Reconnect two wiring harnesses (not shown) to replacement print head (4). NOTE: Each of the printer’s wiring harness connectors are different from all others to ensure proper mating. Mate each matching half for re-connection. 7. Insert replacement print head (4) into print assembly (3) and print head lock lever (1, Figure 4-1a). NOTE: Apply the print to the upper surface of the print assembly’s print bracket and ensure the alignment pins insert into their respective slots. 8. Secure replacement print head (4) to print assembly (3) and secure using screw (2). 9. Restore power, reset the head counter, and test print. GZ4e Series Operator Manual Page 4-5 Section 4: Cleaning and Maintence 4.4 REPLACEMENT PROCEDURES (Cont'd) 4.4.2 Fuse Replacement The fuse is wired to the power receptacle and protects the printer from power surges from the electrical source. If a surge of electricity reaches the fuse, its filament will melt creating a disruption of the flow. In order to bridge the gap so the printer may again be functional, the damaged fuse must be replaced. 1. Switch off the printer and disconnect power supply cord. 2. Unscrew fuse cap (1, Figure 4-2) from fuse cylinder (2) located on rear housing cover (3). 3. Withdraw damaged fuse (4) from fuse cap (1). 4. Insert replacement fuse (4) into fuse cylinder (2) and screw on cap (1). CAUTION: Replace fuse of equal rating, T3.15A H 250V. Do not use a fuse with a higher rating. NOTES: • The fuses may be inspected by looking for a void in its filament or by using a multimeter to check for circuit continuity. • Fuse amperage and voltage rating may be found stamped into the fuse’s metal contacts or labeled on the printer’s rear. The orientation of the fuse does not matter. It only has to be installed into its respective cylinder and be able make contact on each end to function. • CAUTION: IMPROPER FUSE USAGE MAY RESULT IN DESTROYED ELECTRICAL COMPONENTS AND/OR FIRE. ENSURE THE DAMAGED FUSE IS REPLACED WITH ONE OF IDENTICAL PHYSICAL DIMENSIONS AND AMPERAGE. TO DO THIS, DUPLICATE THE INFORMATION STAMPED ON THE FUSE’S METAL CASING. 1 4 2 3 Figure 4-2, Fuse Replacement (T3.15A H 250V) Page 4-6 GZ4e Series Operator Manual Section 4: Cleaning and Maintence 4.5 ADJUSTING PRINT QUALITY Print quality can be optimized with regular cleaning and maintenance of the print head and components along the label path. Additionally, you can fine-tune print quality by adjusting print darkness and print speed settings. 4.5.1 Adjusting Print Darkness This adjustment allows the user to control (within a specified range) the amount of power applied to the individual print head heat elements. It is important to find a proper print darkness level based on your particular label and ribbon combination. The printed images should not be too light nor should the ink from the ribbon “bleed.” The edges of each image should be crisp and well defined. PRINT DARKNESS — The Print Darkness can be set from the Normal Mode menu. There are five settings, from 1 (lightest) to 5 (darkest). The default setting is 3. Once the range has been selected, the setting of the Print potentiometer can be used to make finer adjustments. PRINT DARKNESS 1 2 3 4 5 Print potentiometer — The fine adjustment for Print Darkness can be done by adjusting the Print potentiometer on the front operator panel. It provides a continuous range of adjustment, allowing you to make precise changes. Maximum print darkness is obtained by turning the potentiometer all the way clockwise and maximum counter-clockwise setting will give the lightest print. Note: The Print potentiometer adjustment will affect the darkness regardless of the speed and darkness ranges setting. 4.5.2 Adjusting Print Speed Besides varying the rate at which labels are printed, this adjustment can be used to regulate any changes in print quality. PRINT SPEED — Print Speed can be set from the Normal Mode menu. PRINT SPEED 2 3 4 5 6 >> PRINT SPEED << 7 8 9 10 Setting range differs by print resolution and print mode. GZ408e [8dots/mm] Continuous/ Tear-off mode: between 2 and 10 (inches per second) Cutter/ Dispenser mode: between 2 and 6 (inches per second) GZ412e [12dots/mm] Continuous/ Tear-off mode: between 2 and 8 (inches per second) Cutter/ Dispenser mode: between 2 and 6 (inches per second) The initial value is 4 IPS. GZ4e Series Operator Manual Page 4-7 Section 4: Cleaning and Maintence This page is intentionally left blank. Page 4-8 GZ4e Series Operator Manual Section 5: Troubleshooting TROUBLESHOOTING If you are unable to produce printouts on the GZ4e series printer, use this section to make sure the basics have been checked, before deciding you are unable to proceed any further. The section is divided into four parts: • 5.1 Error signal Troubleshooting • 5.2 Troubleshooting Table • 5.3 Interface Troubleshooting • 5.4 Test Print Troubleshooting GZ4e Series Operator Manual Page 5-1 Section 5: Troubleshooting 5.1 ERROR SIGNAL TROUBLESHOOTING ERROR DISPLAYS ERROR LED 01 Machine Red 02 EEPROM Red LCD DISPLAY MACHINE ERROR EEPROM ERROR Red PARITY ERROR 04 Overrun Red OVERRUN ERROR Red FRAMING ERROR 06 Buffer Overflow Red BUFFER OVER 07 Head Open Red HEAD OPEN Red PAPER END 08 Paper End 09 Ribbon End RIBBON END 10 Sensor Error Red SENSOR ERROR 11 Head Related Red 1. Ensure correct communication parameters. 2. Check cables, cycle printer and resend. 3. Replace board. 1. Check and correct communication cables and settings. 2. Reboot printer and try again. 1. Ensure host system and interface settings match. 2. Check and correct communication cables (null modem serial cable required). 1. Size of received data exceeds size of receiving buffer. 2. Establish the correct communication protocol. 1. 2. Properly latch the print head. Replace the head-open switch. 1. 2. Ensure media is properly loaded. Clean sensor transmit/receive surfaces. Ensure correct sensor configuration. 1. Ensure ribbon stock is properly loaded. 2. Ensure ribbon has not been damaged. 3. Ensure proper printer configuration. 1. 2. 3. HEAD ERROR Ensure all wiring harnesses are properly connected. Replace main circuit board. 1. Ensure correct communication protocols. 2. Check cables, cycle printer power and re-send. 3. Replace board. 3. Red Page 5-2 1. 2. 03 Parity 05 Framing DESCRIPTION Ensure media is properly loaded. Clean sensor transmit/receive surfaces. Ensure correct sensor configuration. 1. Clean the print head’s contact surface. 2. Replace the print head. GZ4e Series Operator Manual Section 5: Troubleshooting 5.1 ERROR SIGNAL TROUBLESHOOTING (Cont’d) ERROR DISPLAYS ERROR LED LCD DISPLAY DESCRIPTION Red DOWNLOAD ERROR XXXXXXXX ERROR Delete unnecessary data to free up memory space. 2. Ensure the data communication settings are correct. 13 Interface Red DOWNLOAD ERROR I/F NOT SUPPORTED 1. Data sequence number doesn’t match previous data. 2. Check send data and communications setting. 14 Download Data Red DOWNLOAD ERROR DATA ERROR 1. Confirm settings are correct. 2. Retry command. 15 Download Write Red DOWNLOAD ERROR WRITE ERROR 1. Confirm settings are correct. 2. Retry command. 16 Print Rate Over Red PRINT RATE OVER 17 Print Pause Red PRINT PAUSE 18 Head overheat Red HEAD OVERHEAT 19 Cutter Error Red CUTTER ERROR 12 Memory Reading 1. 1. Print rate is higher than 70%. Review print data. 1. 2. Review print data. Leave it for a while. 1. Temperature of print head exceed tolerance range. Leave it for a while until print head cool down. 1. Paper jammed or cutter slit doesn’t work correctly. Clean the cutter. Note: If problems persist after performing the suggested countermeasures, please contact SATO Sales Representatives for further assistance. GZ4e Series Operator Manual Page 5-3 Section 5: Troubleshooting 5.1 ERROR SIGNAL TROUBLESHOOTING (Cont’d) 5.1.1 More about Head Check Function The head check function detects the integrity of the heating elements in the thermal print head. However, malfunctions cannot be detected instantaneously—a few printed labels may start showing printing defects before the printer warns of a print head error. After detection of a print head error, use a scanner to check all affected labels. HEAD ERROR Press FEED button for 5 seconds. HEAD CHECK NORMAL BARCODE Press LINE + FEED buttons for 5 seconds. Select BARCODE Disabling the head check function temporarily until the printer is turned off. LINE FEED HEAD CHECK "NORMAL" : Actual printed area "BARCODE" : Barcode printed area Head Check OK? NG OK OFFLINE XXXXXX Figure 5-1, Head Check Function When a head check error occurs during normal printing (barcodes, text and graphics), press and hold down the FEED button for five seconds. At the next screen, select BARCODE, then press FEED button and see if printing can be resumed normally. If printing resume, the fault on the print head does not fall on the barcode area for the current print job. As such, printing may continue but with degraded print quality and readable barcode. If the head check error still occurs and the current print job has to be complete, the printing can be forced to resume by holding down the LINE and FEED buttons for five seconds. Please read the Attention below before you proceed this operation. ATTENTION: Although restricting the head check type to BARCODE allows you to continue printing, or forcing the printer to resume printing, you should only do so in order to complete an urgent print job. Check the printed labels to make sure the output is usable in spite of the head error. As soon as possible, stop using the print head to prevent further damage. If necessary, get the print head replaced. Page 5-4 GZ4e Series Operator Manual Section 5: Troubleshooting 5.2 TROUBLESHOOTING TABLE TROUBLESHOOTING TABLE IMAGE VOIDS Dirty print head. Clean print head. Defective print head. Replace print head. Defective main circuit board. Have SATO authorised servicing personnel replace main board. Damaged or worn platen roller. Replace platen roller. Poor label quality. Use higher quality media. Use only SATO-certified media. Ribbon stock and media are mismatched. Consult with media supplier. Use only SATO-certified media. RIBBON WRINKLING Poor head alignment. Adjust head balance and alignment. Poor ribbon tension. Adjust tension as required. Damaged or worn platen roller. Replace platen roller. Foreign material on print head and/or rollers. Clean as required. Foreign material on labels. Use higher quality media. Use only SATO-certified media. Defective print head. Replace print head as required. LIGHT PRINT IMAGES Low print head darkness. Adjust darkness level setting. Low print head pressure. Adjust head pressure and/or balance. Foreign material on print head. Clean print head and platen roller. Improper head alignment. Align print head as required. Excessive print speed. Reduce print speed setting. UNEVEN PRINT DARKNESS Unbalanced print head. Adjust head balance. Damaged or worn platen roller. Replace platen rollers as required. Dirty print head. Clean print head as necessary. MEANDERING MEDIA Incorrectly loaded media. Ensure correct loading. Improperly adjusted media guides. Adjust as required. Unbalanced print head. Adjust as required. Damaged or worn platen roller. Replace platen roller as required. SMEARED PRINT IMAGES Poor media quality Use higher quality media. Use only SATO-certified media. Foreign material on print head and platen roller Clean print head and platen roller. Foreign material on labels Use higher quality media. Use only SATO-certified media. Excessive print head energy Adjust darkness level setting. Excessive print speed Adjust print speed as required. Excessive print head pressure. Adjust head balance. GZ4e Series Operator Manual Page 5-5 Section 5: Troubleshooting 5.2 TROUBLESHOOTING TABLE (Cont’d) TROUBLESHOOTING TABLE NO LABEL MOVEMENT Loose or broken timing belt. Replace or adjust as required. Incorrect label sensor selected. Check printer configuration for proper sensor selection. No voltage output. Replace fuse as stated, T3.15A H 250V. Test power supply and replace as required. Drive motor not operating. Ensure wiring harness connection. Replace as necessary. INCORRECT LABEL POSITIONING Incorrect label sensor selection. Ensure the correct sensor is selected. Improper sensor adjustment. Adjust sensor sensitivity as required. Data input error. Ensure correct data stream. Incorrect offset settings. Adjust offset settings as required. NO PRINTED IMAGE Print head is disconnected. Ensure print head wiring harness is connected on each end. No voltage output. Replace fuse as stated, T3.15A H 250V. Test power supply and replace as required. Defective print head. Replace print head and reset counter. Defective main circuit board. Have SATO authorised servicing personnel replace main board. Interface problems. Troubleshoot interface - refer to the next chapter. Data input error. Ensure correct data stream. PRINTER CREATES A BLANK LABEL Data input error. Ensure correct data stream. Incorrect label sensor selection. Set the sensor correctly. Print head is disconnected. Power off the printer and ensure a proper connection. Defective print head. Replace print head as required. Defective main circuit board. Have SATO authorised servicing personnel replace main board. LCD FIELD ILLUMINATED BUT WITHOUT WORDS OR NO DISPLAY AT ALL Power supply issues. Page 5-6 Ensure cable properly connected. Check/replace power supply. GZ4e Series Operator Manual Section 5: Troubleshooting 5.3 INTERFACE TROUBLESHOOTING This chapter provides a checklist for the various interface types. Locate the checklist relative to the interface used and perform each of the troubleshooting tasks until the problem has been isolated. IEEE1284 PARALLEL INTERFACE CHK TROUBLESHOOTING STEP Ensure the interface module is correctly installed. Run self-test to verify. Ensure the printer cable is connected to the appropriate LPT port on the host computer. If using a Windows printer driver, ensure the correct port is selected. Ensure a IEEE1284 printer cable is being used. Ensure the host’s peripheral settings are set to ECP for faster throughput. Refer to the computer manufacturer’s documentation for details. Ensure the printer is receiving information from the computer using the Receive Buffer Hex Dump mode. Refer to that procedure within this manual for instructions. The command stream should be continuous and possess 0Dhex and/or 0Ahex (carriage return and line feed) characters throughout. However, there should not be either located between the start (<ESC>A) and the stop (<ESC>Z) commands. Try another port to isolate the problem. Replace the main circuit board if determined to be the problem. RS232 SERIAL INTERFACE CHK TROUBLESHOOTING STEP Ensure the correct interface module is correctly installed. Run self-test to verify. Ensure the serial cable (Null Modem) meets specifications and is correctly connected at each end. Ensure the serial cable is not defective. Ensure the communication parameters for the baud rate, parity, data bits and stop bits are consistent with those being sent from the host computer. Ensure the printer is receiving information from the computer using the Receive Buffer Hex Dump mode. Refer to that procedure within this manual for instructions. The command stream should be continuous and possess 0Dhex and/or 0Ahex (carriage return and line feed) characters throughout. However, there should not be either located between the start (<ESC>A) and the stop (<ESC>Z) commands. Try another port to isolate the problem. Replace the main circuit board if determined to be the problem. UNIVERSAL SERIAL BUS (USB) INTERFACE If nothing prints during a test print, verify the device drivers have been successively installed by performing the following: CHK TROUBLESHOOTING STEP Click on Start, Settings, and then Control Panel. Click on System within the new window. Click on the Device Manager tab. Ensure that the View Device By Type is checked. Scroll to SATO-USB Device and ensure that errors do not exist. Reinstall as required. Reboot the PC and the printer. GZ4e Series Operator Manual Page 5-7 Section 5: Troubleshooting 5.3 INTERFACE TROUBLESHOOTING (Cont’d) LAN ETHERNET INTERFACE CHK TROUBLESHOOTING STEP Ensure the interface has been correctly configured. Wait two minutes and run self-test to verify. If a test label does not print, there may be a hardware problem. Ensure the cable and its ports are not defective. Ensure that a faulty print server or other protocol related scenarios are not creating a queue setup issue. Systematically perform checks and tests to isolate the cause. If using TCP/IP, ensure that a valid IP address is specified and that all parameters are correct (subnet mask, gateway, etc.). Attempt to PING the IP address assigned to the network interface. If using a repeater or hub, ensure the SQE is turned off. Also ensure the repeater port is not defective by trying the print server on another port. Install the IPX/SPX protocol on a workstation to determine if the network device can be discovered via the MAC address. If able, configure the appropriate protocols and retest connectivity. Use a crossover cable to isolate the printer from the network by connecting from the interface and workstation. Verify that the parameters match on each. Test connectivity. 5.4 TEST PRINT TROUBLESHOOTING Chapter provides instruction on special printing to identify and resolve specific print problems. HEX DUMP Allows the operator to determine if there were problems in the downloading of data. TEST LABEL Allows the operator to identify specific problems regarding mechanical performance and setup. 5.4.1 Hex Dump The contents of the print buffer can be examined using the Hex Dump Mode. In the left column, each line of data received is numbered. The center column provides the data in hexadecimal format. And in the right column, the same data is provided in the ASC ll format. Follow the flow chart provided below to perform this activity. Send ESC+HX command or Send ESC+DW2 command to configure DWS2-4 to ON + Power On ONLINE [S] QTY: XXXXXX Printer receives data Printer begins Hex Dump printing Power printer off , to exit Figure 5-2, Hex Dump Mode Page 5-8 GZ4e Series Operator Manual Section 5: Troubleshooting 5.4 TEST PRINT TROUBLESHOOTING (Cont’d) 5.4.2 Test label printing The test label is designed to assist in the identification of print problems. Refer to Section 3.10 Test Print Mode for more details to perform this activity. FEED + POWER TEST PRINT MODE CONFIGURATION BARCODE HEADCHECK FACTORY Scrolls options LINE Configuration Barcode Headcheck FEED TEST PRINT SIZE XXCM Scrolls options Factory FEED PRINT SIZE SMALL LARGE LINE LINE FEED Scrolls options Test printing begins PRESS FEED KEY TO STOP PRINTING USER TEST PRINT YES NO FEED NO FEED PRINT CONTINUE YES NO Scrolls options Scrolls options LINE Test printing stops YES FEED ONLINE MODE [S] QTY: XXXXXX LINE YES FEED NO FEED Figure 5-3, Test Print Model . NOTE: The only print problem that the following sample test label does not display is fading of print image from one side of the label to the other. This is the result of improper print head balance. GZ4e Series Operator Manual Page 5-9 Section 5: Troubleshooting 5.4 TEST PRINT TROUBLESHOOTING (Cont’d) Compare this scale on each side to ensure the print is evenly spaced horizontally . Visually inspect these rows for voids indicating defective head elements. SAMPLE TEST LABEL Label Contents Will Vary Depending on Test Label Type . Displays the dip switch settings at the time of print. Line sharpness is determined by print speed and darkness. D S W 1 D S W 2 D S W 3 N O N E Clear line in print indicates the ribbon was wrinkled during printing. Compare this scale on each side to ensure the print is evenly spaced vertically . Figure 5-4, Sample Test label Page 5-10 GZ4e Series Operator Manual Section 6: Basic Specifications BASIC SPECIFICATIONS 6.1 PRINTER BASIC SPECIFICATIONS Specifications are subject to change without notice. MODEL NAME GZ408e/ GZ412e PHYSICAL CHARACTERISTICS Width 271 mm (10.67”) Height 322 mm (12.68”) Depth 428 mm (16.85”) Weight 14 kg (30.86 lbs.) POWER SUPPLY Input Voltage Input power voltage: AC 100V-120V/ 200V-240V, +/-10% (selectable via jumper position) Frequency: 50/60 Hz Power Consumption At peak: 155W/ 200VA (Print ratio 30%) In standby: 16W/ 28VA ENVIRONMENTAL (EXCLUDING MEDIA) Operating Temperature 5° to 40°C (41 to 104 F) Storage Temperature -5° to 60°C (23 to 140 F) Operating Humidity 30 to 80% RH, Non-condensing Storage Humidity 30 to 90% RH, Non-condensing GZ4e Series Operator Manual Page 6-1 Section 6: Basic Specifications PRINT Method Print Speed (selectable) Thermal Transfer and Direct Thermal GZ408e: Continuous/ Tear-off: 2, 3, 4, 5, 6, 7, 8, 9, 10 Inch/sec (50, 75, 100, 125, 150, 175, 200, 225, 250 mm/sec) Cutter/ Dispenser: 2, 3, 4, 5, 6 Inch/sec (50, 75, 100, 125, 150 mm/sec) GZ412e: Continuous/ Tear-off: 2, 3, 4, 5, 6, 7, 8 Inch/sec (50, 75, 100, 125, 150, 175, 200 mm/sec) Cutter/ Dispenser: 2, 3, 4, 5, 6 Inch/sec (50, 75, 100, 125, 150 mm/sec) Caution: Reduce the print speed depending on the pitch size and type of media used. Resolution Unprintable area GZ408e: GZ412e: 8 dots/mm (203 Dots Per Inch) 12 dots/mm (305 Dots Per Inch) Pitch direction Top: 2.0 mm (0.079”) or less, Bottom: 2.0 mm (0.079”) or less (Excluding liner) Width direction Left: 1.5 mm (0.059”) or less, Right: 1.5 mm (0.059”) or less (Excluding liner) Maximum Print Width 104 mm (4”) Maximum Print Length 178 mm (7”) Pitch at EX Command Print darkness GZ408e: GZ412e: 1249 mm (49.17”) 833 mm (32.80”) Darkness range: A, B Darkness level: 1 to 5 RIBBON (Be sure to use ribbon manufactured or certified by SATO) Width 111 mm (4.37”) * Use the carbon ribbon wider than the paper to be used. Length Max. 450 m (1476.38 ft.) (Depending on ribbon type) * When using the print speed faster than 7 Inch/sec (150 mm/sec), the maximum length is 300 m (984.25 ft.) (Depending on ribbon type) Wind Direction Face-In Winding Method Rolled onto a core Roll Diameter 75 mm (2.95”) Core Diameter Inner core diameter: 25.4 mm (1”) Page 6-2 GZ4e Series Operator Manual Section 6: Basic Specifications MEDIA (Be sure to use media manufactured or certified by SATO) Label Continuous Width: 22 to 128 mm (0.87” to 5.04”) Width including liner: 25 to 131 mm (0.98” to 5.16”) Pitch: 6 to 178 mm (0.24” to 7.01”) Pitch including liner: 9 to 181 mm (0.35” to 7.13”) • When using the print speed faster than 7 Inch/sec (150 mm/sec), Pitch: 20 to 178 mm (0.79” to 7.01”) Pitch including liner: 23 to 181 mm (0.91” to 7.13”) Tear-off Width: 22 to 128 mm (0.866” to 5.04”) Width including liner: 25 to 131 mm (0.984” to 5.16”) Pitch: 17 to 178 mm (0.67” to 7.01”) Pitch including liner: 20 to 181 mm (0.79” to 7.13”) • When using the print speed faster than 7 Inch/sec (150 mm/sec), Pitch: 20 to 178 mm (0.79” to 7.01”) Pitch including liner: 23 to 181 mm (0.91” to 7.13”) Cutter/ Dispenser Width: 22 to 128 mm (0.87” to 5.04”) Width including liner: 25 to 131 mm (0.98” to 5.16”) Pitch: 17 to 178 mm (0.67” to 7.01”) Pitch including liner: 20 to 181 mm (0.79” to 7.13”) Size * Label length may be constrained by media type or operating environment. For example, label length of longer than 147 mm (5.8”) may stick to the front cover when using the optional dispenser, depending on the media type. Be sure to confirm by each case when using the label. Type Direct Thermal/ Thermal Transfer Use roll media or Fan-folded media specified by SATO. Roll Diameter (Roll media) Maximum outer diameter: 218mm (8.6”) Core Diameter (Roll media) Inner core diameter: 76 mm (3”), depending on media type Wind Direction Face-In Fan-folded media Max. folded height: 100mm (3.94”) (External paper feed) (Height restriction may apply to the paper setting location) Thickness 0.08 to 0.26 mm (0.003” to 0.01”) PROCESSING CPU 32 Bit RISC Flash ROM 6 MBytes Receive Buffer 2.95 MBytes maximum, 2 MBytes near full PRINTER LANGUAGE Standard GZ4e Series Operator Manual SATO Barcode Printer Language (SBPL) SZPL emulation Page 6-3 Section 6: Basic Specifications INTERFACES Combo Interfaces on board LAN interface board Universal Serial Bus USB B-type connector Serial Port RS232C (9600 to 57,600 bps) Parallel Port IEEE1284 EXT External signal Local Area Network (LAN) 10BASE-T/100BASE-TX Auto-switching CHARACTER FONT CAPABILITIES (SBPL) MATRIX FONTS XU 5 dots W x 9 dots H (Alphanumeric, symbols) XS 17 dots W x 17 dots H (Alphanumeric, symbols) XM 24 dots W x 24 dots H (Alphanumeric, symbols) XB 48 dots W x 48 dots H (Alphanumeric, symbols) XL 48 dots W x 48 dots H (Alphanumeric, symbols) CHINESE FONTS (ONLY FOR CHINA MODEL) GB18030 GB18030 GB2312 16 x 16 dot Mincho 24 x 24 dot Gothic 24 x 24 dot Gothic (CL400e series compatible font) * GB18030 and GB2312 (CL400e series compatible font) are switched by download. RASTERIZED FONTS CG Times (Alphanumeric, symbols) CG Triumvirate (Alphanumeric, symbols) OUTLINE FONTS Alphanumeric characters and symbols CHARACTER CONTROL Magnification Expansion up to 12 x in either the vertical or horizontal Rotation 0°, 90°, 180° and 270° CHARACTER FONT CAPABILITIES (SZPL) MATRIX FONTS A Page 6-4 9 dots H x 5 dots W (Alphanumeric, symbols) B 11 dots H x 17 dots W (Alphanumeric, symbols) C 18 dots H x 10 dots W (Alphanumeric, symbols) D 18 dots H x 10 dots W (Alphanumeric, symbols) E 28 dots H x 15 dots W (Alphanumeric, symbols) F 26 dots H x 13 dots W (Alphanumeric, symbols) G 60 dots H x 40 dots W (Alphanumeric, symbols) H 21 dots H x 13 dots W (Alphanumeric, symbols) GZ4e Series Operator Manual Section 6: Basic Specifications CHARACTER FONT CAPABILITIES (SZPL) P 20 dots H x 18 dots W (Alphanumeric, symbols) Q 28 dots H x 24 dots W (Alphanumeric, symbols) R 35 dots H x 31 dots W (Alphanumeric, symbols) S 40 dots H x 35 dots W (Alphanumeric, symbols) T 48 dots H x 42 dots W (Alphanumeric, symbols) U 59 dots H x 53 dots W (Alphanumeric, symbols) V 80 dots H x 71 dots W (Alphanumeric, symbols) TTF FONTS O 15 dots H x 12 dots W (Alphanumeric, symbols) CHARACTER CONTROL Magnification Expansion up to 12 x in either the vertical or horizontal Rotation 0°, 90°, 180° and 270° BARCODE CAPABILITIES Linear Bar Codes Supported by SBPL/ SZPL: UPC-A/E JAN/EAN-13/8 CODE39, CODE93, CODE128 GS1-128(UCC/EAN128) CODABAR(NW-7) POSTNET Industrial 2 of 5 MSI Supported by SBPL: Matrix 2 of 5 BOOKLAND Two Dimensional Supported by SBPL/ SZPL: QR code (Ver 8.1) PDF417 (Ver 1.1) Maxi Code (Ver 3.0) GS1 DataMatrix (Ver2.0) *Do not support GB18030 China font Composite Symbols N/A Ratios 1:2, 1:3, 2:5, User definable bar widths Rotation Parallel 1 (0°), Parallel 2 (90°), Serial 1 (180°) and Serial 2 (270°) Magnification 1 to 12 times GZ4e Series Operator Manual Page 6-5 Section 6: Basic Specifications VERSATILE FUNCTIONS 1) Status return function 2) Graphics function 3) Sequential number function 4) Form overlay function 5) Character correction function 6) Black/white inversion function 7) Ruled line function 8) Dump list function (HEX dump mode) 9) Format registration function 10) Outline font function 11) Outline modification function 12) Zero slash switching function SELF-DIAGNOSIS FUNCTION 1) Broken head element check 2) Head open detection 3) Paper end detection 4) Ribbon end detection 5) Ribbon near-end detection 6) Test print 7) Cutter blade position detection (Only when cutter kit is installed) 8) Label detection at dispensing (Only when dispenser kit is installed) HARDWARE AND RELATED Operation keys Indicators Adjustment potentiometer 1) Power switch 2) LINE button 3) FEED button Status: Green/ Red LED Pitch: Paper positioning adjustment Offset: Dispense/ Tear off positioning adjustment Print: Print darkness adjustment *Micro driver for the adjustment is not supplied. Buzzer Built-in buzzer available SENSING Gap (Transmissive) Position & Sensitivity Adjustable I-Mark (Reflective) Position & Sensitivity Adjustable Head Open Fixed Ribbon End/ Near End sensor Fixed Dispense sensor Fixed (When using dispenser kit) Cutter blade position sensor Fixed (When using cutter kit) Page 6-6 GZ4e Series Operator Manual Section 6: Basic Specifications OPTIONS 1) Cutter unit 2) Dispenser kit with internal rewinder 3) LAN board (Only for China model) STANDARD ACCESSORIES 1) Power cable 2) Documentations (Quick guide, Warranty, etc.) 3) USB cable (for Combo interface model) 4) Ribbon core 5) Cleaning sheet set REGULATORY COMPLIANCE Safety regulation EN60950-1 GB4943-2001 EMC regulation EN55022, EN55024 GB9254-2008, GB17625.1-2003 Packaging Drop Standard ISTA-2A Environmental Standards RoHS GZ4e Series Operator Manual The RoHS directive restricts the use of six hazardous materials listed below. Hexavalent chromium------------------------- Max. 0.1% Lead and lead compounds------------------- Max. 0.1% Mercury and mercury compounds---------- Max. 0.1% Cadmium and cadmium compounds------- Max. 0.01% Polybrominated biphenyls (PBB)------------ Max. 0.1% Polybrominated diphenyl ethers (PBDE)--- Max. 0.1% Page 6-7 Section 6: Basic Specifications This page is intentionally left blank. Page 6-8 GZ4e Series Operator Manual Section 7: Interface Specifications INTERFACE SPECIFICATIONS This section presents the interface types and their specifications for the GZ4e series printers. These specifications include detailed information to assist in the selection of the most appropriate method for the printer to interface with the host. The following information is presented in this section: • 7.1 Interface Types • 7.2 RS232C High Speed Serial Interface • 7.3 IEEE 1284 Parallel Interface • 7.4 Universal Serial Bus (USB) Interface • 7.5 Local Area Network (LAN) Ethernet • 7.6 External Signal Interface (EXT) 7.1 INTERFACE TYPES GZ4e series printers are equipped with a multiple interfaces board to perform data communication with the host, an external signal interface to connect peripheral devices to the printer. The following built-in interfaces are available. 1) RS-232C (High-speed) interface (DB9 pin (female)) 2) IEEE1284 interface (Communication mode: ECP/compatible, amphenol 25 pin) 3) USB interface (USB B type connector) 4) External signal interface (amphenol 14 pin) LAN Interface: 1) LAN interface (10BASE-T/100BASE-TX automatic switch over, RJ45 connector) Caution Never connect or disconnect interface cables (or use a switch box) with power applied to either the host or printer. This may caused damage to the interface circuitry in the printer/ host and is not covered by warranty. GZ4e Series Operator Manual Page 7-1 Section 7: Interface Specifications 7.2 RS232C HIGH SPEED SERIAL INTERFACE 7.2.1 Basic Specifications This interface complies with the RS-232C standard. Various communication settings are available by the interface mode of the printer or the printer setup tool. INTERFACE SPECIFICATIONS Asynchronous ASCII Half-duplex communication Bi-Directional Communication Data Transmission Rate 9600, 19200, 38400, 57600 bps Transmission Form Start, b1, b2, b3, b4, b5, b6, b7, b8, Stop (b8 will be omitted if using 7 bit oriented) Data Length 7 or 8 bit (selectable) Stop Bit 1 or 2 bit (selectable) Parity Bit ODD, EVEN, NONE (selectable) Codes Used ASC II Character Codes: 7 bits, Graphics: 8 bits Control Codes STX (02H), ETX (03H), ACK (06H), NAK (15H) Connector (Printer Side) DB-9S Female (equivalent) Cable Connector DB-9P Male (equivalent) Cable Length 15m (50 feet) or less. Signal Levels High = +5V to +12V, Low = -5V to -12V Protocol Ready/Busy, X-On/X-Off, Protocol for Driver, Status4 (Bi-Com) 7.2.2 Printer Configuration Setting when using Serial Interface When RS232C Serial Interface is selected for communicating between printer and host, we need to set up some printer configuration for controlling communication conditions. These configurations can be set in the ADVANCED MODE LCD menu. Please refer to the Section 3.6 Advanced Mode of this manual to configure the printer for host computer interfacing. 7.2.3 READY/BUSY Flow Control Ready/Busy is the hardware flow control method for the serial interface on the GZ4e series printers. By raising/ lowering the voltage level on Pin 4 of the RS232 port, the printer notifies the host when it is ready to receive data. Pin 7 (RTS) and pin 4 (DTR) are the important signals on the printer for this method of flow control. The host must be capable of supporting this flow control method for it to function properly. Pin Assignments 5 1 9 6 Figure 7-1, Serial Connector Pin Assignments Page 7-2 GZ4e Series Operator Manual Section 7: Interface Specifications 7.2 RS232C HIGH SPEED SERIAL INTERFACE (Cont’d) READY/BUSY INTERFACE SIGNALS PIN DIRECTION SIGNAL DEFINITION 1 - Not connected 2 To Printer RD (Receive Data) - Data to the printer from the host computer. 3 To Host TD (Transmit Data) - Data from the printer to the host computer. Sends X-On/X-Off characters or status data (bi-directional protocols). 4 To Host DTR (Data Terminal Ready) - This signal applies to Ready/Busy flow control. The printer is ready to receive data when this pin is high. It goes low when the printer is offline, either manually or due to an error condition, and while printing in the single-job buffer mode. It will also go low when the data in the buffer reaches the buffer near-full level. 5 Reference SG (Signal Ground) 6 To Printer DSR (Data Set Ready) - When this line is high, the printer will be ready to receive data. This line must be high before data is transmitted. If this line is not being used, it should be tied high (to pin 6). 7 To Host RTS (Request To Send) - Used with Ready/Busy flow control to indicate an error condition. RTS is high and remains high unless the print head is open (in this case, RTS would return to the high state after the print head is closed and the printer is placed back online) or an error condition occurs during printing (e.g., label out). 8 To Printer CTS (Clear To Send) - When this line is high, the printer assumes that data is ready to be transmitted. The printer will not receive data when the line is low. If this line is not being used, it should be tied high (to pin 4). 9 - Not connected READY/BUSY CABLE REQUIREMENTS DB9 DB25 HOST DIRECTION DB9 PRINTER 1 1 FG (Frame Ground) - 1 - 3 2 TD (Transmit Data) To Printer 2 RD (Receive Data) 2 3 RD (Receive Data) To Host 3 TD (Transmit Data) 6 6 DSR* (Data Set Ready) To Host 4 DTR (Data Terminal Ready) 5 7 SG (Signal Ground) Bi-Directional 5 SG (Signal Ground) 4 20 DTR (Data Terminal Ready) To Printer 6 DSR (Data Set Ready) 8 5 CTS (Clear To Send) To Host 7 RTS (Request To Send) 7 4 RTS (Request To Send) To Printer 8 CTS (Clear To Send) * This connection at the host side of the interface would depend upon the pin that is being used as the Ready/Busy signal by the driving software. Typically, on a PC, it would be either CTS (pin8) or DSR (pin 6) on a DB-9 connector. GZ4e Series Operator Manual Page 7-3 Section 7: Interface Specifications 7.2 RS232C HIGH SPEED SERIAL INTERFACE (Cont’d) 7.2.4 X-ON/X-OFF Flow Control X-On/ X-Off flow control is used whenever hardware (Ready/Busy) flow control is not available or desirable. Instead of a voltage going high/low at pin 4, control characters representing “Printer Ready” (X-On = 11 hexadecimal) or “Printer Busy” (X-Off = 13 hexadecimal) are transmitted by the printer on pin 3 (Transmit Data) to the host. In order for this method of flow control to function correctly, the host must be capable of supporting it. X-On/X-Off operates in a manner similar to the function of pin 4 (DTR) as previously explained. When the printer is first powered on it sends an X-Off when the “Buffer Near Full” level is reached and a X-On when the data level of the buffer drops below the “Buffer Available” mark. When the printer is taken off-line manually, it transmits an X-Off indicating it cannot accept data. When it is placed back on line manually, it sends an X-On, indicating it is again available for receipt of data. If an error occurs during printing (paper out, ribbon out), the printer sends an X-Off as soon as an error condition is detected. When the error is cleared and the printer is placed back on-line, it transmits an X-On indicating it is again ready to accept data. Upon power up if no error conditions are present; the printer will continually send X-On characters at five millisecond intervals until it receives a transmission from the host. X-ON/X-OFF CABLE REQUIREMENTS Communicates with the host to determine if the printer is ready to receive data by sending “XON” (HEX 11H) or “XOFF” (HEX 13H) code to the TD line. The single and multiple item buffers are switchable in the Interface Mode of the printer. DB9 DB25 HOST DIRECTION DB9 PRINTER 1 1 FG (Frame Ground) - 1 FG (Frame Ground) 3 2 TD (Transmit Data) To Printer 2 RD (Receive Data) 2 3 RD (Receive Data) To Host 3 TD (Transmit Data) 5 7 SG (Signal Ground) Bi-Directional 5 SG (Signal Ground) NOTE: Depending on the host used, it may be required to loop CS and RS (maintaining at high-level) on the host side. For more information, refer to the host computer documentation. Page 7-4 GZ4e Series Operator Manual Section 7: Interface Specifications 7.3 IEEE 1284 PARALLEL INTERFACE The IEEE 1284 Interface on the printer complies with Centronics/ IEEE1284 standards. It will automatically detect the IEEE1284 signals and operate in the high speed mode. If it does not detect the IEEE1284 signals, it will operate in the standard Centronics mode, which is significantly slower. For this reason, an interface cable and host interface conforming to the IEEE1284 specification must be present to fully utilize the speed capabilities. The ECP mode is recommended for LPT1 port settings. Make sure to change the LPT1 port settings through the BIOS settings. 7.3.1 Basic Specifications Interface connector 18 1 36 19 Printer connector: AMP 57-40360 (DDK) or equivalent Cable connector: AMP 57-30360 (DDK) or equivalent Cable length 3m (10 feet) or less Signal level High level Low level Receive mode Single-item buffer or Multi buffer : +2.4 to +5.0V : +0.0 to -0.4V Configure the DIP switch, DSW2-5, of the printer for the setup of receive mode. * DSW2-5 (1 item/ Multi-Job Receive Buffer) is not valid when the printer is in SZPL emulation mode. Note: Send print data while the printer is on. Turn off the printer when disconnect interface cable. GZ4e Series Operator Manual Page 7-5 Section 7: Interface Specifications 7.3 IEEE 1284 PARALLEL INTERFACE (Cont’d) 7.3.2 Pin Assignments Pin assignment of each signal for the Centronics standard (Compatible Mode) is as follows. Note that the line connection for the IEEE1284 standard is based on the IEEE1284-B standard. PIN No. Signal I/O PIN No. Signal 1 STROBE Input 19 STROBE-RETURN 2 DATA 1 Input 20 DATA 1-RETURN 3 DATA 2 Input 21 DATA 2-RETURN 4 DATA 3 Input 22 DATA 3-RETURN 5 DATA 4 Input 23 DATA 4-RETURN 6 DATA 5 Input 24 DATA 5-RETURN 7 DATA 6 Input 25 DATA 6-RETURN 8 DATA 7 Input 26 DATA 7-RETURN 9 DATA 8 Input 27 DATA 8-RETURN 10 ACK Output 28 ACK -RETURN 11 BUSY Output 29 BUSY -RETURN 12 PTR ERROR Output 30 PE -RETURN 13 SELECT Output 31 INIT Input 14 AUTOFD Output 32 FAULT Output 15 Not used 33 Not used 16 LOGIC GND 34 Not used 17 Frame GND Frame Gnd 35 Not used 18 +5V (Z=24K ohm) Output 36 SELECTIN Page 7-6 I/O Input GZ4e Series Operator Manual Section 7: Interface Specifications 7.3 IEEE 1284 PARALLEL INTERFACE (Cont’d) 7.3.3 Input and Output Signals The details of each signal line for the Centronics standard (Compatible Mode) are as follows. Note that each signal line complies with the IEEE1284 standard. Pin No. 1 2~9 Signal I/O Description STROBE Input Synchronization signal that requires low active pulse to read DATA1 ~ DATA8 DATA 1 ~ DATA 8 Input Data entry of 8bits parallel: DATA1 --LSB (lowest bit) DATA8 --MSB (highest bit) 10 ACK Output Low active pulse signal indicating the completion of receive data import 11 BUSY Output High active signal indicating that the printer is not ready to receive data 12 PTR ERROR Output High active signal indicating paper shortage 13 SELECT Output High active signal indicating that the printer is ready to receive data 14 AUTOFD Output Signal for the IEEE1284 standard 17 FRAME GND Connecting to framework ground 18 PERIPHERAL LOGIC HIGH +5V voltage on the printer side SIGNAL GND Connecting to each signal ground 19~30 31 INIT 32 FAULT 33 SELECTIN GZ4e Series Operator Manual Input Output Input Low active pulse signal initializing the printer Low active pulse signal indicating an error in the printer Signal for the IEEE1284 standard Page 7-7 Section 7: Interface Specifications 7.4 UNIVERSAL SERIAL BUS (USB) INTERFACE The Universal Serial Bus (USB) interface of the print complies with USB standard. It requires a driver that must be loaded onto the PC and configured to support USB peripherals using Windows 2000 or above. Up to 127 devices may be connected to a USB port using powered hubs. 7.4.1 Basic Specifications Interface connector 2 1 3 4 USB Type B plug Cable length: 3m (10 feet) or less (Twisted Pair Shielded) Host Window 2000 or above with USB port Power Supply BUS Power through cable Power Consumption +5 V at 80mA 7.4.2 Pin Assignments Pin No. Description 1 VBus 2 -Data(D-) 3 +Data(D+) 4 GND Page 7-8 GZ4e Series Operator Manual Section 7: Interface Specifications 7.5 LOCAL AREA NETWORK (LAN) ETHERNET Local Area Network (LAN) interface is a Plug-In Interface Module that can be installed by replacing the 3-in-1 Combination Interface Module. The driver that must be loaded onto the host computer and configured to support the TCP/IP network protocol using a 10/100BaseT LAN connection. Details for loading the LAN driver are contained on the CD-ROM that is shipped with each LAN interface module. 7.5.1 Basic Specifications SPECIFICATIONS Connector RJ-45 Receptacle Cable 10/100BaseT Category 5 Cable Length 100m or less Power Supply Powered from printer Protocol Status3 Protocol for Driver (cyclic response mode) Protocol for Driver (ENQ response mode) Status5 IP Address 0.0.0.0 to 255.255.255.255 Subnet Mask 0.0.0.0 to 255.255.255.255 Gateway Address 0.0.0.0 to 255.255.255.255 7.5.2 DIP switch settings DIP SWITCH SETTINGS SWITCH SETTING 1 Reserved (setup prohibited). 2 LAN board EEPROM initialization (configuration). 3 Print configuration details on a label. 4 Print a self-diagnosis of the board onto a label. GZ4e Series Operator Manual Page 7-9 Section 7: Interface Specifications 7.5 LOCAL AREA NETWORK (LAN) ETHERNET (Cont’d) 7.5.3 Software Specifications SOFTWARE SPECIFICATIONS Corresponding Protocol TCP/IP Network Layer ARP, RARP, IP, ICMP Session Layer TCP, UDP Application Layer LPD, FTP, TELNET, BOOTP, DHCP NOTE: Print data can be sent by LPR and FTP of TCP/IP and dedicated socket protocol. Printer status is obtainable by dedicated socket protocol. NOTE: In the TCP/IP protocol environment, LPD and FTP are provided for printing; TELNET for variable setup; ARP, RARP, and BOOTP/DHCP for address setup. LPD protocol complies with RFC1179 and handles the list of logical printer name as queue name such as lp, sjis, euc. In addition, a banner page can be printed by a proper setup. When sending the job by LPR, the transmission order of data file/control file within the job will not affect print operation. In addition, if the banner page is specified, it will be added to each data file. Job deletion by LPR is not available. FTP protocol complies with RFC959 and handles the list of logical printer name as a transfer directory. File transfer to this directory executes print operation. It is possible to specify ASCII(A), Binary (I) and TENEX(L8) as transfer mode although the mode difference is dependent on the client. A banner page may be printed with a proper setup. TELNET Complies with RFC854. This operation consists of interactive menu form and enables change and reference of internal setup, and to display status. To change the setup, enter “root” user and password at the time of login. Default of root password is set as null (linefeed only). Important notes: The LAN interface configuration print outs will not be printed if the printer is in manual SZPL Mode. Page 7-10 GZ4e Series Operator Manual Section 7: Interface Specifications 7.6 EXTERNAL SIGNAL INTERFACE (EXT) External signal interface is designed to connect the printer to external peripheral devices. The 14 pin, Centronics type EXT connector provides printer interface with printer accessories with a choice of four different output signals along with various error conditions. External signal setting is set with the DIP switch and in the Service mode of the printer. 7.6.1 Basic Specifications Interface connector 7 1 14 8 EXT External Signal Connector Pin Assignments Centronics IDC Type 14 pin (female) 7.6.2 Pin Assignments EXT CONNECTOR PIN ASSIGNMENTS PIN DIRECTION 1 To Host 2 Reference 3 To Host Ribbon Out - goes low (0V) when ribbon is out. 4 To Host Error - goes low when the printer detects an error condition such as head open or receive buffer is full. 5 To Printer Print Start - one label will print when this pin is pulled to ground. This signal must be enabled by placing DIP switch DSW3-5 to OFF position. 6 To Printer End Print - used to drive an applicator or other external device requiring synchronization with the print cycle. Four types of output signals may be chosen using the DSW3-6 and DSW3-7 DIP switches. Refer to the timing charts below. 7 To Printer Reprint - a duplicate of the last label in a print job is reprinted when this signal is received. 8 To Printer Isolated Power Source - for signal output. 9 To Host When Mode1 on the LCD is selected High Voltage = Online Print Job Waiting. When Mode2 on the LCD is selected High Voltage = Online. This goes low (0V) when the printer is offline. 10 To Host Ribbon Near End - Goes high when the amount of ribbon on the supply spindle is approximately 46 feet (14m). The output will be low when the ribbon is completely out. 11 SIGNAL DEFINITION Label Out - goes low (0V) when a label error exists. Signal Ground. Reserved. 12 To Host +24V +/- 10% @2A - Power for external devices. 13 To Host Vcc +/- 5V 14 Frame Ground GZ4e Series Operator Manual Page 7-11 Section 7: Interface Specifications 7.6 EXTERNAL SIGNAL INTERFACE (EXT) (Cont’d) NOTE: The signals on pins 1, 3, 4, 6, 9 and 10 each have an open collector output. These pins normally measure +.07V maximum when a true condition exists. If a false condition occurs, the voltage will drop to 0V. To achieve a signal level of +5V, you must add a 330 ohm, 1/4 watt pull-up resistor between the open collector output pin and Vcc (pin 13) as illustrated. This will provide a signal level of +5V for a true condition and 0V when a false condition exists. The maximum voltage that can be applied to these pins is +50V and the maximum current they can sink is 500 milliamperes. Pin 13 Vcc= +5V 330 ohm, 1/4W Signal Out Pin 1, 3, 4, 6, 9 or 10 7.6.3 Timing charts Standard Operation Start of Print Cycle Print Start Input End of Print Cycle +5V 0V Print Repeat +5V Input 0V Print End Type 1 +5V 0V 20 Milliseconds Page 7-12 Print End Type 2 +5V Print End Type 3 +5V Print End Type 4 +5V 0V 0V 0V GZ4e Series Operator Manual Section 7: Interface Specifications 7.6 EXTERNAL SIGNAL INTERFACE (EXT) (Cont’d) Repeat Print Start of Print Cycle End of Print Cycle Print Start Input Print Repeat Input Print End Type 1 +5V 0V 20 Milliseconds Print End Type 2 +5V Print End Type 3 +5V Print End Type 4 +5V 0V 0V 0V Error Signals Paper or Ribbon End Motion Stopped +5V Paper End 0V +5V Ribbon End 0V +5V Machine Error 0V Paper/Ribbon Replenished Head Open Head Closed Print Motion Print End Type 1 +5V Print End Type 2 +5V Print End Type 3 +5V Print End Type 4 +5V GZ4e Series Operator Manual 0V 0V 0V 0V Page 7-13 Section 7: Interface Specifications This page is intentionally left blank. Page 7-14 GZ4e Series Operator Manual Section 8: Appendix APPENDIX The following information is provided: • 8.1 Positions of Sensors and Options • 8.2 Operation Mode Selection • 8.3 Base Reference Point • 8.4 Base Reference Point Adjustment • 8.5 Information on Media when using Optional Cutter GZ4e Series Operator Manual Page 8-1 Section 8: Appendix 8.1 POSITIONS OF SENSORS AND OPTIONS Gap 17 - 67mm (0.67 –2.64") I-Mark 6 - 53mm (0.24 –2.09") I-Mark, Gap, Paper-End Sensors Print Head LABEL PRINT DIRECTION 49.4mm (1.94") Print Width: 104mm (4.09") Invalid Area for Print 23.5mm (0.93") 25.3mm (0.99") 29.5mm (1.16") Cutter Tear-Off Dispenser Page 8-2 GZ4e Series Operator Manual Section 8: Appendix 8.2 OPERATION MODE SELECTION There are four modes of printer operation: Continuous, Tear-off, Cutter and Dispense mode. The differences are the ways in which the label and liner are ejected. Before printer configuration, one must determine which mode will be used. This section identifies the functional differences among the four. CONTINUOUS MODE With this mode of operation, the media remains in position for printing at all times. To do so, means that the previous printed label is only available for removal when one to four additional labels have been printed (quantity depends on label size). This mode of operation is specifically suited for printing bulk quantities to be applied later on. TEAR-OFF MODE With this mode of operation, after a batch of printing, the printer feeds the last label so that it is fully extended out of the printer’s front for removal. Upon receiving the next print data, the printer retracts the media so that the next label in line may be printed, then the printer feeds it. This cycle repeats for each batch of printing. CUTTER MODE With the optional cutter unit installed and enabled, this mode of operation will cut individual printed labels or in multiples. The media will be advanced to the cutter blade, the label cut will occur, and the unprinted media will retract for positioning of the next print. DISPENSE MODE When the optional dispenser is installed and enabled, this mode of operation will peel the liner (paper backing) from the printed label as it is advanced to the printer’s front. Once the printed label has been removed from the printer for application, the unprinted media will retract and position itself so the next label may be printed. This operational mode is specifically applicable to print operations where the label is to be immediately adhered. GZ4e Series Operator Manual Page 8-3 Section 8: Appendix 8.3 BASE REFERENCE POINT The base reference point is the point at which one determines the print and cut positions. The base reference position differs, depending on the print mode or the label pitch sensor to be used. . Continuous Mode/ Tear Off Mode I-Mark Label Gap Label Base reference point Base reference point Cutter Mode I-Mark Label Gap Label Base reference point for cutting Base reference point for cutting and printing Base reference point for printing Dispenser Mode I-Mark Label Gap Label Base reference point for dispensing Base reference point for dispensing and printing Page 8-4 Base reference point for printing GZ4e Series Operator Manual Section 8: Appendix 8.4 BASE REFERENCE POINT ADJUSTMENT 8.4.1 Adjustment of Base Reference Point for Printing Normal Mode: PITCH OFFSET: Adjust Pitch VR potentiometer on operator panel: +/-49 mm (1.93”) for all media types +/-3.75 mm (+/-0.15”) for all media types The fine adjustment of the print position can be adjustable within the range of +3.75 mm to -3.75 mm (+0.15” to -0.15”) using the Pitch potentiometer as described above. Base reference point for printing (Print head) Gap sensor Label feed direction Adjustment for “+” value No Adjustment Adjustment for “-” value +3.75mm (+0.15”) -3.75mm (-0.15”) Note: The above base reference point for printing indicates the label stop position when label pitch sensor is set to Gap sensor. GZ4e Series Operator Manual Page 8-5 Section 8: Appendix 8.4 BASE REFERENCE POINT ADJUSTMENT (Cont’d) 8.4.2 Adjustment of option Stop Position Adjust Offset VR potentiometer on operator panel: +/-3.75mm (0.15”) for all media Option stop position (such as Cutter, Dispenser and Tear Off) is adjustable within the range of +3.75 mm to 3.75 mm (+0.15” to -0.15”) using the potentiometer adjustment described above. Cut position Base reference point for printing (Print head) Label feed direction Adjustment for “+” value No Adjustment Adjustment for “-” value +3.75mm (+0.15”) -3.75mm (-0.15”) Note: The above cutting position indicates the stop position when label pitch sensor is set to Gap sensor. Tear off and dispensing positions are adjustable in the same manner. Page 8-6 GZ4e Series Operator Manual Section 8: Appendix 8.5 INFORMATION ON MEDIA WHEN USING OPTIONAL CUTTER 8.5.1 Cutting of Labels The correct cutting position is at the label gap. Cutting onto the label must be avoided because the label adhesive that accumulates on the blade will affect cutter sharpness. Cut Position Label Backing paper Cut Position Label 8.5.2 Cutting Media with Perforation As for media with perforation, cutting on or in front of the perforated lines is prohibited. Cutting in those locations could cause the media to jam and the printer to malfunction. The perforated line +1 mm (+0.04”) is the cut prohibited zone. Cut prohibited zone (1mm, 0.04”) Perforated line 8.5.3 Cutter replacement Over time, the cutter loses its cutting ability and begins to show signs of wear. Replace the cutter unit when the blade becomes blunt and cut edges are rough. (Please contact an authorised SATO Representative for replacement.) 123 — 4 5 6 1 2 3 —456 GZ4e Series Operator Manual Page 8-7 Extensive contact information of worldwide SATO operations can be found on the Internet at www.satoworldwide.com