1
DIY Cellular Alarm
Quick Start Guide
Adapted from PitBoss Quick Start Guide
Quick
Start Installation Guide
V.2.0
Copyright 2012, OmniSite, All Rights Reserved
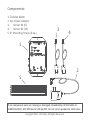
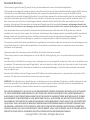
Components:
1. Cellular
PitBoss Cellular
alarm Pump Alarm
2. A/C Power Adapter
3. Pit Sensor #1 (6’)
4. Pit Sensor #2 (15’)
5. 8” Mounting Straps (6 ea.)
3
4
1
2
5
If any component parts are missing or damaged, immediately call OmniSite at
1-888-454-5051, M-F 8:00 am to 5:00 pm EST. Do not return product to retail store.
Copyright 2012, OmniSite, All Rights Reserved
device
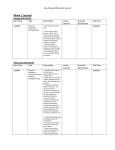
Getting to know your PitBoss:
device Refer to the online manual at
1. Status Light – Indicates the status of the PitBoss.
www.pumpalarm.com for a description of the blink patterns.
2. Low Battery Light – Indicates the backup batteries are low when the light is
flashing. Replace with (4) AAA Alkaline Energizer® batteries.
3. Push to Test/Hold to Configure – Press and hold this button for 3 seconds to put the
unit into configuration mode for setup. Momentarily press and release this button
to send a test notification to all phone numbers configured in the unit.
sensor
detects
a problem
4. Pit Sensor 1 Status Light –This light blinks when the pit
sensor
detects
water.
5. Pit Sensor 2 Status Light – This light blinks when the pit
sensor
detects
water.
sensor
detects
a problem
6. Power Jack – Power plug from A/C power adapter plugs in here.
7. On/Off Switch – Turns PitBoss
device on and off.
8. QR Code – Scan this with your smartphone to download a copy of the complete
user manual.
9. Pit Sensor Inputs Jacks – Insert one of the included Pit Sensor connectors here. To
remove the connector squeeze tab and pull.
Copyright 2012, OmniSite, All Rights Reserved
1
2
3
8
4
7
5
6
Copyright 2012, OmniSite, All Rights Reserved
9
1
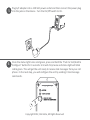
Remove (4) screws, lift lid and install (4) AAA Alkaline Energizer® batteries.
Observe battery Polarity. Negative end of the battery touches the spring in each
Holder.
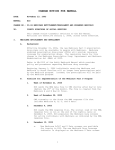
2
Save the PitBoss
device phone number found inside the lid as a contact in your cell
phone. You’ll need this number later to configure the device
PitBoss. Reinstall the lid
and tighten screws.
Phone #: (555)123-4567
Unit #:
12345
For technical support:
1-888-454-5051
www.pumpalarm.com
Phone #: (555)123-4567
EXAMPLE CELL PHONE SCREEN:
add
photo
PitBoss
Last
Company
Mobile (555)123-4567
iPhone
Copyright 2012, OmniSite, All Rights Reserved
3
Mount the PitBoss
device unit to the sump pump discharge pipe about 4 ft above well
cover using two of the mounting straps included. Unit can also be wall mounted.
or installed in other suitable location.
4
Connect one of the Pit Sensors into one of the Pit Sensor Input Jacks at the
bottom of the unit and secure the sensor in the sump pit at the height you want
an alarm to be sent using 1 of the straps included. Loop the sensor wire around
the strap to prevent the sensor from slipping down the pipe. Don’t mount the
sensor below inflow pipe where it could be splashed. Repeat for Pit #2 if present.
Please note: If you are using
alternate sensors such as
temperature, humidity, etc.
Please see additional
installation instructions
Copyright 2012, OmniSite, All Rights Reserved
5
6
Plug A/C adapter into a 120 VAC power outlet and then connect the power plug
device Turn the On/Off switch to On.
into the jack on the PitBoss.
Once the status light turns solid green, press and hold the “Push to Test/Hold to
Configure” button for 3 seconds. Unit will chirp twice and status light will blink
red & green. This will get the unit ready to receive text messages from your cell
phone. In the next step, you will configure the unit by sending it text message
commands.
Copyright 2012, OmniSite, All Rights Reserved
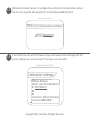
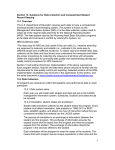
7
device phone number that you saved in
Create and send a text message to the PitBoss
step 2 using the following format: Phone1{space}<10 digit phone number>. This
number will be saved to position #1.
EXAMPLE CELL PHONE SCREEN:
Adding phone numbers
Phone1 5557654321
Phone1{space}<10 digit phone number>
8
If successful, the unit will chirp twice and you will receive a text message to the
phone number you just entered. If you want notifications to additional phones,
you can repeat this process up to two additional phones, using the Phone 2 and
Phone 3 commands. See online manual if this step is not successful.
EXAMPLE CELL PHONE SCREEN:
Unit settings
PitBoss Settings:
Name: Your PitBoss
#1 5557654321
#2
#3
Contractor:
Contact:
Copyright 2012, OmniSite, All Rights Reserved
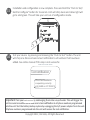
9
Name the PitBoss,
device again by texting the unit using the following format:
Name{space}John Doe Residence.
EXAMPLE CELL PHONE SCREEN:
Naming the unit
Name John Doe Residence
10
If successful, the unit will chirp twice and you will receive a text message with the
current settings. See online manual if this step is not successful.
EXAMPLE CELL PHONE SCREEN:
Unit settings
PitBoss Settings:
Name: John Doe Residence
#1 5557654321
#2
#3
Contractor:
Contact:
Copyright 2012, OmniSite, All Rights Reserved
11
(Optional Contractor Setup)- Your PitBoss
device allows you to configure a contractor
name with associated contact information. When this information is configured,
device appends this contact information to the end of alarm notifications
the PitBoss
(input alarms, low battery, power loss, etc.) so you know who to call in an
emergency. To configure the contractor name, text the unit using the following
format: Contractor{space} Mike’s Plumbing.
EXAMPLE CELL PHONE SCREEN:
Contractor
Contractor Mike’s Plumbing
12
If successful, the unit will chirp twice and you will receive a text message with
the current settings. See online manual if this step is not successful.
EXAMPLE CELL PHONE SCREEN:
Contractor settings
PitBoss Settings:
Name: John Doe Residence
#1 5557654321
#2
#3
Contractor: Mike’s Plumbing
Contact:
Copyright 2012, OmniSite, All Rights Reserved
13
(Optional Contractor Setup)- To configure the contractor’s contact phone number,
text the unit using the following format: Contact{space} 888-454-5051.
EXAMPLE CELL PHONE SCREEN:
Contractor contact phone number
Contact 8884545051
14
If successful, the unit will chirp twice and you will receive a text message with the
current settings. See online manual if this step is not successful.
EXAMPLE CELL PHONE SCREEN:
Contractor settings
PitBoss Settings:
Name: John Doe Residence
#1 5557654321
#2
#3
Contractor: Mike’s Plumbing
Contact: 8884545051
Copyright 2012, OmniSite, All Rights Reserved
15
Installation and configuration is now complete. Press and hold the “Push to Test/
Hold to Configure” button for 3 seconds. Unit will chirp twice and status light will
go to solid green. This will take your unit out of configuration mode.
16
Test your PitBoss
device by pressing and releasing the “Push to Test” button. The unit
will chirp one time and send a text notification to all numbers that have been
added. See online manual if this step is not successful.
EXAMPLE CELL PHONE SCREEN:
Test notification
John Doe Residence
is operating correctly
at 8:55AM on 07/18/2012
water
sensors by submerging them into a cup of water. This will trigger the
Important: Test your Pit
Sensors
unit to sound an audible alarm and send a text notification to all phone numbers programmed
into the unit. Test the battery backup system by unplugging the A/C power adapter from the unit.
All phone numbers programmed into the unit will receive the text notification.
Copyright 2012, OmniSite, All Rights Reserved
Standard Warranty
This warranty is good for two (2) years from the purchase date and covers all manufacturing defects.
If the product is damaged for whatever reason, OmniSite must first issue a Returned Material Authorization (RMA) number.
This number can be obtained by calling OmniSite and a copy will be provided by email. A copy of the RMA must be
included with any materials shipped to OmniSite. For a unit to be reviewed, the entire assembly must be sent back (unless
specifically listed otherwise on the RMA form) to OmniSite. The product or component parts will be inspected within 1-3
days from arrival at our facility. If the damage or defect is found to be the fault of OmniSite and the device is still under
warranty, the device will be repaired at no charge and shipped as quickly as possible. However, any damages found to be
the fault of the Purchaser or any damages not covered under this warranty will not be repaired until payment is received.
Any claim under this warranty must be presented during the warranty period and within 30 days after any covered
condition has occurred. Upon receipt, the Purchaser should inspect the package contents immediately and file any delivery
damage claims with the delivering carrier. OmniSite recommends saving the original box and packing material. The
Purchaser is responsible for any damage to a product or component parts if returned improperly packaged.
The warranty period shall not be extended by the replacement of materials under this warranty but the remaining warranty
period shall continue in effect and be applicable to the replaced or repaired products or component parts areas under
conditions of the warranty.
Upon expiration of the warranty period, all liability of OmniSite shall be terminated.
This warranty does not cover damage due to acts of God (fire, flood, lightning, etc.) nor product misuse and accidental
damage.
OmniSite shall not be liable for any injury, loss or damage, direct or consequential, arising out of the use or the ability to use
the product. This warranty gives specific legal rights. You may have other rights, which vary from state to state. Some states
do not allow the exclusion or limitation of incidental or consequential damages, so that the above limitation of exclusion
may not apply to you.
Payment of the Wireless Service Charge covers ONLY cellular transmission fees and in no way extends any portion of this
warranty. This fee does not include out of warranty service or repair.
WARNING: The individual user should take care to determine prior to use whether this device is suitable, adequate or safe
for the use intended. Since individual applications are subject to great variation, OmniSite makes no representation or
warranty as to suitability or fitness of these devices for any specific application.
THIS LIMITED WARRANTY IS IN LIEU OF ALL OTHER WARRANTIES, EXPRESS OR IMPLIED, INCLUDING, BUT NOT LIMITED
TO, THOSE CONCERNING MERCHANTABILITY OR FITNESS FOR A PARTICULAR PURPOSE. THIS LIMITED WARRANTY IS
ALSO IN LIEU OF ANY OTHER POSSIBLE LIABILITIES OF THE SELLER OR MANUFACTURER, WHETHER ALLEGED TO ARISE
BY AGREEMENT OR BY OPERATION OF LAW. RESPECTING THE SALE , APPLICATION, USE OR FUNCTION OF PRODUCTS,
INCLUDING BUT NOT LIMITED TO CLAIMS OF NEGLIGENCE, GROSS NEGLIGENCE, STRICT LIABILITY OR ANY OTHER TORT.
IN NO EVENT SHALL THE SELLER OR MANUFACTURER BE LIABLE FOR PERSONAL INJURY OR PROPERTY DAMAGE, REAL
OR PERSONAL, ATTRIBUTED TO ITS PRODUCTS, NOR FOR ANY EXCAVATION, REMOVAL,REAPPLICATION, DOWNTIME,
CLEANUP, LOSS OF USE, LOSS OF OPPORTUNITY, LOSS OF MARKET VALUE, LOSS OF RENTAL VALUE OR FOR ANY LOSS OF
PROFITS OR OTHER SPECIAL, INCIDENTAL,RESULTING,CONSEQUENTIAL OR EXEMPLARY DAMAGE.
Copyright 2012, OmniSite, All Rights Reserved
Congratulations!
Your installation is complete; you can now enjoy peace of mind, knowing
your basement is protected.
Need more guidance?
For tech support, call 800-487-1363 M-F 8 AM to 5 PM EST.
For 24 hour tech support, call 1-888-454-5051.
or email us at [email protected]
The following items are available to you at
www.pumpalarm.com:
· In depth Users Manual
· Installation video
· How it works video
· Online store where you can buy units, accessories, and renew your
wireless service
· Live chat Monday – Friday 8:00 am to 5:00 pm EST
· Support ticket system
· Partner program
OmniSite- PitBoss Product Division
494 S. Emerson Avenue Suite E
Greenwood, IN 46143 USA
Copyright 2012, OmniSite, All Rights Reserved